Please refer to the Jean Quick Guide for now!
The current Extended Guide is out of date. Join our Discord if you’re interested in helping update this guide!
Art by @Lumo_1121
A Jean Guide by xf3#3123
Updated for Version 2.4
Table of Contents
Preface
“I am Jean, the Dandelion Knight, requesting approval to join your party. From this day onwards, my honor and loyalty lie with you.”
This guide is dedicated to Jean Gunnhildr, specifically the Anemo playstyle. This guide will provide general recommendations for gear and team setups along with tips and tricks. For On Field and/or Physical/Hybrid Jean playstyles, I recommend you check out the JeanMains resources, including their guides and discord FAQs. You can join JeanMains by clicking here.
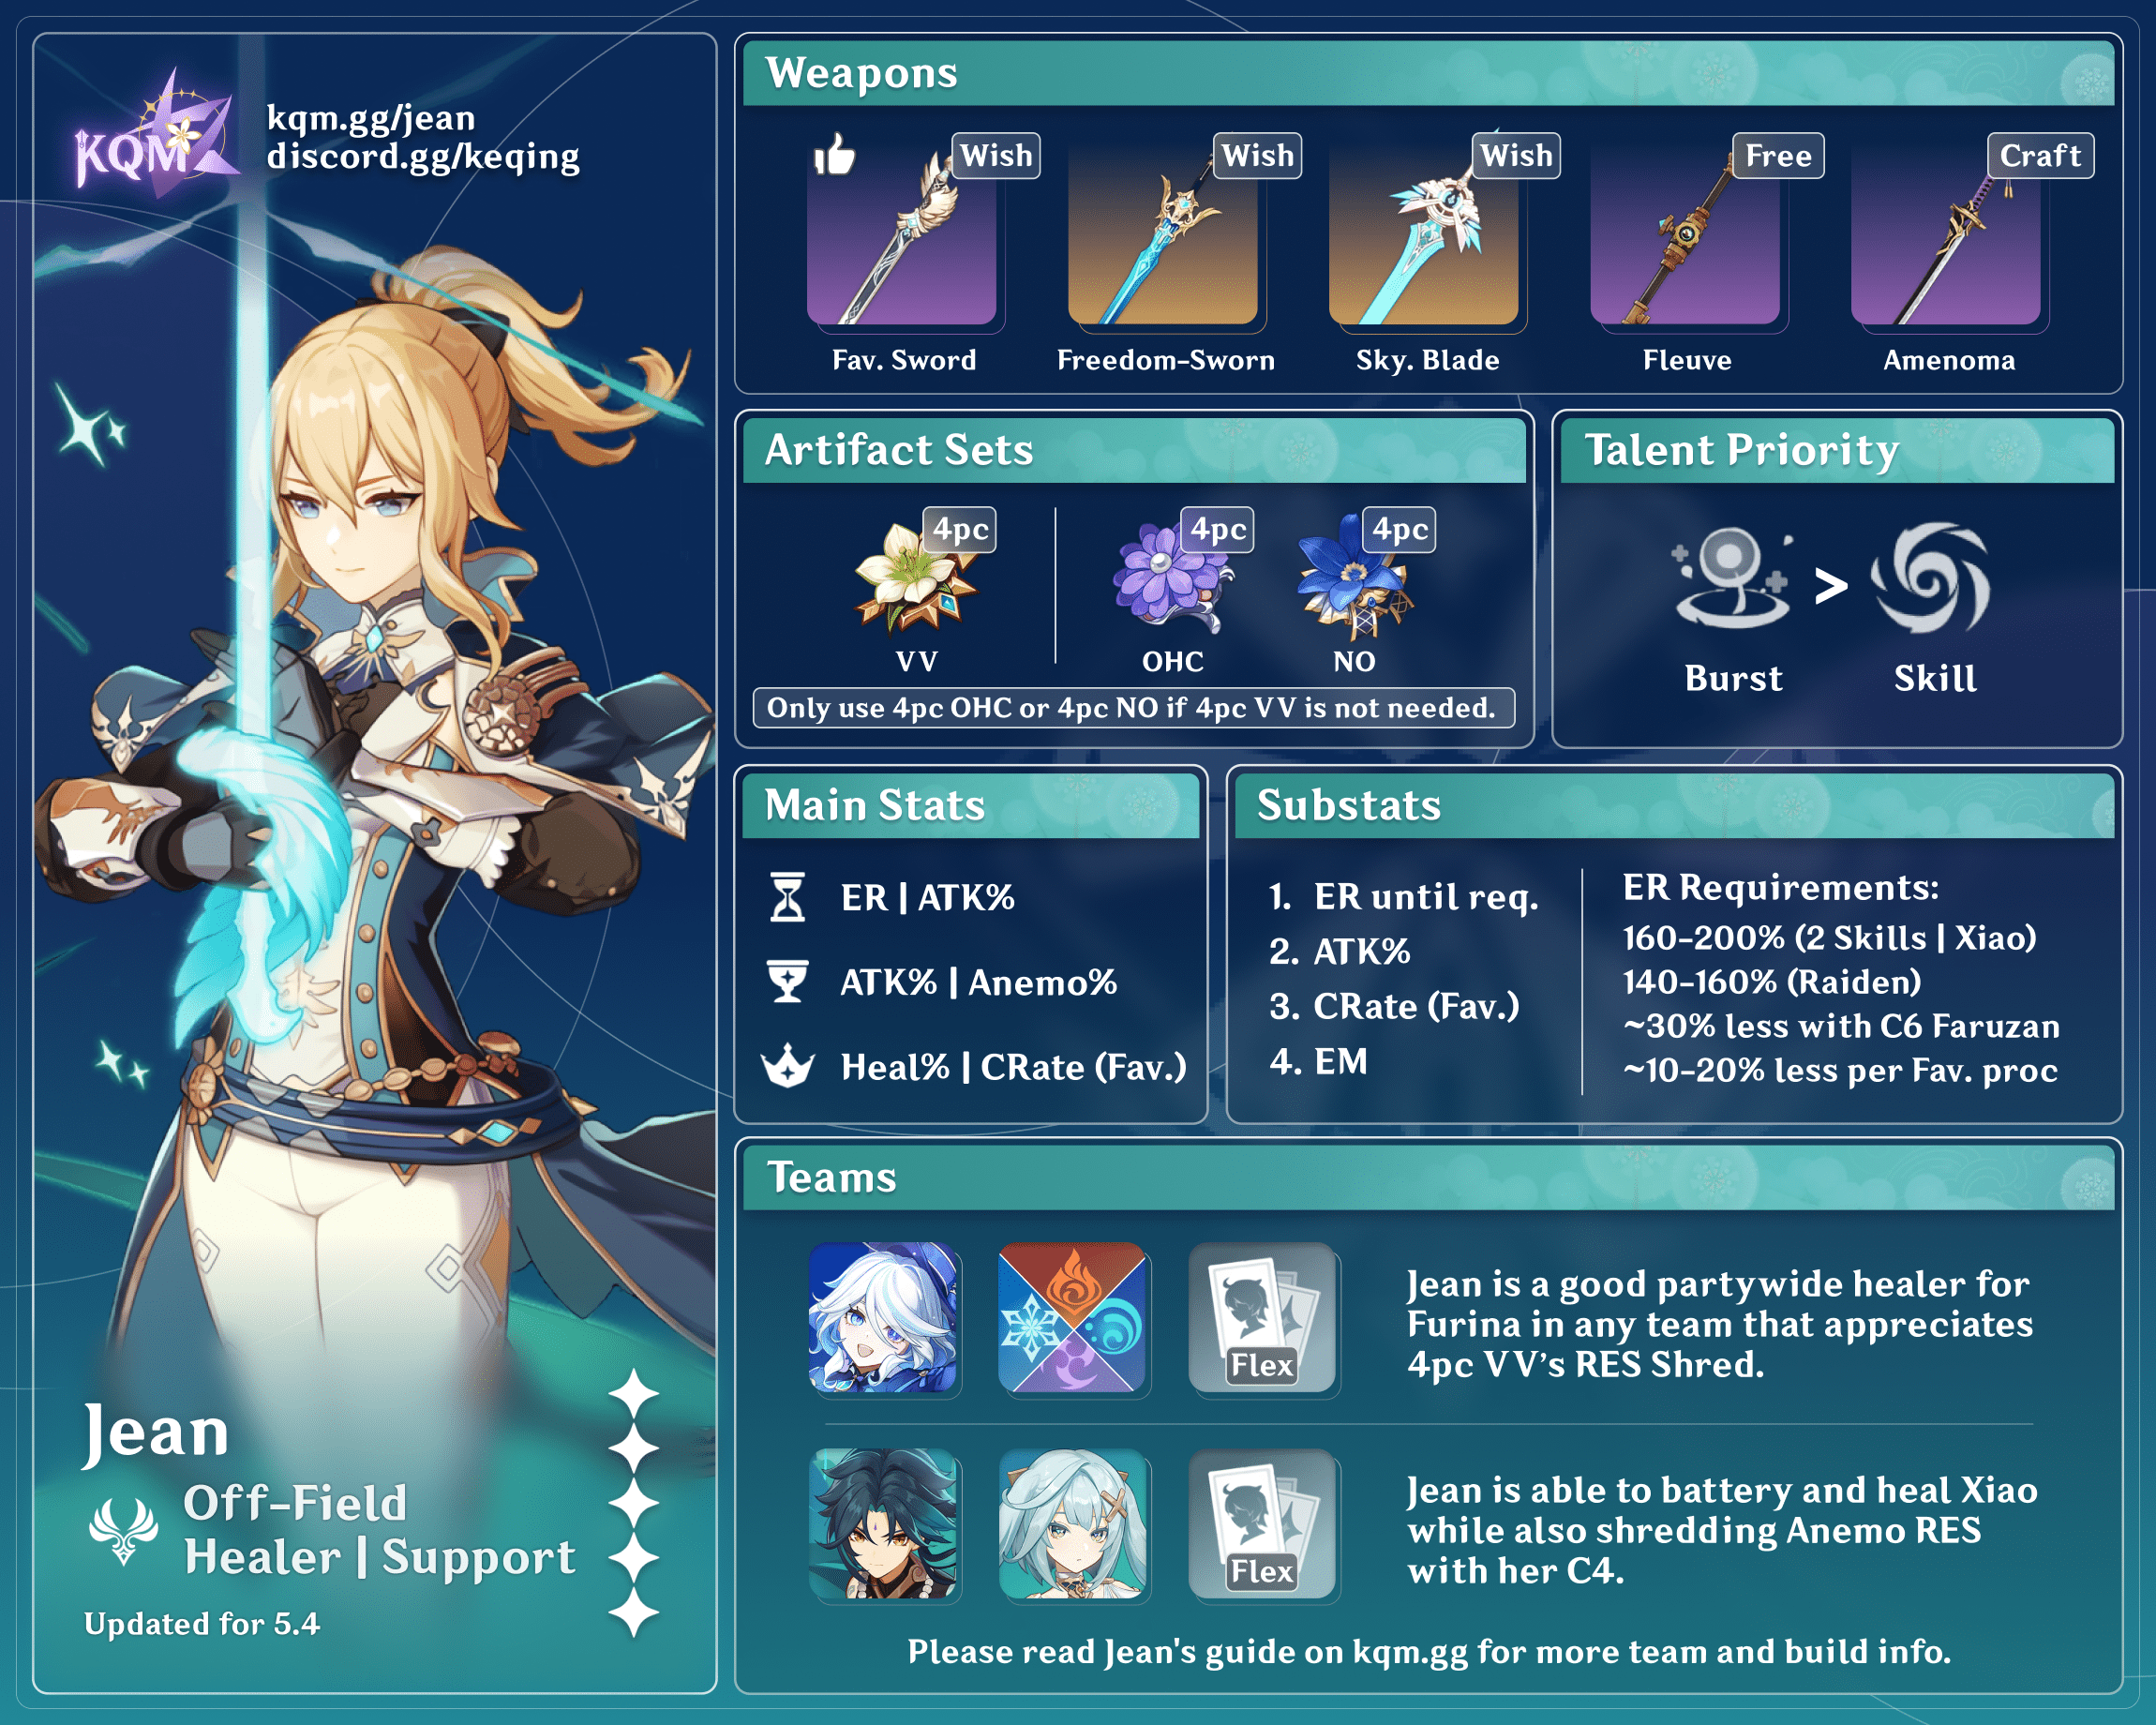
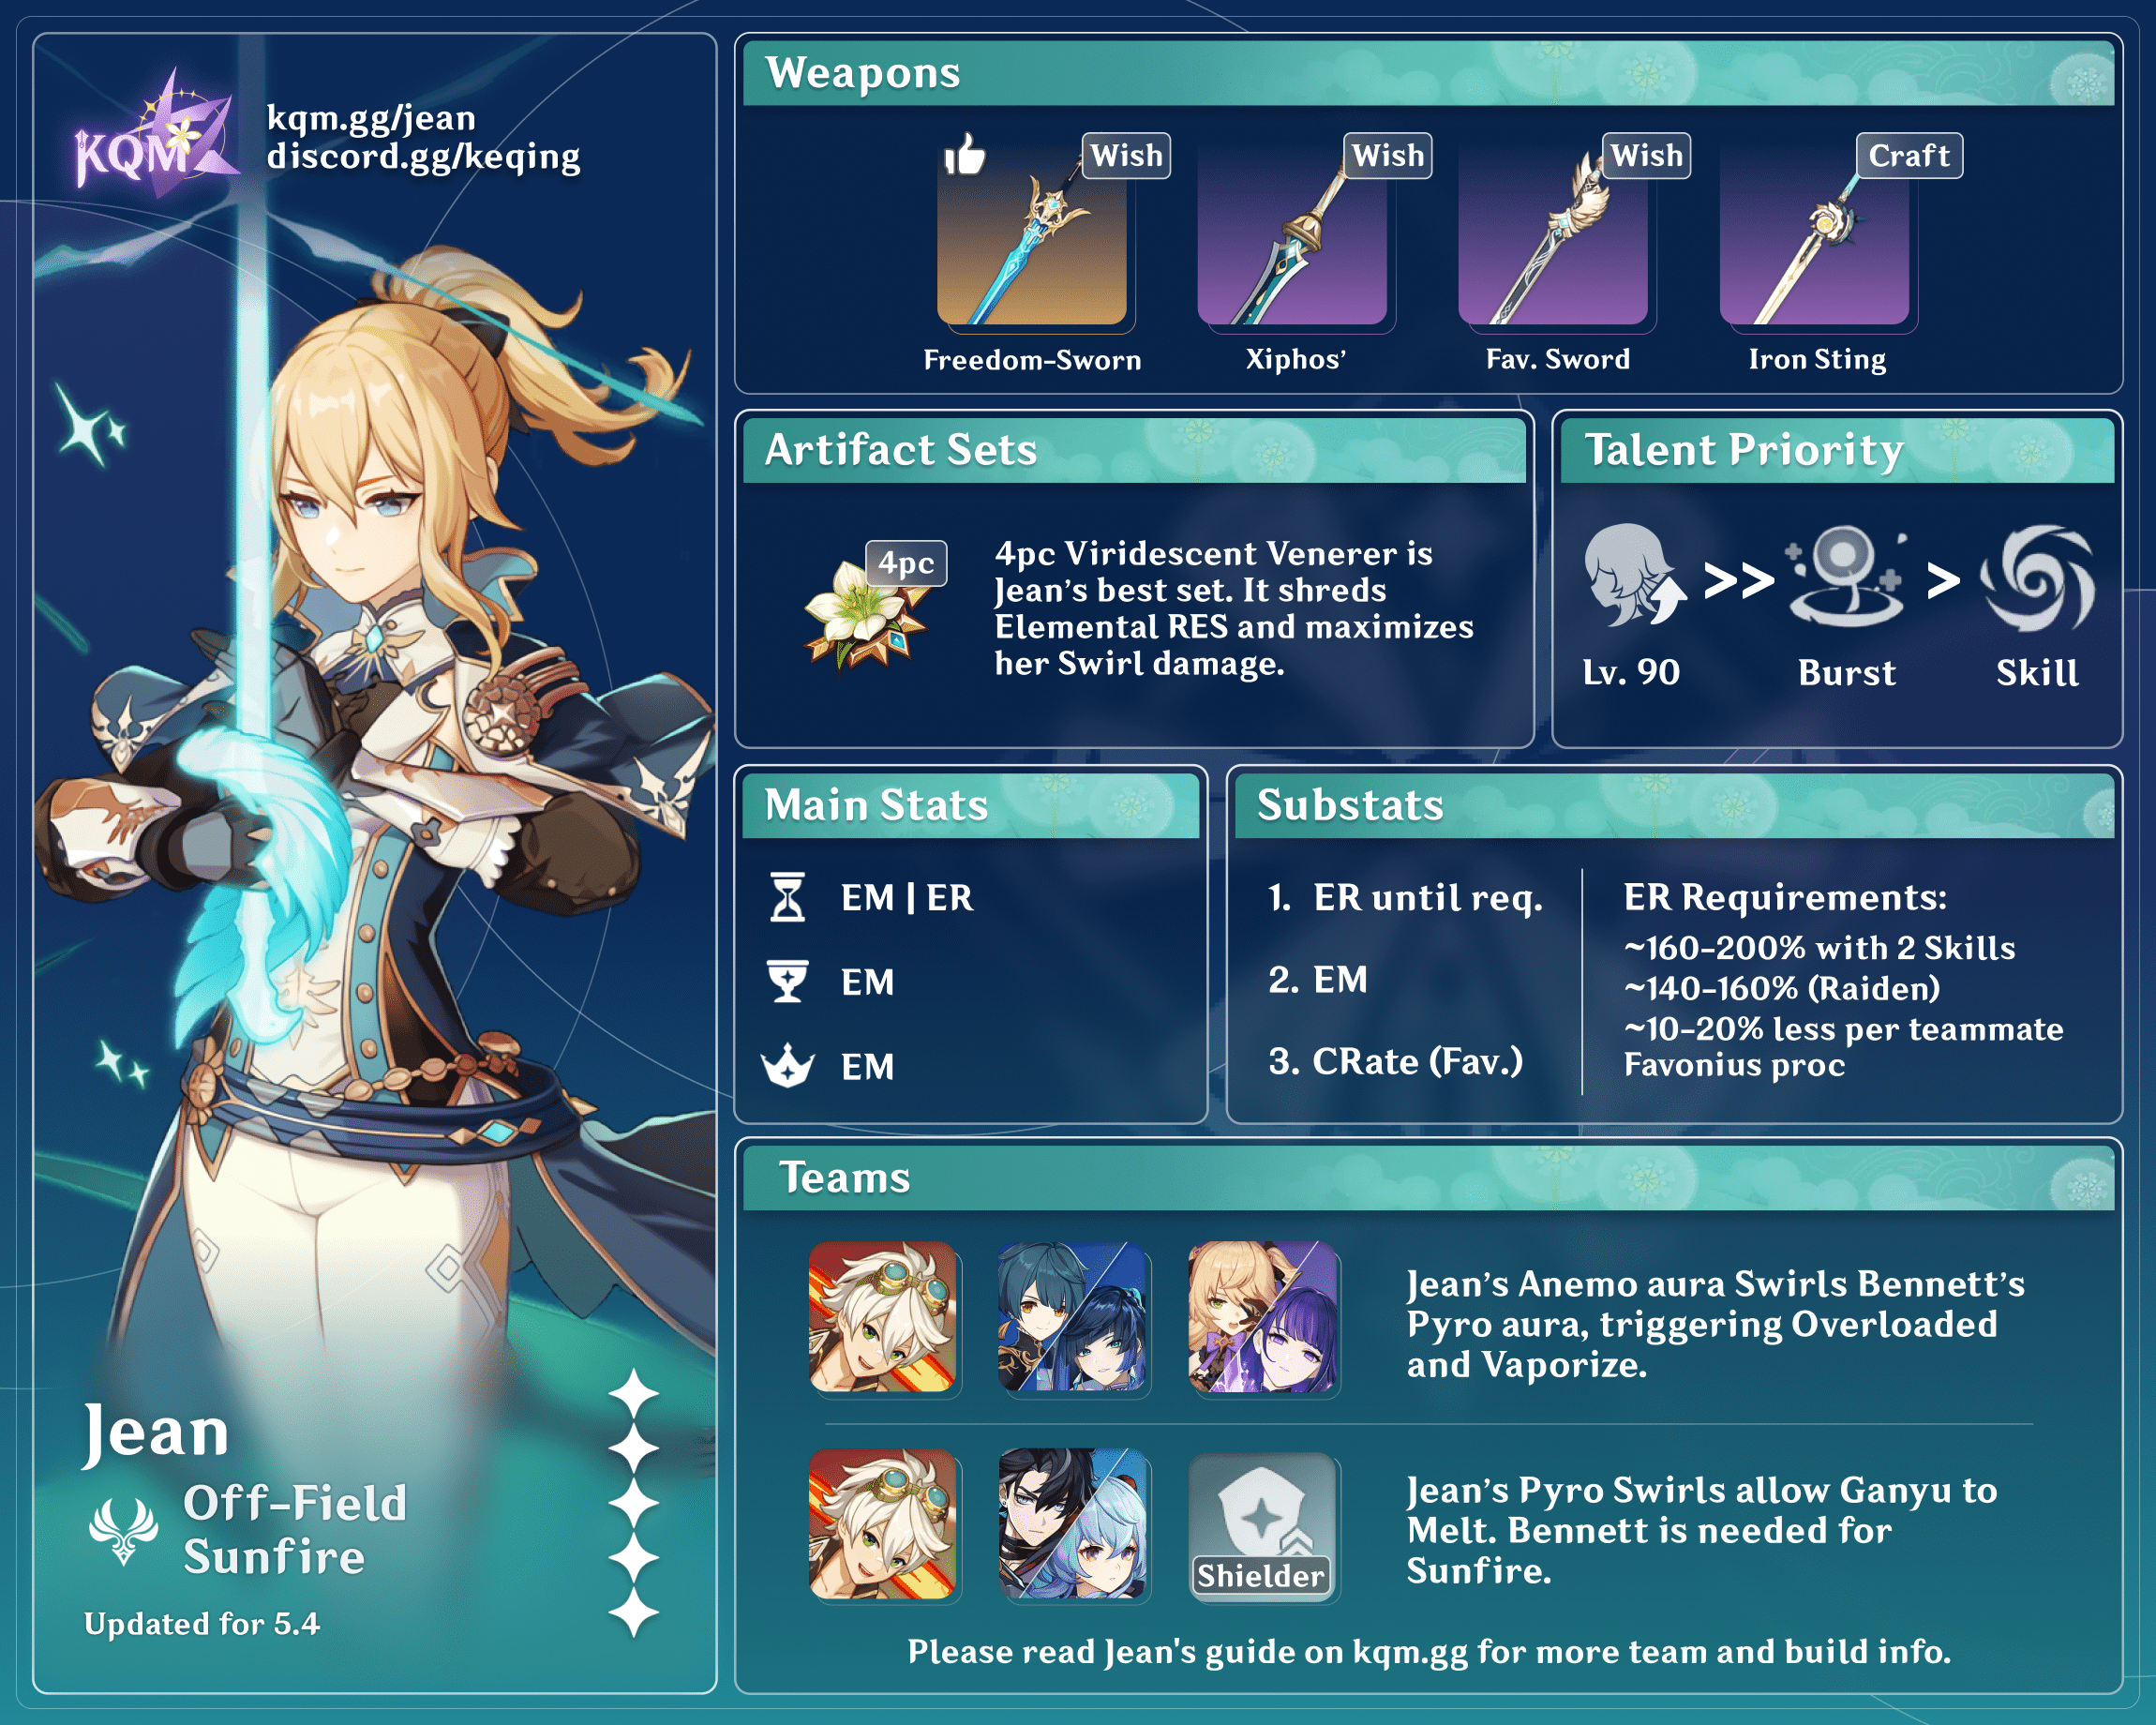
Here is a quick TL;DR on her main playstyle, brought to you by KQM at discord.gg/keqing.
Credits to: kol, cuppacote, baloopy, & KQM Staff
Credits to: mafan404, icedsquid, baloopy, and KQM TC Staff
Talents and Constellations
Talents
For more specifics on each talent, check out the KQM Theorycrafting Library
 Normal Attack | Favonius Bladework
Talent Description
Normal Attack
Performs up to 5 consecutive strikes.
Charged Attack
Consumes a certain amount of stamina to launch an opponent using the power of wind.
Launched opponents will slowly fall to the ground.
Plunging Attack
Plunges from mid-air to strike the ground below, damaging opponents along the path and dealing AoE DMG upon impact.
Although this guide won’t go too in depth on this talent, Anemo Jean can still take use of her normals in teams where she acts as an On Field Enabler for units such as Beidou and Xingqiu. Although generally N3C is her highest damaging and stamina efficient combo, using N2D allows Jean to cast her normals while making the most out of units such as Beidou.
In addition, her Charge Attack is unique to her. The floating state that enemies have allows her to set up fall damage, doing large chunks of damage with little effort and investment (detailed in a later section).
 Elemental Skill | Gale Blade
Talent Description
Focusing the might of the formless wind around her blade, Jean releases a miniature storm, launching opponents in the direction she aims at, dealing massive Anemo DMG.
Hold
At the cost of continued stamina consumption, Jean can command the whirlwind to pull surrounding opponents and objects towards her front.
Direction can be adjusted.
Character is immobile during skill duration.
Her bread and butter talent. This is where a majority of Jean’s damage comes from and its fast cast and low cooldown allow her to be quickly swapped in and out dealing quick bursts of damage.
The hold variant can be used to drag enemies around. When using the hold variant, enemies can be tossed around. This can allow for instances of fall damage which can deal a significant amount of damage with low investment.
Fall/Collision damage is calculated through the enemy’s velocity and is capped based on their max HP. Basically, the faster they fall, the more damage they take. Jean has a variety of setups to reach maximum fall damage or cause multiple fall damage instances with a single Elemental Skill cast.
Some Examples by Me: jean fall damage examples – YouTube
Some Examples in Cola Senami’s Video: How to Use Gale Blade? Jean | GENSHIN IMPACT – YouTube
Note: Jean’s level can be at most 20 levels below the enemy’s level. Meaning a level 70 Jean cannot pick up enemies higher than level 91 without breaking their poise (excluding enemy buffs).
 Elemental Burst | Dandelion Breeze
Talent Description
Calling upon the wind’s protection, Jean creates a swirling Dandelion Field, launching surrounding opponents and dealing Anemo DMG.
At the same time, she instantly regenerates a large amount of HP for all party members. The amount of HP restored scales off Jean’s ATK.
Dandelion Field
Continuously regenerates HP of characters within the AoE and continuously imbues them with Anemo.
Deals Anemo DMG to opponents entering or exiting the Dandelion Field.
One of the few party-wide burst heals in the game. On top of this the field will constantly swirl elements off of the active character both cleansing elements and elemental debuffs like slowing waters and also creating swirl reactions.
This can be abused when using characters such as Bennett who can maintain an aura (pyro in this case) onto the active character. What this allows Jean to do is cause pyro swirls with them, capable of doing large amounts of AoE damage.
It also has a little annoying camera flip, but at least you can look at Jean more.
 Ascension 1 | Wind Companion
Talent Description
Hits by Jean’s Normal Attacks have a 50% chance to regenerate HP equal to 15% of Jean’s ATK for all party members.
Not really used much for Anemo playstyles, this talent shouldn’t really be relied on for consistent healing when compared to units like Noelle, Kokomi, or Barbara, but it’s a small nice thing to have.
 Ascension 4 | Let the Wind Lead
Talent Description
Using Dandelion Breeze will regenerate 20% of its Energy.
Extremely important ascension passive. This cuts Jean’s energy cost from 80 to 64. Do note that it is a refund but doesn’t change the actual cost of the burst, meaning Raiden can still get 80 energy worth of resolve stacks even though Jean’s effective cost is 64. This saves Jean around 40% ER% worth of stats.
 Utility | Guiding Breeze
Talent Description
When a Perfect Cooking is achieved on a dish with restorative effects, Jean has a 12% chance to obtain double the product.
Nice bonus when cooking healing food, same passive as Barbara and Diona.
Talent and Level Priority
Anemo Sub DPS: Skill => Burst => Level 80 > Normals
Sunfire: Level 90 > Burst => Skill > Normals
This will largely depend on how you want to play Jean. As Jean is one of the few healers that can contribute to the team’s overall damage, I recommend you level her Skill and Burst equally. Both provide decent chunks of damage and don’t have particularly long cast times. Your burst will hit harder, but due to her Skill having such a low cooldown, I recommend you level it first as generally, two Skill casts end up being the same damage as one Burst cast.
I recommend leveling Jean to at least 80 so then she can pull enemies up to level 100 using her Elemental Skill. Normals should be leveled last in an Anemo Jean playstyle as you won’t be using them much and that you won’t be opting into Physical damage gear.
For Sunfire, it is recommended to level Jean to 90 first as it will greatly increase the damage of her Swirls and Swirl chain reactions. You may skip on leveling her talents in this playstyle if you choose, but they do offer a decent chunk of damage when leveled due to being paired with Bennett.
Both playstyles will be discussed in the next section and each one will have their own recommended Gear and Stats to prioritize.
Constellations
 Constellation 1 | Spiraling Tempest
Constellation Description
Increases the pulling speed of Gale Blade after holding for more than 1s, and increases the DMG dealt by 40%.
Can be good when doing fall damage set ups with Gale Blade. Note that this 40% is considered additive damage bonus, not multiplicative. Will not work on tap/unheld Gale Blade. You must hold it for at least 1 second, a sound queue will play when you can release it.
DMG Increase from C0: Either 0% or 5% with 1 Held Skill
 Constellation 2 | People’s Aegis
Constellation Description
When Jean picks up an Elemental Orb/Particle, all party members have their Movement SPD and ATK SPD increased by 15% for 15s.
This Constellation is a little misleading in its “value.” For most melee characters the ATK Speed increase doesn’t do much for overall damage other than making certain combos easier. The exception is with Raiden as it enables her to do more variations of combos during her elemental burst. However, for ranged units, the extra ATK Speed can feel very strong as they have no hitlag on their attacks, giving them more use out of this Constellation.
The Movement speed buff cannot be quantitatively measured as it is more of a quality of life buff. Very few set ups require movement speed, such as Dragonstriking, but they are rather niche. However, when just moving around, it feels great moving faster, even more so when Anemo resonance is active.
DMG Increase from C0: Not quantifiable
QoL Increase from C0: Fast = Good
 Constellation 3 | When the West Wind Arises
Constellation Description
Increases the Level of Dandelion Breeze by 3. Maximum upgrade level is 15.
Talent increase, nothing much to say.
DMG Increase from C0: 12%
DMG Increase from C2: 7%
 Constellation 4 | Lands of Dandelion
Constellation Description
Within the Field created by Dandelion Breeze, all opponents have their Anemo RES decreased by 40%.
Extremely powerful for certain team comps, specifically Xiao. There are very few sources of Anemo Resistance shred in the game, making this a very strong constellation. This amount of resistance shred is equivalent to the 4-piece Viridescent Venerer set.
Cumulative DMG Increase from C0: 34%
DMG Increase from C3: 22%
 Constellation 5 | Outbursting Gust
Constellation Description
Increases the Level of Gale Blade by 3. Maximum upgrade level is 15.
Talent increase for her skill, not much to say as well, but provides a great boost in her damage.
Cumulative DMG Increase from C0: 47.5%
DMG Increase from C4: 13.5%
 Constellation 6 | Lion’s Fang, Fair Protector of Mondstadt
Constellation Description
Incoming DMG is decreased by 35% within the Field created by Dandelion Breeze. Upon leaving the Dandelion Field, this effect lasts for 3 attacks or 10s.
This constellation damage wise doesn’t do anything, however the added utility from this constellation is extremely strong. When paired with other sources of damage reduction, you can reach 100% damage reduction, taking literally no damage while everything is up. When paired with interruption resistance, this essentially makes you god for 10 seconds.
Cumulative DMG Increase from C0: 47.5%
DMG Increase from C5: 0%
QoL increase from C0: God
As you can’t really “pull” for Jean constellations, you can’t really aim for a specific one. However, she provides many QoL upgrades through her constellations, which can make her “feel” better to play. In addition, she is one of the few characters who has access to Anemo Resistance through Constellation 4.
Oh and “losing 50/50” on Jean isn’t losing.
Playstyles
Anemo Sub DPS / Support Playstyle and Pros/Cons
Although Jean technically has three playstyles, this guide will focus on the Anemo Playstyle, leaning towards a more supportive role in teams. Although Anemo Jean can be played on field, similarly to Physical or Hybrid Jean, the goal of Anemo Jean is not to do high on field physical damage, but to enable strong Off Field DPS units.
Pros:
- Low field time and fast cast times on Elemental Skill and Burst.
- Relatively cheap to build with good free-to-play weapon options.
- Extremely versatile supportive kit, involving crowd control, healing, and cleansing.
- Generally all useful constellations when missing rate up characters on banner.
Cons:
- Low relative damage compared to other supports due to low base stats and an undesirable ascension stat.
- Brings less potent buffs to most teams in comparison to other Anemo units such as Kazuha or Sucrose.
EM / Sunfire Playstyle and Pros/Cons
This playstyle, when used under the right circumstances can be both powerful and fun to play. Sunfire makes use of Jean and Bennett’s Elemental Burst mechanics to cause Pyro Swirls and reacting with those Swirls. Most of the time, the interaction will use Jean’s Elemental Mastery (EM), which allows Jean to essentially double-dip on her EM through the Pyro Swirls and the chain reactions.
Pros:
- A unique interaction only possible by Jean and Bennett.
- Strong damage when paired with Electro and Hydro units.
- Strong options for Electro and Hydro units to act as “enablers” such as the Raiden Shogun and Xingqiu.
Cons:
- Requires a lot of Energy Recharge (ER%) on both Jean and Bennett when not paired with the Raiden Shogun.
- Requires you to stand within two circles, limiting play range, especially considering knockback from things such as Overload.
Gear
Jean’s gear is relatively straightforward. I do want to note that certain weapons, although they seem “lower damage” on the tables, provide great utility and should be looked at without damage being their main selling point.
This section will go through two playstyles: Anemo Sub DPS / Support and EM / Sunfire.
Not every weapon or artifact combination will be listed, only the main/important ones will be discussed. For a full list of calculations, check out the full list of calculations at the bottom of the gear section.
Anemo Sub DPS / Support:
Stat Priority:
Sands: ATK% or ER%
Goblet: Anemo Damage%
Circlet: Crit RATE% or Crit DMG%
ER% Requirement: 140 to 160 ER%
Substat Priority: ER% > Crit RATE% = Crit DMG% > ATK% > EM = Flat ATK
Jean’s ER% requirement will fluctuate depending on the number of Gale Blades you cast. Generally Jean can fit 2-3 Elemental Skill casts per rotation, which is where these ER% requirements were reached. When playing her without any other Anemo character, aim for around 160 ER%. When paired with another Anemo, like Venti or Kazuha, this requirement can drop to 140 ER%.
Weapons with refunds such as Amenoma Kaguchi can drop these requirements significantly and will be discussed under their weapon description.
Weapons:
Primordial Jade Cutter
Her overall best in slot weapon. It provides great flat ATK and Crit RATE for Jean. Compared to other characters, the HP to ATK conversion on Jean is better compared to other characters due to her high base HP.
Recommended ER%: 140-160%
Mistsplitter Reforged
Although it has a high base ATK and strong passive, Jean cannot make use of the passive well. In addition, she cannot obtain 3 stacks by herself, requiring an external infusion. However, even at 3 stacks, it still barely loses out to Primordial Jade Cutter due to the passive stacks not lasting long enough.
However, for a singular nuke hit, it is her strongest option.
Recommended ER%: 140-160%

Freedom-Sworn
This weapon is on par with Jean’s free-to-play options, however, it provides a strong team buff. When paired with 4-piece Viridescent Venerer, she can act as a strong support/buffer/debuffer all in one slot.
Recommended ER%: 140-160%
Amenoma Kageuchi
Her primary free-to-play option. It’s energy cutting passive is extremely powerful for Jean, potentially cutting her ER% requirements to practically 0. In addition, the weapon serves as a strong stat stick as well.
Depending on how many Elemental Skills you cast before her Burst, the ER% requirements change. Below will have every stack variation listed along with a recommended ER% requirement. If needed, build higher than the recommended in order to allow her to burst off-cooldown.
Double Anemo Recommended ER% Requirements:
R1 1 Stack: 130%
R1 2 Stack: 115%
R1 3 Stack: 105%
R5 1 Stack: 115%
R5 2 Stack: 100%
Solo Anemo Recommended ER% Requirements:
R1 1 Stack: 145%
R1 2 Stack: 130%
R1 3 Stack: 115%
R5 1 Stack: 130%
R5 2 Stack: 100%
Festering Desire R5
Jean’s other free-to-play option. If you still have this from Version 1.2. I recommend you use this weapon over Amenoma Kageuchi if Amenoma Kageuchi is not leveled.
The damage difference between the two is minimal when comparing it to Amenoma Kageuchi, however it mainly depends on how many stacks you obtain.
Festering however does not have to deal with variable ER% requirements due to its ER% substat.
Recommended ER%: Up to 160%
Skyward Blade
Similar to Festering R5 and Amenoma. Overall the difference between all three weapons are around the same. If you have a Skyward Blade already leveled sitting in your inventory, Jean can use it well. Otherwise, stick with Festering or Amenoma due to it requiring less materials to level and ascend.
Recommended ER%: Up to 160%
Favonius and Sacrificial Sword
Although both of these weapons are lower damage compared to the above weapons, they provide a great amount of utility.
Favonius Sword, especially at R5, brings a lot of bonus energy to the team. For units such as Xiao or Ayaka, she can cut their energy requirements by a decent amount.
Sacrificial Sword allows her to use two Elemental Skill casts, bringing a lot of upfront energy. Although it brings less total team energy, it can still be a strong option. It also allows her to perform two fall damage tricks in quick succession.
EM / Sunfire:
Stat Priority:
Sands: EM or ER%
Goblet: EM
Circlet: EM
ER% Requirement: 150% Minimum
Substat Priority: EM = ER% > Crit RATE% = Crit DMG% > ATK% > Flat ATK
Similarly with Ameno Sub DPS, Jean wants quite a lot of ER%. Again 2-3 Gale Blade casts were assumed. When not doing these elemental skill casts, I do not recommend running Sunfire without the Raiden Shogun or ER% Weapons/Sands as her energy requirements can skyrocket.
EM is must used as the majority of Jean’s damage in this playstyle comes from Swirls and Swirl chain reactions.
Weapons:
Freedom-Sworn
This is Jean’s strongest option for an EM / Sunfire build due to it having the largest amount of EM out of any weapon. The passive is also well appreciated.
Recommended ER%: Minimum 150%
Iron Sting
Jean’s free-to-play option. Personal damage wise, it comes close to Freedom-Sworn. However, it loses out on the party wide passive, making it weaker than Freedom-Sworn generally.
Refines barely increase her personal damage. It is recommended to leave it at R1.
Recommended ER%: Minimum 150%
Favonius Sword
Favonius Sword, especially at R5, brings a lot of bonus energy to the team. For units paired with Jean in Sunfire, such as Bennett or Xingqiu, this can be great for cutting their ER% costs.
However, it is significantly less personal damage compared to Iron Sting. Considering that Iron Sting is craftable, you should only use Favonius Sword unless you cannot meet the ER% requirement through substats.
Artifacts:


This is also her best set for EM / Sunfire. No other alternatives.
Full list of calculations here, all calculations were done with KQM Calc standards.
Team Comps and Synergies
Jean is an extremely flexible unit. She can be placed in almost any team and provides many things such as healing, crowd control, cleansing, and resistance shred with 4VV and is generally always good. However, she doesn’t really specifically shine in many teams meta-wise (except Sunfire) compared to other Anemo units like Venti, Kazuha, or Sucrose. Generally she can belong in any team, but here are a few templates that I recommend.
Double Anemo:

The classic double Anemo set up. This team template is centered around spamming Elemental Skills and Bursts. The primary Anemo users to pair with Jean are Venti or Kazuha. The rest is basically up to you. I recommend you choose characters with low Elemental Skill cooldowns.
When paired with Kazuha or Venti, it is worth considering using Electro-Charged reactions. Since they both tend to stack Elemental Mastery, it causes a great amount of damage, especially in AoE scenarios.
Generally do what is required for your other units (ex: snapshot if running Bennett) and just keep rotating Elemental Skills and Bursts.
Anemo Flex Options: Venti, Kazuha
Flex Options: Rosaria, Kaeya, Keqing, Mona, Bennett, Fischl, etc. (basically anyone lol)
Freeze:

Jean in a freeze team provides both healing and 4VV shred. Currently, many freeze teams make use of a Cryo Sub DPS such as Kaeya or Shenhe along with a Hydro enabler, typically Mona or Xingqiu. Although Kokomi and Barbara are options, they don’t provide as much damage compared to Mona or Xingqiu. As a result, Jean can slot in well as a healer when needed due to her high quickswap damage. In addition, she does not have to worry about knocking enemies away with her Elemental Skill in a freeze team.
Cryo Flex Options: Ayaka, Ganyu, Kaeya
Hydro Flex Options: Xingqiu, Mona
Other Flex Options: Shenhe, Rosaria, Diona, Kokomi, Barbara, Venti, Kazuha
Xiao:

Jean can provide many things for Xiao, such as Healing, Particle Generation, and at C4 Anemo Resistance Shred. When equipped with a Favonius Sword, especially when refined, Jean can produce a lot of consistent energy for Xiao.
Note that Sacrificial Sword can be an option but Favonius tends to be better due to how the nature of Xiao funneling works. 2 Elemental Skill casts from Jean may take up too much time for Xiao to prefunnel his burst. However, if he doesn’t have his burst charged up by the time you start funneling, Sacrificial Sword is a perfectly viable option for her.
Flex Options: Zhongli, Albedo, Bennett, Sucrose, Fischl
Taser / Beidou Driver:

The classic taser team setup but with Jean instead. This playstyle is very comfortable as the combination of Beidou and Xingqiu’s Damage Reduction along with Jean’s A1 healing, provides little room to die. In this setup, you want to N2D as it provides the highest number of Beidou Stormbreaker procs. Performing N3D also works when low on stamina.
Jean, like other Anemos, can Double Swirl the Electro-Charged auras, allowing both Electro and Hydro resistance to be shred on the enemy.
If you have C6, this team also reaches 100% Damage Reduction, meaning you take 0 damage while Jean, Beidou, and Xingqiu’s bursts are up.
Fischl can be substituted for Raiden. Other characters such as Sucrose or Kokomi can be substituted, but you may have more success using them as drivers instead of Jean.
Sunfire:

This team is centered around the Bennett and Jean burst interaction, known as Sunfire. Essentially, Bennett’s burst applies a Pyro aura on the on field character and Jean swirls the aura off of the on field character. This swirl uses Jean’s EM and any chain reactions caused by the swirl also uses Jean’s EM, causing an extremely high amount of damage. Generally, this team is paired with a Hydro, such as Xingqiu, and an Electro, either Raiden or Fischl. What happens is that Jean is able to cause Pyro swirls and react with those Pyro swirls to cause Overload and Vaporize reactions.
You should use Bennett’s burst first and then Jean’s. Then use your flex units skills and bursts. If using Raiden, she should be last. When using Fischl, remain on field with Jean or Hydro units, using normal attacks and elemental skills.
Flex Options: Mona, Kokomi, Barbara, Fischl
Two Example Rotations by Me: sunfire rotation – YouTube
Credits
Art by: @alinalal_
Big Thank You to JeanMains Staff and KQM Staff. Please visit JeanMains for any questions you have regarding other Jean playstyles or just things about Jean in general.
I hope you have fun playing Jean!
“Let the Wind lead. The winds of freedom will guide us along the path that lies ahead. I hope you will continue to join us on that path.” – Jean Gunnhildr
Team displays made using Muakasan’s Portrait Tool and other visuals made by using assets from the Genshin Impact Fandom Wiki and Gensh.in