
Updated for Version 7.0

Odette is a 5-star Cryo Sword character in Genshin Impact who provides off-field Cryo damage while enabling and buffing Stellar-Conduct and Stellar Swirl reactions. Learn about Odette’s best builds, weapons, artifacts, and teams in this quick guide.
Note that the information given may change if new discoveries are made. More extensive testing is in progress.
Join our Discord to check on and participate in the theorycrafting process.
Table of Contents
Infographic
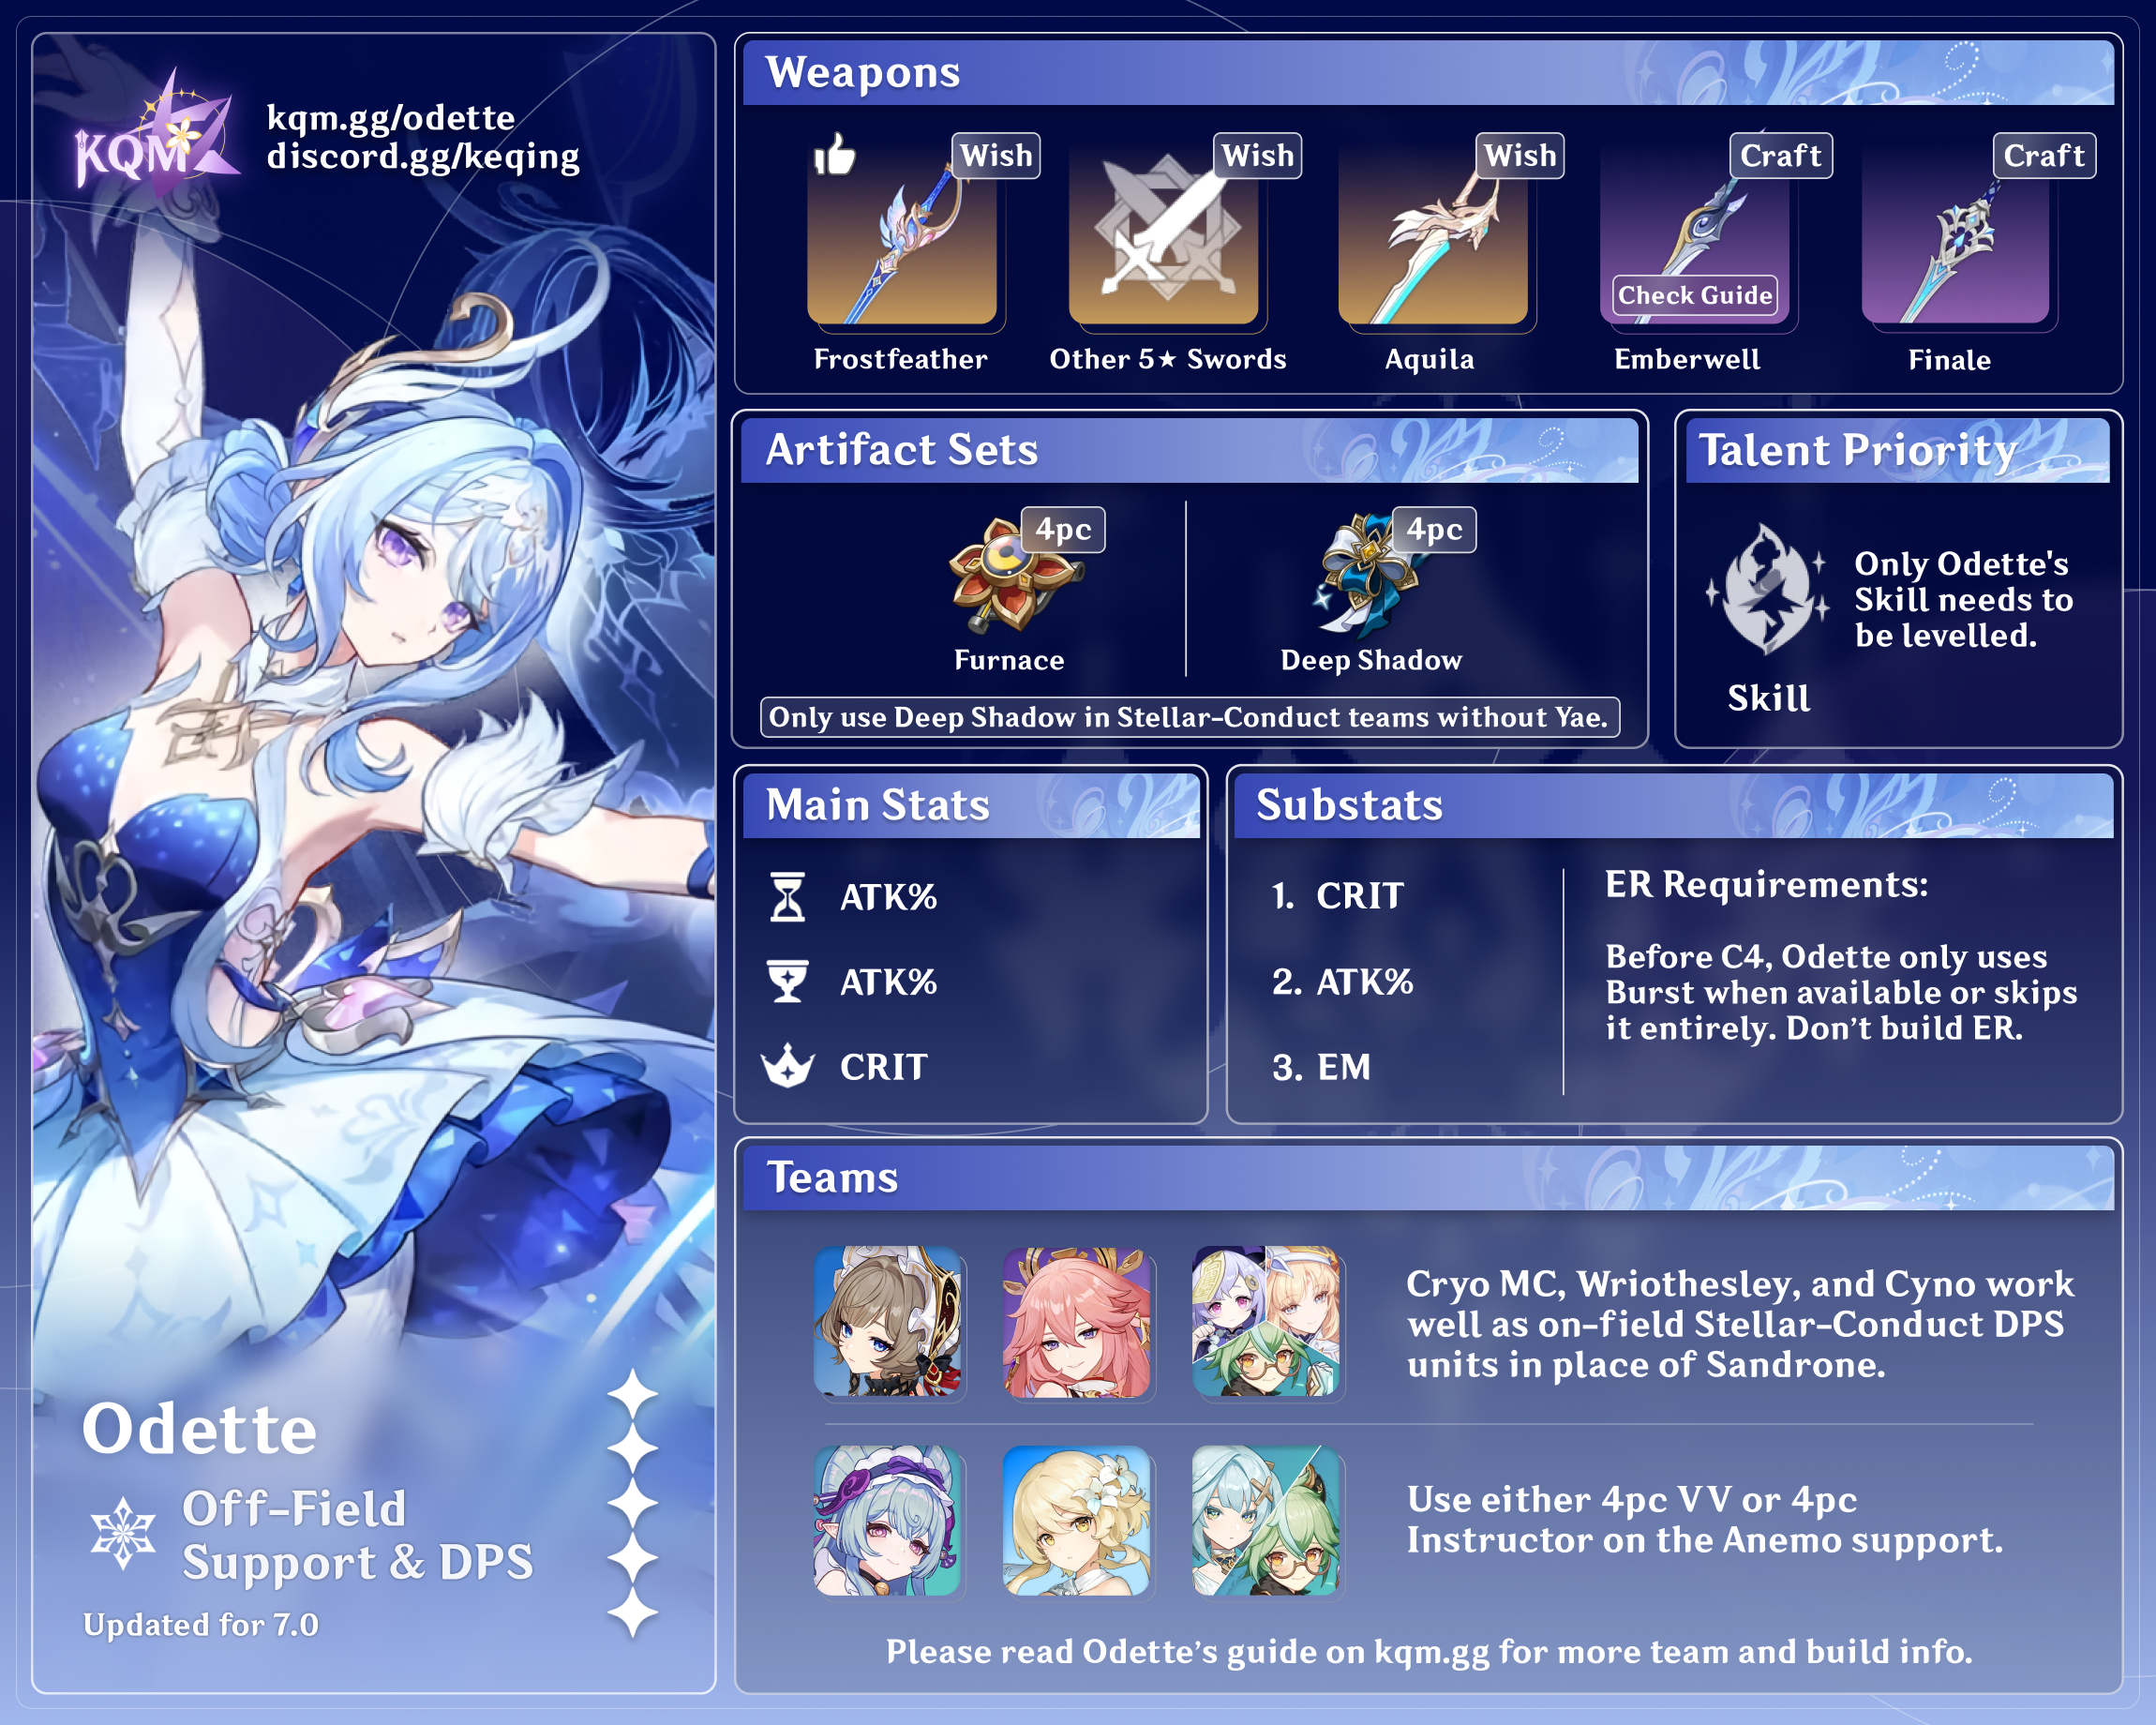
Credits to: laynnea, acerbus114, and KQM Staff
Character Overview
Pros
- Enables and buffs both Stellar-Conduct and Stellar Swirl reactions.
- Provides consistent, wide-AoE off-field Cryo application and damage via her Elemental Skill.
- Highly accessible F2P weapons and easy to build.
- Beautiful dance animations and swan motifs.
Cons
- Loses significant value outside of Stellar teams.
Playstyles
Off-Field Stellar Glimmer Support
Odette is primarily played as an off-field support in Stellar Glimmer teams. She casts her Skill twice to deal Stellar Glimmer damage and to summon a Solo Dance Double. While off-field, she provides consistent Cryo application, damage, and buffing. Due to its long animation, Odette’s Elemental Burst is rarely used despite its personal buffs, being secondary to maintaining Skill uptime and the Solo Dance Double’s damage.
Talents
Level and Talent Priority
Skill >> Level 90 ≥ Burst
Odette’s Elemental Skill is her main source of off-field Cryo damage and application, making it her most critical Talent to level. Character Level 90 provides a minor base stat increase, which assists in reaching her ATK threshold. Her Elemental Burst provides a minor personal DMG bonus and refreshes her Skill duration, but contributes a relatively low proportion of her total team value and is often skipped in rotations. Her Normal Attack Talent can be left completely unleveled as she operates exclusively off-field.
Talent Overview
 Normal Attack | Snow Swan Variation
Talent Description
Normal Attack
Unleashes a sword attack of up to 5 consecutive strikes.
Charged Attack
Consumes a certain amount of Stamina to unleash a dazzling slash on opponents in front of her.
Plunging Attack
Attacks opponents in her path while plunging from mid-air, then deals AoE DMG upon landing.
Odette’s Normal Attacks contribute virtually nothing to her gameplay and should almost never be used. Since all of her damage and utility comes from her other Talents, this Talent can remain unleveled.
 Elemental Skill | Adagio: Phantom Night Dancers
Talent Description
With slow, graceful dance steps, Odette deals AoE Cryo DMG to the opponent, and also summons her Solo Dance Double to the field.
If a Dance Double summoned by Odette is already on the field, this will re-summon the Dance Double and reset its duration.
Solo Dance Double
Alternates between the Plume and Wing dance moves, periodically attacking nearby opponents and dealing to them AoE Cryo DMG.
Additionally, for 6s after unleashing the Elemental Skill Adagio: Phantom Night Dancers, Odette’s Elemental Skill Adagio: Phantom Night Dancers will become the special Elemental Skill Adagio: Coda at Dawn’s Tolling instead, where a dance duet deals AoE Cryo DMG to nearby opponents over time. Then, when the duet ends, she deals another instance of AoE Cryo DMG that is considered Stellar-Conduct or Stellar Swirl DMG.
Odette’s Elemental Skill serves as the foundation of her kit. Activating it deals initial AoE Cryo damage and summons a Solo Dance Double, which persists for 20s. While Odette is off-field, this summon rotates between Plume and Wing dance sequences to provide sustained AoE Cryo damage and trigger Stellar Glimmer reactions.
After the initial activation, Odette can execute Adagio: Coda at Dawn’s Tolling. This follow-up Skill initiates a dance duet that concludes with a strong burst of Stellar-Conduct or Stellar Swirl damage depending on her current Radiance state. The Solo Dance Double remains active throughout, with its standard attacks becoming empowered to deal bonus damage based on the active Stellar reaction.
The enhanced Skill has a 15-second cooldown and cannot be reset by her Elemental Burst.
 Elemental Burst | Presto: Bluebird Finale
Talent Description
With quick, lively dance steps, Odette deals multiple instances of AoE Cryo DMG, and summons her Solo Dance Double. She also gains Snow Swan’s Dream, which increases the Stellar Glimmer reaction DMG Odette deals.
Additionally, for 6s after unleashing the Elemental Burst Presto: Bluebird Finale, Odette’s Elemental Skill Adagio: Phantom Night Dancers will be replaced with the special Elemental Skill Adagio: Coda at Dawn’s Tolling instead.
If there is a Solo Dance Double summoned by Odette on the field, it will be summoned to her side with its duration refreshed.
Odette’s Burst deals multiple instances of Cryo damage while refreshing or summoning her Solo Dance Double, ensuring uninterrupted Skill uptime. It also grants Snow Swan’s Dream, increasing Odette’s Stellar Glimmer reaction damage for 20s, and immediately grants access to Adagio: Coda at Dawn’s Tolling.
Although the Burst buffs Odette, its long animation makes it unwieldy to use, and the damage dealt is rather underwhelming. As a result, the Burst is not worth building ER for and often skipped, even if available.
 Ascension 1 Passive | Spring Rite of the Chosen One
Talent Description
When Odette summons her Solo Dance Double, she also obtains 4 stacks of Marvelous Splendor.
Summoning her Solo Dance Double grants 4 stacks of Marvelous Splendor, each increasing Stellar Glimmer DMG by 15%. After Odette leaves the field, these stacks are gradually transferred to nearby party members, allowing her to provide up to a 60% Stellar Glimmer DMG Bonus while occupying minimal field time.
 Ascension 4 Passive | Pathetique of Pateticheskaya
Talent Description
For every 100 ATK Odette has over 1,000, her Stellar Glimmer DMG is additionally increased by 1.5% of the original DMG. She can deal up to 30% more additional DMG in this way.
Odette Stellar Glimmer damage is increased based on her ATK, receiving an additional 1.5% of the reaction’s original damage for every 100 ATK above 1000, up to a maximum of 30% at 3000 ATK. This is a unique multiplier for her own direct Stellar damage and makes ATK even more useful for her until she reaches the cap.
 Stellar Jubilee Passive | Dance of Aurore
Talent Description
Odette will enter the Radiance: Stellar-Conduct state when she is inside a Polestar Field, or the Radiance: Stellar Swirl state for 8s after a nearby party member triggers a Stellar Swirl reaction.
When a party member triggers a Superconduct or Cryo Swirl reaction, it becomes a Stellar-Conduct or Stellar Swirl reaction instead, and the Base DMG of said reaction is also increased by 0.7% for every 100 points of Odette’s ATK. A maximum increase of 14% can be obtained in this way.
Converts Superconduct and Cryo Swirl into Stellar-Conduct and Stellar Swirl, respectively, while also increasing the Base DMG of these reactions based on Odette’s ATK. If both reactions are triggered, Odette will prioritize entering the Stellar-Conduct state.
Constellations
 Constellation 1 | “On This Danceless Morn, She Gazes at Her Reflection”
Constellation Description
After unleashing the special Elemental Skill Adagio: Coda at Dawn’s Tolling, at the dance duet’s end Odette will deal an additional instance of Cryo AoE DMG to nearby opponents that is considered:
Radiance: Stellar-Conduct or when not in a Radiance state: Stellar-Conduct reaction DMG at 300% of Odette’s ATK;
Radiance: Stellar Swirl: Stellar Swirl reaction DMG at 450% of Odette’s ATK.
Additionally, the Passive Talent “Spring Rite of the Chosen One” is also enhanced: now, when the Solo Dance Double is summoned, Odette also gains 2 stacks of Marvelous Splendor. When Odette is off-field, the rate at which Marvelous Splendor is removed is sped up to 2 stacks per second.
A decent early Constellation providing a small instance of direct Stellar Damage and extra Marvelous Splendor stacks, which provides the team with more Stellar DMG% as well as a faster conversion rate on Marvelous Splendor’s teamwide Stellar DMG% buff.
 Constellation 2 | “I Must See the Snow Swan’s Unseen Dream for Myself, She Thought”
Constellation Description
The Passive Talent “Spring Rite of the Chosen One” is enhanced as follows: every stack of Marvelous Splendor active also increases the character’s ATK by 7%.
Additionally, if Odette is in the Radiance: Stellar Glimmer state when there is a Solo Dance Double on the field, opponents near the Dance Double will also have their corresponding Elemental RES lowered by 20%.
- Radiance: Stellar-Conduct: Cryo and Electro.
- Radiance: Stellar Swirl: Cryo and Anemo.
Odette’s best early Constellation, provides a 42% teamwide ATK buff and teamwide 20% RES Shred when in the Radiance: Stellar Glimmer state for the elements involved — a simple but massive power spike for her teams.
 Constellation 3 | “I’ll Chase the Shouting Wind Along, Climbing Alone As I Go”
Constellation Description
Increases the Level of Adagio: Phantom Night Dancers by 3.
Maximum upgrade level is 15.
Additional Talent levels to Odette’s primary damage source.
 Constellation 4 | “Up, Up the Long, Delirious, Burning Blue”
Constellation Description
The Elemental Burst Presto: Bluebird Finale is enhanced as follows: when Odette obtains Snow Swan’s Dream, Stellar Glimmer reaction DMG dealt by other nearby party members is increased by 50% of Snow Swan Dream’s effects.
Additionally, when a party member deals Stellar Glimmer reaction DMG to an opponent, Odette will also join in with a coordinated attack, dealing an instance of AoE Cryo DMG. This effect, which can trigger once every 3.5s, will be considered:
- Radiance: Stellar-Conduct or when not in a Radiance state: Stellar-Conduct reaction DMG at 66% of Odette’s ATK.
- Radiance: Stellar Swirl: Stellar Swirl reaction DMG at 99% of Odette’s ATK.
Using her burst provides extra value to her Stellar DMG% buff, along with a few more instances of direct Stellar Damage. Makes her Burst worth using in all teams.
 Constellation 5 | “Oh! I Have Slipped the Surly Bonds of Earth”
Constellation Description
Increases the Level of Presto: Bluebird Finale by 3.
Maximum upgrade level is 15.
Increases the damage dealt by Odette’s Burst and Stellar DMG% buff. Gains value due to C4.
 Constellation 6 | “Put Out My Hand, and Touched the Face of the Divine”
Constellation Description
The Passive Talent “Spring Rite of the Chosen One” is enhanced as follows: When Odette grants Marvelous Splendor to all nearby party members, her own Marvelous Splendor stacks will no longer decreasee.
Additionally, characters affected by Marvelous Splendor have their Stellar Glimmer reaction DMG dealt to opponents elevated by 25%, and Stellar Glimmer reaction DMG dealt by Odette is elevated by an additional 20%.
The biggest power spike for Odette. Rather than consuming her Marvelous Splendor stacks, she buffs herself along with her teammates. She also elevates Stellar Damage dealt by teammates by 25%, and her own by 45%.
C1 vs R1
While R1 is a decent increase in damage for Odette, her contribution of personal damage to the team is low enough to massively incentivize getting her C1 (which further buffs the team) over her R1, especially since her craftable option is not far behind her signature weapon for team performance. Getting C1 also brings Odette closer to her very potent C2.
Combos
Combo Notation
- N = Normal Attack
- C = Charged Attack
- A = Aimed Shot
- P = Plunging Attack
- hP = High Plunge
- lP = Low Plunge
- E = Elemental Skill
- tE = Tap Skill
- hE = Hold Skill
- Q = Elemental Burst
- D = dash (cancel)
- J = jump (cancel)
- W = walk (cancel)
- > = switch character
- ( ) = these actions are optional; please refer to the notes below
- [ ] = repeat these actions the specified number of times
| E E | This is Odette’s default combo when you want to start the rotation with her or when her burst isn’t available. |
| Q E | Her burst can be used when it’s available in teams where casting it doesn’t affect the overall rotation time of the team. |
Mechanics
Stellar-Conduct
Stellar-Conduct is triggered by applying Cryo and Electro to an opponent. Rather than dealing reaction damage directly, it creates a Polestar Field, which grants party-wide buffs, reduces enemies’ Physical RES, and enables certain characters to enter the Radiance: Stellar-Conduct state. While the field is active, additional Cryo and Electro application strengthens its buffs. Direct Stellar-Conduct damage can only be dealt through certain character abilities.
Stellar Swirl
Stellar Swirl is triggered by applying Anemo to an opponent affected by Cryo. It creates a Stellar Vortex that deals Stellar Swirl Anemo damage upon creation before exploding after a short delay to deal AoE Stellar Swirl Cryo damage. Repeated Stellar Swirl triggers strengthen the Vortex and increase its explosion damage, while also granting applicable characters the Radiance: Stellar Swirl state to enhance their Talents.
For further information , check out the Stellar Glimmer Reaction Guide.
Artifacts
ER Requirements
Calcs for ER requirements can be found here.
| No Fav | Fav Teammates | With Sig | |
| Solo Cryo (w/ Cyno) | 175-195% | 155-175% | 100–105% |
| Double Cryo (w/ Cyno) | 145-150% | ~135% | 100% |
| Double Cryo | 195-220% | 175-195% | 120-145% |
| Triple Cryo | 140-185% | 130-165% | 100–130% |
It is generally not recommended to burst on Odette as her burst tends to extend rotations, resulting in less damage overall. That being said, there are a few cases where it is actually worth it, typically in certain teams (such as Cryo Traveler or Sandrone) if you have her signature weapon / C4 or above. Even then, it is generally recommended to Burst every other rotation (with half the ER requirement) rather than building ER to Burst every rotation.
Use the Energy Recharge Calculator to determine exact requirements for your team and rotation. For more details on how Favonius weapons will affect your team, please use Ac1d’s Favonius Mastersheet.
Artifact Stats
 Sands |  Goblet |  Circlet |
| ATK% | ATK% | CRIT Rate or CRIT DMG |
Stat Priority: CRIT > ATK% > EM
Odette’s main source of damage comes from her direct Stellar-Conduct and Stellar Swirl damage, which scales with ATK, CRIT, and EM. She values ATK more due to her A4 passive, so ATK% should be prioritized over EM. Cryo DMG Bonus does not affect Stellar Glimmer damage, so ATK% Goblet is preferred. However, building CRIT is the priority.
Artifact Sets
Hover over artifact images for more information.
 4pc Heart of the Furnace (HotF) | Generally one of her best options if the team does not have other suitable holders. |
 4pc Disenchantment in Deep Shadow (DDS) | A more damage oriented set for Stellar-Conduct teams, usually optimal if the team already has a good HotF user. |
  4pc A Day Carved From Rising Winds / 4pc Blizzard Strayer | A placeholder option if you already have a set on standby and there is already a HotF user. |
 4pc Tenacity of the Millelith | An alternative option for team DPS if buffing teamwide members outpaces Odette’s personal damage in teams with another HotF user. |
 2pc Mixed Sets | 2pc Bonuses: ATK% Mixed sets can be used while farming for a 4pc set. |
Weapons
Hover over weapon images/names for more information.
 Whitelake Frostfeather | Odette’s signature weapon. It buffs her Stellar Glimmer damage while also refunding Energy; however, since Odette typically skips her Burst before C4, the Energy refund is not particularly useful until then. |
 5★ CRIT Swords | Azurelight, Absolution, Primordial Jade Cutter, Uraku Misugiri, Light of Foliar Incision, Mistsplitter Reforged, Haran Geppaku Futsu, Athame Artis, Light Bearing Moonshard, Splendor of Tranquil Waters, Summit Shaper 5-star CRIT swords offer valuable stats. Primordial Jade Cutter and Absolution offer useful passives. While Summit Shaper does not give CRIT stats, its performance is similar to other CRIT Swords. |
 Exaiphanes Blade | Typically used on Cryo Traveler, but can be a good stat stick if it is unused. |
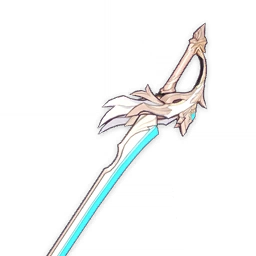 Aquila Favonia | A solid choice due to its high base ATK and unconditional ATK% passive. |
 Finale of the Deep | The best 4 star weapon for Odette if you can clear the BoL, and remains one of her best 4-star weapons even if BoL cannot be cleared. |
 Emberwell | Outperforms Finale of the Deep only if BoL is left uncleared and the weapon’s passive is active. If BoL is cleared, Finale of the Deep performs much better; if Emberwell’s passive is not active, it noticeably underperforms. |
 Heretic’s Molten Blade | A decent option due to the nature of her Elemental Skill teleporting you to the enemy. While the passive is lost once you swap off, the damage from Coda at Dawn’s Tolling while on-field is a significant part of her personal damage. |
Teams
Rotation Notation
- N = Normal Attack
- C = Charged Attack
- A = Aimed Shot
- P = Plunging Attack
- E = Elemental Skill
- tE = Tap Skill
- hE = Hold Skill
- Q = Elemental Burst
- D = dash (cancel)
- J = jump (cancel)
- W = walk (cancel)
- > = switch character
- ( ) = these actions are optional; please refer to the notes below
- [ ] = repeat these actions the specified number of times
Stellar-Conduct

Odette’s main role in Stellar-Conduct teams is to provide strong off-field Cryo damage and teamwide Stellar damage buffs. An Electro teammate (such as Yae Miko, Alyosha, or Beidou) is required to trigger Stellar-Conduct and establish the Polestar Field. The team also includes an on-field carry (such as Sandrone, Wriothesley, or Cryo Traveler) as the primary damage dealer. The flex slot is typically filled by a sustain unit, an additional Electro or Cryo off-field DPS, or a secondary buffer.
Notable Teammates
Electro
An Electro teammate is required to enable Stellar-Conduct via their Electro application.
 Yae Miko ★ | Yae Miko is the best-in-slot Electro teammate thanks to her personal damage and buffs to Stellar-Conduct. Her burst is not used in these teams. |
 Cyno ★ | Cyno appreciates the enablement of Stellar-Conduct and her steady off-field Cryo application, decent personal damage, and teamwide buffs. |
 Alyosha | Alyosha is a viable option at C0, functioning as a budget off-field Electro applier and sustain option who provides a decent ATK buff, along with Stellar-Conduct DMG Bonus and healing to the active character. Alyosha becomes significantly stronger at C6; his ATK and Stellar-Conduct DMG buffs are doubled, as well as additionally granting 100 Elemental Mastery to the on-field character. |
 C6 Beidou | Beidou provides solid buffs at C6 to Stellar-Conduct damage. Her Burst also applies many instances of Electro in multi-target scenarios. Without C6, she drastically loses value in Stellar-Conduct teams. |



Cryo
A Cryo teammate enables Cryo Resonance and either buffs the team or fills the role of On-Field DPS.
   Sandrone / Cryo Traveler / Wriothesley ★ | Odette’s main Stellar-Conduct Cryo DPS partners. They all benefit from her off-field Cryo application, consistent damage, and teamwide buffs. Wriothesley also benefits from the fact that Odette can enable Stellar-Conduct on her own, reducing the need for another dedicated enabler. |
 Qiqi ★ | A strong healer and Cryo support. Pre-C6, she focuses on providing utility using 4pc Tenacity of the Millelith and Favonius Sword. At C6, her buff scales with ATK, making her Burst worthwhile and favoring high-ATK weapons. At C6, if 4pc TotM is already used by a teammate, 4pc Noblesse Oblige works as an alternative. |
 C6 Diona | At C6, Diona grants 200 EM and a 40% Stellar-Conduct DMG buff to the active character within her Burst AoE. Without C6, albeit a usable option, she loses a lot of value in Stellar-Conduct teams. |
 Escoffier | Escoffier grants Cryo RES Shred, decent off-field damage, consistent Cryo application, and healing for if needed. While she does not directly buff Stellar-Conduct, all the aforementioned factors make her a competitive support for Stellar-Conduct teams. Escoffier can hold Favonius Lance if available to help lower her and her teammates’ ER requirements. |




Flex
 Nicole | Nicole grants a teamwide ATK buff and a strong shield. As Nicole does not use her Burst nor does the team require Elemental DMG% buffs, Nicole should opt to maximize her ATK stat with a 2pc + 2pc ATK% combo in lieu of a 4pc artifact set. |
 Xilonen | Xilonen shreds enemy Cryo and Electro RES without the need to react with the aforementioned elements and can buff team EM by holding 4pc Instructor. |
 Sucrose | Sucrose shreds enemy Cryo RES with 4pc Viridescent Venerer and grants a nice EM buff to the team. She can hold TTDS or Wandering Evenstar. |
Example Teams
This is not a comprehensive list of teams. The inclusion or exclusion of any given team does not necessarily reflect its power level.

This is a strong Stellar-Conduct team. Yae Miko delivers significant off-field personal damage while providing her own team buffs at C1, with Sandrone acting as the primary on-field DPS. There are multiple units that can fill the flexible fourth slot: Qiqi and Escoffier offer defensive comfort and additional buffs; C6 Diona shields and heals the on-field DPS while providing 200 EM and a Stellar DMG Bonus; C6 Beidou supplies off-field Electro damage, Cryo and Electro RES Shred, extra EM, and light defensive utility.
Sample Rotation (Qiqi)
Yae 3[E] > Odette 2[E] > Qiqi E(Q)¹ > Sandrone combo
¹Only use Qiqi Q if she is C6
Sample Rotation (Escoffier)
Yae 3[E] > Odette 2[E] > Escoffier E > Sandrone combo
Sample Rotation (Beidou)
Yae 3[E] > Odette 2[E] > Beidou shE1 Q > Sandrone combo
1 Beidou does level 1 hE
Sample Rotation (Diona)
Yae 3[E] > Odette 2[E] > diona hEQ > Sandrone combo

A Stellar-Conduct team where Cryo Traveler acts as the main on-fielder. Yae Miko provides consistent off-field Electro application, strong personal damage, and additional team buffs at C1. The final slot is flexible: Qiqi and Escoffier provide healing, additional team support and personal damage; Sucrose can be used for RES Shred and a teamwide EM buff.
Sample Rotation (Qiqi)
Yae 3[E] > Odette E(Q)1E > Qiqi E(Q)2 > Cryo Traveler E N2CD N1CD N2C Q N2C
1Use Odette’s Burst when available
2Only use Qiqi Q if she is C6
Sample Rotation (Escoffier)
Yae 3[E] > Odette E(Q)1E > Escoffier E > Cryo Traveler E N2CD N1CD N2C Q N2C
1Use Odette’s Burst when available
Sample Rotation (Sucrose)
Yae 3[E] > Odette E(Q)1E > Sucrose N1 ED > Cryo Traveler E N2CD N1CD N2C Q N2C
1Use Odette’s Burst when available

Wriothesley benefits from Yae Miko’s off-field Electro application and Odette’s off-field Cryo application and ability to enable Stellar-Conduct. The flex slot should provide additional off-field damage and support. Nicole offers straightforward buffing and comfort, Xilonen provides a large amount of RES shred, while C6 Beidou brings RES shred, EM buffs and extra Electro application. Wriothesley does not prefer healers due to him needing to be below 60% HP to reliably trigger his enhanced CA, which does direct Stellar-Conduct damage.
Sample Rotation (Beidou)
Yae 3[E] > Odette 2[E] > Beidou shE¹Q > Wriothesley combo
¹Beidou does level 1 hE
Sample Rotation (Nicole)
Yae 3[E] > Odette 2[E] > Nicole E > Wriothesley combo
Sample Rotation (Xilonen)
Yae 3[E] > Odette 2[E] > Xilonen E N2 > Wriothesley combo

One of Cyno’s strongest team options. He appreciates Odette since she can provide steady off-field Cryo application and enable Stellar-Conduct without stealing much field time from him. Yae Miko provides Cyno with additional particles, strong off-field damage, and a Stellar DMG% buff at C1. Qiqi and Alyosha can act as the sustain for the team and provide their own buffs and utility through their kits and gear.
Sample Rotation (Qiqi)
Yae 3[E] > Odette 2[E] > Qiqi E(Q)¹ > Cyno E N1 Q N2E 4[N4D N4E]
¹Only use Qiqi Q if she is C6
Sample Rotation (Alyosha)
Yae 3[E] > Odette 2[E] > Alyosha Q E > Cyno E N1 Q N2E 4[N4D N4E]
Limited Roster Alternatives
These teams are meant for newer players whose limited roster prevents them from using the teams above; as such, the teams below result in lower damage output.

Cryo Traveler acts as the main on-fielder, Alyosha offers off-field Electro support alongside healing and buffs, and Sucrose provides team utility through RES Shred and an EM buff. This team is less demanding on limited units while still giving Odette a functional Stellar-Conduct Team. Odette can freely use her burst in this team due to Cryo Traveler’s lower field time and flexibility.
Sample Rotation
Odette 2[E] > Sucrose N1 ED > Alyosha E(Q)1 > Cryo Traveler E 2[N1CD] N2CD N2C Q N2CD > (Odette Q) > CMC N2CD N22
1Only cast Burst every second rotation starting from C2.
2Use Odette’s Burst when available. Otherwise, do N2CD N2 with Cryo Traveler.
Stellar Swirl

Odette’s role in Stellar Swirl teams is to provide consistent off-field Cryo application while enabling strong Stellar Swirl uptime for an Anemo on-field carry. The Anemo teammate is responsible for triggering Stellar Swirl and driving the team’s damage, while the second Cryo unit helps maintain Cryo aura and adds extra damage or utility. The flex slot usually goes to sustain, additional buffs, or another off-field damage dealer.
Notable Teammates
Anemo
An Anemo teammate is required to enable Stellar Swirl via Anemo application.
 Yumemizuki Mizuki ★ | Yumemizuki Mizuki stands as the premiere Stellar Swirl on-field carry, utilizing her Dream Drifter state to output significant Anemo Stellar Swirl damage. She appreciates Odette’s enablement of the Stellar Swirl reaction and party-wide buffs, as Mizuki lacks the ability to trigger these mechanics independently. |
 Faruzan (C6) ★ | At C6, Faruzan provides substantial support for Anemo on-field DPS units through Anemo RES Shred, Anemo CRIT DMG, and additional Energy particles. Some on-field DPS units may also appreciate her Anemo DMG Bonus. When holding 4pc Viridescent Venerer, she can also shred Cryo RES to further boost Odette’s damage. |
 Sucrose ★ | Sucrose shreds enemy Cryo RES with 4pc VV, provides teamwide EM buffs, and can equip R5 TTDS to buff ATK-scaling characters if needed. Her Elemental Burst provides off-field Anemo and Cryo application, which assists in generating Stellar Swirl stacks. |




Cryo
A Cryo teammate enables Cryo Resonance and contributes to additional damage or provides utility or buffs.
 Cryo Traveler ★ | In Stellar Swirl teams, Cryo Traveler applies off-field Cryo and buffs the on-fielder. They also deal significant damage with their Stellar CA and Burst. |
 Sandrone ★ | Sandrone works well as an on-field DPS in Stellar Swirl teams, taking advantage of Odette’s off-field Cryo application and reaction support while driving the team’s damage. Do note Stellar-Conduct teams are still the better archetype for Sandrone. |
 C6 Diona | Diona reaches her full potential as a support at C6, where she grants 200 EM and a significant DMG bonus to Stellar Glimmer reactions within her Burst field. Without C6, albeit a usable option, she loses a lot of value in Stellar-Swirl teams. |
Qiqi ★ | Qiqi is one of the best Cryo teammates thanks to her buffs to Stellar Glimmer and her sustain capabilities. She typically holds 4pc TotM and Favonius Sword. |




Example Teams
This is not a comprehensive list of teams. The inclusion or exclusion of any given team does not necessarily reflect its power level.

Odette and Cryo Traveler both deal considerable damage and apply consistent Cryo for Mizuki to trigger Stellar Swirl and deal substantial damage from her Witch’s Revelation Passive, while also providing meaningful teamwide buffs that elevates the team even more. The last slot is usually either C6 Faruzan to provide Mizuki with Anemo RES shred and Anemo CRIT DMG or Sucrose as the more accessible teamwide EM buffer. They can both hold VV to provide Cryo RES Shred, or 4pc Instructors if Mizuki has more investment than Odette and CMC.
Sample Rotation (Faruzan)
Odette 2[E] > Faruzan Q / E C1 > Cryo Traveler EQ N1C2 > Mizuki E (Q)
1Faruzan Q should be used every other rotation. Use E C on rotations without Q.
2Skip this during the first rotation due to the lack of Frostglow Stacks.
Sample Rotation (Sucrose)
Odette 2[E] > Sucrose ED (Q)¹ > Cryo Traveler EQ N1C2 > Mizuki E (Q)
1Use Sucrose Q when Available
2Skip this during the first rotation due to lack of Frostglow Stacks
Limited Roster Alternatives
These teams are meant for newer players whose limited roster prevents them from using the teams above; as such, the teams below result in lower damage output.

Cryo Traveler provides off-field Cryo application and can briefly come on-field to deal damage before swapping out to Ifa, who serves as the main on-field DPS. Sucrose rounds out the team with RES Shred and EM support, making the team functional without relying on many limited units. Ideally, Ifa should be replaced by Mizuki, who is available from the standard character selector.
Sample Rotation
Odette 2[E] > Sucrose ED (Q)1 > Cryo Traveler EQ N1C2 > Ifa combo
1Use Sucrose Q When Available
2Skip this during the first rotation due to the lack of Frostglow Stacks
Credits
Writer(s): speify
Contributors: baloopy, acerbus114, luwunae
Team images made with the KQM portrait generator.