Updated for Version 5.7

Raiden Shogun is a 5-star Electro Polearm character in Genshin Impact who provides off-field Electro application, universal batterying, and a powerful on-field Burst. Learn about Raiden’s best builds, Talent priority, best weapons, best artifacts, and best teams in this in-depth review.
Note that the information given may change if new discoveries are made. More extensive testing is in progress.
The full-length guide is available here.
Table of Contents
Infographic
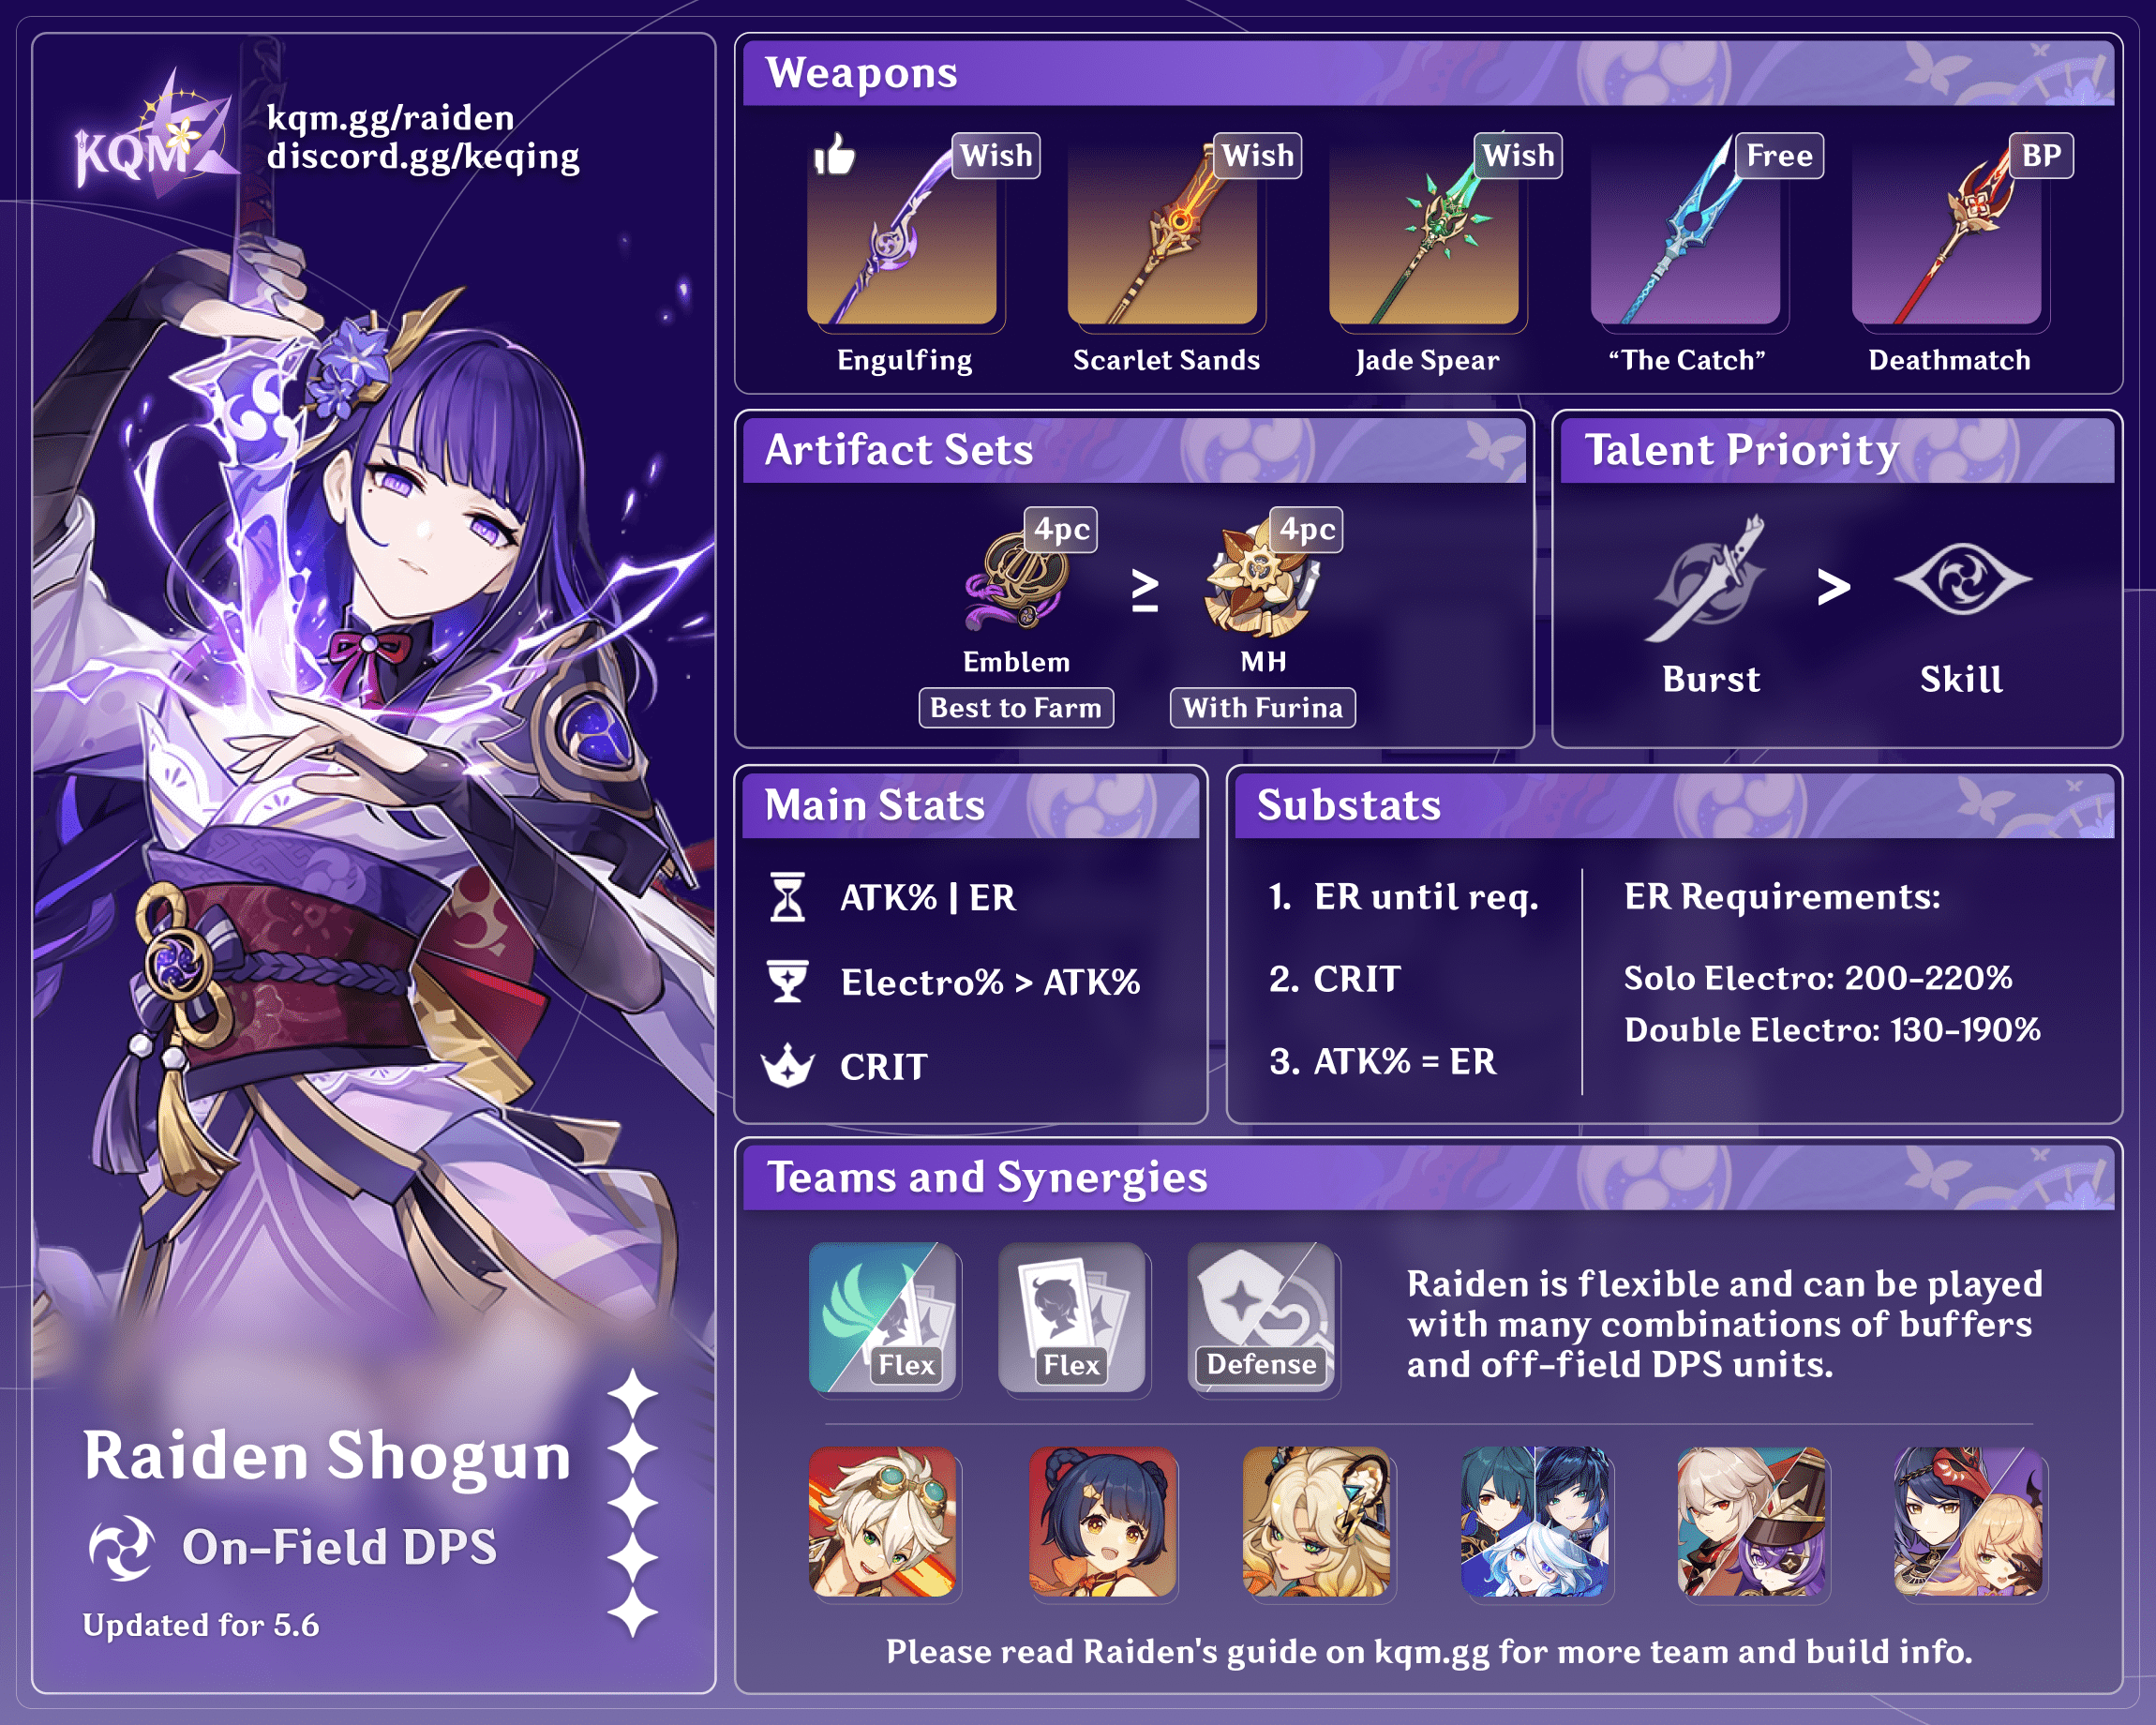
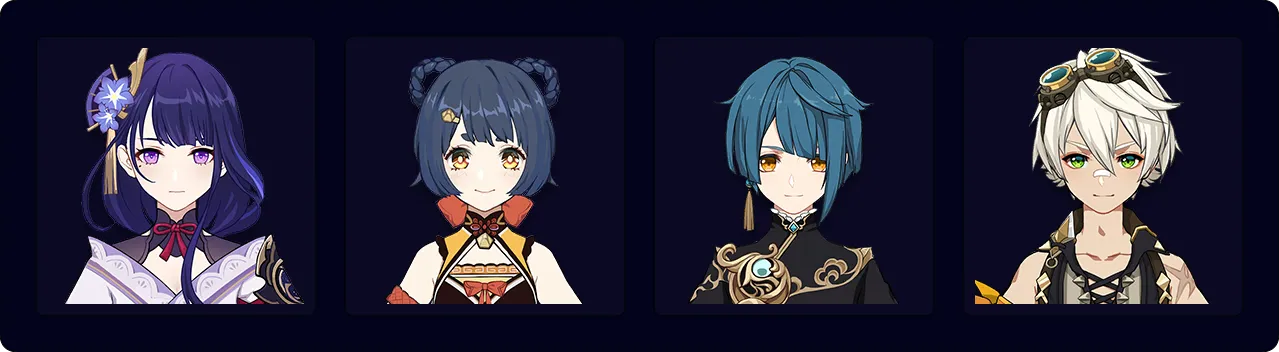
On-Field DPS
Credits to: euphorysm, chasing_haze, and KQM Staff
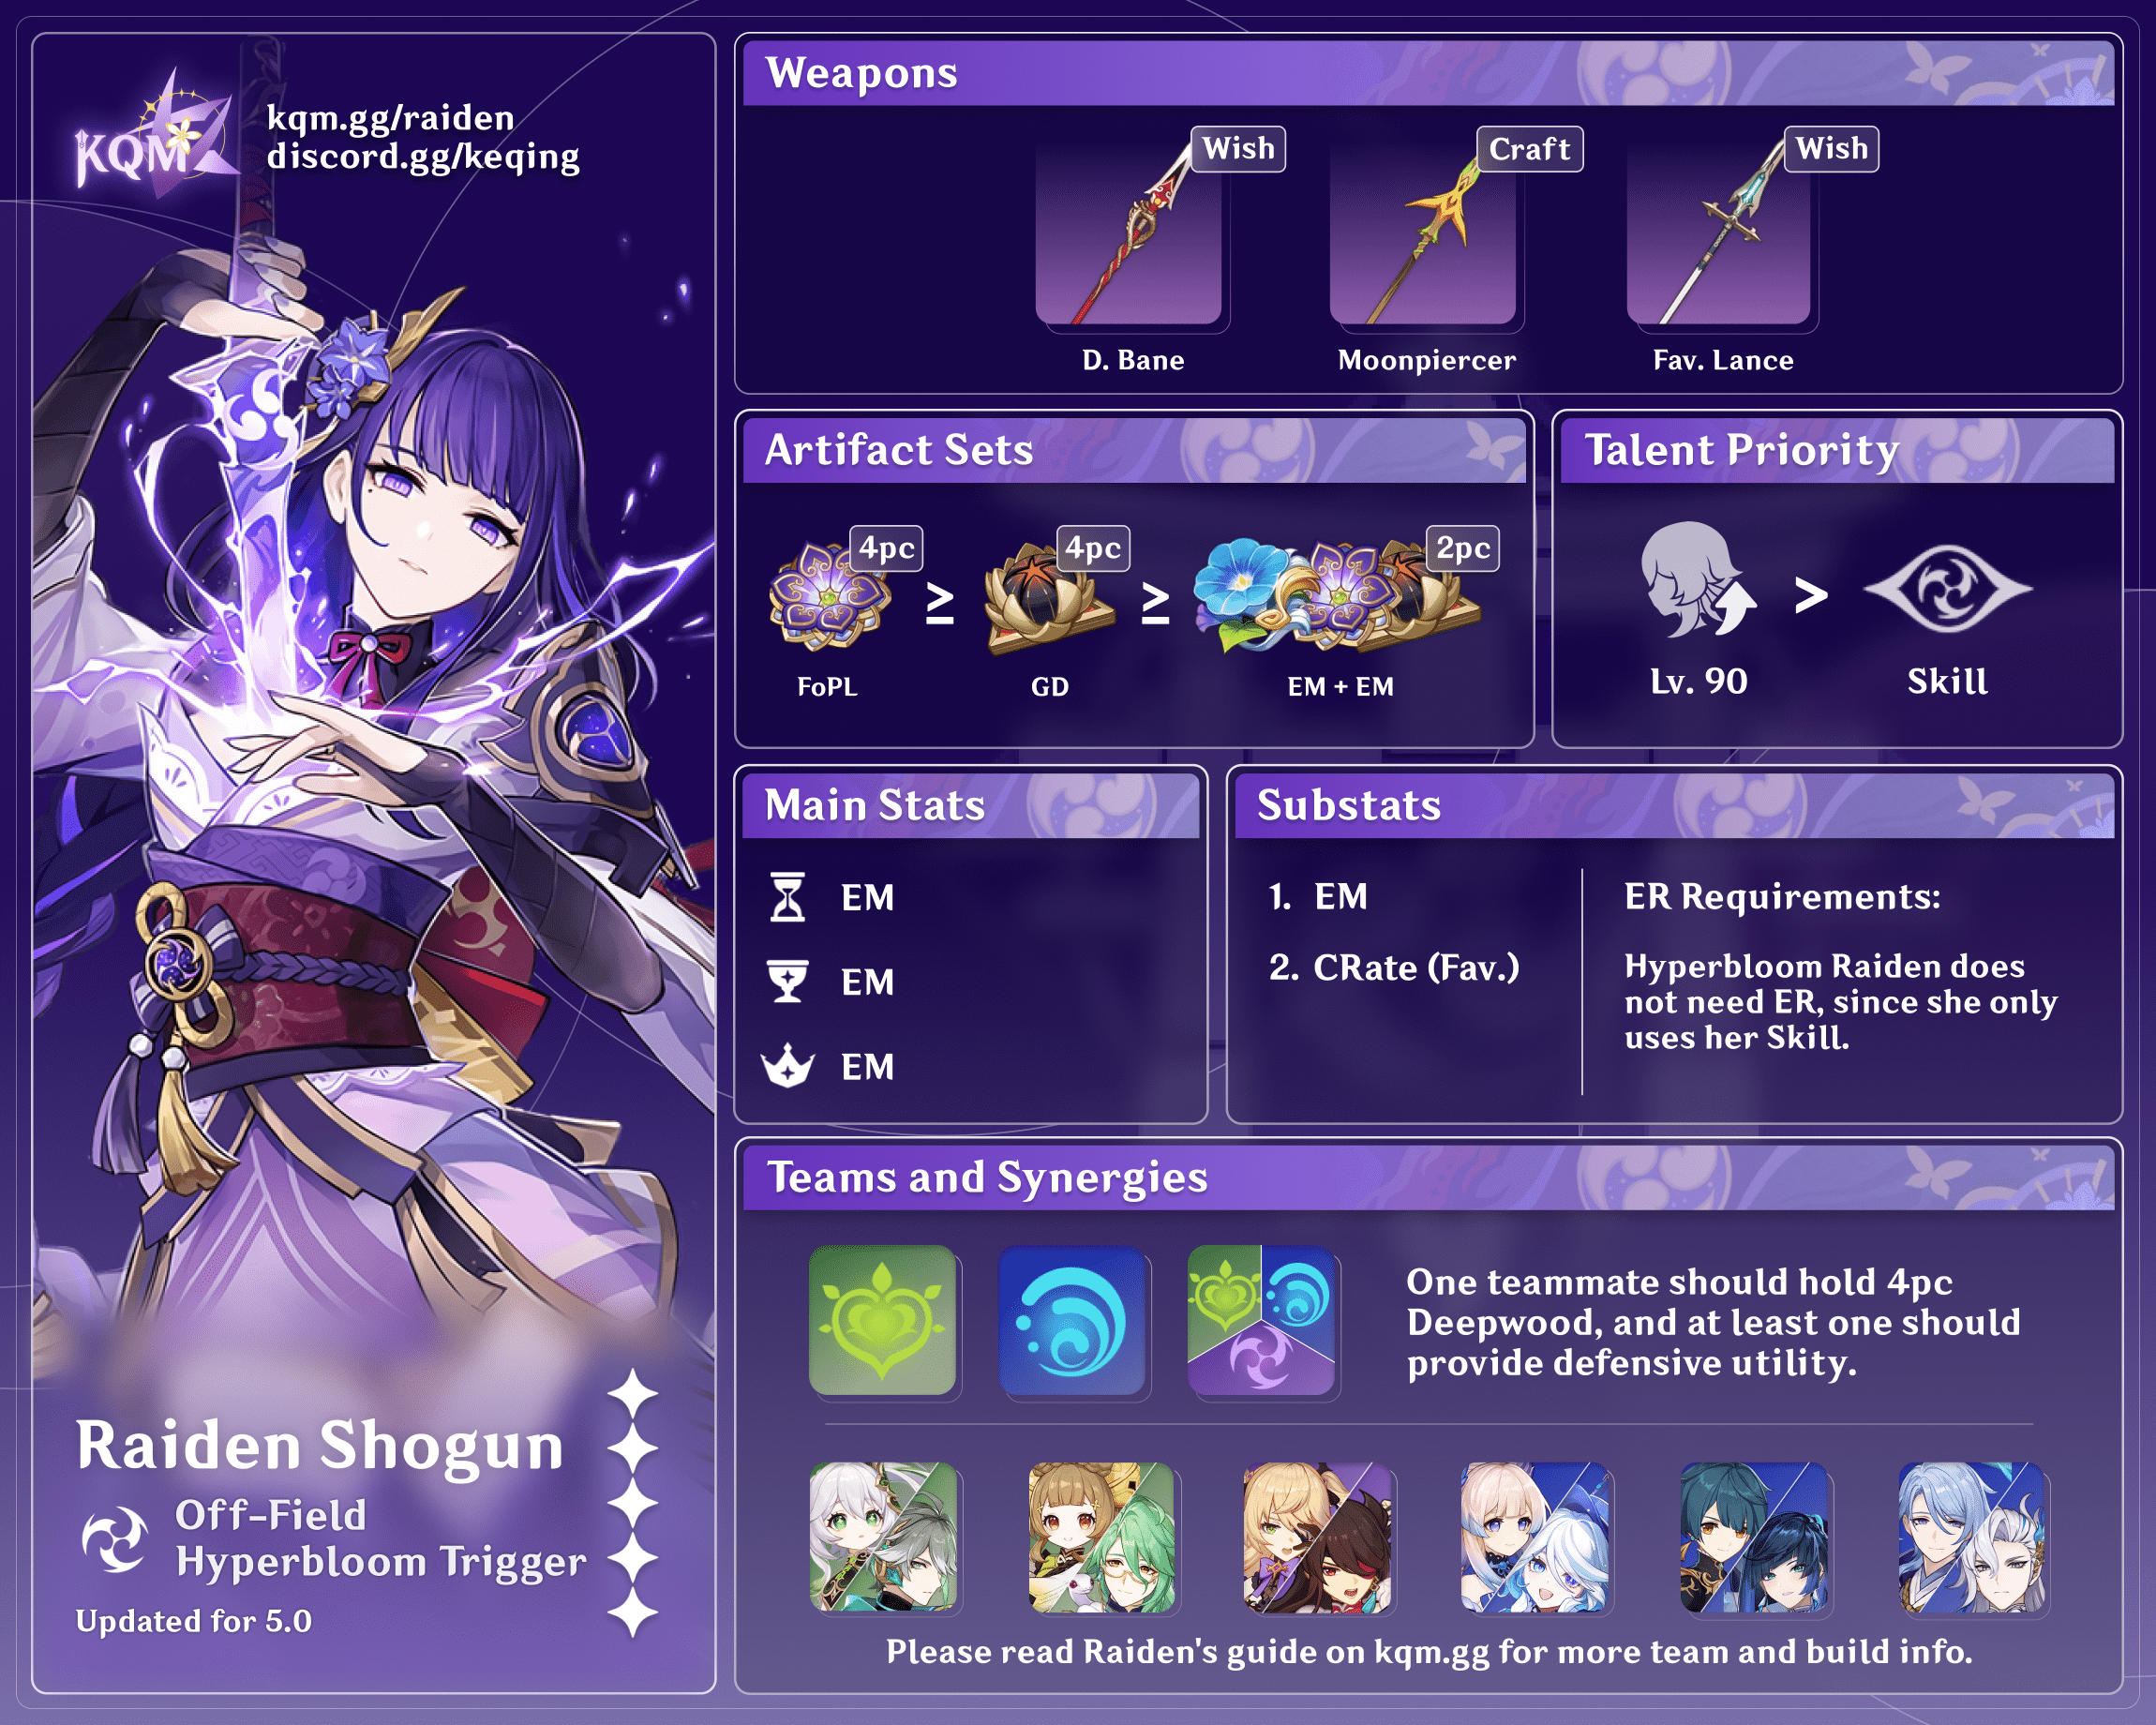
Hyperbloom Trigger
Credits to: euphorysm, chasing_haze, and KQM Staff
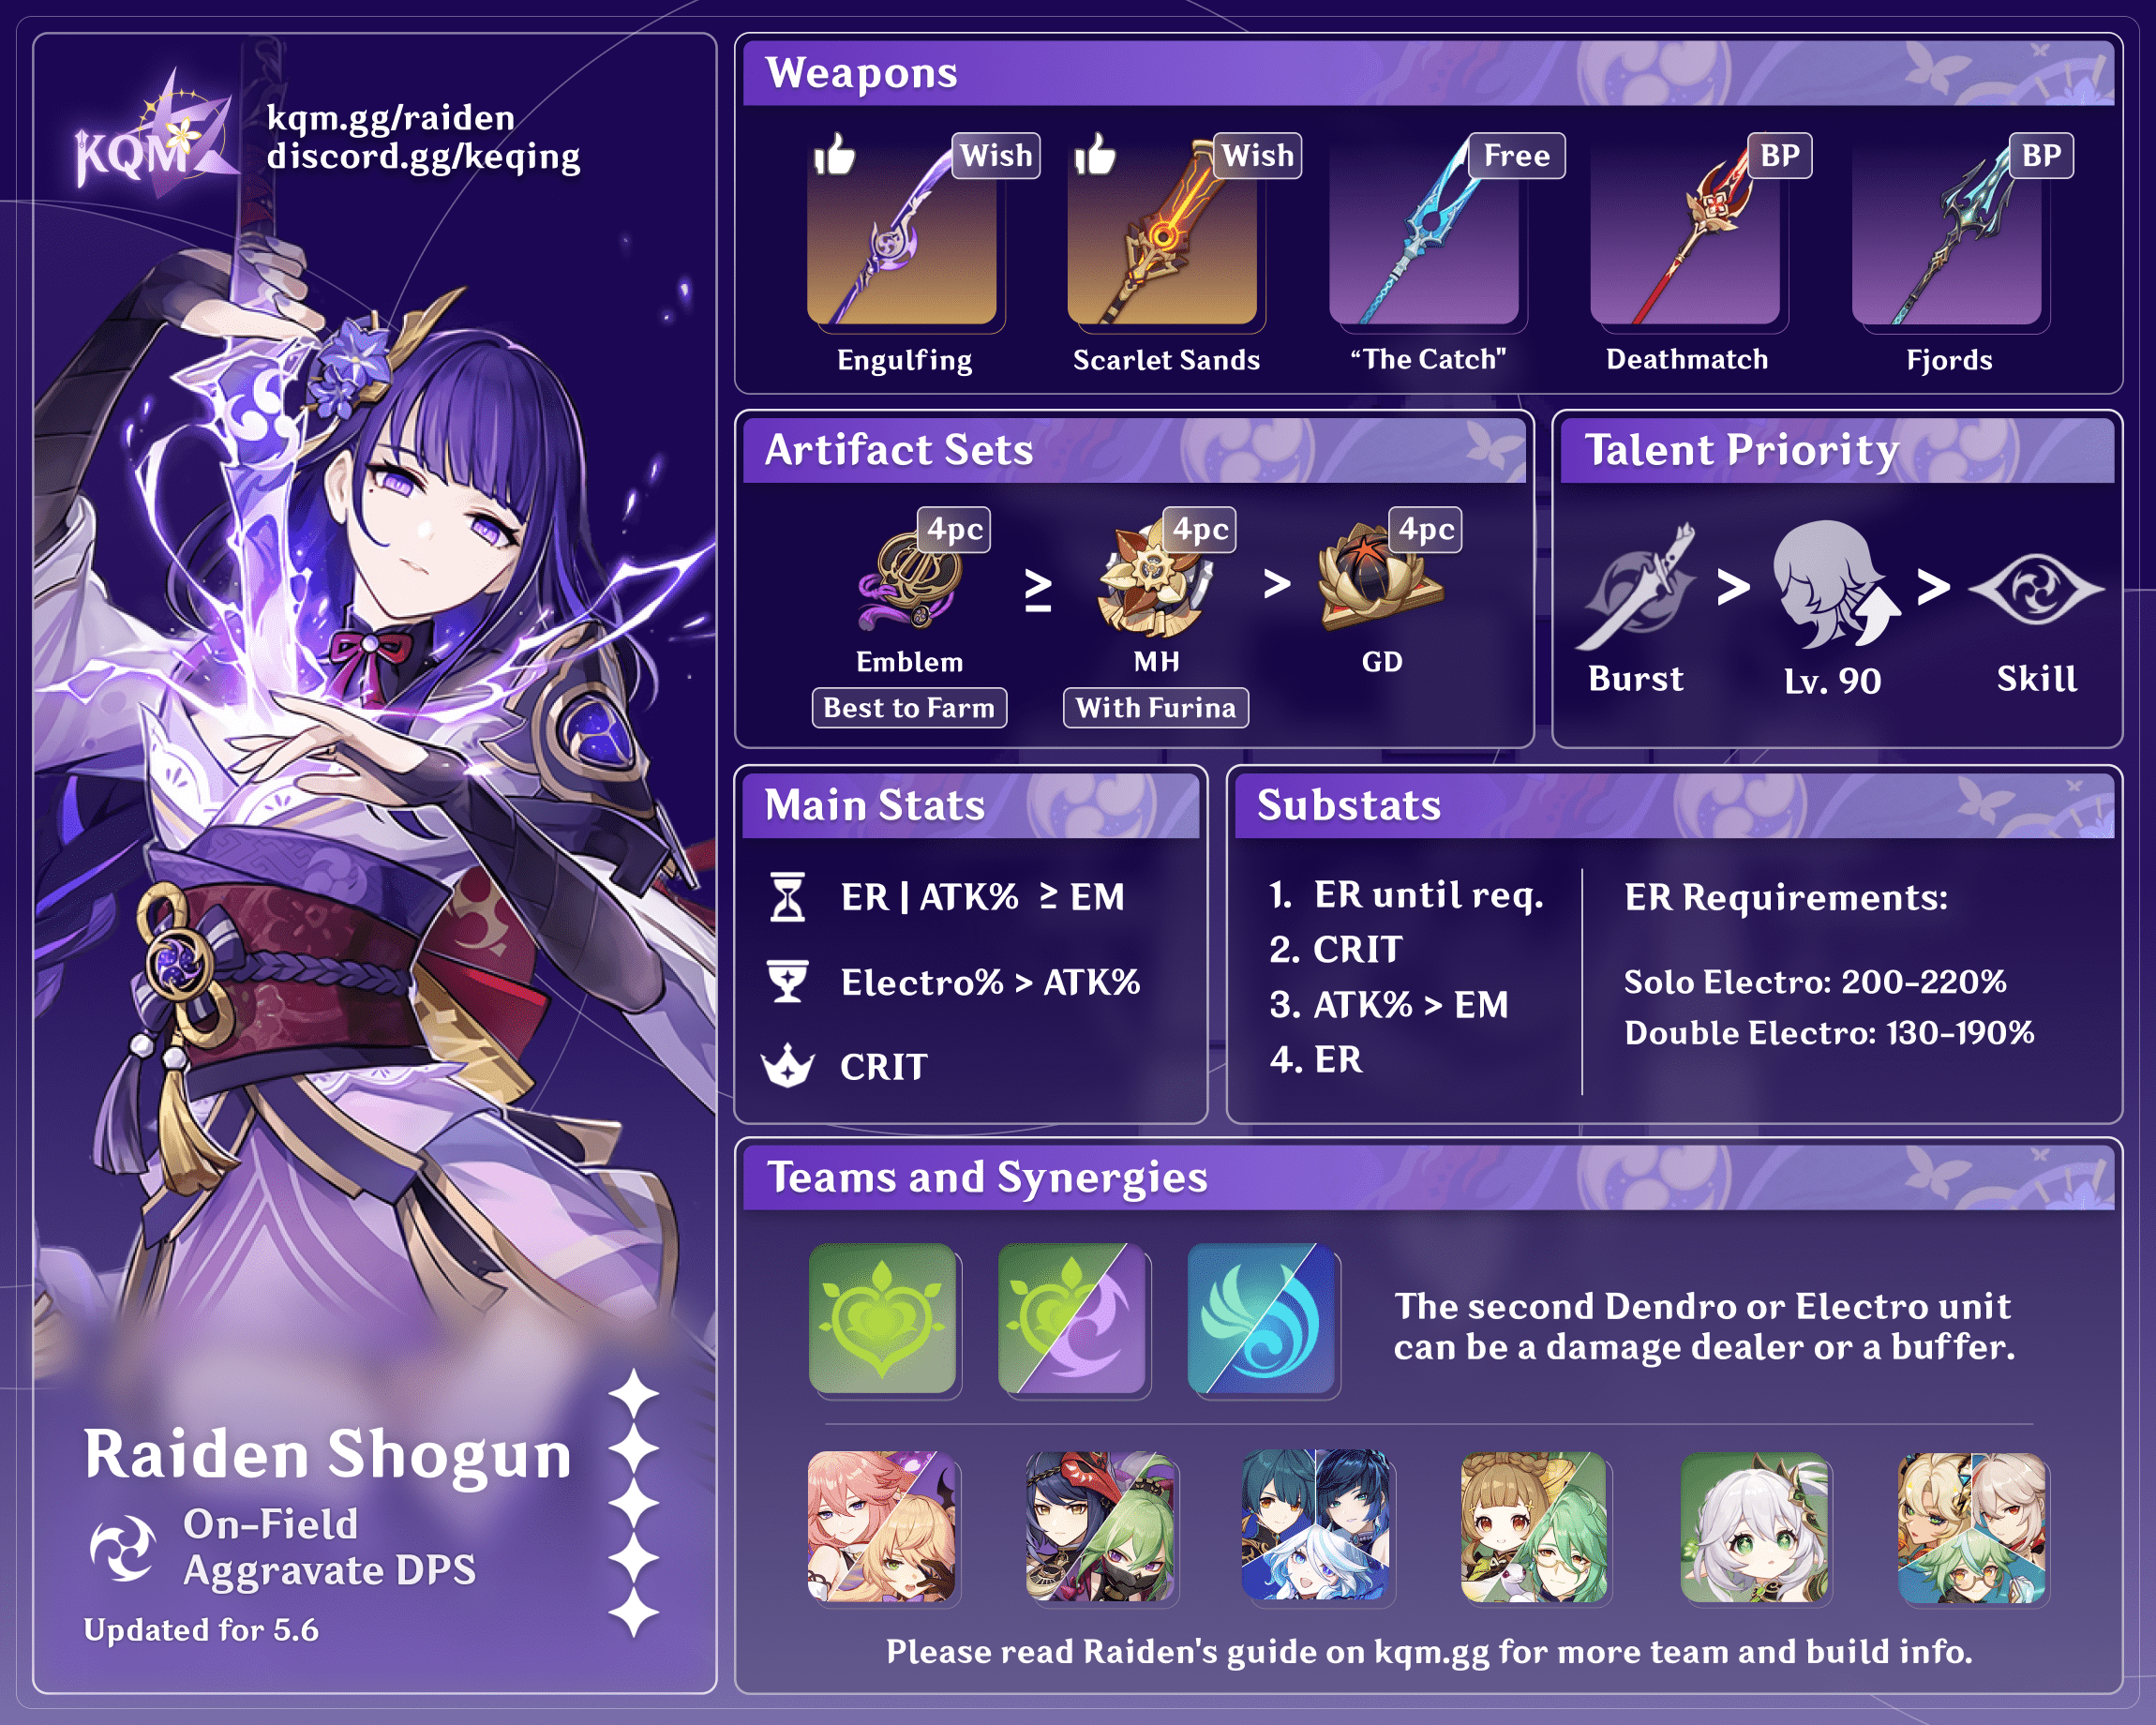
On-Field Aggravate DPS
Credits to: euphorysm, baloopy, and KQM Staff
Character Overview
Playstyles
On-field DPS
Building a team rotation around Raiden’s Burst allows her to deal large amounts of damage while batterying her teammates.
Hyperbloom / Overloaded Trigger
Emphasizes Raiden’s Skill for its ability to easily trigger Hyperblooms or Overloaded off-field.
Talents
Level and Talent Priority
Burst DPS
Talent Priority
Burst > Skill
Raiden’s attacks during her Burst use a separate set of multipliers that are not based on her Normal Attack Talent. As such, it is not recommended to level her Normal Attacks. Leveling Raiden to Lv. 90 is also important to her damage in her Aggravate / Quickbloom teams.
Hyperbloom / Overloaded Trigger
Talent Priority
Character Level > Skill
Transformative Reactions such as Hyperbloom scale with EM and character level rather than Talent level. As such, raising Raiden to level 90 should be the highest priority. Leveling Raiden’s Skill will not increase Hyperbloom damage, but can be useful for its Burst DMG buff.
Talent Overview
 Normal Attack | Origin
Talent Description
Normal Attack
Performs up to 5 consecutive spear strikes.
Charged Attack
Consumes a certain amount of Stamina to perform an upward slash.
Plunging Attack
Plunges from mid-air to strike the ground below, damaging opponents along the path and dealing AoE DMG upon impact.
It is not recommended to level this Talent, since it does not affect Raiden’s attacks during her Burst and she should not use Normal Attacks outside of her Burst.
 Elemental Skill | Transcendence: Baleful Omen
Talent Description
The Raiden Shogun unveils a shard of her Euthymia, dealing Electro DMG to nearby opponents, and granting nearby party members the Eye of Stormy Judgment.
Eye of Stormy Judgment
- When characters with this buff attack and deal DMG to opponents, the Eye will unleash a coordinated attack, dealing AoE Electro DMG at the opponent’s position.
- Characters who gain the Eye of Stormy Judgment will have their Elemental Burst DMG increased based on the Energy Cost of the Elemental Burst during the Eye’s duration.
The Eye can initiate one coordinated attack every 0.9s per party.
Coordinated attacks generated by characters not controlled by you deal 20% of the normal DMG.
Raiden’s Skill provides Electro application with a respectable AoE and 100% uptime, making it a fantastic Hyperbloom trigger. The coordinated attacks can trigger every 0.9s and follow Standard Internal Cooldown (ICD) — every 2.5s or 3 hits. However, ICD will not affect Hyperbloom triggering since ICD is separate per entity (Dendro Core).
Her Skill also provides good Energy particle generation over time. Its Burst DMG buff cannot be snapshot, and Raiden’s Skill itself cannot snapshot other buffs.
It is important to note that Raiden’s Skill triggers on damage, meaning it does not trigger when hitting Elemental Shields. This also means the coordinated attack will hit slightly after the attack that triggers it; see the full Raiden guide for example rotations and setups that take advantage of this mechanic.
 Elemental Burst | Secret Art: Musou Shinsetsu
Talent Description
Gathering truths unnumbered and wishes uncounted, the Raiden Shogun unleashes the Musou no Hitotachi and deals AoE Electro DMG, using Musou Isshin in combat for a certain duration afterward. The DMG dealt by Musou no Hitotachi and Musou Isshin’s attacks will be increased based on the number of Chakra Desiderata’s Resolve stacks consumed when this skill is used.
Musou Isshin
While in this state, the Raiden Shogun will wield her tachi in battle, while her Normal, Charged, and Plunging Attacks will be infused with Electro DMG, which cannot be overridden. When such attacks hit opponents, she will regenerate Energy for all nearby party members. Energy can be restored this way once every 1s, and this effect can be triggered 5 times throughout this skill’s duration.
While in this state, the Raiden Shogun’s resistance to interruption is increased, and she is immune to Electro-Charged reaction DMG.
While Musou Isshin is active, the Raiden Shogun’s Normal, Charged, and Plunging Attack DMG will be considered Elemental Burst DMG.
The effects of Musou Isshin will be cleared when the Raiden Shogun leaves the field.
Chakra Desiderata
When nearby party members (excluding the Raiden Shogun herself) use their Elemental Bursts, the Raiden Shogun will build up Resolve stacks based on the Energy Cost of these Elemental Bursts.
The maximum number of Resolve stacks is 60.
The Resolve gained by Chakra Desiderata will be cleared 300s after the Raiden Shogun leaves the field.
The bulk of Raiden’s personal damage. Its powerful initial slash is followed by an Electro Conversion on her Normal/Charged/Plunging Attacks for 7s, although this duration can be extended with hitlag. The multipliers for these converted attacks are based on Raiden’s Burst Talent level only. See the Combos section for recommended combos.
The converted attacks are considered Elemental Burst DMG despite requiring Normal/Charged Attack input. This makes Raiden unable to take advantage of Normal/Charged/Plunging Attack buffs or units who require Normal/Charged Attack hits, such as Beidou and Electro Traveler. However, she very much synergizes with Burst DMG buffs and units such as Xingqiu and Yelan (who only require Normal Attack animations).
During her Burst, Raiden cannot be interrupted and refunds Flat Energy to the whole team with her converted attacks. Her Burst does not snapshot and does not count towards her own Resolve stacks.
Raiden will build up Resolve stacks based on the respective Energy Cost of her teammates’ Bursts whenever they use them, symbolized by the Chakra Desiderata behind the active character. Resolve further increases Raiden’s Burst damage.
Due to the Energy refund and the nature of the Resolve stacks, it is best to use Raiden’s Burst after all other teammates’ Bursts have been used. See the full Raiden guide for example rotations.
 Ascension 1 Passive | Wishes Unnumbered
Talent Description
When nearby party members gain Elemental Orbs or Particles, Chakra Desiderata gains 2 Resolve stacks.
This effect can occur once every 3s.
Essentially free damage, this is a straightforward Passive that lets Raiden gain a few more Resolve stacks (usually 4–8 more stacks).
 Ascension 4 Passive | Enlightened One
Talent Description
Each 1% above 100% Energy Recharge that the Raiden Shogun possesses grants her:
- 0.6% greater Energy restoration from Musou Isshin
- 0.4% Electro DMG Bonus.
This Passive complements Raiden’s already high ER requirements. However, ER is only on par with ATK% for Raiden’s personal damage when using Engulfing Lightning. Thus, it is not recommended to aim for more ER than is necessary to Burst off-cooldown (see ER Requirements).
 Utility Passive | All-Preserver
Talent Description
Mora expended when ascending Swords and Polearms is decreased by 50%.
A unique Passive that saves Mora when ascending Swords or Polearms. Complementary to Wanderer’s Utility Passive, which is the same but for Bows and Catalysts.
Constellations
Note that comments on Raiden’s Constellations are centered around her Burst DPS playstyle. Raiden’s Constellations generally do not affect her Hyperbloom damage nor playstyle.
 Constellation 1 | Ominous Inscription
Talent Description
Chakra Desiderata will gather Resolve even faster. When Electro characters use their Elemental Bursts, the Resolve gained is increased by 80%. When characters of other Elemental Types use their Elemental Bursts, the Resolve gained is increased by 20%.
Allows Raiden to gain more Resolve stacks and therefore deal more damage. It is quite common to reach maximum Resolve stacks with a second Electro character or with three teammates who have 80 Energy Cost Bursts.
 Constellation 2 | Steelbreaker
Talent Description
While using Musou no Hitotachi and in the Musou Isshin state applied by Secret Art: Musou Shinsetsu, the Raiden Shogun’s attacks ignore 60% of opponents’ DEF.
While not the same as DEF Shred, ignoring DEF is nevertheless extremely potent. This Constellation is a massive ~43% increase to her personal damage.
 Constellation 3 | Shinkage Bygones
Talent Description
Increases the Level of Secret Art: Musou Shinsetsu by 3.
Maximum upgrade level is 15.
A simple +3 Talent levels to Raiden’s Burst, but a significant increase to her personal damage.
 Constellation 4 | Pledge of Propriety
Talent Description
When the Musou Isshin state applied by Secret Art: Musou Shinsetsu expires, all nearby party members (excluding the Raiden Shogun) gain 30% bonus ATK for 10s.
Raiden should practically never use her Burst at the beginning of the rotation, so this Constellation will not affect the first rotation. If content requires multiple rotations, C4 provides a useful ATK% buff to her teammates.
 Constellation 5 | Shogun’s Descent
Talent Description
Increases the Level of Transcendence: Baleful Omen by 3.
Maximum upgrade level is 15.
+3 Talent levels to Raiden’s Skill, not very significant.
 Constellation 6 | Wishbearer
Talent Description
While in the Musou Isshin state applied by Secret Art: Musou Shinsetsu, attacks by the Raiden Shogun that are considered part of her Elemental Burst will decrease all nearby party members’ (but not including the Raiden Shogun herself) Elemental Burst CD by 1s when they hit opponents.
This effect can trigger once every 1s, and can trigger a total of 5 times during the state’s duration.
A unique Constellation that can reduce teammates’ Burst cooldowns. Currently, this has minimal effect on most of her teams, if any.
Combos
The optimal combos for Raiden’s Burst are listed below. Raiden is overall a flexible character with her combos, and as long as they are performed properly, they are all competitive. Each individual combo provides different amounts of AoE or Electro application and therefore has different use cases.
Combo Notation
- N = Normal Attack
- C = Charged Attack
- A = Aimed Shot
- P = Plunging Attack
- E = Elemental Skill
- tE = Tap Skill
- hE = Hold Skill
- Q = Elemental Burst
- D = dash (cancel)
- J = jump (cancel)
- W = walk (cancel)
- > = switch character
- ( ) = these actions are optional; please refer to the notes below
- [ ] = repeat these actions the specified number of times
| 2[N4C] N2C | The recommended combo for beginners due to its forgiving timings. If players feel as though they cannot finish N2C before Raiden’s Burst ends, N1C is a viable replacement. |
| 4[N4D] | Although Dash canceling the N4 requires some practice, this combo has one of the highest damage ceilings in this list and can be performed consistently without Attack SPD buffs. It has high Electro application and is quite good at triggering Xingqiu and Yelan’s Bursts. |
| N4E 2[N4D] N4 | This combo requires some practice to execute; however, incorporating Raiden’s Elemental Skill cast during her combo results in a slight damage increase and not needing to cast it at the start of her next rotation. |
| 3[N4D] N4E | A slightly more forgiving version of the previous combo |
| 3[N3C] N1C | One of the highest damage ceilings in this list, but has slightly tight timings without Attack SPD buffs. This is the most recommended combo if utilizing Attack SPD buffs. |
| N1C spam | Most recommended if using Venti, since Raiden’s Charged Attack will reliably hit enemies within Venti’s Burst. Requires Stamina management. |
On-Field DPS
Artifacts
ER Requirements
| Situation | ER Requirement |
| Solo Electro | 200-220% |
| Double Electro | 130-190% |
Since Raiden’s particle generation is RNG-dependent, it is recommended to build slightly higher ER than necessary. With Engulfing Lightning, building more ER also benefits Raiden’s personal damage.
Raiden can extend her rotations with Fischl’s Oz, allowing for much more lenient ER thresholds.
The value of Electro Resonance highly depends on the second Electro unit. Use the Energy Recharge Calculator to determine exact requirements for your team and rotation.
Artifact Stats
 Sands |  Goblet |  Circlet |
| ATK%, Energy Recharge* or Elemental Mastery** | Electro DMG Bonus or ATK% | CRIT Rate or CRIT DMG |
Substats:
ER (until requirements) > CRIT Rate/DMG > ATK% (= ER*) ≥ EM**
While an ATK% Sands is generally best for Raiden’s personal damage, an ER Sands may be necessary to reach her ER requirements. With Engulfing Lightning, an ER Sands tends to pull ahead.
Teams that provide plenty of ATK buffs prefer an Electro DMG Bonus Goblet whereas teams that provide plenty of DMG% buffs in addition to Raiden’s built-in DMG% buffs (i.e. her Skill and A4) prefer an ATK% Goblet. In most cases, an Electro DMG Bonus Goblet is preferred.
Because Quickbloom Raiden triggers both Aggravate and Hyperbloom, her build will lie somewhere between standard on-field DPS and Hyperbloom trigger. How far her build should lean towards one or the other, however, is highly variable.
In general, if Raiden triggers more Aggravates than Hyperblooms, she should lean more towards the standard Burst DPS build — prioritizing ATK%, DMG%, and CRIT. Conversely, if Raiden triggers more Hyperblooms than Aggravates, she should lean more towards the Hyperbloom trigger build — prioritizing EM.
Use Genshin Optimizer to determine the best Artifacts for your specific team.
*It’s not recommended to purposely build ER beyond Raiden’s ER requirements without Engulfing Lightning, which makes ER substats become about as valuable as ATK%.
**EM is only a useful stat in Quicken or Quickbloom teams. Only if Raiden is triggering a substantial amount of Hyperblooms should EM become a higher priority than CRIT or ATK%.
Artifact Sets
 4pc Emblem of Severed Fate (EoSF) | Undisputed best-in-slot set. Gives everything Raiden wants — ER and an ER-to-Burst-DMG% conversion. Note that it is not worth stacking your ER to maximize the 4pc effect, as it is always better to invest into other offensive stats after reaching the ER requirements. However, if Raiden uses Engulfing Lightning, ER is equal to ATK% until she reaches 270% ER. |
 4pc Marechaussee Hunter (MH) | A situational set that can be used when Raiden is paired with Furina and a healer. It performs roughly equal to 4pc EoSF in those teams. However, as Furina’s HP drain does not affect characters that are in Burst animation, Raiden may fail to trigger the full effect of 4pc MH on her initial Burst hit if she immediately uses her Burst when switched in. |
 4pc Gilded Dreams (GD) | A worthwhile option in Aggravate teams when her ER requirement is low. Generally slightly worse than 4pc EoSF but improves substantially when used with Staff of the Scarlet Sands. |
  4pc Tenacity of the Millelith (TotM) 4pc Scroll of the Hero of Cinder City (Scroll) | Raiden has great uptime on these artifacts’ 4pc set bonuses. However, sacrificing Raiden’s personal damage for the teamwide buffs is often not worth it. |
 2pc mixed sets of ER / ATK% / Electro DMG% / Burst DMG% | Anything other than the above is suboptimal and should only be used as a temporary transition set. The damage difference between 4pc EoSF and everything else is quite large. |
Weapons
 5★ Engulfing Lightning | Raiden’s usual best-in-slot and signature weapon. Converts ER to ATK%, making ATK% less valuable and incentivizing players to build ER past Raiden’s usual ER requirements. CRIT stats are still needed. |
 4★ “The Catch” | A completely free and extremely good weapon available through fishing. Provides Raiden with plentiful amounts of ER and CRIT stats to her Burst. Refinement Rank 5 is worth the pain of fishing. |
 5★ Staff of the Scarlet Sands | Staff of the Scarlet Sands is a very competitive limited 5-star option for Raiden, and situationally it can outperform Engulfing Lightning, especially when EM buffs are present. |
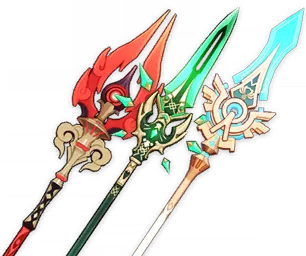 Other 5★ Weapons | Lumidouce Elegy, Staff of Homa, Symphonist of Scents, Primordial Jade Winged-Spear, Skyward Spine, and Calamity Queller*. Generally all good Polearm options, although Raiden may not make the best use of their passives. See the Raiden Extended Guide for more information. *Calamity Queller is a strong ATK% stat stick due to its high base ATK and the absurd amount of ATK% it provides via its secondary stat and passive. In teams with an abundance of ATK buffs, its value is diminished, but otherwise, a noteworthy option. |
 4★ Ballad of the Fjords | Good weapon option that scales well with refinements for Raiden’s Aggravate and Quickbloom playstyles. |
 4★ Wavebreaker’s Fin, 4★ Lithic Spear | Wavebreaker’s Fin and Lithic Spear are both solid options, especially at high refinements. Lithic Spear wants the team to have multiple Liyue characters. |
 4★ Deathmatch | Provides CRIT Rate and ATK%. It is a strong option at R1 and a situational upgrade over the Catch at R5 depending on the team. |
 4★ Favonius Lance | Significantly limits Raiden’s personal damage. Even in Energy-hungry teams, Favonius Lance is rarely an upgrade over the other options. Not recommended. |
Teams
Rotation Notation
- N = Normal Attack
- C = Charged Attack
- A = Aimed Shot
- P = Plunging Attack
- E = Elemental Skill
- tE = Tap Skill
- hE = Hold Skill
- Q = Elemental Burst
- D = dash (cancel)
- J = jump (cancel)
- W = walk (cancel)
- > = switch character
- ( ) = these actions are optional; please refer to the notes below
- [ ] = repeat these actions the specified number of times

A general team formula consisting of Raiden, a healer or other defensive unit, and any synergizing off-field DPS units. Preferably, teammates would have Bursts with high Energy Costs and want to use their Bursts every rotation.
Raiden can be used as a hypercarry in her team. Hyper-Raiden teams tend to focus on Raiden’s personal damage and generally consist of Raiden, a RES shredder, a healer, and a buffer. Kazuha, Xilonen, Chevreuse, Bennett, and C6 Sara are generally the best options.
Other hypercarry characters tend to be Energy-hungry. Pairing them with Raiden helps alleviate these Energy issues, and while she extends rotations, her personal damage can make up for it.
Teambuilding
- Like all characters, Raiden appreciates any form of survivability (e.g. healing or shielding).
- Since Raiden gains infinite interruption resistance during her Burst, shielding is not as necessary for Raiden as it is for other characters.
- Raiden’s attacks during her Burst are considered Elemental Burst damage and hits, but they have Normal and Charged Attack animations.
- This allows her to work with characters such as Yelan, Xingqiu, whose abilities are triggered upon Normal and Charged Attack animations, but limits her synergy with characters such as Beidou and Electro Traveler, who require Normal and Charged Attack hits.
- Raiden can slot into many teams as a general battery, although there are times when she can be replaced with a better battery for a specific Element (e.g. Diona, Fischl, or Bennett).
- See the Raiden Extended Guide for details on rotation management.
Notable Teammates
Electro 
Raiden’s Electro teammates are often either buffers (Sara, Lisa) or damage dealers (Yae, Fischl). They enable Electro Resonance and further decrease the ER requirements of the whole team.
 Yae Miko | Yae Miko benefits from Raiden’s Energy refund and is able to contribute significant personal damage. Additionally, Yae Miko’s 90-Energy Burst cost also helps stack more Resolve points for Raiden’s Burst. |
 Fischl | Fischl also provides strong off-field damage, although with less AoE coverage than Yae Miko. In Aggravate teams, Fischl’s value skyrockets due to her A4 Passive. Fischl should use her Burst every rotation to maximize Raiden’s Resolve stacks. In addition, Fischl significantly lowers Raiden’s ER requirements, which can decrease the value of ER weapons. |
 Kujou Sara | Kujou Sara and Raiden synergize extremely well. Kujou Sara provides powerful buffs in the form of Flat ATK and Electro CRIT DMG (at C6) and is also able to hold Elegy for the End. Her additional particle generation from her Charged Attack can also be situationally useful in case Raiden is not able to fully use her Elemental Burst’s Energy restoration. At C6, Kujou Sara is one of Raiden’s best teammates. |
Ororon | Ororon is a good teammate for Raiden’s EC teams with his decent personal damage, buffing through 4pc Scroll and his C6. Note that Ororon’s A4 Passive does not refund Energy for Raiden during her Burst. |
 Lisa | Lisa’s DEF Shred and ability to hold TTDS, Hakushin Ring, and Wandering Evenstar make her a decent and cheap buffer to build. Alternatively, she can be built for her own personal damage. |
 Kuki Shinobu | Kuki Shinobu offers healing and can hold buffing sets such as 4pc TotM or 4pc Scroll. She is particularly noteworthy in Aggravate teams as her Burst can enable very reliable Electro VV setups. |
 Beidou | Beidou and Burst DPS Raiden do not work well together due to Raiden’s Burst not being able to trigger Beidou’s. However, in Hyperbloom teams where Raiden does not use her Burst, Beidou is able to benefit from Raiden’s DMG% buff and particle generation. Beidou’s Burst procs also do not steal Hyperblooms. |
Anemo 
Anemo characters are notable for their ability to carry 4pc VV, a powerful buffing artifact set, to increase Raiden and her teammates’ damage. They also individually offer other forms of utility in their kit that have a varied range of usefulness.
 Kazuha | Kazuha’s DMG buff, grouping, and ability to hold 4pc Viridescent Venerer (4pc VV) to shred Enemy RES make him one of Raiden’s best Anemo teammates. |
 Sucrose | Sucrose is a viable 4pc VV and TTDS, Hakushin Ring, or Wandering Evenstar holder, with some bonus grouping. Her EM buffs are only valuable for Aggravate, but they are very valuable in such teams. |
 Venti | When content is Venti-able (i.e. multiple light enemies), Venti’s unparalleled grouping, personal damage, Energy refund, and ability to hold 4pc VV all make him very valuable. It is recommended for Raiden to use the “N1C spam” combo in order to best hit enemies within Venti’s Burst. |
 Xianyun Xianyun | Xianyun enables Raiden to use Plunging Attacks while consolidating 4pc VV and teamwide healing. Xianyun’s Additive Base DMG Bonus to Plunging Attacks does not buff Raiden’s Plunging Attacks during her Burst as they are considered Elemental Burst damage. However, as Raiden’s ceiling combos utilize Plunging Attacks but are incredibly difficult to perform consistently, Xianyun makes it much easier to execute these combos. Raiden’s most notable Plunging Attack combos consist of “6[JP]” and “3[N1CJP] N1C.” |


Pyro 
 Bennett | One of Raiden’s best teammates. Being tied to a circle is a small price to pay for Bennett’s valuable healing and massive Flat ATK buff. |
 Chevreuse | Chevreuse’s powerful Pyro and Electro RES% Shred replace the need for an Anemo unit. Her additional ATK% buffs make her Overloaded teams competitive with traditional Raiden Hypercarry teams, and at C6 she buffs Pyro and Electro DMG Bonus. It is generally recommended to use a character that can provide off-field Pyro application to sustain Chevreuse’s RES Shred when pairing Raiden with Chevreuse. |
 Xiangling | Xiangling’s significant off-field damage justifies her placement in Raiden teams. It is recommended to run Xiangling with another Pyro unit, such as Bennett or Chevreuse, since Xiangling faces Energy issues even with Raiden. In Chevreuse Overloaded teams, Xiangling can have a decent amount of Overloaded ownership. This makes building full EM for reaction damage viable on her, especially if she is not receiving strong buffs such as Bennett’s ATK. |
 Pyro Traveler | Pyro Traveler is a free yet effective teammate for Raiden in Chevreuse teams; they have an 80-cost Burst, off-field Pyro application, and buffing through C1 and 4pc Scroll. Additionally, they can have increased usefulness when facing Tenebrous Mimesis enemies, who have wards that are vulnerable to Nightsoul-aligned attacks. |
Mavuika | Mavuika and Raiden have anti-synergy with each other. Mavuika’s Burst damage and DMG% buff are based on her Fighting Spirit, a special kind of Energy that does not count for Raiden’s Resolve stacks. Meanwhile, Raiden’s “Normal Attacks” do not register as valid for Mavuika’s Fighting Spirit stack gaining, leading to less Fighting Spirit stacking that impacts both her damage and buffing. Thus, it is generally not recommended to run both on the same team. Nevertheless, Mavuika is still a decent pick for her large AoE Pyro application from Skill and long-term 4pc Scroll buff. |
 Dehya | Dehya can be used as a quickswap DPS with Raiden, with two of them alternately taking the field to deal damage while the other is on cooldown. Dehya’s high Burst cost benefits Raiden’s Resolve stacks while Dehya’s ER requirements are alleviated with Raiden’s Energy refund. |
Dendro 
Dendro characters are used to enable Quicken and allow Raiden as well as her Electro teammates (e.g. Fischl or Yae) to deal increased damage through Aggravate. Dendro units also help generate Dendro Cores in Quickbloom teams for Raiden to own some Hyperbloom procs.
Nahida | Nahida is an AoE Dendro applier with good personal damage and uptime, as well as a valuable buff for Raiden in Aggravate teams. Nahida’s Dendro application is almost always required to maintain Quicken uptime and allow decent Bloom generation in Quickbloom teams. However, Nahida requires you to swap into her to reapply her Skill on new enemy waves, so other Dendro units such as Dendro Traveler, Baizhu, or Collei can be preferred in multi-wave content. |
 Emilie | A strong off-field Dendro damage dealer that requires Burning uptime to maximize her damage, often requiring strong sources of off-field Pyro application. This means Raiden and Emilie run together in a Quickburn team where Quicken is still maintained for Aggravate and Spread damage. Unlike in Emilie’s traditional builds, she wants to build sufficient Energy to Burst every rotation to generate Resolve, although Raiden’s Energy refund does help her with this. |
 Alhaitham | On-field Raiden uses mostly off-field Dendro units in her teams. However, Alhaitham can act as a quickswap DPS that benefits from Raiden’s long-lasting Electro application (from her Skill) and Energy refund (from her Burst) on a Dual-Carry Quicken team. |


Hydro 
 Furina | At the cost of forcing you to use a healer, Furina’s incredible DMG% buff, significant personal damage, and useful off-field Hydro application make her a powerful option in Raiden teams. While her application may not be at the level of Xingqiu or Yelan’s, it is still worthy of consideration in Overvape teams with Xiangling, and ideal in Quickbloom teams, where lower Hydro application is necessary for higher quicken uptime. In addition, Furina’s HP drain can allow Raiden to use the 4pc MH set, a worthy alternative (with caveats) to 4pc EoSF. |
  Xingqiu, Yelan | Xingqiu and Yelan’s significant personal damage and off-field Hydro application make them great teammates, although slightly limited to single-target situations. Raiden is also able to decrease both of their ER needs. |
  Mona, Kokomi | Support teammates that can hold supportive weapons such as TTDS / Hakushin Ring and artifact sets such as 4pc TotM / 4pc Scroll. Mona offers further buffs through her Burst’s strong albeit brief Omen, while Kokomi provides off-field healing with her Skill. |
 Sigewinne | Sigewinne trades Kokomi’s TTDS or Hakushin Ring for stronger teamwide off-field healing and a Skill damage buff to off-field teammates, most notably Furina. |
Geo 
Xilonen | Xilonen offers a long-lasting Elemental RES% Shred through her Elemental Skill and holds 4pc Scroll of the Hero of Cinder City to further buff Raiden’s personal damage. Her RES Shred works in multi-wave scenarios, making her a powerful alternative to Anemo units and Chevreuse. |
 Zhongli | Zhongli provides strong defensive utility in the form of his shield. While Raiden cannot be interrupted during her Burst, a shield can still be welcomed in some scenarios. However, in order to generate Resolve stacks for Raiden, Zhongli should aim to Burst every rotation; this, paired with its lengthy animation and his weak offensive buffs, makes him a poor option. |
 Navia | Navia is a damage dealer who can be played in a quickswap team with Raiden. Raiden offers high-uptime Electro application for Crystallize and reduces Navia’s ER requirements. Meanwhile, Navia’s front-loaded damage via her Elemental Skills helps the team reach damage breakpoints easily. |
  Chiori, Albedo | These two Geo units can be played with another Geo unit (or with each other) to enable Geo Resonance while dealing solid off-field damage by themselves. Raiden’s Energy refund makes meeting their ER requirements easier. |
Cryo 
 Eula | Raiden’s Skill provides a Burst DMG buff and off-field Electro application to shred Physical RES through Superconduct. Using Raiden’s Burst extends rotations, but its Energy refund is highly valuable for Eula. |
 Freminet | Raiden’s Skill provides long-lasting off-field Electro application to shred Physical RES through Superconduct. Raiden’s Burst helps Freminet’s ER needs, but his chunk of damage is not entirely reliant on his own Burst, contrary to Eula. |
Example Teams
This is not a comprehensive list of teams. The inclusion or exclusion of any given team does not necessarily reflect its power level.
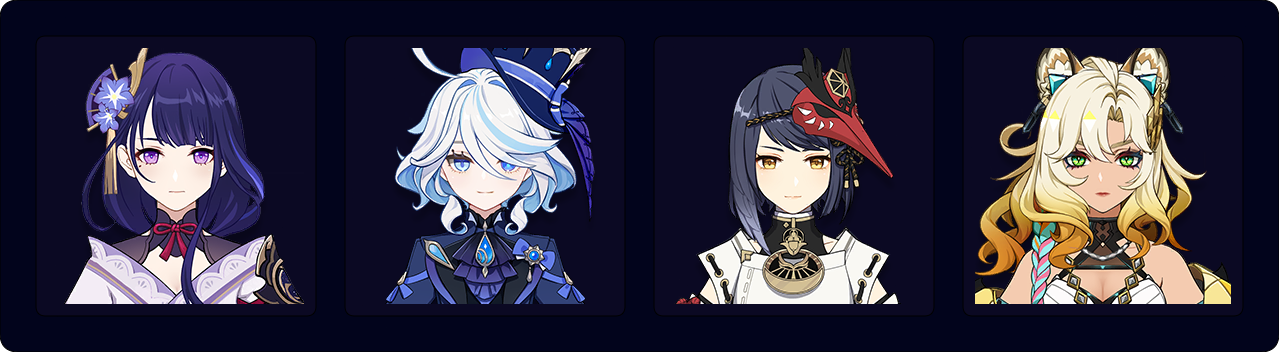
Xiangling Vaporizes her Skill and Burst damage from off-field, and triggers some Overloads. Xingqiu enables Xiangling to Vape through his Hydro application and deals significant personal damage. Bennett buffs both Xiangling and Raiden, heals, and batteries Xiangling. Raiden batteries her team, buffs their Burst damage, provides a source of Electro aura for Xiangling, and deals her own damage on-field.
Sample Rotation
(Raiden E)¹ > Xingqiu EDQ N1 > Bennett Q N1 E > Xiangling N1 Q N1 ED > Bennett E N1 > Raiden Q combo E > Bennett E > (Xiangling)²
¹First rotation only
²Xiangling can catch Bennett’s particles
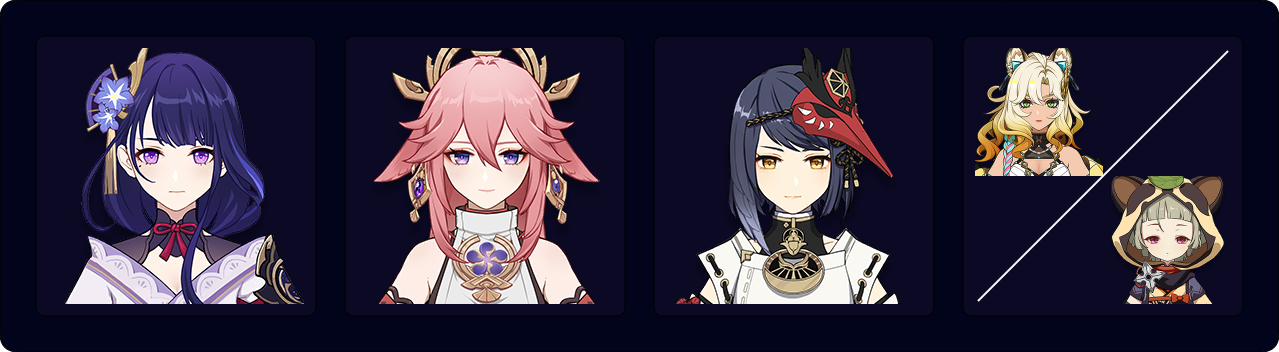
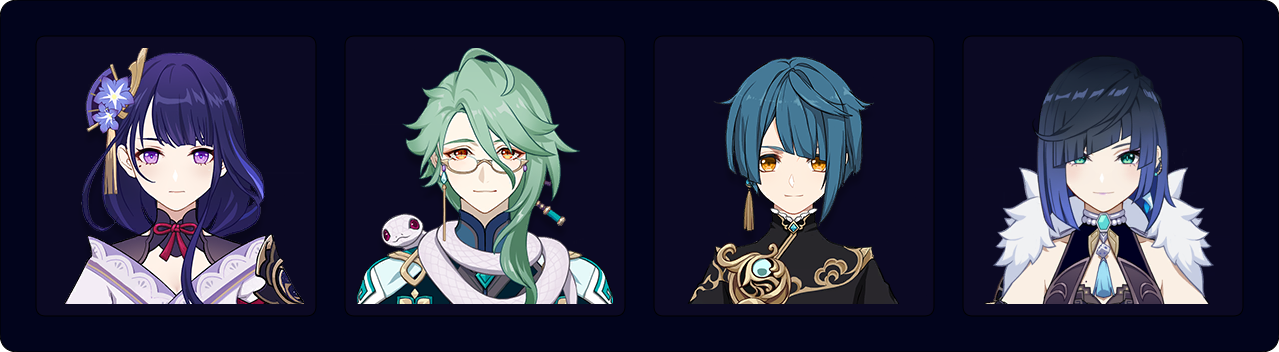
Yae deals strong Burst and off-field Skill damage, and serves as a second source of Electro particles for Raiden and Sara. Sara provides an ATK and Electro CRIT DMG buff (at C6) for Yae’s Burst and for Raiden, as well as her own potent Burst damage. Sayu provides 4pc VV and healing, while Xilonen heals the active character and provides the full 4pc Scroll set buff. Both Electro teammates have high Burst costs, with Yae tied with Raiden for the highest cost in the game, generating a substantial amount of Resolve stacks for Raiden. Yae and Sara also benefit nicely from Raiden’s Burst DMG% buff.
Sample Rotation (Xilonen)
(Raiden E)¹ > Xilonen EQ N2 > Yae 3[E] > Sara E² Q > Yae Q 3[E] > Xilonen E N2 > Sara C > Raiden Q combo E
¹First rotation only
²Use a Normal Attack or slightly delay your Burst to allow Sara to buff herself here
Sample Rotation (Sayu)
(Raiden E)¹ > Yae 3[E] > Sayu shEQ > Sara E² Q > Yae Q 3[E] > Sayu shE > Sara C > Raiden Q combo E
¹First rotation only
²Use a Normal Attack or slightly delay your Burst to allow Sara to buff herself here
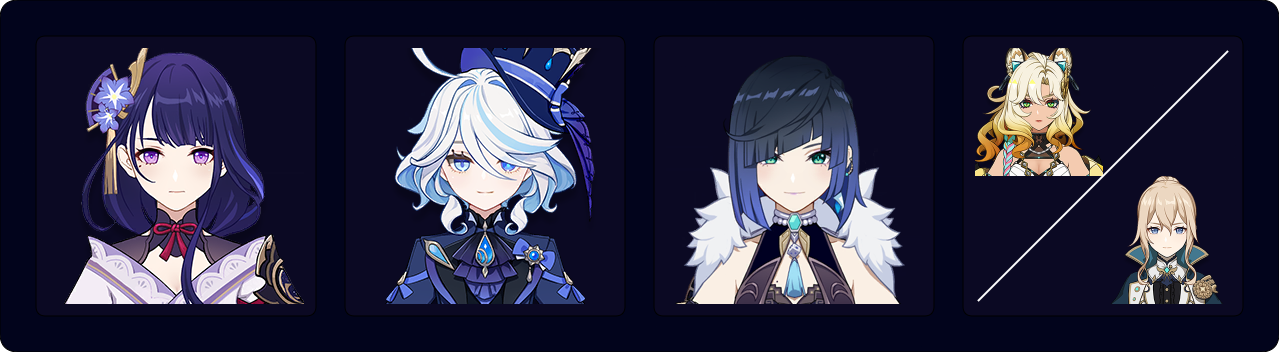
Raiden receives multiple DMG% buffs from Furina and Yelan, while triggering Exquisite Throw procs through her Normal Attacks. The Double Hydro core can function with minimal ER requirements thanks to Raiden’s Energy refund. An Anemo healer or Xilonen can provide further buffs through their RES Shred, while sustaining Fanfare generation through their healing.
Sample Rotation (Xilonen)
(Raiden E)¹ > Xilonen E N2 Q > Furina ED Q > Yelan Q N1 > Xilonen E N2 > Yelan E N1 > Raiden Q combo E > Yelan E
¹First rotation only
Sample Rotation (Jean)
(Raiden E)¹ > Furina ED Q > Jean Q > Yelan Q N1 E N1 > Jean E N1 > Raiden Q combo E > Yelan E N1 > Jean E N1
¹First rotation only
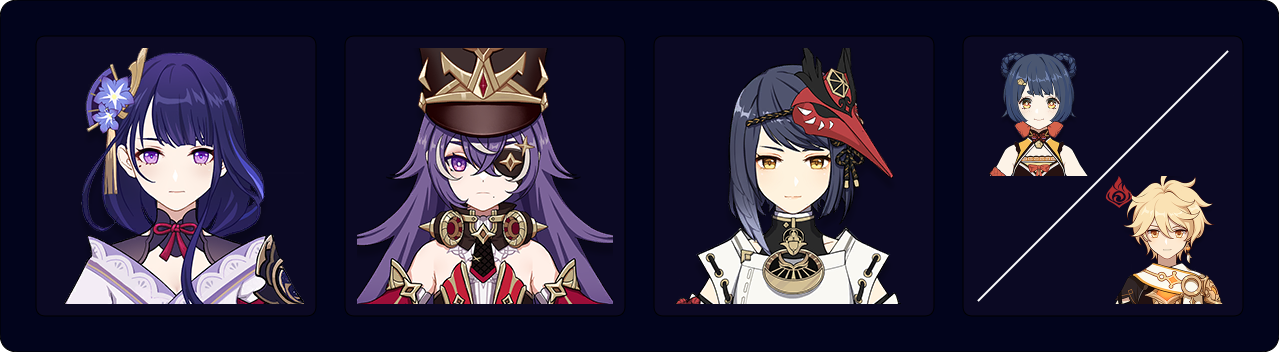
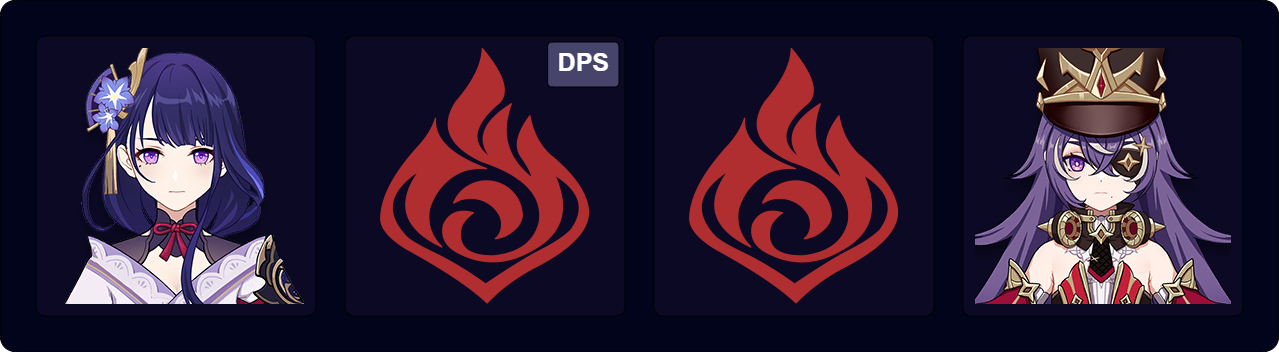
Chevreuse provides Raiden with a powerful 40% Electro RES Shred (same amount as Swirling Electro with a VV holder), ATK%, and at C6, Electro DMG% buffs, all on top of consistent heals. However, Chevreuse’s A1 Passive needs Overloaded to be triggered at least once every 6s to maintain her RES Shred, incentivizing the use of an off-field Pyro applier. Overloaded can knock back smaller enemies, so using Anemo groupers (such as Kazuha) instead can be preferred in certain scenarios. Nonetheless, this team excels in multi-wave fights where 4pc VV’s RES Shred cannot be reapplied without ending Raiden’s field time early, as well as versus high-HP enemies that cannot be displaced by Overloaded, which allows this team to take advantage of its strong sustained damage.
Sample Rotation (Xiangling)
(Raiden E)¹ > Chevreuse Q hE > (Xiangling N2)² > Sara E³ Q > Xiangling Q E > Sara C > Raiden Q combo E
¹First rotation only
²To catch Chevreuse’s particles; skip this if Xiangling has full Energy
³Use a Normal Attack or slightly delay your Burst to allow Sara to buff herself here
Sample Rotation (Pyro Traveler)
(Raiden E)¹ > Chevreuse Q 3[hE]² > Sara E³ Q > Pyro Traveler tEQ N1 > Sara C > Raiden Q combo E
¹First rotation only
²If Chevreuse is not C4, do only 1 Hold Skill and fill the rotation downtime with Normal Attacks
³Use a Normal Attack or slightly delay your Burst to allow Sara to buff herself here

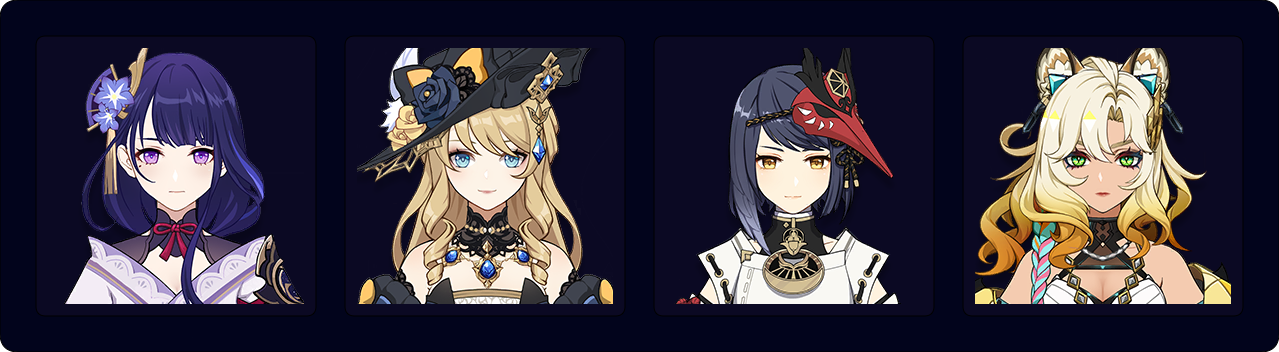
A classic hypercarry team with Sara, Bennett, and an Electro RES shredder. Kazuha is one of the best choices because of 4pc VV, his A4 Electro DMG% buff to both Sara and Raiden, and notable personal damage via his Pyro-absorbed Burst. Chevreuse is a strong alternative to Kazuha, as she activates Pyro Resonance, shreds enemy Electro RES, and provides ATK% and Electro DMG Bonus (at C6). Even though her RES Shred debuff’s duration is shorter than 4pc VV (in a team without off-field Pyro application), C6 Chevreuse can still surpass Kazuha in buffing Raiden.
Sample Rotation (Kazuha)
(Raiden E)¹ > Kazuha hEP > Sara E C > Bennett Q > Kazuha Q > Sara Q > Raiden Q combo E > Bennett E
¹First rotation only
Sample Rotation (Chevreuse)
(Raiden E)¹ > Sara E C > Bennett Q > Chevreuse Q 3[hE]² > Sara Q > Raiden Q combo E > Bennett E > (Chevreuse N3)³
¹First rotation only
²If Chevreuse is not C4, do hE Q
³Chevreuse can catch Bennett’s particles
A Raiden–Furina team that is more centered around Raiden’s personal damage rather than the Hydro teammates’ personal damage.
Sample Rotation
(Raiden E)¹ > Xilonen E N2 Q > Furina ED Q > Sara E C > Xilonen E N2 > Sara Q > Raiden Q combo E
¹First rotation only

Fischl and Raiden synergize nicely in Aggravate teams, as Fischl’s A4 Passive is triggered often, contributing a sizable portion of damage. Yaoyao provides Dendro application for Aggravate uptime, sustain through healing, and the potential to hold supportive sets such as 4pc Scroll or TotM. Sucrose brings RES Shred via 4pc VV and buffs the team with her EM share and Hakushin Ring, and she can perform better than Kazuha in this team in single-target scenarios.
Sample Rotation (Yaoyao)
(Raiden E)¹ > Sucrose ED > Yaoyao Q N1 E N1 > Fischl N2 Q > Sucrose (ED) Q N2 > Raiden Q combo E > (Fischl E)²
¹First rotation only
²Every other rotation

An Aggravate variant that performs well in multi-target fights thanks to Nahida, Shinobu, and Kazuha’s large AoE attacks. Shinobu’s rapid application from her Burst can easily override Nahida’s strong Dendro application, establishing Electro aura for easier VV setup.
Sample Rotation
(Raiden E)¹ > Nahida E Q > Shinobu E N1 Q > Kazuha tEP Q > Raiden Q combo E > Kazuha tEP
¹First rotation only

Raiden can be played in a Quickbloom team where Quicken uptime and Dendro Core generation are maintained to allow for both decent Aggravate and Hyperbloom damage. A slower Hydro applier that can also give strong buffs like Furina is well-suited for the team. Baizhu supplements Nahida’s Dendro application (especially in multi-wave content), provides decent Aggravate and Hyperbloom buffs, and helps Furina stack Fanfare with his strong healing.
Sample Rotation
(Raiden E)¹ > Nahida E Q N1 > Furina ED Q > Baizhu N2 Q E > Raiden Q combo E > Baizhu E N3
¹First rotation only

Raiden can act as both a Superconduct enabler and a battery for Eula. Furina is a good off-field damage dealer and a good buffer for both Eula and Raiden in this team, and Superconduct can still be triggered even with Hydro on the team, as applying Cryo to an enemy affected by Electro-Charged will still trigger it. Mika fits nicely in the last slot as healer for Furina and damage buffer for Eula.
Sample Rotation
(Raiden E)¹ > Furina ED Q > Mika Q E N2 > Eula tE Q N4 hE² N4D N2 > Raiden Q combo E Raiden
¹First rotation only
²Slightly delay Eula’s next Normal Attack to account for her Burst’s stack-gaining cooldown
A Raiden team that uses Navia’s short field time and quickswap playstyle to deal damage. Raiden serves as a damage dealer and off-field Electro applier to enable Crystallize, while Xilonen and Sara provide their respective buffs to both Raiden and Navia.
Sample Rotation
(Raiden E > Navia E)¹ > Navia Q > Xilonen Q E N2 > Sara E Q > Navia hE N3 hE > Sara C > Raiden Q combo E
¹First rotation only. Start with Navia Q from second rotation onwards
Hyperbloom / Overloaded Trigger
Artifacts
Artifact Stats
Sands | Goblet | Circlet |
| Elemental Mastery | Elemental Mastery | Elemental Mastery |
Substats:
EM
It is best to maximize Raiden’s EM, since that is the only stat that affects her Transformative Reaction (i.e. Hyperbloom and Overloaded) damage. Stats such as CRIT, ATK%, and ER are not relevant if playing Raiden solely as an off-field Hyperbloom / Overloaded trigger.
Artifact Sets
 4pc Flower of Paradise Lost (FoPL) | While this set technically yields the highest Hyperbloom damage, it runs in the same domain as the Desert Pavilion Chronicle set, making it generally Resin-inefficient and not recommended to farm directly. Strongboxing this set is recommended otherwise. |
4pc Gilded Dreams (GD) | Increases Raiden’s EM with both the 2-piece and 4-piece set effects. Gilded Dreams also runs in the same domain as Deepwood Memories (see below), making it very Resin-efficient. |
 2pc EM + 2pc EM | Completely viable, but will perform worse than 4pc GD or 4pc FoPL. It can work as a temporary transition set. |
 4pc Deepwood Memories (DW) | A vital set for Hyperbloom teams due to the 4pc set effect reducing Dendro RES. In the rare cases where no other teammates are able to hold 4pc DW, it is viable on Raiden. |
4pc Tenacity of the Millelith (TotM), 4pc Scroll of the Hero of Cinder City (Scroll) | Raiden can sacrifice some of her reaction damage for a 20% ATK or 12% DMG Bonus buff to her teammates. This is usually relevant for Chevreuse Overloaded teams. |
Weapons
 4★ Dragon’s Bane | Out of the available polearms with EM secondary stats, Dragon’s Bane provides the most and is quite accessible through all banners. Refinements are not necessary. |
 4★ Moonpiercer | A solid F2P choice with its EM secondary stat and the ATK% buff it can give to a single teammate. |
 4★ Kitain Cross Spear | Another viable F2P option. Provides the same amount of EM as Moonpiercer but has a passive that regenerates Energy for Raiden. Can be helpful if using Raiden’s Burst, although this is generally not the focus of her Hyperbloom teams. |
4★ Ballad of the Fjords | At R5, Ballad of the Fjords technically provides more EM than Dragon’s Bane. However, it is not recommended to buy the Battle Pass multiple times exclusively for this reason since +19 EM is a relatively insignificant gain. |
4★ Favonius Lance | While Favonius Lance suffers from its lack of EM, its Energy-generating passive can be helpful. Raiden may need to build some CRIT Rate. |
Teams
Rotation Notation
- N = Normal Attack
- C = Charged Attack
- A = Aimed Shot
- P = Plunging Attack
- E = Elemental Skill
- tE = Tap Skill
- hE = Hold Skill
- Q = Elemental Burst
- D = dash (cancel)
- J = jump (cancel)
- W = walk (cancel)
- > = switch character
- ( ) = these actions are optional; please refer to the notes below
- [ ] = repeat these actions the specified number of times

Raiden can be used as an off-field Hyperbloom or Overloaded trigger with her consistent, high-uptime Electro application. In these teams she forgoes building ER, ATK%, DMG Bonus, and CRIT stats to focus on maximizing her reaction damage by stacking EM. She also does not use her Burst for the most part, yielding the field for other characters to deal damage or to apply Elements.
Because of how ICD works, Raiden shines more as a Hyperbloom trigger than an Overloaded one: she can trigger Hyperbloom as fast as every 0.9s, while her Elemental Skill can only trigger Overloaded as fast as every 2.7s to a single enemy. Still, Raiden is a low-effort yet effective off-field Electro unit for Chevreuse teams.
Teambuilding
- For Hyperbloom teams, teammates with fast Dendro and Hydro application increase Dendro Core generation and so benefit the most from Raiden’s fast hit rate.
- Raiden usually only casts her Skill once and then stays off-field for the rest of the rotation. She can use her Burst to refund some Energy to her teammates or to tank damage in an emergency, but this is rarely a DPS gain in these teams.
Notable Teammates
Dendro
Dendro units enable Hyperbloom with their application. Some provide further utility such as buffing, healing, or shielding. Some deal good personal damage (e.g. Alhaitham and Tighnari), especially in a team with higher Quicken uptime.
To maximize Hyperbloom reactions, players may opt for two Dendro units who have slow Elemental application on their own.
 Nahida | Nahida’s unmatched AoE and uptime on her off-field Dendro application make her the premium Dendro applier for Hyperbloom teams. Her Skill application is one of the best in the game, ensuring fast Dendro Core production to pair with Raiden’s fast trigger rate. Nahida can take the field to be the driver / enabler using her Normal and Charged Attacks. This allows for even greater Dendro application and maximized Core production with an off-field Double Hydro core. Alternatively, she can stay off-field and provide the on-fielder with the EM share from her A1 Passive. While Hyperbloom does not snapshot EM and Raiden is usually not on the field, Nahida’s buff is still appreciated by other on-field characters, such as Alhaitham or Tighnari. Nahida’s damage is decent and worth investing in regardless of her playstyles in Hyperbloom teams. |
 Baizhu | Baizhu provides less Dendro (both in its AoE and frequency) and often less buffing than Nahida as an enabler and support. However, he fulfills the sustain role with his teamwide Skill healing and intermittent Burst healing, which makes him a good healer for Furina. Baizhu can do both off-field and on-field playstyles like Nahida. |
 Alhaitham, Tighnari | On-field damage dealers that benefit from the Quicken state co-triggered by Raiden’s Electro application. Both units prefer a slow Hydro applier (such as Furina) in their team to maintain greater Quicken uptime. This comes at the cost of fewer Hyperbloom instances for Raiden. |


Hydro
Together with Dendro units, Hydro characters are used to create Dendro Cores for Hyperbloom. Up to two Hydro characters are desired, with a strong Dendro applier to maximize Core production.
Aside from the application, Hydro units tend to deal respectable personal damage and can also provide some buffing or sustain.


Pyro
Raiden can utilize the application from a Pyro unit to trigger Overloaded from off-field. This is mostly relevant in Chevreuse teams, where constant Overloaded procs are required to keep her RES Shred uptime.
Chevreuse | Chevreuse is the bread-and-butter teambuilding piece for Overloaded teams, providing RES Shred, ATK%, and (at C6) DMG Bonus. Raiden’s Overloaded damage is increased by Chevreuse’s Pyro RES Shred, and in return, Raiden maintains said RES Shred debuff throughout the rotation for the team. |
Bennett | One of Raiden’s best teammates. Being tied to a circle is a small price to pay for Bennett’s valuable healing and massive Flat ATK buff. |


Electro
Off-field Electro damage dealers that do not steal many Dendro Cores from Raiden can be used to supplement Hyperbloom teams with their personal damage and increase Quicken uptime for more Aggravate and Spread damage. For Overloaded, a second Electro unit oftentimes shifts the Overloaded ownership towards the Pyro DPS character, making Raiden’s presence in the team obsolete.

Flex Options
Other characters with various forms of utility can be used as flex options for a Hyperbloom team as long as they do not mess with the Bloom and Hyperbloom reactions. These characters can deal damage and provide additional healing / shields, buffing, or crowd control.
Healers |  Shielders | Anemo Groupers |
Example Teams
This is not a comprehensive list of teams. The inclusion or exclusion of any given team does not necessarily reflect its power level.
Here Baizhu is a comfy on-field Dendro enabler with his Skill’s partywide healing and on-demand application from Normal and Charged Attacks. Yelan and Xingqiu deal off-field Burst damage and apply overwhelming amounts of Hydro to enemies while also reducing each others’ ER requirements. They also benefit from Raiden’s Burst DMG Bonus buff.
Sample Rotation
Baizhu N1 EQ N1 > Xingqiu Q N2 > Raiden E N1 > Yelan E N1 Q N1 > Baizhu N2D N2 E N2D > Xingqiu N1 ED N2 > Baizhu N2D > Yelan N2 E N1 > Baizhu N2D N4D

A variant of Quickbloom where Beidou provides additional team utility and off-field Electro damage, and rarely triggers Hyperbloom. Kokomi provides strong heals and considerable Talent and Ocean-Hued Clam damage, and her slower Hydro application allows for both Aggravate and Spread to trigger.
Sample Rotation
Kokomi E N1 > Raiden N1 E > Nahida N1 E N2 Q > Beidou EQ > Kokomi N1 Q combo > Beidou E (N2)
This Quickbloom team utilizes Raiden’s off-field Electro application to trigger Quicken and Hyperbloom, increasing Alhaitham’s damage and providing strong off-field damage. Yaoyao / Kirara activates Dendro Resonance, helps with Alhaitham’s ER needs, provides decent defensive utility, and holds the 4pc Deepwood set for Dendro RES Shred, benefiting Raiden and Alhaitham the most.
Sample Rotation (Yaoyao)
Yaoyao E > Xingqiu EDQ N1 > Alhaitham Q N1 > Raiden E N1¹ > Alhaitham 2[N3D] N1E N3D N3C 3[N3D] N3
¹Use Raiden E before Alhaitham Q if the circumstances do not allow for a Burst quickswap
Sample Rotation (Kirara)
(Raiden E)¹ > Kirara tEQ > Xingqiu EDQ N1 > Alhaitham hEP N2C N3C > Kirara N1 tE N1 > Alhaitham Q N1 > Raiden E N1² > Alhaitham 2[N3D] N2C N3D N2
¹First rotation only
²Use Raiden E before Alhaitham Q if the circumstances do not allow for a Burst quickswap

Raiden’s slow but periodic application in Overloaded makes her a good off-field Electro unit for a Lyney team with Chevreuse.
Raiden’s best set for team DPS is 4pc TotM, with 4pc Scroll and 4pc NO on Bennett and Chevreuse, in either order. The rotation below assumes Bennett uses 4pc Scroll. If Chevreuse carries the set, put her before Bennett instead to trigger Overloaded from the Electro aura applied by Raiden.
Sample Rotation
Raiden E N1 > Bennett EQ > Chevreuse hE Q > Lyney 2[C] QE¹/C² C E C
¹Cancel Lyney’s Burst with his Skill after colliding with enemies
²Use an additional Charged Shot if his Burst is unavailable
Credits
chasing_haze, jamberry, cuzimori, casdela, nikatosaurus, Leah, grankrathalos, idkanonymized, nociii, irokei, alehannita, nebbles_, staryy, enigwa, itsjaeyou, rezmir, baloopy, pjeljr, acerbus114, lostguide, auraolis
Team images made with the KQM portrait generator.