Updated for Version 5.5
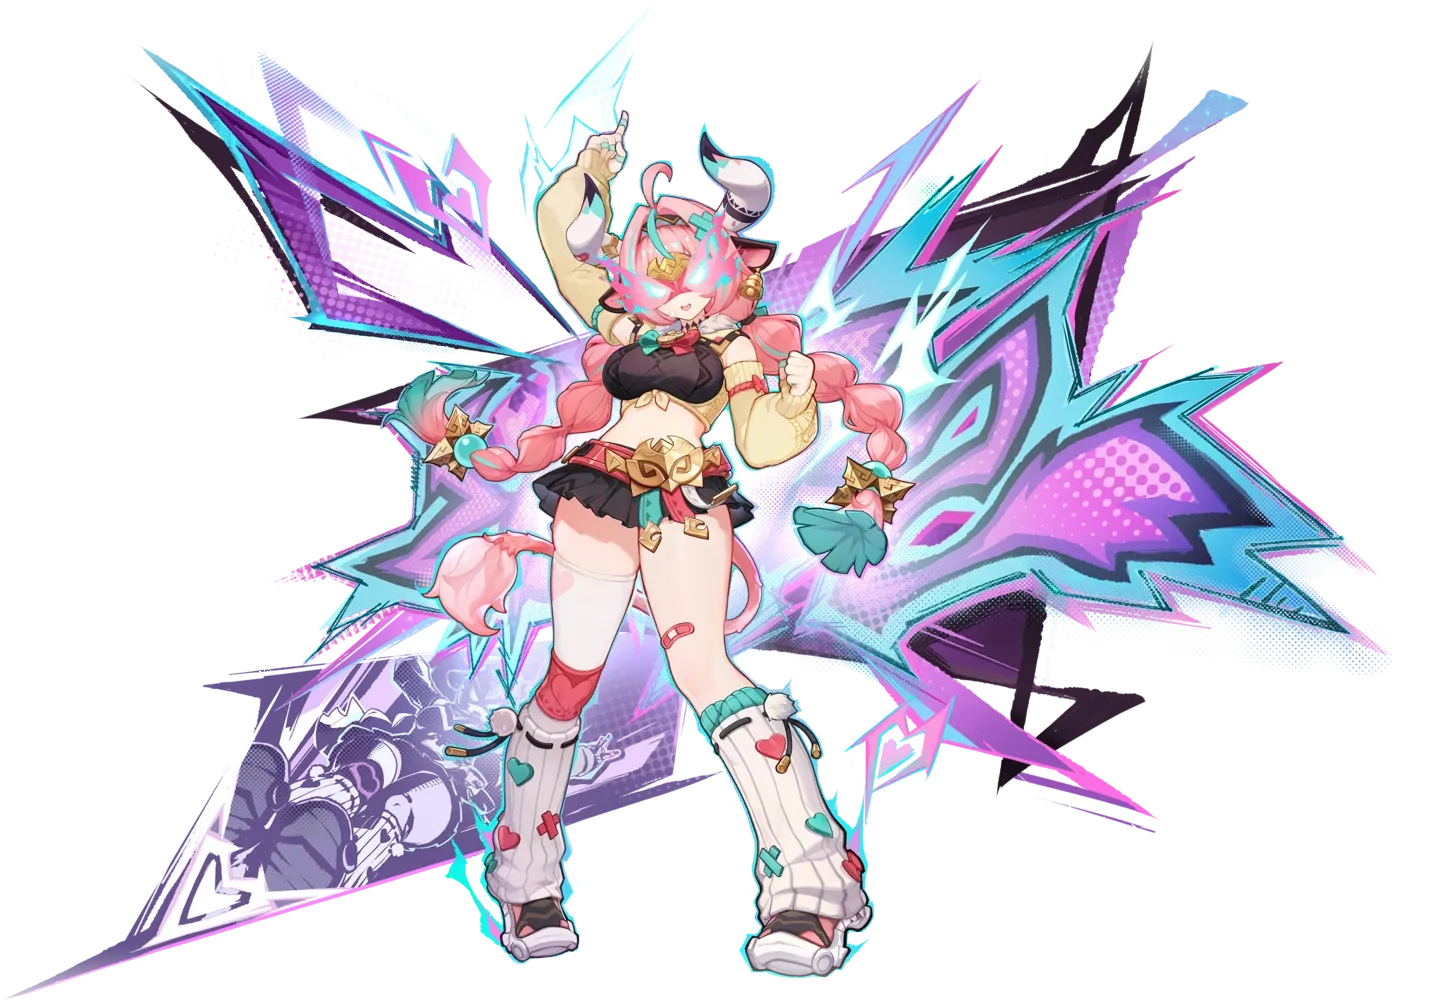
Varesa is a 5★ Electro Catalyst character in Genshin Impact who explosively dispatches enemies with her hard hitting Plunge Attacks and Burst. Varesa boasts rotational flexibility and adaptable combos alongside a unique dual Burst mechanic. Learn about Varesa’s best builds, best weapons, best artifacts, and best teams in this quick guide.
Note that the information given may change if new discoveries are made. More extensive testing is in progress.
Join our Discord to check on and participate in the theorycrafting process.
Table of Contents
Infographic
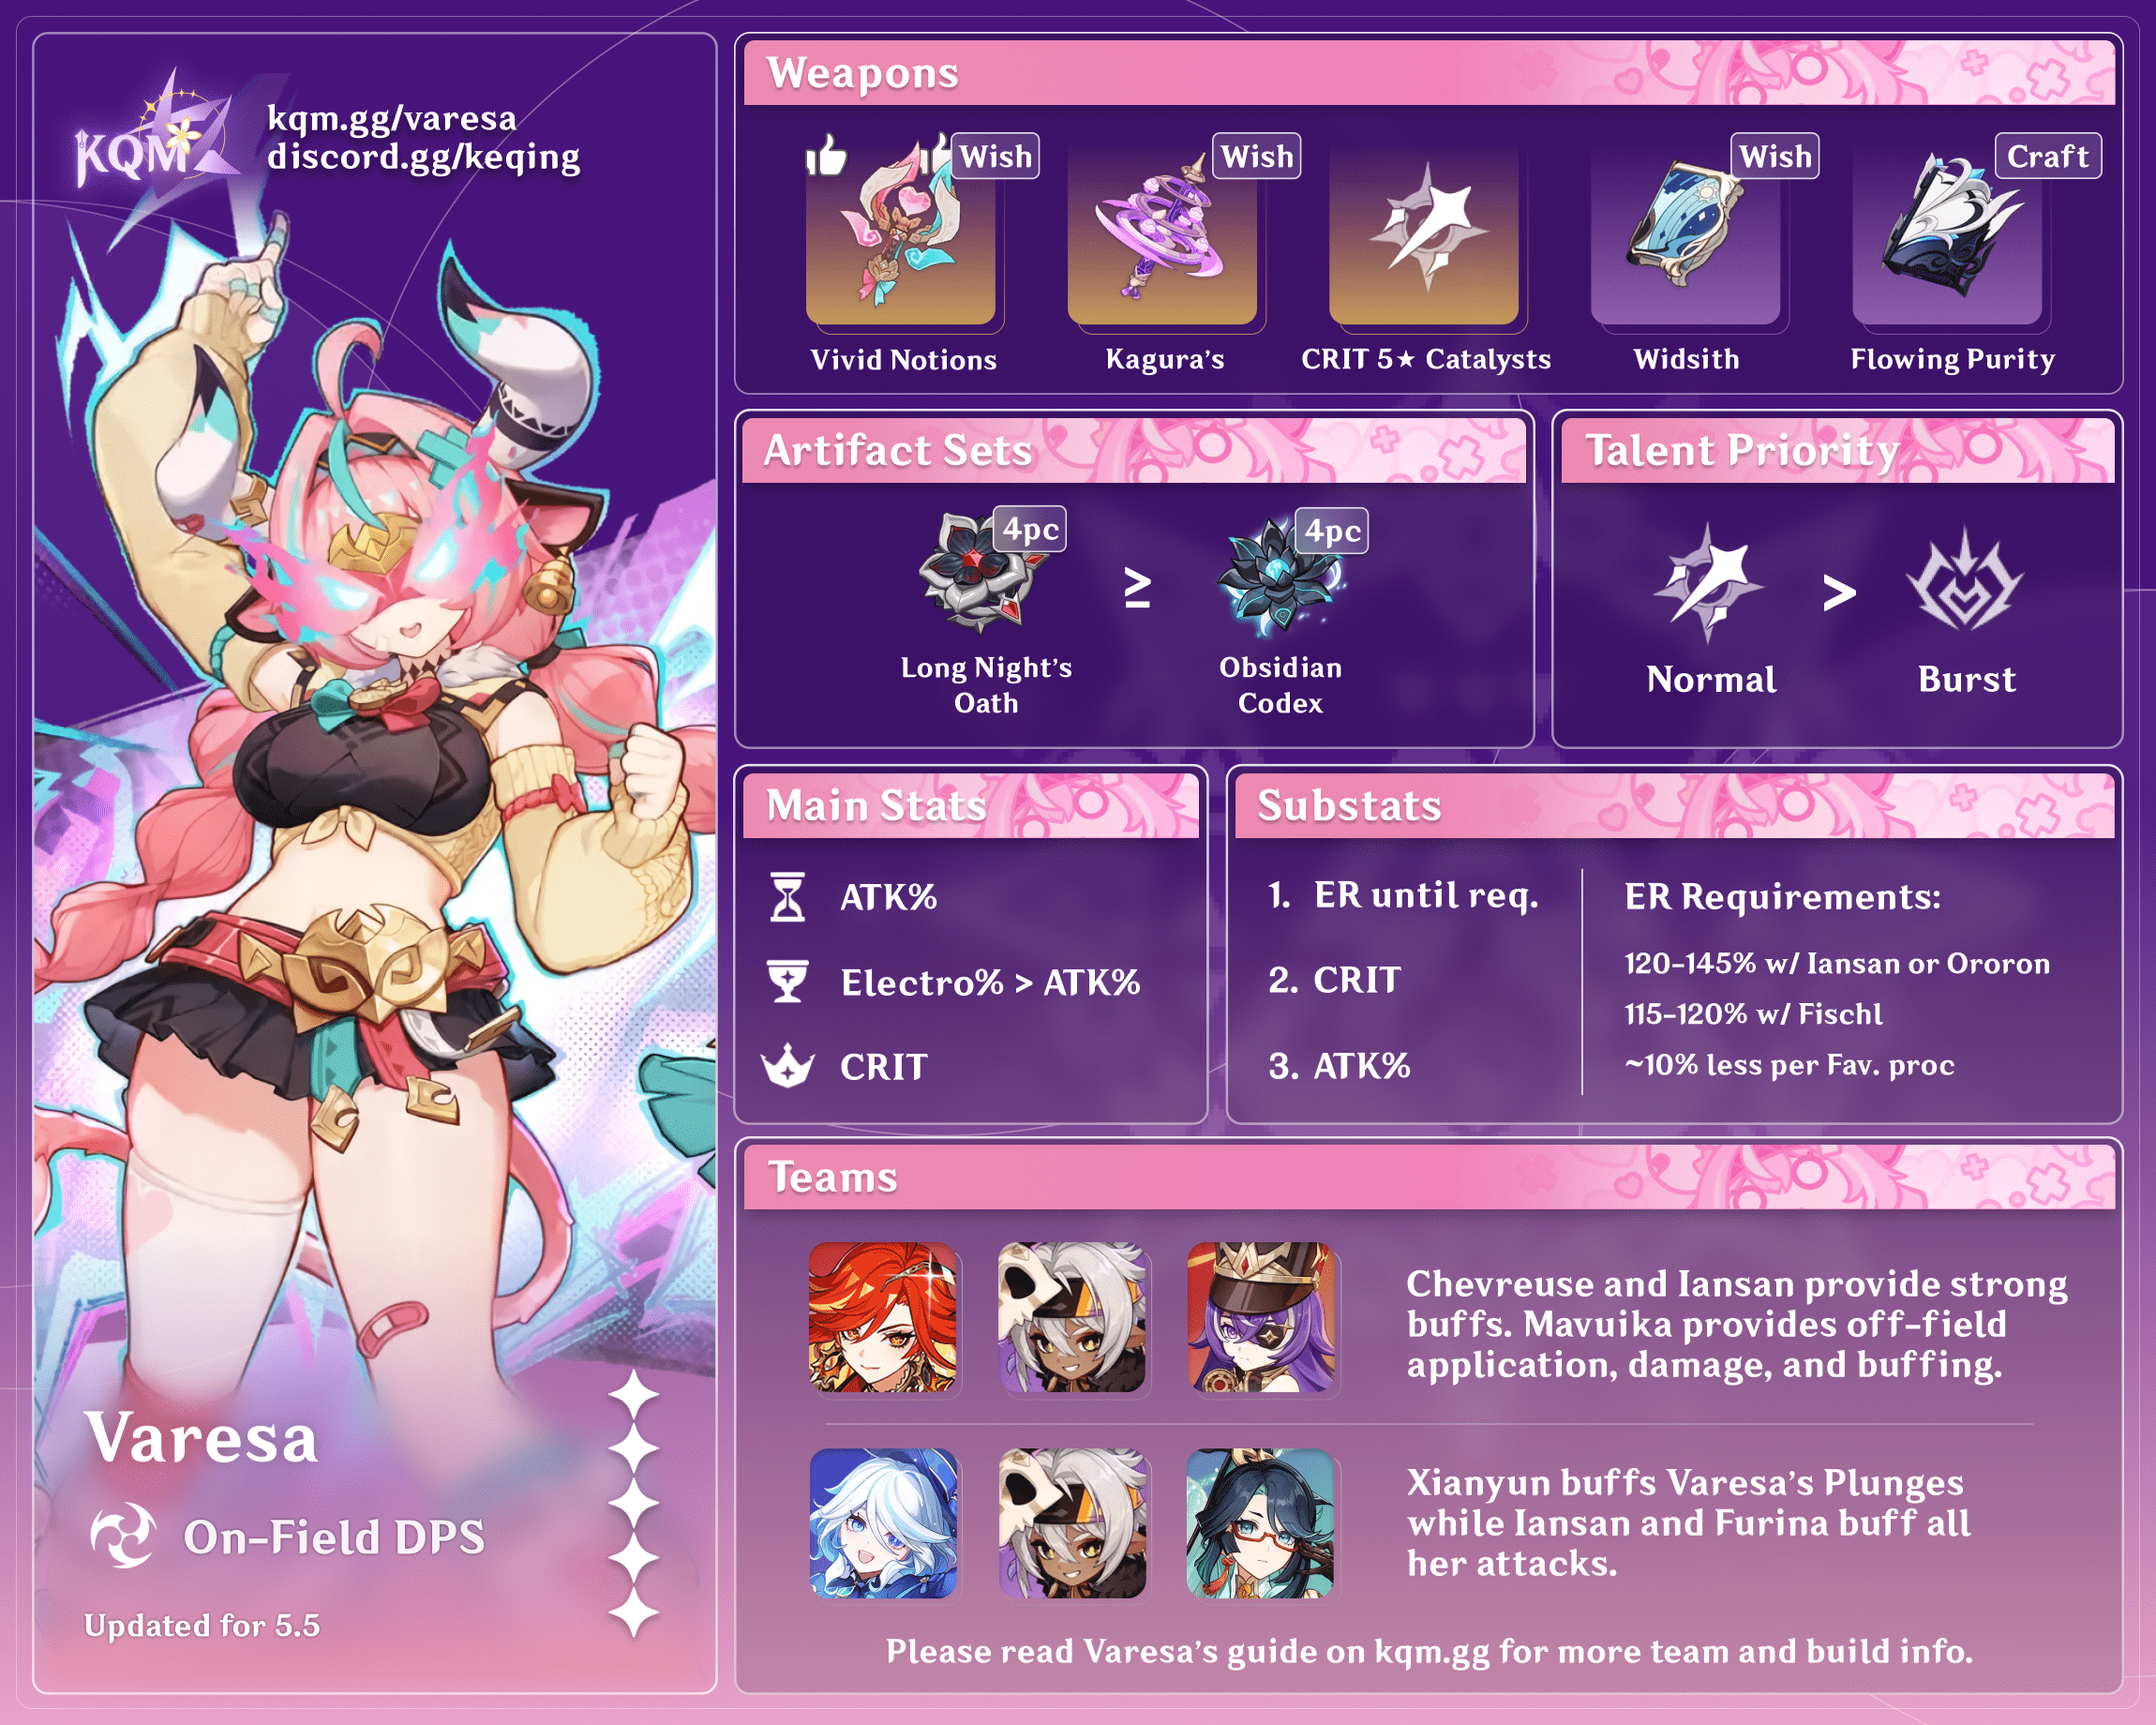
Credits to: cegewinne, Sew, and KQM TC Staff
Character Overview
Pros
- Versatile combos and a fast-paced playstyle
- Great rotation flexibility; can easily adapt to new waves and changing situations during combat
- Huge AoE on her Plunging Attacks
Cons
- Lacks access to Amplifying reactions like Melt/Vaporize, and ICD limits how much she benefits from Aggravate
- Picky with teammates: DPS falls off notably without her best-in-slot options, most of which are limited 5-stars
- Large performance gap between her signature weapon and available alternatives
Playstyles
On-Field DPS
Varesa uses her Charged Attack to execute Plunging Attacks, while also weaving in spikes of damage from her unique Elemental Burst “Guardian Vent: Volcano Kablam.”
Talents
Level and Talent Priority
NA > Burst > Character Level > Skill
Talent Overview
 Normal Attack | By The Horns
Talent Description
Normal Attack
Gotta try… to do battle like the greatest champion luchadors do! Varesa launches up to 3 strikes, dealing Electro DMG.
Charged Attack
Consumes a certain amount of Stamina to headbutt opponents in front, dealing Nightsoul-aligned Electro DMG and using the momentum to leap into the air.
Plunging Attack
Plunges from mid-air to strike the ground below, damaging opponents along the path and dealing Nightsoul-aligned AoE Electro DMG upon impact. If Varesa is in a combat state upon landing, or if the shockwave from her plunging attack hits an opponent, she will gain 25 Nightsoul points. She enters the Fiery Passion state upon reaching maximum Nightsoul points through this method.
Fiery Passion
In this state, Varesa’s Normal, Charged, and Plunging Attacks will gain corresponding buffs:
Normal Attack
Fight like a superstar champion luchador! Launches up to 3 fierce strikes, dealing greater Electro DMG.
Charged Attack
Consumes a certain amount of Stamina to slam into her opponents, dealing greater amounts of Nightsoul-aligned Electro DMG and using the momentum to leap into the air.
Plunging Attack
Consumes all her Nightsoul points and slams down on the ground from mid-air, dealing DMG to opponents in her path and dealing greater amounts of Nightsoul-aligned AoE Electro DMG upon hitting the ground.
Varesa’s main source of damage is her Plunging Attack. Her Charged Attack propels her up to execute a Plunge afterwards. Her Plunging Attack will also restore 25 Nightsoul points. When her Nightsoul points reach 40, she will enter the Fiery Passion state the next time she uses a Plunge (if she reaches 40 Nightsoul Points through her Plunge attack, she will enter Fiery Passion then), and her Plunging and Charged Attack damage is enhanced. While in the Fiery Passion state, using a Plunging Attack will consume all her Nightsoul points, ending Fiery Passion and Nightsoul’s Blessing.
 Elemental Skill | Riding the Night-Rainbow
Talent Description
With footwork swift as lightning and fierce as thunder, Varesa displays the true spirit of lucha libre, rushing forward a certain distance and dealing Nightsoul-aligned Electro DMG to opponents in her path.
After using this Skill, Varesa gains 20 Nightsoul points and gains the “Follow-Up Strike” effect: Varesa has increased interruption resistance during this time, and upon pressing her Normal Attack, she will quickly unleash a Charged Attack that does not consume Stamina. “Follow-Up Strike” will be canceled after Varesa uses a Charged Attack.
She will use different techniques based on whether the skill is Tapped or Held.
Tap
Quickly rush a certain distance forward.
Hold
Varesa enters the Nightsoul’s Blessing state and switches to Sudden Onrush mode.
Sudden Onrush
Continuously consumes Nightsoul points. In this state, Varesa’s Movement SPD and interruption resistance are increased. She can use terrain to execute flying leaps or consume additional Nightsoul points to traverse atop water or liquid Phlogiston while remaining immune to DMG from the latter.
Nightsoul’s Blessing: Varesa
When she runs out of Nightsoul points, her Nightsoul’s Blessing state will be canceled. When Varesa is in the Sudden Onrush state or Fiery Passion state, she will always be counted as being in the Nightsoul’s Blessing state.
Has 2 charges. When Varesa enters the Fiery Passion state, she will obtain an additional Tap charge of her Elemental Skill and its DMG will be increased.
Fiery Passion
· While not in the Fiery Passion state, Varesa can use Plunging Attacks to gain Nightsoul points. She will enter Fiery Passion when she reaches maximum Nightsoul points via this method, or when she uses her Elemental Burst Guardian Vent!
· While in the Fiery Passion state, her Normal Attacks, Elemental Skill, and Elemental Burst will gain unique buffs. She can also use a special Elemental Burst shortly after using a Plunging Attack.
· The Fiery Passion state lasts for up to 15s and will end when she runs out of Nightsoul points or after she leaves combat for a period of time.
Varesa’s Skill deals damage, restores 20 Nightsoul points, and allows Varesa’s next Normal Attack to instead become a Charged Attack that costs no stamina and has a shorter animation than normal. This allows Varesa to quickly chain a Skill into a Charged Attack for a Plunging Attack afterwards. Her Skill has 2 charges and a cooldown of 9 seconds.
Since Varesa’s Skill restores 20 Nightsoul points, and her Plunge restores 25, one ECP is enough for Varesa to enter the Fiery Passion state. She can also enter the Fiery Passion state with two CPs instead. Note that even if her Skill allows her to reach 40 Nightsoul Points, Varesa will not enter Fiery Passion immediately as she can only enter it through her Plunge.
When entering Fiery Passion, Varesa will gain an extra Skill charge. Note that this bonus charge will not reset the cooldown on the base charge(s), unlike the effect from Sacrificial Fragments or 4pc Gambler. With this extra charge, each of Varesa’s Skills is effectively two Skills, as she can enter Fiery Passion with an ECP.
Thus, one base Skill use can result in this combo:
Skill > Charge > Plunge > Enters Fiery Passion > Skill Resets > Bonus Skill > Charge > Plunge > Exits Fiery Passion
Since Varesa’s Skill has 2 base charges on a 9s cooldown, she can run rotations shorter than 18s and still get 2 Skill uses (plus 2 extra Skill uses) per rotation, before desyncing 3-4 rotations later.
If her Skill is held, Varesa will instead enter Sudden Onrush and start sprinting until her Nightsoul points run out. Her next Charged Attack will still cost no Stamina and be executed instantly. This is mostly used for overworld traversal and not in combat. However, with 4pc Obsidian Codex, using a Held Skill instead of a Tap Skill will allow her to immediately consume Nightsoul Points and activate the set’s 40% CRIT Rate buff.
 Elemental Burst | Guardian Vent!
Talent Description
Leaps into the air before using the momentum of the drop to unleash a powerful flying kick, dealing Nightsoul-aligned AoE Electro DMG to opponents — just like those heroes of justice in woven scrolls for kids!
After using this Skill, Varesa’s Nightsoul points will be restored to maximum and she will enter the Fiery Passion state.
In the Fiery Passion state, Varesa’s Elemental Burst will deal a greater amount of Nightsoul-aligned AoE Electro DMG.
Additionally, she will briefly activate Apex Drive after using a Plunging Attack while in her Fiery Passion state.
Apex Drive
Increases Varesa’s interruption resistance. While affected by Apex Drive, Varesa can ignore her Elemental Burst CD and consume less Energy to use her special Elemental Burst, “Guardian Vent: Volcano Kablam”: This causes her to use the especially powerful Plunging Attack, the “Thunderous Tornado Eruption,” which deals Nightsoul-aligned AoE Electro DMG upon landing before causing her to exit Apex Drive. This DMG is considered Plunging Attack DMG.
Varesa will exit Apex Drive after using her Elemental Skill.
Joining Childe, Varesa is the second character to have two different Bursts. Her normal Burst costs 70 Energy and can be used at any time. It deals damage, restores her Nightsoul points to her maximum, and lets her enter the Fiery Passion state. If Varesa is already in the Fiery Passion state, this Burst will do additional damage.
Varesa’s second Burst (short Burst or sQ) costs 30 Energy and can only be used right after exiting Fiery Passion through a Plunge. It does not have a cooldown.
Varesa will usually only use her short Burst due to its much lower Energy cost and shorter animation time while doing a similar amount of damage. The Nightsoul point reset from her normal Burst is not worth its cost. Her short Burst is also considered Plunging Attack damage and benefits from all associated buffs.
 Ascension 1 Passive | Tag-Team Triple Jump!
Talent Description
After using the Elemental Skill Riding the Night-Rainbow, Varesa gains “Rainbow Crash” for 5s.
During this time, when Varesa uses a Plunging Attack, the shockwave DMG dealt when she hits the ground is increased by 50% of her ATK. If Varesa is in the Fiery Passion state, this ground impact DMG is increased by 180% of her ATK instead.
The Rainbow Crash effect will be canceled once a ground impact hits an opponent, or when its duration expires.
This passive increases Varesa’s Plunging Attack damage and AoE after using a Skill, with a higher damage increase while in the Fiery Passion state. A welcome bonus that further incentivizes using her Skill.
 Ascension 4 Passive | The Hero Twice-Returned!
Talent Description
When a nearby party member triggers a Nightsoul Burst, Varesa’s ATK increases by 35% for 12s. Max 2 stacks. Each stack’s duration is counted independently.
Increases Varesa’s ATK by 35% for 12s after a Nightsoul Burst is triggered, with up to 2 stacks. Nothing special, but incentivizes running other Natlan characters, especially Xilonen due to her A4 Passive providing an additional Nightsoul Burst. With only Varesa as the only Natlan character on her team, this passive will have 75% uptime on one stack; with two Natlan characters, this passive will have 100% uptime on one stack; with three Natlan characters, there will be 75% uptime on one stack and 25% uptime on two stacks. Having Xilonen functionally adds 12s of an additional stack after Xilonen uses her Skill.
Constellations
 Constellation 1 | Undying Passion
The effects of the Passive Talent “Tag-Team Triple Jump!” are enhanced:
When performing the Special Plunging Attack “Thunderous Tornado Eruption,” Varesa will also gain “Rainbow Crash” for 5s.
When “Rainbow Crash” is in effect, Varesa’s Plunging Attack ground impact DMG is increased by 180% of her ATK, whether she is in the Fiery Passion state or not. You must first unlock the Passive Talent “Tag-Team Triple Jump!” to access the above effect.
Additionally, when Varesa is in the Sudden Onrush mode of her Nightsoul’s Blessing, she consumes 30% less Nightsoul points or Phlogiston.
This Constellation makes Varesa’s A1 Passive always provide a 180% ATK bonus, instead of when only in Fiery Passion. It also allows Varesa’s short Burst to trigger the same bonus, which will be consumed by her short Burst.
This Constellation also reduces her Nightsoul point consumption out of combat, allowing her to use her held E to sprint for longer.
 Constellation 2 | Beyond the Edge of Light
Varesa will enter Apex Drive after using a Plunging Attack, regardless of whether she is in the Fiery Passion state or not.
When Apex Drive is active, Varesa’s interruption resistance will also further increase.
Additionally, Varesa will restore 11.5 Energy when her Plunging Attack ground impact hits an opponent.
With this Constellation, Varesa can use her short Burst after every plunge, instead of just the ones during Fiery Passion. Additionally, each plunge restores 11.5 Energy, allowing her to Burst more often. This will result in one or two more short Bursts per rotation, depending on team Energy generation.
 Constellation 3 | Unbowed Resolve
Increases the Level of Guardian Vent! by 3.
Maximum upgrade level is 15.
A straightforward talent level increase to Varesa’s Burst. However, due to Varesa’s distribution of damage, this Constellation is not so impactful.
 Constellation 4 | The Courage to Press On
Varesa will receive various buffs based on her state when using her Elemental Burst Guardian Vent! If Varesa:
· Has neither Fiery Passion nor Apex Drive active, she will gain Diligent Refinement for 15s, which will increase her Plunging Attack ground impact DMG by 500% of her ATK, with a maximum increase of 20,000 DMG. This effect will be canceled once the ground impact hits an opponent, or if its duration ends.
· If she has either Fiery Passion or Apex Drive active, this instance of her Elemental Burst Guardian Vent! deals 100% increased DMG.
Greatly enhances the damage of Varesa’s short Burst and provides a buff to Plunging Attacks after using her normal Burst. With this Constellation, Varesa’s short Burst has 100% DMG Bonus, and her normal Burst increases the damage of the next Plunge dealt by 500% of her ATK.
 Constellation 5 | Thoughts Floating on the Warm Breeze
Increases the Level of Normal Attack: By the Horns by 3.
Maximum upgrade level is 15.
A straightforward talent level increase to Varesa’s Normal Attack, thus increasing her Plunge damage. However, since Varesa’s damage is split with her Burst and Skill, this Constellation is not as effective as it could be.
 Constellation 6 | A Hero of Justice’s Triumph
Varesa restores 30 Energy when she enters Apex Drive.
Her Plunging Attacks and Elemental Burst Guardian Vent! gain 10% CRIT Rate and 100% CRIT DMG.
Additionally, when Varesa uses the Hold version of her Elemental Skill Riding the Night-Rainbow, or Taps her Elemental Skill while in the Sudden Onrush mode, she will restore Nightsoul points up to her maximum.
Varesa’s Skill now restores her Nightsoul points to her maximum, and she will restore 30 Energy when entering Apex Drive. This lets Varesa enter Fiery Passion with every Skill alongside restoring 41.5 Energy with each Plunge, guaranteeing that Varesa can use her short Burst every Plunge with excess Energy to spare. With the excess Energy alongside the particles generated from her Skill, Varesa can use her Normal Burst, which will buff her next Plunging Attack due to C4. This Constellation also increases Varesa’s Plunge and Burst CRIT Rate by 10% and Plunge and Burst CRIT DMG by 100%, a significant straightforward damage increase.
Combos
Combo Notation
- N = Normal Attack
- C = Charged Attack
- A = Aimed Shot
- P = Plunging Attack
- E = Elemental Skill
- tE = Tap Skill
- hE = Hold Skill
- Q = Elemental Burst
- sQ = Short Elemental Burst
- D = dash (cancel)
- J = jump (cancel)
- W = walk (cancel)
- > = switch character
- ( ) = these actions are optional; please refer to the notes below
- [ ] = repeat these actions the specified number of times
Note that Varesa’s combos may change as new combos are tested. More extensive testing is in progress.
Pink combos represent actions done in Fiery Passion. Note that Varesa’s Skill converts your next Normal Attack input into an enhanced Charged Attack.
| ECP ECP (sQ) | The building block of Varesa’s rotations. Each of Varesa’s Skills allows her to execute this combo once. If Energy permits, a short Burst can be added after the Fiery Passion Plunge. |
| ECP sQ | After C2, Varesa can use a short Burst after each Plunge, regardless of whether Fiery Passion was active. With this Constellation’s Energy refund, Varesa also has the energy to use her Burst more often. |
| CP CP ECP | When her Skill is on cooldown, Varesa’s Charged Attack takes longer to input, costs Stamina, and does not benefit from her A1 Passive. She can enter Fiery Passion with two plunges, granting one bonus Skill use. |
| ECP ECP (sQ) ECP ECP (sQ) (CP CP) | Varesa’s full combo at C0 with 2 Skill uses per rotation. Additional CPs can be added to lengthen her rotation times. If only one CP is added, Varesa will enter Fiery Passion on her first ECP instead of her second, meaning her first and third ECPs will be in Fiery Passion instead of the second and fourth. |
Artifacts
ER Requirements
Calcs for ER requirements can be found here (last updated for Version 5.5).
ER calcs assume Furina, Iansan, Ororon, Kazuha, and Xilonen hold Favonius.
| 2 sQ | 1 sQ | ER reduced per Fav. Proc (off-field) | ||
| Double Electro | Ororon/Iansan | 120–145% | 100% | ~9% |
| Fischl | 115–120% | 100% | ~7% | |
| Solo Electro | 195–200% | 100–105% | ~10% | |
Varesa should use two sQs per rotation in Double Electro teams. In Solo Electro teams, Varesa can not use 2 sQs per rotation. Assuming Varesa starts from full energy, she is able to use two sQs in her first rotation. Varesa’s later Bursts borrow from this well of energy, in a similar way to how having two Skill charges allow you to borrow cooldown from the future. However, you can not keep borrowing from this well forever and you will have to skip a sQ when you could use one. How many Bursts Varesa can use in a row is variable depending on how much ER she builds. ~135% ER allows her to sQ twice in a row before skipping a sQ.
Use the Energy Recharge Calculator to determine exact requirements for your team and rotation. For more details on how Favonius weapons will affect your team, please use Ac1d’s Favonius Mastersheet.
Artifact Stats
 Sands |  Goblet |  Circlet |
| ATK% | Electro DMG Bonus > ATK% | CRIT |
Stat Priority: ER (until requirement) > CRIT > ATK% > EM (Aggravate)
An ATK% Goblet can be viable when Varesa has access to a lot of DMG% and a low amount of ATK% or equivalent stats. Notably, when using 4pc Long Night’s Oath in Overloaded teams and in teams without Xianyun.
We recommend using Genshin Optimizer to compare your actual artifacts.
Artifact Sets
 4pc Long Night’s Oath | A new set released in 5.5. Varesa is able to easily stack its 4pc effect for a substantial 100% Plunge DMG Bonus. This set performs either better to around equal to 4pc Obsidian Codex, depending on buffs, weapons, and teams. It will outperform 4pc Obsidian Codex with CRIT weapons, in teams lacking DMG% buffs, or with Plunge-specific buffing. However, Long Night’s Oath shares a domain with Finale of Deep Galleries, making farming it highly resin-inefficient, and it is recommended for most players to farm 4pc Obsidian Codex instead. |
 4pc Obsidian Codex | Unlike other Natlan damage dealers, Varesa does not remain in Nightsoul’s Blessing for the entirety of her field time. The 4pc effect will apply continuously after the first time Varesa consumes Nightsoul Points. With her normal combo, this will happen after Varesa’s Fiery Passion Plunge, but if Varesa uses a held Skill instead of a tap Skill at first, she will consume a few Nightsoul Points, thus activating this set’s 4pc passive. The 2pc set’s effect will only apply to Varesa’s Fiery Passion hits and short Burst. It is easy to overcap CRIT Rate with this set since Varesa ascends with CRIT Rate, especially when using a CRIT Rate weapon. |
 4pc Marechaussee Hunter | This set only works reliably with Furina. Unlike Obsidian Codex, it doesn’t have a useful 2pc effect, takes a similar amount to stack and provides less CRIT Rate. There is little reason to use it over 4pc Obsidian Codex, provided you have farmed both of them. |
 2pc Mixed Sets | 2pc Set Bonuses: Obsidian Codex, Long Night’s Oath, Thundering Fury, Scroll of the Hero of Cinder City, Emblem of Severed Fate, ATK% sets These 2pc sets can serve as placeholders before acquiring 4pc Long Night’s Oath or 4pc Obsidian Codex. Emblem and Scroll of the Hero of Cinder City help Varesa meet her ER requirements. |
 4pc Desert Pavillion Chronicle | This set performs similarly to 2pc Mixed sets. Varesa’s Charged Attack triggers its 4pc effect for 40% Plunge DMG Bonus. Only use this set as a placeholder before acquiring 4pc Long Night’s Oath or 4pc Obsidian Codex. |
Weapons
 5★ Vivid Notions | Varesa’s signature and Best-in-Slot. Since it specifically buffs Plunge damage, 4pc Long Night’s Oath performs very well when used with this weapon. |
 5★ Kagura’s Verity | Varesa is able to stack this weapon’s full passive by the middle of her first rotation for 36% Skill DMG Bonus and 12% Elemental DMG Bonus. Varesa’s second-best weapon. |
 5★ Crane’s Echoing Call | Another strong 5-star weapon for Varesa, performing similarly with R5 Widsith; however, it is better to use it on Xianyun if you have her. |
 4★ The Widsith | At high refinements, this weapon performs similarly to Kagura’s Verity. Due to its random passive, though, that performance can be inconsistent. It performs better with faster clears, as its passive is front-loaded with a 30s cooldown. |
 5★ Lost Prayer to the Sacred Winds | A 5-star CRIT weapon with a ramping DMG% passive. A more consistent option than Widsith, with similar performance. Its CRIT Rate mainstat can be difficult to build around if Varesa is on 4pc Obsidian Codex. |
 5★ CRIT Weapons | Cashflow Supervision, Tullaytulah’s Remembrance, Surf’s Up, Tome of the Eternal Flow These 5-star CRIT weapons provide strong baseline stats, but irrelevant passives. CRIT Rate weapons are hard to build around if running 4pc Obsidian Codex. |
 4★ Flowing Purity | Varesa’s best F2P option and second-best 4-star option after The Widsith, provided she runs with a healer. |
Teams
Rotation Notation
N = Normal Attack
C = Charged Attack
P = Plunging Attack
A = Aimed Shot
E = Elemental Skill
tE = Tap Skill
hE = Hold Skill
Q = Elemental Burst
sQ = Short Elemental Burst
D = dash cancel
J = jump cancel
W = walk cancel
> = switch character
( ) = “these actions are optional; please refer to the notes below”
[ ] = “repeat these actions the specified number of times”
Note that Varesa’s combos may change as new combos are tested. More extensive testing is in progress.
General Plunge DPS

These teams focus on buffing Varesa’s damage. Due to Varesa’s short cooldowns and animations, she prefers teammates that allow her to run sub-20s rotations, however strong buffers (i.e. Xianyun and Furina) are worth this rotation extension. Having a second Electro character is preferred for Energy.
Notable Teammates
 Xianyun | Xianyun is a potent buffer for Varesa with 4pc VV and Additive Base DMG Bonus for Plunges. Varesa will still use her Skill and Charged Attack to Plunge due to her A1 Passive and her Skill’s Nightsoul point gain. |
 Iansan | Varesa’s plunge-based playstyle allows her to easily maintain the maximum buff on Iansan’s Burst. Not only does Iansan buff Varesa’s ATK, but her ability to hold 4pc Scroll, provide Energy, and trigger more Nightsoul Bursts provides greater buffing. |
 Bennett | Bennett’s ATK buffing is extremely powerful for Varesa. However, his Burst limits Varesa to a circle. |
Xilonen | Xilonen’s long-lasting RES Shred, ability to hold 4pc Scroll, healing, and additional Nightsoul Burst from her A4 Passive are heavily appreciated by Varesa. |
 Furina | Furina provides off-field damage and a potent DMG% buff. Since many of Varesa’s best teammates are healers, fully stacking her Burst is easy. Note that Iansan’s healing is not enough on its own. |
Pyro
These Pyro characters provide buffing. Bennett and C6 Chevreuse additionally provide healing while Mavuika offers potent personal damage alongside additional Nightsoul Bursts for Varesa’s A4 Passive.

Electro
Electro characters provide buffing, Energy, and personal damage.


Anemo
Anemo characters are able to hold 4pc VV to shred Electro RES by 40%. On top of that, the characters below provide various buffs or sustain.


Geo
Xilonen and Kachina provide buffing through 4pc Scroll. Chiori and Albedo deal off-field damage, while Zhongli provides shielding and RES Shred.


Example Teams
This is not a comprehensive list of teams. The inclusion or exclusion of any given team does not necessarily reflect its power level.

A potent hypercarry team for Varesa. This team’s longer cooldowns require Varesa to extend her combo.
Sample Rotation
Furina ED Q > Iansan E N1 Q > Xianyun N11 EQ > Varesa ECP ECP sQ ECP ECP sQ CP
1Required for Xianyun to reliably swirl and trigger 4pc VV.

Xilonen should hold 4pc Scroll and Iansan/Ororon should hold 4pc Archaic Petra and pick up Xilonen’s Crystallize Shard. Ororon buffs less than Iansan but allows for a shorter rotation and contributes more personal damage.
Sample Rotation (Iansan)
(Varesa N1)1 > Xilonen EQ N2 > Iansan E N1 Q > Kazuha tEPQ > Varesa ECP ECP sQ ECP ECP sQ CP CP ECP
1First rotation only.
Sample Rotation (Ororon)
(Varesa N1)1 > Xilonen EQ N2 > Ororon EQ > Kazuha tEPQ > Varesa ECP ECP sQ ECP ECP sQ
1First rotation only.

Furina uses her Skill every other rotation.
Sample Rotation
Furina (ED)1 Q > Bennett EQ > Fischl (E/Q)2 / Ororon EQ > Varesa ECP ECP sQ ECP ECP sQ CP
1Use Furina’s Skill every other rotation.
2Fischl alternates her Skill and Burst.
Chevreuse Overloaded

Chevreuse Overloaded teams are a potent option for Varesa due to Chevreuse’s numerous buffs (RES Shred, ATK%, and (at C6) DMG%), but a team of only Pyro and Electro characters is required. A Pyro character with off-field Pyro application is needed to maintain good uptime on Chevreuse’s RES Shred. An Electro character is preferred in the fourth slot as they provide Energy and generally better utility. If running a third Pyro character, Varesa must skip one sQ due to a lack of energy.
Notable Teammates
 Chevreuse | Chevreuse’s RES Shred, ATK% buff, DMG% (at C6), and healing make her a very potent support for Varesa with the restriction of running a team with only Pyro and Electro characters. |
 Mavuika | Mavuika is the best Pyro option for this team by far: she provides consistent off-field Pyro application, high personal damage, and significant buffing. Her 18s Skill cooldown allows for shorter rotations. Varesa’s Nightsoul point consumption allows Mavuika to Burst every rotation. |
Pyro
Characters with off-field Pyro application are necessary to trigger Chevreuse’s RES Shred. Mavuika is the best option by far. Pyro Traveler is the next best as they can hold 4pc Scroll. Xiangling provides personal damage, but has a 20s Burst cooldown. Dehya provides some interruption resistance and damage mitigation.


Electro
Electro characters provide buffing, Energy, and off-field damage. Iansan provides the strongest buffing. Ororon buffs through 4pc Scroll and (at C6) ATK%, Sara buffs ATK and (at C6) Electro CRIT DMG, and Lisa provides DEF Shred and TTDS. Ororon and Fischl both contribute notable personal damage.

Example Teams
This is not a comprehensive list of teams. The inclusion or exclusion of any given team does not necessarily reflect its power level.

Varesa’s best Overloaded team.
Sample Rotation
Mavuika tE > Iansan/Ororon E N1 Q > Chevreuse hEQ > Mavuika Q > Varesa ECP ECP sQ ECP ECP sQ CP CP ECP

An option for players without Mavuika.
Sample Rotation
Varesa N11 > Pyro Traveler E Q > Chevreuse hEQ > Iansan E N1 Q > Varesa ECP ECP sQ ECP ECP sQ CP CP ECP
1First rotation only
Aggravate

Varesa’s Aggravate teams are limited by both her ICD and her lower attack frequency. Since only her Plunges have no ICD, significant portions of her damage will not be Aggravated, and without constantly triggering Electro reactions Varesa cannot drive Fischl as efficiently as other Electro on-fielders (e.g., Clorinde or Keqing).
Nonetheless, Aggravate is still a perfectly viable playstyle for Varesa, especially if she is paired with her preferred buffers.
Notable Teammates
Electro
Electro characters provide off-field damage, buffs, or a combination of both alongside Energy.
Dendro
Dendro characters are integral for Aggravate uptime.
Nahida | Nahida provides uninterrupted Dendro application, personal damage, and a strong EM buff. However, her strong Dendro makes it harder to Swirl/Crystallize Electro. |
These healers and shielders maintain Aggravate uptime while letting you use more offensively oriented supports. Baizhu provides buffing through TTDS or Hakushin Ring and his A4 Passive, but does not fit well into 15s rotations.


These free Dendro characters maintain Aggravate uptime while providing minor buffs.

Anemo
Anemo characters can slot in to buff Varesa with 4pc VV’s 40% RES shred, and offer other buffs, utility, or both.


Geo
Xilonen | Xilonen is an extremely strong support for Varesa. Her long-lasting RES Shred and DMG% buff from 4pc Scroll alongside her healing and Nightsoul Bursts are highly appreciated. |
Example Teams
This is not a comprehensive list of teams. The inclusion or exclusion of any given team does not necessarily reflect its power level.

Essentially a hypercarry team, but with a buffer exchanged for a Dendro unit to enable Aggravate. Note that Kirara requires C4 to maintain Quicken uptime. Nahida has no issues maintaining Quicken, at the price of making Electro Swirl inconsistent.
Credits
baloopy, caramielle., sew, madeofseaglass, lesterberne, plumetra, the_mystic_mage, mystathi
Team images made with the KQM portrait generator.