Updated for Version: 5.5

artwork by prinzcake
Written by the Xiao Mains Discord Server
Last Updated: 8 February 2024
Original Document
For any questions or feedback, please visit the Xiao Mains Discord Server
Table of Contents
Credits
Principal Authors
Principal Theorycrafters
baeliph, orum
coded, felic1an, itslin
Guide Content Contributors
- alerine, for the Lithic Thesis.
- leeyuuh, for notes on Diona, Qiqi, and Zhongli.
- 3pi14, for notes on Energy Management and Zhongli.
- poiiyo and .ioncy, for notes on Energy Management.
- notmemu, for Collision Plunge damage mechanics and video examples.
Visual Contributors & Proofreaders
- dri / @prinzcake for providing the guide banner.
- jenjenjl, iongrey, llamagician, never3nder, homeless and rich3331, for edits and proofreading.
- orum, for the guide’s overall design.
Character Introduction
Xiao is a 5★ Anemo Hypercarry DPS. As a Hypercarry, Xiao generally takes up the most field time due to his Elemental Burst’s long duration. Ideally, he will also contribute the majority of the Team’s DPS. This makes Xiao an expensive unit individually, as the majority of investment will be given to him, but the rest of his teammates can be managed with less investment.
TL;DR Visual Guide
Is Xiao Worth It?
Pros
- Low skill floor gameplay.
- Large AoE.
- Team requires minimal investment.
- Plunges count as heavy attacks, which are useful for breaking object shields & staggering enemies.
Cons
- Lacking F2P weapon options.
- Requires intentional energy management.
- Investment-heavy as a Hypercarry.
- Team options can be limited due to the long duration of his Elemental Burst.
- Low value Constellations.
Ultimately, our goal is not to convince you whether Xiao is meta or not meta, or whether he is worth pulling or not for your account. Instead, the reader should review Xiao’s strengths and weaknesses as detailed above and in our “Should You Wish for Xiao?” guide, and then draw your own conclusions whether he is worth your pulls.
Talents
C0 – C5

|
> |

|
> |

|
|
NA |
Q |
E |
- Xiao’s Normal Attack Talent is worth crowning.
- We recommend leveling Xiao’s Skill and Burst to TL8. Raising them past that is not a priority and should only be done out of love for Xiao.
- Getting Burst to at least TL7 is recommended to reduce the life drain from 2.5% to 2% HP/sec.
C6
|
|
= |
|
> |
|
|
E |
NA |
Q |
- Xiao’s Constellation 6 is conditional and will become inactive in single-target scenarios. Because of this, we suggest raising both his Elemental Skill and Normal Attack Talent equally.
Why prioritize Normal Attack over Burst?
Xiao scales better through Normal Attack Talents than his Elemental Burst:
- Xiao’s Elemental Burst simply provides him with additional DMG Bonus to his infused Normal/Charged/Plunging Attacks. Hence, Xiao’s damage is still calculated through the Plunge Modifiers on his Normal Attack Talent.
- The DMG Bonus from Xiao’s Burst is additive to other sources of DMG Bonus, such as from your Goblet, artifact set bonuses, weapon passives, etc.
- The scaling on his Burst’s Elemental DMG Bonus isn’t significant. From TL8 to TL10, you only gain 9.1% more DMG Bonus, which is less than what a 2pc artifact set would provide.
Constellations
C1. Dissolution Eon: Destroyer of Worlds
Increases Lemniscatic Wind Cycling’s charges by 1.
In optimized rotations, C1 only offers a single extra Skill charge between Xiao’s first and second Bursts. This is because:
- Xiao can only pre-funnel two of his Skills, so using the third Skill before his first Burst is wasting those energy particles.
- Xiao should use all three Skill charges between his first and second Burst. After his second Burst, Xiao’s third Skill charge will still be on cooldown and so cannot immediately fund energy for his third Burst.
For these reasons, C1 is not a standard DPS increase to Xiao’s damage per rotation. However C1 does soften his ER needs by enabling Xiao to obtain his second Burst much more reliably, while also being a decent source of extra energy in comps featuring Faruzan and/or additional Anemos.
C2. Annihilation Eon: Blossom of Kaleidos
When in the party and not on the field, Xiao’s Energy Recharge is increased by 25%.
C2 is inconsequential as Xiao should be on-field as much as possible, especially when particles are directly funneled between Elemental Bursts.
C3. Conqueror of Evil: Wrath Deity
Increases the Level of Lemniscatic Wind Cycling by 3.
C3 does not impact Xiao’s plunge damage. It is only useful for C6 Xiao.
C4. Transcension: Extinction of Suffering
When Xiao’s HP falls below 50%, he gains a 100% DEF Bonus.
C4 provides a DEF bonus which is useless in 99% of scenarios, especially since his most popular supports are generally Zhongli and good healers like Jean or Bennett.
C5. Evolution Eon: Origin of Ignorance
Increases the Level of Bane of All Evil by 3.
C5 is also not a big improvement as Xiao gains little overall DPS increase from Burst Levels due to oversaturated DMG Bonus.
C6. Conqueror of Evil: Guardian Yaksha
While under the effects of Bane of All Evil, hitting at least 2 opponents with Xiao’s Plunging Attack will immediately grant him 1 charge of Lemniscatic Wind Cycling, and for the next 1s, he may use Lemniscatic Wind Cycling while ignoring its CD.
This Constellation changes Xiao’s main damage source from spamming plunges to Elemental Skills, assuming that he faces 2 or more enemies. His optimal attack string becomes 1 Plunge followed up by 3-4 Elemental Skills, heavily increasing his damage output.
While this Constellation brings powerful upgrades, it is not without its limitations; for more details please check out our C6 Xiao Guide.
Artifacts
Baseline Stat Recommendations
Xiao is a Hypercarry, so the more you can afford to invest in him, the better. We recommend building Xiao at least to the point that his team is able to clear most content in 2-3 Burst rotations. We recommend the following stat baselines:
- CRIT Rate: 70%+
- Energy Recharge: 120% ~ 140%
ER needs depend on team batteries and investment, we recommend you use the Xiao ER Calculator by 3.14#2780 for specific Energy needs.
Main Stats
 Sands |  Goblet |  Circlet |
| ATK% | Anemo DMG% or ATK% | CRIT Rate or CRIT DMG |
Anemo DMG% vs. ATK% Goblet
The difference between the two is marginal in the majority of cases, and it is often better to prioritize the Goblet’s substats.
The exact number depends on your weapon, team comp, artifact rolls, etc. which is why we suggest checking your damage in-game or using a tool like Genshin Optimizer to confirm which Goblet is better for your Xiao.
- With 4pc Vermillion Hereafter, Anemo Goblet tends to perform better. However if your team includes Faruzan, the difference ends up being small enough that substats will matter more.
- With 4pc Long Night’s Oath, Anemo Goblet will perform better, except for teams with Furina and no Xianyun.
- With Xianyun teams, Anemo Goblet tends to perform better due to her Flat DMG buff scaling with DMG%.
- With C6 Xiao, Anemo Goblet is generally preferred.
CRIT Rate vs. CRIT DMG Circlet
Either Circlet is viable on Xiao depending on your weapon and artifact substats. Regardless of whichever you pick, we recommend at least getting 70% CRIT Rate on Xiao to permit consistent critical hits.
ER% Sands
There is no situation where running an ER% Sands is beneficial as it lowers Xiao’s damage. You should always aim to get sufficient ER% from substats and/or utilize proper batteries in your teams. Please read our Battery section for more information.
Substats
20~40% ER > Crit Rate = Crit DMG > ATK% > Extra ER%
Xiao is a relatively simple character whose damage scales purely from ATK, CRIT Rate and CRIT DMG (as well as DMG Bonus). We recommend a minimum of 70% CRIT Rate on Xiao, and further CRIT stats should ideally be balanced in a 1:2 ratio.
While Energy Recharge may not affect his damage, a large chunk of his gameplay is reliant on utilizing his Elemental Burst, so obtaining ~20-40 ER% from substats can be invaluable.
Recommended Artifact Sets
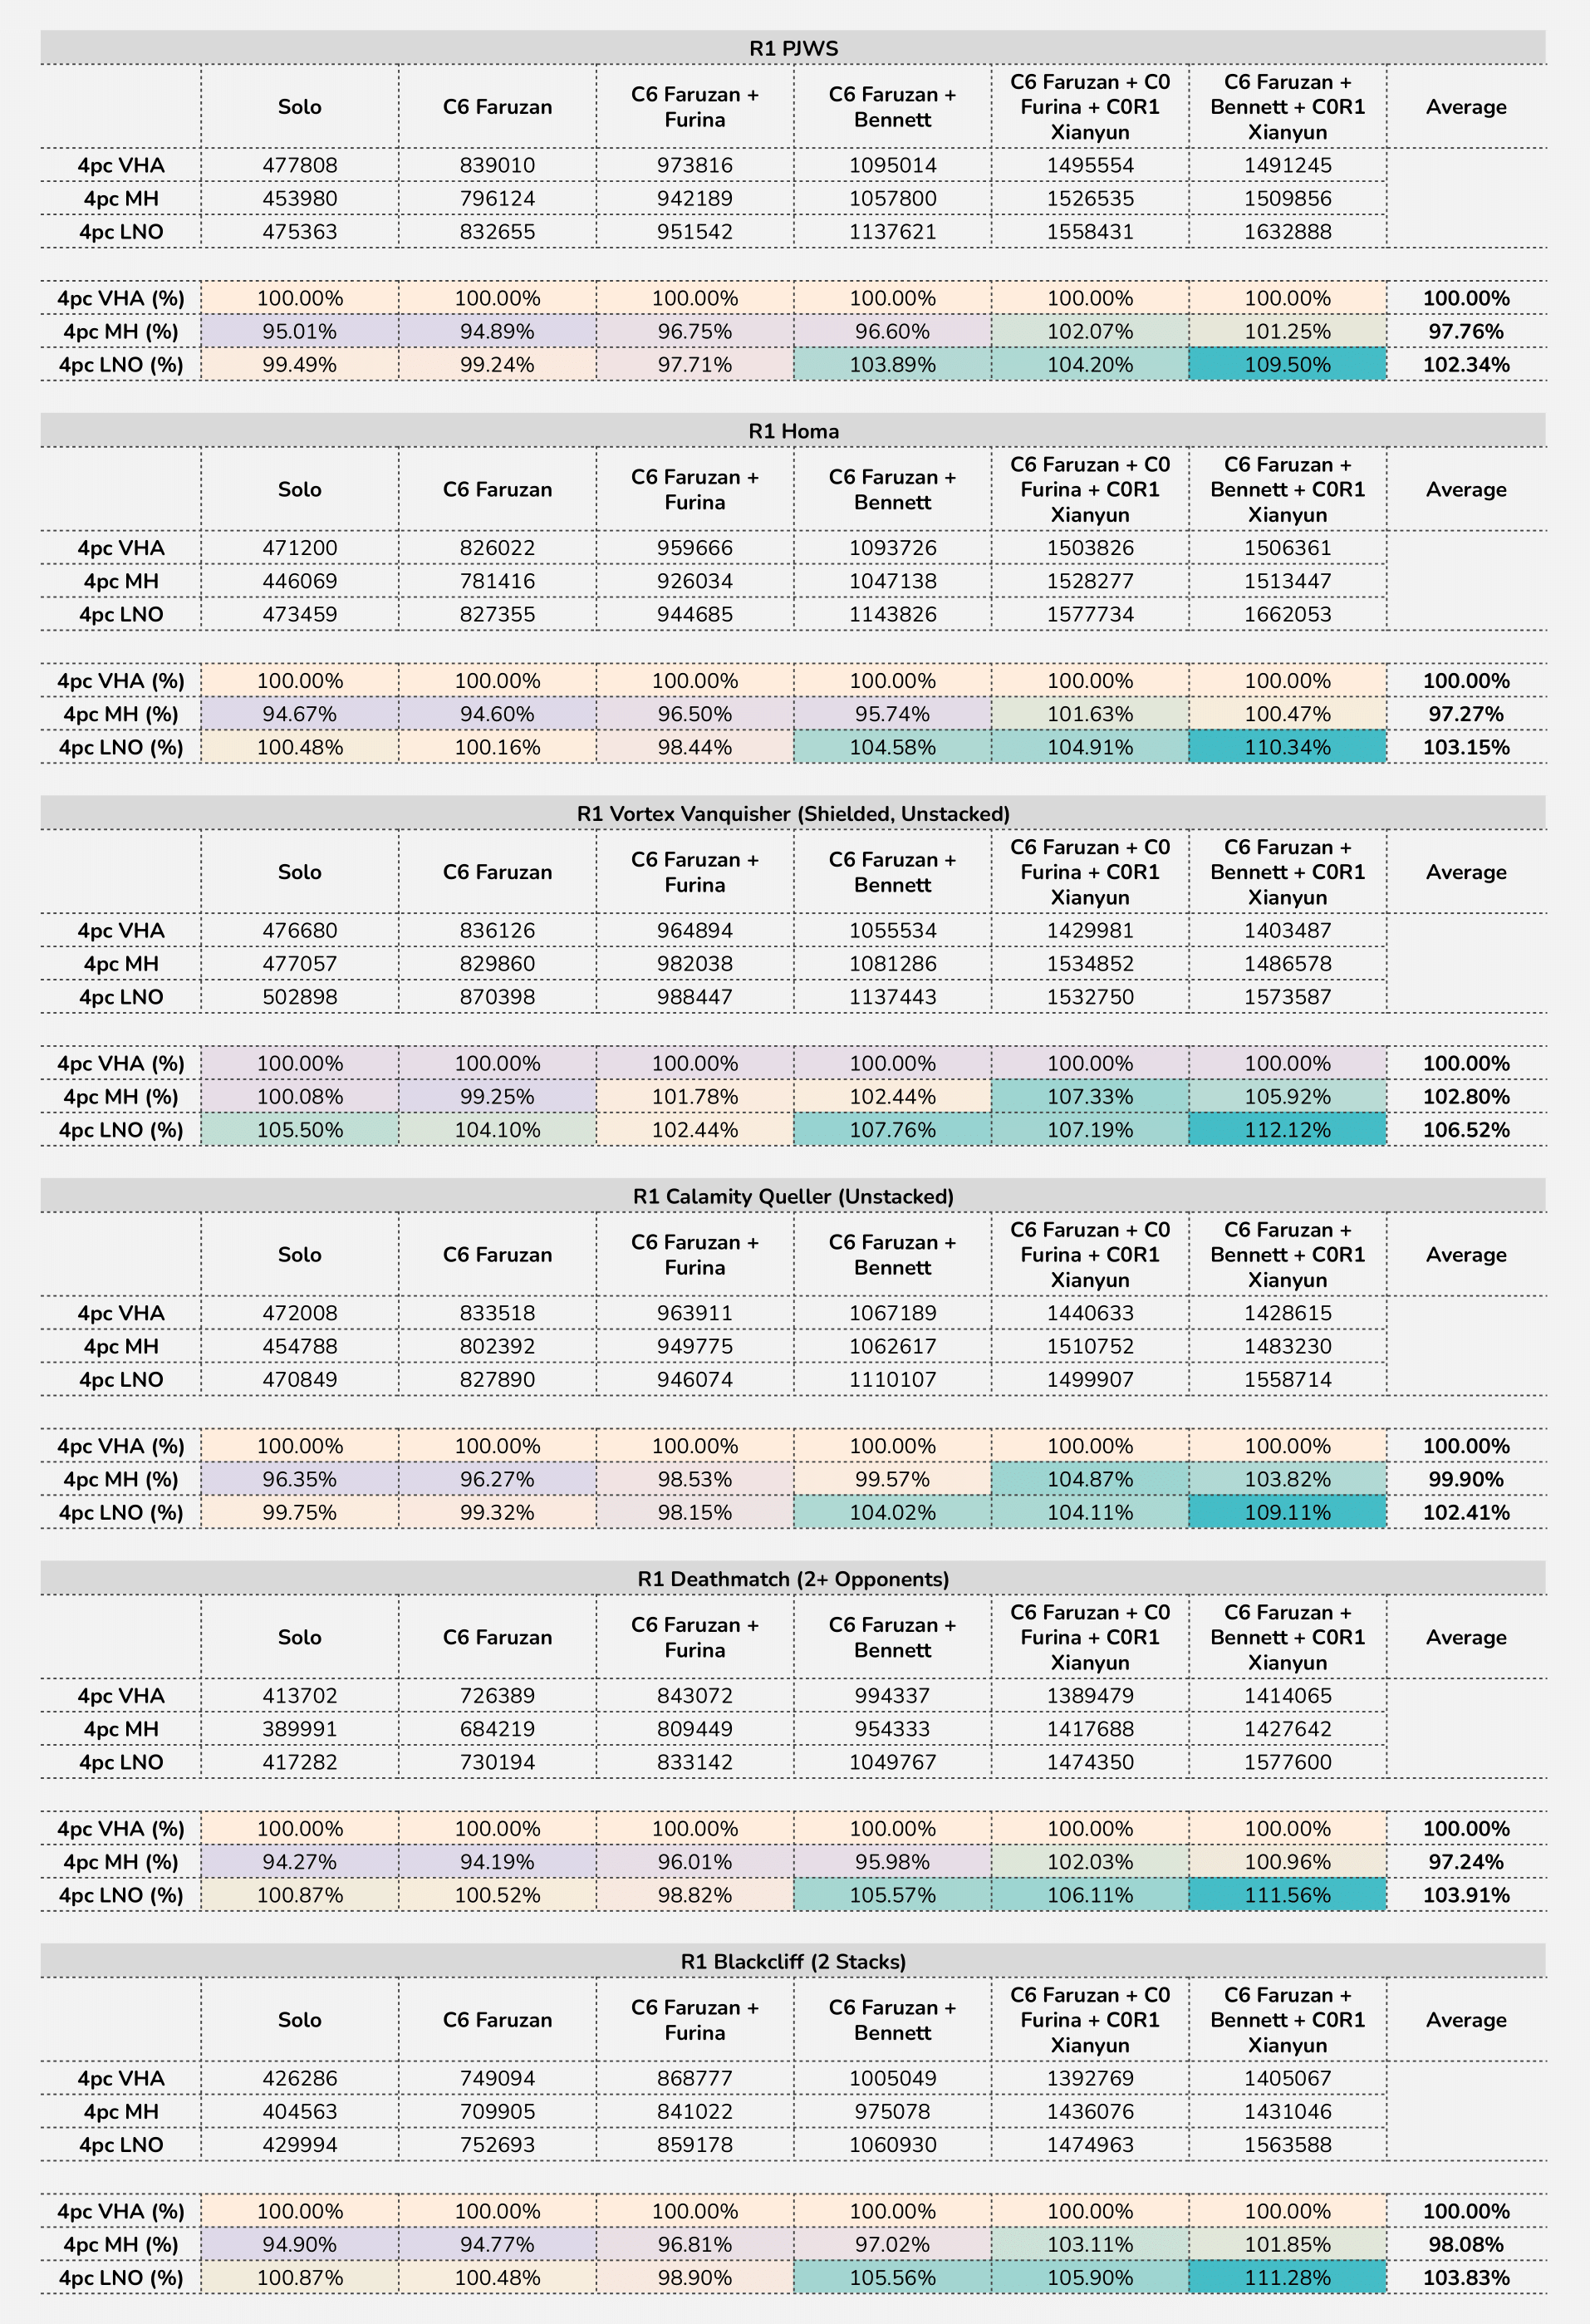
For full sheet comparing 4pc VHA, 4pc MH, and 4pc LNO for all weapons and refines, see Xiao 4pc Artifact Set Comparison and New Set Shenanigans by sohan4543.
4pc Vermillion Hereafter

Click for Details
Xiao is one of the only and best users of this artifact set. Its 4pc effect is easily proccable by Xiao, gaining stacks as Xiao’s Elemental Burst drains his HP. It is also one of the few ATK sources that last for the entire duration of his Burst.
Recommendation
This is one of Xiao’s best-in-slot artifact sets. It performs best in scenarios with less external buffs and more AOE. If you have a highly invested 4pc VHA set, farming other 4pc sets is not required.
Caution
In general, other 4pc sets will often perform better in Single Target scenarios and premium team comps. In particular, Xianyun will give greater weight to DMG% and CRIT stats, and Bennett will decrease the value of 4pc VHA’s ATK stats.
See Xiao 4pc Artifact Set Comparison and the other artifact set descriptions below for more details.
4pc Marechaussee Hunter

Click for Details
While his plunge attacks do not benefit from the 2pc set bonus, the 4pc effect has great synergy with Xiao’s innate HP loss, allowing him to reach max stacks (for a total of 36% CRIT Rate) by the 3rd plunge. It can stack even faster with external HP drain sources, such as Furina.
Recommendation
This set is a great alternative to 4pc VHA.
It has particularly strong synergy with Xianyun team comps due to her Flat DMG buff scaling on CRIT. It is especially powerful in Xiao’s team with both Xianyun and Furina (aka FFXX). With their constellations, it becomes Xiao’s best-in-slot option.
Caution
If using 4pc MH, be cautious to not overcap on CRIT Rate. This may require hunting for primarily CRIT DMG rolls on your artifacts or switching to a non CRIT Rate weapon.
4pc Long Night’s Oath

Click for Details
Both the 2pc and 4pc effect grant Xiao a huge amount of DMG% for his Plunges, which make up the majority of his damage profile. In uninterrupted High Plunge rotations, Xiao will be able to gain 4-5 stacks during his Burst, for a total of 85-100% Plunge DMG in total.
Recommendation
Even when only assuming 4 stacks, Long Night’s Oath is one of Xiao’s strongest artifact sets. It is best-in-slot in Bennett teams and also performs competitively in Xianyun teams due to her Flat DMG buff scaling on DMG%. Given consistent Plunge timing, we recommend farming this set.
Caution
This set’s stacks are dependent on Xiao’s Plunge timing. When performed frame perfect (i.e., one High Plunge every 1.17s), Xiao can refresh stacks before they expire and gain all 5 stacks. However, if his Plunges are delayed or interrupted, then Xiao will no longer be able to maintain max stacks. Thus, for our calculations, we assume 4 stacks max as a baseline.
C6 Xiao
We do not recommend this set for C6 Xiao. This set only buffs Plunge DMG, and Xiao’s Elemental Skill provides the majority of his damage in C6 gameplay.
2pc Anemo DMG% / 2pc ATK%

Any combination of these 2pc sets will work for Xiao.
Comparison between Anemo/ATK and ATK/ATK depends entirely on your teams and the buffs provided to Xiao. Please refer to the sheet below for more information. Generally speaking, however, you should prioritize better substat rolls over specific set bonus combinations.
2pc Emblem of Severed Fate

Energy Recharge is an important part of Xiao’s Gameplay.
The stat value of 18% ATK and 20% ER are virtually identical, making the trade-off fairly equal for those who want to reach a desired ER threshold. While the set on its own does not raise your Xiao’s damage directly, the extra ER% permits for easier Energy management and rotations; the faster you get back Xiao’s Burst, the better your overall DPS will be.
Conditional Sets
4pc Desert Pavilion Chronicle

Conditional proc; falls behind 4pc Vermillion Hereafter.
We do not recommend farming this set specifically for Xiao.
4pc DPC requires the user to cast a Charged Attack to gain a 40% DMG Bonus to Normal/Charged/Plunging Attacks, This bonus is additive to existing DMG Bonus sources like Xiao’s Elemental Burst and Anemo Goblets.
In single-target scenarios using the N1CJP attack string, it performs between 4pc VH and 2pc combinations, making it a good option. In multi-target situations however, since players will prefer pure plunge spamming, the time required to cast a Charged Attack will decrease the overall damage dealt, thus lowering its value.
4pc Viridescent Venerer

Doesn’t buff Xiao’s damage, but buffs Xiao’s supports that deal Elemental damage.
4pc VV is viable for enabling high-damage Pyro/Cryo/Hydro/Electro damage dealers on your team, such as Xiangling, Raiden or Yelan; however, this requires high investment in these supports for it to be worthwhile. The inconsistency of Xiao’s Swirls also makes it less viable than 4pc Vermillion or 2pc combinations. 4pc VV will almost always be better to put on your Anemo battery instead.
Additionally, with the introduction of Faruzan in Patch 3.3, players will generally find more value in increasing Xiao’s own damage, thus rendering 4pc VV less practical on Xiao.
Useless Sets
2pc Noblesse Oblige and 4pc Emblem of Severed Fate

Do NOT work with Xiao’s Elemental Burst
Xiao’s Burst only transforms and modifies Xiao’s Plunging damage. Because of this, he cannot utilize the Elemental Burst DMG buff that is provided by any type of artifact set bonus.
Weapons
Summary
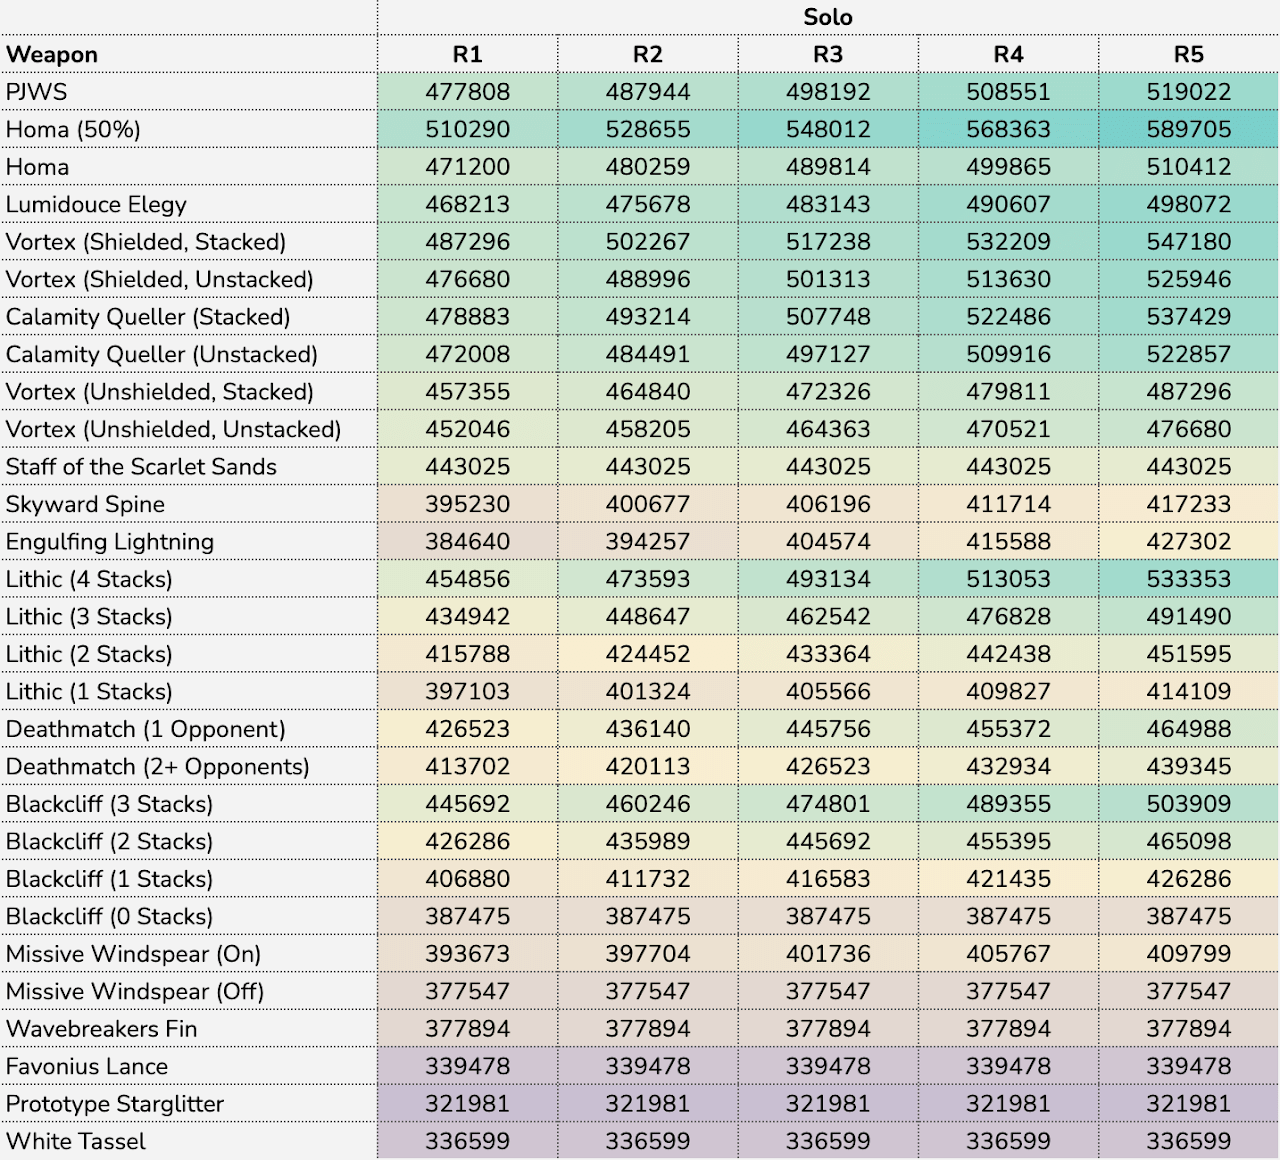
Xiao’s rotation damage with each weapon and refinement. No buffs assumed and ER is not considered.
- The table above displays Xiao’s total damage across a single Burst rotation consisting of two Elemental Skills and twelve High Plunges (EEQ12HP).
- Assumes 10/10/10 Talent and 25 perfect artifact rolls distributed optimally across ATK%, CRIT Rate, and CRIT DMG.
- It does not factor in external buffs of any kind. If you’d like to see how the weapons compare with Faruzan, Bennett and/or TTDS in mind, please check out the full Xiao Weapon Comparison sheet.
The best weapon for your Xiao will depend heavily on the artifacts, stats, and supports available to you.
The purpose of this table is solely to provide a quick damage comparison. If you’d like a more in-depth look into his weapons that considers ease of building, necessary teams, ER effects, etc, please read further to understand their in-depth pros and cons.
To calculate your Xiao’s damage with different weapons (and artifact sets), please use our damage calculator or other in-depth calculators such as Genshin Optimizer.
5★ Polearms
Tier 1
Xiao’s Best-in-Slot weapons. Offering CRIT substats and useful passives, these weapons are similar enough in performance that picking one or the other boils down to personal artifacts and weapon availability.
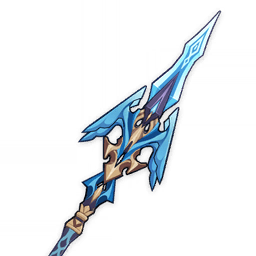
Primordial Jade Winged-Spear
Base ATK: 674 | CRIT Rate: 22.1%
On hit, increases ATK by 3.2% for 6s. Max 7 stacks. This effect can only occur once every 0.3s. While in possession of the maximum possible stacks, DMG dealt is increased by 12%.
Pros
- One of the highest base ATK spears.
- The passive is easy to proc and stacks ATK% and DMG%.
- With his ascension CRIT Rate, Xiao starts with 46.3% CRIT Rate baseline.
- It’s Xiao’s canon and sexiest weapon.
Cons
- Pre-stacking PJWS is a DPS loss, so the weapon’s full passive is only in effect after a few plunges.
- Using NA cancels between plunges helps stack the passive faster.
- Using a CRIT Rate Circlet can be inefficient for DPS.

Staff of Homa
Base ATK: 608 | CRIT DMG: 66.2%
HP increased by 20%. Additionally, provides an ATK Bonus based on 0.8% of the wielder’s Max HP. When the wielder’s HP is less than 50%, this ATK bonus is increased by an additional 1% of Max HP.
Pros
- Massive stat stick that allows you to stack ATK and CRIT DMG.
- Taking advantage of Xiao’s CRIT Rate ascension and artifact substats, you can run Staff of Homa and a CRIT DMG Circlet, gaining an easy 128.4% CRIT DMG.
- Flexibility with allowing the usage of either a CRIT Rate or CRIT DMG Circlet.
Cons
- Reliably activating Staff of Homa’s under 50% HP passive may limit team comps.
- For the reasons explained below, you can choose to use Staff of Homa while disregarding its 50% HP passive.
Notes on <50% HP
- We do not recommend forcing a team comp where Xiao stays at <50% HP. The passive alone is not valuable enough to justify limiting your team options (e.g., not utilizing strong supports such as Bennett and Jean).
- If you do want to reliably activate Staff of Homa’s passive, Xiao will require one of these characters in the team to ensure you can stay under 50% HP safely:
- Zhongli, for his strong shield to keep you alive in a healer-less team comp.
- Diona, for her shield and healing with her Burst when needed.

Lumidouce Elegy
Base ATK: 608 | CRIT Rate: 33.1%
ATK increased by 15%. After the equipping character triggers Burning on an opponent or deals Dendro DMG to Burning opponents, the DMG dealt is increased by 18%. This effect lasts for 8s, max 2 stacks. When 2 stacks are reached or when the duration is refreshed at 2 stacks, restore 12 Energy. Energy can be restored this way once every 12s. The 2 aforementioned effects can be triggered even when the character is off-field.
Pros
- Stat stick that allows you to stack ATK and CRIT Rate.
- It provides equal stat volume as Homa (above 50% HP).
- With his ascension CRIT Rate, Xiao starts with 56.3% CRIT Rate baseline.
Cons
- Running 4pc MH or a CRIT Rate helm with this weapon may lead to overcapping CRIT Rate. We recommend using 4pc VHA or LNO and a CRIT DMG helm instead.
- Xiao cannot, and should not, utilize the Burning dependent buffs from the weapon passive.
Tier 2
Both of these are good 5★ options and are similar to each other in that they boost Xiao’s ATK. Their performance should also be fairly similar.
Overall, these weapons are still overshadowed by PJWS and Staff of Homa due to their sole focus on ATK boosting. This makes them lose out in solo scenarios, and even more so in teams due to oversaturation of ATK and lack of CRIT Value. Compensating the lack of CRIT Value also requires you to possess improbable amounts of CRIT rolls on your substats.

Vortex Vanquisher
Base ATK: 608 | ATK: 49.6%
Increases Shield Strength by 20%. Scoring hits on opponents increases ATK by 4% for 8s. Max 5 stacks. Can only occur once every 0.3s. While protected by a shield, this ATK increase effect is increased by 100%.
Pros
- Stable ATK substat and passive that can be maintained comparatively easily.
- Better in solo or mid/low investment due to well-rounded ATK% buffs.
Cons
- Requires Zhongli in order to be used effectively.
- Relatively lower base ATK than Calamity which lets the latter receive more from ATK% buffs.
Calamity Queller
Base ATK: 741 | ATK: 16.5%
Gain 12% All Elemental DMG Bonus. Obtain Consummation for 20s after using an Elemental Skill, causing ATK to increase by 3.2% per second. This ATK increase has a maximum of 6 stacks. When the character equipped with this weapon is not on the field, Consummation’s ATK increase is doubled.
Pros
- Very high base ATK that can enhance anything that scales off ATK% quite well.
- Gives Xiao unconditional Elemental DMG Bonus in passive.
- Does not require pre-stacking. Not pre-stacking Calamity performs similarly and does not obstruct energy management.
Cons
- Will overall give less ATK than Vortex due to its smaller ATK% multipliers in substat and passive.
Tier 3
These 5★ polearm options are generally considered suboptimal compared to the others. Use them if you have them and they are your best option, but we do not recommend pulling them specifically for Xiao.

Staff of the Scarlet Sands
Base ATK: 542 | CRIT Rate: 44.1%
The equipping character gains 52% of their Elemental Mastery as bonus ATK. When an Elemental Skill hits opponents, the Dream of the Scarlet Sands effect will be gained for 10s: The equipping character will gain 28% of their Elemental Mastery as bonus ATK. Max 3 stacks.
Pros
- Highest CRIT Rate spear with 44.1% CRIT Rate. With Xiao’s ascension CRIT Rate, you get an easy 68.3% CRIT Rate baseline.
Cons
- Low base ATK.
- Xiao does not benefit from the weapon’s passive as he does not generally build EM.
- Unless your Xiao is C6, Xiao cannot maintain full uptime on the passive as stacks only last for 10s.
- Using a CRIT Rate Circlet can be inefficient for DPS.

Engulfing Lightning
Base ATK: 608 | Energy Recharge: 55.1%
ATK increased by 28% of Energy Recharge over the base 100%. You can gain a maximum bonus of 80% ATK. Gain 30% Energy Recharge for 12s after using an Elemental Burst.
Pros
- With its high amount of ER (more than 180% after Bursting), it can be utilized for batteryless team comps or more niche situations like solo runs at high refinements.
- If going batteryless, can allow Xiao to use an additional damage dealer or buffer in his team.
Cons
- Offers too much ER% if used in traditional Xiao teams with a battery.
- Does not have full uptime on its passive as it only lasts for 12s.
- Provides comparatively little in terms of damage.
- Lack of CRIT and ATK substats makes it harder to build around.
- Much better utilized on characters like Raiden and Xiangling that can double dip into building lots of ER.

Skyward Spine
Base ATK: 674 | Energy Recharge: 36.8%
Increases CRIT Rate by 8% and increases Normal ATK SPD by 12%. Additionally, Normal and Charged Attacks hits on opponents have a 50% chance to trigger a vacuum blade that deals 40% of ATK as DMG in a small AoE. This effect can occur no more than once every 2s.
Pros
- Gives a perfect amount of ER% so that you don’t have to build for any ER% substats.
- One of the highest base ATK spears.
- Offers 8%-16% CRIT Rate.
Cons
- Vacuum blades from passive deal negligible damage.
- Lack of CRIT substat makes this weapon difficult to build around.
- Provides comparatively little in terms of damage.
- ER substats significantly lower the value of this weapon’s ER.
4★ Polearms

Lithic Spear
Base ATK: 566 | ATK: 27.6%
For every character in the party who hails from Liyue, the character who equips this weapon gains a 7% ATK increase and a 3% CRIT Rate increase. This effect stacks up to 4 times.
Pros
- High base attack for a 4★ weapon.
- Passive and substat gives both CRIT Rate and ATK%.
- Passive is unconditional in combat. It is always active and does not punish player mistakes.
Cons
- The passive is very difficult to build due to a majority of Xiao’s best supports being from non-Liyue nations.
- Highly dependent on teammates and refinements; otherwise, you may find yourself lacking CRIT Rate, making it difficult to farm artifacts for.

Deathmatch
Base ATK: 454 | CRIT Rate: 36.8%
If there are at least 2 opponents nearby, ATK is increased by 16% and DEF is increased by 16%. If there are fewer than 2 opponents nearby, ATK is increased by 24%.
Pros
- High amount of CRIT Rate. With Xiao’s innate CRIT Rate, you get an easy 61% CRIT Rate at Level 90.
- The passive is easy to utilize, as it is constantly active.
Cons
- Low Base ATK for a 4★Polearm.
- Artifacts must be CRIT DMG substat heavy or risk overcapping on CRIT Rate.
Prospector’s Drill
Base ATK: 565 | ATK: 27.6%
When the wielder is healed or heals others, they will gain a Unity’s Symbol that lasts 30s, up to a maximum of 3 Symbols. When using their Elemental Skill or Burst, all Symbols will be consumed and the Struggle effect will be granted for 10s. For each Symbol consumed, gain 3% ATK and 7% All Elemental DMG Bonus. The Struggle effect can be triggered once every 15s, and Symbols can be gained even when the character is not on the field.
Pros
- High base ATK for a 4★ weapon.
- Passive and substat gives both ATK% and DMG%.
Cons
- Passive can’t be activated until at least second rotation (and you may have to delay Skill use after your first Burst because it might trigger the passive early).
- Weapon banner limited.
Blackcliff Pole
Base ATK: 510 | CRIT DMG: 55.1%
After defeating an opponent, ATK is increased by 12% for 30s. This effect has a maximum of 3 stacks, and the duration of each stack is independent of the others.
Pros
- Similar to Staff of Homa; it allows you to stack CRIT DMG with enough CRIT Rate substat rolls. Running a CRIT DMG Circlet with Blackcliff grants 117.3% CRIT DMG.
- Also gives you the option to pick a CRIT Rate Circlet.
Cons
- A very conditional passive that is generally inactive in Abyss Chambers where enemies have high HP or there is only one enemy.

Favonius Lance
Base ATK: 565 | Energy Recharge: 30.6%
CRIT Hits have a 60% chance to generate a small amount of Elemental Particles, which will regenerate 6 Energy for the character. Can only occur once every 12s.
Pros
- High Base Attack for a 4★ weapon.
- Xiao has high chances of activating the passive due to his on-field playstyle.
- At higher refinements, it reduces the ER needs of the entire team, giving more flexibility in supports.
- Nullifies the necessity of building ER% on Xiao, permitting you to chase after damage oriented substats.
- The passive permits for easier gameplay, as it lessens the necessity of funneling energy to Xiao.
- At R5, it may permit no-battery teams.
Cons
- Requires at least R3 to be utilized properly.
- With less invested builds, it may be difficult for your Xiao to do relevant damage.
Missive Windspear
Base ATK: 510 | ATK: 41.3%
Within 10s after an Elemental Reaction is triggered, ATK is increased by 24% and Elemental Mastery is increased by 96. [R5]
Pros
- Passive can potentially last all of Xiao’s Burst duration, assuming you have a team composition where Xiao can consistently Swirl.
- Even without its passive, it is a decent weapon due to its substat and passive giving ATK%.
Cons
- Due to its high ATK%, it will require plenty of CRIT substats on your artifacts to compete against some other 4★ options.
Other Polearm Options
Any other Polearms not mentioned here are considered suboptimal for Xiao and should generally be avoided or only used until a more suitable Polearm can be obtained.
Supports
The purpose of this section is to provide insight on how to build certain units to be used alongside Xiao. If you’d like a more comprehensive overview on how to build Xiao’s teams, we suggest looking at the Teams section.
Anemo
All Anemo characters can serve as a battery for Xiao with differing levels of capability; generally speaking utilizing any is better than none at all. For each Anemo support, we’ve included a recommended amount of ER to run on Xiao.
Note: ER needs are heavily dependent on what team you’re running, what your rotations are like, and what enemies you’re fighting. Your mileage may vary, so please test your ER needs in game.
- Buffer
- Shred
- Crowd control (C6)
- Off-field DPS (C6)
- Hatsune Miku
- The One True Xiao Support
- Faruzan is Xiao’s best support. She offers a vast range of utility from immense buffs to non-5*-locked Anemo RES Shred, all of which Xiao benefits from. She single-handedly raises Xiao’s personal damage by an approximate 40%-60% depending on buffs and team.
- She enables other CRIT-built Anemo units to be run alongside Xiao as they can benefit from the aforementioned buffs too.
- Before C6, due to her limited particle generation, it is recommended to run her along with another Anemo battery.
Recommended Xiao ER: 140% (Pre-C6 Faruzan), 120 – 130% (C6 Faruzan)
Pre-C6 Faruzan Build
- Artifacts: Anything that gets 250 – 275% ER; 2pc Emblem of Severed Fates (EoSF)
- Mainstats: Energy Recharge (ER) | Anything | Anything
- Weapons: Favonius Warbow
C6 Faruzan Build
- Artifacts: 4pc Tenacity of the Millelith (TotM), 2pc ATK% 2pc Anemo, 4pc EoSF
- Mainstats: ER | Anemo DMG | CRIT
- Weapons: Favonius Warbow, Elegy for the End, Skyward Harp, Any Damage Bow
- Buffer
- CRIT Rate (A1)
- Plunge Flat DMG (A4)
- Plunge DMG% (Signature)
- Healer (Burst)
- Mother
- Xianyun is a premium Xiao support, rewarding high investment builds at C0 by providing up to 9000 Flat DMG (or 18000 Flat DMG at C2) to 8 of Xiao’s Plunge Attacks to a single enemy while her Burst is active.
- She also provides consistent team-wide healing, synergizing well with HP-draining mechanics like Furina’s Fanfare stacking.
- She generates 5 Anemo particles per Elemental Skill, lowering ER requirements in Triple Anemo compositions.
- Her Burst buffs and heals follow the active character.
Energy Requirements
- She generally wants to funnel her Skill’s particles to herself, so she prefers to be run alongside another Anemo battery (e.g., C1 Sucrose, C4/Sacrificial Sword Lynette).
- C6 Faruzan is required to maximize her value while keeping Xiao’s ER requirements low. Other Anemo batteries (e.g., Sucrose, Lynette) can work but at severely reduced efficacy.
- Her C1 can help reduce ER needs.
Recommended Xiao ER: 115% (C6 Faruzan)–140% (other)
Recommended Build
- Artifacts: 4pc Noblesse Oblige, 2pc ATK%/ATK%
- Mainstats: ATK% | ATK% | ATK%
- Weapons: Crane’s Echoing Call, Skyward Atlas, TTDS, Oathsworn Eye, Cashflow Supervision, Flowing Purity
Lan Yan
- Battery
- Buff (TTDS)
- Shield
- Burst DPS
- Lan Yan is a good Battery for Xiao due to her Skill generating 3 particles. These particles can be funneled to Xiao.
- Her C6 provides one additional Skill charge.
- As a catalyst user, she can use Thrilling Tales of Dragon Slayers (TTDS). Alternatively, she can be built with a DPS weapon to deal damage with her Skill and Burst.
- Provides one of the strongest shields in the game for 12.5s (partial uptime on Xiao’s Burst).
Energy Requirements
- She generally wants to funnel her Skill’s particles to herself, so she prefers to be run alongside another Anemo battery (e.g., C1 Sucrose, C4/Sacrificial Sword Lynette).
- C6 Faruzan is required to maximize her value while keeping Xiao’s ER requirements low. Other Anemo batteries (e.g., Sucrose, Lynette) can work but at severely reduced efficacy.
- Her C1 can help reduce ER needs.
Recommended Xiao ER: 120–130%
Recommended Build
- Artifacts: 4pc Scroll, 4pc VV, Anything
- Mainstats: ATK or ER | ATK or Anemo DMG | ATK or CRIT
- Weapons: TTDS, ATK% weapons, CRIT weapons
Sucrose
- Battery
- Crowd control
- Buff (TTDS)
- Sucrose is the best possible Battery one can have for Xiao due to her multiple Skill charges and ability to prefunnel his Burst.
- At C0 she should use Sacrificial Fragments, but at C1+ she can equip whatever Catalyst suits your needs, generally Thrilling Tales of Dragon Slayers (TTDS) or Prototype Amber.
Recommended Xiao ER: 120 – 130%
Recommended Build
- Artifacts: 4pc Viridescent Venerer (VV), Anything
- Mainstats: Anything or ER | Anemo DMG | CRIT
- Weapons: If C0, Sacrificial Fragments. If C1+, TTDS or Prototype Amber.
Jean
- Battery
- Healer
- Burst DPS
- Buff (4pc NO)
- Shred (C4)
- Jean’s main strength lies in her multi-purposeness. She can be built as a Burst DPS, while still being an excellent party-wide healer and good battery.
- Jean enables Xiao Furina teams by sustaining the team’s HP loss and stacking Fanfare points quickly.*
- Jean’s C4 provides 40% Anemo RES shred within her Burst field.*
- 4pc Ocean-Hued Clam is a good alternative to 4pc NO for Burst DPS Jean. For details, please see this sheet.
*Note: With Furina or her C4, it is important to ensure Jean can comfortably Burst every rotation.
Recommended Xiao ER: 130 – 140%
Recommended Build
See Jean Build Comparison Sheet
- Artifacts: 4pc NO, 2pc Anemo 2pc ATK, 4pc Clam
- Mainstats: ER/ATK | Anemo DMG/ATK | CRIT
- Weapons: Favonius Sword, Freedom Sworn, Any 5* Sword, Amenoma Kageuchi, Festering Desire.
Lynette
- Battery
- Off-field DPS
- Crowd Control (Taunt)
- Lynette is a great battery option after Sucrose and C6 Faruzan, and players can get a free copy once they reach AR25, making her the best free-to-play Anemo support.
- She generates 4 Anemo particles on her Skill, and can get an extra Skill charge once she reaches C4.
- In addition to her batterying capabilities, she holds off-field DPS potential once built, especially when paired with Faruzan.
Recommended Xiao ER: 120 – 130%
Recommended Build
- Artifacts: 4pc Noblesse (NO), 4pc NO, 2pc Anemo 2pc ATK, 4pc Emblem of Severed Fates (EoSF)
- Mainstats: ATK | Anemo DMG | CRIT
- Weapons:
- Support: Favonius Sword, Sacrificial Sword, Festering Desire
- Sub-DPS: Any 5* Sword, Amenoma Kageuchi
Sayu
- Battery
- Healer
- Buff (4pc NO)
- Functions much like Jean, but requires the below technique to battery Xiao properly.
- A short Hold Skill must be performed in order to hit an enemy with both the roll and kick to generate 3 particles. If only the kick lands, only 2 particles will be generated.
Recommended Xiao ER: 130 – 140%
Recommended Build
- Artifacts: 4pc Clam, 4pc NO
- Mainstats:
- If non-C6: ATK/EM | ATK | ATK/HB
- If C6: EM/ER | EM | EM
- Weapon: Favonius Greatsword (needs CRIT Rate), Sacrificial Greatsword.
Kazuha
- Battery
- Off-field DPS
- Crowd control
- Does not buff Xiao’s Anemo DMG. Thus, should only be used in conjunction with either Faruzan for a CRIT build, or a strong Elemental Off-field DPS to buff their damage.
- With a Favonius or Sacrificial Sword, generates a lot of energy and has great grouping.
- Kazuha’s Elemental Skill and Burst unfortunately takes quite a bit of time, which results with the loss of other party member’s ability duration for Xiao. His long field presence also equals to extending rotations.
Recommended Xiao ER: 130%
Recommended Build
- Artifacts: 2pc Anemo 2pc ATK, 4pc VV
- Mainstats: ATK | Anemo DMG | CRIT or triple EM
- Weapons: Favonius Sword, Sacrificial Sword, Xiphos’ Moonlight, Any DPS Sword.
Venti
- Battery
- Off-field DPS
- Crowd control
- Shred (C2, C6)
- While Venti is a decent battery, his Elemental Burst can hurt Xiao’s DPS against smaller enemies that are lifted up in his Burst.
- If you want to use Venti’s Burst for Off-field damage, it should be used at the start of rotations to group enemies and minimize interference with Xiao’s plunges.
Recommended Xiao ER: 130%
Recommended Build
- Artifacts: 2pc NO/Anemo/ATK% of choice, 4pc VV
- Mainstats: ATK | Anemo DMG | CRIT or triple EM
- Weapons:
- Anemo DPS Build: The Stringless, Polar Star, any 5* offensive Bows.
- EM Build: The Stringless, Elegy for the End, Windblume Ode.

Anemo Traveler
- Battery
- Shred (C6)
- Crowd control
- Elemental Burst shreds Anemo Resistance at C6.
- Burst can be detrimental against smaller enemies as it carries them away from Xiao. Thus, it should be used against sturdier enemies.
- Burst requires high ER to use every rotation.
- A Quick Hold Skill should be utilized to generate 3-4 particles (Tap Skill only generates 2).
Recommended Xiao ER: 140 – 150%
Recommended Build
- Mainstats: ATK/ER | Anemo DMG | CRIT
- Weapons: Favonius Sword, Sacrificial Sword.
Geo
The available Geo supports are unique in that their utility and Off-field damage are often able to last for the majority or entirety of Xiao’s Burst. Unfortunately, they only excel when paired with Zhongli.
Zhongli
- Shield
- RES Shred
- Buff (4pc TotM, 4pc NO)
- Crowd control
- Healer (C6)
- Off-field DPS & Burst DPS
- Eye Candy
- Moral support
- Xiao’s Savior
- Provides one of the strongest shields in the game for the entirety of Xiao’s Burst, allowing Xiao to resist stagger from enemies and focus on plunging safely, even permitting healer-less comps.
- Requires no Energy management to function effectively.
- Zhongli’s shield offers Anemo RES Shred at C0 and easy access to Geo Resonance.
- Zhongli’s Burst can crowd control by petrifying enemies. If built for damage, his Burst and Skill resonance damage can also deal notable Burst and off-field damage.
- Can run 4pc TotM or 4pc NO to buff his team.
Shield Bot Build (Recommended)
A Zhongli whose sole role and purpose is to be a shielder, advised to get up to 40k+ HP. His Burst is ignored entirely. Resource friendly, as it does not require optimal substats. Comfortable for selfish carries like Xiao.
- Artifacts: 4pc or 2pc TotM
- Mainstats: HP | HP | HP
- Weapons: Black Tassel, Favonius Lance.
DPS Build
This is a high-investment build path and only recommended to those who have resources to spare. Additional sources of damage are always beneficial for clearing Spiral Abyss.
- Artifacts: 4pc NO, 2pc TotM/Archaic Petra (AP)/NO/ATK, 4pc EoSF, 4pc TotM
- Mainstats: HP/ATK | Geo DMG | CRIT
- Weapons: Staff of Homa, “The Catch”, Any DPS Polearm.
Chiori
- Off-field DPS
- Buff (Geo Resonance)
- Chiori is a Geo off-field damage dealer whose Elemental Skill lasts most of Xiao’s Burst duration (17s). Her Skill cannot be destroyed.
- She is recommended to be utilized with Zhongli to maximize her damage potential:
- His Geo construct enables Chiori’s second doll.
- His shield activates Geo Resonance, providing Geo RES shred.
- She generates 1.2 particles with an interval of 3 seconds, making her a decent energy provider.
- Her C1 is not necessary for Xiao teams due to her generally being used with Zhongli.
Recommended Build
- Artifacts: 4pc Golden Troupe, 4pc Husk of Opulent Dreams
- Mainstats: DEF | Geo DMG | CRIT
- Weapons: Uraku Misugiri, Wolf-Fang, Cinnabar Spindle, Harbinger of Dawn, Other High-CRIT 5* Weapons
Albedo
- Off-field DPS
- Buff (Geo Resonance)
- Comfortable off-field DPS; one of the only in this role whose Skill lasts the entirety of Xiao’s Burst duration.
- Decent particle generation through Elemental Skill (around equal to C6 Fischl).
- Has cheap F2P weapon options, including Cinnabar Spindle and R5 Harbinger of Dawn.
- Best utilized with Zhongli to enable Geo Resonance in order to unlock full off-field DPS potential.
Recommended Build
- Artifacts: 4pc Husk of Opulent Dreams (Husk), 4pc Golden Troupe, 2pc 2pc Husk/Archaic Petra/Golden Troupe
- Mainstats: DEF | Geo DMG | CRIT
- Weapons: Uraku Misugiri, Cinnabar Spindle, R5 Harbinger of Dawn, 5* Weapons.

Geo Traveler
- Off-field DPS
- Buff (Geo Resonance, 4pc NO)
- Crowd control
- Only recommended to be utilized with Zhongli, who enables Geo Resonance.
- If invested, can dish out considerable Burst damage through their Elemental Skill and Burst.
- CRIT Rate increased by 10% within their Elemental Burst.
- Can run 4pc NO to offer ATK buff on Burst.
- Elemental Burst can help contain enemies.
- If used with Zhongli, can help proc 4pc TotM buff more effectively by expanding resonance area.
- If used with a built Zhongli, can deal passive damage through resonance ticks.
Recommended Build
- Artifacts: 4pc NO, 2pc NO/AP/EoSF/ATK of choice
- Mainstats: ATK/ER | Geo DMG | CRIT
- Weapons: R5 Harbinger of Dawn, Festering Desire, Favonius Sword, Any DPS Sword.
Pyro
Bennett
- Healer
- Buff (Burst, 4pc NO)
- Elemental Burst offers fast healing.
- Offers ATK buff from both his Talent and 4pc NO.
- Due to Xiao’s plunges knocking back enemies, it can be hard to stay within his circle.
- His ER needs in a Xiao team is higher than others, and you may want more ER% than average to be able to Burst every rotation with ease.
Recommended Build
- Artifacts: 4pc NO
- Mainstats: ER | Anything | Anything
- Weapons: Skyward Blade, Sapwood Blade, The Alley Flash, Any 5* Weapon
Xiangling
- Off-field DPS
- Buff (Pyro Resonance, Guoba)
- Offers powerful off-field Pyro DMG through her Pyronado, which travels at ground level.
- Often requires Bennett or Raiden in the same comp to funnel her Burst due to its expensive energy cost.
- Even with Bennett, ensuring she has enough energy for continuous Bursting without wasting time batterying her can be difficult. She is prone to extending your rotations.
Recommended Build
- Artifacts: 4pc EoSF, 4pc Crimson Witch of Flames (CWoF), DPS Artifacts
- Mainstats: ATK/EM/ER | Pyro | CRIT
- Weapons: “The Catch”, Favonius Lance, Any DPS Weapon

Thoma
- Shielder
- Buff (Pyro Resonance, C6)
- Thoma offers a decent shield with long uptime. However, his shield stacking requires lingering NAs to proc, which can make him tricky to use for players.
- C6 offers 15% Plunge DMG Bonus. However, its value is diminished given Xiao’s abundance of DMG Bonus.
- Energy hungry. Requires at least Bennett to help fund his Burst. Recommended to have at least C4 to use with Xiao.
Recommended Build
- Artifacts: 2pc EoSF, 2pc TotM
- Mainstats: ER | HP | HP/CRIT Rate
- Weapons: Favonius Lance
Cryo

Diona
- Shield
- Healer
- Buff (Cryo Resonance, 4pc NO)
- Battery
- Provides a solid shield for up to 12s (partial uptime on Xiao’s Burst).
- Solid healing, though ticks are slower than other options.
- Can consistently generate particles with Favonius Bow due to her multi-hit Hold Elemental Skill.
- Has potential to battery other Cryo supports in a double Cryo team comp.
Recommended Build
- Artifacts: 4pc NO, 2pc Ocean-Hued Clam (Clam)/2pc TotM
- Mainstats: HP | HP | HP/CRIT/HB
- Weapons: Favonius Bow, Sacrificial Bow
Rosaria
- Off-field DPS
- Buff (Cryo Resonance, 4pc NO)
- Offers off-field Cryo DMG through her Burst.
- Consistent Cryo application allows her to maintain Cryo aura on enemies for Cryo Resonance uptime (usually with Diona).
- When maximized, A4 passive shares an extra 15 CRIT Rate.
Recommended Build
- Artifacts: 4pc NO, 4pc Emblem, 2pc NO 2pc Blizzard Strayer (BS)
- Mainstats: ATK/ER | ATK/Cryo DMG | CRIT
- Weapons: Favonius Lance, “The Catch”
Qiqi
- Healer
- Off-field DPS (4pc Clam)
- Buff (Cryo Resonance)
- Strongest off-field Healer.
- 4pc Ocean-Hued Clam permits Qiqi to be an off-field DPS.
- Only Liyue healer (for Lithic comps).
- No particle generation.
Recommended Build
- Artifacts: 4pc Clam, 4pc TotM
- Mainstats: ATK/ER | ATK | ATK/HB
- Weapons: Favonius Sword, Sacrificial Sword
Electro
Iansan
- Buff (Burst, C2)
- Iansan’s Burst provides Xiao up to 690 ATK (T10) for 12s, making her a great alternative to Bennett in terms of buffing ability.
- With her C5, this cap increases to 810 ATK (T13).
- With her C6, the duration increases to 15s, making her a stronger buffer than Bennett.
- At C2, she can provide an extra 30% ATK for 15s.
- Iansan’s ATK buff stacks with character movement and follows the active character, both of which synergize well with Xiao’s mobile play style.
- Due to the lack of Natlan supports that synergize with Xiao, Iansan will not be able to reliably proc her Ascension 4 Passive’s healing or her C6’s DMG% buff.
Recommended Build
- Artifacts: 4pc NO, 2pc ATK% or ER%
- Mainstats: ATK/ER | ATK | ATK/CRIT
- She needs 2556 ATK (C0-C4) and 3000 ATK (C5+).
- Weapons: Favonius Lance, Skyward Spine, Tamayuratei no Ohanashi, Any ATK%, ER%, or high Base ATK weapon
Raiden
- Off-field DPS
- Team battery
- Please see more details in our Xiaoden guide.
- Enables Xiao to continuously Burst with minimal ER requirements and provides flexibility with rotations by eliminating the need to funnel.
- Mitigates Xiao’s disadvantages against phased bosses and in energy-scarce scenarios.
- Allows Xiao to use teammates with high Burst costs.
- Even at C0, Raiden’s personal damage is worth the rotation extension.
- Raiden needs more investment than other battery options, especially Sucrose who only needs TTDS.
Recommended Build
- Artifacts: 4pc EoSF
- Mainstats: ATK/ER | ATK/Electro DMG | CRIT
- Weapons: “The Catch”, Any 5* Weapon
Fischl
- Off-field DPS
- Buff (4p TotM, Elegy)
- Provides considerable single-target off-field DPS.
- Can also be converted into a pure support build with Elegy for the End and 4pc TotM for buffing purposes.
- Fischl’s C6 can be procced with NA cancels between Xiao’s plunges.
Recommended Build
- Artifacts: 4pc Golden Troupe, 2pc ATK 2pc TF, 4pc TotM
- Mainstats: ATK | ATK/Electro DMG | CRIT
- Weapons:
- Off-field DPS: The Stringless, Alley Hunter, Any 5* Bow
- Support: Elegy for the End, Favonius Bow
Hydro
Furina
- Off-field DPS
- Buff (Burst)
- Furina provides strong off-field DPS and buffs with full uptime and no range limitations (i.e., no “circle impact”).
- Furina’s Skill (Ousia) provides strong off-field DPS.
- Furina’s Burst provides up to 75% DMG Bonus at C0 and up to 100% DMG Bonus with her C1.
- Incentivizes the use of a party-wide healer, such as Jean, to quickly stack Fanfare. Please see Teams for more details.
- As a solo Hydro, Furina will generally require between 180-200% ER (or lower depending on the number of Favonius weapons in the team).
Recommended Build
- Artifacts: 4pc Golden Troupe
- Mainstats: ER/HP | Hydro/HP | CRIT/HP
- Weapons: Splendor of Tranquil Waters, R5 Festering Desire, R5 Fleuve Cendre Ferryman, Favonius Sword

Yelan
- Off-field DPS
- Buff (A4 Passive)
- Sustains Burst for most of Xiao’s field time and provides DMG Bonus% from her A4 passive, making her a solid buffer and off-field DPS.
- Requires using JET or NA cancels to utilize damage, but is easier to proc than most as there is no input delay.
- Has high ER requirements to sustain Burst uptime; therefore may require Raiden or Favonius Weapons.
Recommended Build
- Artifacts: 4pc EoSF, 2pc NO/TotM/Heart of Depth (HoD) of choice
- Mainstats: ER/HP | Hydro/HP | CRIT/HP
- Weapons: Aqua Simulacra, Elegy for the End, Favonius Warbow

Barbara
- Healer
- Off-field DPS (4pc Clam)
- Buff (TTDS)
- Can equip Prototype Amber or Everlasting Moonglow with 4pc Clam to deal passive bubble damage. She can proc 7 bubbles over her E duration.
- Can equip Thrilling Tales of Dragon Slayers to provide ATK buff (although it complicates rotations).
- Applies Wet to Xiao, making him susceptible to Freeze, Electrocharge, etc. depending on the Abyss enemies, this can make her difficult to play with.
- No particle generation.
- Note: Barbara is only included in our guide as she’s the only true free healing unit. If you have other built healers, we recommend using them solely on the merit that they’re built.
Recommended Build
- Artifacts: 4pc Clam
- Mainstats: HP | HP | HP/HB
- Weapons: Prototype Amber, Everlasting Moonglow, TTDS
Xingqiu
- Off-field DPS
- Healer (Pseudo)
- Damage Reduction
- Provides stagger resistance and supplemental healing.
- Requires using JET or lingering NA cancels between plunges in order to utilize as a proper off-field DPS.
Recommended Build
- Artifacts: 4pc EoSF, 4pc NO, 2pc HoD 2pc NO
- Mainstats: ER/ATK | Hydro DMG | CRIT
- Weapons: Sacrificial Sword, Favonius Sword, Primordial Jade Cutter, Mistsplitter Reforged, R5 Harbinger of Dawn
Teams
Overview
Xiao is a Hypercarry, meaning that he should be on the field dealing damage as often as possible. Consequently, his most synergistic supports will help ensure the following:
- Xiao has enough energy to ensure consistent Bursts.
- Xiao’s time on-field dealing damage is maximized.
- Xiao’s team rotations are kept as short as possible.
- Xiao does not die.
- Xiao’s damage in Burst is being supported by his team and for as long as possible.
To achieve these goals, we can generally categorize his supports into the following roles:
- Battery: Funds Xiao Energy for continuous Bursts
- Off-Field DPS / Burst DPS: A secondary damage dealer whose damage can be dealt off-field or quickly on ability cast.
- Sustain: Heals Xiao from enemy damage and Burst HP drain, or shields him from enemy damage
- Utility: Buffs Xiao’s damage, reduces enemy’s Defense/Resistance, provides anti-stagger, or offers crowd control for easier AoE
Battery
For more energy mechanics, please see Energy Management.
Xiao is a character whose damage is reliant on the utilization of his Elemental Burst. For this reason, we strongly recommend a battery to reliably obtain his Burst back.
The battery generates particles using their own Skills and then swaps to Xiao so that their particles “funnel” into Xiao and fund his Burst. As Xiao will gain more Energy absorbing Anemo Particles than other Elemental Particles, we generally recommend Anemo batteries.
Note: If your Xiao team is strong enough to only require 1-2 Bursts to clear content, then you may not need to run a dedicated Anemo battery.
Xiao Team Comp Formula
The basics of Xiao’s team is pairing him with a battery and two flex characters. We recommend that at least one of these flex characters helps Xiao’s sustain in order to ensure consistent and comfortable clears.
However, there is no set formula for creating a viable Xiao team. As long as the above five conditions are met, then his supports and build can be flexible to meet individual enemy and Abyss chamber needs.
Xiao

Battery

Flex

Flex
Example Team Comps
Disclaimer 1: This is not an exhaustive list. Many of these team comps are flexible, and many supports can be flexed in place of other options. Team comps in Spiral Abyss are also highly dependent per chamber. For specific team building advice, please visit Xiao Mains’ Discord and ask in the #questions and #spiral·abyss channels.
Disclaimer 2: While this guide highlights certain teams themed around Elemental Resonances, Elemental Resonance bonuses are generally overrated and not necessary with Xiao. It is better to prioritize a character’s overall value in the team comp beyond just enabling certain Resonance bonuses.
👑 Final Fantasy 20 (FFXX) 👑
This is THE ultimate end-game Xiao team to maximize both his own and the entire team’s damage. This team has great synergy on multiple fronts:
- Xianyun’s team-wide healing synergizes well with Furina’s HP-draining mechanics, allowing her to consistently stack Fanfare while keeping the team healthy.
- C6 Faruzan, on top of her usual massive buffs for Xiao’s damage, provides an abundance of Anemo particles that lower Xiao and Xianyun’s ER requirements.
- Xianyun’s Flat DMG buff will scale with the massive amount of DMG Bonus% (Xiao Burst, Furina Burst, Faruzan Burst) and CRIT DMG (C6 Faruzan) provided in this team.
- Eliminates virtually all “Circle Impact” due to Furina and Xianyun’s buffs following the active character and Faruzan’s wide-range Burst.
Considerations
- To maximize the efficacy of this team, heavy investment is required on party member’s builds and/or Constellations. Notably, C6 Faruzan is required for energy management.
- Furina and Xianyun Constellations are not required to play this team. However, this team’s performance does scale very well with their Constellations (notably their C2s) and signature weapon refinements.
Xiao
Xianyun
Furina
C6 Faruzan
Rotations
C6 Faruzan: Faruzan Q > Furina EQ > Xianyun EPQ > Xiao EE Q
Non-C6 Faruzan: Faruzan EQ > Furina EQ > Xianyun EPQ > Faruzan CA > Xiao EE Q E
Xiao Hypercarry
Xiao’s traditional Hypercarry teams focus on purely buffing Xiao’s personal damage. They generally consist of C6 Faruzan and Bennett or Iansan, as these two supports provide not only huge personal buffs (Anemo DMG, RES Shred, CRIT DMG, ATK) but also satisfy Xiao’s battery and sustain requirements.
Sucrose with TTDS also functions as a viable Faruzan replacement, though not to the same efficacy.
Considerations
- Team’s DPS scales almost entirely off of Xiao’s investment, with optional investment for his supports.
- Bennett’s Burst creates “circle impact” for the team. If Xiao is forced outside of Bennett’s Burst range, the team’s DPS will drop dramatically.
- Iansan is a great alternative to Bennett, offering a comparable ATK buff. With her C6, she offers more buffs than Bennett due to her increased Burst duration (12s -> 15s).
Xiao
Faruzan
Iansan/Bennett

Flex
Flex Options
- Zhongli – Strong shield for survivability and Interruption Resistance. Additional RES Shred and buffs. His RES Shred is diminished in value with Faruzan’s Anemo RES Shred, but it is still valuable (especially for high Anemo RES enemies).
- Furina – Strong off-field DPS and buffs. Note: Furina will be unable to maximize Fanfare in this team at C0. See Xiaorina section below.
- Xianyun – Provides significant Flat DMG and minor CRIT Rate buffs to Xiao’s Plunge Attacks. R1 Crane’s Echoing Call can also provide Plunge Attack DMG%. Generates 5 Anemo particles on Skill-Plunge.
- Jean C4 – Provides Anemo RES Shred and can wield Freedom-Sworn for additional ATK% and Plunge DMG buffs. When built for damage, also provides notable Burst DPS on cast.
- Yelan – Offers a high amount of single-target DPS and DMG Bonus through her Burst and A4, respectively. Requires N1 cancels to proc her Burst.
- Thoma – Long duration shield with 15% Plunge DMG Bonus at C6. However, it is not recommended to run Thoma in this slot unless he is C6 due to energy constraints, requiring lingering NA cancels, and limited utility.
Xiaorina
Xiao can benefit from Furina’s strong off-field DPS and buffs, both of which have full uptime and no range limitations. To sustain both Xiao’s self HP drain and Furina’s party-wide HP drain, this team is generally incentivized to run a party-wide healer that can stack Fanfare points quickly and ensure the whole team stays HP positive.
However, Furina can still be of great advantage to traditional Xiao-Bennett teams. Despite Bennett only healing the on-field character to 70% of their max HP (and thus cannot reliably proc Furina’s A1 to heal the team), his strong ATK buffs make up for the reduced Fanfare points.
Considerations
- High team DPS due to Furina buffing both her own and Xiao’s damage. See XiaoRina sheet by itslin for team damage comparisons.
- Team DPS scales with both Xiao and Furina’s investment. Furina’s constellations (notably C2) increase both the team’s DPS and team building flexibility.
- Furina can stack Fanfare points much more easily, granting the entire party up to 100% DMG Bonus.
- Due to the quick stacking, Bennett can be used as the solo healer and still allow the team to maximize Fanfare, although Jean is still the best option for capping C2 Furina’s max HP increase.
- Incentivizes a strong party-wide healer to maximize Fanfare points.
- Generally more fragile, as Xiao is losing HP more quickly while on-field and may be lacking a defensive option in this team.
Xiao
Furina
Healer

Flex
Healer Options
- Xianyun – Provides consistent team-wide healing to maintain the entire team’s HP and stack Fanfare. Provides significant Flat DMG and minor CRIT Rate buffs to Xiao’s Plunge Attacks. Generates 5 Anemo particles on Skill-Plunge.
- Jean – The best healer for Xiao-Furina. She can fully heal everyone’s HP with her Burst, battery Xiao, and provide buffs with 4pc NO, her C4, and Freedom Sworn.
- Bennett –
- Bennett’s heals will mainly target Xiao and only trigger when he falls below 70% HP. Thus, Furina cannot reliably use her A1 to heal other party members and she will be unable to maximize Fanfare at C0.
- However, Bennett’s strong ATK buffs to Xiao’s personal DPS make up for the loss in DMG% from Fanfare.
- Bennett’s drawbacks are relaxed with C2 Furina, as she can stack Fanfare much more quickly.
- Other healers are viable in this slot but with reduced efficacy.
Flex Options
- Faruzan – BiS support. Use her if you have her C2+.
- Zhongli – Strong shield for survivability and Interruption Resistance. Additional RES Shred and buffs. Provides additional comfort on this team to minimize HP loss from enemy attacks.
- Yelan – Offers a high amount of single-target DPS as well as DMG% buffs. Enables Hydro Resonance and lowers ER requirements for both herself and Furina.
Rotations
With C6 Faruzan, the recommended rotation is:
Faruzan Q > Furina E Q > Jean E Q > Xiao EE Q (example)
With non-C6 Faruzan, you may need to add in additional Skill usages from Faruzan and Jean to battery Xiao between Bursts. With non-C2 Faruzan, you will want to rotate Faruzan after Furina or Jean Q.
With Bennett and C6 Faruzan, the recommended rotation is:
Faruzan Q > Furina E Q > Bennett E Q > Xiao EE Q (example)
With Bennett and Jean, the recommended rotation is:
Furina E Q > Jean E Q > Bennett E Q > Xiao EE Q
Xiao Faruzan Triple Anemo
Xiao Faruzan Triple Anemo takes advantage of Faruzan’s team wide Anemo buffs while also alleviating ER requirements. Anemo supports who were previously unideal batteries can now be run alongside Xiao as independent damage dealers. Because they are Anemo, they can also passively contribute Anemo Particles to the team. This team is recommended for both pre-C6 and C6 Faruzan players.
Considerations
- Lowers ER requirements for all Anemo characters in the team, allowing them smoother rotations and more DMG oriented substats.
- Other Anemo characters may take buff uptime from Xiao, depending on rotation.
Xiao
Faruzan
Anemo

Flex
Anemo Options
- Xianyun – Provides consistent team-wide healing to maintain the entire team’s HP. Provides significant Flat DMG and minor CRIT Rate buffs to Xiao’s Plunge Attacks. Generates 5 Anemo particles on Skill-Plunge.
- Jean – Provides team-wide healing and can serve as a Burst DPS when built. Generates particles relatively quickly with her Tap Skill. Her C4 is particularly strong in this slot due to additional Anemo RES Shred.
- Kazuha – Provides crowd control and Off-Field DPS. C2 Faruzan enables the option of CRIT Kazuha, but requires him to be built for a niche Anemo DPS option.
- Kazuha’s Elemental Skill and Burst unfortunately takes quite a bit of time, which results with the loss of other party member’s ability duration for Xiao. His long field presence also equals to extending rotations.
- Sucrose – Provides TTDS and battery capabilities. C2 Faruzan enables the option of CRIT Sucrose, but requires her to be built for a niche Anemo DPS option.
- Venti – Provides crowd control and off-field damage. Generates particles relatively quickly and can funnel other characters.
- Be careful that his Burst may lift enemies out of Xiao’s plunge range. Using his Burst at the start of rotations can mitigate this, but means he cannot snapshot buffs like Bennett.
Flex Options
- Zhongli – Strong shield for survivability and Interruption Resistance. Additional RES Shred and buffs. His RES Shred is diminished in value with Faruzan’s Anemo RES Shred, but it is still valuable (especially for high Anemo RES enemies).
- Bennett – High ATK Buff and heals. There is potential loss of buff time with pre-C6 Faruzan due to her needing to pre-funnel Xiao.
- Yelan – Offers a high amount of single-target DPS as well as DMG% buffs. Locks your Anemo flex slot to sustain options (Jean or Sayu) and demands N1 procs.
Xiao Double Geo
A classic Xiao comp featuring the very Archon that Xiao devoted his life to. Zhongli ensures easy access to Geo Resonance for a stronger shield and 15% DMG Bonus for everyone in the party. His shield is also one of the few sources of Anemo RES Shred that can last for the entire duration of Xiao’s Burst. The main restriction of this comp is the necessity of a battery for the fourth slot.
Xiao
Battery / Healer

Zhongli
Geo

Geo Options
- Chiori – Chiori is a strong candidate as a second Geo teammate. She offers the highest off-field damage out of the flex options and can benefit from Geo Resonance and Zhongli’s pillar construct, both of which add to her damage.
- Albedo – Albedo is Xiao’s most comfortable off-field DPS, as his Skill is one of the few abilities that lasts for the entirety of Xiao’s Burst duration. His personal damage benefits massively from Geo Resonance with Zhongli.
- Geo Traveler – With low investment, Traveler provides 10% CRIT Rate, crowd control through caging enemies with the Burst, and another Geo Construct for Zhongli’s Pillar to resonate off of. At high investment, Traveler can also deal respectable damage.
Battery / Healer Options
- Faruzan – BiS support. Recommended to have her C6 for this comp, though pre-C6 Faruzan may be used if you have higher ER or C1 on Xiao.
- Jean – The perfect package, offering battery, heals, and Burst damage. C4 Jean in particular shines in this comp and places it above the Sucrose variant.
- Sayu – Budget Jean option, offering battery and heals for Xiao.
- Sucrose – While not a healer, Sucrose is recommended for players who can rely solely on Zhongli’s shield to stay alive. Sucrose offers a lot of Energy and a TTDS buff. Especially valuable for Staff of Homa users.
Rotations
Adjust by Anemo unit used.
Rotation with Chiori. Put her to the left of the unit that comes next in the rotation.
Faruzan C6 Q (C2+ E CA Q) > Zhongli hE > Chiori E tE > Jean E Q / Sucrose E / Lynette E Q E / Faruzan C0 E Q CA / Xianyun C1 EP EP Q > Xiao 2E Q
Rotation with Albedo.
Albedo hE > Faruzan C6 Q (C2+ E CA Q) > Zhongli hE > Jean E Q / Sucrose E / Lynette E Q E / Faruzan C0 E Q CA / Xianyun C1 EP EP Q > Xiao 2E Q
Rotation with Geo MC.
Faruzan C6 Q (C2+ E CA Q) > Zhongli hE > GMC hE Q > Jean E Q / Sucrose E / Lynette E Q E / Faruzan C0 E Q CA / Xianyun C1 EP EP Q > Xiao 2E Q
Xiao Double Cryo
A simple, non-Zhongli Xiao comp that begins with pairing him with Diona. Diona serves as a multi-purpose support with her shielding, healing, battery capability through Favonius Bow, and providing particles to the secondary Cryo character. A secondary Cryo is inserted for Cryo Resonance, which provides Xiao with 15% CRIT Rate against enemies applied with Cryo.
Xiao
Battery
Diona
Cryo

Cryo Options
- Rosaria – Consistent Cryo application and CRIT Rate sharing capabilities (up to 15%). With investment, she can also be a strong off-field DPS.
- When in a team with Xiao/Sucrose/Diona/Rosaria, this team has very little Energy issues, making it comfortable and smooth to utilize. Sucrose’s Burst can absorb Cryo and spread the aura, allowing easier access to Cryo Resonance. Video example with Prototype Starglitter Xiao.
- Ganyu – Large-scale off-field Cryo application and taunt. Her capability to self-funnel her Burst makes her comfortable to utilize. She can be built entirely as a support, or as a fully invested off-field DPS.
- Qiqi – Can be used to replace Diona if a shield is not needed. Her excellent heals can easily keep Xiao alive while also dealing off-field DPS damage via the 4pc Clam set. Her lack of Energy can lead to uptime issues, which is why running her with a second Cryo is recommended.
Xiao Double Pyro
A comp that is heavily reliant on having Bennett. Bennett is ideal for this comp simply because he is a Pyro healer and can battery other Pyro characters through his Tap Elemental Skill. A secondary Pyro not only enables Pyro Resonance, which provides Xiao an additional 25% ATK, but also helps lower Bennett’s ER needs.
Xiao
Battery
Bennett
Pyro

Pyro Options
- Xiangling – Off-field Pyro application and considerable Burst DPS. However her high Energy cost, and inability to generate many particles for herself, can make her difficult to use in a Xiao comp. It is recommended to build her with a lot of ER to minimize the field time needed to utilize Bennett to funnel her Burst. Video Example of Xiao/Sucrose/Xiangling/Bennett.
- Thoma – Long duration shield with 15% Plunge DMG Bonus at C6. However, it is not recommended to run Thoma in this slot unless he is C6 due to Energy constraints, requiring lingering NA cancels, and limited utility.
Battery Options
- C6 Faruzan – BiS support. Not recommended unless C6 due to scarce team Energy.
- Sucrose – As Bennett will cover the healing, you can opt to bring Sucrose for more particles and easy uptime on Xiao’s Burst. Building her with 4VV and full EM provides Pyro RES Shred and add some passive DMG via Swirls.
- Jean – While pairing Jean and Bennett together leads to having two healers on the team, this is a common “Sunfire” comp. Jean can also utilize Bennett’s Burst to do significant Burst damage.
- Kazuha – While Kazuha is generally less recommended for Xiao as a battery option, he works well in a Double Pyro comp with Xiangling specifically due to being able to buff Xiangling’s Pyronado damage. His Swirls also contribute meaningful DMG and help shield break certain enemies. Video example with Kazuha/Xiangling/Bennett.
Xiao Self Battery
This is not recommended for the average Xiao player. Running no battery is an option for those who have invested in Xiao far enough that the extra time needed on generate Energy for his Burst is of no-concern.
Xiao
Flex
Flex
Flex
The lack of a battery can also be mended with:
- Having C1 and enough ER and DPS to self-battery his second Burst and finish all enemies within the second rotation.
- Using R5 Favonius Lance to battery himself, or having enough ER from an ER spear like Skyward Spine to rely on team and HP particles for Burst uptime.
- Utilizing a team where off-field particle generation is possible, or using a team with multiple high-refined Favonius weapons. Note that utilizing Favonius weapons requires you to invest in CRIT Rate for your supports.
- Generally suggested to run with Bennett and/or Faruzan in the team, since they permit Xiao to do enough damage within a singular Burst instance.
Examples
- Xiao Bennett Zhongli Chiori/Albedo/GMC
- Xiao Bennett Xiangling Zhongli
- Xiao Bennett Xiangling Xingqiu
Lithic Teams
Lithic Spear has a unique passive that gives you ATK% and CRIT Rate for every Liyue party member in the team, including the wearer. The exact value depends on the refinement.
Xiao
Battery
Liyue

Liyue
| Refinements | 1 | 2 | 3 | 4 | 5 |
| ATK% | 7% | 8% | 9% | 10% | 11% |
| CRIT Rate | 3% | 4% | 5% | 6% | 7% |
The sheer stat value of this 4★ Polearm permits it to overthrow 5★ Polearm for Xiao’s personal damage. However, it enforces the necessity of using Liyue units with Xiao. This makes it difficult to build around since:
- Currently, Xiao and Xianyun are the only Anemo Liyue units. With Xianyun’s own high ER requirements and limited battery options for Xiao, this often caps sustainable Lithic-based teams at 3 Stacks.
- Faruzan is a Sumeru unit.
- Our only sustain Liyue options consist of Zhongli, Xianyun, Qiqi, Yaoyao and Xingqiu.
When building Lithic Teams it is important to not focus too hard on obtaining passive stacks. Using an ineffective unit just to obtain an extra 7~9% ATK or 3~7% CRIT Rate is generally not considered valuable as certain units can provide buffs, damage or utility that far surpasses the value of those stats.
If you would like further advice on building Liyue Teams, we suggest looking at our in-depth guide, written by alerine: Lithic Team Thesis
Xiaoden
Xiao
Raiden
Flex
Flex
See Alatus Umbrosa: The Complete Xiaoden Guide
Xiaoden refers to the concept of running Xiao and Raiden together in a dual carry team. Along with dealing her own damage during Burst, Raiden also serves as an additional damage dealer and battery for Xiao.
Long thought of as an inferior comp to traditional Xiao teams, the guide linked above presents a new light for why Xiaoden is not only viable but also competitive.
Xiaoden’s strongest benefit lies in its continuity which most batteries fail to sustain. Therefore, as the following calcs show, it can be competitive with pre-existing batteries at two rotations, and can yield a 12-15% damage increase during the third rotation at a mid-high investment.
Gameplay
Glossary
- ST (single-target): Combat scenarios where there is only one enemy.
- MT (multi-target): Combat scenarios where there are multiple enemies.
- N(#): Denotes how many Normal Attacks (NA) are in the attack string. Ex: N2 = NA twice.
- HP (High Plunge)
- LP (Low Plunge)
- C or CA (Charged Attack)
- J (Jump)
Attack Strings
Xiao is a relatively simple character to play. However, his actual skill ceiling is a bit higher as there are various details you should be aware of to play him optimally.
Optimal Combos
- In AoE situations with multiple enemies, you should always spam High Plunges.
- In ST situations with one main enemy, you should aim to use Collision Plunge if possible.
- If Collision Plunge is possible with High Plunge, spam High Plunge.
- If Collision Plunge is possible with only Low Plunge, use N1CJLP.
- If Collision Plunge is not possible, use N1CJHP.
- N1CJP requires tight input timing. Omitting the CA for standard N1JP combos is also acceptable for easier spamming and performs about equally.
- N1 Cancels can be performed during regular Plunge Spam combos for additional damage or faster weapon passive stacking. Read here for more information.
High and Low Plunge
If you open your Talent menu, you will see three different plunge modifiers: High Plunge, Low Plunge and Plunge.
The AoE damage of Xiao’s Burst plunges are scaled off High or Low Plunge modifiers, depending on the height from which Xiao plunges from. In general, anything slightly above Xiao’s height will be considered a High Plunge.
There is only a 1 frame difference between the two, and Plunging too early can cause Xiao to do LP instead. So if you desire to perform High Plunges, it is better to let the jumping animation linger a bit before plunging.
Video example showing Low vs. High Plunge by Artesians#0002
Collision Plunge
Collision Plunge damage is the name given to the third and last Plunge modifier in the Talent menu, separate from Low and High Plunge. This plunge only appears in situations where Xiao’s plunging animation has direct contact with the enemy’s model, this additional number will be referred to as Collision Plunge damage.
To perform it, one simply has to hug the enemy and plunge alongside it, making it one of the easiest of Xiao’s techniques to learn while also increasing damage in single-target scenarios by a significant amount without any delays.
Video example showing Collision Plunge by Memu#6453
The video shows an example of Collision Plunge damage, where there’s an initial ~27k-28k Collision Plunge damage when Xiao hits the top of the Ruin Guards, and then a secondary number 55k-70k when Xiao actually hits the ground and unleashes his High Plunge damage.
Additional Information on Collision Plunge
While the technique is simple in execution, its utilization is entirely dependent on the enemy as all enemies have varying height models. As a general rule of thumb:
- Tall enemies such as Lawachurls, Primo Geovishap, Ruin Guards, Ruin Graders, etc. can consistently Collision Plunge with High Plunges without issues.
- Shorter enemies with high stagger, such as Geovishaps, Fatui Mages, Skirmishers, etc. are too short and move too often to Collision Plunge reliably even with Low Plunges.
There are also enemies whose model height is dependent on their animations; an example is the Perpetual Mechanical Array. In its downed phase, it can only be dealt Collision Plunge damage with Low Plunges.
This sheet contains player found interactions with Collision Plunge on different types of mobs. Thank you Rhetorical#8956 for your bulk testing.
JET (N1CJP)
N1CJP is an abbreviated form of Normal Attack 1 > Charged Attack > Jump > (High) Plunge. It is also known as JET for ease of naming.
It is a combo that cancels the animation for Xiao’s Charged Attack and allows Xiao to plunge enemies that he has knocked up. Currently, it is his highest MV/s combo while he is inside his Burst.
However, it should only be used on single (sometimes duo) target enemies. Otherwise, High Plunge spam is still his highest combo in AoE mob situations.
Normal Attack (NA) Cancel
Xiao’s NA cancel can be performed by mashing your Normal Attack and Jump inputs at the same time. It is beneficial for faster weapon passive stacking, activating abilities triggered by Normal Attacks, and additional damage.
How it Works
Xiao’s N1 consists of two hits: a swing, and then a thrust with his spear. The first swing of Xiao’s NA has no hitlag, and the animation can be canceled out with a jump while the damage still goes through.
When using NA cancel, be sure to cancel out his N1 after the initial swing and before the thrust, as the full N1 animation has hitlag.
Interaction with Other Units
Certain characters (such as Thoma and Xingqiu) have an input delay when triggering their abilities, Thus, N1 cancels where you mash Normal Attack and Jump at the same time will actually fail to proc their ability. Instead, you have to space out your Normal Attack and Jump inputs, allowing Xiao’s N1 to linger just long enough to trigger their abilities.
Caution: If you are not precise with this animation cancelling and allow his full N1 to go out, it can significantly reduce the number of Plunges you are able to fit into his Burst, lowering his DPS. For characters whose abilities have input delay, we recommend only reliabily using them with N1CJP combos.
In contrast, a character like Yelan has no input delay, so Xiao can easily proc her Burst with N1 cancels.
Notice how only the first swing of Xiao’s N1 is shown in the animation above.
With Thoma and Xingqiu’s Bursts, Xiao has to let his N1-1 linger long enough to proc the effect.
Out of Ult Playstyle
Generally speaking, one should always minimize the amount of time Xiao spends out of his Burst. That being said, in specific scenarios such as Overworld gameplay or when the enemy has little HP left, it may be better to save his Burst. The most optimal combo strings are as follows:
- N1C: Xiao’s highest DPS Normal Attack string.
- N1CJEP: If your Elemental Skill is up, use N1C > Jump > E > Plunge.
Video example showing out of Burst combos by Memu#6453
Plunging Effectively
Xiao’s AoE
Xiao’s plunge has a surprisingly large AoE radius. In the example below, you can see that Xiao easily plunges all three Cicin Mages continuously, even while knocking them back.
Video example showing Xiao’s plunge AoE by Memu#6453
Positioning
While Plunging
Generally, positioning Xiao’s plunges fall into one of two strategies:
- Place him in the center of all enemies to hit as many as possible.
- This is useful if the goal is to hit as many enemies as possible. However some enemies possess high knockback, which means after a couple of plunges they may be pushed out of Xiao’s Plunge range.
- Place him in line with enemies so that they are knocked back in the same direction.
- This strategy is more beneficial for enemies with high knockback. You will slowly push them in the same direction, ideally towards a wall to reliably group them. You will be able to move forward while plunging to adjust Xiao’s position.
For enemies with knockback, you can lure them towards the Spiral Abyss walls first before casting Xiao’s Burst. Then, you can use Xiao’s plunges to pin enemies against a wall.
While using Elemental Skill
Xiao’s Elemental Skill, when it fails to target a specific enemy, will send you dashing towards where Xiao’s Character Model is facing. Be mindful of when you use his Skill, and repositioning your camera and/or where Xiao’s facing with the movement inputs.
In Air Maneuverability
Mobility while Jump-Plunging
Holding the directional key as Xiao Jump-Plunges will permit him to move in the direction your camera is facing. This can help him keep up with enemy knockback.
Delayed Plunge
Another trick that can be useful is avoiding damage by hanging or gliding in the air while enemies are attacking or damaging structures (e.g., ice cages & rock waves) are beneath you. Gliding can also help you reposition Xiao more dramatically than just holding a directional key while jumping.
Video example compilation by Sohan#4543.
Energy Management
With contributions from: 3.14#9270, Poiyo#3488, ioncy#5314
How to Battery Xiao
Xiao’s DPS is heavily reliant on his Elemental Burst. Therefore, it is crucial to understand Energy management and keep Xiao’s Elemental Burst active as much as possible.
Energy Management for Xiao comes with two basic techniques:
- Funneling: Catching the particles generated by another character’s Elemental Skill or Favonius Weapon by quickly swapping to Xiao after you use their Skill.
- Pre-funneling: Using up to two of Xiao’s Elemental Skills and then quickly activating his Elemental Burst, allowing Xiao to refill his Energy with his own self-generated particles. This technique is important for giving Xiao enough Energy for his next Burst rotation.
It is also important to understand the basic mechanics of how Energy works in this game:
- On-field characters get more energy from Energy Particles/Orbs than off-field characters. This is why you should always swap back to Xiao to catch any generated particles when possible.
- Characters get more Energy from same-element Energy Particles/Orbs. This is why Anemo batteries are generally preferred.
Additional Pre-Funneling Tips
- It is advised to not jump before using two of Xiao’s Elemental Skills to pre-funnel. This will result in the energy particles reaching Xiao before he can cast his Elemental Burst.
- For those with C1: Xiao cannot pre-funnel the particles of 3 Elemental Skill charges.
- Pre-funneling is not just limited to Xiao’s Elemental Skill. In fact, you can actually pre-funnel three Skills worth of energy particles into Xiao’s Burst:
- Sucrose’s Elemental Skill animation is quick enough for her particles to be pre-funneled alongside Xiao’s Elemental Skill particles. Sucrose E > Xiao EE Q
- If you chose to dash cancel Sucrose’s Skill in a standard rotation, you will not be able to swap to Xiao due to the character swap cooldown. It is advised to N2 with Sucrose before the E cancel to make up for the time.
- Faruzan’s particles from her vortex are generated after a slight delay, allowing Xiao to pre-funnel her particles with his own. Faruzan E CA > Xiao EE Q

Xiao prefunneling Faruzan’s Skill particles alongside two of his own Skills’ particles.
It is also possible to pre-funnel two of Sucrose’s Elemental Skill particles, by dash canceling both of Sucrose’s E Skills to get all 8 particles. However this technique can be a bit more difficult to utilize while providing less Energy, so we recommend using Sucrose E > Xiao EE Q when possible.
See the images below to compare how much of Xiao’s Burst is filled after pre-funneling with different combos.
| Xiao EE | Sucrose EE | Sucrose E > Xiao EE |
 |  |  |
| Video Example | Video Example | Video Example |
If you are lacking Energy for your next Burst, we recommend using your battery’s Elemental Skill to funnel Xiao’s Burst back and then restart the rotation. Doing the rotation while your Burst isn’t full will result in wasted particles.
Rotation Management
With contributions from: 3.14#2780
General Team Rotation Guidance
Xiao’s long Elemental Burst duration means that there are always some general and unchanging rules when building rotations for his teams:
- Prioritize the party member with the longest duration ability first.
- If you have any off-field DPS with non-conditional damaging abilities, always rotate them first.
- If you have buffers with low-uptime, place them as close to Xiao’s Burst to optimize the uptime of their buffs.
- Any battery with particles that can be pre-funneled to Xiao should be placed right before him.
- Xiao is always rotated last.
Managing Your Next Rotation(s)
After Xiao’s first Burst ends, you will likely face yourself in a situation where you do not have enough energy to repeat the rotation. There are two ways to face this problem:
- Go through your rotation like normal, but simply utilize your battery’s abilities to get Xiao’s Burst back up and then pre-funnel Xiao’s two Elemental Skills and cast Burst. (Video Example Below)
- Instead of restarting your rotation immediately, use your battery (and/or other units with short CDs) to get your Xiao’s Burst back up and then go through with the rotation once more.
- This should be the last resort for when you are certain that the first method wouldn’t generate enough energy for Xiao’s Burst.
- You should avoid using Xiao’s Elemental Skill during his Burst; this ensures both charges are up to pre-funnel the particles for when you cast his Burst.
If you own C1, you may insert the third charge of Xiao’s Elemental Skill right after Xiao’s Burst ends to lessen the Energy needs of the next Burst.
Managing Your Energy in the Spiral Abyss
If you are in a situation where the enemy only has a bit of HP left, we suggest ending Xiao’s Burst early to get his Burst back up for the next chamber. This is easier to do when you have a secondary source of damage in your team.
Start rotations by 3.14#2780
Middle rotations by 3.14#2780
Afterword
Once the guide is thick enough, we can eat it.
Thank you for taking the time to read this guide. We hope that this has provided you with all the information you need to play the Eternal Yaksha, Xiao.
If you have comments or suggestions for the guide, or wish to contribute to our Theorycrafting in the future, be sure to join the Xiao Mains Discord. We would love to have you there!
Additional Resources
- Xiao Mains Discord Server
- Xiao Damage Calculator by the Xiao Mains Discord Server
- How Much ER Does My Xiao Need? by 3.14#2780
- Xiao Optimizer Guide by the Xiao Mains Discord Server
- Xiao Weapon Comparison Sheet
- Xiao Mains Stats Database
- View the many Xiao Stats here: https://bit.ly/3qtBFGa
- Submit your own here here: https://forms.gle/z4jokw66w9nhUV9X9
Supplemental Guides
- Should You Wish for Xiao? by Xiao Mains
- C6 Xiao Guide
- Lithic Teams Thesis
- Xiao Mains Faruzan Guide
- Xiao Mains Xianyun Guide
- Alatus Umbrosa: The Complete Xiaoden Guide
- End of the Windborne Wraith: A Physical Xiao Guide
- Xiao Mains Mob Interaction Guide
Changelog
June 4th, 2021
- Guide published.
August 8th, 2021
- Shimenawa added.
August 30th, 2021
- Ganyu as Sub-DPS.
- Removing Kazuha section, and rewording unrecommended batteries.
September 13th, 2021
- Weapon Comparison Chart updated.
- Added link to Weapon Comparison spreadsheet in Weapons and Resources.
- Slight wording changes: Sub-DPS Section, ER Management and Anemo Battery.
- Updated talent priority.
- Visual guide updated with 2SR artifact set.
- Added Coded#2644 to Principal Theorycrafters.
- Removed one of Xiao’s Pros under Pros and Cons due to no longer being true.
- “Because no enemies in Spiral Abyss have thus far been immune or resistant to Anemo Damage, Xiao has historically been and continues to be viable in all Abyss floors”.
October 10th, 2021
- Added Emblem of Severed Fates to ‘Useless Artifact Sets’.
- Fixed issue with Engulfing Lightning’s positioning in the Weapon DPS Chart.
December 26th, 2021
- Added Sayu and Kazuha to the Anemo Battery section.
- Added extended Favonius Lance section and renamed Other 4* Options to Other Polearm Options.
- Sub DPS section: Moved Geo MC from Buffer to Sub DPS, added Rosaria, reordered characters, and edited details for Xiangling.
- Additional info added to the Team Comps introduction section.
- Added General Rotation Management section.
- Added two more example teams under Example Team Comps.
- Additional info added to C1, C6 and C2-5 sections.
- Updated Weapon Comparison Sheets to include improved stat distribution, Wavebreaker’s Fin and Calamity Queller.
January 5th, 2022
- Completely revamped Supports and Team Comps section.
- Updated the Pros & Cons table and the Is Xiao Worth It? sections.
- Updated Zhongli section with weapons and artifacts choice.
- Added C6 Pros and Cons table.
- Added Calamity Queller section.
January 19th, 2022
- Updated TL;DR Visual Guide.
February 4th, 2022
- Added 2pc Emblem to Recommended Artifact Sets.
February 26th, 2022
- Added Yae Miko to Supports.
March 16th, 2022
- Updated Xiaoden section with Xiaoden guide.
March 23, 2022
- Added ⭐ next to Raiden in Supports and added Raiden under ER Sands? section.
- Added 4pc Vermillion Hereafter and updated the entire Artifacts section.
June 17, 2022
- Added Yelan to Supports.
- Updated TL;DR Visual Guide.
July 22, 2022
- Major edits to the entirety of the guide.
September 2, 2022
- Deathmatch, Blackcliff and Favonius Lance sections updated.
October 9, 2022
- Updated weapon chart and spreadsheet with Missive Windspear and Staff of Scarlet Sands. It now uses 4pc Vermillion Hereafter for calcs as well.
- Added detailed weapon notes for Staff of Scarlet Sands, Engulfing Lightning, Skyward Spine, and Missive Windspear.
- Minor updates to recommended builds for Bennett and Xiangling.
- Deathmatch no longer has the highest crit rate for spears and the section has been updated as such.
December 21, 2022
- Updated tl;dr Visual Guide.
- Updated Pros & Cons.
- Updated formatting for Talents
- Updated C1.
- Added 4pc Desert Pavilion Chronicle to Artifacts and updated 2p2p section.
- Updated Weapons table and linked sheet.
- Added Faruzan and Thoma to Supports.
- Added Triple Anemo to Teams.
- Added Faruzan as battery options for Double Geo and Double Pyro.
- Added information on NA cancels.
- Updated Zhongli and title of On Zhongli, Xiao’s Second-Best Support.
- Updated Venti and Kazuha’s recommended Main Stats.
- Added Xiao Mains Faruzan Guide to Supplemental Guides.
January 16, 2023
- Updated for Version 3.3
- Major format and writing overhaul for clarification and correction
November 3, 2023
- Updated for Version 4.1
November 17, 2023
- Updated for Version 4.2
- Added Furina
February 14, 2024
- Updated for Version 4.4
- Added Xianyun and updated Supports/Teams accordingly
March 15, 2024
- Updated for Version 4.4
- Added Chiori and updated Supports/Teams accordingly
21 March 2025
- Added 4pc Long Night’s Oath to Artifacts.
- Added Lumidouce Elegy to Weapons.
- Added Lan Yan and Iansan to Supports.
- Updated tl;dr Visual Guide.
4 April 2025
- Updated for Version 5.5
- Added Iansan to Supports.
- Added Iansan to Teams for Xiao Hypercarry.
- Updated Artifact Set Comparison table.