Written by Nociii#0111 and Sir_pick_the_prick#2209
Updated for Version 4.0
Table of Contents
Glossary
Click to view/hide
| Term | Definition |
| AoE | Area of Effect |
| Battery | A character who produces Energy Particles to help charge the team’s Bursts. |
| Carry/Hypercarry | A character who stays on-field for an extended period of time in order to do most of the team’s damage. |
| DPS | Damage per second. Also refers to a character whose primary purpose is to do damage. |
| Dynamic | As opposed to snapshotting, a phenomenon where a Skill, Burst, or weapon passive does not retain buffs for its entire duration. Instead, buffs for a dynamic effect are calculated at the moment the damage is dealt. |
| EM | Elemental Mastery |
| Enabler | A character who applies an Elemental aura for another character to react with. |
| ER | Energy Recharge |
| Funneling | The practice of generating Elemental Particles with a character’s Skill and intentionally catching them with the same or different character. |
| Quadratic scaling | A phenomenon where AoE damage instances from multiple enemies can all hit each other, increasing a character/Talent’s effectiveness when enemies are tightly grouped. In other words, more enemies = more damage. See AoE and Quadratic Scaling for details. |
| Quickswap | A team archetype that avoids staying on one character for too long. The player continuously swaps between different characters to use their Skills and Bursts. |
| Snapshotting | A phenomenon where a Skill or Burst retains buffs throughout its entire duration based on buffs present when it was first cast. |
| Split scaling | When different parts of a character’s kit scales with different stats. (i.e., Albedo’s Skill scales with DEF while his Burst scales with ATK.) |
TL;DR
Design: cuppacote
Content: baloopy
Introduction
Albedo is a 5-star Geo Sword user and the Chief Alchemist of the Knights of Favonius. Since his release in the early days of Genshin, his builds have become more flexible as new characters, weapons, and artifacts were introduced.
Thankfully, Albedo’s playstyle remains fairly straightforward: Albedo is an off-field DPS and battery who does periodic Geo DMG with his Skill.
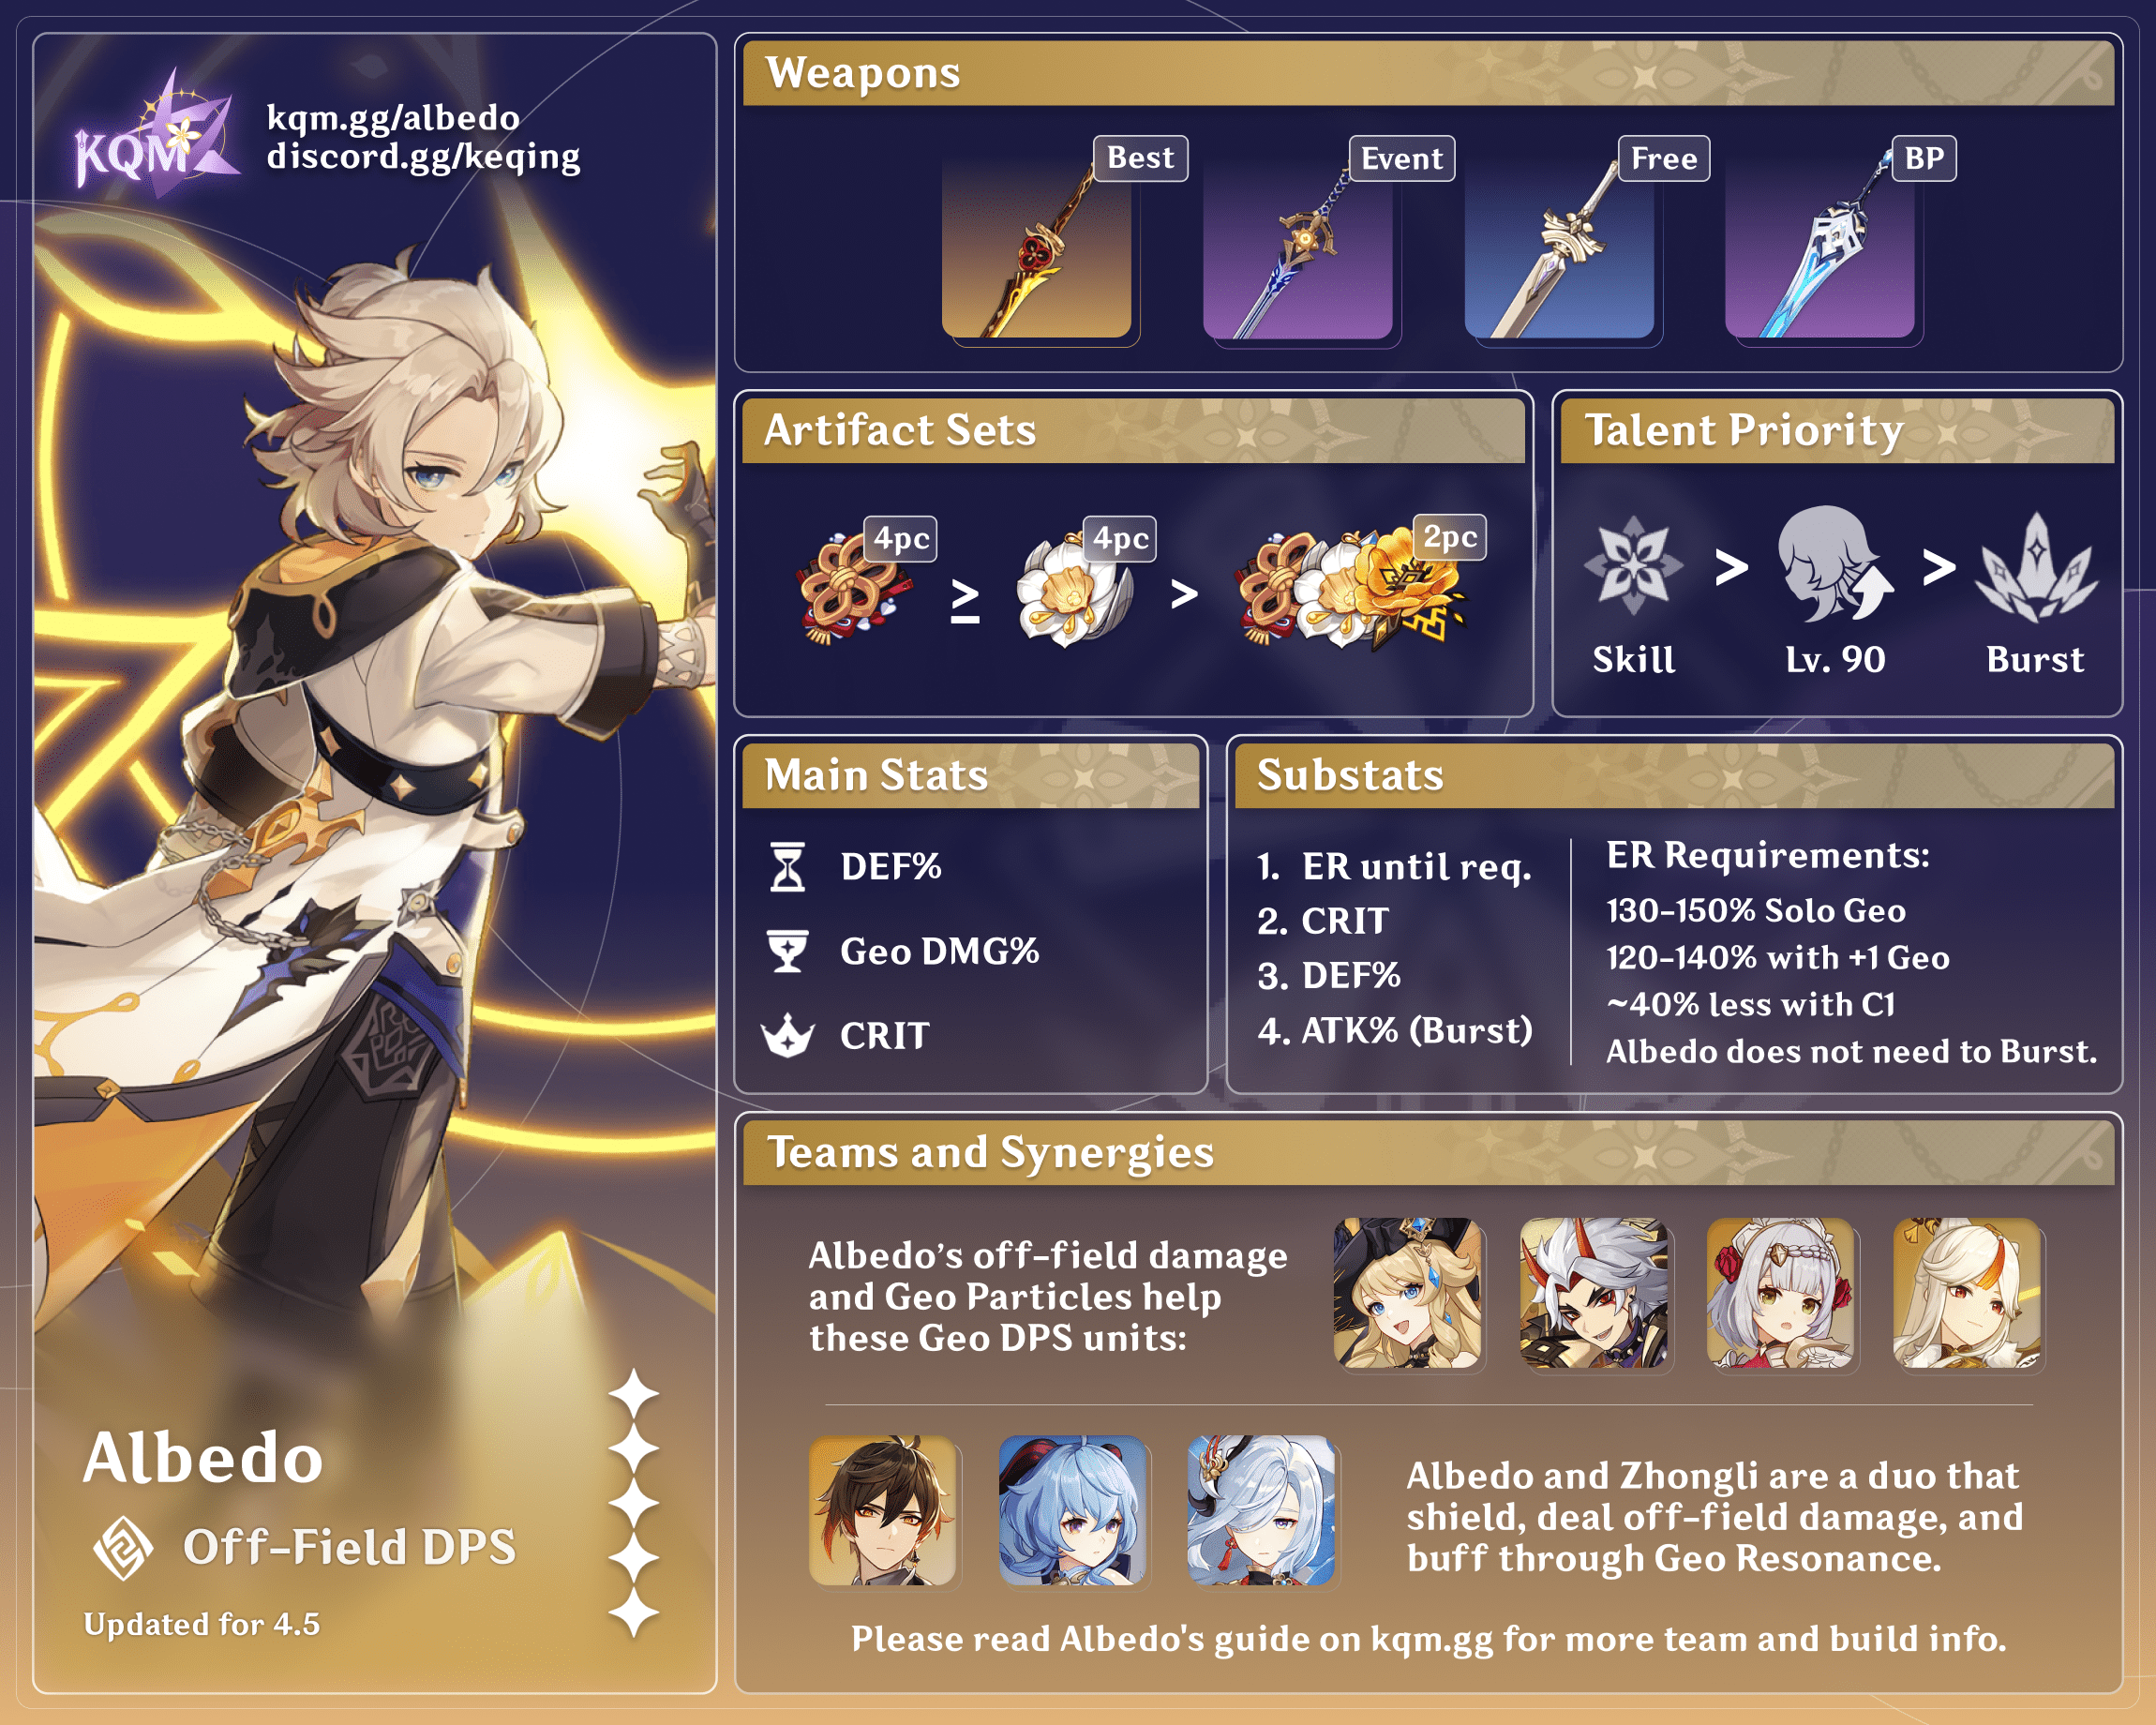
Click here for the Albedo Quick Guide.
Why Play Albedo?
Albedo is one of the only units who provide meaningful Geo DMG and Particles from off-field. This makes him a decent option for an off-field DPS when you have a free flex slot in your team. However, Albedo truly shines when paired with other Geo units like Zhongli, Gorou, Noelle, or Itto.
Pros
+ Extremely easy to play, with one of the lowest field time requirements of any character.
+ F2P-friendly weapon options, including a 3-star sword easily obtainable through Wishes.
+ Slow Geo application rarely interferes with other reactions in your team, and in certain cases can even help the team.
+ Provides an EM buff with his Burst.
+ Can be flexibly slotted into most teams.
+ Generates a steady stream of Geo Particles from off-field.
+ Solar Isotoma elevator can aid in overworld traversal.
Cons
– Best artifact set can be Resin-inefficient to farm if you’re not also building other Geo characters or specific healers.
– Best weapon is a past event reward that is no longer obtainable.
– The Geo Element itself does not have access to damage-enhancing reactions.
– Struggles to personally benefit from most buffs outside of specific ones (Gorou).
– Somewhat tied to other Geo units to maximize his damage.
– Takes time to generate Particles, can’t provide a lot of Energy quickly.
– Improper placement of Solar Isotoma can break it (see Solar Isotoma Placement).
Talents
 Normal Attack | Favonius Bladework – Weiss
Talent Description
Normal Attack
Performs up to 5 rapid strikes.
Charged Attack
Consumes a certain amount of Stamina to unleash 2 rapid sword strikes.
Plunging Attack
Plunges from mid-air to strike the ground below, damaging opponents along the path and dealing AoE DMG upon impact.
Chaining Albedo’s Normal Attacks does not produce very high damage since they deal Physical DMG based on ATK and have poor scalings. Albedo is usually built for Geo DMG based on his DEF. Accordingly, Albedo will generally not use his Normal Attacks to deal damage and they can be left unleveled.
 Elemental Skill | Abiogenesis: Solar Isotoma
Talent Description
Albedo creates a Solar Isotoma using alchemy, which deals AoE Geo DMG on appearance.
Solar Isotoma
has the following properties:
- When opponents within the Solar Isotoma field take DMG, the Solar Isotoma will generate Transient Blossoms which deal AoE Geo DMG. DMG dealt scales off Albedo’s DEF.
- Transient Blossoms can only be generated once every 2s.
- When a character is located at the locus of the Solar Isotoma, the Solar Isotoma will accumulate Geo power to form a crystallized platform that lifts the character up to a certain height. Only one crystallized platform can exist at a time.
- Solar Isotoma is considered a Geo construct. Only one Solar Isotoma created by Albedo himself can exist at a time.
Hold to designate the location of the Skill.
The highlight of Albedo’s kit. On cast, Albedo places a flower which deals Geo DMG in a small AoE. Afterwards, every time an enemy takes damage within the flower’s field, the flower creates a Transient Blossom, which deals additional Geo DMG in a small AoE that scales with DEF. The procs can happen every 2s, but due to hitlag and actual attack frequency, procs are usually a bit slower. Note that procs require an enemy to take damage. This means that if an enemy is shielded, you cannot proc Transient Blossoms by hitting its shield.
The internal cooldown for Transient Blossoms is based on the individual flower placed. This means that Albedo can use a Normal Attack to proc a Blossom, replace the flower, and then immediately generate another Blossom before the 2s are up. (See N1-E-N1 Combo.)
Each Transient Blossom has a 67% chance to produce one Geo Particle. This makes Albedo one of the best Geo batteries overall in terms of Particles per second. However, due to the Particles being generated over time, Albedo cannot funnel many Particles at once to a specific character.
The Skill snapshots all buffs at the time of casting, so all Transient Blossoms will receive those buffs even if the buff times out. For example, if Gorou creates his General’s War Banner and Albedo casts his Skill while inside of it, all of his Transient Blossoms will receive the DEF buff from Gorou even if the General’s War Banner expires. Re-casting Albedo’s Skill will re-snapshot any buffs.
Standing on the flower creates a small elevator that raises the character into the air. This is not useful in combat, but it can be a nice exploration feature.
 Elemental Burst | Rite of Progeniture: Tectonic Tide
Talent Description
Under Albedo’s command, Geo crystals surge and burst forth, dealing AoE Geo DMG in front of him.
If a Solar Isotoma created by Albedo himself is on the field, 7 Fatal Blossoms will be generated in the Solar Isotoma field, bursting violently into bloom and dealing AoE Geo DMG.
Tectonic Tide DMG and Fatal Blossom DMG will not generate Transient Blossoms.
Albedo’s Burst actually has quite high multipliers. However, his Burst damage scales with ATK rather than DEF, putting it at odds with his Skill scaling. It may be tempting to build ATK to capitalize on his Burst, but even the most dedicated ATK builds with 5-star weapons and more frequent Bursts end up with lower overall damage than traditional DEF builds. Rather than specifically building for Albedo’s Burst, ATK stats should be considered a nice bonus.
Albedo’s Burst can be used to fill downtime during rotations, such as in several quickswap teams. The EM buff from his 4th Ascension Passive can also benefit some Vaporize and Melt teams. If you have Albedo’s C2, the increased damage can also help justify choosing to Burst, though this Constellation on its own does not make Bursting optimal if it is not already.
A significant portion of his Burst damage comes from his Fatal Blossoms. If Albedo’s Skill is active when he uses his Burst, 7 Fatal Blossoms will be generated within the Skill’s circle. Fatal Blossoms have a small AoE and target enemies randomly within the Solar Isotoma field. This means there is quadratic scaling built into his Burst, which dramatically increases its effectiveness when multiple enemies are closely grouped. Conversely, Burst damage drops significantly in single-target situations, where Fatal Blossoms have fewer enemies to hit.
Note that casting Albedo’s Skill too soon after his Burst will cause his Fatal Blossoms to not go off. See Canceling Fatal Blossoms for details.
A strange quirk of Albedo’s Burst is that — despite being considered Burst damage — the Fatal Blossoms’ buffs are snapshot when Albedo casts his Skill, not his Burst. In other words, Fatal Blossoms do not benefit from buffs obtained when Albedo casts his Burst (i.e., 4NO or Mistsplitter stack). The initial damage when casting his Burst still receives these buffs, just not the Fatal Blossoms afterward.
 Ascension 1 Passive | Calcite Might
Talent Description
Transient Blossoms generated by Abiogenesis: Solar Isotoma deal 25% more DMG to opponents whose HP is below 50%.
A decent damage buff that leads to an overall damage increase of about 13% when the enemy drops below 50% HP. However, given its requirements, don’t expect its uptime to be more than 50%.
 Ascension 4 Passive | Homuncular Nature
Talent Description
Using Rite of Progeniture: Tectonic Tide increases the Elemental Mastery of nearby party members by 125 for 10s.
This Passive seems decent on paper as 125 EM is a sizable buff. However, Albedo’s most effective teams tend to center around the Geo element, where EM is not as valuable. Most other teams that could utilize the EM are capable of running Kazuha or Sucrose instead, whose ability to hold the 4pc Viridescent Venerer set makes them a superior choice in most cases. The exceptions are some Dendro teams or Hu Tao teams where Swirling the desired Element is difficult. You should never pick Albedo specifically for his EM buff, but it can be a nice bonus in the few cases where it matters.
 Utility Passive | Flash of Genius
Talent Description
When Albedo crafts Weapon Ascension Materials, he has a 10% chance to receive double the product.
A crafting Passive that can save you Resin is always welcome. This Passive competes with Mona’s Passive, which has a 25% chance to refund a material used. While Albedo may appear to generate more materials, in practice, the additional number of crafts allowed by Mona makes them about equal in the long run.
Leveling Priority:
Character Level = Skill > Burst > Normal Attack
Since Albedo’s primary source of damage (his Skill) scales with his DEF stat, Albedo benefits greatly from character levels. While characters who scale with ATK can gain almost two thirds of their Base ATK from their weapon, characters who scale with other stats — like Albedo — do not have this luxury. Simply being taken from Level 80/90 to 90/90 increases Albedo’s damage by almost 10%.
His Normal Attacks are generally not used and can be left unleveled.
Constellations
Albedo is a complete unit at C0. Pulling for Constellations results in more damage for himself and certain teammates, but it does not significantly change his playstyle. Albedo teams are perfectly capable of clearing difficult content with him at C0. If you choose to spend money on Genshin, please do so responsibly.
 Constellation 1 | Flower of Eden
Constellation Description
Transient Blossoms generated by Albedo’s Abiogenesis: Solar Isotoma regenerate 1.2 Energy for Albedo.
Damage increase over C0: 13-14%
(0% if not using Burst)
The value of this Constellation depends heavily upon the team that Albedo is in. In teams where Albedo does not use his Burst or when he needs very little Energy Recharge, this Constellation is irrelevant. However, if Albedo does Burst every rotation, then C1 reduces his ER needs significantly. (See ER Requirements.)
 Constellation 2 | Opening of Phanerozoic
Constellation Description
Transient Blossoms generated by Abiogenesis: Solar Isotoma grant Albedo Fatal Reckoning for 30s:
- Unleashing Rite of Progeniture: Tectonic Tide consumes all stacks of Fatal Reckoning. Each stack of Fatal Reckoning consumed increases the DMG dealt by Fatal Blossoms and Rite of Progeniture: Tectonic Tide’s burst DMG by 30% of Albedo’s DEF.
- This effect stacks up to 4 times.
Damage increase over C1: 13-17%
Damage increase over C0: 28-33%
(0% if not using Burst)
The split scaling in Albedo’s base kit makes it difficult to invest in both ATK and DEF, forcing most players to neglect his Burst damage in favor of his more powerful Skill. C2 mostly solves these split scaling issues and makes all of his abilities scale at least partially with DEF. This Constellation is difficult to evaluate, in part because its value is highly dependent on Albedo Bursting, which is not always optimal for some teams (such as Xiao teams). However, if Albedo Bursts regularly, this Constellation is very valuable.
It is interesting to note that C1 and C2 are directly synergistic. C2 without C1 would be a much worse Constellation because C1 makes using Albedo’s Burst outside of high Geo Energy generation teams viable without tanking Albedo’s damage. However, C2 also gives meaning to C1 in said teams by making the Burst actually deal meaningful damage.
Note that if Albedo does not optimally use his Burst in a team at C0, this Constellation will not change that.
![]() Constellation 3 | Grace of Helios
Constellation 3 | Grace of Helios
Constellation Description
Increases the Level of Abiogenesis: Solar Isotoma by 3.
Maximum upgrade level is 15.
Damage increase over C2: 10-13%
Damage increase over C0: 42-50%
C3 is an upgrade to Albedo’s main damage source. This is a good Constellation, and it’s recommended to stop here if you are pulling for Constellations at all.
 Constellation 4 | Descent of Divinity
Constellation Description
Active party members within the Solar Isotoma field have their Plunging Attack DMG increased by 30%.
Damage increase over C3: 0%
Damage increase over C0: 42-50%
Elevator memes aside, this Constellation is pretty useless for Albedo. It’s not even that useful for Xiao, given it only produces a small damage increase for him with little synergy otherwise. If Xiao is using a 2pc Viridescent Venerer 2pc ATK% artifact combo, he only gains about 2-8% total damage from this Constellation.
If Xiao is instead using 4pc Vermillion Hereafter — which does not confer any DMG% buffs — this Constellation gains some value.
Conversely, if Xiao is being buffed by Faruzan, the added DMG% from her buffs decreases this Constellation’s value.
![]() Constellation 5 | Tide of Hadean
Constellation 5 | Tide of Hadean
Constellation Description
Increases the Level of Rite of Progeniture: Tectonic Tide by 3.
Maximum upgrade level is 15.
Damage increase over C4: 1-3%
Damage increase over C0: 44-53%
The extra Talent levels to Albedo’s Burst only affect his ATK-based multipliers. The bonus damage that scales with DEF from his C2 is unaffected. As such, the damage gained from C5 is minimal, provided Albedo uses his Burst to begin with.
 Constellation 6 | Dust of Purification
Constellation Description
Active party members within the Solar Isotoma field who are protected by a shield created by Crystallize have their DMG increased by 17%.
Damage increase over C5: 0-1%
Damage increase over C0: 45-55%
C6 marginally strengthens Albedo’s capabilities as an off-field DPS by increasing the damage of his teammates. Note that just like the DMG% from Geo Resonance, this bonus only applies to on-field units and cannot be snapshot. This means that C6 has very little impact on Albedo himself and is only really beneficial for on-field teammates.
Gameplay Mechanics
Albedo is fairly simple to play on the surface, but knowing a few tips can improve your experience.
Solar Isotoma Placement
Albedo’s Skill has a short cooldown, allowing you to reposition his Solar Isotoma field when necessary. Holding his Skill allows you to determine its location with greater precision. This is useful because the flower will break (and the field will disappear) under the following circumstances:
- Placed too close to a boss’ hitbox.
- Takes too much damage from a large enemy.
- Placed on top of another Geo construct.
- Placed on certain movable platforms (i.e., Oceanid arena).
- If Albedo is standing on a high platform with no ground in front of him.
If Albedo is paired with Zhongli, the pulses of Geo DMG from Zhongli’s Stone Steles will also emanate from Albedo’s flower. Placing a Stele near the flower allows enemies to be hit by pulses from both sources, effectively doubling Zhongli’s pulse damage. Adding even more Geo constructs (like Geo Traveler’s Skill/Burst) enables even more pulses. Note that any Geo constructs must be placed fairly close to Zhongli’s Stele in order to emit pulses. These pulses are also an easy way to proc Transient Blossoms. This interaction is informally known as ‘microwave.’
Microwave demonstration
N1-E-N1 Combo
When casting Albedo’s Skill, following up with a quick Normal Attack allows you to proc a Transient Blossom immediately. If you have high ping, the Transient Blossom can sometimes receive Cinnabar Spindle’s buff when it should be on cooldown.
If a Solar Isotoma field already exists, creating a new field will reset the 2s cooldown timer for Transient Blossoms. This means that Albedo can proc a Transient Blossom with a Normal Attack, cast his Skill, and then immediately proc another Transient Blossom with another Normal Attack. This N1-E-N1 combo is useful for generating two Transient Blossoms within a short period of time.
N1-E-N1 demonstration
AoE and Quadratic Scaling
Both Albedo’s Transient Blossoms and Fatal Blossoms have a small AoE, meaning you can increase Albedo’s DPS dramatically if you can group enemies tightly together. Venti’s strong, consistent pulling ability is best for this.
Albedo’s Burst triggers 7 Fatal Blossoms within the area of his Solar Isotoma field. Each Fatal Blossom will randomly target one enemy within the field, up to one Fatal Blossom per enemy. If there are more Fatal Blossoms than enemies, the Fatal Blossoms will be generated randomly within the field, with more appearing toward the center. If multiple enemies are tightly grouped, they will take damage from their own Fatal Blossom as well as those from enemies around them. This quadratic scaling effect can be powerful, but its efficacy is limited by several factors:
- Albedo’s Burst scales with ATK, which is generally ignored in his builds.
- You may not even use Albedo’s Burst.
- Requires a teammate with crowd control, who may not fit well in your team.
- Has an upper limit of 7 damage instances per enemy. (i.e., 7 enemies will give you 49 total instances of damage, but 8 enemies will only give you 56, not 64.)
Skill and Burst on grouped enemies
Canceling Fatal Blossoms
Casting Albedo’s Skill too soon after his Burst will cause his Fatal Blossoms to not go off. For this reason, if you are Bursting with Albedo, it is recommended to do an E-Q combo instead of Q-E.
However, if you don’t care about Fatal Blossom damage, you can do Q-E instead to minimize Albedo’s field time and snapshot any Burst-dependent buffs onto his subsequent Skill (i.e., Mistsplitter stack).
Fatal Blossom cancel demonstration
Artifacts
Regardless of his team, Albedo is mostly used in the same way. To that end, his builds are similarly straightforward: you should seek to maximize his CRIT and DEF through your weapon and artifacts.
ATK-focused builds are certainly possible, but not optimal. ATK stats on Albedo only benefit his Burst damage, which is not the highlight of his kit. Even in the most favorable conditions with 5-star weapons and shorter rotations, ATK builds still result in less overall damage than DEF builds. As such, ATK builds will not be covered in this guide.
Of course, if you are not concerned with overall damage and simply want to build ATK Albedo for fun, don’t let this guide stop you!

ER Requirements
Most of Albedo’s damage comes from his Skill, so you may choose not to use his Burst at all. In these cases, you can ignore Energy Recharge altogether.
If your Albedo is C2 and you do want to use Albedo’s Burst, then it’s recommended to either Burst every other rotation or simply whenever you happen to have his Burst up. ER should not be a priority.
If you need to Burst every rotation (e.g., your team relies on the Elemental Mastery buff from his Ascension 4 Passive), then ER Requirements are roughly as follows. Use Zakharov’s ER calculator for more detailed ER requirements for your specific teams.
| C0 | C1+ | |
| 2+ Geo units | ~120-140% | 100% |
| Solo Geo | ~130-150% | ~100-110% |
Mainstats/Substats
 Sands |  Goblet |  Circlet |
| DEF% | Geo DMG% | CRIT Rate/DMG% DEF%* |
*DEF% Circlet is an option if you are not using Gorou. CRIT is still better by a margin of about 2-8% depending on your weapon. With Gorou, a CRIT Circlet is significantly stronger.
If you have a DEF% Goblet that rolled entirely into CRIT, you may want to try it out. With 4pc Golden Troupe and Wolf-Fang, the difference between DEF% and Geo DMG% is around 4-5%.
Substat Priority:
CRIT Rate/DMG% > DEF% > (ATK% if using Burst)
Artifact Sets
Ranked by order of recommendation.
Assumptions: C0 Albedo Level 90, Talents 9/9/9, Level 90 Cinnabar Spindle/Harbinger of Dawn, KQM Standard substats.
1 Solar Isotoma hit, 10 Transient Blossom procs, 1 Tectonic Tide hit, 3 Fatal Blossom hits, no ER requirement*
| Artifact Set | % of 4Husk | Notes |
4pc Husk of Opulent Dreams (4Husk) | 100% | Albedo’s Transient Blossoms will snapshot the 4pc effect at the moment he casts his Skill and keep the buffs until his flower disappears or he recasts his Skill. Husk’s 4pc effect can be pre-stacked by waiting for 12 seconds before starting a Domain or Abyss floor, as long as Albedo is not in the first team slot. |
4pc Golden Troupe (4GT) | 100.7% (Cinnabar) 96.3% (HoD) | With Cinnabar Spindle, 4GT’s massive 70% Skill DMG puts it on par with 4Husk. With Gorou and another Geo teammate, add about 1-2% to the values shown. Which set you choose largely depends on which domain you want to farm. You may not want to farm the Husk domain if you don’t also need Ocean-Hued Clam artifacts. Husk can be strongboxed though, allowing you to passively farm it while grinding other domains. |
2pc Golden Troupe / Husk of Opulent Dreams / Archaic Petra combos | 86-90% | A full 4pc set is definitely recommended, but it may not be worth farming for your account. If you do not want to farm either of the domains or don’t have enough pieces to go around, then you can settle for these 2pc-2pc combos. You will need about 4-5 more substat rolls on your 2AP2Husk set to be competitive with 4Husk. 2GT combos perform similarly. |
4pc Tenacity of the Millelith (4ToM), 4pc Noblesse Oblige (4NO), or 4pc Instructor (4IN) | <77% | These are support sets that sacrifice Albedo’s personal damage in favor of team buffs. There are very few teams where a 20% ATK or 120 EM buff will outweigh the damage loss. 4pc Instructor is particularly limiting due to its lower stats and +16 level cap. If you are thinking of building Albedo with any of these support sets, consider if a dedicated support/buffing teammate would be a better choice. |
*Realistically, Albedo will need some ER to Burst every rotation depending on your team. However, since his Burst contributes so little damage in comparison to his Skill, accounting for ER does not change his artifact/weapon rankings or recommendations.
Weapons
Ranked by order of recommendation.
Though there are a few 5-star weapons on this list, it is not recommended to specifically pull 5-star weapons for Albedo. It can cost more Primogems to obtain a desired 5-star weapon than a 5-star character and it’s difficult to justify even the strongest 5-stars over the 3-star Harbinger of Dawn.
The rankings below assume Albedo with no external buffs. Separate analyses with Gorou and other buffs can be found in the References.
Assumptions: C0 Albedo Level 90, Talents 9/9/9, 4Husk DEF/Geo/CRIT, KQM Standard substats.
1 Solar Isotoma hit, 10 Transient Blossom procs, (1 Tectonic Tide hit, 3 Fatal Blossom hits), no ER requirement*
| Weapon | % R5 HoD w/Burst | % R5 HoD w/o Burst | Notes |
Cinnabar Spindle | 111.3% (R5) 98.9% (R1) | 118.7% (R5) 103.7% (R1) | Albedo’s uncontested Best-in-Slot. If you have Cinnabar, there is little reason not to use it. If you do not Burst during your rotation, the gap between Cinnabar and other Swords grows even wider. Cinnabar’s passive is dynamic, meaning it does not snapshot any DEF buffs at the time you cast Albedo’s Skill. Note that in teams with Gorou, the gap between Cinnabar and other Swords shrinks notably. The placements remain the same, however. This weapon was available as an event reward during Version 2.3. If you were not able to claim it, then it is unfortunately no longer obtainable. Note that there is a bug whereby hitting a shielded enemy with this weapon sometimes disables Cinnabar’s passive until Albedo is swapped out of the party or the game is restarted. |
Harbinger of Dawn | 100.0% (R5) | 100.0% (R5) | Easily obtainable through Wishes, Harbinger of Dawn is Albedo’s best F2P option if you missed Cinnabar Spindle. Its passive is conditional upon Albedo staying above 90% HP, but this is usually easy to achieve with Albedo’s low field time requirements. Corrosion can be a problem though, so having a team healer is recommended against content that damages your characters through shields or while they are off-field. |
Wolf-Fang | 102.9% (R5) 94.6% (R1) | 100.9% (R5) 92.9% (R1) | The CRIT Rate passive cannot gain stacks while Albedo is off-field, limiting him to 1 stack if you E>swap and 2 stacks if you E>N1>swap. Calculations are for E>N1>swap, but the difference is small, so just do whatever combo is most comfortable for you. While slightly better than Harbinger of Dawn at R5, the miniscule damage increase does not justify spending $50. It may be the best 4-star option if you don’t have Cinnabar, but Harbinger of Dawn has much better value. |
Primordial Jade Cutter | 103.3% (R1) | 96.7% (R1) | PJC’s high CRIT value and ATK buff on its passive make it the best 5-star option for Albedo if you use his Burst. However, it is only slightly ahead of Harbinger of Dawn, a 3-star weapon that is much more obtainable. Its damage falls below Harbinger of Dawn if you do not use Albedo’s Burst in your rotations. |
Light of Foliar Incision or Haran Geppaku Futsu | 98.6% (R1 LoFI) 97.5% (R1 HGF) | 97.5% (R1 LoFI) 94.1% (R1 HGF) | If you have a spare of either of these Swords, then they make a good alternative to Harbinger of Dawn without needing to stay above 90% HP. These are potent stat sticks with passives that are marginally useful to Albedo. |
Mistsplitter Reforged | 97.6% (R1, 2 stacks) 91.6% (R1, 1 stack) | 87.2% (R1, 0 stacks) | Albedo is only able to gain at most 2 stacks from Mistsplitter’s passive. He can snapshot both stacks with his Skill, but casting his Skill immediately after his Burst will cancel his Fatal Blossoms. If you want the buff from both stacks, then you must either forgo his Fatal Blossoms or cast his Burst, wait for the Fatal Blossoms to go off, and then recast his Skill. Forgoing his Fatal Blossoms is a damage loss, but waiting for them to go off increases his field time. All of that to say: we recommend just using his E-Q combo as normal and not worrying about trying to obtain 2 stacks. |
Festering Desire or Traveler’s Handy Sword | 86.4% (R5 Festering) 76.8% (R5 Traveler’s) | 88.3% (R5 Festering) 77.3% (R5 Traveler’s) | These are serviceable only if none of the above are available to you. If you are considering either of these weapons, we recommend just using Harbinger of Dawn if at all possible. Festering Desire was available as an event reward during Version 1.2. If you did not claim it then, it is unfortunately no longer obtainable. Traveler’s Handy Sword can be found in chests around Mondstadt. |
Freedom-Sworn | 76.7% (R1) 57.6% (R1, 4ToM) | 73.9% (R1) 53.1% (R1, 4ToM) | As long as there is a constant Elemental aura, Albedo’s Transient Blossoms can reliably proc Freedom-Sworn’s passive with Crystallize. It’s very difficult to get Freedom-Sworn’s buff onto Albedo’s Burst without extremely short rotations. Freedom-Sworn also severely reduces his personal damage, even more so if used with a non-Husk artifact set. Since much of Albedo’s value comes from his personal damage, this should only be considered if you think the team buff is worth it. Please don’t do this. |
*Realistically, Albedo will need some ER to Burst every rotation depending on your team. However, since his Burst contributes so little damage in comparison to his Skill, accounting for ER does not change his artifact/weapon rankings or recommendations.
Teams
Due to Geo’s insular nature, many Geo units best synergize with other Geo units. This is also the case with Albedo and his DEF-oriented kit. However, Albedo can be slotted in as a solo Geo unit when you need an off-field DPS.
This is not a comprehensive list of teams, and the inclusion of a certain team or lack thereof does not necessarily indicate the power level of the team in question. This section is not ranked.
Itto/Noelle Hypercarry

Albedo works well with the classic Geo on-field hypercarries: Itto and Noelle. He provides Geo particles to fund their Bursts and ensures the highest level of Gorou’s buffs — all while requiring very little field time. These teams can even be full Mono Geo teams if another Geo unit is used for the flex slot.
Albedo can snapshot Gorou’s DEF and Geo DMG% buffs, but not the CRIT DMG buff from Gorou’s C6. However, since Gorou’s C6 buff is applied to all nearby party members (including off-field characters) for its duration, Albedo will still benefit from it as long as it is active.
Notable flex slot options are listed below. Characters are grouped by what utility they provide and are not ranked.
| Character(s) | Notes |
 | Layla and Thoma allow for near-permanent shielding through both their Talents and off-field Elemental application enabling Crystallize. It can be hard to maximize uptime of both Layla’s shields and Gorou’s buffs in your rotation. Zhongli has permanent shield uptime and decreases surrounding enemies’ Geo RES. |
 | These options provide damage and constant off-field Elemental application, enabling Crystallize. Though the Crystallize shields themselves are not very strong, they will help with uptime for Geo Resonance buffs. Yelan and Rosaria in particular provide additional buffs for your carry (DMG% and CRIT Rate, respectively). Note that Itto may have trouble triggering Yelan and Xingqiu’s Bursts during his Charged Attack combo. |
| Even Triple Geo teams cannot escape Bennett. Noelle and Itto are still able to use his massive ATK buff, and Albedo himself can benefit if he uses his Burst. However, Bennett may have more value in another team if you have to choose. Bennett may also need more ER than usual as the only Pyro unit in this team. It’s also important to note that Bennett is a poor Crystallize enabler, and so Itto teams with Bennett will have less Geo Resonance and shield uptime. | |
    | These characters combine healing and Elemental application into one slot. The Elemental application enables Crystallize, which helps maintain Geo Resonance buffs. Itto especially appreciates the healing, since his teams lack a healer if Gorou is not C4. |
 (for Noelle only) | Geo Traveler can help provide Energy for your carry while dealing respectable damage whenever they are swapped in. However, Geo Traveler does not provide any healing or shielding utility, so Itto may lose out on Geo Resonance buffs and survivability. They are still usable with Itto in a pinch, but we recommend pairing them with Noelle instead. |
 (for Noelle only) | Despite their slow attack speed, Noelle’s Normal Attacks have an enormous AoE that makes efficient use of Yun Jin’s buff. Unfortunately, the buff does not benefit from Gorou since it does not snapshot. Yun Jin also does not synergize well with Itto, since most of Itto’s damage comes from his Charged Attacks. |
Example Teams
Rotation: When playing Albedo in an Itto team, the highest DPS rotation is Gorou E Q > Albedo E > Itto Q. The alternative, Gorou E > Albedo E > Gorou Q > Itto Q, gives slightly more damage to Itto. However, this rotation is less optimal because it doesn’t allow Albedo to snapshot the DEF% buff from Gorou’s Ascension 1 Passive, and the rotation duration is also longer. Thus, the overall team DPS is lower.

Double Geo w/Zhongli

Albedo and Zhongli together form a flexible Double Geo core. Zhongli provides a shield and Universal RES Shred for the entire team, while Albedo provides respectable off-field damage and enables Geo Resonance, further increasing team damage. Between these two characters alone, you get damage mitigation, Interruption Resistance, buffs/debuffs, and damage. While the Geo application can sometimes interfere with desired reactions, this is uncommon and can be mitigated by placing Zhongli’s pillar away from the enemy. The flexibility of this pairing makes them easy to slot into many teams, but they especially benefit those who appreciate Interruption Resistance (e.g., Xiao, Wanderer, Yoimiya, etc.).
Example Teams

Rotation: Albedo E > Zhongli hE [break pillar on Albedo flower] > Xingqiu Q N1 E D N2 > Albedo N1 Q N1 > Hu Tao combo
Rotation: Albedo E N1 > Faruzan E Q > Zhongli hE > Xiao E E Q 11P
(Video courtesy of Cuzimori#1535, note that this particular rotation requires C6 Faruzan)

Rotation: (Yoimiya Q) > Zhongli hE (Q) > Albedo E (Q) > Venti E Q > Yoimiya E 3N5
(Yoimiya Burst is optional, but recommended at the beginning of the rotation to provide Pyro for Venti to Swirl. Albedo’s and Zhongli’s Bursts are also optional and used to fill time if necessary.)
Geo Quickswap

Albedo can be used with Geo Traveler or Ningguang in a more quickswap-style Geo team. Both Geo Traveler and Ningguang have Skills and Bursts with short cooldowns and high multipliers. Because of the short field time requirements, these teams are capable of rotation times as short as 12 seconds. Using Albedo’s and Zhongli’s Bursts also incur less of a DPS loss, as they are not taking valuable field time from a dedicated carry. In general, these teams do not provide the highest DPS in the game, but they are still decently viable for the Abyss.
The flex units here can be other Geo characters (e.g., Gorou or Zhongli) or other quickswap/off-field DPS units. Bennett in particular is helpful, as he provides a potent ATK buff for ATK-scaling teammates such as Geo Traveler, Ningguang, Fischl, Yae Miko, or Zhongli.
An Anemo unit can be considered in content where crowd control is valuable. Kazuha or Venti in particular provide valuable grouping and respectable damage. Venti specifically allows Albedo to take full advantage of the small AoE in his attacks. You should try to pair them with Bennett if possible, and only bring them if they are not needed in another team.
Zhongli in particular enables a playstyle informally known as “microwave,” in which his pillar causes all Geo constructs in the area to pulse with Geo DMG in a small AoE. These instances of damage can also proc Albedo’s Transient Blossoms. This means you can place as many Geo constructs as you can (Geo Traveler’s Burst can get around the 3-construct limit) and then just wait for the pulses to do your work for you. Demonstration here.
Example Teams

Rotation: Albedo E > Bennett EQ > Fischl E or Q > Ningguang EQ(E) CA > Bennett E > Ningguang N2C > Bennett E
(Fischl will alternate Skill and Burst uses. Albedo can skip his Skill use every other rotation.)

Rotation: Albedo E > Bennett EQ > GMC EQ > Bennett E > Zhongli hEQ > Bennett E > GMC E
Solo Geo

Albedo can be slotted into most teams when you want an additional off-field DPS. Though he will rarely be the best option in these scenarios, he can work decently well. His periodic Geo application can even be helpful in some circumstances to enable certain reactions. These situations are detailed below.
Burgeon

Burgeon teams run a risk of triggering Burning instead of Bloom/Burgeon. If Burning occurs, it must be put out before more Blooms can be triggered. Having sufficient Hydro to avoid this is the conventional solution, but Albedo’s Geo application can also help react away any excess Pyro or Burning aura that may be present. At the same time, Geo does not interact with Dendro Cores or Dendro auras on enemies, limiting his impact on desired reactions.

Rotation: Kokomi E > Albedo E N1 Q > Nahida E > Thoma Q E N1 > Kokomi Q NA combo
(Video courtesy of Cuzimori#1535)

Electro-Charged

Sometimes, Anemo units in Electro-Charged teams have trouble Swirling Hydro due to too much Electro aura being present on the enemies. Albedo’s Geo application can react with the excess Electro aura, which allows the next Anemo attack to Swirl both Electro and Hydro. This lets you apply the 4pc Viridescent Venerer RES Shred for both Elements, which is helpful when your Hydro unit is built for damage. This is doubly true when using Kazuha, who provides an Elemental DMG% Bonus based on what Element(s) he Swirls. Demonstration of this principle here.

Flex
Even when Albedo’s Geo application doesn’t actively help, it rarely hurts you either. Because of this, he can often be slotted into other teams as desired. These teams are never the highest-performing of their respective archetypes, but certainly viable.

Rotation: Albedo E N1 Q > Bennett Q E > Xiangling Q E > Tartaglia rQ E NA combo > battery Xiangling
Rotation video (courtesy of Mystathi#9705)

Rotation: Albedo E N1 Q > Rosaria E > Bennett QE > Rosaria Q > Xiangling Q N1 E > Rosaria E > Bennett N1 E > Xiangling N2 > Rosaria E > Bennett E > Xiangling

References
- All calculations referenced in this guide can be found here.
- Xiao calculations for Albedo’s C4 are courtesy of Xiao Mains.
 Thank you for reading!
Credits
Authors
Nociii#0111, Sir_pick_the_prick#2209
Contributors
Sew#2409, Reddraegon#0019, Cuzimori#1535, Rathalos#2875, Chasing Haze#3014, baeliph#8346, Coded#2644, Casdela#5121, idkanonymized#4166, ZchryRbbt#3752, Mr. Pillow#0065, fritzzes#2211
Changelog
August 2023 – Added notes on Wolf-Fang and Golden Troupe.
February 2023 – Re-written with more specific weapon and team details.