A Baizhu Guide
by irokei, jadur, and fritz
Updated for Version 4.6
Life, death… and the world around us all follow a set of laws… Hehe, but if you never test the limits, how can anyone know where the boundaries of these laws are?
Table of Contents
Introduction
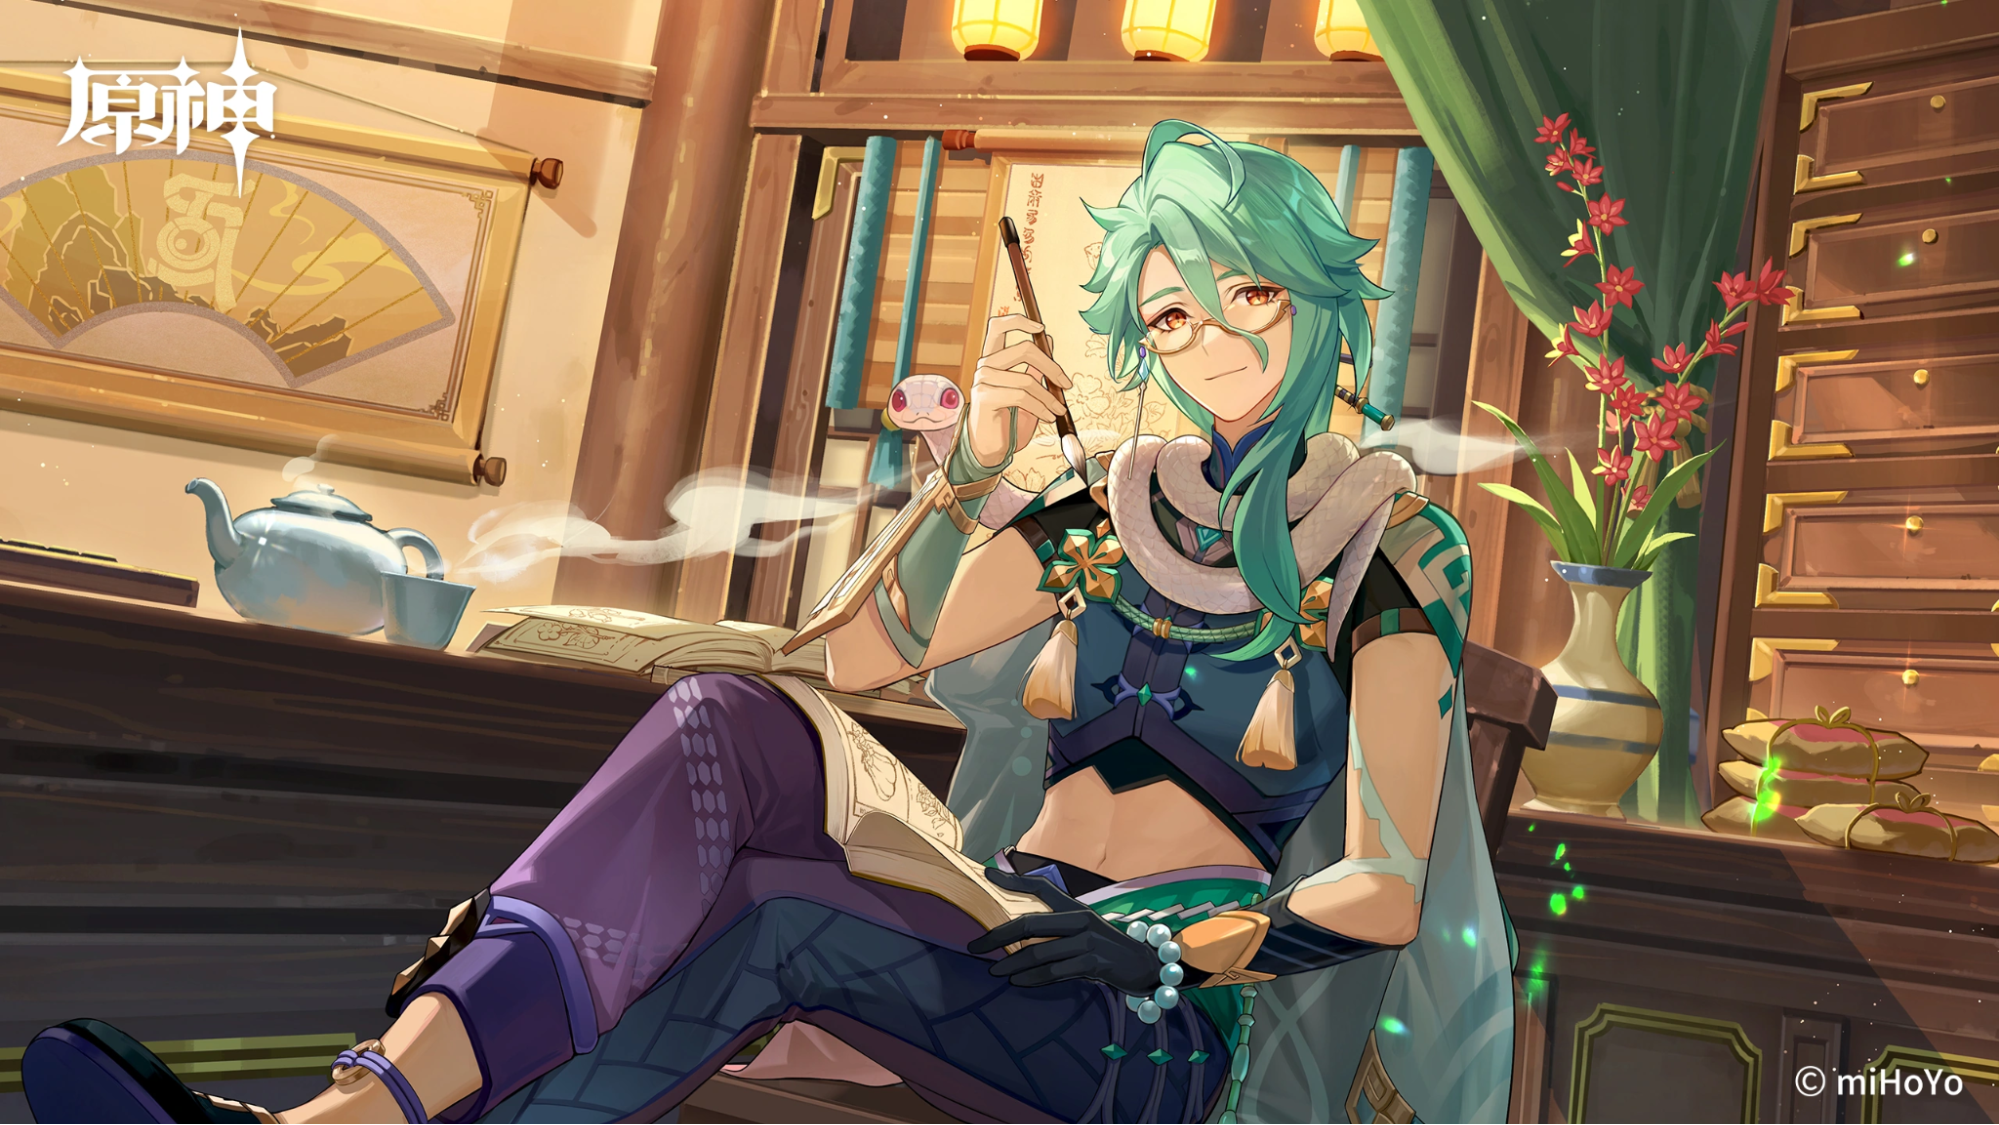
Baizhu is a 5-star Dendro Catalyst user in Genshin Impact who specializes in healing, interruption resistance, and Dendro-related buffs. He is an excellent free-to-play–friendly support in many Dendro-related teams. This guide examines Baizhu's kit in-depth to help you better understand his best builds, best teams, best weapons, best artifacts, synergies, Talents, Constellations, and more!
Why Play Baizhu?
Pros
- Fulfills many roles via his healing, interruption resistance, buffs, and Dendro application
- Sustains the entire team, even when paired with Furina
- Frequently applies Dendro on-field as a Dendro Catalyst, making him a decent driver
- Buffs on-field units who trigger Dendro-related reactions
- Has flexible build options, with a strong free-to-play weapon selection
Cons
- His Normal Attacks have a very limited range
- Lacks any significant personal damage, even with Constellations or 5-star Catalysts
- Slow and limited Dendro application when played off-field
- Requires a high amount of ER% investment in most teams
- Has difficulty maintaining 4pc Deepwood Memories uptime against multiple enemies
TL;DR
Design: lapsy & cegewinne
Content: irokei
Glossary
FAQ
How strong is Baizhu’s shield?
Baizhu technically has a shield, but it doesn’t have the same practical effect as other shields. Instead, he grants a small “pseudo-shield” that provides interruption resistance, very small damage mitigation, and off-field Dendro application. Baizhu’s pseudo-shield refreshes every 2.5s while his Burst is up, so multiple instances of enemy damage can result in the on-field character taking excessive damage and becoming staggered.
Despite this, Baizhu provides comfortable and sufficient defensive utility at most skill levels in most scenarios. While you cannot withstand a barrage of enemy attacks with Baizhu’s shield like you would with Zhongli’s, you can avoid being staggered with proper positioning and stay healthy thanks to his healing.
Should I pull for Jadefall’s Splendor or Baizhu’s Constellations?
Baizhu’s Constellations provide greater quality-of-life improvements over Jadefall’s Splendor in most scenarios. Additionally, you would spend fewer wishes on average to obtain a Constellation than a signature weapon. However, Baizhu is perfectly fine at C0, so don’t feel pressured to spend beyond your means for Baizhu.
Overall, Jadefall’s Splendor is a very niche option that is basically only viable on Baizhu and not worth spending for. R5 Prototype Amber, Favonius Codex, and other 4-star Catalysts are perfectly fine options that can even outperform Jadefall’s Splendor.
Is Baizhu worse than other characters like Zhongli or Nahida?
It would be unfair to directly compare Baizhu to other units that specialize in a certain role. Baizhu’s strength lies in his ability to fulfill multiple roles at once: healer, shielder, buffer, Dendro applier, etc. This potentially allows a team slot to open up for another damage dealer or support. Additionally, he is one of the best healer options in teams with Furina, especially for Dendro, Electro, and Hydro DPS units. He can even pair up with Nahida to form a strong, supportive Double Dendro core. In general, Baizhu’s teams perform on par with units that he is frequently compared to.
Character Overview

Playstyles
Baizhu primarily provides defensive utility, Dendro application, and team buffs in all of his teams and playstyles. He is a support with very little damage potential, so it is not recommended to play him as a primary damage dealer. While this guide does not cover Baizhu’s DPS builds, you can still play him that way if it makes you happy!
Off-Field Support
Baizhu is most often played as an off-field support. He swaps in to use his Elemental Skill and Burst then swaps out to the next party member.
Baizhu’s Skill has a 10s cooldown, so it can be used twice per rotation in some teams with at least a 20s rotation; this is possible in teams with short teammate field-time requirements or flexible rotations. Baizhu tends to have extremely high ER requirements and prefers a weapon that lowers them. Fortunately, he usually only has to focus on HP% and ER% stats, so you can reach his stat priorities with some investment.
On-Field Driver
Baizhu can also be played as an on-field driver since he is a Dendro Catalyst user. Baizhu is fairly tanky with his HP stats, healing, and pseudo-shields, which makes him a comfortable driver. However, he has extremely close-range Normal Attacks, so you need to be well within melee range to hit enemies and apply Dendro. Additionally, Baizhu deals poor damage and is often not the reaction trigger in his teams, so his A4 Passive’s buff doesn’t contribute much to team damage when he’s driving. Despite this, he has a fairly quick Normal Attack sequence that can proc off-field abilities from teammates like Xingqiu, Yelan, and C6 Fischl.
Ultimately, Baizhu is a viable team driver and on-field Dendro applier in a variety of team archetypes. While these teams are uncommon, they deal strong damage and give Baizhu more screen time!
Level and Talent Priority
 >
>  ≥
≥  >>
>> 
Burst > Skill ≥ Level 90 >> Normal Attack
Baizhu’s Burst provides the majority of his utility and its Talent level increases his single-ally healing and pseudo-shield strength (although it is still quite weak at max Talent level). His Skill is still worth leveling since it increases his teamwide healing. His Normal Attacks deal very low damage, even when used as a driver; as a result, his Normal Attack does not need to be leveled at all.
You should raise Baizhu to at least Level 80/90, but Level 90 is recommended to maximize his Max HP (to increase his healing, pseudo-shield durability, and A4 Passive buff). This is especially relevant to teams with Furina, where his healing helps increase team damage output via Furina’s DMG% buff.
Talent Overview
 Normal Attack | The Classics of Acupuncture
Talent Description
Normal Attack
Performs up to 4 attacks that deal Dendro DMG to opponents in front of him.
Charged Attack
Consumes a certain amount of Stamina to deal AoE Dendro DMG to opponents in front of him after a short casting time.
Plunging Attack
Calling upon the might of Dendro, Baizhu plunges towards the ground from mid-air, damaging all opponents in his path. Deals AoE Dendro DMG upon impact with the ground.
Baizhu’s Normal Attack Talent is not necessary to level in any of his support playstyles. His Normal Attack string consists of a simple set of Dendro melee attacks that deal poor damage in a very small AoE. N3 or N4 combos with dash cancels are his most common attack sequences while driving. Baizhu’s Charged Attack is quite slow and consumes a lot of Stamina, so it is not worth the additional instance of Dendro application in most scenarios.
Elemental Skill | Universal Diagnosis
Talent Description
Controls a Gossamer Sprite that cruises and attacks nearby opponents, dealing Dendro DMG.
After it performs 3 attacks or if there are no opponents nearby, the Sprite will return, healing all nearby party members based on Baizhu's Max HP
Baizhu’s Elemental Skill fires a homing projectile that deals 3 instances of Dendro damage and returns to heal the entire party. In multi-target scenarios, it can either attack one enemy 3 times or bounce between multiple enemies. Baizhu’s Skill is notable for its rapid teamwide healing (whereas most healers have teamwide healing tied to their Burst), so it makes him one of the best healing options in the game, especially in teams with Furina.
Note that Baizhu’s Skill has a 10s cooldown, so you can use it twice in some teams with at least a 20s rotation. Additionally, there are some teams with 15s rotations that use his Skill once every rotation and his Burst every other rotation.
Elemental Burst | Holistic Revivification
Talent Description
Enters the Pulsing Clarity state, creating a Seamless Shield that absorbs Dendro DMG with 250% effectiveness.
While in this state, Baizhu will generate a new Seamless Shield every 2.5s.
The Seamless Shield will heal your own active character based on Baizhu's Max HP and attack opponents by unleashing Spiritveins, dealing Dendro DMG under the following circumstances:
- When a character is under the protection of a Seamless Shield and a new Seamless Shield is generated.
- When the Seamless Shield's effects expire, or when it is shattered.
Baizhu’s Elemental Burst generates a pseudo-shield for the on-field character every 2.5s for 14s. It also heals the active character and deals ranged Dendro damage in a very small AoE after the shield breaks, expires, or refreshes via his C6. The shield itself is rather weak, but it nonetheless provides interruption resistance even against the hit that breaks it. Note that it is still possible to be staggered even with Baizhu’s Burst active if you take consecutive instances of enemy damage after the shield breaks.
Ultimately, Baizhu’s Burst is one of his most valued assets thanks to its comfort and modest off-field Dendro application.
 1st Ascension Passive (A1) | Five Fortunes Forever
Talent Description
Baizhu gains different effects according to the current HP of your current active character:
- When their HP is less than 50%, Baizhu gains 20% Healing Bonus.
- When their HP is equal to or more than 50%, Baizhu gains 25% Dendro DMG Bonus.
Baizhu’s A1 Passive is pretty boring. Its 20% Healing Bonus helps when the on-field unit drops below 50% Max HP, but its 25% Dendro DMG Bonus is basically useless on Baizhu since he deals such poor personal damage to begin with.
 4th Ascension Passive (A4) | All Things Are of the Earth
Talent Description
Characters who are healed by Seamless Shields will gain the Year of Verdant Favor effect: Each 1,000 Max HP that Baizhu possesses that does not exceed 50,000 will increase the Burning, Bloom, Hyperbloom, and Burgeon reaction DMG dealt by these characters by 2%, while the Aggravate and Spread reaction DMG dealt by these characters will be increased by 0.8%. This effect lasts 6s.
Baizhu’s A4 Passive grants the on-field character healed by his Burst a DMG Bonus to Dendro-related reactions that scales with his Max HP (up to 50,000 HP). This buff lasts 6s, cannot snapshot, and is additive with Elemental Mastery. At 50,000 Max HP, Baizhu’s A4 Passive grants a 40% Aggravate and Spread DMG Bonus and a 100% Burning and Bloom-related DMG Bonus for 6s to the on-field character healed by his Burst. However, since this buff is not multiplicative, the actual DPS increase is lower (especially at higher levels of EM investment).
This passive is primarily used for on-field units with extended field time. In quickswap playstyles, you can pass the buff to multiple teammates, but you need to time Baizhu’s Burst shield breaking or expiring while they are on-field.
 Utility Passive | Herbal Nourishment
Talent Description
When Baizhu is in the party, interacting with certain harvestable items will heal your current active character for 2.5% of Baizhu's Max HP.
Baizhu’s Utility Passive has no use in Spiral Abyss or Domains. It is a helpful passive when exploring the overworld and especially when diving in Fontaine, since it is one of the few sources of healing underwater.
Constellations
Baizhu is fully functional at C0. His Constellations can be good, but they are fairly unnecessary. Other characters’ Constellations (e.g., Nahida's C2, Furina’s C2, Neuvillette’s C1) are likely more impactful to team performance.
 Constellation 1 | Attentive Observation
Universal Diagnosis gains 1 additional charge.
Baizhu’s C1 grants him an extra charge of his Elemental Skill, which can slightly improve his Dendro application, increase his teamwide healing, and make rotations more flexible and forgiving. The extra Skill generates Dendro Particles, which helps lower Baizhu’s ER requirements. However, the additional charge also has a 10s cooldown, so it is mostly useful in the first rotation or in teams where he normally casts his Skill once per rotation.
 Constellation 2 | Incisive Discernment
When your own active character hits a nearby opponent with their attacks, Baizhu will unleash a Gossamer Sprite: Splice.
Gossamer Sprite: Splice will initiate 1 attack before returning, dealing 250% of Baizhu's ATK as Dendro DMG and healing for 20% of Universal Diagnosis's Gossamer Sprite's normal healing.
DMG dealt this way is considered Elemental Skill DMG.
This effect can be triggered once every 5s.
Baizhu’s C2 provides an additional instance of Dendro application every 5s and increases his net teamwide healing by a fair amount. This is very helpful for teams that rely on off-field Baizhu as their sole source of Dendro application. This allows him to more easily reapply Dendro after finishing an enemy wave, which is great for on-field DPS units with extended field time like Cyno. You don’t have to swap to Baizhu at all for the effect to trigger, which means he could have no field time and still be an effective Dendro applier in theory.
This Constellation requires the on-field character to hit an enemy. Almost any source of damage or Elemental application counts: Bloom-related damage, 4pc Ocean-Hued Clam damage, Alternate Sprints, etc.
 Constellation 3 | All Aspects Stabilized
Increases the Level of Holistic Revivification by 3.
Maximum upgrade level is 15.
Baizhu’s C3 increases his Burst damage, Shield DMG Absorption, and single-ally healing. His shields are still fairly weak with this Constellation, and his healing is already more than enough without this Constellation.
 Constellation 4 | Ancient Art of Perception
For 15s after Holistic Revivification is used, Baizhu will increase all nearby party members' Elemental Mastery by 80.
Baizhu’s C4 increases the team’s EM by 80 after using his Burst. However, this buff is relatively weak in the grand scheme of things. It basically provides a 2pc EM set bonus to every character in the team. Overall, an unsatisfying Constellation for its Primogem investment.
 Constellation 5 | The Hidden Ebb and Flow
Increases the Level of Universal Diagnosis by 3.
Maximum upgrade level is 15.
Baizhu’s C5 is a boost to his teamwide healing, but this is unnecessary since he already heals enough at C0.
 Constellation 6 | Elimination of Malicious Qi
Increases the DMG dealt by Holistic Revivification's Spiritveins by 8% of Baizhu's Max HP.
Additionally, when a Gossamer Sprite or Gossamer Sprite: Splice hits opponents, there is a 100% chance of generating one of Holistic Revivification's Seamless Shields. This effect can only be triggered once by each Gossamer Sprite or Gossamer Sprite: Splice.
Baizhu’s C6 adds HP-scaling to his Elemental Burst, which increases his personal damage. When his Skill or C2 hits an enemy, a new shield is created which results in another instance of Dendro damage and application. At C6, Baizhu applies approximately 6 more instances of Dendro in 20s rotations. While useful, this Constellation is quite underwhelming compared to other 5-star units’ final Constellations.
Builds
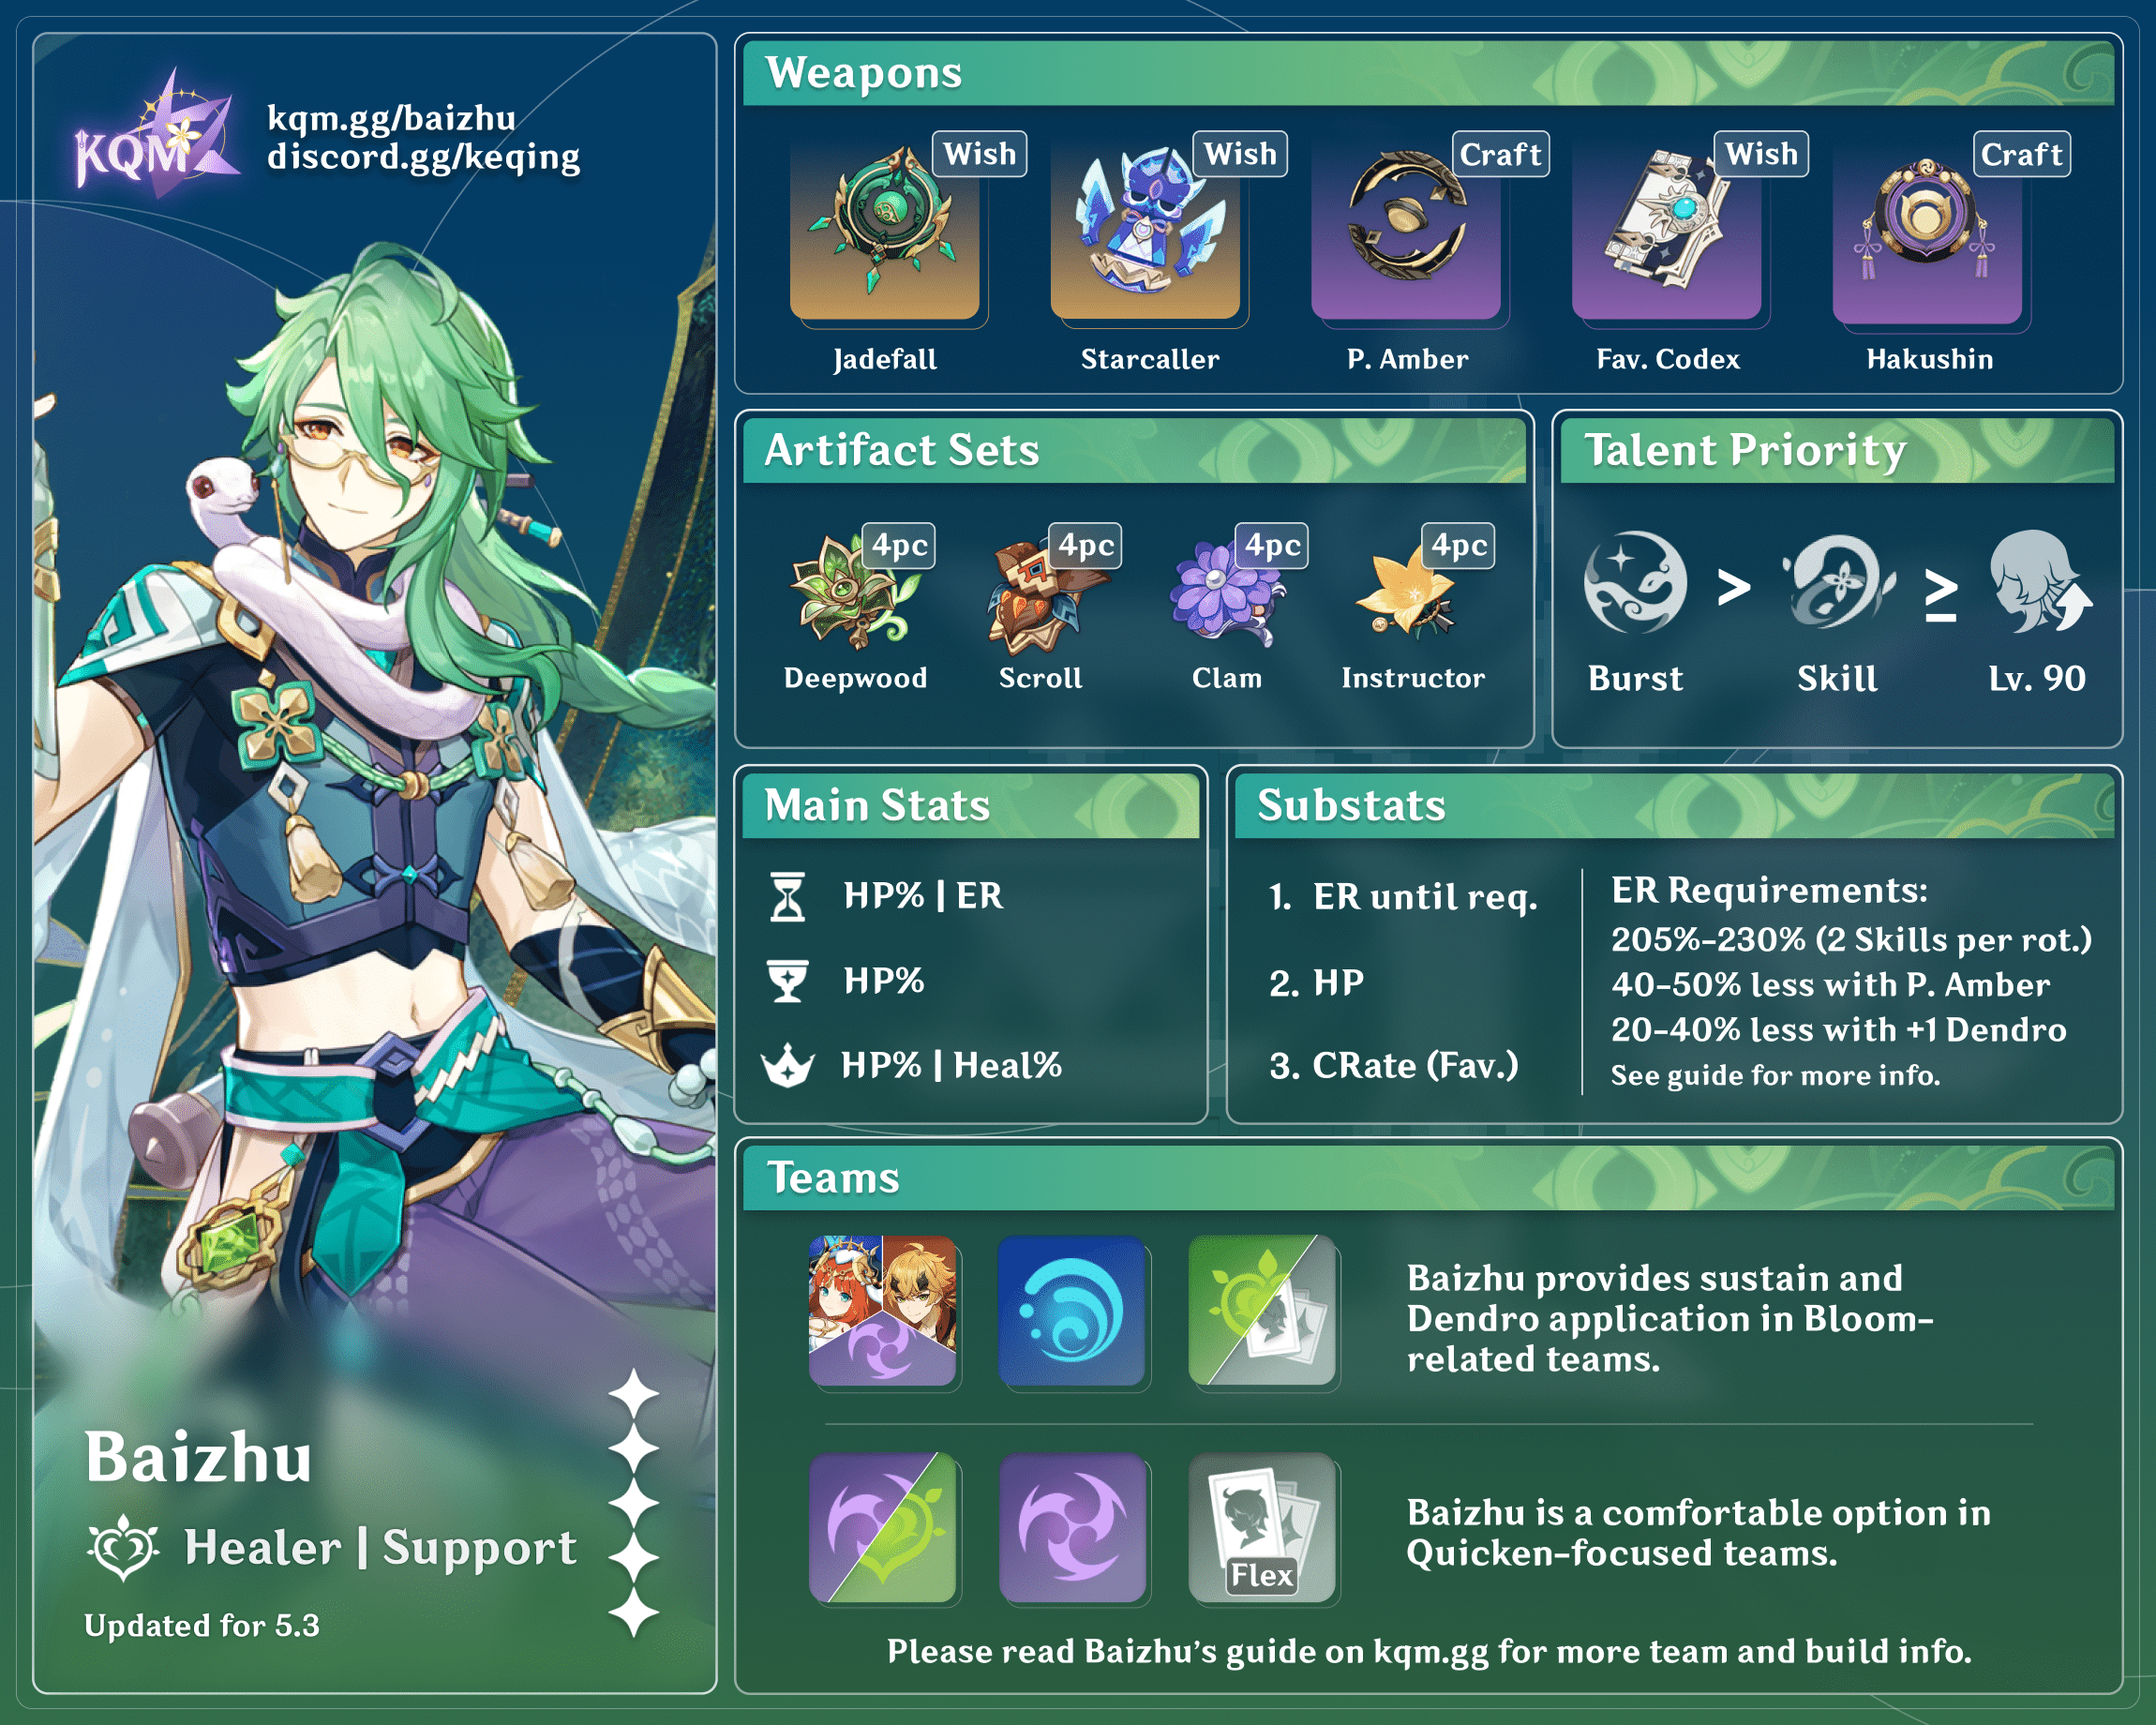
ER Requirements
Baizhu’s Burst costs 80 Energy, which results in high ER requirements in most teams. Catalysts like Jadefall’s Splendor, Prototype Amber, and Favonius Codex can help lower Baizhu’s ER requirements.
These numbers are approximate; ER requirements will vary depending on team and context. For a more accurate estimate of your ER requirements, use the Energy Recharge Calculator.
Calcs for ER requirements can be found here in this spreadsheet (last updated for 4.5). Every example team in this guide is included.
| Team | # Skills | R1 Jadefall’s Splendor | R5 Prototype Amber | R5 Favonius Codex | Other Weapons |
| Solo Dendro | 1 | 210–250% | 250–290% | 250–290% | 320–370% |
| 2 | 135–155% | 160–180% | 155–175% | 205–230% | |
| Double Electro (Fischl) | 1 | 145–170% | 170–200% | 195–220% | 220–250% |
| 2 | 115–130% | 135–155% | 140–160% | 175–200% | |
| Double Dendro (Other) | 1 | 145–160% | 170–190% | 180–200% | 220–240% |
| 2 | 120–150% | 140–170% | 140–170% | 175–225% | |
| Double Dendro (Nahida) | 1 | 125–140% | 145–160% | 160–180% | 180–200% |
| 2 | 110–120% | 130–140% | 130–145% | 165–180% | |
| On-Field Raiden | 1 | 100–105% | 110–130% | 135–165% | 155–190% |
Assumptions:
• Additional teammate Favonius procs reduce ER requirement by roughly 10%
• 1 enemy particle every 10s
• “Safe” particle RNG
• 1 Favonius proc per Skill use when holding Favonius Codex
• Fischl C6
• Raiden assumes 22 Flat Energy recharged
Artifact Stats
 Sands |  Goblet |  Circlet |
| ER% or HP% | HP% | HP% > Healing Bonus | CRIT Rate* |
Substat Priority:
ER% (until requirement) > HP% (up to 50,000 Max HP)
Baizhu only needs to reach his ER requirements and invest in HP% to be a fully functional unit. Upon reaching his A4 Passive’s 50,000 Max HP cap, Baizhu can invest in offensive stats like EM, ATK%, and CRIT, but this level of optimization is unnecessary. After reaching his HP and ER stat requirements, you should use your Resin for your DPS units instead.
An ER% Sands can be necessary to reach Baizhu’s ER requirements, you can use an HP% Sands if you can reach his ER requirements through substats alone. Additionally, an HP% Circlet is almost always better than a Healing Bonus Circlet since Baizhu heals enough as is, so you should try to reach 50,000 Max HP before considering increased healing.
Lastly, Baizhu should invest in some CRIT Rate stats when holding Favonius Codex*. 7–8 CRIT Rate substats or a CRIT Rate Circlet helps consistently trigger Favonius’s passive with Baizhu’s Skill alone. You can always weave in Normal Attacks with lower CRIT Rate investment until you land a crit; however, this can take a considerable amount of field time, extend rotations, and chew into buff uptime.
We recommend using Genshin Optimizer to compare your actual artifacts.
Artifact Sets
Baizhu has a variety of artifact set options depending on his team. Each 4pc set fits its own niche, so direct comparisons are difficult to generalize. We recommend prioritizing your team’s buffing needs and using Genshin Optimizer to compare your actual artifacts.
 4pc Deepwood Memories 4pc Deepwood Memories | 4pc Deepwood Memories is Baizhu’s best option in Spread, Bloom, Hyperbloom, and Burgeon teams if no other teammate can hold it. It provides a very valuable 30% Dendro RES Shred that increases Spread and Bloom-related damage. However, Baizhu can struggle to consistently trigger the 4pc effect in AoE scenarios, especially against multiple enemies. His Skill targets three enemies at most and his Burst projectiles almost always hits only one enemy. Other units like Nahida and Kokomi are more reliable holders. This artifact set is not recommended in Aggravate teams where Baizhu is the sole Dendro teammate. The 4pc effect does not benefit Aggravate damage, so it would only buff Baizhu’s Dendro damage, which is quite negligible. |
 4pc Ocean-Hued Clam | 4pc Ocean-Hued Clam is a generalist set for Baizhu since he can consistently deal maximum “Clamage” with his Skill and Burst healing. If another 4pc Deepwood holder is already on the team or 4pc Deepwood isn’t necessary, then 4pc Instructor or 4pc Noblesse Oblige may result in higher team damage than 4pc Ocean-Hued Clam, especially with higher investment into the team’s primary DPS units. Note: 1 Skill cast is enough to overcap bubble damage, so you can wait at least 3s before casting Baizhu’s Skill again at C1 or with Sacrificial Fragments. As an on-field driver, this is fairly easy to do. As an off-field support in teams that normally permit only 1 Skill use at C0, you can use the additional Skill at the end of the rotation. |
 4pc Instructor | 4pc Instructor is a 4-star artifact set, so it provides lower stats than a 5-star artifact set. Despite this, it provides a teamwide 120 EM buff for 8s if Baizhu triggers a reaction while on-field. This EM buff can snapshot, but it does not snapshot for Transformative and Additive Reaction damage. As a result, it is primarily used in quickswap teams or for on-field DPS units with short field time. |
 4pc Noblesse Oblige | 4pc Noblesse Oblige provides a teamwide 20% ATK buff for 12s after Baizhu uses his Burst. This is primarily used for ATK-scaling DPS units in Aggravate teams since Spread and Bloom-related teams generally scale better with EM. |
 4pc Song of Days Past | 4pc Song of Days Past is a fairly niche artifact set that performs best in single-target scenarios. Its buff only lasts for 5 instances of damage, so it is not worth using in AoE scenarios. While it scales better with investment into single-target DPS units in single-target scenarios, 4pc Ocean-Hued Clam is generally a better artifact set for Baizhu that results in higher team damage in most cases. |
 2pc Mixed Sets | • 2pc Tenacity of the Millelith • 2pc Vourukasha’s Glow • 2pc Emblem of Severed Fate 2pc HP% + 2pc HP% or 2pc Emblem are decent combinations to meet Baizhu’s ER requirement and Max HP threshold. However, there are no additional teamwide buffs, so they should only be used as transitional sets. In almost all cases, 4pc Ocean-Hued Clam results in better team damage at equal investment. |
Weapons
Baizhu has a great free-to-play weapon selection that helps address his ER requirements or increase his team utility via weapon passive buffs. 5-star weapons are largely unnecessary since Baizhu is perfectly viable with free 4-star options.
Recommended Catalysts
These weapons help lower Baizhu’s ER requirements and perform roughly the same.
 Jadefall’s Splendor | Jadefall’s Splendor is a good option for Baizhu due to its HP% secondary stat and Energy regeneration via its passive. However, its DMG% buff is not that impactful, since Baizhu’s personal damage is quite low. Furthermore, it lacks team utility or buffs in its passive, making it a selfish option for Baizhu. Overall, Jadefall is not a very significant improvement over R5 Prototype Amber. Moreover, it is only really useful on Baizhu, which makes it a very Primogem-inefficient option. |
 R5 Prototype Amber | R5 Prototype Amber is one of Baizhu’s best 4-star options since it is essentially a free version of Jadefall’s Splendor. Its HP% secondary stat and Energy regeneration via its passive are greatly appreciated, and its teamwide healing is mostly unnecessary but a nice bonus. |
 Favonius Codex | Favonius Codex helps reduce Baizhu’s and his team’s ER requirements. However, it does not provide any benefit to his healing, shields, or A4 Passive buff. Additionally, it takes significant investment to build enough CRIT Rate to reliably proc its passive with only Baizhu’s Skill. While Normal Attacks can help trigger its passive, this extends rotations and can bite into buff uptime. Favonius Codex may perform better than other options with high-investment DPS teammates since it slightly lowers their ER requirement, which allows more investment into offensive substats. |
Other Catalysts
 R5 Hakushin Ring | Hakushin Ring provides a useful ER% stat and an Elemental DMG% buff to Baizhu’s Electro and Dendro teammates for 6s. This short buff duration prevents it from being a good option outside of Baizhu driver teams. Hakushin Ring’s passive does snapshot, but some notable units like Cyno, Raiden, and Yae cannot snapshot its buff. Moreover, its lack of HP% stats make it less-than-ideal for Baizhu’s A4 Passive buff. |
 R5 Thrilling Tales of Dragon Slayers | Thrilling Tales of Dragon Slayers (TTDS) is a 3-star Catalyst that provides a good HP% secondary stat and a strong ATK% buff to a single teammate. However, it can be difficult to reach Baizhu’s ER requirements on TTDS without significant investment or teammate Favonius procs. TTDS is a generally good option in Raiden Aggravate teams. |
 Everlasting Moonglow | Everlasting Moonglow is not worth pulling for Baizhu. However, if you have a spare lying around from some unlucky weapon banner pulls, it provides a nice HP% secondary stat and regenerates Energy with its passive if Baizhu is used on-field. However, this “donut” is basically a null improvement over R5 Prototype Amber in most cases. |
 R3+ Sacrificial Fragments | R3+ Sacrificial Fragments is a good option in Nilou Bloom teams since Baizhu triggers a fair amount of Bountiful Blooms. It helps reduce his ER requirements and provides an extra instance of teamwide healing in most rotations. |
 A Thousand Floating Dreams | A Thousand Floating Dreams is not worth pulling for nor using on Baizhu. Its EM and DMG% buffs are not worth its lack of HP% stats or Energy-related effects. While this Catalyst does offer a teamwide EM buff (that is especially nice in Nilou Bloom teams), it is better used on Nahida. |
 Sacrificial Jade | Baizhu should not use Sacrificial Jade since it provides roughly the same amount of HP% as Prototype Amber, but lacks the Energy regeneration. It could be used in very niche circumstances where Baizhu has low ER requirements and you have R5. |
Synergies
Baizhu is almost exclusively used in teams that focus on Dendro-related reactions. His teammate synergy reflects his ability to increase their damage, improve their survivability, or enable their reactions.
Note that all teammates are presented in alphabetical order within their Element, irrespective of their performance with Baizhu.


Electro
Electro teammates are primarily seen in Quicken and Hyperbloom teams. Some teams may be considered “Quickbloom” since they have high Quicken uptime with some Dendro Core production, but this distinction isn’t too important for most characters. A few Electro units are viable in Burgeon teams (triggering Aggravate and Overloaded).
In general, Baizhu provides Dendro application to enable Aggravate or Hyperbloom, which are also buffed by his A4 Passive if the Electro unit is on-field when his Burst heals. Additionally, on-field Electro DPS units appreciate his defensive utility (especially interruption resistance).
 Beidou | Beidou is a viable Aggravate DPS unit, especially against 2–3 enemies. She is often played as a secondary DPS unit to other Electro damage dealers like Fischl, Keqing, and Cyno since she has extremely high ER requirements in Solo Electro teams. Additionally, she does not target Dendro Cores, so she can team up with Raiden or Kuki Shinobu in Hyperbloom teams without stealing Hyperblooms. On-field Baizhu can drive Beidou’s Burst and apply Dendro to new waves of enemies in Hyperbloom teams, and on-field Electro DPS units (except Raiden) can drive her Burst in Aggravate teams. |
 Cyno | Baizhu is a fantastic option for Cyno, especially in multiwave content. Baizhu consolidates Dendro application, healing, buffing, and interruption resistance for Cyno. His Burst applies Dendro periodically for 14s, which aligns well with Cyno’s field time. In Aggravate teams, Baizhu is sufficient as the sole Dendro unit, but in Quickbloom and Hyperbloom teams, a second Dendro unit (typically Nahida) is necessary to maintain a Quicken aura. |
 Fischl | Fischl is an excellent option in almost any Quicken team with Baizhu. Her consistent off-field Electro damage and application via Oz and her A4 Passive results in reliably high DPS output. |
 Keqing | Keqing appreciates Baizhu’s interruption resistance, Dendro application, and A4 Passive Aggravate DMG Bonus in her on-field Aggravate DPS teams. Baizhu is usually a better option than Nahida in teams with an Anemo unit since his Dendro application is weak enough to enable a consistent Electro Swirl. However, Kirara is generally preferred over Baizhu since she fits neatly into Keqing’s short rotations. Nonetheless, Baizhu is still a viable and comfortable option. |
 Kujou Sara | Kujou Sara is seen with Baizhu almost exclusively in Raiden Aggravate teams. While she doesn’t really benefit from Baizhu’s presence aside from a buff to her Aggravate damage, she pairs well with Baizhu to amplify Raiden’s damage output. |
 Kuki Shinobu | Kuki Shinobu is still a viable Hyperbloom trigger with Baizhu despite their overlapping healing niches. She is also seen in Aggravate teams, albeit generally outclassed by Fischl or Yae Miko in the off-field Aggravate DPS role. |
 Lisa | Lisa appreciates Baizhu’s interruption resistance in her Aggravate playstyles. She can also be used as a DEF Shred support with her Burst for on-field units like Raiden or Alhaitham. |
 Raiden | Raiden Shogun greatly appreciates Baizhu in her on-field Aggravate teams and her off-field Hyperbloom teams. In Aggravate, Baizhu provides valuable healing and Aggravate buffs. Additionally, Raiden can recharge Baizhu’s Burst and enable him to hold Thrilling Tales of Dragon Slayers without worrying about his ER requirement too much. In Hyperbloom, Raiden has the highest rate of off-field Electro application that can trigger Hyperbloom. She also applies Electro at the enemy, which is helpful with units like Neuvillette who can attack enemies from afar. In some teams, Raiden can be an on-field Hyperbloom trigger in her Burst state. |
 Razor | Baizhu is a fantastic defensive option in Razor’s Hyperbloom and Aggravate teams. He provides a good buff to Razor’s damage and much appreciated interruption resistance. In Hyperbloom teams, Baizhu provides supplemental Dendro application to Nahida or Dendro Traveler. |
 Yae Miko | Baizhu fits flawlessly in Yae-Raiden teams, but his cooldowns are slightly misaligned in Yae-Fischl Aggravate teams. Baizhu’s interruption is great in Yae’s on-field playstyles or while she is setting up her totems. |
Hydro
Hydro units are essential in Hyperbloom, Burgeon, and Nilou Bloom teams. Some units can also enable “Quickbloom” due to their slow Hydro application. Notably, Furina and Neuvillette can also enjoy Baizhu as a teammate even in teams that don’t focus on Dendro-related reactions.
 Ayato | Ayato is a good option in Bloom-related teams thanks to his strong personal damage and AoE Hydro application. In teams with Nilou and Baizhu, he can perform 2 Skills per rotation since Baizhu prefers 20s rotations. |
 Barbara | Barbara can provide additional healing and on-field Hydro application in Nilou Bloom teams with Baizhu. She is most often played as an on-field enabler in such teams; on a full EM build, she greatly appreciates Baizhu’s additional defensive utility. |
 Candace | Candace and Baizhu can work together in Nilou Bloom teams when paired with Yaoyao or Dendro Traveler since they can take advantage of her Hydro Infusion. She can also be an on-field Hydro applier by infusing her own Normal Attacks. |
 Furina | Baizhu is one of Furina's best teamwide healers. Together, they form a venerable core that pairs well with many different on-field damage dealers. Baizhu’s healing is more than enough to counteract Furina’s teamwide HP drain even in Nilou Bloom teams. Baizhu can easily stack 200 Fanfare with a single use of his Skill if all teammates are near half of their Max HP, and he can generate even more stacks with his Burst’s healing. Furthermore, he is the only character with teamwide healing on his Skill, which he can use twice per rotation in some teams with Furina. |
 Kokomi | Kokomi and Baizhu can be used together in Nilou Bloom teams to good effect. Their healing redundancy helps Kokomi invest more into EM and removes the need for Kokomi to Burst every rotation. Furthermore, they both enjoy 20s rotations. |
 Neuvillette | Neuvillette appreciates Baizhu’s interruption resistance at C0. Neuvillette’s A1 Passive stacks with Bloom, which Baizhu enables in any rotation. They pair together well in teams with Furina, where Baizhu provides teamwide healing and stacks Fanfare more quickly. At C2, Baizhu can remain off-field for the entire rotation and can hold 4pc Song of Days Past to further buff Neuvillette, making him one of Neuvillette’s best supports at high investment. |
 Nilou | In Nilou Bloom teams, Baizhu provides most of the team’s sustain via his healing, with his shield serving as partial protection from Bloom self-damage. He prefers Nahida as the second Dendro character to alleviate his high ER requirements and supplement his poor Dendro application. |
 Xingqiu | Baizhu comfortably fits in Xingqiu’s Dendro teams, whether they be Hyperbloom, Burgeon, or Nilou Bloom. Their combined defensive utility, in particular their interruption resistance, results in very comfortable gameplay. Baizhu can also act as a driver for Xingqiu’s Burst. |
 Yelan | Yelan performs similarly to Xingqiu and pairs well with Baizhu. Her ramping DMG% buff is quite good for hypercarry DPS units like Raiden, Hu Tao, and Alhaitham; however, Furina is often a stronger choice since Baizhu’s healing enables a high amount of Fanfare stacks. |
Pyro
Pyro teammates are primarily seen with Baizhu in Burgeon teams. However, many on-field Pyro DPS units enjoy using Baizhu with Furina in Double Hydro Vaporize teams, which have some Burgeon reactions but primarily focus on Vapes and personal damage.
 Hu Tao | Hu Tao enjoys Baizhu’s healing and interruption resistance in a team with Furina and Yelan (or Xingqiu). The short, intermittent duration of Burning can cause her to miss a couple Vapes, but this is somewhat compensated with Burgeon reactions. |
 Lyney | Baizhu is a viable shield option in Lyney’s Mono Pyro teams; however, Zhongli outclasses Baizhu due to his stronger shield and Universal RES Shred. |
 Thoma | Thoma and Baizhu work extremely well together in Burgeon teams. Baizhu is a good driver for Thoma’s Burst, which provides slow and steady Pyro application. Their combined defensive utility can make up for each other’s gaps, allowing Thoma to focus entirely on EM without worrying about HP stats for sustain. With an off-field Hydro applier, another Hydro unit or Electro unit is recommended to mitigate Burning. With an on-field Hydro applier like Ayato or Tartaglia, another Dendro unit like Nahida or Traveler could also be used. |
 Xiangling | Xiangling is most often seen with Baizhu in Neuvillette teams. While she typically struggles as a solo Pyro unit, she can use her Skill twice per rotation in Neuvillette’s 24–25s rotations; this enables her to use R5 Kitain Cross-Spear to significantly reduce her ER requirements. |
 Yanfei | Yanfei greatly appreciates Baizhu’s defensive utility since she is an on-field DPS unit. They commonly team up with Furina in Vaporize-Burgeon archetypes. |
 Yoimiya | Baizhu has good synergy with Yoimiya since he provides her with interruption resistance and healing. Furina is a strong partner with this duo. |
Dendro
Baizhu can pair up with Dendro units to enable Dendro Resonance, somewhat lower ER requirements, or provide supplemental Dendro application. Double Dendro Baizhu teams typically revolve around Spread, Hyperbloom, or Bloom.
 Alhaitham | Alhaitham and Baizhu both have high ER requirements even with paired together. Nonetheless, as an on-field DPS unit with extended field time, Alhaitham appreciates Baizhu’s interruption resistance. They work well together in Spread, Quickbloom, and Nilou Bloom teams. |
 Collei | Collei is a free Dendro option often seen in Aggravate and Nilou Bloom teams. She provides rapid successive instances of Dendro application via her Burst, which is great for triggering Blooms and enabling Aggravate and Spread reactions. |
 Kaveh | Kaveh appreciates Baizhu’s interruption resistance and supplemental healing in Nilou Bloom teams. While Kaveh can sustain himself well enough, Baizhu’s added defensive utility makes gameplay very easy and comfortable for their teammates. Additionally, Baizhu’s A4 Passive buffs Kaveh’s Bloom damage considerably. |
 Kirara | Kirara and Baizhu both provide a shield, so they aren’t often seen together on the same team. Nonetheless, you can play them together in a very comfy Nilou Bloom team where Kirara runs around via her Hold Skill. |
 Nahida | Nahida is one of Baizhu’s best Dendro teammates thanks to her strong Dendro application. They work very well together in Aggravate, Hyperbloom, and Nilou Bloom teams. Furthermore, if Nahida is played on-field, she greatly appreciates Baizhu’s defensive utility since she has very low HP, DEF, and poise. |
 Tighnari | Tighnari and Baizhu are primarily seen together with two Electro teammates, usually Fischl and Yae; however, Solo Electro (Triple Dendro) teams are possible. Tighnari prefers short rotations not exceeding 15s, so Baizhu uses his Burst every other rotation. Baizhu’s interruption resistance lasts roughly 14s, and his buff lasts roughly 20s in practice. As a result, Tighnari is still protected and buffed for a majority of his DPS windows in typical rotations. |
 Traveler | Dendro Traveler provides sustained, AoE Dendro application with their Burst that helps compensate for Baizhu’s gaps. They are most commonly seen with Baizhu in free-to-play–friendly Nilou Bloom teams with a Hydro teammate like Xingqiu or Barbara. Although Traveler themself has extremely high ER requirements, they can help lower Baizhu’s ER requirements by a bit thanks to their Skill casts. |
 Yaoyao | Yaoyao and Baizhu both have subpar off-field AoE Dendro application, but together they apply enough to maintain a Dendro aura in most Hyperbloom teams, as well as enabling Quicken auras in multi-target scenarios. Additionally, they work well together in Nilou Bloom teams with a Hydro unit like Xingqiu, Yelan, Furina, or Candace. |
Anemo
Anemo teammates are primarily seen as 4pc Viridescent Venerer supports in Aggravate teams, but some units are also viable in Hyperbloom.
 Heizou | Heizou is an alternative to Sucrose that provides stronger personal damage in exchange for poorer grouping and a teamwide EM buff. As a Catalyst user, he has access to supportive weapons that buff team damage like Hakushin Ring and TTDS. |
 Kazuha | Kazuha is a great support in Aggravate teams thanks to his grouping and A4 Passive’s Electro DMG Bonus. He can deal decent personal damage thanks to his Aggravated Electro Swirls. |
 Lynette | Lynette is freely available after clearing Floor 4 of the Spiral Abyss. She can provide additional Electro application and a minor ATK% buff in Aggravate teams. She is not worth using over Kazuha or Sucrose if you can use them. |
 Sucrose | Sucrose provides a valuable EM buff in Aggravate and Hyperbloom teams. She can become an on-field Hyperbloom trigger via Electro Swirls when paired with Fischl, taking good advantage of Baizhu’s A4 Passive Hyperbloom buff and interruption resistance. As a Catalyst user, she has access to supportive weapons that buff team damage like Hakushin Ring and TTDS. |
 Venti | Venti is an option in some Aggravate teams, especially in high-AoE content. His strong grouping can incidentally increase Baizhu’s Dendro application, but beyond that he doesn’t have much synergy with Baizhu. |
Geo
Geo is generally inert with Dendro, but a couple teammates have niche uses that can help with Dendro-related damage.
 Albedo | Albedo provides consistent off-field Geo damage with his Skill and a teamwide 125 EM buff with his Burst. However, he usually uses his Burst every other rotation. Most Electro, Dendro, or Hydro characters are better picks for Baizhu, but Albedo is nonetheless viable. One niche case for Albedo is Burgeon teams, since his Geo application can trigger Pyro Crystallize, consuming applied Pyro. |
 Chiori | Chiori provides consistent off-field Geo damage with her Skill, but can only activate one Tamoto doll due to the lack of a second Geo teammate. Despite this, her high personal damage and fast rate of Geo application helps mitigate Burning in Dendro teams. She performs similarly to Albedo in Burgeon teams, even accounting for Albedo’s 125 EM buff every other rotation. |
 Zhongli | Zhongli’s shield is largely redundant with Baizhu, but he still provides a Universal RES Shred which is beneficial in any of Baizhu’s teams. Despite this, damage dealers or other supports are generally better options. |
Cryo
Cryo teammates are generally not played with Baizhu since Cryo and Dendro can’t react directly and Baizhu doesn’t buff Cryo-related reactions. Burnmelt teams with Baizhu are generally unreliable or have extremely high ER requirements, so Reverse Melt Cryo DPS teammates aren’t recommended despite this possibility. Even with Furina on the team, Cryo DPS units prefer Charlotte or Mika as the teamwide healer to enable Cryo Resonance and generate Cryo Particles.
Baizhu — Wriothesley — Furina – Thoma/Xiangling is a potential team that focuses on Wriothesley’s personal damage with some Burgeon reactions, but everyone on the team besides Wriothesley has extremely high ER requirements, which makes the team difficult to recommend.
Teams
Baizhu is a highly viable unit in a variety of Dendro-related teams, most notably Quicken (Aggravate and Spread), Hyperbloom, Burgeon, and Nilou Bloom. He is also a good generalist teamwide healer, especially in teams with Furina. His A4 Passive’s buffs are best used by on-field damage dealers who consistently trigger Dendro reactions.
Quicken

Baizhu is an excellent support in teams that focus on Aggravate and Spread damage. His A4 Passive provides up to a 40% Aggravate and Spread DMG Bonus for the on-field character, which results in a significant damage increase. Furthermore, his role consolidation allows the team to slot in more offensive teammates while still maintaining solid survivability.
Baizhu’s personal damage in Quicken teams is quite low due to his lackluster damage scaling and slow Elemental application. As such, he primarily serves as an off-field support since an on-field DPS unit makes much better use of his A4 Passive and triggers more Aggravate or Spread reactions.
Example Teams

Raiden and Yae Miko make a very potent Aggravate core, especially in single-target and low-AoE scenarios. Kazuha’s A4 Passive Electro DMG% buff, 4pc Viridescent Venerer Electro RES Shred, and grouping are all very helpful. Baizhu’s interruption resistance helps Yae Miko safely set up her turrets, and his healing lessens the need for Raiden to dodge during her Burst combo.
Raiden E > Yae 3[E] > Kazuha tEP > Baizhu EQ > Yae Q 3[E] > Kazuha hEPQ > Raiden Q combo
This is a fast-paced quickswap team that excels in single-target scenarios. Tighnari and Yae contribute roughly the same amount of damage to the team. Note that Yae can Burst every rotation thanks to Fischl’s particle generation.
Yae 3[E] N2 > Baizhu EQ > Fischl Q > Tighnari E 3[C] Q > Yae Q 3[E] N2 > Baizhu N1 E N3 > Fischl E > Tighnari E 3[C] > Baizhu N3D N3

This team splits Alhaitham’s field time to allow Fischl to refresh her Burst and Baizhu to provide Dendro Particles (battery). Fischl inconsistently targets Dendro Cores.
Fischl E > Furina ED Q > Baizhu EQ > Alhaitham hEP N3D N3CD N3 > Fischl Q > Alhaitham Q > Baizhu E > Alhaitham 2[N3D N3CD]

This is one of Cyno’s highest-performing Quickbloom teams.
Fischl E > Furina ED Q > Baizhu EQ > Fischl Q > Cyno E N1 Q E 6[N4E]
Cyno’s combo assumes 4pc Thundering Fury.

This Keqing Aggravate team can run a 12–13s rotation in which her team uses their Elemental Burst every other rotation. However, Keqing lacks a shield every other rotation since Baizhu relies on his Burst for his shield. Nonetheless, he can still guarantee 100% Quicken uptime.
Fischl Q > Baizhu EQ > Sucrose N2 EDQ > Keqing E Q E 2[N1C] N1 E 2[N1C] >
Fischl E N1 > Baizhu E N2 > Sucrose N2 ED N1 > Keqing E Q E 2[N1C] N1 E 2[N1C]
This is basically a 13s rotation with Bursts plus a 12s rotation without Bursts. Keqing’s combo is only possible with 4pc Thundering Fury.
Hyperbloom

Baizhu functions quite well in Hyperbloom teams, either as an on-field driver or as a secondary Dendro support for another Dendro applier. By himself, he does not have enough Dendro application from off-field to sustain sufficient Dendro Core production.
Baizhu’s A4 Passive buffs Hyperbloom damage by up to 100% if the Hyperbloom trigger is on-field during his Burst, so he pairs really well with on-field Electro units like Cyno, Razor, Keqing, and Raiden in this playstyle. Nonetheless, his Hyperbloom teams have solid performance with him as an on-field driver.
Some teams may be considered “Quickbloom” since they have high Quicken uptime with some Dendro Core production.
Example Teams

This Raiden Hyperbloom team works with her either as an on-field Quickbloom DPS or an off-field Hyperbloom DPS. Either playstyle performs well and keeps Baizhu’s ER requirements relatively low. Yelan can use 2 Skills per rotation in either variation.
Off-Field Raiden Rotation
Raiden E > Nahida E Q > Baizhu EQ > Yelan E N1 Q N1 > Baizhu or Nahida combo > Baizhu E > Yelan E > Baizhu or Nahida combo
On-Field Raiden Rotation
Raiden E > Nahida E Q > Baizhu EQ > Yelan E N1 Q N1 > Raiden Q 4[N4D] > Yelan C E > Nahida [N2CD]

This Quickbloom team splits Alhaitham’s field time to allow Baizhu to use his Skill twice per rotation. Favonius Sword may be a good option on Xingqiu.
Raiden E > Baizhu EQ > Xingqiu EDQ N1 > Alhaitham hEP N3D N3CD N3 Q > Baizhu E > Alhaitham 2[N3D N3CD]

This is a Hyperbloom team variation for the Neuvillette-Furina core. However, Neuvillette’s personal damage contributes roughly the same to team DPS as Hyperblooms do.
Neuvillette E > Raiden E > Baizhu EQ > Furina ED Q > Neuvillette C Q E C > Baizhu E > Neuvillette 2[C]

This is a strong Cyno Quickbloom team where he can also build for personal damage thanks to Furina’s DMG% buff.
Nahida E Q > Furina ED Q > Baizhu EQ > Cyno E N1 Q N1 E 6[N4E]
This rotation assumes Cyno is holding 4pc Thundering Fury.

This is a viable Hyperbloom team with Baizhu driving on-field. Both Baizhu and Yelan can easily use their Skills twice per rotation. Raiden is also an option over Kuki Shinobu.
(Shinobu Q) > Baizhu EQ > Xingqiu Q N1 > Yelan E N1 Q N1 > Shinobu E N1 > Baizhu N3D N1 E N3D > Xingqiu ED N1 > Baizhu N3D > Yelan E N1 > Baizhu N3D N3

This is one of Razor’s best Hyperbloom teams. Razor should hold R5 Favonius Greatsword to completely mitigate his need to invest in ER% substats and significantly lower the team’s ER requirements. He can trigger the Favonius passive 3 times per rotation.
(Razor tED) > Nahida E Q N1 > Xingqiu EDQ (E) N1 > Baizhu EQ N1 > Razor N1 tEQ tED 2[N3D N3 tED]
Burgeon

Baizhu’s healing is particularly appreciated in Burgeon teams. He is especially beneficial for Thoma, who no longer has to worry about protecting the team and can invest solely into EM for increased Burgeon damage. While off-field Burgeon triggers like Thoma, Xiangling, and Dehya cannot take good advantage of Baizhu’s A4 Passive buff, on-field Burgeon triggers like Yoimiya, Hu Tao, and Yanfei can.
Burgeon teams want to avoid triggering Burning since it interferes with Dendro Core production. As such, playing with Baizhu and only one Hydro unit is generally not recommended. You should typically use another Hydro character, Electro character, or Albedo / Chiori in the flex team slot to clear any excessive Pyro application and maintain consistent Dendro Core generation. There are some exceptions to this, however:
- Against enemies with innate Hydro or Electro auras (since their aura prevents Burning),
- If Ayato, Tartaglia, or C6 Xingqiu is your Hydro applier,
- If Neuvillette is the Hydro character (since Burning enables him to Vape).
Example Teams

This is a high-performing Thoma Burgeon team thanks to Yelan and Furina’s personal damage contribution. Baizhu drives on-field. While Yelan and Furina are typically insufficient Hydro appliers for Burgeon by themselves, they make up for each other’s Hydro application gaps to prevent Burning from occurring.
Furina ED Q > Baizhu EQ > Thoma EQ > Yelan EQ N1 > Baizhu N3D N3E N3D N3 > Yelan E N1 > Baizhu N4

This is a highly potent team that focuses on Burgeon and Overloaded reactions in addition to Xingqiu’s and Fischl’s personal damage. Fischl’s Electro application helps mitigate Burning from occurring, which enables consistent Dendro Core production for Thoma to trigger Burgeon.
Baizhu EQ > Xingqiu Q N1 > Thoma EQ N1 > Fischl E > Baizhu N3 E 2[N3D] C > Fischl Q N1 > Baizhu 2[N3D]

This team brings together the “closest friends” of the Kamisato Estate. Ayato, Baizhu, and Dendro Traveler can use their Elemental Skills twice per rotation. Dendro Traveler should hold Favonius Sword.
Ayato Q > Traveler EQ > Baizhu EQ > Thoma EQ > Ayato E N15 > Traveler ED N2 > Baizhu E N2 > Ayato E N15

This is a potent Burgeon team that pairs Baizhu and Xiangling with the ever-powerful Neuvillette-Furina core. Xiangling should hold R5 Kitain Cross-Spear to significantly lower her ER requirements (since she can use her Skill twice per rotation).
Neuvillette E > Baizhu EQ > Xiangling Q ED > Furina ED Q > Neuvillette C E C Q > Baizhu E (N1) > Xiangling ED (N1) > Neuvillette 2[C]

This is a possible Yoimiya Burgeon-Vape team with good personal damage from Yelan and Furina. Baizhu has quite high ER requirements in this team, so Favonius weapons may be helpful on him and the Hydro characters.
Furina ED Q > Yelan EQ > Baizhu EQ > Yoimiya E 3[N5] Q > Baizhu E > Furina Q ED > Yelan EQ > Baizhu Q > Yoimiya E 3[N5] Q

This Hu Tao team focuses more on Hu Tao’s Vapes and the team’s personal damage than Burgeon. Baizhu is used primarily for his Skill’s teamwide healing, and his Burst is used for its interruption resistance. He has incredibly high ER requirements in this team, but that’s not an issue since Hu Tao doesn’t benefit from his A4 Passive buff except for incidental Burgeon and Burning reaction damage.
Furina ED Q > Yelan Q N1 > Baizhu EQ N1 > Yelan E N1 > Hu Tao E combo (Q) > Yelan E
Nilou Bloom

Baizhu provides more than enough sustain by himself to keep Nilou Bloom teams alive. Bountiful Cores (Nilou’s enhanced Dendro Cores) deal significantly higher damage to the on-field character compared to regular Blooms, so Baizhu’s healing and increased shield strength against Dendro damage is highly valued. Baizhu, on the other hand, functions well as both an on-fielder or off-fielder in this archetype. Nilou teams can run fairly flexible rotations. While some possible rotations are listed, they do not need to be strictly followed.
Note that you should avoid playing Triple Dendro and Triple Hydro Nilou Bloom teams with Baizhu since these compositions have more limited Bountiful Core production and inconsistent Bountiful Bloom ownership.
Example Teams

This Neuvillette-Nilou team has relatively low ER requirements and performs extremely well in AoE scenarios. The rotation below is the most practical and fits neatly in 25–26s.
Neuvillette E > Nilou (Q) E N2 E > Nahida E Q > Baizhu (N1) EQ > Neuvillette C Q E C > Baizhu E (N1) > Neuvillette (N1) 2[C]

This is another possible Nilou Bloom team with Ayato. While Ayato can cast his Skill twice per rotation, single-Skill rotations are shorter and pull ahead slightly in terms of DPS.
Nahida EQ > Ayato Q > Nilou E N2 E > Baizhu EQ > Nahida E N1C > Ayato E N15 > Baizhu E > (Nilou Q)

Alhaitham and Yelan deal good personal damage in conjunction with Bloom damage in this team. Alhaitham’s field time is split to allow Baizhu and Yelan to cast their Elemental Skills twice per rotation.
Nilou (Q) E N2 E > Baizhu EQ > Yelan EQ N1 > Alhaitham hEP N3C N4 > Baizhu E N1 > Alhaitham Q > Yelan E N1 > Alhaitham 2[N3D] N2

This Kaveh-Nilou team is quite safe to play thanks to Kaveh’s self-sustain and Xingqiu’s and Baizhu’s combined defensive utility. Kaveh should hold Favonius Greatsword in this team to significantly decrease the team’s ER requirements. He can easily trigger the passive 3 times per rotation.
Baizhu EQ > Nilou (Q) E N2 E > Xingqiu ED Q N1 > Kaveh Q E 3[N4] E N4

This is a more free-to-play–accessible Nilou team with Baizhu as the on-field driver. Traveler should hold Favonius Sword if available.
Baizhu EQ > Nilou (Q) E N2 E > Xingqiu ED Q N1 > Traveler EQD N1 > Baizhu N3E N3D > Traveler E > Baizhu 2[N3D] N2

This is as free-to-play as it gets for Nilou-Baizhu Bloom teams. Collei should hold Sacrificial Bow or Elegy for the End if available.
Baizhu EQ > Barbara (E) N2 > Nilou (Q) E N2 E > Collei EQ > Barbara N2CD N3 > Baizhu E N2 > (Collei E) > Barbara N2CD N3D N2CD
This is just one of many possible rotation starts. Use Barbara’s Burst if you need emergency healing.
Flex Healer

Baizhu is a good generalist defensive unit for non–Dendro-oriented teams that require healing or interruption resistance. In teams with Hydro units, there may be incidental Dendro Core production that results in Bloom or Burgeon reactions, but a majority of the team’s DPS stems from non-Dendro damage.
He is most often seen in teams with Furina since he provides excellent teamwide healing with his Skill and persistent sustain for the on-field DPS unit. Neuvillette, especially at C0, greatly appreciated Baizhu’s interruption resistance.
Example Teams

This is a hypercarry Neuvillette team with Baizhu. C0 Neuvillette appreciates Baizhu’s interruption resistance. On the other hand, C1 Neuvillette prefers other off-field units over Baizhu since Neuvillette can easily perform his full Charged Attacks without getting staggered.
Neuvillette Q > Baizhu EQ > Furina ED Q > Kazuha tEP > Neuvillette E 2[C] > Kazuha tEP > Baizhu E > Neuvillette E C

While Bennett or Mika are generally the preferred healers in Wanderer-Furina teams, Baizhu is still a good option thanks to his interruption resistance, teamwide heal, and flexible positioning (as opposed to Bennett’s “Circle Impact”). Baizhu, Furina, and Faruzan should all probably hold Favonius weapons to help manage their ER requirements.
Faruzan E (C) Q > Furina ED Q > Baizhu EQ > Wanderer E combo (Q) > (Baizhu N4 if Favonius)

Baizhu is a good option in Eula-Furina teams that performs on par with Jean and non-C6 Mika thanks to his teamwide healing and ability to enable some Raiden Hyperbloom reactions. Raiden helps lower Baizhu’s ER requirements to a manageable degree. Baizhu can hold TTDS to buff Eula as long as Raiden holds Favonius Lance and you follow the rotation below.
Raiden E > Furina ED Q > Baizhu EQ > Eula tE Q N4 hE N4 > Baizhu E > Raiden Q 3[N4D]
Credits

Writing: irokei, fritz, jadur
Theorycrafting: nikatosaurus, haafr, caramielle., rarepossum
Editing: cuppacote, polomo
Transcription: alehannita
Quick Guide Content: leifa, gerryoat, natc, kbphan, reens, chasing_haze, polomo, seima, idkanonymized, sexyeboy69