Updated for Version 3.1

“Trainee Forest Ranger Collei, reporting for duty! I will ensure your safe passage through this forest. …Phew, I think I’ve finally got that line down! …I—I didn’t get any of it wrong, did I?”
Glossary
| Term | Meaning |
| Aura | When an enemy is not affected by any Element, the next Elemental source to hit them will apply an aura of that Element. This aura will slowly decay and disappear entirely after a certain length of time. (The “aura” can also refer to the character supplying the aura for a reaction.) |
| Trigger | When an enemy has an existing aura, the next Elemental source to hit them can consume some or all of that aura to trigger an Elemental Reaction. Applying Electro/Pyro to a Dendro Core will trigger the respective Hyperbloom/Burgeon reaction. (The “trigger”, or “owner”, can also refer to the character triggering the reaction.) |
| ICD | The Internal Cooldown of Elemental application, a hidden timer that starts when an Elemental source applies an aura or trigger to an enemy. Details can be found here. |

“My hobbies? …Sewing, practicing gliding, and helping people! Hmm? Sounds familiar? Well, that’s because… I want to be someone that gives people that warm feeling, too.
Table of Contents
Introduction
Collei is an extremely cute 4-star Bow character and is one of the three Dendro units that debuted with the Dendro Element. She offers support in the form of off-field Dendro application and off-field damage.
There are two main ways to play her:
- As the aura provider in any team focused on Dendro reactions. [CRIT]
- As the trigger in Quicken, Bloom/Rupture, or Burning teams. [Elemental Mastery]
Collei, on top of dealing decent off-field damage, has several support options in her weapons and artifacts.
Join us in exploring what this adorable trainee forest ranger’s got to show us!
TL;DR
Credits to: cuppacote, haafr and KQM Staff
Why Play Collei?
Collei cute. That’s why.

Pros
- Great off-field Dendro applicator.
- Decent personal damage.
- Excellent F2P weapon choice—Favonius Warbow.
- Flexible artifact options.
- As of 3.2, good in Burgeon and Burning teams.
- Cooldowns allow her to be used in a wide range of rotations.
- Very cute.
- Confirmed Amber-liker.
Cons
- Constellations 2, 5, and 6 are massive improvements to her gameplay and damage, so Collei is somewhat dependent on them.
- Also hungry for Energy—requires 200% ER or more
- Needs help from teammates and high investment for competitive damage.
- Suffers from a terminal disease and deserves better from the world. We’ll actually fight you for her.

Evaluating Personal Damage
In short, Collei’s personal damage values per Elemental Reaction are ranked in the following way (assuming maximum ownership):
- Bloom (EM/EM/EM)
- Burning (EM/EM/EM) or (ATK% or EM/DMG%/CRIT)
- Spread (ATK% or EM/DMG%/CRIT)
- No reactions
While Bloom deals the most damage, Bloom and Burning are the least consistent. An ATK%/DMG%/CRIT build will provide the most consistent damage and will still offer decent Burning damage, for those who care about that. Running the ATK%/DMG%/CRIT build will also allow Collei to benefit from Spread reactions.
It should be noted, however, that as of 3.2, Burning is not a recommended reaction to build around, due to the lack of team options outside of Bennett and Xiangling, who don’t need to utilize Burning at all to clear Abyss. This is subject to change as new characters are released.
“In response to the homo— homogenization of crop species… taken import measures… avoid long-term consumption of fungal foods…” What is the point of all this… They’re literally saying, “I don’t wanna eat mushrooms,” but because they’re from the Akademiya, they have to make it sound all complicated!”
FAQ
Why should I play Collei over DMC?
Dendro Main Character (DMC) and Collei have a significant overlap in gameplay. Many have argued that DMC is strictly better than Collei, due to the fact that all Constellations are free for DMC, while they aren’t for Collei (even if the first copy of her is free as well).
Both are Dendro characters that require no Wishes to acquire. Both specialize in being off-field supports by facilitating Dendro-based reactions, and both are flexible and easy to build, as long as their Energy needs are managed properly. Both also use Favonius weapons well. Most of the time, it really will come down to preference and resources.
However, some important differences do exist:
 |  Collei |   DMC |
| Weapon Access | Has access to Elegy for the End (+100 EM, +20% ATK — teamwide buffs) | Has access to Freedom-Sworn (+16% NA/CA/Plunge, +20% ATK — teamwide buffs) |
| Skill | 12-second cooldown. Can be played in 12–15s rotations | 8-second cooldown. Less flexible in synergies |
| Burst | Burst can be skipped in some team compositions and rotations | Burst ends prematurely if it first makes contact with Pyro, requiring play-around. Burst cannot be neglected |
| Energy Cost | 60 Energy, 15s cooldown (more lenient with rotations and Energy needs) | 80 Energy, 20s cooldown (less lenient with rotations and Energy needs) |
| Dendro Application | Front-loaded Dendro application (slightly less consistent) | Evenly spaced Dendro application (slightly more consistent) |
I don’t understand how Collei’s Sprout works at C0 and C2?
The Sprout effect refers to a ring of Dendro around the active character that deals Dendro DMG in intervals over a length of time.
At C0, after the boomerang is thrown and before it returns, if any party member triggers a Dendro reaction, the active character will gain the Sprout effect. While it sounds complicated, it is not necessarily difficult to do, as the window before Collei’s boomerang returns is quite generous.
At C2, the Sprout effect is gained immediately upon the boomerang’s return. If any party member triggers a Dendro reaction, it will extend the Sprout effect by an additional 3 seconds.
“Ah, I’m feeling alright today. I’ll take the chance to try and get some more done than usual.”
Talents
Talent Priority
 >
> >
>
Normal Attack | Supplicant’s Bowmanship
Talent Description
Normal Attack
Perform up to 4 consecutive shots with a bow.
Charged Attack
Performs a more precise Aimed Shot with increased DMG. While aiming, Dendro energy will accumulate on the arrowhead. A fully charged arrow will deal Dendro DMG.
Plunging Attack
Fires off a shower of arrows in mid-air before falling and striking the ground, dealing AoE DMG upon impact.
Collei’s Normal Attacks are unimpressive compared to her Skill and Burst and, in most cases, are not worth leveling. However, if you are using an unconventional build that does prioritize her Normal Attacks, it is optimal to perform an animation cancel (through aiming, if possible) after the second attack in her string (N2).
In a pinch, and when you need just a little more Dendro application in a rotation or need to refresh Instructor, an Aimed Shot can apply Dendro, but again, the damage this inflicts is negligible and will generally be a DPS loss. It should be used solely for exploiting a powerful Elemental Reaction or in rare cases like emergency shield-breaking.
Elemental Skill | Floral Brush
Talent Description
Throws out a Floral Ring that deals 1 instance of Dendro DMG to targets it comes into contact with. The Floral Ring will return after a set time, dealing Dendro DMG once again.
The main benefit of using Collei’s Skill is the Dendro application it provides. It has a lengthy cooldown of 12 seconds.
The boomerang applies Dendro twice — once on throw and once on return. The delay this travel time provides spaces out Collei’s normally front-loaded application rate, allowing for more Dendro uptime on an enemy. This is especially valuable for Quicken teams where long, sustained Dendro application is more valuable than short, fast application to maintain the Quicken aura.
Mastering the Boomerang
A good boomerang doesn’t come back to you. Unfortunately, Collei’s does and must take some extra effort to be played around. Collei’s Skill can prove to be fairly unwieldy, even with the game’s inherent auto targeting. Its slow animation coupled with an arcing animation path can easily result in a missed shot.
One way to work around the slow animation is to only use Collei’s Skill when you’re close to the enemy. This reduces the chance of it missing. As an additional note, when dashing backwards to put some space between Collei and the enemy, it is recommended to move towards the right or left depending on the Bow’s returning arc. This can ensure a second hit upon the enemy on the way back.
Elemental Burst | Trump-Card Kitty
Talent Description
Throws the doll named Cuilein-Anbar, causing an explosion that deals AoE Dendro DMG, creating a Cuilein-Anbar Zone. Cuilein-Anbar will bounce around within this zone, dealing AoE Dendro DMG.
In most cases, Collei’s Burst is the vast majority of her damage. Between this and her Skill, the Burst has more Dendro application at C0. It has a bizarre ICD of three seconds — without a hit count. This means that her Burst only applies Dendro three or four times per rotation at C0 (once fully extended by Collei’s 4th Ascension Passive).
With a 60-cost Burst on a 15-second cooldown, Collei can fit comfortably in teams with rotations of 15 or 20 seconds. In 12-second rotation teams, it’s better to alternate every two rotations or even forgo her Burst when lacking in time.
 Ascension 1 Passive | Floral Sidewinder
Talent Description
If one of your party members has triggered Burning, Quicken, Aggravate, Spread, Bloom, Hyperbloom, or Burgeon reactions before the Floral Ring returns, it will grant the character the Sprout effect upon return, which will continuously deal Dendro DMG equivalent to 40% of Collei’s ATK to nearby opponents for 3s.
If another Sprout effect is triggered during its initial duration, the initial effect will be removed. DMG dealt by Sprout is considered Elemental Skill DMG.
Collei needs to be close to the enemy in order for the Sprout to apply Dendro and deal damage to an enemy. The range, however, is wider than it appears. The location of the hilichurl in the image below is the maximum distance — nearly reaching the edge of the inner circle of Bennett’s Elemental Burst zone.
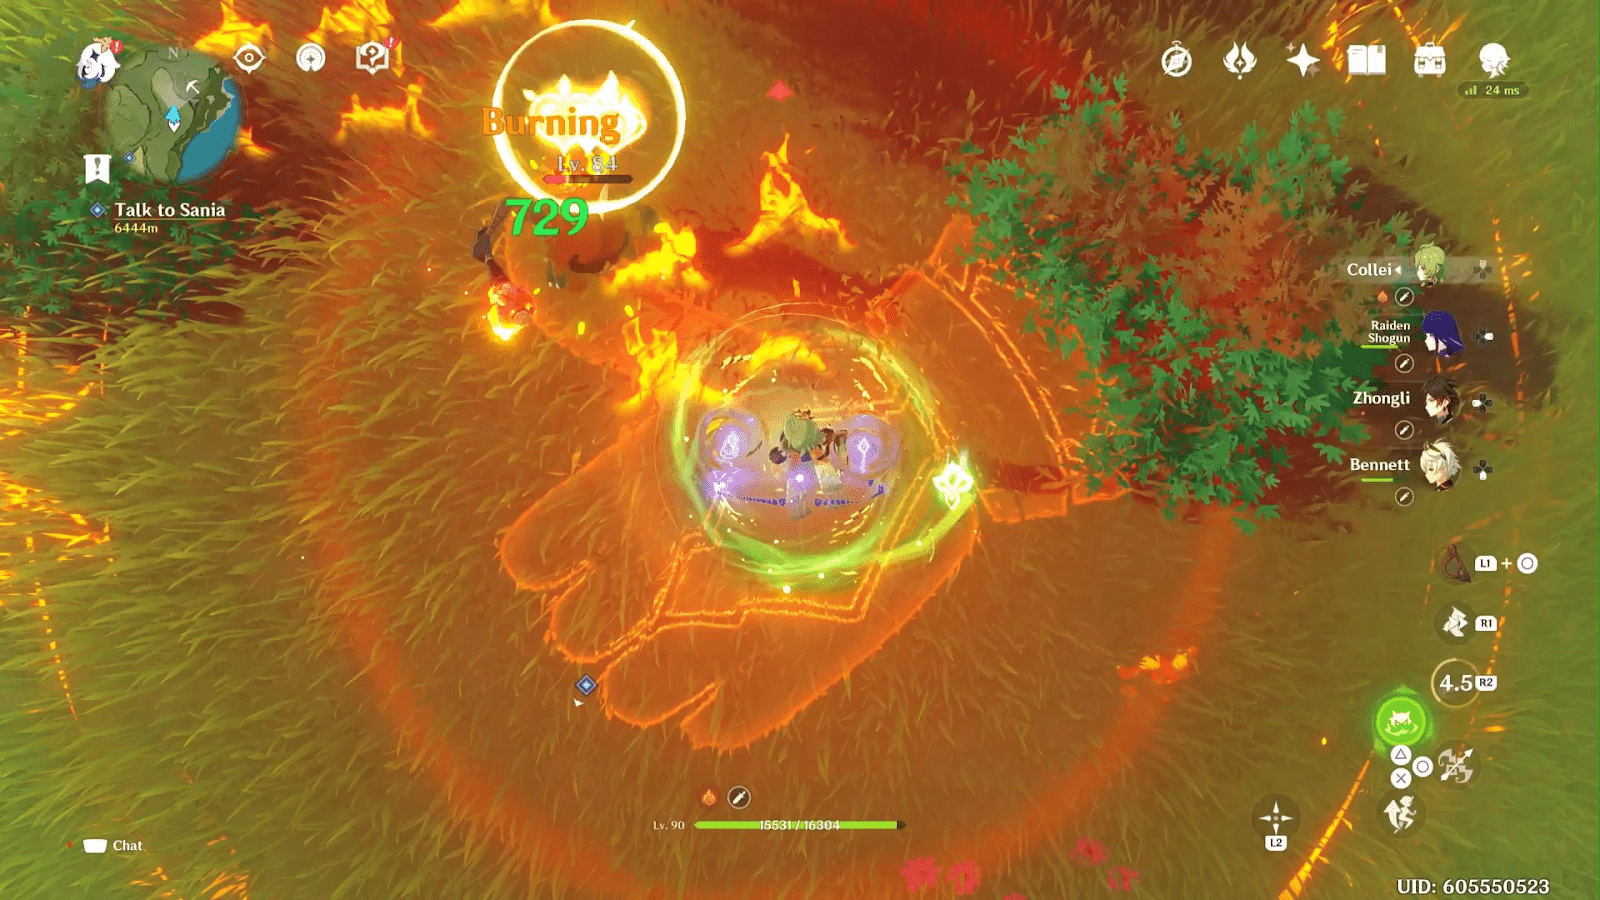
The damage here is so low that it doesn’t make a difference to her DPS, but the extra Dendro application is extremely valuable.
 Ascension 4 Passive | The Languid Wood
Talent Description
When a character within the Cuilein-Anbar Zone triggers Burning, Quicken, Aggravate, Spread, Bloom, Hyperbloom, or Burgeon reactions, the Zone’s duration will be increased by 1s.
A single Trump-Card Kitty can be extended by up to 3s.
It extends her Burst duration by 50% with very little drawback — in any team Collei is on, her entire purpose is triggering and facilitating reactions regardless.
 Utility Passive | Gliding Champion of Sumeru
Talent Description
Decreases gliding Stamina consumption for your own party members by 20%.
Not stackable with Passive Talents that provide the exact same effects.
It matches Amber and that’s the most important part, no questions asked. Unfortunately, the two passives between these characters do not stack.

“It probably wouldn’t even matter if I unsealed that power now — I’ve come so far, I think I’d be able to control it, don’t you? Well — only one way to find out! Hu-uh!
…Just kidding. My real superpower is all about the adventure experience I’ve had with you.”
Constellations
 Constellation 1 | Deepwood Patrol
When in the party and not on the field, Collei’s Energy Recharge is increased by 20%.
Many people might believe this essentially reduces Collei’s ER needs by 20%, since she’s an off-field support anyway. This is not the case — Collei wants to be on field to catch the particles from her Skill. In practice, this reduces her ER needs by about 15%. Still, a worthwhile quality-of-life Constellation.
DPS increase from C0: ~3%
 Constellation 2 | Through Hill and Copse
The Passive Talent Floral Sidewinder is changed to this:
The Floral Ring will grant the character the Sprout effect from Floral Sidewinder upon return, dealing 40% of Collei’s ATK as Dendro DMG to nearby opponents for 3s.
From the moment of using Floral Brush to the moment when this instance of Sprout effect ends, if any of your party members triggers Burning, Quicken, Aggravate, Spread, Bloom, Hyperbloom, or Burgeon reactions, the Sprout effect will be extended by 3s.
The Sprout effect can only be extended this way once. If another Sprout effect is triggered during its initial duration, the initial effect will be removed.
Requires you to have unlocked the Floral Sidewinder Passive Talent.
While the wording of the in-game description is confusing, all it is saying is that triggering an Elemental reaction while Sprout is active can extend its duration by 3 seconds once per rotation. Here, the Sprout effect from Collei’s 1st Ascension Passive can apply Dendro one additional time (sometimes more, but one is a safe assumption).
With highly technical Sacrificial Bow play, you can possibly even draw out another application from her Sprout, but this will be challenging to pull off. You will need to use her Skill, swap back as the boomerang returns and create a Sprout, then use the Skill again for Sacrificial Bow’s passive to trigger the second Sprout as soon as the first one ends.
Here is a video showing the number of applications with Sacrificial Bow. You’ll have time to swap to a character, maybe use a Skill, and swap back between the first and second hits from Collei’s boomerang.
DPS increase from C1: ~7% || from C0: ~10%
 Constellation 3 | Scent of Summer
Increases the Level of Floral Brush by 3.
Boomerang, now with 2% more wood compared to previous Constellations!
DPS increase from C2: ~2% || from C0: ~13%
 Constellation 4 | Gift of the Woods
Using Trump-Card Kitty will increase all nearby characters’ Elemental Mastery by 60 for 12s (not including Collei herself).
Not a personal DPS boost, but a favorable buff for her teammates, who will usually benefit from it just by triggering reactions.
DPS increase from C3: 0% || from C0: ~13%
 Constellation 5 | All Embers
Increases the Level of Trump-Card Kitty by 3.
While just as uninteresting as raising Collei’s Talent Levels, this boost in damage is genuinely worthwhile and is among her strongest Constellations.
DPS increase from C4: ~8% || from C0: ~22%
 Constellation 6 | Forest of Falling Arrows
When the Floral Ring hits, it will create a miniature Cuilein-Anbar that will deal 200% of Collei’s ATK as Dendro DMG.
Each Floral Brush can only create one such miniature Cuilein-Anbar.
The only takeaway here is that Collei gets one extra Dendro application per Skill, which, to be clear, is a worthwhile boost in damage. Another good Constellation for Collei, though an uninteresting C6.
Keep in mind that this may cause hiccups in Elemental application, such as with Fischl, if the intention is to Swirl Electro immediately after use. This will not seriously hurt team damage, but it’s worth mentioning.
DPS increase from C5: ~7% || from C0: ~30%

“Master is always reminding me that practice makes perfect, so I sometimes try reading some light novels to improve my reading ability… Because they’re at least easier to read than Master’s essays.
But recently, I was reading this book where the main character has loads of different skills. Each one has a name, and I didn’t know a single word in any of them… Hmm? The title? I think it was, um… “Onibudou”? Have you read it before?”
Gameplay Mechanics
Dendro Application
At C0, Collei can reliably trigger up to seven Dendro reactions in a rotation. With Constellations, this number increases to eight or nine. These applications are divided as such between her Burst and Skill:
| Boomerang hits | 2 |
| Sprout | 1 (requires melee distance from enemy) |
| Initial Burst hit | 1 |
| Every 3s of Burst | 3–4 (the fourth doesn’t usually occur, due to ping, FPS, and other variables) |
The Talent that matters the most for supporting the team depends on the type of team she’s in. For example, consider Collei as the aura in Quicken-based teams, many of whose rotations are in intervals of (roughly) 12 seconds. Her Skill will be the central point of her kit in these rotations, as it has a 12-second cooldown. In most other cases, the Burst is the central part of her kit.
Think of it like this:
- In 12s rotations, Collei cannot Burst every rotation. Thus, Collei only needs to build Energy to Burst every other rotation, and her Burst is half as effective.
- In long rotations of 24–29 seconds, Collei uses her Skill twice as often as her Burst, and so her Skill applies, across two uses, more Dendro than her Burst.
In other rotations, like standard 20-second ones, deploying Collei’s Burst off cooldown is essential to maximize reactions. Hence, we strongly advise picking a strong Energy Recharge Bow for Collei.
Collei’s Elemental Skill, despite not benefitting much from Talent Levels, is still more impactful than her Burst when she’s played as a support, for example, in Aggravate teams. However, her Burst is usually better for personal and team damage.
Reactions
Spread + 
Spread is the easiest reaction to control. Simply affect an enemy with Quicken (Electro + Dendro in any order), then apply Dendro as often as possible. Collei can use either an ATK% or Elemental Mastery Sands to roughly equal effect. Elemental Mastery has a slightly higher damage ceiling, but ATK% has a higher floor.
Spread is the reaction that leads to the least personal damage for Collei when she is the trigger, but it offers gameplay flexibility, as this build is also good for Collei as an aura-producing character.
Bloom + 
Bloom requires a full commitment to Elemental Mastery (once ER requirements are met). As the trigger, Collei applies Dendro to an enemy affected by Hydro in order to create a Dendro Core. If neither Electro nor Pyro interacts with it for up to 6 seconds, the core explodes, dealing exactly the same damage as Overloaded, while also slightly injuring the player if caught in the blast.
One drawback to this composition is that Dendro consumes more Hydro aura on an enemy when applied as a trigger, compared to the amount of Dendro aura that a Hydro trigger would consume. This means you will need more Hydro application in order to accomplish the same amount of Blooms compared to vice versa.
If Collei is the aura and not the trigger, the team can then add an Electro character geared with high Elemental Mastery investment (like Kuki Shinobu) for Hyperbloom reactions or a Pyro character with high Elemental Mastery investment (like Thoma) for Burgeon reactions. Collei can still trigger Bloom reactions, but her personal Elemental Mastery stat is not relevant if Hyperbloom or Burgeon occurs right after. In these cases, focus on ATK%/DMG%/CRIT mainstats for your artifacts.
Bloom results in the most personal damage for Collei when she is the trigger, but it requires the most commitment to a single playstyle. For comparison, Bloom is about 88% more damage than if Collei was focusing on Spread reactions.
Burning + 
Burning is often ridiculed for being the least effective Dendro reaction. When Pyro and Dendro combine, enemies affected by Burning take four instances of damage every second. After eight such instances, the overall damage dealt is equal to one instance of Overloaded.
The problem with this, however, is that Burning is very easy to extinguish by accident. Applying Hydro or Cryo will end Burning, and using other reactions may also react with Pyro and take away the Pyro aura. Furthermore, Pyro continuously consumes Dendro, meaning Dendro must be frequently reapplied to keep Burning going.
This means that for Burning to compete with 6 Blooms in a single-target case, Burning must be kept up perpetually for 12 seconds. This is a tall order while also demanding a restructuring of team composition. Ten seconds is about how much one can expect to reliably keep Burning on an enemy for, in well-played scenarios.
Burning results in roughly 40% more damage than Spread reactions on the same ATK%/DMG%/CRIT build, and this can be enhanced with Viridescent Venerer, as Burning deals Pyro damage. Like Spread, Collei can reasonably run either ATK%/DMG%/CRIT builds or Elemental Mastery builds to a relatively similar effect. However, Elemental Mastery will always result in the most damage.
Energy Recharge Requirements
| Energy Requirement Range (Assumes 20s Rotation) | |
| Regular circumstances | 200% ER |
| Double Dendro | 180% ER |
| With Favonius Warbow | 170% ER |
| In Energy-rich teams (e.g., Fischl, Raiden) or long rotations | 160–170% ER |
| With Sacrificial Bow (assuming proc on first Skill hit) | 160% ER |
Energy needs, as always, will depend on weapon choice and the teammates you surround a character with.
Collei, despite only having a 60-cost Burst, will generally need 200% ER to Burst off cooldown. If she’s equipped with a Favonius Warbow, her ER should be 170%. With Sacrificial Bow, Collei needs 160%.
When played in an Energy-rich team (containing a strong battery like Fischl or Raiden) or in rotations longer than 24 seconds, Collei’s ER requirement also drops to between 160% and 170%. With just one additional Dendro character, Collei’s ER requirement is closer to 180%.

“Cuilein-Anbar, help!”
Builds
CRIT Build (for Aura/Quicken)
The CRIT build is the safest, most generalized set for Collei if you have no idea what team you want her to focus on, at the cost of being weaker in comparison to Elemental Mastery builds. However, if you only care about Collei’s supportive capabilities and are confident in the damage your other team members can deal, it is a fine option.
If you want to squeeze the maximum personal damage out of Collei as a support/aura-provider, focus instead on traditional damage builds (ATK%/Dendro DMG%/CRIT). ATK% will be more valuable than Elemental Mastery as the latter only matters when Collei is the trigger. Having enough Energy Recharge to meet requirements, of course, should always come first.
Artifacts
 Sands |  Goblet |  Circlet |
| ER%/EM/ATK% | Dendro DMG% | CRIT DMG/CRIT Rate |
Substat Priority
ER% > CRIT Rate/CRIT DMG > EM/ATK%
EM barely edges out ATK% when it comes to damage. The difference, however, is negligible enough to not matter much which Sands you end up using. Aside from that, this is a pretty typical build for most characters.
Assumptions
KQM Standards | Level 90 | Talents 9/9/9 | C0 | Rotation: E > Q | 1 Sprout hit | 18 Burst ticks, after extension | Calcs Here
| Artifact Set | Notes |
 4pc Deepwood Memories | If there isn’t already a 4pc Deepwood holder on the team, Collei should hold this set. The Resistance Shred is excellent for her personal damage, while also allowing her to support your other Dendro characters or any character triggering Bloom, Hyperbloom, or Burgeon. |
 4pc Gilded Dreams | This is the next strongest set for personal damage, due to the raw stats that are both appreciated by Collei. This set shines most in a pure EM build, since teams usually don’t need two Dendro units. Three non-Dendro teammates means 230 EM. |
 4pc Tenacity of the Millelith | It’s important to note that Collei’s Sprout instances count as Skill damage, meaning her Skill can, with both boomerang hits and multiple Sprout instances, perpetuate the teamwide 20% ATK buff. With C2, you can reliably hit enemies with Collei’s Sprouts. This means 10.5s of uptime on a 12s Skill cooldown — nearly unlimited uptime. In Aggravate teams, this is sometimes Collei’s Best in Slot. |
 4pc Noblesse Oblige | When in doubt, this 4pc set will work on just about any support. It is also nice to stack the teamwide 20% ATK buff with Elegy for the End’s Elemental Mastery and ATK buffs. |
 4pc Instructor | 4-star artifact sets sacrifice a lot of personal stats in order to give their beneficial passives. The Instructor set is the Elemental Mastery equivalent of Noblesse Oblige, and is also a good option if you’re okay with Collei not dealing damage. |
 4pc The Exile | 4pc Exile is mainly a set used when your team desperately needs Energy that your other teammates can’t provide. It’s a rare choice but not a terrible one. For extra Energy, equip a Favonius Warbow too. |
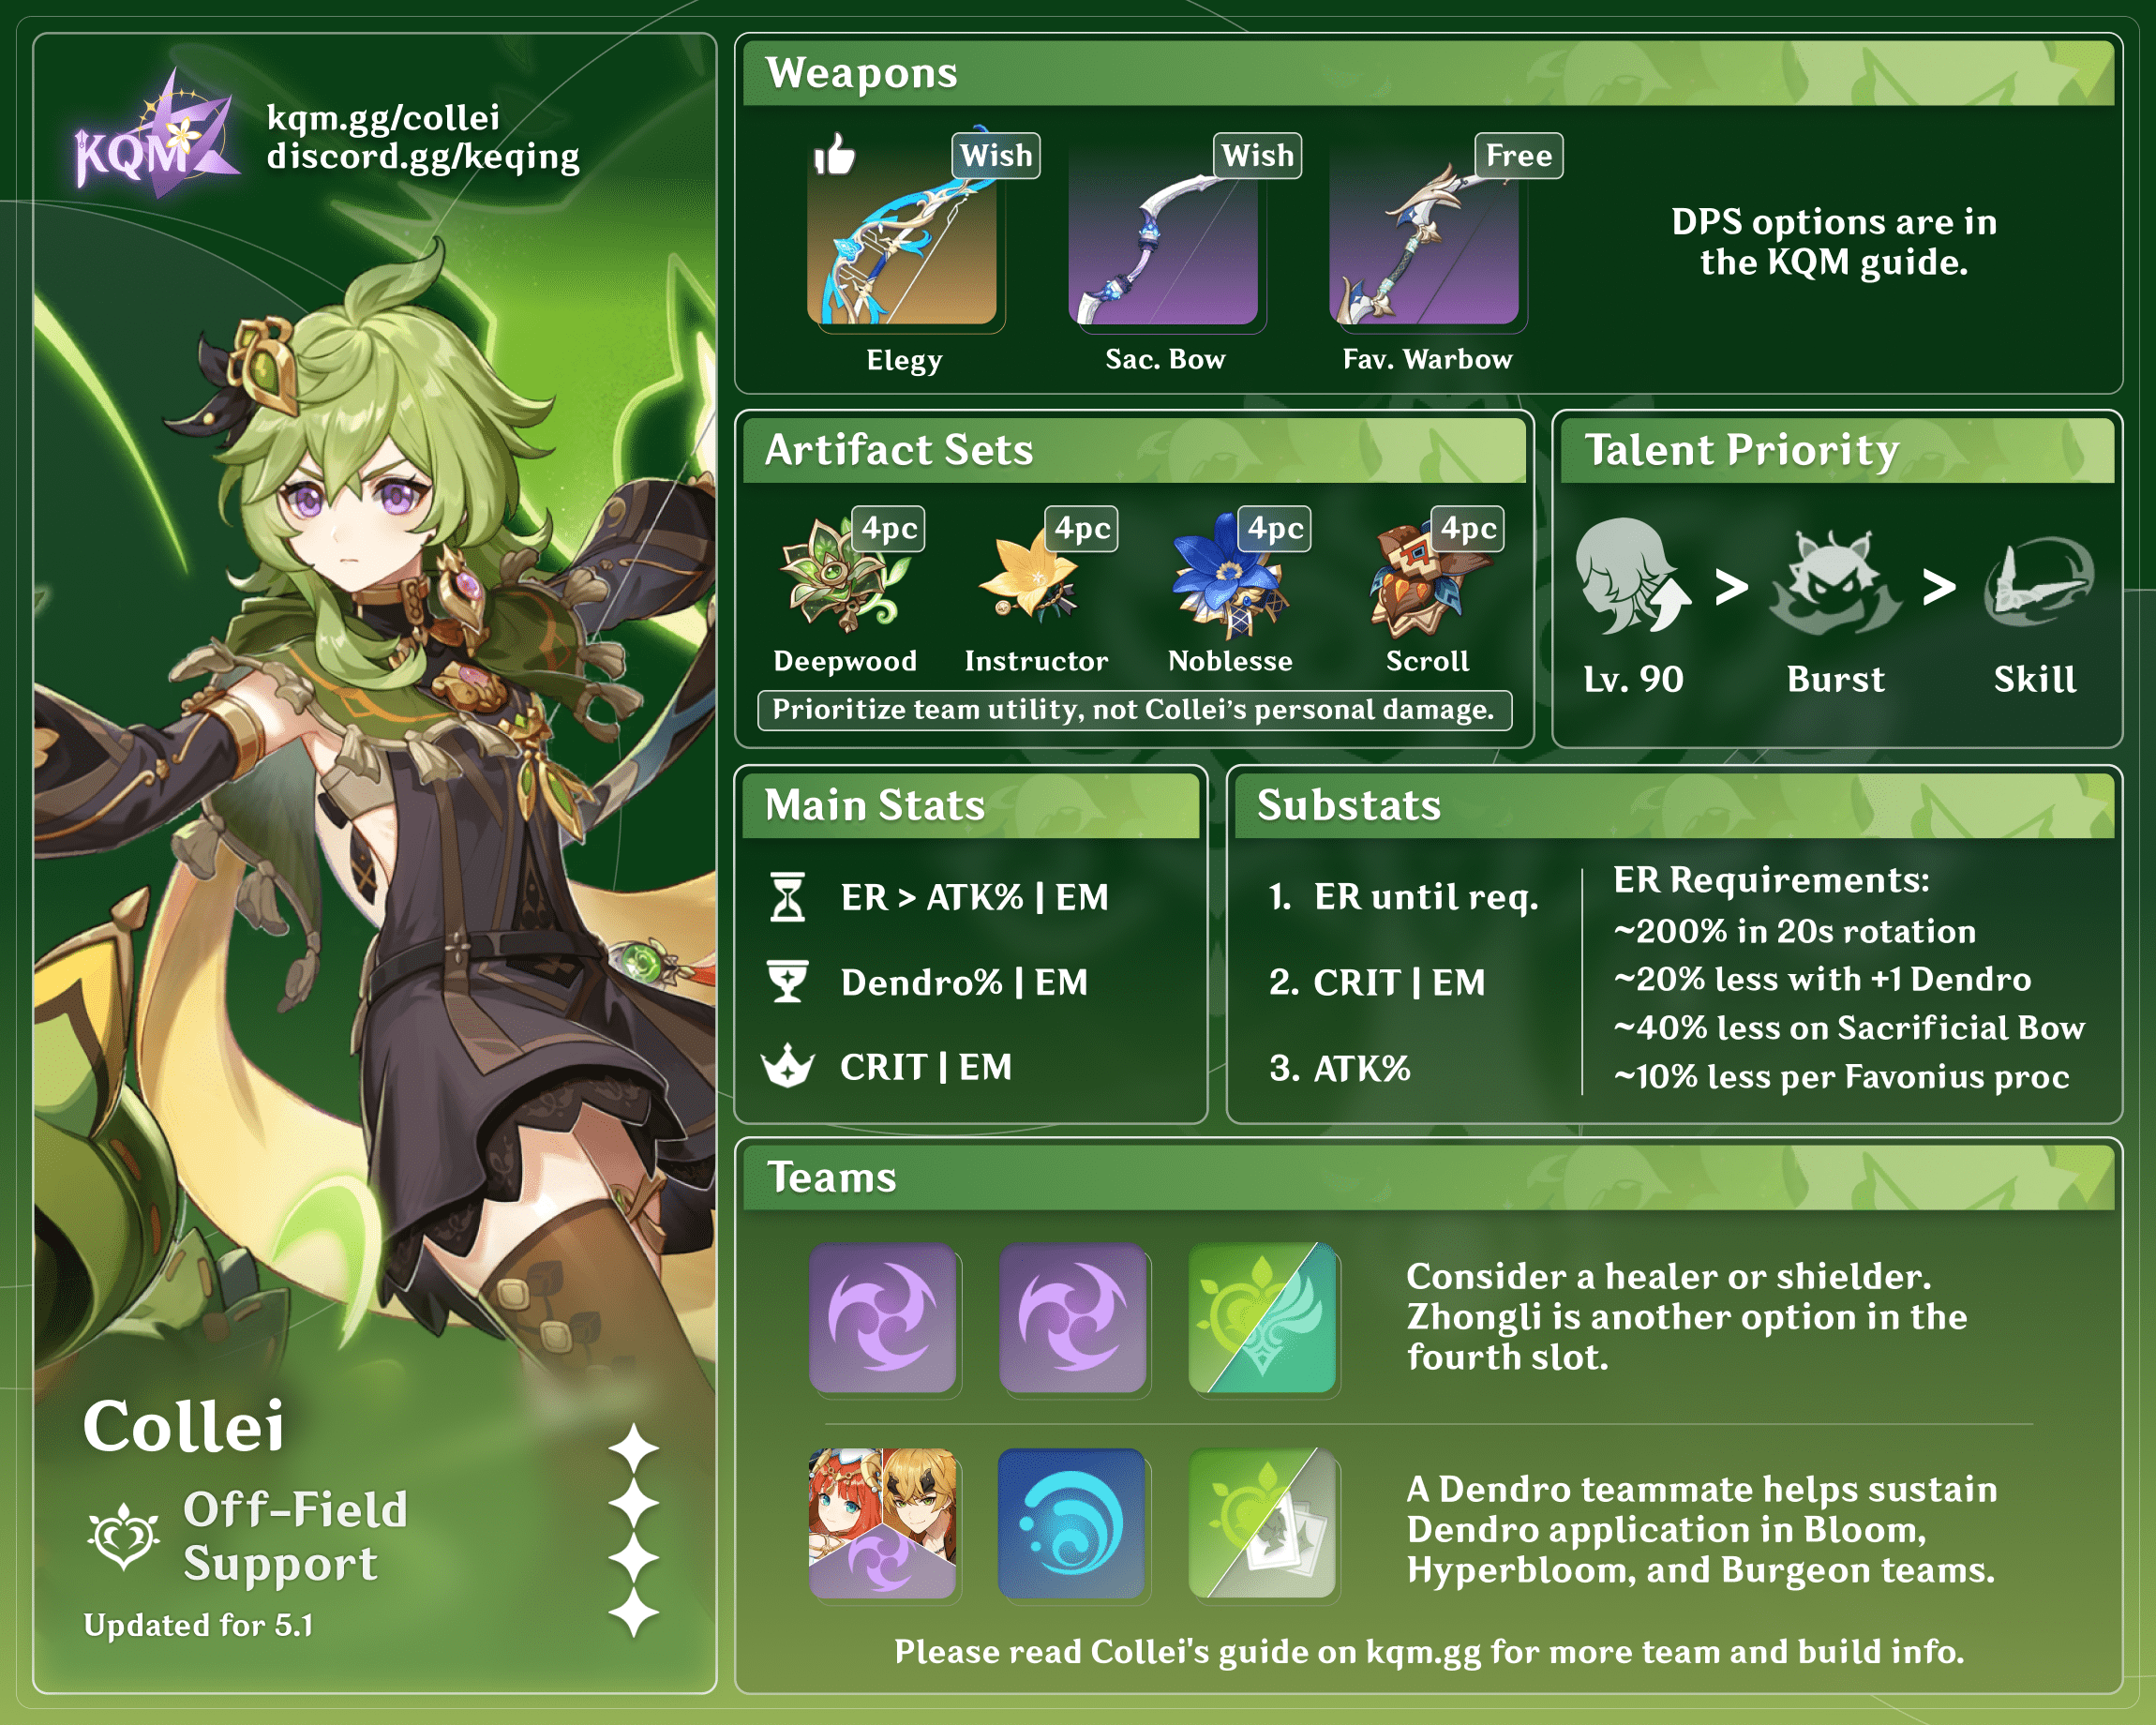
Weapons
Assumptions
KQM Standards | Level 90 | Talents 9/9/9 | C0 | 4pc Deepwood Memories | Rotation: E > Q | 1 Sprout hit | 18 Burst ticks, after extension | Calcs Here
| Weapon | Notes |
 R1 Polar Star | [ Best for Personal Damage Only ] By using a Normal Attack and a quick Aimed Shot (no charging up required), Polar Star gains two extra stacks that give ATK%. Otherwise, only two stacks are possible. Use this weapon only if you do not care at all about team utility and just want to see Collei’s numbers as high as possible. |
 R1 Elegy for the End | [ Best in Slot in Nearly All Cases ] This Bow gives Elemental Mastery, Energy Recharge, and ATK%, which are all buffs Collei benefits from. The EM and ATK% buff for the entire party are tremendous too. Elegy for the End may be the biggest leg-up Collei has over DMC. |
 R1 Aqua Simulacra | Aqua Simulacra is an excellent Bow for most characters, just for being a generically good stat stick with the massive CRIT stat it carries. However, Collei’s damage is not particularly high (or even worth categorizing as a DPS until C6), so this Bow can usually be used more effectively on another character. Elegy is strictly better, as they both do similar damage but Elegy buffs the team as well. |
 R5 Sacrificial Bow | [ R4 or R5 Required for 20s Rotations; passive cooldown is longer than 20s otherwise ] Sacrificial Bow requires extra time on the field, which eats into rotation time from teammates. However, it offers plenty of Energy Recharge in exchange, an extra Skill to generate more particles (reducing Energy requirements), and up to three extra Dendro applications if you properly time Skill uses. |
 R5 The Stringless | This weapon is easy to acquire and works for Collei regardless of what build you use for her, as long as you care about damage. The Elemental Mastery is very much appreciated when it comes to incidentally triggering reactions as well. Overall, a very solid choice that beats most other 5-star weapons on her. |
 R5 Mouun’s Moon | Generically strong weapon, though it can only be obtained via limited gacha, which means getting R5 is going to be difficult. It only barely deals more damage than Stringless but also requires carefully planning your team composition to have the largest Energy costs possible. Most of the time, you’ll be better off with Stringless if you had to choose. |
 R1 Thundering Pulse | Collei doesn’t make much use of the passive offered by Thundering Pulse, so unfortunately it just becomes a generic stat stick for her. It doesn’t quite synergize with any part of her kit, but if you just happen to have an extra lying around and don’t have the above 4-star options, an argument can be made for it. |
 R1 Hunter’s Path | Collei doesn’t use her Charged Shots for damage and doesn’t want to be on field most of the time anyway, so the passive doesn’t do much. At this point, just use a Favonius Warbow. |
 R1–R5 Favonius Warbow | One can be acquired for free by completing Mondstadt’s story quest. It reduces the Energy needs of the entire party so they can focus slightly more on offensive stats when equipping artifacts and weapons. Furthermore, it smooths out rotations in places one might normally get stuck. Moreover, it adds a ton of Energy Recharge to satisfy Collei’s Energy needs. Collei should build at least 30% CRIT Rate to trigger the weapon’s passive. Favonius weapons deserve all the praise they get, just for utility alone. |
 Others R1 The Stringless / R1 Mouun’s Moon / R1 Prototype Crescent/ R1 Skyward Harp | All of these perform very, very similarly to each other, so they’re all bundled here. We’re approaching the bottom of the barrel. |
 R5 King’s Squire | Sometimes, the drip doesn’t fit. It looks beautiful on Collei, but it just doesn’t get the job done in any meaningful way. The Elemental Mastery buff only applies while Collei is on field, which conflicts with her off-field playstyle. Hence, the only benefit this Bow gives is the single instance of Physical damage scaling with ATK, which is underwhelming and negligible. This weapon is for the ultra-casual who doesn’t care at all about performance and just wants to look neat. |
 R5 Raven Bow | The absolute bare minimum. No excuses! |

“Try this on for size!”
Elemental Mastery Build (for Bloom and Burn)
This build focuses on stacking as much Elemental Mastery on Collei as possible in order to maximize her personal damage potential. Collei cannot be the trigger for Hyperbloom or Burgeon reactions. Use the CRIT Build for that.
Sands | Goblet | Circlet |
| ER%/EM | EM | EM |
Substat Priority
ER% until requirement > EM
Artifacts are straightforward; since we only care about the power of Collei’s Transformative Reactions in this build, the only stats worth caring about are Energy Recharge (to Burst off cooldown) and Elemental Mastery.
Assumptions
KQM Standards | Level 90 | Talents 9/9/9 | C0 | 170% ER (Fav Bow) | EM/EM/EM | 6 Bloom / 10s Burning ownership | Calcs Here
| Artifact Set | Notes |
4pc Gilded Dreams | [ Best for Raw Damage in Bloom ] This set assumes that Collei is the only Dendro character in your party. However, it has no support utility, unlike Noblesse, Tenacity, or Deepwood. Use this only for dedicated Bloom performance and for squeezing as much personal damage out of Collei as possible. Collei must own 6/6 Blooms. |
4pc Noblesse Oblige | [ Most General Support Set; Best for Burning ] Noblesse Oblige is surprisingly effective when Collei is focusing on Burning and continues to be an excellent all-purpose support set. For team support, choose this or Tenacity of the Millelith. |
4pc Tenacity of the Millelith | [ Most Consistent Teamwide Buff ] It’s important to note that Collei’s Sprout instances count as Skill damage, meaning her Skill can, with both boomerang hits and multiple Sprout instances, perpetuate the teamwide 20% ATK buff. With C2, you can reliably hit enemies with Collei’s Floral Sprouts. This means 10.5s uptime and with a 12s CD on her skill — nearly unlimited uptime. |
4pc Deepwood Memories | [ Most Flexible Artifact Set Between Builds ] Deepwood Memories does not shine as much in a full Elemental Mastery build as it does in CRIT-based builds, but it remains the most flexible. Even when built for CRIT, Deepwood Memories competes with all other options when those other options prioritize EM, making this a true generalist set for Collei. |
Weapons
Assumptions
KQM Standards | Level 90 | Talents 9/9/9 | C0 | 4pc Gilded Dreams | EM/EM/EM | 18 Burst ticks, after extension | Calcs Here
| Weapon | Notes |
R1 Elegy for the End | [ Best in Slot in Nearly All Cases ] This Bow gives Elemental Mastery, Energy Recharge, and ATK%. The fact it buffs the entire team is what makes this weapon exceptional. Elegy for the End may be the biggest leg-up Collei has over DMC. |
R5 Sacrificial Bow | Sacrificial Bow requires a little bit of extra time on the field, which could eat into rotations and take time away from teammates. However, in exchange it offers several boons. First, it offers plenty of Energy Recharge. Second, it allows an extra Skill use to generate more particles (further reducing Energy requirements). Third, it gives up to three extra Dendro applications if you wait for the first boomerang to return before firing off another. |
R5 The Stringless | This weapon is easy to acquire and works for Collei regardless of what build you use for her, as long as you care about damage. The Elemental Mastery is very much appreciated when it comes to incidentally triggering reactions as well. Overall a very solid choice that beats most other 5-star weapons on her. |
 R5 Windblume Ode | The event weapon from the Windblume Festival offers a good amount of Elemental Mastery, which already helps it beat most 5-star options (since we care only about Energy Recharge and Elemental Mastery). A nice substitute for The Stringless if you’ve been playing for a while but haven’t managed to refine it. |
R1 Polar Star | By using a Normal Attack and a quick Aimed Shot (no charging up required), Polar Star gains two extra stacks that give ATK%. Generally not recommended, as easily accessible 4-star weapons at high refinement deal more damage. |
R1–R5 Favonius Warbow | One copy can be acquired for free by completing Mondstadt’s story quest. It reduces the Energy needs of the entire party so they can focus slightly more on offensive stats when equipping artifacts and weapons. It smooths out rotations in places one might normally get stuck. It also adds a ton of Energy Recharge to satisfy Collei’s Energy needs. Collei should build at least 30% CRIT Rate to trigger the weapon’s passive. Favonius weapons deserve all the praise they get, just for utility alone. |
 R5 End of the Line | This weapon, like “The Catch”, can be acquired by fishing; however, it functions more like the Luxurious Sea-Lord Claymore. It’s really only good here because it gives Energy Recharge. The extra instance of damage is underwhelming for a build focused on Elemental Mastery. |
R1 Hunter’s Path | Collei doesn’t use her Charged Shots for damage and doesn’t want to be on field most of the time anyway, so the passive doesn’t do much. At this point, just use a Favonius Warbow. |
R1 Aqua Simulacra | Generic stat stick that doesn’t provide either Energy Recharge or Elemental Mastery. Free weapons do more. |
R5 Mouun’s Moon | Generically strong weapon, though it is a limited gacha weapon, which means getting R5 is going to be difficult. It only barely deals more damage than Stringless but also requires carefully planning your team composition to have the largest Energy costs possible. Most of the time, you’ll be better off with Stringless if you had to choose. |
R5 Raven Bow | The absolute bare minimum and competes with Skyward Harp, Thundering Pulse, and Amos’ Bow when assuming 100% uptime on the passive. Even without the passive, it’s better than spending money on a 5-star weapon that doesn’t work on Collei. |
“Are you going to keep traveling? Let me do my part, please? I’ll study hard… whether it’s reading, medicine, combat, or assessing the danger… even something small, like checking the streetlights!”
Physical Build (for the Brave and Daring)
This final build is not recommended for the average player, but there is enough demand that it’s worth its inclusion in the guide. Collei has no benefits over other 4-star Bow-wielding characters, and is neither Cryo nor Electro, so Superconduct requires two additional team slots.
The goal of this build is to not care about Collei’s Burst, build as much ATK%, Phys DMG%, and CRIT as possible, and spam two Normal Attacks in a row, canceled by aiming after the second shot is fired.
To be clear, there is no competitive reason to use Collei over other on-field Bow-wielding characters unless you just like playing Collei.
Artifacts
Sands | Goblet | Circlet |
| ATK% | Physical DMG% | CRIT DMG/CRIT Rate |
Substats: CRIT > ATK%
Assumptions
KQM Standards | Level 90 | Talents 9/9/9 | C0 | 100% ER | ATK%/Phys DMG%/CRIT | Calcs Here
| Artifact Set | Notes |
 2pc Bloodstained Chivalry + 2pc Pale Flame | There’s really only one correct choice here, and that’s picking 2pc Bloodstained Chivalry and 2pc Pale Flame for a total of 50% Physical DMG Bonus. Otherwise, mix and match ATK% and Phys DMG% set bonuses. |
Weapons
Assumptions
KQM Standards | Level 90 | Talents 9/9/9 | C0 | 2pc Bloodstained Chivalry 2pc Pale Flame | ATK%/Phys DMG%/CRIT | Calcs Here
| Weapon | Notes |
R1 Thundering Pulse | Collei can maintain all three stacks from the Thundering Pulse’s passive when used purely as an on-field Physical attacker, allowing her to fully utilize this weapon’s potential. |
 R1 Skyward Harp | Skyward Harp is often the default 5-star option for Physical DPS Bow-wielders, due to its flexibility in granting both CRIT stats. While Skyward Harp deals about 10% less damage than Thundering Pulse on conservative estimates for Skyward Harp’s passive, the former can be obtained on any banner, making it more accessible. |
R1 Polar Star | Polar Star is calculated assuming only three stacks are acquired, since Physical Collei cannot use her Elemental Burst immediately after cooldown. The difference between Skyward Harp and Polar Star is only about 2%. |
 R5 Rust | With a massive Normal Attack boost with no drawback for Collei, Rust is easily the best 4-star weapon choice for a Physical Normal Attack–focused Collei. |
 R5 Prototype Crescent | CAUTION: This placement assumes you get a headshot immediately. Without, it is comparable to Slingshot. Offers a lot of raw ATK% if you can secure the headshot, but not the ideal Bow to craft for this build, due to its prerequisites. |
 R5 Compound Bow | Offers Physical DMG% as its secondary stat, ATK%, and Attack Speed, all of which are great for a “machine-gun” build. With adept canceling techniques, this weapon can easily get out of hand for your opponents. |
 R5 Slingshot | The absolute bare minimum. Slingshot offers CRIT Rate and a nice damage bonus, so long as you stay relatively close to your opponents. |

“I used to think that I’d never make a single friend in my whole life, but things changed when I went to Mondstadt… Then after that, I met Master in Sumeru. Now I’ve met you, too. All in all, I think I’ve been really lucky.”
Teams
Collei can fit into any team that utilizes Dendro reactions. Start a team with an intended reaction, and then fill the team with characters who exploit that reaction.
Quicken
For Quicken teams, the best candidates for DPS units are characters that have extremely high Electro application, like Fischl or Keqing. This is because Aggravate is an additive buff, much like Shenhe and Yun Jin’s buffs. Additive buffs are best when there are multiple hits, rather than high multipliers. From there, you focus on sustaining the reaction or Shredding Elemental Resistance, often with an Anemo character or Zhongli.
A helpful tip: Zhongli is the only character at this point who can Shred enemy Dendro Resistance without the use of 4-Piece Deepwood. He can also Shred Electro Resistance at the same time.
If Collei is meant to support another Dendro DPS for Spread while holding 4-Piece Deepwood Memories, then Tighnari is the default (and only) on-field Dendro DPS currently available. When not using Tighnari, the Traveler can also be added to contribute more bountiful Dendro application for an Electro DPS to abuse.
Most Electro units who care about damage and CRIT stats benefit from Aggravate. Fischl is a top-tier option, due to her ability to loop Quicken and Aggravate reactions, thanks to her 4th Ascension Passive. Keqing benefits enormously from Dendro reactions, and Aggravate teams become her default team. If you need a healer and don’t bring Jean or Sayu, then Kuki Shinobu will be your default option. Yae Miko is able to reap double benefits from Elemental Mastery bonuses with her Ascension Passive, giving her damage a healthy boost. Sara helps boost Electro damage even higher after Anemo units Shred Resistances and Quicken gives its additive damage bonus to Elemental hits.
You mainly want to bring a Viridescent Venerer support to enhance the damage of your Electro party members. Kazuha is the clear best option in many cases but can be substituted for Venti when the team needs lots of crowd control. Sayu and Jean are prime options, due to being able to heal and Shred Resistances at the same time. Sucrose is also a powerful support option due to her ability to share Elemental Mastery with the team and pass on the 48% ATK buff from the 3-star weapon Thrilling Tales of Dragon Slayers.
One benefit of Aggravate teams is their aggressive playstyle on short (12–15s) rotations. In such cases, Collei will benefit from defaulting to the Tenacity of the Millelith 4-Piece Set, due to its near-unlimited uptime on its team-wide 20% ATK boost.
Team Members for Quicken
| Dendro | |
 Tighnari | – On-field DPS. – 12s cooldown on Burst, meaning he can synchronize cooldowns with Collei’s Skill. This allows for both short and long (24+ second) rotations. – Rapid Dendro application on special Charged Attacks exploits Spread reaction. |
 Dendro Traveler | – Application support. – Extra Dendro character for particle generation. – The Honorary Knight’s Favonius Sword further provides Energy for the team. |
| Electro | |
 Cyno | – On-field Hypercarry. – Consistent Electro application for maximizing Aggravate damage during Burst state. – High damage output. |
 Fischl | – Off-field DPS. – Consistent Electro application. – Extremely effective abuser of Aggravate due to her A4 triggering additional applications for each Aggravate reaction, leading to even more Aggravate reactions. |
 Keqing | – DPS — on field or off field.Rapid Electro application throughout her kit, including her Electro Infusion. – Burst hits ten times, allowing for four Aggravates on standard ICD. – She’s finally good now because of Quicken. You may as well. |
 Raiden Shogun | – On-field DPS. – Excellent battery for her team, lowering Energy Recharge requirements for more offensive investment. – Burst changes her Normal Attacks to Electro attacks that count as Burst damage. |
 Yae Miko | – DPS — on field or off field. – Consistent Electro applicator with turrets from her Skill. – Burst hits multiple times with no ICD, allowing for additional Aggravates for higher Burst damage. |
 Kujou Sara | – Buffing support (Flat ATK, plus CRIT DMG at C6). – Can buff herself and make herself a nuke at C6.Burst hits multiple times. – Can buff multiple team members with strategic play at C2. – Can stack buffs with Skill, 4pc Noblesse Oblige, and Elegy for the End if Collei doesn’t equip it. |
 Kuki Shinobu | – Healing support. – Healing and reactions both scale with Elemental Mastery. – Buffs party with 4pc Tenacity of the Millelith. |
| Anemo | |
 Kaedehara Kazuha | – Viridescent (de)buffer. – Crowd control. – DMG% bonus while inside Kazuha’s Burst. – Basically universally an excellent option on any Pyro, Cryo, Hydro, or Electro team. |
 Sayu | – Viridescent (de)buffer. – Healer. – Can buff team ATK% with Wolf’s Gravestone, which is helpful for Aggravate. – Overworld taxi. |
 Jean | – Viridescent (de)buffer. – Healer. |
 Sucrose | – Viridescent (de)buffer. – Crowd control. – Elemental Mastery sharing with team. – Decent battery. |
Burgeon and Hyperbloom
From here, we can move onto Bloom, Burgeon, and Hyperbloom teams. These teams prefer to maximize the trigger’s Elemental Mastery in order to deal loads of damage through Transformative Reactions.
We’ll start with Hyperbloom and Burgeon first, as Bloom is an odd case. The goal is to have plenty of Hydro application to make sure Burning and Quicken do not occur, enough Dendro application to consistently Bloom and generate Dendro Cores, then an Electro or Pyro character with slow Elemental application on their attacks to guarantee ownership of the reaction.

Your flex spot will usually be dedicated to filling whatever gap your team has. The best generic flex choices are usually Viridescent supports and Zhongli, due to their rare ability to Shred Resistances, which is almost universally useful. Other times you may need a second Pyro to battery the first. Do note that Anemo cannot Swirl Dendro.
The characters that most benefit from Hyperbloom and Burgeon are Kuki Shinobu and Thoma respectively. Both used to be considered weak picks, but these reactions finally gave them a chance to shine.
For Kuki to take advantage of Hyperbloom, she has to sacrifice some of her healing effectiveness. However, Kuki Shinobu only loses 15–20% of her healing potential on a full EM set and can carry a variety of support artifact options too.
Thoma can utilize a full EM artifact set as well and provides a defensive option in the form of his shield.
Hydro characters need a lot of application to fit into these teams, but it doesn’t matter if it’s on or off field, as long as your Pyro or Electro character secures the reactions. Tartaglia has the most Hydro application of any character in the game and is a strong on-field DPS who likes playing with Electro and Pyro reactions. Ayato is a similar alternative. Yelan and Xingqiu serve similar roles in Hydro application and together can carry most other two-character combinations in the game. Kokomi deserves a mention as well, due to her AoE Hydro application and her ability to satisfy two roles at once — healing and on-field damage.
Team Members for Burgeon and Hyperbloom
| Dendro | |
Dendro Traveler | – Application support. – Extra Dendro character for particle generation. – The Honorary Knight’s Favonius Sword further provides Energy for the team. |
| Electro | |
Kuki Shinobu | – One of the most reliable and effective Hyperbloom triggers. Most other Electro characters would rather not change their build to full EM investment. – Healing support. – Healing and reactions both scale with Elemental Mastery. – Buffs party with 4pc Tenacity of the Millelith. |
| Pyro | |
 Thoma | – One of the most reliable and effective Burgeon triggers. Most other Pyro characters would rather not change their build to full EM investment. – Slow, consistent Pyro application ensures Burgeon triggers more often than Burning. – Protects the team with a shield from his Skill and Burst. – He finally has a use now! |
| Hydro | |
 Yelan | – Consistent Hydro application. – Offensive ramping buff for active character. – High damage output. Even higher when paired with Xingqiu. – Can outspeed the application of most potential Hyperbloom and Burgeon triggers. |
 Xingqiu | – Consistent Hydro application. – Interruption Resistance, damage reduction, and minor healing. – High damage output. Even higher when paired with Yelan. – Can outspeed the application of most potential Hyperbloom and Burgeon triggers. |
 Sangonomiya Kokomi | – Consistent Hydro application. – Healer, which is especially important in Burgeon teams, since you take a portion of the damage from Burgeon as well. – Viable on-field driver. – Can outspeed the application of most potential Hyperbloom and Burgeon triggers. |
 Candace | – Grants Hydro Infusion, making Hydro application much easier for the entire party. – Benefits from HP scaling. – Normal Attack damage support, which you want anyway if Xingqiu is in the party. |
 Tartaglia | – Fastest on-field Hydro application of any character in the game, allowing for tons of Blooms. – Respectable damage on his own. – Riptide ability allows for quadratic scaling. |
 Kamisato Ayato | – Excellent Hydro application both on and off field. – Respectable damage on his own. – Burst allows for quadratic scaling with crowd control. |
| Anemo | |
Kaedehara Kazuha | – Viridescent (de)buffer. – Crowd control. – DMG% bonus while inside Kazuha’s Burst. – Basically universally an excellent option on any Pyro, Cryo, Hydro, or Electro team. |
Sayu | – Viridescent (de)buffer. – Healer. – Can buff team ATK% with Wolf’s Gravestone, which is helpful for Aggravate. – Overworld taxi. |
Jean | – Viridescent (de)buffer. – Healer. |
Sucrose | – Viridescent (de)buffer. – Crowd control. – Elemental Mastery sharing with team. – Decent battery. |
 Venti | – Viridescent (de)buffer. – Godly crowd control. – Minor Energy refund. |
| Geo | |
 Zhongli | – Shielder. – Excellent Universal debuffer. |
Bloom and Fridge
Bloom teams come next. Sometimes, a Bloom team will also include a Cryo character for Freeze reactions, and these are known as Fridge teams. The saying goes something like, “you preserve your veggies when you refrigerate them,” and what this means in mechanical terms is that Freeze reduces the depletion of Elemental aura. When reactions deplete less Elemental aura, you can trigger more reactions with less application.
The Bloom/Rupture formula is identical to the Overloaded formula. The concept is similar — reduce Dendro Resistance and trigger as many Transformative Reactions as possible.

The flex slots can be more Dendro or Hydro characters. Anemo is useful when your on-field DPS is Hydro and not the trigger for reactions. In these cases, you want your Dendro character to carry Elemental Mastery gear. It’s not recommended to run other Elements, aside from Zhongli for his Universal Resistance Shred. Choose Dendro or Hydro based on balancing the amount of application for whoever you decide to be your trigger DPS.
The trigger should be Dendro or Hydro, running a full EM set, and have slower application than the application of the other Element.
Yelan and Xingqiu provide lots of Hydro application while also being generically strong units. Kokomi is a candidate for being a Hydro trigger, as her Skill has slow but consistent application. This will take away much of her healing potential, though depending on your skill level, that might be manageable. While Ayato and Tartaglia have high Hydro application, the fact that they benefit more from CRIT builds than EM builds means their Blooms will not deal as much damage. Ayato, uniquely, can be played either on field or off field.
Nilou, of course, is the Queen of Bloom, due to her Ascension Passives massively upgrading Bloom AoE and damage values — that is, if you can handle the drawback of using only Hydro and Dendro characters on your team. In this case, it’s worth the restriction, so long as you can bring potent healing on the team. Note that this does not allow for Fridge teams.
For Dendro, practically any current character can have a try at being the trigger for Bloom/Rupture. As for Cryo, the character will usually want to be off field while consistently applying Cryo. Exceptions can be made if your Bloom aura and trigger both do their job off field (like Collei or Kokomi).
Team Members for Bloom and Fridge
| Dendro | |
Dendro Traveler | – Application support. – Extra Dendro character for particle generation. – The Honorary Knight’s Favonius Sword further provides Energy for the team. |
| Hydro | |
Yelan | – Consistent Hydro application. – Offensive ramping buff for active character. – High damage output. Even higher when paired with Xingqiu. – Best when not the trigger for Bloom reactions. |
Xingqiu | – Consistent Hydro application. – Interruption Resistance, damage reduction, and minor healing. – High damage output. Even higher when paired with Yelan. – Best when not the trigger for Bloom reactions. |
Sangonomiya Kokomi | – Consistent Hydro application. – Healer, which is especially important in Bloom teams, since you take a portion of the damage from Dendro Cores explosions, similar Burgeon. – Viable on-field driver. – Basically a necessity in Bloom teams, as Barbara is the only Hydro healing substitute. |
Candace | – Grants Hydro Infusion, making Hydro application much easier for the entire party, especially if you have a full EM Dendro Traveler. – Benefits from HP scaling. – Normal Attack damage support, which you want anyway if Xingqiu is in the party. |
Tartaglia | – Fastest on-field Hydro application of any character in the game, allowing for tons of Blooms, especially in a Fridge team. – Respectable damage on his own. – Riptide ability allows for quadratic scaling. |
Kamisato Ayato | – Consistent and flexible Hydro application between Skill and Burst. – Respectable damage on his own. – Burst is similar to Ganyu’s, allowing for quadratic scaling, given there’s good crowd control. |
 Mona | – Burst nuke. – Increases team damage thanks to the debuff on enemies inflicted by her Burst. – Skill is a taunt for helping group enemies together. – Optimal with Ayaka or Ganyu. – Can stack buffs with Noblesse, Tenacity, and Thrilling Tales. |
 Nilou | – The Queen of Bloom. No one can buff Bloom reactions like Nilou does. – Strict team restrictions: Dendro and Hydro characters ONLY. – Functions as an on-field or off-field DPS. – Can ignore using her Burst entirely with no drawbacks. |
 Barbara | – Budget Kokomi. – Generates lots of Blooms through her Skill at melee range. – 100%-free character. – Requires playing around her long cooldowns. – Equip Sacrificial Fragments and be close to opponents while using her Skill for two chances to proc Bloom. |
| Anemo | |
Kaedehara Kazuha | – Viridescent (de)buffer. – Crowd control and can gather Dendro cores. – DMG% bonus while inside Kazuha’s Burst. – Basically universally an excellent option on any Pyro, Cryo, Hydro, or Electro team. |
Sayu | – Viridescent (de)buffer. – Healer. – Can buff team ATK% with Wolf’s Gravestone, which is helpful for Aggravate. – Overworld taxi. |
Jean | – Viridescent (de)buffer. – Healer. |
Sucrose | – Viridescent (de)buffer. – Crowd control. – Elemental Mastery sharing with team. – Decent battery. |
Venti | – Viridescent (de)buffer. – Godly crowd control. – Minor Energy refund. |
| Geo | |
Zhongli | – Shielder. – Excellent Universal debuffer. |
| Cryo | |
 Kamisato Ayaka | – Potent Cryo DPS. – Extremely powerful Burst. – Can infuse Normal Attacks with Cryo for rapid, consistent Cryo application. – Best for fighting at melee range. |
 Ganyu | – Potent Cryo DPS. – Excellent Cryo application with her Burst, with the chance for quadratic scaling if the team brings good crowd control like Venti or with the taunt from her Skill. – Charged Attacks are strong. – Best for fighting at long range. |
 Jessie (Rosaria) | – Powerful for a 4-star character — she has high multipliers. – Can localize her Cryo application to a specific area with her Burst. – Skill closes gaps between you and opponents and has a short cooldown. – Member of Team Rocket (allegedly). |
 James (Kaeya) | – 100%-free character. – Does most of the things Rosaria does, except his application is mobile. – Makes extra particles when enemies are Frozen, thanks to his Skill.Best at melee range, due to his Burst. – Member of Team Rocket (allegedly). |
Burning
Finally, there are Burning teams, which focus on providing as much Dendro application as possible with Pyro in order to afflict enemies with Damage over Time. Dendro application demands are generally higher because Dendro acts as the “fuel” for Burning. 1U of Dendro with Burning lasts about two seconds. Collei is the best at keeping this application up while off field. Dendro Traveler, however, requires playing around the premature explosion part of their Burst in Burning teams.

Thoma returns as a strong Pyro trigger for Burning. Most Pyro characters generally do not run full Elemental Mastery investments, so most other Pyro characters will probably just focus on raw power and just be happy that Burning is extra damage for the team. In these cases, either Collei or Tighnari should be the trigger.
Bennett is an obvious first pick for a flex slot, especially if using a Pyro DPS with high Energy requirements, like Thoma or Xiangling. Anemo units also tend to run full Elemental Mastery investments anyway, and Swirling Pyro onto Dendro would be another way to channel a high amount of EM into Burning damage.
Team Members for Burning
| Pyro | |
 Amber | – Girlfriend. – Amber’s damage isn’t exceptional, so she can get away with building EM for Burning. – Burst has 12s cooldown, allowing her to be played in short rotations with Collei. – Burst is good at destroying non-Pyro shields. |
 Xiangling | – 100% free. – Insane raw damage potential — beats many 5-star characters’ damage output. – With Bennett, the two can carry any other two characters. – Rapid Pyro application from her Burst. |
Thoma | – Currently the best and only dedicated Elemental Mastery character in Pyro. – Slow, consistent Pyro application ensures Burgeon triggers more often than Burning. – Protects the team with a shield from his Skill and Burst. |
 Bennett | – Straight-up good for nearly any team. Almost always a safe pick. – Great battery potential for Energy-hungry Pyro characters like Thoma and Xiangling — Bennett’s Tap Skill has a very short cooldown. – Incredible Flat ATK buff for the team from Burst. – Quick, effective healing from Burst. |
| Dendro | |
Tighnari | – On-field DPS. – 12s cooldown on Burst, meaning he can synchronize cooldowns with Collei’s Skill. This allows for both short and long (24+ second) rotations. |
| Anemo | |
Kaedehara Kazuha | – Viridescent (de)buffer. – Crowd control. – DMG% bonus while inside Kazuha’s Burst. – Basically universally an excellent option on any Pyro, Cryo, Hydro, or Electro team. |
Sayu | – Viridescent (de)buffer. – Healer. – Can buff team ATK% with Wolf’s Gravestone, which is helpful for Aggravate. – Overworld taxi. |
Jean | – Viridescent (de)buffer. – Healer. – Synergizes with Bennett (Sunfire), who Collei also benefits from. |
Sucrose | – Viridescent (de)buffer. – Crowd control. – Elemental Mastery sharing with team. – Decent battery. |
Venti | – Viridescent (de)buffer. – Godly crowd control. – Minor Energy refund. |
| Geo | |
Zhongli | – Shielder. – Excellent Universal debuffer. |
Physical
There’s really only a few possibilities for building around Collei’s Physical damage. Even with Superconduct, Collei will still need to be carried by backline characters with high damage output. Again, it is not recommended to use Physical Collei, but here is a team anyways as proof of concept.

The characters that satisfy this criteria are Fischl and Rosaria respectively. Fischl will synergize with Collei’s Dendro application for high damage output while also providing one half of Superconduct. Rosaria and Kaeya are about equal in terms of power and efficiency, but Rosaria’s Burst doesn’t orbit the active character, meaning you don’t have to be in melee range with a bow character. Bennett provides healing and an enormous ATK boost to the team.
References/External Links
References
Calcs
Utility Tools
“Are you ready to get some sleep? Okay. The campfire’s lit — I’ll keep watch tonight.”
Credits
Author
- Emiliabyss#1641
Assistant
- Latiwings#3308
Art Seeker and Moral Support
- Tibo#4309
- koko#1111
Special Thanks
- idkanonymized#4166
- LostGuide#4812
- juko#9385
- Rare Possum#0511
- Ena#6013
- Magnus Artifex#8719
- Cuzimori#1535
- naivety | pkach#6934
- jamie#9248
- koko#1111
- TheGaminSeshion#1648
- Rathalos#2875
- Lesterberne#9695
- mina#4448
Changelog
- 12/08/2022 – Guide release
