Written by ultimate.noob
Updated for 3.8
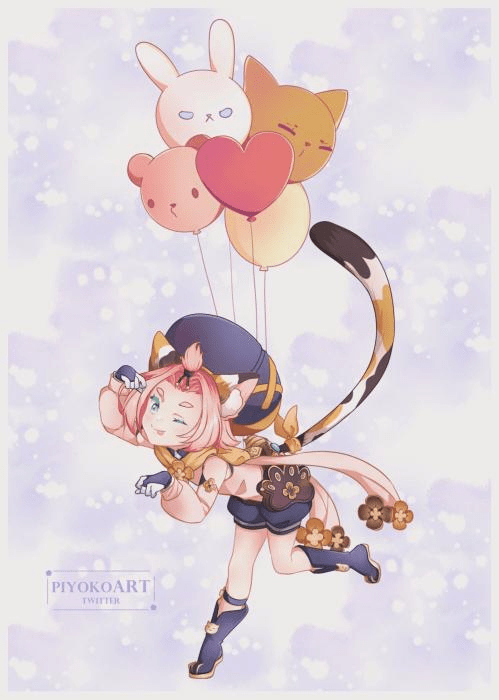
Table of Contents
Introduction
“The incredibly popular bartender of the Cat’s Tail tavern, rising star of Mondstadt’s wine industry, and the greatest challenger to its traditional powerhouses. A feisty feline young lady from Springvale, any drink mixed by Diona’s hand tastes delicious beyond belief. Yet given her extreme distaste for alcohol, is her talent a blessing or a curse?“
Diona is an easy-to-pilot 4* Cryo shielder and healer. She condenses multiple roles into a single slot, making her a valuable character on many teams. This guide will go in-depth about Diona’s kit, helping you to build a Diona suitable for your needs.
Why Play Diona?
Pros
- Strong shield when invested
- Decent healing
- Can support the team through artifact sets such as 4 Noblesse Oblige
- Relatively easy to build due to HP scaling
- Excellent Cryo battery
- Constellations increase her support capabilities
- C6 provides a substantial EM buff
Cons
- Slow Cryo application
- Burst costs 80 Energy (mitigated by Constellations)
- Personal damage is near nonexistent
Diona TL;DR
Design: cuppacote & icedsquid
Content: KQM TC Staff
Playstyles
Support
Diona’s primary playstyle.
This playstyle is extremely simple to play and typically consists of doing one or two Hold Elemental Skills, Bursting, and then swapping off to another character.
Shielding
One of the core facets of Diona’s kit is her ability to provide decent uptime access to cryo shielding. While it is not the strongest, it provides a cleansing effect by applying Cryo to shielded characters upon cast and swap, potentially removing Elemental Debuffs such as Engulfing Storm. Check this sheet by Zakharov#5645 for more information about different characters’ shield strength.
Electro Cleansing Preview
Example of cleansing the Electro on Diona (Footage by Puffin#9920)
Healing
With the recent introduction of mechanics that bypass shields, characters that can heal while providing extra utility have recently become more valuable. Diona is one of these characters, delivering healing on top of the plethora of other utilities she can offer in a team. Oftentimes, you will find that Diona’s Burst over heals your characters.
Batterying
In the current state of the game, many Cryo characters —such as Eula and Ayaka— are unable to generate enough Energy for themselves, creating the need for batteries. A battery is able to funnel Particles into other characters, helping them acquire the Energy needed to Burst. Diona is currently one of the best Cryo batteries, generating a significant number of Cryo Particles (80% chance for 1 Particle per paw). She’s able to fully utilize Sacrificial Bow and Favonius Warbow for increased Particle generation as her Elemental Skill can deal damage up to five times.
To further her support capabilities, Diona is able to animation cancel her Elemental Skill by swapping to another character or dashing right after the cast. While it is not a large increase in efficiency like canceling is for characters like Hu Tao, it’s useful and practical to do. Diona’s shield also provides a Movement Speed increase, which can be useful for doing techs such as Dragonstrike and much more.
Animation Cancels
Swap Cancel
Dash Cancel
Footage by Puffin#9920
On-Field DPS
It is not at all recommended to build Diona as on-field DPS as Diona’s personal damage is very low. Nonetheless, for the Diona fans who choose this playstyle, the two main teams are Mono-Cryo Diona and Physical Diona. Most variations of these teams rely primarily on off-field DPSes to do the majority of the damage. Melt Diona cannot work due to Diona’s ICD, a system limiting how often elemental reactions can occur. These teams will not be covered in this guide.

Character Overview
Talents
Talent Priority
Skill ≥ Burst >>> Normal Attack
In most cases, Diona’s Elemental Skill and Elemental Burst should be leveled about equally. Diona’s Elemental Skill should be prioritized if you are mainly using her shield, and her Elemental Burst should be prioritized if you are mainly using her for healing. Diona’s Normal Attack should not be leveled when playing Diona in her traditional support role. Note that Diona’s Talent levels are not important if you do not struggle with shields breaking prematurely or a lack of healing.
 Normal Attack | Kätzlein Style
Talent Description
Normal Attack
Perform up to 5 consecutive shots with a bow.
Charged Attack
Perform a more precise Aimed Shot with increased DMG.
While aiming, biting frost will accumulate on the arrowhead. A fully charged frost arrow will deal Cryo DMG.
Plunging Attack
Fires off a shower of arrows in mid-air before falling and striking the ground, dealing AoE DMG upon impact.
It’s a run-of-the-mill Normal Attack with low multipliers. It isn’t recommended to level this Talent.
 Elemental Skill | Icy Paws
Talent Description
Fires an Icy Paw that deals Cryo DMG to opponents and forms a shield on hit.
The shield’s DMG Absorption scales based on Diona’s Max HP, and its duration scales off the number of Icy Paws that hit their target.
Press
Rapidly fires off 2 Icy Paws.
Hold
Dashes back quickly before firing five Icy Paws.
The shield created by a Hold attack will gain a 75% DMG Absorption Bonus.
The shield has a 250% Cryo DMG Absorption Bonus, and will cause your active character to become affected by Cryo at the point of formation for a short duration.
- Icy Paws only need to explode to generate shields. However, they have to hit enemies to generate Particles.
- Although her Tap Skill has higher shield uptime if repeatedly used off cooldown, it is advised to use her Hold Skill while in battle. Players should aim to minimize time spent on Diona to maximize DPS due to Diona’s low personal damage.
It is highly recommended to level Diona’s Skill to at least Talent Level 7, as each level increases both the shield HP and more importantly, the shield duration. Leveling the Talent past Level 7 is only recommended if you’re still not satisfied with the amount of HP that the shield has, as the shield reaches its max duration at Level 7.
Cleansing Elemental Debuffs
Diona’s Skill applies Cryo onto herself and her teammates when casting a shield or switching characters; you can use it to remove debuffs such as Engulfing Storm.
Note: This Cryo isn’t very strong, so some effects can’t be removed, such as Slowing Waters.
Interactions with Sacrificial Bow
Sacrificial Bow on Diona adds more complexity to her shield. When recasting Skill while a shield already exists, the shield will inherit the HP of the newest shield and extend its duration (this extension cannot exceed the duration of a 5 Paws shield, which, assuming Talent Level 7, is 12 seconds). For example, if you were to perform a Diona Hold Skill, then perform a Diona Tap Skill, the result would be a shield with HP equal to that of a Tap Skill’s with a 12-second duration. Check out more info on how the duration works in this document by EggsD#9603.
As for the chances of proccing Sacrificial Bow in the first place, every Paw has a chance of triggering the passive, resulting in a very high proc rate overall. Do note that Sacrificial Bow’s proc rate is not consistent with the given proc rate in its description; however, this typically has very little significant impact on gameplay. See this for more details.
 Elemental Burst | Signature Mix
Talent Description
Tosses out a special cold brew that deals AoE Cryo DMG and creates a Drunken Mist in an AoE.
Drunken Mist
- Deals continuous Cryo DMG to opponents within the AoE.
- Continuously regenerates the HP of characters within the AoE.
It is highly recommended for players to level Diona’s Burst up alongside her Skill until at least Level 6, which is a relatively cheap investment. After that, you can level her Burst up further if you find her healing to be lacking.
Diona kicks her shaker at the nearest enemy and deploys an AoE Cryo field that deals Cryo DMG over time. However, unlike Jean or Bennett, Diona will aim her Burst towards an enemy rather than cast it right underneath her. As a result, players should expect to have to move towards the enemy if they wish to be healed. Do also note that Diona aims her Burst early into the cast, which can cause the field to miss the enemy if the enemy moves midway through the cast. See the gif below for an example.
Despite dealing damage every 2 seconds, because of ICD, Diona’s Burst will only apply Cryo every 4 seconds. This can be good or bad depending on the team you’re using. On one hand, this can be beneficial as it makes it difficult for Diona to steal reactions; on the other hand, this means Diona is not of much use for applying Cryo.
Elemental Burst Missing
 Ascension 1 Passive | Cat’s Tail Secret Menu
Talent Description
Characters shielded by Icy Paws have their Movement SPD increased by 10% and their Stamina Consumption decreased by 10%.
Diona’s Ascension 1 Passive Talent increases Movement Speed and decreases Stamina Consumption for active characters shielded by Icy Paws universally, including the overworld and abyss. This is not only a great Talent for overworld exploration and Charged Attack-reliant carries such as Keqing and Hu Tao, it also makes it easier to execute the Dragonstrike tech, making her an enticing option to help learn and perform this tech. This Talent will stack with other buffs, examples being Movement SPD and Stamina Consumption decreasing buffs.
 Ascension 4 Passive | Drunkards’ Farce
Talent Description
Opponents who enter the AoE of Signature Mix have 10% decreased ATK for 15s.
This Talent is negligible for the most part, but it can extend Diona’s shield lifespan by decreasing the damage that enemies deal to the shield.
 Utility Passive | Complimentary Bar Food
Talent Description
When a Perfect Cooking is achieved on a dish with restorative effects, Diona has a 12% chance to obtain double the product.
This Talent is somewhat useful, providing a 12% chance to double the product produced when cooking healing food. This Talent stacks with the chance to obtain Diona’s specialty when cooking “Mondstadt Grilled Fish,” potentially increasing both the amount of received normal dishes and her signature dish, “Definitely Not Bar Food!”, at the same time. However, this ability is also provided by other characters, including the free Barbara, making it not as valuable as it would be otherwise.
Constellations
 Constellation 1 | A Lingering Flavor
Constellation Description
Regenerates 15 Energy for Diona after the effects of Signature Mix end.
This Constellation effectively reduces Diona’s Burst Energy cost from 80 to 65, reducing her ER requirements and making her easier to build.
 Constellation 2 | Shaken, Not Purred
Constellation Description
Increases Icy Paws’ DMG by 15%, and increases its shield’s DMG Absorption by 15%.
Additionally, when paws hit their targets, creates a shield for other nearby characters on the field with 50% of the Icy Paws shield’s DMG Absorption for 5s.
While the damage increase is insignificant, the buffs to Diona’s shields are fairly useful. This Constellation is primarily co-op oriented, allowing you to provide all your co-op teammates with a shield identical in utility to your own, including the cleansing ability and Diona’s Ascension 1 passive “Cat’s Tail Secret Menu” (as stated in the Constellation, however, the DMG absorption of the shields will be less). If in co-op, it’s recommended to Press E instead of Hold E for better shield uptime.
 Constellation 3 | A—Another Round?
Constellation Description
Increases the Level of Signature Mix by 3.
Maximum upgrade level is 15.
Overall a decent Constellation for increased healing.
 Constellation 4 | Wine Industry Slayer
Constellation Description
Within the radius of Signature Mix, Diona’s charge time for aimed shots is reduced by 60%
Diona’s worst Constellation, useful for only Diona on-field DPS builds. Even then, due to ICD, Diona cannot Melt all of her Aimed Shots with this Constellation, making on-field Melt DPS Diona unfeasible.
 Constellation 5 | Double Shot, on the Rocks
Constellation Description
Increases the Level of Icy Paws by 3.
Maximum upgrade level is 15.
Another generic +3 Talent levels, useful for a low investment Diona as it helps reach Talent Level 7 (T4+3) for max shield duration for fewer materials.
 Constellation 6 | Cat’s Tail Closing Time
Constellation Description
Characters within Signature Mix’s radius will gain the following effects based on their HP amounts:
- Increases Incoming Healing Bonus by 30% when HP falls below or is equal to 50%.
- Elemental Mastery increased by 200 when HP is above 50%.
This is one of Diona’s better Constellations, if not her best. It provides a good damage increase for reaction-based teams and is useful for 1 shot Damage per Screenshot comps. This is not functional for characters who want to be below 50% HP such as Hu Tao.
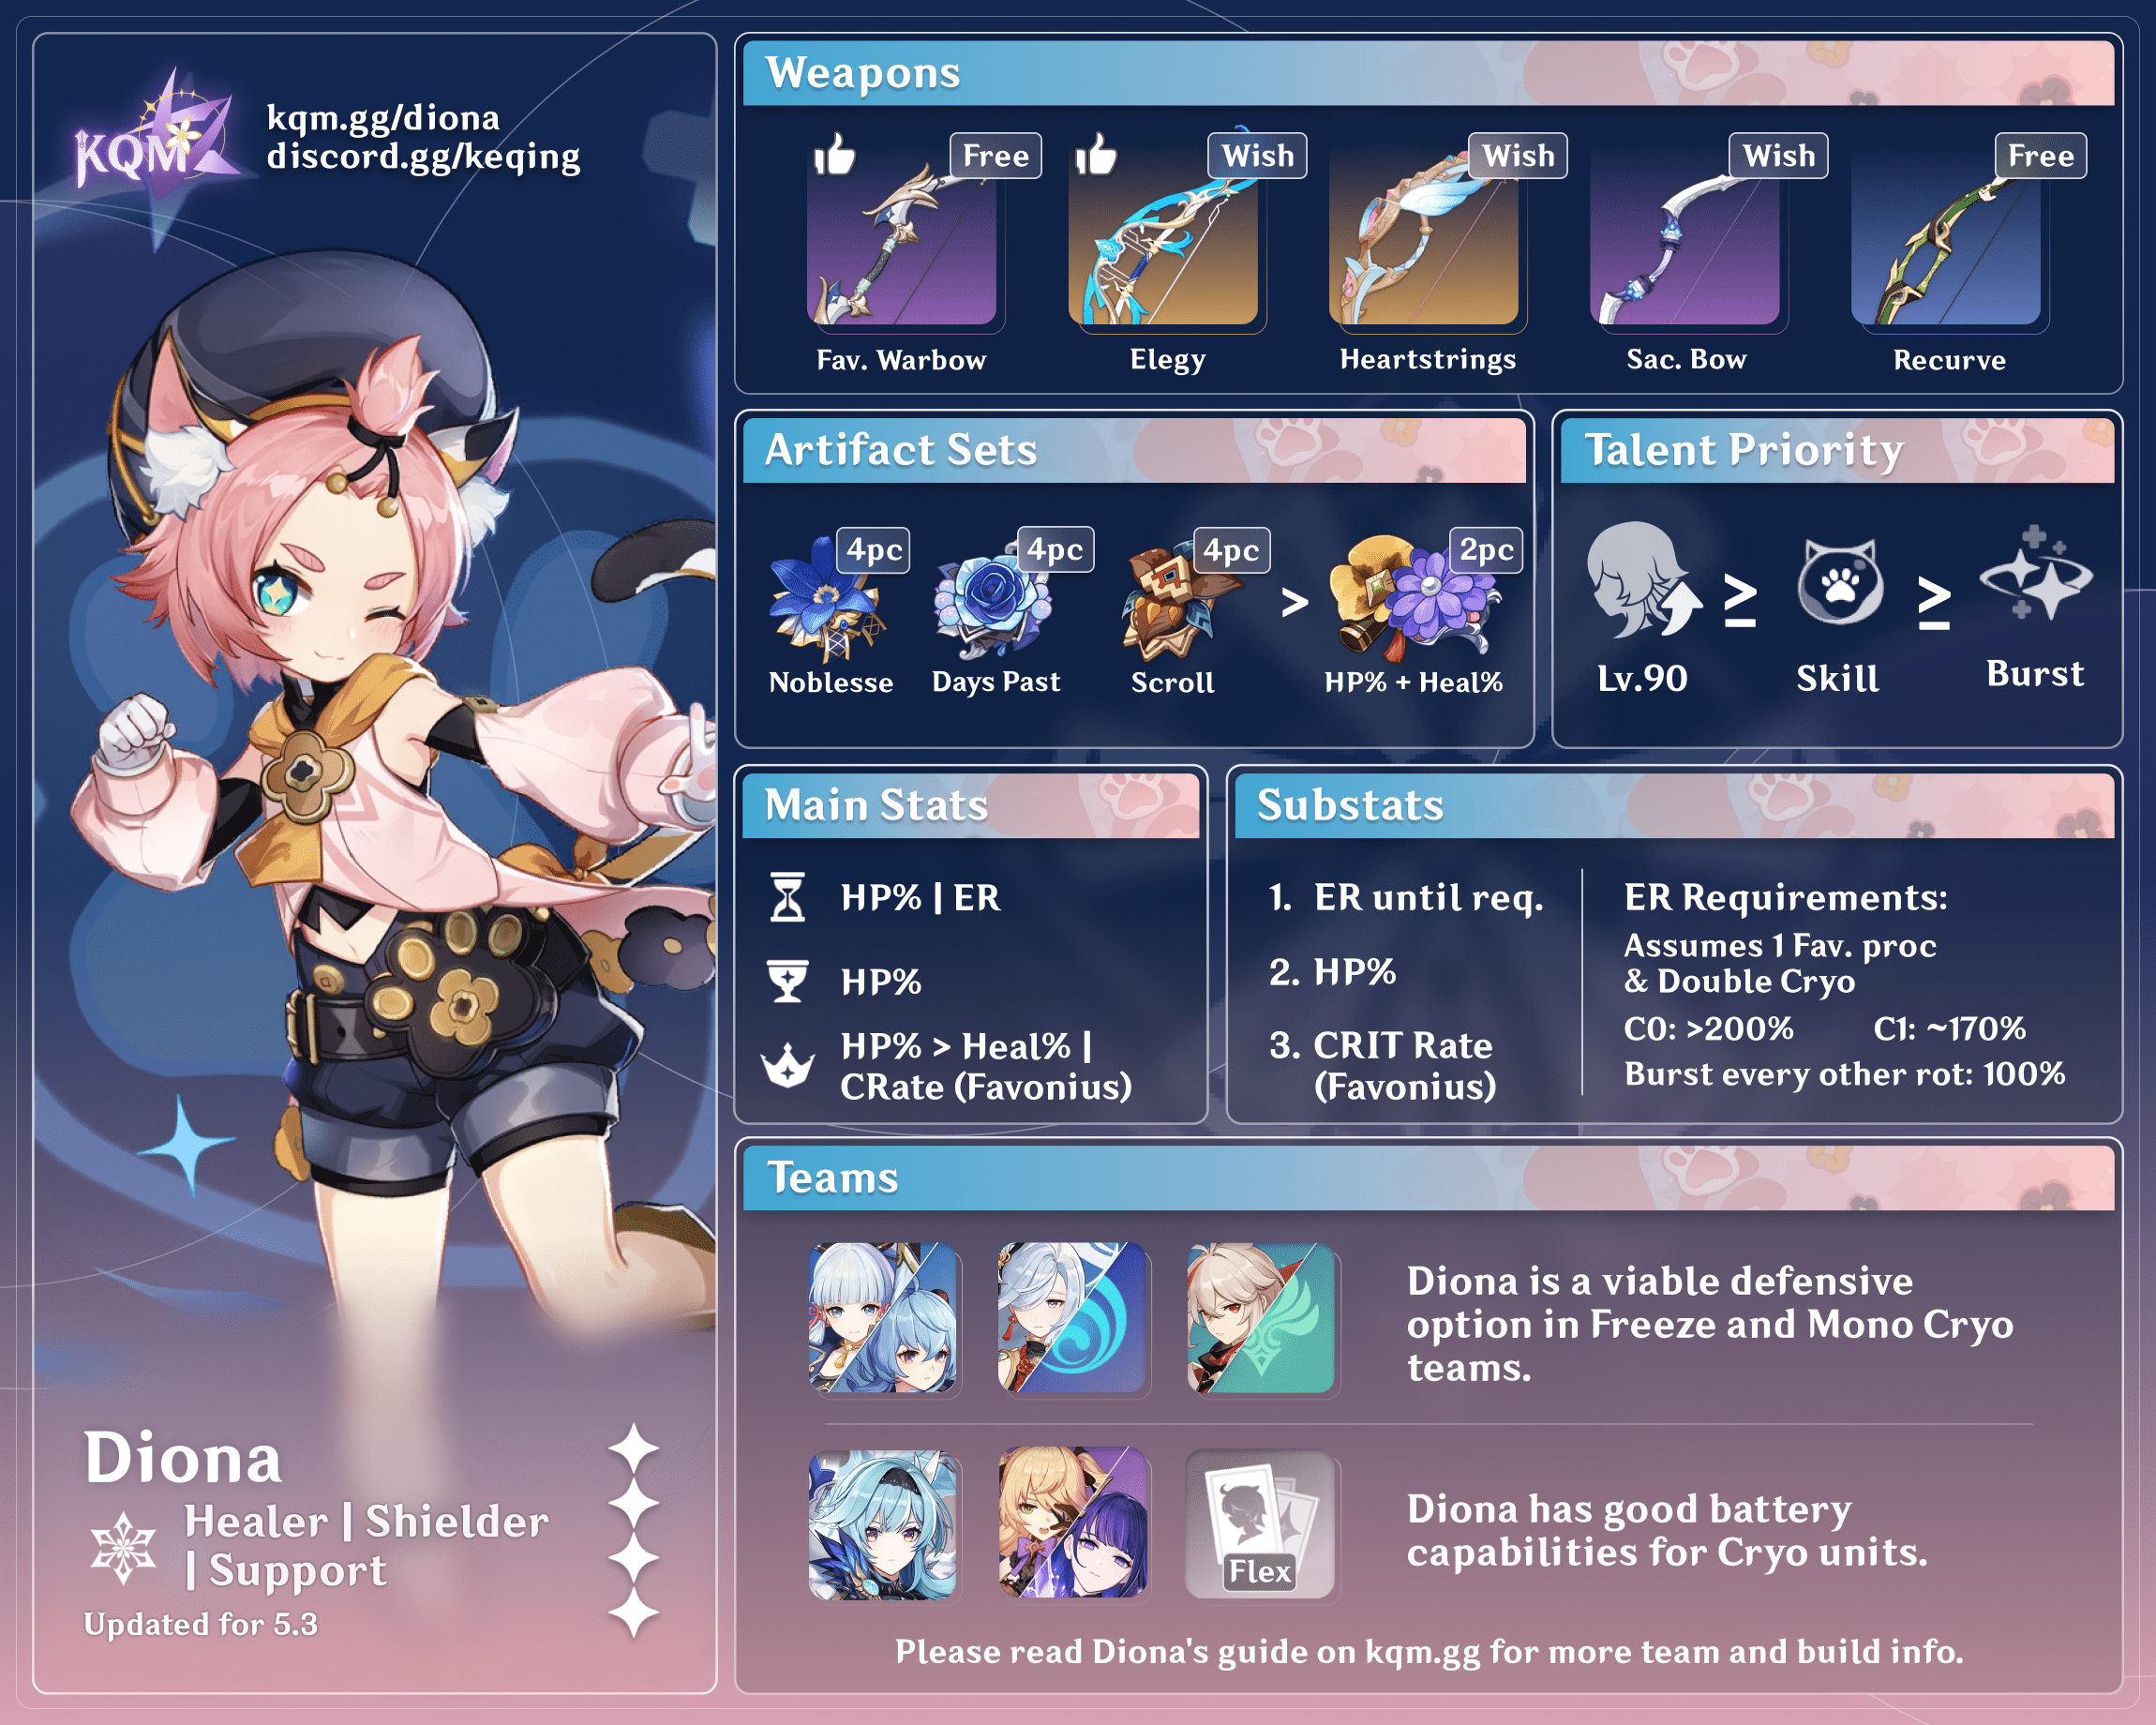
Weapons
Pros and Cons
| Weapon | Notes | Pros | Cons |
 Favonius Warbow | One of Diona’s stronger weapon options, as it has an Energy Recharge substat that both helps with providing Energy for Diona’s Burst. This bow can be better than Sacrificial Bow by allowing Diona to function as a battery for non-Cryo units as well. |
|
|
 Sacrificial Bow | Another strong option for Diona, giving her increased shield uptime and Energy generation through its passive. Its Energy Recharge substat also makes it easier for Diona to have her Burst up off cooldown. Sac Bow can be superior to Fav Bow when additional Cryo Particles are preferred, whether for other Cryo units or for Diona herself. |
|
|
 Elegy for the End | Elegy for the End is by far the best 5* option for a support-focused Diona. The Energy Recharge substat makes it easy to fill Diona’s Burst gauge, and Diona’s damage ticks on her burst can trigger Elegy’s team-wide buff. |
|
|
 Recurve Bow | A solid bow based on its HP substat alone. If you don’t have any of the above options or want to maximize Diona’s shield HP, the HP% is useful. The passive provides little to no value because Diona isn’t meant to kill enemies. |
|
|
Rankings
TL;DR
Sacrificial Bow > Favonius Warbow (if Cryo Particles and shield are more valuable)
Favonius Warbow > Sacrificial Bow (otherwise)
Favonius Warbow VS Sacrificial Bow
Favonius Warbow provides more Energy than Sacrificial Bow (math by sakuno#7950). Just using an Elemental Skill will usually proc Fav Warbow’s passive, although players can opt to guarantee a CRIT shot via a weak point Charged Shot if it still does not trigger or use 4-piece Blizzard Strayer to more easily land a CRIT hit. Even without R5, Favonius’ passive is better than Sacrificial Bow’s passive as it provides Clear Energy Orbs as opposed to more Cryo Energy Orbs, allowing non-Cryo teammates to get more Energy as well. However, Favonius Warbow requires stable ping which is why some comps still prefer Sacrificial Bow.
On the other hand, Sacrificial Bow provides increased Cryo Particles, which can make it more valuable than Fav Warbow in teams where Cryo units are in greater need of Energy (such as some Eula-focused teams). At R1, Sac Bow provides increased survivability via better shield uptime and is more forgiving to players who cannot aim well. Furthermore, at R5, Sacrificial Bow’s 16-second cooldown almost aligns with Diona’s 15-second Skill cooldown. However, Sacrificial Bow may extend the rotation time of your team, which can lead to less overall DPS.
The Elegy Nightmare
TL;DR: Elegy isn’t bad but can be inconsistent to activate
While Diona is a viable Elegy user, there are usually better options than her as activation of its passive can vary from 1-7 seconds on Diona. Casting an Elemental Skill followed by a Burst will proc Elegy within 3 seconds of casting Burst (5 seconds if ping is higher than ~120 ms). When equipped with Noblesse Oblige or Instructors, it can be a substantial buff—certainly not as good as Bennett, but still a buff nonetheless.
Note that the amount of time necessary for Diona to proc the passive can vary a lot depending on distance, ping, and RNG. If Diona is far away enough from an enemy and has good RNG, the first and fifth Paw can activate 2 Sigils instead of the usual 1. Ping comes into play when you fire her Burst: if your ping is bad (~120+ms), the initial shaker hit and the first burst DoT proc will occur very close to each other, resulting in only 1 Sigil being gained instead of 2. In the best-case scenario, the passive can be activated within 1 second, while an unlucky attempt could take up to 7 seconds.
Additionally, keep in mind that Elegy’s buff will only be activated once every other rotation if running a 15-second rotation, as Elegy’s passive is on a 20-second cooldown.

Artifacts
Energy Recharge Requirements
Generally, Energy Recharge is unnecessary for Diona as she shouldn’t need to Burst every rotation. The only case where Diona needs to Burst every rotation is when running 4-piece Noblesse Oblige; if so, then she typically needs around ~170 Energy Recharge. For more specific Energy Recharge Requirements, check out the Energy Recharge Calculator, as well as this video on how to use the Energy Recharge Calculator to figure out how much Energy Recharge your Diona needs.
Artifact Stats
Generally, you will want HP% on all three of Sands, Goblet, and Circlet, as Diona’s ER requirements are easily met with substats and the use of Sacrificial Bow or Favonius Warbow.
For substats, ER until ER requirement > CRIT Rate (Fav) > HP% > Flat HP.
Healing Bonus vs HP%
This section will go over the usage cases for a Healing Bonus Circlet and HP%. Majority of the time, Diona’s shield is more valuable than the healing she offers. Most characters will benefit from the shield for knockback protection and still have sufficient healing from Diona’s Elemental Burst. Healing Bonus can be better utilized by characters with high poise, such as Eula during her Elemental Burst. Trading HP% for the Healing bonus results in a loss of 10.4% shield HP and an increase of the healing by 18.07%.
Artifact Sets
| Artifact Set(s) | Pros and Cons |
 2-piece Tenacity, 2-piece Vourukasha’s Glow |
|
 2-piece Tenacity, 2-piece Emblem/Clam/Maiden |
|
 4-piece Noblesse Oblige |
|
 4-piece Maiden’s Beloved |
|
 4-piece Tenacity of The Millelith | Tenacity of The Millelith is a niche set that requires specific rotations, scenarios, and characters to perform.
|
 4-piece Blizzard Strayer |
|
 4-piece Ocean-Hued Clam |
|
 4-piece Instructor |
|
 4-piece Deepwood Memories |
|

Team Compositions
Your average perma-freeze

Standard Freeze team; Diona is a great battery who additionally provides shielding and healing (which no other Cryo characters can provide) as well as buffs through 4-piece ToM or 4-piece NO, allowing the rest of the team to be built around maximizing damage. The Cryo unit is typically the primary damage dealer, often Ayaka or Ganyu; the Hydro can be any of Mona, Kokomi, Xingqiu, or Ayato; and the Anemo is ideally Kazuha, Venti, or Sucrose.
Eula

Eula is an on-field DPS whose specialty lies in doing a significant amount of Physical damage. Her otherwise self-sufficient kit is held back by her high Burst cost of 80, which forces her to run batteries to aid in regaining her Burst in a timely manner. Diona fills this battery role very well due to her excellent Particle generation; furthermore, her lack of offensive presence is more than made up for by her healing and shielding. Shielding and healing greatly benefits Eula, preventing her from dying due to her inability to dodge while performing combos. The third slot is reserved for an Electro character for enabling Superconduct—usually Raiden or Fischl. By virtue of Diona’s defensive utility, the last slot is extremely flexible—consult the Eula Guide for more detail about possible options.
Mono Cryo

Mono-Cryo is a viable team for situations where enemies are un-Freezable, particularly against bosses. The recent addition of Shenhe to the roster has improved the performance of mono-Cryo teams significantly, adding Cryo buffs and increasing the team’s single-target damage output. The third Cryo slot is usually the on-field DPS—often Ayaka or Ganyu—and the Anemo slot is usually Kazuha, Venti, or Sucrose.
Zhongli Replacement

Diona can replace Zhongli with a weaker shield and heals. A lot of teams enjoy shielders, such as the above Yoimiya team; another team could be a Melt Ganyu team (Ganyu Diona Xiangling Bennett). With the addition of Dendro, Diona at C6 with 4-piece Instructor can provide 320 Elemental Mastery (420 if Elegy), making her a great support unit for teams utilizing Dendro Reactions.
Damage per Screenshot

C6, with its 200 EM buff, is where this type of composition becomes feasible for Diona, built around maximizing the damage of a single instance of Pyro damage. With Elegy and 4-piece Instructor, Diona can provide over 400 EM to the damage-dealing Pyro character. An example team is shown above. A rotation for such a setup could be: Diona Hold Skill Burst -> Kazuha Burst -> Bennett Skill Burst -> Kazuha Skill -> Pyro DPS gaming. Keep in mind that the EM bonus only works over 50% HP so it will not work with Hu Tao.
Fridge

Diona is a fantastic choice within fridge thanks to her 200 EM buff from C6 and the additional defensive utility. While she may not have the finest Cryo application, she more than makes up for it with the rest of her equipment by surviving Bloom and enhancing its damage. She offers a considerable damage bonus, unlike other healing options, and increases the blooms generated, increasing Burgeons and Hyperblooms.
Potential Team Example
Advanced
Bloom Seed Targeting
Diona’s Elemental Talent appears to focus on Bloom Seeds for no apparent reason. This might result in Energy issues because no particles will be produced when Icy Paws make contact with something that is not an enemy. Although there is no use case for this in the current patch (3.3), it may have valuable features in the future.
Diona Targeting Bloom Seeds
Diona Homing
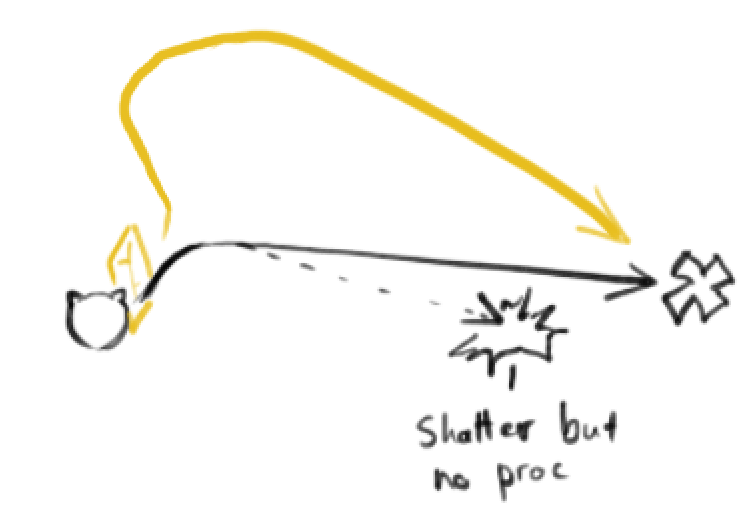
Diona’s Paws are homing, very similar to how the stones from Ningguang’s Burst follow enemies, but with a faster animation. Keep in mind that Diona’s Paws actually fire from behind the character, so if there’s a wall behind Diona, the Paws will explode on the wall. Diona’s Burst also snapshots the location of the enemy on cast, so it can completely miss enemies if the enemy moves while the Paws are flying through the air. See illustration below.
Animation Cancels
This tech is based on the simple animation canceling mentioned earlier in the guide. Normally, Diona performs a backflip when holding Skill, but it can be canceled. There are 2 ways of canceling Diona’s Elemental Skill; Swapping, and Dashing. Under the following conditions, you would need to Dash or Swap cancel.
Depending on the character you want to swap to next, you may or may not want to get further away from enemies.
- One should animation cancel when using melee centric characters (Beidou, Childe in Melee Stance, Mona Skill baiting, etc).
- One should not animation cancel when on long-range characters (Amber, Venti, Ganyu, Lisa, Mona, Sucrose).
- One should only animation cancel the first Elemental Skill when using Sacrificial bow.
To get further away from the enemy, you would let the animation finish, to stay close you would simply just Swap cancel.
In a co-op context when Diona may have permanent onfield time, again, dash canceling may or may not give benefit, especially if paired well with the enemy’s movement. Dash also consumes stamina, with innate short female character rig and limited stamina; those conditions may put Diona in Stamina Check (Low stamina). At the very least, Diona is fairly forgivable and safe even when making errors.
Known Problems
Arrow Deviant
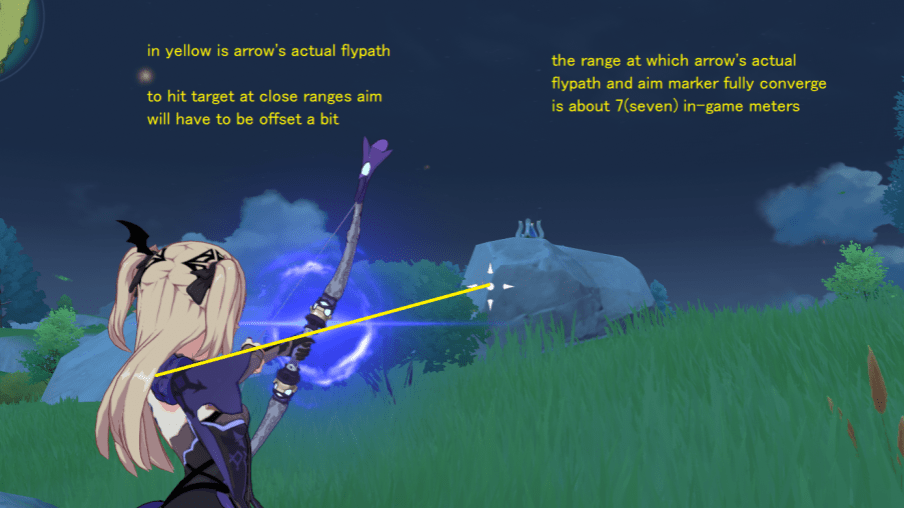
This is not really a bug, but an issue both in real-life archery, and how Unity handles the projectile (including Particles). There are many cases when archer characters do not land the arrow on the crosshair aim. This is one of the disadvantages of archers in general, and Ganyu’s Lv2 charged shot is a very forgiving one that’s able to compensate for this issue. An example could be Amber, a charged shot-centric, and Arrow Deviance. Due to Arrow Deviance, Amber can detonate Baron Bunny accidentally, resulting in possibly messing up rotations. Hoyoverse probably will not fix this issue since it’s more of the Engine issue in general, or they could make another Ganyu-style rocket launcher character to compensate.
Undisplayed Damage Numbers
This affects not just Diona, but also other characters, though Diona has a more significant impact. Due to the Paws often shattering in a very short window of time, it could be a problem for someone counting damage numbers. This happens when there is a barrage of attacks and the game has trouble displaying all the numbers, resulting in some not being displayed.
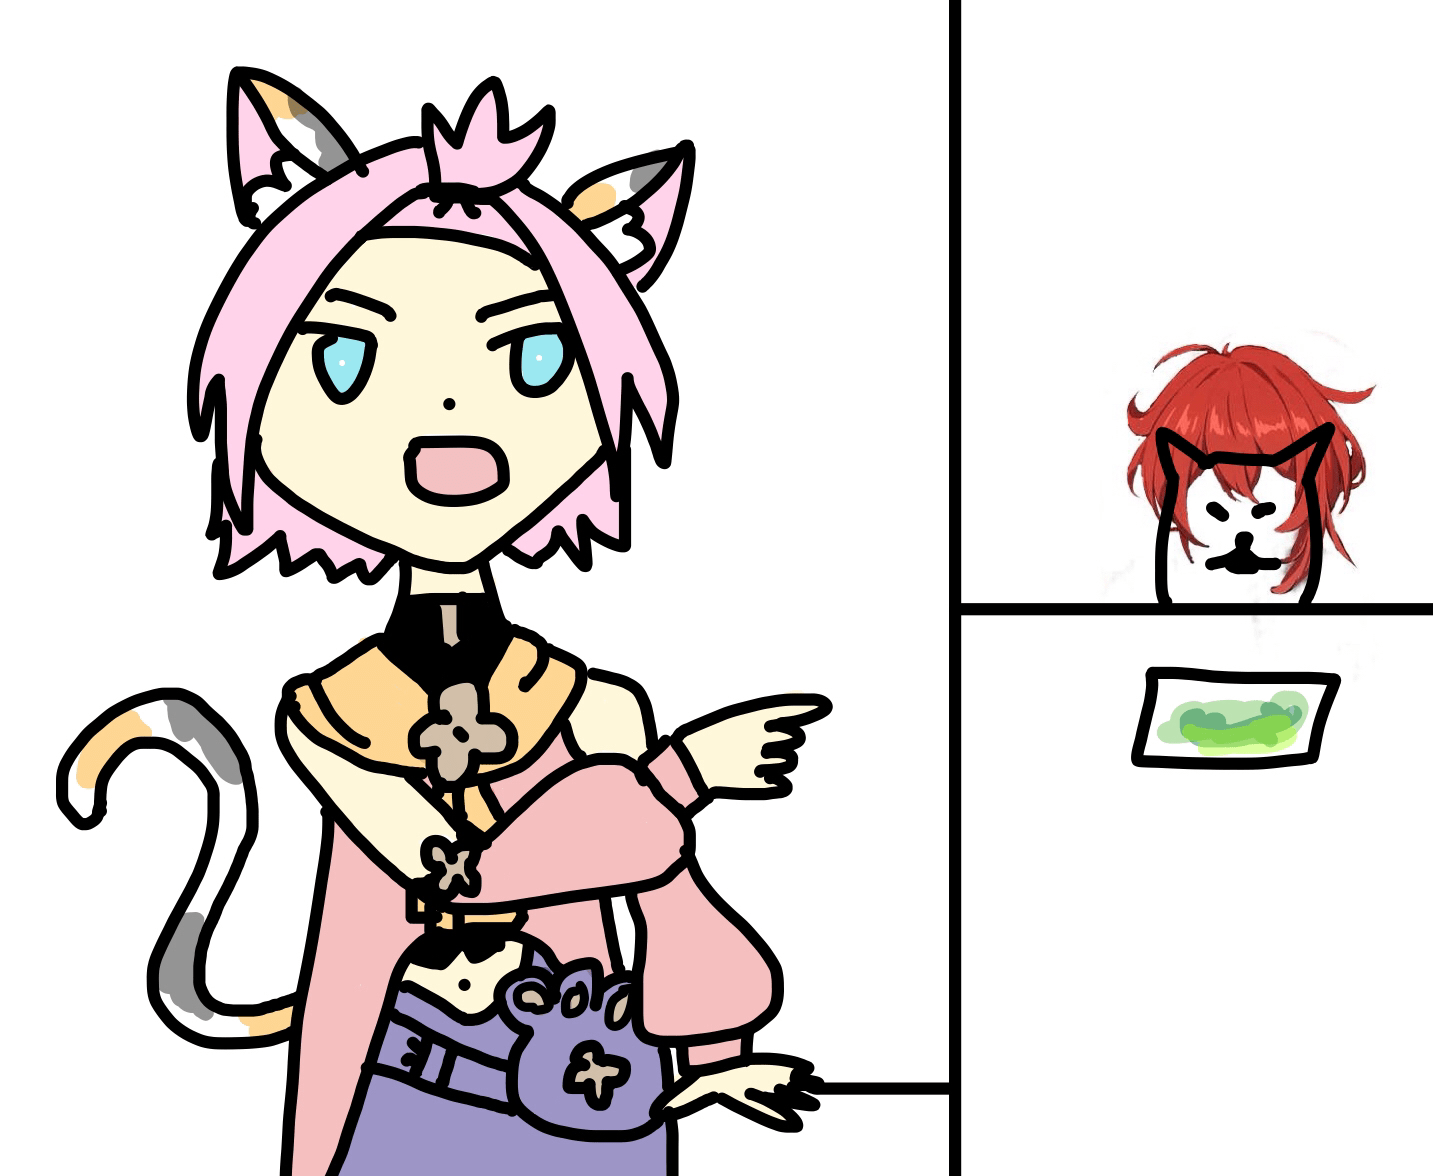
“Diona Hating on the Wine Industry,” 2022, colorized.
Art by Puffin#9920
Resources
- Diona Artifact Calcs by ultimate.noob
- Favonious Warbow Vs Sacrifical Bow by sakuno#7950
- Shield Comparison by Zakharov#5645
Credits
Thanks to the following for helping write the guide (in no particular order):
- Mystathi#9705
- sexyeboy69#2687
- Puffin#9920
- CQLQRS#7853
- naivety | pkach#6934
- pkachalt#8194
- AngaFundarge#4044
- EggsD#9603
- Cuzimori#1535
- Sir_pick_the_prick#2209