by dusted wind
Updated for Version “Luna VII”

Table of Contents
Introduction
Keqing is a 5★ Electro Sword character who serves as an on-field DPS to shred enemies with fast-hitting attacks. This guide examines Keqing’s kit in-depth to help you better understand her best builds, best teams, best weapons, best artifacts, synergies, Talents, Constellations, and more!
Why Play Keqing?
Pros
- Highly flexible rotations
- Highest amount of Burst iframes in the entire game
- Teleport is valuable utility and counters certain boss mechanics
- Fast hits and excellent application rate make her strong against content that requires high hit counts
Cons
- Weak Constellations
- Charged Attacks may knock light enemies away and consume high amounts of Stamina
- Lower personal damage compared to newer 5-star DPS units
TL;DR
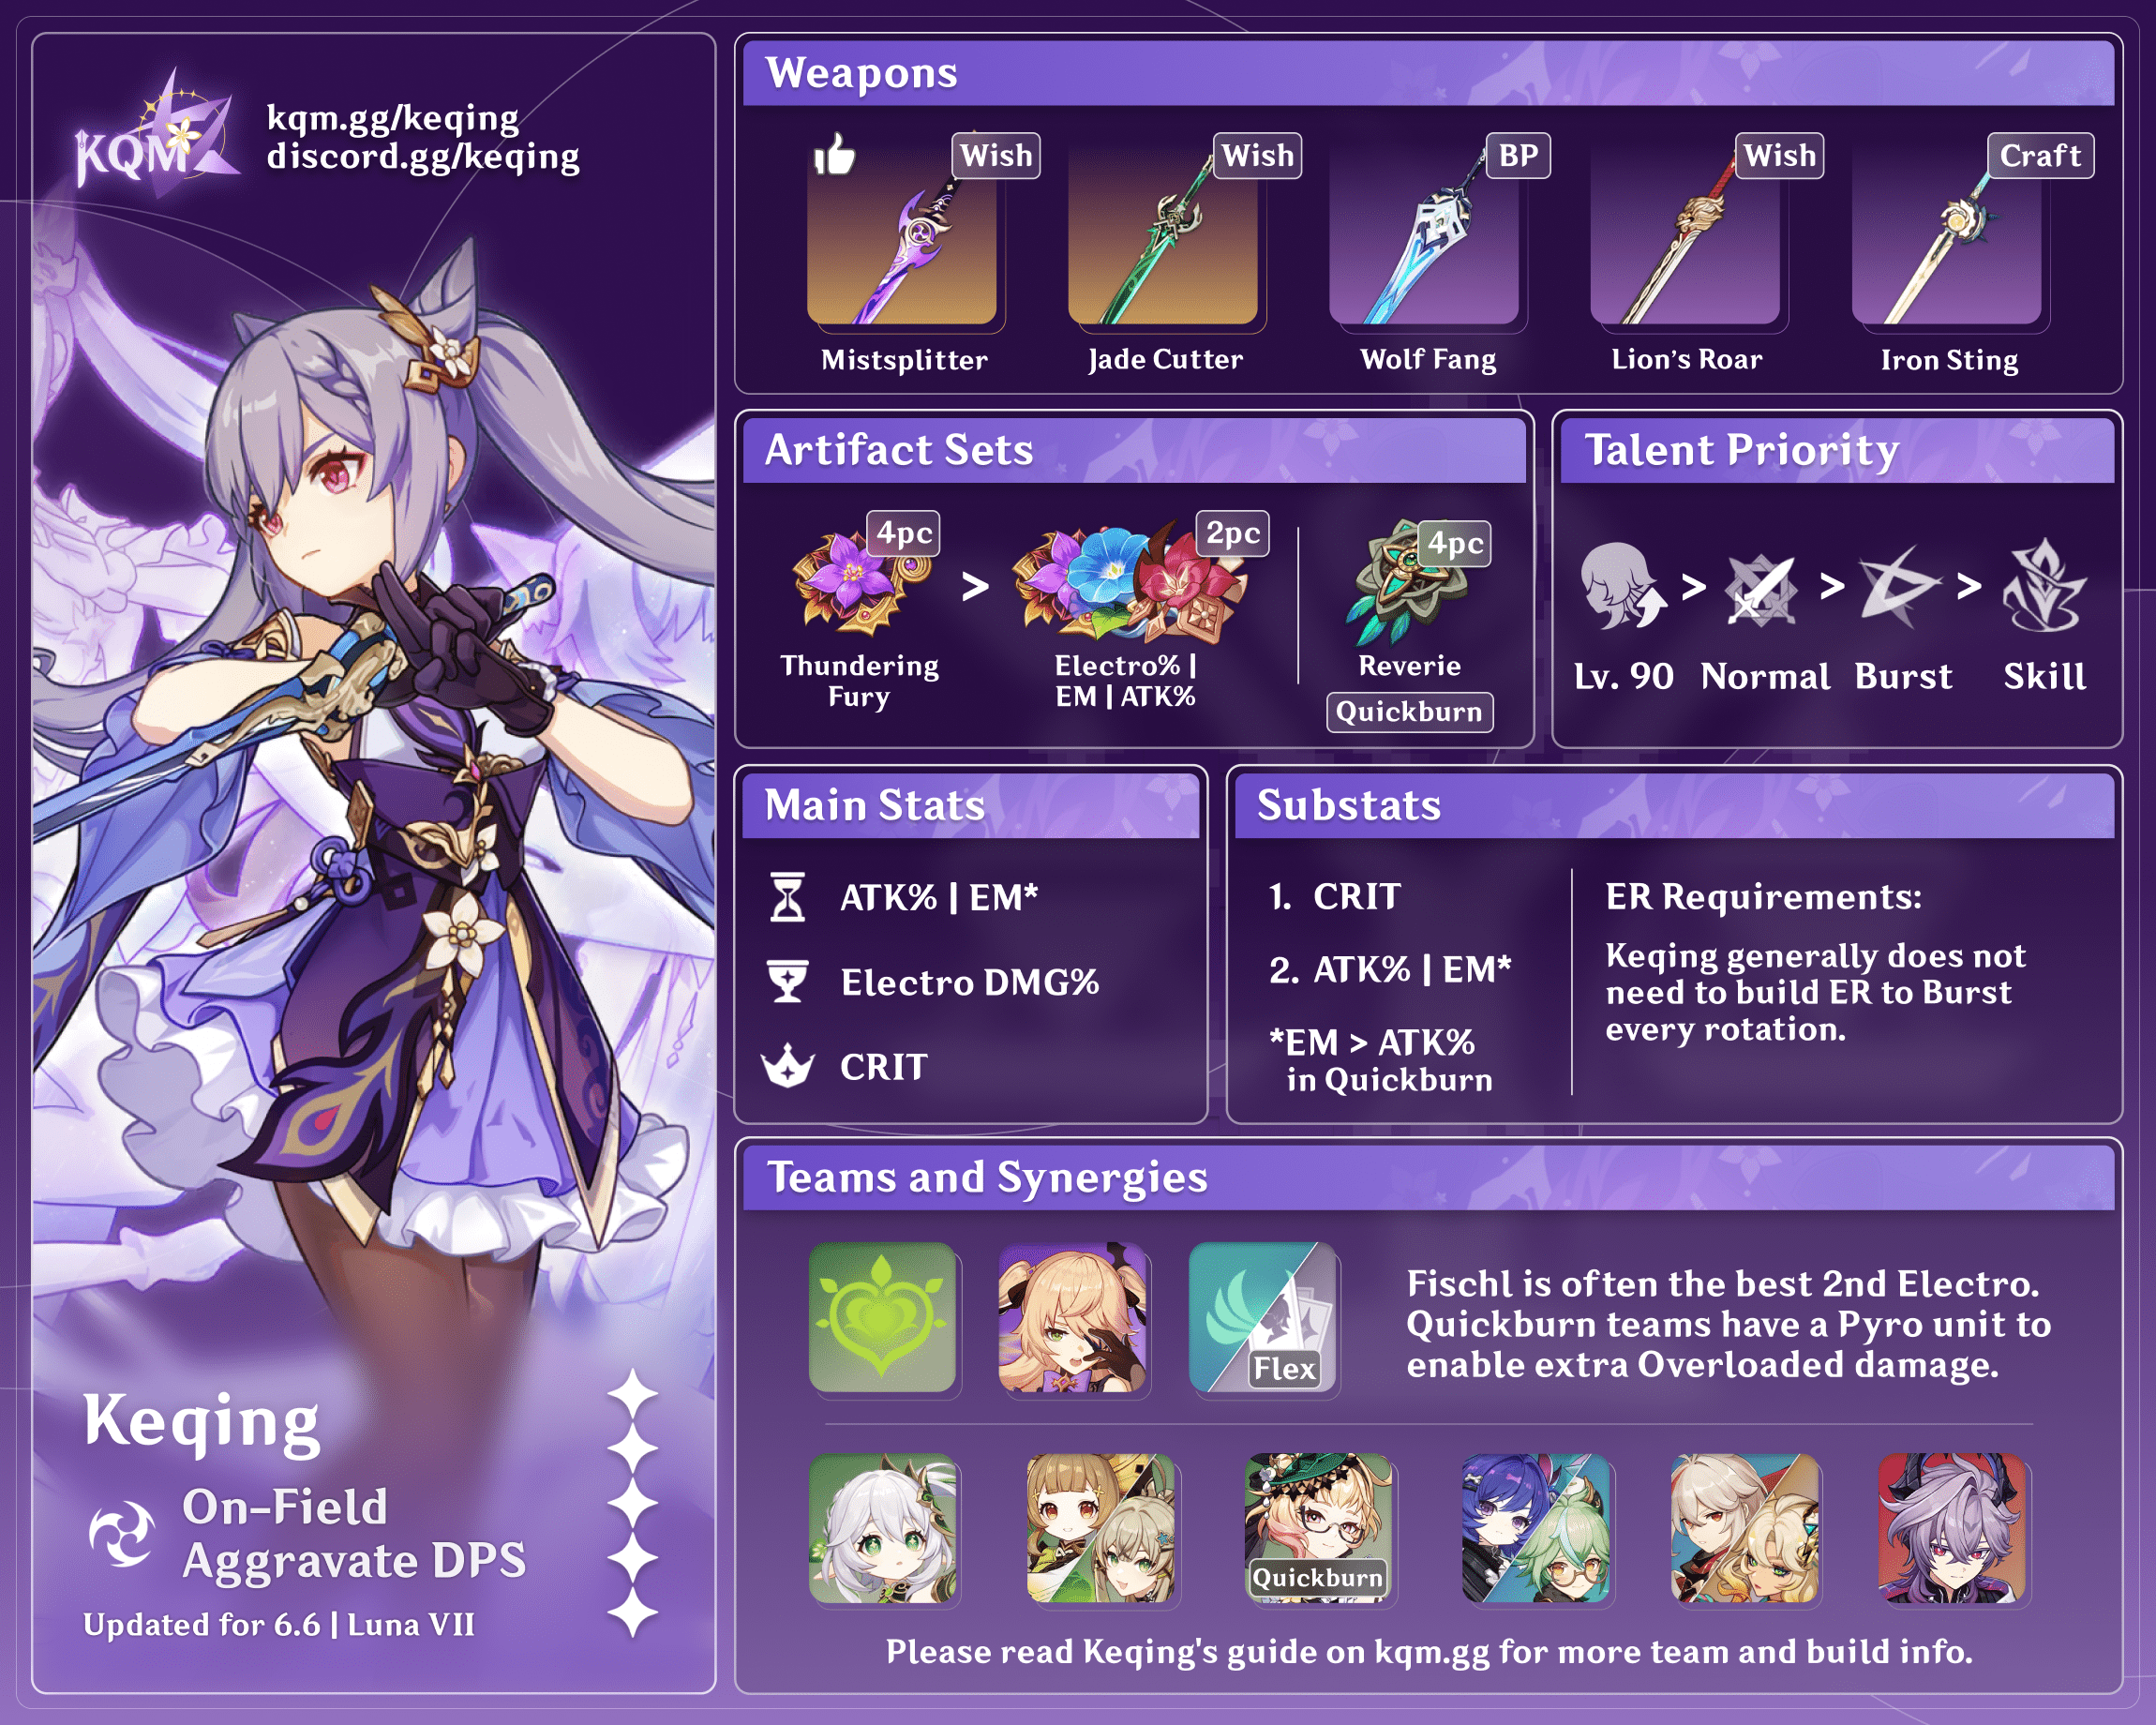
Aggravate DPS
Design: euphorysm, cuppacote, auraolis
Content: haafr, casdela, acerbus114, dusted wind
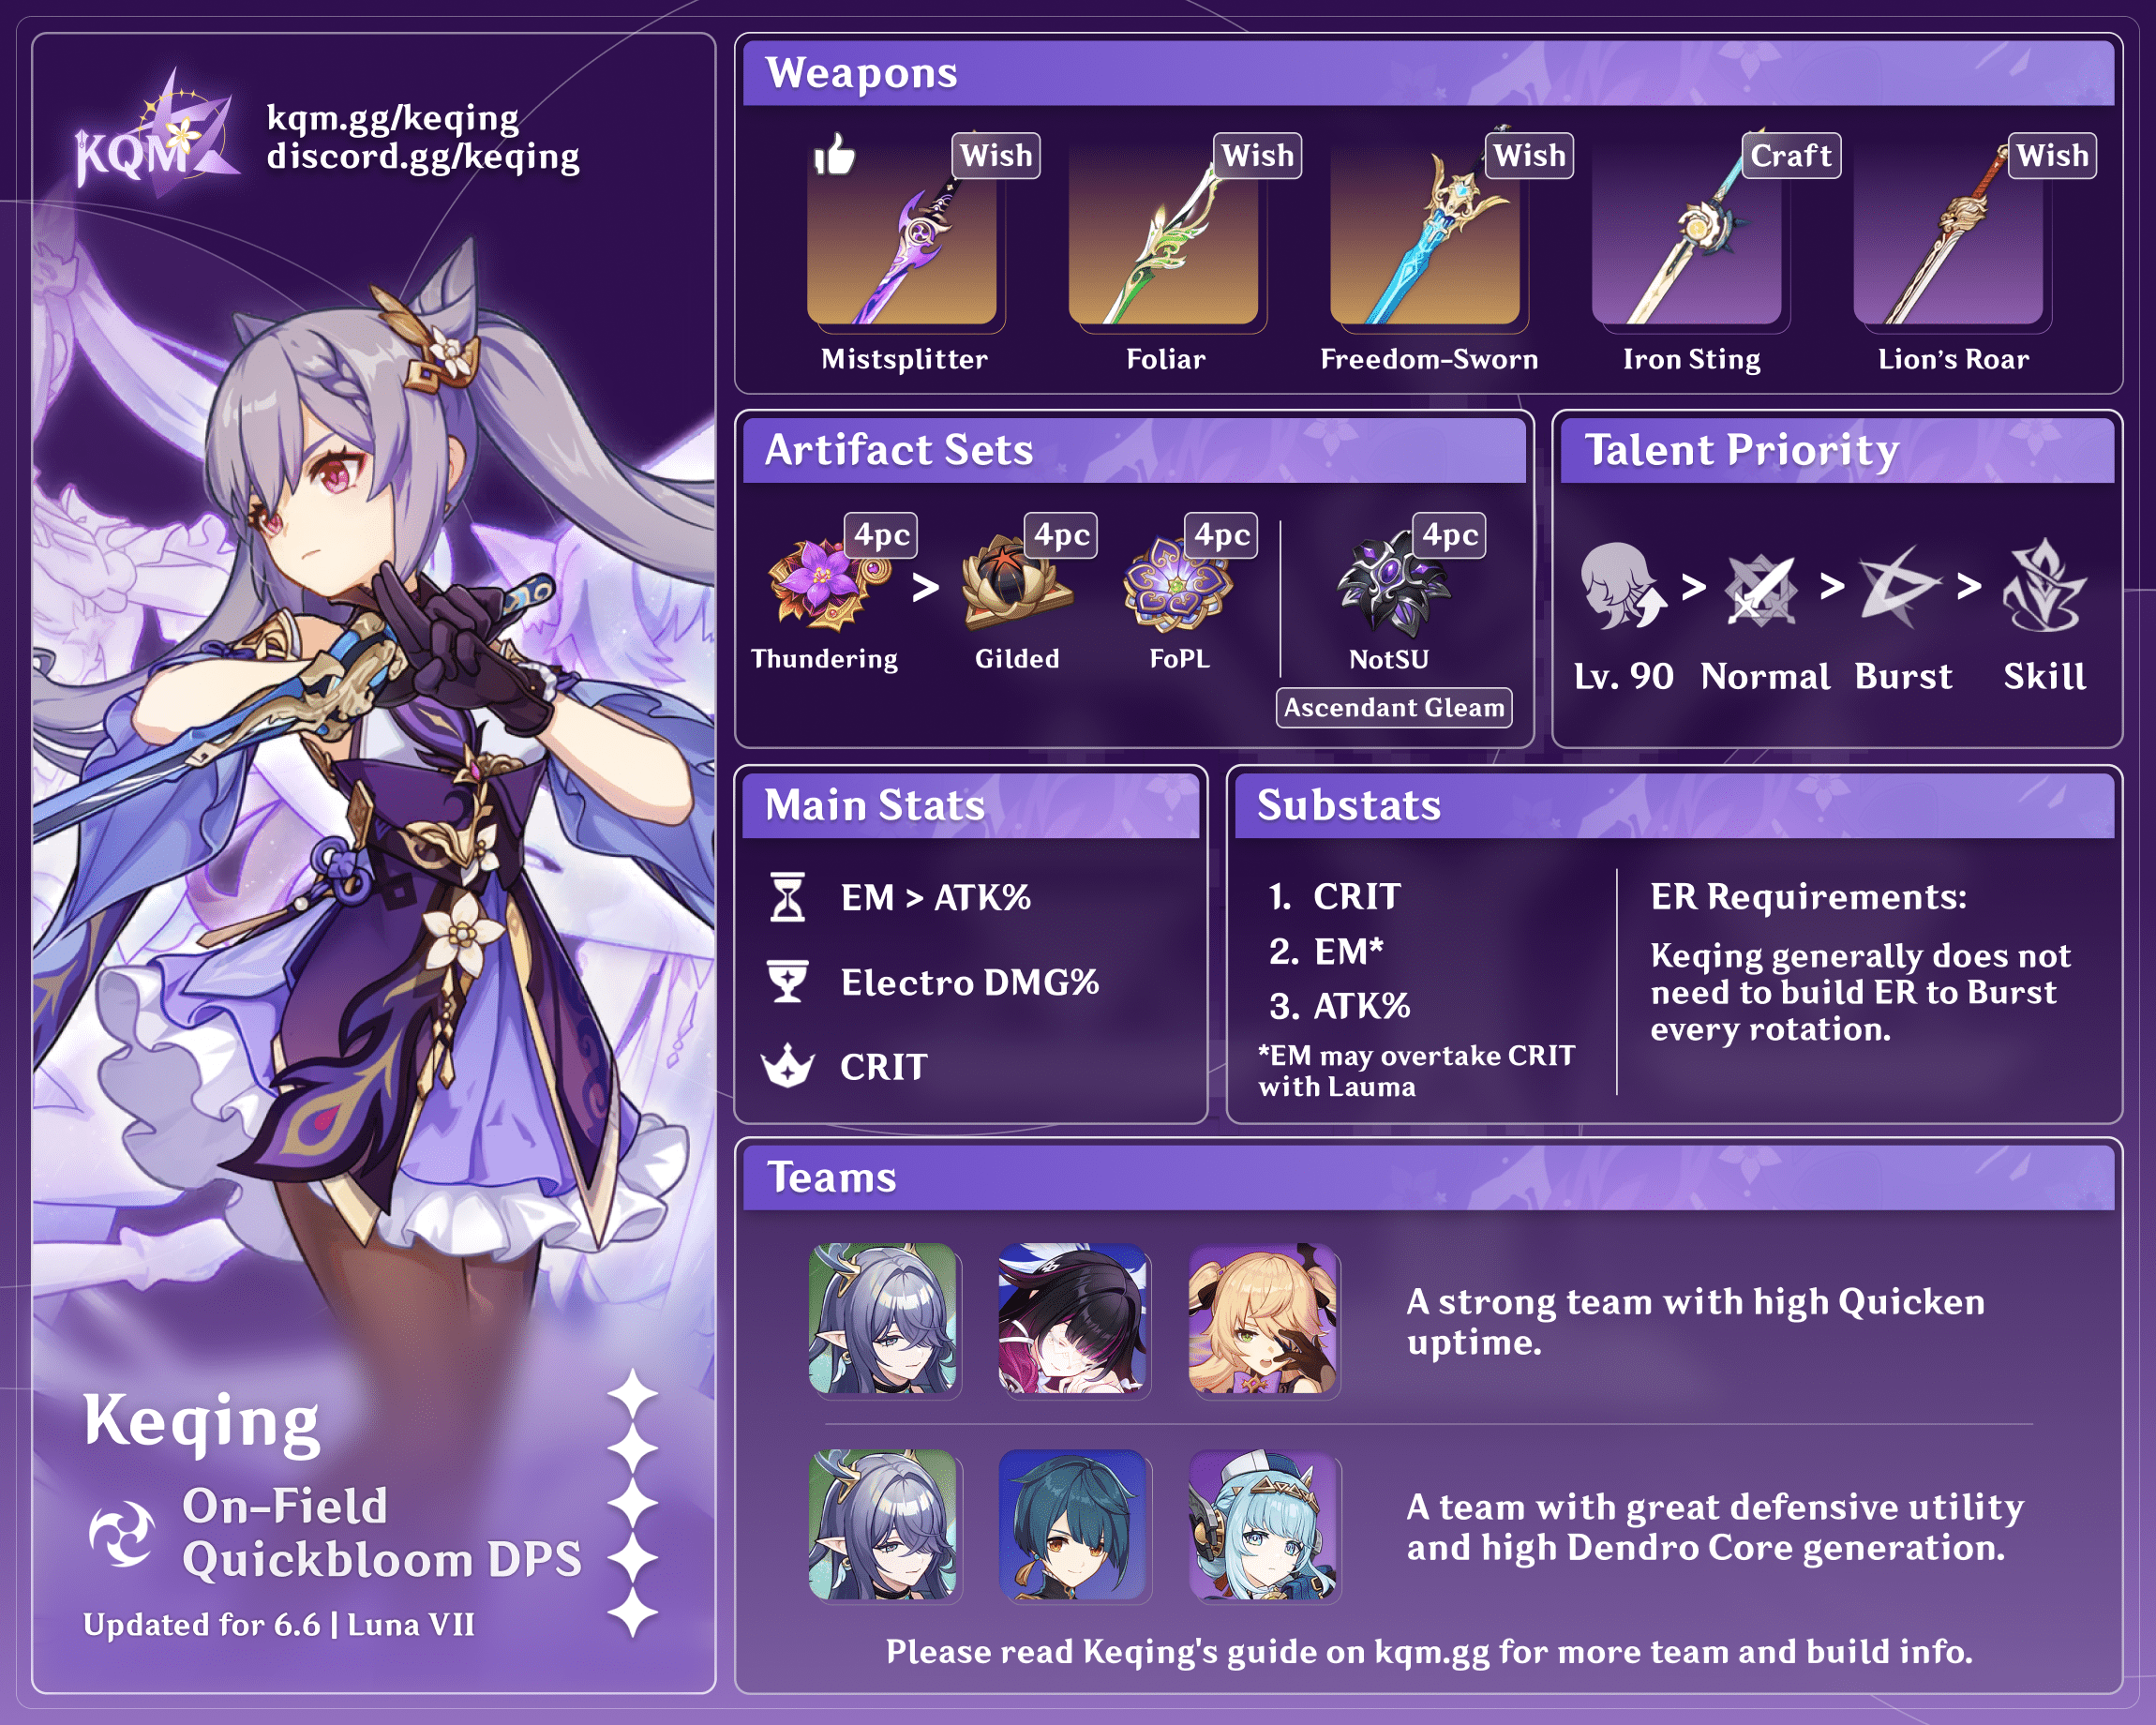
Quickbloom DPS
Design: auraolis
Content: acerbus114, dusted wind
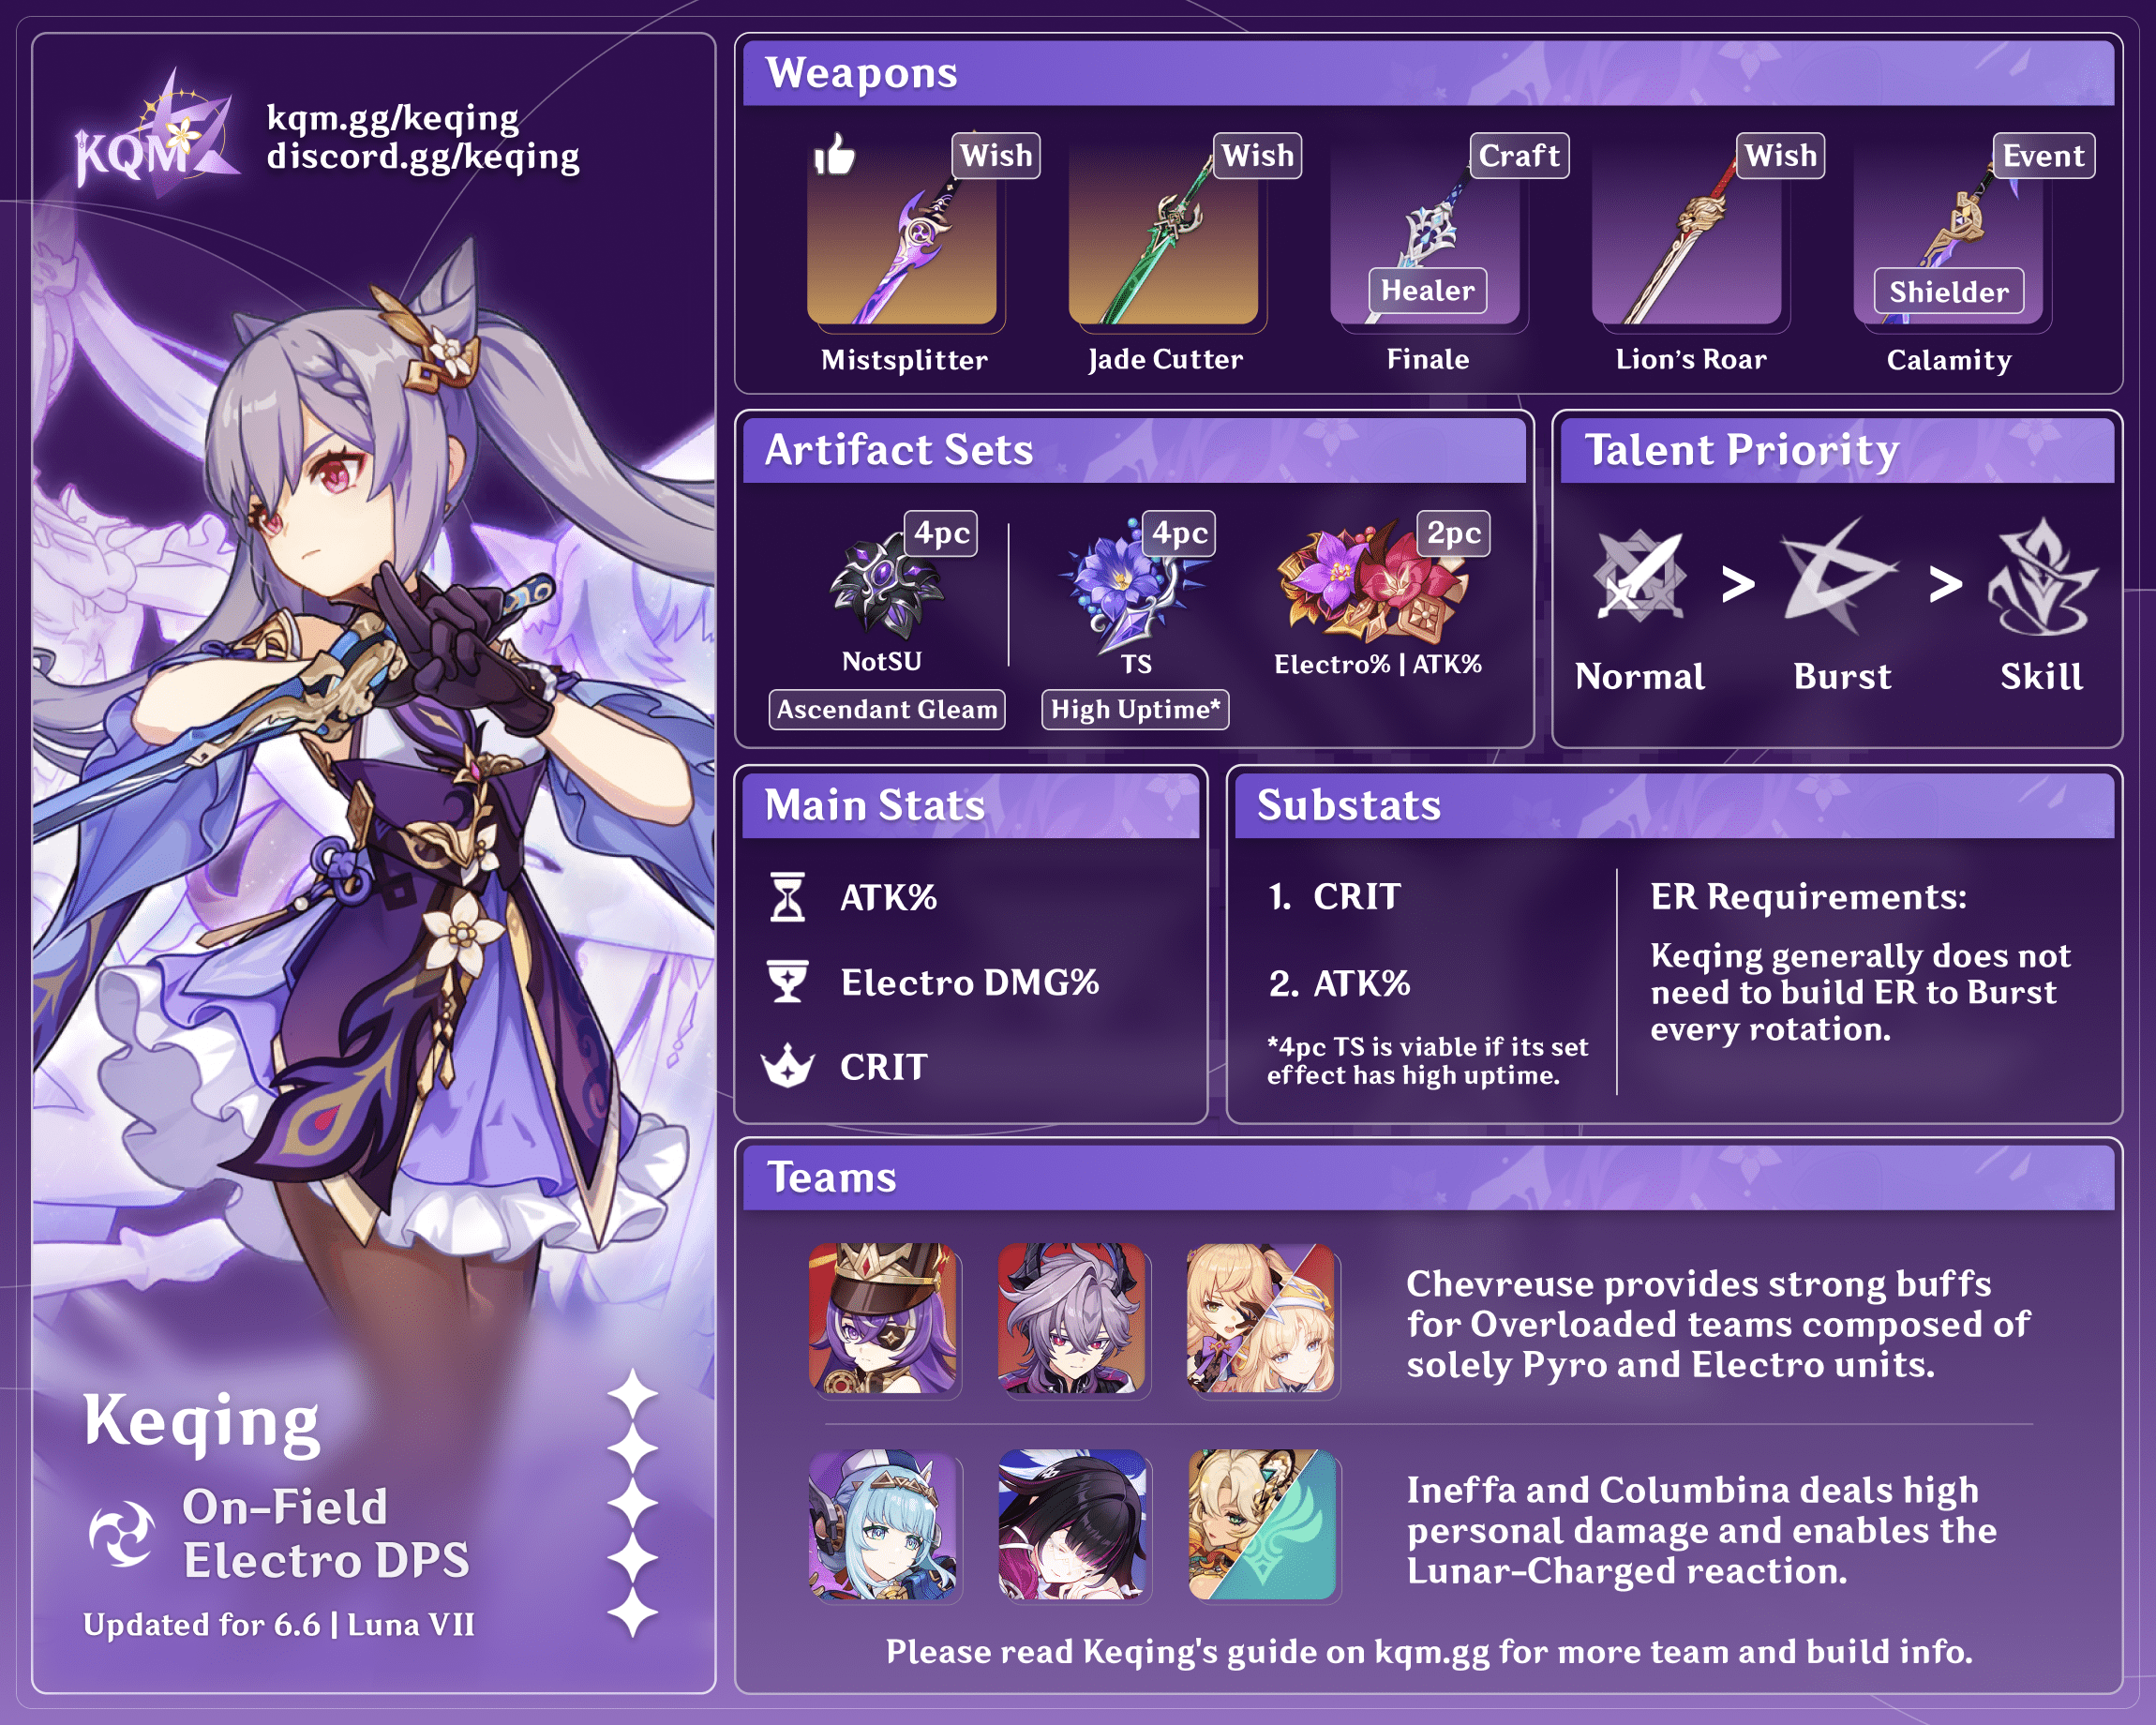
Electro DPS
Design: cuppacote, auraolis
Content: haafr, casdela, acerbus114, dusted wind
Glossary
FAQ
Q1: You’re still playing Keqing in 2026?
Of course! You aren’t?
Q2: How does Keqing perform against modern endgame content / How does she compare to newer DPS units?
Unfortunately, powercreep has mostly pushed Keqing out of the Genshin “meta”, and her DPS numbers are certainly much lower than those of newer units. As an older Standard Banner character, she also has very weak Constellations, which means that the DPS gap only widens with vertical investment. This means that Fearless Stygian Onslaught is fairly difficult to clear, and Dire is largely reserved for whales or incredibly skilled players.
Nevertheless, Keqing’s kit has actually aged very well — although her damage output is lower than newer units, Keqing has completely retained her identity as a fast-hitting, rotationally flexible Electro DPS who rewards strong game knowledge and creativity. As such, she still feels very rewarding to play and learn, and her gameplay patterns and rotations are varied enough to remain addictive.
Q3: Is Moonweaver’s Dawn good on Keqing?
No, it is not a competitive option compared to Keqing’s best 4-star Swords. Please stop calling it a weapon made for Keqing. It’s quite bad, especially at R1, and getting refinements is unrealistic because they are locked to limited weapon banners.
Q4: Is Keqing’s best weapon still Mistsplitter Reforged / Is her best artifact set still 4pc Thundering Fury?
Mistsplitter is still more or less Keqing’s best weapon across all archetypes, and 4pc Thundering Fury is still a top option in her Dendro teams, even comparing solidly against newer, hyperspecific sets like 4pc Marechaussee Hunter and 4pc Night of the Sky’s Unveiling. However, outside of Dendro teams, 4pc Thundering Fury is middling at best and simply bad at worst. In these scenarios, 2pc mixed sets serve as decent generalist sets, but hyperspecific options will be significantly better as long as you can fulfill their conditions.
Q5: How good are new Nod-Krai supports for Keqing? Is Aggravate still Keqing’s best archetype?
The new 5-star supports are very good! Unfortunately, most of them do not provide buffs to Aggravate, so it has fallen behind the times. Regardless, Aggravate is still the archetype that Keqing has the strongest synergy with and one that maximizes her freedom of gameplay. That being said, to clear high-difficulty endgame content, Keqing’s new teams are typically her best options, especially because Hoyoverse continues to design endgame boss mechanics specifically to promote their new 5-star releases.
Q6: I have a high-Constellation Keqing from the Standard Banner. Is she better than [Clorinde/Varesa/Flins]?
Definitely not on paper. Keqing’s Constellations are not a significant increase to her performance and generally do not close the gap between her and newer DPS units. That being said, Keqing has many practical advantages (high particle generation and low Energy costs, high rotational flexibility and a large invincibility frame window) that may make her easier to play than other characters. She still performs worse than modern Electro DPS units, but if you are a skilled Keqing player and a weak Clorinde/Varesa/Flins player, you might get better results if you stick to what you know. Even then, it would take a truly exceptional set of circumstances for Keqing to ever be competitive with Flins in a Lunar-Charged team.
Character Overview
Playstyle
Everything Keqing does, she does on-field. Her gameplay centers around using her Elemental Skill to generate an Electro Infusion and dealing damage through her entire kit. Her field time, gearing, and the reactions she triggers may vary from team to team, but this playstyle holds steady across all archetypes.
Talents
Level and Talent Priority
![]() >
>  ≥
≥  >
> 
Level 90* > Normal Attack ≥ Burst >** Skill
*Level 90 is highly recommended to maximize Keqing’s damage in teams where she triggers Dendro reactions. Level 100 is a similarly powerful increase, but is far more costly and uses a very limited resource, making it extremely optional.
**If using 4pc Thundering Fury, Skill is relatively even with Burst.
Keqing’s damage profile is split quite evenly among her Talents, particularly in Aggravate, and you should level them all equally.
Outside of Aggravate, her Talent damage shifts slightly more towards her Charged Attacks, and her NA Talent slightly increases in importance. Still, she should level her Skill and Burst Talents as they remain a considerable amount of her damage.
Talent Overview
Normal Attack | Yunlai Swordsmanship
Talent Description
Normal Attack
Performs up to 5 rapid strikes.
Charged Attack
Consumes a certain amount of Stamina to perform 2 rapid sword strikes.
Plunging Attack
Plunges from mid-air to strike the ground below, damaging opponents along the path and dealing AoE DMG upon impact.
Keqing’s largest source of single-target damage. Note that her Charged Attacks consume 25 Stamina and can knock light enemies out of range. Nevertheless, N1C is her highest damaging combo and thus the preferred combo string.
Elemental Skill | Stellar Restoration
Talent Description
Hurls a Lightning Stiletto that annihilates her opponents like the swift thunder.
When the Stiletto hits its target, it deals Electro DMG to opponents in a small AoE, and places a Stiletto Mark on the spot hit.
Hold
Hold to adjust the direction in which the Stiletto shall be thrown.
Stilettos thrown by the Hold attack mode can be suspended in mid-air, allowing Keqing to jump to them when using Stellar Restoration a second time.
Lightning Stiletto
If Keqing uses Stellar Restoration again or uses a Charged Attack while its duration lasts, it will clear the Stiletto Mark and produce different effects:
- If she uses Stellar Restoration again, she will blink to the location of the Mark and unleash one slashing attack that deals AoE Electro DMG. When blinking to a Stiletto that was thrown from a Holding attack, Keqing can leap across obstructing terrain.
- If Keqing uses a Charged Attack, she will ignite a series of thundering cuts at the Mark's location, dealing AoE Electro DMG.
When Keqing casts her Elemental Skill, she throws a Stiletto that deals damage upon landing on enemies. Recasting her Skill causes her to teleport onto the Stiletto and gain an Electro Infusion through her Ascension 1 Passive. Alternatively, performing a Charged Attack while the Stiletto is active detonates the Stiletto and deals AoE Electro damage without granting the Electro Infusion. Regardless of how the Stiletto is used, Keqing will generate Electro particles upon hitting an enemy.
Unlike other characters with teleports, Keqing does not immediately jump to her Stiletto when it is cast. This allows her high freedom of gameplay, especially given that the Skill cooldown starts once the Stiletto is cast and not when she teleports.
Because detonating the Stiletto does not grant Keqing an Electro Infusion, Keqing will usually recast her Skill. The detonation effect is primarily useful when using 4pc Thundering Fury, as its Skill cooldown reduction effect allows her to cast two Skills in one combo.
 Ascension 1 Passive | Thundering Penance
Talent Description
After recasting Stellar Restoration while a Lightning Stiletto is present, Keqing's weapon gains an Electro Infusion for 5s.
Allows Keqing to function properly as an on-field Electro DPS. This Infusion lasts even if Keqing switches out, although one must be mindful of the Infusion’s short 5-second duration. Note that this Infusion can be overridden by other Elemental Infusions, such as the Pyro Infusion provided by C6 Bennett.
 Ascension 4 Passive | Aristocratic Dignity
Talent Description
When casting Starward Sword, Keqing's CRIT Rate is increased by 15%, and her Energy Recharge is increased by 15%. This effect lasts for 8s.
An excellent CRIT Rate buff for Keqing that lasts for her entire on-field window. Remember not to overcap on CRIT Rate by accident with this passive. The 15% Energy Recharge is one of many reasons why you never need to build ER on Keqing.
 Utility Passive | Land's Overseer
Talent Description
When dispatched on an expedition in Liyue, time consumed is reduced by 25%.
Standard expedition passive.
Constellations
Keqing is a complete unit at C0, and her Constellations do not change her gameplay. Similar to most characters on the standard banner, Keqing’s Constellations are quite weak compared to newer DPS units.
Constellation DPS increases shown are for Aggravate.
 Constellation 1 | Thundering Might
Constellation Description
Recasting Stellar Restoration while a Lightning Stiletto is present causes Keqing to deal 50% of her ATK as AoE Electro DMG at the start point and terminus of her Blink.
Adds a slight bit of damage to Keqing’s Elemental Skill. Note that this Constellation disables some niche Swirl setups with Nahida, although this drawback can usually be avoided with minimal issue. The damage instance also steals an Aggravate from Keqing’s normal recast Elemental Skill hit, which is typically fine but can lead to an odd DPS loss in some Quickbloom teams. On the positive end, this behavior can also result in a strangely large DPS increase in some Quickburn teams.
| DPS Increase from C0: 2% |
 Constellation 2 | Keen Extraction
Constellation Description
When Keqing’s Normal and Charged Attacks hit opponents affected by Electro, they have a 50% chance of producing an Elemental Particle.
This effect can only occur once every 5s.
A slight bit of extra particle generation. Does nothing for her personal damage, as she does not have to worry about ER requirements anyways, but it can be of some help to her teammates, especially if team particle generation is low or when you are fighting in Stygian Onslaught. However, this Constellation generally remains of fairly minor importance: her Burst cost is very low, and Fischl is one of Keqing’s best teammates across most archetypes and produces a great amount of Energy.
| DPS increase from previous Constellation: 0% | DPS increase from C0: 2% |
 Constellation 3 | Foreseen Reformation
Constellation Description
Increases the Level of Starward Sword by 3.
Maximum upgrade level is 15.
A simple increase to her Elemental Burst damage.
| DPS increase from previous Constellation: 3% | DPS increase from C0: 5% |
 Constellation 4 | Attunement
Constellation Description
For 10s after Keqing triggers an Electro-related Elemental Reaction, her ATK is increased by 25%.
A solid ATK% buff that gives Keqing a pleasant damage boost. This is arguably Keqing’s first Constellation with any significant impact. Note that the performance of this Constellation suffers in the rare teams where Keqing is not triggering many reactions (e.g. certain Overload teams).
| DPS increase from previous Constellation: 6% | DPS increase from C0: 12% |
 Constellation 5 | Beckoning Stars
Constellation Description
Increases the Level of Stellar Restoration by 3.
Maximum upgrade level is 15.
Keqing’s Skill isn’t quite as big a part of her damage as her Burst, but the Talent levels are appreciated nonetheless, especially when using 4pc Thundering Fury.
| DPS increase from previous Constellation: 3% | DPS increase from C0: 15% |
 Constellation 6 | Tenacious Star
Constellation Description
When initiating a Normal Attack, a Charged Attack, Elemental Skill or Elemental Burst, Keqing gains a 6% Electro DMG Bonus for 8s.
Effects triggered by Normal Attacks, Charged Attacks, Elemental Skills and Elemental Bursts are considered independent entities.
A useful bundle of DMG Bonus. Although there isn’t a very high bar to clear, this is Keqing’s best Constellation.
| DPS increase from previous Constellation: 10% | DPS increase from C0: 26% |
Combo
N = Normal Attack
C = Charged Attack
A = Aimed Shot
P = Plunging Attack
E = Elemental Skill
tE = Tap Skill
hE = Hold Skill
Q = Elemental Burst
D = Dash (cancel)
J = Jump (cancel)
W = Walk (cancel)
> = Switch character
( ) = Optional actions; see notes below
[ ] = Repeat these actions the specified number of times
| Non-4pc TF Combo | Notes |
|---|---|
| EQE¹ 5[N1C] (N1)² | Keqing’s default combo when not using 4pc TF. |
| 4pc TF Combo | Notes |
|---|---|
| EQE N1C N1 E 3[N1C] (N1)² | Keqing’s default combo when using 4pc TF. Detonating the second Stiletto instead of teleporting onto it is mandatory for 4pc TF to outdamage other options. |
| EQE 2[N1C] N1 E 2[N1C] (N1)² | Practically interchangeable with the above combo. An Aggravate proc shifts onto a Normal Attack instead of a Charged Attack, which can be an extremely minor DPS increase when using weapons like Haran Geppaku Futsu. |
¹For non-TF Keqing only, Q EE is a slightly less-optimal alternative that can be useful when Keqing’s E is on cooldown, instant iframes are desired, or if you are waiting for an enemy to move so Keqing can follow them with her teleport. 4TF Keqing can technically replicate this with Q EE 3[N1C] N1 E N1C, but this combo is significantly more awkward.
²Fast-enough inputs allow Keqing to perform another N1 at the end of her default combos before her Electro Infusion ends. This requires tight timing and is impractical against mobile or highly aggressive enemies.
Shortening Keqing Combos
The combos listed above fit as much damage as possible in an ~8s window, and swap out when Keqing’s Electro Infusion expires. However, Keqing’s field time can be quite flexible. Keqing can usually safely cut a few Normal / Charged Attacks off from the end of her combo without suffering much DPS loss, e.g. EQE 3[N1C] N1 instead of EQE 5[N1C]. This is useful when an enemy moves outside of Keqing’s attacking range, when a wave is defeated, or when enemies are too aggressive to complete a full Keqing combo. Keqing’s combo can technically be shortened even further if enemies are exceptionally dangerous. However, this often leads to cooldown issues later on in the rotation that will have to be improvised around.
Keqing’s combos can also be shortened in another fashion. In some teams (usually Quickbloom or Lunar-Charged), Keqing performs an on-field combo twice per rotation, but her combos are less than 12 seconds apart. This forces Keqing to skip her Burst every other DPS window, e.g. EE 5[N1C]. While not particularly pleasant, this is generally better than dragging out a rotation’s length just to fit Keqing’s full combo.
Extending Keqing Combos
Although extending Keqing’s field time is generally rarer than shortening it, Keqing can easily extend her combo by recasting her Skill at the end of her initial window, e.g. EQE 5[N1C] EE 3[N1C]. This is not often recommended in set rotations, but is useful when Keqing needs to buy time for teammate cooldowns or just to kill a particularly low-health enemy.
A common misconception is that 4pc Thundering Fury helps extend Keqing’s combo duration thanks to the Skill cooldown reduction effect. However, because Keqing’s Skill cooldown is shorter than her basic combo duration, 4pc Thundering Fury has zero impact on Keqing’s Infusion uptime — your Skill will be available by the time your Infusion expires with or without 4pc TF. In fact, these combo extensions are incompatible with optimal 4TF combos, as the second Skill detonation will put Keqing’s E on cooldown. However, 4pc TF will often still be of great help in syncing your cooldowns as the rotation progresses, especially if you are extending your combo out of improvisation rather than pre-planned intention.
Note that Stamina can become a noticeable issue when extending Keqing’s combos due to the high Stamina consumption of Keqing’s Charged Attacks. N4C is Keqing’s recommended combo string when Stamina is low, but it is frankly advisable to simply switch off Keqing instead, although this occasionally leads to further cooldown issues.
Miscellaneous Notes on Keqing’s Combos
If you want to fit a dash into Keqing’s combo for invincibility frames or repositioning, the best time to do it is directly after her Skill recast, e.g. EQED. This is actually slightly faster than the ordinary EQE if done properly. By contrast, dash-canceling Keqing’s Normal Attack chain (through something like N1CD) is very slow and thus should be avoided whenever possible, although it is sometimes required to chase after enemies who move out of Keqing’s range mid-combo.
Keqing’s C1 procs hit before her Skill recast slash damage and shares ICD: in practical terms, this means that C1 Keqing will trigger reactions and apply Electro with the 1U C1 effect instead of the 2U Skill recast. This is why Keqing EE → Nahida E is not a possible Swirl setup for C1+ Keqing. To compensate for this, one can simply perform E CA instead of EE, as the Thunderclap Slash from the Stiletto detonation still applies 2U of Electro. In fact, E CA is generally preferred over EE even if you are C0, as it is simply more damage.
Keqing’s Stiletto lingers on the battlefield when she switches out, even as her cooldown starts ticking: as such, it is possible to do Keqing E → [teammate Skills] → Keqing E recast. This makes it so that you effectively have a shorter cooldown on your E than normal. Note that this is slightly asynchronous with typical Keqing combos and is reliant on a mostly stationary enemy. Additionally, if you do not recast Keqing’s Skill in time before the Stiletto expires, you will lose your Infusion and the rotation will be thrown into chaos.
ER Requirements
Due to her low-cost Burst, Energy-laden teams, and A4 buff, Keqing’s ER requirements are effectively nonexistent in the vast majority of her teams.
However, there are a few Keqing teams where Keqing’s ER requirements can become problematic: specifically, when she only casts one Skill between Bursts and teammate particle generation is quite lacking. This most commonly occurs when Keqing is Solo Electro or when replacing Fischl with an Electro teammate with poor particle generation like Kujou Sara. In these cases, Keqing’s ER requirements can go up to heights of ~140–150%. Finding a way to cast additional Skills per rotation slashes such requirements significantly — for example, in Dendro teams, Keqing can run 4pc Thundering Fury, which often cuts problematic ER requirements down to the point where it can be completely covered by her A4 Passive.
In general, Keqing should not seek out ER as a stat. If you are engineering rotations where Keqing needs significant amounts of ER, you are probably best off changing the rotation entirely.

Aggravate
Artifact Stats

|

|

|
|
Sands
ATK% / EM
|
Goblet
Electro DMG%
|
Circlet
CRIT
|
Stat Priority: CRIT > ATK% = EM*
Since Aggravate hits can crit, CRIT is exceptionally valuable in Quicken teams, even more so than usual.
*ATK% and EM are roughly equal in Aggravate, but EM’s diminishing returns mean that ATK% is generally the more valuable artifact stat, given that Keqing’s supports often provide her with large amounts of EM. However, in Quickburn, the extra Transformative Reaction damage means that EM is superior to ATK%, although the gap still narrows the more EM Keqing has.
As a general rule, in pure Aggravate, EM overtakes ATK% if Keqing is unbuffed, but the presence of any strong EM buffer causes ATK% to pull ahead.
Keqing’s ER requirements are extremely low in most teams and do not need to be built around.
Using  Genshin Optimizer is recommended as a way to compare your actual artifacts.
Artifact Sets
Assumptions:
Keqing — Fischl — Kirara — Sucrose
R5 Lion’s Roar
ATK% — Electro DMG% — CRIT
For full Aggravate and Quickburn calcs see ![]() here. [Updated for Version 5.7]
here. [Updated for Version 5.7]
Hover over artifact images/names for more information.
| Artifact | DPS% of Best 2pc Combination | Notes |
|---|---|---|
 4pc Thundering Fury (TF) | 104% | Keqing’s highest-damaging set in Quicken teams thanks to its Skill cooldown reduction effect, which allows Keqing to cast another Skill for extra damage. Detonating the second Stiletto instead of teleporting onto it is mandatory for 4pc TF to outdamage other options. Although 4pc TF is often touted for its flexibility, this holds less true the more optimized your gameplay becomes. Nevertheless, the extra Skill cast can serve as a useful bailout in emergencies or improvised scenarios. Other, less-touted benefits of 4pc TF are actually more important than the minor flexibility it offers: the extra particles from the second Skill cast help decrease teammate ER requirements, which is especially helpful in Stygian Onslaught, and the slight frontload created by the Stiletto detonation makes it even better than it appears on paper if you are slightly shortening your combos. |
 4pc Thundersoother (TS) | 103% | Extremely competitive with 4pc TF in Aggravate teams. Fares badly in teams with low Electro aura uptime, making it somewhat unplayable in a few Quickburn teams. |
 4pc Gilded Dreams (GD) | 101% | Keqing appreciates both EM and ATK% in Quicken teams, making this a highly competitive artifact set in Aggravate. Falls off slightly as Keqing gets more EM. |
 2pc TF + 2pc ATK% / EM / MH 4pc A Day Carved from Rising Winds | 97-100% | 2pc mixed set options are reasonably competitive with Keqing’s top options in Aggravate. 2pc Marechaussee Hunter (MH) is the weakest of the options here but is close enough to win out given superior substats. 2pc combinations that do not have 2pc TF are noticeably behind other options, although good substats can still make up the difference. Because Keqing is not a Hexerei character, she cannot obtain the CRIT Rate buff from 4pc Rising Winds. Nevertheless, the 43 ATK% still makes it a slightly better version of 2pc ATK + 2pc ATK. (This applies to all archetypes.) |
 4pc Unfinished Reverie | 109% (Quickburn only) 4pc TF improves to 108% in Quickburn, keeping it very competitive. | A top option for Keqing in Quickburn teams, as it offers a hefty chunk of DMG Bonus if you can trigger Burning. However, such teams simultaneously increase the value of 4pc TF due to the additional reactions that Keqing or her Pyro teammate triggers. As such, even though 4pc Reverie is a very strong option, 4pc TF is only slightly behind at worst. |
Weapons
Assumptions: The rankings listed here assume an unbuffed Keqing with 4pc Thundering Fury and ATK%/Electro DMG%/CRIT main stats. For full calculations and other assumptions, see ![]() here for ATK% Sands and
here for ATK% Sands and ![]() here for EM Sands. [Updated for Version “Luna III”]
here for EM Sands. [Updated for Version “Luna III”]
Note that EM main stat weapons (and Light of Foliar Incision) may outperform their rankings here if Keqing is playing in a Quickburn team and triggering large amounts of Overload reactions.
Hover over weapon images/names for more information.
| Weapon | DPS% of R1 Lion’s Roar | Notes |
|---|---|---|
 5★ Mistsplitter Reforged | 120% | Thanks to its high Base ATK, CRIT DMG main stat, and powerful passive, Mistsplitter is generally Keqing’s best weapon across all archetypes. |
 5★ Primordial Jade Cutter | 118% | As the highest CRIT Rate main stat Sword in the game, combined with a strong and consistent passive, Jade Cutter is one of Keqing’s top options. |
 5★ Athame Artis | 117% [Hexerei] 112% [non-Hexerei] | A very solid weapon for Keqing, albeit one that requires two Hexerei units to unlock its full potential. In Quickburn teams, this is actually better used on Keqing than on Durin so long as you don’t have another competitive option for her. |
 5★ Haran Geppaku Futsu | 115% | Haran offers a large amount of CRIT Rate on top of a hefty chunk of DMG Bonus. Keqing usually triggers Aggravate on all her Normal Attacks, making Haran’s passive extremely valuable. May outperform Jade Cutter and Athame Artis when not running 4pc TF. |
 5★ Uraku Misugiri | 121% (proc) 115% (no proc) | Thanks to its high CRIT DMG and useful passive, Uraku is an excellent weapon for Keqing. Equal to Haran if running either 4pc TF or a Geo unit, and slightly better than Mistsplitter if running both. |
 5★ Light of Foliar Incision | 111% (EM Sands) | A decent weapon with high CRIT DMG and an interesting quirk: thanks to the EM-scaling passive, Foliar compares increasingly favorably to other weapons the more EM Keqing has. |
 4★ Wolf-Fang | 110% (R5) 102% (R1) | Wolf-Fang does quite well in Aggravate as Keqing deals a lot of damage from her Elemental Burst and Skill, especially when running 4pc TF. However, it’s not worth buying the Battle Pass specifically to obtain this weapon for Keqing. |
 5★ Freedom-Sworn | 108% (passive every other combo) | The EM main stat and teamwide buff makes Freedom-Sworn a useful weapon for Keqing. Unfortunately, the passive usually only triggers every other combo. Note that the teamwide buff it offers slightly improves its contribution to team damage, and that the pull value of this weapon is helped by Kazuha being a good Keqing support. |
 4★ Lion’s Roar | 109% (R5) 100% (R1) | Keqing’s trademark 4-star option thanks to its ATK% secondary and hefty DMG% passive, stats that are useful for Keqing in most archetypes . Quite hard to beat at high refinements. |
 5★ Azurelight | 107% | A pure stat stick with a powerful passive that is utterly useless on most of the character roster. Do not pull this weapon specifically for Keqing. |
 5★ Summit Shaper | 106% (shielded) 102% (unshielded) | A decent weapon if you are using one of the few shielders available in Aggravate, but a fairly underwhelming option otherwise. For this archetype, Kirara is the only real unit who both remains competitive with more offensive units and maintains full shield uptime. |
 5★ Absolution, Lightbearing Moonshard, Splendor of Tranquil Waters | 105% | 5-star stat sticks with useless passives. Intentionally taking damage from enemies to stack Splendor’s passive is not a recommended strategy, especially since you will suffer a large DPS loss if you get staggered. |
 4★ Moonweaver’s Dawn | 105% (R5) 97% (R1) | A new weapon that provides Keqing with a large amount of DMG Bonus on her Burst, making it a fairly playable option if you have little better. A free copy of this weapon is available in Nod-Krai, but further refinements are much more difficult to obtain, as it is only available on limited weapon banners. This is unfortunately the best Moonweaver performs out of any of Keqing’s archetypes, as her damage shifts away from her Elemental Burst outside of Dendro. |
 4★ The Black Sword | 104% (R5) 99% (R1) | Equal to Lion’s Roar at R1, but falls off at higher refinements because the passive is relatively defensive in nature. You should not buy the Battle Pass specifically to obtain this weapon for Keqing. |
 3★ Harbinger of Dawn | 104% (EM Sands) | Ceases to be competitive if you cannot keep the passive active. Note that this weapon’s low Base ATK makes it noticeably favor an EM Sands. |
 4★ Calamity of Eshu | 102% (shielded) 109% (ideal conditions) | Eshu is equal to or slightly better than R5 Lion’s Roar in ideal conditions (Non-TF set, full shield uptime, full 5N1C combo) but is usually worse in practice. Because it incentivizes Keqing to stay on-field for her entire Infusion duration on every combo, it also limits how you can play Keqing without losing damage. |
 4★ Toukabou Shigure | 101% (lower uptime) 108% (full uptime) | A free option for Keqing from the 3.3 event. Note that the passive uptime will suffer against single-wave content, although in multiwave you can get it to trigger every time if you defeat an enemy during the debuff’s duration. |
 4★ Iron Sting | 102% (R5) 97% (R1) | Keqing’s strongest craftable weapon in Aggravate, as the EM main stat and DMG% passive are quite useful. Although Iron Sting is not the strongest of weapons, its ease of access and simple passive makes it a viable choice for every Keqing player. |
 4★ Finale of the Deep | 99% (R5) 94% (R1) Assumes healer that clears BoL after ~2 seconds. | A craftable option that requires a healer to trigger the full passive. Given its flexibility as a weapon for several different on-field DPS units, Finale is more Billet-efficient to refine than Iron Sting. With a healer, Finale also enables 4pc Fragment of Harmonic Whimsy, although Finale is simply not a good enough weapon in Quicken to make this combo an enthralling option. |
 4★ Kagotsurube Isshin | 94% | Free option from Kazuha’s Story Quest. Use only if you have absolutely nothing better. |
Teambuilding

Aggravate is the archetype that Keqing is most known for, and for good reason: her multihit, rapid attacks are ideal for triggering many Aggravates over the course of a rotation, and her field time syncs exceptionally well with her Aggravate teammates.
Key Teammate
| Character | Notes |
|---|---|
Fischl | Fischl is Keqing’s most important Aggravate teammate and synergizes exceptionally well with both her and the archetype as a whole. Keqing drives Fischl’s A4 and C6 while on-field, skyrocketing Fischl’s personal damage. While Fischl’s 25s Skill cooldown is usually a nuisance to most DPS units, Keqing welcomes 25s rotations as they allow her enough time to Burst twice per rotation. The only remotely comparable replacement to Fischl is C6 Sara, but due to Fischl’s extremely high personal damage and Keqing’s relatively low Talent multipliers compared to other Electro on-fielders, Fischl remains Keqing’s most prominent Electro teammate. Additionally, as a Hexerei unit, Fischl can be paired with other Hexerei units to enable Hexerei: Secret Rite effects. While Fischl herself usually reaps no benefits from this in pure Aggravate as her Hexerei buffs require triggering either Electro-Charged or Overload, she can still unlock benefits for other Hexerei teammates. |
Other Electro
Fischl replacements, if you absolutely must. They take advantage of Aggravate and can provide either buffs, small amounts of sustain, or personal damage.
| Character | Notes |
|---|---|
 Sara | As mentioned above, C6 Sara is your best chance at replacing Fischl, as she grants Keqing a boatload of ATK and Electro CRIT DMG. However, this is still not enough to overcome the loss of Fischl’s personal damage, and between Sara’s high ER requirements, short buff duration, requiring Aimed Shots, and odd cooldowns, she can feel quite awkward to play. The gap between Sara and Fischl begins to narrow as Keqing reaches higher levels of investment, but Keqing’s vertical ceiling is unfortunately quite low, which places a limit on how valuable Sara’s buffing can be. Note that Sara teams will undoubtedly lead to higher Keqing personal damage than Fischl teams, and they can theoretically perform quite well versus AoE where Fischl might be single-target locked. |
 Beidou | Beidou offers a mixture of everything: she has decent personal damage (especially in AoE), decent sustain between her Burst damage reduction and C1 shield, and mild Electro RES Shred at C6. Even so, she does not particularly excel in any one area, and her high ER requirements make her unpleasant to play, especially if you miss her parries. Although this problem would be mitigated by running her in a Triple Electro composition, her modest RES Shred is unfortunately not enough to justify running her over an Anemo unit given that she provides no other offensive buffs. |
 Kuki Shinobu | Kuki offers underwhelming personal damage but has a niche as an Electro healer, and the only one that heals from her Skill instead of her Burst. Unfortunately, defensive options are generally better searched for outside the Electro Element. |
Iansan | Although Keqing is often thought of as a mobile unit, she is actually fairly stationary during her on-field combo, meaning that she cannot prevent Iansan’s Nightsoul bar from draining. As such, Iansan’s buffs cannot be used to full effect and fall behind Sara’s. |
 Ineffa | Compared to her damage in teams with Hydro units, Ineffa’s damage in Aggravate teams is quite abysmal, but she at least provides a shield with high uptime. Still, there is little reason to play her in an archetype that she has no synergy with. That being said, she is an excellent option if fighting enemies with Hydro innate aura. |
Dendro
Dendro units enable Quicken and typically provide either team buffs or defensive utility. Quicken’s long duration means that fairly little Dendro application is needed to sustain full uptime.
| Character | Notes |
|---|---|
 ★ Nahida | Nahida is Keqing’s top option in Quicken teams, although the gap between her and other Dendro supports is a fair bit closer than the gap between top Electro or Anemo teammates and their replacements. Nahida has solid personal damage (especially in AoE), her Burst provides a large EM buff to Keqing, and she has access to Catalyst support weapons such as Wandering Evenstar, Hakushin Ring, and Thrilling Tales of Dragon Slayers. However, she provides no sustain (aside from Prototype Amber) and occasionally complicates Electro Swirl setups, which sometimes makes her teams more difficult to play than other Dendro options. In multiwave, she may have to swap in slightly more often to maintain full Quicken aura uptime. Note that once Nahida hits C2, she provides an extremely valuable DEF Shred debuff against enemies marked by her Skill, and she ascends far ahead of other Dendro options in terms of team performance. |
★ Kirara | Kirara is the only true Dendro shielder in the game, and her short cooldowns synergize excellently with Keqing’s field times. She also provides a small DMG% buff at C6. Her limited Dendro application is thankfully largely a non-concern in Keqing’s pure Aggravate teams, although she has to swap in fairly often in multiwave scenarios. |
(★ in Quickburn) Emilie | Emilie is a fairly lackluster option in pure Aggravate as she provides absolutely nothing in terms of buffs. However, she is one of Keqing’s top options in Quickburn, as her personal damage skyrockets thanks to the existence of Burning. She also makes Quickburn teams a fair bit safer thanks to her Utility Passive providing high RES against Burning damage. Emilie’s vertical scaling is actually comparable to Nahida in Quickburn teams, as her early Constellations offer her a large increase to her personal damage that is only slightly less valuable than Nahida’s DEF Shred. |
 Yaoyao | Yaoyao offers incredibly strong healing, making her an excellent option for sustain and a stable ‘break glass in case of emergency’ choice against hyper-aggressive enemies. Unfortunately, her high Burst cost and awkward cooldowns force her to alternate Skill and Burst to sustain Quicken aura, leading to mildly clunky gameplay and very high ER requirements. |
 Baizhu | Baizhu is a very safe defensive option for Keqing: he has strong healing on his Skill, and while his Burst shields are paper-thin, they prevent Keqing from being staggered. Unfortunately, his A4 buff to Aggravate damage is surprisingly insignificant, and his high Energy cost and awkward cooldowns make him a mediocre option for team fluidity and damage. His Dendro application is also quite awkward in AoE. |
 Collei | Collei is a free option with relatively friendly cooldowns and a small EM buff to other party members at C4. With no sustain, limited support potential, and middling personal damage, she does nothing exceptionally well but is still a serviceable option. While the Bow support weapon pool is extremely small, it does at least include Elegy for the End. |
 Dendro Traveler | Dendro Traveler has an awkward 80 Energy Burst cost on a 20s cooldown, but provides a modest ramping EM buff to active characters from their A1 and a DMG% buff at C6. Unfortunately, it is all tied to the Burst, which only enjoys half uptime in Keqing’s rotations. Be very careful of casting the Traveler’s Burst near enemies that apply Pyro, as coming into contact with Pyro will cause the Lotus Lamp to explode. |
Lauma | Lauma is in a similar predicament as Ineffa — her Dendro application is more than enough to sustain Quicken aura, but she is simply not nearly as valuable in Aggravate as she would be in teams with Hydro units. However, just like Ineffa, she is a fantastic choice when fighting enemies with a Hydro innate aura. |
 Tighnari | Tighnari is a somewhat odd choice for Keqing, as he is an on-field DPS that competes with her for field time. However, their DPS windows are short enough that it is possible for them to execute quick on-field combos without taking too much time off of the rotation. Even so, because Keqing and Tighnari provide nothing for each other, this is usually not a very optimal choice. However, high Constellations on Tighnari make this a much more appealing option, namely his C4, which provides a strong teamwide EM buff, and his C6, which both increases his personal damage by a large amount and makes his already short DPS window even shorter, thus allowing him to easily fit his entire combo into Keqing’s rotations. |
Anemo
The basic function of an Anemo unit is to hold 4pc Viridescent Venerer to shred Electro RES. Further benefits typically range between offensive buffing and powerful sustain.
| Character | Notes |
|---|---|
 ★ Sucrose | Sucrose is a powerful buffer for Keqing in Aggravate, offering a large amount of teamwide EM through her Ascension Passives. She can hold an EM weapon like Sacrificial Fragments to enhance her A4 buff, but as a Catalyst user, she has access to more direct support weapons, most notably Wandering Evenstar and Hakushin Ring but also occasionally Thrilling Tales of Dragon Slayers or even Prototype Amber if healing is absolutely demanded. Her C6 grants a further teamwide 20% DMG Bonus if her Burst absorbs Electro, although this is infamously inconsistent. As a Hexerei unit, Sucrose can also offer an additional chunk of DMG Bonus when paired with a second Hexerei character like Fischl. |
★ Prune | Prune is the other Anemo Catalyst Hexerei support option, boasting a DMG% buff from her A4 and a Flat ATK buff from her C6. Unfortunately, she has no grouping and lacks any form of Elemental Absorption: she has Elemental Conversion on her abilities but can only pick up Elements that are already being Swirled, i.e. only Electro. She is also highly reliant on her C6, as it provides both an important buff and additional buff uptime: without this Constellation, Prune’s performance takes a notable hit. Even if her utility is lacking, however, her pure buff strength at C6 is good enough to make her a solid option. |
 ★* Kazuha | While Kazuha’s raw buffing capabilities are slightly behind the 4-star Hexerei Catalysts, he still offers a large teamwide DMG% buff from his A4 alongside powerful grouping abilities. An already a good choice in single-target, his surprisingly decent personal damage from Aggravated Swirls once his Burst absorbs Electro makes him an especially attractive option in AoE. Notably, he also has Elemental Absorption on both his Burst and his A1 Passive and can absorb from self-auras: this enables him to easily deal with the mechanics of a boss like the Crab Tsar. Depending on the boss, Sucrose can do the same, but the process is far more inconsistent. |
Lan Yan | Lan Yan has a unique and valuable niche in that she is the only Anemo shielder in the game, and provides a very sturdy one at that. As a Catalyst, she also has access to several useful buffing weapons. Unfortunately, her 16s Skill cooldown does not fit well with Keqing’s typical 25s Aggravate rotations, meaning that Keqing usually only enjoys half uptime on her shield. |
  Heizou & Lynette | Weaker offensive buffers with teamwide buffs that are a step below the best: Heizou offers 80 EM from his A4 and has access to Catalyst support weapons, and Lynette offers 16% ATK from her A1 and a taunt from her Burst. These units are not recommended, but acceptable if there are no better options. Lynette has the edge benefit of being free to obtain. |
 Anemo Healers | Jean, Sayu, Xianyun, Jahoda. Keqing is certainly not short of Anemo healing options, but their offensive utility is unfortunately quite limited. Jean and Sayu provide essentially no offensive utility beyond 4pc VV and do little more than keep Keqing alive. Jahoda and Xianyun are not incredibly impressive, but manage to scrape out a decent bit more value: Jahoda offers a modest EM buff from her A4 Passive, and Xianyun can hold Catalyst support weapons. Xianyun also enables Keqing to Plunge at will, which is situationally useful, especially in AoE. |
Geo
Geo units provide team buffing or other similar value without interfering with the Quicken aura.
| Character | Notes |
|---|---|
★ Xilonen | Xilonen offers ample RES Shred from her Source Samples, a powerful DMG% buff thanks to 4pc Scroll of the Hero of Cinder City, and strong healing from her Burst. Her offensive buffs are somewhat equal to or only slightly behind Kazuha and Sucrose, and although she lacks both their grouping abilities and notable AoE personal damage, her sustain makes her quite appealing for players who want to make their Keqing teams safer without losing too much damage. Her high buff durations also make it extremely easy for Keqing to enjoy full uptime on her RES Shred and DMG Bonus even with extended combos or slow gameplay. |
 Zhongli | Zhongli is a famously stable defensive option thanks to his extremely strong shield, and also offers modest RES Shred. He also has access to useful support artifact sets such as 4pc Tenacity of the Millelith and 4pc Archaic Petra, although these can be inconsistent in practice, as enemies can move out of his pillar range and picking up Crystallize shards can be quite awkward, especially against larger enemies. |
 Albedo | With the introduction of Hexerei units and Hexerei buffs to old characters, Albedo becomes a viable choice for Keqing Aggravate teams thanks to his reasonable personal damage and teamwide EM buff from his A4. However, his lack of RES Shred means he cannot be much more than a viable sidegrade. Note that he essentially must be paired with Fischl, as he does not activate his Hexerei effects otherwise. |
Pyro
When using Pyro flex units, Quicken and Burning will coexist, leading to “Quickburn” team comps where Keqing triggers both Aggravate and Overload. Note that Pyro units usually favor full EM builds over CRIT here as they can have some Overload ownership, and their Talent damage is typically completely unbuffed.
Quickburn teams are usually comparable to standard Aggravate in terms of team damage: in fact, with the release of Durin, they have shot significantly far ahead of most other archetypes and are theoretically incredible options for Keqing. However, Quickburn does have a few practical concerns that can make it difficult to play. For one, Burning and Overload are dangerous reactions to play with, as Burning self-damage is very threatening to Keqing, and triggering Overload can be very bad against light enemies. Additionally, the Elemental auras in this archetype can be very fragile, making the archetype fairly punishing to play if one makes even minor mistakes.
Not only are Quickburn teams difficult to play, but they also significantly restrict the player’s choices of Dendro options. Nahida and Emilie are effectively the only units who can reliably sustain Quicken aura, and traditional defensive Dendro options unfortunately range from middling to awful: Kirara is unplayable before she unlocks C4 and is not particularly good even once she does, Baizhu offers little offensive value and has very high ER requirements, and Yaoyao’s awkward cooldowns entirely disqualify her use. As such, Keqing Quickburn comps find it difficult to fit strong healers or shielders.
In total, although Quickburn teams are very powerful for Keqing on paper, they are quite difficult to play and mainly shine against bosses with large hitboxes. On the positive side, these kinds of enemies are very common in Genshin’s hardest endgame mode, Stygian Onslaught.
| Character | Notes |
|---|---|
★ Durin | Durin is Keqing’s best Pyro teammate in Quickburn by a very large margin thanks to his hefty RES Shred and decent rate of off-field Pyro application. His Hexerei: Secret Rite effect, and the full 4pc effect of Celestial Gift, can be easily unlocked by pairing him with Fischl — in fact, he has tremendous synergy with Fischl, as he is a Hexerei unit who enables Overload and thus the teamwide ATK% buff from her Hexerei Passive. Additionally, Durin’s Constellations, specifically his C2 and C6, are extremely high increases to team damage, granting him excellent scaling in vertical investment. Note that he favors full ATK over full EM once he activates C1. |
★* Nicole | Nicole offers an extremely coveted Pyro shield, sustain that normally eludes the Quickburn archetype. However, she is a strange Pyro unit in that she has zero off-field application, meaning that she does not enable Burning on her own. Instead, she provides powerful buffs and pairs very well with Durin, but this contorts Keqing’s teambuilding by forcing double Pyro. In short, she makes for an excellent option in one specific Quickburn team: Keqing — Nicole — Durin — Emilie. In traditional Aggravate setups of Keqing — Dendro — Electro — Flex, Nicole is an awkward fit as her rotation lengths are antisynergistic and she provides less buffs than Anemo options. She is a passable option with Constellations, but this is largely a waste of her abilities compared to her high potential in other archetypes, specifically Overload. |
Xiangling | Xiangling has the highest application of any Pyro off-fielder, which makes her excellent against content that requires Pyro hits or application. This high rate of application also pushes the reaction count of the team quite high, leading to a large amount of Overload damage. Her high ER requirements are easily managed by having her cast Guoba twice per rotation, especially with Kitain Cross Spear. |
Mavuika | Mavuika’s extremely high Talent damage is essentially wasted in Keqing’s Quickburn teams as she receives no buffs or Amplifying Reactions, but she provides modest Pyro application, 4pc Scroll of the Hero of Cinder City, and the occasional DMG% buff from her Burst whenever it charges enough Fighting Spirit. These buffs are enough to even out the damage loss from her much slower application compared to Xiangling. |
Pyro Traveler | Pyro Traveler is essentially a free version of Mavuika with drastically lower Talent damage and a lower DMG% buff. As Mavuika’s Talent damage is already mostly irrelevant in Quickburn teams, Pyro Traveler plays a roughly identical role to Mavuika in the archetype and serves as a decent budget replacement. |
Example Teams
This is not a comprehensive list of teams. The inclusion or exclusion of any given team does not necessarily reflect its power level.

Keqing’s traditional premium Aggravate team. Has excellent damage, but can be somewhat difficult to play, especially given the lack of sustain. Prototype Amber can be used on Nahida if survivability is a large concern.
This team arguably has the most flexible rotations of any Keqing team. Understand that the rotation samples given below are exceptionally flexible even by typical Keqing standards, and that the best rotation in any given situation is often something specifically customized against the enemy lineup.
C6 Fischl Rotation
(Keqing E)¹ > Kazuha tEP > Nahida E Q > Fischl E N1² > Kazuha tEP > Keqing combo > Kazuha tEP > Fischl Q > Kazuha Q > (Nahida E)³ > Keqing combo
Pre-C6 Fischl Rotation
(Keqing E)¹ > Nahida Q > Kazuha tEP Q > Nahida E > Fischl E > Keqing combo > (Nahida E)³ > Fischl Q > Kazuha tEP > Keqing combo
¹First rotation only.
²Fischl procs her C6 with Normal Attacks until Electro aura is established.
³Often required in multiwave to re-mark new enemies.

Xilonen lacks Kazuha’s grouping and AoE damage, but compensates with effortless full uptime on her buffs and strong healing. Rotations are slightly inflexible but fairly easy to perform. Xilonen uses Burst when necessary. With C2 Xilonen, Fischl can start the first rotation with her Skill and replace all following Skill uses with Burst.
Sample Rotation
(Fischl C)¹ > Xilonen E N2 > Nahida E Q > Fischl E > Keqing combo > Xilonen E(Q) N2 > (Nahida E)² > Fischl Q > Keqing combo
¹First rotation only. Can be replaced with Keqing E C if you need particles.
²Often required in multiwave to re-mark new enemies.

A non-Fischl team option. C6 Sara compares somewhat unfavorably to Fischl in single-target but begins to even out with higher investment on Keqing and in higher-health AoE. Due to the team’s poor particle generation, 4pc TF is extremely desired to keep ER requirements low. Xilonen uses Burst when necessary.
Sample Rotation
(Sara E C)¹ > Xilonen E(Q) N2 > Nahida E Q > Sara (E C)² Q > Keqing combo > Xilonen E N2 > (Nahida E)³ > Sara E C > Keqing combo
¹First rotation only.
²Subsequent rotations only.
³Often required in multiwave to re-mark new enemies.

One of Keqing’s typical 4-star–only teams. Kirara and especially Sucrose are pleasantly competitive with 5-star supports. Be careful not to jump out of Kirara’s E too quickly when performing the Swirl setup, as you need to wait .5s between instances of her Dendro application to trigger Fischl A4 and maintain Electro aura. To avoid this problem, you can simply swap to Sucrose before Kirara, as long as you do not mind losing a bit of buff uptime.
Sample Rotation
Fischl E > Kirara shE > Sucrose E > Keqing combo > Fischl Q > Kirara shE > Sucrose E > Keqing combo

Durin Quickburn teams are extremely powerful options for Keqing but can be quite hard to play in practice. This team has almost no defensive utility, which is very dangerous against smaller enemies that may cause Keqing to take Burning self-damage. Furthermore, Keqing’s teammates do not have particularly useful gapfill, so Keqing has to fill large amounts of field time; as a result, you will often be playing at low Stamina due to the high drain from her Charged Attacks. Nevertheless, even with the dangers involved, the sheer offensive power offered by this team makes it a very appealing option, especially against bosses. Emilie and Nahida are bundled into one sample team because they rotate virtually identically and they are the clear best options.
Sample Rotation (Emilie)
Durin EE Q > Emilie E N1 > Fischl E> Keqing EQE 5[N1C] EE 3[N1C] > Fischl Q > Keqing Q EE 3[N1C] N1¹
Sample Rotation (Nahida)
Durin EE Q > Nahida E (Q)² > Fischl E > Keqing EQE 5[N1C] EE 3[N1C] > (Nahida E)³ > Fischl Q > Keqing Q EE 3[N1C] N1¹
¹If 4pc TF, instead use EQE 2[N1C] N1 E N1C with Emilie or EQE N1C N1 E N1C with Nahida.
²Burst when available.
³Often required in multiwave to re-mark new enemies.

A Quickburn team that breaks the rules and slots Keqing alongside a common three-unit core. Emilie is the only viable Dendro here as no one else can match her personal damage. Nicole offers a shield, powerful buffing, ideal rotation lengths for Emilie and Durin, and can hold Celestial Gift, allowing Durin to run 4pc Rising Winds. Keqing gets to reap the benefits of both Durin’s and Nicole’s buffs and a permanent Dendro aura, at the cost of being forced into inflexible combos and awkward rotation lengths. All things considered, this team is competitive with any other Keqing – Durin team, and it scales very well with Constellations thanks to the three limited 5-stars.
4pc Thundering Fury is practically mandatory to keep Keqing’s ER requirements manageable, and even with it, she may have to pick up a few ER rolls from substats. Use Emilie’s and Nicole’s Burst when available, which usually means every other rotation.
Sample Rotation
Emilie (Q)¹ E > Nicole (Q)² E > Durin EE Q > Keqing EQE 3[N1C] EE 3[N1C] N1 E N1C
¹Burst when available. Do not Burst on first rotation.
²Burst when available.

A traditional option against content that requires Pyro units. This team has some survivability issues against groups of enemies thanks to Burning self-damage and a lack of sustain. Prototype Amber Nahida is a viable solution, but will lead to a slight drop in team DPS. Against larger enemies (e.g. Lava Dragon Statue), you will not take Burning self-damage and the team is notably safer.
Sample Rotation
Nahida E Q > Xiangling Q ED > Fischl Q > Keqing EQE 5[N1C] EE N1C N1 > (Nahida E)¹ > Xiangling ED > Fischl E > Keqing Q EE 4[N1C]²
¹Often required in multiwave to re-mark new enemies.
²If 4pc TF, perform EQE 2[N1C] N1 E N1C instead.

Quickbloom/Hyperbloom
Is Keqing a Quicken DPS or a Hyperbloom trigger?
This is a fairly common and rather loaded question that takes some effort to defuse. It is also semantical; after all, Keqing’s playstyle as an on-field damage dealer does not change no matter what category she falls into. The simple, unhelpful answer is that she is both: as a “Quickbloom” DPS, Keqing triggers a significant number of Hyperbloom cores and Aggravate on much of her Talent damage. To get a more useful answer, we should investigate the following:
1. Is the majority of Keqing’s damage coming from her Talents or from Hyperbloom?
It changes from team to team. If you have low Hydro application that leads to a stable Quicken aura and low Bloom core production, most of Keqing’s damage will come from Talents; if you have high Hydro application that produces many Bloom cores at the expense of Quicken uptime, most of Keqing’s damage will come from Hyperbloom. Additionally, if Lauma is on the team, her extremely powerful buffs to Bloom-related damage may shift Keqing’s damage splits towards Hyperbloom, even when there is high Quicken aura uptime. Conversely, Electro teammates may trigger some Hyperblooms themselves and therefore push Keqing’s damage towards Talents.
2. Should Keqing prioritize EM or CRIT?
This is obviously contingent on your answer to the previous question. If a majority of Keqing’s damage is coming from Talents, then CRIT is generally the more valued stat. If a majority of Keqing’s damage is coming from Hyperbloom, then EM is generally the more valued stat.
However, EM’s diminishing returns make this question more nuanced than one might expect. The value of Elemental Mastery drops off sharply as one gets to higher and higher amounts, and Keqing is likely to have extremely high EM in Quickbloom teams — between team buffs, an EM weapon, and artifact sets and substats, she can quickly reach the point where any more EM will be at heavily reduced value. As such, even in teams where Hyperbloom constitutes the hefty majority of Keqing’s damage, CRIT (and DMG%) can become equal to or slightly ahead of EM.
Conclusion:
Quickbloom Keqing should first be thought of as a hybrid DPS who deals mostly Talent damage and supplements said damage with Hyperbloom cores. The addition of Lauma will flip that dynamic and shift her damage sharply towards Hyperbloom, making EM her most valued stat until very high amounts. However, Keqing still retains her identity as a CRIT-scaling DPS whose Talent damage is worth of consideration, and sources of EM are so plentiful in her Quickbloom teams that CRIT can have competitive value once EM begins to suffer from diminishing returns.
Note that it is of course possible to engineer teams where Keqing’s Talent damage is truly irrelevant, i.e. no Quicken aura, high Hyperbloom count, and no significant team buffs to anything other than her Hyperbloom damage. In these cases, it is certainly optimal for her to build full EM. However, she is largely outclassed by off-field triggers in this capacity, as they allow a Dendro Catalyst driver to go on-field and increase core generation. Furthermore, such a build is trivial to gear and detailed analysis will not lead to any useful revelations. As such, this “playstyle” will not be extensively covered nor calculated in this guide.
Artifact Stats
|
|
|
|
|
Sands
EM > ATK%
|
Goblet
Electro DMG ≥ EM*
|
Circlet
CRIT ≥ EM*
|
Stat Priority: CRIT ≥ EM* > ATK%
*If the majority of Keqing’s damage is coming from Hyperbloom, EM overtakes CRIT until very high amounts. If the majority of Keqing’s damage is coming from her Talents, CRIT is more valuable, and Electro DMG% and CRIT main stats are noticeably better than EM main stats.
Using Genshin Optimizer is recommended as a way to compare your actual artifacts.
Artifact Sets
Assumptions:
Calculations with Lauma:
Keqing — Lauma — Xingqiu — Ineffa
R5 Iron Sting
EM — Electro DMG% — EM or CRIT
Full assumptions and calcs ![]() here [last updated for Version “Luna II”].
here [last updated for Version “Luna II”].
Calculations without Lauma:
Keqing — Furina — Nahida — Baizhu and Keqing — Kokomi — Nahida — Fischl
R5 Iron Sting
EM — Electro DMG% — CRIT
Full assumptions and calcs ![]() here [last updated for Version 4.2].
here [last updated for Version 4.2].
Hover over artifact images/names for more information.
| Artifact Set | Notes |
|---|---|
4pc Thundering Fury (TF) | Keqing’s highest-damaging set in Quickbloom teams thanks to its Skill cooldown reduction effect allowing Keqing to cast another Skill for extra damage. Detonating the second Stiletto instead of teleporting onto it is mandatory for 4pc TF to outdamage other options. The extra particles also help decrease teammate ER requirements, and in Hyperbloom, 4pc TF’s DMG% effect actually gets quite a bit of value. Although 4pc TF is often touted for its flexibility, this holds less true the more optimized your gameplay becomes. Nevertheless, the extra Skill cast can serve as a useful bailout in emergencies or improvised scenarios. |
 4pc Flower of Paradise Lost (FoPL) | A theoretically excellent option in Quickbloom teams to maximize Keqing’s Hyperbloom damage. However, in contrast to most users of this set who only care about building EM, Keqing demands high CRIT value on her artifacts as well to maximize her Talent damage. As such, it can be quite difficult to farm good FoPL pieces, and it is very unlikely that you will have a usable 4pc set lying around. |
4pc Gilded Dreams (GD) | 4pc Gilded’s stat bundle is quite valuable in Quickbloom teams, making it a fairly competitive option for Keqing. CRIT stats on Gilded are also useful for more characters than CRIT stats on FoPL, making it more efficient to farm. |
 2pc TF + 2pc EM / ATK% 4pc A Day Carved from Rising Winds | 2pc mixed set options are reasonably competitive with Keqing’s top options in Quickbloom. EM 2-pieces gain increasing value over other sets the more Keqing’s damage comes from Hyperbloom. Conversely, ATK% 2-pieces (and 4pc Rising Winds) suffer as Keqing’s damage shifts toward Transformative Reactions. |
4pc Thundersoother (TS) | 4pc Thundersoother can be a competitive option given high Electro aura uptime, but falters as uptime drops and Keqing’s damage splits more towards Hyperbloom. |
 4pc Marechaussee Hunter (MH) 4pc Night of the Sky’s Unveiling (NotSU) | Hyperspecific artifact sets that are Keqing’s best options in the right conditions: 4pc NotSU with two Nod-Krai teammates, 4pc MH with Furina. Note that 4pc NotSU’s Reaction DMG Bonus is useless for Keqing in this archetype, as she does not deal any relevant amount of Lunar Reaction damage. |
Click the dropdowns below to view/hide its contents.
Artifact Comparison Table (Lauma/Xingqiu/Ineffa — ~70% Hyperbloom Damage)
| Artifact Set(% of Rainbow) | DPS % of Rainbow |
|---|---|
| 4pc Marechausee Hunter | - |
| 4pc Night of the Sky’s Unveiling | 110% |
| 4pc Thundering Fury* | 109% |
| 4pc Gilded Dreams | 108% |
| 4pc Flower of Paradise Lost | 110% |
| Best 2pc Mixed Set Combo | 106% |
| 4pc Thundersoother | 105% |
| Rainbow | 100% |
*With optimal TF combos. 4pc TF typically has more value than what can be seen by simply analyzing Keqing’s personal damage, as the extra Skill cast reduces team ER requirements.
Artifact Comparison Table (Furina/Nahida/Baizhu — ~45% Hyperbloom damage)
| Artifact Set | DPS % of Rainbow |
|---|---|
| 4pc Marechausee Hunter | 116% |
| 4pc Night of the Sky’s Unveiling | - |
| 4pc Thundering Fury* | 113% |
| 4pc Gilded Dreams | 111% |
| 4pc Flower of Paradise Lost | 110% |
| Best 2pc Mixed Set Combo | 108% |
| 4pc Thundersoother | 104% |
| Rainbow | 100% |
*With optimal TF combos. 4pc TF typically has more value than what can be seen by simply analyzing Keqing’s personal damage, as the extra Skill cast reduces team ER requirements.
Artifact Comparison Table (Kokomi/Nahida/Fischl — ~35% Hyperbloom damage)
| Artifact Set | DPS % of Rainbow |
|---|---|
| 4pc Marechausee Hunter | - |
| 4pc Night of the Sky’s Unveiling | - |
| 4pc Thundering Fury* | 118% |
| 4pc Gilded Dreams | 112% |
| 4pc Flower of Paradise Lost | 110% |
| Best 2pc Mixed Set Combo | 110% |
| 4pc Thundersoother | 110% |
| Rainbow | 100% |
*With optimal TF combos. 4pc TF typically has more value than what can be seen by simply analyzing Keqing’s personal damage, as the extra Skill cast reduces team ER requirements.
Weapons
Assumptions:
Calculations with Lauma:
Keqing — Lauma — Xingqiu — Ineffa
4pc TF and 4pc NotSU
EM — Electro DMG% — EM or CRIT
Full assumptions and calcs ![]() here [last updated for Version “Luna 1”].
here [last updated for Version “Luna 1”].
Calculations without Lauma:
Keqing — Furina — Nahida — Baizhu and Keqing — Kokomi — Nahida — Fischl
4pc MH and 4pc TF
EM — Electro DMG% — CRIT
Full assumptions and calcs ![]() here [last updated for Version 4.2].
here [last updated for Version 4.2].
Hover over weapon images/names for more information.
| Weapon | Notes |
|---|---|
5★ Mistsplitter Reforged | Thanks to its high Base ATK, CRIT DMG main stat, and powerful passive, Mistsplitter is generally Keqing’s best weapon across all archetypes. However, Mistsplitter can often run into trouble in Quickbloom teams as it does nothing for Keqing’s Hyperbloom damage, a problem which is exacerbated by Lauma pushing Keqing’s damage further towards Hyperbloom. As such, while Mistsplitter is still one of the best weapons for Quickbloom Keqing, it faces compelling competition and can be outclassed by powerful EM-scaling weapons. |
5★ Freedom-Sworn | Freedom-Sworn is the only EM main stat 5-star Sword in the game, making it a premier option for Quickbloom Keqing. It is also the only good weapon choice Keqing has that offers a teamwide buff, although said buff will vary in usefulness based on how often Keqing can trigger it and how much Keqing’s teammates appreciate ATK%. |
5★ Light of Foliar Incision | Light of Foliar Incision doesn’t offer an EM main stat, but its EM-scaling passive makes it a powerful option in Quickbloom nonetheless. Consistently a top-performing option for Quickbloom Keqing across all team variants. |
 5★ Primordial Jade Cutter, Haran Geppaku Futsu, Uraku Misugiri | Other typical top-performing options for Keqing in Dendro teams. They are Keqing’s best non-Mistsplitter weapons in Aggravate and remain powerful in Quickbloom, although their performance suffers if Keqing’s damage is skewed heavily towards Hyperbloom. Not many Quickbloom teams run Geo units, so Uraku usually cannot trigger its full passive. |
 Other 5★ CRIT Stat Sticks | Athame Artis, Azurelight, Absolution, Lightbearing Moonshard, Splendor of Tranquil Waters. Generic 5-star stat sticks with little else to offer. They provide less-than-exciting performance in Quickbloom, and you’re likely only using them on Keqing because they are burning a hole in your inventory. Athame Artis is anti-synergistic with the long or Burstless combos that are frequent in many Quickbloom teams. Splendor should stay on Furina if you have her. |
 4★ The Black Sword, Wolf-Fang | Battle Pass options. At high refinements, they are fairly competitive with 5-star stat sticks. Wolf-Fang likes being run with 4pc TF thanks to the extra Skill damage. |
 4★ Iron Sting, Toukabou Shigure | EM main stat 4-star weapons that serve as Keqing’s accessible baseline in Quickbloom. These are frankly very good options, and are competitive with or even better than high-refinement Battle Pass weapons and 5-star stat sticks depending on how much Hyperbloom damage Keqing is dealing. As both of these weapons are free (Iron Sting is craftable, and Toukabou Shigure is an old event weapon), there's not much of a reason to use anything worse than them. They should also dissuade you from chasing after Battle Pass Sword refinements. |
4★ Finale of the Deep | Not bad if you have a healer in the team, but nothing particularly exciting. Arguably very Billet-efficient to refine. |
5★ Summit Shaper | A decent option if Keqing is playing with one of the few shielders available in Quickbloom, but fairly underwhelming otherwise. |
4★ Lion’s Roar | Hyperbloom is arguably the worst archetype for Lion’s Roar. It remains competitive with other top 4-stars if there is high Electro aura uptime, but it suffers a bit in Hyperbloom in comparison to EM main stat weapons and loses value as uptime fades (for instance, if Keqing is solo Electro). |
3★ Harbinger of Dawn | Competitive with other accessible options if you can maintain the passive, although that may be a tall task in some teams, especially if you are playing with Furina. Hopefully your healing is strong enough to balance out her drain. |
4★ Moonweaver’s Dawn | Not a particularly good weapon for Keqing in most scenarios, and Quickbloom is no exception. A free copy of this weapon is available in Nod-Krai. |
4★ Kagotsurube Isshin | Please craft Iron Sting. |
Click the dropdowns below to view/hide its contents.
Weapon Comparison Table (Lauma/Xingqiu/Ineffa — 4pc TF)
| Weapon | DPS % of Iron Sting R5 |
|---|---|
| Freedom-Sworn R1 | 104% |
| Light of Foliar Incision R1 | 102% |
| Mistsplitter Reforged R1 (low uptime) | 101% |
| Primordial Jade Cutter R1 | 102% |
| Haran Geppaku Futsu R1 | 101% |
| Toukabou Shigure R5 | 101% |
| Iron Sting R5 | 100% |
| Uraku Misugiri R1 | 99% |
| Lion’s Roar R5 | 99% |
| Athame Artis R1 (low uptime) | 99% |
| Harbinger of Dawn R5 (full uptime) | 99% |
| Wolf-Fang R5 | 99% |
| Summit Shaper R1 (shielded) | 98% |
| Azurelight R1 | 98% |
| The Black Sword R5 | 98% |
| Calamity of Eshu R5 (shielded) | 98% |
| Iron Sting R1 | 98% |
| Splendor of Tranquil Waters R1, Lightbearing Moonshard R1 | 97% |
| Absolution R1 | 97% |
| Moonweaver’s Dawn R5 | 97% |
| The Black Sword R1 | 97% |
| Wolf-Fang R1 | 97% |
| Lion’s Roar R1 | 96% |
| Dark Iron Sword R1 | 96% |
| Moonweaver’s Dawn R1 | 95% |
| Finale of the Deep R5 (no healer) | 95% |
| Kagotsurube Isshin R1 | 94% |
Italicized weapons offer CRIT Rate and thus may be difficult to build with in practice when using 4pc NotSU or 4pc MH. Of course, the problem is not equally pressing in all cases — the more CRIT Rate granted by the weapon, the more you will be in danger of overcapping.
Weapon Comparison Table (Lauma/Xingqiu/Ineffa — 4pc NotSU)
| Weapon | % of Iron Sting R5 |
|---|---|
| Freedom-Sworn R1 | 105% |
| Light of Foliar Incision R1 | 103% |
| Mistsplitter Reforged R1 (low uptime) | 103% |
| Primordial Jade Cutter R1 | 102% |
| Haran Geppaku Futsu R1 | 102% |
| Toukabou Shigure R5 | 101% |
| Iron Sting R5 | 100% |
| Uraku Misugiri R1 | 101% |
| Lion’s Roar R5 | 100% |
| Athame Artis R1 (low uptime) | 99% |
| Harbinger of Dawn R5 (full uptime) | 98% |
| Wolf-Fang R5 | 96% |
| Summit Shaper R1 (shielded) | 99% |
| Azurelight R1 | 99% |
| The Black Sword R5 | 99% |
| Calamity of Eshu R5 (shielded) | 99% |
| Iron Sting R1 | 98% |
| Splendor of Tranquil Waters R1, Lightbearing Moonshard R1 | 99% |
| Absolution R1 | 98% |
| Moonweaver’s Dawn R5 | 98% |
| The Black Sword R1 | 97% |
| Wolf-Fang R1 | 95% |
| Lion’s Roar R1 | 97% |
| Dark Iron Sword R1 | 95% |
| Moonweaver’s Dawn R1 | 95% |
| Finale of the Deep R5 (no healer) | 95% |
| Kagotsurube Isshin R1 | 93% |
Italicized weapons offer CRIT Rate and thus may be difficult to build with in practice when using 4pc NotSU or 4pc MH. Of course, the problem is not equally pressing in all cases — the more CRIT Rate granted by the weapon, the more you will be in danger of overcapping.
Weapon Comparison Table (Furina/Nahida/Baizhu)
| Weapon | DPS % of Iron Sting R5 |
|---|---|
| Mistsplitter Reforged R1 | 108% |
| Light of Foliar Incision R1 | 106% |
| Freedom-Sworn R1 | 106% |
| Primordial Jade Cutter R1 | 105% |
| Haran Geppaku Futsu R1 | 104% |
| Uraku Misugiri R1 | 104% |
| The Black Sword R5 | 102% |
| Splendor of Tranquil Waters R1 | 102% |
| Wolf-Fang R5 | 101% |
| Summit Shaper R1 | 101% |
| Iron Sting R5 | 100% |
| Harbinger of Dawn R5 (full uptime) | 100% |
| Toukabou Shigure R5 | 99% |
| The Black Sword R5 | 99% |
| Finale of the Deep R5 | 99% |
| Iron Sting R1 | 97% |
| Wolf-Fang R1 | 97% |
| The Black Sword R1 | 97% |
| Wolf-Fang R1 | 97% |
| Lion’s Roar R1 | 94% |
| Kagotsurube Isshin R1 | 95% |
Italicized weapons offer CRIT Rate and thus may be difficult to build with in practice when using 4pc NotSU or 4pc MH. Of course, the problem is not equally pressing in all cases — the more CRIT Rate granted by the weapon, the more you will be in danger of overcapping.
Weapon Comparison Table (Kokomi/Nahida/Fischl)
| Weapon | DPS % of Iron Sting R5 |
|---|---|
| Mistsplitter Reforged R1 | 109% |
| Light of Foliar Incision R1 | 106% |
| Freedom-Sworn R1 | 103% |
| Primordial Jade Cutter R1 | 107% |
| Haran Geppaku Futsu R1 | 105% |
| Uraku Misugiri R1 | 104% |
| The Black Sword R5 | 100% |
| Splendor of Tranquil Waters R1 | 100% |
| Wolf-Fang R5 | 104% |
| Summit Shaper R1 | 96% |
| Iron Sting R5 | 100% |
| Harbinger of Dawn R5 (full uptime) | 101% |
| Toukabou Shigure R5 | 99% |
| The Black Sword R5 | 97% |
| Finale of the Deep R5 | 96% |
| Iron Sting R1 | 97% |
| Wolf-Fang R1 | 98% |
| The Black Sword R1 | 97% |
| Wolf-Fang R1 | 95% |
| Lion’s Roar R1 | 95% |
| Kagotsurube Isshin R1 | 91% |
Italicized weapons offer CRIT Rate and thus may be difficult to build with in practice when using 4pc NotSU or 4pc MH. Of course, the problem is not equally pressing in all cases — the more CRIT Rate granted by the weapon, the more you will be in danger of overcapping.
Teambuilding

When both Dendro and Hydro units are in the team, Keqing can trigger both Aggravate and Hyperbloom. The last slot is usually an Electro unit who provides significant offensive value.
Key Teammate
| Character | Notes |
|---|---|
 Lauma | Lauma is an extremely powerful Bloom support who offers respectable off-field Dendro application, Dendro and Hydro RES Shred, a large increase to Hyperbloom damage, and even allows Hyperblooms to crit at a fixed value if she is the only Nod-Krai unit in the team. Note that Nod-Krai units will unlock Ascendant Gleam and thus disable Lauma’s Hyperbloom crits if they are paired together. This is certainly unfortunate, but the flip side is that it will grant the team full access to the passives of Nod-Krai artifact sets. It will also make the team significantly better against Wild Hunt enemies. |
Other Dendro
Dendro units provide a variety of Elemental application, team buffs, and sustain. They are also usually the ones running 4pc Deepwood Memories, which is essentially required in Quickbloom teams as Hyperbloom damage greatly values the Dendro RES Shred.
You can run these units in place of Lauma if you do not have her, or you can run them as a second Dendro for Dendro Resonance and additional application or buffs, although you will typically get more mileage out of an Electro teammate instead.
| Character | Notes |
|---|---|
★ Nahida | Nahida’s strong Dendro application ensures high Quicken uptime, and her already valuable EM buff is even more useful now that Keqing is triggering Hyperblooms. If needed, she can run Prototype Amber to help stack Furina’s Fanfare, although it is unsafe to rely on this as your only source of healing. If you obtain Nahida’s C2, she soars far ahead of every other Dendro listed here. She can even outperform C0 Lauma, although Lauma of course has the potential for vertical investment of her own. |
 Baizhu | Baizhu is a very safe defensive option for Keqing: he has strong healing on his Skill, and while his Burst shields are paper-thin, they prevent Keqing from being staggered. His minor buff to Aggravate and Hyperbloom damage also makes him not entirely deadweight as far as offensive buffing goes, and he can also stack Fanfare if applicable. Note that his Dendro application is quite awkward in AoE. |
 Collei | Collei is a free option with relatively friendly cooldowns and a small EM buff to other party members at C4. With no sustain, limited support potential, and middling personal damage, she does nothing exceptionally well but is still a serviceable option. While the Bow support weapon pool is extremely small, it does at least include Elegy for the End. |
 Yaoyao | Yaoyao offers incredibly strong healing, making her a top option for sustain and a ‘break glass in case of emergency’ choice against hyper-aggressive enemies. Unfortunately, her high Burst cost and awkward cooldowns can lead to clunky gameplay and very high ER requirements, especially considering that she may have to Burst every rotation to maintain Quicken aura. |
 Dendro Traveler | Dendro Traveler has an awkward 80 Energy Burst cost on a 20s cooldown, but provides a modest ramping EM buff to active characters from their A1 and a DMG% buff at C6. Unfortunately, it is all tied to their Burst, which only enjoys half uptime in Keqing’s rotations. Be very careful of casting the Traveler’s Burst near enemies that apply Pyro, as coming into contact with Pyro will cause the Lotus Lamp to explode. |
Hydro
Hydro units provide a variety of considerable offensive buffs, utility, and personal damage.
| Character | Notes |
|---|---|
★ Columbina | Columbina’s strength in Quickbloom can be chalked up to the raw magnitude of her personal damage: as long as Lauma is present, she has the highest Talent damage of any Hydro listed by a significant margin. Furthermore, when compared to a similarly offensive unit like Furina, she does not bind the team to a healer, either freeing up a team slot or freeing up Lauma to run a better offensive weapon than Prototype Amber. The sum of these virtues leads Columbina to be the best Hydro option in Quickbloom, provided Lauma is on the team. Columbina has some awkward faults in Quickbloom, as her enabling of Lunar Reactions means quite little and her Burst is almost entirely useless. Because of this, Columbina Lunar-Charged teams produce slightly higher team damage than Columbina Quickbloom teams: however, Quickbloom is still quite viable and generally produces better Keqing personal damage. Columbina’s low Hydro application also means that she reduces Hyperbloom damage in favor of Talent damage. Combined with her powerful Constellations, this allows her to improve this archetype’s vertical scaling from ‘poor’ to ‘passable’. |
 Xingqiu | Xingqiu has the highest off-field application of any Hydro unit and as such is a very good choice for maximizing Bloom core production. Additionally, the damage reduction from his Rain Swords improves Keqing’s survivability. His cooldowns often align oddly with Keqing’s, which can be annoying, but Keqing usually has enough flexibility in her rotations and field time to make this a manageable problem. |
 Furina | Fanfare makes Furina the strongest Hydro buffer for Keqing’s Talent damage. Her application is low enough to allow for significant Quicken uptime while also providing a respectable amount of Bloom cores, and her HP drain also allows Keqing to run 4pc Marechaussee Hunter. Additionally, she scales very well with Constellations. Note that Furina requires a healer to stack her Fanfare. Players who do not wish to spend a team slot on a healer may instead equip Prototype Amber on a Catalyst unit, although this is quite dangerous as it will not be enough healing to keep your team at full health. |
 Yelan | Yelan is awkward as far as non-Columbina Hydros go: she has a lower rate of application than Xingqiu, which makes her unideal for Hyperbloom-centric teams, but her personal damage and DMG% buff is outdone by Furina and her Fanfare, which makes her unideal for Talent damage-centric teams. Although she remains a passable choice, she is not the best option. |
Aino | Aino is a completely free option who offers Keqing 80 EM from her C1, although her usually powerful C6 is unfortunately entirely wasted on Keqing in a Quickbloom composition. Note that it is a fairly bad idea to play her as the sole Nod-Krai unit, as her already middling Hydro application will become even lower. |
 Kokomi | Kokomi provides healing and can hold TTDS, and her Hydro application is low enough that it does not interfere with Quicken uptime. Even so, she lacks the offensive firepower necessary to make her a competitive option as the sole Hydro unit. |
Electro
Offensive Electro units contribute via either personal damage or strong buffs. Some may steal a modest amount of Hyperbloom ownership. Units with high Electro application help stabilize Quicken aura or generate more Bloom Cores for Hyperbloom. This is because applying Dendro to an Electro-Charged aura can result in both a Bloom core and a Quicken aura, which can create its own Bloom core. More detailed information can be found [here].
| Character | Notes |
|---|---|
 ★ Fischl | Fischl remains a powerful off-field DPS in Quickbloom, and her high Energy generation shines even more as it helps reduce the high ER Requirements of Keqing’s Hydro teammates. Whenever one wishes to include a second Electro unit in Keqing’s Dendro-related teams, she should be a top consideration. |
 ★* Ineffa | Ineffa is an extremely attractive option in teams where Lunar-Charged procs frequently enough to maintain full thundercloud uptime. In these cases, she provides both high personal damage and a strong shield, making her one of the best offensive options and an excellent source of sustain. However, teams with high Dendro application and low Hydro application can make it difficult for Lunar-Charged to trigger, which can greatly hamper Ineffa’s performance. In multi-wave scenarios, it is theoretically possible to maintain high thundercloud uptime by continuously triggering Lunar-Charged on new enemies, but this is reliant on facing large swarms of squishy enemies and is not applicable at all to Stygian Onslaught. Note that because Ineffa secures a decent amount of Hyperbloom ownership in Quickbloom teams, EM is a fairly prized stat for her, although ATK% remains excellent for both her damage and utility. |
 Sara | C6 Sara’s position in Quickbloom is the same as it is in Aggravate: she lacks Fischl’s high personal damage but can make up the difference through her hefty Flat ATK and Electro CRIT DMG buffs to Keqing. Note that her buffs become quite devalued in teams where Keqing’s personal damage is majority Hyperbloom. |
Beidou | Beidou offers a mixture of everything: she has decent personal damage (especially in AoE), decent sustain between her Burst damage reduction and C1 shield, and mild Electro RES Shred at C6. Even so, she does not particularly excel in any one area, and her high ER requirements can make her unpleasant to play, especially if you miss her parries. |
Kuki Shinobu | Using Kuki as your second Electro is perhaps akin to playing with fire, as she takes a fair bit of Keqing’s Hyperbloom ownership and frankly begins to boot Keqing out of the team composition. Nevertheless, she remains a serviceable option in this team whose Electro application helps increase Quicken aura uptime, and her multi-hit Burst makes her a nice choice against enemies with hitcount-based shields. She is also a healer in case you need the sustain or are using Furina. |
Ororon | Similar to Ineffa, Ororon’s viability in this archetype varies with how often Electro-Charged is triggered. Unlike Ineffa however, his personal damage is uninspiring, making him a lesser-tier option even in ideal scenarios. |
Example Teams
This is not a comprehensive list of teams. The inclusion or exclusion of any given team does not necessarily reflect its power level.

A Nod-Krai Quickbloom team with high Talent damage. Compared to the old Keqing — Nahida — Furina — Fischl team, this composition has much more power with far less risk. Columbina’s app is low enough that the Quicken aura is essentially permanent, which allows Keqing and Fischl to Aggravate as normal.
Sample Rotation (Non-TF)
(Lauma E)¹ > Columbina E > (Lauma hE)² > Fischl E > Keqing Q EE 4[N1C] > Lauma Q hE > Fischl Q > Keqing EQE 5[N1C] > (Columbina C)³
Sample Rotation (4pc TF)
(Lauma E)¹ > Columbina E > (Lauma hE)² > Fischl E > Keqing EQE 4[N1C] > Lauma Q hE > Fischl Q > Keqing EQE N1C N1 E 3[N1C] > (Columbina C)³
¹First rotation only.
²Subsequent rotations only.
³Optional. Use for gapfill only if needed.

A Nod-Krai Quickbloom team with high Bloom core production. Ineffa unfortunately disables Lauma’s Hyperbloom crits by raising the team’s Moonsign Level to Ascendant Gleam, but she offers Keqing access to 4pc Night of the Sky’s Unveiling along with a sturdy shield that becomes even more durable thanks to Xingqiu’s Rain Sword damage reduction. The dominant aura of this team is Quicken, but Xingqiu’s application is strong enough to sneak in a few Lunar-Charged procs so that Ineffa loses minimal thundercloud uptime.
Note that the rotation given below is a simple looping rot meant as a safe option. Skilled players comfortable with highly desynced rotations should cast abilities more dynamically and play for maximum uptime on Lauma’s and Ineffa’s Skills and Xingqiu’s Burst.
Sample Rotation (Non-TF)
Ineffa E Q > Xingqiu EDQ N1 > Lauma N1 Q hE > Keqing E N1 Q E 5[N1C] (N1) EE 3[N1C] N1
Sample Rotation (4pc TF)
Ineffa E Q > Xingqiu EDQ N1 > Lauma N1 Q hE > Keqing E N1 Q E 3[N1C] N1 EE 3[N1C] N1 E N1C

A safe team focused on single-target damage. Baizhu offers teamwide healing, small shields, Dendro Resonance, and a slight buff to both Aggravate and Hyperbloom damage. Keqing only casts Burst once per rotation due to cooldown constraints, which may make the second 4TF combo awkward or inconsistent due to Skill cooldown concerns.
Sample Rotation (Non-TF Keqing)
Furina ED Q > Nahida E Q > Baizhu E Q > Keqing EQE 5[N1C] > (Nahida E)¹ > Baizhu E > Keqing EE 5[N1C]
Sample Rotation (4pc TF Keqing)
Furina ED Q > Nahida E Q > Baizhu E Q > Keqing EQE N1C N1 E 3[N1C] > (Nahida E)¹ > Baizhu E > Keqing EE 3[N1C] N1(C)² E N1C
¹Often required in multiwave to re-mark new enemies.
²Makes the combo more fluid, but runs the risk of losing full Infusion uptime.

A classic but very risky team. The only source of teamwide healing is Prototype Amber Nahida, but this is not enough to counterbalance Furina’s drain, so your team members will constantly hover around 50% HP. This team has little margin for error, as getting hit and dropping below 50% HP greatly lowers the team’s already middling Fanfare generation, not to mention the challenge of simply surviving. You cannot even use Ineffa for her shield instead of Fischl without risking a severe DPS loss, as Lunar-Charged thundercloud uptime in single-target would be exceedingly low.
However, if you happen to have C6 Furina, this team can easily and safely generate maximum Fanfare and suddenly becomes a much more powerful and appealing option. (Note that the “Elemental Bursts instantly restore 30% HP” card in Spiral Abyss can also serve as a satisfactory source of healing if you luck into it.)
Sample Rotation (Non-TF Keqing)
Furina ED Q (N2)¹ > Fischl E > Nahida E Q > Keqing EQE 5[N1C] E > Fischl Q > Nahida E > Keqing E² N1 Q N1C N1 E N1C
Sample Rotation (4pc TF Keqing)
Furina ED Q (N2)¹ > Fischl E > Nahida E Q > Keqing EQE 5[N1C] > Fischl Q > Nahida E > Keqing combo
¹Only if Furina is C6.
²Because Stiletto was cast at the end of Keqing’s first combo, this is a teleport!

A team with far more Hydro application than Dendro application, meaning that Keqing triggers a great number of Hyperblooms and very few Aggravates. Furina and Yelan lower each other’s ER requirements and unlock Hydro Resonance to enhance their considerable personal damage. Keqing’s combos are built around proccing as many waves of Yelan’s Burst as possible.
Sample Rotation
Furina ED Q > Baizhu E Q > Yelan E Q N1 > Keqing E N1 E 4[N1C] N1 Q > Yelan N1 E N1 > Keqing E N1 E 5[N1C]¹
¹Switch out whenever Yelan’s Burst ends. 4pc TF can perform 3[N1C] N1 E N1C if desired.

Overload
Artifact Stats
|
|
|
|
|
Sands
ATK%
|
Goblet
Electro DMG%
|
Circlet
CRIT
|
Stat Priority: CRIT > ATK%
Although CRIT is still easily above ATK%, the difference is notably smaller than in Keqing’s Dendro teams.
Keqing’s ER requirements are extremely low and should not need to be built around.
Using Genshin Optimizer is recommended as a way to compare your actual artifacts.
Artifact Sets
Assumptions:
Keqing — Chevreuse — Xiangling — Fischl
R5 Finale of the Deep
ATK% — Electro DMG% — CRIT
Full assumptions and calcs ![]() here [last updated for Version 5.7].
here [last updated for Version 5.7].
Hover over artifact images/names for more information.
| Artifact Set | DPS% of 2pc TF + 2pc ATK | Notes |
|---|---|---|
 4pc Fragment of Harmonic Whimsy (requires Finale of the Deep) | 112% | 4pc Whimsy is a stunningly powerful option in Overload, especially when compared to other underwhelming competitors, but it requires the usage of both Finale of the Deep and a healer. Thankfully, Chevreuse is both a healer and Keqing’s most important Overload teammate. |
 2pc Thundering Fury / 2pc ATK / MH 4pc A Day Carved from Rising Winds | 100% (2pc TF + 2pc ATK) 98-99% (other mixed set combinations) 99% (Rising Winds) | 2pc mixed set options are Keqing’s go-to options in Overload. 2pc MH is the weakest of the options here but is close enough to win out if substats are exceptional. 2pc combinations that do not involve 2pc TF fall slightly behind other options, although the gap narrows sharply if Keqing is using weapons with high amounts of DMG Bonus. |
4pc Thundersoother | 100% | Electro aura uptime is not excellent in Overload and may vary from team to team, but it is good enough to make 4pc Thundersoother a competitive option, although in practice most players likely have a 2pc mixed set with better substats. |
4pc Thundering Fury | 96-97% | 4pc Thundering Fury is not a good set outside of Dendro archetypes, and it is particularly suboptimal in Overload because Keqing often does not trigger many reactions and can struggle to activate the passive at all. That being said, the set is still somewhat playable, although longtime Keqing mains looking to make use of their TF pieces should likely put them towards 2pc TF + 2pc ATK. |
Weapons
Assumptions:
Keqing — Chevreuse — Xiangling — Fischl
2pc TF + 2pc ATK
ATK% — Electro DMG% — CRIT
Full assumptions and calcs ![]() here [last updated for Version 5.7].
here [last updated for Version 5.7].
Hover over weapon images/names for more information.
| Weapon | DPS% of R5 Finale | Notes |
|---|---|---|
5★ Mistsplitter Reforged | 117% | Thanks to its high Base ATK, CRIT DMG main stat, and powerful passive, Mistsplitter is generally Keqing’s best weapon across all archetypes. |
5★ Primordial Jade Cutter | 115% | Jade Cutter is as reliable as ever, arriving at a comfortable #2 spot in Overload thanks to its high CRIT and pleasantly strong passive. |
4★ Finale of the Deep (With 4pc Fragment of Harmonic Whimsy) | 112% | Seriously? Yes! Finale of the Deep creates a Bond of Life when Keqing casts an Elemental Skill, allowing her to take advantage of the powerful 4pc Whimsy. In Overload, this combo manages to perform better than most 5* CRIT weapons. However, this comes with a notable list of caveats, as there are various difficulties in stacking the 4pc Whimsy passive. Chevreuse must be at least C4 if Keqing is casting Burst twice per rotation, otherwise half of Keqing’s combos will only have one stack. Keqing never fully stacks 4pc Whimsy on her first combo, so its performance falters the less rotations you take to clear. Finally, if extending Keqing’s combo beyond her basic EQE 5[N1C], Whimsy stacks will fall off entirely for the rest of the combo. Even so, in Overload, this weapon + artifact combo is a lethal option for Keqing. Even in the worst case scenario, it is competitive with weapons like Absolution. |
5★ Haran Geppaku Futsu | 111% | Haran is still one of Keqing’s top weapons, but Keqing’s Normal Attacks are a much less important part of her damage in the absence of Aggravate, making Haran sit firmly behind Mistsplitter and Jade. |
 5★ Azurelight, Athame Artis | 109% | Azurelight’s Energy-conditional passive is almost entirely useless for Keqing, but its high Base ATK and decent stat bundle make it a strong option regardless. Athame Artis is tied with Azurelight if there are less than two Hexerei units in the team. It performs much better in Durin+Fischl teams, becoming Keqing’s second-best option behind Mistsplitter — however, at that point, it would be a significantly greater team DPS increase to just give the weapon to Durin and keep Keqing on Finale+Whimsy. |
 5★ Absolution | 108% | Absolution becomes a solid choice for Keqing in Overload thanks to lessened competition and the increased value of ATK. Its secondary passive is still utterly useless. |
5★ Light of Foliar Incision | 107% | Foliar doesn’t get any significant value out of its passive in an archetype entirely devoid of EM buffers. |
5★ Uraku Misugiri | 105% | Between the lack of Geo teammates, nonviability of 4pc TF, and decreased Normal Attack / Skill damage, Uraku performs much worse in Overload than it does in Quicken. |
 5★ Splendor of Tranquil Waters, Lightbearing Moonshard | 103% | CRIT DMG stat sticks with nothing else to offer. |
5★ Summit Shaper | 102% (unshielded) | Benefits from ATK% being an abnormally valuable stat in Overload. Unfortunately, there are no good shielders for Keqing in this archetype. |
4★ The Black Sword | 101% (R5) 96% (R1) | A decent stat stick from the Battle Pass. Not worth the expenditure when Finale is free. |
4★ Finale of the Deep (Without Whimsy) | 100% (R5) 94% (R1) | There is no good reason not to use 4pc Whimsy with Finale — even in the worst of circumstances, it easily outperforms mixed 2pc sets. That being said, even if you don’t have a 4pc Whimsy set lying around, Finale is still Keqing’s best accessible option. |
4★ Wolf-Fang | 99% (R5) 95% (R1) | Wolf-Fang slightly underperforms Black Sword in Overload, as Keqing’s damage splits shift away from her Elemental Burst and Skill outside of Aggravate. |
4★ Moonweaver’s Dawn | 98% (R5) 93% (R1) | In Overload, Moonweaver’s Dawn is equal to or slightly better than Lion’s Roar given equal refinements. R1 is trivial to obtain, as a free copy of this weapon is available from a World Quest in Nod-Krai, but further refinements may prove difficult to get as it is only available on limited banners. Overall, while it is a somewhat passable free option, this weapon is quite underwhelming for how hard it is to obtain R5. |
4★ Lion’s Roar | 97% (R5) 93% (R1) | Keqing’s old reliable weapon. Lessened Electro aura uptime barely damages the performance of Lion’s Roar in Overload, as its passive works on enemies affected by Pyro as well. |
5★ Freedom-Sworn | 94% | EM main stat weapons are largely noncompetitive in Overload, and Keqing struggles to activate this weapon’s passive until late into her first rotation. Even so, the high Base ATK is quite valuable, and the teamwide buff can put it roughly equal to R1 Black Sword when it comes to team DPS. |
3★ Harbinger of Dawn | 94% | HoD’s low Base ATK hurts its performance outside of Dendro. Completely noncompetitive if you cannot maintain the passive. |
4★ Kagotsurube Isshin | 91% | Please craft Finale. |
Teambuilding
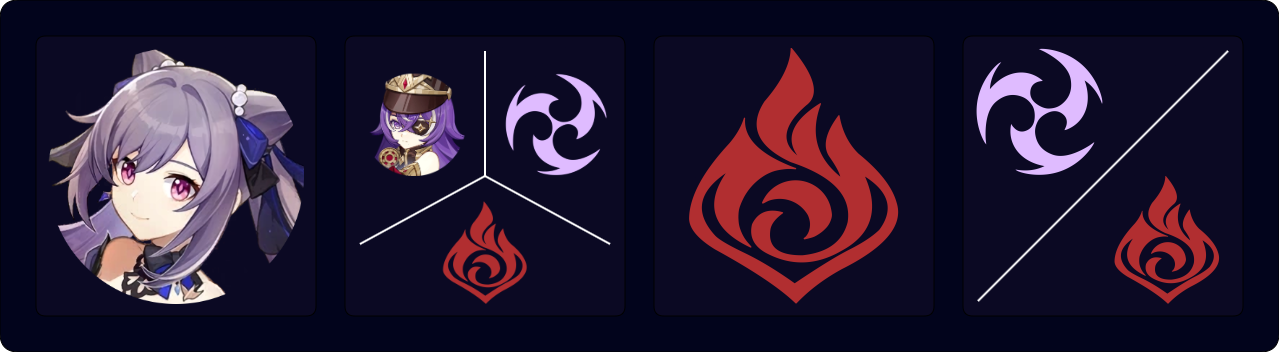
Keqing’s synergy with non-Dendro archetypes is somewhat limited, as her relatively low motion values become apparent when she cannot trigger Aggravate. Nevertheless, she can still find success outside of Quicken teams. Overload teams are particularly appealing, as Keqing greatly benefits from the raw buffing power of Chevreuse, particularly if Chevreuse is C6. In fact, given the abundance of powerful Pyro and Electro buffers, Overload is usually the archetype that one should play if they want to maximize Keqing’s personal damage, especially since Durin and Nicole significantly boost the archetype’s scaling with vertical investment. Overload also provides a way for Keqing to pair with Pyro units without having to reckon with Burning self-damage.
However, the archetype is not without notable downsides. Although top Overload teams do very high team damage on paper when compared to most of Keqing’s other archetypes, they become significantly more pedestrian if you lack C6 Chevreuse. Additionally, Keqing Overload teams deal extremely high poise damage between the Overload reaction itself and Keqing’s Charged Attacks. This is occasionally useful for niche situations like staggering Wayob Manifestations, but is unfortunately a significant downside overall: these teams fare horribly against light enemies, as the slightest touch will send them flying across the arena floor.
Key Teammate
| Character | Notes |
|---|---|
 Chevreuse | Chevreuse enables Overload Keqing as an archetype. Her Ascension 1 Passive offers crucial Electro and Pyro RES Shred as long as there are no other Elements in the team, and her A4 offers a sizable ATK% buff. Her already high value is supercharged at C6, which offers a massive DMG% buff to the team. The strength of these raw numbers makes her Keqing’s most important Overload teammate. An important point: many of Keqing’s 4-star supports spike in performance at higher Constellations, but even among them, Chevreuse stands out as a character who has absurd amounts of value locked behind her C6. In many Keqing Overload teams, unlocking this single Constellation can result in almost a 20% team DPS increase. Additionally, without her C4, she rotates awkwardly in many Keqing teams due to her unpleasant 15s Skill cooldown. Even at C0, Chevreuse is a very powerful unit in Overload, but with the release of new units she is no longer irreplaceable. |
Durin | Durin is Keqing’s best option for a second Pyro thanks to his solid personal damage and excellent offensive buffing. He is a natural fit alongside Chevreuse, as he takes great advantage of her buffs and possesses off-field Pyro application, and he also scales excellently with vertical investment. Note that Durin requires you to run a second Hexerei unit to reach his full potential, both to amp his RES Shred and to grant the team access to the full 4pc effect of Celestial Gift. |
Pyro
Pyro units provide strong buffs and/or off-field application to keep uptime on Chevreuse’s A1 Passive if Durin is not available.
| Character | Notes |
|---|---|
★ Nicole | Nicole has no off-field Pyro application and thus can only slot in as an emergency Chevreuse replacement or as a Triple Pyro buffer, but she has an impressive resume of buffs to make up for it: a Flat ATK buff from her A1 and Skill, “quill”-like Coordinated Attacks from her Burst, 40 DMG Bonus from 4pc Celestial Gift, and a high-uptime shield for good measure. It is strongly advised to pair her with Durin, as she synergizes very well with him. Note that Nicole, like Durin, has extremely powerful Constellations, most notably her C2 and C6. |
Mavuika | Mavuika has two separate roles depending on the team composition. If she is the only Natlan unit in the team, she runs 4pc Scroll of the Hero of Cinder City and builds full EM, Bursting whenever she has maximum Fighting Spirit (which tends to be every 2–3 rotations). In this role, she does less personal damage than Xiangling but compensates by buffing Keqing through 4pc Scroll and her occasional DMG% buff from Burst. However, if there is another Natlan support (e.g. Ororon, Iansan) in the team, Mavuika’s playstyle dramatically shifts. As the other Natlan unit can run 4pc Scroll and charge Mavuika’s Fighting Spirit, Mavuika switches to 4pc Obsidian Codex and builds full DPS, Bursting every rotation. Mavuika can also take some field time so that Keqing does not have to extend her on-field combo to uncomfortably long lengths. |
Xiangling | Xiangling has the highest application of any Pyro off-fielder, which makes her excellent against content that requires Pyro units. As in Quickburn, an EM Xiangling build is advised in most compositions, as she is the dominant Overload trigger in her teams. However, because Xiangling’s Burst has a 20s CD and costs 80 Energy, she forces longer rotations than most other options. This may seem like a strict downside at first, but these long rotations also have the benefit of syncing nicely with units like Fischl. They also give Keqing enough time to perform two full combos. |
 Pyro Traveler | Pyro Traveler is essentially a free version of Mavuika with drastically lower Talent damage and a lower DMG% buff. PMC plays a roughly identical role to Mavuika when there are no other Natlan units in the team and generally serves as a decent budget replacement. Unfortunately, instead of benefiting from other Natlan supports, Pyro Traveler would prefer to be the only unit who can enter Nightsoul’s Blessing in the team, as the DMG% buff from 4pc Scroll does not stack and PMC does not deal enough Talent damage to justify running 4pc Obsidian Codex in the same fashion as Mavuika. |
 Bennett | Bennett does not apply off-field Pyro but is a worthwhile consideration as a third Pyro slot, as he is a strong buffer who fits within Chevreuse’s Element restriction. Bennett can also potentially be run in Double Electro + Double Pyro teams, as C6 Bennett can circumvent Chevreuse’s off-field application requirement by infusing Keqing’s Normal and Charged Attacks with Pyro. However, this carries the obvious downside of forcing Keqing to split her damage between two Elements, which can turn catastrophic when using large buffs to Electro damage like Keqing’s C6, 4pc Thundersoother, or C6 Sara. |
Electro
Offensively-oriented Electro units contribute either via personal damage or strong buffs.
| Character | Notes |
|---|---|
 ★ Fischl | While her personal damage isn’t quite as strong as it is in Aggravate, Fischl is still an excellent choice in Keqing’s Overload teams and remains the strongest Electro off-field DPS available. Her high energy generation also helps reduce team ER requirements. As a Hexerei character, Fischl also provides a strong teamwide ATK% buff when paired with Durin, maximizes his RES Shred, and unlocks the full effects of Hexerei artifact sets, making her an excellent choice for the final slot if you are running the trio of Keqing — Durin — Chevreuse. |
 Sara | Sara remains Keqing’s strongest Electro buffer in Overload, and she also has a chance to buff Keqing’s Pyro teammates (primarily Xiangling, as she can snapshot Sara’s Flat ATK buff). This generally makes Sara a surprisingly pleasant and competitive option for Overload Keqing, although her low particle generation is still sometimes a cause for concern. |
Iansan | Although Keqing is often thought of as a mobile unit, she is actually fairly stationary during her on-field combo, meaning that she cannot stop Iansan’s Nightsoul bar from draining. As such, Iansan’s buffs cannot be used to full effect and fall behind Sara’s. However, Iansan still carves out a role in Overload teams thanks to her ability to charge Mavuika’s Fighting Spirit. |
Ororon | Similar to Iansan, but with slightly more personal damage, less buffs, and an even more crippling reliance on Mavuika, as Ororon cannot enter the Nightsoul’s Blessing state (and thus cannot activate the full passive of 4pc Scroll of the Hero of Cinder City) without either Electro-Charged or a second Natlan unit in the team. Note that he can still be played without Mavuika if you are fighting an enemy with a Hydro innate aura. |
Example Teams
This is not a comprehensive list of teams. The inclusion or exclusion of any given team does not necessarily reflect its power level.

One of Keqing’s most powerful Overload teams, with strong buffers who also chip in high amounts of personal damage. Skip Chevreuse’s second hE if she is under C4. Exceptionally fast players should perform a physical Keqing E N1C at the end of the rotation for optimal gapfill, and may also be able to recast Keqing’s opening Skill on first rotation for a bit of extra damage.
Sample Rotation
(Durin Q > Keqing E)¹ > Chevreuse Q hE > Durin EE > Fischl E > Keqing Q EE² 5[N1C] > Chevreuse hE > Durin EE Q > Fischl Q > Keqing EQE 5[N1C]
¹First rotation only.
²EQE is also possible from second rotation onward.

An Overload team with classic off-field damage dealers in Xiangling and Fischl. The long rotation time makes Xiangling’s ER requirements exceedingly manageable. Skip Chevreuse’s second hE if she is under C4. Exceptionally fast players should perform a physical Keqing E N1C at the end of the rotation for optimal gapfill.
Sample Rotation
(Keqing E)¹ > Chevreuse Q hE > Fischl E > Xiangling E > Keqing Q EE² 5[N1C] > Chevreuse hE > Fischl Q > Xiangling Q E > Keqing EQE 5[N1C]
¹First rotation only.
²EQE is also possible from second rotation onward.

An Overload team with Nightsoul units. Ororon and Mavuika mutually benefit one another: Mavuika allows Ororon to enter the Nightsoul’s Blessing state and trigger 4pc Scroll, and Ororon generates enough Fighting Spirit for Mavuika to Burst every rotation.
Sample Rotation
Ororon E Q > Chevreuse Q hE > Mavuika E Q C2D > Keqing EQE 5[N1C] EE 2[N1C] N1

“Hyper” Keqing. This team has numerous advantages over the old Keqing – Sara – Kazuha – Bennett: it gives Keqing reliable access to the Finale + Whimsy combo, handles multiwave better, has a second unit who deals respectable personal damage in Xiangling, and buffs Keqing’s personal damage far more than the old team given a C6 Chevreuse. Also, because Bennett is not in the team, it avoids the problem caused by his C6 Pyro Infusion.
Note that replacing Fischl with Sara tightens ER requirements for the entire team, making it an especially bad idea to play this team without C4+ Chevreuse.
Sample Rotation
(Keqing E)¹ > Chevreuse Q hE > Xiangling E > Sara E C > Keqing Q EE² 5[N1C] > Chevreuse hE > Sara Q > Xiangling Q E > Sara E C > Keqing EQE 5[N1C] E³ N1C
¹First rotation only.
²EQE is also possible from second rotation onward.
³This extra Skill cast is usually required due to Sara’s low particle generation.
Lunar-Charged
On Lunar-Charged Reaction Damage Contribution
Lunar-Charged (LC) reaction damage ownership is quite difficult to make objective statements about, as it changes on an account-to-account basis. Even more infuriatingly, it is quite literally impossible to tell who is the top LC contributor from simply playing the game — the only way to know for sure is to input your personal builds into a tool like Genshin Optimizer and seeing whether Keqing or Ineffa is outputting the higher number.
Furthermore, there is no actual gain in the mere transfer of ownership from one character to another. Whether Keqing is the highest or second-highest Lunar-Charged contributor should not be seen as a necessarily positive or negative thing, only a neutral factor that can influence her optimal gearing. Keqing being the top LC contributor can be a sign of high team LC reaction damage, but it can also simply be a sign of an underbuilt Ineffa.
Given this, it is generally advisable to ignore LC contributions unless stated otherwise. LC ownership does not significantly influence Keqing’s gearing in most cases — having the top LC contribution does not change her optimal artifact sets or artifact main stats. If anything, it only makes her best sets even better. When it comes to weapons, assume that if a weapon has a noticeable jump in performance if Keqing takes top LC contribution, she probably will.
Finally, on the semantical point of improving Keqing’s damage share in the team — save your worries. It isn’t possible to tell the difference between second LC Keqing and top LC Keqing in-game anyways.
Artifact Stats
|
|
|
|
|
Sands
ATK%
|
Goblet
Electro DMG% > ATK%*
|
Circlet
CRIT**
|
Stat Priority: CRIT > ATK% > EM
In Lunar-Charged teams, EM is a somewhat useful stat, especially if Keqing manages to take top LC contribution, but it is not competitive with ATK%.
*ATK% Goblets are typically far worse than Electro Goblets, but can become competitive or even outright better if Keqing has both a weapon with high Base ATK (such as Mistsplitter Reforged) and large amounts of DMG Bonus (from sources such as her own C6, Furina’s Fanfare, a teammate holding 4pc Scroll of the Hero of Cinder City, and Mistsplitter Reforged).
**Be wary of using CRIT Rate Circlets if Keqing is running an artifact set that boosts CRIT Rate, as it is easy for her to overcap.
Using Genshin Optimizer is recommended as a way to compare your actual artifacts.
Artifact Sets
Assumptions:
Keqing — Ineffa — Aino — Sucrose and Keqing — Ineffa — Furina — Xilonen
ATK% — Electro DMG% — CRIT
R5 Lion’s Roar and R5 Finale of the Deep
Full assumptions and calcs ![]() here [last updated for Version “Luna III”].
here [last updated for Version “Luna III”].
Hover over artifact images/names for more information.
| Artifact Set | Notes |
|---|---|
 4pc Night of the Sky’s Unveiling (NotSU) | A very powerful option that is roughly equal to traditional sets when there is only one Nod-Krai unit in the team and drastically better when there are two. |
 4pc Marechaussee Hunter (MH) | 4pc MH is Keqing’s top option in Lunar-Charged by an exceedingly large margin when there is only one Nod-Krai unit in the team. Unfortunately, it requires Furina. Lunar-Charged Keqing should hopefully only use either this or 4pc NotSU, depending on what artifact set is best in your specific team composition (4pc NotSU with 2 Nod-Krai units, and 4pc MH with Furina). If you fulfill both of those conditions at once, you should just use the set that you have better pieces for. |
| 4pc Thundersoother | Electro aura is essentially permanent in Lunar-Charged, making 4pc Thundersoother Keqing’s best traditional option. Falters slightly if Keqing has a high amount of DMG Bonus. |
2pc Mixed Sets (TF/ATK/MH) 4pc A Day Carved from Rising Winds 4pc Thundering Fury 4pc Gilded Dreams | 2pc mixed set options generally fall slightly behind 4pc Thundersoother. 2pc MH is the weakest of the options here but is close enough to win out if the substats are exceptional. 4pc Thundering Fury and 4pc Gilded Dreams are competitive with mixed sets if Keqing is somehow the top LC contributor even without running a CRIT Rate artifact set, but if she is not, these sets are quite lacking. |
| 4pc Fragment of Harmonic Whimsy | The Whimsy + Finale of the Deep combo is still theoretically powerful in Lunar-Charged, but faces much stiffer competition than it does in Overload. 4pc MH in particular destroys 4pc Whimsy’s value, as it is the clear best option in many of the situations where 4pc Whimsy would otherwise shine (e.g. Keqing — Ineffa — Furina — Healer). Thus, while technically strong, it is difficult to find a situation in which Whimsy + Finale is practical and optimal, and in Lunar-Charged it is only slightly better than 4pc Thundersoother anyways. |
Click the dropdowns below to view/hide its contents.
Artifact Comparison Table (Aino/Sucrose, high EM buffs, Top LC)
| Artifact Set | DPS % of 4pc TS |
|---|---|
| 4pc Night of the Sky’s Unveiling | 115% |
| 4pc A Day Carved from Rising Winds | 100% |
| 4pc Thundersoother | 100% |
| 4pc Thundering Fury | 99% |
| 2pc Mixed Sets (TF/ATK/MH) | 97-99% |
| 4pc Gilded Dreams | 98% |
Artifact Comparison Table (Furina/Xilonen, high DMG% buffs — 2nd LC)
| Artifact Set | DPS % of 4pc TS |
|---|---|
| 4pc Marechausee Hunter | 115% |
| 4pc Fragment of Harmonic Whimsy* | 104% |
| 4pc Night of the Sky’s Unveiling (1 Nod-Krai) | 99% |
| 4pc Thundersoother | 100% |
| 4pc A Day Carved from Rising Winds | 98% |
| 2pc Mixed Sets (TF/ATK/MH) | 95-98% |
| 4pc Thundering Fury | 94% |
| 4pc Gilded Dreams | 94% |
*4pc Whimsy requires the usage of Finale of the Deep.
Artifact Comparison Table (Furina/Xilonen, high DMG% buffs — Top LC)
| Artifact Set | DPS % of 4pc TS |
|---|---|
| 4pc Marechausee Hunter | 117% |
| 4pc Fragment of Harmonic Whimsy* | 103% |
| 4pc Night of the Sky’s Unveiling (1 Nod-Krai) | 102% |
| 4pc Thundersoother | 100% |
| 4pc A Day Carved from Rising Winds | 98% |
| 2pc Mixed Sets (TF/ATK/MH) | 96-98% |
| 4pc Thundering Fury | 98% |
| 4pc Gilded Dreams | 97% |
*4pc Whimsy requires the usage of Finale of the Deep.
Weapons
Assumptions:
Keqing — Ineffa — Aino — Sucrose and Keqing — Ineffa — Furina — Xilonen
ATK% — Electro DMG% — CRIT
4pc NotSU and 4pc MH
Full assumptions and calcs ![]() here [last updated for Version “Luna I”].
here [last updated for Version “Luna I”].
Hover over weapon images/names for more information.
| Weapon | Notes |
|---|---|
5★ Mistsplitter Reforged | Thanks to its high Base ATK, CRIT DMG main stat, and powerful passive, Mistsplitter is generally Keqing’s best weapon across all archetypes. |
5★ Primordial Jade Cutter | Jade Cutter is a fairly polarizing weapon in Lunar-Charged. With traditional artifact sets, it is actually Keqing’s best weapon, overtaking Mistsplitter by a decent margin. However, it is heavily anti-synergistic with both of her optimal artifact sets for Lunar-Charged, 4pc Marechaussee Hunter and 4pc Night of the Sky’s Unveiling, as the combination of 4pc MH / 4pc NotSU, Jade Cutter, and Keqing’s A4 turns CRIT Rate into a dead substat. When this happens, Jade Cutter falls equal to or behind theoretically inferior weapons which can make much better use of CRIT Rate artifact sets, so it is never one of Keqing’s best options when she is running 4pc MH or 4pc NotSU. |
5★ Light of Foliar Incision | Foliar is another strangely polarizing option in Lunar-Charged that takes advantage of the fact that many of Keqing’s common teammates in Lunar-Charged buff her Elemental Mastery. When Keqing has exceptional amounts of EM, Foliar becomes one of her very best weapons, performing equal to or even slightly better than Mistsplitter. If she does not, it reverts to being a generic 5-star stat stick with a fairly underwhelming passive. Note that 88.2% CRIT DMG weapons like Foliar are often technically Keqing’s best options for her personal damage, as Keqing is most likely to take top LC contribution when using them. However, this increase to Keqing’s damage simultaneously halves Ineffa’s LC reaction damage and is thus rather misleading, as it is still better overall to simply maximize Keqing’s Talent damage. |
5★ Summit Shaper | Summit Shaper manages to be a top choice for Keqing in Lunar-Charged, as ATK% is a valuable stat and Ineffa’s shield is extremely high uptime. Even so, certain rotations only have partial uptime on Ineffa’s shield. In those cases (or if the shield simply breaks), Summit Shaper admittedly loses a slight bit of value, but it remains a strong option. As Summit Shaper does not buff Lunar-Charged reaction damage in any way, it also falls behind 5-star CRIT stat sticks in scenarios where Keqing would take top LC contribution regardless of the weapon she is using (for instance, if she is paired with C6 Aino). |
Other 5★ CRIT Stat Sticks | Absolution, Athame Artis, Azurelight, Haran Geppaku Futsu, Lightbearing Moonshard, Uraku Misugiri, Splendor of Tranquil Waters 5-star stat sticks that perform solidly in Lunar-Charged, although they are never competitive with Mistsplitter. Weapons that offer CRIT DMG are easier to use with 4pc MH and 4pc NotSU than weapons that offer CRIT Rate. Splendor should likely stay on Furina, if you’re using her. |
4★ Finale of the Deep | R5 Finale of the Deep is competitive with 5-star stat sticks if you have a healer that is clearing the Bond of Life for every Keqing combo. It loses some value if your rotation only allows your healer to clear BoL every other combo, and loses yet more if you don’t have a healer at all. |
5★ Freedom-Sworn | A weapon with passable personal damage for Keqing and a nice teamwide buff. Loses slight value if you’re only triggering the buff every other combo. |
4★ Lion’s Roar | Keqing’s trademark 4-star option, with full uptime on the passive guaranteed. |
4★ Calamity of Eshu | Tied with R5 Lion’s Roar assuming full uptime on the passive. Similarly to Summit Shaper, it loses slight value if you lack full shield uptime. |
3★ Harbinger of Dawn | Although HoD is still not competitive with a high-refinement Lion’s Roar, it appreciates Ineffa greatly, as her shield makes it far more likely that you will enjoy full uptime on the weapon’s passive. Note that this is an especially terrible option to pair with Furina, as her HP drain is fairly likely to disable its passive, and even if it doesn’t, the CRIT Rate HoD offers pairs poorly with 4pc MH. |
4★ The Black Sword, Wolf-Fang | Battle Pass options. Black Sword is generally equal to Lion’s Roar at equal refinements, while Wolf-Fang fares a bit worse, as Keqing’s damage distribution shifts away from her Elemental Skill outside of Dendro. Unfortunately, both Battle Pass options are CRIT Rate main stats and, as such, pair poorly with 4pc MH and 4pc NotSU. |
 4★ Moonweaver’s Dawn, Kagotsurube Isshin | Weak free options that should only be used if you have nothing better. Kagotsurube Isshin can currently only be obtained at R1, and refinements on Moonweaver’s Dawn are locked to limited weapon banners — even if you obtain R5 Moonweaver’s Dawn, it will only be very slightly better than R1 Lion’s Roar. |
Click the dropdowns below to view/hide its contents.
Weapon Comparison Table (Aino/Sucrose, high EM buffs, Top LC)
| Weapon | DPS % of Lion’s Roar R1 |
|---|---|
| Light of Foliar Incision R1 | 117% |
| Mistsplitter Reforged R1 | 116% |
| Uraku Misugiri R1 | 112% |
| Absolution, Splendor of Tranquil Waters, Lightbearing Moonshard, Azurelight, Haran Geppaku Futsu | 110% |
| Summit Shaper R1 (shielded), Primordial Jade Cutter R1 (4pc TS), Athame Artis | 109% |
| Harbinger of Dawn R5 (full uptime) | 106% |
| The Black Sword R5 | 105% |
| Lion’s Roar R5 | 105% |
| Calamity of Eshu R5 (shielded) | 104% |
| The Black Sword R1 | 101% |
| Wolf-Fang R5 | 101% |
| Freedom Sworn R1 (half uptime) | 101% |
| Moonweaver’s Dawn R5 | 101% |
| Lion’s Roar R1 | 100% |
| Wolf-Fang R1 | 99% |
| Finale of the Deep R5 (no healer) | 99% |
| Moonweaver’s Dawn R1 | 98% |
| Toukabou Shigure R5 | 98% |
| Kagotsurube Isshin R1 | 97% |
| Iron Sting R5 | 96% |
| Iron Sting R1 | 93% |
Italicized weapons offer CRIT Rate and thus may be difficult to use with CRIT Rate artifact sets. Of course, the problem is not equally pressing in all cases — the more CRIT Rate granted by the weapon, the more you will be in danger of overcapping
Weapons with asterisks (*) next to their 2nd LC DPS% numbers offer CRIT DMG (or EM) and thus are likely to cause Keqing to take top LC contribution, especially when combined with 4pc Marechausee Hunter. As such, although their values are included on the 2nd LC column for completion’s sake, a more accurate comparison of their value in most circumstances should be found on the Top LC columns.
Again, this value is not equal — the more CRIT DMG granted by the weapon, the more likely it is that you will take top LC uptime. Also, CRIT Rate main stat weapons are not asterisked as you are likely to hit close to 100% CRIT Rate no matter what weapon you choose, meaning that CRIT Rate weapons do not increase your expected CRIT value ceiling.
Weapon Comparison Table (Furina/Xilonen, high DMG% buffs — 2nd LC)
| Weapon | DPS % of Lion's Roar R1 |
|---|---|
| Mistsplitter Reforged R1 | 118%* |
| Summit Shaper R1 | 116% |
| Azurelight R1 | 112% |
| Uraku Misugiri R1 | 110%* |
| Absolution R1 | 110%* |
| Light of Foliar Incision R1 | 109%* |
| Finale of the Deep R5 | 109% |
| Athame Artis R1 | 108% |
| Splendor of Tranquil Waters R1 | 107%* |
| Primordial Jade Cutter R1 | 107% |
| Lightbearing Moonshard | 106%* |
| Calamity of Eshu R5 (shielded) | 106% |
| Lion’s Roar R5 | 106% |
| Freedom Sworn R1 (full uptime) | 105%* |
| The Black Sword R5 | 102% |
| Moonweaver’s Dawn R5 | 102% |
| Lion’s Roar R1 | 100% |
| Moonweaver’s Dawn R1 | 97% |
| Kagotsurube Isshin R1 | 97% |
| The Black Sword R1 | 97% |
| Wolf-Fang R5 | 97% |
| Harbinger of Dawn R5* (full uptime) | 96% |
| Wolf-Fang R1 | 95% |
| Toukabou Shigure R5 | 93%* |
| Iron Sting R5 | 91%* |
| Iron Sting R1 | 87%* |
Italicized weapons offer CRIT Rate and thus may be difficult to use with CRIT Rate artifact sets. Of course, the problem is not equally pressing in all cases — the more CRIT Rate granted by the weapon, the more you will be in danger of overcapping
Weapons with asterisks (*) next to their 2nd LC DPS% numbers offer CRIT DMG (or EM) and thus are likely to cause Keqing to take top LC contribution, especially when combined with 4pc Marechausee Hunter. As such, although their values are included on the 2nd LC column for completion’s sake, a more accurate comparison of their value in most circumstances should be found on the Top LC columns.
Again, this value is not equal — the more CRIT DMG granted by the weapon, the more likely it is that you will take top LC uptime. Also, CRIT Rate main stat weapons are not asterisked as you are likely to hit close to 100% CRIT Rate no matter what weapon you choose, meaning that CRIT Rate weapons do not increase your expected CRIT value ceiling.
Weapon Comparison Table (Furina/Xilonen, high DMG% buffs — Top LC)
| Weapon | DPS % of Lion's Roar R1 |
|---|---|
| Mistsplitter Reforged R1 | 117% |
| Summit Shaper R1 | 113% |
| Azurelight R1 | 111% |
| Uraku Misugiri R1 | 112% |
| Absolution R1 | 110% |
| Light of Foliar Incision R1 | 113% |
| Finale of the Deep R5 | 108% |
| Athame Artis R1 | 108% |
| Splendor of Tranquil Waters R1 | 108% |
| Primordial Jade Cutter R1 | 107% |
| Lightbearing Moonshard | 107% |
| Calamity of Eshu R5 (shielded) | 104% |
| Lion’s Roar R5 | 105% |
| Freedom Sworn R1 (full uptime) | 108% |
| The Black Sword R5 | 102% |
| Moonweaver’s Dawn R5 | 102% |
| Lion’s Roar R1 | 100% |
| Moonweaver’s Dawn R1 | 98% |
| Kagotsurube Isshin R1 | 98% |
| The Black Sword R1 | 98% |
| Wolf-Fang R5 | 98% |
| Harbinger of Dawn R5* (full uptime) | 99% |
| Wolf-Fang R1 | 96% |
| Toukabou Shigure R5 | 97% |
| Iron Sting R5 | 95% |
| Iron Sting R1 | 91% |
Italicized weapons offer CRIT Rate and thus may be difficult to use with CRIT Rate artifact sets. Of course, the problem is not equally pressing in all cases — the more CRIT Rate granted by the weapon, the more you will be in danger of overcapping
Weapons with asterisks (*) next to their 2nd LC DPS% numbers offer CRIT DMG (or EM) and thus are likely to cause Keqing to take top LC contribution, especially when combined with 4pc Marechausee Hunter. As such, although their values are included on the 2nd LC column for completion’s sake, a more accurate comparison of their value in most circumstances should be found on the Top LC columns.
Again, this value is not equal — the more CRIT DMG granted by the weapon, the more likely it is that you will take top LC uptime. Also, CRIT Rate main stat weapons are not asterisked as you are likely to hit close to 100% CRIT Rate no matter what weapon you choose, meaning that CRIT Rate weapons do not increase your expected CRIT value ceiling.
Teambuilding

Electro-Charged is traditionally known as a very flexible archetype where the reaction itself deals very little damage. In principle, Keqing could be paired with any strong Hydro or Electro units and the team would function. Unfortunately, these compositions usually deal fairly low damage and are generally not recommended unless Keqing is fighting against specific enemy content that demands Electro-Charged.
However, the release of Lunar-Charged has transformed the archetype entirely, making it a much more powerful option. Lunar-Charged teambuilding now revolves around pairing Keqing with the Nod-Krai supports that enable Lunar-Charged, Ineffa and Columbina. The final slot is typically reserved for a unit who can provide RES Shred, such as an Anemo for 4pc VV.
These premium Lunar-Charged teams are easily Keqing’s highest-damaging teams at C0R0 investment if one defines a “Keqing team” as nothing more than a team where on-fielding Keqing is DPS-positive. They also have solid sustain thanks to Ineffa’s shield. However, at the same time, they provide very little for Keqing’s Talent damage, and she often struggles to deal meaningful damage or to feel impactful. As such, while these teams are extremely strong and quite comfortable to play, players who wish to maximize Keqing’s personal damage should look elsewhere, although there still may be times where you are forced to play this archetype to defeat certain Nod-Krai enemies.
Note that having two Nod-Krai characters for Ascendant Gleam is highly recommended, as it enables a notable Lunar Reaction DMG% buff, the full effects of powerful Nod-Krai artifact sets, and several passives for Nod-Krai characters. It also makes combat against Wild Hunt enemies significantly easier.
Key Teammates
If you do not have either of these units, you literally cannot play Lunar-Charged Keqing. If you only have one of them, the archetype will be playable, but it will deal dramatically less damage than it would if you had both. If you are looking to build a Lunar-Charged team and do not have either unit, you should prioritize getting Ineffa first, as her shield will make the team far more comfortable to play.
| Character | Notes |
|---|---|
Columbina | Columbina is the only Hydro unit in the game that enables Lunar-Charged, and she is the best Hydro support for the archetype by leaps and bounds. She deals excellent personal damage given Ascendant Gleam, buffs Lunar-Charged damage by a significant amount through her Moonsign Passive and Burst, and of course raises the team’s Moonsign Level. Her Constellations are also incredibly powerful, particularly her C2 and C6, and ensure that team damage in Lunar-Charged archetypes scales well given vertical investment. |
 Ineffa | Ineffa is the only Electro off-fielder who enables Lunar-Charged and is Keqing’s clear best Electro teammate in this archetype. Although most of her value is in her extremely high off-field personal DPS, she can still benefit Keqing in several ways. Her Utility Passive brings a teamwide buff to Lunar-Charged damage, which Keqing can push even higher thanks to her high CRIT stats from her CRIT DMG Ascension and A4 Passive. Her C1 and Fractured Halo further buff the Lunar-Charged damage of all party members, which includes Keqing’s Lunar-Charged reaction damage. Defensively, her shield brings much-appreciated QoL to Keqing’s gameplay and unlocks certain weapon options such as Calamity of Eshu. |
Other Hydro
Columbina performs drastically better than every Hydro option listed here, and none of them should be considered as truly competitive replacements in terms of team damage. However, these units remain playable choices that can slot into viable teams, and some of them provide increases to Keqing’s Talent damage that Columbina does not.
| Character | Notes |
|---|---|
 ★ Furina | When excluding Columbina, Furina is Keqing’s best Hydro teammate. She deals the most personal damage, has the most flexible cooldowns and the lowest ER requirements, and buffs Keqing a significant amount, not just through Fanfare but also by granting Keqing access to 4pc Marechausee Hunter. Her primary downside is that she requires a healer, but luckily there are a fairly large number of healers to go around. As always, she also scales well with Constellations. |
Aino | Aino has the worst personal damage of any of the listed Hydro options but compensates by enabling Ascendant Gleam once paired with another Nod-Krai character like Ineffa. Her Constellations are also quite valuable: her C1 offers a decent EM buff to Keqing, and C6 grants Keqing a powerful Lunar-Charged DMG% buff. Note that her C6 in particular makes it quite likely that Keqing reaches top LC contribution, as it only applies to the on-field character. |
 Yelan | Yelan is an off-field DPS who also offers Keqing a sizable DMG% buff from her A4, making her a fairly solid option. However, she does not buff Keqing nearly as much as Furina, as she cannot match the combination of Fanfare and access to 4pc MH. |
 Xingqiu | Xingqiu is an extremely safe defensive option thanks to the damage reduction effect on his Rain Swords, and it is extremely difficult to die when pairing his defensive utility with Ineffa’s shield. Unfortunately, he offers little in terms of offensive value. |
Resistance Shredders
Most sources of RES Shred are Anemo units that contribute through 4pc Viridescent Venerer. Durin and Xilonen are the exceptions, as they provide RES Shred along with a mixture of other benefits that make them competitive with the usual Anemo options.
Keqing — Columbina — Ineffa teams do not have the room to enable the Hexerei: Secret Rite passives of Hexerei characters, and you should not drop Columbina or Ineffa simply to enable these passives. However, if Columbina or Ineffa are unavailable, you may pursue Hexerei buffs as a consolation prize, although this should still be avoided if you are fighting enemies weak to Ascendant Gleam.
| Character | Notes |
|---|---|
 Sucrose | Sucrose’s EM buff provides a healthy increase to Lunar-Charged reaction damage, making her a strong offensive support in Lunar-Charged. Furthermore, as a Catalyst user, she has access to support weapons like Wandering Evenstar, Hakushin Ring and Thrilling Tales of Dragon Slayers. |
Prune | Prune is another respectable Catalyst user who offers DMG% from her A4 and Flat ATK at C6. Similarly to Sucrose, she performs solidly even in the absence of double Hexerei. |
Jahoda | Jahoda is a healer from Nod-Krai who can enable Ascendant Gleam, provide 100 EM to the on-field unit, and stack Fanfare if Furina is in the team. She also has a significant powerspike at C6 as it gives Nod-Krai characters a boatload of CRIT value, although she unfortunately does not buff Keqing’s Talent damage at all beyond 4pc VV. |
Durin | Durin only provides 20% Electro RES Shred without a Hexerei teammate, and cannot shred Hydro RES at all, but he compensates by contributing a very large amount of personal damage as he is able to trigger both Vaporize and Overload on the Lunar-Charged aura. Additionally, he scales well with vertical investment. |
 Kazuha | Kazuha’s DMG% buff unfortunately does not affect Lunar-Charged damage, but he still provides a valuable increase to Keqing’s Talent damage. Additionally, his grouping remains potent in AoE scenarios. |
Xilonen | Xilonen offers RES Shred from her Source Samples, a powerful DMG% buff thanks to 4pc Scroll of the Hero of Cinder City, and strong healing from her Burst. Her buff profile is similar to Kazuha’s, meaning she also suffers from the focus on Lunar-Charged damage, and in non-Columbina teams she can struggle to trigger Hydro Crystallize. Nevertheless, she remains a compelling option if one wishes to condense sustain and offense. |
  Heizou, Lynette | Typical second-tier offensive buffers that are playable if you lack better options. Lynette’s taunt is less useful since Ineffa is already providing sustain, but she still provides both Keqing and Ineffa with a decent ATK% buff through her A1. Heizou is a Catalyst user with a modest EM buff and is essentially a lesser version of Sucrose. |
 Xianyun | An interesting Anemo healer — access to Plunging Attacks doesn’t particularly benefit Keqing on paper, but it increases her AoE range and enables her to dodge certain enemy attacks by jumping into the air. Xianyun also has access to Catalyst support weapons, although her high ER requirements somewhat restrict her options. |
  Jean, Sayu | Jean and Sayu are pure healers who make for extremely safe Anemo options. Offensively, they contribute little more than applying 4pc VV and stacking Furina’s Fanfare. |
Other Electro
If you must play Electro/Lunar-Charged without Ineffa for whatever reason, these Electro units contribute a variety of strong off-field damage, sustain, or buffs. They are also the go-to units for if you want to play Triple Electro, which can be a strong choice against an enemy with mechanics that massively lower its own RES (such as the Battle-Hardened Pipilpan Idol) to the point that further RES Shred is significantly devalued.
| Character | Notes |
|---|---|
 Fischl | While her personal damage isn’t quite as strong as it is in Aggravate, Fischl is still the highest-damaging Electro off-field DPS around if Ineffa is unavailable or already in the team. It is also possible to use Fischl in conjunction with other Hexerei units to enable Hexerei: Secret Rite passives: Durin in particular is an appealing choice, as he enables Overload and thus the ATK% part of her Hexerei passive in addition to the EM from Electro-Charged. |
Ororon | Ororon shines in this archetype as he can freely enter Nightsoul’s Blessing and accumulate Nightsoul points, maximizing his personal damage and granting him access to 4pc Scroll. Scroll is slightly devalued in Triple Electro teams as it does not buff Ineffa, but Ororon remains a good fit for this archetype regardless. |
 Sara | C6 Sara remains Keqing’s highest-buffing Electro support in Lunar-Charged. In Triple Electro teams, she can also buff Ineffa, although her short buff uptime remains a nagging issue. |
Example Teams
This is not a comprehensive list of teams. The inclusion or exclusion of any given team does not necessarily reflect its power level.

A very high-damaging team that focuses on maximizing Lunar-Charged reaction damage. Keqing has fairly little Talent damage in this composition but can still snag 4pc VV from Sucrose and a buff from TTDS, Hakushin Ring, or Wandering Evenstar. Note that most of the team damage is being dealt by the Nod-Krai off-fielders.
The sample rotation below is both very simple and slightly strange: Ineffa, Columbina, and Sucrose either have too long a Burst cooldown or too high an Energy requirement to Burst every rotation, so instead, all three of them Burst every even rotation. This results in different rotation lengths for odd and even rotations, i.e. 18s first rot, 22s second rot, 18s third rot, and so forth.
Sample Rotation
Ineffa E(Q)1 > Columbina E(Q)1 > Sucrose E N12 / Q N12 > Keqing EQE 5[N1C] > Sucrose E N12 > Keqing EE 3[N1C]
1Every other rotation
2N1 guarantees Swirl

A very safe team with very strong healing from Jean, and by extension, very high Fanfare generation. There are two distinct ways to approach rotating with this team:
Opting for a fairly long rotation — this sacrifices Keqing’s Fanfare uptime in favor of doing full combos with low team ER requirements; it leads to slightly higher damage at low investment and makes the team feel more forgiving in Energy-tight situations.
Shortening the rotation to as close to 20s as possible — this maximizes Fanfare uptime at the cost of higher team ER requirements and not being able to cast Keqing’s Burst every combo; it leads to maximum uptime on Ineffa’s shield and tends to scale better with vertical investment. For instance, Furina’s early Constellations increase the value of Fanfare and therefore make full Fanfare uptime extremely appealing.
Sample Longer Rotation (Low ER Requirements)
Ineffa E > Furina ED Q > Jean EQ > Keqing EQE 5[N1C] > Ineffa Q > Jean tE > Keqing EQE 5[N1C]¹ > Jean tE
Sample Shorter Rotation (Max Fanfare Uptime)
Ineffa EQ > Furina ED Q > Jean EQ > Keqing EQE 5[N1C] > Jean tE > Keqing EE 5[N1C]¹
¹You can cut this combo short by one or two Charged Attacks

A solid team that is excellent even without Constellations, but also has high potential for vertical investment. Xilonen condenses healing and offensive buffing into one slot, giving Keqing a safe team with a ton of DMG% buffs. Unfortunately, there is one minor point of anti-synergy: the high durability of Lunar-Charged aura and Ineffa’s permanent uptime on her Skill make it largely impossible for Xilonen to Scroll Hydro. (Still, it remains possible in some cases through use of “booking,” i.e. opening the Adventurer Handbook or another pause menu, to dodge global Crystallize ICD.)
Rotations for this team are extraordinarily nuanced but also quite forgiving, and the optimal sequence of actions will vary greatly depending on if you have certain Constellations (most obviously Xilonen C2 and Furina C6), the enemy mechanics, and your priorities (for instance, if you have pre-C2 Ineffa and feel unsafe without maximum uptime on her shield).
Sample Rotation
(Furina ED)¹ > Ineffa E > Xilonen EQ N2 > Furina Q > Keqing EQE 5[N1C] > Xilonen E N2 > Ineffa Q > Keqing EE 3[N1C]
Sample Rotation (Max Shield Uptime)
Ineffa (Q)² E > Furina ED Q > Xilonen EQ N2 > Keqing EQE 5[N1C] > Xilonen E N2
¹You can move this to when she Bursts on subsequent rotations
²Whenever available

One of the cheaper Lunar-Charged teams to build, with an exceedingly simple ~16s rotation enabled by Aino’s fast cooldowns and low Burst Energy cost. Sucrose comes on-field at the end of the rotation to refresh 4pc VV.
Ineffa often doesn’t have enough ER to Burst every rotation, and Sucrose’s 20s cooldown is too long for the rotation, so it is advised to use Ineffa and Sucrose’s Bursts on separate rotations for optimal gapfill.
Sample Rotation
Ineffa E (Q)¹ > Aino EQ > Sucrose ED (Q)¹ > Keqing EQE 5[N1C] > Sucrose N2
¹Every other rotation (alternate between Ineffa and Sucrose)

An option without Furina or Aino, which unfortunately does mean Keqing deals lower damage, but at least she manages to pick up a few buffs from Yelan and Kazuha. A slightly long rotation enables two Yelan Skill casts per rotation for lower ER requirements.
Sample Rotation
Ineffa E Q > Yelan Q N1 E N1 > Kazuha tEP N1 > Keqing E N1 Q E 5[N1C] > Yelan E N3 > Kazuha tEPQ
Sample Rotation (Yelan C1+)
Ineffa E Q > Yelan E Q N1 E N3 > Kazuha tEPQ N1 > Keqing E N1 Q E 5[N1C] > Kazuha tEP

An ordinary Electro-Charged option without any Nod-Krai units. In sharp contrast to the modern Lunar-Charged cores, this team focuses heavily on buffing Keqing’s personal damage, pairing her with traditionally powerful supports.
This team frankly cannot be considered competitive or even fun to play at low investment, as team damage is quite low and team ER requirements are extremely high. However, it becomes significantly more playable if one has high Constellations on Furina and Xilonen, as they provide hefty increases to team damage and mostly solve the team’s Energy problems. While this team will still deal notably less damage than newer teams at equivalent cost, it will be quite unique to play, and in contrast to almost every Lunar-Charged team, it is a team where Keqing holds top damage share.
Sample Rotation
Furina ED (N1)¹ > Xilonen E N2 (Q)² > Furina Q (N2)¹ > Sara E C > Keqing EQE 3[N1C] > Xilonen E N2 > Sara EC Q > Keqing EE 4[N1C]
Sample Rotation (Xilonen C2+)
Furina ED (N1)¹ > Xilonen E N2 (Q)² > Furina Q (N2)¹ > Sara E C > Keqing EQE 3[N1C] > Xilonen E N2 > Sara Q > Keqing EQE [4N1C]
¹Only if Furina is C6
²Skip if Furina is C6
Credits
Writing: dusted wind
Editing: lostguide, idkanonymized
New Calculations: dusted wind
Old Calculations: luno_, taylor_series19, freenek
TC Contributors: haafr, rezmir, speify, cosmic_wanderer_, mikeskies