Dendro is the first new Element added to Genshin Impact, and has brought with it a whole host of changes and new Reactions. There are many new archetypes enabled by the Dendro Element, which are all going to be covered in this guide. Additionally, many of the new Reactions in the game have their own mechanics that do not abide by the same mechanics that the reactions currently in the game do. This guide will aim to explain the new archetypes enabled by the Dendro Element, in addition to the new Dendro Reaction mechanics and which characters can use them to their fullest.
Quick intro on Elemental Reactions in Genshin:
Definitions
Aura: The Element that is currently on the target
Trigger: An application of an Element on an existing aura, which triggers a Reaction
Gauges: The amount of an Element; typically characters apply Elements in units of 1U, 2U, or 4U
Reaction Quick Select
Table of Contents
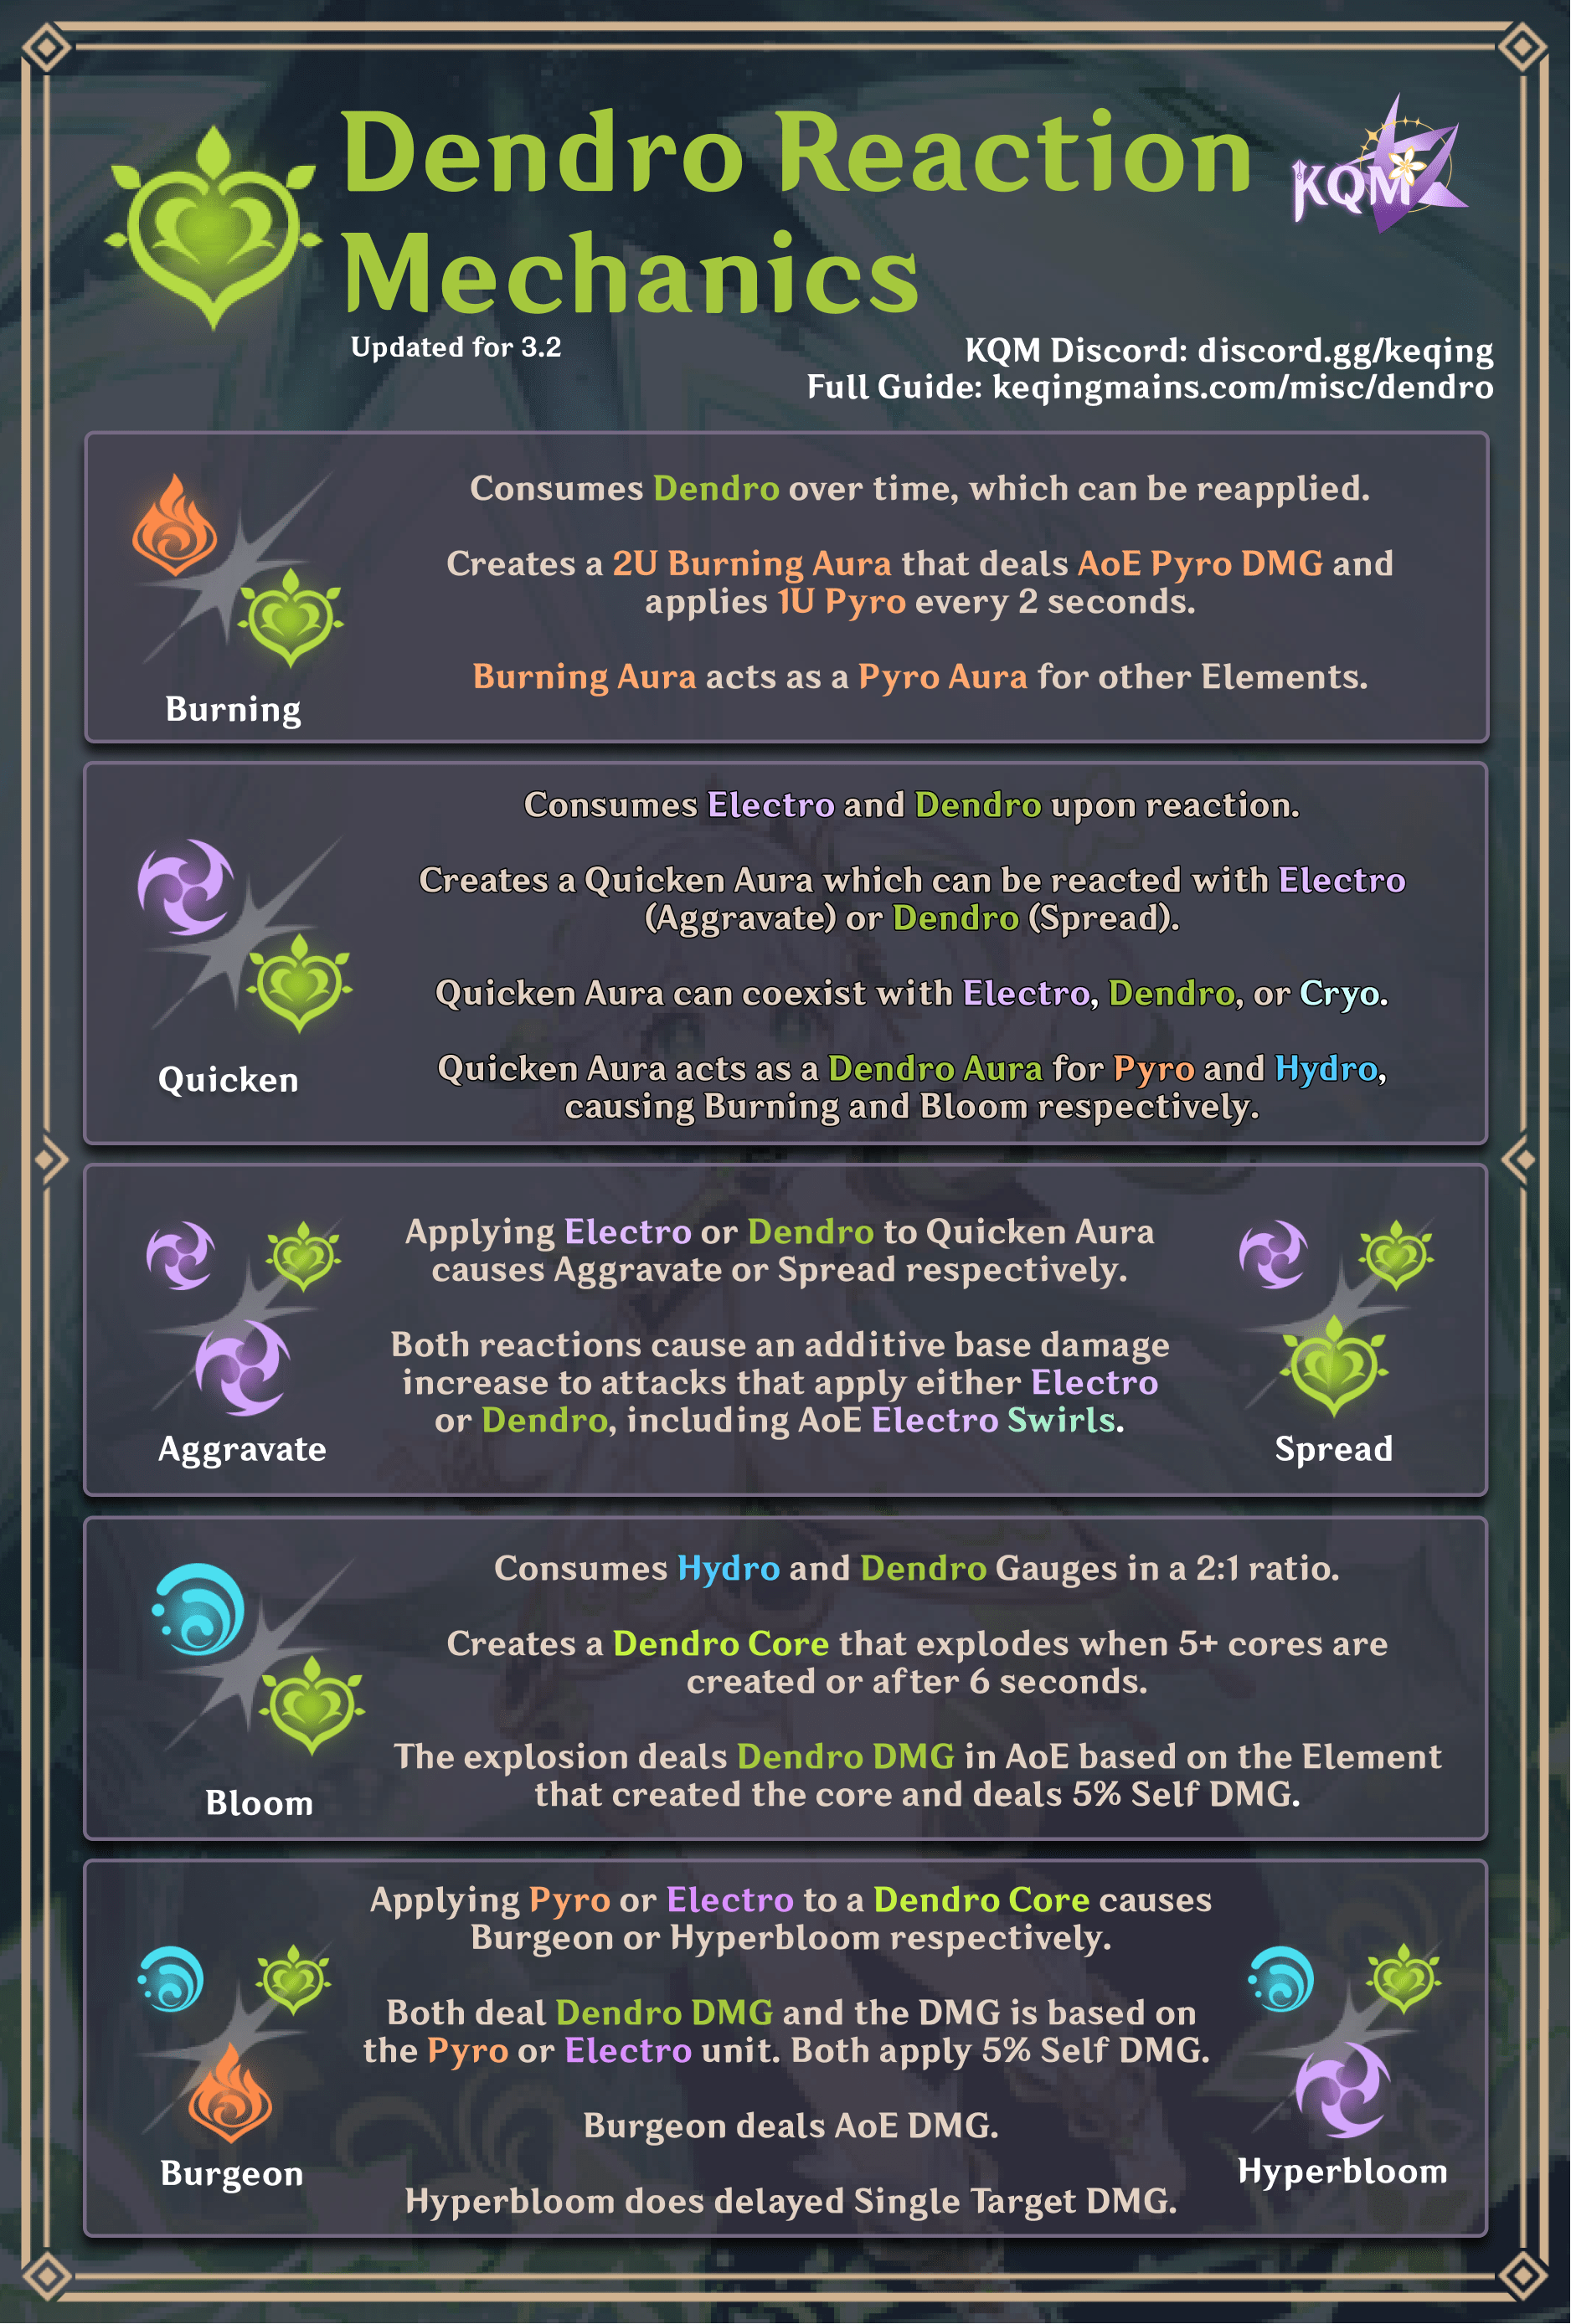
Basic Infographic
New Reactions – The Basics
With the introduction of Sumeru in Version 3.0, Dendro is getting a whole new set of Reactions.
As an Element, Dendro is now capable of reacting with Pyro, Electro, and Hydro. Dendro Reactions now include Quicken, Spread, Aggravate, Bloom, Hyperbloom, Burgeon, and Burning.
Dendro does NOT react with Cryo or Geo, and cannot be Swirled by Anemo. Cryo and Dendro can co-exist, allowing them to both be reacted with at the same time in some scenarios.
Burning

The Reaction of Dendro with Pyro produces Burning, lighting the enemy on fire and dealing Pyro damage every 0.25s for a short duration. Burning applies Pyro to the enemy and its surroundings every 8 ticks (2s) of damage.
While Burning is not a new Reaction, it did receive some significant changes in 3.0 which should be highlighted—namely that Burning now applies 1U of Pyro aura every 2s (8 ticks) of damage (down from 2U of Pyro every 0.25s of damage prior to 3.0).
Additional Information:
- Burning can be extinguished, leaving the underlying Dendro (and, very infrequently, Pyro) aura.
- The attack that extinguishes Burning can react “through” the Burning aura, allowing a single attack to both extinguish Burning and also react with the underlying auras. For example, a strong enough Electro attack could both extinguish the Burning aura and also react with Dendro to trigger Quicken.
- Burning can act as a Pyro aura, capable of reacting with other Elements for their respective Reactions.
- Burning duration can be refreshed by reapplying Dendro.
- Burning ownership is based on which character last applied Pyro or Dendro to the Burning target.
Multi-Step Reactions
The new Dendro Reactions introduce a new mechanism to Elemental combat in Genshin in the form of 2-stage Reactions. While previous Reactions involved applying one Element (the trigger) to another Element (the aura) for an immediate result, 3.0 introduces the Quicken and Bloom Reactions; these initial Reactions first create a unique mechanism with which Elements can further react.
Quicken Reactions
Quicken

The initial Reaction of Dendro with Electro is a non-damaging Reaction that creates the Quicken status effect aura on the enemy. The Quicken aura can react with additional Dendro or Electro application to trigger Spread or Aggravate respectively.
Additional Information:
- Quicken deals no damage on its own.
- Triggering Quicken consumes Electro and Dendro at a 1:1 ratio.
- The Quicken aura can coexist with Electro, Dendro, or Cryo.
- Quicken acts as a Dendro aura when reacting with Pyro or Hydro (it is consumed to trigger Burning and Bloom respectively).
- Quicken aura is not consumed when reacting with Dendro or Electro to trigger Spread or Aggravate.
- Quicken lasts a set duration depending on the gauges of the Dendro and Electro application that triggered the status effect:

Additive Reactions
Spread and Aggravate are Additive Reactions, which have their own base damage. Like other Reactions, they receive bonuses based on Elemental Mastery, Enemy Resistance, and Reaction DMG Bonus. Unlike Transformative Reactions, this damage is also affected by DMG Bonus, CRIT, and Defense. We will refer to this as AdditiveReactionDamage in the Damage Formulas.
Spread

Applying Dendro to a Quicken aura causes the Spread Reaction, dealing additive Dendro damage that is affected by DMG Bonus, CRIT, and Enemy Resistance & Defense. This extra damage is expressed in the same damage number, with the reaction damage added to the damage of the initial hit.
Additional Information:
- Spread does not consume the Quicken Aura.
- The cooldown of Spread is based on the Internal Cooldown (ICD) of the triggering attacks. This varies with each individual character.
- Applying Dendro to an enemy with only Quicken Aura will result in both a Quicken and Dendro aura. Applying Electro on top of this dual aura will both trigger Aggravate and refresh Quicken.
Aggravate

Applying Electro to a Quicken aura causes the Aggravate Reaction, dealing extra Electro damage that is affected by DMG Bonus, CRIT, and Enemy Resistance & Defense. This extra damage is expressed in the same damage number, with the reaction damage added to the damage of the initial hit.
Additional Information:
- Aggravate does not consume the Quicken Aura.
- The cooldown of Aggravate is based on the Internal Cooldown (ICD) of the triggering attacks. This varies with each individual character.
- Electro Swirls can trigger Aggravate if they hit a secondary target other than the target being Swirled—this is a special case where Aggravate’s damage is treated as Transformative Reaction damage (it is affected by EM, Reaction DMG%, and Enemy Resistance, but NOT other sources of DMG%, CRIT or Enemy Defense).
Bloom

Applying Hydro to a Dendro or Quicken aura, or Dendro to a Hydro aura, creates the Bloom Reaction, generating a Dendro Core. The Dendro Core can be reacted with to create the Hyperbloom or Burgeon Reactions, or can explode on its own after six seconds to trigger Bloom Explosion.
Additional Information:
- Only a maximum of five Dendro Cores can exist at a certain time; if a sixth core is created, then the oldest existing Dendro Core will explode to trigger Bloom.
- Dendro Cores can be grouped by skills with suction (e.g. Venti’s Burst, Sucrose’s Burst, Kazuha’s Elemental Skill, AMC Skill & Burst and Heizou’s Burst).
- Similar to Melt and Vaporize, Bloom Elemental gauge consumption depends on the order of Elemental application. Hydro and Dendro gauge are consumed in a 2:1 ratio, where Hydro is “weak” against Dendro. This means that 2U of Hydro is necessary to react away 1U of Dendro—see Gauge Properties for more details.
- All Dendro Core Reactions share an Internal Cooldown of 2 damage instances per 0.5s per enemy per source. For example, if three Dendro Cores were to exist and all were to be hit with Pyro at the same time, enemies would only take two instances of Burgeon damage, not three.
- Dendro Cores can be triggered by player OR enemies.
- The following table shows some special attacks and whether they can or cannot hit Dendro Cores:
| Talent | Can hit Dendro Core? |
|---|---|
| Beidou Burst | No |
| Oz | Yes (But lowest priority) |
| Lisa Burst | Yes (Same priority as other targets) |
| Yae Turrets | Yes (Same priority as other targets) |
| Thoma Burst | Yes |
| Guoba | Yes |
| Sunfire | Yes |
Bloom Explosion
Dendro Cores will explode after existing for 6s or if the maximum number of on-field Dendro Cores is exceeded. Bloom Explosion deals AoE Dendro damage to both enemies and the player, and has the same 2x multiplier as Overload.
Additional Information:
- Player damage received from Bloom Explosions is reduced by 95%.
- Bloom Explosions do not stagger enemies or the player.
- Bloom Explosions do not apply Dendro.
Hyperbloom

Applying Electro to a Dendro Core triggers the Hyperbloom Reaction. Hyperbloom creates a projectile that will target the closest enemy, dealing Dendro damage.
Additional Information:
- The projectile created by Hyperbloom has a small AoE, but will generally only deal damage to a single target.
- Hyperbloom can damage the player, but this requires the player to be very close to the target of the Hyperbloom projectile.
- The damage dealt by Hyperbloom scales off of the Elemental Mastery of the unit that applies Electro.
- Electro Swirls can trigger Hyperbloom, and the damage dealt will scale with the Anemo unit’s Elemental Mastery.
- Hyperbloom doesn’t apply Dendro.
Burgeon

Applying Pyro to a Dendro Core triggers the Burgeon Reaction, dealing AoE Dendro damage.
Additional Information:
- While players can be damaged by Burgeon, the damage received by players is reduced by 95% compared to the damage dealt to enemies.
- The damage dealt by Burgeon scales off of the Elemental Mastery of the unit that applies Pyro.
- Pyro Swirls can trigger Burgeon, and the damage dealt will scale with the Anemo unit’s Elemental Mastery.
- Burgeon does not apply Dendro.
- Burgeon does not stagger the player or enemies.
Damage Formulas
Complete Formula
For a detailed explanation of each part of the damage formula, please see the KQM TCL – Damage page.

Quicken
Spread and Aggravate are calculated as AdditiveReactionDamage. This means they add to the base damage and will be multiplied with the rest of the formula in the same way damage is normally calculated. To put it simply, Additive Reaction Damage is added to the damage formula in the same way as Shenhe’s Quills or Yun Jin’s Elemental Burst Buff. However, Additive Reaction Damage is always entirely based off of the stats of the triggering character.

| Aggravate | 1.15 |
| Spread | 1.25 |
Base Damage
| Level | 10 | 20 | 30 | 40 | 50 | 60 | 70 | 80 | 90 |
| Level Multiplier Base (1x) | 34.14 | 80.58 | 136.29 | 207.38 | 323.60 | 492.88 | 765.64 | 1077.44 | 1446.85 |
| Aggravate (1.15x) | 39.26 | 92.67 | 156.73 | 238.49 | 372.14 | 566.81 | 880.49 | 1239.06 | 1663.56 |
| Spread (1.25x) | 42.68 | 100.73 | 170.36 | 259.23 | 404.50 | 616.10 | 957.05 | 1346.80 | 1808.56 |
Bloom
These are calculated as TransformativeReaction. The method is the same, but the ReactionMultiplier is different.
Base Damage
| Level | 10 | 20 | 30 | 40 | 50 | 60 | 70 | 80 | 90 |
| Level Multiplier Base (1x) | 34.14 | 80.58 | 136.29 | 207.38 | 323.60 | 492.88 | 765.64 | 1077.44 | 1446.85 |
| Bloom (2x) | 68.28 | 161.16 | 272.58 | 414.76 | 647.20 | 985.76 | 1531.28 | 2154.88 | 2893.70 |
| Hyperbloom (3x) | 102.42 | 241.74 | 408.87 | 622.14 | 970.80 | 1478.64 | 2296.92 | 3232.32 | 4340.55 |
| Burgeon (3x) | 102.42 | 241.74 | 408.87 | 622.14 | 970.80 | 1478.64 | 2296.92 | 3232.32 | 4340.55 |
| Burning (0.25x) | 8.54 | 20.15 | 34.07 | 51.85 | 80.90 | 123.22 | 191.41 | 269.36 | 361.71 |
| Reaction | Reaction Multiplier |
|---|---|
| Hyperbloom | 3 |
| Burgeon | 3 |
| Bloom | 2 |
| Overloaded | 2 |
| Shattered | 1.5 |
| Electro-Charged | 1.2 |
| Swirl | 0.6 |
| Superconduct | 0.5 |
| Burning | 0.25 |
Aggravated Swirls
An Aggravated Swirl is a Swirl that also has Aggravated status and is added to the Swirl damage before the EnemyResMult. This still counts as a TransformativeReaction. Aggravated Swirls can only be triggered in multi-target, because Aggravated Swirls cannot be triggered on the enemy hit by the swirl.

Dendro Gauge Mechanics
With the addition of so many new Reactions, Elemental Gauge Theory’s scope has significantly expanded. This section will explain new interactions and cover the basics of Gauge Theory that players should understand when playing Dendro.
Quicken Units
Quicken GU is equal to the smaller of the existing auras, taking into account aura tax and the trigger gauge.
For example, if a character were to apply 2U Electro to a target, then shortly after apply 2U Dendro to the target, the following would occur:
- The 2U Electro would be taxed to 1.6U Electro
- The 1.6U Electro would slowly decay
- The 2U Dendro would react with however much Electro was left after tax and decay
- Say, for the sake of example, that the Electro gauge decayed to 1.4U when the Dendro application occurred
- The Quicken gauge would be 1.4U
Gauge Ratios
When an Element is applied to a target already affected by another Element, the trigger Element will consume a certain amount of the aura Element to cause a Reaction. The amount of aura consumed by the trigger Element is affected by the Gauge Consumption multiplier.
For example, if the triggering Elemental attack has a Gauge Unit value of 1U and has a Gauge Consumption multiplier of 1x, then the Elemental attack will consume 1U of the aura Element. If the multiplier were to be 2x instead, then the Elemental attack would consume 2U of the aura Element.
| Reaction | Gauge Consumption Ratio | Notes |
|---|---|---|
| Quicken | 1:1 | Creates a Quicken aura. |
| Hydro applied to Dendro | 0.5x | The Dendro Core will produce the same damage regardless of the order of Elemental application. |
| Dendro applied to Hydro | 2x | |
| Pyro applied to Hydro | 0.5x | “Reverse Vape” — 1.5x DMG |
| Hydro applied to Pyro | 2x | “Forward Vape”— 2x DMG |
| Cryo applied to Pyro | 0.5x | “Reverse Melt”— 1.5x DMG |
| Pyro applied to Cryo | 2x | “Forward Melt”— 2x DMG |
Given that Hydro is “weak” against Dendro and vice versa, players will need a significantly greater amount of Hydro application to ensure that Dendro is the trigger for Bloom, while a much smaller amount of Dendro application is needed to ensure that Hydro is the trigger for Bloom Reactions, similar to how it is very difficult to Forward Vape a Hydro unit’s damage.
Burning
Burning sees a significant reduction in its Elemental application in 3.0, being reduced to applying an AoE of 1U Pyro to the burning target every 8 ticks (every 2s) of damage. Ultimately, this means that Burning cannot apply enough self-Pyro to maintain itself when it is involved in further Reactions with Cryo or Electro.
This functionally kills the idea of using Burning as a driver to enable more Reverse Melt reactions.
Electro-Charged Multi-Bloom
Electro-Charged provides a vehicle to get additional Blooms in Hyperbloom teams. Applying Dendro to an Electro-Charged aura can result in both a Bloom Reaction and Quicken Reaction. This Quicken aura can react with Hydro for a 2nd Bloom. Generally, this mechanic requires fast Hydro and Electro application to maintain Electro-Charged uptime, which makes units like Fischl and Xingqiu ideal.
Freeze Bloom Interaction
This is a simultaneous aura Reaction involving Freeze and Bloom that takes advantage of the fact that Hydro will react with Cryo before it reacts with Dendro, allowing you to use the Freeze Reaction to reduce the amount of Hydro that consumes Dendro when triggering Bloom.
For example:
- An enemy has co-existing 0.8U Dendro and 0.8U Cryo auras on it and 1U Hydro is applied. Hydro will first react with Cryo, triggering Frozen and leaving 0.2U Hydro. This 0.2U Hydro will react with Dendro at a 2:1 ratio, reducing Dendro to 0.7U. This allows the existing Dendro aura to be further reacted with for additional Blooms.
“Wood” is NOT Dendro
- Wooden objects in-game such as Hilichurl shields, boxes and barricades can only react with Pyro and trigger Burning. They cannot trigger other Dendro related Reactions such as Bloom or Quicken.
Grass is NOT Dendro
- The game engine can’t handle the millions of Dendro Cores that would be generated when it rained if Grass was actually Grass.
Other 3.0 Additions
Elemental Resonance
Patch 3.0 also includes changes to Elemental Resonances. Resonance is the bonus received by running specific Elemental combinations of characters in a full party.
Specifically, these include the introduction of Dendro Resonance, a major rework of Hydro Resonance, and the addition of the new Electro-related Reactions to Electro Resonance.
Dendro Resonance (2x  )
)
1. +50 EM
2. Upon triggering Burning/Quicken/Bloom: nearby party members +30 EM for 6s
3. Upon triggering Aggravate/Spread/Hyperbloom/Burgeon: nearby party members +20 EM for 6s
The focus of Dendro Resonance is obviously on Reaction-based teams that benefit from Elemental Mastery on multiple characters. At baseline, this Resonance will provide 80-100 EM to party members in most teams utilizing two Dendro characters, providing a valuable boost to Reaction damage.
Hydro Resonance (2x  )
)
Affected by Pyro for 40% less time. Increases Max HP by 25%.
Hydro Resonance is now a significant general buff to several HP scaling characters—namely, Yelan and Kokomi, and to a lesser extent, Ayato and Xingqiu (through increased healing in his A1).
This is not limited only to Hydro characters; Hu Tao sees a significant gain in her double Hydro teams, with potentially 4 characters (Hu Tao, Xingqiu, Yelan, Zhongli) receiving benefit from this change. Additionally, Bennett, Diona, Kuki Shinobu and Yanfei (C4) all have HP scaling Talents that can benefit from Hydro Resonance in relevant teams.
Electro Resonance (2x  )
)
Affected by Hydro for 40% less time. Superconduct, Overloaded, Electro-Charged, Quicken, Aggravate and Hyperbloom have a 100% chance to generate an Electro Elemental Particle (CD: 5s).
Functionally, Electro Resonance hasn’t changed. However, it remains applicable to teams utilizing the new Dendro-Electro Reactions. The overall impact of Electro Resonance on required Energy Recharge, however, remains low.
Team Building with Dendro
Collei
Collei is a 4-Star Dendro bow character capable of acting as an off-field Dendro enabler & support. Collei’s Elemental Skill throws a boomerang that applies Dendro on hit. On return, it creates a Sprout (at Ascension 1) which deals additional Dendro damage. Collei’s Elemental Burst is the focus of her ability kit, dealing the majority of her damage output and Dendro application over the course of a rotation. Her Burst is capable of applying Dendro to a single target 4 times over the course of its duration. Collei’s Normal and Charged Attacks are generally unimpressive and do not lend themselves to an on-field playstyle.
Collei’s Constellations further enhance her position as an off-field Dendro support. C2 provides an additional Dendro application per Sprout. C4 gives Collei a team-wide Elemental Mastery buff—invaluable in teams using the new reactions; Bloom- and Quicken-based teams often have multiple characters triggering reactions rather than focusing on a single character as the trigger. C6 is an additional hit on her Elemental Skill which provides one more instance of Dendro application.
Collei’s multiple instances of Dendro application from her Elemental Skill (especially at C6) can take great advantage of the Spread Reaction for personal damage, but she is also one of the limited choices of off-field Dendro application in version 3.0. This makes her one of only two choices (along with Dendro MC) for teams that are looking for consistent off-field Dendro application—whether to take advantage of Quicken-based, Bloom-based or Burning Reactions (or a combination of these).
Collei has three distinct advantages over Dendro Traveler: the first advantage is that, unlike Dendro MC, her Elemental Burst has no limitations to work around with Pyro. (Dendro MC’s Elemental Burst will explode if it comes into contact with Pyro before Hydro or Electro.) Second, Collei is a bow character, allowing her to hold Elegy of the End. Third, Collei has a 60-cost, 15-second cooldown Elemental Burst, which can sometimes allow for more flexible rotations.
However, Collei also has a few drawbacks compared to Dendro MC. First, she applies less Dendro than the Dendro Traveler on her Elemental Burst. She also has a longer Skill CD on her Elemental Skill, which can present difficulties with some rotations – for example, in 20 second rotations, Collei will only be able to cast her Elemental Skill once, while Dendro Traveler would be able to cast their Elemntal Skill twice. The converse is also, however, true – in 15s rotations, Collei’s shorter Elemental Burst cooldown can make her the superior off-field Dendro DPS unit.
Traveler (Dendro)
The Traveler has mastered another Element, and this time they play the role of an off-field Dendro support. The Dendro Traveler’s kit focuses on their Elemental Burst, which summons a Lamp that deals AoE Dendro damage and can undergo a Transfiguration if it comes in contact with specific Elements. The Lamp has a 12s duration which is further extended to 15s at C2 with a 20s cooldown, providing significant uptime on off-field Dendro application.
If the Lamp comes in contact with Hydro or Electro, the Lamp receives buffs to its AoE or ATK SPD respectively. This gives the Traveler the tools to provide off-field Dendro application in Hyperbloom and Quicken teams. Their role as an off-field support is further emphasized by their Ascension 1 Passive, which provides a ramping EM buff to the on-field character as long as the Traveler’s Elemental Burst remains on-field.
It should be noted that Dendro Traveler’s Electro Transfiguration increases the number of hits from 9 to 15 (C0) or 11 to 17 (C2), but does not actually apply Dendro more times. Without Electro transfiguration, DMC’s Burst applies Dendro every other hit because of timer-based ICD, but with Electro Transfiguration applies Dendro every third hit because of hit-based ICD.
However, this Transfiguration also presents a problem. If the Lamp comes in contact with Pyro before coming into contact with any other Element, it explodes and disappears. As such, in teams with Pyro units, special care must be taken to not apply Pyro to the Lamp. This can be prevented by causing either an Electro or Hydro transfiguration first, as once the Lamp has been transfigured into one Element, no other Transfigurations can occur.
Even though Dendro Traveler can have difficulties in rotations with Pyro units in the team, they will have higher uptime on their off-field Dendro application, allowing them to be the better off-field Dendro DPS in some circumstances. Additionally, they have a larger AoE circle on their Dendro application compared to Collei, making “circle impact” less of a hinderance.
Tighnari
Tighnari is the first 5-Star Dendro character. He is a bow-using on-field DPS whose playstyle is based on his two-stage Charged Attack which triggers 4 Clusterbloom Arrows each, dealing Dendro damage. Tighnari occupies relatively low field time for an on-field DPS, as his field time is limited by his Elemental Skill buff, which reduces the charge time of his next three Level 2 Charged Attacks.
Tighnari makes good use of the Spread Reaction, which he can trigger multiple times with his Clusterbloom Arrows (which at C0 apply Dendro twice per Charged Attack) and his multi-hit Elemental Burst (which applies Dendro 4 times if all arrows hit).
Both of his Ascension Passives are centered around Elemental Mastery. Ascension 1 provides him with EM after using a Level 2 Charged Attack, and his Ascension 4 increases his Charged Attack and Elemental Burst damage by a percentage of his EM, further incentivizing him to take advantage of EM, and therefore, Spread.
Tighnari is used as an on-field DPS with short field time in Aggravate/Spread teams with significant amounts of free time for Tighnari to use his Charged Attacks; good teammates for him include Yae Miko and Fischl. Beidou can also be used with Tighnari, although this requires weaving in Normal Attacks given that Tighnari generally only uses three Charged Attacks per rotation. He doesn’t particularly work well as an off-field Dendro Enabler (compared to Dendro MC), given that he generally wants to take field time to fire off his Charged Attacks, which is time (and Aggravates) stolen from the Electro driver unit.
Tighnari is also a poor enabler for Bloom teams due to a few factors: first, his lack of synergy with many of the prominent Hydro characters. Some of these Hydro characters—such as Ayato and on-field DPS Kokomi—require extended periods of field time, which Tighnari teams do not have. Others—namely Xingqiu and Yelan—require Normal Attacks to trigger their Bursts, and Tighnari’s focus on Charged Attacks and the general quickswap-like nature of his teams do not accommodate that need well.
Character Synergies with Dendro Reactions
One thing to note about all characters who trigger many Dendro-related reactions (such as Fischl in an Aggravate team or Kazuha in a Hyperbloom team) is that they all want to be leveled to 90 for the additional Base Reaction Damage gained from character levels.
Hydro
 Ayato Full Ayato Guide | Decent Hydro application for Bloom teams but requires a healer. Can be used in both Hyperbloom teams (with off-field Electro characters) or Burgeon teams (which are similar to traditional Vape teams that have an off-field Dendro enabler replacing the traditional Anemo support—these teams are comparable in AoE situations but lose the grouping utility of that Anemo units provide). Ayato finds a valuable spot in Burgeon teams that require enough Hydro application to both maintain a Hydro aura to trigger Bloom and prevent Dendro from overtaking the Hydro aura, causing Burning to trigger. |
 Barbara Full Barbara Guide | Consistent on-field Hydro application allows her to be a competent driver in Bloom Reaction teams without worrying about the self damage from Bloom/Burgeon. However, her slow Hydro application compared to other units means that she will generally be the trigger in Bloom-based teams, not the aura. This can allow her to build EM in pure Bloom-based teams, but with Hyperbloom and Rupture she will not be the reaction trigger. |
 Mona Full Mona Guide | Mona’s biggest issue in many teams is that her Hydro application is very, very low as an off-field Hydro unit. While she can provide a decent amount of support with her Elemental Burst and ability to hold both Thrilling Tales of Dragon Slayers and Tenacity of the Millelith, she does not provide much else given her lack of healing and Hydro application. |
 Kokomi Full Kokomi Guide | Consistent AoE Hydro application combined with her team healing allows Kokomi to take full advantage of Bloom Reactions without worry about self-damage from Bloom/Burgeon. However, as an off-field Hydro unit, Kokomi’s comparatively slower off-field Hydro application (compared to units like Yelan and Xingqiu) means that she will more consistently be the trigger for Bloom reactions instead of the aura element, unless she is used with another Hydro unit. This means that, if players want to maximize Bloom damage, they need to build EM on Kokomi, not the Dendro unit. This is fine for Kokomi, as she doesn’t deal a significant amount of damage as an off-field unit in the first place. Kokomi is also very useful in Quickbloom teams. In these teams, Kokomi’s slow Hydro application means that Quicken aura will be on targets more frequently, as faster Hydro-applying units like Yelan and Xingqiu will react away Quicken aura and prevent Quicken reactions from occurring. More testing is needed to determine whether Kokomi as an on-field unit can consistently be the aura unit for Bloom-based teams. |
 Tartaglia Full Tartaglia Guide | Childe is the fastest Hydro applier in the game; as such, he can be a staple in team archetypes that require fast Hydro application. One example team archetype is a Burgeon team; Burgeon requires a Hydro, Dendro, and Pyro unit—the Hydro and Dendro unit to create the Dendro core, and the Pyro unit to trigger Burgeon. However, given that Dendro is strong against Hydro, if the Hydro application from the Hydro unit isn’t rapid enough, then the Dendro element will overwhelm the Hydro aura, causing the Pyro unit to trigger Burning instead of Burgeon. As such, Childe’s strength in Burgeon teams is undeniable; unfortunately, the Burgeon teams in which he is used don’t tend to be stronger than “traditional” Childe team options such as Childe/Xiangling/Bennett/Kazuha. |
 Xingqiu Full Xingqiu Guide | Xingqiu possesses the same advantage that Childe does—in Bloom-based teams that require fast Hydro application, Xingqiu can be a potent off-field DPS/Enabler. Xingqiu can also be used with another Hydro unit, such as Yelan, Kokomi, Childe, or Ayato, to apply a significant amount of Hydro aura to ensure that Dendro is more consistently the trigger element, not the aura element. This allows Xingqiu and the other Hydro unit to build ADC stats, while the Dendro unit can build EM stats to gain more damage from Bloom. Xingqiu also has application from his orbital rainswords, allowing him to easily maintain Hydro aura off-field, especially if hugging enemies to apply Hydro every 2.25 seconds with his orbital rainswords. However, Xingqiu’s Hydro application is single-target, which prevents him from generating more Dendro Cores in AoE situations. |
 Yelan Full Yelan Guide | Yelan functions very much like Xingqiu in many teams. However, she has her disadvantages and advantages compared to him. On the side of disadvantages, she doesn’t apply as much Hydro as he does because of her lack of orbitals to apply Hydro and because of Xingqiu’s sixth Constellation, which applies an extra instance of Hydro every third wave. On the flip side, Yelan has a shorter rotation time given her shorter Elemental Burst cooldown, and has a team buff tied to her Ascension Four talent which can significantly boost her teammates’ damage. However, this DMG% bonus is less significant in Dendro teams because these teams focus on Transformative Damage, which is not affected by DMG%, and the shorter rotation time is less relevant as well given that many Dendro teams are locked to 25s rotations to accommodate Fischl’s cooldowns. One important team that Yelan enables is a double Hydro team with Xingqiu, which is enough Hydro application to enable Dendro to be the trigger in reactions in most situations; this allows a non-Hydro unit to be the on-field driver unit. |
Electro
 Beidou Full Beidou Guide | Can use Aggravate for extra damage, but her builds do not shift towards EM since her Talent scalings are already high. She can certainly benefit from Aggravate as a Reaction, but may not benefit as much as a character like Fischl does. However, she generally wants to be played with Fischl, which means that her Aggravate teams are generally already quite strong. In short, Beidou certainly gets buffed by Dendro and Aggravate, but does not benefit as much as other Electro units (namely, Fischl). Keep in mind that her Elemental Burst will ignore the Dendro Cores for targeting. This allows other units who can apply the Electro element, such as Kazuha or Kuki Shinobu/Raiden/Fischl/other Electro units, to trigger Hyperbloom. |
 Fischl | Fischl is one of, if not the, biggest winners of 3.0. This is because of her Ascension 4 Passive, which triggers whenever an Electro-related Reaction occurs while Oz is on the field to deal an instance of Electro damage. While this Talent is extremely strong in its own right, it is also extremely important for Aggravate teams because it lacks an Internal Cooldown on Elemental application, meaning that every single A4 proc can trigger Aggravate. This allows her to trigger Aggravate dozens of times per rotation, massively increasing her personal damage output. Her Ascension 4 Passive can also be triggered by Aggravate, which makes using her with another on-field Electro driver unit (such as Keqing) a very strong pairing. Some additional mechanics for Fischl: Oz can target Dendro Cores to trigger Hyperbloom; however, Oz will prioritize Dendro Cores last. Fischl can be very useful in teams that require a high amount of Electro application, such as teams which trigger a large amount of Blooms for Fischl to trigger Hyperbloom. |
 Keqing Full Keqing Guide | Keqing can shine in Dendro teams because of her high Electro application, which allows her to consistently trigger Aggravate. She has zero Internal Cooldown on her Elemental Skill, allowing it to apply Electro on both hits. She also applies Electro four times with her Elemental Burst, and can infuse her Normal and Charged Attacks with Electro to trigger even more reactions. Keqing can also make use of the 4-Piece Thundering Fury set to reduce the cooldown on her Elemental Skill, consequently allowing her to trigger Aggravate more frequently. This not only allows her to deal more damage with the Reaction, but also allows her to act as a fantastic driver for Fischl, whose Ascension 4 Talent triggers whenever Keqing triggers Aggravate for even more damage. This makes Keqing a very synergistic Electro driver for Fischl in an Aggravate team. With her ability to trigger Aggravate reactions, Keqing can opt for an Elemental Mastery sands, which is around equal in strength to an ATK sands. |
 Kuki Shinobu | Kuki’s AoE Electro application allows her to easily react with Dendro Cores to trigger Hyperbloom. While her Elemental Skill has an Internal Cooldown, ICD isn’t shared across targets, allowing each tick of her Elemental Skill to trigger Hyperbloom on new Dendro Cores. Hyperbloom teams also require a set of three characters at their core, leaving little room for flex options. Kuki’s role consolidation with both healing and off-field Electro application provides her with a niche in these teams. Kuki also possesses a multi-hit Elemental Burst that applies Electro multiple times, which allows her to benefit heavily from Aggravate. This takes advantage of her Elemental Mastery-oriented builds. In these teams, she can also utilize for Electro DMG% or Crit stats given that they multiply Aggravate damage. Kuki’s Electro application, however, is relatively slow compared to Fischl; this means that she will overall trigger less Aggravate reactions. Additionally, her relatively slower Electro application can be detrimental for some teams which abuse constant, fast Electro applications (such as some teams utilizing the Electro-Charged Multi-Bloom mechanic). Additionally, while the role consolidation that Kuki offers is certainly appreciated, the existing cast of off-field Electro DPS units in Genshin Impact is already highly stacked with strong units such as Fischl and Beidou, meaning that Kuki finds herself with a lot of strong competition for her slot. She provides unique utility by also offering healing, which many teams may lack. This allows her to be used well by players who want to utilize Electro in a Dendro team but also desire healing. |
 Lisa Full Lisa Guide | Lisa can apply a decent amount of Electro to trigger Aggravate when enemies are grouped together tightly. C4 is especially beneficial, providing her with additional Electro damage and application in AoE situations. In addition, she benefits from being able to utilize her EM ascension stat in Aggravate teams. Lisa does have a high Elemental Burst Energy cost, but this can be alleviated by using her with Fischl, who is a staple in many Dendro-based teams. Lisa also provides a lot of utility for her teams; she can shred enemies’ defense, which buffs Aggravate and non-Reaction damage, and, as a catalyst user, can hold Thrilling Tales of Dragon Slayers, Hakushin Ring, and even Prototype Amber if players require the additional healing. Note that in Hyperbloom teams, Lisa’s Elemental Burst can target Dendro Cores. |
 Raiden Full Raiden Guide | Raiden does not benefit as strongly from Dendro as other Electro units because she already has extremely strong teams which aren’t heavily improved by adding the Dendro Element; however, she can still utilize Dendro Reactions (Aggravate and Hyperbloom) because of her high Electro application. Raiden can also utilize a Dendro unit instead of other supports—namely, Bennett. This allows players to use Raiden without Bennett, which saves Bennett for their other Abyss team. Raiden can be paired with Fischl in Dendro teams, as Raiden’s Electro attacks will allow Fischl to constantly trigger her Ascension 4 Passive to deal tremendous amounts of damage. Raiden can also sometimes be used as an off-field Electro applier and buffer in Hyperbloom without utilizing her Elemental Burst. In these teams, she can build full EM, as her main purpose is only to trigger Hyperbloom. |
 Razor Full Razor Guide | While Razor is generally viewed as more of a physical unit rather than an Electro unit, his Electro self-application and Electro application on his Elemental Burst leaves him a beneficiary of new Dendro Reactions. He has a large amount of Electro application with the low cooldown on his Elemental Skill along with his Normal Attacks applying Electro, allowing him to trigger a large amount of Hyperbloom and/or Aggravate Reactions. Razor’s self-application allows Jean to use her Elemental Burst to swirl Electro off of Razor, allowing her to apply Electro in an AoE to trigger Aggravate and Hyperbloom. Razor also has a build (self-Overload Razor) where he is incentivized to build Elemental Mastery, allowing him to further benefit from Aggravate and Hyperbloom. However, Razor’s EM builds are generally more on the “meme” side, leaving the strength of these teams to be determined. |
 Yae Miko Full Yae Miko Guide | Yae’s Ascension 4 Passive converts her Elemental Mastery to Skill DMG%, allowing her to buff both her Skill DMG and her Aggravate or Hyperbloom damage. This does not mean that Yae should build EM over her other stats (i.e. ATK%, DMG%, and CRIT), but it does make an EM sands competitive with an ATK% sands. Additionally, Fischl—a core unit for many Dendro teams—has synergy with Yae, given Fischl’s ability to battery Yae and Yae’s ability to trigger Electro-related Reactions to proc Fischl’s Ascension 4 Passive. It should also be mentioned that, while Yae’s Elemental Skill has an Internal Cooldown, ICD is not shared across targets, meaning that every single hit of Yae’s Elemental Skill can trigger Hyperbloom with new Dendro Cores. Note: in Hyperbloom teams, Yae’s Elemental Skill turrets can target Dendro cores. |
Anemo
Notes on Anemo:
While it might be unintuitive, Anemo characters can particularly abuse the nature of the new Dendro reactions, which can be triggered by Elemental Swirls. Due to their preference towards building EM, Anemo characters can double dip in terms of both Swirl and secondary Reaction damage (Aggravate, Hyperbloom, Burgeon).
Aggravated Swirls are a particular interaction to note—Electro Swirls can trigger Aggravate, and the damage scales off of the Anemo unit’s Elemental Mastery. The formula for this interaction is above in the Aggravated Swirls section.
Anemo units also have access to the 4-Piece Viridescent Venerer set, which can boost the damage of Electro units (namely, Fischl) in Aggravate.
 Jean Full Jean Guide | Unlike many other Anemo units, Jean cannot absorb Elements into her Elemental Burst or Skill, which prevents her from triggering Dendro Reactions with her Talents directly. She also does not build EM for damage or support unlike Kazuha, Sucrose, or Venti, which prevents her from dealing that much damage with Aggravated Swirls compared to her Anemo peers. She can still be used in Dendro teams as a role consolidator by providing both Anemo application and healing, which is very important for Bloom teams because of the self-damage from the Reaction. Jean can use Sunfire to apply Pyro, but this Pyro application is too strong, making it impossible to consistently trigger Burgeon. |
 Kazuha Full Kazuha Guide | Kazuha is one of the major beneficiaries of Dendro. He can absorb Elements into his Elemental Burst and Skill, allowing him to trigger many of the new Dendro Reactions. For example, he can absorb Electro into his Elemental Burst, allowing him to consistently trigger Aggravate and Aggravated Swirls. Additionally, because Kazuha already builds Full EM, he can deal massive damage with Aggravate. Kazuha can also be used in other Dendro-based teams to great effect, such as Hyperbloom/Quicken teams where he can absorb his Elemental Burst to both spread aura and trigger Reactions, with which he can deal tremendous amounts of damage given his high Elemental Mastery. He can infuse Hydro on his Elemental Burst and constantly swirl both Hydro and Electro, allowing him to be an all-in-one Hyperbloom unit by both generating Dendro Cores and also triggering Hyperbloom on them. Kazuha is also unique among the Anemo units because he can utilize the 4-Piece Thundering Fury artifact set, which triggers its CD reduction passive on Aggravate, allowing Kazuha to very easily spam his Elemental Skill for tremendous amounts of damage and even more Aggravate procs. This also allows Kazuha to use much less Energy Recharge. This all doesn’t even take into account Kazuha’s supporting capabilities; his ability to hold the 4-Piece Viridescent Venerer set is a strength shared by all Anemo units, but his Ascension 4 Passive, which buffs DMG% of any Swirled Element, is a very strong passive which is specific to him. Disclaimer: Kazuha’s Elemental Skill can very easily trigger multiple Burgeons at the same time if it absorbs Pyro, which can deal a very significant amount of damage to the player in a short amount of time. |
 Sayu | Sayu serves the same purpose as Jean does of being a role consolidator who can both apply Anemo and heal. However, she possesses two advantages over Jean. First, her Elemental Skill can absorb an Element, allowing her to trigger Reactions such as Bloom and Aggravate. However, this is not a very widely-used mechanic given that using Sayu as an on-field character generally produces subpar results. Second, she tends to build Elemental Mastery, allowing her to more easily gain the “double dip” effect to increase both her Swirl and secondary reaction damage compared to Jean, who almost always wants to build ADC for damage. |
 Heizou | Heizou can provide some grouping and Anemo application for Dendro teams; however, he tends to build ADC instead of EM, which makes the “double dip” effect with Anemo characters less effective with Heizou. Additionally, while he can absorb his Elemental Burst with an element to trigger reactions, his absorption is much less effective than the absorption effect of units like Venti, Kazuha, and even Sucrose. Heizou does have the ability to trigger many Swirl Reactions, given that he has a separate ICD on his Normal Attacks and Charged Attacks—this means that he can trigger a Swirl on both, even if they’re used in quick succession. This allows him to be a good “driver” unit for off-field DPS units in Dendro teams, especially Fischl. |
 Sucrose Full Sucrose Guide | Similar to Kazuha and Venti, Sucrose wants to build EM, allowing her to easily deal massive damage with Swirls and their secondary Dendro Reactions. Sucrose is also a highly effective support for all Dendro teams, as all Dendro teams benefit from her Elemental Mastery sharing buff. For example, she can share her Elemental Mastery with an Electro character in an Aggravate team, in addition to the buffs which she provides with Hakushin Ring (which can be her strongest weapon in many of her Dendro-based teams, such as Hyperbloom) or Thrilling Tales of Dragon Slayers and the 4-Piece Viridescent Venerer set. She can also share her Elemental Mastery with Hydro and Dendro characters in a Bloom team, allowing her teammates to deal much more damage. Like Heizou, Sucrose is a fantastic driver for off-field DPS units in Dendro teams given that she does not share ICD between Normal Attacks and Charged Attacks. Her supporting ability is somewhat impeded by the fact that Dendro cannot be swirled, which prevents her from sharing 50 EM with her Ascension 1 Passive and, more importantly, prevents her from shredding 40% Elemental Resistance with 4VV. |
 Traveler (Anemo) Full Anemo Traveler Guide | The Anemo Traveler possesses many of the strengths that other Anemo characters have in Dendro teams—they can absorb Elements into their Elemental Burst/Skill to trigger Dendro Reactions, they have grouping on their Talents to gather enemies and Dendro Cores for AoE damage, and they can build Full EM to deal damage with Swirl and secondary Dendro Reactions. However, Anemo Traveler has two big weaknesses. First, their Burst is clunky and moves enemies away from the character, forcing the player to chase after enemies. This can be mitigated to some degree by using constructs or walls to block the Anemo Traveler’s Elemental Burst, but still presents an obstacle that players must work around. Doing this is also relatively clunky and difficult to do in many situations. Second, playing AMC means that players cannot play DMC. |
 Venti Full Venti Guide | Venti’s strengths in Dendro teams stem largely from his Elemental Burst. His Burst can gather Dendro Cores and enemies to one location, allowing players to deal tremendous amounts of AoE damage in Bloom teams. He can also absorb his Elemental Burst with Electro, which allows him to constantly trigger Aggravate; given that Venti already builds EM for damage, this Reaction damage can be quite significant. |
Pyro
Notes on Pyro:
The Pyro Element has a unique drawback when used with Dendro—namely, the Burning Reaction masking the Dendro aura and preventing Bloom or Quicken Reactions from proceeding.
This is particularly problematic in Burgeon teams looking to utilize Pyro to trigger Burgeon on Dendro Cores but avoiding the Burning reaction. This generally limits Burgeon teams to characters that have controllable Pyro application or teams which apply enough Hydro to ensure enemies carry a Hydro aura (thereby making Dendro the triggering element), preventing Burning from ever occurring.
Burning itself rarely deals enough damage to justify a focus on the reaction.
 Amber Full Amber Guide | Sorry friends, Collei & Amber do not make good teammates! Amber is a poor choice for Burgeon teams. She struggles to take advantage of her main kit strength—her Elemental Burst’s impressive Pyro application, which doesn’t confer any advantage in these types of teams and can in fact be seen as a drawback, as it can clear Dendro and Hydro aura’s reducing the number of Blooms triggered. |
 Bennett Full Bennett Guide | Bennett can be used in conjunction with Xiangling or Kazuha in Burgeon teams, but these teams rely on having a unit who can apply enough Hydro to maintain a Hydro aura on the enemy. If the Hydro user cannot apply enough Hydro, then Dendro/Pyro will overwhelm the Hydro aura to begin triggering Burning instead of Burgeon. As of the current patch (3.0), the only unit who is known to consistently apply enough Hydro is Childe. There are also situations where no Hydro unit can keep up with the combined Pyro/Dendro application; one example of a team that does not function well with Burgeon is Sunfire Jean. This is because Sunfire applies too much Pyro for a Hydro aura to remain on the enemy. However, with Childe as a Hydro applier and teammates who don’t overwhelm his Hydro application, Bennett’s usefulness in Burgeon teams is unparalleled, as he provides Healing to mitigate the self-damage caused by Burgeon, and a very significant ATK buff for his team. Bennett can also be used in Burning teams, but the damage dealt by Burning is low, and players are generally better off using a Reaction like Reverse Vaporize instead of Burning. Bennett also has a unique method of applying Pyro with his sixth constellation, which allows melee weapon-using teammates to apply Pyro with their Normal Attacks; one example of a team which uses this mechanic is a Razor Self-Overload team consisting of Razor, C6 Bennett, Xingqiu, and Dendro MC. |
 Thoma Full Thoma Guide | Thoma has an Internal Cooldown on his Elemental Burst, making it easier to maintain a Hydro aura and have Thoma consistently trigger Burgeon on Dendro Cores. However, he deals significantly less damage than Xiangling. His shield can help offset the self-damage taken from Burgeon, but his lack of healing can make it difficult to tank through all Burgeon damage. It is also worth mentioning that Thoma has the same strength as Kuki Shinobu in Bloom-based teams. While his Elemental Burst itself has an ICD, this ICD is unique to each enemy, allowing every single tick of his Elemental Burst to trigger Burgeon even with an ICD. |
 Xiangling Full Xiangling Guide | A case of where too much Pyro can be a bad thing. Xiangling has zero Internal Cooldown on her Elemental Burst, meaning that she can potentially overtake Hydro. This would, in combination with Dendro, trigger Burning on the target instead of Burgeon, thus preventing Xiangling from Reverse Vaporizing and preventing Burgeon from occurring. This is only made worse by the 2:1 Hydro-to-Dendro ratio—2U of Hydro is necessary to react away 1U—which, combined with Xiangling’s rapid Pyro application, makes it very easy to overtake Hydro aura and cause Xiangling to lose Reverse Vaporizes. Outside of Tartaglia, it is near-impossible for a single Hydro character to keep up with Dendro application and Xiangling’s Pyro application. Additionally, Xiangling generally requires Bennett as a battery, which makes it very difficult to run another Hydro or Anemo unit to apply more Hydro aura—as such, it’s only really possible to use Xiangling in a non-Burning Dendro team with Tartaglia. |
 Xinyan | Xinyan can be used in Burgeon teams, but this is dependent on Pyro application from her shield; if her shield breaks, then she loses Pyro application. This forces her to build DEF to maintain her shield and Pyro, meaning less Elemental Mastery for reactions. Burgeon’s self-damage makes this problem even worse, as the self-damage breaks shields quickly. In general, Xinyan is not a good choice for Dendro teams. |
Geo
Notes on Geo:
Geo lacks a Reaction with Dendro, which makes Geo generally lack a place in Dendro teams. Geo units generally prefer to be used with other Geo units, and the Geo units who specifically want to be used with non-Geo units (specifically Yun Jin) do not benefit Dendro units or their teams. However, Zhongli can find a place in some Tighnari teams.
 Albedo Full Albedo Guide | Given that Geo does not enhance Dendro teams and Dendro teams don’t generally have many open slots in which Albedo can fit, Albedo’s usefulness for Dendro is questionable at best. While players may want to use Albedo for the 125 Elemental Mastery he shares when he casts his Elemental Burst, it is generally not worth using an entire team slot for this buff plus Albedo’s off-field DPS when better off-field DPS units (i.e. Fischl, who takes major advantage of Dendro reactions) exist. Albedo can be a flex option in a Tighnari team when paired with Zhongli, thanks to him fitting well into the short rotation time, providing Geo Resonance, and EM buff and unconditional off-field damage. |
 Zhongli Full Zhongli Guide | Zhongli continues to offer his universal support capabilities to Dendro-based teams. His Universal Resistance Shred remains applicable to Dendro and his ability to utilize 4pc Instructor is appreciated in both Quicken and Bloom-based team comps where multiple characters can utilize the EM buff it provides. In the case of Aggravate teams, the fact that Geo does not react with Dendro is a positive—it does not lower Quicken’s cooldown. It should be noted that Tighnari has a comfortable synergy with Zhongli who is also capable of providing valuable Interruption Resistance. |
Cryo
Notes on Cryo:
Cryo does not see any new reactions with Dendro; however, the Freeze Bloom Interaction tech allows Cryo characters (specifically Ganyu) to enable additional Bloom-based Reactions.
 Ganyu Full Ganyu Guide | Ganyu is a core unit for Freeze Bloom Interaction teams, as she can maintain 100% uptime on her AoE Cryo application. She can also deal significant amounts of personal damage with both her Charged Attack and Elemental Burst, providing Freeze Bloom Interaction teams with even more DPS. Ganyu does not work well in Reverse Melt teams with Burning; Burning alone cannot sustain Reverse Melt, and using another Pyro unit such as Xiangling to “help” the Burning leaves Ganyu without a shielder. |
Credits & Acknowledgements
Writers:
- Ayzel
- Reens
- KB
- LoftyGinger
Additional credits to:
- Zajef
- Xf3
- Vladone
- KQM TC team