Updated for Version 5.7
Mavuika is a 5★ Pyro Claymore character in Genshin Impact who can dish out powerful nukes and strong sustained DPS. Learn about Mavuika’s best builds, best weapons, best artifacts, and best teams in this quick guide.
Note that the information given may change if new discoveries are made. More extensive testing is in progress.
Join our Discord to check on and participate in the theorycrafting process.
Table of Contents
New Content
Mizuki | On-field Swirl damage dealer and healer. Mavuika uses her Skill and Burst to deal damage while Mizuki drives reactions. |
Varesa | A powerful on-field Electro damage dealer that can greatly benefit from Mavuika’s buffs and Pyro application. |
Iansan | A unique 4pc Scroll and ATK buffer that requires movement to maintain her uptime, which Mavuika easily accommodates. |
 Escoffier | Off-field Cryo applier and damage dealer. While she typically prefers her Freeze-focused teams, she’s still a remarkable option with Mavuika’s Forward Melt teams. |
Ifa | An on-field Anemo character who can play either as a hypercarry or as a Swirl damage dealer. Both roles can use Mavuika’s supportive strengths. |
 Finale of the Deep Galleries | While this set does buff Mavuika’s initial Burst damage, it doesn’t improve the subsequent Charged Attacks, making it a lackluster set option. |
Infographic
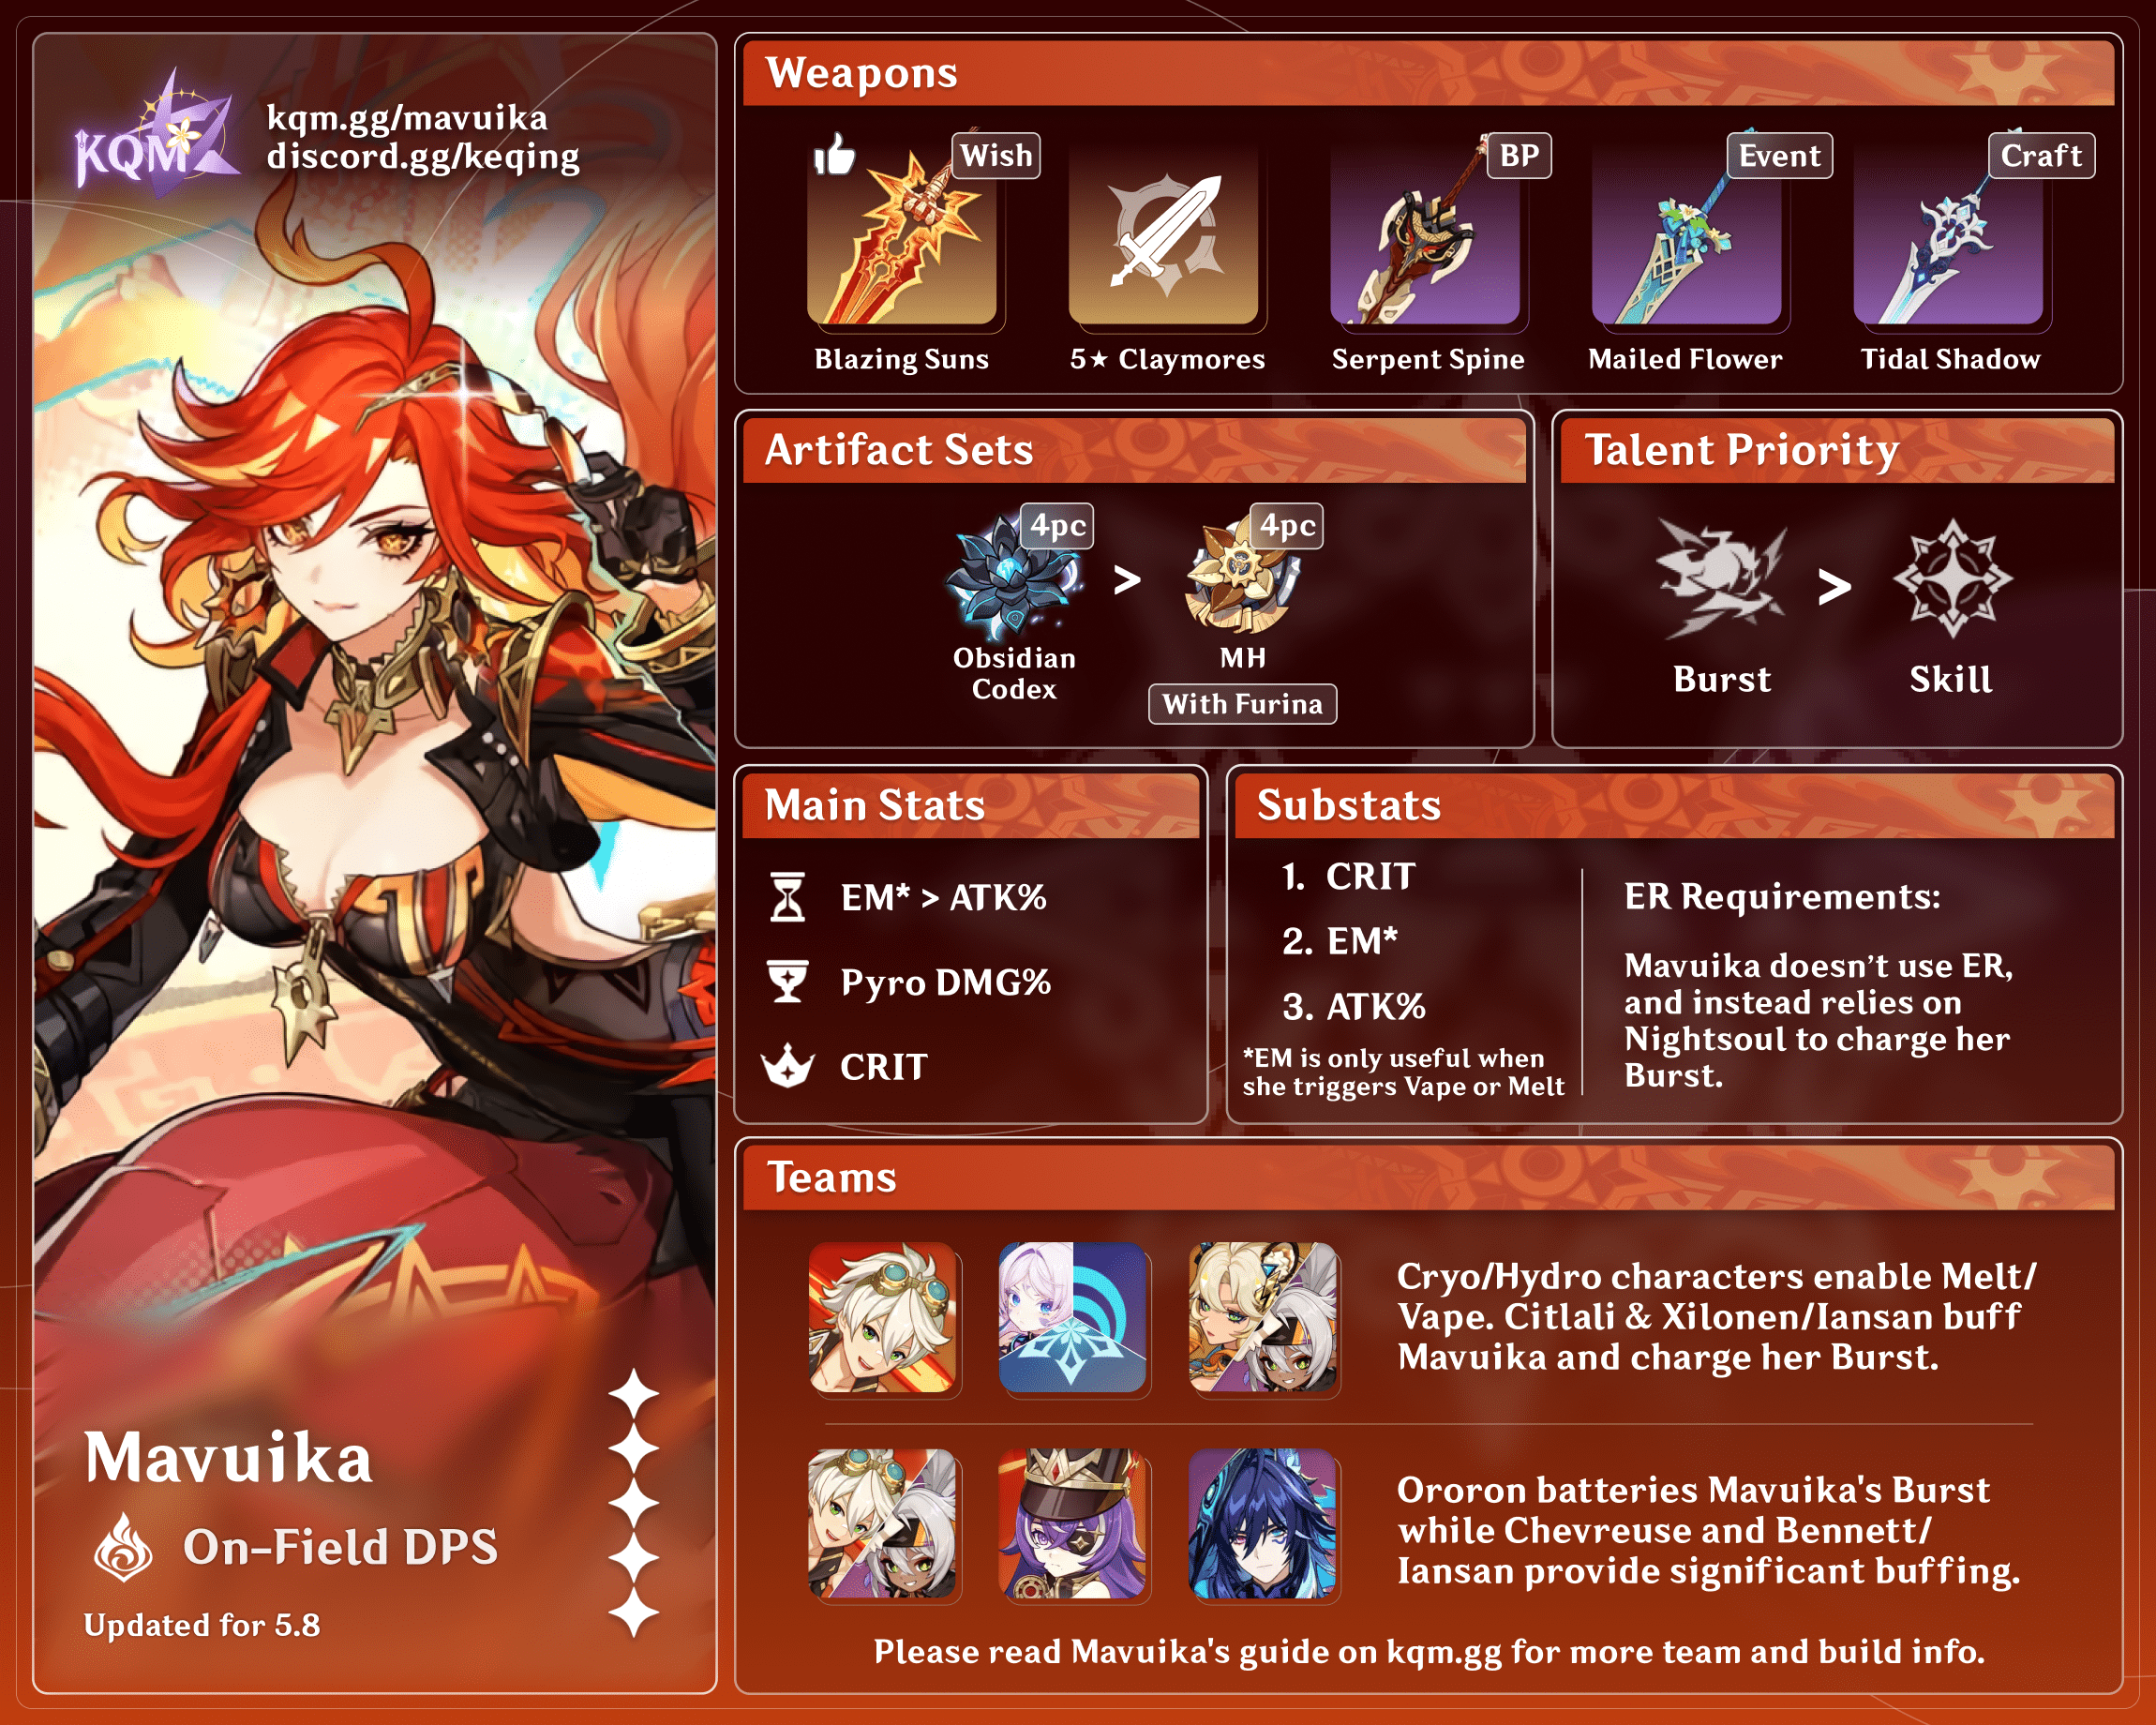
On-field DPS
Credits to: plumetra, cuppacote, auraolis & KQM Staff
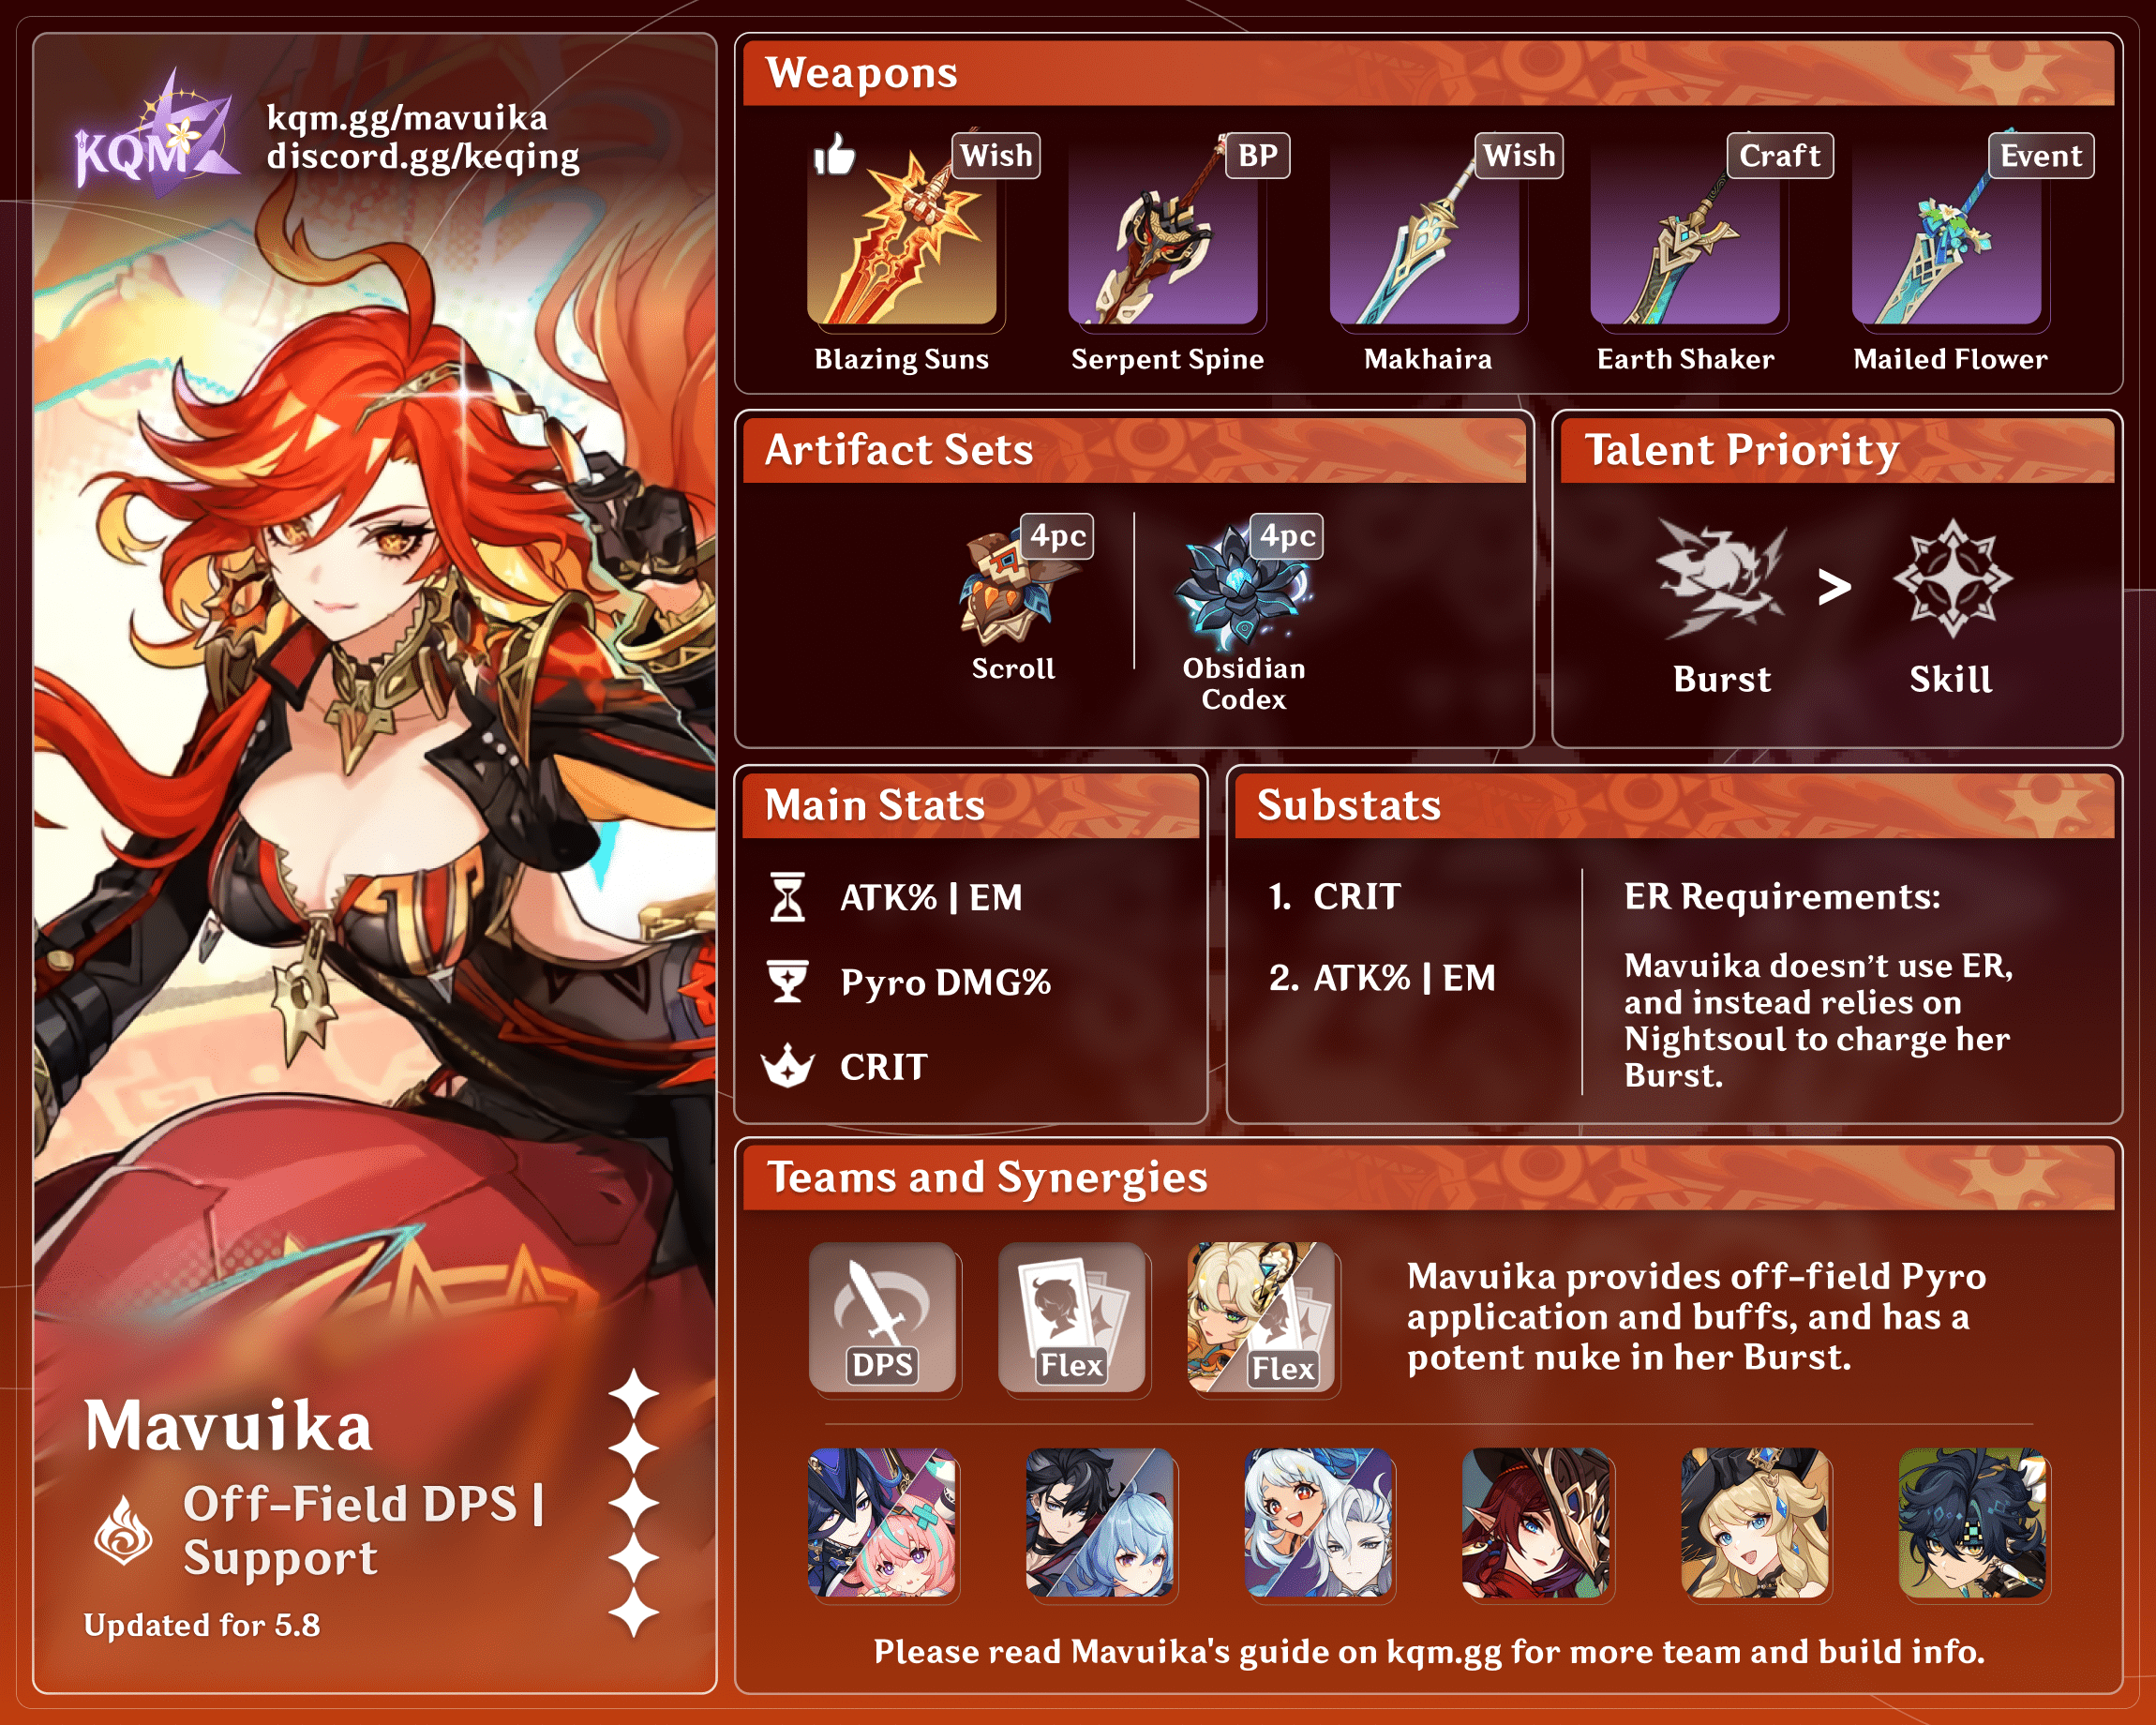
Off-field DPS / Enabler
Credits to: plumetra, cuppacote, auraolis & KQM Staff
Character Overview
Playstyles
On-Field DPS
Mavuika shines primarily as an on-field DPS with her incredibly high yet easily accessible damage. Her Burst deals a massive AoE damage instance then converts her Normal / Charged / Plunging Attacks into Pyro and increases those Normal and Charged Attacks’ damage. Her Pyro conversion can also be accessed using the Hold version of her Skill, although it is generally not worth using outside of her Burst state.
Pros
- Very high personal damage output
- Good AoE
- Deals both front-loaded and sustained damage via initial Burst hit and subsequent Normal / Charged Attacks
- Has full interruption resistance in Burst state
- Hot Biker Archon
Cons
- Requires at minimum one other Natlan character, which severely restricts teambuilding
- Wants Citlali (another new 5-star character) to reach damage ceiling
- Requires incessant field time during DPS window
- Optimal combos for certain Melt setups are tight and can be inconsistent, especially with higher ping
Off-Field DPS / Enabler
Mavuika is also a good off-field DPS with the Tap version of her Elemental Skill, which deals considerable AoE damage and applies the Pyro Element to enable reactions for her teammates. She can still use her Elemental Burst to deliver a good chunk of front-loaded damage and give a further buff to the team through her A4 Passive.
Pros
- Pyro application isn’t locked behind sky-high ER requirements
- Massive nuke potential on her Burst with buffs or Amplifying Reactions
- Large attack range and AoE
- Winding-down DMG% buff from A4 Passive and 4pc Scroll of the Hero of Cinder City
Cons
- Not enough Pyro application on her own to enable many Hydro units (including Childe and Neuvillette)
- Can run into uptime issues with characters that want longer rotations
- Potentially low-value A4 buff due to needing other Natlan characters in the team to stack Fighting Spirit
Talents
Talent Priority
Burst > Skill
Mavuika’s Burst is incredibly powerful, even when played for her off-field Pyro application. Her Normal Attack Talent does not increase her damage in either playstyle as her Bike attacks are from her Skill Talent.
Talent Overview
 Normal Attack | Flames Weave Life
Talent Description
Normal Attack
Performs up to 4 consecutive claymore strikes.
Charged Attack
Consumes a certain amount of Stamina to perform an especially powerful Severing Splendor strike toward the front.
Plunging Attack
Plunges from mid-air to strike the ground below, damaging opponents along the path and dealing AoE DMG upon impact.
Mavuika’s standard Normal Attacks can be ignored as they are almost never used and serve no purpose in her gameplay.
 Elemental Skill | The Named Moment
Talent Description
Calling upon her authority over “conflict,” Mavuika summons the All-Fire Armaments passed down through the line of human Archons, dealing Nightsoul-aligned Pyro DMG
After using this, Mavuika’s Nightsoul points are restored to max value, and she enters the Nightsoul’s Blessing state.
All-Fire Armaments
Has different forms when Tapped or Held.
(Press/Tap)
“Divine Name Unleashed”: The All-Fire Armaments manifest as a Ring of Searing Radiance. The Ring follows the current active character and attacks nearby opponents at intervals, dealing Nightsoul-aligned Pyro DMG.
Hold
“Ancient Name Unbound”: The All-Fire Armaments manifest as a Flamestrider. In this state, Mavuika can ride the Flamestrider at high speed, or activate its hidden backup propulsion module to temporarily cross various terrain types and glide in mid-air. Mavuika’s Normal, Charged, and Plunging Attacks will also be converted to deal Nightsoul-aligned Pyro DMG which cannot be overridden. When sprinting, she also deals Nightsoul-aligned Pyro DMG to opponents along her path.
While in the Nightsoul’s Blessing state, Tapping the Elemental Skill can switch the All-Fire Armaments’ form. The Armaments will disappear once Mavuika’s Nightsoul’s Blessing state ends.
Nightsoul’s Blessing: Mavuika
Continuously consumes Nightsoul points according to the All-Fire Armaments’ form. Mavuika’s Nightsoul’s Blessing state ends once her Nightsoul points are exhausted.
Her Elemental Skill’s All-Fire Armaments have two forms depending on whether the Skill is tapped or held. When tapped, her Skill manifests as a Ring of Searing Radiance, following the active character and inflicting Nightsoul-aligned Pyro damage at 2s intervals.
When held, Mavuika summons her Flamestrider mount, which gives her mobility and converts her Normal / Charged / Plunging Attacks into Nightsoul-aligned Pyro damage.
After using her Skill, whether it is the Tap or Hold version, Mavuika enters the Nightsoul’s Blessing state and gains 80 Nightsoul points, which are consumed continuously to maintain her Ring of Searing Radiance or Flamestrider uptime. At C0, a Skill use gives her around 12s or 6 hits of Tap Skill damage. Additionally, Mavuika can freely swap between the two states of her Skill by using the ability again. The Ring of Searing Radiance disappears if Mavuika mounts her Flamestrider, but whenever she leaves the field while still having Nightsoul points, her Ring will be in effect again.
Mavuika’s Normal / Charged / Plunging Attacks (outside of Burst state) are generally not worth using for damage; they are mainly utilized to inflict Nightsoul-aligned Elemental attacks on some enemies or to gain faster Fighting Spirit for her Burst.
 Elemental Burst | Hour of Burning Skies
Talent Description
Let the people’s inner voices reach the divine throne in the heavens.
Mavuika’s Elemental Burst is not reliant on Energy, but instead, on “Fighting Spirit.”
Fighting Spirit
When Mavuika has at least 50% Fighting Spirit, she can consume it all to unleash her Elemental Burst.
Mavuika can obtain Fighting Spirit via the following methods:
- When in combat, Nightsoul points consumed by nearby party members are converted to Fighting Spirit.
- When nearby party members’ Normal Attacks hit opponents, Mavuika gains 1.5 Fighting Spirit. This can trigger once every 0.1s.
After using this, Mavuika gains 10 Nightsoul points and enters the Nightsoul’s Blessing state. Riding her Flamestrider high in the air, she uses a powerful Sunfell Slice against opponents on the ground, dealing Nightsoul-aligned AoE Pyro DMG and entering the “Crucible of Death and Life” state.
Crucible of Death and Life
During this time, Mavuika’s various actions will no longer consume Nightsoul points, and her interruption resistance is increased. Also, the DMG dealt by Sunfell Slice and “Ancient Name Unbound”‘s Normal and Charged Attacks is increased based on the amount of Fighting Spirit she has when using the Elemental Burst.
Crucible of Death and Life will be canceled when Mavuika leaves the field.
Mavuika enters the Nightsoul’s Blessing state with 10 Nightsoul points, striking with a massive Nightsoul-aligned Pyro attack to surrounding enemies in a large AoE. After that, she enters the Crucible of Death and Life state that lasts for 7s or until she leaves the field. During this state, Mavuika rides her Flamestrider without consuming any Nightsoul points.
Importantly, Mavuika’s Burst does not require normal Energy but relies on Fighting Spirit.
Fighting Spirit (FS):
- Gains 1 FS for each Nightsoul point consumed by Mavuika or her teammates (Pyro Traveler and Natlan characters)
- Doing Normal Attacks on any character also gives her FS (1 Normal Attack for 1.5 FS)
- A maximum of 200 FS can be obtained, and Mavuika needs at least 100 FS to cast her Burst
- Mavuika’s Burst and her Normal / Charged Attacks during the Crucible of Death and Life state deal increased damage based on the amount of Fighting Spirit she has when casting Burst.
During her Burst, Mavuika cannot be interrupted and stops consuming Nightsoul points as well as pausing the Ring of Searing Radiance effect.
 Ascension 1 Passive | Gift of Flaming Flowers
Talent Description
When a nearby party member triggers a Nightsoul Burst, Mavuika’s ATK increases by 30% for 10s.
Nice ATK% buff with good uptime, especially in a team with many Natlan characters.
 Ascension 4 Passive | “Kiongozi”
Talent Description
After using her Elemental Burst, Hour of Burning Skies, every point of Fighting Spirit present when it is used increases the DMG that the current active party member deals by 0.2%. The maximum increase obtainable this way is 40%, and this effect lasts 20s, decaying over this duration until it reaches 0.
Useful for the active character, including herself as an on-field DPS. The DMG% buff from this passive applies to Mavuika’s initial Burst hit and it decays over time starting after the Burst hit.
 Night Realm’s Gift Passive | Exhaust Mode
Talent Description
After Nightsoul points have been fully depleted, Mavuika will switch to using Phlogiston to maintain the All-Fire Armaments’ Flamestrider form.
While in an area with Phlogiston Mechanics within Natlan, Nightsoul Transmission: Mavuika can be used. When the current active character is sprinting, climbing, swimming, in movement modes caused by certain Talents, or at a certain height in the air, switching to Mavuika will trigger the following: Mavuika enters the Nightsoul’s Blessing state and obtains 50% of her maximum Nightsoul points. Nightsoul Transmission can be triggered once every 10s by your own party.
The standard exploration Talent every Natlan character has, which lets them consume Phlogiston when they run out of Nightsoul points in Natlan to extend their Nightsoul state.
In addition, when you swap into Mavuika in an area with Phlogiston mechanics, she mounts her Flamestrider immediately and gains 40 Nightsoul points to maintain her Nightsoul’s Blessing state. This can happen every 8s at most thanks to Mavuika’s Utility Passive.
 Utility Passive | Night-Shattering Radiance
Talent Description
The party’s Nightsoul Transmission CD is decreased by 20%.
Mavuika decreases the team’s Nightsoul Transmission cooldown by 2s. This is a nice boost to Natlan overworld exploration.
Constellations
 Constellation 1 | The Night-Lord’s Explication
Constellation Description
Mavuika’s maximum Nightsoul points are increased to 120, and she gains Fighting Spirit 25% more efficiently.
Additionally, she gains 40% ATK for 8s after gaining Fighting Spirit.
Increases the duration of her Skill (both the off-field and on-field versions). Makes Mavuika gain 25% more Fighting Spirit through Nightsoul point consumption and Normal Attacks. At C1, Mavuika can use her Burst every rotation with just the Nightsoul point consumption from her Skill alone. Additionally, Mavuika receives a permanent 40% ATK buff in most of her teams.
 Constellation 2 | The Ashen Price
Constellation Description
When in the Nightsoul’s Blessing State, Mavuika’s Base ATK is increased by 200, and she obtains the following effects based on All-Fire Armaments’ form:
- Ring of Searing Radiance: Nearby opponents’ DEF decreased by 20%.
- Flamestrider: Mavuika’s Normal Attacks, Charged Attacks, and her Sunfell Slice from the Elemental Burst Hour of Burning Skies deal 60%, 90%, and 120% of her ATK as increased DMG respectively.
Massive increase to her personal damage by giving her 200 Base ATK, and either 20% DEF Shred to enemies in the Tap Skill version, or extra multipliers to her Flamestrider’s Normal / Charged Attacks and Burst hit. The DEF Shred increases the damage dealt by the team as well, but it is not active while she’s on her Flamestrider until her C6.
 Constellation 3 | The Burning Sun
Constellation Description
Increases the Level of Hour of Burning Skies by 3.
Maximum upgrade level is 15.
Simple Burst level increase, but is a remarkable damage increase to her Burst nuke and on-field DPS Normal / Charged Attacks during her Burst state.
 Constellation 4 | The Leader’s Resolve
Constellation Description
Enhances the effects of the Passive Talent “Kiongozi”:
The DMG increase gained after using the Elemental Burst Hour of Burning Skies will not decay over time, and an additional 10% DMG Bonus will be gained.
You must first unlock the Passive Talent “Kiongozi.”
Increases her support abilities and personal damage slightly by making the DMG% buff from the A4 Passive stay at 50% permanently instead of a decaying 40%.
 Constellation 5 | The Meaning of Truth
Constellation Description
Increases the Level of The Named Moment by 3.
Maximum upgrade level is 15.
Skill level increase, which is helpful to both her off-field Skill damage and on-field Normal / Charged Attacks.
 Constellation 6 | “Humanity’s Name” Unfettered
Constellation Description
The All-Fire Armaments from the Elemental Skill The Named Moment receive all-round improvements:
- Ring of Searing Radiance: When the Ring’s attacks hit opponents, a Flamestrider will crash into the struck opponent, dealing 200% of ATK as Nightsoul-aligned AoE Pyro DMG.
- Flamestrider: When Mavuika is riding the Flamestrider, she will also summon a Scorching Ring of Searing Radiance to follow her, which will decrease nearby opponents’ DEF by 20% and deal 500% of ATK as Nightsoul-aligned AoE Pyro DMG to nearby opponents once every 3s. Mavuika’s terrain-crossing abilities will also be further improved.
Additionally, when Mavuika is riding her Flamestrider and is not in combat, when her Nightsoul points drop to 5, she will gain 80 Nightsoul points. This effect can trigger once every 15s.
Gives additional damage during both her off-field Skill and on-field Flamestrider duration. The extra hits during her on-field time also shred nearby opponents’ DEF by 20%. Note that none of the added attacks from C6 apply Pyro, so they cannot react or interfere with Mavuika’s usual combo’s reactions.
Mavuika’s C6 also significantly improves her exploration abilities, allowing her to travel across various terrains much more efficiently.
Combos
Combo Notation
- N = Normal Attack or Flamestrider Normal Attack for Mavuika
- N# = Corresponding number of consecutive Normal Attacks. Example: N4: 4 consecutive Normal Attacks
- C = Charged Attack or Flamestrider Cyclic Charged Attack for Mavuika
- C# = Corresponding number of consecutive Charged Attacks. Example: C4: 4 consecutive Charged Attacks
- F = Flamestrider Final Charged Attack for Mavuika
- A = Aimed Shot
- P = Plunging Attack or Flamestrider Plunging Attack for Mavuika
- E = Elemental Skill
- tE = Tap Skill
- hE = Hold Skill
- Q = Elemental Burst
- D = dash (cancel) or Flamestrider Sprint Attack for Mavuika
- J = jump (cancel)
- W = walk (cancel)
- > = switch character
- ( ) = these actions are optional; please refer to the notes below
- [ ] = repeat these actions the specified number of times
On-Field
Due to how big of a DPS difference there is between her Charged and Normal Attacks, Mavuika prefers using Charged Attacks (the higher-DPS attacks) during her Burst uptime to dish out as much damage as possible, even at the cost of fewer teammates’ coordinated attack procs. Vaping / Melting her Burst hit is extremely important, as it makes up for around a third of her damage output.
All combos listed below perform similarly to each other, so it is down to players’ preference to pick what combo is most suited for them. Note that Mavuika can use all these combos in Vape or non-reaction teams, while the options are more limited in Melt teams.
| Q C3F D C3F (can be used for Melt) | On-field Mavuika’s highest-DPS Melt combo with Citlali or Rosaria as a solo Cryo unit. This aligns well with those two characters’ Cryo application and allows for 2 Cyclic Charged Attack Melt and 2 Final Charged Attack Melt. However, if you are too slow to perform the dash cancel, Mavuika’s dash attack can apply Pyro instead of the following Charged Attack. This results in a Pyro application before the Cryo aura is applied, which ruins the reactions on the rest of the combo. |
| Q J C8 (can be used for Melt) | A simpler Melt combo that intentionally delays the first Pyro application after Mavuika’s Burst to line up with the off-field Cryo application by jumping before starting the Charged Attack chain. When Mavuika’s Burst state runs out, players can choose to finish with a Final Flamestrider Charged Attack or cancel the combo by a dash, jump, or Skill. |
| Q C4J C4 (can be used for Melt) | Similar to the combo above, but here Mavuika uses a jump cancel during her Charged Attack chain. This leads to easier Cryo aura management, and thus a more consistent Melt pattern. When Mavuika’s Burst state runs out, players can choose to finish with a Final Flamestrider Charged Attack or cancel the combo by a dash, jump, or Skill. |
| Q C2D C3D C4 (can be used for Melt with Double Cryo) | The most consistent combo with 5 non-reacting and 5 reacting Cyclic Charged Attacks (however, the last react Cyclic Charged Attack is usually out of Burst state). This combo requires either good Hydro application, such as Furina, Xingqiu, or Yelan; or C6 Kaeya; or a Double Cryo setup of Citlali / Rosaria plus an off-field Cryo applier (i.e., Diona or Layla). However, the timing with Melt is tighter than with Vape. Xingqiu and Yelan are viable to use as Hydro appliers because every time Mavuika starts a Cyclic Charged Attack chain, the game registers her input as doing one Normal Attack animation first, thus proccing Xingqiu or Yelan’s coordinated attack. However, if players use Yelan as the only Hydro applier in the team, Mavuika may not have enough Hydro to Vape all her hits with the presence of off-field units such as Pyro Traveler or Kachina. When Mavuika’s Burst state runs out, players can choose to finish with a Final Flamestrider Charged Attack or cancel the combo by a dash, jump, or Skill. |
| Q 4[C2D] C | A viable combo in Vaporize teams that allows the use of off-field characters such as Yelan with either Pyro Traveler or Kachina. However, the timing for it is rather tight, as players can react with the Sprint Attack instead of the Charged Attack during the combo, causing Mavuika to lose her damage. When Mavuika’s Burst state runs out, players can choose to finish with a Final Flamestrider Charged Attack or cancel the combo by a dash, jump, or Skill. |
| Q C8F / C9F | The simplest combo that only consists of Charged Attack spam for non–Amplifying Reaction teams. Furina is the only applier worth using that can enable Amplifying Reactions for Mavuika with this combo. |
Off-Field
| Q E | Casting her Burst before her Skill ensures that her Burst reacts if the Hydro / Cryo application is not abundant. It also funnels all of her particles into the next character you swap in if they need it. |
| E Q | One upside of using Skill first, Burst later, is to avoid the unwanted distance Mavuika lunges herself forwards with Skill while being on Flamestrider, which could result in leaving some AoE (like Bennett’s Burst circle) or missing the Skill damage cast and thus generating no particles. Moreover, using Skill before Burst allows Mavuika to trigger 4pc Scroll with her Skill’s application, thus benefiting her Burst with the set bonus. |
| E only | Using Skill only is viable in teams that do not generate enough Fighting Spirit for Mavuika to Burst every rotation. |
Artifacts
Artifact Stats
 Sands |  Goblet |  Circlet |
| ATK% / EM | Pyro DMG% | CRIT |
Stat Priority: CRIT > EM (Vaporize / Melt) > ATK% > Flat ATK
Like most damage dealers, Mavuika wants an ATK% / EM — DMG% — CRIT build. Assuming equal substats, an EM Sands is generally better if she triggers in Vaporize / Melt teams; otherwise, use ATK%. Use whichever CRIT Circlet brings her closer to a 1:2 CRIT Rate to CRIT DMG ratio, taking into account available CRIT buffs, such as 40% CRIT Rate from 4pc Obsidian Codex.
Since Mavuika’s Burst charges with Fighting Spirit rather than Energy, she should not build ER%.
Artifact Sets — On-Field
 4pc Obsidian Codex | 4pc Obsidian Codex is on-field Mavuika’s Best-in-Slot and highly recommended to farm. It offers an unmatched amount of stats with both DMG Bonus from the 2pc and a hefty CRIT Rate buff from the 4pc. As Mavuika’s Burst gives her a few Nightsoul points to consume before the Nightsoul point consumption pause takes effect, her initial Burst hit and subsequent attacks benefit from the 4pc effect of Obsidian Codex. However, it is noteworthy that a few last hits of Mavuika’s Burst DPS window do not get the full 4pc Codex bonus as the set’s 6s duration is shorter than the 7s duration of her Burst. |
 4pc Marechaussee Hunter (MH) | The second-best option in teams with Furina. |
 4pc Gilded Dreams | An option for Vaporize / Melt teams, though strictly worse than 4pc Obsidian Codex. Best suited as a placeholder while farming 4pc Codex. |
 4pc Unfinished Reverie | An option for Burning teams where Mavuika deals the majority of the team’s damage, although marginally worse than 4pc Obsidian Codex. |
 2pc Combinations | EM + EM, Pyro + ATK%, MH + Pyro, ATK% + ATK% Other placeholder options while farming 4pc Obsidian Codex. Pick whatever combination offers better substats. |
 4pc Crimson Witch | Players who already have a 4pc Crimson Witch set can use it as a placeholder while farming 4pc Obsidian Codex. However, the set merely performs similarly to 2pc combinations, while being harder to get good substats on. |
Artifact Sets — Off-Field
 4pc Scroll of the Hero of Cinder City | 4pc Scroll is off-field Mavuika’s best set unless there is a better 4pc Scroll holder in the team, such as Xilonen; it lets her buff the team’s on-field damage dealer without compromising too much of her own significant personal damage, since Mavuika also benefits from the buff herself. |
 4pc Tenacity of the Millelith | Mavuika can equip 4pc Tenacity for its teamwide ATK% buff if there already is a 4pc Scroll holder. However, it significantly decreases her personal damage, so it is best used when her damage contribution is less than what the 4pc Tenacity can bring to the rest of the team. |
 4pc Archaic Petra | Similar to 4pc Tenacity, Archaic Petra can be used on Mavuika if her personal damage is less important in the team. However, picking up Crystallize Shards can be somewhat difficult or inconsistent for her, so it is recommended for the Geo unit (i.e., Xilonen) to use it instead. |
 4pc Instructor | Another support option for Mavuika. Use it only if she can reliably trigger a reaction while on-field and her damage output is less important than the potential damage increase her teammates can gain from this set. |
 4pc Deepwood Memories | A support set for Mavuika in teams where the majority of the damage comes from the Dendro Element. Mavuika is often the best holder for it. |
4pc Obsidian Codex | While 4pc Obsidian Codex does not buff the whole duration of her Skill damage as it does not refresh while Mavuika is off-field, it boosts her Burst damage significantly, which is still the main source of her damage as an off-field unit. This set gains more value when there are other Natlan supports who can hold Scroll in the team or when she can Melt / Vape her Burst for a strong nuke. |
 4pc Golden Troupe | A placeholder option while farming for 4pc Scroll or 4pc Obsidian Codex. |
Weapons
 5★ A Thousand Blazing Suns | Mavuika’s signature provides everything she could want: CRIT Rate, CRIT DMG, a high Base ATK, and ATK%. It performs significantly better than the alternatives. |
5★ Verdict, Beacon of the Reed Sea, Redhorn Stonethresher | 5-star CRIT stat sticks that all perform similarly; their passives are useful to varied degrees. |
 4★ Serpent Spine | If you are able to keep high stacks on it, such as when using a strong shielder, high-refinement Serpent Spine can compete against 5-star CRIT weapons. However, without a shielder, as Mavuika neither can nor wants to normally dodge, it performs similarly to F2P weapons such as Mailed Flower and Tidal Shadow. |
 5★ The Unforged, Wolf’s Gravestone, Fang of the Mountain King | Other good 5-star Claymores that offer a lot of ATK but little to no CRIT and thus fall behind 5-star CRIT Claymores. |
 4★ Talking Stick, Mailed Flower | Recommended 4-star alternatives for players who have neither 5-star Claymores nor Serpent Spine. Mailed Flower offers ATK% and EM to increase Mavuika’s Melt / Vaporize damage, while Talking Stick offers CRIT Rate and — depending on what Element she is affected by — ATK% or Elemental DMG%. |
 4★ Tidal Shadow | Mavuika’s best F2P option (for those who don’t have Mailed Flower) in teams that run a healer, though it might not work when Bennett is the only healer without Furina in the team. |
 4★ Rainslasher | Similar to Tidal Shadow in Vaporize teams, but not recommended otherwise. |
 4★ Earth Shaker, Blackcliff Slasher, Ultimate Overlord’s Mega Magic Sword | Viable options in teams where Mavuika cannot do Vape / Melt reactions, and she does not have access to any of the 5-star or Battle Pass weapons, and healing her for Tidal Shadow’s passive is not reliable / feasible. |
 4★ Makhaira Aquamarine | A good weapon that has a teamwide ATK buff with full uptime. It performs decently in teams where she is built as an Overloaded trigger (i.e., Clorinde Overloaded teams). |
Teams
Rotation Notation
- N = Normal Attack or Flamestrider Normal Attack for Mavuika
- N# = Corresponding number of consecutive Normal Attacks. Example: N4: 4 consecutive Normal Attacks
- C = Charged Attack or Flamestrider Cyclic Charged Attack for Mavuika
- C# = Corresponding number of consecutive Charged Attacks. Example: C4: 4 consecutive Charged Attacks
- F = Flamestrider Final Charged Attack for Mavuika
- A = Aimed Shot
- P = Plunging Attack or Flamestrider Plunging Attack for Mavuika
- E = Elemental Skill
- tE = Tap Skill
- hE = Hold Skill
- Q = Elemental Burst
- D = dash (cancel) or Flamestrider Sprint Attack for Mavuika
- J = jump (cancel)
- W = walk (cancel)
- > = switch character
- ( ) = these actions are optional; please refer to the notes below
- [ ] = repeat these actions the specified number of times
On-Field DPS

Mavuika shines the most in the on-field DPS playstyle, as it lets her take advantage of her own A4 Passive buff, which bolsters the already high multipliers of her attacks. Mavuika’s Burst deals a massive front-loaded hit, followed by sustain damage from her Normal / Charged Attacks during her Burst state. As Mavuika is a hypercarry who scales extremely well with investments on herself and buffs received from teammates, it is recommendable to build the team around her by using as many support teammates with buffing gear as you can and by using a well-invested build on Mavuika.
Mavuika’s best team archetype is Forward Melt, especially with Citlali, due to how well she can use Forward Melt to amplify her already impressive personal damage for amazing DPS performance. Mavuika can Melt her Burst, which outputs an insane amount of damage, and around half of her Cyclic Charged Attacks during her Burst state. Reverse Vape teams tend to be on the weaker side as the Reverse reaction has lower scaling compared to its Forward counterpart. However, it is less restrictive when it comes to building and combo execution since Reverse Vape teams allow the use of certain off-field characters (i.e., Ororon, Pyro Traveler) and ensure a more reliable Amplifying Reaction pattern for Mavuika.
Note that since Mavuika’s attacks deal blunt damage, it is not advisable to use both Cryo and Hydro units in the same team. This is to avoid Mavuika’s attacks applying Pyro on a Frozen enemy with neither underlying Cryo nor Hydro aura, resulting in only Shatter damage and no Melt or Vaporize reaction.
Although Melt and Vaporize teams are recommended as Mavuika takes excellent advantage of Amplifying Reactions, she can also be played in other teams. For instance, her teams with Chevreuse are not far behind in damage (though note that these teams require Ororon in order to run Chevreuse and Bennett, as Ororon is the only Electro Natlan character).
Notable Teammates
Natlan
Mavuika should run at minimum one Natlan unit to stack her Burst. They should also equip 4pc Scroll to buff her damage and, if possible, provide other buffs or utility.
★ Xilonen | Xilonen is easily one of the best Natlan supports available, providing RES Shred, 4pc Scroll’s damage bonus, or 4pc Archaic Petra / Instructor if there is another 4pc Scroll holder, and sustain with her healing. She lets Mavuika stack her Burst, without sacrificing buffs. |
★ Citlali | Similarly to Xilonen, Citlali also consolidates Fighting Spirit stacks and buffing. She provides Pyro RES Shred and a shield, and she can hold TTDS or Starcaller’s Watch to buff Mavuika and enable her to Forward Melt for significantly increased damage. |
★ Iansan | Iansan is a very notable support for Mavuika. Her Flat ATK buff comes with the condition that the active character moves a lot, which Mavuika’s highly mobile playstyle accommodates effortlessly. At C2 and C6, she can further buff Mavuika with an ATK% and a DMG% buff, respectively. If available, she can also use Symphonist of Scents to provide an ATK% buff through her innate but unremarkable healing. |
| ★ Ororon | Ororon’s A1 Passive lets him consume Nightsoul points and apply Electro from off-field, as Mavuika’s Elemental attacks are considered Nightsoul-aligned, making him an ideal partner in Overloaded and Overvape teams. |

Anemo
An Anemo unit can shred Pyro RES with 4pc VV; units with additional buffs or utility are recommended.
 ★ Kazuha | In addition to 4pc VV’s RES Shred, Kazuha’s A4 Passive provides an Elemental DMG Bonus to further buff Mavuika. His Skill also offers strong, on-demand grouping. |
 ★ Sucrose | Sucrose trades Kazuha’s DMG Bonus for a high EM buff to increase Mavuika’s Melt / Vaporize damage. She also provides some grouping with her Skill and Burst, and can hold Thrilling Tales to further buff Mavuika. |


Cryo
A Cryo unit with off-field Cryo application lets Mavuika Melt her attacks for a hefty damage increase. Weaker Cryo appliers should pair with a second Cryo to compensate.


Hydro
Similarly to Cryo units, a Hydro unit with off-field application lets Mavuika Vaporize her hits to significantly increase her damage. If using a Hydro unit that requires Normal Attacks to apply Hydro (e.g., Yelan or Xingqiu), note that Mavuika has to use certain Charged Attack combos to Vape all her hits.
 ★ Furina | Furina consolidates off-field Hydro application and buffing. Her Skill applies Hydro without requiring Normal Attacks (unlike Yelan or Xingqiu), and her Burst offers a ramping DMG% bonus to boost Mavuika’s damage. It is noteworthy that Furina wants a healer to help stack Fanfare as Mavuika has no innate HP fluctuations — but this is not a concern, as Mavuika strongly prefers to be paired with Bennett and/or Xilonen anyway. |


Pyro
A Pyro unit can slot into Mavuika’s Vaporize / Melt teams to provide buffs and/or utility as long as their Pyro application doesn’t interfere with reactions. If the team doesn’t rely on reactions, it can also run an off-field Pyro damage dealer.
 ★ Bennett | Bennett provides everything Mavuika needs: an unmatched ATK buff, Pyro DMG% at C6, good healing, and strong Pyro application on demand to help set up reactions. He is the staple of almost all on-field Mavuika teams. |
 Chevreuse | Chevreuse’s RES Shred, ATK%, and (at C6) DMG Bonus, make her teams a fine option for Mavuika despite losing out on Vaporize / Melt. She also consolidates this with healing. Note that Ororon is required for this playstyle, as he is the only Electro Natlan unit if you run Bennett in the team. At C6, Chevreuse also becomes a solid pick for non-Overloaded teams as she still consolidates sustain with a high DMG Bonus. She can also use Symphonist of Scents to provide an ATK% buff. |
 Xiangling | Xiangling is a good off-field damage dealer in Mono Pyro teams. She has some decent buffs to offer to Mavuika such as Pyro RES Shred from C1, Pyro DMG Bonus from C6, and an occasional ATK% buff from A4. |
Others
Other units that provide buffs, personal damage, or utility can slot into Mavuika’s teams as a flex pick. Geo units can unobtrusively slot into Mavuika’s Melt / Vaporize teams without interfering with reactions, while Electro units are decent flex pick options for Chevreuse teams.


Example Teams
This is not a comprehensive list of teams. The inclusion or exclusion of any given team does not necessarily reflect its power level.

The general best Forward Melt team for Mavuika, featuring Citlali for Cryo application, Fighting Spirit stack, and buffs. Bennett and either Xilonen, Sucrose, or Kazuha are used for further buffs such as ATK, DMG%, EM, or Pyro Shred to enemies. As Xilonen stacks Mavuika’s Burst extremely fast with a single Skill use, she is more valuable to Mavuika in fights where the rotation ends too early, before Mavuika and Citlali have enough time to generate Fighting Spirit back.
Note that the rotations below all leave 1–2s of Mavuika’s Burst cooldown if played frame-perfect. This can be solved by adding 1–2 Mavuika Normal or Charged Attacks outside of her Burst state.
Sample Rotation (Xilonen)
Mavuika tE > Xilonen E N2 > Bennett EQ¹ > Citlali EQ (N1) > Mavuika Q Melt combo
¹Use Bennett EQ before Xilonen E N2 if Xilonen is equipped with 4pc Petra
Sample Rotation (Sucrose)
Mavuika tE > Bennett EQ > Sucrose E(E) > Citlali EQ (N1) > Mavuika Q Melt combo
Sample Rotation (Kazuha)
Mavuika tE > Bennett EQ > Kazuha tEP > Citlali EQ (N1) > Mavuika Q Melt combo
Sample Rotation (Iansan)
Mavuika tE > Bennett EQ > Iansan E N1 Q > Citlali EQ (N1) > Mavuika Q Melt combo

An accessible Forward Melt team that consists of only 4-star characters. C2+ Rosaria has similar Cryo application and duration to that of Citlali’s. Kachina is quite cheap to build here as she does not need anything other than 4pc Scroll of Hero of Cinder City.
Sample Rotation (Kachina)
(Mavuika tE)¹ > Kachina tE (N1–2)² > Bennett EQ > Rosaria Q E > Mavuika Q Melt combo tE > Bennett E N2 > Rosaria E N2
¹First rotation only
²To increase the chance of proccing Favonius
Sample Rotation (Iansan)
(Mavuika tE)¹ > Bennett EQ > Iansan E N1 Q² > Rosaria Q E > Mavuika Q Melt combo tE > Bennett EN2 > Rosaria E N2
¹First rotation only
²If Iansan is C6, use her before Bennett

Mavuika can use off-field Hydro appliers to Vaporize her attacks. Furina gives a strong DMG% buff while Yelan has a smaller buff but allows the team to run a faster rotation. Note that Yelan has relatively high ER requirements in this team, so it is a priority to meet her Energy needs by building enough ER% first before investing into their damage.
Sample Rotation (Furina)
Mavuika tE > Xilonen E N2 Q > Furina ED Q > Bennett EQ > Xilonen E¹ N2 > Mavuika Q Vape combo
¹Add a N1 on Furina or Bennett (if C6, after using his Burst) if Xilonen’s 2nd E is on cooldown.
Sample Rotation (Yelan)
Mavuika tE > Yelan EQ N1 > Bennett EQ > Xilonen E N3¹ > Mavuika Q Vape combo
¹Proc Yelan’s coordinated attack twice to ensure Mavuika’s Burst Vapes.
Or
Mavuika tE¹ > Xilonen E N2 > Bennett EQ > Yelan E Q N1 > Mavuika Q Vape combo¹
¹Make sure you end with Pyro aura on the enemy, e.g., by using combos ending with C3D / C3F / C4F.

A decent team choice for those who don’t have access to good 5-star Natlan supports. Even though Overloaded has knockback on small enemies, its playstyle and Mavuika’s combos here are incredibly simple and straightforward. Iansan is a powerful alternative to Bennett as she doesn’t restrict Mavuika to a circle, while freeing up Bennett for a different team. Ororon also provides off-field Electro application, as Mavuika’s attacks are Nightsoul-aligned. All of Chevreuse, Iansan, and Ororon’s C6 benefit Mavuika greatly.
Sample Rotation (Bennett)
(Mavuika tE)¹ > Ororon EQ > Chevreuse hEQ > Bennett EQ > Mavuika Q combo tE > Bennett E
¹First rotation only
Sample Rotation (Iansan)
(Mavuika tE)¹ > Ororon EQ > Chevreuse hEQ > Iansan E N1 Q > Mavuika Q combo tE
¹First rotation only
Off-Field DPS / Enabler

Mavuika’s Skill lets her act as an off-field Pyro enabler, finally providing an alternative for players who have had enough of Xiangling’s ER requirements. She also gives strong buffs: Mavuika can hold 4pc Scroll for its powerful DMG% buff, and her Burst provides a winding-down DMG Bonus on top.
Mavuika pairs especially well with Natlan DPS units: they provide Fighting Spirit for her Burst, which in turn provides the active character with Mavuika’s A4 DMG% buff. As a bonus, Mavuika’s Burst also provides a hefty nuke if Melted or Vaporized — which she often does even when played as a Pyro enabler.
In addition to enabling Melt or Vaporize, Mavuika can also be played with an on-field Electro DPS in Chevreuse teams, or in Burning / Burgeon teams with Kinich. She can also simply play as an off-field damage dealer in Mono Pyro.
Mavuika’s slow Pyro application means she cannot keep up with all Vape / Melt units, only the slower ones among them such as Mualani or Ganyu.
Notable Teammates
As Mavuika can slot into plenty of teams in her off-field playstyle, the below section will only include a select few of her possible teammates. For more information on teambuilding, check out the respective character’s Quick Guide.
Hydro
Though Mavuika’s slow Pyro application makes her unable to enable Forward Vape for most Hydro DPS units, she is still a decent offensive flex for them. By Vaporizing her Skill and Burst nuke, she deals solid damage. Mualani teams are also an exception; here Mavuika is a solid Pyro enabler pick.


Cryo
Similarly to Hydro units, Mavuika can enable a Cryo DPS to Melt their hits for a significant DPS increase.


Electro
Most relevant for Chevreuse teams, an Electro unit can pair with Mavuika to deal damage, while benefiting from 4pc Scroll’s DMG Bonus. On-field Electro units also benefit from Mavuika’s Burst buff — if she is able to Burst regularly.


Dendro
Mavuika is a strong off-field DPS option for teams that want Burning (e.g., Emilie and Kinich teams). An off-field Dendro applier can also enable Burning to help Mavuika keep up with DPS units with faster Hydro / Cryo application.


Anemo
An Anemo unit with 4pc VV can buff the team’s on-field DPS and, if possible, Mavuika as well. Characters that provide other buffs or utility are recommended. Alternatively, Mavuika can slot into Chasca’s teams to provide off-field damage, buffs, and Pyro bullet conversion.

Geo
Geo units that offer buffs, utility, or damage can slot into a variety of Mavuika’s teams to support her and the on-field DPS or to deal damage.


Pyro
Pyro units that offer buffs or utility can slot into Mavuika’s teams to support the on-field DPS. As a bonus, their Pyro application can help enable Cryo or Hydro units that would otherwise struggle with Mavuika’s Pyro application alone.


Example Teams
This is not a comprehensive list of teams. The inclusion or exclusion of any given team does not necessarily reflect its power level.
Forward Vaporize

Classic Forward Vape Mualani with Mavuika as the Pyro applier and also buffer with her A4 Passive.
Note that Mavuika’s C1 can make Crystallizing and Swirling Hydro harder due to the additional Pyro application on subsequent rotations.
Sample Rotation (Kazuha)
Mualani N1 > Xilonen E N2 > Kazuha tEP > Mavuika tE Q > Mualani Q¹ E combo
Sample Rotation (Sucrose)
Mualani N1 > Xilonen E N2 > Sucrose E > Mavuika tE Q > Mualani Q¹ E combo
¹Burst if available
Reverse Melt

Mavuika holds 4pc Obsidian Codex when paired with Xilonen on 4pc Scroll. This can allow Mavuika to Melt her Burst with good enough ping, dishing out a sizable nuke.
When paired with Emilie, Mavuika takes a more background role as an off-field DPS / enabler — allowing Wriothesly to take center stage as the primary DPS. As such, Mavuika should hold Scroll in this setup.
Sample Rotation (Xilonen)
(Wriothesley N1)¹ > Xilonen E N2 > Mavuika Q tE > Bennett EQ > Wriothesley E 3[N5CD] N3CD / Q²
¹First rotation only.
²Use Wriothesley Burst when available, otherwise use N3CD to ensure Cryo aura.
Sample Rotation (Emilie)
(Wriothesley N1)¹ > Emilie Q / E² > Mavuika Q tE > Bennett EQ > Wriothesley E 5[N3CD] Q / 6[N3CJ] N1³
¹First rotation only
²Burst when available; otherwise, use Skill
³Alternate between 5[N3C] Q when Burst is ready, or 6[N3CJ] N1 if Burst is not ready.

Likewise, Mavuika’s off-field Pyro application can enable Reverse Melt for Ganyu. Xilonen provides more buffs to both Ganyu and Mavuika compared to Zhongli (including stacking more Fighting Spirit, which results in more DMG% from Mavuika’s A4 Passive). However, the Geo Archon’s sturdy shield is still greatly appreciated. Make sure to aim Zhongli’s pillar away from enemies so that he doesn’t ruin Melt reactions.
Sample Rotation (Xilonen)
Ganyu E > Xilonen E N2 > Mavuika tE > Bennett EQ > Ganyu 5[C]¹ > Mavuika Q
¹Use 4–6 Charged Attacks to make sure Mavuika receives the last tick of Bennett’s Burst
Sample Rotation (Zhongli)
Zhongli hE > Ganyu E > Mavuika Q tE > Bennett EQ > Ganyu 5[C]
Others

Chasca can Vaporize the Pyro or Hydro bullets from her Charged Attack. Bennett provides his classic high ATK buff for both Mavuika and Chasca and helps line up more Pyro bullets for Chasca. Chasca’s Hydro bullets can help enable her Pyro ones or Mavuika’s Skill to Vaporize, but this is unreliable due to her random bullet order and Swirls consuming Hydro. Xilonen buffs everyone and carries Scroll.
Sample Rotation (Bennett)
Furina ED Q > Mavuika tE > Bennett EQ > Mavuika Q > Chasca E 4[C] (Q)1
Sample Rotation (Xilonen)
Furina ED Q > Xilonen EQ N2 > Mavuika tE Q > Chasca E 4[C] (Q)1
1Burst if available

Mavuika provides strong buffs (via 4pc Scroll and her A4 Passive) and decent damage for the team. Fischl generates the most particles for Clorinde, but her damage output is single-target focused. Ororon on the other hand can hit multiple enemies and also helps with stacking Fighting Spirit. Sara is generally the best option at C6 in both single and multi-target scenarios, as she boosts Clorinde’s damage by a significant amount.
Note that for the Sara variation, if you try to do “Sara C > Chevreuse hE > Clorinde Q” with high ping or slow gameplay, Sara’s buff may be passed onto Chevreuse instead of Clorinde. The solution for this is provided below.
Sample Rotation (C2 Sara)
Opener: Sara E > Mavuika N1 tE > Chevreuse Q hE > Mavuika Q (D) > Sara Q > Clorinde E combo
Ongoing Rotation: Sara C > Chevreuse hE N1¹ > Clorinde Q > Mavuika tE (Q)² > Sara E (Q)³ > Clorinde E combo
¹If you have high ping, or lack Chevreuse’s C4, use Chevreuse’s Skill immediately after Clorinde’s Burst
²Every other rotation, unless Mavuika is C1+, in which case Burst every rotation and do C2D before swapping
³Every other rotation
Sample Rotation (Ororon)
Opener: Ororon EQ > Chevreuse Q hE > Mavuika tE Q C2D> Clorinde combo
Ongoing Rotation: Chevreuse hE Q > Clorinde Q > Ororon EQ > Mavuika tE Q 2[C2D] > Clorinde combo
Sample Rotation (Fischl)
Opener: Fischl Q > Chevreuse Q hE > Mavuika tE Q > Clorinde combo Q
Ongoing Rotation: Chevreuse Q hE > Fischl E / Q > Mavuika tE (Q)¹ > Clorinde combo Q
¹Burst if available

Similarly to Clorinde, Varesa greatly benefits from Mavuika’s buffs and application. Mavuika also helps Varesa have better uptime on her A4’s ATK% buff.
Sample Rotation (Iansan)
Varesa ECP¹ > Mavuika (N1) tE > Chevreuse hE Q > Iansan E (N1) Q > Mavuika Q (D) > Varesa ECP sQ 2[ECP ECP sQ²] 2[CP]
¹First rotation only
²Aim to perform 2 sQ per rotation, up to 3 if available
Sample Rotation (Ororon)
Mavuika tE > Ororon EQ > Chevreuse hEQ > Mavuika Q > Varesa ECP ECP sQ ECP ECP sQ CP CP ECP

Mavuika’s off-field Pyro application and buffs pair naturally well with Kinich.
Sample Rotation (Bennett)
(Kinich Q)¹ > Mavuika Q tE > Bennett Q E > Iansan E N1 Q > Kinich shE combo
¹Use Kinich’s Burst if available
Sample Rotation (Emilie)
Emilie E/Q > Iansan E N1 Q > Mavuika tE Q > Kinich shE combo
Credits
caramielle., erisdc, haafr, acerbus114, lostguide, caxia5, pjeljr, aftermathrar, mikeskies, cinders_pear, breadcatow, rezmir, plumetra
Team images made with the KQM portrait generator.