Written by: kol#1593, Cuzimori#1535
Updated for 3.8
Table of Contents
Introduction
Tighnari is a 5* Dendro Bow user whose use of the Catalyze reaction allows him to unleash a quick flurry of damage with his Burst and Charged Attacks while simultaneously boosting his teammates’ damage. This makes playing Tighnari both a novel and rewarding experience, proving that the fluffy-eared botanist’s arrows are just as sharp as his tongue. This guide seeks to inform players how best to utilize Tighnari as they take him beyond his realm in the forest and into the forays of the Spiral Abyss.
Glossary
Explanation of terms used (in context of this guide)
| Term | Meaning |
| DPS | Refers to units who are responsible for a respectable bulk of the damage on a team. |
| Enabler | Refers to units who “enable” their teammates to do more damage, typically through Elemental application. |
| Support | Refers to units who can provide utility such as buffing and healing in order to allow the DPS options to function properly. |
| Single-Target | Refers to damage that is highly, if not totally concentrated on one enemy. |
| AoE | Refers to damage that can hit multiple enemies simultaneously. |
| ICD | Generally refers to any non-visible timers in the game on a particular event. More information on the KQM TCL here. |
| Snapshotting | Property by which an ability uses the stats present on a character during the casting of the ability throughout its duration. More information on the KQM TCL here. |
| BiS | Best in Slot. Refers to the best option for a given composition. |
TL;DR
Character Breakdown

Tighnari’s role can be confusing to truly place, as he is a combination of a Quickswap DPS and an Enabler. His playstyle consists of using the Quicken reaction, which causes enemies to enter a state where subsequent attacks that apply Dendro or Electro will trigger Spread and Aggravate respectively, dealing bonus damage. Tighnari serves as the Dendro component: quickly switching in to trigger Catalyze and deal a good chunk of damage on an enemy affected by Electro, then swapping off to allow other teammates to cast their abilities. Thus, in this short span of time, he can contribute a solid share of damage while also boosting the capabilities of the Electro characters he is used alongside.
Why Play Tighnari
Pros
- High damage with very low field time for an on-field DPS character
- High rate on-field Dendro application makes full use of Spread
- Enables Electro/Dendro teammates through Catalyze
- Significant range with Burst and Charged Shots
- Strong F2P weapon choices
- The most adorable ears you’ll ever see
Cons
- Damage is mostly single-target
- Energy generation is not self-sufficient to Burst off cooldown
- Lacks any off-field presence
- Does not possess any innate utility or team buffs in base kit, limiting role compression
- Only works well in Catalyze-based teams
Talents
Tighnari’s Talent priorities are:
 >
> >>
>>
It is strongly recommended to level Tighnari to Level 90, as it significantly increases the damage boost from Spread.
Normal Attack: Khanda Barrier-Buster
Normal Attack
Perform up to 4 consecutive shots with a bow.
Charged Attack
Perform a more precise Aimed Shot with increased DMG.
While aiming, the power of Dendro will accumulate on the arrowhead before the arrow is fired. Has different effects based on how long the energy has been charged:
– Charge Level 1: Tighnari fires a Dendro-infused arrow that deals Dendro DMG.
– Charge Level 2: Tighnari fires a Wreath Arrow that deals Dendro DMG. Upon hit, the Wreath Arrow will create 4 Clusterbloom Arrows that will track nearby opponents automatically and deal Dendro DMG.
Tighnari’s Normal Attacks are fairly standard, and will generally not see use unless required to trigger teammates’ effects, such as Beidou’s Stormbreaker.
His Charged Shot, however, is much more interesting and generally the main focus of his kit. It has two stages of charging, similar to Ganyu. At the first stage, he fires a singular arrow that deals Dendro damage, much like other bow characters. At the second stage, however, this singular arrow turns into a Wreath Arrow, which also deals Dendro damage when it hits an enemy, but additionally generates 4 Clusterbloom Arrows that home in on enemies and deal 4 more smaller instances of Dendro damage.
While the charging time for his Level 2 Charged Shots can seem very lengthy, the rest of his kit has means to circumvent this. This, combined with his Burst, gives Tighnari a very high rate of on-field Dendro application and is what allows him to use Spread so effectively to boost his damage.
Elemental Skill: Vijnana-Phala Mine
Tighnari throws a Vijnana Stormheart ahead of him that deals AoE Dendro DMG and creates a Vijnana-Khanda Field, which summons strange illusions to taunt enemies and draw their fire.
Additionally, Tighnari gains the Vijnana Suffusion effect, which will decrease the Wreath Arrow’s charging time by 2.4s. This effect will dissipate once the skill duration ends or after Tighnari has fired 3 Wreath Arrows.
Tighnari’s Skill has two effects. The first has Tighnari throw a Vijnana Stormheart projectile that deals damage, generates Particles and creates a field around where it lands. This field taunts non-boss enemies, protecting Tighnari from attacks and adding a nice layer of defensive utility.
The main use of his Elemental Skill, however, is its second effect: the Skill grants Tighnari the Vijnana Suffusion effect for 12 seconds, which greatly reduces his Charged Shot charge time for his next three Charged Shots. This effect reduces his field time while preserving his damage potential, all while massively improving how Tighnari feels to play.
Elemental Burst: Fashioner’s Tanglevine Shaft
Combines the power of all seeds to fire 6 Tanglevine Shafts that can track opponents and deal Dendro DMG.
After they hit, the Tanglevine Shafts will create a secondary wave of Tanglevine Shafts that can also track opponents and deal Dendro DMG on hit.
Tighnari’s Burst is a simple and effective high damage tool. It fires six projectiles that deal Dendro damage, which then produce one projectile each to deal six more instances of Dendro damage. It also applies Dendro four times in total, thus triggering a good amount of Spread procs. The low cooldown and Energy cost are icing on the cake—offering Tighnari much more flexibility.
 1st Ascension Passive: Keen Sight
After Tighnari fires a Wreath Arrow, his Elemental Mastery is increased by 50 for 4s.
A simple and effective self EM buff with an easy trigger requirement. This Talent encourages using his Burst after his Charged Shots, as detailed in the Combos section.
 4th Ascension Passive: Scholarly Blade
For every point of Elemental Mastery Tighnari possesses, his Charged Attack and Fashioner’s Tanglevine Shaft DMG are increased by 0.06%.
The maximum DMG Bonus obtainable this way is 60%.
Tighnari’s Ascension 4 Passive makes EM more useful for him beyond simply boosting the effectiveness of his Spread reactions, by allowing it to directly boost the damage of his Charged Shots and Elemental Burst.
 Utility Passive: Encyclopedic Knowledge
Displays the location of nearby resources unique to Sumeru on the mini-map.
Displays the location of nearby resources unique to Sumeru on the mini-map. Outclassed by interactive maps, but a neat quality of life passive to have in conjunction with them.
Combos
The difference between the exact order that Tighnari uses his Talents is generally inconsequential as long as his Skill is used before firing his Charged Shots. Their various combinations are listed in the table below.
| Combo | Notes |
| Skill -> Burst -> CAx3 | The easiest but generally weakest combo, as his Burst does not benefit from his A1 Passive. Still, the damage loss is not significant and its ease of use means it is still recommendable. |
| Skill -> CAx3 -> Burst | While this combo allows his Burst to benefit from his A1 Passive while also being easy to execute, it does mean that Tighnari cannot pre-funnel the particles from his Skill for his next Burst. While this is generally not a significant issue, it can lessen the frequency with which he can use his Burst at times. |
| Skill -> CA -> Burst -> CAx2 | The most mechanically difficult combo to perform, however, this allows him to both have his A1 effect apply to his Burst whilst also pre-funneling the particles generated by his Skill. |
Generally Tighnari will aim to use his Burst whenever it is available, as it does not particularly constrain the relatively flexible rotations most of his teams have. That said, if used alongside units that demand strict rotations or occupy a lot of field time, this may not be the case.
One more aspect to note is that Tighnari can open up an abyss chamber by using his Skill at the beginning of the first rotation. This is mostly to establish a Dendro aura on the enemy so that his teammates can get a few extra reactions, however, in some teams it can also allow Tighnari to use 6 sets of Charged Shots on the first rotation instead of 3 if the rotation permits it.
Constellations
Tighnari’s Constellations are all generally good, however, most of them are largely unspectacular and do not change the way he plays. As a Standard character, one cannot roll specifically for his Constellations—but if he happens to surprise you on a banner, his Constellations are useful enough that it is hopefully a pleasant one.
 Constellation 1: Beginnings Determined
Tighnari’s Charged Attack CRIT Rate is increased by 15%.
A straightforward, minor damage increase.
Damage increase over C0: 6.5%
 Constellation 2: Origins Known From the Stem
When there are opponents within the Vijnana-Khanda Field created by Vijnana-Phala Mine, Tighnari gains 20% Dendro DMG Bonus. The effect will last up to 6s if the field’s duration ends or if it no longer has opponents within it.
An equally straightforward and minor damage increase.
Damage increase over previous Constellation: 8.7%
Damage increase over C0: 15.7%
 Constellation 3: Fortunes Read Amongst the Branches
Increases the Level of Fashioner’s Tanglevine Shaft by 3. Maximum upgrade level is 15.
Tighnari’s Burst is a decent portion of his damage even with a rotation that uses only 1 Burst per 2 Skill casts, but the level increase doesn’t do much for his overall damage.
Damage increase over previous Constellation: 1.7%
Damage increase over C0: 17.6%
 Constellation 4: Withering Glimpsed in the Leaves
When Fashioner’s Tanglevine Shaft is unleashed, all nearby party members gain 60 Elemental Mastery for 8s. If the Fashioner’s Tanglevine Shaft triggers a Burning, Bloom, Quicken, or Spread reaction, their Elemental Mastery will be further increased by 60. This latter case will also refresh the buff state’s duration.
It’s free teamwide EM. Free EM is good. Simple as that.
The trigger condition being tied to his Burst seems to encourage using 1 Skill per Burst rotations, but it is currently not worth building specifically for. The damage boost for Tighnari alone is relevant; the boost it gives for his team can go beyond that.
Damage increase over previous Constellation: 16.5% (Personal damage only)
Damage increase over C0: 37.0% (Personal damage only)
 Constellation 5: Comprehension Amidst the Flowers
Increases the Level of Vijnana-Phala Mine by 3. Maximum upgrade level is 15.
Tighnari’s Skill itself is a rather small portion of his damage, so this Constellation is effectively useless.
Damage increase over previous Constellation: 0.5% (Personal damage only)
Damage increase over C0: 37.7% (Personal damage only)
 Constellation 6: Karma Adjudged From the Leaden Fruit
Wreath Arrow’s charging time is decreased by 0.9s, and will produce 1 additional Clusterbloom Arrow upon hit. This arrow deals 150% of Tighnari’s ATK as DMG.
Tighnari’s C6 shortens the time needed to execute his Skill CAx3 combo by about 2s, and provides some extra damage in the form of an additional Clusterbloom Arrow per Wreath Arrow fired. This additional Clusterbloom arrow has no ICD, and therefore will trigger Spread every time. The extra arrow damage is a significant damage increase in and of itself, but the value of the shortened combo time is more difficult to determine.
Tighnari’s rotation lengths are typically determined by cooldowns and not his own field time, and as a result this Constellation cannot reduce his rotation lengths. Therefore, the actual value of this Constellation depends on how well the other members of the team can take advantage of the extra field time they now have.
Increase over previous Constellation: 25.6% (At minimum, personal damage only)
Increase over C0: 73% (At minimum, personal damage only)
Artifacts
Artifact Stats
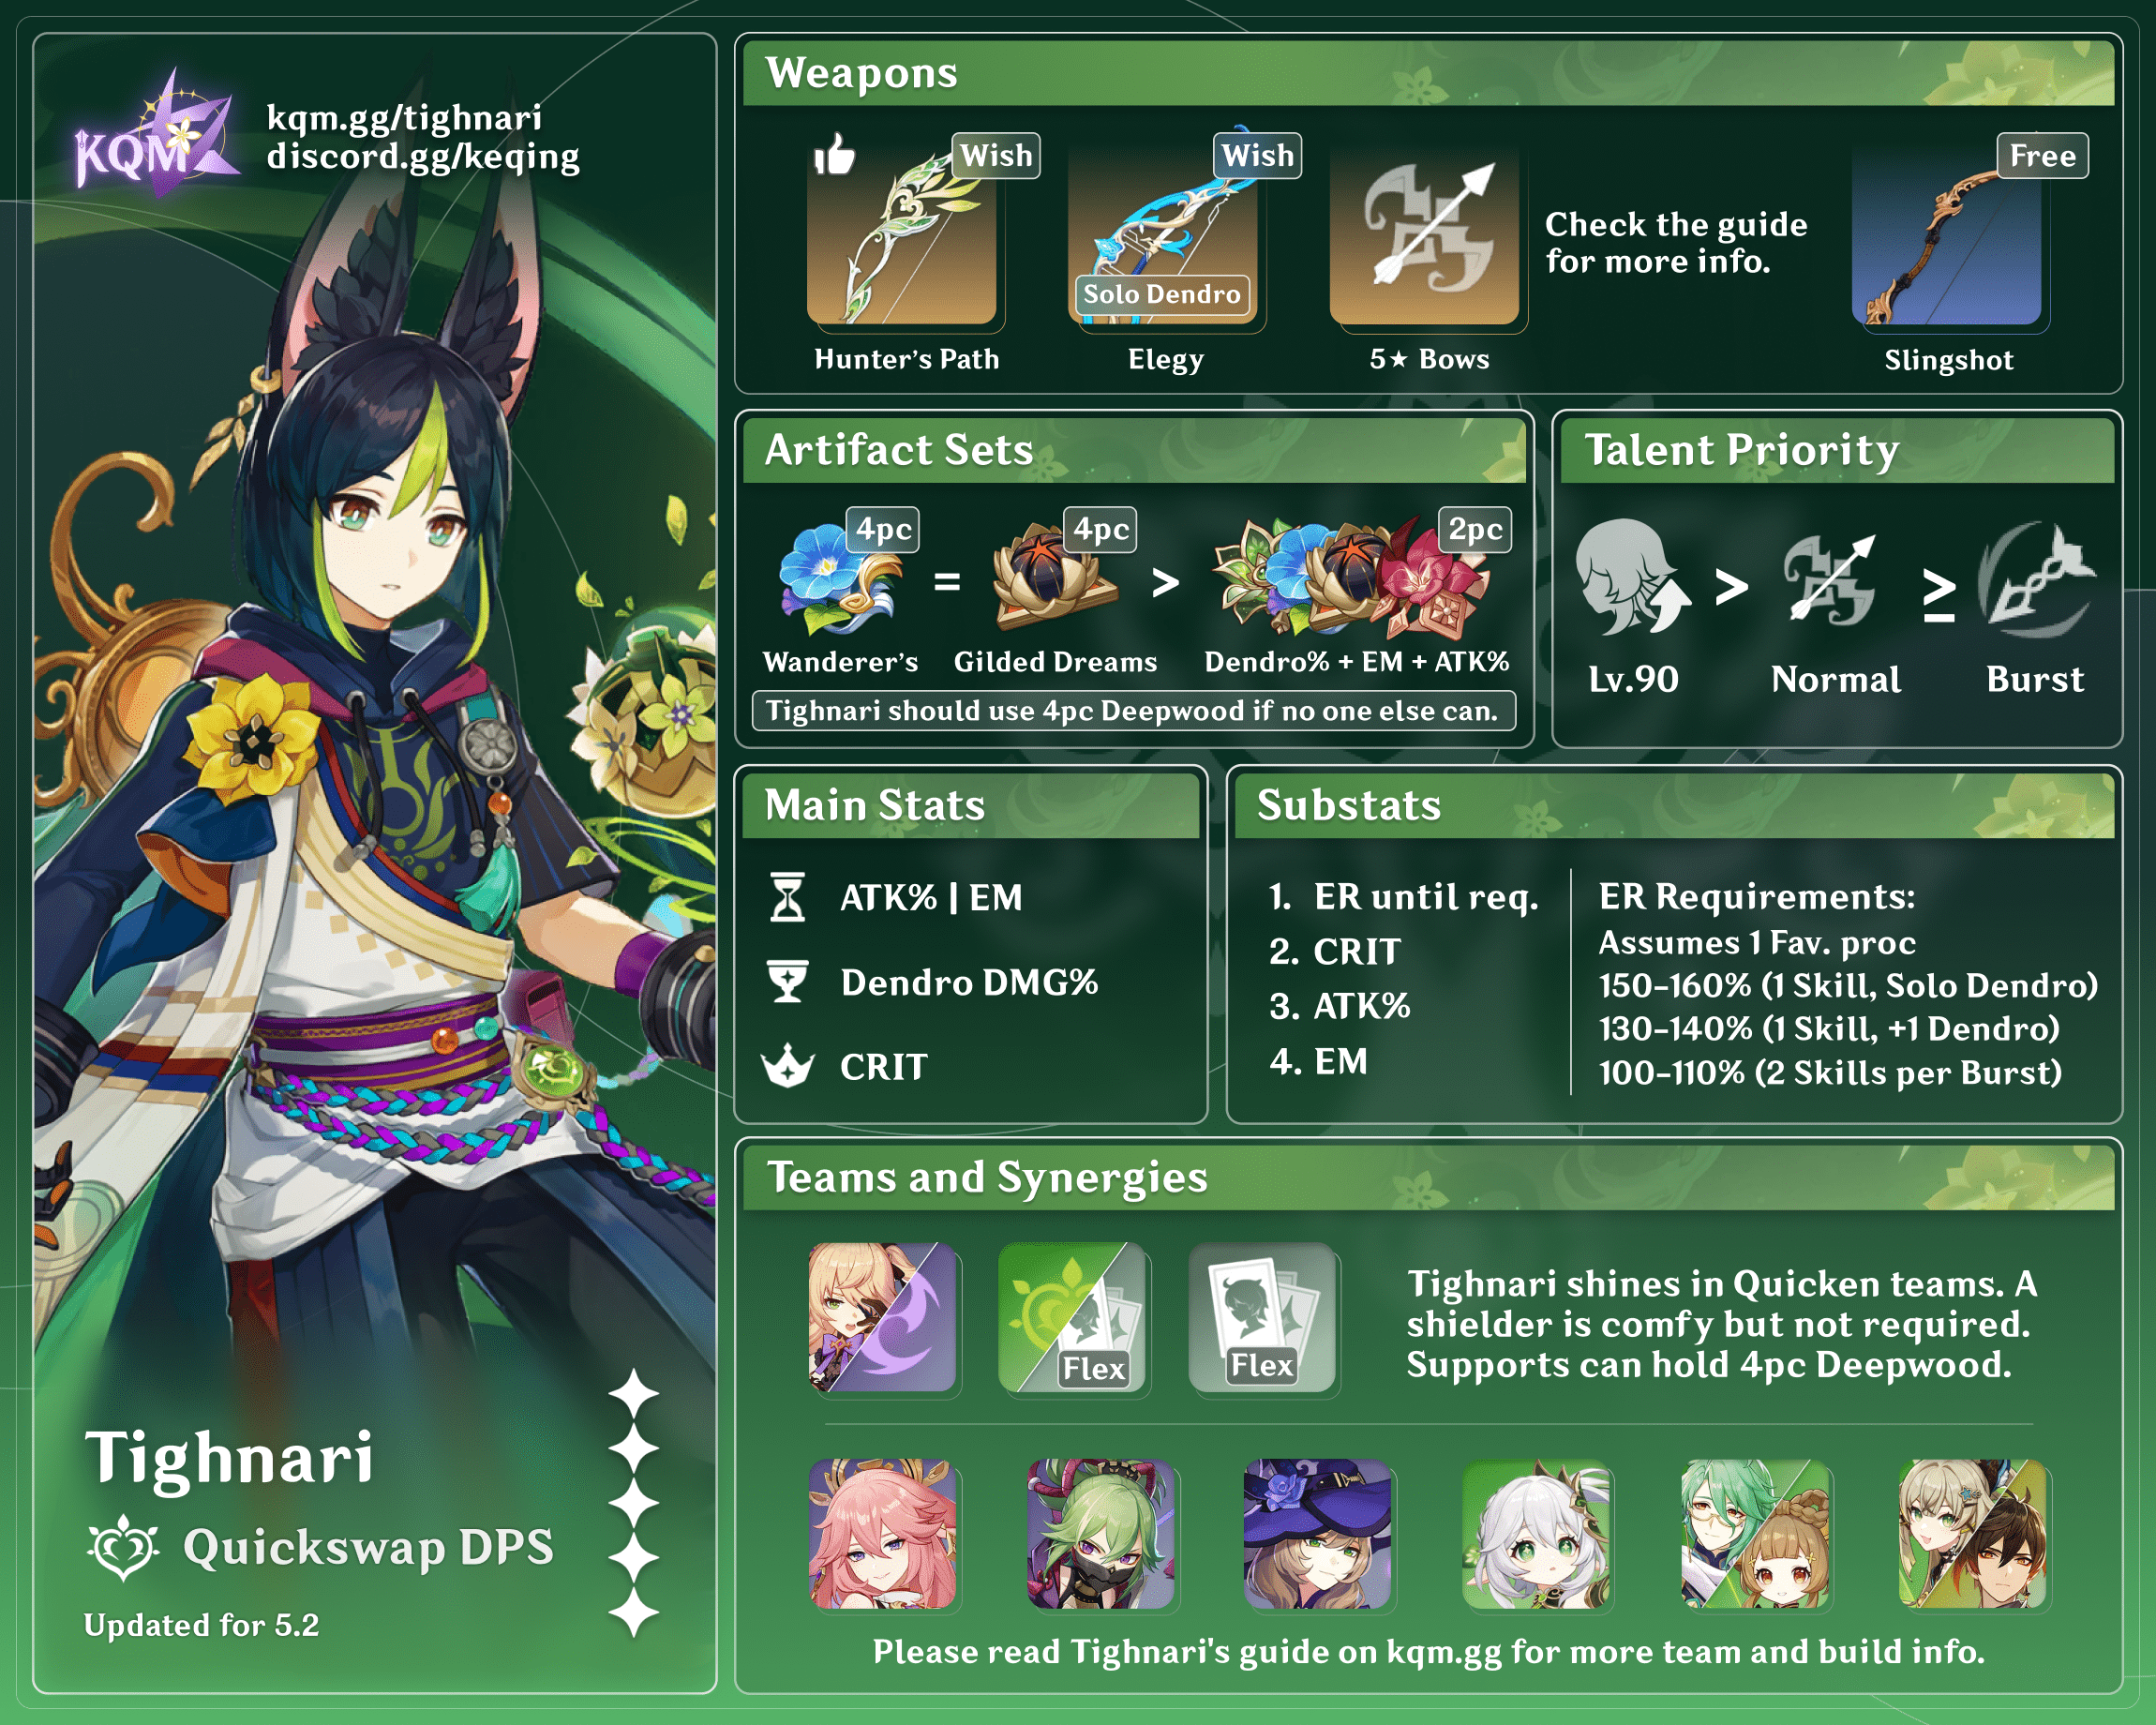
Main Stats
ATK% or EM | Dendro DMG% | CR or CDMG
The difference between an ATK or EM Sands is negligible and generally dependent on substats; however, if using Tighnari’s signature weapon, Hunter’s Path, EM sands will always be preferred.
Substats
Tighnari will primarily focus on meeting his ER requirement as detailed below through either his weapon or artifact substats.
After this, due to the entirety of his damage scaling from it, players will want to prioritize CRIT in his substats, trying their best to maintain a 1:2 ratio for CRIT Rate and CRIT Damage. ATK% and EM substats are also valuable, with both being generally equal in value—the difference between them will depend on the weapon and Sands chosen, as well as team buffs, with ATK heavy builds preferring EM and vice versa.
It is worth noting that ER, even when exceeding requirements, is not an entirely wasted stat on Tighnari unless severely overshot. Tighnari rotations are generally flexible enough to the point that using his Burst whenever it is available is an effective DPS gain, and having ER can potentially allow his Burst to be used more often on more Energy-rich floors than those in the assumptions used.
ER Requirements
Note that the given ER values were determined using Zakharov’s Energy Recharge Calculator with Default Safe assumptions and 1 Favonius weapon proc per rotation on all teams. With no Favonius-wielding teammates, ER Requirements tend to increase by about 10% if using Burst every Skill, with no change otherwise.
| Conditions | Recommended Energy Recharge |
| 2 Skills per Burst | 100-110% |
| 1 Burst per Skill, no Dendro teammate | 150-160% |
| 1 Burst per Skill, 1 Dendro Teammate | 130-140% |
Artifacts Sets
Assumptions: KQM Standards, 0% ER Requirement, E Q CAx3 E CAx3, 18 Spreads, Assumes Slingshot on Tighnari, Assumes another teammate is holding Deepwood Memories for all non-DM sets.
| Artifact Set | % DPS of 4WT | Notes |
| If there are no other viable holders of 4 Deepwood Memories on the team | ||
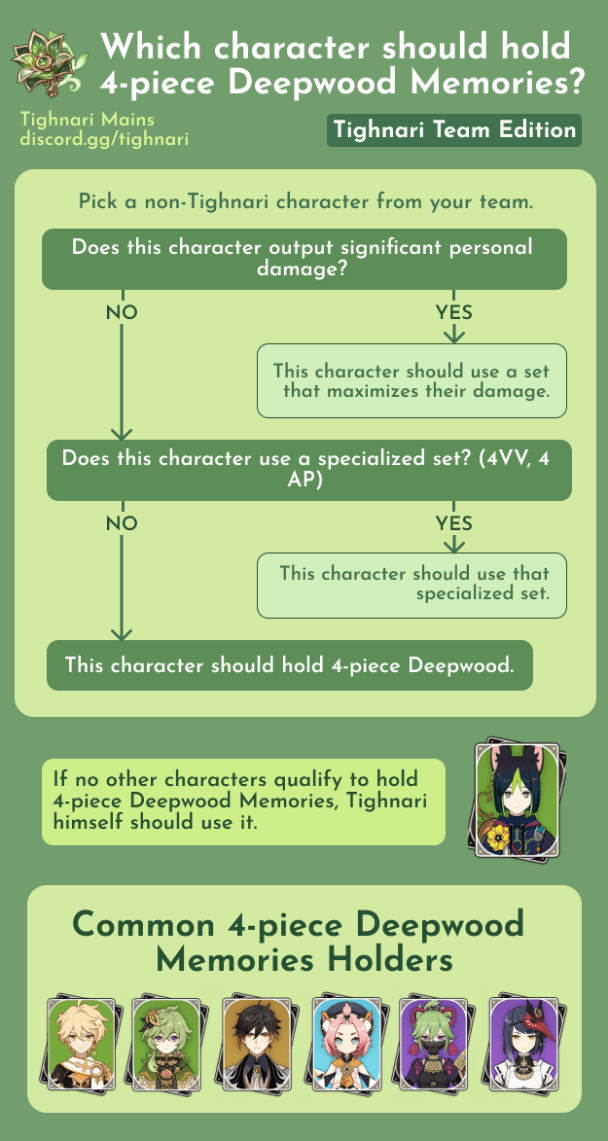
4 Deepwood Memories (4DM) | > 112% | It is recommended to equip 4 Deepwood Memories on another teammate instead of Tighnari if possible, but otherwise, 4 Deepwood Memories is by far the superior set to all other choices (by a margin of over 12%). The graphic below provides a useful way to see whether Tighnari’s teammates can use Deepwood Memories or not. |
| If there is another viable holder of 4 Deepwood Memories on the team | ||
4 Wanderer’s Troupe (4WT) | 100% | 4 Wanderer’s Troupe is a perfect fit for Tighnari: the 2pc effect is a helpful stat buff, and the 4pc effect provides a powerful, unconditional boost to the most important part of his kit. Further, due to providing DMG%, its effects are less diluted with external buffs. While player’s cannot farm for 4WT specifically, it is generally gradually obtained through fighting world bosses, and can be obtained through strongbox if needed. |
4 Gilded Dreams (4GD) | Solo Dendro: 100% Double Dendro: 99% | 4 Gilded Dreams is generally competitive to 4 Wanderer’s Troupe, however, it scales slightly worse with buffs. Nevertheless, the artifact set is generally strong on multiple other characters, making it relatively resin-efficient to farm. The additional Elemental Mastery it provides does, however, give it a small edge when using Hunter’s Path. |
2pc Combinations | 93-97% | While worse than any of the above options, players can use various 2pc combinations of WT, GD, DM, Gladiator’s, etc. if they have good enough substats to overcome the value provided by set bonuses. |
Which character should hold 4DM?

Weapons
Assumptions: KQM Standards, 0% ER Requirement, E Q CAx3 E CAx3, 18 Spreads, Assumes 4 Wanderer’s Troupe on Tighnari, Assumes another teammate is holding Deepwood Memories.
| Weapon | % DPS of Slingshot R5 | Description |
Hunter’s Path R1 | 130.7% | Tighnari’s best weapon for his personal damage, as well as his signature. Its passive is custom-made for Tighnari, and its good base Attack and CRIT Rate are also very valuable–with its visual appeal on him being the icing on the cake. It is worth noting that with Hunter’s Path, Tighnari will always prefer an EM Sands, and Elemental Mastery in general gains more value on him. |
Aqua Simulacra R1 | 118.6% | A very strong generalist bow that also performs solidly on Tighnari. It is worth noting that maintaining its passive requires being within a certain distance of the enemy—this is generally quite easy, but might make the weapon worse if Tighnari’s range is put to the test. |
Polar Star R1 | 116.8% | Polar Star is a very strong option, and its stacks are generally easy to accumulate on Tighnari while playing naturally—however, players ideally should additionally fire a single Normal Attack when Tighnari enters the field to maximize stacks. |
Thundering Pulse R1 | 110.2% | While Tighnari cannot make use of the passive, the weapon still performs favorably due to the helpful stats it offers. |
Skyward Harp R1 | 110.1% | Skyward Harp is a very potent stat stick for most bow users, and Tighnari is no exception to this rule. |
Elegy for the End R1 | 102.3%-123.5% | Elegy for the End’s value varies based on the value of the immense amount of ER% it provides. This extra ER can allow him to always consistently Burst once per every Skill use where other bows might have to Burst every other Skill use, and its values in such scenarios shoots up immensely, beating all other 5* options other than Hunter’s Path. This is true even disregarding the team-wide buff it provides—even with inconsistent activation, it can allow this bow to outpace all other options for overall team damage. |
Amos’ Bow R1 | 105.7% | Despite Amos’ passive being quite valuable for Tighnari due to his Clusterbloom Arrows’ high travel time, the weapon falls short of other 5* options due to Tighnari valuing the CRIT stats they offer. |
Prototype Crescent R5 (with Passive) | 104.9% | With its passive activated, Prototype Crescent is an immensely powerful F2P option that can outpace every other non-5* weapon. However, its passive requires both skill and is entirely reliant on enemy matchups—with many of the bosses Tighnari teams are tasked with handling having no weak spots at all. |
Viridescent Hunt R5 | 102.4% | The Viridescent Hunt is mostly a stat stick and an aesthetic masterpiece. While its passive can provide situationally handy crowd control, it is generally not particularly relevant and its refinements are not worth buying. |
Slingshot R5 | 100.0% | Tighnari’s F2P option, and a spectacular one at that, despite its drawback. It is worth noting it does not perform as strongly if his Wreath arrow does not get the buff, however, this is generally rare unless Tighnari is at a significant range from the enemy. Calculated assuming buff applies on the Wreath Arrow and debuff applies on his Clusterbloom Arrows. |
| Viridescent Hunt R1 | 100.0% | |
Windblume Ode R5 | 99.2% | Windblume Ode acts as an excellent, hassle-free stat stick for those who have it. |
Stringless R5 | 99.1% | Similar to Windblume Ode, R5 Stringless is an excellent, unconditional option. However, the weapon is generally contested by units such as Venti and especially Fischl, who Tighnari is often paired with. |
| Prototype Crescent (without Passive) | 97.1% | While still a decent stat stick, Prototype Crescent loses a lot of its luster without the passive. |
Ibis Piercer R5 | 96.3% | Ibis Piercer is a decent option at R5, but nonetheless loses out to other F2P options Tighnari has. |
| Stringless R1 | 95.6% | Without refinements on its passive, Stringless is not nearly as potent, as the loss of the additional Burst DMG% is noticeable. |
King’s Squire R1 | 92.3% | A noticeably poor option as the passive does not play nicely with Tighnari’s rotations. A very last-ditch option for players who refuse to use Slingshot and cannot craft Crescent. Refinements improve its value, but even then performs worse than Slingshot without its passive—making getting them for Tighnari an extremely questionable investment. |
Team Compositions
All team images generated with KQM TCL team portrait generator tool.

Tighnari – Electro – Flex – Flex
Tighnari’s teams will generally consist of at least one other Electro unit at minimum for him to reliably trigger Spreads. The remaining two slots are generally flexible—typically, they tend to be another Dendro or Electro unit so as to capitalize on the Energy generation and Catalyze reactions produced in Tighnari’s teams; however, exceptions exist. It should be noted that units that apply a high amount of Pyro or Hydro can disrupt Catalyze, and thus they should be put aside for less obtrusive options.
While Tighnari can function in Burning or Bloom-related teams, they are generally not the best team for him and he is generally not the best Dendro for them.
Double Electro vs. Double Dendro
Double Electro
Double Electro compositions typically revolve around the Electro units, with Tighnari as a Dendro applicator who happens to provide a significant amount of personal damage.
Double Dendro
Double Dendro compositions tend to focus on Tighnari’s damage, aided by another Dendro unit for increased Dendro Energy generation. The Electro unit’s contributions are generally still significant, especially if Fischl is used.
Tighnari’s Double Dendro compositions as they exist right now are much more rigid and generally weaker than his Double Electro compositions in almost all cases. This is not because the Double Dendro archetype is inherently weak, rather, neither Collei nor DMC can provide anything significant beyond Energy in these teams. Further, Tighnari’s strongest teams typically use Fischl, who cannot have her A4 be activated at all if primarily only triggering Spread. It is worth noting that these teamstyles are not mutually exclusive, and teams with 2 Dendro units and 2 Electro units can also serve players well.
Collei and DMC are primarily designed as enablers—an unnecessary role in this archetype due to Tighnari already fulfilling it. For Double Dendro to shine, it would need more relevant buffers, healers, and/or off-field DPSes similar to what the current Electro roster can offer. While Nahida fulfills a similar role, her significant personal damage and buffs make her a more noteworthy option.
With of Dendro characters likely slated for release in the near future, the Double Dendro archetype may become more prominent with each release.
This is not to say that Double Dendro teams are not viable—because they are most definitely viable, and some variants are even competitive—but merely something to keep in mind if your goal is to maximize your Tighnari team’s damage.
Furthermore, certain exceptions exist to these two setups, as Tighnari’s team options are very flexible beyond desiring one other Electro. Notable competitive exceptions will be detailed as necessary in the following section.
Electro Flexes
| Unit | Ranking | Notes |
Fischl | S | Tighnari’s best teammate by far is Fischl for a number of reasons. Her low field time and high damage further boosted by Aggravate are already valuable; her cooldowns and uptime lining up perfectly with Tighnari only serve to further bolster this synergy. Furthermore, her high Energy generation not only greatly helps Tighnari, but also can help battery teammates. All this allows Tighnari and Fischl to serve as a 2-member high-damage core, with solid flexibility in teammates. |
Yae Miko | S | Recommended to run Yae Miko with an Electro battery in a Double Electro composition. That said, she is usable as solo-Electro as a slightly worse Fischl replacement. Yae, in most teams, suffers from two main problems that limit her: her high 90-Energy-cost Burst, and her high field time for an off-field DPS. In Tighnari teams, she is generally set free of these limitations thanks to Fischl or Kuki’s particle generation alongside Tighnari’s very low field time for an on-field DPS. This allows her to make the most of her turrets and Burst and contribute significant amounts of damage. Further, Tighnari’s field time being so low can also allow her to take spare time in a rotation to use Normal Attacks between her Skill casts, further driving up team damage due to the additional Fischl C6 and A4 procs as well as causing more Aggravates. Additionally, Quicken (or more specifically the subsequent Aggravate) and her A4 Talent allow her to double-dip in EM. Note that even now, building ATK% is about equal or slightly better than building EM. |
Kuki Shinobu | A | While Shinobu’s personal damage, range and rate of Electro application are poor compared to Fischl, her unique ability to provide healing combined with her good Energy generation frees up many team building restrictions—especially useful if Fischl is needed on the other side. She can also be used in conjunction with Fischl to great effect. Kuki can hold 4 Tenacity of the Millelith if another viable holder of 4 DW is present. |
Lisa | A | Recommended to run Lisa with an Electro battery in a Double Electro composition. While often overlooked, Lisa’s A4 Defense shred combined with either her personal damage or further buffing capability with Thrilling Tales of Dragon Slayers or Hakushin allow her to function as a potentially strong teammate. Moreover, Tighnari’s low field time requirement affords her room to use her Hold Skill for Energy and additional damage, making her much more self sufficient. Her EM Ascension also finally finds solid use here, strengthening her Aggravate procs. |
Beidou | B | Recommended to run Beidou with an Electro battery in a Double Electro composition. Beidou has monstrous damage potential in AoE situations, particularly in 2-target scenarios. While this is usually limited by her high Burst cost, Tighnari’s tendency to run Electro batteries generally resolves this. Further, his low field time gives her more breathing room to execute perfect parries, thus opening up more potential for skilled players. That said, it is worth noting that her single-target performance is disappointing, and single-target tends to be where Tighnari excels most. Nonetheless, her ability to cover for some of Tighnari’s weaker matchups and vice versa makes her a valuable option. Note that running Beidou requires players to weave (quickly using Normal Attacks in between Skill and Burst casts) to gain more procs of her Burst; while Tighnari’s Charged Attacks do proc her Burst, the few procs he gets from those are not nearly enough to justify running Beidou. Furthermore, even when weaving, the number of procs of Beidou’s Burst is still significantly fewer than typical of her most popular teams. |
Raiden Shogun | B | Tighnari can seem like an appealing option for Raiden teams—his personal damage with Spread reactions is significant, something that the other Dendro units cannot match. However, his low Burst cost does not generate much Resolve for Raiden; furthermore, while his required field time is low it nonetheless conflicts with Raiden, causing rotations to become awkward. That said, the pairing is functional and can somewhat patch up Tighnari’s poorer performance in AoE scenarios – however, there are better alternatives for this. |
Dori | B | Dori serves many of the same functions as Kuki in Tighnari teams, albeit being significantly more restrictive in all of them: having much longer cooldowns, restricting the team to a fixed circle AoE and dealing lower personal damage. Her main advantage, her Energy generation, is poorly utilized by the quickswap nature of Tighnari teams. At C6, she has a small niche of filling rotation time by using her Electro Infusion to trigger Aggravates. Even then, however, other units are still usually preferred over Dori. |
Kujou Sara | B | Sara is a potent buffer for both Tighnari and his Electro teammate, particularly when with Constellations. Additionally, with proper usage of her Skill and potentially the help of Favonius Warbow if needed, she can function as an Electro battery for any Energy-hungry Electro teammates. However, she generally lacks any additional utilities or personal damage beyond this—thus, the teams she can fit into are rather limited. |
Keqing | B | Keqing works quite well as an on-field DPS with Quicken, as her Aggravates also enable Fischl to Aggravate more through Fischl’s A4—however, this same desire for field time complicates things in Tighnari teams, as she must compete with Tighnari for that field time. If Tighnari relinquishes his field time (specifically his Charged Attacks) and acts only as a Quicken enabler with his Skill and Burst, there is little reason not to just run Collei or DMC—both of whom can do the job of applying Dendro but can additionally provide off-field damage and minor buffs. Likewise, if Keqing relinquishes her field time in favor of becoming a quickswap DPS—coming onto the field just to cast her Skill and Burst—she loses her ability to consistently proc Fischl’s C6, reducing her value. And when it comes down to just damage, Tighnari teams are likely to see greater gains from running one of the aforementioned off-field Electro DPSes. Nonetheless, players can opt to run Keqing as a quickswap DPS as long as they are aware that she may not be the optimal choice for Tighnari teams and vice versa. |
Dendro Flexes
| Unit | Ranking | Notes |
Nahida | A | Nahida’s strong AoE personal damage, potent Elemental Mastery buff, short cooldowns and flexible Energy generation work perfectly with Tighnari, allowing her to serve as a strong option on his teams. While it is generally recommended to build her for damage, she can also potentially help with a team’s survivability using Prototype Amber. However, she is a highly contested unit for most Dendro teams, and Tighnari can use many other units to good effect in her slot — particularly, even with her inclusion Double Dendro tends to remain weaker than Double Electro setups. |
| Baizhu | A | Baizhu’s disposition as a Dendro healer allows his to serve as a viable slot-in to Tighnari’s Double Dendro compositions, allowing the use of more offensively oriented teammates such as Fischl, Yae and Kazuha. While his shielding will only be available for a part of the rotation, it nonetheless makes Tighnari much easier to play and his healing can more than cover for any downtime. |
| Kirara | A | Kirara is a Dendro shielder; this allows her to serve much the same role as Baizhu in allowing for more offensive teammates to increase team damage. Her cooldowns are also extremely well suited for Tighnari teams, making her an excellent pick. |
| Yaoyao | B | As a Dendro healer, Yaoyao performs a very similar role to Baizhu. That said, her awkward cooldown for Tighnari and a lack of shielding makes her much less suited than Baizhu or Kirara in such a role. |
Dendro Traveler | B | While DMC does have some minor Dendro Damage Bonus and EM buffs stapled onto their kit, they are largely in Tighnari teams for their Energy generation. Their long Burst duration and cooldown, coupled with their short Skill cooldown means they work best on longer rotations that are at least 20 seconds or more. |
Collei | B | Similar to DMC, Collei also has some minor buffs in her kit—also similar to DMC, she is primarily used for her particle generation. Her shorter Burst cooldown and higher particle generation from a single Skill use make her more suited for shorter rotations, which generally also tends to be where Double Dendro works best. |
Other Flexes
| Unit | Ranking | Notes |
Zhongli | A | While Tighnari does not need shielding, it is nonetheless appreciated; Zhongli’s strong shield is often more than sufficient defensive utility whilst simultaneously protecting against stagger. He also can simultaneously reduce both Electro and Dendro Resistance with his shield, allowing him to serve as a comfortable and worthy option on Tighnari teams. |
Kaedehara Kazuha | A | Anemo units’ ability to effectively use 4pc Viridescent Venerer to give a potent increase to the damage of the Electro Units allows them to fit in well on Tighnari’s teams. Kazuha further focuses on this aspect, leveraging his strong A4 buff, grouping, and incredible personal damage with Aggravated Electro Swirls making him a worthy option. |
Sucrose | A | Sucrose’s EM share serves as a powerful damage increase for both Tighnari and the Electro unit by boosting the strength of Catalyze reactions they trigger, and she possesses avenues for additional utility with weapon choices such as TTDS, Hakushin Ring, or Prototype Amber. Her personal damage is also significant if able to consistently use her Burst; however, her long cooldowns can somewhat hamstring her own damage compared to Kazuha. |
Sayu | A | While Sayu lacks Kazuha’s or Sucrose’s raw buffing power or damage, her ability to provide healing can provide invaluable utility for Tighnari teams. Her own personal damage is also not insignificant—in an off-field role, she can still inconsistently trigger Aggravated Swirls, and she can also use her roll to take up spare time in rotations to output considerable damage. |
Bennett | A | Tighnari does not work well with most Pyro units due to their tendency to disrupt Quicken. Bennett is a notable exception—his controlled Pyro application allows the Electro unit to quickly remove whatever Pyro he applies, and his huge Attack buff and strong healing make him as powerful here as he is in most teams. Fischl can even snapshot multiple Oz casts onto a single one of Bennett’s Bursts, thanks in part to Tighnari’s short field time requirement. His biggest downside of having to play within his field is even mitigated here by virtue of Tighnari’s range, making him a very solid choice. However, he cannot be used with Anemo units that can absorb Pyro into their abilities from his field. |
Venti | A | Venti’s potent personal damage with Aggravate further bolstered by his unmatched grouping make him an unrivaled choice in AoE content where his suction is effective. However, AoE content also tends to be Tighnari’s worst matchup, and outside of these situations Venti is generally subpar compared to other flexes—nonetheless, he can still remain useful between providing VV, Energy refund and good damage. |
Jean | B | Similar to Sayu, Jean provides healing and VV that allow her to serve as a good option. That said, her lack of personal damage in comparison tends to make Sayu a superior choice between the two in Tighnari teams. |
| Shikanoin Heizou  | B | Heizou mostly acts as a worse Sucrose—providing EM buffs, VV, and personal damage, though generally being worse in the role. However, his shorter cooldowns allow him to fit some shorter rotations much more comfortably, especially if trying to act as a healer using Prototype Amber. |
Albedo | B | Albedo’s constant off-field turret damage and potent EM buff triggered by using his Burst allow him to serve as a good option, particularly in conjunction with Zhongli. That said, his simplicity is both his greatest strength and downfall: he is incredibly easy to use compared to some other options, but he also tends to provide less in the process. |
| Sangonomiya Kokomi  | B | Kokomi’s low rate of Hydro application means that she tends to not disrupt Catalyze, allowing her to serve as a good defensive option by condensing healing alongside some buffing capability with TTDS or Hakushin Ring. Her damage contribution is also not negligible, as she allows Tighnari teams to infrequently trigger Hyperbloom. |
| C6 Diona | B | Before C6, Diona is a rather lackluster defensive option who can be used if nothing else is available. At C6, however, her EM buff makes her a competitive choice. It is worth noting her value partly depends on how Electro interacts with an enemy who is Quickened and has a Cryo aura—if she prevents Aggravates from triggering, she might be worse. However, this has not yet been fully determined. |
Example Teams
This is not a comprehensive list of teams, and the inclusion of a certain team or lack thereof does not necessarily indicate the power level of the team in question. This list is not ranked.

Tighnari – Fischl – Kuki Shinobu – Kaedehara Kazuha
Rotation: Kuki Skill -> Burst -> Kazuha Tap Skill -> Burst -> Fischl Skill or Burst -> Tighnari Skill -> CAx2 -> Kazuha Tap Skill -> Tighnari CA -> Burst
Rotation Demo
This is one of Tighnari’s most potent teams, albeit requiring at least two targets to reach its full potential. Without two targets, Kazuha’s damage is heavily neutered due to halving the damage of his Aggravated Swirls, however, even in such a case the team’s damage is competitive.

Tighnari – Fischl – Yae Miko – Zhongli
Rotation: Zhongli Hold Skill -> Yae Skill x3 -> Fischl Skill -> Tighnari Combos -> Zhongli Hold Skill -> Yae Burst -> Yae Skill x3 -> Fischl Burst -> Tighnari Combos (~25s)
Rotation Demo
A strong team that focuses on turret damage. This focus combined with the highly forgiving rotation and Zhongli’s shielding make this team extremely simple to play, while still maintaining a high damage output. It is plausible to use Zhongli’s Burst in place of his Hold Skill if the extra shielding is not required and players have him built for Burst damage.

Tighnari – Nahida – Fischl – Zhongli
Rotation: Zhongli Hold Skill -> Nahida Skill -> Burst -> Fischl Skill -> Tighnari Combos -> Zhongli Hold Skill -> Burst -> Fischl Burst -> Tighnari Combos
Rotation Demo
Nahida serves as a strong option for Tighnari’s Double Dendro playstyles; when paired alongside his usual fare of Zhongli for survivability and the go-to Fischl, the four can serve as a strong and versatile team option. The rotation given is highly flexible, but it is worth noting Nahida and Zhongli will tend to alternate Bursts as they will usually lack the Energy to Burst every 12s.

Tighnari – Fischl – Collei – Bennett
Rotation: Bennett Skill -> Burst -> Fischl Skill or Burst -> Collei Skill -> Burst -> Tighnari Combos -> Bennett Skill -> Repeat (~15s)
Rotation Demo
A good double Dendro composition that utilizes Bennett’s buffing and role compression through healing and a short rotation to maintain competitive damage. Be sure to cast Fischl’s Skill or Burst after Bennett’s Burst to remove Pyro aura and prevent Burning—further, it is important to use Bennett’s Skill at the tail-end of Bennett’s Burst duration in order to utilize his Ascension 4 Passive and thus reduce the rotation time.

Tighnari – Fischl – Albedo – Zhongli
Rotation: Zhongli Hold Skill -> Albedo Skill -> Burst -> Fischl Skill -> Tighnari Combos -> Zhongli Hold Skill -> Burst -> Fischl Burst -> Tighnari Combos
Rotation Demo
An example of a Tighnari team that deviates from his standard Double Dendro/Double Electro archetypes, utilizing Albedo’s Ascension 4 Passive and high turret damage in conjunction with Geo Resonance. Zhongli also has enough time to utilize his Burst in this teamstyle.
Afterword
Thank you for reading this guide about Tighnari! I hope it has instructed you as deftly as General Watchleader does his many pupils. Tighnari occupies a unique role in the Genshin roster, and his kit accomplishes this effectively, making him a joy to play. For any questions or inquiries regarding the guide, feel free to message me at Cuzimori#1535 on Discord.
– Cuzi
Haha floofy ears.
– kol
Credits
For their work as authors of the guide:
Cuzimori#1535
kol#1593
For providing calculations for Tighnari, a special thanks to:
kol#1593
Sir_pick_the_prick#2209
For their help in working out Tighnari’s mechanics, thanks to:
Sir_pick_the_prick#2209
flamescion#9370
For their assistance in editing the guide into its final, polished form, thanks to:
Leah, Seima#4597, Mr. Pillow#0065, Rathalos#2875
For transcribing the guide, thanks to:
Seima#4597
And further thanks to everyone involved in both KQM and Tighnari Mains for their efforts in making this guide possible.
References
Tighnari Team Rotations Mastersheet
Any contributions made to these sheets are duly credited in the sheets themselves.
