Updated December 2022 (Version 3.3)
Written by Charliex3000#9403 and Cuzimori#1535
In collaboration with itslin#2505 and Nociii#0111
Calculations by Charliex3000#9403, itslin#2505, and Nociii#0111
Table of Contents
Introduction
Venti is a 5-star Anemo Bow user who revolves around providing strong crowd control and off-field enabling of his teammates. Venti’s kit is designed in a manner that encourages quickly rotating between units to take advantage of his strong crowd control and deal damage to many enemies at once.
Venti can be slotted into most, if not all teams, and is able to trivialize content due to the damage and grouping he provides. However, his strength is highly constrained in situations where his suction does not affect the enemy, a restriction that is more dependent on the kind of enemy he matches up against rather than a drawback that can be accounted for by supports. Nonetheless, he still provides good amounts of utility even at his worst.
Make no mistake—the Anemo Archon will blow you away.
Pros
- Efficient Energy economy
- Strong enabling prowess
- High amounts of Elemental application with Burst
- Unparalleled crowd control
- Very flexible teammate
- Single-handedly sweeps crowds of enemies
- Requires very little field time
Cons
- Unreliable against enemies that cannot be pulled by his Elemental Burst
- Difficult to control Burst targeting
- The vortex’s lifting effect can raise enemies out of reach of other characters’ attacks
- “Wouldn’t gliding be faster? Wouldn’t gliding be faster? Wouldn’t gliding b-”
TL;DR
On-Field DPS
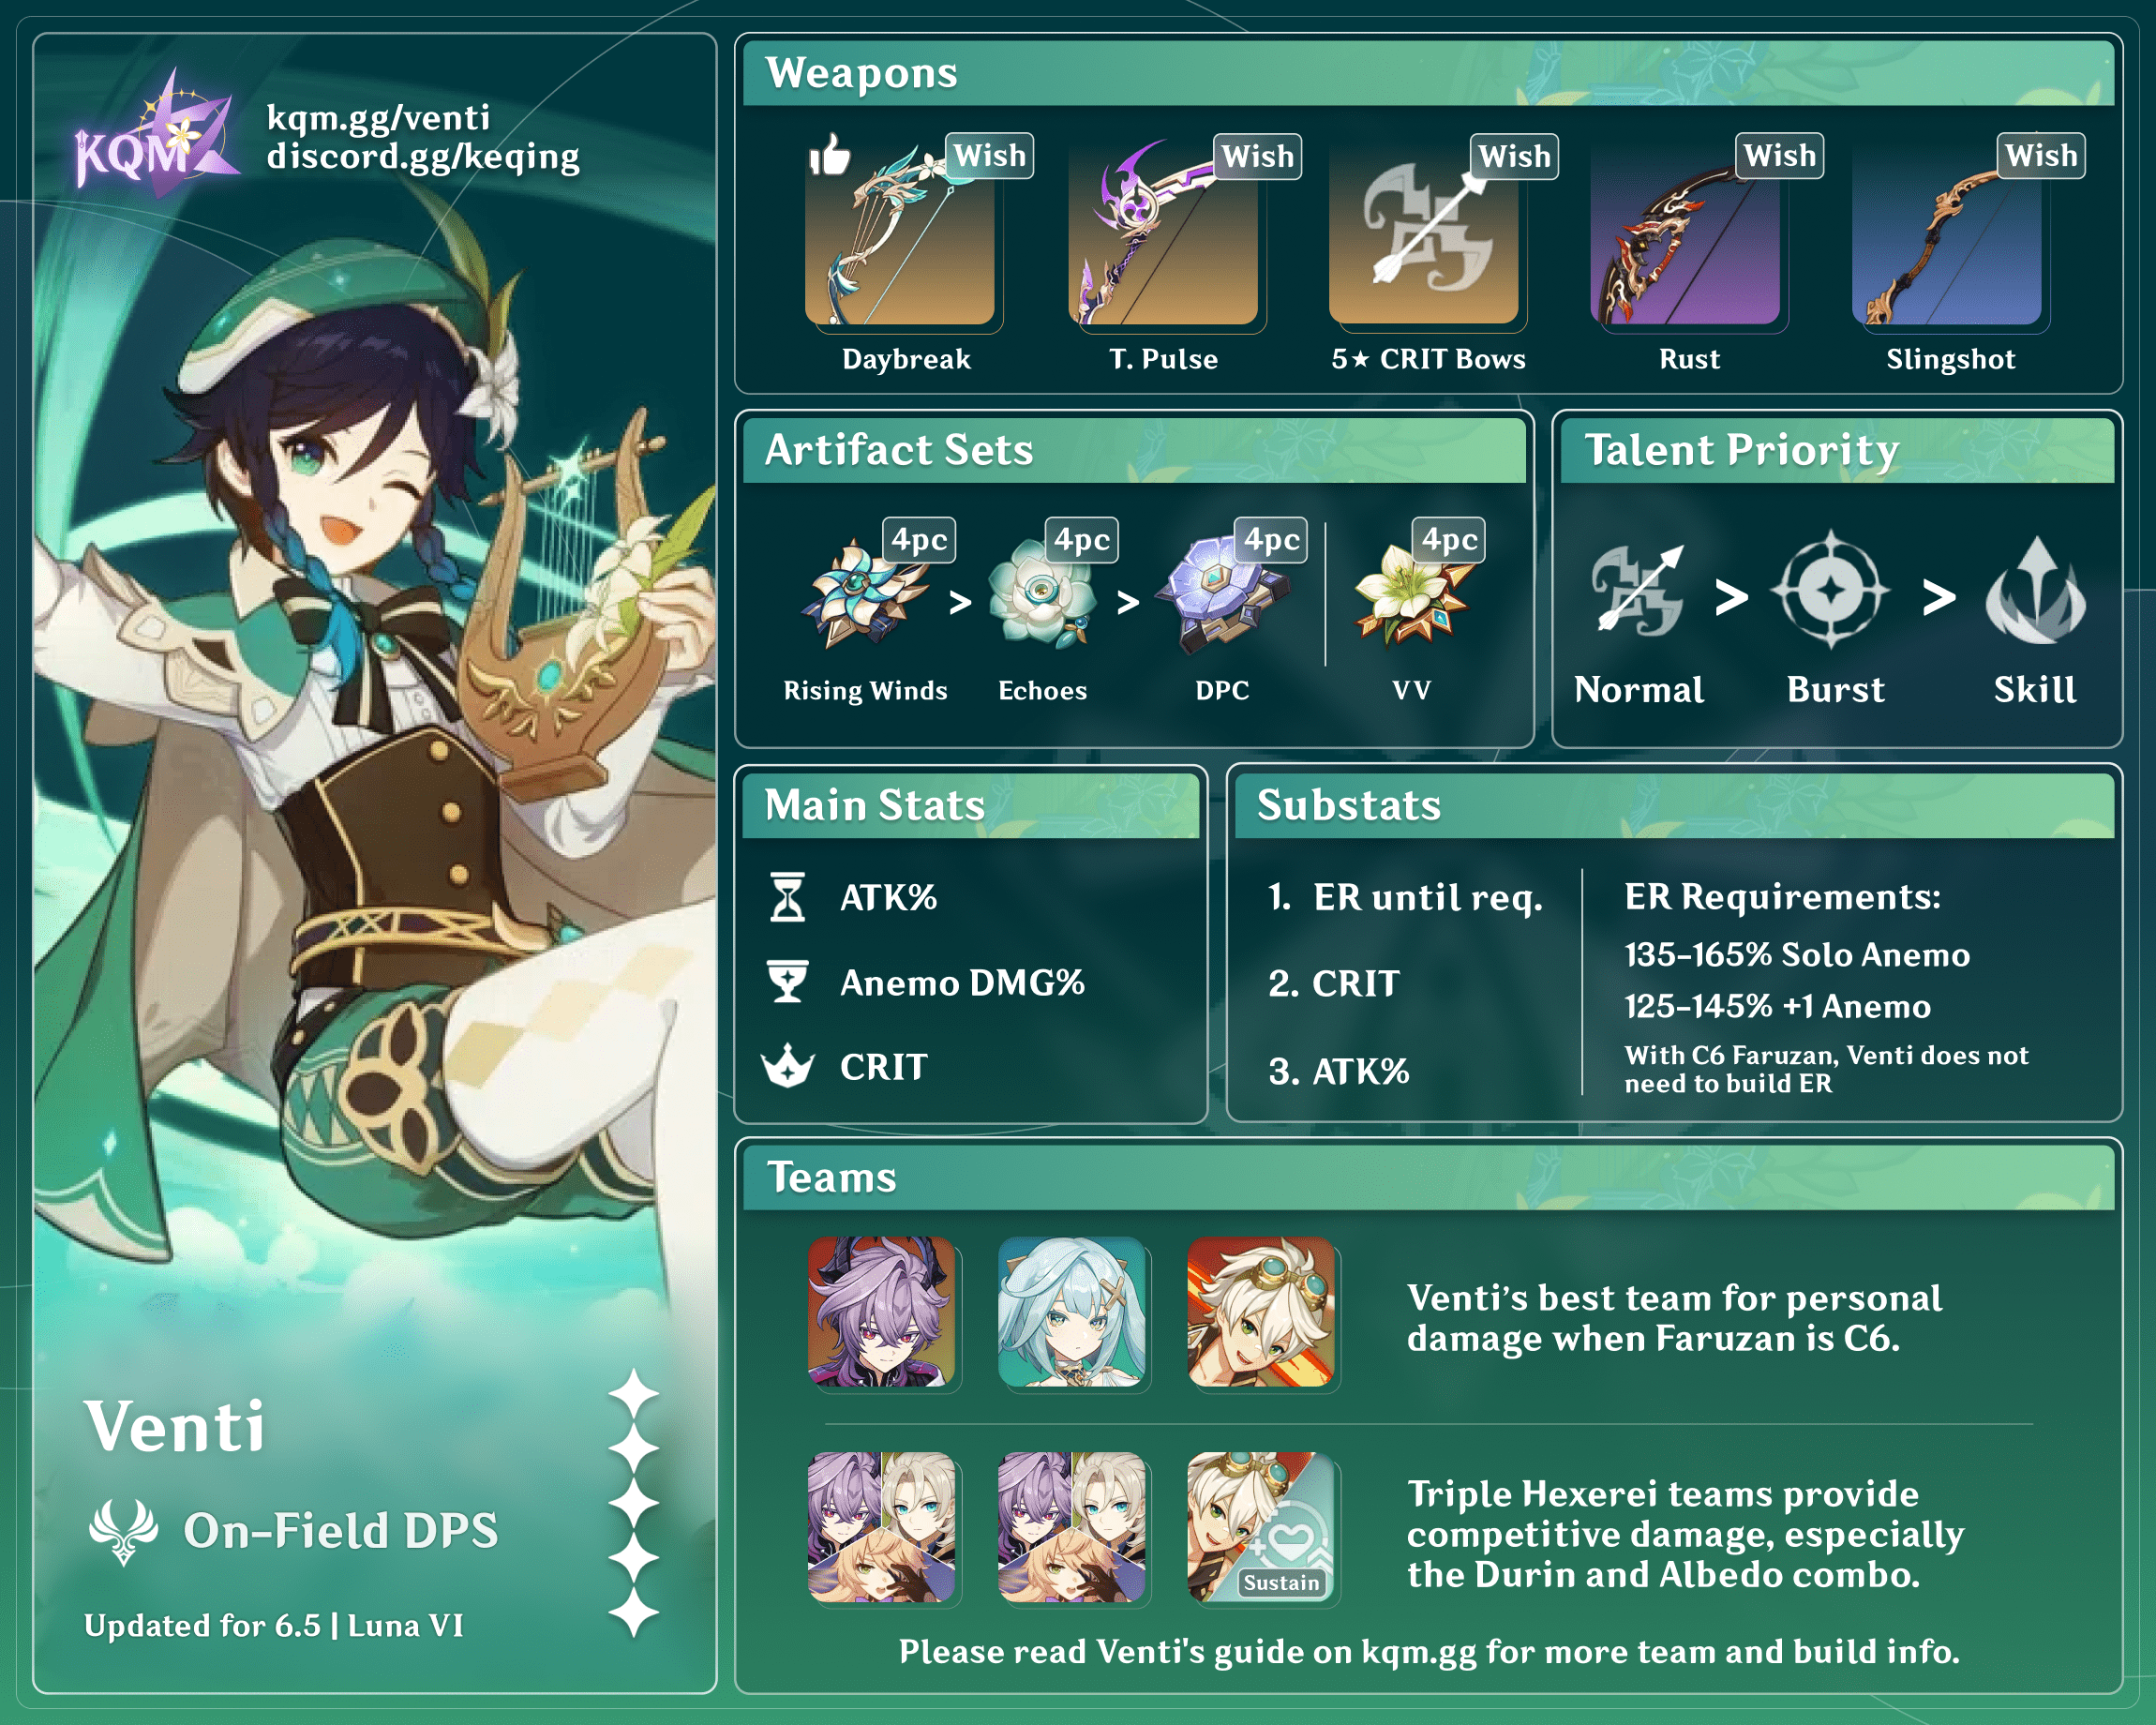
Credits to Irokei, shade.645, madeofseaglass and KQM Staff
Off-Field Support
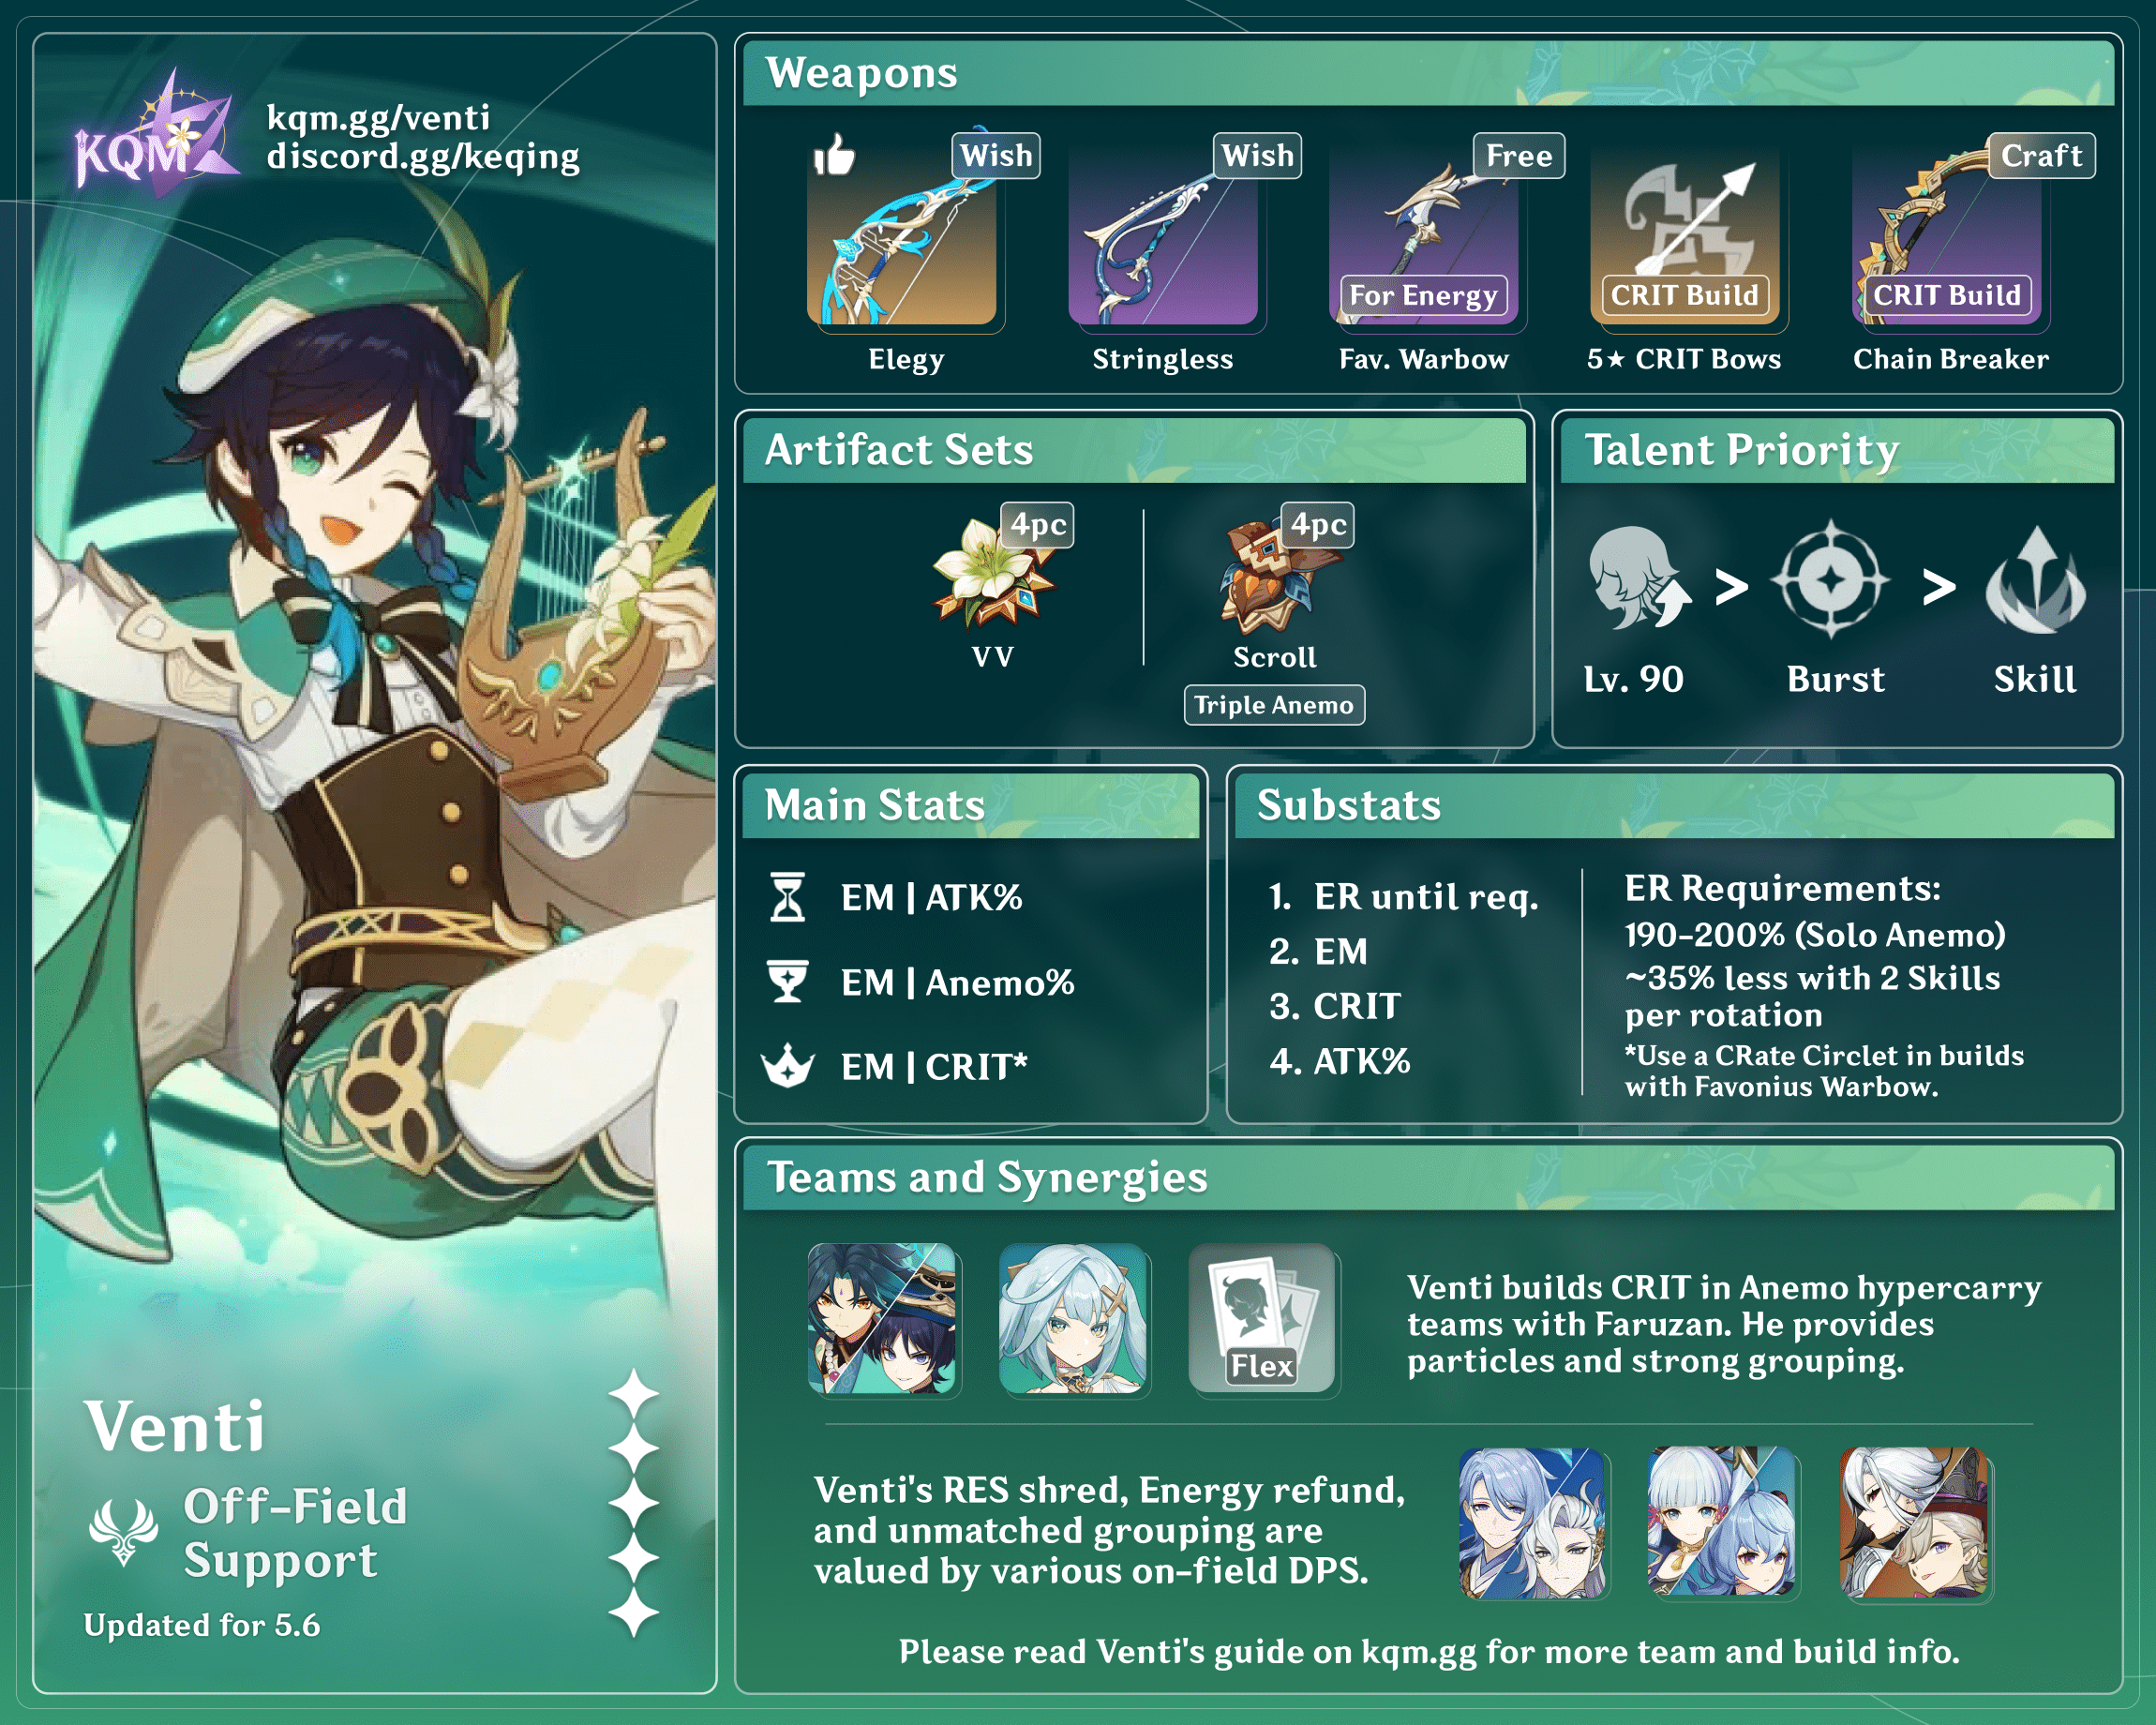
Credits to kolvii, mocha_biscuit, shade.645 and KQM Staff
Glossary
Click to view/hide content
| Shorthand | Full |
| ER | Energy Recharge |
| CR | CRIT Rate |
| CD | CRIT DMG |
| C# | Constellation Level |
| R# | Refinement Level |
| CC | Crowd Control |
| TTDS | Thrilling Tales of Dragon Slayers |
| VV | The RES Shred effect from 4-piece Viridescent Venerer. |

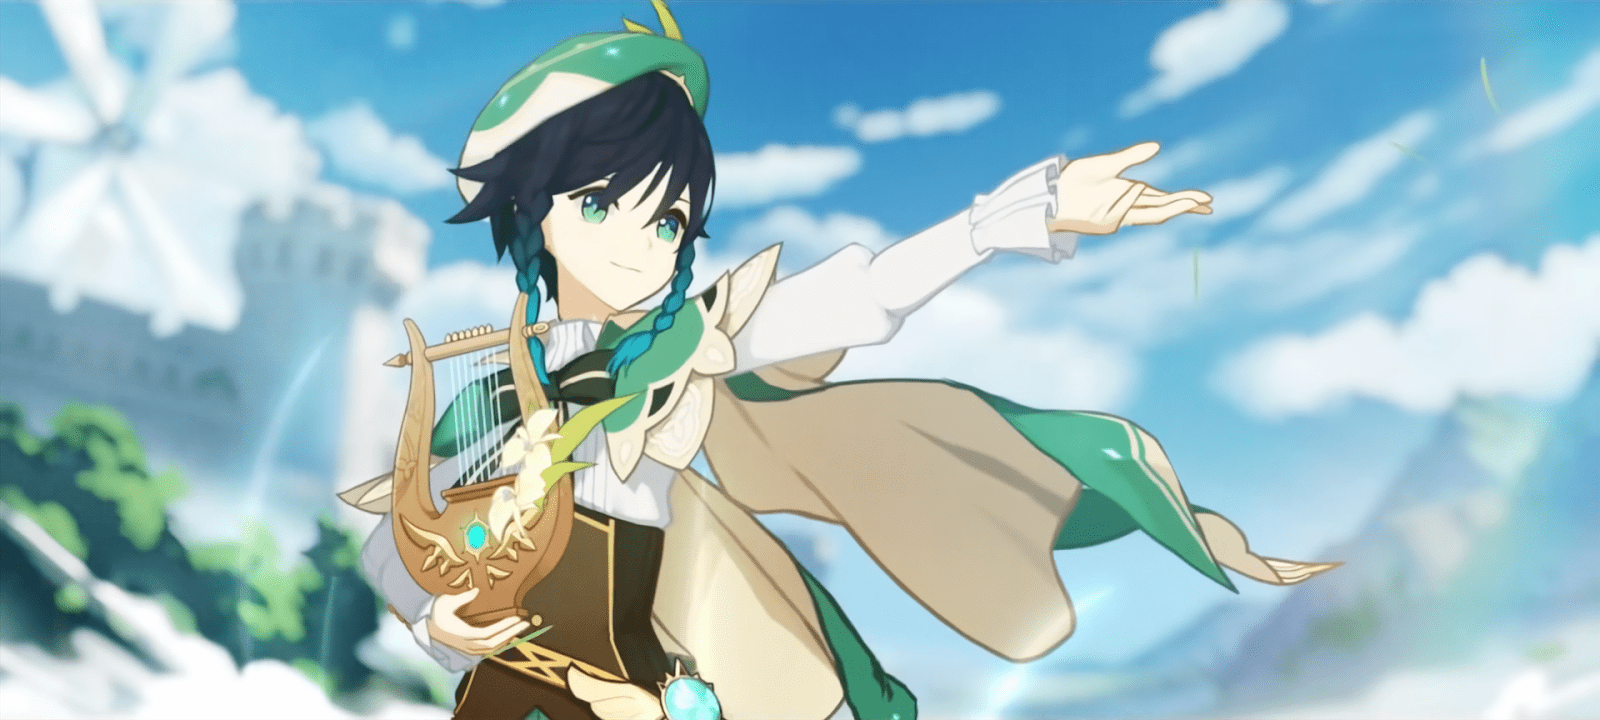
“Come on Traveler, let’s go! The world is full of lost ballads just waiting to be rediscovered.”
Talents
 Normal Attack | Divine Marksmanship
Talent Description
Normal Attack
Perform up to 6 consecutive shots with a bow.
Charged Attack
Perform a more precise Aimed Shot with increased DMG.
While aiming, favorable winds will accumulate on the arrowhead. A fully charged wind arrow will deal Anemo DMG.
Plunging Attack
Fires off a shower of arrows in mid-air before falling and striking the ground, dealing AoE DMG upon impact.
This is Venti’s basic attack. Venti should only use this to animation cancel or while waiting for the swap cooldown. There are niche cases where his fully charged Aimed Shot can be used in single target situations in combination with his Skill in order to consecutively Swirl and thus apply VV for two different Elements, however, such situations are rare and his Burst can usually fulfill the same purpose. Similarly, there are instances where his Aimed Shot can be used to paralyze Ruin enemies.
 Elemental Skill | Skyward Sonnet
Talent Description
O wind upon which all hymns and songs fly, bear these earth-walkers up into the sky!
Press
Summons an Wind Domain at the opponent’s location, dealing AoE Anemo DMG and launching opponents into the air.
Hold
Summons a larger Wind Domain at Venti’s location, dealing AoE Anemo DMG and launching opponents into the air. Venti then rides the winds into the air. Opponents launched by Skyward Sonnet will fall to the ground slowly.
Venti’s Elemental Skill has two versions: a Tap (Press) and a Hold version. The Tap version is a single instance of Anemo AoE damage, centered on a target, that launches smaller enemies into the air. Heavy enemies are not launched. The Hold version deals greater damage in a larger AoE centered on Venti himself.
Cooldown:
Energy Generation:
Press: 6s
Press: 3 Particles
Hold: 15s
Hold: 4 Particles
In combat, the Hold version should only be used to take advantage of specific mechanics, such as exposing the Ruin Hunter’s weak point. The animation takes too long, and Venti’s plunge damage is too low to justify otherwise.
 Elemental Burst | Wind’s Grand Ode
Talent Description
Fires off an arrow made of countless coalesced winds, creating a huge Stormeye that sucks in opponents and deals continuous Anemo DMG.
Elemental Absorption If the Stormeye comes into contact with Hydro/Pyro/Cryo/Electro, it will deal additional elemental DMG of that type. This can only occur once per use.
Energy: 60
Cooldown: 15s
Venti fires off a Stormeye at a fixed distance away from himself. It will suck in enemies in a large radius. If the Stormeye comes into contact with Pyro/Hydro/Electro/Cryo, it will absorb that Element and deal additional Elemental DMG of that type.
The Stormeye deals 20 Anemo damage ticks and 16 ticks of the absorbed Element. The 16 ticks of the absorbed Element will happen regardless of whether or not the Element is absorbed later in the Burst duration. It can also trigger Swirl up to 7 times. It should be noted that Venti’s Burst snapshots – that is, all buffs present on Venti during its cast will persist throughout the entire duration. However, EM buffs for Transformative reactions such as Swirl will not be snapshot and will instead be calculated dynamically – ie., their effect is calculated according to the duration of the buff itself.
Many smaller enemies can be lifted by Venti’s Stormeye, potentially to a height out of reach of certain characters’ attacks, a list of which can be found here.
 1st Ascension Passive | Embrace of the Winds
Talent Description
Holding Skyward Sonnet creates an upcurrent that lasts for 20s.
Using Venti’s Hold Skill will produce an upcurrent for 20s. Useful for allowing other characters to plunge and exploration, but due to the long animation of activating Hold Skill, this is generally not useful in combat.
 4th Ascension Passive | Stormeye
Talent Description
Regenerates 15 Energy for Venti after the effects of Wind’s Grand Ode end. If an Elemental Absorption occurred, this also restores 15 Energy to all characters of that corresponding element in the party.
Regenerates 15 Energy for Venti after the effects of Wind’s Grand Ode end.
If an Elemental Absorption occurred, this also regenerates 15 Energy for all characters of that corresponding element in the party.
The Energy regeneration from this Talent is not affected by ER%.
 Utility Passive | Windrider
Talent Description
Decreases gliding Stamina consumption for your own party members by 20%. Not stackable with Passive Talents that provide the exact same effects.
Decreases gliding Stamina consumption for your own party members by 20%. Identical to Amber’s as well as Collei’s passive and does not stack.
Constellations
Venti is a complete unit at C0, and pulling for his Constellations is not recommended. Constellations primarily increase his damage when running his CRIT build, with its value being comparatively smaller for EM builds. Breakdowns for DPS increases with Constellations are below. All calculations assume 4NO buff, KQM standard artifacts.
 Constellation 1 | Splitting Gales
Constellation Description
Fires 2 additional arrows per Aimed Shot, each dealing 33% of the original arrow’s DMG.
Venti does not use Aimed Shots in most of his teams, making this Constellation all but worthless outside of meme shotgun builds. Polar Star Venti uses a quick Aimed Shot to build stacks, but the damage increase there is still minimal.
| Polar Star (CRIT build) | Elegy for the End (EM build) |
| DPS increase over C0: 0.71% | DPS increase over C0: 0% |
 Constellation 2 | Breeze of Reminiscence
Constellation Description
Skyward Sonnet decreases opponents’ Anemo RES and Physical RES by 12% for 10s. Opponents launched by Skyward Sonnet suffer an additional 12% Anemo RES and Physical RES decrease while airborne.
Only the lightest of enemies are actually launched by Skyward Sonnet, but this Constellation is still a rare source of Anemo RES shred.
| Polar Star (CRIT build) Assume enemies are hit but not launched. | Elegy for the End (EM build) Assume enemies are hit but not launched. |
| DPS increase over C0: 6.72% DPS increase over C1: 5.97% | DPS increase over C0: 1.81% DPS increase over C1: 1.81% |
 Constellation 3 | Ode to Thousand Winds
Constellation Description
Increases the Level of Wind’s Grand Ode by 3.
A welcome upgrade to the most powerful aspect of Venti’s kit.
| Polar Star (CRIT build) | Elegy for the End (EM build) |
| DPS increase over C0: 15.75% DPS increase over C2: 8.47% | DPS increase over C0: 4.57% DPS increase over C2: 2.71% |
 Constellation 4 | Hurricane of Freedom
Constellation Description
When Venti picks up an Elemental Orb or Particle, he receives a 25% Anemo DMG Bonus for 10s
Particles from Venti’s Skill spawn at the hit enemy’s location and take a few seconds to travel to Venti. For this reason, we advise adjusting your team rotation to generate Particles with a teammate’s Skill, then swap to Venti so that he can catch the Particles.
| Polar Star (CRIT build) | Elegy for the End (EM build) |
| DPS increase over C0: 24.70% DPS increase over C3: 7.73% | DPS increase over C0: 8.49% DPS increase over C3: 3.74% |
 Constellation 5 | Concerto dal Cielo
Constellation Description
Increases the Level of Skyward Sonnet by 3.
Another straightforward talent upgrade, this time for his Skill. Grants a modest DPS upgrade.
| Polar Star (CRIT build) | Elegy for the End (EM build) |
| DPS increase over C0: 30.04% DPS increase over C4: 4.28% | DPS increase over C0: 10.13% DPS increase over C4: 1.51% |
 Constellation 6 | Storm of Defiance
Constellation Description
Targets who take DMG from Wind’s Grand Ode have their Anemo RES decreased by 20%. If an Elemental Absorption occurred, then their RES towards the corresponding Element is also decreased by 20%.
- The resistance reduction lasts 10 seconds from the last tick of damage taken. Anemo resistance reduction duration can only be refreshed by Anemo DMG ticks, while the absorbed Element’s resistance reduction duration is refreshed by that Element’s DoT ticks.
On top of improving Venti’s personal damage, the additional RES Shred for the absorbed Element increases team damage of the same Element.
| Polar Star (CRIT build) | Elegy for the End (EM build) |
| DPS increase over C0: 38.17% DPS increase over C5: 6.25% | DPS increase over C0: 18.02% DPS increase over C5: 7.16% |
“An evening breeze really sets the mood for becoming my disciple, don’t you think? We can do it right now, you just need to make me a small offering…”
Combos And Mechanics
Understanding Venti’s Damage
Venti’s damage mainly comes from Wind’s Grand Ode, which has three sources of damage:
- Anemo damage: 20 ticks
- Elemental Absorption damage: 13-15 ticks
- Swirl damage: Maximum 7 ticks in single target, 14 ticks in multi-target
To use Venti to his full potential, you should always absorb an Element into his Burst. Note that if the Element absorbed in Venti’s Burst is Hydro, there can only be 7 Swirl ticks maximum even against multiple targets, as Hydro Swirl applies the Wet status to the enemies within the AoE, but does not deal AoE damage. More details can be found in the Swirl guide.
There is an Electro-Charged Venti technique where Venti’s Burst absorbs Hydro, but still Swirls Electro due to Reaction priorities. This is elaborated upon in the Electro-Charged team composition section.
The priority of absorption for Venti’s Burst is:
Pyro > Hydro > Electro > Cryo
Lifting Enemies
The suction power of the vortex produced by Venti’s Burst is influenced by 2 factors: the level difference between Venti and the enemy, and the weight of the enemy. Venti’s Elemental Burst will attempt to pull in enemies within a 15 meter radius around the vortex created and then lift them inside it. If the enemy is at least 20 levels higher than Venti, the strength of the pull and lift will be diminished.
As for weight, certain enemies are too heavy to be lifted without external intervention, but some can still be slowly pulled (e.g. Lectors, Frozen vishaps) or lifted with the help of other characters (e.g. Mitachurls when knocked up by Jean or Klee’s Charged Attacks). Some enemies (e.g. Nobushi, Shadowy Husks) can be lifted by using Venti’s Skill while his Burst is active.
It is not recommended to leave Venti at Level 70 in an attempt to prevent him from lifting enemies out of your teammates’ reach. This will severely undermine Venti’s damage due to Swirls scaling with character level. Even characters who may not be able to reliably hit within Venti’s vortex, such as Xiao or Eula, can still work with Venti with proper rotation management.
For a comprehensive breakdown of who can hit mobs lifted by Venti’s Burst, see this table.
Skill → Burst
The most common combo. The animation of Venti’s Skill can be canceled early, shortening the duration required to cast it by more than 66%. By using E before Q, you save frames on Venti’s E ending animation with your next attack. You may need to stay on Venti for a little bit of extra time for Venti to be on field when absorbing the Particles from E alone.
Skill → N1 → Swap
Venti’s Skill lasts a total of 111 frames, which is much longer than the character swap lockout. However, Venti can cancel his Skill animation by using a Normal Attack or dashing. This cuts out the long ending animation of Venti’s Skill and allows the player to swap off Venti as soon as possible, speeding up rotations and giving another character more field time.
Additionally, the swap can occur at any point in the N1 animation, including when the arrows have not yet been fired. This means that a Q-E-N1-swap can be just as fast as a E-Q combo; however, this leads to the Anemo Particles being absorbed by a different unit.
Hold Skill → Early Release
Venti’s Skill enters its Hold Skill animation after 9 frames of holding. However, if you release after the 9 frames of holding, it transitions directly into the Tap Skill ending animation, allowing you to cancel it with his Burst or N1. An example of this combo can be found here. Notice that Venti doesn’t do the twirl that is usually associated with a Tap Skill.
Tips and Tricks
Venti’s Burst aims at the nearest target, but the Stormeye appears at a fixed distance away from Venti. This means that when playing Venti, you need to carefully consider which enemy is nearest. That nearest enemy will determine the direction that Venti fires his Burst in. If the nearest enemy is between Venti and the wall, Venti may fire his Burst into the wall. To prevent this from happening you can:
- Circle around the enemy so Venti is between the enemy and the wall.
- Run away from the wall so that when Venti Bursts, the Stormeye is not inside the wall.
- Run towards a different enemy so that Venti aims at it instead.
Sometimes, you may want to aim Venti’s Burst between two enemies. When there are no enemies, Venti will fire directly forward. You can take advantage of this by firing Venti’s Burst before the enemies spawn in. Otherwise, this can be done by lining up Venti, enemy A, and enemy B in a line, so that Venti’s Burst will fly over A and land in between A and B.
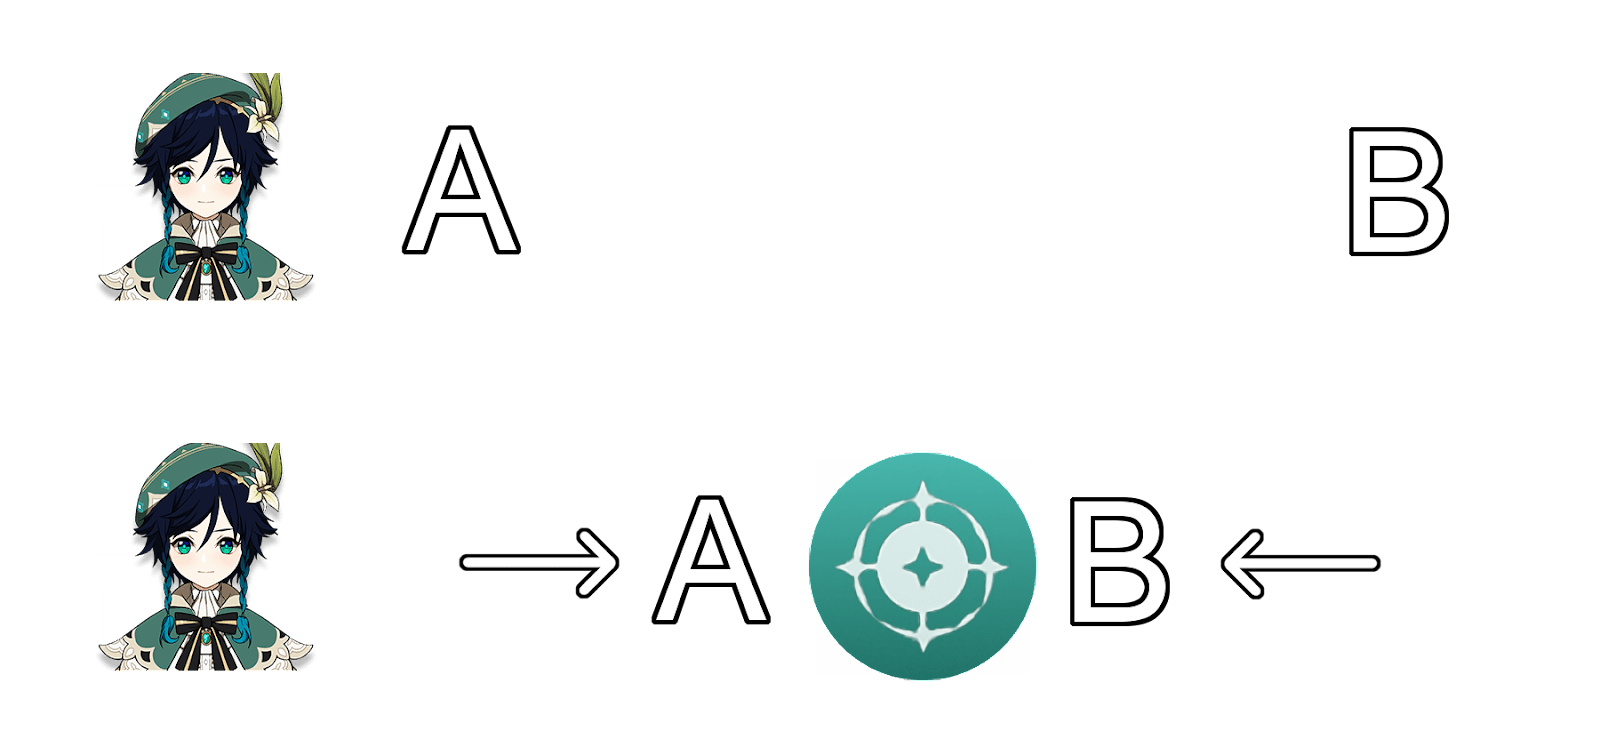
When Venti fires his Burst from point-blank in front of enemy A, the vortex will be deployed behind enemy A, landing between enemies A and B.
Builds
Overview (EM vs CRIT)
All calculations below assume you have a highly invested Venti, who is a premier sub DPS on most quickswap teams. However, you can choose to use Venti as a pure support with lower investment, or even as an on-field DPS (which we do not recommend).
There are two different types of builds for Venti: stacking EM and dealing damage primarily through Swirls, or focusing on his Anemo damage by building ATK and CRIT. Generally, EM Venti is easier to build, with very strong F2P weapon options and less dependence on rolling the correct artifact substats. While his CRIT build has a higher ceiling, it requires much higher investment and proper teambuilding to reach that higher ceiling. The build you choose will not impact Venti’s support potential, as his support capabilities come from his crowd control and ability to proc Viridescent Venerer’s Resistance Shred.
| EM | CRIT | |
| Pros | + Easier to build (just stack EM, no need for CRIT subs, cheaper weapon options) + Scales better in multi-target scenarios + Great for Electro-charged teams | + More consistent single-target damage + Effective against slimes or Element-resistant enemies + Makes better use of external buffs (e.g. Faruzan, 4NO, Bennett, etc.) + Makes better use of Venti’s Constellations |
| Cons | – Difficult to obtain EM main stat (drop rate is the lowest among all possible stats) – Requires Absorption/Swirls to deal damage, which can be unreliable at times | – Much higher investment required to overtake EM – Loses out in scenarios where chain reactions can be triggered |
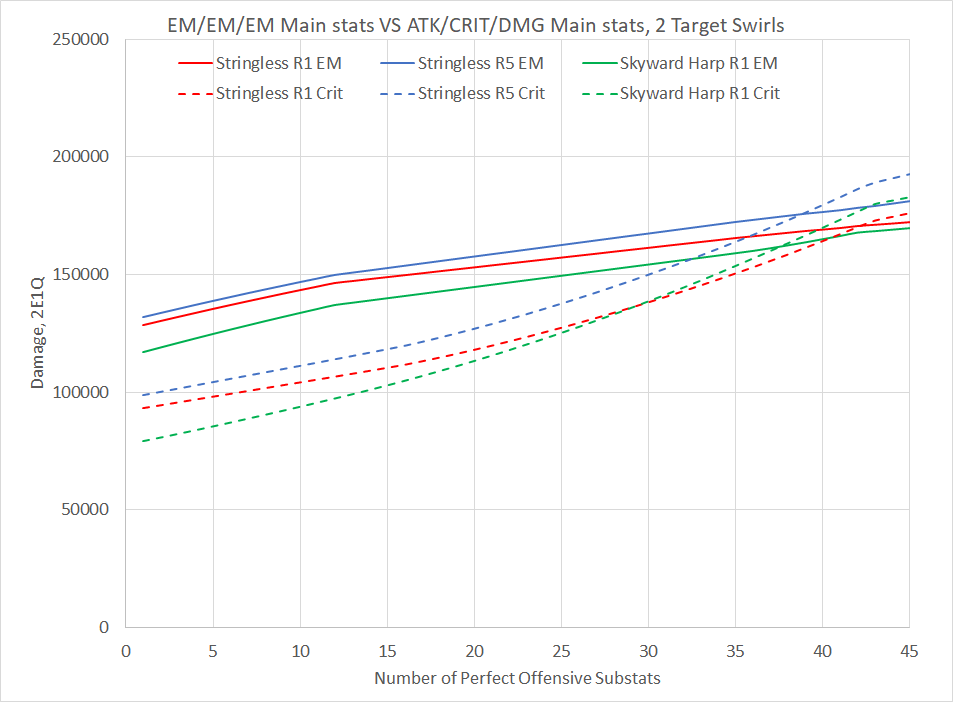
Multi-Target
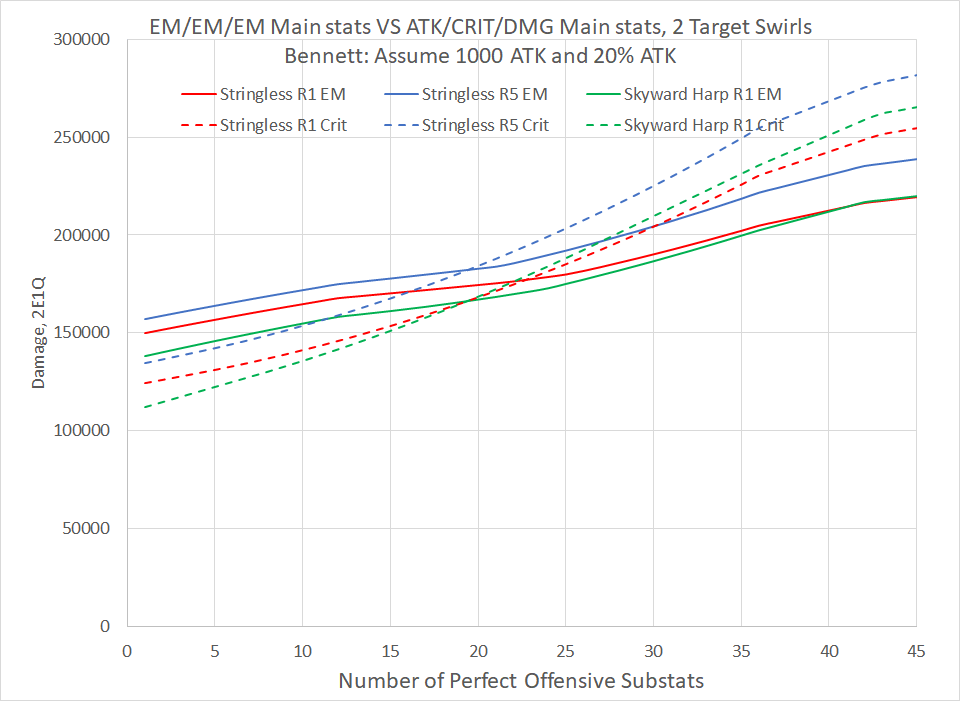
For a multi-target scenario, EM build is favored for Venti’s personal damage. In general, you need above 30 perfect offensive substats for CRIT build to deal more damage than with an EM build. With Bennett, this breakpoint is lowered to around 20 perfect offensive substats, which is much more achievable with high investment. More details on the breakpoints of CRIT and EM Venti can be found in the Appendix.
Single Target
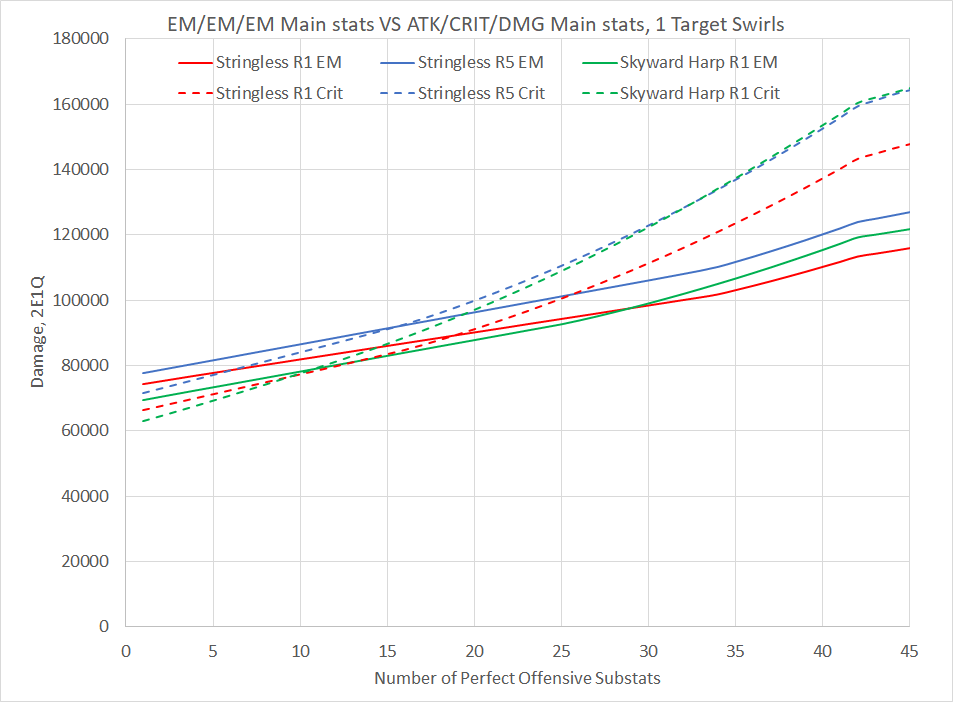
For reference, a Venti with R5 Stringless, ATK/DMG%/CRIT with 30 perfect offensive subs has the following stats:
ATK: 1624 | EM: 188 | CR: 79.1% | AnemoDMG%: 61.6% | CDMG: 159.0%
When there is only a single target, or when you are Swirling Hydro, the CRIT build overtakes EM build at between 12 to 19 perfect substat rolls. The difference is even larger if no Element is absorbed in Wind’s Grand Ode, or if the enemy is particularly resistant against the absorbed Element.
ER Requirements
Until you can Burst off cooldown, Energy Recharge has high priority, but it also depends on the rest of your team and your rotation. As a general rule, if you only cast 1 E between Q casts, you need around 200% ER. If you cast 2 E’s between Q casts, you need around 165% ER.
Venti’s Ascension 4 passive regenerates 15 Energy for him after Wind’s Grand Ode ends, effectively bringing his Energy cost to 45. In addition, he gains ER as an ascension stat and has 132% base ER at ascension phase 6. This means that at Level 90, you only need around 35% ER from artifacts and weapons combined for a 2E1Q rotation. For 1E1Q, you need 70% ER from artifacts and weapons combined.
As with all units, exact ER requirements will vary depending on your build and team. We recommend using the Energy Recharge Calculator to pinpoint your exact ER needs.
“Come, sit with me. I’ve written a new poem. I call it ‘Wind of the Traveler.’”
EM Venti
The EM build focuses on dealing damage through Swirls. Swirl damage is only affected by the character’s level and amount of EM they have. CRIT is not required as his pure Anemo damage is not strong enough to justify it. Therefore, an EM Venti is achieved by building lots of EM and running the 4VV artifact set. For C0, no external buffs, and 2 targets, this build out-damages the CRIT build. This build can, however, be unreliable in cases where the enemies are particularly resistant to the absorbed Element.
Venti can trigger Swirl once for each Skill and 7 times in his Burst. In multi-target scenarios where enemies are grouped, this number is effectively doubled as each Swirl AoE hits adjacent enemies. For this reason, it is especially important for enemies to be grouped for EM Venti to shine. Luckily, grouping is what he does best!
Talent/Level Priority
Character Level > Wind’s Grand Ode (Q) ≥ Skyward Sonnet (E) > Divine Marksmanship (Normal Attack)
In the EM build, character levels are far more important than Talent Levels. Direct Talent damage only accounts for about 30% of Venti’s total damage at Level 90 and Talent Level 10.
In terms of actual increase, Venti’s Burst does more damage than his Skill in standard rotations, but keeping them the same level is also fine. Venti rarely uses Normal or Charged Attacks so keeping it at Talent Level 6 or Talent Level 1 is fine.
Artifacts
| Artifact Set | Notes |
 4 Viridescent Venerer (4VV) (This isn’t what the VV set looks like, but when you’re done farming, it’ll feel like it) | 4VV is the optimal set for Venti. It boosts teammates’ damage nicely and is also the highest damage option for Venti alone, since it buffs Swirl damage greatly through both the RES shred and the +60% Swirl damage. No other option comes close to what 4VV can offer for Venti. |
 4 Glided Dreams (4GD) | 4GD is an option if you have another Anemo unit holding 4VV on your team. With the resistance shred from an external 4VV holder, the damage from 4GD is comparable to if Venti was holding 4VV himself. However, this necessitates having another Anemo teammate with 4VV, so having Venti on 4VV is still recommended for team flexibility. |
 2 Wanderer’s Troupe/2 Instructor (2WT2IN) | If using interim artifacts while farming for better ones, consider ignoring set bonuses and just using what you have with the best substats. If you happen to have 2-piece combinations of Viridescent Venerer, Wanderer’s Troupe, or Gilded Dreams, they will work fine until you can farm your intended set. 2pc Instructor will also work if you have Instructor flower and feather so that the lower +16 cap of 4* artifacts will not affect the EM main stats. |
 4 Instructor (4IN) | This set can be used when the team would appreciate the 120 EM share and you are okay with sacrificing Venti’s personal damage. However, before running 4IN Venti, consider if running 4VV Sucrose would be a better choice. |
Main Stats
 Sands |  Goblet |  Circlet |
| EM | EM | EM |
The optimal main stats are EM/EM/EM, but keep in mind that having your Burst up off cooldown should be your first priority. If you can’t achieve it, it might be reasonable to run either ER sands with an EM based weapon or an ER weapon instead. However, it is recommended to get ER from substats which, when combined with ascension bonus, should provide you with enough Energy Recharge.
The differences in damage between using an EM vs Anemo DMG% goblet is small enough (2-3% with Stringless) that we suggest going with the one that gives the higher substats. If you have neither, you can use one ATK% piece with 2 EM pieces, which has a difference of 3-4% vs triple EM with Stringless. The exact difference, naturally, varies with both weapon, team, and the player’s own artifacts.
Substats
Substat Priority:
ER (until sufficient) > EM > ATK% = CR > CD/Flat ATK
On your flower and feather, prioritize maximize the number of EM substats. On the sands, goblet, and circlet, look for ER substats, since EM substat cannot appear on an EM main stat pieces. Once you have enough ER, look for ATK% or CR substats because you might as well go for the free damage. CD is not worth as much because there is very little CR to help scale it.
Very approximate relative worth of the offensive substats are:
| EM | ATK | Flat ATK | CRIT Rate | CRIT DMG |
| 100% | 50%~70% | 25%~35% | 40%~70% | 10%~70% |
This means that in an invested EM build, an ATK% substat is worth about 60% of an EM substat.
The specific combination of artifacts that gives the most damage is highly variable, and we recommend using Genshin Optimizer to help find your best build.
Weapons
The list of recommended weapons for EM Venti may seem short, but it is predominantly made up of F2P-accessible options.
| Weapon | %Damage of Stringless R1 | Notes |
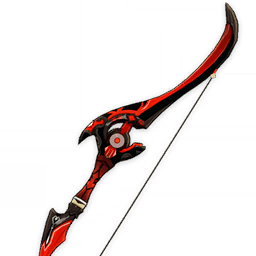
 Elegy for the End | R1, passive active (98.55%) | While the 20s cooldown on Elegy’s buff is awkward with Venti’s 15s cooldown on his Burst, it makes building Venti easy, since it provides enough ER on its own to meet most ER requirements. The EM provided by the buff can make Elegy’s damage competitive with that of Stringless or Windblume Ode. The ATK% from the buff is hard for Venti to take advantage of, since his Burst snapshots. However, the value of the buff is very strong for team DPS. In a 15s rotation, the buff is only active every other rotation, which lowers the value of the weapon. Playing Venti in a 23s rotation enables the weapon’s EM buff to maintain almost continuous uptime on Venti’s Swirls, and the 20% ATK is active for the rest of the team on every rotation. If this weapon is available, it is generally always Venti’s best choice, as it is usually better for overall team damage. |
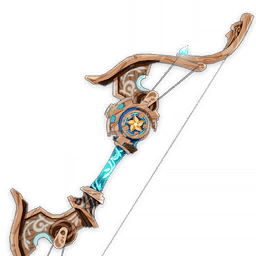
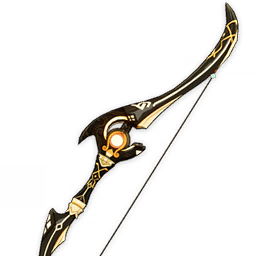
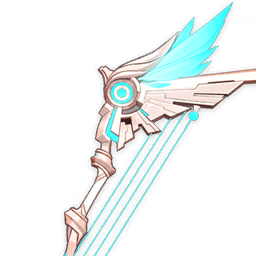
 The Stringless | R5 (103.91%) R1 (100.00%) | This is Venti’s best weapon for personal DPS. Depending on refinement, EM Venti with Stringless is competitive with CRIT Venti using 5* bows. It is the safest option and you should run it if you have it if Elegy is not available. Refinements are not as significant for EM Venti, but still useful. |
 Mouun’s Moon | R5, 260 Energy (99.23%) R1, 260 Energy (95.19%) | A good option if you got lucky during weapon banners and need Stringless elsewhere. Though the value of this bow depends on your team’s total energy cost, the classic Morgana team (Mona, Ganyu, Venti, Diona) gets its damage fairly close to Stringless. |
 Alley Hunter | R5 (99.10%) R1 (95.13%) | Another good option if you got lucky during weapon banners and need Stringless elsewhere. The passive is almost always active for Venti in a quickswap team, letting him take advantage of the sizable damage buff. Just make sure you wait a few seconds to pre-stack its buff before starting an Abyss chamber. |
 Windblume Ode R5 | 97.86% | A solid F2P option if you were lucky to obtain this weapon during the event. Remember to use his Skill before his Burst so that Venti’s Burst can snapshot the ATK% buff this weapon provides. |
 Raven Bow | R5, passive active (95.13%) R5, no passive (91.83%) | Despite being a 3* weapon, Raven Bow can be a good weapon choice for Venti due to its EM secondary substat. It is readily available through wishes even for F2P players. |
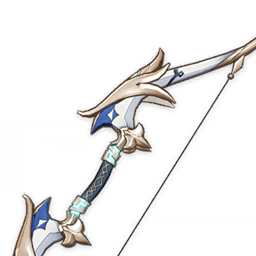
 Fading Twilight | R5, average buff (92.97%) | Fading Twilight takes care of Venti’s ER needs without help from artifacts and is a decent F2P option. However, it is outscaled by Raven Bow with its passive up, and Favonius Warbow’s Energy generation can sometimes be more useful than Venti’s personal damage. Nonetheless, it is a worthy choice if you are struggling to meet ER requirements through substats. |
 Prototype Crescent | R5 (98.50%) R1 (94.18%) R1, no passive (90.62%) | If absolutely none of the above options are available, and you care about Venti’s personal damage then you might consider Prototype Crescent. It requires precious billets to craft though, and its passive is conditional upon landing an Aimed Shot on a weak point. This is not always possible depending on what enemy you’re facing. Due to the scarcity of billets and the availability of other options on this list, we recommend this only at R1 and only as a last resort. |
 Favonius Warbow | (R5, EM Circlet) 87.87% (R5, CR Circlet) 81.62% | While Favonius is not optimal for Venti’s personal damage, the extra Energy Particles generated make Venti extremely good at giving Energy to his teammates. At R5, the cooldown on Favonius Warbow’s passive matches Venti’s E cooldown. With the Skill-N1 combo, you have at least 3 chances of landing a critical hit and proccing Favonius Warbow’s Particle generation. Venti may want to run a CRIT Rate Circlet for more consistent proc-chance or have many CRIT Rate substats on his EM pieces. |
*Damage calculated for a Level 90 Talent 9/9/9 Venti with EM/EM/EM main stats, 4VV, 20 optimally allocated substats per KQM standards, and 20% ATK buff in a multi-target scenario.
“My greatest wish? It has always been to roam free and experience the whole world. Now I would add that wherever I go, it simply must be with you!”
CRIT Venti
The CRIT build focuses on dealing Anemo damage through talents. This is achieved by stacking ATK and CRIT. With external buffs, high Constellations, or in single-target scenarios, this build can out-damage the EM build.
Venti’s Burst has up to a 1,895% total MV at Talent Level 10, and his E hits hard with up to 496.8% MV at Talent Level 10. The CRIT build maximizes the damage dealt by these talents.
The CRIT build has a higher ceiling than EM, but reaching this ceiling requires external buffs or Constellations. In general, a 1000 ATK and 20 ATK% buff from Bennett pushes the breakpoint for when CRIT beats EM to about 19 perfect offensive subs; note that this breakpoint is significantly lower with Faruzan, especially when she is C6. This is generally achievable for high investment Venti. Depending on your investment level and teammates, CRIT Venti may be your best build.
Talent/Level Priority
Wind’s Grand Ode (Q) ≥ Skyward Sonnet (E) ≥ Character Level > Divine Marksmanship (Normal Attack)
As CRIT Venti relies on doing Anemo damage through his Burst and Skill, those should be given priority. CRIT Venti will rarely use his Normal Attacks outside of niche/meme cases (e.g. C1 “Shotgun Venti” or Physical builds, neither of which will be covered here) so his Normal Attacks can remain unleveled. Venti’s character level is still important, as even in a CRIT build, a decent chunk of his damage will still come from Swirls.
Artifacts
| Artifact Set | Notes |
 4 Viridescent Venerer (4VV) | 4VV is still the optimal set for CRIT Venti. It contributes greatly to team DPS by providing resistance shred. Additionally, Swirl still contributes a significant amount of damage for CRIT Venti. |
 4 Emblem of Severed Fate (4ESF) | For teams that don’t care about the resistance shred from 4VV, 4ESF comes fairly close in terms of Venti’s personal damage. It can even surpass 4VV sometimes with Benny’s ATK buff and/or another 4VV user on the team to provide the resistance shred (which is generally when non-VV CRIT Venti should be considered). Even then, the difference is usually quite small (<5% with Polar Star and external 4VV holder), so 4VV remains the generally recommended set for Venti’s personal damage and utility. |
 2 Viridescent Venerer/2 Desert Pavilion Chronicle/2 Noblesse Oblige/2 ATK% | 2-piece combinations of Viridescent Venerer, Desert Pavilion Chronicle, Noblesse Oblige, and +18% ATK sets are still options. They provide less damage than 4VV and 4ESF, but their set bonuses are still helpful. These sets are only recommended if your team doesn’t have a swirlable element that can use the 4VV set bonus or has a different 4VV holder already. 18% ATK sets include Echoes of an Offering, Gladiator’s Finale, Shimenawa’s Reminiscence, and Vermillion Hereafter. |
 Other | If you are still farming for your desired set, you can also consider just running whatever has the best substats. A 2pc set bonus can help if you can scrape together 2VV, 2NO, or 2ATK, but substats often matter more than another 2pc set bonus. |
Main Stats
Sands | Goblet | Circlet |
| ATK% | Anemo DMG% ATK% | CRIT Rate/DMG% |
An ATK% goblet can be competitive with Anemo DMG%, especially at higher Constellations. In this case, prioritize the stronger substats when deciding. Using Anemo DMG% goblet only performs significantly better with Bennett’s ATK buff.
Substats
Substat Priority:
ER (until sufficient) > CR = CD > ATK% > EM/Flat ATK
In general, try to stack as much CRIT Rate and CRIT Damage as possible. Depending on the team and/or weapon choice, ATK% can be oversaturated, making CR or CD worth more. The specific combination of artifacts that give the most damage is highly variable, and we recommend using Genshin Optimizer to help find the best build.
Weapons
In general, the 5* weapons gain value in ATK/DMG%/CRIT builds. While The Stringless starts becoming less powerful compared to the 5* weapons, it still remains a solid option among the 4*.
| Weapon | %Damage of The Stringless R1 | Notes |
 Polar Star | R1, 4 stacks (111.10%) R1, dynamic (110.30%) | While Polar Star at full stacks theoretically produces the highest damage, you need to incorporate an NA and Aimed Shot in your rotation before using Venti’s Skill and Burst. Venti’s Burst will also not snapshot the buff from its own stack onto itself. In the case of the 4 stacks, the first Burst will actually only get a maximum of 3 stacks. The 4 stacks will apply for the next Burst in a perfect rotation. Venti’s rotation using Polar Star will be: Normal Attack > Aimed Shot > Skill > Burst > swap > Skill |
The Stringless | R5 (107.52%) R1 (100.00%) | The Stringless, even with ATK/Anemo%/CRIT main stats, is a strong contender due to its passive strengthening both Venti’s Skill and Burst damage. The EM secondary stat isn’t wasted, as even in a CRIT build a significant portion of Venti’s damage still comes from Swirls, especially in multi-target scenarios. It scales very well with refinement. Use it if you have it. |
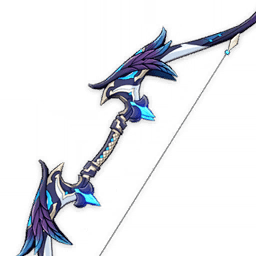
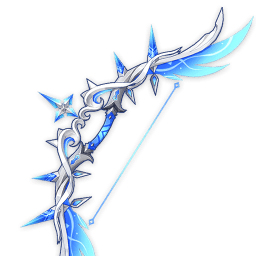
 Aqua Simulacra | R1 (102.57%) | A strong stat stick. The passive is almost always active, which makes it easier to use than Polar Star in a rotation. |
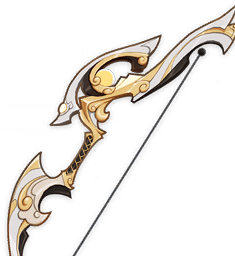
 Skyward Harp | R1, 2 procs (100.80%) | Harp holds its own in ultra-high investment builds and is easier to obtain by accident than other 5*s on this list. If you’re unwilling to pull for the weapon banner exclusives and your Stringless is low-refinement or needed elsewhere, Harp is still a competitive option. |
Elegy for the End | R1, passive active w/partial uptime (100.48%) | Although the 20s cooldown on Elegy’s buff is awkward with Venti’s 15s burst-cooldown, it makes Venti easy to build, since it provides enough ER on its own to meet most ER requirements. Elegy provides slightly lower personal damage than some of the other recommendations, but the extra ER, ease of building, and team buff make Elegy worth it. In a 15s rotation, the buff is only active for every other rotation, which lowers the value of the weapon. Playing Venti in a 23s rotation enables the weapon’s EM buff to have almost full uptime on Venti’s Swirls, and the 20% ATK is active for the rest of the team on every rotation. |
 Hunter’s Path | R1 (99.90%) | A decent stat stick that makes it easier to build CRIT due to its massive CRIT Rate secondary stat. The additional Elemental DMG% bonus helps increase Venti’s damage, but the Charged Attack passive is insignificant to him. |
Mouun’s Moon | R5, 260 Energy, (99.83%) R1, 260 Energy (92.06%) | Mouun’s Moon becomes a viable option in high-Energy teams. If you have it and other options are unavailable, then it’s worth considering. |
Alley Hunter | R5, passive active (99.59%) R1, passive active (91.93%) | A decent option for CRIT builds, but limited in availability. Overall a generally strong weapon for off-field bow users like Venti, as its passive can be stacked before combat starts and is almost always active thereafter. |
 Blackcliff Warbow | R5, 3 stacks (109.64%) R1, 3 stacks (94.20%) 0 stacks (84.82%) | On paper, Blackcliff is about on par with Stringless, but only with its passive stacked and at R5. It’s difficult to recommend spending Starglitter to obtain R5 Blackcliff due to its cost and conditional passive. There are more economical options on this list that more reliably provide similar damage. |
 Thundering Pulse | R1 (99.40%) | Thundering Pulse’s second passive does nothing for Venti. It’s decent as a stat stick, but falls behind other 5* options. |
*Damage calculated for a Level 90 Talent 9/9/9 Venti with ATK/Anemo%/CRIT main stats (CRIT Rate or Dmg based on weapon), 4VV, 20 optimal substats per KQM standards, with 20% ATK buff in a multi-target scenario.
“Oh no…my lyre is broken…”
Team Compositions
Venti is very flexible and there are many teams that can utilize him well, and as such listing every composition where he can shine is beyond the scope of this guide. For a list of all characters and whether or not they can hit in Venti’s Burst and which enemies can be lifted (or pulled), see here. When fighting enemies that Venti can’t lift, his Burst will still apply a pulling force to slowly suck them in, but some enemies are able to walk/dash out of this effect.
Specific Unit Synergies
Quadratic Scaling Units
Quadratic scaling is the phenomenon wherein a unit’s ability deals exponentially more damage in an AoE situation. One of the most prominent examples is Tartaglia’s Riptides, and the difference between linear and quadratic scaling for AoE abilities is illustrated with an example below:
Assume Kaeya is fighting a group of 4 enemies that are grouped together, and casts his Elemental Skill, which does 7000 damage. As he is hitting 4 enemies, the total damage dealt by the skill, when added up, will be 28000.
Tartaglia is fighting 4 grouped enemies with Riptide Marks on them. He hits them all with an attack in his melee stance, which causes Riptide Flashes that do 2000 damage each in an AoE. Each enemy hit will trigger their own Riptide Flash for a total of 4 Flashes, and each Flash will hit all 4 enemies that are grouped. Therefore, the enemies are hit by a grand total of 16 Riptide Flashes, and the total damage done by them will be 32000.
While the above damage numbers are arbitrary assumed values, it shows how quadratic abilities ramp up massively if enemies are grouped together—and Venti provides near unparalleled grouping, making him a powerful choice for units with quadratic scaling attached to their abilities. Below are his specific synergies with such units.
| Unit/s | Notes |
 Albedo, Ayato, & Ganyu | Albedo, Ayato, and Ganyu feature pseudo-quadratic scaling—their Elemental Bursts have random targeting mechanics that give essentially a form of quadratic scaling, which means they scale very well with the number of grouped enemies. Nothing is more satisfying than seeing the screen flooded with damage numbers you can’t make sense of. |
Tartaglia | Tartaglia also scales very well with the number of group enemies, with Riptide Flashes being fully quadratic. However, his Normal Attacks or Charged Attacks in Melee form are unable to hit enemies lifted by Venti’s ult. If fighting against enemies that are not being lifted, or a method is used to boost Tartaglia upwards (such as Geo MC rock or Albedo flower), he can take great advantage of the grouped enemies inside Venti’s ult. |
Klee

Although Venti cannot suction the mines created by Klee’s Skill, Klee nonetheless has extremely good synergy with Venti. Her immense stagger potential allows Venti to lift enemies that he would otherwise be unable to and her A4 allows her to generate Energy for him and the team. In turn, Venti can provide his own Energy refund, while also providing 4VV resistance shred. Most importantly, his ability to group together enemies is exploited by allowing Klee to not have to chase after enemies she would otherwise knock back, conserving precious stamina. Venti can fit very well in most of Klee’s teams, detailed more extensively in the Klee Guide.
Kazuha
Kazuha and Venti together provide a powerful double Anemo core that can fit into certain teams. Together, they provide an abundance of Swirls, Anemo Resonance, 4VV shred, significant personal damage, Kazuha’s A4 buff, Venti’s Energy refund, and incredible grouping capabilities, all while providing Energy for each other. While Kazuha’s Midare Ranzan can occasionally fail to reach into Venti’s Burst, this is mitigated with proper rotations—and their combined synergy in AoE is so great this is often too minor to be significant.
Faruzan
Faruzan is the long awaited dedicated Anemo support, providing a vast array of specialized buffs. Before C6, she provides 30% Anemo RES Shred and a large Anemo DMG Bonus%; her C6 further improves her buff consistency and energy generation and gives an additional 40% Anemo CRIT Damage. All this means that Venti’s CRIT builds are significantly stronger when paired with her — that said, it is worth noting that without significant hyper investment, Faruzan and Venti will not be able to carry teams on their own. Rather, she is notable as her considerable boost to Venti’s personal damage makes his value significantly higher on teams where she already sees use.
Freeze
As mentioned earlier, Venti’s grouping abilities for certain enemies can be limited as they can walk/dash away from his Burst. However, using Freeze, Venti can more consistently group these enemies since they can no longer move to counteract his pulling force. For example, a Frozen Geovishap will be slowly pulled into the center of Venti’s Burst. For this reason, you may want to absorb Hydro in Venti’s Burst during the first rotation to group certain enemies together.
Venti/Ganyu Freeze

All team images generated with muakasan#2792’s tool.
While Venti is a strong option for almost all Freeze teams, he truly shines when paired with Ganyu to fully utilize the strength of her quadratic scaling. The setup is fairly straightforward—Venti provides VV, grouping, and Energy refund, while Ganyu is the main source of team damage. The last two slots are generally flexible, with a Cryo unit used for Cryo resonance and to generate Particles for Ganyu. This is traditionally Diona, but can also be virtually any Cryo character, including Rosaria, Ayaka, Shenhe, or Kaeya. A Hydro unit with off field Hydro application is used to enable freeze, e.g. Mona, Kokomi, Xingqiu, or Ayato. It should be noted Xingqiu has anti-synergy with Ganyu due to her desire to use Aimed Shots instead of Normal Attacks. Ayato may also run into energy problems if he doesn’t use his Shunsuiken slashes in your rotation.
Alternatively, Shenhe enables a Mono Cryo team using Ganyu, Shenhe, Diona and Venti; however, this team suffers from only performing better against bosses/mobs that cannot be Frozen, which are usually situations where Venti and Ganyu are at their weakest anyway. Specifics regarding EM vs CRIT Venti in Ganyu Freeze, calculated with Venti/Ganyu/Diona/Mona can be found in the Appendix.
A video guide for Venti/Ganyu/Diona/Mona comp rotations can be found below:
Rotation Guide Video
Electro-Charged

Venti can take advantage of reaction priorities to Swirl Electro but absorb Hydro in his Burst. He will then apply Electro onto the enemies inside his Burst, allowing Venti to Swirl Electro instead of Hydro, but still do EC damage. Because Venti applies both elements, the EC damage is based on Venti’s EM instead of a unit with less EM. Furthermore, as detailed earlier, it allows the possibility for Venti to Swirl more than the usual 14 times due to EC imbuing both elements simultaneously, albeit with some inconsistency. As such, Venti can be used in teams that utilize the reaction to great effect, providing VV and grouping with very high personal damage.
Electro-Charged teams in general are quite flexible. Potential Hydro partners include Mona, Kokomi, Xingqiu, Ayato, and Yelan. Potential Electro partners include Fischl, Beidou, Yae, or even Raiden in a pinch—though Beidou and Yae necessitate the inclusion of a battery for their ER needs. The last flex slot can be another Electro off-field DPS, another Anemo unit, or a healer/shielder/buffer of your choice. If using teammates whose skills proc when using Normal Attacks, it is recommended to use someone other than Venti as the on-field driver, as Venti’s Normal Attacks are rather weak.
Venti/Kazuha EC

Venti’s tendency to be the trigger of Electro-Charged makes him a powerful inclusion in teams that use the reaction. Kazuha takes this up a notch, by causing even more reactions bolstered by his high EM due to his own ability to cause multiple Swirls, while providing all the aforementioned benefits. Kokomi is used to compress healing and Hydro application into one slot, while Fischl summons Oz—who provides significant damage and Electro application. 4 Thundering Fury (4TF) Kazuha is a viable option on this team for additional skill casts; however, it is unclear whether doing so is better than simply running 4VV, and it is not recommended to farm 4TF specifically for this purpose. Moreover, due to the significant number of reactions, EM Venti is strongly recommended for this team.
Pure Pyro

Named because of the lack of reactions outside of Pyro Swirl, “Pure Pyro” compositions are able to stack buffs and output competitive damage while preserving ease of play. While Xiangling often fares better for scenarios where Venti’s suction fails, Venti has significant benefits—his Anemo Particles and Energy refund reduces ER for all members of the team, his grouping and AoE damage is significant and his lower cooldowns allow the team to play on a much shorter rotation. The last slot is reserved for a Pyro DPS character, and the best member for the role here is undoubtedly Klee, due to the various benefits listed above. However, Yoimiya can also fill the role albeit with more caveats, as she requires even more field time than Klee with lower Energy generation.
Venti/Xiangling versions of Pure Pyro are not recommended due to their inherent anti-synergy—Xiangling can only function consistently in content Venti doesn’t, as such, there are better options for both of them.
Rotation Guide Video
Wanderer/Anemo Hypercarry

Wanderer is a 5* Anemo on-field DPS who deals significant damage with his Normal and Charged Attacks while floating in the Windfavoured state conferred to him by his Elemental Skill. Faruzan is a natural inclusion on such teams due to the significance of the buffs she provides to Anemo damage; the two form a relatively flexible core, leaving the remaining slots open for further buffs, damage, crowd control or defensive utility.
Venti’s advantage in these teams is mainly twofold. Firstly, he contributes significant personal damage as he is able to make full use of Faruzan’s buffs — while he can also snapshot Bennett’s buffs onto his Burst, doing so will reduce Bennett’s uptime on Wanderer; this means whether to do so or not will vary based on situation and investment. Secondly, his unparalleled grouping not only allows Wanderer to hit his primarily single target Normal Attacks in an AoE, the significant crowd control it provides can protect the Wanderer from being staggered which greatly reduces his DPS. While not as significant, his Energy refund can also be highly useful for the fourth unit in an otherwise very energy-starved team setup.
This makes Venti a very strong slot-in for AoE situations where his suction functions, while his high damage also gives him some usability when it doesn’t. The fourth slot is reserved for a unit with defensive utility, with Bennett being by far the best option due to his massive Attack buff alongside his healing. That said, if he is unavailable then players can opt for other options such as Layla, Thoma, TTDS Kokomi, Zhongli and Diona.
Finally, Xiao also fits the bill as an Anemo DPS who greatly appreciates Faruzan. Venti’s good Particle generation can allow him to serve as a good battery for Xiao. While he lacks the significant utility and/or buffing brought to the table by Jean and Sucrose, he can situationally compensate through his powerful Sub-DPS damage and ability to suction mobs. However, it should be noted Xiao can struggle to target mobs in Venti’s vortex, and care must be taken to minimize their overlapping uptime — this in turn can make rotations with the pair rather awkward. That said, if enemies can be grouped but not lifted by Venti, this will not be an issue.
In a team with Faruzan, Xiao’s inability to hit inside Venti’s Burst puts Venti early in the rotation. Due to Xiao’s long Burst duration, to allow for full uptime of buffs on Xiao, this team is suggested to run with at least C2 Faruzan so that Venti can still snapshot her buffs.
To take full advantage of Faruzan, we recommend building CRIT Venti as detailed above.
Rotation Guide Video
Other Teams
Venti’s grouping potential, high damage, 4VV application, and Energy refund to the absorbed element are all quite valuable, making Venti a decent to good option all around. This even holds in teams that cannot properly synergize with him, such as Eula carry teams or Tartaglia/Xiangling compositions.
In many cases, if Venti can suck in and lift the enemies, he single-handedly trivializes entire floors and can solo many of them. Whilst his performance is diminished when his suction does not work, with proper play, he can still offer VV application, Energy generation, and good damage.
“Ready for a rehearsal?”
Afterword
Thank you so much for reading this far, and hope you enjoyed it! This guide was a huge collaborative project, and I had a thoroughly enjoyable time detailing one of my favorite characters. I would like to give a huge mention to Charliex3000#9403 – they did a bulk of the writing and calculations used in this guide, and spearheaded this project in its entirety. A thanks is also in order for itslin#2505 and Nociii#0111 for their huge assistance in writing. Finally, I am grateful to all those who contributed and KQM as a whole for creating an atmosphere where such work is possible. The Anemo Archon is undeniably formidable both in his singing and his battlefield performance, and I hope this guide has achieved its purpose teaching players how to use him best – and on that note, pun intended, I shall depart. – Cuzim
Credits
Writers:
Charliex3000#9403
Cuzimori#1535
itslin#2505
Nociii#0111
Contributors:
jamie#9248
puka#0967
kol#1593
Prévisible#7440
Sir_pick_the_prick#2209
Team Composition Images:
muakasan#2792
Calculation Repository
- Weapons Comparison Summary Sheet
- Artifacts Comparison Sheet
- Constellation DMG Sheet
- ATK% vs Anemo DMG% Goblet Comparison Sheet
Appendix
The tables below (by Charliex3000) were not derived from the above calculations and are based on older calculation methods. They are still useful for visualizing relative DPS increases with varying degrees of investment, so they are displayed here for your information.
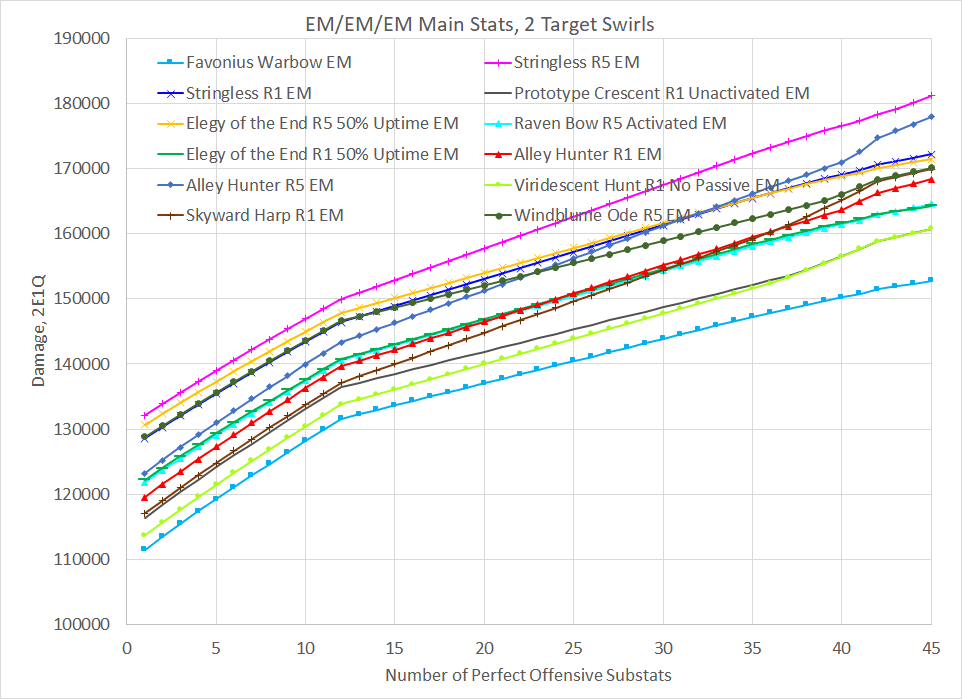
EM Weapon Comparisons
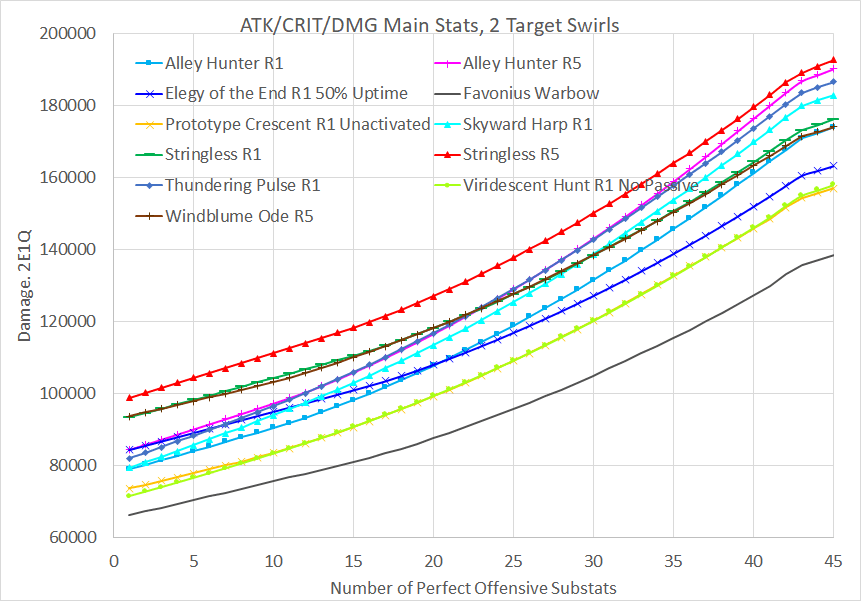
ATK/DMG%/CRIT Weapon Comparisons
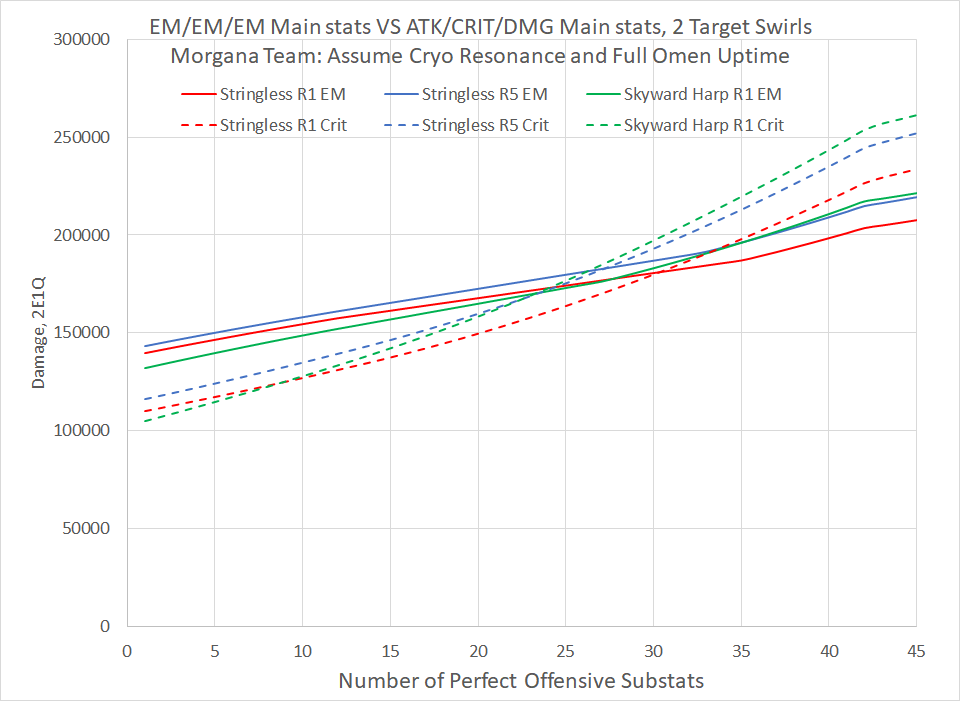
EM vs CRIT Venti in Morgana
In Morgana, one of Venti’s most common teams, he enjoys a 15% CR boost from Cryo Resonance and up to 60% DMG bonus from Omen. This lowers the breakpoint for when CRIT beats EM to around 25 subs. This is still very high and difficult to achieve while also meeting ER requirements.