A Faruzan Guide
Written by .athene., chasing_haze, cuzimori, itslin, & seima
Updated for Version 4.6

“Interested in my story? Well, Madam Faruzan’s life started more than a hundred years ago, and her story covers as much ground as some major academic publications. Still curious? Good, willingness to learn is an indispensable trait for scholars. You’ve got one foot in the door.”
Table of Contents
Introduction
Our genius Madam Faruzan is the first and only dedicated support for simultaneously buffing Anemo damage and shredding Anemo RES, a role she performs very well.
Faruzan is the only unit who increases Anemo DMG% (and Anemo CRIT DMG% at C6). While there are other units who can shred enemy Anemo RES (e.g. C6 Anemo Traveler, C4 Jean, C2 and C6 Venti, Zhongli), their debuff capabilities are all locked behind 5-star Constellations or are weaker debuffs compared to Faruzan.
Faruzan is easily the optimal choice for teams reliant on an on-field Anemo DPS such as Xiao or Wanderer. She also opens up viable CRIT builds for other Anemo characters like Kazuha and Venti, who otherwise tend to prefer EM builds. Without her C6, her playstyle comes across as clunky, but her unique supportive capabilities still make her a highly valued unit for any Anemo DPS. Even with significant caveats in her kit, investing in her will definitely take you FAR-uzan.
Pros
- Faruzan is one of the few sources of Anemo DMG% buffs.
- Her Skill provides grouping with the Pressurized Collapse vortices from her special Charged Shots.
- Her C6 greatly enhances her buffs to Anemo damage while lowering her ER requirements and providing more consistent RES Shred and grouping.
- As an Anemo unit, Faruzan can hold 4pc VV where relevant.
- Hatsune Miku.
Cons
- Faruzan’s ease of play, Energy generation, grouping, and additional buffing are gated behind her highly-desired C6.
- Her extremely high ER requirements make it difficult to use her Burst every rotation.
- Outside of 4pc VV, she provides little to teams that do not benefit from her Anemo DMG% buffs.
TL;DR
Glossary
Talents

 Normal Attack | Parthian Shot
Talent Description
Normal Attack
Performs up to 4 consecutive shots with a bow.
Charged Attack
Performs a more precise Aimed Shot with increased DMG.
While aiming, mighty winds will accumulate on the arrowhead. A fully charged wind arrow will deal Anemo DMG.
Plunging Attack
Fires off a shower of arrows in mid-air before falling and striking the ground, hitting opponents along the path and dealing AoE DMG upon impact.
Faruzan’s Charged Shot damage is fairly inconsequential towards her teams’ overall damage. Note that it is still a core part of her combos to trigger her Elemental Skill's Pressurized Collapse (via Hurricane Arrows), so players may still find some value in leveling this Talent.
 Elemental Skill | Wind Realm of Nasamjnin
Talent Description
Faruzan deploys a polyhedron that deals AoE Anemo DMG to nearby opponents. She will also enter the Manifest Gale state.
While in the Manifest Gale state, Faruzan's next fully charged shot will consume this state and will become a Hurricane Arrow that contains high-pressure currents. This arrow deals Anemo DMG based on the DMG of a fully charged Aimed Shot from "Normal Attack: Parthian Shot."
Pressurized Collapse
The Hurricane Arrow will apply a Pressurized Collapse effect to the opponent or character hit. This effect will be removed after a short delay, creating a vortex that deals AoE Anemo DMG and pulls nearby objects and opponents in. If the Hurricane Arrow does not hit any opponent or character, it will create a Pressurized Collapse effect at its point of impact.
The vortex DMG is considered Elemental Skill DMG.
Faruzan’s Elemental Skill enhances her next Charged Shot. On hit, the Charged Shot will trigger Pressurized Collapse, providing grouping and Anemo RES Shred (with her A1).
Wind Realm of Nasamjnin does not generate Anemo Particles on cast. Rather, Faruzan generates 2 Anemo Particles only after Pressurized Collapse vortices hit enemies. Faruzan’s Energy production is further hampered by her 5.5s particle generation cooldown, which nullifies any potential of creating extra particles within that window from C1, C6, or Sacrificial Bow.
 Elemental Burst | The Wind's Secret Ways
Talent Description
Faruzan deploys a Dazzling Polyhedron that unleashes a Whirlwind Pulse and deals AoE Anemo DMG.
While the Dazzling Polyhedron persists, it will continuously move along a triangular path. Once it reaches each corner of that triangular path, it will unleash 1 more Whirlwind Pulse.
Whirlwind Pulse
- When the Whirlwind Pulse is unleashed, it will apply Perfidious Wind's Bale to nearby opponents, decreasing their Anemo RES.
- The Whirlwind Pulse will also apply Prayerful Wind's Benefit to all nearby party members when it is unleashed, granting them an Anemo DMG Bonus.
The focal point of Faruzan’s kit. The Wind's Secret Ways decreases enemies’ Anemo RES, while simultaneously granting allies an Anemo DMG Bonus. At C6, her Burst also provides off-field damage, Anemo application, Energy generation and a hefty CRIT DMG buff to Anemo teammates.
Note that Whirlwind Pulse is triggered every 2s, with the final Pulse occurring 12s after cast. Since the buffs and debuffs triggered by the Pulse last for 4s, her total buff and debuff uptime is 16s without C2 and 22s with C2.
As Faruzan’s utility is highly dependent on her Burst, its 80 Energy Cost requires players to build her with a substantial amount of ER in order to Burst consistently and provide maximum buff uptime. Furthermore, this Talent is also conditional on enemies being within range of the ever-moving Dazzling Polyhedron, mandating good timing and good understanding of enemy behavior to make use of all of its facets. These problems are somewhat negated by Faruzan’s C6 and A1.
 Ascension 1 Passive | Impetuous Flow
Talent Description
When Faruzan is in the Manifest Gale state created by Wind Realm of Nasamjnin, the amount of time taken to charge a shot is decreased by 60%, and she can apply The Wind's Secret Ways' Perfidious Wind's Bale to opponents who are hit by the vortex created by Pressurized Collapse.
Faruzan’s A1 reduces her field time by shortening the time taken to charge a shot, which helps prevent interruption by enemies. This Passive also applies the Anemo RES Shred from her Burst, granting additional Shred uptime pre-C2 and increasing her personal damage during setup. Additionally, this Talent works in tandem with C6, making up for any lost Shred uptime from her Burst missing the enemy, while not requiring any additional Charged Shots.
Overall a well-appreciated QoL Passive.
 Ascension 4 Passive | Lost Wisdom of the Seven Caverns
Talent Description
When characters affected by The Wind's Secret Ways' Prayerful Wind's Gift deal Anemo DMG using Normal, Charged, Plunging Attacks, Elemental Skills, or Elemental Bursts to opponents, they will gain the Hurricane Guard effect: This DMG will be increased based on 32% of Faruzan's Base ATK. 1 instance of Hurricane Guard can occur once every 0.8s. This DMG Bonus will be cleared after Prayerful Wind's Benefit expires or after the effect is triggered once.
While not game-breaking, Faruzan’s A4’s Additive Base DMG Bonus still helps other Anemo characters dish out more DPS and makes for a much welcome addition to her kit.
Players should still prioritize weapons that help with Energy over weapons that have a high Base ATK, but lack an ER% secondary stat or Energy-related passive.
 Utility Passive | Tomes Light the Path
Talent Description
Gains 25% more rewards when dispatched on a Sumeru Expedition for 20 hours.
Sending Faruzan on a 20-hour expedition in Sumeru gives additional rewards. Useful to obtain more Mora or Sumeru ingredients.
Talent Level Priority
C0-C5
> >
Burst > Skill > Normal Attack
As Faruzan’s buffs and debuffs mostly do not increase with Talent levels, there is no strict requirement to level up any of her Talents. That being said, it is recommended to level her Burst to a minimum of Level 8, as Faruzan’s Anemo DMG% buff scales directly with her Burst’s level. While raising Faruzan to Level 90 increases her A4 Passive's Base DMG Bonus and damage of potential Swirls, these gains are middling. Overall, it is not worth spending the materials required for Level 90.
C6
= >
Burst = Skill > Normal Attack
At C6, Faruzan’s Burst periodically applies Pressurized Collapse, so her Skill should be given equal leveling priority to her Burst.
Constellations
Faruzan’s Anemo-buffing abilities at Constellation 0 are already noteworthy. However, at C0, her Burst duration is 12s, which means the Anemo DMG Bonus she provides only lasts for a total of 16s. This may pose a limitation for teams using longer rotations as Faruzan’s buff uptime must be taken into consideration.
 Constellation 1 | Truth by Any Means
Faruzan can fire off a maximum of 2 Hurricane Arrows using fully charged Aimed Shots while under the effect of a single Manifest Gale created by Wind Realm of Nasamjnin.
While seemingly a DPS increase and a reduction to ER requirements at first glance, actively using this Constellation — performing 2 Charged Shots every Skill — actually results in an overall team DPS decrease due to extending Faruzan’s field time. Furthermore, her Skill’s 5.5s particle generation cooldown means the second Charged Shot from this Constellation will not provide Energy.
However, Faruzan’s C1 can still serve as a backup plan in case a Charged Shot is missed, making it a fine QoL Constellation. Additionally, this Constellation holds some value for Faruzan’s 4pc TF playstyle, where the 4pc TF set effect syncs up perfectly with her shots’ charge time. TF Faruzan is able to shoot twice in a row for additional Aggravated Swirls without worrying about ICD.
 Constellation 2 | Overzealous Intellect
The duration of the Dazzling Polyhedron created by The Wind's Secret Ways is increased by 6s.
One of Faruzan’s better Constellations and a good stopping point. C2 prolongs her Burst, giving a total of 22s uptime on its Anemo DMG% buff and Anemo RES Shred. This Constellation also grants more flexibility in team rotations as Faruzan can be used at the beginning of a rotation and still maintain full uptime on buffs, allowing for other buffs with shorter uptime to be activated later.
 Constellation 3 | Spirit-Orchard Stroll
Increases the Level of Wind Realm of Nasamjnin by 3.
Increasing the multiplier of Faruzan’s Skill does not enhance any of her roles in teams. Overall, C3 only provides a minor increase to Faruzan’s damage pre–Constellation 6. Its value, however, can change upon obtaining C6.
 Constellation 4 | Divine Comprehension
The vortex created by Pressurized Collapses will restore Energy to Faruzan based on the number of opponents hit: If it hits 1 opponent, it will restore 2 Energy for Faruzan. Each additional opponent hit will restore 0.5 more Energy for Faruzan.
A maximum of 4 Energy can be restored to her per vortex.
Faruzan’s Pressurized Collapse vortices regenerate 2–4 Flat Energy according to the number of enemies hit, independently from the Collapses’ 5.5s cooldown on particle generation. This supplemental Energy is welcome but only somewhat alleviates her ER needs. With that said, if working in tandem with C6, this Constellation will proc more often and reduce Faruzan’s ER requirements greatly.
 Constellation 5 | Wonderland of Rumination
Increases the Level of The Wind's Secret Ways by 3.
This Constellation’s boost to Faruzan’s Elemental Burst level increases damage dealt by its initial hit and the Anemo DMG% buff given to allies, thus providing a decent increase to her team’s DPS potential.
 Constellation 6 | The Wondrous Path of Truth
Characters affected by The Wind's Secret Ways' Prayerful Wind's Benefit have 40% increased CRIT DMG when they deal Anemo DMG. When the active character deals DMG while affected by Prayerful Wind's Benefit, they will apply Pressurized Collapse to the opponent damaged. This effect can be triggered once every 3s. This CD is shared between all party members.
Faruzan’s C6 is hands down her most outstanding Constellation. The additional buff of 40% Anemo CRIT DMG alone puts her above any other pure Anemo support. Together with the rest of her kit, it makes Faruzan the best Anemo damage–supporting unit by far. Besides that, the Pressurized Collapse vortices generated by this Constellation increases RES Shred consistency via her A1 Passive and provides more effective grouping by keeping smaller enemies contained within range.
Most notably, Faruzan’s C6 drastically lowers her high ER requirements. C6’s Pressurized Collapse vortices trigger every 3s throughout Faruzan’s 18s Burst duration (12s + 6s from C2), and generate 2 Anemo Particles with a 5.5s cooldown. In other words, Faruzan can be off-field and still generate up to 8 Anemo Particles through C6 alone. Additionally, Faruzan's C4 works in tandem with this Constellation, as these Pressurized Collapse vortices will also provide her with Flat Energy. This means that C6 lowers Faruzan’s ER requirements by about 40% from C0 if she catches all of the Anemo particles during her Burst. If an Anemo DPS character is on-field when the particles are generated, they will be funneled to the on-field character, reducing the overall ER requirement for the team.
All in all, the 40% Anemo CRIT DMG buff and off-field Pressurized Collapse vortices — contributing Energy and DPS to the team without extending field time — make this Faruzan’s best Constellation.

“A hundred years ago, my greatest source of frustration was my inability to decipher the information engraved on ruin monuments. Now, nothing irritates me more than the struggle to get funding. Ugh, it's making my head hurt again...”
Combos and Mechanics
Combos
| Skill → Charged Shot → Burst | Performing a Fully Charged Shot to proc the Pressurized Collapse effect from her Skill and then catching her own Anemo Particles right after Bursting, alleviating Faruzan’s monstrous ER needs. Highly recommended in most scenarios, even at C6. |
| Skill → Burst → Charged Shot | Swapping immediately after Pressurized Collapse to funnel Anemo Particles to another Energy-hungry Anemo character. Recommended in cases where Faruzan herself is equipped with an abundance of ER while the supported Anemo character lacks the needed Energy. |
| [Skill (and/or) N2 →] Burst | This combo is only recommended if you have C6 Faruzan or if all Anemo characters in the team have an abundance of ER and Faruzan’s Charged Shot can be omitted. Although not technically necessary, using Faruzan’s Skill or Normal Attacks will help her trigger Favonius Warbow. If she is not using Favonius Warbow, simply using her Burst is sufficient. |
Mechanics
Burst Range
Faruzan’s Anemo DMG Bonus buff from her Burst has a deceptively large range that is not represented well in-game. Each application of the buff has an AoE large enough to envelop the entirety of the Spiral Abyss chamber. Therefore, players will not encounter problems with Faruzan’s Burst range in a chamber.
On the other hand, the Anemo RES debuff range is exactly as it appears from the Polyhedron’s pulses, which occasionally proves to be a setback for Faruzan pre-C6. C6 Faruzan will not have this problem due to her Pressurized Collapse vortices generated on hit.
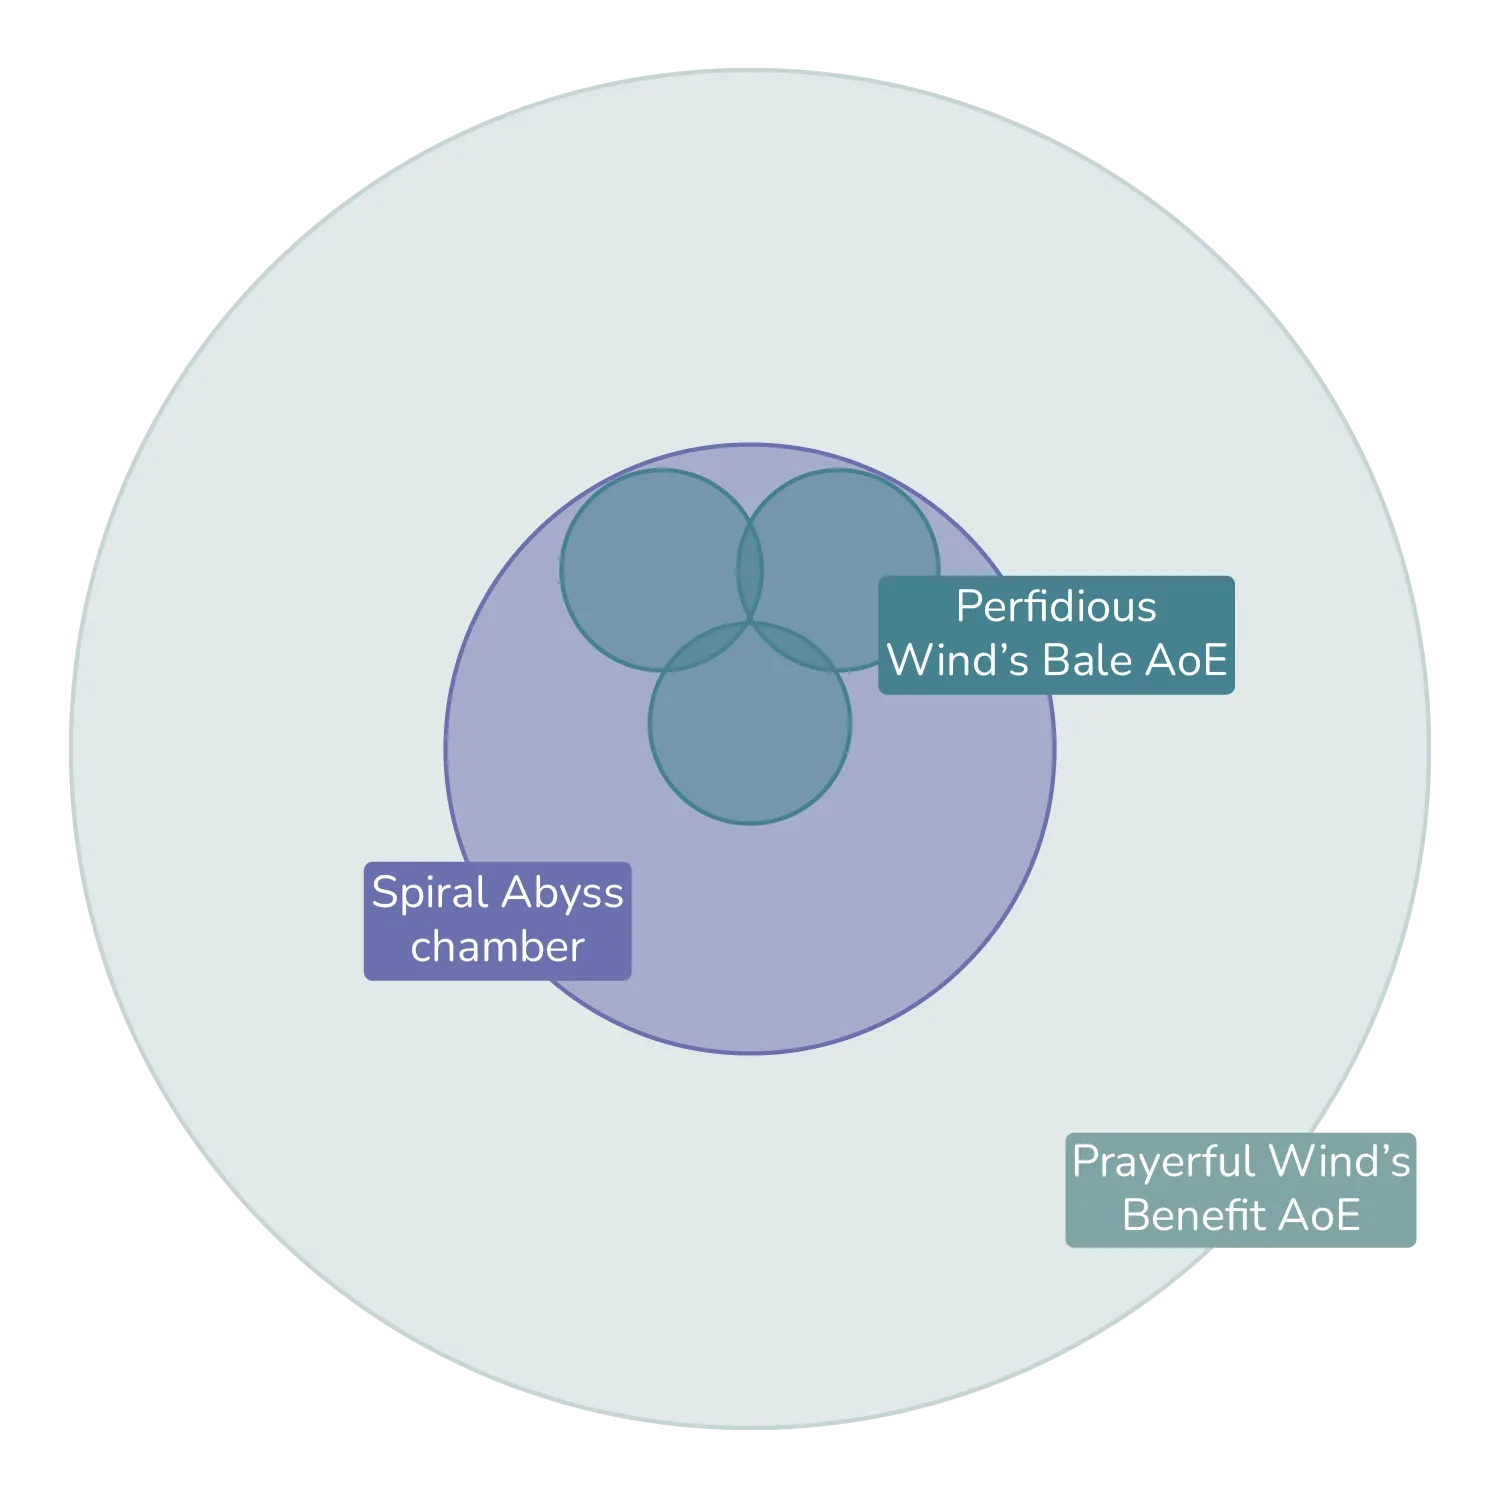
Comparison of AoE of Prayerful Wind’s Benefit and Perfidious Wind’s Bale with respect to the size of a Spiral Abyss chamber.
Burst Positioning
Faruzan’s Burst moves independently from her in a set triangular pattern. When casting her Burst, Faruzan will automatically turn to face nearby enemies; if there are no enemies nearby, the triangular alignment will be based on the direction Faruzan faces upon cast. Despite her large Burst range, some caution should be practiced when positioning it.
If Faruzan happens to cast her Burst in the direction of the wall, the Burst may fire into the wall and not apply its RES Shred due to being out of range from enemies. To circumvent this, Faruzan should always be between the enemy and the wall when casting her Burst.
(Pre)Funneling Energy Particles
Faruzan’s Anemo Particles only generate after the Pressurized Collapse vortex spawns. This delay between casting Hurricane Arrow and particle generation makes it relatively easy for her to funnel or prefunnel the particles to another Anemo character. In some cases, it is even possible to fit in additional funneling, either from the swapped character or a third Anemo character. Xiao makes excellent use of this as it allows him to prefunnel Faruzan’s Particles along with his own two Skills, giving him a total of eight Anemo particles.
Energy Generation at C6
Faruzan’s C6 drastically lowers her ER requirements by allowing her to trigger Pressurized Collapse off-field once every 3s. These Pressurized Collapse vortices are identical to those of her Skill, sharing the 5.5s particle generation ICD. This drastically lowers her ER needs and significantly improves her batterying capabilities.
However, it is worth noting that Faruzan’s Energy generation being tied to her Burst can pose some problems — should players clear an Abyss floor shortly after casting Faruzan’s Burst, they will start the next chamber with very little Energy on Faruzan and no easy way to regenerate more as they cannot cast her Burst. This problem may be familiar to Raiden players, who can often face the same issue after clearing a floor with her Burst’s initial slash. To prevent this issue, it is advisable to build a surplus of ER on Faruzan so that she can refill her Burst more easily.
ER Requirements
“Ha, aren't you an energetic youngster? So enthusiastic, even about collecting materials.”
As Faruzan’s supportive kit is centered around her Burst, it is important that it can be cast every rotation. Additionally, Faruzan’s particle generation is lacking as she can only generate Energy via her Pressurized Collapse vortices, and only 2 Anemo Particles at a time. These factors make Faruzan’s ER requirements incredibly high, especially prior to C6. Therefore, it is recommended to have Faruzan catch every particle she produces (including Clear ones from Favonius Warbow). If Faruzan funnels particles to other Anemo characters, her ER requirements will be higher.
Assumes 22s rotations with 1 Favonius weapon proc.
- 100% particles: Faruzan catches all her particles.
- 50% particles: Faruzan catches 1 set of particles (2 particles).
| Scenario | 2 Pressurized Collapse |
1 Pressurized Collapse |
||
|---|---|---|---|---|
| 100% Particles | 50% Particles | 100% Particles | ||
| Double Anemo | Pre-C6 | 220–240% | 245–260% | 275–300% |
| C6 | 175–200% | — | — | |
| Triple Anemo | Pre-C6 | 190–205% | 200–225% | 210–235% |
| C6 | 160–185% | — | — | |
- Each additional Favonius proc reduces requirements by ~35% or ~25% ER when caught by herself or a teammate, respectively.
- 4pc The Exile on a teammate lowers her ER requirements by ~25%, but using 4-star artifact sets makes it harder for the teammate to meet higher ER requirements.
- Triple Anemo ER requirements highly depend on the third Anemo character in the team.
- With C6, there are 7 total off-field Pressurized Collapse vortices every rotation, which means 8 Anemo Particles (only 4 of the 6 off-field Pressurized Collapse vortices generate particles due to ICD) and 7 C4 procs. This also further decreases the Anemo DPS’s ER requirement.
The values provided above are purely estimations. To see accurate ER requirements for your specific teams and rotations, please use Zakharov’s Energy Recharge Calculator.
Artifacts
Artifact Stats
 Sands |  Goblet |  Circlet | |
| Pre-C6 (Support) | ER | Anything (with ER substat) | Anything or CRIT Rate (for Favonius Warbow) |
| Pre-C6 (TF DPS) | EM | EM | EM |
| C6 (All Playstyles) | ER or ATK% | Anemo DMG% | CRIT Rate or CRIT DMG |
Substat Priority:
ER > CRIT Rate > CRIT DMG = ATK%
Faruzan’s ER requirements are exorbitantly high prior to C6. With her buffing abilities mostly locked behind her Burst, casting her Burst every rotation is of highest priority, meaning Goblets and Circlets with high ER substats will take precedence over ones with damage-related main stats. If she is equipped with Favonius Warbow, a CRIT Rate Circlet will be needed to ensure consistent Favonius procs.
With C6, Faruzan’s ER thresholds are lowered significantly, and building her for some damage becomes feasible. Once her ER requirements are met, any extra offensive stats (CRIT and ATK%) are welcome to nudge her damage potential above baseline. If she is also Level 90, Faruzan can use EM rolls on her artifacts to boost incidental Swirls from Pressurized Collapse vortices to a degree — though players should not prioritize EM over other stats even in those circumstances.
Artifact Sets
C0-C5
Prior to C6, it is best to fulfill Faruzan’s ER needs before obtaining set bonuses as her utility is heavily reliant on her Burst. Since ER% main stats only exist on Sands pieces, it is often not worth it to aim for set bonuses while sacrificing ER. For these reasons, Faruzan’s general artifact recommendation will be whichever pieces allow her to meet her ER requirement.
Equipping 2pc EoSF can help achieve Faruzan’s ER threshold, especially if there are no pieces with high ER substats available.
Nevertheless, if ER requirements are met, the following artifact sets can be considered:
4pc Noblesse Oblige (NO) | Grants the entire team a 20% ATK buff for 12s after using Faruzan’s Burst. This set is not recommended in Anemo hypercarry teams if her Burst is used at the start of the rotation. In most scenarios, this buff is only used optimally in pre-C2 Faruzan rotations where she Bursts immediately before the hypercarry comes on-field. Alternatively, a quickswap Anemo team with abilities that snapshot can artificially extend the buff uptime. |
4pc Viridescent Venerer | A staple choice for an Anemo character. By shredding Pyro, Hydro, Electro, and/or Cryo RES, this set is able to buff team damage if there are teammates of those Elements contributing significant DPS. Consider putting this set on your on-fielder instead of Faruzan, as its effect cannot trigger from off-field; note, however, that 4pc VV does not have value to on-fielders that do not deal significant Swirl damage. Regardless, if Faruzan is the set holder, players should keep in mind the 10s duration of its Shred when developing rotations. |
4pc The Exile | This set can help alleviate Faruzan’s teammates’ Energy problems. As 4pc The Exile is hampered by 4-star stat volumes, it is highly recommended to maximize Energy Recharge by using a 5-star off-set ER Sands. |
2pc Emblem of Severed Fate / 2pc The Exile | Mixing 2pc from these sets gives Faruzan a whopping 40% ER from set bonuses while offering more 5-star substats vs. 4pc The Exile. Still, this combination’s value is lower than 4pc The Exile in an Energy-hungry team as it only helps with Faruzan’s ER requirements. |
C6 (Support)
Assumptions:
- KQMS
- Calculations assume a Xiao—Faruzan—Bennett—Zhongli team.
- C6 Faruzan holds Favonius Bow with 200% ER, built ER/Anemo DMG%/CRate.
- C5 Bennett with 565 weapon Base ATK and 4pc NO (partial uptime).
- Zhongli holds Favonius Lance.
- Rotation: Faruzan EQ > Zhongli hE > Bennett EQ > Xiao EEQ 8[N1C JhP]
| Artifact Set | Team % DPR of 4TotM | Description |
4pc Tenacity of the Millelith | 100% | Provides a 20% ATK and 30% Shield Strength buff to nearby teammates when an Elemental Skill hits an opponent. As C6 Faruzan will consistently proc Pressurized Collapse vortices, she can provide good uptime on 4pc TotM’s buffs. Note that the buffs do not apply to Faruzan’s hits except for the initial Burst hit as the buffs will run out before her vortex refreshes, so the set does nothing for her own personal damage. |
4pc Golden Troupe | 97.45% | The Pressurized Collapse vortices triggered by Faruzan’s C6 are considered Skill DMG, which lends to 4pc GT being Best-in-Slot for Faruzan’s personal DPS and scales higher with more buffs present. This set is recommended if another unit in the team already holds 4pc ToTM. |
Any combination of 2pc ATK% / 2pc Anemo DMG% / 2pc Emblem of Severed Fate | ~96.97% | At C6, Faruzan’s personal damage represents a sizable portion of the team’s total DPS as she benefits from her own buffs. As such, using a more offensive set on Faruzan contributes modestly to team damage. The damage difference between the three possible set combinations is small enough that using one over the other is a matter of substats. Using 2pc EoSF helps alleviate Faruzan’s ER requirements, allowing for more offensive substats. Conversely, combinations without EoSF need more ER rolls. |
| 4pc Viridescent Venerer | 95.81% | A staple choice for an Anemo character. By shredding Pyro, Hydro, Electro, and/or Cryo RES, this set is able to buff team damage if there are teammates of those Elements contributing significant DPS. Consider putting this set on your on-fielder instead of Faruzan, as its effect cannot trigger from off-field; note, however, that 4pc VV does not have value to on-fielders that do not deal significant Swirl damage. Regardless, if Faruzan is the set holder, players should keep in mind the 10s duration of its Shred when developing rotations. Note: the team used for calculations does not benefit from 4pc VV’s effects; ranking may differ for teams that do. |
4pc Emblem of Severed Fate | 96.80% | This set is able to considerably increase Faruzan’s personal damage because of her high ER requirements. With that said, it is almost never her Best-in-Slot set as it requires higher investment for a noticeable increase in damage. |
C6 (Anemo DPS)
Assumptions:
- KQMS
- R1 Skyward Harp
- ATK%/Anemo DMG%/CDMG artifact main stats
- E > Q > 2CS > E > 2CS combo
- 140% ER requirement
| Artifact Set | Personal % DPR of 4VV | Description |
2pc ATK% + 2pc Anemo DMG% | 107.41% | As the more offensive artifact set, this becomes C6 Faruzan’s Best-in-Slot artifact set when playing her as a DPS. |
2pc ATK% or 2pc Anemo DMG% + 2pc Emblem of Severed Fate | 107.10–108.18% | With 2pc Emblem of Severed Fate providing an additional 20% ER, more focus can be put towards obtaining offensive substat rolls. The damage difference between 2pc ATK% and 2pc Anemo DMG% is small enough that the best option damage-wise depends on the substat rolls and external buffs that may be present. While 2pc The Exile provides the same set bonus as 2pc EoSF, its 4-star stat volume hampers Faruzan’s damage output. |
| 4pc Golden Troupe | 105.72% | As Faruzan will mostly be on-field, she only reliably maintains 45% Skill DMG Bonus. 4pc GT is still a respectable set to use on her if you have good pieces, since the damage difference is minimal compared to her other options. |
| 4pc Emblem of Severed Fate | 103.34% | The additional periodic Pressurized Collapse vortices during Faruzan’s Burst are considered Skill DMG and therefore are not buffed by the 4pc effect. Additionally, Faruzan’s ER requirement is greatly reduced due to her being on-field a lot more. As such, Faruzan will not benefit from 4pc EoSF outside of the buff to her initial Burst cast. |
| 4pc Viridescent Venerer | 100% | A staple choice for an Anemo character. By shredding Pyro, Hydro, Electro, and Cryo RES, this set is able to buff team damage if there are teammates of said Elements contributing DPS. While Faruzan does do Swirl DMG that would reap the benefits of 4pc VV, her main sources of damage are still pure Anemo, which the 4pc effect does nothing for. |
4pc Wanderer’s Troupe | 103.34% | When doing the Charged Shot after using Faruzan’s Skill, the Hurricane Arrow damage is affected by 4pc WT, but the Pressurized Collapse is not, lowering 4pc WT’s value. While 4pc WT performs fairly well, 4pc EoSF is more efficient to farm and 4pc VV provides more utility. |
Thundering Fury Charged Shot DPS
4pc Thundering Fury | 4pc Thundering Fury enables a fun and unique on-field playstyle for Faruzan, letting her fire Hurricane Arrows more frequently than she normally can with the help of Electro Reactions. For more details on this playstyle, see the TF Faruzan section. |
Weapons

“Haha, I'm not called "Madam Faruzan" for nothing, you know.”
ER Weapons
Favonius Warbow | Undoubtedly Faruzan’s BiS in almost every scenario. Favonius Warbow lowers her entire team’s ER requirements with the clear orbs from its passive. Even without sufficient CRIT Rate and refinements, Faruzan can still hit enemy weak points with her Charged Shot for a guaranteed CRIT Hit, ensuring particle generation from Favonius’ passive. Favonius’ passive becomes less reliable at lower refinements, and this combined with its longer cooldown means it may not proc every time Faruzan comes on-field. Even so, Favonius still provides the most Energy Recharge of any Bow and is more useful than other 4-star options. At R5, the cooldown of this weapon’s passive matches perfectly with her Skill cooldown, further enabling a Charged Shot–less playstyle for Faruzan for smoother and more stable rotations. This is also the only weapon that allows Faruzan to equip 4pc VV and still have enough ER (at KQMS) to Burst every rotation. |
Elegy for the End | A strong 5-star choice for Faruzan that provides substantial ER from its secondary stat while buffing her team. Requires utilizing E > Q > 2CS prior to C6 to activate Millennial Movement: Farewell Song. With a C6 Faruzan, using E > Q > CS allows the buff to activate immediately. Otherwise, the Sigils will build over time, and Millennial Movement: Farewell Song will activate midway through Faruzan’s Burst duration. |
End of the Line / Fading Twilight | Both weapons have smaller but highly-appreciated ER secondary stats, while their offensive passives are negligible in Faruzan’s primary use cases. |
Offensive Support Weapons
Assumptions:
- KQMS
- Calculations assume a Xiao—Faruzan—Bennett—Zhongli team.
- C6 Faruzan is built ER/Anemo DMG%/CRIT, with 200% ER and on 4pc ToTM for ER bows, and 225% ER on 2pc Anemo DMG% 2pc ER for others.
- C5 Bennett with 565 weapon Base ATK and 4pc NO (partial uptime).
- Zhongli holds Favonius Lance.
- Rotation: Faruzan E CS Q > Zhongli hE > Bennett EQ > Xiao EEQ 8[N1C JhP]
Running offensive weapons on Faruzan is not recommended prior to C6. It makes fulfilling her ER requirements harder while not considerably contributing to DPS due to Faruzan’s poor personal damage pre-C6. With C6, offensive 5-star weapons can increase team DPS and have the potential to make Faruzan an off-field damage-dealer, as long as her ER requirements are met. This can be achieved by running a 2pc ER artifact set for her and is only recommended if there is a second reliable ToTM holder on the team to provide buffs to the Anemo DPS. Otherwise, Faruzan is better off with an ER secondary stat weapon and holding 4pc ToTM.
| Weapon | % Team DPR of Favonius Warbow | % Personal DPS of R1 Skyward Harp |
| Elegy for the End R1 | 102.58% Calculated with 100% uptime on its passive. BiS for team damage, though Favonius Warbow is not far behind. | 84.85% Calculated with 100% uptime on its passive. |
| Favonius Warbow R3 | 100.00% | 72.13% |
Polar Star R1 | 97.42% Calculated with 2 stacks. | 101.03% Calculated with 2 stacks. BiS for personal damage, though Skyward Harp is not far behind. |
Skyward Harp / Thundering Pulse / Aqua Simulacra / Hunter's Path / Amos' Bow | 96.00-97.30% All weapons calculated at Refinement 1 with passives active where applicable. | 89.26-100.00% All weapons calculated at Refinement 1 with passives active where applicable. |
Prototype Crescent R5 | 96.14% (with passive) 94.61% (without passive) | 90.37% (with passive) 77.74% (without passive) |
On-Field DPS Weapons
Assumptions:
- KQMS
- C6 Faruzan on a 2pc ATK% / 2pc Anemo DMG% artifact set combination, with ATK%/Anemo DMG%/CRIT main stats.
- 125% ER requirement on Favonius Bow, 140% ER on other weapons.
- Rotation: E > Q > 2CS > E > 2CS
DPS Faruzan will want a standard ATK/DMG%/CRIT build, making 5-star offensive weapons viable options for her. While Faruzan can technically carry an on-field role prior to C6, obtaining her final Constellation allows for a much higher DPS ceiling that is competitive for Spiral Abyss content.
| Weapon | % Personal DPR of R1 Skyward Harp | Notes |
| Polar Star R1 | Three stacks 112.16% | Faruzan’s rotation utilizes her Skill and Burst thus making it possible to maintain at least three stacks. Obtaining full stacks with Polar Star requires incorporating an additional NA in the rotation. |
Hunter’s Path R1 | 102.75% | A good 5-star option if an additional Charged Shot is incorporated at the start of the rotation. As her build does not prioritize EM, the Charged Attack passive is insignificant for Faruzan despite her utilizing Charged Shots in her rotation. |
Aqua Simulacra R1 | 102.53% | A decent stat stick bow as its passive is always active. |
Thundering Pulse R1 | 101.23% | The 20% ATK increase is appreciated, especially if Faruzan does not receive additional ATK% bonus from other sources such as Bennett’s Burst or 4pc Noblesse Oblige. The second passive is not utilized by Faruzan. |
Skyward Harp R1 | 100.00% | Skyward Harp’s availability on the Standard banner makes it more accessible than the limited weapons. It is still a strong bow option as it performs only slightly worse than most of the 5-star CRIT bows. |
Amos’ Bow R1 | Three stacks 94.12% | Depending on Faruzan’s distance to the enemies, she can gain between one to three stacks of the passive for her Charged Shots. Regardless, Amos’ Bow falls short from other offensive 5-star options as Faruzan better appreciates the CRIT stats those bows can offer. |
| Prototype Crescent R5 | With passive 99.18% Without passive 79.46% | With its passive active, Prototype Crescent holds itself well against its 5-star contenders. However, triggering the passive requires hitting enemy weak spots, which may not be present on some enemies. |
Teams
“Huh, you're really putting a lot into this... Don't worry, it's my responsibility as your senior to guide and protect you. I won't let you go astray.”
Wanderer Hypercarry
| Faruzan | |
| Wanderer | |
Defensive Option
|
     |
| Buffer Option |   |
Flex Option
|
  |
| Grayed-out portraits mean there are caveats to utilizing the characters in a team. Characters are grouped by the utility they provide; you do not necessarily need to pick one from each category. |
|
Notes
Wanderer is a 5-star Anemo on-field DPS who deals significant damage with his Normal and Charged Attacks during the Windfavored state conferred to him by his Elemental Skill. Faruzan’s significant buffs to Anemo damage make her a natural inclusion in his teams. The two form a relatively flexible core, leaving the remaining slots open for further buffs, damage, crowd control, and/or defensive utility.
Defensive and Buffer Option
In a vacuum, Wanderer generally prefers shielding to healing due to his tendency to be staggered; that said, the choice between the two will come down to individual units’ perks. It is worth noting, however, that Bennett is a particularly strong option as he is capable of both healing and buffing, and is thus strongly recommended if available. Mika also provides good healing, a nice ATK SPD buff, and potential Cryo Absorption on Wanderer’s A1. Otherwise, the slot is rather season-to-taste for what each player values as the nuances between units are relatively small. Jean is an exception to this: she is rather underwhelming at C0, but C2 and C4 make her a much more noteworthy choice.
Flex Option
Wanderer’s remaining team slot is similarly flexible to content, player investment and personal preference. Venti is an especially powerful choice who trivializes most AoE content, as the Anemo Archon can deal significant personal damage with Faruzan as well as provide continuous grouping.
While Furina can offer potent off-field DMG and DMG% buffs with full uptime, her teams will require a healer who can counteract her party-wide HP drain. This often requires running Wanderer with no shielder, which can prove difficult given his extremely low poise. If players feel up to the task, both Mika and C4 Jean are particularly synergistic options to round off the team.
The main caveats worth mentioning in the listed units are for Yun Jin and Xiangling. Yun Jin has significant ER needs and appreciates being paired with another Geo unit, while making N3 Wanderer’s best combo.This causes her to fall off in AoE, where this combo is not as potent and her Burst’s trigger instances are burnt through more quickly. Xiangling needs to be paired with Bennett to shine; even then, she needs significant ER investment and possibly even a Favonius Lance to Burst consistently.
Rotations
Wanderer / Faruzan / Bennett / Zhongli
Zhongli hE -> Faruzan Q -> Bennett tEQ -> Wanderer E 5N2C Q
Xiao Hypercarry
| Faruzan | |
| Xiao |  |
Anemo Flex
|
|
Defensive Option
|
|
Flex Option
|
|
| Grayed-out portraits mean there are caveats to utilizing the characters in a team. Characters are grouped by the utility they provide; you do not necessarily need to pick one from each category. |
|
Notes
Xiao is an on-field hypercarry DPS unit who greatly benefits from Faruzan’s buffs to Anemo damage. His teams with Faruzan are flexible, and players can choose the remaining two units to tailor to Xiao’s needs and the content they are facing.
Anemo Option
Without Faruzan’s C6, an Anemo flex character is strongly suggested because of the teams’ high Energy needs. C0 Faruzan prefers to Burst immediately before Xiao; this is both to maximize her buff uptime during his lengthy Burst as well as prefunnel particles to him. In this scenario, Anemo supports who provide healing or particle generation utility may be a better fit than Anemo damage dealers, who cannot snapshot Faruzan’s buffs on their abilities. Xianyun is particularly recommended for both her healing and Plunging Attack buff. Jean is also notable for her healing, while Sucrose and Lynette provide good particle generation.
With Faruzan’s C2, the Anemo flex option carries more value as they can now offer more significant damage contribution or maximize their own buff uptimes. Xianyun, TTDS Sucrose, CRIT Kazuha, Lynette and Jean (particularly at C4) are all great options. CRIT Venti is situationally valuable, though limited by Xiao’s inability to hit enemies lifted by his Burst, which necessitates careful rotation management. At C6, Faruzan’s improved Energy generation allows her to act as a solo battery, allowing for more team flexibility — though her improved buffs still make Anemo flex units a great choice.
Defensive Option
The choice to use a shielder and/or healer is a trade-off between comfort and damage. Bennett is an ideal choice for Xiao in both a defense and buffing role as he provides strong healing and a powerful ATK buff. However, the pairing is occasionally difficult to utilize due to Bennett’s Burst having a comparatively short duration and limited radius, which Xiao can easily knock enemies out of. The most notable option for shielding is Zhongli, at which he is unparalleled while also providing appreciated RES Shred. Diona provides good healing and shielding, as well as contributing Energy to the team if she is equipped with Favonius Warbow.
Flex Option
If there is a spot for a flex unit in the team, there are only a few characters that can provide off-field DPS or buffing that lasts through the full duration of Xiao’s Burst. Furina, even at C0, is a strong contender since she provides strong off-field DPS and DMG% buffs. A Xiao-Furina team will absolutely require a healer to sustain the team and maximize Furina’s buffs, with the best choice being Xianyun followed by (C4) Jean, though Bennett can still be used at the loss of some team comfort.
In solo Geo compositions, Chiori and Albedo are reliable if unspectacular choices for an off-field DPS unit. In Double Geo compositions, Chiori pulls ahead due to Geo Resonance providing helpful damage boosts for both Chiori and Xiao; however, these teams typically require C6 Faruzan to reliably battery Xiao. Albedo is also viable in Double Geo, but Chiori is preferred due to her higher personal damage.
Yelan and Xingqiu are excellent flex options: they provide great single-target damage and come with additional utility, either through Yelan’s ramping DMG% buff or Xingqiu’s damage reduction. As Yelan’s Exquisite Throw and Xingqiu’s sword rain are both triggered by Normal Attacks, Xiao must weave NAs between his plunges to trigger the effects. However, Yelan’s Exquisite Throw triggers considerably earlier in Xiao’s Normal Attack animation — this makes Xiao’s N1 quicker to cancel and solidifies her as his preferred flex option. Fischl has good single-target damage, but her Skill’s poor uptime with Xiao makes her less appealing.
For players without C6 Faruzan, Raiden is a possible teammate as she can battery both Xiao and Faruzan simultaneously, making gameplay easier for those struggling to funnel to Xiao in Triple Anemo compositions. This comes at the cost of a longer rotation, though Raiden’s personal damage somewhat makes up for it. Note that, as both Xiao and Raiden take extended field time, it is preferable to bring defensive options with enough uptime to protect both units.
It is also worth considering pairing Burst-reliant units with another unit of the same Element due to the Energy-hungry nature of Xiao teams. For example, Rosaria appreciates having Diona in the team, and the combination of Rosaria’s A4 Passive and Cryo Resonance provides significant CRIT Rate buffs. Another example is Xiangling (or Thoma) with Bennett. Note that these teams do not have a slot for a third Anemo unit, so they typically require C6 Faruzan to reliably battery Xiao.
For further breakdown on Xiao’s optimal team compositions, please refer to the Xiao Guide.
Xiao’s ER Requirement
Xiao’s DPS is heavily reliant on having his Burst back by the end of the rotation. As a general recommendation, his ER requirements in a Faruzan team are listed in the Table below.
| ER values given assume there are 2 teammates wielding Favonius weapons on the team; adding or removing Favonius weapons respectively decreases or increases ER values by about 10%. | |
| Scenario | Xiao’s ER Requirement |
|---|---|
| Pre-C6 Faruzan, Triple Anemo (including Xiao) | 145–160% |
| Pre-C6 Faruzan, Raiden | 100% |
| C6 Faruzan, Double Anemo (including Xiao) | 130–145% |
| C6 Faruzan, Triple Anemo (including Xiao) | 120–130% |
| Note that the ER values given are for continuous rotations; if Xiao only needs two rotations to clear content, it is safe to run him with only 110–120% ER pre-C6 in Triple Anemo Faruzan and with 100% ER with C6 Faruzan in all scenarios. Doing so however will require proper pre-funnelling. Sucrose allows Xiao to do 3 rotations with the aforementioned values due to the extra charge on her Skill. She also allows Xiao to run at 100% ER pre-C6 Faruzan if he can clear in 2 rotations. |
|
Rotations
Note: Xiao’s Plunging Attack combo during his Burst is dependent on the scenario. See the full Xiao guide for more details.
Pre-C2 Faruzan
To ensure full uptime, Faruzan’s Burst must be used right before Xiao’s.
Xiao / C0 Faruzan / Jean / Zhongli
Faruzan E CS -> Zhongli hE -> Jean tEQ -> Faruzan EQ CS -> Xiao EEQ -> Xiao Plunging Attack spam
Faruzan C2 and above
As Faruzan’s Burst has a longer duration, it can be used earlier in the rotation and still provide Xiao with full uptime on its buffs during his Burst.
If Zhongli is in the team, the decision to use Zhongli’s Skill before or after Faruzan’s Burst depends on the need for survivability over a slight increase in damage. Depending on the full team rotation, using Faruzan’s Burst before Zhongli’s Skill may have Faruzan’s buffs end approximately 2s before Xiao’s Burst does, meaning that his final plunge will be unbuffed. The resulting damage loss is fairly minor and can be worth the sacrifice for full shield uptime.
Xiao / C2 Faruzan / Sucrose / Bennett
Faruzan E CS Q -> Bennett tEQ -> Sucrose E -> Xiao EEQ -> Xiao Plunging Attack spam
Xiao / C6 Faruzan / Bennett / Zhongli
Zhongli hE -> Faruzan Q -> Bennett tEQ -> Xiao EEQ -> Xiao Plunging Attack spam
Xiao / C6 Faruzan / Furina / Xianyun
Faruzan (E)Q -> Furina EDQ -> Xianyun EPQ -> Xiao EEQ -> Xiao Plunging Attack spam
Anemo Quickswap
| Faruzan | |
Anemo Options
|
 |
| Flex Options | 
|
Notes
Though best taken advantage of by hypercarries, Faruzan’s potent buffs can be utilized well by many quickswap Anemo characters to allow them to shine. Faruzan herself is no exception — though rarely optimal, she can use these teams’ generous particle generation and flexible field time to fire high-damage Charged Shots. These teams in most cases require Bennett due to his ability to condense both healing and buffing into a single slot. The archetype can be generally split into two main variants: Double Anemo and Triple Anemo.
Double Anemo
Double Anemo compositions tend to output more competitive damage, particularly if using Heizou and Xiangling, whose playstyles are best suited to the archetype. Venti or Kazuha can also be used for their additional grouping and buffs; this allows them to shine in AoE, though Venti comes with the additional caveat of lifting lighter enemies outside the range of Xiangling’s Burst.
Triple Anemo
Triple Anemo compositions are typically weaker, but they take better advantage of Faruzan’s buffs while providing almost unparalleled grouping. Note that the Anemo units in this playstyle tend to build ATK/DMG Bonus/CRIT over EM due to the former scaling better with the numerous buffs Faruzan and Bennett provide. While Kazuha can run a full EM build if running with Xiangling to maximize the buffs she receives, Faruzan’s value dwindles in such a case.
While Jean’s personal damage is considerably lower than her competition’s, her ability to heal allows for more varied team compositions. One of the strongest of these is running with Xingqiu and Yelan. Here, her healing, flexible field time, and ability to provide VV Shred can be put to full use in supporting the Double Hydro core while outputting reasonable damage numbers herself. Jean’s C4 considerably boosts her personal damage, while the additional Anemo RES Shred also aids various Triple Anemo compositions that include Bennett.
Rotations
Rotations for these teams are generally flexible. Typically, as long as important buffs can be snapshot — such as Bennett’s buff on units like Xiangling and Kazuha — players can swap between units to cast abilities as necessary. That said, it is still possible to optimize rotations as shown below.
Faruzan / Heizou / Xiangling / Bennett
Faruzan Q -> Bennett tEQ -> Heizou N1 E -> Bennett tE -> Xiangling Q -> Bennett tE -> funnel to Xiangling -> Heizou N1C QE N1C -> Bennett tE -> funnel to Xiangling
Use Xiangling’s Skill as available. Rotation given is for C6 Faruzan; players without C6 are advised to swap Faruzan in during the rotation and fire Charged Shots for Energy.
TF Faruzan
| TF Faruzan is not necessarily the most optimal way to play Faruzan, but can remain a fun and decently viable option. | ||
| Faruzan | ||
Anemo Option
|
||
| Electro Applier | |
|
| Reaction Enabler | Electro-Charged Enabler | Aggravate Enabler |
 |
    |
|
Notes
TF Faruzan utilizes 4pc Thundering Fury’s cooldown-reducing effect alongside Faruzan’s C1 to fire multiple Charged Shots per rotation. Typically, these builds seek to maximize Faruzan’s Elemental Mastery after meeting ER requirements to capitalize on damage from Electro-Charged and Aggravated Swirls. That said, a CRIT build can also be used at Constellation 6. These teams do not necessarily dish out the highest damage, nor are they Faruzan’s optimal use case; instead, TF Faruzan teams are meant to serve as a viable, enjoyable option for those who want to use Faruzan in an on-field capacity. Do note that this team archetype has low flexibility, which means you do not have a slot for a comfort defensive unit such as Zhongli, whose shielding would be otherwise valuable in making Charged Shots easier to fire without interruption.
Anemo Option
Another Anemo unit is used primarily to hold VV and help battery Faruzan, as well as provide other utilities. The choice is typically between Kazuha and Venti due to their grouping, significant personal damage, and additional application through their abilities’ Elemental Absorption. While Kazuha has a higher damage ceiling, Venti is recommended when his grouping allows players to more easily fire Charged Shots.
Electro Applier
Fischl is crucial in these teams so that Electro is consistently applied on the enemy for Faruzan to Swirl and trigger the 4pc TF effect; she also has high personal damage, particularly via her A4 when Aggravate is triggered. If players have C6 Fischl, it is recommended to weave in Normal Attacks where possible to trigger Oz’s coordinated attacks. Yae Miko is also a fine option if the Dendro option is not Nahida (with 1.5U Dendro application); however, she can be paired with other defensive options and has more damage in some AoE situations.
Reaction Enabler
Finally, either Kokomi or a Dendro unit is used to enable Electro-Charged or Aggravate, respectively. Kokomi is by far the most sensible choice for Electro-Charged teams due to her consistent AoE Hydro application and healing, which make the team much more comfortable. The choice among Dendro units is a bit more nuanced: Nahida is theoretically the best damaging option by far, but her strong Dendro application can make it difficult to Swirl Electro. Dendro Traveler is easier to play at the cost of forcing longer rotations (20s+) and providing worse damage and buffs. While Collei can be used for teams with shorter rotations (~15s), her limited range and clunky animation-locked times can prove difficult to play around. Yaoyao,Baizhu and Kirara have comparatively lower damage than other Dendro characters and slightly unreliable Elemental application, but provide valuable defensive utility to these teams.
Rotations
4TF Faruzan rotations are very flexible, particularly since they have no important snapshottable buffs; as long as Elemental application is consistent, players can use abilities as they come off cooldown while using Faruzan’s Charged Shots as frequently as possible in-between.
References/External Links
References
Credits

“The past one hundred years have only afforded me the glimpse of a spindrift floating upon the endless sea of wisdom. As for the fields and puzzles that remain to be studied and explored... It'll be up to you and I to reveal their secrets.”
Authors: .athene., chasing_haze, cuzimori, itslin, seima
Editors: arbutus_unedo, cuppacote, grankrathalos, Leah, nikatosaurus, nociii, polomo, sew
Calculations: akane, .athene., sirvaughan
Document formatting: latiwings
Transcriber: nociii
Changelog
August 2023 - Release
December 2023 - Updated for Version 4.2
- Added 4pc Golden Troupe
- Added Furina to Xiao and Wanderer teams
- Added Mika to Wanderer teams
May 2024 - Updated for Version 4.6
- Added Xianyun to Xiao teams
- Added Chiori to Xiao and Wanderer teams