Hover over the buttons to see the contents of each page.
₪ A mechanically in-depth Lisa Guide ₪
₪ by ArchedNosi ₪
[Original Document]
Updated For Version “Luna VI”

Table of Contents
Credits & References
Thanks to the members of the Lisa Mains Discord for the help in the creation of this document!
Some clips/gifs were sourced there!
Feel free to join the Lisa Mains Discord and Lisa Mains Subreddit here!
Artwork Credit List in Chronological Order:
- @HTKJheadache
- @GenshinImpact & さいね
- @GenshinImpact
- @もじゅ
- @richarano
- @FallingMist
- @yuko666_666 | Twitter | Pixiv
- @Reiji-RJ
- @ArtofFRanzilla
Spreadsheets used and/or maintained:
- Motion Value and Combo Sheet by ComputingMagus
- Lisa C4 Infodump, Lisa Burst Targeting Infodump, Lisa Equipment Calculations, Lisa Team Rotations, and Personal Calculator by ArchedNosi
External Sites referenced:
- KQM EGT by KeqingMains
- Lisa Theorycrafting Evidence Vault by KeqingMains
- Genshin Optimizer by frzyc et al.
- GCSIM
Extra Info:
- Guide Legacy, containing items that were either patched or removed.
- Genshin Optimizer Multi-Target Optimization Configurations for Lisa.
Terminology
Here are some terms used strictly within this guide that are exclusive to explaining Lisa:
| Stacks of Conductive | Refers to the name of Lisa’s Elemental Skill’s stacks. |
| Cast Time and Active Time | Refers to the individual stages of Lisa’s Hold Elemental Skill. |
| Discharge or Bolt | Refers to the individual damaging entities emitted from Lisa’s Elemental Burst. |
| Arc | Refers to any of the groups of instances of when Lisa’s Elemental Burst releases Discharges or Bolts. |
| Bounce Tech and Bounce | Refers to the mechanic integrated in Lisa’s Tap Elemental Skill allowing Conductive stacks to spread. |
| Bounce Radius | Refers to the initial radius of Lisa’s Tap Elemental Skill upon impact that allows her Bounce Tech to take place. |
| Multi-Stack | Refers to being able to simultaneously apply multiple stacks of Conductive. |
| Radiation and Radiate | Refers to the property of how her Bounce Tech and relevant reactions, like Overloaded and Superconduct, may produce an additional stack of Conductive. |
Preface

Welcome to the official Lisa Mains guide to Lisa, written and prepared by ArchedNosi!
Lisa is an astute and dynamic 4-star Electro Catalyst character who utilizes her access to frequent, reliable Electro Applications from her various abilities to deal burst, sustained, and reaction damage while also elevating other teammates with her supportive attributes.
Lisa has a bewildering complex kit because of her stacking mechanic, interchangeable combos, and gameplay adaptations in various situations. Arguably, Lisa has one of the most nuanced kits for new players due to how little is revealed of all Lisa can do and offer. She also gets neglected for being one of the starter characters by many who underestimate her potential, especially considering her kit's affinity to the Dendro element—completing and reforging Lisa’s identity as a character. Yet even still, Lisa can be alternatively utilized as a cheap and feasible supportive option given her available value, devoid of complexity.
Lisa is a heavily misunderstood character, and it doesn’t help that both her skill descriptions are written in such a confusing way in-game as well as much of her potential being in her synergy with the Dendro element. This document was created to alleviate those issues, and we at Lisa Mains hope it serves you well as a complete guide and overview of how to play Lisa to her optimum!
Why Should I Play Lisa?
Pros
- Synergistic with other Electro and Dendro characters
- Great Electro Application, especially when on-field with ranged attacks
- Competitive Damage over Time (DoT) damage from her Burst (especially with C4)
- Effective in multi-target scenarios
- Constellations are not mandatory for entry usage
- Artifacts are fairly obtainable and, optionally, Strongbox-able
- Has one of the only DEF debuffs in the game
- Can be utilized as an effective supportive option with little investment
- Many archetypes are open to being valid and flexible
- Complex and mechanical (double-edged)
Cons
- As an Off-field DPS, she is reliant on her Hold Elemental Skill’s CD
- Has an 80 Energy Cost Elemental Burst which often will mandate for ER% and/or a sufficient Battery
- Requires high investment for damage
- Constellations are not easily obtainable due to Starter Characters being not featured in Character Event banners
- Her better Constellations are found later as opposed to early
- If to be used effectively as an On-field DPS, there is a learning curve in her rotations, attack strings, and overall cognitive awareness—and more so if 4-piece Thundering Fury is opted (for Aggravate)
Gameplay Overview
Common Misconceptions
“Lisa is only good at C6.”
“Lisa takes too long to set up.”
These two are the biggest misconceptions. Once you learn how to efficiently stack Conductive stacks with a single Tap Elemental Skill (tE, Tap E) via Lisa's Bounce Tech or by other means, her relative effectiveness without C6 is much more apparent. As you get more familiar with her kit, “setting up” will take up only around the same amount of time that any other character would.
Many people also overlook her true "best" constellation: C4. It makes Lisa surprisingly potent by vastly raising her Burst's damage and utility, especially in multi-target scenarios and in Dendro’s presence. It also enables somewhat of a Pseudo-Quadratic scaling if enemies are close enough to permit it. However, the randomness and three-entity ceiling of this Quadratic scaling can make it potentially limiting. Nevertheless, C6 remains a worthwhile Constellation and boost because of its possible flexibility and options.
“Lisa’s 3-Stack Hold Elemental Skill takes too long to execute.”
“Lisa needs a Shielder to operate.”
In a similar vein to the previous claims, a properly maximized Hold Elemental Skill (hE, h#E, Hold E) can be quickly stacked using Lisa's Bounce Tech. Additionally, some people are unaware that her Hold Elemental Skill can be released when the inner circle aligns with the outer radius—this takes approximately 1.9 seconds.
As for shields, although a Shielder can be helpful to some, mandating one to even use Lisa is never necessary as the choice to use one is often conditional or by one’s discretion.
“Lisa’s Elemental Burst has a bad knockback.”
Colloquially, there is the assumption that her Elemental Burst (Burst, Q) innately knockbacks enemies. This is false. In reality, connections from her Burst effectively only induce a knockback if enemies are airborne. Otherwise, if enemies are either grounded or bulky enough to withstand a brief knockback from either Crowd Control (CC) or from sheer size, her infamous “knockback” becomes non-existent.
Therefore, when planning for Lisa’s Elemental Burst, it may be beneficial to be cognisant of airborne-liable attacks, like triggering the Overloaded reaction or other upward-motion attacks. This knockback also becomes irrelevant as a concern in much of the game’s later content, as many opponents are immune to it regardless.
Preliminary Questions
“What should I take away from this guide, if anything?”
At the very least, it is highly recommended to read the sections regarding Lisa’s Constellations, Tap and Hold Skill properties, and Hidden Tech because these elements are deficiently explained in-game. Furthermore, we hope that you will recognize Lisa's identity in the game as a character who synergizes with Dendro and Electro-related reactions as both an On-field DPS or an Off-field DPS, but also as one who can effectively be a viable supportive option given the utility in her kit.
“How does the Dendro element affect Lisa?”
In a concise answer, Dendro completes Lisa as a character—how fitting for Sumeru Akademiya’s most excelling and reigning valedictorian!
By virtue of the Dendro element and its subsequent reactions with the Electro element, Lisa's team-building options become open to Hyperbloom and Quicken-based teams, the latter of which she specializes most. In her own Aggravate teams, Lisa finds herself a select and dedicated role that perfectly meshes with her kit. Moreover, when paired with the Dendro element, Lisa's teams may often avoid using contested characters, enabling both variance and leniency for their respective teams and her own.
As a whole, Dendro has near-complete synergy with how Lisa functions. As an on-fielder, she has access to quick and reliable Electro Applications from her Burst and various attack strings, which pairs well with Quicken, allowing her to capitalize on triggering Aggravate and a sizable benefit from her EM Ascension stat. Yet, as an off-fielder, she transforms into a competitive Electro teammate due to how much she triggers Aggravate from her Burst alone.
Otherwise, outside of Aggravate, Lisa can function as a Hyperbloom trigger on account of her Burst being able to trigger Dendro Cores, be used as an Electro Enabler/Off-field DPS for Spread teams, and, while more niche than the others, barely utilize the Burning reaction as a supply for an Overloaded Reaction DPS build.
Lisa's Best Role in a Team
Lisa’s most prominent role is as an Electro On-field DPS through various Electro and Dendro reactions. Her high Electro Application, from both her Burst and when on-fielding, synergizes with her greatly by constantly triggering her notable reactions: Quicken/Aggravate and occasionally Hyperbloom. She also fully utilizes her EM Ascension stat through reactions, buffs the team’s overall damage as her potent DEF Shred affects both Aggravated and non-Aggravated damage, and can maximally abuse the 4-piece Thundering Fury artifact set for more flexible rotations, better attack strings, and optimized damage.
Outside of Lisa’s Aggravate teams, she can also function as an On-field DPS or a Reaction DPS (Hyperbloom or Overloaded), though with much less of an incentive due to the omission of Dendro, being less effective, or heavy with investment. Regardless, either of the two remains a valid archetype to play and enjoy, even if inferior.
If Lisa isn't being purposed in teams to be a core source of damage, she can have prominent use as her more referenced and officially recognized role, as an Off-field DPS: occasionally swapping in to deal AoE damage from her Burst and Skill in a relatively short time. Even still from off-field, she prefers to be alongside at least one Dendro teammate for reasons explained prior.
Alternatively, at cheaper investment levels or for accessibility as a supportive option, she can also suit as a tertiary Support/Buffer/Enabler. While it does not make the most use out of Lisa’s kit, she can be a popular choice as she offers Electro aura uptime, an innate 15% DEF Shred, and can wield the Thrilling Tales of Dragon Slayer (TTDS) Catalyst to buff a teammate. Be aware compositions that utilize Support Lisa are often rare. Nevertheless, her buffs and what she provides make her a viable choice as a Support—sometimes even ideal.
Talents

 Normal Attack | Lightning Touch
Consists of Normal Attack (NA), Charged Attack (CA), and Plunge Attack (P)
Talent Description
Normal Attack
Performs up to 4 lightning attacks that deal Electro DMG.
Charged Attack
Consumes a certain amount of Stamina to deal AoE Electro DMG after a short casting time.
Plunging Attack
Gathering the might of Electro, Lisa plunges towards the ground from mid-air, damaging all opponents in her path. Deals AoE Electro DMG upon impact with the ground.
| NA | CA | Plunge Landing | |
| Gauge Value | 1U | 1U | 1U |
*The ICDs of all of these actions are independent of one another.
Normal Attack
While Lisa’s Normal Attacks do not have outstanding multipliers, they are integral to her kit as she uses them for much of her field time. Her Normal Attacks are relatively swift to execute and ranged, making them prime for applying Electro and driving notable characters—like Fischl—as much as possible.
All of Lisa’s Normal Attacks "lock" onto enemies and are hitscan, rather than a projectile. Her Normal Attacks also have a small AoE radius upon impact, allowing them to indirectly trigger Dendro Cores by attacking a primary target. In succession, Lisa’s first three attacks are in a quick string, with the fourth following after a brief teleport that positions Lisa away or forward from her target or targeted area. Lisa’s teleport can be used to dodge or escape certain attacks.
Charged Attack
A wide AoE Electro DMG attack that costs 50 Stamina.
The most notable attributes of Lisa’s Charged Attack as to why it is commonly used are its damage output and Elemental Application from having no Internal Cooldown (ICD). Because of its cast time and how common dashes are when playing Lisa, using her Charged Attack appropriately will often require users to be aware of their surroundings and have proper Stamina management.
Lisa’s Charged Attack also ignores terrain and is visually false; it is a sector of a circle. The attack is also visually placed relative to Lisa's angle of elevation. However, her Charged Attack cannot hit enemies above Lisa’s altitude.
In the screenshot below, Lisa’s Charged Attack is perceivably placed above the hilichurl yet still connects. This is because the actual hitbox of her Charged Attack is placed on the terrain that the targeted mob is on.
Even though it is placed on nearby terrain, the hitbox cannot be rotated to match the terrain perfectly, it can only be rotated by where it is relative to Lisa.
(Only Left-Right, can’t be rotated Up-Down, or Clockwise-C. Clockwise)
Plunging Attack
Realistically, Lisa’s Plunging Attack is only used in teams with Xianyun since she enables and buffs Plunging Attacks. Should Lisa’s Plunging Attacks be available, it guarantees an Electro Application due to not having an ICD—which is appreciably abused in her Aggravate teams.
 Elemental Skill | Violet Arc
(E) Consists of a Tap (tE) and Hold (h#E) variant.
Talent Description
Channels the power of lightning to sweep bothersome matters away.
Press/Tap
Releases a homing Lightning Orb.
On hit, it deals Electro DMG and applies a stack of the Conductive status (max 3 stacks) to opponents in a small AoE.
Hold
After an extended casting time, calls down lightning from the heavens, dealing massive Electro DMG to all nearby opponents.
Deals great amounts of extra damage to opponents based on the number of Conductive stacks applied to them, and clears their Conductive status.
| Tap | Hold | |
| Gauge Value | 1U | 2U |
| Cooldown | 1s | 16s; Effectively 18s |
| Particle Generation | - | 5 |
| Duration | 3s Lifespan | 4s Max Hold Time |
| Snapshot? | Yes | No; Dynamic upon release |
Tap Variant
Lisa’s Tap Skill is frequently used when on-fielding, often weaved between Normal Attacks for reliable extra damage given how short it takes to execute. Upon tapping her Elemental Skill, she sends a projectile that impacts mobs in a given visual radius, adding at least one Conductive stack to affected enemies. Fully understanding this mechanic is fairly esoteric, but it is the key to mastering Lisa. By understanding the Hidden Bounce Mechanic, Radiating with Elements, and possible Tap Skill combos, players can manipulate situations to multi-stack Conductive stacks efficiently.
If Lisa swaps out of the party before the projectile connects, the tagged mob will not gain a Conductive stack.
Each Conductive stack individually decays after 15 seconds.
The ICD of Lisa’s Tap Skill on applying Electro auras is also shared between her regular Normal Attacks.
Note no particles are created naturally from her Tap Skill.
Hold Variant
Lisa’s Hold Skill is a crucial part of her kit, acting as both a fair source of damage through detonating Conductive stacks and as one of her main sources of Energy, often executed once per rotation. If an enemy has 1, 2, or 3 Conductive stacks by the time her Hold Skill is released, it will deal 115%, 133%, and 152% of its original damage from 0 Conductive stacks.
This ability can be held for a maximum of ~4 seconds but ideally should be held for a minimum of 1.9 seconds (or 2.2 seconds if Lisa is affected by a Cryo aura). Releasing Violet Arc later has no additional benefits, and its cooldown only begins once released. Thus, it is advised to be as optimal with your timing as to maximize DPS and Energy Generation over time.
There are 1.9 seconds of Cast Time and ~2.1 seconds of Active Time.

Releasing a Hold Skill during Cast Time acts as if a Tap Skill was executed while releasing at any point during Active Time yields the same effect as if the Hold Skill was maintained for 4 seconds.
Once the visual radius connects with the outer radius, the ability has switched from Cast Time to Active Time (at 1.9s). The outer ring will glow slightly brighter to indicate Active Time has begun. Releasing during Active Time strikes all mobs within the outer radius. As Lisa channels Violet Arc, she will remain still and become susceptible to damage.
When under a Cryo aura, release when it’s ~2.2s, a bit after the rings are aligned.
From left to right:
Optimal Timing | Optimal Timing under Cryo | Full Duration
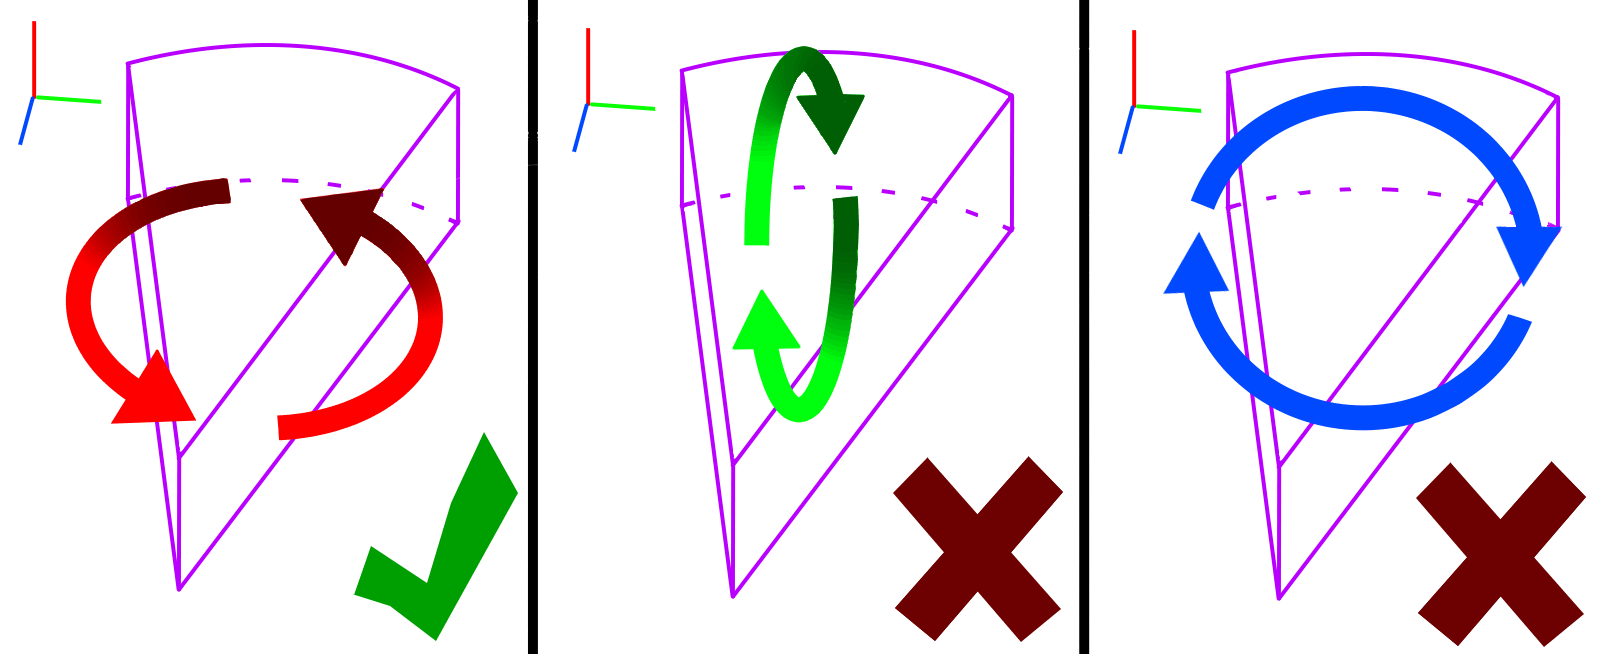
This Skill is not a Spherical Hitbox, but rather an entire Cylindrical Hitbox with a radius of 10m and has no apparent height limit—or at least a very high limit.
Only Lisa’s Hold Skill is affected by Lisa’s C1, allowing 2–10 Self-Energy to be generated in addition to the usual 5 Electro particles dependent on enemy count.
 Elemental Burst | Lightning Rose
(Q) Consists of an Initial Summon Attack and a lingering Field.
Talent Description
Summons a Lightning Rose that unleashes powerful lightning bolts, launching surrounding opponents and dealing Electro DMG.
The Lightning Rose will continuously emit lightning to knock back opponents and deal Electro DMG throughout the ability's duration.
| Lightning Rose | Initial Summon | Field Arcs | |
| Gauge Value | [See right] | 0U | 1U |
| Cooldown | 20s | - | 0.5s |
| Energy Cost | 80 | - | - |
| Radius | 7m | 7m | 1m Discharge Impact Radius |
| Snapshot? | Yes; when Lantern is formed | - | - |
Lisa’s Elemental Burst is another important part of her kit which summons a Lightning Rose. Her Burst is a prominent source of off-field damage, provides many Electro Applications, and enables a teamwide buff. Because of how relevant Lisa’s Burst is and being an 80 Energy cost Burst, another Electro teammate is recommended for Energy.
Upon its initial cast, there is a singular instance of damage dealing a constant 10% Talent Damage Multiplier of Lisa’s ATK. Although it is considered and calculated as Burst Damage, it is not affected by the actual level of Lisa’s Lightning Rose Talent. Interestingly, this Summon Damage will not apply any Electro aura.
There are 29 total Arcs—or instances for Discharges—from her Burst, with each Discharge targeting a random entity within the field, prioritizing enemies. With Lisa’s C4, each Arc gains the ability to send multiple Discharges and thus can hit multiple enemies, gaining a potential Pseudo-Quadratic Scaling and turning her into a highly effective Off-field Electro Enabler or DPS with her constant Electro Application—which is especially notable for Aggravate. In single-target scenarios, her Burst can expect to apply Electro 10 times.
Lightning Rose lasts for 15 seconds out of its 20-second cooldown. Fortunately, Lisa’s DEF Shred from her A4 lingers for 10 seconds and continually refreshes itself as enemies get tagged. It is therefore not necessary to chain Bursts back-to-back to maintain DEF Shred uptime, however, it is still beneficial to do so as the total damage from her Burst is often a majority when built.
When Dendro Cores are within Lightning Rose’s radius, Arcs will always prioritize targeting actual enemies over Dendro Cores.
Just as with Lisa’s Normal Attacks, Discharges from Lightning Rose have a slight AoE impact radius, allowing for multiple entities, like enemies or Dendro Cores, to be damaged with a single Discharge indirectly. And, just as with Lisa’s Hold Skill hitbox, Lightning Rose’s hitbox is also a cylinder with no apparent height limit—or at least another very high limit.
Lightning Rose’s connections will briefly stun “weak” mobs and not on “sturdier” mobs. Weak mobs will only get knocked back if the mob itself is airborne, otherwise, it functions as a stagger. This is widely misunderstood among the community.
 Ascension 1 Passive | Induced Aftershock
Talent Description
Hits by Charged Attacks apply Violet Arc's Conductive status to opponents.
The Conductive stack gained from Lisa’s A1 functions identically to how other Conductive stacks are applied. The only exception is that the Conductive stack gained from this is always one singular additional stack.
Unlike her Tap Skills, the stacks from her A1 will not radiate/bounce.
 Ascension 4 Passive | Static Electricity Field
Talent Description
Opponents hit by Lightning Rose have their DEF decreased by 15% for 10s.
The 10s duration gets refreshed every time the enemy is tagged again by any of Lightning Rose’s Discharges. However, the Initial Summon DMG does not apply this debuff.
(This equates to around 7-8% of a DPS increase when fighting enemies of an equal level as your character)
 Utility Passive | General Pharmaceutics
Talent Description
When Lisa crafts a potion, she has a 20% chance to refund a portion of the crafting materials used.
A unique passive that refunds materials when crafting potions. While potions aren’t extensively used as they are purely for overworld purposes, the passive ties neatly to Lisa’s erudite background and elemental knowledge.
Talent Priorities

Respectively, the Damage Distribution (%) of Lisa’s Burst, Skill, and Normal Attacks assumes C6 and 3 Enemies averaged upon Primary Target.
Electro On-field DPS
![]() > ≥ >
> ≥ >
Level 90 > Burst ≥ Skill > Normal Attack
~40%, ~35%, ~25%
As an On-field DPS, Lisa’s talents are almost uniform in how they each contribute to her overall damage. While most of her damage lies in her Elemental Burst and Elemental Skills, her Normal Attack talent offers fair value because of her effectiveness as a Driver in her relevant teams—like Aggravate. Lisa often alternates using Tap Elemental Skills, Normal Attacks, and Charged Attacks with routine Elemental Bursts and Hold Elemental Skills.
Lisa should prioritize leveling to 90 in her Aggravate teams for a substantial boost, if not greater than leveling her talents. For instance, the difference in leveling her from 80 to 90 will be ~34% more additive (Aggravate) and transformative (Hyperbloom, Overloaded, Lunar/Electro-Charged, etc.) reaction damage.
Leveling Lisa further to 95 or 100 is an option, but the costs are significant, making it hard to justify unless for dedication reasons. If you choose to do this, keep in mind that the increase in Elemental Reactions is not as substantial; the scaling from level 90 to 100 results in only a ~16% increase in Elemental Reactions. It is, however, a much more significant boost to Base ATK than previously. This precaution remains true for all of her archetypes.
Electro Off-field DPS + Support/Buffer/Enabler
![]() >> > >>
>> > >>
Ascension 4 >> Level 90* > Burst > Skill >> Normal Attack
~45-65%, ~35%, ~20-0%
Lisa's Elemental Burst and Elemental Skill should be leveled in tandem as both are integral as an Off-field DPS, while Normal Attacks have less of an importance. If in a Quicken team, leveling Lisa to 90 is also a priority.
Supportive builds are more or less just less invested Off-field DPS builds, so the same priorities apply. Do note there are cases where not using her Elemental Skill is preferred, in which case only leveling her Elemental Burst is necessary.
*Level 90 should only be considered if Lisa is meant to deal off-field damage in a Quicken team.
Reaction DPS
![]()
Talent Levels are irrelevant for this archetype. In order to maximize Lisa’s damage, focus on leveling herself instead.
Lisa’s Reaction builds focus on maximizing her transformative reaction damage, often through either the Hyperbloom or Overloaded reactions. Correspondingly, the damage output from Lisa’s talents here will be relatively low.
Leveling Lisa to 90 is another notable method in increasing this build’s damage as it is one of the only few ways to scale with investment aside from getting more EM and ER%, unlike her other builds.
Constellations
Many of Lisa’s Constellations are good to very good. Notably C4, C6, and arguably C2.
Approximate Constellation% Increases assume Lisa as an On-field Aggravate DPS.
 Constellation 1 | Infinite Circuit
Lisa regenerates 2 Energy for every opponent hit while holding Violet Arc.
A maximum of 10 Energy can be regenerated in this manner at any one time.
| Increase from C0: ~0–2% |
In typical scenarios, Lisa’s C1 supplies only a fair amount of Energy, which may be equivalent to an extra ER% substat. Regardless, an additional source of Energy is always pleasant to keep uptime on her Elemental Burst.
Visually, a distinct particle spawns adjacent to Lisa and appears to reward her with the respective 2–10 Flat Energy as it travels to her. It happens to be that the spawned particle from this Constellation is purely cosmetic. In reality, the Flat Energy is given to Lisa after a constant delay of 0.4 seconds following the connection of her Hold Elemental Skill. A consequence is that the Flat Energy gets wasted if you attempt to swap to another character before being rewarded, as Lisa would not be present to claim it.
 Constellation 2 | Electromagnetic Field
Holding Violet Arc has the following effects:
- Increases DEF by 25%.
- Increases Lisa's resistance to interruption.
| Increase from C1: ~0% | Cumulative Increase from C0: ~2% |
(Her C2 can potentially save situations that would otherwise have canceled her Hold Elemental Skill though, thus relating to more DPS)
Although Lisa’s C2 does not provide offensive power, its Interruption Resistance boost is still a respectable QoL. This Constellation is not a necessity as you can often time her Hold Elemental Skills between enemy attacks with practice.
However, this Constellation truly shines if you know what attacks Lisa can and cannot resist with this newfound poise. Under that criterion, you can ensure to confirm her Hold Elemental Skills on specific attacks, which also allows for smoother gameplay. A basic heuristic is that she can resist a single attack from most enemies.
 Constellation 3 | Resonant Thunder
Increases the Level of Lightning Rose by 3.
Maximum upgrade level is 15.
| Increase from C2: ~3–5% | Cumulative Increase from C0: ~5–7% |
More damage to her Elemental Burst is always appreciated, especially considering what her next Constellation entails…
Note that its Initial Summon damage is not affected by Talent Levels.
 Constellation 4 | Plasma Eruption
Lightning Rose now unleashes 1-3 lightning bolts when it attacks.
| Increase from C3: ~0–40% | Cumulative Increase from C0: ~7–47% |
Lisa's C4 is arguably her best Constellation. Her C4 allows her Elemental Burst to fire up to three Discharges at an instance. Aside from massively increasing her damage in AoE, it also increases her Elemental Burst's Electro Application, which is significantly appreciable for Aggravate teams and a pleasant addition to consistency for Reaction teams. At the same time, this Constellation can have no effect at all if against single-target situations.
Its description is a simplified version of its effect, however. While it is true that every Arc, or attack, Lightning Rose releases can unleash 1, 2, or 3 bolts/discharges, there are many other variables as to how it selects from its options.
- If there is only one enemy on the field, each Arc will always emit exactly 1 Discharge—never 2 or 3—resulting in 10 total Electro applications.
- If there are two enemies, each Arc may emit either 1 or 2 Discharges:
- The first Arc has a 60% chance to emit 1 Discharge and a 40% chance to emit 2 Discharges.
- All subsequent Arcs emit either 1 Discharge (15% chance) or 2 Discharges (85% chance).
- On average, ~16.6% of Arcs are 1 Discharge and ~83.4% are 2 Discharges.
(~1.83× more total Discharges → ~53.1 Discharges & ~18.7 applications)
- If there are three or more enemies, each Arc may emit 1, 2, or 3 Discharges:
- The first Arc will only emit 1 (55% chance) or 2 Discharges (45% chance).
- From there, Discharge counts follow a Markov chain with the following transition probabilities dependent on the previous Arc:
Previous → Next Arc 1 Discharge 2 Discharges 3 Discharges 1 Discharge 20% 50% 30% 2 Discharges 25% 50% 25% 3 Discharges 50% 50% 0% - Because of this transition system, 3-Discharge Arcs cannot occur back-to-back (after a 3, the next Arc is always 1 or 2).
- On average, ~28.8% of Arcs are 1 Discharge, ~50% are 2 Discharges, and ~21.2% are 3 Discharges.
(~1.91× more total Discharges → ~55.3 Discharges & ~20.7 applications)
This is also one of the only other sources of Pseudo-Quadratic Scaling in Genshin. In Lisa’s case with her C4, if enemies are close enough together when multiple Discharges connect and hit, each enemy gets damaged in proportion to how many enemies are tagged within that clump.
Lisa’s case of Pseudo-Quadratic Scaling isn’t as ubiquitous in the community because it carries many caveats for it to work. Mainly, it is capped at 3 Discharges maximum, is dependent on randomness, and also is dependent on enemies being close enough anyways.
Specifically for Reaction Lisa builds like Overloaded and especially Hyperbloom, Lisa’s C4 is a highly effective Constellation in those regards. Within Overloaded teams, this constellation allows for more consistent and constant triggers. Similarly, within Hyperbloom teams, it solves the issue of how Lisa’s Burst prioritizes targeting enemies over Dendro Cores, thus increasing Lisa’s trigger consistency immensely.
 Constellation 5 | Electrocute
Increases the Level of Violet Arc by 3.
Maximum upgrade level is 15.
| Increase from C4: ~3–4% | Cumulative Increase from C0: ~11–51% |
Like the former +3 Constellation, this remains a fair Constellation. It does not have the same potential as C3 but is still consistent and can radically make strings that contain Tap Elemental Skills to be more effective.
Having C5 allows Lisa’s Hold Elemental Skill to achieve over 1000% scaling if leveled, which is neat.
 Constellation 6 | Pulsating Witch
When Lisa takes the field, she applies 3 stacks of Violet Arc's Conductive status onto nearby opponents.
This effect can only occur once every 5s.
| The damage increase C6 brings varies greatly. It can range from being a minimal increase to a sizable one depending on how Lisa is being played. |
Lisa's C6 makes her automatically apply the maximum amount of Conductive stacks to nearby entities upon swapping in. Overall, the value of her C6 depends on how much she necessitates having max Conductive stacks at any given moment. For instance, if she uses her Charge Attacks frequently or only her Elemental Burst in a rotation, then her C6 loses value as her Conductive stacks are either already being passively accumulated or not utilized.
Nevertheless, Lisa's C6 holds itself as an effective Constellation in most of her archetypes. Although it can be subjective since people tend to overrate it, her C6 does smoothen how she plays and makes her less mechanically intense.
Be aware that merely having C6 does not mean it always has to accumulate three free Conductive stacks to be of value. Simply gaining two, or even a singular, Conductive stack when an enemy would otherwise not is still a benefit. It is more applicable to think of her C6 as another tertiary source of Conductive stacks rather than to forgo and replace former ways completely—Lisa’s C6 opens another option and is not a reliance but a privilege. Therefore, rotations will often not change when having her C6; however, it does require more cognition.
As for the effect, Pulsating Witch applies in a 5-meter radius and does not deal damage nor apply an Electro aura.
Interestingly and purely for trivia, her C6 can also trigger outside combat.
Constellation Afterword
Having taken all of the information given about Lisa’s Constellations into account, there arises a valid string of thoughts:
Are any Constellations “necessary” to use/play Lisa?
By itself, the question is flawed as anyone can play any character if there is an appeal towards them, regardless of Constellations. That said, the Constellation with the most notable changes is mainly in Lisa’s C4, with her C6 and C2 arguable. However, none of these are inherently necessary.
If the aim of reading this guide is to discern if C[X] Lisa can be a starting point to use Lisa, then, objectively, these scenarios can be when she is C0, C2, C4, or C6.
C4 and C6 are suggested as these are when differences in gameplay can start to exist, both in usage and effectiveness. C2, on the other hand, is more variable and player-dependent but can be a starting point for some if using her Hold Elemental Skill becomes troublesome or if knowing its poise limits is achievable.
Should I search for Lisa’s Constellations via wishing?
No, it is not suggested to do so.
Due to Lisa’s Constellations being only naturally obtainable from the Standard Banner and occasional Chronicled Banners, as well as the progressive addition of newer 4-stars to the loot pool, it becomes challenging to recommend that line of thinking due to the obscene rates for obtaining a specific 4-star. A much more recommendable approach is to buy her Constellations from the Starglitter Shop when her time returns in the cycle (May and November). With everything said, however, the choice is ultimately in your hands.
Lisa's MV/s and Optimal Strings
Credits to ComputingMagus for the frame data and MV/s.
(% Values are taken from Talent Lv. 9)
This section is separate due to Lisa having what are essentially four string-able actions:
- Her NAs, CAs (C), Tap Es, and Hold Es.
- Along with cancels: J/DC, or Jump/Dash Cancels, where Dash Canceling is often more time-efficient but costs Stamina.
- For ease, the strings here will assume both are equivalent time-wise to Dash Cancels and will be simply referred to as "cancels."
If Lisa will be on-field for a prolonged time, her most notable strings are:
(With NAs/CAs/Tap Es)
| N2 → Tap E → Cancel (188%/sec) |
This basic combo generally offers the most DPS for sustained play. For reference, Lisa's Tap E has 20 active frames (⅓ of a second) and can cancel its animation quickly. It is advisable to concatenate a Jump/Dash at the end of a Tap E to enable a form of movement, which most Catalyst users lack.
In practice, you would also Tap E → N2 for the initial start-up instead to apply Electro with her Tap E and potentially radiate additional Conductive stacks if applicable. Strings similar to this one are also effective in their Electro Application for the sake of Aggravate teams but can additionally be optimized further. |
|
| N1 → C → Cancel (190%/sec) |
This combo is very Stamina-draining, but it is better than N2 → Tap E → Cancel if multiple enemies are present.
Note initiating with a Tap E instead of an N1 can be a better option due to her Tap E having more AoE and DPS, inherently scaling Conductive stacks, and activating certain weapon passives. N1 is merely the listed option because it is more feasible to perform. |
|
| N2 → C → Cancel (184%/sec) |
This string is less damaging than the above but does not harshly drain Stamina. It is also the best loopable string to drive Beidou’s Burst, garnering ten triggers. | Note: If there are multiple enemies, any combo that includes CA scales dramatically higher. Do also be warned that it is possible to cancel her CA early, resulting in a waste of Stamina as well as time. |
| N3 → Cancel (177%/sec) |
This string offers the most DPS if all Lisa can do is Normal Attack. Situations include when her Elemental Skill is on Cooldown, when she has no remaining Stamina, or if for generalized mobility, as it is also the quickest execution-wise.
An apparent benefit to executing N3Ds, or even N3tEs, in succession is that it securely triggers Bursts like Xingqiu’s and Yelan’s. N3s also have relatively safe and reliable Electro Application for triggering Aggravates, although they lack dedicated AoE. |
|
(Including Hold Es; Hold Es will be calibrated at [3] Stacks unless specified)
| Tap E → N2 → Hold E (291%/sec) |
When on-field, this can be a general way to initiate a Hold E. Canceling a Hold E is redundant since you can immediately do attacks after casting it. While it does not allow canceling, it does enable you to Dash right after connecting a Hold E to dodge attacks.
The N2 can substitute for a CA if a situation proves to be more beneficial. |
|
| Swap in → Hold E (355%/sec) |
In a vacuum, if you have C6 or enemies are pre-stacked to 3 Conductive stacks, Lisa’s Hold E scaling is widely apparent. | |
| Swap in FROM Pyro/Cryo → Tap E → N2 → Hold E (263%/sec [2] or 291%/sec [3]) |
This string takes advantage of Lisa’s bouncing and radiative properties and is the most efficient for rotations timewise should Lisa trigger such reactions. However, given her teams do not naturally opt for a Pyro or Cryo teammate, only be aware of this string in situations where Pyro or Cryo enemies exist.
The N2 can substitute for a CA if a situation proves to be more beneficial. |
|
How or when should I cast Lisa’s Tap and Hold Elemental Skills?
For Tap Es, they will often be her opening attack when she is swapped into. This is to ensure that she radiates Conductive stacks if applicable. Beginning with a Tap E also smoothly transitions into the other combos represented above.
Otherwise, for Hold Es, it is tangentially better to confirm a Hold E after her Burst has been cast. This is to take advantage of the 15% DEF Shred from her Burst as well as be efficient with Energy Generation and coordinating both of the cooldowns together (for future rotations).
Do keep in mind that it is never necessary to connect a Hold E at maximum Conductive stacks, it is only more optimal to do so. If, by chance, there is high mob density, which allows for her Hold E to damage more opponents, purely connecting it with 1 or 2 Conductive stacks can result in more overall DPS if stacking to 3 stacks isn’t easily doable. Of course, her C6 makes doing so more tolerable but only slightly.
Choosing when to use her Hold E in a given rotation can be slightly complex, however, it can be easily explained when sectioning her rotations around her Hold E itself.
For example, the Pre-Hold E combo(s), the actual Hold E, and the Post-Hold E combo(s).
Combos before the Hold E consist of those that weave in Tap Es in order to generate some Conductive stacks—N2tE or N3tE.
Combos following the Hold E often consist of the alteration of her NAs and her CAs to both maximize Electro Application and passive Conductive stacks—N1C, N2C, or sometimes N3.
There exists the scenario in which doing no Hold Es at all is optimal, like as a sole support unit or if it just is impossible to do so at a given moment. In those cases, she necessitates having more ER% as compensation.
When should I cast Lisa’s Burst for optimal use?
If you ever want to cast her Burst, it is most optimal to cancel her Tap E by following with her Burst. Doing so won’t interfere with potential Conductive stack radiation since the Initial Summon DMG of Lightning Rose does not inflict an Electro aura and can edge out another Aggravate trigger.
Tap E > Q can be further evolved to Tap E > Q > N1C for more additional Aggravate triggers.
Furthermore, Hold E > Q is an attack string that allows Lisa to catch and funnel all of her generated Electro particles for her next Elemental Burst afterward, which can be useful for off-field uses due to the time it saves.
4TF Specific Combos
As the following combos within this section are dedicated to when Lisa has the 4-piece Thundering Fury artifact set equipped, the info collected here is only directly usable within her preferred use case—her On-field Aggravate teams.
Generally, these combos are primarily only functional if Lisa is positioned close enough to enemies to allow for quick execution, but if that parameter is met, then these combos become both efficient and add even more variability to her kit’s options as expecting the CDR to trigger is easily confirmable with Aggravates.
| Tap E → Tap E (263%/sec) |
Specifically when in a vacuum, two Tap Es chained together in succession offer relatively high value in terms of Talent%.
This generic chained string will be the basis for the next combos, contingent on the fact that chaining Elemental Skills allows for slightly faster Conductive stacking effectiveness, indirect synergy with her most optimal weapon, as well as attaining more AoE from her basic combos. |
|
| Weaving Tap Es between N1s and N2s (173 - 263%/sec) |
Outside of the short window of a vacuum that is the Chaining of Tap Es, it becomes notable that these combos are marginally weaker than the recommended ones to use referenced without 4TF.
However, while the raw MV/s is lower comparatively, doing these specialized combos becomes more efficient due to reasons mentioned prior: Conductive stack efficiency and slight AoE. It also remains to be a fairly loopable attack string. |
|
| Tap E → Hold E (308%/sec) |
If achieving this combo is doable in given situations, Lisa can be easily expected to unleash a maximized Hold E even when an enemy has only 2 Conductive stacks, which is a very effective and efficient method to input Hold Es within rotations.
Its raw MV/s is also only slightly less than doing a generic Hold E, although how this string truly becomes effective is in realizing that an extra Aggravate trigger is guaranteed upon its execution; one from both variants of her Elemental Skill. |
|
Hidden Tech./Mechanics

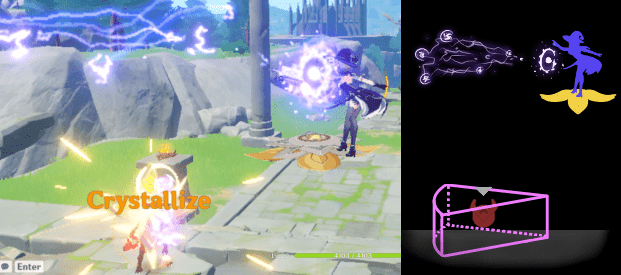
Violet Arc's Bounce Mechanic
Lisa's Violet Arc's bouncing property is her most influential hidden mechanic—often ubiquitously used when on-fielding. Although bouncing her Violet Arc becomes less relevant in single-target scenarios as it usually requires another entity to bounce Conductive stacks off from, exceptions still exist, and the mechanic remains vital to understanding how to play her.
In the example shown above, Violet Arc was tapped once, yet applied 3 Conductive stacks to most of the 6 Hilichurls. This was because of the "Bounce" Mechanic of Violet Arc.
In essence, the initial impact of Violet Arc’s projectile has a small radius, and enemies within the radius, including the tagged enemy itself, will all gain one stack—as the ability’s description would imply. The very initial radius will be referred to as the “bounce” radius.
Do note that the radius of how the first Conductive stack spreads is virtually a slightly larger radius than what is actually shown in-game.
However, the description does not mention at all that mobs within the initial impact, or “bounce,” radius will also themselves output additional radii, and those enemies inside of those radii will be additionally stacked once more. Within a group, multiple radii and therefore multiple stacks can occur.
Only the initial bounce radius applies an Electro aura; none of the other resulting radii apply any aura.
In the video, notice how the uppermost and right uppermost Hilichurls only gained 2 Conductive stacks because they were only inside 2 resulting radii, unlike others who were in potentially 3 or more.
Using this mechanic, Lisa can easily stack 3 Conductive stacks given a group of enemies. Thus, grouping can act as a “conductor” of sorts and becomes greatly beneficial.
Radiating Violet Arc with Elements
In addition to the Bounce Mechanic explained above, the Overloaded and Superconduct reactions allow another way to simultaneously afflict more than one Conductive stack. While this specific mechanic remains useful for Lisa, it is only reasonably applicable in Quickburn teams because many of her other synergistic teams omit Pyro or Cryo teammates and instead focus on the Dendro element and/or the Quicken root reaction. Regardless, radiating Conductive stacks should not be ignored as sources of external Pyro or Cryo, like those innately on some enemies, may still allow this mechanic to occur.
This radiation property is unique to the Overloaded and Superconduct reactions only.
When Violet Arc‘s projectile triggers Overloaded or Superconduct upon impact, enemies gain Conductive stacks equivalent to the number of resulting radii they are within. The applicable radii include the initial/bounce radius of the Violet Arc projectile and the respective Overloaded/Superconduct reaction radius.
For example, should Violet Arc trigger Overloaded/Superconduct onto an enemy, the enemy hit directly receives 2 Conductive stacks for being within the initial radius and the reaction’s radius. Surrounding enemies receive 1 Conductive stack because they were within only the reaction’s radius and thus were "radiated" a stack instead.
This mechanic can be improved if the Overloaded/Superconduct reaction triggers near a Pyro/Cryo environment, such as Burning Grass/Frozen Water. In those cases, the directly affected enemy receives 3 Conductive stacks, and surrounding enemies receive 2 Conductive stacks.
These additional effects happen because these environments act as “entities” just as enemies would, so they also create their own radius that would allow for Conductive stack radiation to occur.
Pyro/Overloaded
Cryo/Superconduct
Optimizing Violet Arc
Via utilizing the two mechanics mentioned above, here is a quick overview of situations players can create and abuse in order to make the most of Lisa’s Violet Arc and its Conductive stacks.
This section strictly covers her Violet Arc in situations when elements like Pyro or Cryo are present. This does not take into account her CAs also producing a Conductive stack.
All of the following graphics will assume enemies will have no initial Conductive stacks.
Legend
 | ||||
| Arbitrary indicator pointing at initial impact | Number of Conductive stacks | Visual radius for Overloaded/Superconduct | Visual radius for Lisa’s Tap Skills | Location of an enemy/entity |
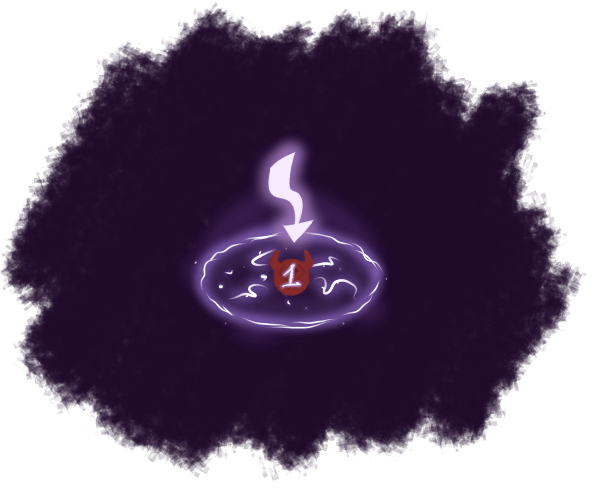
The Basics
Link to an In-Game Example
Against a single enemy, with no additional occurrences, a single Tap Skill will produce 1 Conductive stack to that enemy.
Notice how a radius is outputted even when against a single target. This is also the only way to produce a single stack on a single enemy. However...
Example
Because the initial spreading radius of the first Conductive stack is ever so slightly larger than the bounce radius that is visualized if enemies are at enough distance, they will all generate a single stack and not bounce, which is suboptimal at worst.
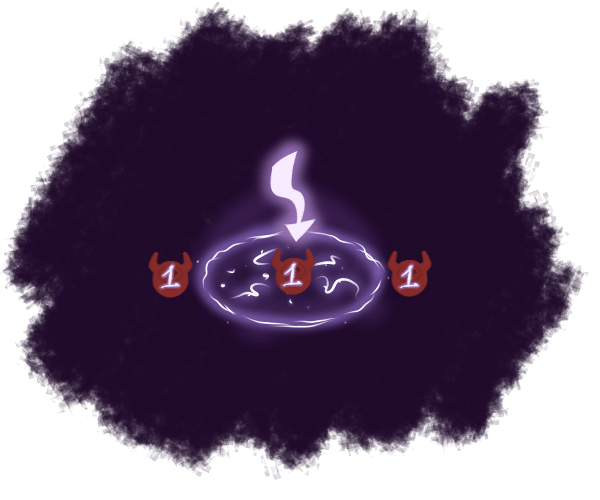
Example
Now against two enemies that are near enough to each other, both enemies gain 2 Conductive stacks. This is because of the Bouncing Mechanic taking place; the initial bounce radius gives both 1 stack, and the resulting radius gives another stack since both enemies were in both radii.
Example
Likewise, the same would apply among 3 or more enemies as each enemy is within at least 3 radii, thus accumulating the maximum amount of Conductive stacks. As with the above situation, at whom the impact initially was directed does not change the results.


Example
But what is "bouncing" again? Well, as previously mentioned, only the initial impact (and reactions, which will be covered later) are able to "bounce" and allow resulting enemies to output their own radius. This new radius cannot create more radii. As such, in this situation, notice how only the enemy within the initial impact had further produced a radius, and how the farthest one did not, hence only gaining 1 Conductive stack instead of 2 like the others.
Example
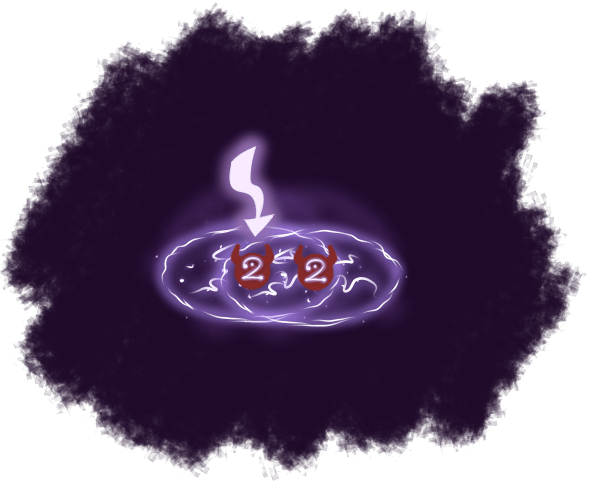
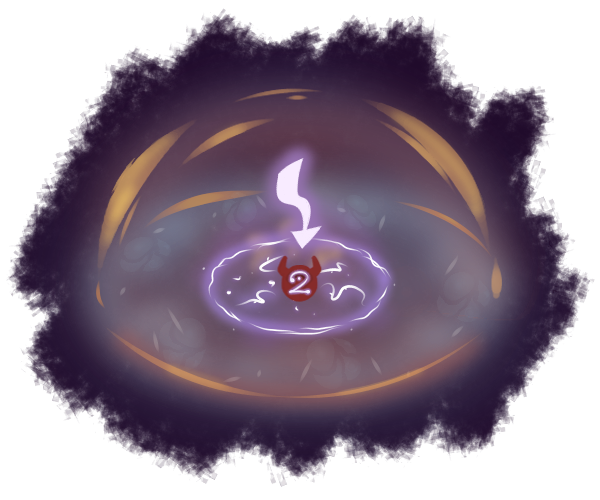
Let’s now re-introduce Overloaded/Superconduct (OL/SC) as a mechanic. As mentioned before, if Violet Arc, upon initial impact, had also triggered either OL/SC, enemies within the radius of the OL/SC will be radiated with an additional Conductive stack. Therefore, with a single enemy and an accompanying reaction, that enemy gains 2 Conductive stacks.
Example
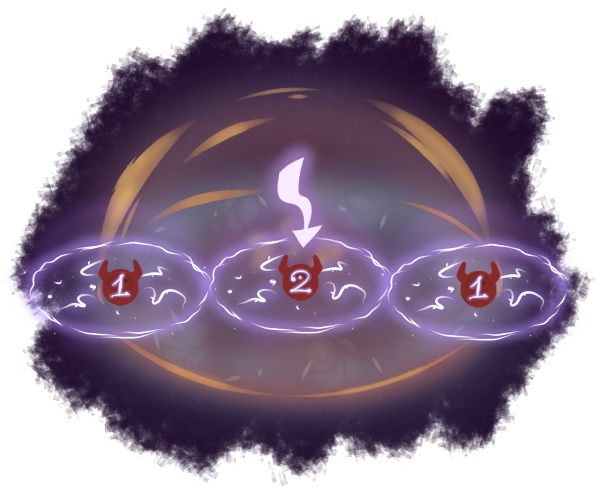
With the same logic, any surrounding enemies within the OL/SC radius, but not in the initial bounce radius, will be generated with 1 Conductive stack as the reaction had radiated a stack outward. You should be aware of this and abuse this knowledge to one’s advantage. Also note how both outer enemies still output their own radii from the reaction’s radiation, not from the initial bounce—although, think of the radiation as an extension of a bounce allowing other radii to form.
The enemy that gained 2 stacks received them from the initial impact (1 stack) and the reaction (1 stack), while the 2 outer enemies only gained 1 stack from the reaction’s radiation.
Example
In the scenario where those outer enemies were near each other, then both enemies would be within each other’s radius. Therefore, instead of both only gaining 1 stack, both will gain 2 stacks: 1 stack from the OL/SC and 1 stack from them being in each other’s radius, not from the initial impact radius.

Example
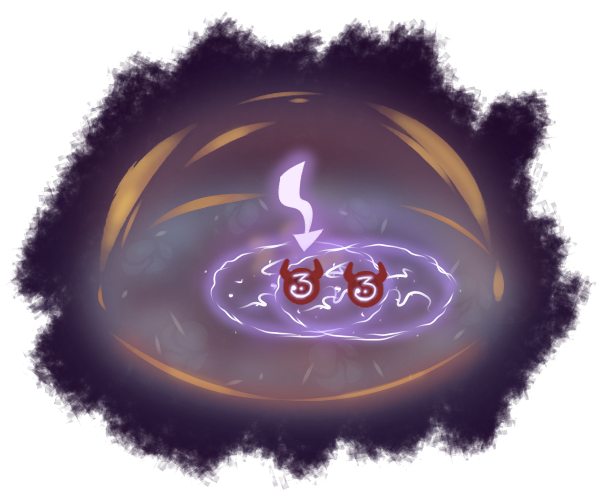
Combining these two mechanics, it is feasible to produce 3 Conductive stacks given there are at least 2 enemies/entities as well as an accompanying reaction to radiate off of. The 3 stacks originate from the initial impact (1 stack), the resulting bounced radius (1 stack), and the radiated reaction radius (1 stack).
However, it is possible to generate 3 Conductive stacks at once as seen in the previous section, right? So where is it here?
Well, that scenario fits the scenario directly above this text, which is where 2 enemies/entities both garnered 3 Conductive stacks from them being close as well as having an accompanying reaction. Recalling that, in order to generate 3 stacks on a single enemy requires an Elemental environment, so to speak, like Burning Grass, Frozen Water, or even Flaming Flowers and Mist Corollas, all of those “environments” act as “entities” to which can radiate as if they were mobs.
Therefore, it is, at least currently, not possible to realistically generate 3 Conductive stacks on a single enemy with a single Tap Skill in a neutral non-Elemental environment, say the Spiral Abyss for example.
Hover over the buttons to see the contents of each page.