by mr.pillow. — KQM
Updated for Version 4.6

Jump to:
Table of Contents
1. Preface
In Genshin Optimizer, multi-target optimization is an advanced method of optimization that can generate better and more balanced builds for your characters.
This guide is divided into two sections:
- Multi-Optimization Guide: This section introduces multi-target optimization and how to use it. It’s recommended to read the section if you’re unfamiliar with the concept. For a TL;DR, refer to this video tutorial from the official Genshin Optimizer channel.
- KQM’s Config Collection: This section has community-written configs that you can use for your multi-optimization needs, and is probably what you’re here for.
The contents of this guide assume that the reader is familiar with using the basic features of Genshin Optimizer. If you’re new to the tool, a good place to start is Genshin Optimizer’s official video tutorials playlist.
2. Multi-Optimization Guide
2.1. Introduction
In Genshin Optimizer, the goal of an optimization is called the optimization target or target. The builds that Genshin Optimizer recommends are ranked based on how well they maximize the given target. Since targets play such a central role in optimization, getting the right builds requires inputting the right targets.
Choosing a good optimization target is often straightforward. For example, if the goal is to maximize Zhongli’s Elemental Burst damage, the target will simply be his Elemental Burst DMG. This type of optimization, one that uses a single optimization target, will be referred to as normal optimization.
Normal optimization is fundamentally limited by allowing only a single optimization target. The type of optimization that lifts this restriction is called multi-target optimization or multi-optimization. As opposed to normal optimization, multi-optimization allows the user to optimize for a set of targets, simultaneously. This, in turn, leads to better build recommendations.
It can be said that the release of the multi-optimization feature has been one of the most significant developments for Genshin Optimizer. At present, many characters benefit from the feature, which makes learning how to use multi-optimization highly relevant.
2.2. Why Use Multi-Optimization?
The need for multi-optimization becomes apparent with characters who have complex damage profiles. Take a look at the following scenarios:
A character triggers Elemental Reactions on only some of their attacks, for example:
- In a Vaporize team, only a portion of Yoimiya’s Normal Attacks triggers Vaporize.
- Only some of Tighnari’s attacks trigger Spread in Quicken teams.
A buff is partially active or applies to only some of a character’s attacks, for example:
- Itto’s attacks during his Burst don’t have full uptime on Gorou’s Constellation 6 buff.
- Not all of Ayaka’s Elemental Burst hits receive Shenhe’s Icy Quill effect.
A character deals both Transformative Reaction and Talent damage, for example:
- Venti deals Elemental Skill and Burst damage in addition to his Swirl damage.
- In certain teams, Cyno deals Hyperbloom damage in addition to his Normal Attack and Skill damage.
In each example, normal optimization won’t suffice. This is because there’s no single optimization target that can accurately model the entirety of the character’s damage.
As an example, once again consider Yoimiya in a Vaporize team. She deals a mix of Vaped and non-Vaped Normal Attack damage. When using normal optimization, there are two alternatives:
- If Vape damage is used as Yoimiya’s optimization target, the builds recommended by Genshin Optimizer will risk having too much Elemental Mastery (EM) relative to the other stats. This is because Vape damage favors the EM stat and the Optimizer would believe that Yoimiya has 100% Vaporize uptime — more than what she has in-game.
- Conversely, if the optimization target is set to non-Vape damage, the recommended builds will likely have less EM than what is optimal. This is due to the Optimizer believing that Yoimiya has 0% Vaporize uptime — less than what she has in-game.
The above generalizes as follows: inaccurate optimization targets can result in build recommendations that are biased to some stats. This can be any stat — not just Elemental Mastery. The issue of inaccurate targets is largely solved by multi-target configurations, explained in-depth by the rest of this guide.
2.3. Multi-Target Configuration Properties
2.3.1. Introduction to Configs
A multi-target configuration or a config is the optimization target used in multi-optimization. In Genshin Optimizer, a config is a group of targets that is specific to a character. Abstractly, a config is a model of a character’s damage that aims to describe the gameplay scenario to be optimized for. The following sections explain the properties of configs. How to make and use configs is described further in the guide.
As a first example of a config, consider the one below. This is a Yoimiya config that consists of 2 targets: Vaped and non-Vaped 1st Normal Attack damage. Note that Yoimiya’s Elemental Skill has been activated from the Talents tab, thus giving the Pyro Conversion to her Normal Attacks.
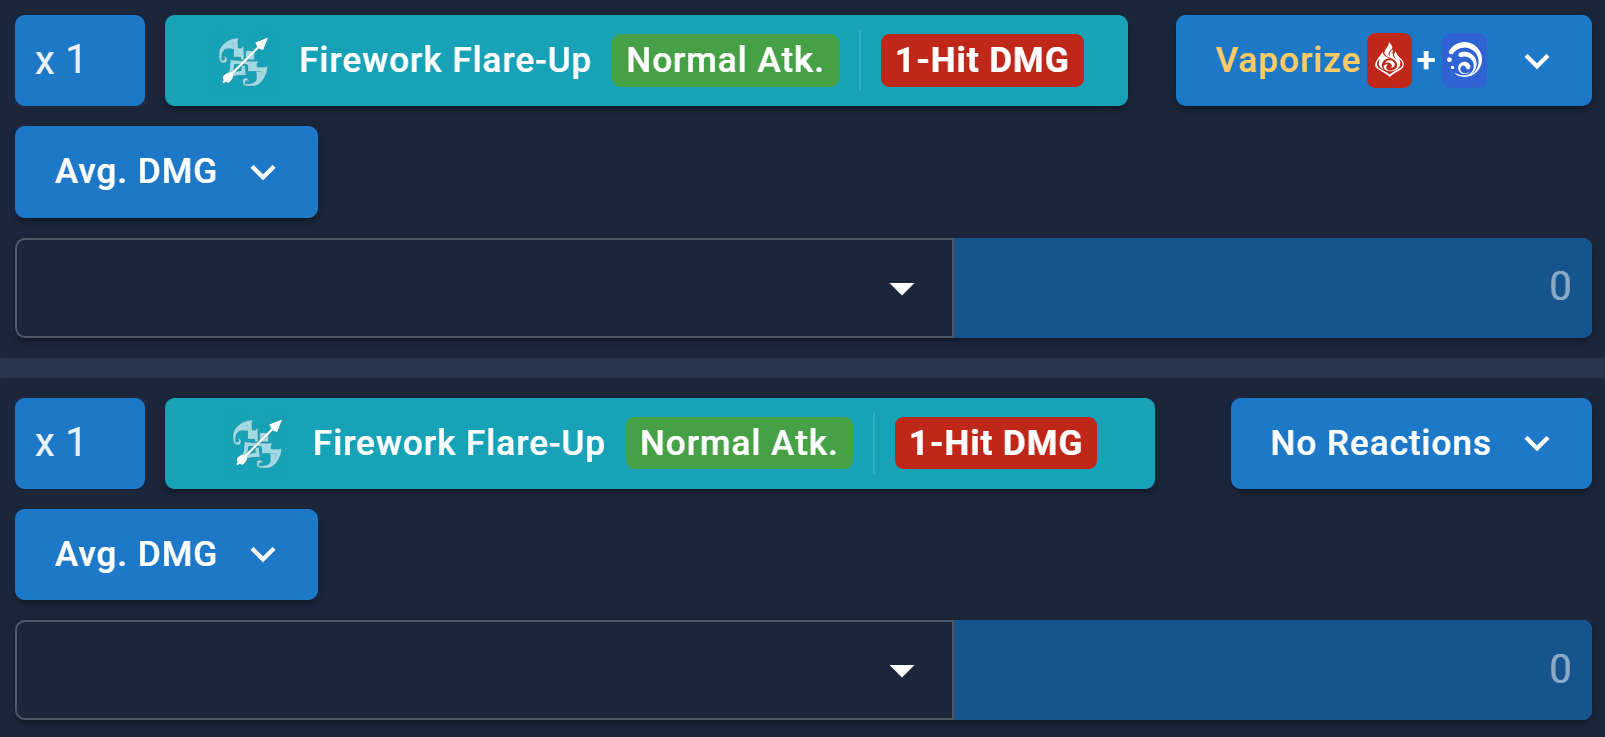
A Yoimiya config with two targets.
It’s emphasized in the previous section that when optimizing Yoimiya’s build, it’s important to account for the combination of Vaped and non-Vaped damage. The config above isn’t very accurate since it, e.g., assumes Yoimiya’s damage consists of only her 1st Normal Attack. However, it’s already a better model of her situation compared to before; the config tells Genshin Optimizer that she has 50% Vaporize uptime — not 0% or 100%. A more accurate model is discussed further in the guide.
2.3.2. Target Modifiers
The targets in a config can be customized using target modifiers. A modifier can only affect one target — the one that it’s added to. For instance, in the Yoimiya config from the previous section, the first target has a modifier that sets its damage value to be Vaporized while the second target has no such Reaction modifier.
There are five available types of target modifiers:
- Weight
A config may need to use a target multiple times. Instead of making a copy of the target, it can be given a weight that indicates how many times the target occurs. Weights can also be interpreted in the statistical sense: a number that states the importance of a target relative to the rest of the targets. Note that weights can be decimal numbers. - Reaction
A target corresponding to an attack that triggers an Amplifying or Additive Elemental Reaction can be given a reaction modifier. The reaction modifier is essential when modeling the damage of characters who don’t have full Reaction uptimes. - Hit mode
The hit mode refers to the CRIT setting of a target. The available options are Non-CRIT DMG, Average DMG, and CRIT Hit DMG. In practice, only Average DMG has relevance. - Bonus stats
This modifier is used for adding buffs or debuffs to a target. Using a minus sign turns a buff into a debuff. Bonus Stats modifiers are useful when modeling partial buff uptimes. - Infusion aura
Infusion aura is a modifier that changes the Element of targets that correspond to melee attacks. This feature is useful for modeling partial Infusion uptimes, though this is rare. Note that this modifier will override Infusions from the Talents tab, but will not override Infusions from the Team Buffs tab or any Elemental Conversions.
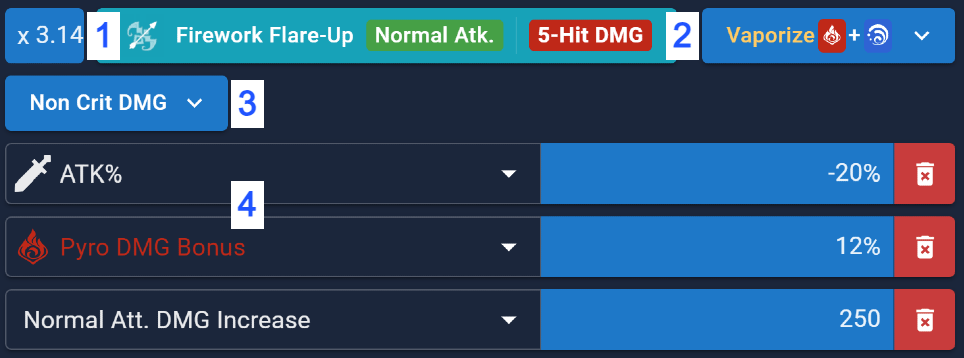
You can see examples of the different target modifiers in the image below. The target is the damage of Yoimiya’s 5th Normal Attack and has the following modifiers: a weight of 3.14, the Vaporize modifier, and the Non-CRIT DMG hit mode. It also has several bonus stats: an ATK% debuff, a Pyro DMG Bonus buff, and a Normal Attack DMG Increase buff. Note that DMG Increase buffs are Additive Base DMG Bonuses, different from usual Elemental DMG Bonuses.
A target with different modifiers.
Target modifiers are powerful tools. In a config with multiple targets, each target can be given its own modifiers. This makes it possible to create detailed configs that can model complex gameplay scenarios. In such configs, the most important target modifiers are usually the Reaction and Bonus Stat modifiers. Considering their importance, they are elaborated upon in the following examples.
Reaction Modifier Example
Amplifying and Additive Reactions (Vaporize, Melt; Spread, Aggravate) directly affect Talent damage. For most characters who make use of these Reactions, their attacks will not always trigger the said Reactions. This is mainly due to Internal Cooldown (ICD), which is a game mechanic that affects how often an attack can apply an Element.
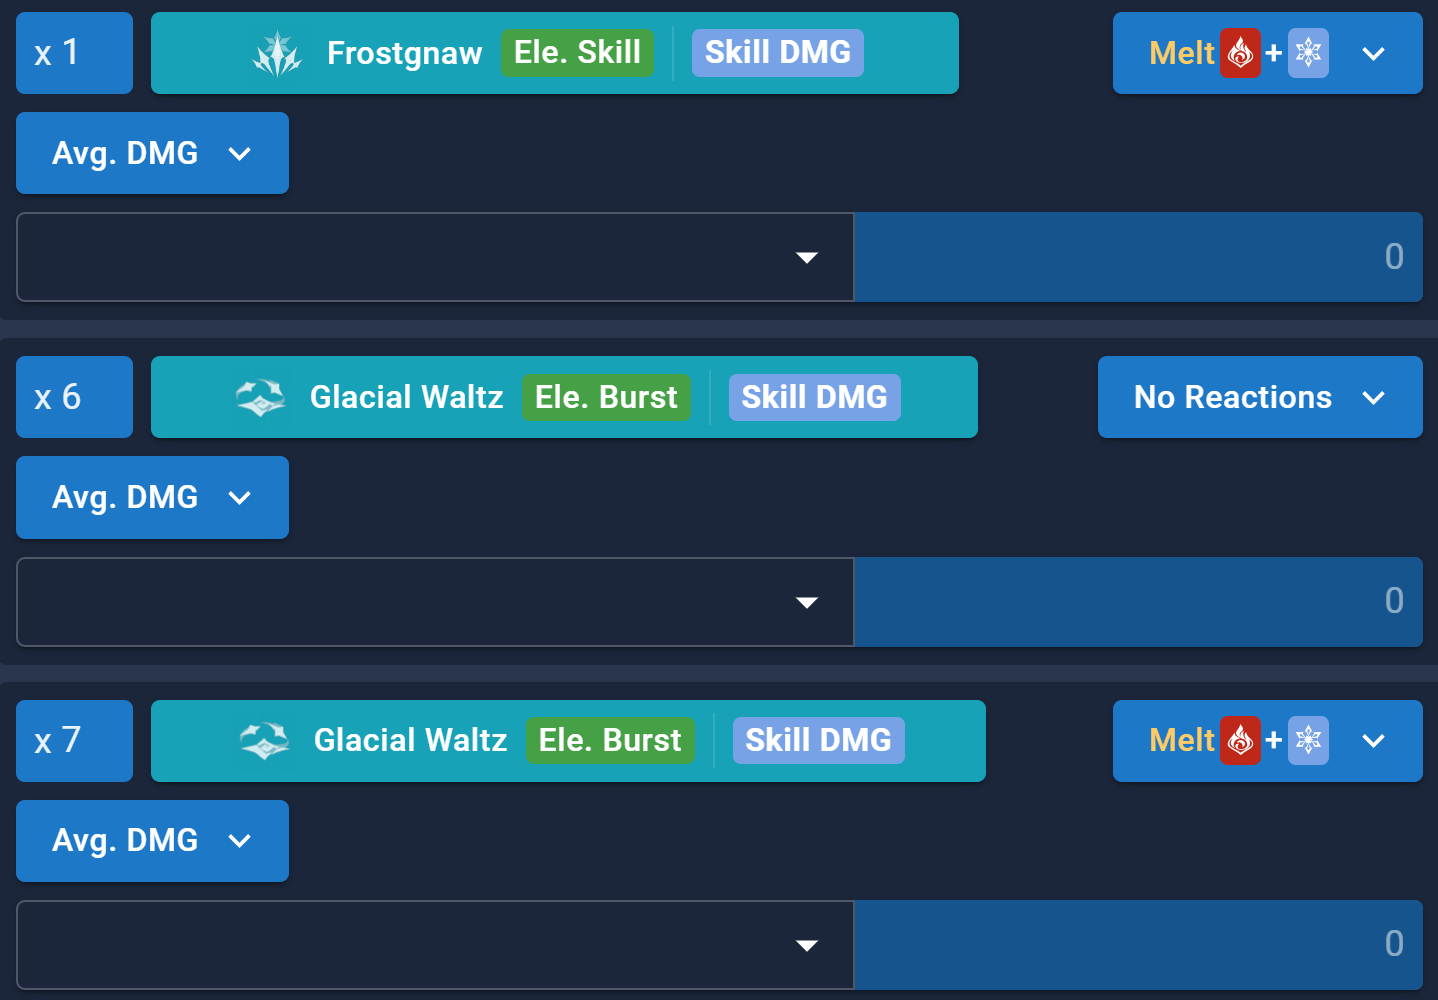
As an example, consider C0 Kaeya in a Melt team that can be assumed to have high Pyro application. Kaeya’s Elemental Burst hits 13 times at a baseline. Furthermore, his Burst has the default ICD, which results in 7 out of 13 Burst hits triggering Melt. In other words, Kaeya has a partial Reaction uptime, which can be modeled using the Reaction modifier.
Assuming one Elemental Skill use that triggers Melt as well, a reasonable config will be as follows:
A config for Melt Kaeya.
Targets that use the Melt modifier represent hits that trigger the Reaction (1 Skill hit + 7 Burst hits), and the remaining target represents the hits that go unreacted (6 Burst hits).
Bonus Stats Modifier Example
In some scenarios, the duration of a buff or a debuff may be too short, or they may apply to only certain attacks. These lead to partial buff uptimes, which can be accounted for with the use of the Bonus Stats modifier. One can do this in two equivalent ways — choose the more convenient one:
- Toggle off the buff in its corresponding tab (which could be the Team Buffs tab or one of the other tabs). Then, in the multi-optimization menu, manually add the buff to the targets that have uptime on it.
- Alternatively, toggle on the buff in its corresponding tab and manually add a matching debuff to the targets that have downtime on the buff.
Note that for buffs that don’t have partial uptime (i.e., buffs that have full uptime), the Bonus Stats modifier should not be treated as a substitute for the Team Buffs tab. This practice should be avoided because it limits the scope of configs, increases the risk of repeating buffs, and may increase the optimization time. Instead, it’s recommended that buffs with full uptime should be toggled on in the usual way from their corresponding tabs.
For example, consider a Kaeya config for a Mono Cryo team consisting of Kaeya, Shenhe, and Sucrose. If Sucrose has the 4pc Viridescent Venerer artifact set equipped, it can be assumed that she will grant full uptime on the Cryo RES Shred debuff. Therefore, this effect can be toggled on in the Team Buffs tab and doesn’t need to be taken into account when making Kaeya’s config.
On the other hand, Shenhe’s Icy Quill effect will not have full uptime; it will buff only a certain portion of Kaeya’s attacks. In this case, Shenhe’s Icy Quill buff can be toggled on in the Team Buffs tab and a matching debuff can be added to the targets that don’t receive the Icy Quill effect. (The alternative method mentioned earlier also works just as well.)
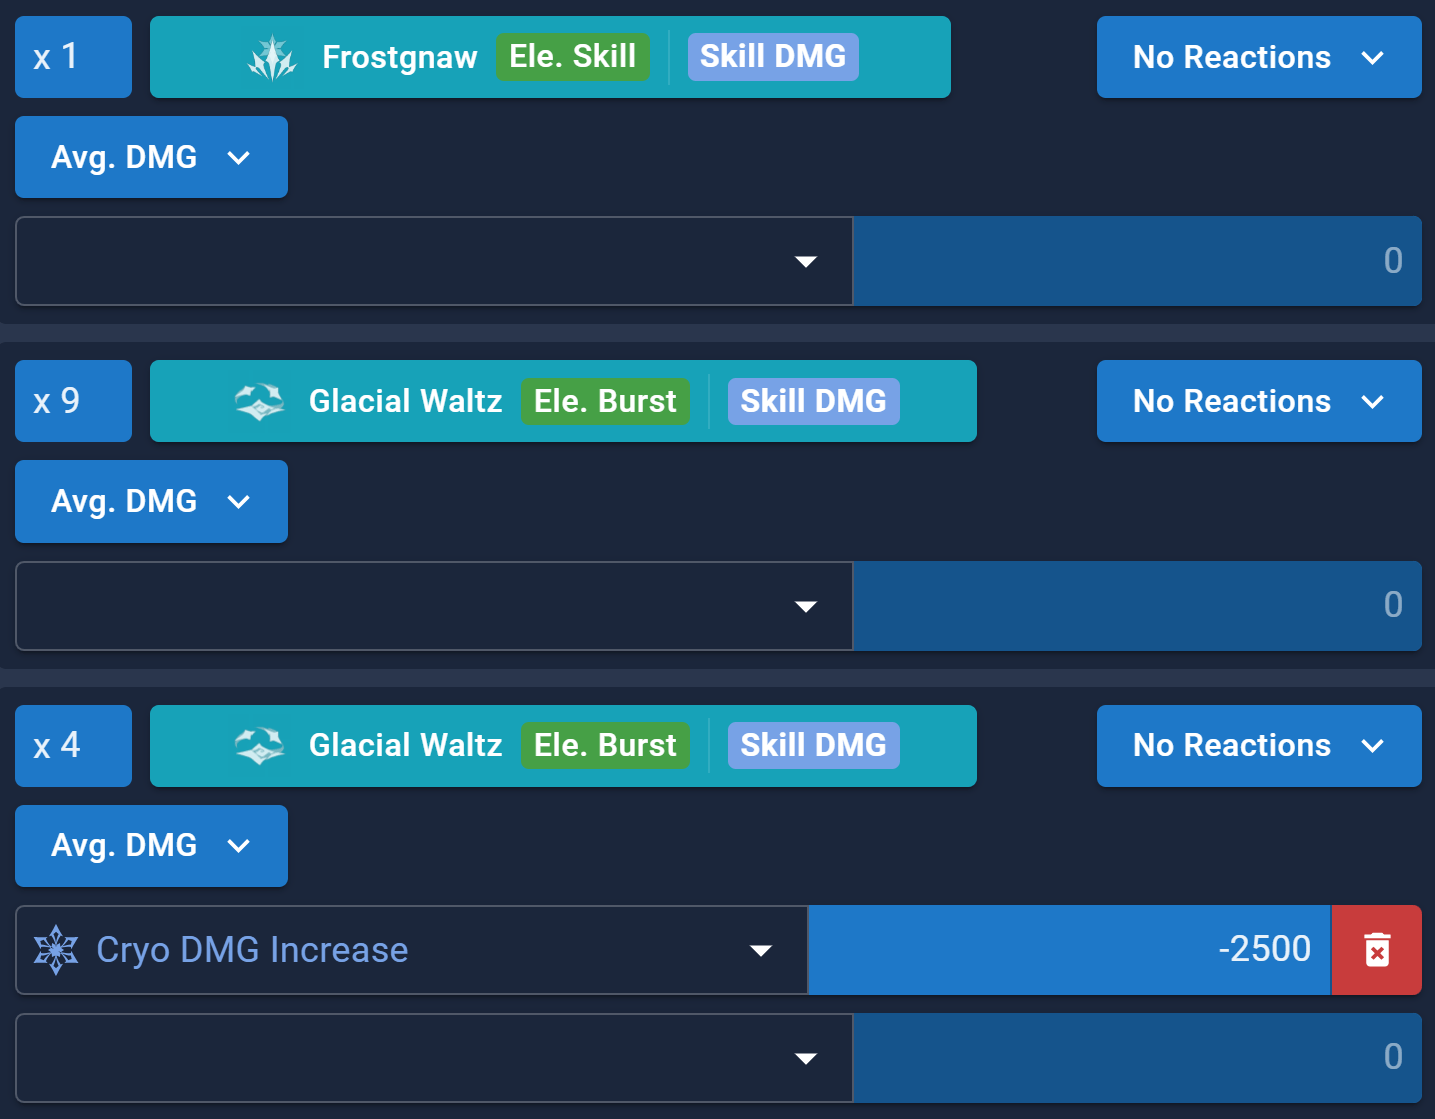
Assuming Kaeya uses one Elemental Skill followed by his Burst, and that he triggers 10 of Icy Quill’s effects in total, a reasonable config will be as follows:
A config for Kaeya in a Cryo team with Shenhe.
The weights of the first two targets add up to 10 (1 Skill + 9 Burst hits). These represent the attacks that benefit from Shenhe’s Icy Quill effect. The last target (4 Burst hits) has the given weight because, similar to the previous example, Kaeya’s Elemental Burst is assumed to hit 13 times. The last target also models Icy Quill’s downtime with the matching debuff for Shenhe’s Icy Quill effect, which is a negative Cryo DMG Increase.
Here’s how this works: Shenhe’s Icy Quill buff is toggled on in the Team Buffs tab, and it applies to all targets in the config — including the last one. However, since the last target has the matching debuff, they cancel out. Effectively, the last target doesn’t receive the Icy Quill effect.
2.3.3. Active and Inactive Targets
Another property of configs is that targets can be active or inactive. If the condition for a target’s existence is met, it will be active. Otherwise, it will be inactive. An active target is taken into account when calculating the total value of the config. An inactive target, on the other hand, does not affect the config’s value in any way.
To determine whether a target is active or inactive, you can look at the background color of the “DMG” text. Inactive targets will have a dark blue color while active ones will have a color corresponding to the target’s Element (or gray for Physical and light green for Healing).
This feature often goes unnoticed but it’s useful for generalizing configs. For instance, consider the Razor config below in two different states. In the first state, Razor is pre-C6, meaning the condition for the first target isn’t met, making it an inactive target. In the second state, the condition is met and the target is active. In other words, the config automatically adapts to the user’s Constellation level, making it easy for anyone to use it.
Likewise, weapon proc targets will be active if the character has the matching weapon equipped. Otherwise, they will be inactive.
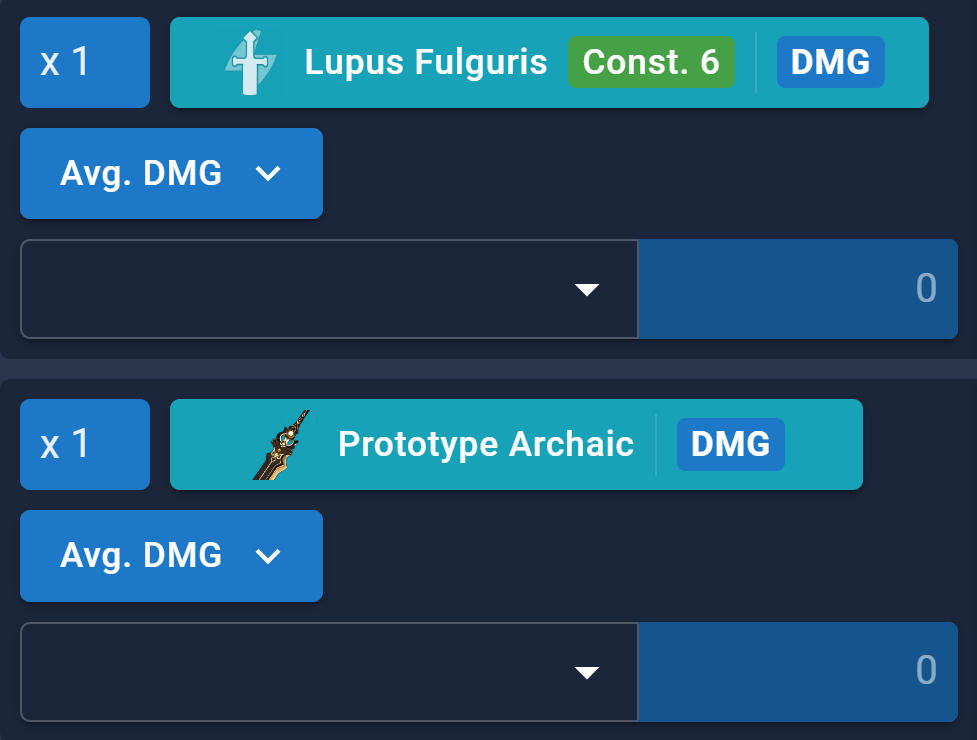
a) Razor is pre-C6 and not using Prototype Archaic.
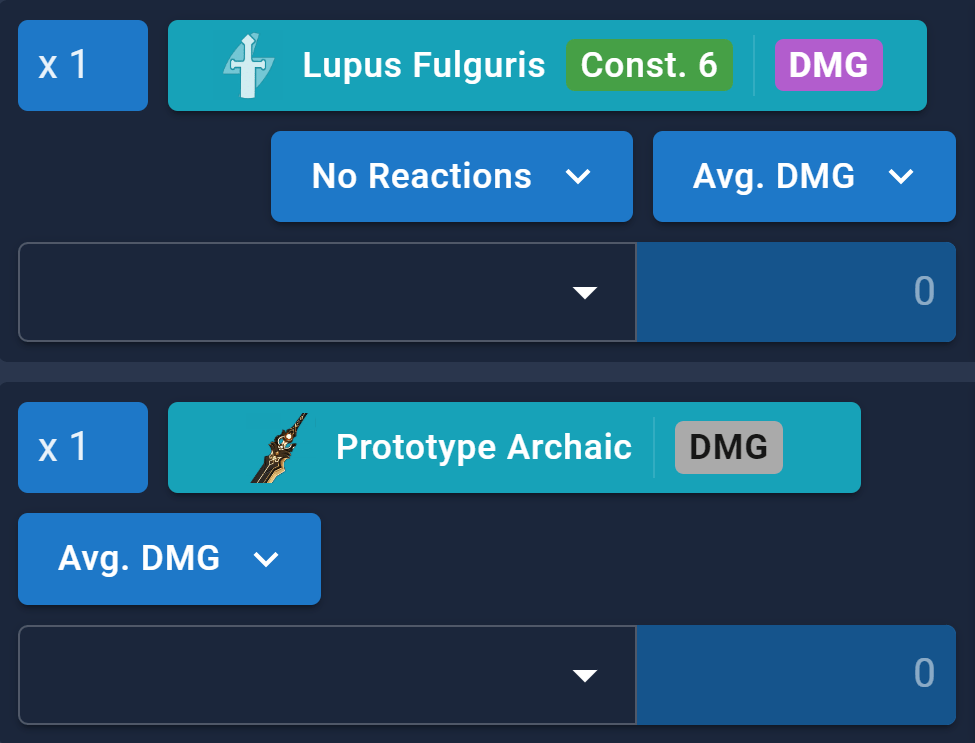
b) Razor is C6 and using Prototype Archaic.
It’s important to note that this kind of config generalization isn’t always applicable. For example, a certain Constellation might affect the other targets, in which case the assumed Constellation level must be respected. To stay on the safer side, it’s best to assume that a config isn’t generalized unless otherwise stated.
2.3.4. Making and Using Configs
There isn’t much more to say about the properties of targets themselves. Moving on, the following sections explain the practical uses of configs, including what to be mindful of when using them. Fortunately, making configs and using them in multi-optimization is a relatively straightforward process. Follow the diagram below:
- Access the Multi-Optimization Target Config menu at the top of the character’s page.
- In the popup menu, click Add New Custom Multi-target.
- Give your config a name and optionally, a description.
- Click Add New Custom target. In the popup menu, choose from the available optimization targets. After the target has been added, it can be customized using target modifiers as explained in the previous sections. Repeat this step until all the targets have been added and the config is complete.
- Return to the Optimize tab and click Select an Optimization Target. From inside the optimization target menu, select your new config.
- Click Generate Builds.
Note: The diagram below is outdated as of Genshin Optimizer’s latest UI update. However, the steps are still principally the same.
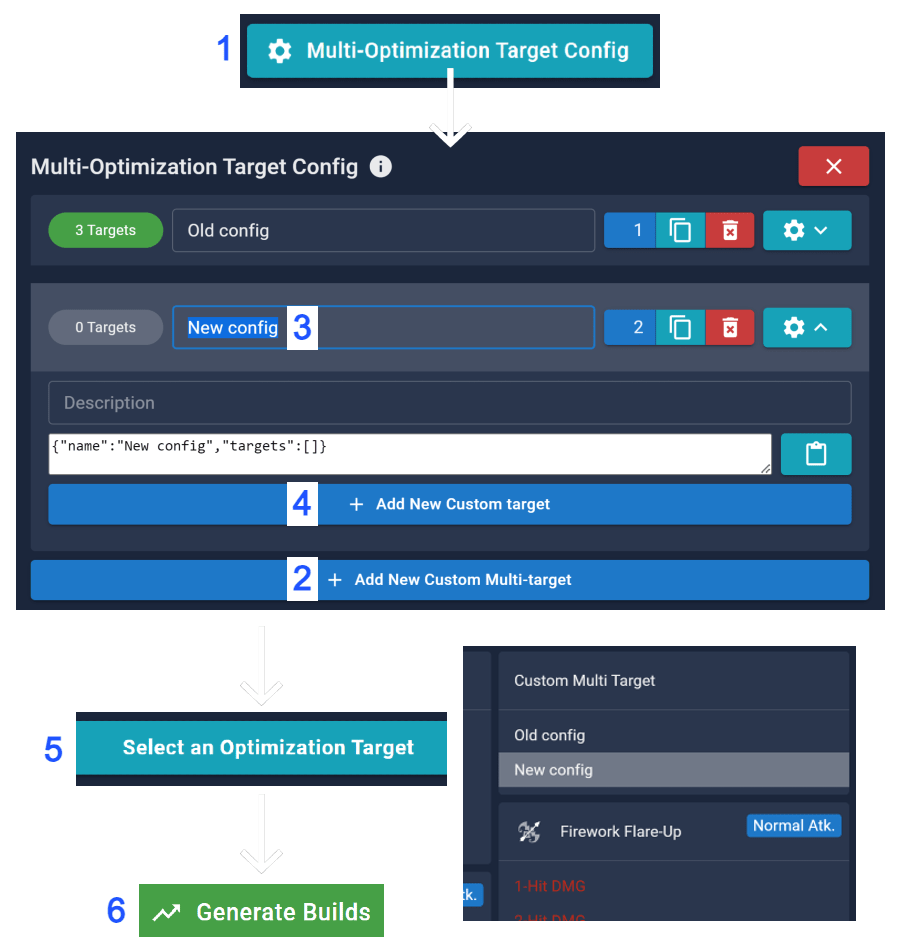
Diagram for creating a config and using it in multi-optimization.
At this point, it’s important to recall that the primary use of a config is to act as an optimization target for generating character builds. If two different configs lead to the same build recommendations, it’s irrelevant what the targets in the two configs look like, or what the configs’ damage values are.
For example, consider the two simple Kaeya configs below. The first config has one target: Kaeya’s Element Skill with a weight of 1. The second config is identical to the first one except that the weight is 2. When these configs are used in multi-optimization, the build recommendations will be exactly the same. This is because the artifacts that maximize Kaeya’s Elemental Skill damage are the same artifacts that maximize the damage of 2 of its instances. Notwithstanding, the damage value of the second target will be twice that of the first (4800 vs. 2400).
Note: The diagram below is outdated as of Genshin Optimizer’s latest UI update. However, the steps are still principally the same.
Config 1: Config 2:  | 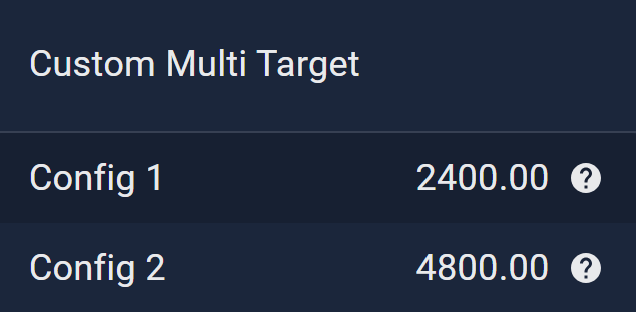 |
Two different Kaeya configs that give identical builds.
In other words, the damage values of different configs don’t necessarily indicate the quality of the builds generated by them. In a similar vein, the damage value of a config doesn’t say what a build’s damage per second (DPS) is. This is because Genshin Optimizer cannot take into account in-game execution of the actions described in a config, including factors such as the time spent performing them. It is especially important to be careful about this when comparing builds using the calculated damage of different configs. In general, two configs aren’t comparable unless they’re specifically designed to be.
As a final remark, it’s also crucial to bear in mind that the only difference between normal and multi-optimization is the type of target you use. Other than this, the two optimization methods involve the same steps such as setting up your characters’ Talents, adding in your team buffs, toggling on artifact set effects, and so on; configs cannot replace these steps.
2.3.5. Sharing Configs
Multi-target configurations can be shared in the string format, i.e., as text. An advantage with the string format, as opposed to, e.g., sharing screenshots of the multi-optimization menu, is that people can copy-and-paste the config into Genshin Optimizer. This makes it easy for others to use the config and to make sure everyone is on the same page.
To obtain the string, open the multi-optimization menu and copy the text in the white text field, or click the clipboard button to the right. Note that the text field can also be used to paste configs.
The highlighted string output of a Kaeya config.
It’s important to pay attention to the following when sharing configs: they may include symbols such as underscores ( _ ) or asterisks ( * ) that can count as Markdown syntax. On most platforms (Discord, Reddit, etc.), this causes the symbols to disappear, making the config unusable for those that copy it. Therefore, it’s recommended to always share configs as raw strings. In Markdown, this is done by wrapping the config in backticks ( ` ), `like this`.
An example config is shown below. It’s one of the Kaeya configs from earlier. Since configs are specific to their characters, note that this will not work for anyone except Kaeya.
{"name":"Kaeya E Q in Mono Cryo with Shenhe: example config","description":"","targets":[{"weight":1,"path":["skill","dmg"],"hitMode":"avgHit","bonusStats":{}},{"weight":9,"path":["burst","dmg"],"hitMode":"avgHit","bonusStats":{}},{"weight":4,"path":["burst","dmg"],"hitMode":"avgHit","bonusStats":{"cryo_dmgInc":-2500}}]}
2.4. On Writing Good Configs
This guide hasn’t more to say about the properties of targets and configs. However, the question of what config to use is interesting, and this last section is dedicated to this topic.
What makes multi-optimization a powerful tool is enabling users to have more precise optimization targets. After all, to get a good build recommendation, you need to input a good target. If the purpose of multi-optimization is to increase gameplay performance, a good config can be defined as one that models the gameplay scenario accurately.
This is where things can get tricky; there’s no simple formula for making accurate configs. In the first place, each gameplay scenario is defined uniquely by its character, team, game mechanics, rotation, and so on. Furthermore, one needs to be able to translate the scenario to config language, which requires a certain level of familiarity with both the game and Genshin Optimizer. Accounting for all this can be demanding, but does not mean multi-optimization is difficult.
Here’s some broad advice that can help structure how to think about writing good configs: begin by identifying the gameplay scenario you wish to optimize for. Ask yourself why multi-optimization, rather than normal optimization, is needed. Then, use targets to model the scenario, making use of target modifiers and other properties that the guide has covered. This step can require a bit of game knowledge and even in-game testing, but approximations can also go a long way. Try to aim for accuracy, but understand that perfection is far from what’s necessary to make useful configs.
Studying the configs that others write can also help with writing your own. Here are some examples of how one can go about making multi-optimization configs:
1. Vaporize Yoimiya
Continuing the Vaporize Yoimiya example from the beginning of the guide, this video guide from the official Genshin Optimizer channel explains how to make a suitable config. (It’s recommended to watch the video guide since it also shows how the menus are navigated.)
The config models a 5-hit Normal Attack string where some targets have the Vaporize modifier, and the rest don’t. Which targets should be Vaporized is based on Yoimiya’s Pyro application ICD on her Normal Attacks, which is the default ICD given by the rule “3 hits or 2.5s.” In the end, it turns out that the hits that trigger Vaporize are NA1~1, NA3, and NA5, which is reflected in the final config with the help of the Reaction modifier.
{"name":"Vaporize Yoimiya example","targets":[{"weight":1,"path":["normal","0"],"hitMode":"avgHit","reaction":"vaporize","bonusStats":{}},{"weight":1,"path":["normal","0"],"hitMode":"avgHit","bonusStats":{}},{"weight":1,"path":["normal","1"],"hitMode":"avgHit","bonusStats":{}},{"weight":1,"path":["normal","2"],"hitMode":"avgHit","bonusStats":{},"reaction":"vaporize"},{"weight":2,"path":["normal","3"],"hitMode":"avgHit","bonusStats":{}},{"weight":1,"path":["normal","4"],"hitMode":"avgHit","bonusStats":{},"reaction":"vaporize"}]}
2. Albedo and C6 Gorou
Consider a Geo team with Albedo and Gorou. Gorou’s 6th Constellation can buff the CRIT DMG of the party members’ Geo damage by 40%. This effect lasts for 12s, so in a standard 20s team rotation, Albedo’s Elemental Skill hits will have partial uptime on this buff. This can be taken into account with multi-optimization to ensure that the Optimizer recommends Albedo builds that have a balanced CRIT distribution.
Doing in-game tests show that Albedo’s Transient Blossoms are triggered 9 times in the given rotation, with 4 of them not getting buffed by Gorou’s C6. Hence, an appropriate config can consist of 2 targets: the first target being Transient Blossom DMG with a weight of 5, and the second target being Transient Blossom DMG with a weight of 4 and a Bonus Stats modifier of -40% Geo CRIT DMG. Notice how the debuff on the last target is used to model the downtime of Gorou’s buff.
{"name":"Albedo and Gorou C6 example","targets":[{"weight":5,"path":["skill","blossom"],"hitMode":"avgHit","bonusStats":{}},{"weight":4,"path":["skill","blossom"],"hitMode":"avgHit","bonusStats":{"geo_critDMG_":-40}}]}
3. Burgeon Thoma
For Burgeon Thoma, it’s sufficient to use normal optimization and set Burgeon damage as the optimization target. However, suppose that a Thoma enthusiast wants to verify that multi-optimization indeed isn’t necessary. For this, they use the results from a simulation (like gcsim) and note the following: in a certain team and single-target scenario, and over a few rotations, Thoma’s Fiery Collapse from his Elemental Burst hits 55 times and he deals Burgeon damage 98 times.
A simple multi-target configuration can therefore be made out of two targets: the first target being Fiery Collapse damage with a weight of 1, and the second target being Burgeon damage with a weight of ~1.8. The latter weight corresponds to the ratio taken from the aforementioned results (98 ÷ 55).
{"name":"Burgeon Thoma example","targets":[{"weight":1,"path":["burst","collapseDmg"],"hitMode":"avgHit","bonusStats":{}},{"weight":1.781,"path":["reaction","burgeon"],"hitMode":"avgHit","bonusStats":{}}],"description":"The used simulation is here: https://gcsim.app/v3/viewer/share/97c0e4d1-4b92-433c-930b-b3fafcbbde4d"}
After using the config as an optimization target, the Thoma player compares the recommended builds with the ones from normal optimization. As expected, they are the same. Surely, this couldn’t have been time wasted.
The config could’ve been made in an alternative and easier way with the help of a suitable approximation. Due to a special property of Bloom-related Reactions, an opponent can only take up to 2 instances of Burgeon damage every 0.5s. Therefore, in a single-target scenario, each Fiery Collapse hit will have Thoma dealing Burgeon damage at most twice. This is a powerful fact that can be derived without playing the team at all! If there’s enough Dendro Core production, it can therefore be assumed that the ratio between Fiery Collapse hits and Burgeon damage instances will be about 1:2. This value is close enough to the actual value (1:1.8) that this estimate would’ve most likely given the same results.
4. Nahida with The Widsith
Widsith’s passive grants its holder a random buff for 10s every 30s when they take the field. This weapon is particularly tricky to work with when optimizing due to the randomness of the buff and the difficulty of determining when the passive activates. Depending on the circumstances, different approaches can be taken; this example mentions only one.
Consider Nahida in a team that has a 20s rotation. If Nahida is swapped into once per rotation, Widsith’s passive will be triggered once every two rotations (i.e., every 40s) because of the weapon’s long 30s cooldown. This translates to a passive uptime of roughly one-fourth (10s ÷ 40s). Furthermore, since there are three possible buffs (60% ATK, 48% DMG Bonus, and 240 EM at R1), each buff will have an uptime equal to one-third of the passive’s uptime. In other words, each buff will have an uptime of 1:12.
Buffs with partial uptimes have been discussed before. According to the method from earlier, Widsith’s buffs can be modeled by first toggling off the weapon’s passive in the Overview tab and then adding the buffs to the config targets that have uptime on it.
{"name":"Nahida with The Widsith","targets":[{"weight":9,"path":["skill","karmaDmg"],"hitMode":"avgHit","bonusStats":{}},{"weight":1,"path":["skill","karmaDmg"],"hitMode":"avgHit","bonusStats":{"atk_":60}},{"weight":1,"path":["skill","karmaDmg"],"hitMode":"avgHit","bonusStats":{"dendro_dmg_":48}},{"weight":1,"path":["skill","karmaDmg"],"hitMode":"avgHit","bonusStats":{"eleMas":240}}],"description":"Nahida with The Widsith example"}
This config consists of four targets: three targets with a weight of 1 where each target has one of the three Widsith buffs and a last target with a weight of 9 that doesn’t have any Bonus Stats modifiers. This way, each of the three buff types has an uptime equal to 1 ÷ (1 + 1 + 1 + 9), i.e., 1:12 — as desired.
This config makes many assumptions, some of which may not be applicable to gameplay. For instance, if the combat scenario ends earlier than what is assumed here, Nahida may end up having a completely different uptime on the buffs. It’s crucial to verify that what a config models and what the gameplay scenario actually is match.
In practice, making accurate configs can require more effort. For example, the Yoimiya config could’ve considered the ramping Pyro DMG Bonus from her Ascension 1 Passive. Similarly, the Albedo config could’ve taken into account the partial uptimes of the rest of Gorou’s buffs. The remaining configs also have room for improvement.
Indeed, the more accurate the config, the more difficult it is to make it. However, there’s a limit to how much accuracy is actually needed for artifact optimization. It’s up to the user to decide on the balance between model and reality, with “useful enough” often being the stopping point. For the configs above, it’s not at all guaranteed that making them more accurate will lead to better build recommendations. At the same time, it’s clear that normal optimization wouldn’t have sufficed at all.
3. KQM’s Config Collection
3.1. Introduction
Apart from making your own configs, you can also use the multi-optimization feature by taking configs from config collections. A config collection is a group of premade configs written by others.
This guide has KQM’s Config Collection, available further below. It consists of community-written configs that are verified by KQM Theorycrafting, and also includes external multi-optimization resources.
The config entries in KQM’s Config Collection follow this structure:
- Explanation: the scenario that the config is meant to be used for
- Assumptions: what the config assumes along with other important info
- The config itself — use the copy button!
- Customization: extra scenarios that the config can be used for after small edits
Some entries in KQM’s Config Collection link to external multi-optimization resources. Note that these may not follow the structure above and may be of different quality.
3.2. Contribution to KQM’s Config Collection
This collection is an active project and you’re welcome to submit your configs to be published in it, see the Submission form for KQM’s Config Collection.
3.3. Setting Up Configs
After copying a config, follow the diagram below to use it:
- Access the Multi-Optimization Target Config menu at the top of the character’s page.
- In the popup menu, click Add New Custom Multi-target.
- Paste the config into the white text box.
- Return to the Optimize tab and click Select an Optimization Target. From inside the optimization target menu, select the config.
After choosing a config, you can still tweak it to fit your specific needs. Config collections can also be treated as a point of reference when making your own configs.
Note: The diagram below is outdated as of Genshin Optimizer’s latest UI update. However, the steps are still principally the same.
Diagram for setting a config as the optimization target.
3.4. Disclaimer
Both parties have responsibilities when sharing and using configs:
- The sharer should aim to make accurate configs and explain them, allowing the users to make educated decisions.
- The user should check that the config fits their scenario and playstyle, and understand what it does before using it.
While KQM bears responsibility for the first point, the second point is on you. When using the config collection, pay attention to the following:
- Each config comes with important explanations and assumptions that the config authors write. Certain configs may require you to edit them to match your scenario before they can be used.
- The configs are valid only under their assumptions. If a config doesn’t match your scenario, for example your team or Constellation levels, it may be best to not use it at all.
- Not all characters have configs submitted for them, even if they may be popular. If you can’t find a config, it means it hasn’t been submitted yet.
3.5. Config Entry List
Please read the Disclaimer section before using the config collection.
- Config Collections
- Albedo
- Alhaitham
- Aloy
- Amber
- Arataki Itto
- Arlecchino
- Barbara
- Baizhu
- Beidou
- Bennett
- Candace
- Charlotte
- Chevreuse
- Chiori
- Chongyun
- Collei
- Cyno
- Dainsleif
- Dehya
- Diluc
- Diona
- Dori
- Eula
- Faruzan
- Fischl
- Freminet
- Furina
- Gaming
- Ganyu
- Gorou
- Hu Tao
- Jean
- Kaedehara Kazuha
- Kaeya
- Kamisato Ayaka
- Kamisato Ayato
- Kaveh
- Keqing
- Kirara
- Klee
- Kujou Sara
- Kuki Shinobu
- Layla
- Lisa
- Lynette
- Lyney
- Mika
- Mona
- Nahida
- Navia
- Neuvillette
- Nilou
- Ningguang
- Noelle
- Qiqi
- Raiden Shogun
- Razor
- Rosaria
- Sangonomiya Kokomi
- Sayu
- Shenhe
- Shikanoin Heizou
- Sucrose
- Tartaglia (Childe)
- Thoma
- Tighnari
- Traveler
- Venti
- Wanderer
- Wriothesley
- Xiangling
- Xianyun
- Xiao
- Xingqiu
- Xinyan
- Yae Miko
- Yanfei
- Yaoyao
- Yelan
- Yoimiya
- Yun Jin
- Zhongli
Config Collections
GO Discord Repository
Genshin Optimizer Discord
Explanation: The Genshin Optimizer Discord server has a user-submitted multi-optimization target repository. Note that it isn’t curated by KQM nor Genshin Optimizer. Please observe their guidelines.
Link to external resource: multi-opt-collection in Genshin Optimizer Discord
Albedo
Dynamic Transient Blossoms
mr.pillow.
Explanation: Intended for ~20s Itto team rotations when using Gorou C6 and R5 Cinnabar. Multi-optimization is important in this case since accounting for dynamic buff uptimes can give a more balanced build.
Assumptions: 9 Transient Blossoms over the rotation Gorou EQ > Albedo E > Itto N1Q and Burst combo. The config accounts for buff uptimes: certain Cinnabar procs aren’t buffed by some of Gorou’s buffs (this assumes Albedo is Level 90 and Gorou Q is Level 12), certain Transient Blossom procs aren’t buffed by Gorou C6, and Albedo A1 has 50% uptime. When using the config, you should toggle on all buffs, including Gorou’s buffs, Cinnabar’s passive, and Albedo A1.
{"name":"Albedo Dynamic Transient Blossoms: C6 Gorou and R5 Cinnabar","targets":[{"weight":1,"path":["skill","blossom"],"hitMode":"avgHit","bonusStats":{"all_dmg_":-12.5}},{"weight":4,"path":["skill","blossom"],"hitMode":"avgHit","bonusStats":{"all_dmg_":-12.5,"skill_dmgInc":-330}},{"weight":4,"path":["skill","blossom"],"hitMode":"avgHit","bonusStats":{"all_dmg_":-12.5,"critDMG_":-40,"skill_dmgInc":-505}}]}
Skill and Burst Damage
jamberry
Explanation: Config for when using Albedo’s Elemental Burst off-cooldown. While it’s usually sufficient to optimize for Transient Blossom damage, when using Burst, and especially if the Burst receives buffs, it’s important to use multi-optimization.
Assumptions: The config includes Skill and Burst attacks in a typical ~12s rotation. 5 Transient Blossom + 3 Fatal Blossom. (Fatal Blossom targets enemies up to once each, and then hits randomly within its AoE after this, so multiple tightly grouped enemies are more likely to be hit more times. For teams without significant grouping, 2-3 hits is a reasonable baseline). No buffs are assumed in the config.
{"name":"Skill and Burst","targets":[{"weight":1,"path":["skill","dmg"],"hitMode":"avgHit","bonusStats":{}},{"weight":5,"path":["skill","blossom"],"hitMode":"avgHit","bonusStats":{}},{"weight":1,"path":["burst","dmg"],"hitMode":"avgHit","bonusStats":{}},{"weight":3,"path":["burst","blossom"],"hitMode":"avgHit","bonusStats":{}}]}
Alhaitham
Spread
reens
Explanation: Config that models a long on-field Alhaitham combo in Spread teams.
Assumptions: Full Quicken uptime is assumed. The used rotation is Q E N2D 2N3D 3N2C. Toggle on the Dendro Infusion under Alhaitham’s Elemental Skill (Talents Tab) before optimizing. If using Light of Foliar Incision, make sure to activate its passive Whitemoon Bristle in the Overview tab.
{"name":"Alhaitham Spread QE N2D 2N3D 3N2C","targets":[{"weight":2,"path":["burst","instanceDmg"],"hitMode":"avgHit","bonusStats":{}},{"weight":2,"path":["burst","instanceDmg"],"hitMode":"avgHit","reaction":"spread","bonusStats":{}},{"weight":3,"path":["charged","dmg"],"hitMode":"avgHit","bonusStats":{}},{"weight":1,"path":["charged","dmg"],"hitMode":"avgHit","reaction":"spread","bonusStats":{}},{"weight":8,"path":["skill","mirrorDmg1"],"hitMode":"avgHit","bonusStats":{}},{"weight":9,"path":["skill","mirrorDmg1"],"hitMode":"avgHit","reaction":"spread","bonusStats":{}},{"weight":1,"path":["skill","rushDmg"],"hitMode":"avgHit","reaction":"spread","bonusStats":{}},{"weight":5,"path":["normal","0"],"hitMode":"avgHit","reaction":"spread","bonusStats":{}},{"weight":1,"path":["normal","0"],"hitMode":"avgHit","bonusStats":{}},{"weight":6,"path":["normal","1"],"hitMode":"avgHit","bonusStats":{}},{"weight":2,"path":["normal","2"],"hitMode":"avgHit","bonusStats":{}}]}
Quickbloom
skylarke and choumari
Explanation: Config for modeling the Spread uptime in a Quickbloom with Nahida – Xingqiu – Kuki Shinobu.
Assumptions: Rotation: Alhaitham Q N1 swap 2N3D N2E 2N3D N1C 3N3D N3. Reaction counts are from this gcsim. No buffs are assumed; add buffs in the Team Buffs menu but keep in mind that they in reality may not have full uptime.
{"name":"Alhaitham Quickbloom Spread Q N1 swap 2N3D N2E 2N3D N1C 3N3D N3","description":"","targets":[{"weight":3,"path":["burst","instanceDmg"],"hitMode":"avgHit","bonusStats":{}},{"weight":1,"path":["burst","instanceDmg"],"hitMode":"avgHit","reaction":"spread","bonusStats":{}},{"weight":1,"path":["charged","dmg"],"hitMode":"avgHit","bonusStats":{}},{"weight":1,"path":["charged","dmg"],"hitMode":"avgHit","reaction":"spread","bonusStats":{}},{"weight":12,"path":["skill","mirrorDmg1"],"hitMode":"avgHit","bonusStats":{}},{"weight":5,"path":["skill","mirrorDmg1"],"hitMode":"avgHit","reaction":"spread","bonusStats":{}},{"weight":1,"path":["skill","rushDmg"],"hitMode":"avgHit","bonusStats":{}},{"weight":1,"path":["normal","0"],"hitMode":"avgHit","reaction":"spread","bonusStats":{}},{"weight":10,"path":["normal","0"],"hitMode":"avgHit","bonusStats":{}},{"weight":1,"path":["normal","1"],"hitMode":"avgHit","reaction":"spread","bonusStats":{}},{"weight":8,"path":["normal","1"],"hitMode":"avgHit","bonusStats":{}},{"weight":3,"path":["normal","2"],"hitMode":"avgHit","reaction":"spread","bonusStats":{}},{"weight":4,"path":["normal","2"],"hitMode":"avgHit","bonusStats":{}}]}
Aloy
Amber
Arataki Itto
Handbook to Optimizing Itto
mr.pillow.
Explanation: The Handbook to Optimizing Itto is an optimization guide that explains basic and advanced optimization for Arataki Itto. The guide includes multi-optimization configs.
Link to external resource: The Handbook to Optimizing Itto
Arlecchino
Barbara
Baizhu
Beidou
Aggravate
itsjaeyou
Explanation: This config provides a rough mapping of the Aggravate procs for C2+ Beidou in a two-target (2T) environment. This configuration should be used as an approximation as various assumptions will change the results.
Assumptions: The following assumptions are used: Beidou is C2+ and all hits bounce consistently (targets do not move in and out of Stormbreaker bounces). Stormbreaker has 10 discharges (50 total hits). Beidou’s Tidecaller and Stormbreaker initial damage will always Aggravate. Only Aggravate is accounted for in the config; any other buffs should be accounted for normally in the Talents / Team Buffs tabs.
{"name":"C2 in 2 target","targets":[{"weight":2,"path":["skill","dmgOneHit"],"hitMode":"avgHit","reaction":"aggravate","bonusStats":{}},{"weight":2,"path":["burst","burstDmg"],"hitMode":"avgHit","reaction":"aggravate","bonusStats":{}},{"weight":21,"path":["burst","lightningDmg"],"hitMode":"avgHit","reaction":"aggravate","bonusStats":{}},{"weight":29,"path":["burst","lightningDmg"],"hitMode":"avgHit","bonusStats":{}}]}
Customization: If more than 10 Stormbreaker discharges are triggered, it is suggested to set the number of Aggravates / discharges to 23 / 55 or 25 / 60 for 11 or 12 hits, respectively. Assuming 10 discharges, for scenarios other than C2 in 2T, the following can be done: Change the number of hits on Tidecaller and Stormbreaker Initial Hit to match the number of opponents, and refer to the following rates for the Aggravates / discharges counts: 12 / 30 for C0 in 2T, 3 / 10 for CX in 1T, 25+ / 50 for C2 in 3+T.
Bennett
Candace
Charlotte
Chevreuse
Chiori
Chongyun
Collei
Cyno
Aggravate
not.logic
Explanation: Config for Aggravate Cyno assuming non-4pc Thundering Fury.
Assumptions: Full Quicken uptime is assumed. The rotation is E Q N4E N5E N5E N4D N4E (18 Aggravates in total). When using the config, toggle on Cyno’s Elemental Burst and toggle off his A1.
{"name":"Non-TF Cyno (EQ n4E n5E n5E n4d n4E)(18 aggravates)","targets":[{"weight":4,"path":["burst","normal_0"],"hitMode":"avgHit","reaction":"aggravate","bonusStats":{}},{"weight":1,"path":["burst","normal_0"],"hitMode":"avgHit","bonusStats":{}},{"weight":1,"path":["burst","normal_1"],"hitMode":"avgHit","reaction":"aggravate","bonusStats":{}},{"weight":4,"path":["burst","normal_1"],"hitMode":"avgHit","bonusStats":{}},{"weight":5,"path":["burst","normal_2"],"hitMode":"avgHit","bonusStats":{}},{"weight":5,"path":["burst","normal_3"],"hitMode":"avgHit","reaction":"aggravate","bonusStats":{}},{"weight":5,"path":["burst","normal_3"],"hitMode":"avgHit","bonusStats":{}},{"weight":2,"path":["burst","normal_4"],"hitMode":"avgHit","bonusStats":{}},{"weight":3,"path":["passive1","boltDmg"],"hitMode":"avgHit","reaction":"aggravate","bonusStats":{}},{"weight":6,"path":["passive1","boltDmg"],"hitMode":"avgHit","bonusStats":{}},{"weight":1,"path":["skill","skillDmg"],"hitMode":"avgHit","reaction":"aggravate","bonusStats":{"eleMas":-100}},{"weight":1,"path":["skill","riteDmg"],"hitMode":"avgHit","reaction":"aggravate","bonusStats":{}},{"weight":3,"path":["skill","riteDmg"],"hitMode":"avgHit","reaction":"aggravate","bonusStats":{"skill_dmg_":35}}]}
4pc TF Quickbloom
fjgwey
Explanation: This config can be used to approximate a typical Cyno rotation when played in a quickbloom team. Using differing Hydro units can change what reactions are triggered and in what frequency.
Assumptions: Before using these configs, turn on Pactsworn Pathclearer in Cyno’s “Talents” tab, and leave his A1 passive “Featherfall Judication” toggled off since this bonus is added in the config. Also make sure to activate any relevant team buffs in the “Team Buffs” tab, such as Nahida’s Q or Baizhu’s Q. This config assumes a typical rotation of EQ > N1E > 6x N4E. In practical gameplay, you may sometimes get your skill CD back at N3 just before your next Endseer but it’s always better to wait a little bit and trigger the Endseer.
Xingqiu Config:
Assumes one Aggravate on each N1 as a rough estimation, 7 Es in total with 3 Endseer procs, 2 of which are Aggravated. 2 out of the 9 total Duststalker Bolts are Aggravated. With Xingqiu C6, assumes an average of 22 Hyperbloom procs. You could lower this by 3-4 if not using C6 Xingqiu.
{"name":"Cyno TF Quickbloom XQ Rotation (EQ > N1E > 6x N4E)","targets":[{"weight":1,"path":["skill","skillDmg"],"hitMode":"avgHit","bonusStats":{}},{"weight":7,"path":["burst","normal_0"],"hitMode":"avgHit","reaction":"aggravate","bonusStats":{}},{"weight":6,"path":["burst","normal_1"],"hitMode":"avgHit","bonusStats":{}},{"weight":6,"path":["burst","normal_2"],"hitMode":"avgHit","bonusStats":{}},{"weight":6,"path":["burst","normal_3"],"hitMode":"avgHit","bonusStats":{}},{"weight":4,"path":["skill","riteDmg"],"hitMode":"avgHit","bonusStats":{}},{"weight":2,"path":["skill","riteDmg"],"hitMode":"avgHit","reaction":"aggravate","bonusStats":{"skill_dmg_":35}},{"weight":1,"path":["skill","riteDmg"],"hitMode":"avgHit","bonusStats":{"skill_dmg_":35}},{"weight":7,"path":["passive1","boltDmg"],"hitMode":"avgHit","bonusStats":{"skill_dmg_":35}},{"weight":2,"path":["passive1","boltDmg"],"hitMode":"avgHit","reaction":"aggravate","bonusStats":{"skill_dmg_":35}},{"weight":22,"path":["reaction","hyperbloom"],"hitMode":"avgHit","bonusStats":{}}]}
Yelan/Furina Config:
Assumes one Aggravate on each N1, with one extra N4 Aggravate as a rough estimation, and 7 Es total with 3 Aggravated Endseer procs. 3 out of the 9 total Duststalker Bolts are Aggravated. 16 Hyperbloom procs are assumed. Lower this to 12-13 if using Furina instead of Yelan.
{"name":"Cyno TF Quickbloom Yelan Rotation (EQ > N1E > 6x N4E)","targets":[{"weight":1,"path":["skill","skillDmg"],"hitMode":"avgHit","bonusStats":{}},{"weight":7,"path":["burst","normal_0"],"hitMode":"avgHit","reaction":"aggravate","bonusStats":{}},{"weight":6,"path":["burst","normal_1"],"hitMode":"avgHit","bonusStats":{}},{"weight":6,"path":["burst","normal_2"],"hitMode":"avgHit","bonusStats":{}},{"weight":5,"path":["burst","normal_3"],"hitMode":"avgHit","bonusStats":{}},{"weight":1,"path":["burst","normal_3"],"hitMode":"avgHit","reaction":"aggravate","bonusStats":{}},{"weight":4,"path":["skill","riteDmg"],"hitMode":"avgHit","bonusStats":{}},{"weight":3,"path":["skill","riteDmg"],"hitMode":"avgHit","reaction":"aggravate","bonusStats":{"skill_dmg_":35}},{"weight":6,"path":["passive1","boltDmg"],"hitMode":"avgHit","bonusStats":{"skill_dmg_":35}},{"weight":3,"path":["passive1","boltDmg"],"hitMode":"avgHit","reaction":"aggravate","bonusStats":{"skill_dmg_":35}},{"weight":16,"path":["reaction","hyperbloom"],"hitMode":"avgHit","bonusStats":{}}]}
Dainsleif
Dehya
Mono Pyro
spacebarium
Explanation: Models total Skill damage and Burst damage in one rotation in a mono Pyro team.
Assumptions: C0 Dehya. The assumed rotation is Dehya E > Kazuha Q > Bennett QE > Xiangling QE > Kazuha tEP > Dehya E Q10+1 > Kazuha tEP > Bennett E. The buffs in the config assume 4pc NO C6 Bennett and C6 Xiangling. Change Flat ATK on the Elemental Skill damage to however much your Bennett gives and activate 4pc NO on Bennett. 100% A4 and 4pc VV uptime can be assumed (enable in Team Buffs). Likewise, 100% Pyro aura uptime can be assumed for 4pc LW.
{"name":"Monopyro","description":"","targets":[{"weight":1,"path":["skill","indomitableDmg"],"hitMode":"avgHit","bonusStats":{"atk":-1051,"atk_":-20,"pyro_enemyRes_":15,"pyro_dmg_":-30}},{"weight":3,"path":["skill","fieldDmg"],"hitMode":"avgHit","bonusStats":{"atk":-1051,"atk_":-20,"pyro_enemyRes_":15,"pyro_dmg_":-30}},{"weight":1,"path":["skill","rangingDmg"],"hitMode":"avgHit","bonusStats":{}},{"weight":4,"path":["burst","fistDmg"],"hitMode":"avgHit","bonusStats":{}},{"weight":6,"path":["burst","fistDmg"],"hitMode":"avgHit","bonusStats":{"atk_":-20}},{"weight":1,"path":["burst","driveDmg"],"hitMode":"avgHit","bonusStats":{"atk_":-20}},{"weight":1,"path":["skill","fieldDmg"],"hitMode":"avgHit","bonusStats":{"atk_":-20}},{"weight":1,"path":["weapon:LuxuriousSeaLord","dmg"],"hitMode":"avgHit","bonusStats":{}}]}
Customization: If Bennett is not C6, add 15% Pyro DMG% Bonus to the first 2 targets. If Xiangling is not C6, add 15% Pyro DMG Bonus to the first 2 targets. If Xiangling is not C1, deduct 15% Enemy Pyro DMG RES from the first 2 targets. If Dehya is C6, add 5 Flame-Mane’s Fists (from 6 to 11), 2 of which with Bennett’s ATK buff deducted, and deduct Bennett’s ATK buff from the final Incineration Drive.
Burst Vape
polomo
Explanation: This config takes into account Dehya’s Vaporize frequency in a team such as Mona-Kazuha-Bennett.
Assumptions: Vape on Indomitable Flame. 3 non-Vaped Field Coordinated Attacks in the full rotation. Ranging Flame isn’t used. 4 Vaped and 6 non-Vaped Fist damage. Un-Vaped Incineration Drive damage.
{"name":"Vape Combo (C0)","targets":[{"weight":1,"path":["skill","indomitableDmg"],"hitMode":"avgHit","reaction":"vaporize","bonusStats":{}},{"weight":6,"path":["burst","fistDmg"],"hitMode":"avgHit","bonusStats":{}},{"weight":4,"path":["burst","fistDmg"],"hitMode":"avgHit","reaction":"vaporize","bonusStats":{}},{"weight":1,"path":["burst","driveDmg"],"hitMode":"avgHit","bonusStats":{}},{"weight":3,"path":["skill","fieldDmg"],"hitMode":"avgHit","bonusStats":{}}]}
Customization: Add a Vaped Ranging Flame if using it. You can model random Vaped Incineration Drives by adding a target with a fractional value.
Diluc
Diona
Dori
Eula
Standard Burst Rotation
twce_
Explanation: The config covers Eula’s typical Burst rotation using 4pc Pale Flame (her best-in-slot artifact set). Multi-target optimization allows for a more holistic optimization of Eula’s Normal Attacks and Burst, which both do significant damage.
Assumptions: Equipped artifact set is 4pc Pale Flame, Eula’s best-in-slot set. This rotation is generally optimal and should almost always be used, with very few exceptions. Superconduct is included in the config, so should not be enabled by default. Eula’s ATK% from the 4-piece PF effect is calculated dynamically, so it should not be enabled by default. The same dynamic calculation is done for Eula’s held Skill RES shred, so that should not be enabled either. The assumed Skill Talent level is 9 — adjust the RES shred accordingly to match yours. Most buffs typically last the entirety of Eula’s rotation, except for, notably, Rosaria’s CRIT Rate buff (unless using Song of Broken Pines), so they can be enabled by default in Team Buffs. Do not assume Cryo resonance is active, as it depends on the team, timing, and often circle impact. Build Constraint Recommendations: CRIT Rate: 70%, Energy Recharge: 120% (team dependent, can be up to 140% without Raiden). Lightfall stacks: 26 (C6), 14 (Song of Broken Pines), 13 (else) (choose this in Eula’s Talents tab).
{"name":"Standard Burst Rotation","description":"Eula's standard Burst rotation using the 4 PF set.","targets":[{"weight":1,"path":["skill","press"],"hitMode":"avgHit","bonusStats":{}},{"weight":1,"path":["burst","dmg"],"hitMode":"avgHit","bonusStats":{"atk_":9}},{"weight":1,"path":["normal","0"],"hitMode":"avgHit","bonusStats":{"atk_":9,"physical_enemyRes_":-40}},{"weight":1,"path":["normal","1"],"hitMode":"avgHit","bonusStats":{"atk_":9,"physical_enemyRes_":-40}},{"weight":2,"path":["normal","2"],"hitMode":"avgHit","bonusStats":{"atk_":9,"physical_enemyRes_":-40}},{"weight":1,"path":["normal","3"],"hitMode":"avgHit","bonusStats":{"atk_":9,"physical_enemyRes_":-40}},{"weight":1,"path":["skill","hold"],"hitMode":"avgHit","bonusStats":{"atk_":9,"cryo_enemyRes_":-24}},{"weight":1,"path":["skill","icewhirl"],"hitMode":"avgHit","bonusStats":{"atk_":9,"cryo_enemyRes_":-24}},{"weight":1,"path":["skill","icewhirl"],"hitMode":"avgHit","bonusStats":{"atk_":18,"cryo_enemyRes_":-24}},{"weight":1,"path":["passive1","shatteredLightfallSword"],"hitMode":"avgHit","bonusStats":{"atk_":18,"physical_enemyRes_":-64,"physical_dmg_":25}},{"weight":1,"path":["normal","0"],"hitMode":"avgHit","bonusStats":{"atk_":18,"physical_enemyRes_":-64,"physical_dmg_":25}},{"weight":1,"path":["normal","1"],"hitMode":"avgHit","bonusStats":{"atk_":18,"physical_enemyRes_":-64,"physical_dmg_":25}},{"weight":2,"path":["normal","2"],"hitMode":"avgHit","bonusStats":{"atk_":18,"physical_enemyRes_":-64,"physical_dmg_":25}},{"weight":1,"path":["normal","3"],"hitMode":"avgHit","bonusStats":{"atk_":18,"physical_enemyRes_":-64,"physical_dmg_":25}},{"weight":1,"path":["burst","lightFallSwordNew"],"hitMode":"avgHit","bonusStats":{"atk_":18,"physical_enemyRes_":-64,"physical_dmg_":25}}]}
Customization: If not using 4 Pale Flame, remove the 25% Physical DMG Bonus and 18% ATK buffs that are added after the held Skill. If using weapons with dynamic passives, such as Song of Broken Pines, those must be accounted for individually. For example, Pines’ passive will not proc until after the first N4. If Eula is Constellation 1+, add the 30% Physical DMG Bonus buff for targets including and after Roiling Rime.
Faruzan
Fischl
Aggravate
mr.pillow.
Explanation: Config collection for Aggravate Fischl. Depending on the team and rotation, Fischl’s Aggravate and A4 frequency changes, which in turn changes the optimal ratio of Elemental Mastery and other stats. The following configs are meant to make a rough categorization of such teams — choose the one that fits your scenario the best.
Assumptions: C6 Fischl is assumed. The rotations, hit counts, and Aggravate frequencies are taken from the gcsim simulations linked in the descriptions of respective configs, see them for the details. Aggravate ratio is defined as “the number of Aggravate triggers ÷ the total number of attacks,” and A4 frequency is defined as “the number of A4s triggered ÷ simulation duration.” No buffs are assumed. Note that the values from the configs can’t directly be compared as they assume differing rotations, durations, etc.
1. Low: Assuming the Spread team Alhaitham – Nahida – Zhongli – Fischl.
Aggravate ratio: 37%, A4 frequency: 0.26 A4 per second.
{"name":"Aggravate Fischl: Low Aggravate level (Alhaitham-Nahida-Zhongli-Fischl)","description":"gcsim link: https://gcsim.app/v3/viewer/share/eb1956a8-17dd-4935-b70b-fb885f40ea0e","targets":[{"weight":31,"path":["passive2","dmg"],"hitMode":"avgHit","bonusStats":{},"reaction":"aggravate"},{"weight":111,"path":["constellation6","ozActiveCharDmg"],"hitMode":"avgHit","bonusStats":{}},{"weight":34,"path":["constellation6","ozActiveCharDmg"],"hitMode":"avgHit","bonusStats":{},"reaction":"aggravate"},{"weight":5,"path":["constellation4","burstAdditionalDmg"],"hitMode":"avgHit","bonusStats":{},"reaction":"aggravate"},{"weight":76,"path":["skill","ozDmg"],"hitMode":"avgHit","bonusStats":{}},{"weight":38,"path":["skill","ozDmg"],"hitMode":"avgHit","bonusStats":{},"reaction":"aggravate"},{"weight":1,"path":["skill","summonDmg"],"hitMode":"avgHit","bonusStats":{}},{"weight":4,"path":["skill","summonDmg"],"hitMode":"avgHit","bonusStats":{},"reaction":"aggravate"}]}
2. Medium: Assuming the Quickbloom team Nahida – Xingqiu – Raiden – Fischl.
Aggravate ratio: 35%, A4 frequency 0.76 A4 per second.
{"name":"Aggravate Fischl: Medium Aggravate level (Nahida-Raiden-Xingqiu-Fischl)","description":"gcsim link: https://gcsim.app/v3/viewer/share/30fa760f-dd9b-4452-b840-224349889687","targets":[{"weight":11,"path":["passive2","dmg"],"hitMode":"avgHit","bonusStats":{}},{"weight":61,"path":["passive2","dmg"],"hitMode":"avgHit","reaction":"aggravate","bonusStats":{}},{"weight":106,"path":["constellation6","ozActiveCharDmg"],"hitMode":"avgHit","bonusStats":{}},{"weight":27,"path":["constellation6","ozActiveCharDmg"],"hitMode":"avgHit","reaction":"aggravate","bonusStats":{}},{"weight":4,"path":["constellation4","burstAdditionalDmg"],"hitMode":"avgHit","bonusStats":{}},{"weight":4,"path":["burst","dmg"],"hitMode":"avgHit","bonusStats":{}},{"weight":71,"path":["skill","ozDmg"],"hitMode":"avgHit","bonusStats":{}},{"weight":14,"path":["skill","ozDmg"],"hitMode":"avgHit","reaction":"aggravate","bonusStats":{}},{"weight":4,"path":["skill","summonDmg"],"hitMode":"avgHit","reaction":"aggravate","bonusStats":{}},{"weight":1,"path":["reaction","electrocharged"],"hitMode":"avgHit","bonusStats":{}},{"weight":3,"path":["reaction","hyperbloom"],"hitMode":"avgHit","bonusStats":{}}]}
3. High: Assuming the Aggravate team Keqing – Fischl – Collei – Sucrose.
Aggravate ratio: 62%, A4 frequency: 1.20 A4 per second.
{"name":"Aggravate Fischl: High Aggravate level (Keqing-Fischl-Collei-Sucrose)","description":"gcsim link: https://gcsim.app/v3/viewer/share/2519837e-40ef-428d-8728-41c3ec2a4478","targets":[{"weight":119,"path":["passive2","dmg"],"hitMode":"avgHit","reaction":"aggravate","bonusStats":{}},{"weight":40,"path":["constellation6","ozActiveCharDmg"],"hitMode":"avgHit","bonusStats":{}},{"weight":12,"path":["constellation6","ozActiveCharDmg"],"hitMode":"avgHit","reaction":"aggravate","bonusStats":{}},{"weight":1,"path":["constellation4","burstAdditionalDmg"],"hitMode":"avgHit","bonusStats":{}},{"weight":3,"path":["constellation4","burstAdditionalDmg"],"hitMode":"avgHit","reaction":"aggravate","bonusStats":{}},{"weight":4,"path":["burst","dmg"],"hitMode":"avgHit","bonusStats":{}},{"weight":60,"path":["skill","ozDmg"],"hitMode":"avgHit","bonusStats":{}},{"weight":35,"path":["skill","ozDmg"],"hitMode":"avgHit","reaction":"aggravate","bonusStats":{}},{"weight":4,"path":["skill","summonDmg"],"hitMode":"avgHit","reaction":"aggravate","bonusStats":{}}]}
Freminet
Furina
Gaming
Ganyu
Ganyu Guide Configs
rarepossum and previsible
Explanation: The KQM Ganyu guide has a database of configs for some of her Freeze, Melt, and Mono Cryo teams.
Link to external resource: KQM Ganyu Guide
Gorou
Hu Tao
Vape
poiiyo
Explanation: Config for Hu Tao Vaporize combo.
Assumptions: The combo is 8N2CD Q. No buffs are assumed. Activate the Paramita Papilio state from the Talents tab.
{"name":"8n2cd+Q no buff","targets":[{"weight":5,"path":["normal","0"],"hitMode":"avgHit","bonusStats":{}},{"weight":3,"path":["normal","0"],"hitMode":"avgHit","reaction":"vaporize","bonusStats":{}},{"weight":5,"path":["normal","1"],"hitMode":"avgHit","bonusStats":{}},{"weight":3,"path":["normal","1"],"hitMode":"avgHit","reaction":"vaporize","bonusStats":{}},{"weight":8,"path":["charged","dmg"],"hitMode":"avgHit","reaction":"vaporize","bonusStats":{}},{"weight":2,"path":["skill","dmg"],"hitMode":"avgHit","reaction":"vaporize","bonusStats":{}},{"weight":1,"path":["burst","lowHpDmg"],"hitMode":"avgHit","reaction":"vaporize","bonusStats":{}}]}
Vape: PJWS
yukiyafuyu
Explanation: Vape Hu Tao config with dynamic passive stacking and uptime for R1 Primordial Jade-Winged Spear.
Assumptions: The combo is 8N2C. 2 Blood Blossoms are Vaped. No Elemental Burst is assumed. No buffs are assumed.
{"name":"8N2C PJWS (Unbuffed)","description":"","targets":[{"weight":1,"path":["normal","0"],"hitMode":"avgHit","reaction":"vaporize","bonusStats":{"atk_":3.2}},{"weight":1,"path":["normal","1"],"hitMode":"avgHit","bonusStats":{"atk_":3.2}},{"weight":1,"path":["charged","dmg"],"hitMode":"avgHit","reaction":"vaporize","bonusStats":{"atk_":6.4}},{"weight":1,"path":["normal","0"],"hitMode":"avgHit","bonusStats":{"atk_":9.6}},{"weight":1,"path":["normal","1"],"hitMode":"avgHit","reaction":"vaporize","bonusStats":{"atk_":9.6}},{"weight":1,"path":["charged","dmg"],"hitMode":"avgHit","reaction":"vaporize","bonusStats":{"atk_":12.8}},{"weight":1,"path":["normal","0"],"hitMode":"avgHit","bonusStats":{"atk_":16}},{"weight":1,"path":["normal","1"],"hitMode":"avgHit","bonusStats":{"atk_":16}},{"weight":1,"path":["charged","dmg"],"hitMode":"avgHit","reaction":"vaporize","bonusStats":{"atk_":19.2}},{"weight":2,"path":["normal","0"],"hitMode":"avgHit","reaction":"vaporize","bonusStats":{"atk_":22.4,"all_dmg_":12}},{"weight":3,"path":["normal","1"],"hitMode":"avgHit","bonusStats":{"atk_":22.4,"all_dmg_":12}},{"weight":5,"path":["charged","dmg"],"hitMode":"avgHit","reaction":"vaporize","bonusStats":{"atk_":22.4,"all_dmg_":12}},{"weight":3,"path":["normal","0"],"hitMode":"avgHit","bonusStats":{"atk_":22.4,"all_dmg_":12}},{"weight":2,"path":["normal","1"],"hitMode":"avgHit","bonusStats":{"atk_":22.4,"all_dmg_":12},"reaction":"vaporize"},{"weight":2,"path":["skill","dmg"],"hitMode":"avgHit","reaction":"vaporize","bonusStats":{"atk_":22.4,"all_dmg_":12}}]}
Vape: SSS
yukiyafuyu
Explanation: Vape Hu Tao config with passive uptime for R1 Staff of Scarlet Sands.
Assumptions: The combo is 8N2C. 2 Blood Blossoms are Vaped. No Elemental Burst is assumed. The Config Assumes 200 EM on Hu Tao and R1 Staff of Scarlet Sands, So 1 Stack is 56 Flat ATK for 200 EM. You need to edit the ATK to match the ATK gained from EM in SoSS to optimize as accurately as possible. No buffs are assumed.
{"name":"8N2C SSS (Unbuffed)","description":"","targets":[{"weight":2,"path":["normal","0"],"hitMode":"avgHit","reaction":"vaporize","bonusStats":{}},{"weight":3,"path":["normal","1"],"hitMode":"avgHit","bonusStats":{}},{"weight":4,"path":["charged","dmg"],"hitMode":"avgHit","reaction":"vaporize","bonusStats":{}},{"weight":2,"path":["normal","0"],"hitMode":"avgHit","bonusStats":{}},{"weight":1,"path":["normal","1"],"hitMode":"avgHit","reaction":"vaporize","bonusStats":{}},{"weight":1,"path":["skill","dmg"],"hitMode":"avgHit","reaction":"vaporize","bonusStats":{}},{"weight":3,"path":["normal","0"],"hitMode":"avgHit","bonusStats":{"atk":56}},{"weight":2,"path":["normal","1"],"hitMode":"avgHit","reaction":"vaporize","bonusStats":{"atk":56}},{"weight":4,"path":["charged","dmg"],"hitMode":"avgHit","reaction":"vaporize","bonusStats":{"atk":56}},{"weight":2,"path":["normal","1"],"hitMode":"avgHit","bonusStats":{"atk":56}},{"weight":1,"path":["normal","0"],"hitMode":"avgHit","reaction":"vaporize","bonusStats":{"atk":56}},{"weight":1,"path":["skill","dmg"],"hitMode":"avgHit","reaction":"vaporize","bonusStats":{"atk":56}}]}
Customization: Add 0.5 Burst with 2 Stacks from Staff of Scarlet Sands passive if Bursting every other rotation.
Config Generator
poiiyo
Explanation: A sheet to generate configs for Hu Tao. You can customize your buffs in this sheet, complete with buff uptimes.
Link to external resource: Hu Tao/Xiao/Yoimiya GO Config Generator
Jean
Kaedehara Kazuha
C6 On-Field: ST
mimithiz
Explanation: Config for C6 Kazuha making use of Anemo-infused Normal Attacks in an on-field playstyle utilizing his C1. This config is for single-target only. Example team comp: Kazuha – Faruzan – Zhongli – Bennett. Multi-optimization is important due to C6 Kazuha’s multiple scalings.
Assumptions: The config uses Pyro as the Swirled Element; change this if Swirling another Element. The assumed combo is hEP > Q > N1C > tEP > 3xN1C > tEP. It’s assumed that there’s an initial Element application but no off-field application during Kazuha’s field time. All 3 Skill Plunges get the extra collision damage. Lastly, no additional reactions are triggered by Kazuha’s Elemental Infusion.
{"name":"C6 Kazuha carry, single target","description":"","targets":[{"weight":14,"path":["reaction","pyroSwirl"],"hitMode":"avgHit","bonusStats":{}},{"weight":3,"path":["passive1","absorb"],"hitMode":"avgHit","bonusStats":{}},{"weight":1,"path":["skill","hold"],"hitMode":"avgHit","bonusStats":{}},{"weight":3,"path":["skill","pdmg"],"hitMode":"avgHit","bonusStats":{}},{"weight":3,"path":["skill","phigh"],"hitMode":"avgHit","bonusStats":{}},{"weight":2,"path":["skill","press"],"hitMode":"avgHit","bonusStats":{}},{"weight":1,"path":["burst","dmg"],"hitMode":"avgHit","bonusStats":{}},{"weight":5,"path":["burst","dot"],"hitMode":"avgHit","bonusStats":{}},{"weight":5,"path":["burst","absorb"],"hitMode":"avgHit","bonusStats":{}},{"weight":4,"path":["normal","0"],"hitMode":"avgHit","bonusStats":{}},{"weight":4,"path":["charged","dmg1"],"hitMode":"avgHit","bonusStats":{}},{"weight":4,"path":["charged","dmg2"],"hitMode":"avgHit","bonusStats":{}}]}
Customization: If you have an external Elemental application (e.g., Xiangling), add 2 instances of Swirl for a total of 16. If an external melee Infusion is used (e.g., C6 Bennett), change the team melee Infusion modifiers to that Element and remove 2 instances of Swirl damage for a total of 12.
C6 On-Field: MT
mimithiz
Explanation: Config for C6 Kazuha making use of Anemo-infused Normal Attacks in an on-field playstyle utilizing his C1. This config is for multi-target only. Example team comp: Kazuha – Faruzan – Zhongli – Bennett. Optimizing C6 Kazuha in multi-target is tricky due to Swirl damage having quite an impact on his overall DPS. Thus, multi-optimization becomes quite relevant.
Assumptions: The config uses Pyro as the Swirled Element; change this if Swirling another Element. The assumed combo is hEP > Q > tEP > 3xN1C > tEP. Minimum 2 targets. It’s assumed that there’s an initial Element application but no off-field application during Kazuha’s field time. Swirl is triggered on at least two targets at once, and both targets are close enough to be hit by the Swirls’ AoE. All 3 Skill Plunges get the extra collision damage on at least one target. Lastly, no additional reactions are triggered by Kazuha’s Elemental Infusion.
{"name":"C6 Kazuha carry, multi target","description":"","targets":[{"weight":30,"path":["reaction","pyroSwirl"],"hitMode":"avgHit","bonusStats":{}},{"weight":3,"path":["passive1","absorb"],"hitMode":"avgHit","bonusStats":{}},{"weight":1,"path":["skill","hold"],"hitMode":"avgHit","bonusStats":{}},{"weight":3,"path":["skill","pdmg"],"hitMode":"avgHit","bonusStats":{}},{"weight":3,"path":["skill","phigh"],"hitMode":"avgHit","bonusStats":{}},{"weight":2,"path":["skill","press"],"hitMode":"avgHit","bonusStats":{}},{"weight":1,"path":["burst","dmg"],"hitMode":"avgHit","bonusStats":{}},{"weight":5,"path":["burst","dot"],"hitMode":"avgHit","bonusStats":{}},{"weight":5,"path":["burst","absorb"],"hitMode":"avgHit","bonusStats":{}},{"weight":3,"path":["normal","0"],"hitMode":"avgHit","bonusStats":{}},{"weight":3,"path":["charged","dmg1"],"hitMode":"avgHit","bonusStats":{}},{"weight":3,"path":["charged","dmg2"],"hitMode":"avgHit","bonusStats":{}}]}
Customization: If an external melee Infusion is used (e.g., C6 Bennett), change the team melee Infusion modifiers to that Element and remove 6 instances of Swirl damage for a total of 24. If the element Swirled is Hydro, divide the Swirl instances in half (15 with Anemo Infusion, 12 with external melee Infusion).
Kaeya
Reverse Melt
sohan4543
Explanation: Config for a standard quickswap Reverse Melt rotation. About 60% of Kaeya’s Burst goes unreacted, which should be accounted for to not overly bias towards EM.
Assumptions: The attacks used are E Q 2E. Assumes no C2 extensions. If running double Cryo, ensure the Cryo Resonance buff is turned off. Modify the -ATK on the final two Es to match your own Bennett’s buff (which should be kept ticked in the Team Buffs tab). Also assumes Noblesse on Bennett; if he is on Instructor or rainbow instead, then the -ATK% should be changed accordingly.
C0-C5 Reverse Melt Kaeya
{"name":"E Q 2E | Melt","description":"","targets":[{"weight":1,"path":["skill","dmg"],"hitMode":"avgHit","reaction":"melt","bonusStats":{}},{"weight":6,"path":["burst","dmg"],"hitMode":"avgHit","reaction":"melt","bonusStats":{}},{"weight":9,"path":["burst","dmg"],"hitMode":"avgHit","bonusStats":{}},{"weight":2,"path":["skill","dmg"],"hitMode":"avgHit","reaction":"melt","bonusStats":{"atk_":-20,"atk":-1038}}]}
C6 Reverse Melt Kaeya: Kaeya’s C6 raises Glacial Waltz’s baseline number of hits from 15 to 20.
{"name":"E Q 2E | Melt, C6 :copium:","description":"","targets":[{"weight":1,"path":["skill","dmg"],"hitMode":"avgHit","reaction":"melt","bonusStats":{}},{"weight":8,"path":["burst","dmg"],"hitMode":"avgHit","reaction":"melt","bonusStats":{}},{"weight":12,"path":["burst","dmg"],"hitMode":"avgHit","bonusStats":{}},{"weight":2,"path":["skill","dmg"],"hitMode":"avgHit","reaction":"melt","bonusStats":{"atk_":-20,"atk":-1038}}]}
Customization: The configs assume no C2 extensions, but as a rough rule of thumb, each extension grants two extra icicle hits. One out of two icicles melt for the first two extensions, but all icicles on the third extension onward should be unreacted either due to ICD misalignments or the source of the Pyro application running out. Regardless of Constellation, backhanding (running counterclockwise around your target to effectively cut down the revolution time of the icicles) adds four to five extra hits, typically two of which melt. Add any of these if you want. For Mistsplitter users, the first E will have no stacks, the Burst will have one, the second E will have two, and the third E will have one; modify the Cryo DMG% accordingly. If your Bennett is C6, the first Kaeya E will instead have one stack and the Burst two (provided there is a single infused N1 prior).
Kamisato Ayaka
Full Combo
charliex3000
Explanation: This config is intended to calculate the total damage Ayaka deals in a rotation. The config works from C0 to C6.
Assumptions: Combo: Dash E N1 Q N1C. No buffs were assumed; add your buffs in the Team Buffs tab.
{"name":"Ayaka full combo damage","targets":[{"weight":19,"path":["burst","cutting"],"hitMode":"avgHit","bonusStats":{}},{"weight":1,"path":["burst","bloom"],"hitMode":"avgHit","bonusStats":{}},{"weight":38,"path":["constellation2","dmg"],"hitMode":"avgHit","bonusStats":{}},{"weight":2,"path":["constellation2","bloom"],"hitMode":"avgHit","bonusStats":{}},{"weight":2,"path":["normal","0"],"hitMode":"avgHit","bonusStats":{}},{"weight":3,"path":["charged","dmg1"],"hitMode":"avgHit","bonusStats":{}},{"weight":1,"path":["skill","press"],"hitMode":"avgHit","bonusStats":{}}]}
Full Combo with Shenhe
charliex3000
Explanation: This config is intended to calculate the total damage Ayaka deals in a rotation when played with Shenhe. Change the Cryo DMG Increase modifiers from 2555 to reflect the Icy Quill buff from your Shenhe. The config works from C0 to C6.
Assumptions: Combo: Dash E N1 Q N1C. Only Shenhe’s Icy Quill buff is used. Assuming 10 Quills in total. No buffs otherwise; add the rest of your buffs in the Team Buffs tab.
{"name":"Ayaka full combo damage with C0 Shenhe (10 quills total)","targets":[{"weight":8,"path":["burst","cutting"],"hitMode":"avgHit","bonusStats":{"cryo_dmgInc":2555}},{"weight":11,"path":["burst","cutting"],"hitMode":"avgHit","bonusStats":{}},{"weight":1,"path":["burst","bloom"],"hitMode":"avgHit","bonusStats":{}},{"weight":38,"path":["constellation2","dmg"],"hitMode":"avgHit","bonusStats":{}},{"weight":2,"path":["constellation2","bloom"],"hitMode":"avgHit","bonusStats":{}},{"weight":1,"path":["normal","0"],"hitMode":"avgHit","bonusStats":{"cryo_dmgInc":2555}},{"weight":1,"path":["normal","0"],"hitMode":"avgHit","bonusStats":{}},{"weight":3,"path":["charged","dmg1"],"hitMode":"avgHit","bonusStats":{}},{"weight":1,"path":["skill","press"],"hitMode":"avgHit","bonusStats":{"cryo_dmgInc":2555}}]}
Kamisato Ayato
Kaveh
Keqing
4pc TF Aggravate
taylor_series19
Explanation: This config provides a general starter point for Keqing when she is using 4pc Thundering Fury in an Aggravate team. Some of the more common buffs (or the confusing parts about them) and their effect on the damage instances are indicated in the customization section. Keqing’s Constellations do not change builds offered by the Optimizer in a significant way, so the config can be used by any Constellation level Keqing builds.
Assumptions: The combo used is EQE N1C N1 E 3[N1C] and is assumed to be performed with fast inputs and with full Quicken uptime. (If the combo is performed with slow inputs, the Aggravated damage instances might shift a little due to standard ICD on Keqing’s Normal and Charged Attacks but the builds offered by the Optimizer will largely stay the same due to the additive nature of Aggravate reaction.) There are 13 Aggravated damage instances and these are indicated in the config. Note that Keqing detonates her second Stiletto cast rather than teleporting for higher DPS. For this config to work, please turn on both Keqing’s A1 Passive for Electro Infusion and Keqing’s A4 Passive for her CRIT Rate buff.
{"name":"Keqing Aggravate 4pc TF Config ","targets":[{"weight":1,"path":["skill","stiletto"],"hitMode":"avgHit","reaction":"aggravate","bonusStats":{"critRate_":-15}},{"weight":1,"path":["burst","initial"],"hitMode":"avgHit","reaction":"aggravate","bonusStats":{}},{"weight":2,"path":["burst","slash"],"hitMode":"avgHit","reaction":"aggravate","bonusStats":{}},{"weight":6,"path":["burst","slash"],"hitMode":"avgHit","bonusStats":{}},{"weight":1,"path":["burst","final"],"hitMode":"avgHit","reaction":"aggravate","bonusStats":{}},{"weight":1,"path":["skill","slash"],"hitMode":"avgHit","reaction":"aggravate","bonusStats":{}},{"weight":1,"path":["normal","0"],"hitMode":"avgHit","bonusStats":{}},{"weight":1,"path":["charged","dmg1"],"hitMode":"avgHit","bonusStats":{}},{"weight":1,"path":["charged","dmg2"],"hitMode":"avgHit","reaction":"aggravate","bonusStats":{}},{"weight":4,"path":["normal","0"],"hitMode":"avgHit","reaction":"aggravate","bonusStats":{}},{"weight":3,"path":["charged","dmg1"],"hitMode":"avgHit","bonusStats":{}},{"weight":3,"path":["charged","dmg2"],"hitMode":"avgHit","bonusStats":{}},{"weight":1,"path":["skill","stiletto"],"hitMode":"avgHit","reaction":"aggravate","bonusStats":{}},{"weight":1,"path":["skill","thunderclap"],"hitMode":"avgHit","reaction":"aggravate","bonusStats":{}},{"weight":1,"path":["skill","thunderclap"],"hitMode":"avgHit","bonusStats":{}}]}
Customization: The effects of some of the more common buffs are listed below. If a buff isn’t present, then it’s largely irrelevant, applies to Keqing’s entire combo, or has to be studied case-by-case.
- Kazuha’s A4 Passive can be assumed to apply to the entire combo for rotations where Kazuha Swirls just before Keqing takes field time or if the combo is after Kazuha’s Burst.
- Sucrose C6 and Hakushin Ring buffs are very short duration (about 6s) and can be assumed to not apply to the last two N1C.
- Wolf Fang gains a stack with each damage instance of Keqing’s Burst.
- Sara’s buffs have variable duration, since they can refresh after her Burst. However, Sara can never buff Keqing’s last C for 4pc TF (or last N1C for non-4pc TF), and if Sara’s Skill is used rather than her Burst, the last two N1C won’t be buffed by her.
- Here’s a list of the number of Mistsplitter’s Emblem stacks that can be assumed for the config’s targets:
- Lightning Stiletto DMG for the first Elemental Skill: no stacks.
- Elemental Burst initial hit DMG: 1-2 stacks depending on the ping and FPS (the choice won’t usually change the optimized builds).
- Slashing DMG from Skill Teleport, all 8 Burst Consecutive Slash DMG, and the first Normal Attack DMG: 2 stacks.
- Last Attack DMG for the Elemental Burst: 2-3 stacks depending on how early Keqing’s Burst is canceled by the Teleport Slash (the choice won’t usually change the optimized builds).
- The rest of the damage instances: 3 stacks with the exception that if Fischl is in the party, the last two N1C can be safely assumed to have 2 stacks.
Aggravate
taylor_series19
Explanation: This config provides a general starter point for Keqing in an Aggravate team when she isn’t using 4pc Thundering Fury. Some of the more common buffs (or the confusing parts about them) and their effect on the damage instances are indicated in the customization section. Keqing’s Constellations do not change builds offered by the Optimizer in a significant way, so the config can be used by any Constellation level Keqing builds.
Assumptions: The combo used is EQE 5[N1C] and is assumed to be performed with fast inputs and with full Quicken uptime. (If the combo is performed with slow inputs, the Aggravated damage instances might shift a little due to standard ICD on Keqing’s Normal and Charged Attacks but the builds offered by the Optimizer will largely stay the same due to the additive nature of Aggravate reaction.) There are 11 Aggravated damage instances and these are indicated in the config. For this config to work, please turn on both Keqing’s A1 Passive for Electro Infusion and Keqing’s A4 Passive for her CRIT Rate buff.
{"name":"Keqing Aggravate Non-TF Config","description":"","targets":[{"weight":1,"path":["skill","stiletto"],"hitMode":"avgHit","reaction":"aggravate","bonusStats":{"critRate_":-15}},{"weight":1,"path":["burst","initial"],"hitMode":"avgHit","reaction":"aggravate","bonusStats":{}},{"weight":2,"path":["burst","slash"],"hitMode":"avgHit","reaction":"aggravate","bonusStats":{}},{"weight":6,"path":["burst","slash"],"hitMode":"avgHit","bonusStats":{}},{"weight":1,"path":["skill","slash"],"hitMode":"avgHit","reaction":"aggravate","bonusStats":{}},{"weight":1,"path":["normal","0"],"hitMode":"avgHit","reaction":"aggravate","bonusStats":{}},{"weight":1,"path":["burst","final"],"hitMode":"avgHit","reaction":"aggravate","bonusStats":{}},{"weight":5,"path":["charged","dmg1"],"hitMode":"avgHit","bonusStats":{}},{"weight":5,"path":["charged","dmg2"],"hitMode":"avgHit","bonusStats":{}},{"weight":4,"path":["normal","0"],"hitMode":"avgHit","reaction":"aggravate","bonusStats":{}}]}
Customization: See the customization section for the 4pc TF Aggravate entry.
Kirara
Klee
Kujou Sara
Kuki Shinobu
Aggravate
rockidayo
Explanation: In Aggravate, Kuki’s reaction count is split fairly evenly among her kit, so it’s important to use multi-optimization when optimizing for her damage.
Assumptions: Assuming the combo E Q with C2+ Kuki. Full Quicken uptime is assumed. Due to its low uptime, the C6 effect is ignored.
{"name":"bestgirlbtw","targets":[{"weight":1,"path":["skill","pressDmg"],"hitMode":"avgHit","reaction":"aggravate","bonusStats":{}},{"weight":5,"path":["skill","ringDmg"],"hitMode":"avgHit","reaction":"aggravate","bonusStats":{}},{"weight":5,"path":["skill","ringDmg"],"hitMode":"avgHit","bonusStats":{}},{"weight":4,"path":["burst","singleDmg"],"hitMode":"avgHit","reaction":"aggravate","bonusStats":{}},{"weight":8,"path":["burst","singleDmg"],"hitMode":"avgHit","bonusStats":{}},{"weight":3,"path":["constellation4","markDmg"],"hitMode":"avgHit","reaction":"aggravate","bonusStats":{}}]}
Customization: For pre-C2 Kuki, lower both the Aggravated and no reaction Sanctifying Ring hits from 5 to 4.
Layla
Lisa
Aggravate On-Field
archednosi
Explanation: This config models a general rotation purposed for Lisa’s Aggravate teams comprised of proper field time. Her access to 4pc Thundering Fury (4TF) allows for more efficient attack strings involving Lisa’s Tap Skill. Using multi-optimization is preferred as much of her damage is distributed between Aggravated and Non-Aggravated damage as well as all of her Talents.
Assumptions: The assumed rotation is tE Q tE CA N1 tE CA tE … tEh3E 2N2CA. Lisa’s Constellations do not factor majorly when optimizing; this config remains to work regardless of Lisa’s Constellation. Lisa’s A4 Passive should be toggled on. 4TF is assumed, but can still be used to optimize from, should 4TF not be available. No external buffs are assumed. All 29 Arcs from Lisa’s Burst connect. Full Quicken uptime is assumed; 22 Aggravates in total. An Energy Recharge constraint should be used for ideal builds. For Energy Recharge constraint values, 130% is a safe recommendation. However, this constraint can vary from anywhere as low as 100% to much more depending on her team.
{"name":"Aggravate DPS Rotation (4TF Preferred)","description":"tE (Aggr) Q (10 Aggr) tE (Aggr) CA (Aggr) N1 tE (Aggr) CA (Aggr) tE (Aggr) ... tE (Aggr) h3E (Aggr) 2N2CA (4 Aggr)","targets":[{"weight":1,"path":["skill","press"],"hitMode":"avgHit","reaction":"aggravate","bonusStats":{}},{"weight":1,"path":["burst","summon"],"hitMode":"avgHit","bonusStats":{}},{"weight":19,"path":["burst","tick"],"hitMode":"avgHit","bonusStats":{}},{"weight":10,"path":["burst","tick"],"hitMode":"avgHit","reaction":"aggravate","bonusStats":{}},{"weight":1,"path":["skill","press"],"hitMode":"avgHit","reaction":"aggravate","bonusStats":{}},{"weight":1,"path":["charged","dmg"],"hitMode":"avgHit","reaction":"aggravate","bonusStats":{}},{"weight":1,"path":["normal","0"],"hitMode":"avgHit","bonusStats":{}},{"weight":1,"path":["skill","press"],"hitMode":"avgHit","bonusStats":{},"reaction":"aggravate"},{"weight":1,"path":["charged","dmg"],"hitMode":"avgHit","bonusStats":{},"reaction":"aggravate"},{"weight":1,"path":["skill","press"],"hitMode":"avgHit","bonusStats":{},"reaction":"aggravate"},{"weight":1,"path":["skill","press"],"hitMode":"avgHit","bonusStats":{},"reaction":"aggravate"},{"weight":1,"path":["skill","stack3"],"hitMode":"avgHit","bonusStats":{},"reaction":"aggravate"},{"weight":1,"path":["normal","0"],"hitMode":"avgHit","bonusStats":{},"reaction":"aggravate"},{"weight":1,"path":["normal","1"],"hitMode":"avgHit","bonusStats":{}},{"weight":1,"path":["charged","dmg"],"hitMode":"avgHit","bonusStats":{},"reaction":"aggravate"},{"weight":1,"path":["normal","0"],"hitMode":"avgHit","bonusStats":{}},{"weight":1,"path":["normal","1"],"hitMode":"avgHit","bonusStats":{},"reaction":"aggravate"},{"weight":1,"path":["charged","dmg"],"hitMode":"avgHit","bonusStats":{},"reaction":"aggravate"}]}
Customization: If you are applying any buffs within the config, recall that Lisa’s Burst snapshots buffs upon its creation and that her Aggravated attacks factor her EM dynamically.
Off-Field
archednosi
Explanation: Brief configs for two off-field scenarios: Quicken / Catalyze and General.
Assumptions: The assumed attacks are h3E + Q. Lisa’s A4 Passive should be toggled on. No external buffs are assumed. All 29 Arcs from Lisa’s Burst connect. An Energy Recharge constraint should be used for ideal builds. As Lisa is purposed for being off-field primarily, the Energy Recharge constraint values must be set relatively high, often 140%–200% for most teams that prefer her dealing damage.
Catalyze Off-Field
{"name":"Catalyze Off-field","description":"h#E + Q","targets":[{"weight":1,"path":["burst","tick"],"hitMode":"avgHit","reaction":"aggravate","bonusStats":{"enemyDefRed_":-15}},{"weight":9,"path":["burst","tick"],"hitMode":"avgHit","reaction":"aggravate","bonusStats":{}},{"weight":19,"path":["burst","tick"],"hitMode":"avgHit","bonusStats":{}},{"weight":1,"path":["skill","stack3"],"hitMode":"critHit","reaction":"aggravate","bonusStats":{}}]}
General Off-Field
{"name":"General Off-field","description":"h#E + Q","targets":[{"weight":1,"path":["skill","stack3"],"hitMode":"avgHit","bonusStats":{}},{"weight":28,"path":["burst","tick"],"hitMode":"avgHit","bonusStats":{}},{"weight":1,"path":["burst","tick"],"hitMode":"avgHit","bonusStats":{"enemyDefRed_":-15}}]}
Customization: Both of the configs may be shortened to exclude Lisa’s Hold Skills should a scenario deems it necessary. Likewise, her Hold Skill’s Conductive stack multiplier can be changed as need be (by default, the configs assume h3E).
Hyperbloom or Overload
archednosi
Explanation: Brief configs for two scenarios utilizing Transformative reactions: Hyperbloom and Overload.
Assumptions: The following rotation is used: tE Q tE … h3E. A C4+ Lisa is assumed for proper consistency, but results can be comparable otherwise. Lisa’s A4 Passive should be toggled on. No external buffs are assumed. It’s assumed there are at least two valid targets, including enemies and triggerable Dendro Cores (for Hyperbloom), at any time. All 29 Arcs from Lisa’s Burst connect on valid targets. An Energy Recharge constraint should be used for ideal builds. As Lisa is purposed for being off-field without a common dedicated battery, the Energy Recharge constraint values must be set high, often 200%–220%.
Hyperbloom (Total Damage)
{"name":"Hyperbloom","description":"2+ Targets, Total DMG","targets":[{"weight":1,"path":["skill","press"],"hitMode":"avgHit","bonusStats":{"enemyDefRed_":-15}},{"weight":1,"path":["burst","tick"],"hitMode":"avgHit","bonusStats":{"enemyDefRed_":-15}},{"weight":7,"path":["burst","tick"],"hitMode":"avgHit","reaction":"aggravate","bonusStats":{}},{"weight":17,"path":["burst","tick"],"hitMode":"avgHit","bonusStats":{}},{"weight":1,"path":["skill","stack3"],"hitMode":"avgHit","bonusStats":{}},{"weight":1,"path":["skill","press"],"hitMode":"avgHit","bonusStats":{}},{"weight":1,"path":["reaction","hyperbloom"],"hitMode":"avgHit","bonusStats":{"hyperbloom_dmg_":0}},{"weight":1,"path":["reaction","hyperbloom"],"hitMode":"avgHit","bonusStats":{"hyperbloom_dmg_":0}},{"weight":1,"path":["reaction","hyperbloom"],"hitMode":"avgHit","bonusStats":{"hyperbloom_dmg_":0}},{"weight":1,"path":["reaction","hyperbloom"],"hitMode":"avgHit","bonusStats":{"hyperbloom_dmg_":0}},{"weight":14,"path":["reaction","hyperbloom"],"hitMode":"avgHit","bonusStats":{"hyperbloom_dmg_":0}},{"weight":3,"path":["reaction","electrocharged"],"hitMode":"avgHit","bonusStats":{}}]}
Overload (Primary Target Damage)
{"name":"Overload","description":"2+ Targets, Primary Target DMG","targets":[{"weight":1,"path":["skill","press"],"hitMode":"avgHit","bonusStats":{"enemyDefRed_":-15}},{"weight":1,"path":["burst","tick"],"hitMode":"avgHit","bonusStats":{"enemyDefRed_":-15}},{"weight":24,"path":["burst","tick"],"hitMode":"avgHit","bonusStats":{}},{"weight":1,"path":["skill","stack3"],"hitMode":"avgHit","bonusStats":{}},{"weight":1,"path":["skill","press"],"hitMode":"avgHit","bonusStats":{}},{"weight":18,"path":["reaction","overloaded"],"hitMode":"avgHit","bonusStats":{}}]}
Customization: Both of the configs may be shortened to exclude her Hold Skills should a scenario deems it necessary. Likewise, her Hold Skill’s Conductive stack multiplier can be changed as need be (by default, the configs use h3E) though they will often not contribute much. For Hyperbloom specifically, if you are optimizing along 4pc Flower of Paradise Lost, the config has separated the beginning Hyperbloom instances for the artifact set’s additive buff.
Lynette
Lyney
Mika
Mona
Nahida
Navia
Neuvillette
Nilou
Ningguang
Standard Combo
justinleea
Explanation: Config for a standard Ningguang Burst combo that can be used in 12 to 18s rotations.
Assumptions: It’s assumed that Ningguang is C6 and that the combo is EQE CA N2C.
{"name":"Standard combo","targets":[{"weight":2,"path":["skill","dmg"],"hitMode":"avgHit","bonusStats":{}},{"weight":10,"path":["burst","gemDmg"],"hitMode":"avgHit","bonusStats":{}},{"weight":2,"path":["charged","baseDmg"],"hitMode":"avgHit","bonusStats":{}},{"weight":9,"path":["charged","jadeDmg"],"hitMode":"avgHit","bonusStats":{}},{"weight":2,"path":["normal","0"],"hitMode":"avgHit","bonusStats":{}}]}
Noelle
Qiqi
Raiden Shogun
Burst Attack String
edisonsmathsclub
Explanation: Config for Raiden Burst Attack String. Add Buffs in the Team Buffs tab (will be inaccurate as not all buffs will be full uptime).
Assumptions: The combo is Raiden 3N3C N1C. 11 Skill Procs are assumed. No buffs are assumed.
{"name":"11E proc, Q 3N3C + N1C","targets":[{"weight":1,"path":["skill","dmg"],"hitMode":"avgHit","bonusStats":{}},{"weight":11,"path":["skill","coorDmg"],"hitMode":"avgHit","bonusStats":{}},{"weight":1,"path":["burst","dmg"],"hitMode":"avgHit","bonusStats":{}},{"weight":4,"path":["burst","hit1"],"hitMode":"avgHit","bonusStats":{}},{"weight":3,"path":["burst","hit2"],"hitMode":"avgHit","bonusStats":{}},{"weight":3,"path":["burst","hit3"],"hitMode":"avgHit","bonusStats":{}},{"weight":4,"path":["burst","charged1"],"hitMode":"avgHit","bonusStats":{}},{"weight":4,"path":["burst","charged2"],"hitMode":"avgHit","bonusStats":{}}]}
Razor
Physical
sharaths21312
Explanation: Models a typical rotation for Physical Razor. Using a config is useful because Razor is split between Electro and Physical Damage and it’s important to consider both when optimizing.
Assumptions: The assumed rotation is tE Q tE 3x(N4D N3tED). 4pc Noblesse buff is assumed with dynamic uptime; don’t activate it in the Team Buffs tab. The config works with both C6 and pre-C6 Razor. Weapon procs for Prototype Archaic, Snow-Tombed Starsilver, and Skyward Pride are included. These are active only when your Razor’s weapon is matching.
{"name":"Physical","description":"","targets":[{"weight":2,"path":["normal","0"],"hitMode":"avgHit","bonusStats":{"atk_":20}},{"weight":2,"path":["normal","1"],"hitMode":"avgHit","bonusStats":{"atk_":20}},{"weight":2,"path":["normal","2"],"hitMode":"avgHit","bonusStats":{"atk_":20}},{"weight":1,"path":["normal","3"],"hitMode":"avgHit","bonusStats":{"atk_":20}},{"weight":3,"path":["skill","press"],"hitMode":"avgHit","bonusStats":{"atk_":20}},{"weight":1,"path":["burst","dmg"],"hitMode":"avgHit","bonusStats":{"atk_":20}},{"weight":2,"path":["burst","companionDmg1"],"hitMode":"avgHit","bonusStats":{"atk_":20}},{"weight":2,"path":["burst","companionDmg2"],"hitMode":"avgHit","bonusStats":{"atk_":20}},{"weight":2,"path":["burst","companionDmg3"],"hitMode":"avgHit","bonusStats":{"atk_":20}},{"weight":1,"path":["burst","companionDmg4"],"hitMode":"avgHit","bonusStats":{"atk_":20}},{"weight":1,"path":["constellation6","dmg"],"hitMode":"avgHit","bonusStats":{"atk_":20}},{"weight":4,"path":["normal","0"],"hitMode":"avgHit","bonusStats":{}},{"weight":4,"path":["normal","1"],"hitMode":"avgHit","bonusStats":{}},{"weight":4,"path":["normal","2"],"hitMode":"avgHit","bonusStats":{}},{"weight":2,"path":["normal","3"],"hitMode":"avgHit","bonusStats":{}},{"weight":2,"path":["skill","press"],"hitMode":"avgHit","bonusStats":{}},{"weight":4,"path":["burst","companionDmg1"],"hitMode":"avgHit","bonusStats":{}},{"weight":4,"path":["burst","companionDmg2"],"hitMode":"avgHit","bonusStats":{}},{"weight":4,"path":["burst","companionDmg3"],"hitMode":"avgHit","bonusStats":{}},{"weight":2,"path":["burst","companionDmg4"],"hitMode":"avgHit","bonusStats":{}},{"weight":1,"path":["constellation6","dmg"],"hitMode":"avgHit","bonusStats":{}}]}
Customization: The Noblesse assumption can be removed by removing all the ATK% modifiers.
Aggravate
kirkie.
Explanation: Typical rotation for Aggravate Razor. Similar to Physical Razor, there’s still a healthy split between Electro and Physical Damage, making optimizing for a combination of the two useful. Additionally, it’s important to account for Aggravate frequency.
Assumptions: The assumed rotation is tE Q tE 4x(N4D N2tED). No buffs are assumed. The config works with both C6 and pre-C6 Razor.
{"name":"Aggravate","targets":[{"weight":1,"path":["burst","dmg"],"hitMode":"avgHit","reaction":"aggravate","bonusStats":{}},{"weight":4,"path":["skill","press"],"hitMode":"avgHit","reaction":"aggravate","bonusStats":{}},{"weight":2,"path":["constellation6","dmg"],"hitMode":"avgHit","reaction":"aggravate","bonusStats":{}},{"weight":5,"path":["burst","companionDmg1"],"hitMode":"avgHit","reaction":"aggravate","bonusStats":{}},{"weight":5,"path":["burst","companionDmg2"],"hitMode":"avgHit","bonusStats":{}},{"weight":4,"path":["burst","companionDmg3"],"hitMode":"avgHit","bonusStats":{}},{"weight":4,"path":["burst","companionDmg4"],"hitMode":"avgHit","reaction":"aggravate","bonusStats":{}},{"weight":5,"path":["normal","0"],"hitMode":"avgHit","bonusStats":{}},{"weight":5,"path":["normal","1"],"hitMode":"avgHit","bonusStats":{}},{"weight":4,"path":["normal","2"],"hitMode":"avgHit","bonusStats":{}},{"weight":4,"path":["normal","3"],"hitMode":"avgHit","bonusStats":{}}]}
4pc TF Aggravate
kirkie.
Explanation: Typical rotation for Aggravate Razor running 4pc Thundering Fury.
Assumptions: The assumed rotation is tE Q tE 3x(N4tED). No buffs are assumed. The config works with both C6 and pre-C6 Razor. Note that this and the previous Aggravate config are not directly comparable as they may take different amounts of time to perform.
{"name":"4pc TF Aggravate","targets":[{"weight":5,"path":["skill","press"],"hitMode":"avgHit","reaction":"aggravate","bonusStats":{}},{"weight":1,"path":["burst","dmg"],"hitMode":"avgHit","reaction":"aggravate","bonusStats":{}},{"weight":3,"path":["burst","companionDmg1"],"hitMode":"avgHit","reaction":"aggravate","bonusStats":{}},{"weight":3,"path":["burst","companionDmg2"],"hitMode":"avgHit","bonusStats":{}},{"weight":3,"path":["burst","companionDmg3"],"hitMode":"avgHit","bonusStats":{}},{"weight":3,"path":["burst","companionDmg4"],"hitMode":"avgHit","reaction":"aggravate","bonusStats":{}},{"weight":1,"path":["constellation6","dmg"],"hitMode":"avgHit","bonusStats":{}},{"weight":3,"path":["normal","0"],"hitMode":"avgHit","bonusStats":{}},{"weight":3,"path":["normal","1"],"hitMode":"avgHit","bonusStats":{}},{"weight":3,"path":["normal","2"],"hitMode":"avgHit","bonusStats":{}},{"weight":3,"path":["normal","3"],"hitMode":"avgHit","bonusStats":{}}]}
Rosaria
On-Field Combo
skynet.exe
Explanation: Config for on-field Rosaria (no reactions).
Assumptions: The attacks used are E Q 2N4. Assumes C2+. Has conditional passives from a few weapons written in, as to be more “plug and play” friendly.
{"name":"On-field: 2x4N, E, Q","targets":[{"weight":2,"path":["normal","0"],"hitMode":"avgHit","bonusStats":{}},{"weight":2,"path":["normal","1"],"hitMode":"avgHit","bonusStats":{}},{"weight":4,"path":["normal","2"],"hitMode":"avgHit","bonusStats":{}},{"weight":2,"path":["normal","3"],"hitMode":"avgHit","bonusStats":{}},{"weight":2,"path":["normal","4"],"hitMode":"avgHit","bonusStats":{}},{"weight":2,"path":["normal","5"],"hitMode":"avgHit","bonusStats":{}},{"weight":1,"path":["skill","hit1"],"hitMode":"avgHit","bonusStats":{}},{"weight":1,"path":["skill","hit2"],"hitMode":"avgHit","bonusStats":{}},{"weight":1,"path":["burst","hit1"],"hitMode":"avgHit","bonusStats":{}},{"weight":1,"path":["burst","hit2"],"hitMode":"avgHit","bonusStats":{}},{"weight":6,"path":["burst","dotDmg"],"hitMode":"avgHit","bonusStats":{}},{"weight":1,"path":["weapon:Halberd","dmg"],"hitMode":"avgHit","bonusStats":{}},{"weight":1,"path":["weapon:DragonspineSpear","dmgOnCryoOp"],"hitMode":"avgHit","bonusStats":{}},{"weight":14,"path":["weapon:CrescentPike","hit"],"hitMode":"avgHit","bonusStats":{}}]}
Sangonomiya Kokomi
Sayu
Shenhe
Shenhe in Genshin Optimizer
vladutsu and revycord
Explanation: The KQM Shenhe guide has a Genshin Optimizer section that explains how to optimize for her.
Link to external resource: KQM Shenhe Guide
Shikanoin Heizou
Sucrose
Tartaglia (Childe)
Childe in Genshin Optimizer
mystathi
Explanation: This document will explain how to use Genshin Optimizer with Childe, as well as provide several template Custom Targets for you to use.
Link to external resource: Childe in Genshin Optimizer
Thoma
Tighnari
Spread
nicobiche
Explanation: General template for Spread Tighnari teams. Not all hits proc the Spread reaction, that’s why it is relevant to use the multi-optimization tool in order to avoid a bias towards EM.
Assumptions: Quicken aura is permanent. Using the following rotation: E (Q) 3xCA. Burst every other rotation (hence, the Burst damage is halved in the config). Only the charged attacks get the A1 (50 EM) bonus. Toggle off A1 when using the config.
{"name":"E (Q) 3xCA","targets":[{"weight":3,"path":["charged","wreath"],"hitMode":"avgHit","reaction":"spread","bonusStats":{"eleMas":50}},{"weight":9,"path":["charged","cluster"],"hitMode":"avgHit","bonusStats":{"eleMas":50}},{"weight":2,"path":["burst","primaryDmg"],"hitMode":"avgHit","bonusStats":{}},{"weight":2,"path":["burst","secondaryDmg"],"hitMode":"avgHit","bonusStats":{}},{"weight":1,"path":["burst","primaryDmg"],"hitMode":"avgHit","reaction":"spread","bonusStats":{}},{"weight":1,"path":["burst","secondaryDmg"],"hitMode":"avgHit","reaction":"spread","bonusStats":{}},{"weight":3,"path":["charged","cluster"],"hitMode":"avgHit","reaction":"spread","bonusStats":{"eleMas":50}},{"weight":1,"path":["skill","dmg"],"hitMode":"avgHit","reaction":"spread","bonusStats":{}}]}
Customization: Slingshot can be accounted for by removing 60% CA DMG Bonus on the clusterbloom arrows and ticking the weapon passive bonus (or adding 70% on the wreathed by ticking the penalty). The same can be done for Amos (2 stacks on wreathed and 4 on clusterblooms seems to be a fair assumption).
Spread: Hunter’s Path
mr.pillow.
Explanation: Standard Spread Tighnari combo. Multi-optimization is important when using Hunter’s Path because only 12 out of 15 Charged Attacks will get the buff, which needs to be accounted for.
Assumptions: The following config assumes the rotation E 3CA Q (Burst every rotation) with permanent Quicken aura (i.e., even the E triggers Spread). The config assumes a total of 500 EM and Refinement Rank 1, and thus adds −800 Charged Att. DMG Increase modifiers to hits that wouldn’t be buffed by the weapon passive. Note that you’ll need to iteratively edit this modifier to match the actual EM you have to optimize as accurately as possible. Activate Tighnari’s A1 in the Talents tab, since the config already removes 50 EM from hits that wouldn’t get the A1 buff.
{"name":"Hunter's Tighnari E 3CA Q","description":"","targets":[{"weight":1,"path":["skill","dmg"],"hitMode":"avgHit","bonusStats":{"eleMas":-50}},{"weight":1,"path":["charged","wreath"],"hitMode":"avgHit","reaction":"spread","bonusStats":{"eleMas":-50,"charged_dmgInc":-800}},{"weight":2,"path":["charged","wreath"],"hitMode":"avgHit","reaction":"spread","bonusStats":{}},{"weight":3,"path":["charged","cluster"],"hitMode":"avgHit","reaction":"spread","bonusStats":{}},{"weight":7,"path":["charged","cluster"],"hitMode":"avgHit","bonusStats":{}},{"weight":2,"path":["charged","cluster"],"hitMode":"avgHit","bonusStats":{"charged_dmgInc":-800}},{"weight":2,"path":["burst","primaryDmg"],"hitMode":"avgHit","reaction":"spread","bonusStats":{}},{"weight":4,"path":["burst","primaryDmg"],"hitMode":"avgHit","bonusStats":{}},{"weight":2,"path":["burst","secondaryDmg"],"hitMode":"avgHit","reaction":"spread","bonusStats":{}},{"weight":4,"path":["burst","secondaryDmg"],"hitMode":"avgHit","bonusStats":{}}]}
Traveler
Multi-Optimization Guide
grankrathalos
Explanation: The purpose of this document is to teach players how to optimize for their Travelers and to provide a collection of Traveler configs.
Link to external resource: A Traveler’s Guide to Multi-Optimization Target Config
Venti
2 Skills 1 Burst
nociii and itslin
Explanation: In most teams, Venti will be able to use two Skills and one Burst in his rotation. This is fairly straightforward to optimize for C0 Venti. Exceptions are detailed below for Constellation effects and Polar Star.
Assumptions: Assumes 15 ticks of Additional Elemental damage. The actual number of Additional Elemental damage ticks may vary according to your ping and when the Absorption happens, but 14-15 is reasonable. Assumes 18 Swirls to simulate a multi-target scenario, or 9 Swirls to simulate a single-target scenario. Important: change the Swirls in the config to be the correct Element for your team. This config assumes a C0 Venti. If using 4pc Viridescent Venerer, ensure that the 4pc effect is marked as active with the proper Element in the Overview tab. Lastly, in the Talents tab, check that the Elemental Absorption in his Burst is active and set to the proper Element.
2E1Q Single-Target (9 Swirls)
{"name":"Venti 2E1Q ST","targets":[{"weight":2,"path":["skill","press"],"hitMode":"avgHit","bonusStats":{}},{"weight":20,"path":["burst","base"],"hitMode":"avgHit","bonusStats":{}},{"weight":15,"path":["burst","absorb"],"hitMode":"avgHit","bonusStats":{}},{"weight":9,"path":["reaction","cryoSwirl"],"hitMode":"avgHit","bonusStats":{}}]}
2E1Q Multi-Target (18 Swirls)
{"name":"Venti 2E1Q AoE","targets":[{"weight":2,"path":["skill","press"],"hitMode":"avgHit","bonusStats":{}},{"weight":20,"path":["burst","base"],"hitMode":"avgHit","bonusStats":{}},{"weight":15,"path":["burst","absorb"],"hitMode":"avgHit","bonusStats":{}},{"weight":18,"path":["reaction","cryoSwirl"],"hitMode":"avgHit","bonusStats":{}}]}
Assumptions (Polar Star): To account for the dynamic damage increase when using Polar Star, the rotation is NA > Aimed Shot > E > Q > E (+18 Swirls). Note: Make sure to set Polar Star’s Ashen Nightstar stacks to ”Not Active” in the Overview tab.
Polar Star 2E1Q Multi-Target
{"name":"Venti 2E1Q AoE Polar Star","targets":[{"weight":2,"path":["normal","0"],"hitMode":"avgHit","bonusStats":{}},{"weight":1,"path":["charged","aimed"],"hitMode":"avgHit","bonusStats":{"atk_":10}},{"weight":1,"path":["skill","press"],"hitMode":"avgHit","bonusStats":{"atk_":20}},{"weight":20,"path":["burst","base"],"hitMode":"avgHit","bonusStats":{"atk_":30}},{"weight":15,"path":["burst","absorb"],"hitMode":"avgHit","bonusStats":{"atk_":30}},{"weight":1,"path":["skill","press"],"hitMode":"avgHit","bonusStats":{"atk_":48}},{"weight":18,"path":["reaction","cryoSwirl"],"hitMode":"avgHit","bonusStats":{}}]}
Customization:
- Venti’s Burst snapshots, (but Swirls do not) so you can apply any relevant buffs to all Burst DoT ticks and Additional Elemental damage ticks at once. However, swirls still have to be accounted for individually.
- If you have C2, it’s easiest to mark it as active in the Talents tab. It’s generally safer to set it to “Opponent hit” and not “Opponent launched” since, even if an enemy is light enough to be launched, their actual airborne time can be unpredictable.
- If you have C4, it may be better to leave it unchecked and apply the buff manually. If doing a quick E-Q combo, the particles from Venti’s Skill generally won’t reach him in time to buff his Burst (which snapshots at the time of cast). If you’re willing to either funnel another character’s particles to Venti or spend some time on-field to catch his own particles before casting his Burst, then you can add the 25% Anemo DMG Bonus to his Burst DoT ticks. Also, not all Skill uses may be buffed by C4, depending on the rotation, but it’s fine to just toggle on the effect for simplicity.
- If Venti is C6, apply the -20% RES Shred manually to the Burst DoT ticks, Additional Elemental damage ticks, and 14 of his Swirls (7 Swirls in single-target). One of his Skills may also be buffed (netting an additional 1 or 2 Swirls). If you are simulating from the second rotation onward or just want to assume 100% uptime on his C6, you can also just toggle it as permanently active in the Talents tab.
Wanderer
N2C Combo w/ Faruzan A4 (Lost Prayers)
scootyyy
Explanation: C0 Wanderer 6N2C combo. Note that executing the 6N2C combo requires perfect timing. If you are only able to execute 5N2C + N2, remove the final CA in the config. No Burst included.
Assumptions: Wanderer is using Lost Prayer to Sacred Winds; remove the Anemo Damage Bonus buffs to change to a generic config. Assumes the Zhongli – Bennett – Faruzan team. Bennett is holding 4pc NO and Faruzan is holding 4pc ToTM. Change Anemo DMG Increase to whatever Faruzan’s A4 provides in your team. Default is for 90/90 Faruzan with 90/90 Favonius Warbow. Toggle on: Zhongli Shield, Bennett Field, Faruzan Burst, 4pc NO, 4pc TotM, Wanderer Skill, Wanderer Pyro Infusion. Toggle off: Faruzan A4, LP Stacks.
{"name":"N2C Combo | No Burst | Faruzan A4 | LP","description":"Enable: Zhongli Shield, Bennett Field, Faruzan Burst, 4pc NO, 4pc TOTM, Wanderer Skill, Wanderer Pyro Infusion\nDisable: Faruzan A4, LP Stacks\nChange Anemo DMG Increase to whatever Faruzan's A4 provides in your team. Default is for 90/90 Faruzan with 90/90 Favonius Warbow. Remove the Anemo% for no LP.","targets":[{"weight":1,"path":["skill","dmg"],"hitMode":"avgHit","bonusStats":{"anemo_dmgInc":208}},{"weight":1,"path":["normal","0"],"hitMode":"avgHit","bonusStats":{}},{"weight":1,"path":["normal","1"],"hitMode":"avgHit","bonusStats":{"anemo_dmgInc":208}},{"weight":1,"path":["charged","dmg"],"hitMode":"avgHit","bonusStats":{}},{"weight":1,"path":["normal","0"],"hitMode":"avgHit","bonusStats":{"anemo_dmgInc":208}},{"weight":1,"path":["normal","1"],"hitMode":"avgHit","bonusStats":{}},{"weight":1,"path":["charged","dmg"],"hitMode":"avgHit","bonusStats":{"anemo_dmgInc":208,"anemo_dmg_":8}},{"weight":1,"path":["normal","0"],"hitMode":"avgHit","bonusStats":{}},{"weight":1,"path":["normal","1"],"hitMode":"avgHit","bonusStats":{"anemo_dmgInc":208,"anemo_dmg_":8}},{"weight":1,"path":["charged","dmg"],"hitMode":"avgHit","bonusStats":{"anemo_dmg_":8}},{"weight":1,"path":["normal","0"],"hitMode":"avgHit","bonusStats":{"anemo_dmgInc":208,"anemo_dmg_":8}},{"weight":1,"path":["normal","1"],"hitMode":"avgHit","bonusStats":{"anemo_dmg_":8}},{"weight":1,"path":["charged","dmg"],"hitMode":"avgHit","bonusStats":{"anemo_dmgInc":208,"anemo_dmg_":8}},{"weight":1,"path":["normal","0"],"hitMode":"avgHit","bonusStats":{"anemo_dmg_":16}},{"weight":1,"path":["normal","1"],"hitMode":"avgHit","bonusStats":{"anemo_dmgInc":208,"anemo_dmg_":16}},{"weight":1,"path":["charged","dmg"],"hitMode":"avgHit","bonusStats":{"anemo_dmg_":16}},{"weight":1,"path":["normal","0"],"hitMode":"avgHit","bonusStats":{"anemo_dmgInc":208,"anemo_dmg_":16}},{"weight":1,"path":["normal","1"],"hitMode":"avgHit","bonusStats":{"anemo_dmg_":16}},{"weight":1,"path":["charged","dmg"],"hitMode":"avgHit","bonusStats":{"anemo_dmgInc":208,"anemo_dmg_":16}}]}
CA Spam w/ Faruzan A4 (Lost Prayers)
scootyyy
Explanation: C0 Wanderer 13CA combo, accounting for Faruzan A4 at C6 and Lost Prayer stacks, with no Burst.
Assumptions: Wanderer is using Lost Prayer to Sacred Winds; remove the Anemo Damage Bonus buffs to change to a generic config. Change Anemo DMG Increase to whatever Faruzan’s A4 provides in your team. Default is for 90/90 Faruzan with 90/90 Favonius Warbow.
{"name":"CA Spam | No Burst | C6 Faruzan | LP","description":"Enable: Zhongli Shield, Bennett Field, Faruzan Burst, 4pc NO, 4pc TOTM, Wanderer Skill, Wanderer Pyro Infusion\nDisable: Faruzan A4, LP Stacks\nChange Anemo DMG Increase to whatever Faruzan's A4 provides in your team. Default is for 90/90 Faruzan with 90/90 Favonius Warbow. Remove the Anemo% for no LP.","targets":[{"weight":1,"path":["skill","dmg"],"hitMode":"avgHit","bonusStats":{"anemo_dmgInc":208}},{"weight":2,"path":["charged","dmg"],"hitMode":"avgHit","bonusStats":{"anemo_dmgInc":208}},{"weight":1,"path":["charged","dmg"],"hitMode":"avgHit","bonusStats":{}},{"weight":2,"path":["charged","dmg"],"hitMode":"avgHit","bonusStats":{"anemo_dmgInc":208,"anemo_dmg_":8}},{"weight":4,"path":["charged","dmg"],"hitMode":"avgHit","bonusStats":{"anemo_dmg_":8}},{"weight":2,"path":["charged","dmg"],"hitMode":"avgHit","bonusStats":{"anemo_dmgInc":208,"anemo_dmg_":16}},{"weight":2,"path":["charged","dmg"],"hitMode":"avgHit","bonusStats":{"anemo_dmg_":16}}]}
Wriothesley
Xiangling
Pure Vape
jamberry
Explanation: Configs for pure Vape Xiangling teams. While normal optimization is sufficient in many cases, if there are non-Vaped hits, such as in Childe or Ayato teams, it’s valuable to do multi-optimization.
Assumptions: C4+ Xiangling (12 hits of Pyronado). Adjust buffs to reflect rotation. Since Xiangling snapshots, the only relevant partial uptime buffs should be if Guoba is summoned twice with different buffs, Guoba is used at a different point from Pyronado, or a non-snapshottable stat is in play such as Yelan A4.
Full Vape with Xingqiu / Yelan Example: 12 / 12 Pyronado Vaporize, 0 / 4 Guoba Vaporize.
{"name":"Pure Vape with Yelan/Xingqiu","targets":[{"weight":1,"path":["burst","dmg1"],"hitMode":"avgHit","reaction":"vaporize","bonusStats":{}},{"weight":1,"path":["burst","dmg2"],"hitMode":"avgHit","bonusStats":{}},{"weight":1,"path":["burst","dmg3"],"hitMode":"avgHit","bonusStats":{}},{"weight":12,"path":["burst","dmgNado"],"hitMode":"avgHit","reaction":"vaporize","bonusStats":{}},{"weight":4,"path":["skill","press"],"hitMode":"avgHit","bonusStats":{}}]}
Partial Vape with Childe Example: 8 / 12 Pyronado Vaporize, 3 / 8 Guoba Vaporize. Since the second Guoba is summoned after 4pc Noblesse and Bennett buffs are gone, their values are subtracted from it. Adjust the ATK modifier to match your Bennett’s stats.
{"name":"Pure Vape with Tartaglia","targets":[{"weight":1,"path":["burst","dmg1"],"hitMode":"avgHit","bonusStats":{}},{"weight":1,"path":["burst","dmg2"],"hitMode":"avgHit","bonusStats":{}},{"weight":1,"path":["burst","dmg3"],"hitMode":"avgHit","bonusStats":{}},{"weight":8,"path":["burst","dmgNado"],"hitMode":"avgHit","bonusStats":{},"reaction":"vaporize"},{"weight":4,"path":["burst","dmgNado"],"hitMode":"avgHit","bonusStats":{}},{"weight":3,"path":["skill","press"],"hitMode":"avgHit","bonusStats":{},"reaction":"vaporize"},{"weight":1,"path":["skill","press"],"hitMode":"avgHit","bonusStats":{}},{"weight":4,"path":["skill","press"],"hitMode":"avgHit","bonusStats":{"atk_":-20,"atk":-1203}}]}
Overload + Vape
jamberry
Explanation: Configs for Xiangling in Overload + Vape teams. The Overload reaction splits Xiangling’s damage profile significantly, which makes multi-optimization even more valuable.
Assumptions: Adjust buffs to reflect rotation. Since Xiangling snapshots, the only relevant partial uptime buffs should be if Guoba is summoned twice with different buffs, Guoba is used at a different point from Pyronado, or a non-snapshottable stat is in play such as Yelan A4. Note that Overloads don’t snapshot.
Overload + Vape with Raiden – Xinqiu – Bennett (Rational) Example:
{"name":"Overload + Vape: Raiden-Xingqiu-Bennett","targets":[{"weight":1,"path":["burst","dmg1"],"hitMode":"avgHit","reaction":"vaporize","bonusStats":{}},{"weight":1,"path":["burst","dmg2"],"hitMode":"avgHit","bonusStats":{}},{"weight":1,"path":["burst","dmg3"],"hitMode":"avgHit","bonusStats":{}},{"weight":8,"path":["burst","dmgNado"],"hitMode":"avgHit","reaction":"vaporize","bonusStats":{}},{"weight":4,"path":["burst","dmgNado"],"hitMode":"avgHit","bonusStats":{}},{"weight":3,"path":["skill","press"],"hitMode":"avgHit","bonusStats":{},"reaction":"vaporize"},{"weight":1,"path":["skill","press"],"hitMode":"avgHit","bonusStats":{}},{"weight":6,"path":["reaction","overloaded"],"hitMode":"avgHit","bonusStats":{}}]}
Overload + Vape with Kokomi – Fischl – Sucrose (Sukokomon) example: Note that since the first Guoba is summoned before Sucrose, he does not receive TTDS or Sucrose’s EM buff, while the second Guoba does benefit from Sucrose A4 but still misses TTDS. This is handled by subtracting these buffs from the affected hits.
{"name":"Overload + Vape with Kokomi-Fischl-Sucrose","targets":[{"weight":1,"path":["burst","dmg1"],"hitMode":"avgHit","reaction":"vaporize","bonusStats":{}},{"weight":1,"path":["burst","dmg2"],"hitMode":"avgHit","bonusStats":{}},{"weight":1,"path":["burst","dmg3"],"hitMode":"avgHit","bonusStats":{}},{"weight":12,"path":["burst","dmgNado"],"hitMode":"avgHit","reaction":"vaporize","bonusStats":{}},{"weight":4,"path":["skill","press"],"hitMode":"avgHit","bonusStats":{"atk_":-48,"eleMas":-175},"reaction":"vaporize"},{"weight":4,"path":["skill","press"],"hitMode":"avgHit","bonusStats":{"atk_":-48},"reaction":"vaporize"},{"weight":9,"path":["reaction","overloaded"],"hitMode":"avgHit","bonusStats":{}}]}
Customization: Some guidelines for Overload counts: 5–7 is reasonable for Raiden – Xingqiu – Bennett with a C4+ Xiangling, and with Kokomi – Fischl – Sucrose, 8–12 in AoE or 4–6 single-target.
Pure Overload
jamberry
Explanation: Helpful for Chevreuse teams and other non-Vape Overload teams where Xiangling’s damage is mostly from Pyronado talent damage but Overloads have some limited value that is worth accounting for.
Assumptions: EQ rotation assuming C4. Assumes Overload count accurate to Raiden solo Electro and Raiden – Sara teams. All buffs should be accounted for in team buffs. If using C6 Chevreuse, do not enable all 3 stacks of her C6 as her healing only applies to on-field characters; Xiangling will receive at most 1 stack for most rotations.
{"name":"Chevy","targets":[{"weight":1,"path":["burst","dmg1"],"hitMode":"avgHit","bonusStats":{}},{"weight":1,"path":["burst","dmg2"],"hitMode":"avgHit","bonusStats":{}},{"weight":1,"path":["burst","dmg3"],"hitMode":"avgHit","bonusStats":{}},{"weight":12,"path":["burst","dmgNado"],"hitMode":"avgHit","bonusStats":{}},{"weight":4,"path":["skill","press"],"hitMode":"avgHit","bonusStats":{}},{"weight":8,"path":["reaction","overloaded"],"hitMode":"avgHit","bonusStats":{}}]}
Customization: For teams with 2 Electro characters with consistent application such as Raiden – Fischl, Yae – Beidou, etc., increase Overload count to 10-12. If using 2 Elemental Skills, add a second Guoba target with 4 hits, subtracting relevant buffs from the target that may have expired such as Bennett Q or Noblesse. For C0-3, reduce Pyronado count by 4.
Reactionless
jamberry
Explanation: Config for reactionless teams. Helpful to properly weight Guoba’s damage when considering EoSF vs other sets.
Assumptions: EQ rotation assuming C4. All buffs should be added as team buffs.
{"name":"No Reaction","targets":[{"weight":1,"path":["burst","dmg1"],"hitMode":"avgHit","bonusStats":{}},{"weight":1,"path":["burst","dmg2"],"hitMode":"avgHit","bonusStats":{}},{"weight":1,"path":["burst","dmg3"],"hitMode":"avgHit","bonusStats":{}},{"weight":12,"path":["burst","dmgNado"],"hitMode":"avgHit","bonusStats":{}},{"weight":4,"path":["skill","press"],"hitMode":"avgHit","bonusStats":{}}]}
Customization: If using 2 Elemental Skills, add a second Guoba target with 4 hits, subtracting relevant buffs from the target that may have expired such as Bennett Q or Noblesse. For C0-3, reduce Pyronado count by 4.
Xianyun
Xiao
Plunge Combo w/ PJWS and 4pc Vermillion
watahmelawn
Explanation: This is to emulate PJWS and 4pc Vermillion’s ramping buff as the optimizer doesn’t have an average buff option. The combo is 2E Q 11hP. Made for Xiao enjoyers who want to accurately optimize their main.
Assumptions: Primordial Jade Winged-Spear and 4pc Vermillion Hereafter’s ramping buffs are taken into account in the config. Set PJWS and Vermillion stacks to max stacks. Additionally, disable Xiao’s A4 and set Xiao’s A1 to 0 seconds.
{"name":"Xiao 11 plunge Jade spear r1 4 Vermillion (see description)","description":"- Turn Jade Spear's passive on to max stacks\n- Turn off Xiao's A4 passsive\n- Turn on Xiao's A1 passive to 0 seconds\n- Turn on Xiao's burst buff\n- Turn on Vermillion's Burst Buff, and set it at 4 stacks","targets":[{"weight":1,"path":["skill","press"],"hitMode":"avgHit","bonusStats":{"atk_":-70.4,"all_dmg_":-17.1}},{"weight":1,"path":["skill","press"],"hitMode":"avgHit","bonusStats":{"atk_":-67.2,"all_dmg_":-17,"skill_dmg_":15}},{"weight":1,"path":["plunging","high"],"hitMode":"avgHit","bonusStats":{"atk_":-46,"all_dmg_":-12}},{"weight":1,"path":["plunging","high"],"hitMode":"avgHit","bonusStats":{"atk_":-32.8,"all_dmg_":-12}},{"weight":1,"path":["plunging","high"],"hitMode":"avgHit","bonusStats":{"atk_":-19.6,"all_dmg_":-7}},{"weight":1,"path":["plunging","high"],"hitMode":"avgHit","bonusStats":{"atk_":-6.4,"all_dmg_":-7}},{"weight":1,"path":["plunging","high"],"hitMode":"avgHit","bonusStats":{"atk_":-3.2,"all_dmg_":-2}},{"weight":1,"path":["plunging","high"],"hitMode":"avgHit","bonusStats":{"all_dmg_":10}},{"weight":1,"path":["plunging","high"],"hitMode":"avgHit","bonusStats":{"all_dmg_":15}},{"weight":1,"path":["plunging","high"],"hitMode":"avgHit","bonusStats":{"all_dmg_":15}},{"weight":1,"path":["plunging","high"],"hitMode":"avgHit","bonusStats":{"all_dmg_":20}},{"weight":1,"path":["plunging","high"],"hitMode":"avgHit","bonusStats":{"all_dmg_":20}},{"weight":1,"path":["plunging","high"],"hitMode":"avgHit","bonusStats":{"all_dmg_":20}}]}
Customization: Additional Jade spear refinements can be taken into account. Just edit the first 7 “ATK%” buffs to match your refinements.
Plunge Combo w/ PJWS and 4pc Vermillion + Bennett
watahmelawn
Explanation: This is to emulate PJWS and 4pc Vermillion’s ramping buff in a team with Bennett. The combo is 2E Q 11hP.
Assumptions: Primordial Jade Winged-Spear and 4pc Vermillion Hereafter’s ramping buffs are taken into account in the config. Set PJWS and Vermillion stacks to max stacks. Additionally, disable Xiao’s A4 and set Xiao’s A1 to 0 seconds. Toggle off Bennett’s Burst buff and Noblesse buff from the Teams tab. The config takes into account Bennett buffing at 1000 ATK. Edit this flat ATK buff to match your Bennett’s buff.
{"name":"Xiao 11 plunge Jade spear r1 4 Vermillion + 4NO Bennett (see description)","description":"- Turn Jade Spear's passive on to max stacks\n- Turn off Xiao's A4 passsive\n- Turn on Xiao's A1 passive to 0 seconds\n- Turn on Xiao's burst buff\n- Turn on Vermillion's Burst Buff, and set it at 4 stacks\n- Turn off Bennett buffs and Noblesse buff (this takes into account Bennett buff of 1000 ATK. adjust flat ATK buff to match your Bennett's buff)","targets":[{"weight":1,"path":["skill","press"],"hitMode":"avgHit","bonusStats":{"atk_":-58.4,"all_dmg_":-17,"atk":1000}},{"weight":1,"path":["skill","press"],"hitMode":"avgHit","bonusStats":{"atk_":-55.2,"all_dmg_":-17,"skill_dmg_":15,"atk":1000}},{"weight":1,"path":["plunging","high"],"hitMode":"avgHit","bonusStats":{"atk_":-34,"all_dmg_":-12,"atk":1000}},{"weight":1,"path":["plunging","high"],"hitMode":"avgHit","bonusStats":{"atk_":-20.8,"all_dmg_":-12,"atk":1000}},{"weight":1,"path":["plunging","high"],"hitMode":"avgHit","bonusStats":{"atk_":-7.6,"all_dmg_":-7,"atk":1000}},{"weight":1,"path":["plunging","high"],"hitMode":"avgHit","bonusStats":{"atk_":5.6,"all_dmg_":-7,"atk":1000}},{"weight":1,"path":["plunging","high"],"hitMode":"avgHit","bonusStats":{"atk_":8.8,"all_dmg_":-2,"atk":1000}},{"weight":1,"path":["plunging","high"],"hitMode":"avgHit","bonusStats":{"all_dmg_":10,"atk":1000,"atk_":12}},{"weight":1,"path":["plunging","high"],"hitMode":"avgHit","bonusStats":{"all_dmg_":15,"atk":1000,"atk_":12}},{"weight":1,"path":["plunging","high"],"hitMode":"avgHit","bonusStats":{"all_dmg_":15,"atk":1000}},{"weight":1,"path":["plunging","high"],"hitMode":"avgHit","bonusStats":{"all_dmg_":20}},{"weight":1,"path":["plunging","high"],"hitMode":"avgHit","bonusStats":{"all_dmg_":20}},{"weight":1,"path":["plunging","high"],"hitMode":"avgHit","bonusStats":{"all_dmg_":20}}]}
Customization: Additional Jade spear refinements can be taken into account. Just edit the first 7 “ATK%” buffs to match your refinements.
Xingqiu
EQ
jamberry
Explanation: This config helps account for Xingqiu’s Elemental Skill damage as well when evaluating EoSF vs. other sets.
Assumptions: Unbuffed, non-Vaped hits with 15 Burst waves. Turn on C4 if relevant.
C6:
{"name":"C6 XQ","targets":[{"weight":1,"path":["skill","press1"],"hitMode":"avgHit","bonusStats":{}},{"weight":1,"path":["skill","press2"],"hitMode":"avgHit","bonusStats":{}},{"weight":50,"path":["burst","dmg"],"hitMode":"avgHit","bonusStats":{}}]}
C2-5:
{"name":"C2 XQ","targets":[{"weight":1,"path":["skill","press1"],"hitMode":"avgHit","bonusStats":{}},{"weight":1,"path":["skill","press2"],"hitMode":"avgHit","bonusStats":{}},{"weight":37,"path":["burst","dmg"],"hitMode":"avgHit","bonusStats":{}}]}
Customization: The config can easily be edited to have more or fewer hits to account for more or fewer waves: for C6, 3 Burst waves = 10 hits and for pre-C6, 2 waves = 5 hits. Change the weights for the two Skill targets to 2 if using Sacrificial Sword.
Xinyan
Yae Miko
Mono Electro 1
unglck13
Explanation: Yae configs for Skill and Burst use in Mono Electro team compositions.
Assumptions: This config assumes Burst off cooldown every 22s and full turret uptime with 26 turret hits. (In practice, 22-23 turret hits are more likely, however).
{"name":"26 Skill hits + 1 Burst","targets":[{"weight":26,"path":["skill","dmg3"],"hitMode":"avgHit","bonusStats":{}},{"weight":1,"path":["burst","dmg"],"hitMode":"avgHit","bonusStats":{}},{"weight":3,"path":["burst","tenkoDmg"],"hitMode":"avgHit","bonusStats":{}}]}
Mono Electro 2
justinleea
Explanation: Config for Yae in the team Raiden-C6 Sara-Kazuha.
Assumptions: Rotation is Raiden E > Yae EEE > Kazuha E Plunge Q > Sara E CA Q > Yae Q EEE > Kazuha E Plunge > Sara E > Raiden Q. The config includes partial buff uptimes for Sara’s ATK and CRIT DMG buffs; don’t activate these in Team Buffs. It’s assumed that Sara is C6, Level 80 / 90, using Level 90 Fading Twilight Bow, and E Talent Level is 12. Edit the config to change the ATK modifiers to reflect your Sara’s stats. The config also accounts for the 4pc Noblesse buff uptime. Toggle it on in Team Buffs when using the config. Other buffs (like from Kazuha) aren’t included.
{"name":"Yae in Eimiko ","targets":[{"weight":6,"path":["skill","dmg3"],"hitMode":"avgHit","bonusStats":{"atk_":-20}},{"weight":1,"path":["burst","dmg"],"hitMode":"avgHit","bonusStats":{"electro_critDMG_":60,"atk":641}},{"weight":3,"path":["burst","tenkoDmg"],"hitMode":"avgHit","bonusStats":{"electro_critDMG_":60,"atk":641}},{"weight":3,"path":["skill","dmg3"],"hitMode":"avgHit","bonusStats":{"electro_critDMG_":60,"atk":641}},{"weight":5,"path":["skill","dmg3"],"hitMode":"avgHit","bonusStats":{}},{"weight":4,"path":["skill","dmg3"],"hitMode":"avgHit","bonusStats":{"atk_":-20}}]}
Raiden-Kazuha-Bennett
itsjaeyou
Explanation: This config provides a dynamic buff mapping for Yae in a Raiden Hyper (Raiden Yae Kazuha Bennett) team rotation.
Assumptions: The rotation is Raiden E > Yae EEE > Kaz Q > Bennett Q > Yae Q EEE > Kaz tE > Raiden Q combo > Repeat. This config accounts for partial buff and debuff uptimes. The assumed buffs shouldn’t be activated in the Team Buffs tab, and the target modifiers need to be adjusted to match your own stats. The following buff assumptions are used: Raiden E talent lvl9+. Yae is C0. Kazuha 800EM. Bennett 980 ATK buff. Yae maintains positioning on Bennett’s burst. Other Buffs are not accounted for. Note that Kazuha is calculated with 800EM / 32% DMG bonus and needs to be adjusted. Raiden’s E bonus only applies to Yae’s Burst (32% + 27% = 59%) and needs to be adjusted if not T9+. Bennett is calculated with a 980 ATK bonus for C5 / T12 with a 4-star weapon and needs to be adjusted.
{"name":"Yae for Raiden Hyper","description":"Raiden Yae Kazuha Bennett: Raiden E > Yae EEE > Kaz Q > Ben Q > Yae Q EEE > Kaz tE > Raiden Q combo > loop","targets":[{"weight":3,"path":["skill","dmg3"],"hitMode":"avgHit","bonusStats":{}},{"weight":3,"path":["skill","dmg3"],"hitMode":"avgHit","bonusStats":{"electro_dmg_":32,"electro_enemyRes_":-40,"atk_":20}},{"weight":1,"path":["burst","dmg"],"hitMode":"avgHit","bonusStats":{"electro_dmg_":59,"electro_enemyRes_":-40,"atk_":20,"atk":980}},{"weight":3,"path":["burst","tenkoDmg"],"hitMode":"avgHit","bonusStats":{"electro_dmg_":59,"electro_enemyRes_":-40,"atk_":20,"atk":980}},{"weight":3,"path":["skill","dmg3"],"hitMode":"avgHit","bonusStats":{"electro_dmg_":32,"electro_enemyRes_":-40,"atk_":20,"atk":980}},{"weight":3,"path":["skill","dmg3"],"hitMode":"avgHit","bonusStats":{"electro_dmg_":32,"electro_enemyRes_":-40,"atk_":20}},{"weight":3,"path":["skill","dmg3"],"hitMode":"avgHit","bonusStats":{"electro_dmg_":32,"electro_enemyRes_":-40}},{"weight":3,"path":["skill","dmg3"],"hitMode":"avgHit","bonusStats":{"electro_enemyRes_":-40}},{"weight":3,"path":["skill","dmg3"],"hitMode":"avgHit","bonusStats":{}}]}
Customization: If positioning on Bennett’s field cannot be maintained, his buffs should be removed. If using Kagura, its effect doesn’t need to be dynamically applied and can be turned on by default in the character tab. If using Widsith: the buff should only be added up to her Burst and not during her second phase of totem hits.
Aggravate
charliex3000
Explanation: This config is based on an Alhaitham-Zhongli-Nahida-Yae team where Yae does not Burst. The rotation is about 25s long. The user needs to put in their own buffs.
Assumptions: The config is based on the sim linked in the config’s description. The reaction counts are taken from the 2nd rotation (24.7s to 49.4s). The config counts the damage from two sets of turrets.
{"name":"Aggravate Yae, No burst, 24s Rotation","description":"https://gcsim.app/v3/viewer/share/0613d32d-0e77-4be7-a1a3-effb0f12d3e9","targets":[{"weight":16,"path":["skill","dmg3"],"hitMode":"avgHit","bonusStats":{}},{"weight":10,"path":["skill","dmg3"],"hitMode":"avgHit","reaction":"aggravate","bonusStats":{}}]}
Customization: For C2, change the level 3 Skills to level 4 Skills.
Yanfei
Yaoyao
Skill and Burst Healing
itsjaeyou
Explanation: These configs display the total healing that Yaoyao’s Skill and Burst provides, which is often difficult to visualize as only her healing ticks and not total healing is shown in her Talents.
Assumptions: The following assumptions are used: Yaoyao Burst will summon 3 Yuegui with each one healing 4, 3, and 2 times, respectively. Yaoyao will use skill during Burst for 3 partywide healing procs out of 10 total. Yaoyao will trigger A1 (Jump / Dash) 3 times. Note that Yaoyao A4 is not party wide and does not stack.
Total Party-Wide Skill + Burst Healing (per Character during Burst:)
{"name":"Burst total party heal","targets":[{"weight":4,"path":["burst","radishHeal"],"hitMode":"avgHit","bonusStats":{}},{"weight":3,"path":["burst","radishHeal"],"hitMode":"avgHit","bonusStats":{}},{"weight":2,"path":["burst","radishHeal"],"hitMode":"avgHit","bonusStats":{}},{"weight":3,"path":["burst","radishHeal"],"hitMode":"avgHit","bonusStats":{}},{"weight":3,"path":["burst","radishHeal"],"hitMode":"avgHit","bonusStats":{}}]}
Total Elemental Skill Healing (Active Character Only):
{"name":"Skill total heal","targets":[{"weight":10,"path":["skill","heal"],"hitMode":"avgHit","bonusStats":{}},{"weight":14,"path":["passive2","heal"],"hitMode":"avgHit","bonusStats":{}}]}
Customization: Not all radishes will heal (some will only damage or miss), so the totals can be changed as desired. This configuration has 15 total Radish healing ticks for Burst. The minimum and maximum Radishes possible during Yaoyao’s Burst are 9 and 18, respectively.
Yelan
Yoimiya
Vaporize
dereku3
Explanation: Yoimiya config for Vaporize teams (such as Xingqiu – Yun Jin – Zhongli) that takes her ramping Pyro DMG% Bonus from her A1 Passive into account.
Assumptions: When using this target, set “Tricks of the Trouble-Maker” to “Not Active” on Yoimiya’s Talents tab. It’s assumed that Yoimiya uses Burst and then cycles through supports, with 4 total Aurous Blaze ticks: 2 Vape, and 2 non-Vape. Burst expires before Yoimiya’s A1 passive is able to provide it any bonus. This target assumes Bursting every other rotation and should work for most weapon and artifact combinations provided enough ER%. If you play the rotation correctly (e.g. funnel Favonius particles into Yoimiya after cycling supports) it could work for SR as well.
{"name":"Q(4) E3N5 E3N5 (Vape) (Ramping Pyro Bonus)","targets":[{"weight":1,"path":["burst","dmg"],"hitMode":"avgHit","bonusStats":{}},{"weight":2,"path":["burst","exp"],"hitMode":"avgHit","reaction":"vaporize","bonusStats":{}},{"weight":2,"path":["burst","exp"],"hitMode":"avgHit","bonusStats":{}},{"weight":2,"path":["normal","0"],"hitMode":"avgHit","reaction":"vaporize","bonusStats":{}},{"weight":2,"path":["normal","0"],"hitMode":"avgHit","bonusStats":{}},{"weight":2,"path":["normal","1"],"hitMode":"avgHit","bonusStats":{"pyro_dmg_":4}},{"weight":2,"path":["normal","2"],"hitMode":"avgHit","reaction":"vaporize","bonusStats":{"pyro_dmg_":6}},{"weight":4,"path":["normal","3"],"hitMode":"avgHit","bonusStats":{"pyro_dmg_":8}},{"weight":2,"path":["normal","4"],"hitMode":"avgHit","reaction":"vaporize","bonusStats":{"pyro_dmg_":12}},{"weight":2,"path":["normal","0"],"hitMode":"avgHit","reaction":"vaporize","bonusStats":{"pyro_dmg_":14}},{"weight":2,"path":["normal","0"],"hitMode":"avgHit","bonusStats":{"pyro_dmg_":14}},{"weight":2,"path":["normal","1"],"hitMode":"avgHit","bonusStats":{"pyro_dmg_":18}},{"weight":2,"path":["normal","2"],"hitMode":"avgHit","reaction":"vaporize","bonusStats":{"pyro_dmg_":20}},{"weight":4,"path":["normal","3"],"hitMode":"avgHit","bonusStats":{"pyro_dmg_":20}},{"weight":2,"path":["normal","4"],"hitMode":"avgHit","reaction":"vaporize","bonusStats":{"pyro_dmg_":20}},{"weight":2,"path":["normal","0"],"hitMode":"avgHit","reaction":"vaporize","bonusStats":{"pyro_dmg_":20}},{"weight":2,"path":["normal","0"],"hitMode":"avgHit","bonusStats":{"pyro_dmg_":20}},{"weight":2,"path":["normal","1"],"hitMode":"avgHit","bonusStats":{"pyro_dmg_":20}},{"weight":2,"path":["normal","2"],"hitMode":"avgHit","reaction":"vaporize","bonusStats":{"pyro_dmg_":20}},{"weight":4,"path":["normal","3"],"hitMode":"avgHit","bonusStats":{"pyro_dmg_":20}},{"weight":2,"path":["normal","4"],"hitMode":"avgHit","reaction":"vaporize","bonusStats":{"pyro_dmg_":20}}]}
Vaporize with Yelan A4
justinleea and scootyyy
Explanation: Config for a Vaporize Yoimiya combo that accounts for Yelan’s A4 and Yoimiya’s A1.
Assumptions: It’s assumed that you perform the 3N5D combo during the last 10s of Yelan’s Burst. Hits that trigger Vaporize are NA1~1, NA3, and NA5, according to her ICD. Yelan A4 buff uptime data is taken from this sim. Disable Yoimiya’s A1 and Yelan’s A4 in the Talents and Team Buffs tabs when using the config. This config doesn’t account for Yoimiya’s Burst.
{"name":"Vape w/ Yelan A4 & Yoimiya A1","targets":[{"weight":1,"path":["normal","0"],"hitMode":"avgHit","reaction":"vaporize","bonusStats":{"all_dmg_":18.5}},{"weight":1,"path":["normal","0"],"hitMode":"avgHit","bonusStats":{"all_dmg_":18.5}},{"weight":1,"path":["normal","1"],"hitMode":"avgHit","bonusStats":{"all_dmg_":22,"pyro_dmg_":4}},{"weight":1,"path":["normal","2"],"hitMode":"avgHit","reaction":"vaporize","bonusStats":{"all_dmg_":22,"pyro_dmg_":6}},{"weight":2,"path":["normal","3"],"hitMode":"avgHit","bonusStats":{"all_dmg_":25.5,"pyro_dmg_":8}},{"weight":1,"path":["normal","4"],"hitMode":"avgHit","reaction":"vaporize","bonusStats":{"all_dmg_":29,"pyro_dmg_":12}},{"weight":1,"path":["normal","0"],"hitMode":"avgHit","reaction":"vaporize","bonusStats":{"all_dmg_":29,"pyro_dmg_":14}},{"weight":1,"path":["normal","0"],"hitMode":"avgHit","bonusStats":{"all_dmg_":29,"pyro_dmg_":14}},{"weight":1,"path":["normal","1"],"hitMode":"avgHit","bonusStats":{"all_dmg_":32.5,"pyro_dmg_":18}},{"weight":1,"path":["normal","2"],"hitMode":"avgHit","reaction":"vaporize","bonusStats":{"all_dmg_":32.5,"pyro_dmg_":20}},{"weight":2,"path":["normal","3"],"hitMode":"avgHit","bonusStats":{"all_dmg_":36,"pyro_dmg_":20}},{"weight":1,"path":["normal","4"],"hitMode":"avgHit","reaction":"vaporize","bonusStats":{"all_dmg_":39.5,"pyro_dmg_":20}},{"weight":1,"path":["normal","0"],"hitMode":"avgHit","reaction":"vaporize","bonusStats":{"all_dmg_":39.5,"pyro_dmg_":20}},{"weight":1,"path":["normal","0"],"hitMode":"avgHit","bonusStats":{"all_dmg_":39.5,"pyro_dmg_":20}},{"weight":1,"path":["normal","1"],"hitMode":"avgHit","bonusStats":{"all_dmg_":43,"pyro_dmg_":20}},{"weight":1,"path":["normal","2"],"hitMode":"avgHit","reaction":"vaporize","bonusStats":{"all_dmg_":43,"pyro_dmg_":20}},{"weight":2,"path":["normal","3"],"hitMode":"avgHit","bonusStats":{"all_dmg_":46.5,"pyro_dmg_":20}},{"weight":1,"path":["normal","4"],"hitMode":"avgHit","reaction":"vaporize","bonusStats":{"all_dmg_":50,"pyro_dmg_":20}}]}
Customization: To account for C6 Yun Jin’s Attack SPD buff, add 4 more targets of Yoimiya’s NA string: 2x NA1, NA2, and NA3. One of the NA1, and the NA3 should Vape. All 4 targets should have 50% Common DMG and 20% Pyro DMG Bonus.
Yun Jin
Zhongli
Microwave with Burst
sohan4543
Explanation: Config for C0 Microwave Zhongli in the team Geo Traveler – C6 Gorou – Itto.
Assumptions: Assumes the 2nd rotation Zhongli tE > Gorou E > GMC Q E > Zhongli hE N1 Q > Gorou Q > Itto field time. Throughout the rotation, the config counts ticks from 1 Stone Stele, 3 GMC Burst constructs, 1 GMC Skill, and 2 Ushis. Resonance ticks are buffed dynamically with Geo Resonance, Gorou, and Zhongli’s shield. Keep GMC’s CRIT Rate buff unticked, and all of Gorou’s and Geo Resonance’s buffs ticked.
{"name":"E hE N1 Q + 57 resonances","targets":[{"weight":1,"path":["skill","stele"],"hitMode":"avgHit","bonusStats":{"geo_dmg_":-15,"all_dmg_":-15,"geo_critDMG_":-40,"geo_enemyRes_":20}},{"weight":6,"path":["skill","resonance"],"hitMode":"avgHit","bonusStats":{"geo_dmg_":-15,"all_dmg_":-15,"geo_enemyRes_":20}},{"weight":1,"path":["skill","holdDMG"],"hitMode":"avgHit","bonusStats":{"critRate_":10,"all_dmg_":-15,"geo_enemyRes_":20}},{"weight":1,"path":["normal","0"],"hitMode":"avgHit","bonusStats":{"critRate_":10}},{"weight":1,"path":["burst","dmg"],"hitMode":"avgHit","bonusStats":{"critRate_":10}},{"weight":10,"path":["skill","resonance"],"hitMode":"avgHit","bonusStats":{"geo_dmg_":-15}},{"weight":33,"path":["skill","resonance"],"hitMode":"avgHit","bonusStats":{"geo_dmg_":-15,"all_dmg_":-15}},{"weight":6,"path":["skill","resonance"],"hitMode":"avgHit","bonusStats":{"geo_dmg_":-15,"all_dmg_":-15,"geo_critDMG_":-40}},{"weight":2,"path":["skill","resonance"],"hitMode":"avgHit","bonusStats":{"geo_dmg_":-15,"all_dmg_":-15,"geo_critDMG_":-40,"geo_res_":20}}]}
Customization: The config can easily be modified for pre-C6 Gorou by just removing all the Geo CRIT DMG modifiers.
4. Credits
Guide authored by mr.pillow.. Thank you to jamberry and reens for their help with the initial guide work and organization, and thank you to polomo and arbutus_unedo for reviewing and to chasing_haze, latiwings, and nociii for transcribing the guide. Config Collection submissions were verified by mr.pillow., itslin, and haafr.
The config submissions are credited to their respective authors. Many of the configs were provided by theorycrafters from different communities such as KQM TC and Guhua, Genshin Optimizer, and KSM SALT — thank you to these.