Updated for Version 4.0
A Ganyu Guide
by Rare Possum#0511 & Prévisible#7440
Table of Contents
Introduction
Ganyu, the General Secretary of the Liyue Qixing, is the first 5-star Cryo Bow character in Genshin Impact.
Her popularity among the game’s many powerful units is well established due to her versatility and flexibility. Ganyu has an on-field DPS-oriented kit with a specialization in Charged Attacks, but still offers high off-field damage with her Elemental Burst.
This Ganyu guide covers her recommended builds, best weapons, ideal artifacts, common playstyles, optimal rotations, and notably synergies, best teams. Additionally, it includes useful resources on Ganyu, from weapon comparisons to infographics on Freeze, Mono Cryo, and Melt Ganyu.
At the end of the guide, there is a rotation bank with a lot of Ganyu's teams. There is also a Genshin Optimizer multi-opt configuration database with popular Ganyu teams with a variety of build options.
Why Play Ganyu?
Pros
- Strong, free-to-play weapon selection.
- Easily accessible artifacts for every playstyle.
- Simple kit.
- Many playstyles for different scenarios.
- Comfortable gameplay at a range.
- Good scaling with high investment.
- Consistent and reliable damage against the vast majority of content.
Cons
- Extreme vulnerability to damage and interruption in Charged Attack–focused playstyles since she requires 2s to charge each of her shots.
- Specific teambuilding requiring highly contested units such as Bennett.
- Inability to effectively weave Normal Attacks between Charged Attacks, making it suboptimal to use powerful off-field damage dealers like Xingqiu and Yelan.
- A wide variety of teammate requirements for different team archetypes.
Glossary
| AoE | Area of Effect; refers to scenarios with multiple enemies. |
| ARCC | Alternate Rapid Charged Attack. A Charged Attack method where you enter R-Aim, fire the Charged Attack, then exit Aim Mode to cancel the end lag. |
| -ATK | Short for artifact sets that have a 2pc bonus granting 18% ATK. |
| aura | A status effect that signifies that an entity, usually enemies or the player, is affected by an Element. Application of another Element onto existing auras can trigger Elemental reactions. |
| BiS | Best-in-Slot; the best option for a given equipment slot. |
| DMG | Short for “damage”; used to refer to stats of specific sources of damage like Charged Attack DMG or Cryo DMG Bonus. |
| DPS | Damage per second. A colloquial metric that generalizes a unit’s damage output. It can also refer to units whose primary role in a team is dealing damage on-field or off-field. |
| dynamic / static | Properties that are assigned to Skills and Bursts that last over time. Static abilities “snapshot” or maintain buffs that were active at the time they were cast, even after the buffs run out. Dynamic abilities cannot snapshot buffs. Not all buffs can be snapshot and not all abilities can snapshot. See the Snapshot & Dynamic page in the KQM TCL for more details. |
| ER | Energy Recharge. A stat that increases the Energy a unit receives from particles. |
| Fav | Short for Favonius, referring to weapons in the Favonius series, which have a chance to generate particles on CRIT Hits. |
| funnel | The act of generating Elemental Particles with one unit, and then catching them with another unit, usually of the same Element. The unit who generates particles for another teammate is known as a “battery”. |
| ICD | Internal Cooldown. A mechanic that limits how frequently certain game effect instances can occur in a short period, it is often used to describe the rate at which attacks can apply their Element or trigger reactions. Standard ICD for Elemental application is every 3 hits or 2.5s. |
| M1-Hold | A Charged Attack method where you hold down the left-click button, charge the arrow, then release when fully charged. |
| M1-R Dash | A Charged Attack method that is slightly faster than M1-Hold but requires more precision. |
| NO | Noblesse Oblige. An artifact set that grants a +20% Elemental Burst DMG Bonus and grants a partywide 20% ATK buff when the holder uses their Elemental Burst. |
| proc | Activation of effects like Favonius Lance’s particles or Prototype Crescent’s ATK% buff. |
| QoL | Quality of Life; general improvements to the enjoyability of the game. |
| R-Aim | A Charged Attack method where you press “R” to enter Aim Mode and left-click once an arrow is charged, then wait for the next arrow to charge. |
| shield | A defensive buff that negates damage taken by the on-field unit until it is destroyed or expires. The amount of damage a shield can negate is known as Shield Absorption. Note that enemy Elemental shields work differently from player shields. |
| shielder | A unit whose main role is to create a shield for other units on the team. Shielders may act as alternatives to healers. |
| snapshot | A property of certain Talents wherein the character’s stats at the time the Talent is cast are used for calculating damage dealt over its entire duration, regardless of the character’s stats afterwards. |
| stacks | Talent, artifact, or weapon effects that build up over time or under certain conditions. |
| TotM | The Tenacity of the Millelith artifact set. An artifact set that gives a personal HP% boost and grants a partywide ATK% and Shield Strength buff when the equipping unit deals Skill damage, even while off-field. |
| TTDS | Thrilling Tales of Dragon Slayers. A 3-star Catalyst whose passive increases the ATK of the next unit to be swapped in after the holder. |
| VV | The Viridescent Venerer artifact set. |
Combo Notation
| N / NA | N – Normal Attack, # – Number of attacks performed In this guide, N# (N1, N2, etc.) refers to the number of Normal Attacks done in a row without interruption. For example, N3 would refer to three Normal Attacks in a row. |
| C / CA | Charged Attack. For a Bow character, this refers by default to their fully charged shot. |
| E | Elemental Skill |
| Q | Elemental Burst |
| D | Dash Cancel |
| #[Combo] | Number of times to perform that combo |
| tE | Tap Skill – Tap the Elemental Skill |
| hE | Hold Skill – Hold the Elemental Skill |
| P | Plunging Attack |
| J | Jump |
TL;DR
FAQ
How do I use Charged Attacks? (R-Aim, M1-Hold, M1-R Dash, ARCC)
Charged Attacks are an extremely important part of Ganyu’s kit. There are three primary ways to perform them, although the “advanced” methods are not mandatory. At C6, an additional method becomes available, as there is no need to charge.
Note that for all methods, you should fire slightly before the Frostflake Arrow is fully charged to anticipate the timing of the fully charged arrow. For players unfamiliar with animation cancel nomenclature, here is a video demonstrating the cancels mentioned below, with keybinds shown.
R-Aim
The easiest way to use Ganyu’s Charged Attacks is to press “R” to enter Aim Mode and left-click once an arrow is charged, then wait for the next arrow to charge. However, this method is the least efficient by a significant margin.
M1-Hold (Recommended)
The recommended method is to hold down the left-click button, charge the arrow, then release when fully charged. Repeat this process for subsequent Charged Attacks. This is an easy and notable improvement over R-Aim. M1-Hold is very similar to M1-R Dash, but without the dash-canceling of the end lag.
This method can be practiced by standing on water and shooting the ground, then jumping and repeating. If you get close to the maximum speed, you can consistently release your Charged Attack and jump before the ice melts.
M1-R Dash
The M1-R Dash method is slightly faster than M1-Hold but requires more precision. Start by holding down the left-click button and releasing it when the arrow is fully charged. Then enter Aim Mode to cancel the end lag and dash cancel it to restart the process. This is the fastest method, but the difference between M1-R Dash and M1-Hold is extremely small. Use whichever you are most comfortable with.
ARCC (C6 Only)
This is not usable below C6. At C6, Frostflake Arrows charge instantly, making the Alternate Rapid Charged Attack (ARCC) method very useful. However, performing ARCC shots requires almost frame-perfect inputs, which is made easier by lowering FPS. ARCC is performed by entering R-Aim, firing the Charged Attack, then exiting Aim Mode to cancel the end lag. Aim Mode can then be quickly re-entered to save time. Prior to C6, if Ganyu attempts this, she will always fire a regular, Physical arrow rather than a Frostflake Arrow. For more information on how to do ARCC, see these videos for keyboard and controller. Although very hard, it can also be performed on mobile.
See an example of ARCC with Ganyu C6 here.
Should I pull C1 or Amos?
C1.
Should I pull C1 or Polar Star / Aqua Simulacra / Hunter's Path / The First Great Magic?
It depends. Performance-wise, the 5-star upgrades usually produce a similar gain to C1.
On one hand, Polar Star, Aqua Simulacra, The First Great Magic are more broadly useful across Ganyu’s different teams. Their unconditional nature makes them a huge QoL improvement over Prototype Crescent and Hamayumi, and they look fantastic on Ganyu.
On the other hand, C1 is cheaper and lowers ER requirements so you have your Burst up more often. If you want to do solo runs, C1 is almost a 25% increase in damage with its Cryo RES Shred and additional Energy generation.
Hunter’s Path, if it ever reruns, is the best option for Melt by a noticeable margin. However, it is a much weaker weapon overall compared to the other two 5-star weapons. It does not hold up as well in AoE, it struggles outside of Melt, and it is not as universal. It is still a powerful weapon, but its strengths pale in comparison to Polar and Aqua. If you only play Melt Ganyu and you dislike managing Prototype Crescent or Hamayumi’s passives, then Hunter’s Path is better than C1. Otherwise, you are better off pulling either C1 or one of the other weapons.
What is quadratic scaling and how does it relate to Ganyu?

Quadratic scaling occurs when a character deals more damage per enemy as the number of enemies increases. In Genshin Impact, most characters have linear scaling, which means the damage per enemy remains the same regardless of the number of enemies. Some characters’ damage per enemy decreases as the number of enemies increases, e.g., single-target abilities and Beidou’s Burst.
In Ganyu’s case, her Burst displays pseudo-quadratic scaling because of the way her Ice Shards target enemies. Celestial Shower drops 50 Ice Shards over 15s. Each Ice Shard targets a random enemy within its field that has not been targeted by one of the four most recent Ice Shards. If there are no such enemies, the next Ice Shard drops randomly within the field.
Additionally, each Ice Shard damages enemies in a small radius. If there are other enemies near the targeted enemy, they will also be hit. When enemies are grouped, the number of Ice Shards hitting each target increases. This causes her Burst to deal more damage, increasing per enemy up to five enemies.
Should I play Melt or Freeze? What about Mono Cryo?
Ganyu’s two major team archetypes have complementary strengths and weaknesses. Melt Ganyu shines in single-target, while Freeze Ganyu excels in AoE. Ideally, you should play both and adapt as needed. However, if you only want to build Ganyu for one team, check out the Playstyles section for greater detail on the requirements and advantages of each team.
Mono Cryo Ganyu should also be considered. They complement Freeze teams extremely well by making use of the same artifacts on Ganyu but performing better against enemies that cannot be Frozen.
Should I use Ganyu's Burst in Melt?
Generally, you shouldn’t. Her Burst’s Ice Shards consume Pyro auras, preventing Ganyu from triggering Melt on both hits of her Charged Attack. However, there are some scenarios where this isn’t the case:
- When Jean is applying Pyro via Sunfire.
- When there are multiple Pyro applicators (e.g., Xiangling’s Pyro application combined with Kazuha’s Pyro application.).
- When enemies are far enough from each other to avoid taking multiple hits from different Ice Shards.
Note that Xiangling’s damage at higher investment levels can compensate for Ganyu’s missed Melts, since Xiangling can Melt leftover Cryo auras. However, this still results in lower overall damage compared to not using Ganyu’s Burst.
Should I craft Hamayumi or Prototype Crescent?
For more detail, see the Weapons section of this guide.
It depends. As a general rule, Hamayumi is better in Melt if you use 4pc Wanderer’s Troupe and don’t Burst, while Prototype Crescent is better in all other scenarios.
However, this assumes you can proc Prototype Crescent’s passive. You may find that many enemies don’t have a weak point or that you cannot proc the passive reliably even when they do. In those cases, Hamayumi performs better, even without its passive.
It’s up to you to make the final call; either one is good enough to clear most content. Of course, you could just craft both, but that requires more billets.
I don't have a certain character; can I still play this team?
Melt Teams Without Bennett
While such teams exist, they do not perform well. They usually get outperformed by a team of Ganyu, Zhongli, a Cryo flex, and a Geo flex, where the last two characters are never swapped to and only exist for Elemental Resonance.
Freeze Teams Without Kokomi or Mona
While Ayato and Nilou are far from the best options, they can enable Freeze teams. Barbara, Yelan and Xingqiu are terrible to play but usable nonetheless.
Freeze Teams Without Venti or Kazuha
While Venti and Kazuha are the best groupers, it is possible to use Sucrose or Heizou instead. You can also consider using The Viridescent Hunt to make Ganyu the grouper, or push enemies together with Jean. However, these alternatives are less enjoyable to play.
Character Overview
Playstyles
Freeze Ganyu
Freeze teams use a Hydro unit along with Ganyu to trigger the Freeze reaction. These teams are extremely effective in multi-target scenarios due to the strength of Ganyu’s Elemental Burst.
Pros
- Works with low investment into teammates
- Makes gameplay much easier by immobilizing enemies, keeping them grouped, and preventing them from attacking
- Benefits from the excellent 4pc effect of the Blizzard Strayer artifact set
- Uses teammates which aren’t highly contested in other team compositions
- Performs extremely well in AoE scenarios
Cons
- Requires multiple 5-star units in most team variations
- Struggles in single-target content or against enemies that can’t be Frozen
- Has few effective substats (only CRIT and ATK are useful on Ganyu in this team)
- Hits the CRIT Rate cap easily
Melt Ganyu
Melt Ganyu is a highly demanding playstyle that takes advantage of the Reverse Melt reaction to deal enormous amounts of damage by Melting both parts of Ganyu’s Charged Attack. However, Melt Ganyu requires very specific teammates with tremendously high ER requirements to function.
Pros
- Outputs higher single-target damage than Freeze
- Has access to multiple artifact sets
- Simple kit
- Can down enemies very quickly
Cons
- Avoids using Ganyu’s Elemental Burst due to its tendency to steal Melts
- Has teammates who suffer from extremely high ER requirements
- Requires limited 5-star units or highly contested units like Bennett and Xiangling
- Almost always requires a shield to protect Ganyu
Mono Cryo Ganyu
Mono Cryo is an extremely flexible way to play Ganyu, which involves using Bursts off cooldown and Charged Attacks whenever possible. The Mono Cryo archetype offers high single-target and AoE potential, though Freeze is more practical against multiple targets if you have access to the archetype.
Pros
- Performs great in both single-target and AoE content
- Works fairly flexibly
- Simple kit.
- Has low ER requirements
- Can be used against enemies that cannot be Frozen
- Benefits from Blizzard Strayer’s incredible strong 4pc set effect
Cons
- Requires 5-star units such as Shenhe and Kazuha
- Is outclassed by Freeze in AoE and Melt in single-target
- Still requires a shield in many scenarios
- Lacks Element diversity, making it challenging to play against Cryo-resistant or Cryo-immune enemies and shields
Support Ganyu
Ganyu’s long Burst duration makes her an excellent off-field support.
Cryo Teams
Her support potential is best used in conjunction with other Cryo characters. This reduces her ER requirements and allows her teammates to take advantage of her Ascension 4 Passive’s Cryo DMG% buff. Often, you may find Ganyu still does more damage than the Cryo “carry”, with the exception of Ayaka, who often out-damages Ganyu.
Forward Melt
Outside of Cryo-focused teams, however, Ganyu may face some issues. Her Cryo application alone is not enough to keep up with most Pyro DPS characters. To address this problem, she can be paired with other Cryo units like Rosaria and Kaeya, who can both reduce her ER requirements and supplement her Cryo application.
Superconduct
Ganyu can also apply Cryo for Superconduct, although this playstyle requires quite a bit of Energy Recharge to work effectively in most team compositions.
Dendro (Fridge)
Ganyu can also be considered in “Fridge” team comps, where Cryo is applied to an enemy along with Dendro. In theory, this causes Hydro to consume less Dendro aura to produce more Dendro Cores. However, in practice, because of the nature of current Hydro applicators, the interaction doesn’t actually result in more Cores. It can even result in less Cores if paired with an Anemo character.
Ganyu can also be used in Burgeon to reduce the effect of Burning and produce more Cores; however, her slow rate of off-field Cryo application renders this ineffective. She does still remain a decent option for her personal damage, but this will not be further explored in this guide.
Talents
 Normal Attack | Liutian Archery
Talent Description
Normal Attack
Performs up to 6 consecutive shots with a bow.
Charged Attack
Performs a more precise Aimed Shot with increased DMG.
While aiming, an icy aura will accumulate on the arrowhead before the arrow is fired. Has different effects based on how long the energy has been charged:
- Charge Level 1: Fires off an icy arrow that deals Cryo DMG.
- Charge Level 2: Fires off a Frostflake Arrow that deals Cryo DMG. The Frostflake Arrow blooms after hitting its target, dealing AoE Cryo DMG.
Plunging Attack
Fires off a shower of arrows in mid-air before falling and striking the ground, dealing AoE DMG upon impact.
Ganyu’s Normal Attack Talent consists of a 6-hit Normal Attack string that is very pretty but very rarely used. Her true strength lies in her Charged Attacks.
Unlike most other Bow characters, Ganyu’s Level 2 Charged Attack is extremely powerful and has no ICD on either instance of damage, which allows her to trigger reactions on both hits. This is especially important for her Melt teams, as it enables her to Melt both parts of her Charged Attack.
 Elemental Skill | Trail of the Qilin
Talent Description
Leaving a single Ice Lotus behind, Ganyu dashes backward, shunning all impurity and dealing AoE Cryo DMG.
Ice Lotus
- Continuously taunts surrounding opponents, attracting them to attack it.
- Endurance scales based on Ganyu's Max HP.
- Blooms profusely when destroyed or once its duration ends, dealing AoE Cryo DMG.
The flower taunts all non-Boss enemies for 6s or until enough damage has been dealt to it, after which it explodes and deals another instance of damage. This Skill can generate a total of four particles per cast, two for each hit.
The taunt can group or distract enemies to a degree, but it is not a reliable source of survivability. The dash can be used to reposition Ganyu, allowing her to dodge enemy attacks or gain distance for Amos' Bow stacks.
 Elemental Burst | Celestial Shower
Talent Description
Coalesces atmospheric frost and snow to summon a Sacred Cryo Pearl that exorcises evil.
During its ability duration, the Sacred Cryo Pearl will continuously rain down shards of ice, striking opponents within an AoE and dealing Cryo DMG.
Ganyu’s Burst is an extremely important part of her kit, but can be complex to use effectively. Her Burst lasts for 15s and drops 50 Ice Shards that deal Cryo damage in a small AoE, but not all Ice Shards necessarily hit an enemy.
Each Ice Shard targets a random enemy within its field that has not been targeted by one of the four most recent Ice Shards. If there are no such enemies, the next Ice Shard drops randomly within the field.
Ganyu’s Burst is particularly potent against multiple enemies grouped together, as its damage can scale quadratically. In single-target scenarios, it only targets the enemy once every five Ice Shards, resulting in 10 instances of Cryo damage (assuming no random Ice Shards hit). Against two ungrouped enemies, each enemy is targeted by an Ice Shard in each group of five icicles, resulting in 10 targeted Ice Shards and 20 instances of Cryo damage (again, assuming no random Ice Shard hits). However, if the two enemies are grouped, each targeted Ice Shard hits both enemies because of its AoE, resulting in around 40 instances of damage instead of only 20. Refer to the FAQ for more information.
Ganyu’s Burst has a 15s CD and lasts for 15s as well, allowing for up to 100% uptime. It also snapshots stats on cast, which lets it enjoy most buffs for the full 15s duration. Lastly, her Burst follows standard ICD: it applies Cryo to enemies every 3 hits or 2.5s, whichever comes first.
Overall, Ganyu's Elemental Burst is a crucial tool for dealing damage, and it is even more effective when enemies are grouped together. By understanding how her Burst works and how to use it optimally, Ganyu can deal a considerable amount of Cryo damage to enemies.
Note that Ganyu’s Burst is generally not used in Melt teams.
Quadratic Scaling Infographic
 Ascension 1 Passive | Undivided Heart
Talent Description
After firing a Frostflake Arrow, the CRIT Rate of subsequent Frostflake Arrows and their resulting bloom effects is increased by 20% for 5s.
Ganyu's Ascension 1 Passive Talent provides a significant boost to Charged Shots, making it particularly useful for teams that rely heavily on them, such as Melt teams. However, it is less beneficial for teams that rely heavily on Burst damage, such as Freeze teams.
Note that the buff only applies to successive Charged Shots after Ganyu’s first Charged Shot.
 Ascension 4 Passive | Harmony Between Heaven and Earth
Talent Description
Celestial Shower grants a 20% Cryo DMG Bonus to active members in the AoE.
Ganyu’s Ascension 4 Passive adds value to her as a DPS unit and to any Cryo teammates. Additionally, Ganyu can snapshot the Cryo DMG Bonus onto her own Burst on the second rotation and onwards, assuming that the previous Burst is still active upon cast. The window for this is about ~17.5s.
 Utility Passive | Preserved for the Hunt
Talent Description
Refunds 15% of the ore used when crafting Bow-type weapons.
Relatively useless; you probably don’t craft many Bows.
Constellations
 Constellation 1 | Dew-Drinker
Taking DMG from a Charge Level 2 Frostflake Arrow or Frostflake Arrow Bloom decreases opponents' Cryo RES by 15% for 6s.
A hit regenerates 2 Energy for Ganyu. This effect can only occur once per Charge Level 2 Frostflake Arrow, regardless if Frostflake Arrow itself or its Bloom hit the target.
Ganyu’s first Constellation provides a great QoL improvement by further decreasing her already low ER requirements in Freeze and Mono Cryo teams.
The Cryo RES Shred is also valuable, as it can boost both Ganyu’s damage output and that of her teammates.
 Constellation 2 | The Auspicious
Trail of the Qilin gains 1 additional charge.
This Constellation grants more flexibility in timing Ganyu’s Ice Lotuses in rotations where she uses her Elemental Skill twice. It allows you to use her Elemental Burst earlier or skip waiting for her Skill to come off cooldown. The Constellation does not grant you an extra Skill use outside of these scenarios. While not game-changing on its own, its true value shines with Ganyu’s sixth Constellation.
Note that using the second charge of Ganyu’s Elemental Skill won’t refresh the buff from the 4pc effect of Shimenawa’s Reminiscence if it is currently active.
 Constellation 3 | Cloud-Strider
Increases the Level of Celestial Shower by 3.
Maximum upgrade level is 15.
Decent damage increase for Ganyu in Freeze and off-field DPS teams.
 Constellation 4 | Westward Sojourn
Opponents standing within the AoE of Celestial Shower take increased DMG. This effect strengthens over time.
Increased DMG taken begins at 5% and increases by 5% every 3s, up to a maximum of 25%.
The effect lingers for 3s after the opponent leaves the AoE.
Ganyu’s Constellation 4 is a strong addition to her kit. Although similar to Yelan's A4, this Constellation is only half as strong and stacks at around 6-7% of the total value per second. However, unlike Yelan’s A4 active character buff, this Constellation debuffs enemies, which benefits the entire team.
This Constellation is particularly useful in Freeze and Mono Cryo teams, but is worthless in many Melt teams, where Ganyu doesn’t use her Burst. It becomes even more powerful if Ganyu can Burst off cooldown. In that case, the increased damage doesn’t reset, effectively being a 25% DMG Bonus for the entire team after the first rotation until the enemy dies.
 Constellation 5 | The Merciful
Increases the Level of Trail of Qilin by 3.
Maximum upgrade level is 15.
Ganyu’s Skill is a small portion of her damage. Slightly more damage and taunt durability is nice but is rarely an important difference.
 Constellation 6 | The Clement
Using Trail of the Qilin causes the next Frostflake Arrow shot within 30s to not require charging.
Ganyu’s final Constellation greatly increases her DPS potential within a short window of time. When combined with her second Constellation, it lets Ganyu fire off up to three Frostflake Arrows in quick succession. In sustained rotations, she can effectively gain an extra “free” Charged Attack for each time her Skill is used. This Constellation is especially good for speedrunning.
An additional benefit is that, with the removal of charging time, there is almost no chance that Ganyu is interrupted, which lets her do away with a shield.
Constellation Damage Comparison
When comparing Ganyu’s damage output at different Constellations, it is important to note that her 2nd and 6th Constellations use different rotations, and their benefit cannot be shown in direct numerical increases.
Ganyu’s 2nd Constellation provides increased Energy, which can help Ganyu or another Cryo character, but has negligible effect on team damage output.
In contrast, Ganyu’s 6th Constellation drastically increases her DPS because she can deal more damage in a short period of time, which is especially beneficial against certain enemies or when speedrunning. Her C6 allows for one of the biggest gameplay changes of any Constellation in the game and is highly impactful to her damage output.
Below are DPS increases for a variety of Ganyu's teams.
| Constellation | Cumulative Increase | Increase Over Previous Constellation |
| C0 | 100% | - |
| C1 | 106% | 6.0% |
| C3 | 121% | 14.0% |
| C4 | 142% | 17.4% |
| C5 | 144% | 1.2% |
| Constellation | Cumulative Increase | Increase Over Previous Constellation |
| C0 | 100% | - |
| C1 | 110% | 10% |
| C3 | 118% | 8% |
| C4 | 126% | 7% |
| C5 | 129% | 2% |
| Constellation | Cumulative Increase | Increase Over Previous Constellation |
| C0 | 100.0% | - |
| C1 | 105.8% | 5.8% |
| C3 | 105.8% | 0.0% |
| C4 | 115.6% | 9.2% |
| C5 | 128.1% | 10.9% |
| Constellation | Cumulative Increase | Increase Over Previous Constellation |
| C0 | 100% | - |
| C1 | 107% | 6.66% |
| C3 | 111% | 1.69% |
| C4 | 116% | 5.07% |
| C5 | 118% | 1.13% |
Talent Priority & Artifacts
Please consider using the Genshin Optimizer to find the optimal set to use. Here is a general tutorial that can help you if you’re unfamiliar.
Please use the Energy Recharge Calculator by Zakharov#5645 to determine more precise ER requirements for your team and rotation.
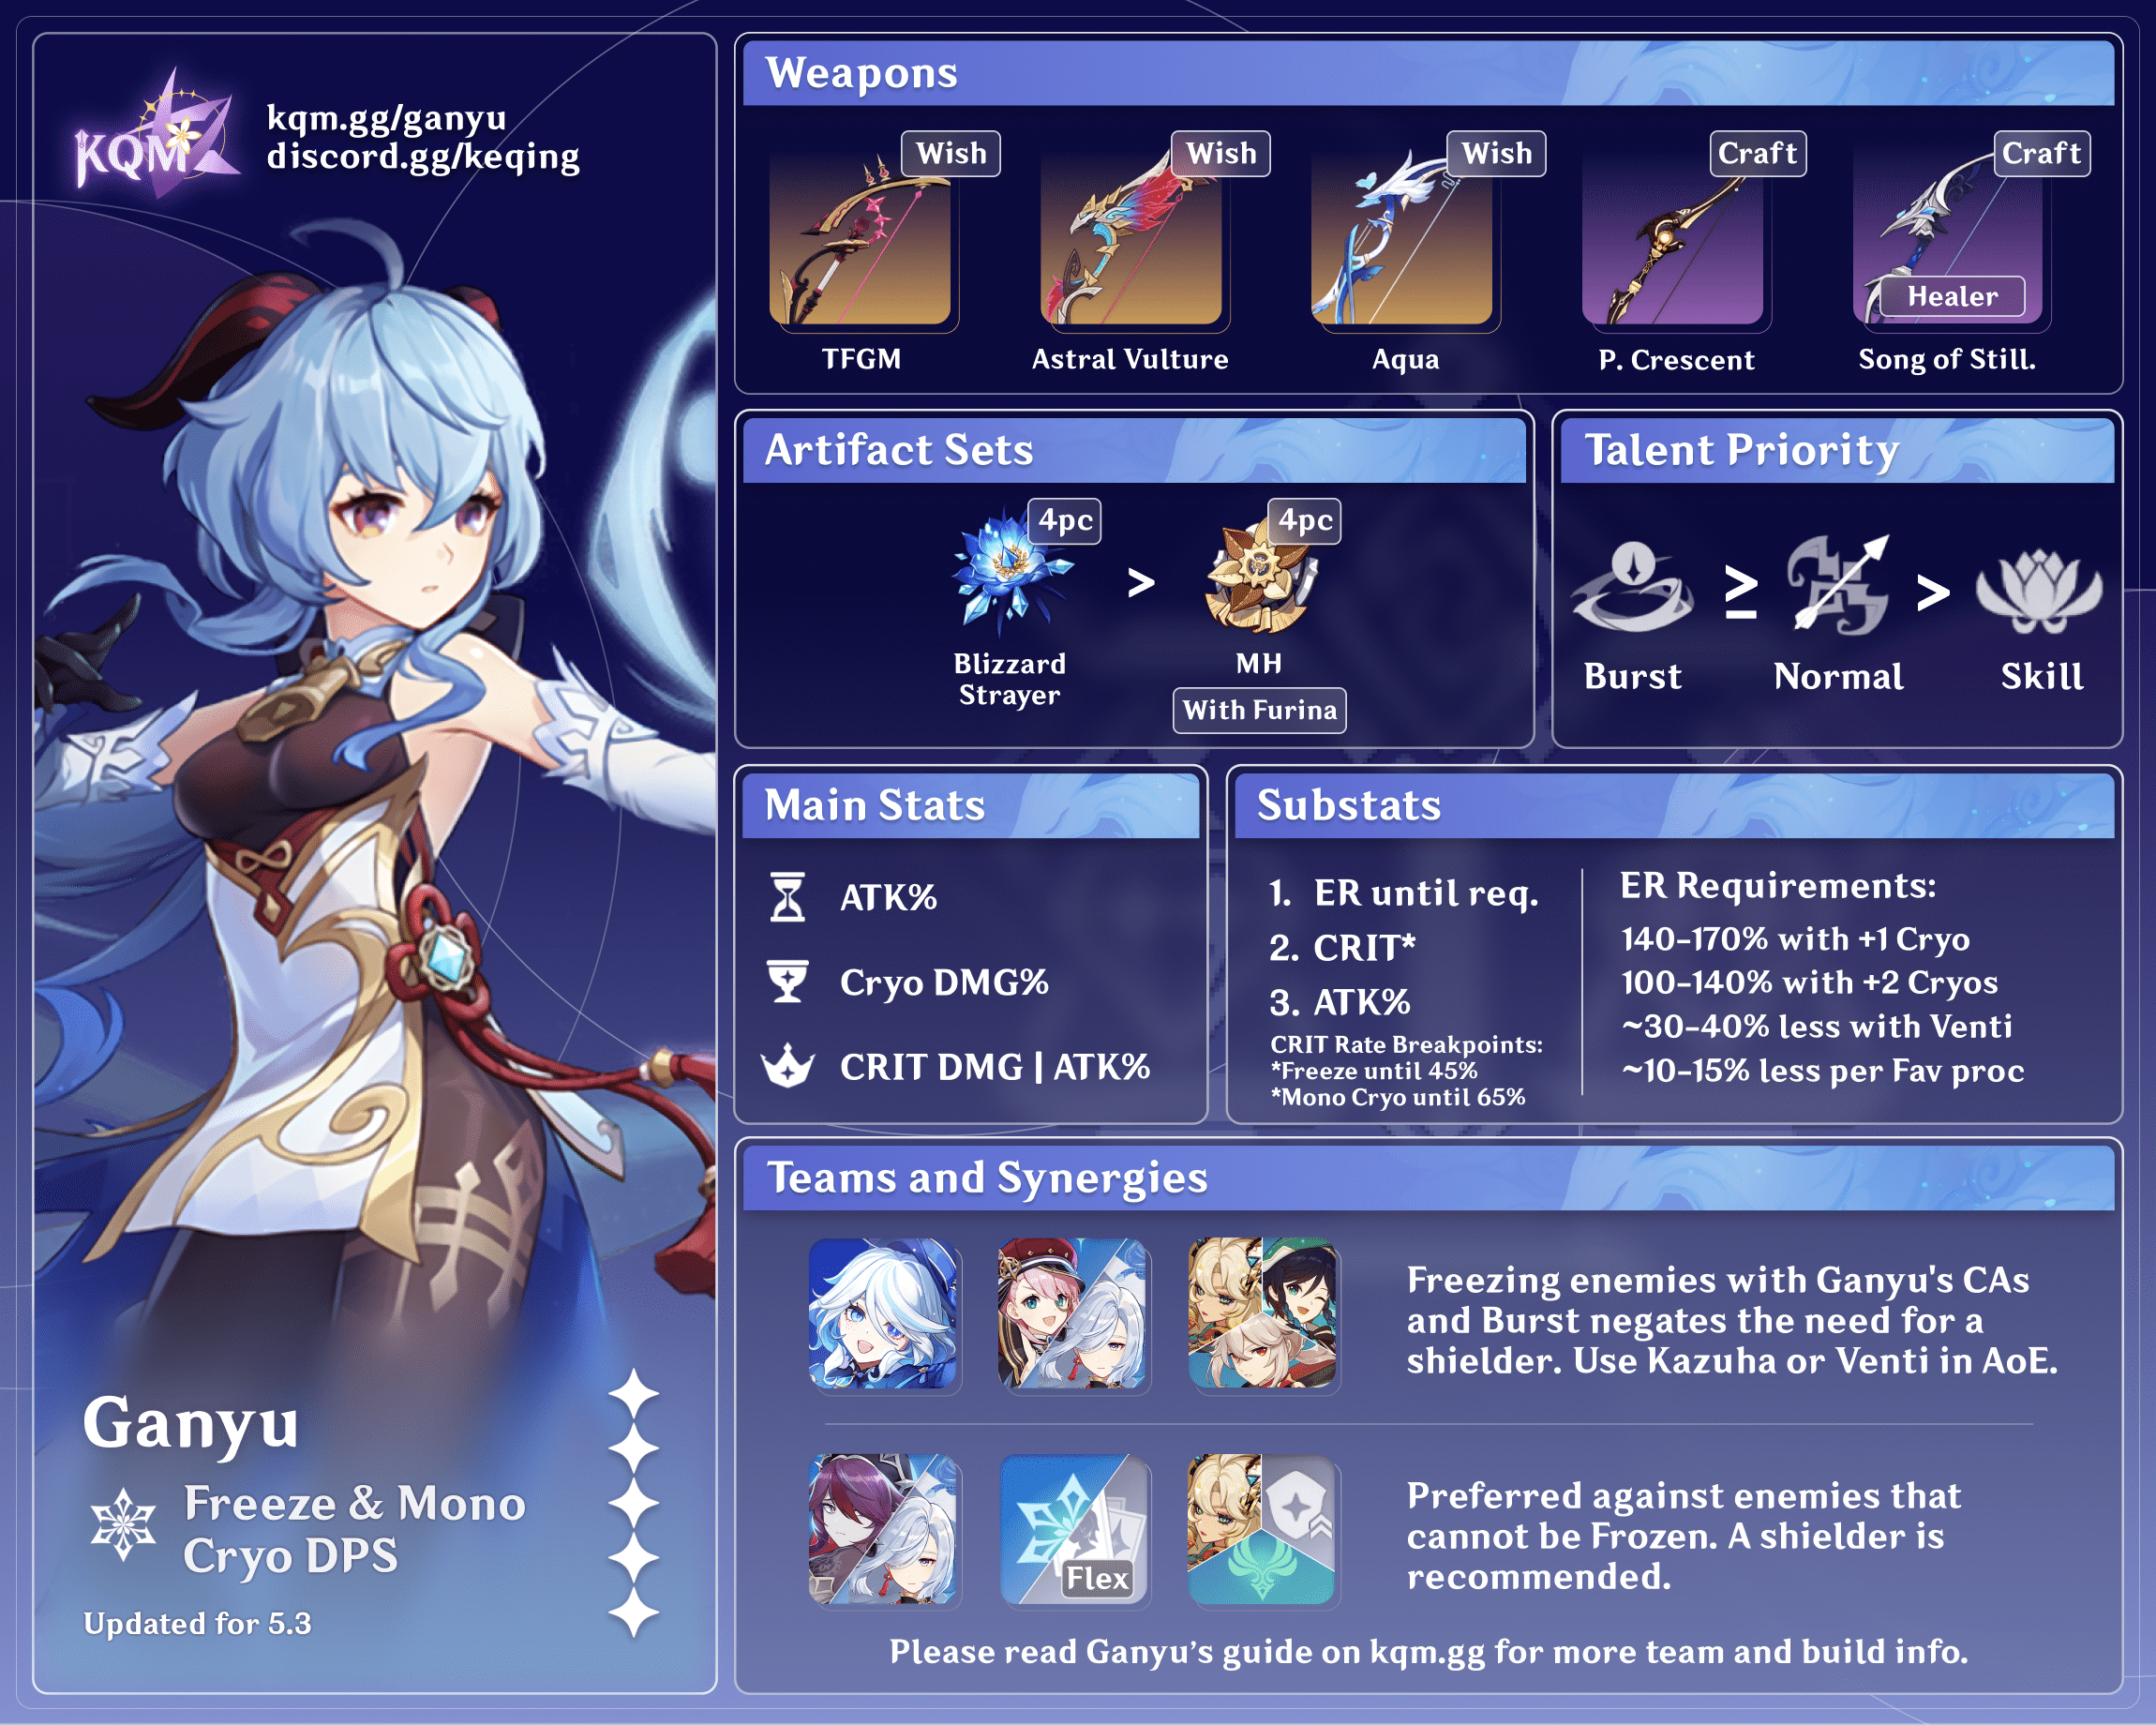
Freeze Builds
Freeze Talent Priority
≥ >
Burst ≥ Normal Attack > Skill
The two most important Talents in Freeze are Ganyu’s Normal Attack and Burst Talents. Most of her damage comes from her Burst, but her Charged Attacks allow for great flexibility. Hence, it is important to level them equally.
Freeze Artifacts
Freeze Main Stats
 Sands |  Goblet |  Circlet |
| ATK% | Cryo DMG% | CRIT / (ATK%*) |
In Freeze teams, Ganyu typically holds 4pc Blizzard Strayer, which gives her a massive amount of CRIT Rate against Frozen enemies. This allows you to focus on ATK% and CRIT DMG main stats and substats. While most Freeze teams don’t demand Ganyu to build a lot of Energy Recharge, some rotations and teams require more ER to function.
*ATK% Circlets are competitive in conjunction with CRIT DMG Bows in Freeze teams.
Freeze Substat Priority
ER (until requirement) > CRIT DMG ≥ ATK% > CRIT Rate
However, despite all the CRIT Rate 4pc Blizzard Strayer provides, CRIT Rate is still important. Your desired CRIT Rate should be 35-45%. You should also aim for around 1800-2000 ATK and 200% CRIT DMG before extending any stat further.
If you are not currently using 4pc Blizzard Strayer, it is highly recommended that you do (unless paired with a high investment Ayaka). Otherwise, aim for 70% CRIT Rate and 170% CRIT DMG, with around 1800-2000 ATK
Freeze Artifact Sets
 4pc Blizzard Strayer (4BS) | The only set you should use for Freeze Ganyu builds. The free CRIT Rate provided by its 4pc set effect makes it the best option. |
2pc + 2pc BS / Noblesse Oblige (NO) / ATK% | These combinations should only be used as transitory gear while you farm a 4pc Blizzard Strayer set. |
Freeze Artifact Set DPS Comparison
Assumptions: Ganyu Mastersheet
| 4pc Blizzard Strayer | 100.00% |
| 2pc Blizzard Strayer / 2pc ATK% | 84.38% |
| 2pc Blizzard Strayer / 2pc Noblesse Oblige | 84.01% |
| 2pc Noblesse Oblige / 2pc ATK% | 82.90% |
| 2pc ATK% / 2pc ATK% | 82.78% |
| 4pc Emblem of Severed Fate | 79.94% |
| 4pc Wanderer's Troupe | 79.34% |
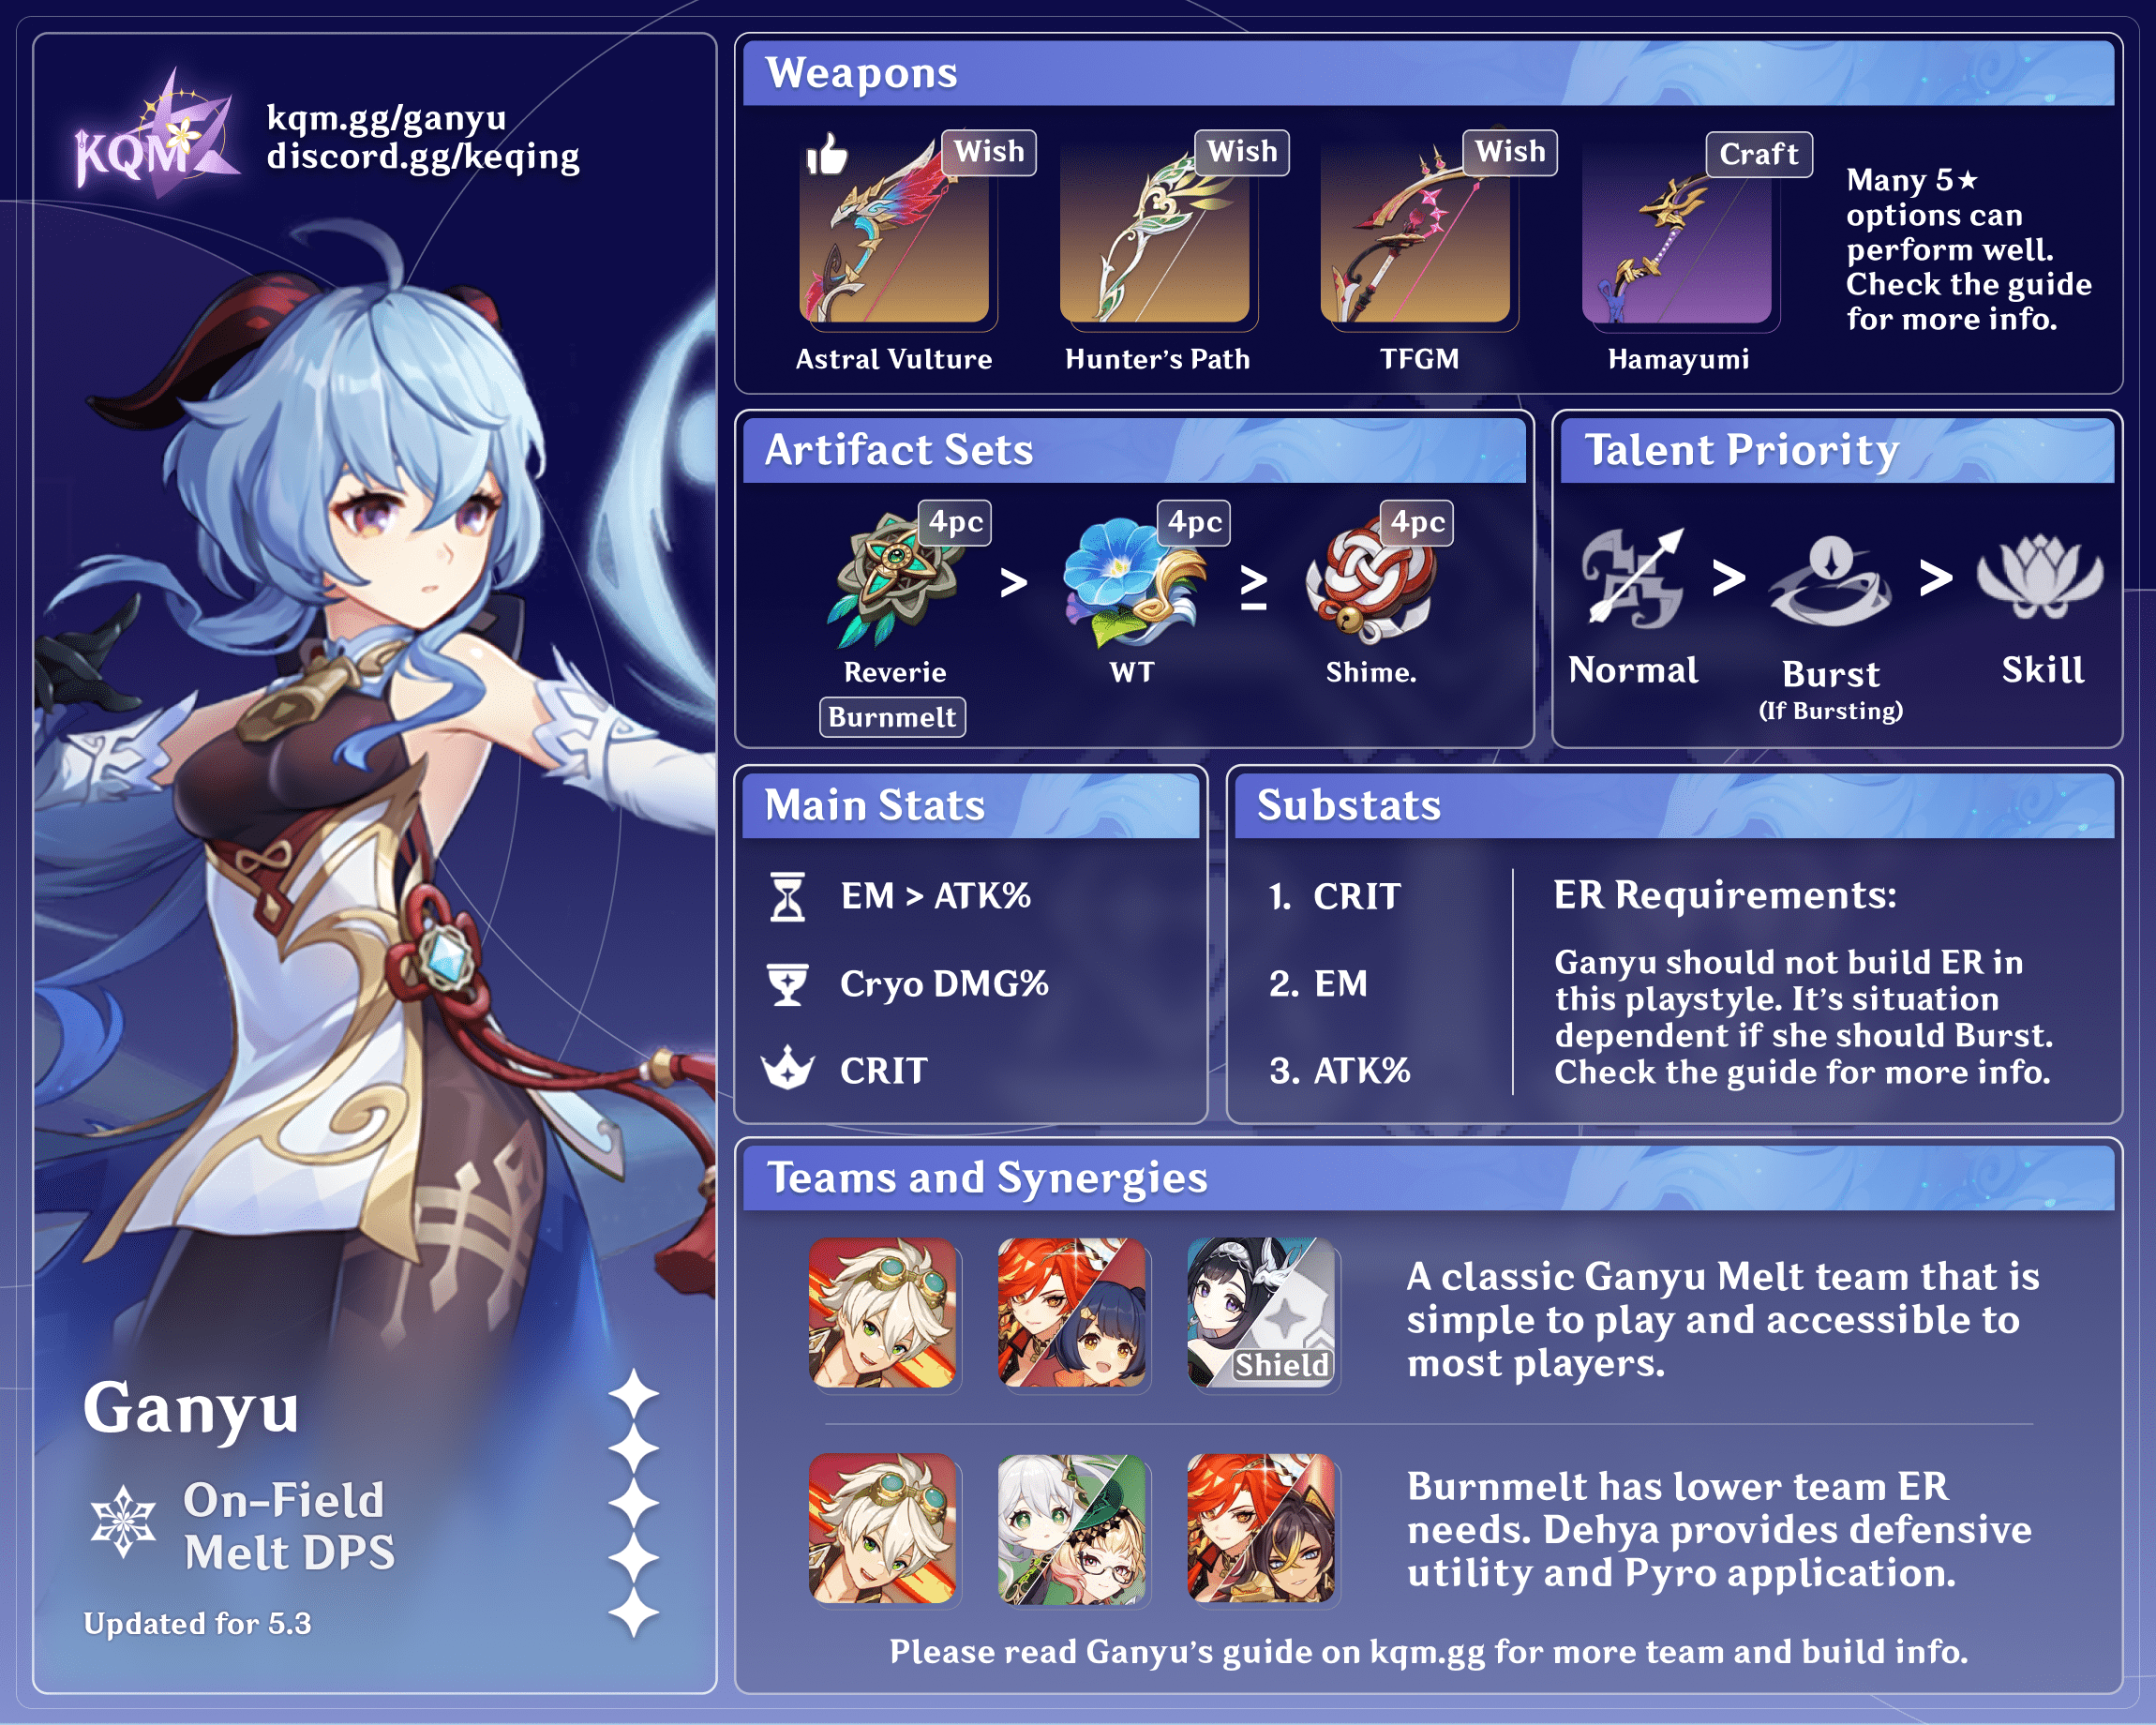
Melt Builds
Melt Talent Priority
>
Normal Attack > Skill
In Melt teams, over 90% of Ganyu’s damage comes from her Normal Attack Talent (Charged Attacks), making it very important to level. Her Skill does decent damage though, and the durability increase from Talent levels are much appreciated for the taunt. Even in teams where she uses her Burst, it does very little relative damage, so it can be ignored.
Melt Artifacts
Melt Main Stats
Sands | Goblet | Circlet |
| EM > ATK%* | Cryo DMG% | CRIT |
Generally, Melt Ganyu wants an EM Sands, Cryo DMG Goblet, and CRIT Circlet. EM is generally preferred since Melt Ganyu is almost always played with Bennett, who provides a massive Flat ATK buff.
*An EM Sands is significantly better than an ATK% Sands, unless Ganyu is paired with multiple Elemental Mastery buffers like C2 Kazuha with Nahida.
Melt Substat Priority
EM (to 200) > CRIT > EM > ATK%
In terms of substats, you should prioritize getting Ganyu’s Elemental Mastery to 200 before focusing on CRIT. You should aim for a 1:2 CRIT ratio, taking into account Ganyu’s bonus 20% CRIT Rate on Charged Attacks.
Melt Artifact Sets
 4pc Wanderer’s Troupe (4WT) | Generally the BiS option. You can passively farm it by defeating Bosses, and it's also available through the Strongbox, making it incredibly efficient to farm. The 2pc effect (80 Elemental Mastery) is very valuable, especially compared to the ATK% of 2pc SR. In addition, the 4pc set bonus is completely unconditional and applies to every Charged Attack. |
4pc Shimenawa’s Reminiscence (4SR) | While this set deals slightly more damage than 4pc WT on paper, it has several drawbacks that make it a worse option. This set is more restrictive with both rotations and weapons (notably Hamayumi), and it requires you to fire 5 Charged Attacks in under 10s to outperform 4pc WT — a feat which is impossible to achieve with M1-Hold and has a margin of less than 0.07s even with M1-R. Even macros start to become inconsistent at those speeds. Nonetheless, 4pc Shimenawa’s Reminiscence performs similarly enough to 4WT and can be farmed from the same Domain as Emblem of Severed Fate, making it a convenient set to farm. |
2pc + 2pc Blizzard Strayer / EM / ATK% | These 2pc combinations are generally worse than the above sets but are close enough in performance that they could outperform the 4pc sets depending on their substat rolls. |
The following sets should generally not be farmed due to Resin efficiency but are still viable options in regards to damage.
 4pc Lavawalker (4LW) | You can consider 4pc Lavawalker if you have no access to any of the above sets, or if your Lavawalker pieces are much better than your other available sets. |
 4pc Retracing Bolide (4RB) | 4pc Retracing Bolide is an option if Ganyu is paired with a very strong shielder. However, it requires farming a generally Resin-inefficient Domain, as Retracing Bolide and Archaic Petra are quite niche sets. |
 4pc Gilded Dreams (4GD) | The additional 230 Elemental Mastery 4pc Gilded Dreams provides makes it slightly better than 2pc EM + 2pc EM combinations. Unfortunately, 4GD, much like 4SR, doesn’t always buff every Charged Attack because of the timing restriction on its set effect. Overall, 4pc Gilded Dreams is slightly better than 2pc combos, but is unremarkable otherwise. |
Melt Artifact Set DPS Comparison
Assumptions: Melt Ganyu with Xiangling Artifacts
| 4pc Shimenawa’s Reminiscence 5CAs buffed | 101.4% |
| 4pc Wanderer’s Troupe | 100% |
| 4pc Shimenawa’s Reminiscence with 4CAs buffed | 97.7% |
| 4pc Lavawalker | 96.01% |
| 4pc Retracing Bolide | 95.54% |
| 4pc Gilded Dreams | 93.62% |
| 2pc Blizzard Strayer / 2pc EM | 92.23% |
| 2pc EM / 2pc EM | 90.80% |
| 2pc Blizzard Strayer / 2pc ATK% | 90.10% |
| 2pc ATK% / 2pc EM | 89.61% |
| 2pc ATK% / 2pc ATK% | 87.36% |
| 4pc Blizzard Strayer | 85.98% |
Mono Cryo Builds
Mono Cryo Talent Priority
≥ >
Burst ≥ Normal Attack > Skill
Much like Freeze, most of Ganyu’s damage in Mono Cryo teams comes from her Burst, though her Charged Attacks are still a significant amount of damage. However, Charged Attacks take additional priority as taking advantage of their flexibility is much more important in Mono Cryo.
Mono Cryo builds are very similar to Freeze builds, with the primary difference being that Ganyu needs to build more CRIT Rate.
Mono Artifacts
Mono Cryo Main Stats
Sands | Goblet | Circlet |
| ATK% | Cryo DMG% | CRIT* |
High CRIT DMG weapons like Aqua Simulacra and Thundering Pulse generally favor CRIT Rate and sometimes ATK% Circlets.
4pc Blizzard Strayer and Cryo Resonance still provide a massive amount of CRIT Rate, though not as much as in Freeze.
*Choose a CRIT Rate or CRIT DMG Circlet depending on CRIT ratio and substats.
Mono Cryo Substat Priority
ER (until requirement) > CRIT DMG > CRIT Rate ≥ ATK%
You should aim for 1800-2000 ATK with around 50-65% CRIT Rate and 180% CRIT DMG before going for higher stats.
Mono Cryo Artifact Sets
4pc Blizzard Strayer (4BS) | 4pc Blizzard Strayer is the optimal set for Ganyu in Mono Cryo. While its CRIT Rate buff is lower than in Freeze teams, this set remains the BiS. No other 4pc set buffs her entire kit, and the 20% CRIT Rate buff is better than any other set bonus from 2pc combinations. |
2pc + 2pc BS / Noblesse Oblige (NO) / ATK% | 2pc set combinations can only be used as an alternative if you don’t own a usable 4pc Blizzard Strayer set. However, farming a 4pc Blizzard Strayer is highly recommended. |
Mono Cryo Artifact Set DPS Comparison
Assumptions: Ganyu Mastersheet
| 4pc Blizzard Strayer | 100.00% |
| 2pc Blizzard Strayer / 2pc ATK% | 92.10% |
| 2pc Blizzard Strayer / 2pc Noblesse Oblige | 91.50% |
| 2pc ATK% / 2pc ATK% | 90.70% |
| 2pc ATK% / 2pc Noblesse Oblige | 90.50% |
| 4pc Emblem of Severed Fate | 89.80% |
| 4pc Wanderer's Troupe | 86.00% |
Support Builds
Support Talent Priority
> ≥
Burst > Skill ≥ Normal Attack
Support Artifact Stats
When using Ganyu as a support, Energy Recharge becomes way more important, since she spends significantly less time on field. Her main stat and substat priorities remain similar to the corresponding DPS builds above.
Support Artifact Sets
 4pc Emblem of Severed Fate (EoSF) | This is a decent set for Support Ganyu, as it helps with Energy Recharge and increases her Burst damage. However, 4pc EoSF is highly contested and may be difficult to give to Ganyu. Nonetheless, it is still appreciated because of the Resin-efficiency of its Domain. |
4pc Blizzard Strayer (BS) | 4pc Blizzard Strayer remains a good option if your ER requirements are low enough and you can maintain a consistent Cryo aura. |
 4pc Noblesse Oblige (NO) | 4pc Noblesse Oblige is greatly appreciated for both Ganyu and her team due to its team-wide 4pc ATK% buff and 2pc Burst DMG buff for Ganyu. Note that Ganyu can’t reliably snapshot the 4pc set bonus onto her own Burst as the buff activates after Ganyu snapshots. |
 2pc + 2pc EoSF / BS / NO / ATK% | You can use good 2pc variations, as long as they help Ganyu with Energy Recharge or her Burst damage. |
Weapons
Weapon comparisons are below the following notes on different weapons.
Weapon Overview
Amos' Bow

Amos in Melt
In a Melt team, Amos’ Bow is amongst the top four weapons, alongside Hunter’s Path, Aqua Simulacra, and Polar Star. It solidly beats out 4-star options. However, Ganyu’s close-range positioning in Melt teams makes it difficult to obtain the maximum bonus from the weapon’s effect. This usually results in either 0 or 1 Amos stacks on the Arrow (with an additional three on the Frostflake Bloom).
Amos in Freeze & Mono Cryo
In Freeze and Mono Cryo team compositions, Amos can achieve more stacks; still, it may not be the best option since her Elemental Burst does not benefit from the weapon passive. In some cases, a highly refined Prototype Crescent can outperform Amos. However, Amos’ passive does not require a weak point hit, which can improve the quality of life for, especially mobile or console players, who have more difficulty aiming.
Amos in Solo or Duo Runs
In solo or duo runs, Amos has its niche due to its high ATK%, which is valuable since buffs are limited. The only comparable weapon is Polar Star, which performs better if its stacks are maintained. However, solo runs often involve kiting, which keeps the enemy at a distance. This reduces Polar Star's ability to maintain stacks while allowing Amos to gain even more.
Lastly, Amos is the best weapon to use in the overworld as all other weapons have less reliable passives.
Maximizing Stacks on Amos' Bow
To gain one stack with Amos’ Bow, the Charged Attack must travel for 0.1s, according to its description. However, flight time rounds to the nearest 0.1s, which means the arrow only needs to be in flight for 0.05s, or a distance of 3.67m (just under 1.5 Abyss tiles). In Freeze and Mono Cryo teams, this isn’t a concern due to Ganyu’s typical positioning. However, in Melt, Xiangling’s Pyronado has a range of 5.4m (slightly over 2 Abyss tiles). This forces you to stay near the edge of Xiangling’s Burst, which is difficult to maintain.
Against larger enemies, you can increase the arrow’s flight time by aiming upward. For Maguu Kenki, this only reduces the required distance by a mere 0.2m, but for Ruin Guards it is halved to 1.8m, or under 1 Abyss tile. See more details regarding flight time here.
The First Great Magic
The First Great Magic is Ganyu’s overall best weapon. Even with no other Cryo party members in the team, it is competitive with all of her other weapons. In fact, in almost every single situation, it is her best or second best weapon — and never by a large margin.
In Melt, Hunter’s Path will often find itself barely beating out First Great Magic even with no other Cryo characters. However, because Hunter’s Path performs worse in AoE, there are many situations where First Great Magic is better.
In Freeze and Mono Cryo, Polar Star will typically perform better. However, the difference is highly dependent on the situation. In Freeze, First Great Magic will do better in single-target scenarios, but Polar will take over in AoE. Since Freeze is naturally predisposed to AoE combat, Polar will emphasize that strength while First Great Magic will compensate for it.
In Mono Cryo, where First Great Magic can obtain all of its stacks, it closes the gap even more with Polar Star. The difference again comes down to playstyle, with Polar performing better in Burst heavy teams and in AoE, while First Great Magic prefers Charge Attack heavy teams. The difference in both cases is marginal though, but most of the time Burst heavy rotations will perform better.
First Great Magic’s second buff, the movement speed, while appreciated, does not have a huge value though. In Melt, where the buff is the strongest, you are typically confined to a small area. In Freeze, the enemy is frozen, minimizing the need to move, and Mono Cryo will usually run Shenhe or Rosaria who will dash around for you. It would come in best in Solo/Duo runs, however, it may not even activate in those situations.
Polar Star

Polar Star is one of Ganyu’s best weapons. It is her BiS in Freeze and Mono Cryo teams, and excels in Melt teams (if you can maintain its stacks). Polar Star's high CRIT Rate is particularly useful in Melt and Mono Cryo teams, as it lets you focus more on other stats. It can lead to overcapping CRIT Rate in Freeze teams, though this can be mitigated by prioritizing ATK% and CRIT DMG stats.
Maintaining Stacks on Polar Star
Each Polar Star stack lasts 12s, with each instance of Normal Attack, Charged Attack, Skill and Burst damage granting an independently tracked stack.
To quickly gain stacks at the beginning of a fight, perform a Normal Attack, then buffer an Aimed Shot, firing it as soon as possible, then finishing with Ganyu’s Elemental Skill. This allows Ganyu to cast her Burst with three stacks active. However, skipping the Aimed Shot usually doesn’t make a significant difference.
In Freeze and Mono Cryo teams, it is easy to maintain all four stacks thanks to Celestial Shower’s long duration, although keeping the Normal Attack stack requires the most consideration. You can maintain it by performing a Normal Attack before animation canceling it with her Elemental Skill. Be careful not to use Ganyu’s Skill too fast or the Normal Attack will be canceled entirely. Keep in mind that slow gameplay (due to ping or skill) may require you to fire an additional Normal Attack, which can cause you to miss or Burst snapshots. If this is the case, forfeiting the additional stack is your best option.
In Melt teams, Ganyu can only maintain three stacks, since she rarely uses her Burst outside of teams with a high amount of Pyro application.
Aqua Simulacra

Aqua Simulacra is one of Ganyu's top weapons, just behind Hunter's Path in Melt, comparable to Polar Star in Freeze, and First Great Magic in general. However, it falls short in Mono Cryo and solo runs due to its lack of ATK. This shortcoming means ATK% Circlets may be highly preferred over CRIT Circlets in Freeze and Mono Cryo teams, although Aqua's high CRIT DMG can compensate for this loss.
Aqua Simulacra’s passive is quite reliable. It grants DMG Bonus when Ganyu is within 8m of an enemy (~3 Abyss tiles). This is slightly longer than the range of the Trail of the Qilin’s dash. In Melt teams, this range is more than enough as Ganyu should always be within 6m of an enemy (the maximum range of Jean’s Pyro application in “Sunfire” teams). However, in Freeze or Mono Cryo teams, Ganyu may be out of range, especially if you prefer to play at a distance.
Hunter's Path

Hunter’s Path is Ganyu’s BiS in Melt teams. It provides a massive amount of CRIT Rate, and its passive buffs Ganyu’s Charged Attack damage by a percent of her EM stat.
However, it falls short outside of Melt. In Freeze teams, you are guaranteed to overcap on CRIT Rate. In Mono Cryo teams, it lacks the raw stats to compete with weapons like Polar Star or Aqua Simulacra. Its passive is useless in either team composition since Ganyu neither benefits from nor builds EM.
Note that Hunter’s Path does not buff the Arrow that triggers its passive, and with high enough ping (>150ms), it does not buff the first Frostflake Bloom either. Additionally, the Bow gets worse in AoE scenarios, as its Charged Attack Base DMG increase is consumed earlier.
Prototype Crescent

For a list of enemies and their weak points, please refer to this document.
Prototype Crescent is Ganyu’s preferred 4-star weapon. It is craftable and available from the start of the game. With its immense ATK%, Prototype Crescent is valuable in all of Ganyu’s teams, frequently outperforming some 5-star weapons.
Prototype Crescent’s passive activates upon hitting an enemy’s weak point with a Charged Attack. This is surprisingly easy. A partially charged Aimed Shot is enough to trigger the passive, and you can spam Aimed Shots until you hear the sound of a headshot (hitting a weak point). This method is mostly useful when you have more time to spare. To refresh the weapon passive, you need to hit the weak point regularly, which may take some practice.
Note: Most of the rotations are written to allow Prototype Crescent beforehand. Prototype Crescent faces issues against enemies with no weak point, notably the Perpetual Mechanical Array, Rifthounds, and the Ruin Serpent. In these cases, it can be helpful to have a backup weapon, like Hamayumi.
Prototype Crescent vs. Hamayumi
When deciding between Prototype Crescent and Hamayumi, it is important to consider team compositions, enemy weak points, and artifact sets. Prototype Crescent is preferred in Freeze and Mono Cryo for its massive ATK% buff, while Hamayumi is preferred in Melt for its Charged Attack DMG Bonus. However, if you have difficulty hitting weak points reliably, Hamayumi will perform better in all scenarios. It’s worth noting that 4pc Shimenawa’s Reminiscence halves Hamayumi’s passive effect since Ganyu almost never completely fills her Energy.
Hamayumi

Hamayumi is Ganyu’s best free-to-play option in Melt, comparable to some 5-star options. Its passive is extremely valuable since almost all of Ganyu’s damage comes from her Charged Attacks.
However, this weapon’s passive requires Ganyu to have full Energy. This makes Hamayumi lose significant value if you use 4pc Shimenawa’s Reminiscence, if you cast your Burst frequently, or if you fight against Energy-draining debuffs. Collecting Energy particles from defeated enemies can offset this issue.
Scion of the Blazing Sun
In Melt, Scion of the Blazing Sun is a good 4-star weapon, just barely trailing behind Hamayumi. It also provides CRIT Rate which makes it much easier to build around.
Its biggest downside is its cost. While the damage is slightly less compared to Hamayumi, it is more broadly applicable in her other teams, and much less conditional. If you don’t want to pull on weapon banners, but buy BP, Scion of the Blazing Sun is likely your best option.
Blackcliff Warbow
Blackcliff Warbow is usable and performs well in some rare circumstances. When stacked and refined, it is extremely powerful. However, obtaining stacks is highly context-dependent and unreliable, making it difficult to recommend in most cases. In addition, Ganyu’s Burst snapshotting mechanics may prevent obtaining stacks.
Obtaining Blackcliff Warbow requires you to spend your Masterless Starglitter, which is not recommended.
Weapon Comparisons In-Depth
Freeze On-Field DPS Weapons
Assumptions:
❄ 90/90 Weapons, Ganyu C0 90/90 T9/9/9, 4BS ATK% - Cryo% - CDMG%
❄ 111% ER requirement, 20 adjustable subs KQMC Standards
❄ Level 100 Enemy, 10% Base RES, Primary Target (against 2 enemies), 5 rotations
❄ 4pc NO Fav Lance Shenhe - 4pc TotM R5 TTDS Kokomi
| Weapon | % of Crescent R1 | Notes |
| Polar Star | 118.04% | Polar Star is an excellent Bow as Ganyu can permanently maintain all 4 stacks. Unfortunately, the excessive amount of CRIT Rate becomes problematic in Freeze teams with 4pc Blizzard Strayer. If players have too much CRIT Rate in substats, other weapons will outperform Polar Star. Note: The listed percentage was calculated assuming there was a slight overcap in CRIT Rate. |
| Aqua Simulacra | 116.54% | Ganyu’s 2nd best weapon. Its high CRIT DMG stat permits the use of an ATK% Circlet with little difference in performance. With Freeze being less restricted by range, you may sometimes leave Aqua Simulacra’s range; however, this is generally not a major concern. See Aqua Simulacra Notes for more details. |
Thundering Pulse | 112.94% | Good option because of the ATK and CRIT DMG it provides, but its Normal Attack DMG% passive is useless for Freeze Ganyu. |
| Amos’ Bow R1 | 110.60% | Amos is a good option because it provides a large amount of ATK%, and with Freeze being less restricted by range, it is easier to obtain extra stacks. However, its value is dependent on how many buffs Ganyu receives. When played with Shenhe and TTDS Kokomi for example, Amos becomes less valuable because its ATK% substat doesn’t scale well with the buffs that these two characters provide. |
Skyward Harp R1 | 110.23% | Depending on the team, Freeze Ganyu can have quite low ATK%, making it hard to take advantage of Skyward Harp’s high Base ATK. The CRIT Rate is still highly appreciated but does run a small risk of overcapping. |
| Prototype Crescent R5 | 108.67% | Craftable from the beginning of the game, it’s a decent choice that, regardless of its refinement, should be a baseline option. Without Bennett, ATK% is significantly more valuable, and Prototype Crescent provides an absurd amount of it. However, Prototype Crescent requires players to hit weak spots to activate its passive, and this is impossible at times. In these scenarios, it can be helpful to have a backup weapon like Hamayumi. Refer the Prototype Crescent Weapon Notes for a list of enemies and their weak spots. |
| Mouun’s Moon R5 (270 cost)  | 107.08% | Mouun’s Moon provides Ganyu with a large amount of Burst DMG%, making it a good option in rotations where Ganyu is more reliant on her Burst than her Charged Attacks. However, Mouun’s value varies widely depending on the team you use, as the passive is based on the Energy Costs of your characters. |
| Hunter’s Path R1 | 100.23% | With its large amount of CRIT Rate, reliance on Charged Attacks, low Base ATK, and near useless passive, Hunter’s Path suffers a lot in Freeze teams. |
| Prototype Crescent R1 | 100% | The best free-to-play option for Freeze Ganyu. It’s also possible to get refinements easily if players have a lot of Northlander Bow Billets. Without Bennett, ATK% is significantly more valuable, and Prototype Crescent provides an absurd amount of it. However, as mentioned previously, if you can’t hit weak spots, it gets significantly weaker. In those cases, Hamayumi may be preferable. |
| Mouun’s Moon R1 (270 cost) | 99.71% | If you’re not performing Charged Attacks, this is one of the better options, especially for teams with higher Burst Energy Cost. |
| Hamayumi R5 | 94.97% | Given that Ganyu uses her Elemental Burst, Hamayumi’s passive is less effective. However, it’s a better craftable option than Prototype Crescent if enemies lack a weak spot. |
The Viridescent Hunt R5 | 92.45% | Battle Pass-locked weapon. The passive provides additional grouping that can increase Ice Shard hits. However, the CRIT Rate can result in overcapping, making this weapon unremarkable. |
| Prototype Crescent (no passive) | 91.54% | See the above notes. |
Freeze Quickswap Weapons
Assumptions:
❄ Calcs are done for a Freeze Quickswap, meaning you’ll do fewer Charged Attacks.
❄ 90/90 Weapons, Ganyu C0 90/90 T9/9/9, 4BS ATK%- Cryo% - CDMG%
❄ 107% ER requirement, 20 adjustable subs KQMC Standards
❄ Level 100 Enemy, 10% Base RES, Single-Target, 5 Rotations
❄ 4pc TotM Prototype Amber Mona - 4pc NO Rosaria
❄ For additional Weapon Notes, go to Weapon Overview
| Weapon | % of Crescent R1 | Notes |
| Aqua Simulacra | 113.72% | As long as you stay in range, its passive is nice and reliable. |
| Polar Star | 112.89% | Assuming you can maintain its stacks, Polar Star is an incredibly strong weapon. |
| Thundering Pulse | 112.81% | Essentially a stat stick. |
| Mouun’s Moon R5 (240 cost) | 111.25% | With the heavy Burst focus of Support Ganyu, the value of Mouun’s Moon rises significantly. |
| Prototype Crescent R5 | 108.97% | Important load of ATK%. |
| Skyward Harp | 107.75% | Essentially a stat stick. |
| Amos’ Bow | 106.31% | Another stat stick, as Ganyu won’t be performing Charged Attacks. |
| Mouun’s Moon R1 (240 cost) | 101.93% | With the heavy Burst focus of Support Ganyu, the value of Mouun’s Moon rises significantly. |
| Prototype Crescent R1 | 100% | Huge load of ATK%. |
| The Viridescent Hunt R5 | 92.92% | Ganyu doesn’t perform Charged Attacks frequently enough to reliably proc this Bow’s passive. The CRIT Rate may also cause overcapping. The passive may be useful in circumstances where Venti or Kazuha are unavailable. |
| Hamayumi R5 | 92.02% | Its passive is wasted because Ganyu uses her Burst frequently and hardly ever performs Charged Attacks. |
| Prototype Crescent (no passive) | 91.93% | See the descriptions above. |
Assumptions:
❄ 90/90 Weapons, Ganyu C0 90/90 T9/9/9, 4BS ATK% - Cryo% - CDMG%
❄ 111% ER requirement, 20 adjustable subs KQMC Standards
❄ Level 100 Enemy, 10% Base RES, Averaged damage against 2 enemies, 2nd rotation onwards
❄4pc TotM Diona (snapshot onto Burst) and 4pc NO Mona (not snapshot onto Burst)
Calcs by Rare Possum#0511
| Weapon | % of Crescent R1 |
| Polar Star R1 | 116.8% |
| The First Great Magic R1 | 116.2% |
| Prototype Crescent R5 | 111.8% |
| Aqua Simulacra R1 | 109.2% |
| Thundering Pulse R1 | 108.3% |
| Skyward Harp R1 | 106.7% |
| Amos’ Bow R1 | 105.9% |
| Mouun's Moon R5 (260 cost) | 102.5% |
| Aqua Simulacra (no passive) | 100.4% |
| Prototype Crescent R1 | 100% |
Song of Stillness R5 | 99.9% |
| Hunter’s Path R1 | 99.5% |
| Scion of the Blazing Sun R5 | 95.6% |
| Mouun's Moon R1 (260 cost) | 95.4% |
| Song of Stillness R1 | 93.7% |
| The Viridescent Hunt R5 | 93.2% |
| Scion of the Blazing Sun R1 | 92.2% |
| Hamayumi R5 | 90.3% |
| The Viridescent Hunt R1 | 89.5% |
| Hamayumi R1 | 88.9% |
| Prototype Crescent (no passive) | 88.2% |
Melt Weapons
Assumptions:
❄ 90/90 Weapons, Ganyu C0 90/90 T9/9/9, EM - Cryo% - CRIT
❄ 100% ER requirement, 20 adjustable subs KQMC Standards
❄ Level 100 Enemy, 10% Base RES, Single-Target, 5 Rotations
❄ Pyro Resonance - 4pc NO Bennett (+ 1000 ATK from Burst) - 4pc Instructor Zhongli
| Weapon | % of Crescent R1 | Notes |
| Hunter’s Path | 120.2% (119.6% when over 150 Ping) | Hunter’s Path is BiS in Melt Ganyu. Its high CRIT Rate is greatly appreciated, and the passive works well with Ganyu’s build, which desires a large amount of Elemental Mastery anyway. There are some things to note. First, Hunter’s Path does want more EM than other weapons (about 350-450 EM); however, even if you don’t have that much, it is still one of her best weapons. Second, Hunter’s Path gets worse in AoE scenarios, as its passive is consumed faster. Finally, the passive only activates on the first Bloom, not the first Arrow. At higher ping (>150), it won’t activate until the second Arrow. Nevertheless, these are all quite small issues. A bigger deal breaker is that Hunter’s Path doesn’t perform well in Freeze and Mono Cryo with its excess CRIT Rate, so if you want to play both, you may want to hold off on this weapon. |
| The First Great Magic | 119.7% | Overall, The First Great Magic is one of Ganyu’s best weapons, performing well in all teams. It is the most universal of all 5-star weapons. Even with only one stack of the ATK% passive, it keeps up with Hunter’s Path, while also providing a massive amount of CRIT Damage and decent ATK%. However, the movement speed passive is unfortunately not used here due to the restrictive movement enforced by Bennett’s Burst area. |
| Aqua Simulacra | 118.3% (106.5% with no passive) | Aqua Simulacra is one of Ganyu’s strongest weapons. Its low Base ATK is offset by Bennett’s buff. The range of the passive is usually not a problem in Melt because Ganyu needs to stay close to enemies anyways. |
| Polar Star | 116.4% | Since it’s generally not recommended to use Ganyu’s Elemental Burst in Melt teams, she can’t gain the fourth stack on this weapon. Additionally, the passive provides ATK%, which isn’t that useful on Melt Ganyu. However, Polar Star still remains very powerful because of its high CRIT substat. It may outperform above options if your CRIT DMG Circlets are of higher quality than your CRIT Rate Circlets. |
| Amos’ Bow | 113.6% (117.8% if you can get one extra stack) | Amos’ Bow has the highest Frostflake Bloom damage but slightly falls off in overall damage. On a side note, its passive works in a confusing manner: the amount of stacks is determined by the flight time, not distance. See more details here. |
| Hamayumi R5 | 113.1% (101..7% with no passive) | A craftable weapon obtainable in Inazuma. While it is the best 4-star and free-to-play option for Melt, it’s not much better than Prototype Crescent, so players shouldn’t craft Hamayumi if they already have a Prototype Crescent. Furthermore, the set effect of 4pc Shimenawa’s Reminiscence is antagonistic with Hamayumi’s passive, which makes it less desirable. |
| Scion of the Blazing Sun R5 | 112.4% | Scion’s biggest problem is that it is a BP weapon, meaning it costs money. Otherwise, it is a good option, almost competitive with Hamayumi. It is much less conditional and a better option in other teams. However, it will struggle more when its passive is on cooldown and new enemies spawn, such as in multi-wave content. |
| Thundering Pulse | 111.7% | Thundering Pulse provides some decent stats. However, the passive is useless for Ganyu. |
| Skyward Harp R1 | 109.9% | Good stat stick with high Base ATK, which is both a drawback and an advantage considering it may be the deciding factor when choosing your artifacts. In ATK-heavy teams (notably with Bennett, Double Pyro and/or ATK% boosting sets) this weapon loses value. However, when boosted by Kazuha C2 or Sucrose, it gains value: the need for EM is reduced, allowing Harp to shine. |
| Prototype Crescent R5 | 109.5% (90.5% with No Passive) | Prototype Crescent remains a good weapon, but with the presence of Bennett, its passive is weaker. If you play Freeze a lot or use 4pc Shimenawa’s Reminiscence, Prototype Crescent will be a good choice. |
| Song of Stillness R5 | 106.7% (100% Uptime) | Song of Stillness’s buff isn’t particularly strong unfortunately, making it perform poorly. While the calculation was done with 100% heal uptime, this isn’t very realistic, especially if your healer is Bennett. At 0% uptime, the weapon performs identically to Prototype Crescent with no passive. |
| Hamayumi R1 | 101.7% (95.9% with no passive) | See description of R5. |
| The Viridescent Hunt R5 | 100.7% | Battle Pass-locked weapon. The passive can help with grouping, but this isn’t as important in Melt teams as it is in Freeze. The CRIT Rate offered by the weapon is appreciated. |
| Prototype Crescent R1 | 100% (90.5% with no passive) | See description of R5. |
King's Squire R5 | 99.5% | It's a meh weapon. |
Ibis Piercer R5 | 98.1% | The weapon simply does not provide enough stats to perform above her craftable weapons. It is a decent free option if you do not want to craft any weapons though. |
Raven Bow R5 | 92.7% | Ganyu’s best 3-star weapon for Melt. However, with how easy it is to get some of the above 4-stars, there is rarely a reason to consider it. |
Mono Cryo Weapons
Assumptions:
❄ 90/90 Weapons, Ganyu C0 90/90 T9/9/9, 4BS ATK%- Cryo% - CRIT Circlet (Some CRIT DMG weapons prefer CRIT Rate Circlets)
❄ 115% ER requirement, 20 adjustable subs KQMC Standards
❄ Level 100 Enemy, 10% Base RES, 2 Target Average
❄ Cryo Resonance - R5 Favonius Lance 4pc NO Shenhe, 4pc Archaic Petra Zhongli, 4pc VV Iron Sting Kazuha 960EM
Calcs by Rare Possum#0511
| Weapon | % of Crescent R1 |
| Polar Star R1 | 123.1% |
| The First Great Magic R1 | 121.6% (3 Cryo) 115.4% (2 Cryo) |
| Prototype Crescent R5 | 110.9% |
| Aqua Simulacra R1 | 110.8% |
| Thundering Pulse R1 | 109.5% |
| Skyward Harp R1 | 107.5% |
| Hunter’s Path R1 | 106.6% |
| Aqua Simulacra (passive off) | 102.7% |
| Amos’ Bow R1 | 103.5% |
| Prototype Crescent R1 | 100.0% |
| Song of Stillness R5 | 100.0% (100% Uptime) |
| Mouun's Moon R5 | 99.6% |
| The Viridescent Hunt R5 | 98.4% |
| The Viridescent Hunt R1 | 94.6% |
| Mouun's Moon R1 | 94.2% |
| Song of Stillness R1 | 93.8% (100% Uptime) |
| Scion of the Blazing Sun R5 | 93.2% |
| Scion of the Blazing Sun R1 | 91.6% |
| Hamayumi R5 | 90.6% |
| Prototype Crescent (no passive) | 89.1% |
| Hamayumi R1 | 88.6% |
Teammates
Anemo Teammates
 Venti | In Freeze Variations: Venti provides extremely strong grouping against low-to-mid staggerable opponents and an appreciated Energy refund. This, along with his access to 4pc Viridescent Venerer, solidifies him as the advised option for Freeze Ganyu teams. With short cooldowns and Energy refund, Venti is especially effective in 15s rotations, where Ganyu can snapshot her own A4. However, Venti does struggle against heavier enemies and Bosses, who can simply leave his Burst. This makes his Energy refund more inconsistent as well. Despite this, he is still a very good option. |
 Kazuha | In Melt Variations: Despite his reputation, Kazuha does not perform well in Melt Ganyu teams. He brings Elemental DMG Bonus and 4pc VV, both of which are incredibly strong buffs. However, his lackluster Pyro application means that even the slightest interference can result in Ganyu losing Melts (This includes Zhongli’s Skill, Ganyu’s Skill, and other enemies). In addition, Kazuha’s short Burst duration makes it difficult to Melt 5 Charged Attacks. Most players can only Melt 4, losing a tremendous amount of damage. On top of that, his own damage is quite poor, as Ganyu will clear all Pyro aura and leave nothing to Swirl. Because of the above, the rotation is hard to execute, and the team deals less than admirable damage. While adding another Pyro applicator like Xiangling or Nahida can avert some of these issues, it results in very long setups and reduced buff uptime, making Kazuha a net damage loss compared to other options. However, if Ganyu has her C6, she no longer needs a shield, so Kazuha’s weak Pyro application can be supplemented by Xiangling or Nahida. Ganyu’s instant charging time lets her get all of her Charged Attacks off and take full advantage of Kazuha’s buffs. In Freeze Variations: Kazuha’s buffs are much more effective in Freeze teams, especially when snapshotted onto Ganyu’s Burst. Unlike in Melt, he can also take full advantage of Swirl. Kazuha’s grouping is not as good as Venti’s in heavy AoE content, but his flexible positioning makes him a great option against heavier enemies. However, Kazuha’s increased field time and lack of Energy refund may not always let him perform better than Venti, especially in 15s rotations. In Mono Cryo Variations: Kazuha is by far the best Anemo unit for Mono Cryo teams. His immense buffs and reasonable ER requirements increase his value in comparison to Venti. |
 Jean | In Melt Variations: When paired with Bennett, Jean produces a unique interaction called “Sunfire” with their Bursts. When a character stands within the overlapping area of their Bursts, Jean’s Burst applies Anemo to the player, Swirling the self-applied Pyro from Bennett’s Burst. The reaction results in a powerful yet brief period of off-field Pyro application and significant damage. The Sunfire interaction is used in a specific rotation that allows Ganyu to Melt 4 Charged Attacks (5 in AoE) while her Burst is active, while also providing an immense amount of healing. |
 Sucrose | In Melt Variations: Sucrose is a viable flex slot if there are no alternatives. Her EM share can be useful, but her ability to Swirl Cryo is unreliable, her grouping is lackluster, and her Pyro application is terrible. In Freeze Variations: Though a significant step down from Kazuha and Venti, Sucrose is usable in Freeze teams. Her 6th Constellation can slightly boost Elemental DMG%, albeit inconsistently. However, Sucrose’s grouping is worse, and her EM share is completely useless. She also has very high ER requirements, but this can be alleviated with the use of Prototype Amber, which would allow her to provide additional healing. |
 Sayu | In Freeze and Mono Cryo Variations: If you have no other Anemo unit, Sayu is an option in Freeze teams. The Mujina Ninja can be a comfortable choice thanks to her healing. She can also trigger Swirl and deal damage off-field. |
Cryo Teammates
 Shenhe | Shenhe is the premier Cryo buffer, with her Cryo RES Shred, Cryo DMG Bonus, and Elemental Skill + Burst or Normal and Charged Attack DMG Bonus. On top of that, her Icy Quill effect further increases the team’s damage output. Lastly, Shenhe brings some utility with the dash from her Skill, allowing you to reposition after Ganyu uses her Skill. In Freeze Variations: While these buffs are extremely potent, Shenhe is less valuable in AoE situations as her Icy Quill effect is consumed faster. As such, she may not be a massive improvement over other options in Freeze teams unless Kazuha is also used. In Melt Variations: In Melt, Shenhe distinguishes herself as the only character who consistently provides a greater damage increase than Zhongli in the flex slot, though at the cost of a shield. Furthermore, C6 Melt Ganyu is the only character who takes full advantage of Shenhe’s C6. In Mono Cryo Variations: Shenhe truly shines in Mono Cryo. Here, she provides a significant damage increase over all other options, and her buffs are greatly appreciated by multiple members of the team. In addition, Ganyu can still use a shielder like Layla or Zhongli, since Shenhe does not need to take up their slot. |
 Layla | Layla has the second strongest shield available to Ganyu, which is also the strongest against Cryo damage. Additionally, Layla generates a decent number of Cryo Particles. While her damage isn’t the highest, it is better than most other shielders, especially when paired with Shenhe. However, Layla’s shield duration is quite short, lasting only 12s. This is fine in Mono Cryo and Freeze teams, where their quickswap playstyle allows the shield to be used between Ganyu’s Charged Attacks. In Melt, this comes at the cost of Bennett’s uptime, making her less valuable there. Layla’s C4 provides a small buff that increases Charged Attack damage once per Skill wave. The buff isn’t too significant but is nice to have. Unlike similar effects such as Shenhe’s Icy Quill, Layla’s C4 does work in AoE. As such, it can be optimal to intentionally miss Ganyu’s Frostflake Arrow to apply the buff to her Bloom. This breakpoint typically occurs around three or more enemies. If Ganyu has low ATK or Layla has high HP, this technique becomes ideal even when facing two enemies. |
 Diona | Diona provides good particle generation and a decent shield. This makes her a good option in Freeze teams if you want more survivability. Her Elemental Skill hits multiple times, letting her use Favonius Warbow extremely well. Though her shield can be underwhelming in Melt teams, her C6 EM buff is useful. |
 Rosaria | Rosaria is a good option in Freeze and Mono Cryo teams: she provides high personal damage, great particle generation, and CRIT Rate share, while also being a fantastic 4pc NO user. Much like Shenhe, Rosaria’s Skill brings her back towards the enemy after Ganyu dashes away with her Skill. This is very handy for positioning. Note that in Freeze, she cannot hit lighter enemies lifted by Venti’s Burst. Nevertheless, Ganyu and Venti are sufficient in dealing with those enemies. |
 Ayaka | Unlike the above characters, Ayaka does not support Ganyu. Instead, Ganyu Ayaka teams operate similarly to dual-carry teams. While Ayaka generates a good amount of particles, she needs slightly more Energy Recharge than other Cryo units since neither she nor Ganyu uses Favonius weapons. If Venti is used with these two, then this isn’t an issue. Furthermore, all three characters excel in AoE scenarios, where particles drop frequently from defeated enemies. If players can satisfy Ayaka’s Energy Recharge needs, she can be a strong partner for Ganyu because of her highly-damaging Elemental Burst, which can take full advantage of Ganyu’s A4 Passive. This guide will not cover Ganyu Ayaka teams in depth. For more information please refer to the KQM Ayaka Guide. |
Pyro Teammates (Melt)
 Bennett | Bennett is an indispensable member of Melt teams due to his Burst’s massive Flat ATK buff, good healing, and Pyro self-application. Jean uses this Pyro application to enable the Sunfire interaction, whereas other Anemo units use it to absorb Pyro into their abilities. Furthermore, his Skill’s short cooldown allows him to generate a generous amount of Pyro Particles for the team. |
 Xiangling | Xiangling has high personal damage, contributing a significant amount to overall team damage. Her Pyro application is fast enough to allow Ganyu to Melt all of her Charged Attacks (unless Ganyu’s Burst is active). Prior to C4, Xiangling’s Burst only allows up to 5 of Ganyu’s Charged Attacks to Melt. However, after unlocking her C4, Xiangling provides the longest lasting Pyro application out of any character, letting Ganyu Melt up to 6 Charged Attacks. Generally, Xiangling is the best option in Melt teams due to her high Pyro uptime, reliable performance, simple rotation, and impressive personal damage. However, she has very high ER requirements and requires a battery — a role that Bennett excels in. |
 Xinyan | Xinyan offers a modest shield and acceptable particle generation. By itself, her Pyro application isn’t enough for Ganyu to Melt reliably, but it can supplement other Pyro applicators or Burning. Her second Constellation greatly increases the probability of Favonius procs on her Elemental Burst, and her full-strength shield offers some defense. Only use Xinyan if you do not own any viable shield alternatives. |
 Yanfei | At C4, Yanfei’s Burst creates a 15s shield. Her shield holds up quite nicely compared to other characters’ shields, but it is held back by Yanfei’s 80-cost Burst. She needs over 200% Energy Recharge, Prototype Amber and particles from Xiangling and Bennett in order to reliably shield Ganyu. Yanfei is preferable to many shield units but pales in comparison to Zhongli. However, unlike the other Pyro defensive options, Yanfei lacks any form of off-field Pyro application, which makes her less appealing in Burning teams. |
 Dehya | Dehya’s kit alone is not enough to apply Pyro for Ganyu or act as the sole defensive role in Melt teams. However, Nahida and Bennett make up for these shortcomings. In Burning teams, Dehya can consolidate both the role of the shielder and the Pyro applicator, with distinct advantages over Thoma and Xinyan. Compared to Thoma, Dehya doesn’t require Ganyu to perform Normal Attacks, which makes gameplay much smoother; compared to Xinyan, Dehya’s interruption resistance is much more reliable since damage can’t break it. However, Dehya’s interruption resistance is quite short: it only lasts 9s, which is enough for 4 Charged Attacks. After this duration, there is reduced interruption resistance for 3s (9s at C2), but this is very weak and not particularly useful. Dehya is arguably the best option for Burning teams. |
 Thoma | Thoma has one of the strongest shields in the game when it is fully stacked. However, as Ganyu does not perform Normal Attacks, she can’t stack it reliably. In addition, he grants a small buff to Charged Attack DMG via his C6, which is appreciated albeit not too significant. Thoma’s Burst Energy Cost is also very high, leading to high ER requirements. Even with his C4, he requires over 200% Energy Recharge. He can carry Favonius Lance to lower team ER requirements, but this comes at the cost of his Shield Strength. His on-demand Pyro has a use with Burning reactions though: if Burning goes out, you may deal one Normal Attack to restart it. Overall, Thoma is not the best shield option for Ganyu due to her playstyle. Only use him if you do not own any other shield alternatives mentioned here. |
 Nahida | Nahida, while not actually a Pyro character, fills the same role in Melt teams by enabling Burning. She grants huge buffs and lets Ganyu use Bennett’s buffs longer. In theory, Nahida allows up to 13 consecutive Melt Charged Attacks, although 6 or 7 Charged Attacks are usually optimal. However, Burning is incredibly unreliable; while it is technically possible to use Nahida as the sole Pyro applicator, it is almost guaranteed to fail. Therefore, you should use any of the previously mentioned Pyro characters (aside from Yanfei) or Kazuha to stabilize the Pyro aura. Keep in mind that Nahida’s EM share is not large enough to use ATK% Sands on Ganyu in most circumstances. Nevertheless, you should ultimately verify your build with Genshin Optimizer. Note: Nahida’s C1 makes her worse in Ganyu teams. You may find that with C1, Burning is more likely to extinguish. |
Hydro Teammates (Freeze)
 Kokomi | Kokomi has the best Hydro application available to Ganyu. Her Skill has no ICD and a 2s tick rate, making her application superior to every Hydro character except Nilou. Additionally, Kokomi has access to both TTDS and 4pc Tenacity of the Millelith in order to buff Ganyu’s damage. Her low field time enables faster setups and more Charged Attacks. Furthermore, Kokomi heals, consolidating the defensive role and allowing higher DPS Cryo units like Rosaria, Shenhe or Ayaka to be used without worry. |
 Mona | Mona is a common option since she is a standard 5-star character. While her Freeze uptime is poor and her ER requirements are high, she provides an incredible buff with her Burst’s Omen. Additionally, her lower cooldowns let Ganyu run shorter 15s rotations. Omen applies a debuff to all enemies in Mona’s Burst AoE at the time of its casting. When affected by Omen, enemies take increased damage. However, Omen only lasts 5s after its “bubble” pops, which occurs after either 8s or when the enemy takes stagger damage. When the enemy is Frozen, they don’t take stagger damage, which extends the Omen’s duration. |
 Ayato | Unlike Mona and Kokomi, Ayato brings no direct buffs to Ganyu herself. Instead, he brings his own personal damage and a different playstyle. When paired with Ayato, you’ll most likely use Ganyu as a support. Ganyu provides off-field Cryo application while Ayato deals Hydro damage on-field. Although Ayato’s Burst has pseudo-quadratic scaling like Ganyu, the majority of his damage comes from his Skill-empowered Normal Attacks. Nonetheless, his Burst provides additional Hydro application and a Normal Attack DMG buff. |
 Nilou | Nilou applies Hydro in a small AoE via her Skill at no Energy Cost. She provides nothing else, but she works fine if you lack other characters. In addition, her low field time compared to other Hydro options (aside from Kokomi) lets you spend more time on Ganyu to do more Charged Attacks. However, the biggest shortfall is that her Hydro application is short-ranged and centered on the player. This can cause problems when Ganyu uses her Elemental Skill, which dashes her away and prevents Hydro from being applied. It may be worth noting there is a jank technique involving R5 Sacrificial Sword. The weapon lowers Nilou’s Skill cooldown such that the rotation is cut down and Ganyu can snapshot her Burst’s A4 buff. |
Geo Teammates
 Zhongli | Zhongli is by far the best shielder in the game and guarantees that Ganyu completes her lengthy Charged Attacks free from interruption. His shield has high damage absorption and stacks Shield Strength, making it unlikely to break. With a 20s duration and 12s cooldown, Zhongli’s shield easily maintains 100% uptime; even if it does break, it can be refreshed. On top of that, Zhongli provides several small buffs. His 20% RES Shred is valuable in all teams, but especially in Melt, where the RES Shred from 4pc Viridescent Venerer is difficult to achieve and not always worth it. Zhongli also has access to artifact sets that further buff Ganyu: 4pc Instructor in Melt teams, 4pc Archaic Petra in Mono Cryo teams, or 4pc Tenacity of the Millelith in all teams. However, Zhongli triggers Shatter against Frozen enemies, so he should not be used in Freeze teams except against when facing enemies that require Geo to easily defeat. |
 Albedo | In Mono Cryo, Albedo can act as a flex slot. When paired with Zhongli, they grant Geo Resonance. This provides extra survivability and damage when characters are shielded. However, Albedo suffers in performance in Ganyu’s other teams. In Freeze, Shatter ruins Frozen uptime. In Melt, Crystallize interferes with reactions and the shields made by the reaction aren’t particularly strong. |
Teams
Ganyu Freeze Teams

Freeze is a classic Ganyu team archetype. The teams group enemies with Anemo characters, immobilize them with Freeze, and then let Ganyu’s quadratic scaling do the work with minimal effort. They are particularly strong against scenarios with multiple opponents that can be Frozen.
As mentioned earlier, shorter rotations allow Ganyu to snapshot her A4 Passive onto her Burst. However, they are harder to execute and require more Energy Recharge, especially for Mona. Nevertheless, rotations locked to 20s by units like Kokomi and Shenhe remain competitive because they bring their own buffs to compensate for the loss of Ganyu’s A4.
Venti - Mona - Diona

Also known as "Morgana", the oldest and most famous of Ganyu’s Freeze teams. It uses a 16s rotation to maximize Frozen uptime, Mona’s Omen uptime, and Venti’s grouping. Diona provides additional safety with her shield and emergency healing from her Burst. While Morgana is by no means the best Freeze team, it still performs well enough for all content. However, it struggles against Freeze-resistant enemies more than other options.
Rotation
Diona hE - Ganyu EQ - Venti EQ - Mona (N1)EQ - Ganyu 2CA - Venti EN1 (Drop if slow) - Ganyu CA
It is possible to fit up to 3 Charged Attacks and 2 Venti Skills in this rotation. However, the rotation is quite tight and you may drop Venti’s second Skill if you can’t snapshot Ganyu's Burst in time.
Diona should not Burst every rotation because it takes up too much time and its cooldown is longer than the rotation. Her Burst is best saved for emergency healing instead.
Ganyu - Venti - Mona - Diona Rotation Video
Team Gearing
 Venti | Weapon Venti should consider Elegy for the End or The Stringless. To further decrease the team’s ER requirements, he can also use Favonius Warbow (if you have another one available). Artifacts 4pc Viridescent Venerer |
 Mona | Weapon Mona typically needs Favonius Codex or Prototype Amber to meet her high Energy Recharge requirements. Even if you meet the requirements with TTDS, only every second rotation will be buffed due to the shorter team rotation. Artifacts Mona can use either 4pc NO or 4pc TotM, but 4pc NO is usually better since Diona already prefers 4pc TotM. ER Requirements Favonius Codex: 250% Prototype Amber: 200% |
 Diona | Weapon Diona should use Favonius Warbow since she takes less field time to make use of the weapon’s passive and it benefits Mona and Venti more than other options. Prior to R5, the cooldown on Sacrificial Bow’s passive is too long to fit this rotation. Artifacts Diona should use 4pc Tenacity of the Millelith (TotM) as its effect lasts just long enough for Ganyu to snapshot onto her Burst. 4pc Noblesse Oblige is also an option, but its value is lower since Diona can't Burst every rotation. Her stats don't particularly matter, so a set of 4-star artifacts works identically to a set of 5-star artifacts. |
Venti - Mona - Layla

Layla can replace Diona to provide more damage and 4pc TotM uptime at the cost of increased rotation time. While the team’s damage can be slightly higher, it is harder to snapshot Ganyu’s A4 in successive rotations.
Rotation
Ganyu EQ - Venti EQ - Layla QE - Mona (N1)EQ - Ganyu 2CA (1 if slow) - Venti E N1/D - Ganyu CA
It remains possible to do 3 Charged Attacks and the additional Venti Skill; however, it may be difficult to swap fast enough to snapshot Ganyu’s A4. In that case, you should skip one of Ganyu’s Charged Attacks.
Ganyu - Venti - Mona - Layla Rotation Video
Team Gearing
 Ganyu | ER Requirements Building a bit more ER can make rotations feel more fluid by reducing the chance that Ganyu must wait for particles and potentially miss her snapshot. Ganyu’s ER requirements can reach up to 130%, even with one Favonius weapon. A second Favonius weapon decreases it to 115%. |
Venti | Weapon Venti should consider Elegy for the End or The Stringless. If Layla cannot use or proc Favonius Sword, you should give him Favonius Warbow to lower the team’s ER requirements. Artifacts 4pc Viridescent Venerer |
Mona | Mona should use the same build as in the traditional Morgana variant above. Weapon Her premier weapons are Favonius Codex and Prototype Amber. Artifacts 4pc Noblesse Oblige is her best artifact set. ER Requirements Favonius Codex: 250% Prototype Amber: 200% |
 Layla | While her damage is decent, it is not too important (especially in AoE). You can build Layla as either a pure shielder or an off-field DPS unit. A pure shielder build is faster to farm since she needs only HP% main stats. Weapon Her weapon does not particularly matter since she is often out of range or off-field, preventing Favonius Sword procs. Favonius Sword is still a decent option nonetheless, as few other weapons contribute to her damage. If you want to trigger Favonius Sword’s passive, use Layla at the beginning of the rotation (at a cost of lower shield uptime) or dash closer to enemies after swapping to her. Artifacts Layla should use 4pc TotM. |
Venti - Mona - Rosaria

This team replaces Diona and Layla’s shielding for Rosaria’s higher personal damage and particle generation. However, in doing so, the rotation removes two of Ganyu’s Charged Attacks, making the change net neutral in terms of damage.
The primary advantage of the team lies in its smooth gameplay. The team constantly swaps between characters to use their abilities as they come off cooldown, creating a quickswap feeling with high i-frame uptime.
This team is also referred to as "CN Morgana" in some communities.
Rotation
Ganyu E CA - Mona E - Venti EQ - Rosaria EQ - Ganyu Q - Mona Q - Venti EN1 - Rosaria E
There are other variations but this one is relatively easy.
Ganyu - Venti - Mona - Rosaria Rotation Video
Team Gearing
Venti | Weapon Venti should consider Elegy for the End or The Stringless. Artifacts 4pc Viridescent Venerer |
Mona | Mona should use the same build as in the traditional Morgana variant above. Weapon Her premier weapons are Favonius Codex and Prototype Amber. Artifacts 4pc Noblesse Oblige is her best artifact set. ER Requirements Favonius Codex: 250% Prototype Amber: 200% |
 Rosaria | Weapon Rosaria should use Favonius Lance, which has a high Base ATK that synergizes well with her. Rosaria’s Skill hits twice, providing more chances to proc its passive. Artifacts Rosaria can use either 4pc Blizzard Strayer (BS) or 4pc Noblesse Oblige (NO). If you can give Rosaria Ganyu’s hand-me-downs, 4pc Blizzard Strayer is recommended. ER Requirements Before C4: 150% With C4: 125% |
Venti - Mona - Shenhe

This Freeze variant suffers from reduced Frozen uptime since Shenhe forces a 20s rotation. However, if you can play through it, Mona and Shenhe provide significant buffs to Ganyu.
Rotation
Shenhe QE - Ganyu EQ - Venti EQ - Mona EQ - Ganyu CA - Shenhe EN1 - Ganyu E CA - Venti EN1 - Ganyu 2CA
Note that the rotation uses Shenhe QE instead of EQ. This lines up Shenhe’s Skill cooldown much better for the second use, but increases her ER requirements as she doesn’t catch her own particles.
Ganyu - Venti - Mona - Shenhe Rotation Video
Team Gearing
Venti | Weapon Favonius Bow if Mona uses TTDS. Alternatively, Elegy of the End or The Stringless if Mona uses Favonius Codex or Prototype Amber. Either scenario performs similarly, so it is a matter of personal choice and weapon availability. Artifacts 4pc Viridescent Venerer ER Requirements Single Favonius with Prototype Amber: 165-175% Double Favonius: 150% |
Mona | Weapon Mona can use TTDS and transfer its buff to Ganyu, but it does not snapshot onto her Burst. To meet Mona’s ER requirements on TTDS, Venti and Shenhe should both have Favonius weapons. Alternatively, Mona can use Favonius Codex or Prototype Amber, which allows Venti to hold Elegy of the End or The Stringless. Either scenario performs similarly, so it is a matter of personal choice and weapon availability. Artifacts There are two ways to pick artifact sets for Shenhe and Mona. The highest damage option is to give Shenhe 4pc NO and Mona 4pc TotM. The second option is to give both of them 4pc NO, which is easier to farm. The difference in team DPS between the two options is less than 0.5%. ER Requirements With double Favonius: 200-210% Single Favonius with Prototype Amber: 150% |
 Shenhe | Weapon Favonius Lance if Mona uses TTDS. Artifacts 4pc Noblesse Oblige (NO) ER Requirements Single Favonius with Prototype Amber: 175-185% Double Favonius: 160% |
Venti - Kokomi - Rosaria / Shenhe

Replacing Mona with Kokomi in Rosaria and Shenhe Freeze variants forces a 20s rotation due to Kokomi’s Skill cooldown, making Shenhe and Rosaria play almost identically. They only differ in the case where Kokomi Bursts to refresh her Skill. While Kokomi variants lack a shielder, they offer higher Frozen uptime than Mona variants.
Refreshing Kokomi’s Skill in this team is optional. Doing so trades a Charged Attack for longer Freeze duration, more healing, and higher 4pc TotM uptime. This is especially valuable against mobile or lethal enemies such as Rifthounds, Abyss Heralds, or Lectors. However, both Venti and the Cryo support require Favonius weapons to meet Kokomi’s ER requirements if her Burst is used every rotation. Alternatively, you can just Burst only when it is available.
Rosaria and Shenhe differ in team performance if Kokomi uses her Burst. With Rosaria, using Kokomi’s Burst makes no difference in the team’s damage. Conversely, with Shenhe (especially at C2), using Kokomi’s Burst decreases team DPS by 10-15%. Therefore, you should not use Kokomi’s Burst with Shenhe unless you need the healing or Freeze uptime.
Rotation
No Refresh
Shenhe EQ/Rosaria EQ - Kokomi E - Ganyu EQ - Venti EQ - Ganyu CA - Shenhe EN1/Rosaria E - Ganyu CA E CA - Venti EN1 - Ganyu CA
Ganyu - Venti - Kokomi - Rosaria (No Refresh) Rotation Video
With Refresh
Shenhe EQ/Rosaria EQ - Kokomi E - Ganyu EQ - Venti EQ - Ganyu CA - Shenhe EN1/Rosaria E - Kokomi Q - Ganyu E CA - Venti EN1 - Ganyu CA
Ganyu - Venti - Kokomi - Rosaria (With Refresh) Rotation Video
Team Gearing
Venti | Weapon Using Favonius on Shenhe allows Venti to use Stringless or Elegy for increased Swirl damage or team buffs, respectively. Both Bows are favored in high target counts. Using Favonius Warbow on Venti allows Shenhe to use a high ATK weapon like Calamity Queller or Vortex Vanquisher for increased Icy Quill damage, which is better against one or two enemies. Artifacts 4pc Viridescent Venerer ER Requirements 140% with one Favonius weapon. |
Kokomi | Weapon Her best weapon is TTDS, whether or not she uses her Burst. Artifacts Kokomi has the choice of either 4pc Ocean-Hued Clam or 4pc TotM. Once again, they perform similarly, with 4pc TotM winning out when Ganyu is heavily invested or has a high Base ATK Bow like Polar Star or Skyward Harp. ER Requirements Burst every rotation with both teammates on Favonius weapons: 200%. |
Rosaria | Artifacts 4pc NO and 4pc BS perform similarly, with the former being better with high-investment Ganyu, and the latter being more convenient with hand-me-down pieces from Ganyu. ER Requirements Before C4: 150% With C4: 125% |
Shenhe | Weapon Using Favonius on Shenhe allows Venti to use Stringless or Elegy for increased Swirl damage or team buffs, respectively. Both Bows are favored in high target counts. Using Favonius Warbow on Venti allows Shenhe to use a high ATK weapon like Calamity Queller or Vortex Vanquisher for increased Icy Quill damage, which is better against one or two enemies. Artifacts 4pc NO usually performs better than other options. ER Requirements 160% with one Favonius weapon. |
Kazuha - Mona - Layla / Diona

In this variant, Kazuha replaces Venti in order to buff Ganyu more. However, with the loss of Venti’s Energy refund, Ganyu’s ER requirements skyrocket, resulting in slightly worse team DPS.
Rotation
Ganyu CA - Kazuha tEPQ - Diona hE/Layla N1QE - Ganyu EQ - Kazuha hEP - Mona EQ - Ganyu CA
Note that Kazuha Swirls once at the beginning of the rotation and again immediately before Mona. This maximizes Mona’s Omen duration as Plunging while it is active ends the Omen state.
Ganyu - Kazuha - Mona - Layla Rotation Video
Team Gearing
To lower the team’s ER requirements, every single member except Ganyu should hold a Favonius weapon. This lowers Ganyu’s ER requirements to 140-150%. This is still very high but is somewhat manageable. AoE scenarios slightly alleviate this issue.
 Kazuha | Weapon Favonius Sword Artifacts 4pc Viridescent Venerer ER Requirements 160% |
Mona | Weapon Favonius Codex Artifacts 4pc NO ER Requirements 220%. |
Layla | Weapon Favonius Sword Artifacts 4pc TotM |
Diona | Weapon Favonius Warbow Artifacts 4pc TotM |
Kazuha - Mona - Rosaria

Swapping in Rosaria significantly reduces Ganyu’s ER requirements due to her generous particle generation and ability to proc Favonius twice per rotation. However, Rosaria’s increased field time requires certain adjustments.
Ganyu CA - Kazuha tEP - Rosaria QE - Ganyu EQ - Kazuha hEP - Mona (N1)EQ - Rosaria E
Kazuha’s Burst is cut from the rotation, along with one of Ganyu’s Charged Attacks. This ensures that the rotation stays under 17s so Ganyu can snapshot her A4. However, using Kazuha’s Burst isn’t a significant damage loss; it's just usually not worth it. Nonetheless, it can be used for i-frames when necessary.
Ganyu - Kazuha - Mona - Rosaria Rotation Video
Team Gearing
To lower the team’s ER requirements, every single member except Ganyu should hold a Favonius weapon. This lowers Ganyu’s ER requirements to 140-150%. This is still very high but is somewhat manageable. AoE scenarios slightly alleviate this issue.
Kazuha | Weapon EM weapons like Iron String and Freedom-Sworn are good for maximizing his buff, while ER weapons like Favonius Sword further lowers the team’s ER requirements. Xiphos’ Moonlight happens to do both of these, though the energy it provides is much less than Favonius Sword. Artifacts 4pc Viridescent Venerer ER Requirements As Kazuha does not use his Burst, he does not need any Energy Recharge and has a wider range of weapons to choose from. |
Mona | Weapon Her premier weapons are Favonius Codex and Prototype Amber. Artifacts 4pc NO and 4pc TotM are her best artifact sets. Double stacking 4pc NO does not stack the buff, but the increased uptime is appreciated. ER Requirements She typically needs 250% ER with Favonius Codex and 200% with Prototype Amber. Assuming two Favonius weapons: 220% ER. With Prototype Amber, Mona’s requirements fall to 141%. A third Favonius weapon lowers each character’s ER requirements by about 15%. |
Rosaria | Weapon Favonius Lance is recommended to help with Ganyu’s ER requirements. Artifacts Rosaria should use 4pc NO or 4pc BS. 4pc NO is preferred because Freeze uptime is relatively low. ER Requirements Assuming two Favonius weapons: 160%. With C4: 135%. A third Favonius weapon lowers each character’s ER requirements by about 15%. |
Other Kazuha Freeze Teams

Other Kazuha teams not mentioned here play extremely similarly to the Venti versions. Regardless, there are three notable differences.
- The absence of Venti’s Energy refund increases ER requirements, especially for Shenhe.
- Kazuha should Swirl before Ganyu so she can snapshot his Cryo DMG buff.
- Kazuha’s Plunge Shatters Frozen enemies; when used in conjunction with Mona, her Burst bubble instantly pops and Frozen uptime is cut short. To minimize the damage loss caused by this, Kazuha’s second Skill use should take place immediately before Mona uses her abilities.
Rotations for other Kazuha teams may be found in the Rotation Bank at the end of this guide.
Ayaka Teams

Ganyu and Ayaka are quite strong together, especially in AoE where Ganyu’s Burst shines. Ganyu compensates for Ayaka’s downtime by using her Charged Attacks. On top of that, the two of them generate a massive amount of particles for each other, which greatly lowers the team’s Energy needs.
In these teams, it is better to buff Ayaka as her damage is more compressed and has access to more buffs, such as Ganyu’s A4. Ganyu often cannot transfer such buffs onto her own Burst in these teams. In the interest of space, only one variation is covered here. Other teams’ rotations are in the Rotation Bank. For more details on Ganyu Ayaka teams, visit the Ayaka Guide.
Example Team

Ayaka D (N2) E - Kazuha tEPQ - Ganyu EQ - Kokomi E - Ayaka D N2C EQ - Kazuha tEP - Ganyu E 2CA
Ayaka’s initial Cryo application allows Kazuha to absorb and Swirl Cryo so both Ganyu and Ayaka can snapshot his A4 buff. Ganyu then uses her Burst, followed by Kokomi’s Skill so Ayaka can snapshot Kokomi’s TTDS and Ganyu’s A4 before using her own Burst. Kazuha is swapped in to Swirl Cryo again, and the rotation ends with Ganyu’s Charged Attacks.
These principles apply to most Ganyu Ayaka teams. With Venti, the rotation changes slightly, since he Bursts after Ganyu for better grouping and positioning, but the rest of the rotation stays the same.
Nilou & Ayato Teams

Nilou and Ayato do not provide any meaningful buffs in Freeze teams, which makes them unideal Hydro options. Although they provide enough Hydro application, they lack the buffs to compete with Mona and Kokomi.
When building Nilou, R5 Sacrificial Sword is a good option since she has four chances to proc its passive. If activated, the passive lets the team run a 16s rotation. Nilou’s damage is not significant so she can use 4pc TotM, whose set bonus can snapshot on Ganyu’s Burst. Note that 4pc TotM’s set effect does not refresh as Nilou’s Skill AoE does not deal damage.
Some rotations have been provided below, but they are not examined in depth.
Example Teams

Rosaria EQ - Nilou EN2E - Ganyu EQ - Venti EQ - Rosaria E - Ganyu 2CA - Venti EN1 - Ganyu CA

With Ayato, there is a trade-off with his Shunsuiken attacks (Skill-converted Normal Attacks). A single Ganyu Charged Attack takes about the same time as 5 Shunsuiken slashes, but Ganyu’s Charged Attacks deal more damage at equal investment. However, disregarding Ayato’s Shunsuiken attacks greatly increases his ER requirements. Additionally, Ayato’s Burst deals lower damage than his Shunsuiken attacks but is still important to enable Freeze.
The second rotation allows Ganyu to snapshot Prototype Crescent’s passive, which is a significant boost in damage. You can further reduce Ayato’s combo to N5 (enabling 3 Ganyu Charged Attacks), but that results in extremely high ER requirements for him.
Ganyu 1CA / N15 Rotation
Diona (Q)hE - Ganyu EQ - Venti EQ - Ayato Q - Ganyu 1CA - Venti EN1 - Ayato E N15
Ganyu - Venti - Ayato - Diona (1CA / N15) Rotation Video
Ganyu 2CA / N10 Rotation
Diona (Q)hE - Ganyu EQ - Venti EQ - Ayato Q - Ganyu 2CA - Venti EN1 - Ayato E N10
Ganyu - Venti - Ayato - Diona (2CA / N10) Rotation Video
Ganyu Melt Teams

Melt teams are less flexible than Freeze teams compositionally. The first party member must be Bennett. The second character must apply Pyro off-field. This limits the second slot to just three characters. The final slot is flexible, but unless you speedrun or have C6 Ganyu, it is heavily, heavily, HEAVILY recommended to choose a shielder, preferably Zhongli.
Ganyu - Xiangling Melt Teams

This team has Genshin Optimizer configs available at the bottom of the page.
This is the most common and accessible variant of Melt Ganyu, and it performs the best overall in terms of damage and ease of gameplay. Xiangling’s Pyro application is reliable and lasts a long time, and the team has an easy rotation. In addition, Xiangling’s damage is quite high, and she reduces Bennett’s ER requirements, who in turn reduces hers.
Recommended Rotations
Rotation Option 1
Xiangling E - Zhongli hE - Bennett QE - Xiangling Q - Ganyu 5CA E CA - Bennett E
The first rotation here is fast enough for Ganyu to still have Bennett’s Burst up on her 5th Charged Attack. This is the recommended rotation for players who can’t perform Charged Attacks quickly. Furthermore, it lets Zhongli hold 4pc Instructor and has higher shield uptime.
Ganyu - Bennett - Xiangling - Zhongli (Option 1) Rotation Video
Rotation Option 2
Zhongli hE - Bennett QE - Xiangling QE - Ganyu 5CA E CA - Bennett E - Xiangling N2
The second rotation is slightly slower and harder to pull off all 5 Charged Attacks in time. However, if you are adept enough, it deals noticeably more damage. This rotation is more intuitive and has higher uptime on Xiangling’s C1, but it is only recommended if you are skilled enough to do all 5 Charged Attacks fast enough with Bennett's buff.
Ganyu - Bennett - Xiangling - Zhongli (Option 2) Rotation Video
Team Gearing
 Bennett | Artifacts Bennett should use 4pc Noblesse Oblige. In practice, as his damage is negligible, his priority should just be getting as much ER as possible, regardless of main stats. ER Requirements He needs around 230% ER. |
 Xiangling | Artifacts Xiangling should use 4pc Emblem of Severed Fate since it converts her extremely high ER requirements into damage. ER Requirements Xiangling needs 200-250% ER to meet her requirements. |
 Zhongli | Weapon Favonius Lance is recommended to help with ER requirements. Artifacts Zhongli can use either 4pc Instructor or 4pc Tenacity of the Millelith. 4pc Instructor is often better for damage, but 4pc Tenacity’s increased Shield Strength and ability to buff Xiangling may be preferred. ER Requirements Zhongli does not use his Burst. |
Alternative Rotations and Recommendations
If you use 4pc Shimenawa’s Reminiscence or Polar Star, you should use Ganyu’s Skill before all her Charged Attacks, changing from Ganyu 5CA E CA to Ganyu E 6CA. This change makes it harder to use Bennett’s buff on the 5th Charged Attack, but it is the better option.
It is also possible to perform Ganyu E 5CA E CA and retain Bennett’s buffs on both Elemental Skills, but this is extremely difficult and only possible below ~100 ping. Achieving this sequence is a significant boost in team damage, but if you cannot pull it off, stick to the above combos.
Ganyu - Bennett - Xiangling - Zhongli (2E) Rotation Video
In the event that you don’t have the team’s Bursts ready in subsequent rotations, you have two options. Both are significant damage losses, but if you don’t build enough Energy Recharge to meet ER requirements, there aren’t any other options.
The first option is to battery until your Bursts are back. In this case, you would loop Bennett E - Xiangling N5. This is best if you almost have your Bursts ready and just need a little bit more Energy.
The second option is to Reverse Melt off Guoba’s Pyro application. While this is a bit inconsistent, it allows you to retain more damage than looping Bennett’s Skill. This option is useful if you need a decently large amount of Energy back or if you want to save your Bursts for later. You can only Melt 3 or 4 Charged Attacks though. Nevertheless, this is very useful against enemies like the Golden Wolflord. There isn’t enough time to do the full rotation, so you can Melt off Guoba until the boss is fully stunned.
Other Shielders in Ganyu - Xiangling Teams
Other shielders generally follow the same rotation as Zhongli, with one main difference. If the duration of their shield is short, such as Layla, Diona, or Dehya (though in Dehya’s case it is interruption resistance), or Xinyan’s, they should use their shield after Xiangling. Longer duration shields such as Thoma and Yanfei’s need not worry about this.
Example Ganyu - Xiangling Teams With Other Shielders

Diona Q - Bennett QE - Xiangling EQ - Diona hE - Ganyu 5CA E CA - Bennett E - Xiangling N3
Ganyu - Bennett - Xiangling - Diona Rotation Video

Yanfei EQ - Bennett QE - Xiangling EQ - Ganyu 5CA E CA - Bennett E - Xiangling N3
Ganyu - Bennett - Xiangling - Yanfei (C4) Rotation Video
Bursting in Ganyu - Xiangling Teams
Generally, using Ganyu’s Burst is not worth it. It is a slight damage loss and makes Charged Attack Melts less consistent. On top of that, Ganyu’s Burst animation is extremely long at over 2s. However, there are two major scenarios where using her Burst is the right call.
Note that investing Energy Recharge to Burst every rotation is not optimal; instead, Burst whenever it's available.
The first scenario where Ganyu’s Burst is useful is in AoE. If the enemies are spread far apart, Ganyu cannot hit all of them with her Frostflake Blooms. Bursting lets Ganyu deal damage to farther enemies, while she uses Charged Attacks on higher priority targets.
The second scenario is against very big enemies. Xiangling’s Pyronado applies Pyro twice per revolution against enemies like the Primordial Geovishap, the Aeonblight Drake, and Ruin Graders. The doubled Pyro application allows Ganyu to reliably Melt all her Charged Attacks and much of her Burst. In this case, the optimal rotation is as follows:
Zhongli hE - Bennett QE - Xiangling EQ - Ganyu EQ 4CA E CA - Bennett E - Xiangling N3
This rotation is slightly longer but has higher DPS. In addition, Ganyu’s two Skill uses allow her to Burst more frequently. It's even possible to skip funneling Xiangling at the end of the rotation if you have enough Energy Recharge, which compensates for the increased rotation time.
Burning Teams (BurnMelt)

Burning teams maximize Ganyu’s personal damage and have lower ER requirements compared to other Melt teams. On top of that, rotations are simpler and Ganyu can fire Charged Attacks from farther away. However, they have one really big problem — Burning is really unstable.
Any interference from non-Pyro Elements (including Dendro) can cause Burning to extinguish. For example, if you use Zhongli’s Skill, Ganyu’s Skill, or just mess up the rotation, Burning can fail to persist. Even shooting your Charged Attacks too slow makes it fail. Moreover, contrary to what you may think, C1 Nahida does not fix this problem at all: it worsens the issue. For this reason, Bursting with Ganyu is usually not recommended, even with supplemental Pyro application.
This issue can be solved by using an additional Pyro applicator in the flex slot, but Burning still suffers from high variability in damage with even slight changes in rotation.
Overall, while Burning is the second most recommended Melt Ganyu team variant, it is still highly unstable to play.
Bennett-less Melt
With the introduction of Burning, it is possible but not recommended to use Pyro applicators that don't need a battery, for example by pairing Dehya with Nahida. This trades Bennett’s buffs for another character’s, like Kazuha or Shenhe.
These alternatives suck; don't do it. Their damage is low, their buffs don’t last long enough, and they sacrifice all defensive utility (Dehya by herself is not enough). Don’t do it. Keep Bennett.
Team Gearing
Bennett | Artifacts Bennett should generally use 4pc Noblesse Oblige. In practice, as his damage is negligible, his priority should just be getting as much ER as possible, regardless of main stats. Weapon In some of these teams, Bennett can activate Sapwood Blade’s passive, which benefits Ganyu. If its passive is activated, Ganyu should pick up the Leaf while charging her first Charged Attack to maximize its effectiveness. If used successfully, Sapwood Blade provides a similar damage boost to a 674 Base ATK Sword like Aquila Favonia or Mistsplitter Reforged. The teams where this is possible are mentioned; however, as Burning teams are highly variable, you might not be able to use it in your own gameplay. ER Requirements He needs around 230% ER. |
Nahida | Artifacts For Nahida, it is generally recommended to use 4pc Tenacity of the Millelith on a full Elemental Mastery build. Weapon & ER Requirements Her ER requirements can reach up to 180%, so using Fruit of Fulfillment or Prototype Amber (which lowers her needs to 140% at R5) helps a lot. If you use Wandering Evenstar or A Thousand Floating Dreams instead, Nahida can hold an ER Sands for slightly better performance. |
Choosing Your Flex Slot
The flex slot in Burning teams serves two roles. First, they provide additional Pyro to stabilize Burning. Using an additional Pyro applicator is highly encouraged even if you are skilled enough to play rotations properly. Second, they provide interruption resistance so Ganyu can perform her lengthy Charged Attacks. Again, it is highly recommended to employ a unit with defensive utility even if you are skilled enough to play without one.
Here is our overall ranking of recommended units for Burning:
Dehya > Thoma > Xinyan > Xiangling > Kazuha > Zhongli > Shenhe
Here is our ranking in terms of team damage for Burning:
Shenhe > Zhongli > Dehya with Sacrificial Greatsword > Xiangling > everyone else (roughly equal)
Please remember that Burning teams are highly unstable in practice, so the differences in team damage are often negligible and rarely relevant.
A breakdown for each flex slot character is presented below.
Dehya

| Weapon | · Sacrificial Greatsword · Favonius Greatsword |
| Artifacts | · 4pc TotM - Max HP (or HB Circlet) |
| Bennett's Build | · 240% ER · 260-270% ER if Dehya holds Sacrificial Greatsword · Sapwood Blade is unreliable in successive rotations |
Dehya is arguably the best choice for a Burning team due to her convenient off-field Pyro triggered by damage. Her full interruption resistance is good in higher damage scenarios where shields might break, but it only lasts for 9s. After 9s, her interruption resistance reduces significantly. It can still prevent minor attacks from staggering Ganyu, but in most cases, you will have to dodge.
Dehya Burning Build Analysis
Dehya Burning Build Analysis
Dehya’s recommended artifact stat build invests in full HP (or with a Healing Bonus Circlet). Dehya is quite vulnerable to dying, especially as she receives only a single healing tick from Bennett in the rotation. Her damage is not particularly high, so a full defensive build is recommended to avoid dying and make farming easier.
In regards to weapons, Dehya can use Sacrificial Greatsword to increase her interruption resistance uptime, but its passive is not completely reliable. When the passive procs, skip the last Charged Attack on Ganyu for better interruption resistance uptime and a roughly 10% DPS gain when successful. This does require additional attention for the easily missed Sacrificial Proc sound and icon. You can also use Favonius Greatsword for extra Energy.
Dehya can alternatively build full EM with Makhaira Aquamarine. This maximizes Ganyu’s damage but requires more investment and a limited banner exclusive 4-star weapon Furthermore, Dehya is much more prone to dying.
In any case, Dehya should use 4pc Tenacity of the Millelith. This allows Nahida to use 2pc/2pc Elemental Mastery sets. 4pc Gilded Dreams is unreliable because refueling Burning does not proc the set effect.
Bennett may need up to 240% ER with Dehya (up to 260-270% if she uses Sacrificial Greatsword). It is possible to use Sapwood Blade’s passive in this team, but it can be unreliable in successive rotations. Regardless, it is still a fantastic choice for the Energy Recharge secondary stat.
Rotation
Nahida EQ - Bennett EQ - Dehya E - Ganyu 7CA E
Using Ganyu’s Burst is optional in this team. However, it is generally better to not Burst as it makes Burning noticeably more unstable. Nonetheless, you can use Ganyu’s Burst to deal damage to enemies outside her Frostflake Arrow AoE or for i-frames.
Ganyu - Bennett - Nahida - Dehya Rotation Video
Thoma

| Weapon | · Favonius Lance |
| Artifacts | · 2pc ER + 2pc HP · 200% ER |
| Bennett's Build | · 190% ER · Sapwood Blade's passive cannot be triggered but it is still a good option |
Note: Thoma requires C4 or higher to reliably fulfill this role.
Thoma's shield and additional Charged Attack DMG Bonus at C6 make him a strong option. However, there is one major drawback: Thoma requires Ganyu to use Normal Attacks to reapply Pyro and refresh his shield, which can disrupt gameplay.
Thoma Burning Build Analysis
Thoma Burning Build Analysis
For builds, Thoma needs up to 200% Energy Recharge with a Favonius Lance and his C4. As Bennett normally holds 4pc Noblesse, Thoma’s best artifact set is a 2pc combo of ER and HP%. You could also use 4pc Instructor, but buff uptime is quite poor.
Bennett needs up to 190% ER. He can still hold Sapwood Blade, but he can’t trigger its passive.
Rotation
Nahida EQ - Thoma EQ - Bennett EQ - Ganyu N1 5CA E CA - Bennett E
To clarify, it isn’t necessary to weave Normal Attacks after every Charged Attack. It is only needed when the shield breaks or Burning goes out. Despite this, the gameplay is not pleasant. Maintaining Burning becomes a conscious decision rather than an automated process. Additionally, Ganyu’s Burst is not recommended in this team, as it greatly increases the number of times you need to Normal Attack to refresh Burning.
A simple rotation is shown below. Remember to do a Normal Attack when Burning goes out or when his shield breaks.
Ganyu - Bennett - Nahida - Thoma Rotation Video
The rotation video doesn’t include any Normal Attacks since Burning did not extinguish.
Xinyan

| Weapon | · Favonius Greatsword (100% chance to proc off Xinyan's Burst at C2) |
| Artifacts | · 2pc ER + 2pc DEF · 190% ER |
| Bennett's Build | · 210% ER · Sapwood Blade's passive can be triggered |
Note: Xinyan requires C2 or higher to reliably fulfill this role.
Xinyan’s primary problem is her extremely weak shield. Even on a defensive build, just one or two hits from a strong enemy can break her shield. Furthermore, her Pyro application is tied to her shield; once it breaks, Burning loses its stability. Therefore, you should build full DEF on Xinyan to minimize the likelihood of her shield breaking.
Xinyan Burning Build Analysis
Xinyan Burning Build Analysis
Xinyan’s ER requirements are significant; it is recommended to build 190% Energy Recharge with a Favonius Greatsword. With C2, Favonius Greatsword has an increased chance to proc too, with Xinyan’s Burst’s 100% CRIT Rate. However, this comes at a cost to her shield strength. Similarly to Thoma, Xinyan should use 2pc DEF% / 2pc ER since Bennett already uses 4pc Noblesse Oblige.
Bennett needs up to 210% Energy Recharge and can trigger Sapwood Blade’s passive.
Rotation
Nahida EQ - Bennett EQ - Xinyan EQ - Ganyu E 7CA
It is possible to fit a second use of Ganyu’s Elemental Skill after the fifth Charged Attack if you are fast enough.
Ganyu’s Burst is not recommended in this team. Ganyu’s Skill dash makes it so that enemies are out of range of Xinyan’s Rave (her shield’s intermittent Pyro DMG), which increases the chance that Burning will fail. Bursting can compound this issue. However, in some situations, Bursting can be the optimal choice: for example, when enemies are spread out, the occasional lost Melt is much less substantial compared to the damage loss of not hitting certain enemies at all.
Ganyu - Bennett - Nahida - Xinyan Rotation Video
The rotation video doesn’t include any Normal Attacks since Burning did not extinguish.
Kazuha
| Weapon | · Favonius Sword · Xiphos' Moonlight |
| Artifacts | · 4pc Viridescent Venerer · 180% ER (200% without Favonius) |
| Bennett's Build | · 220% ER (240% without Kazuha's Favonius) · Sapwood Blade's passive can be triggered |
Ganyu gains tremendous buffs from Kazuha. She can easily do over 200K damage Charged Attacks with Hamayumi. Twice. After that, the buffs begin to fall off and the remaining Charged Attacks rapidly lose their damage.
On top of providing no interruption resistance, Kazuha’s rotations are very long with high ER requirements. In addition, Burning prevents Kazuha from Swirling Cryo again with his Burst, reducing uptime on his buffs and 4pc VV’s RES Shred. This makes his performance worse than one might expect.
Kazuha Burning Build Analysis
Kazuha Burning Build Analysis
Kazuha requires Favonius Sword or Xiphos’ Moonlight since his ER requirements are quite high. With Favonius Sword, his ER requirement is 180%, while Bennett’s is 220%. Otherwise, Kazuha needs 200% and Bennett needs 240%.
Bennett can reliably trigger Sapwood Blade’s passive in this team.
Rotation
Ganyu CA/Q - Nahida EQ - Kazuha EP - Bennett EQ - Kazuha Q - Ganyu 6CA - Bennett E - Kazuha EP - Ganyu E (CA until there is no Pyro or Burning)
If you do not extinguish Burning, you cannot Swirl Pyro on subsequent rotations. Creating a new Cryo aura afterwards is unnecessary though, since Ganyu’s Skill detonation will reapply Cryo for Kazuha to Swirl.
Using Ganyu’s Burst is optional in this team. However, their damage is nigh identical while not Bursting has slightly faster rotations. Nonetheless, you can use Ganyu’s Burst to deal damage to enemies outside her Frostflake Bloom AoE or for i-frames.
Ganyu - Bennett - Nahida - Kazuha Rotation Video
Zhongli / Shenhe

When using Zhongli or Shenhe, Burning becomes extremely unstable. If you have the skill, it is possible to maintain Burning without additional Pyro but even then, it is not reliable as enemy movement can cause it to become mistimed.
Zhongli / Shenhe Burning Rotations
Example rotations are shown below for those who wish to try. In all of these rotations, you need to break Zhongli’s pillar or avoid using Shenhe’s Burst.
There are three possible rotations for teams with Zhongli or Shenhe. Each variation prioritizes different buffs onto Ganyu:
- Nahida’s A1 EM buff
- TTDS’s ATK% buff
- Both Nahida’s A1 and TTDS.
The last option is by far the hardest, but it has the highest damage.
Rotation Option 1: Prioritizing Nahida’s A1
Zhongli/Shenhe hE - Nahida EQ - Bennett EQ - Nahida Swap and Do Nothing - Ganyu 6CA - Bennett E
This is the simplest rotation. It prioritizes Nahida’s A1 EM buff and does not transfer TTDS. Nahida’s second swap is just for Burning timing; it is not required but reduces the likelihood of Burning extinguishing. Doing Normal Attacks with Nahida during this period increases the chance of failure.
Rotation Option 2: Prioritizing TTDS
Zhongli/Shenhe hE - Bennett EQ - Nahida E - Ganyu 7CA E - Bennett E
This rotation trades Nahida’s EM buff for TTDS’s ATK% buff, an extra Charged Attack, and an Elemental Skill use. The additional Skill use is extremely important to balance Burning uptime. The damage between option 1 and 2 are almost identical.
Rotation Option 3: Nahida's A1 & TTDS
Initial Rotation
Zhongli/Shenhe hE - Bennett EQ - Nahida E - Ganyu 6CA E - Bennett E - (Ganyu 1CA if Nahida’s Burst isn’t ready)
Subsequent Rotations
Zhongli/Shenhe hE - Nahida E (Q if available) - Bennett EQ - Nahida Swap and Do Nothing - Ganyu 6CA E - Bennett E - (Ganyu 1CA if Nahida’s Burst isn’t ready)
The rotation to get both buffs is quite complex and depends on the availability of Nahida’s Burst. Nahida’s Burst is skipped in the first rotation to ensure that Ganyu gets TTDS without cutting into Bennett’s Burst uptime.
The second rotation lets Ganyu receive the TTDS buff and Nahida’s A1 EM buff if you have the ER for it. Executing this rotation too slowly results in Nahida transferring TTDS to Bennett instead. Applying Dendro via Nahida’s Skill or Normal Attacks where it says “Swap and Do Nothing” results in Burning failing.
Sunfire Teams

Sunfire uses the self-applied Pyro and Anemo from Bennett’s Burst and Jean’s Burst to trigger Swirl and apply Pyro to nearby enemies.
Sunfire is a very potent source of Pyro, allowing up to 3 Reverse Melts per application. Jean Swirls Pyro every 1s, so Ganyu can use her Burst and even employ a second Cryo character without much trouble.
However, there are three problems.
- The team is very Energy-hungry. However, this is to be expected as this is a Melt Ganyu team. Using Favonius weapons greatly alleviates this issue.
- This is peak “Circle Impact.” Pyro is only applied while Ganyu is within both Jean and Bennett’s Bursts. This severely limits your mobility
- The damage and Pyro application uptime isn’t that great when compared to Xiangling and Burning teams. Unfortunately, Jean’s Pyro application only lasts long enough for 4 Charged Attacks, resulting in less damage. AoE fights can increase this to 5CAs but this is DPS neutral.
It is highly desirable for Ganyu to Burst in this team since it rarely steals Melts from Charged Attacks. Her Burst is free damage and provides a nice 20% Cryo DMG Bonus. However, it is not recommended to Burst every rotation as this drastically increases Ganyu’s required ER. Instead, you should use Ganyu’s Burst only when it is available.
Sunfire Example Rotations
Two example rotations are shown below, both with Zhongli. Other shielders (except Xinyan or Dehya) work as well.

Rotation Option 1
Ganyu E Q/CA - Zhongli hE - Bennett Q - Jean EQ - Ganyu 4CA - Bennett E - Jean E - Bennett E
The first rotation requires extremely tight timing. It lets Bennett use his Skill twice after his Burst to slightly lower his ER requirement. However, this rotation is quite difficult to execute, and most people cannot perform it properly. If you have skill issues, use the second rotation below.
Ganyu - Bennett - Jean - Zhongli (Option 1) Rotation Video
Rotation Option 2
Ganyu E Q/CA - Zhongli hE - Bennett Q - Jean EQ - Ganyu 4CA - Jean E - Bennett hE
If you don’t have enough Energy with this rotation, you should repeat Jean E - Bennett tE after Ganyu’s Charged Attacks until your Bursts are full. However, Jean’s Skill has a 6s cooldown, which means you need to fill time in between. One method is to perform Jean E - Bennett E - Ganyu CA, which allows you to maintain some damage. Another is to use Jean and Bennett’s Normal Attacks after they each use their Skills. This way, Jean and Bennett can catch their own particles, slightly speeding up the battery process.
When Jean’s Burst dissipates, it will apply Anemo one more time to the enemies. In single-target scenarios, this will prevent a 5th Melted Charged Attack as it consumes the Pyro to Swirl. But in AoE, this Pyro swirl will then reapply Pyro, allowing Ganyu to Melt her 5th CA. However, this is DPS-neutral and prevents Bennett from using his Elemental Skill twice like in the first rotation.
Ganyu - Bennett - Jean - Zhongli (Option 2) Rotation Video
Sunfire Gearing
Bennett | Weapon Bennett should use your highest available Base ATK weapon or an Energy Recharge weapon like Festering Desire. Artifacts Bennett should use 4pc Noblesse Oblige. In practice, as his damage is negligible, his priority should just be getting as much ER as possible, regardless of main stats. ER Requirements His ER requirement exceeds 230% if he doesn’t catch his own particles, but hovers around 210% if he does. |
 Jean | Jean’s personal damage scales best when built with Elemental Mastery to maximize Swirl damage. However, in practice, her damage is negligible compared to Ganyu’s. It is often better to ignore Jean’s damage and focus on Energy Recharge to meet her extremely high ER requirements. Weapon Jean should equip Favonius Sword. Amenoma Kageuchi can be a good choice, but comes at a cost to Bennett’s ER requirements. Freedom-Sworn is an option, but you need to build a massive amount of ER. Freedom-Sworn is only recommended if you can one-cycle a chamber. Artifacts 4pc Viridescent Venerer with a CRIT Rate Circlet. ER Requirements 210% ER with Favonius Sword 160% ER with R5 Amenoma Kageuchi |
Zhongli | Weapon Favonius Lance is highly recommended to help with ER requirements. Artifacts Zhongli should use 4pc Tenacity of the Millelith or 4pc Instructor. 4pc TotM is better for proccing Favonius Lance and grants a stronger shield, while 4pc Instructor deals more damage. ER Requirements Zhongli does not use his Burst. |
Shenhe | Weapon Favonius Lance is necessary to help with ER requirements. Artifacts Shenhe should use two 2pc ATK% sets like Gladiator’s Finale and Shimenawa’s Reminiscence and prioritize building ATK to maximize her Icy Quill effect for Ganyu. ER Requirements Generally, Shenhe’s ER requirements to Burst every rotation are quite high, and sacrificing ATK to achieve that might not be a net benefit. While Energy Recharge is a priority, it should not be the main focus. If the team can support Shenhe’s Burst and it is available, then Burst; otherwise, don’t bother. |
Ganyu - Kazuha Melt Teams

Ganyu - Kazuha Melt teams are not recommended.
Kazuha Melt teams are only mentioned here because people perceive them to be strong, when in reality they are one of Ganyu’s weakest Melt team variations in terms of damage. It is also one of the hardest teams to play correctly, with the most chances to ruin Elemental auras.
Issues with Kazuha Melt
To begin with, Kazuha Melt has extremely high ER requirements. It arguably has the highest requirements of any commonly recommended team in the game. The optimal rotation requires Bennett and Kazuha to build almost 350% ER. Favonius Swords do lower their ER needs, but even then, they need over 250% ER when they both hold Favonius Sword.
On top of that, it is extremely easy to lose Melts. Kazuha applies just enough Pyro for Ganyu to Melt 5 Charged Attacks, but if anything ever interferes with the Pyro aura, Kazuha triggers Melt instead of Ganyu. Interference can come from Ganyu’s and Zhongli’s Skills. This can be overcome by using an additional Pyro applicator like Xinyan, Dehya or Thoma; however, in doing so, you lose significant Cryo RES Shred from 4pc VV since you cannot re-Swirl Cryo with Kazuha’s Burst hit.
Even if you do address these issues, the timing on Ganyu’s Charged Attacks is extremely tight, with roughly half a second of leeway. Most people can only Melt 4 Charged Attacks, which reduces team damage by 20%. If you use Kazuha’s Skill after his Burst to Swirl Pyro or use your Pyro flex to maximize shield uptime, chances are you will only Melt 3 Charged Attacks.
Even if you ignore all of that, Kazuha Melt teams have the worst damage output of any of the teams listed here. Despite Ganyu’s high Charged Attack damage, she can only execute up to 5 Charged Attacks (which may not all Melt depending on your skill). Furthermore, her teammates deal negligible damage: Kazuha only Swirls four times, Bennett deals incredibly low damage due to his high ER requirements, and the flex slot is typically a shielder. This is all compounded by the increased rotation time, which reduces Ganyu’s DPS.
If you want to ignore all of the issues above and go ahead with playing Melt Kazuha, the following team is the least painful option.
Bennett - Kazuha - Zhongli

There are two rotations below. The first has 5 Charged Attacks, and your goal should be to achieve this rotation. However, if you can’t, you should perform the 4CA rotation.
In single-target scenarios, you must place Zhongli’s pillar away from the enemy or directly on the enemy to break it.
5CA Rotation
Zhongli hE - Ganyu E CA - Kazuha tEP - Bennett Q - Kazuha Q - Ganyu 5CA - Kazuha tEP - Bennett E
Ganyu - Bennett - Kazuha - Zhongli (5CA) Rotation Video
4CA Rotation
Zhongli hE - Ganyu E CA - Kazuha tEP - Bennett Q - Kazuha Q - Ganyu 4CA - Bennett E - Kazuha tE - Bennett EP
Ganyu - Bennett - Kazuha - Zhongli (4CA) Rotation Video
For AoE scenarios, add an additional Bennett Skill after his Burst like in this video. Alternatively, if you have C6 Bennett, a Normal Attack achieves the same result but faster. This lets you Swirl both Pyro and Cryo.
If you want to play Shenhe instead of Zhongli, Shenhe should generally be used at the same point in the rotation as Zhongli. She performs a Hold Skill to grant more Icy Quill procs and a Charged Attack DMG Bonus.
Kazuha Melt Gearing
Bennett | Weapon Bennett should use Favonius Sword. Artifacts Bennett should use 4pc Noblesse Oblige. In practice, as his damage is negligible, his priority should just be getting as much ER as possible, regardless of main stats. ER Requirements His ER requirements easily reach over 250% (up to 350%). His requirements remain incredibly high even with one Favonius proc in the 4CA rotation or two procs in the 5CA rotation. |
Kazuha | Weapon Kazuha should use Favonius Sword or high refinement Xiphos' Moonlight. Artifacts 4pc Viridescent Venerer ER Requirements His ER requirements easily reach over 250% (up to 350%). His requirements remain incredibly high even with one Favonius proc in the 4CA rotation or two procs in the 5CA rotation. |
Zhongli | Weapon Favonius Lance is necessary to help with ER requirements. Artifacts In single-target scenarios, Zhongli can’t place his pillar nearby enemies, preventing 4pc Tenacity of the Millelith from activating. 2pc TotM / 2pc Vourukasha’s Glow can be used for maximum HP. ER Requirements Zhongli does not use his Burst. |
C6 Ganyu Melt Teams

At C6, Ganyu performs her Charged Attacks in a much smaller window, skyrocketing her Cryo application. This causes two major effects on her teams.
The first is that she needs much more Pyro application. While Bennett — Xiangling — Zhongli is highly recommended prior to C6, that team falls short significantly at C6.
The second outcome is that Ganyu no longer needs a shield to protect her because she fires her Charged Attacks almost instantly. This allows her to use higher damage characters (typically Shenhe) or an additional Pyro applicator with no concern.
On top of that, Ganyu’s shorter Charged Attack time lets her use Kazuha’s buffs more effectively, especially when paired with another Pyro applicator. This makes Kazuha a much better option with C6 Ganyu.
C6 Ganyu Melt Example Teams
The below rotations assume you are attempting to defeat the enemy in a single rotation. As such, they use 3 Ganyu Es in the first rotation. This cannot be done without waiting an additional 10s after completing the first rotation.

This is generally the best option, though it is the hardest to play. Jean consistently applies enough Pyro for Ganyu to Melt all Charged Attacks while buffed by Shenhe’s Burst. With Ganyu’s front-loaded damage, enemies generally do not have time to move out of the way before they die.
It is possible for Ganyu to Burst as well, but at that point Sunfire’s Pyro application can become insufficient for Ganyu to Melt all her Charged Attacks. In addition, Shenhe’s Icy Quill effect is consumed by Ganyu’s Burst rather than her harder-hitting Charged Attacks. Her C6 does minimize this to a degree, but the problem still remains.
Rotation
Ganyu E - Shenhe EQ - Jean E - Bennett Q - Shenhe hE - Jean Q - Ganyu CA E CA E CAs
The above rotation assumes C1+ Shenhe. If you lack C1, skip the first Hold Skill.
Using a hold Skill for Shenhe’s first cast of her Elemental Skill is overall slightly more damage, however, tap E allows for better repositioning. It is important to place the second Shenhe hold Skill before Jean’s Burst, as this drastically reduces the likelihood of a Cryo aura instead of a Pyro aura occurring.
Ganyu (C6) - Bennett - Jean - Shenhe Rotation Video
The rotation above misses Melts since the player was out of range for a few of Jean's Swirls. This can be resolved by dashing out of CA when using ARCC. This video was kept with the errors to display the difficulty in playing this team well.
Ganyu (C6) - Bennett - Jean - Shenhe with Burst Rotation Video

This team operates on the same principles as the Jean variant. In single-target scenarios, neither Venti nor Kazuha apply enough Pyro. In AoE, however, their Pyro application is significantly better.
Whether Venti or Kazuha is the better pick depends on the content faced. Kazuha prefers heavier, single-wave enemies while Venti does better against lighter, spread out, multi-wave enemies.
Using Ganyu’s Burst is not recommended here.
Kazuha - Shenhe Rotation
Ganyu E - Kazuha E - Shenhe EQ - Bennett Q - Kazuha Q - Shenhe hE - Ganyu CA E CA E CAs
Venti - Shenhe Rotation
Ganyu E - Shenhe hE - Venti EQ - Bennett EQ (Be quick so Venti doesn’t absorb Cryo instead of Pyro) - Ganyu CA E CA E CAs

An alternative option that sacrifices Shenhe’s buffs for a lot of Pyro application. Compared to the aforementioned C6 Ganyu teams, this team deals slightly less damage but is easier to play.
Using Ganyu’s Burst is highly recommended here due to the excessive Pyro application. It is still not worth building Energy Recharge to Burst every rotation though; just use Ganyu’s Burst whenever it is available.
Rotation
Ganyu E(Q) - Kazuha E - Bennett Q - Kazuha Q(E) - Nahida EQ/Xiangling QE - Ganyu CA E CA E CAs
If you have C1 Kazuha, you may Swirl Pyro after using his Burst with his Skill. This is usually not worth it as the Pyro damage is insignificant compared to Ganyu’s damage, but it is beneficial if you require slightly more Energy for the next chamber or phase.
Interesting to note, in this team, refined Polar Stars will frequently outperform equally refined Aqua Simulacra, as the ATK% buff can be fully stacked for a massive gain in damage.
Ganyu (C6) - Bennett - Kazuha - Xiangling Rotation Video
This recorded rotation does not follow the written rotation above, so please refer to the written rotation for an optimal sequence.
Ganyu Mono Cryo Teams

Mono Cryo teams, while not as reliable as Freeze teams, perform well against enemies that cannot be Frozen, such as Bosses. Many Freeze teams can swap their Hydro unit for a shielder like Zhongli or Layla.
The biggest strength of Mono Cryo is its flexibility, especially with Shenhe. They easily transition between AoE and single-target content, and they generate an immense amount of Energy. Shenhe teams can also transition between Burst-focused and Charged Attack-focused playstyles, depending on what you need.
The following section explores recommended Mono Cryo teams.
Shenhe - Kazuha - Zhongli / Layla

This team is highly versatile, handling both AoE and single-target content due to its good grouping and shielding.
The damage between Layla and Zhongli is very close. On one hand, Layla provides more Energy with her own Cryo Particles, excels at proccing Shenhe’s Icy Quill effect, and can use 4pc Tenacity of the Millelith. On the other hand, Zhongli has a longer shield duration, provides additional Cryo RES Shred, and has access to both 4pc Archaic Petra and 4pc Tenacity of the Millelith. 4pc Archaic Petra is better here but some may find picking up the Crystallize Shard a nuisance.
Rotations
These first two rotations focus more on Ganyu’s Burst. This is the higher damage orientation in general, but it isn’t always possible to play.
A Charged Attack-focused build works best against enemies with short DPS windows, such as the Golden Wolflord or Setekh Wenut. There is no set rotation; just follow these guidelines:
- Use Shenhe’s Hold Skill for higher Charged Attack damage and more procs of her Icy Quill’s effect.
- Refresh your shields as needed, but not too often; you’ll waste DPS windows otherwise.
- Activate your supports’ abilities, buffs, and shields before the enemy enters its vulnerable phase to save time.
- Wait to use your Bursts. Generating particles can be difficult, so it is important to use your Bursts just before vulnerability windows rather than on cooldown. Long animation times cut into Ganyu’s Charged Attacks.
- If you have Shenhe’s C1, save a charge of her Skill so you can immediately pivot into Burst rotations when the enemy becomes vulnerable.
Zhongli Mono Cryo Rotation
Ganyu E - Zhongli hE - Shenhe tEQ - Kazuha EQ - Ganyu CA EQ - Shenhe EN1 - Ganyu CA - Kauzha E - Ganyu 2CA
Ganyu - Shenhe - Zhongli - Kazuha Rotation Video
Layla Mono Cryo Rotation
Ganyu E - Shenhe QE - Kazuha EQ - Layla (N1)QE - Ganyu CA EQ - Shenhe EN1 - Ganyu CA - Kazuha EP - Ganyu 2CA
The Layla rotation follows a similar structure, but uses Layla later in the rotation to maximize shield uptime.
Ganyu - Shenhe - Layla - Kazuha Rotation Video
Gearing
When using Layla instead of Zhongli, you can run a single Favonius weapon on Shenhe, raising her and Kazuha’s ER requirement to 185% while dropping Ganyu’s to 100%.
Alternatively, you can give Layla Favonius Sword, which lowers Kazuha and Shenhe back down to a 170% ER requirement.
Ganyu | ER Requirements Favonius Lance on both Zhongli and Shenhe: 110% Non-Favonius on Layla and Favonius Lance on Shenhe: 100% |
Shenhe | ER Requirements Favonius on Layla/Zhongli and Shenhe: 170% Non-Favonius on Layla and Favonius Lance on Shenhe: 185% |
Kazuha | ER Requirements Favonius on Zhongli and Shenhe: 165% Favonius on Layla and Shenhe: 170% Non-Favonius on Layla and Favonius Lance on Shenhe: 185% |
Zhongli | Weapon Favonius Lance is good for lowering the team’s ER requirements, while Black Tassel offers a better shield. Generally, Favonius Lance is the better option. Artifacts For Mono Cryo teams, Zhongli should use 4pc Archaic Petra, as the excess Cryo always provides him with a Cryo Crystallize Shard. While 4pc Tenacity of the Millelith is an option, especially if you want a stronger shield, 4pc Archaic Petra is significantly better for damage. ER Requirements Zhongli does not use his Burst. |
Layla | Weapon Her weapon is not particularly important. Favonius Sword provides additional Energy, while Harbinger of Dawn deals more damage. Among the 5-star weapons, Key of Khaj-Nisut grants a much stronger shield than 4-star options, and Primordial Jade Cutter gives a slightly stronger shield and deals slightly more damage. Artifacts Layla should always use 4pc Tenacity of the Millelith. She can go for either a shield-oriented build with high HP investment or a damage-oriented build with Cryo DMG Bonus Goblet and CRIT Circlet. Either option is fine. ER Requirements 100-110% |
Rosaria - Kazuha - Zhongli / Layla

Rosaria can serve as an alternative for players without Shenhe. She makes up for the loss of Shenhe’s buffs with a 15s rotation, which allows Ganyu to snapshot her own A4. In addition, the shorter rotation lets you maintain higher shield uptime.
Zhongli slightly outperforms Layla here. 4pc Archaic Petra is more valuable than 4pc Tenacity of the Millelith, and Layla’s damage decreases significantly without Shenhe. However, Layla and Zhongli still perform rather similarly; if Zhongli is unavailable or if you are facing Cryo enemies like Triple Maguu Kenki, Layla is a fantastic choice.
Rotations
Rotation
Ganyu CA - Kazuha tEP - Layla QE/Zhongli hE - Rosaria EQ - Ganyu EQ - Kazuha tEP - Ganyu CA - Rosaria E
Notice that Kazuha does not Burst in the above rotation, removing the need for Energy Recharge. In this team, Kazuha’s Burst lengthens the rotation but also deals damage, resulting in a net zero DPS gain. His Burst should be saved for scenarios where your shield is unavailable and you need i-frames.
Ganyu - Rosaria - Kazuha - Layla Rotation Video
Gearing
Ganyu | ER Requirements Ganyu’s ER requirement reaches as high as 145%, so you should use Favonius weapons. With two Favonius weapons, her ER requirement drops to under 120% ER. With three Favonius weapons (one on each teammate), Ganyu requires no additional ER. |
Zhongli | Weapon Favonius Lance is good for lowering the team’s ER requirements, while Black Tassel offers a better shield. Generally, Favonius Lance is the better option. Artifacts Zhongli can use 4pc Archaic Petra or 4pc TotM (Tenacity of the Millelith), with the former option being preferred if you are willing to pick up Crystallize Shards. ER Requirements Zhongli does not use his Burst. |
Layla | Weapon Her weapon is not particularly important. Favonius Sword provides additional Energy, while Harbinger of Dawn deals more damage. Among the 5-star weapons, Key of Khaj-Nisut grants a much stronger shield than 4-star options, and Primordial Jade Cutter gives a slightly stronger shield and deals slightly more damage. Artifacts Layla should use 4pc TotM. She can go for either a shield-oriented build with high HP investment or a damage-oriented build with Cryo DMG Bonus Goblet and CRIT Circlet. Either option is fine. ER Requirements 100-110% |
Rosaria - Kazuha - Venti

This is an extremely powerful team in AoE scenarios. By using the two of the best groupers in the game, all light enemies are sucked into a central location, enabling quadratic scaling and enormous Swirl damage.
Healing and shielding is not needed in this team since Venti and Kazuha immobilize enemies.
Rosaria’s damage is not particularly high in this team, especially as Venti lifts enemies out of her Burst’s range. Her primary utility is her Skill’s ability to bring the team back into melee range.
Rotations
Rotation
Ganyu CA - Kazuha hE Q - Rosaria EQ - Ganyu QE - Venti EQ - Ganyu CA - Rosaria E
Both Ganyu and Rosaria’s Elemental Skills are used here for repositioning. Ganyu’s Skill takes the team aways from the enemies, so that Venti can fire his Burst into the center, while Rosaria’s Skill returns the team to the center so Kazuha can use his abilities.
It’s important to position yourself so Venti fires his Burst into the center of the chamber. This allows his Burst to work against multiple waves of enemies, rather than just one. It also minimizes the chance of firing in the wrong direction.
It is also possible to play this team with Shenhe instead, but her longer cooldowns make her less comfortable than Rosaria.
Gearing
As this is an AoE-focused team, the expected Energy drops are extremely frequent, and it is unlikely that anyone needs large amounts of Energy Recharge.
Nevertheless, it is nice to have extra Energy Recharge on Kazuha, as he doesn’t receive Energy refund from Venti’s A4 passive, unlike Ganyu and Rosaria.
Outside of high AoE content, ER needs rise drastically, but this team is not recommended in such cases.
Ganyu | Weapon Burst-oriented weapons such as Polar Star and Mouun’s Moon work well, though the latter is weakened by the team’s low Burst Energy Costs. Artifacts Ganyu should still use 4pc Blizzard Strayer, though 2pc combinations do perform quite similarly. |
Rosaria | Rosaria’s damage is unimportant as she often cannot connect hits due to Venti’s Burst. Weapon CRIT Rate weapons allow Rosaria to give Ganyu a bigger CRIT Rate buff, and Favonius Lance ensures ER requirements stay low. Artifacts 4pc Noblesse Oblige is her recommended set. |
Kazuha | Kazuha should use 4pc Viridescent Venerer as it provides the most Swirl damage. Stacking 4pc VV on both allows higher uptime on RES Shred while minimizing unnecessary swaps. |
Venti | Venti should use 4pc Viridescent Venerer as it provides the most Swirl damage. Stacking 4pc VV on both allows higher uptime on RES Shred while minimizing unnecessary swaps. |
Shenhe - Zhongli - Albedo

This variant strengthens Zhongli’s shield at the cost of some damage, but Ganyu has more time for extra Charged Attacks, with a simplified rotation to boot.
Albedo’s inclusion has several benefits: he activates Geo Resonance, strengthens Zhongli’s shield, and deals decent damage, all while maintaining low field time. Albedo provides lower team damage compared to Kazuha, but he is much simpler to play.
Rotations
A rotation is not required to play this team; you can refresh abilities as they come off cooldown. Still, an optimized rotation is shown here.
Rotation
Ganyu CA - Albedo E - Zhongli hE - Shenhe EQ - Ganyu EQ 3CA - Shenhe EN1 - Ganyu CA E CA
Ganyu’s Charged Attacks make up the bulk of her damage. However, Shenhe’s Tap Skill is used to allow two uses per rotation for increased Energy generation. Since Ganyu’s Charged Attacks do not use direct buffs, the team rotation requires minimal setup. Just make sure to place Zhongli’s pillar and Albedo’s flower away from Bosses to ensure they don't break.
Ganyu - Shenhe - Zhongli - Albedo Rotation Video
Gearing
Builds for this team are quite simple.
Ganyu | ER Requirements As Albedo and Zhongli’s particle generation is somewhat low, Ganyu occasionally needs up to 120% ER. In most cases however, you can easily get away with none. |
Shenhe | Weapon Favonius Lance Artifacts 4pc Noblesse Oblige ER Requirements Shenhe may need up to 170% ER. |
Zhongli | Weapon Favonius Lance Artifacts Either 4pc Archaic Petra or 4pc Tenacity of the Millelith. With the former option being preferred if you can pick up the Crystallize Shards. ER Requirements Zhongli does not use his Burst. |
 Albedo | Weapon Cinnabar Spindle or Harbinger of Dawn Artifacts 4pc Husk of Opulent Dreams ER Requirements Albedo does not use his Burst. |
Zhongli - Cryo - Geo

This is the bare minimum to make a viable Ganyu team. Zhongli and two other characters activate Cryo and Geo Resonances. It doesn’t really matter who the other characters are. Here are some suggestions:
- You could use Ningguang for TTDS and Kaeya for additional Cryo Particles.
- You could use some combination of Chongyun/Eula/Itto/Noelle/Ningguang, built with full EM and Makhaira Aquamarine or Wandering Evenstar for their passive’s Flat ATK buff.
- You could even lug around Aloy and Gorou, both of whom do nothing except take up party slots.
As this team is basically Solo Ganyu with Zhongli’s shield, no rotation is provided. Frankly, this joke of a team performs better than the weaker Melt teams with Kazuha.
Ganyu, Zhongli, a stray dog, and dead weight
Credits
Much appreciation to anyone reading this guide. Thanks for reaching this far! This guide is around 22,000 words, not including the Rotation Bank and Multi-Opt Configs. You should be proud for reaching this far.
Written by:
Rare Possum#0511 & Prévisible#7440
Verification by:
Casdela#5121
cote#4733
irokei#6189
Leah
Transcription by:
irokei#6189
Team images courtesy of the KQM Team Portrait Generator.
With special thanks for feedback and other contributions:
Air Conditioner#1555
Ayzel#7399
Casdela#5121
caxia5#6525
CC#5588, specifically for rotations and weapon calcs
cote#4733
idkanonymized#4166
irokei#6189
jamie#9248
jstern25#1399
Leah
LostGuide#4812
naivety | pkach#6934
References
Feel free to look at the additional Ganyu-related resources, brought to you by KQM:
Here are some additional resources you may find useful:
Calculations used in this guide:
- Ganyu Weapons Mastersheet
- Morgana Weapon Sheet
- Melt Ganyu with Xiangling Weapon Sheet
- Mono Cryo with Shenhe Weapon Sheet
- Melt Ganyu with Xiangling Artifact Sheet
- Ganyu Aim Timings
Rotation Bank
Freeze Rotations
Venti — Mona — Diona
Diona hE - Ganyu EQ - Venti EQ - Mona EQ - Ganyu 2CA - Venti EN1 - Ganyu CA
Venti — Mona — Layla
Ganyu EQ - Venti EQ - Layla DQE - Mona EQ - Ganyu CA - Venti EN1 - Ganyu CA
Venti — Mona — Rosaria
Ganyu ECA - Mona E - Venti EQ - Rosaria EQ - Ganyu Q - Mona Q - Venti EN1 - Rosaria E
Venti — Mona — Shenhe
Shenhe QtE - Ganyu EQ - Venti EQ - Mona EQ - Ganyu CA - Shenhe tEN1 - Ganyu ECA - Venti EN1 - Ganyu 2CA
Venti — Mona — Ayaka

Ayaka (D)E - Ganyu QE - Venti EQ - Mona EQ - Ayaka DEQ - Ganyu E - Venti E - Ganyu 2CA
Venti — Kokomi — Rosaria

No Refresh
Rosaria EQ - Kokomi E - Ganyu EQ - Venti EQ - Ganyu CA - Rosaria E - Ganyu CA E CA - Venti EN1 - Ganyu CA
With Refresh
Rosaria EQ - Kokomi E - Ganyu EQ - Venti EQ - Ganyu CA - Rosaria E - Kokomi Q - Ganyu E CA - Venti EN1 - Ganyu CA
Venti — Kokomi — Shenhe

No Refresh
Shenhe tEQ - Kokomi E - Ganyu EQ - Venti EQ - Ganyu CA - Shenhe tEN1 - Ganyu CA E CA - Venti EN1 - Ganyu CA
With Refresh
Shenhe tEQ - Kokomi E - Ganyu EQ - Venti EQ - Ganyu CA - Shenhe tEN1 - Kokomi Q - Ganyu E CA - Venti EN1 - Ganyu CA
C6 Rotation
Ganyu E - Shenhe tEQ - Kokomi E - Ganyu Q - Venti EQ - Ganyu CA ECAs - Shenhe tE - (Kokomi Q) - Venti E - Ganyu CA
Can execute an additional Charged Attack if you used Kokomi’s Burst.
Venti — Kokomi — Ayaka

No Refresh
Ayaka D N1E - Ganyu CA EQ - Venti EQ - Kokomi E - Ayaka D N1EQ - Ganyu E CA - Venti N1E - Ganyu CA
Venti — Kokomi — Diona

This team does not currently have a recommended rotation. Please pick another team.
Venti — Kokomi — Layla

This team does not currently have a recommended rotation. Please pick another team.
Kazuha — Mona — Diona

Ganyu CA - Kazuha tEQ - Diona hE - Ganyu EQ - Kazuha hE - Mona EQ - Ganyu CA
Kazuha — Mona — Layla

Ganyu CA - Kazuha tEQ - Layla N1QE - Ganyu EQ - Kazuha hE - Mona EQ - Ganyu CA
Kazuha — Mona — Rosaria
Ganyu CA - Kazuha tE - Rosaria QE - Ganyu EQ - Kazuha hE - Mona EQ - Rosaria E
Kazuha — Mona — Shenhe

Ganyu CA - Kazuha tE - Shenhe tEQ - Ganyu EQ - Kazuha hE - Mona EQ - Shenhe tEN1 - Ganyu CA E CA
Kazuha — Mona — Ayaka

Ayaka D E - Kazuha tEQ - Ganyu EQ - Mona QE - Ayaka D EQ - Kazuha hE - Ganyu E 3CA
Kazuha — Kokomi — Diona

This team does not currently have a recommended rotation. Please pick another team.
Kazuha — Kokomi — Layla

Ganyu CA - Kazuha tEQ - Layla QE - Kokomi E - Ganyu CA EQ - Kazuha E - Ganyu 3CA E
Kazuha — Kokomi — Rosaria

Ganyu CA - Kazuha tEQ - Rosaria EQ - Kokomi E - Ganyu EQ - Kazuha hE - Ganyu CA - Rosaria E - Ganyu CA E 2CA
Kazuha — Kokomi — Shenhe

Ganyu CA - Kazuha tEQ - Shenhe QtE - Kokomi E - Ganyu EQ - Kazuha hE - Ganyu CA - Shenhe tEN1 - Ganyu CA E 2CA
Kazuha — Kokomi — Ayaka
Ayaka D (N2) E - Kazuha tE - Ganyu EQ - Kokomi E - Ayaka D N2C EQ - Kazuha hE - Ganyu E 2CA.
Melt Rotations
Ganyu - Xiangling Melt Rotations

Ganyu — Bennett — Xiangling — Zhongli
Rotation Option 1: Long Window
Xiangling E - Zhongli hE - Bennett QE - Xiangling Q - Ganyu 5CA E CA - Bennett E
Ganyu - Bennett - Xiangling - Zhongli (Long Window) Rotation Video
Rotation Option 2: (Short Window)
Zhongli hE - Bennett QE - Xiangling QE - Ganyu 5CA E CA - Bennett E - Xiangling N2
Ganyu - Bennett - Xiangling - Zhongli (Short Window) Rotation Video
Ganyu — Bennett — Xiangling — Diona
Rotation With Shield
Diona Q - Bennett QE - Xiangling EQ - Diona hE - Ganyu 5CA E CA - Bennett E - Xiangling N3
Ganyu - Bennett - Xiangling - Diona (With Shield) Rotation Video
Rotation Without Shield
Ganyu E - Diona hEQ - Bennett QE - Xiangling Q - Ganyu 6CA - Bennett E
Ganyu - Bennett - Xiangling - Diona (Without Shield) Rotation Video
Ganyu — Bennett — Xiangling — Yanfei (C4)
Yanfei EQ - Bennett QE - Xiangling EQ - Ganyu 5CA E CA - Bennett E - Xiangling N3
Ganyu - Bennett - Xiangling - Yanfei (C4) Rotation Video
Ganyu - Nahida Burning (BurnMelt) Rotations
Ganyu — Bennett — Nahida — Dehya

Nahida EQ - Bennett EQ - Dehya E - Ganyu 7CA E
Ganyu — Bennett — Nahida — Thoma

Nahida EQ - Thoma EQ - Bennett EQ - Ganyu N1 5CA E CA - Bennett E
Ganyu — Bennett — Nahida — Xinyan

Nahida EQ - Bennett EQ - Xinyan EQ - Ganyu E 7CA
Ganyu — Bennett — Nahida — Kazuha

Ganyu CA - Nahida EQ - Kazuha EP - Bennett EQ - Kazuha Q - Ganyu 6CA - Bennett E - Kazuha EP - Ganyu E (CA until there is no Pyro or Burning)
Ganyu - Jean Sunfire Melt Rotations
Rotation (1E Easy)
Ganyu E Q/CA - Zhongli hE - Bennett Q - Jean EQ - Ganyu 4CA - Jean E - Bennett hE
Ganyu — Bennett — Jean — Zhongli (1E Easy) Rotation Video
Rotation (2E Hard)
Ganyu E Q/CA - Zhongli hE - Bennett Q - Jean EQ - Ganyu 4CA - Bennett E - Jean E - Bennett E
Ganyu — Bennett — Jean — Zhongli (2E Hard) Rotation Video
Ganyu - Kazuha Melt Rotations
Rotation (4CA Easy)
Zhongli hE - Ganyu E CA - Kazuha tE - Bennett Q - Kazuha Q - Ganyu 4CA - Bennett E - Kazuha tE - Bennett E
Ganyu — Bennett — Kazuha — Zhongli (4CA Easy) Rotation Video
Rotation (5CA Hard)
Zhongli hE - Ganyu E CA - Kazuha tE - Bennett Q - Kazuha Q - Ganyu 5CA - Kazuha tE - Bennett E
Ganyu — Bennett — Kazuha — Zhongli (5CA Hard) Rotation Video
Ganyu Mono Cryo Rotations
Shenhe - Kazuha - Zhongli / Layla
Zhongli Mono Cryo Rotation
Ganyu E - Zhongli hE - Shenhe tEQ - Kazuha EQ - Ganyu CA EQ - Shenhe EN1 - Ganyu CA - Kauzha E - Ganyu 2CA
Ganyu - Shenhe - Zhongli - Kazuha Rotation Video
Layla Mono Cryo Rotation
Ganyu E - Shenhe QE - Kazuha EQ - Layla (N1)QE - Ganyu CA EQ - Shenhe EN1 - Ganyu CA - Kazuha EP - Ganyu 2CA
Ganyu - Shenhe - Layla - Kazuha Rotation Video
Rosaria - Kazuha - Zhongli / Layla
Rotation
Ganyu CA - Kazuha tEP - Layla QE/Zhongli hE - Rosaria EQ - Ganyu EQ - Kazuha tEP - Ganyu CA - Rosaria E
Ganyu - Rosaria - Kazuha - Layla Rotation Video
Rosaria - Kazuha - Venti
Rotation
Ganyu CA - Kazuha hE Q - Rosaria EQ - Ganyu QE - Venti EQ - Ganyu CA - Rosaria E
Shenhe - Zhongli - Albedo
Rotation
Ganyu CA - Albedo E - Zhongli hE - Shenhe EQ - Ganyu EQ 3CA - Shenhe EN1 - Ganyu CA E CA
Ganyu - Shenhe - Zhongli - Albedo Rotation Video
Ganyu Support Rotations
Hu Tao — Xingqiu — Rosaria

Rotation
Xingqiu EQ - Ganyu EQ - Rosaria EQ - Hu Tao E - Hu Tao CAs - Hu Tao Q - Rosaria E
C6 Ganyu Rotations
Venti — Kokomi — Shenhe
C6 Rotation
Ganyu E - Shenhe tEQ - Kokomi E - Ganyu Q - Venti EQ - Ganyu CA ECAs - Shenhe tE - (Kokomi Q) - Venti E - Ganyu CA
Can execute an additional Charged Attack if you used Kokomi’s Burst.
Bennett — Jean — Shenhe
C6 Rotation
Ganyu EQ - Shenhe hEQ - Jean E - Bennett Q - Jean Q - Shenhe hE - Ganyu CA E CAs
Shenhe hE is only available for C1+ Shenhe users. Skip Shenhe hE and Jean E during the setup for quicker frontload in single-rotation scenarios. Ganyu’s Burst is optional (the performance is similar) but may steal Shenhe’s Quills and make the setup slightly less reliable.
Bennett — Xiangling — Kazuha

C6 Rotation
Ganyu EQ - Kazuha tE - Bennett Q - Kazuha Q - Xiangling EQ - Ganyu CA E CAs
Make sure Kazuha Swirls Cryo. Kazuha tE/hE during the setup can be skipped for quicker frontload in single-rotation scenarios.
Multi-Opt Configs
Freeze Configs
Venti — Mona — Diona
Venti Mona Diona (Default)
{"name":"Freeze Ganyu","description":"Freeze Ganyu with Diona Mona Venti.\nFor use WITHOUT Blizzard Strayer or Amos\n\nRemember to activate Cryo Resonance and weapon passives. Everything else is accounted for in the config\nReplace Flat ATK Buff with whatever buff your Bennett provides\nATK% Sources: Diona's Tenacity, Mona's Noblesse\nCryo RES Shred: Venti's VV\nCryo DMG Bonus: Ganyu's A4\nCRIT Rate: Ganyu's A1","targets":[{"weight":7.2,"path":["burst","dmg"],"hitMode":"avgHit","bonusStats":{"cryo_dmg_":20,"atk_":40,"cryo_enemyRes_":-40}},{"weight":15.2,"path":["burst","dmg"],"hitMode":"avgHit","bonusStats":{"cryo_dmg_":20,"atk_":40,"cryo_enemyRes_":-40,"all_dmg_":58}},{"weight":1.6,"path":["burst","dmg"],"hitMode":"avgHit","bonusStats":{"cryo_dmg_":20,"atk_":40,"cryo_enemyRes_":-40,"all_dmg_":0}},{"weight":2,"path":["skill","dmg"],"hitMode":"avgHit","bonusStats":{"cryo_dmg_":20,"atk_":40,"cryo_enemyRes_":-40,"all_dmg_":58}},{"weight":0.5,"path":["charged","frostflake"],"hitMode":"avgHit","bonusStats":{"cryo_dmg_":20,"atk_":20,"cryo_enemyRes_":-40,"all_dmg_":58}},{"weight":1,"path":["charged","frostflake"],"hitMode":"avgHit","bonusStats":{"cryo_dmg_":20,"atk_":20,"cryo_enemyRes_":-40,"all_dmg_":58}},{"weight":2,"path":["charged","frostflakeBloom"],"hitMode":"avgHit","bonusStats":{"cryo_dmg_":20,"atk_":20,"cryo_enemyRes_":-40,"all_dmg_":58,"critRate_":20}},{"weight":2,"path":["charged","frostflakeBloom"],"hitMode":"avgHit","bonusStats":{"cryo_dmg_":20,"atk_":20,"cryo_enemyRes_":-40,"all_dmg_":58,"critRate_":20}}]}
Venti Mona Diona (Amos)
{"name":"Freeze Ganyu with Amos","description":"Freeze Ganyu with Diona Mona Venti.\nFor use WITHOUT Blizzard Strayer\nFor use WITH Amos. Remeber to set either 0 or 1 stacks on Amos\nRemember to activate Cryo Resonance and weapon passives. Everything else is accounted for in the config\nReplace Flat Attack Buff with whatever buff your Bennett Provides\nATK% Sources: Diona's Tenacity, Mona's Noblesse\nCryo RES Shred: Venti's VV\nCryo DMG Bonus: Ganyu's A4\nCRIT Rate: Ganyu's A1","targets":[{"weight":7.2,"path":["burst","dmg"],"hitMode":"avgHit","bonusStats":{"cryo_dmg_":20,"atk_":40,"cryo_enemyRes_":-40}},{"weight":15.2,"path":["burst","dmg"],"hitMode":"avgHit","bonusStats":{"cryo_dmg_":20,"atk_":40,"cryo_enemyRes_":-40,"all_dmg_":58}},{"weight":1.6,"path":["burst","dmg"],"hitMode":"avgHit","bonusStats":{"cryo_dmg_":20,"atk_":40,"cryo_enemyRes_":-40,"all_dmg_":0}},{"weight":2,"path":["skill","dmg"],"hitMode":"avgHit","bonusStats":{"cryo_dmg_":20,"atk_":40,"cryo_enemyRes_":-40,"all_dmg_":58}},{"weight":0.5,"path":["charged","frostflake"],"hitMode":"avgHit","bonusStats":{"cryo_dmg_":20,"atk_":20,"cryo_enemyRes_":-40,"all_dmg_":58}},{"weight":1,"path":["charged","frostflake"],"hitMode":"avgHit","bonusStats":{"cryo_dmg_":20,"atk_":20,"cryo_enemyRes_":-40,"all_dmg_":58}},{"weight":2,"path":["charged","frostflakeBloom"],"hitMode":"avgHit","bonusStats":{"cryo_dmg_":20,"atk_":20,"cryo_enemyRes_":-40,"all_dmg_":58,"critRate_":20,"charged_dmg_":24}},{"weight":2,"path":["charged","frostflakeBloom"],"hitMode":"avgHit","bonusStats":{"cryo_dmg_":20,"atk_":20,"cryo_enemyRes_":-40,"all_dmg_":58,"critRate_":20,"charged_dmg_":24}}]}
Venti Mona Diona (4BS)
{"name":"Freeze Ganyu with Blizzard Strayer","description":"Freeze Ganyu with Diona Mona Venti.\nFor use WITHOUT Amos\nFor use WITH Blizzard Strayer\nRemember to activate Cryo Resonance and weapon passives. Everything else is accounted for in the config. Do not activate Blizzard Strayer but do force it. \nReplace Flat Attack Buff with whatever buff your Bennett Provides\nATK% Sources: Diona's Tenacity, Mona's Noblesse\nCryo RES Shred: Venti's VV\nCryo DMG Bonus: Ganyu's A4\nCRIT Rate: Ganyu's A1","targets":[{"weight":7.2,"path":["burst","dmg"],"hitMode":"avgHit","bonusStats":{"cryo_dmg_":20,"atk_":40,"cryo_enemyRes_":-40,"critRate_":20}},{"weight":15.2,"path":["burst","dmg"],"hitMode":"avgHit","bonusStats":{"cryo_dmg_":20,"atk_":40,"cryo_enemyRes_":-40,"all_dmg_":58,"critRate_":40}},{"weight":1.6,"path":["burst","dmg"],"hitMode":"avgHit","bonusStats":{"cryo_dmg_":20,"atk_":40,"cryo_enemyRes_":-40,"all_dmg_":0,"critRate_":40}},{"weight":2,"path":["skill","dmg"],"hitMode":"avgHit","bonusStats":{"cryo_dmg_":20,"atk_":40,"cryo_enemyRes_":-40,"all_dmg_":58,"critRate_":41.2}},{"weight":0.5,"path":["charged","frostflake"],"hitMode":"avgHit","bonusStats":{"cryo_dmg_":20,"atk_":20,"cryo_enemyRes_":-40,"all_dmg_":58,"critRate_":40}},{"weight":1,"path":["charged","frostflake"],"hitMode":"avgHit","bonusStats":{"cryo_dmg_":20,"atk_":20,"cryo_enemyRes_":-40,"all_dmg_":58,"critRate_":40}},{"weight":2,"path":["charged","frostflakeBloom"],"hitMode":"avgHit","bonusStats":{"cryo_dmg_":20,"atk_":20,"cryo_enemyRes_":-40,"all_dmg_":58,"critRate_":60}},{"weight":2,"path":["charged","frostflakeBloom"],"hitMode":"avgHit","bonusStats":{"cryo_dmg_":20,"atk_":20,"cryo_enemyRes_":-40,"all_dmg_":58,"critRate_":60}}]}
Venti Mona Diona (4BS + Amos)
{"name":"Freeze Ganyu with Blizzard Strayer and Amos","description":"Freeze Ganyu with Diona Mona Venti.\nFor use WITH Blizzard Strayer and Amos\nRemember to activate Cryo Resonance and weapon passives. Everything else is accounted for in the config. Do not activate Blizzard Strayer but do force it. \nSet Amos to 0 or 1 stack. \nReplace Flat Attack Buff with whatever buff your Bennett Provides\nATK% Sources: Diona's Tenacity, Mona's Noblesse\nCryo RES Shred: Venti's VV\nCryo DMG Bonus: Ganyu's A4\nCRIT Rate: Ganyu's A1","targets":[{"weight":7.2,"path":["burst","dmg"],"hitMode":"avgHit","bonusStats":{"cryo_dmg_":20,"atk_":40,"cryo_enemyRes_":-40,"critRate_":20}},{"weight":15.2,"path":["burst","dmg"],"hitMode":"avgHit","bonusStats":{"cryo_dmg_":20,"atk_":40,"cryo_enemyRes_":-40,"all_dmg_":58,"critRate_":40}},{"weight":1.6,"path":["burst","dmg"],"hitMode":"avgHit","bonusStats":{"cryo_dmg_":20,"atk_":40,"cryo_enemyRes_":-40,"all_dmg_":0,"critRate_":40}},{"weight":2,"path":["skill","dmg"],"hitMode":"avgHit","bonusStats":{"cryo_dmg_":20,"atk_":40,"cryo_enemyRes_":-40,"all_dmg_":58,"critRate_":41.2}},{"weight":0.5,"path":["charged","frostflake"],"hitMode":"avgHit","bonusStats":{"cryo_dmg_":20,"atk_":20,"cryo_enemyRes_":-40,"all_dmg_":58,"critRate_":40}},{"weight":1,"path":["charged","frostflake"],"hitMode":"avgHit","bonusStats":{"cryo_dmg_":20,"atk_":20,"cryo_enemyRes_":-40,"all_dmg_":58,"critRate_":40}},{"weight":2,"path":["charged","frostflakeBloom"],"hitMode":"avgHit","bonusStats":{"cryo_dmg_":20,"atk_":20,"cryo_enemyRes_":-40,"all_dmg_":58,"critRate_":60,"charged_dmg_":24}},{"weight":2,"path":["charged","frostflakeBloom"],"hitMode":"avgHit","bonusStats":{"cryo_dmg_":20,"atk_":20,"cryo_enemyRes_":-40,"all_dmg_":58,"critRate_":60,"charged_dmg_":24}}]}
Venti — Kokomi — Shenhe
Venti Kokomi Shenhe (Default)
{"name":"Freeze Ganyu","description":"With Venti Kokomi Shenhe\n\nNot for Amos\nSet Blizzard Strayer to Freeze.\nReplace Cryo Damage Increase with Your Shenhe's Quill.\nOnly activate weapon passives and cryo resonance, and artifacts. Everything else is included in the config,\n","targets":[{"weight":5.6,"path":["burst","dmg"],"hitMode":"avgHit","bonusStats":{"atk_":88,"burst_dmg_":15,"cryo_dmg_":15,"cryo_enemyRes_":-40}},{"weight":4,"path":["burst","dmg"],"hitMode":"avgHit","bonusStats":{"atk_":88,"burst_dmg_":15,"cryo_dmg_":15,"cryo_enemyRes_":-40,"cryo_dmgInc":2600}},{"weight":14.4,"path":["burst","dmg"],"hitMode":"avgHit","bonusStats":{"atk_":88,"burst_dmg_":15,"cryo_dmg_":15,"cryo_enemyRes_":-54}},{"weight":1,"path":["skill","dmg"],"hitMode":"avgHit","bonusStats":{"atk_":88,"skill_dmgInc":15,"cryo_dmg_":15,"cryo_enemyRes_":-54,"cryo_dmgInc":2600}},{"weight":1,"path":["skill","dmg"],"hitMode":"avgHit","bonusStats":{"atk_":88,"skill_dmgInc":15,"cryo_dmg_":15,"cryo_enemyRes_":-54}},{"weight":1,"path":["skill","dmg"],"hitMode":"avgHit","bonusStats":{"atk_":40,"skill_dmgInc":15,"cryo_dmg_":15,"cryo_enemyRes_":-54}},{"weight":1,"path":["skill","dmg"],"hitMode":"avgHit","bonusStats":{"atk_":40,"skill_dmgInc":15,"cryo_dmg_":15,"cryo_enemyRes_":-40}},{"weight":0.5,"path":["charged","frostflake"],"hitMode":"avgHit","bonusStats":{"atk_":40,"cryo_dmg_":35,"cryo_enemyRes_":-54}},{"weight":1,"path":["charged","frostflakeBloom"],"hitMode":"avgHit","bonusStats":{"atk_":40,"cryo_dmg_":35,"cryo_enemyRes_":-54}},{"weight":0.5,"path":["charged","frostflake"],"hitMode":"avgHit","bonusStats":{"atk_":20,"cryo_dmg_":35,"critRate_":20,"cryo_enemyRes_":-54}},{"weight":1,"path":["charged","frostflakeBloom"],"hitMode":"avgHit","bonusStats":{"atk_":20,"cryo_dmg_":35,"critRate_":20,"cryo_enemyRes_":-54}},{"weight":0.5,"path":["charged","frostflake"],"hitMode":"avgHit","bonusStats":{"atk_":68,"cryo_dmg_":35,"critRate_":20,"cryo_enemyRes_":-40}},{"weight":1,"path":["charged","frostflakeBloom"],"hitMode":"avgHit","bonusStats":{"atk_":68,"cryo_dmg_":35,"critRate_":20,"cryo_enemyRes_":-40}}]}
Venti Kokomi Shenhe (Amos)
{"name":"Freeze Ganyu","targets":[{"weight":5.6,"path":["burst","dmg"],"hitMode":"avgHit","bonusStats":{"atk_":88,"burst_dmg_":15,"cryo_dmg_":15,"cryo_enemyRes_":-40}},{"weight":4,"path":["burst","dmg"],"hitMode":"avgHit","bonusStats":{"atk_":88,"burst_dmg_":15,"cryo_dmg_":15,"cryo_enemyRes_":-40,"cryo_dmgInc":2600}},{"weight":14.4,"path":["burst","dmg"],"hitMode":"avgHit","bonusStats":{"atk_":88,"burst_dmg_":15,"cryo_dmg_":15,"cryo_enemyRes_":-54}},{"weight":1,"path":["skill","dmg"],"hitMode":"avgHit","bonusStats":{"atk_":88,"skill_dmgInc":15,"cryo_dmg_":15,"cryo_enemyRes_":-54,"cryo_dmgInc":2600}},{"weight":1,"path":["skill","dmg"],"hitMode":"avgHit","bonusStats":{"atk_":88,"skill_dmgInc":15,"cryo_dmg_":15,"cryo_enemyRes_":-54}},{"weight":1,"path":["skill","dmg"],"hitMode":"avgHit","bonusStats":{"atk_":40,"skill_dmgInc":15,"cryo_dmg_":15,"cryo_enemyRes_":-54}},{"weight":1,"path":["skill","dmg"],"hitMode":"avgHit","bonusStats":{"atk_":40,"skill_dmgInc":15,"cryo_dmg_":15,"cryo_enemyRes_":-40}},{"weight":0.5,"path":["charged","frostflake"],"hitMode":"avgHit","bonusStats":{"atk_":40,"cryo_dmg_":35,"cryo_enemyRes_":-54}},{"weight":1,"path":["charged","frostflakeBloom"],"hitMode":"avgHit","bonusStats":{"atk_":40,"cryo_dmg_":35,"cryo_enemyRes_":-54,"charged_dmg_":24}},{"weight":0.5,"path":["charged","frostflake"],"hitMode":"avgHit","bonusStats":{"atk_":20,"cryo_dmg_":35,"critRate_":20,"cryo_enemyRes_":-54}},{"weight":1,"path":["charged","frostflakeBloom"],"hitMode":"avgHit","bonusStats":{"atk_":20,"cryo_dmg_":35,"critRate_":20,"cryo_enemyRes_":-54,"charged_dmg_":24}},{"weight":0.5,"path":["charged","frostflake"],"hitMode":"avgHit","bonusStats":{"atk_":68,"cryo_dmg_":35,"critRate_":20,"cryo_enemyRes_":-40}},{"weight":1,"path":["charged","frostflakeBloom"],"hitMode":"avgHit","bonusStats":{"atk_":68,"cryo_dmg_":35,"critRate_":20,"cryo_enemyRes_":-40,"charged_dmg_":24}}],"description":"With Venti Kokomi Shenhe\n\nFor Amos, set its passive to 0 or 1 stacks\nSet Blizzard Strayer to Freeze.\nReplace Cryo Damage Increase with Your Shenhe's Quill.\nOnly activate weapon passives and cryo resonance, and artifacts. Everything else is included in the config,\n"}
Melt Configs
Bennett — Xiangling — Zhongli
Xiangling - Bennett - Zhongli (Default)
{"name":"Melt Ganyu Standard ","description":"Melt Ganyu with XL Zhongli Bennett.\nDO NOT USE WITH SHIMENAWAS REMINISCENCE AMOS OR POLAR STAR\n\nReplace Flat Attack buff with whatever buff your Bennett Provides\nATK% Sources: Bennett's Noblesse Oblige, Zhongli's Tenacity of the Millelith, Pyro Resonance\nATK Sources: Bennett's Burst\nCryo RES Shred: Zhongli's Shield\nCRIT Rate: Ganyu's A1","targets":[{"weight":1,"path":["charged","frostflake"],"hitMode":"avgHit","reaction":"melt","bonusStats":{"atk_":65,"atk":996,"cryo_enemyRes_":-20}},{"weight":1,"path":["charged","frostflakeBloom"],"hitMode":"avgHit","reaction":"melt","bonusStats":{"atk_":65,"atk":996,"cryo_enemyRes_":-20}},{"weight":4,"path":["charged","frostflake"],"hitMode":"avgHit","reaction":"melt","bonusStats":{"atk_":65,"atk":996,"cryo_enemyRes_":-20,"critRate_":20}},{"weight":4,"path":["charged","frostflakeBloom"],"hitMode":"avgHit","reaction":"melt","bonusStats":{"atk_":65,"atk":996,"cryo_enemyRes_":-20,"critRate_":20}},{"weight":1,"path":["skill","dmg"],"hitMode":"avgHit","reaction":"melt","bonusStats":{"atk_":45,"atk":0,"cryo_enemyRes_":-20,"critRate_":0}},{"weight":1,"path":["skill","dmg"],"hitMode":"avgHit","reaction":"melt","bonusStats":{"atk_":45,"atk":0,"cryo_enemyRes_":-20,"critRate_":0}},{"weight":1,"path":["charged","frostflake"],"hitMode":"avgHit","reaction":"melt","bonusStats":{"atk_":45,"atk":0,"cryo_enemyRes_":-20,"critRate_":20}},{"weight":1,"path":["charged","frostflakeBloom"],"hitMode":"avgHit","reaction":"melt","bonusStats":{"atk_":45,"atk":0,"cryo_enemyRes_":-20,"critRate_":20}}]}
Xiangling - Bennett - Zhongli (Amos)
{"name":"Melt Ganyu WT+AMOS","description":"Melt Ganyu with XL Zhongli Bennett.\nONLY FOR USE WITH AMOS AND WANDERER’S TROUPE\n\nSet Amos's passive to 0 or 1 stacks. The additional stacks have already been prepared\nReplace Flat Attack buff with whatever buff your Bennett Provides\nATK% Sources: Bennett's Noblesse Oblige, Zhongli's Tenacity of the Millelith, Pyro Resonance\nATK Sources: Bennett's Burst\nCryo RES Shred: Zhongli's Shield\nCRIT Rate: Ganyu's A1","targets":[{"weight":1,"path":["charged","frostflake"],"hitMode":"avgHit","reaction":"melt","bonusStats":{"atk_":65,"atk":996,"cryo_enemyRes_":-20}},{"weight":1,"path":["charged","frostflakeBloom"],"hitMode":"avgHit","reaction":"melt","bonusStats":{"atk_":65,"atk":996,"cryo_enemyRes_":-20,"charged_dmg_":24}},{"weight":4,"path":["charged","frostflake"],"hitMode":"avgHit","reaction":"melt","bonusStats":{"atk_":65,"atk":996,"cryo_enemyRes_":-20,"critRate_":20}},{"weight":4,"path":["charged","frostflakeBloom"],"hitMode":"avgHit","reaction":"melt","bonusStats":{"atk_":65,"atk":996,"cryo_enemyRes_":-20,"critRate_":20,"charged_dmg_":24}},{"weight":1,"path":["skill","dmg"],"hitMode":"avgHit","reaction":"melt","bonusStats":{"atk_":45,"atk":0,"cryo_enemyRes_":-20,"critRate_":0}},{"weight":1,"path":["skill","dmg"],"hitMode":"avgHit","reaction":"melt","bonusStats":{"atk_":45,"atk":0,"cryo_enemyRes_":-20,"critRate_":0}},{"weight":1,"path":["charged","frostflake"],"hitMode":"avgHit","reaction":"melt","bonusStats":{"atk_":45,"atk":0,"cryo_enemyRes_":-20,"critRate_":20}},{"weight":1,"path":["charged","frostflakeBloom"],"hitMode":"avgHit","reaction":"melt","bonusStats":{"atk_":45,"atk":0,"cryo_enemyRes_":-20,"critRate_":20,"charged_dmg_":24}}]}
Xiangling - Bennett - Zhongli (4SR)
{"name":"Melt Ganyu Shimenawa","description":"Melt Ganyu with XL Zhongli Bennett.\nFOR USE WITH SHIMENAWA BUT NOT AMOS OR POLAR STAR\nDO NOT ACTIVATE SHIMENAWA PASSIVE, IT ALREADY INCLUDED\n\nReplace Flat Attack Buff with whatever buff your Bennett Provides\nATK% Sources: Bennett's Noblesse Oblige, Zhongli's Tenacity of the Millelith, Pyro Resonance\nATK Sources: Bennett's Burst\nCryo RES Shred: Zhongli's Shield\nCRIT Rate: Ganyu's A1","targets":[{"weight":1,"path":["charged","frostflake"],"hitMode":"avgHit","reaction":"melt","bonusStats":{"atk_":65,"atk":996,"cryo_enemyRes_":-20,"charged_dmg_":50}},{"weight":1,"path":["charged","frostflakeBloom"],"hitMode":"avgHit","reaction":"melt","bonusStats":{"atk_":65,"atk":996,"cryo_enemyRes_":-20,"charged_dmg_":50}},{"weight":3,"path":["charged","frostflake"],"hitMode":"avgHit","reaction":"melt","bonusStats":{"atk_":65,"atk":996,"cryo_enemyRes_":-20,"critRate_":20,"charged_dmg_":50}},{"weight":3,"path":["charged","frostflakeBloom"],"hitMode":"avgHit","reaction":"melt","bonusStats":{"atk_":65,"atk":996,"cryo_enemyRes_":-20,"critRate_":20,"charged_dmg_":50}},{"weight":1,"path":["skill","dmg"],"hitMode":"avgHit","reaction":"melt","bonusStats":{"atk_":65,"atk":996,"cryo_enemyRes_":-20,"critRate_":0}},{"weight":1,"path":["skill","dmg"],"hitMode":"avgHit","reaction":"melt","bonusStats":{"atk_":65,"atk":0,"cryo_enemyRes_":-20,"critRate_":0}},{"weight":2,"path":["charged","frostflake"],"hitMode":"avgHit","reaction":"melt","bonusStats":{"atk_":45,"atk":0,"cryo_enemyRes_":-20,"critRate_":20}},{"weight":2,"path":["charged","frostflakeBloom"],"hitMode":"avgHit","reaction":"melt","bonusStats":{"atk_":45,"atk":0,"cryo_enemyRes_":-20,"critRate_":20}}]}
Xiangling - Bennett - Zhongli (4SR + Amos)
{"name":"Melt Ganyu Shimenawa+AMOS","description":"Melt Ganyu with XL Zhongli Bennett.\nONLY FOR USE WITH SHIMENAWA WITH AMOS\nDO NOT ACTIVATE SHIMENAWA PASSIVE, IT ALREADY INCLUDED\nSet Amos stacks to 0 or 1, the rest has been done for you.\nReplace Flat Attack Buff with whatever buff your Bennett Provides\nATK% Sources: Bennett's Noblesse Oblige, Zhongli's Tenacity of the Millelith, Pyro Resonance\nATK Sources: Bennett's Burst\nCryo RES Shred: Zhongli's Shield\nCRIT Rate: Ganyu's A1","targets":[{"weight":1,"path":["charged","frostflake"],"hitMode":"avgHit","reaction":"melt","bonusStats":{"atk_":65,"atk":996,"cryo_enemyRes_":-20,"charged_dmg_":50}},{"weight":1,"path":["charged","frostflakeBloom"],"hitMode":"avgHit","reaction":"melt","bonusStats":{"atk_":65,"atk":996,"cryo_enemyRes_":-20,"charged_dmg_":74}},{"weight":3,"path":["charged","frostflake"],"hitMode":"avgHit","reaction":"melt","bonusStats":{"atk_":65,"atk":996,"cryo_enemyRes_":-20,"critRate_":20,"charged_dmg_":50}},{"weight":3,"path":["charged","frostflakeBloom"],"hitMode":"avgHit","reaction":"melt","bonusStats":{"atk_":65,"atk":996,"cryo_enemyRes_":-20,"critRate_":20,"charged_dmg_":74}},{"weight":1,"path":["skill","dmg"],"hitMode":"avgHit","reaction":"melt","bonusStats":{"atk_":65,"atk":996,"cryo_enemyRes_":-20,"critRate_":0}},{"weight":1,"path":["skill","dmg"],"hitMode":"avgHit","reaction":"melt","bonusStats":{"atk_":65,"atk":0,"cryo_enemyRes_":-20,"critRate_":0}},{"weight":2,"path":["charged","frostflake"],"hitMode":"avgHit","reaction":"melt","bonusStats":{"atk_":45,"atk":0,"cryo_enemyRes_":-20,"critRate_":20}},{"weight":2,"path":["charged","frostflakeBloom"],"hitMode":"avgHit","reaction":"melt","bonusStats":{"atk_":45,"atk":0,"cryo_enemyRes_":-20,"critRate_":20,"charged_dmg_":24}}]}
Xiangling - Bennett - Zhongli (Polar Star)
{"name":"Melt Ganyu WT+Polar","description":"Melt Ganyu with XL Zhongli Bennett.\nFOR USE WITH POLAR STAR BUT NOT SR\nSet Polar star stacks to 3\nReplace Flat Attack Buff with whatever buff your Bennett Provides\nATK% Sources: Bennett's Noblesse Oblige, Zhongli's Tenacity of the Millelith, Pyro Resonance\nATK Sources: Bennett's Burst\nCryo RES Shred: Zhongli's Shield\nCRIT Rate: Ganyu's A1","targets":[{"weight":1,"path":["charged","frostflake"],"hitMode":"avgHit","reaction":"melt","bonusStats":{"atk_":65,"atk":996,"cryo_enemyRes_":-20}},{"weight":1,"path":["charged","frostflakeBloom"],"hitMode":"avgHit","reaction":"melt","bonusStats":{"atk_":65,"atk":996,"cryo_enemyRes_":-20}},{"weight":3,"path":["charged","frostflake"],"hitMode":"avgHit","reaction":"melt","bonusStats":{"atk_":65,"atk":996,"cryo_enemyRes_":-20,"critRate_":20}},{"weight":3,"path":["charged","frostflakeBloom"],"hitMode":"avgHit","reaction":"melt","bonusStats":{"atk_":65,"atk":996,"cryo_enemyRes_":-20,"critRate_":20}},{"weight":1,"path":["skill","dmg"],"hitMode":"avgHit","reaction":"melt","bonusStats":{"atk_":65,"atk":996,"cryo_enemyRes_":-20,"critRate_":0}},{"weight":1,"path":["skill","dmg"],"hitMode":"avgHit","reaction":"melt","bonusStats":{"atk_":65,"atk":0,"cryo_enemyRes_":-20,"critRate_":0}},{"weight":2,"path":["charged","frostflake"],"hitMode":"avgHit","reaction":"melt","bonusStats":{"atk_":45,"atk":0,"cryo_enemyRes_":-20,"critRate_":20}},{"weight":2,"path":["charged","frostflakeBloom"],"hitMode":"avgHit","reaction":"melt","bonusStats":{"atk_":45,"atk":0,"cryo_enemyRes_":-20,"critRate_":20}}]}
Bennett — Nahida — Dehya
Nahida - Dehya - Bennett (Default)
{"name":"Burning Melt with Dehya","targets":[{"weight":1,"path":["charged","frostflake"],"hitMode":"avgHit","bonusStats":{"atk_":40,"atk":1070,"eleMas":220},"reaction":"melt"},{"weight":1,"path":["charged","frostflakeBloom"],"hitMode":"avgHit","bonusStats":{"atk_":40,"atk":1070,"eleMas":220},"reaction":"melt"},{"weight":4,"path":["charged","frostflake"],"hitMode":"avgHit","bonusStats":{"atk_":40,"atk":1070,"eleMas":220,"critRate_":20},"reaction":"melt"},{"weight":4,"path":["charged","frostflakeBloom"],"hitMode":"avgHit","bonusStats":{"atk_":40,"atk":1070,"eleMas":220,"critRate_":20},"reaction":"melt"},{"weight":1,"path":["charged","frostflake"],"hitMode":"avgHit","bonusStats":{"atk_":20,"atk":1070,"eleMas":220,"critRate_":20},"reaction":"melt"},{"weight":1,"path":["charged","frostflakeBloom"],"hitMode":"avgHit","bonusStats":{"atk_":20,"atk":1070,"eleMas":220,"critRate_":20},"reaction":"melt"},{"weight":1,"path":["charged","frostflakeBloom"],"hitMode":"avgHit","bonusStats":{"critRate_":20},"reaction":"melt"},{"weight":1,"path":["charged","frostflake"],"hitMode":"avgHit","bonusStats":{"critRate_":20},"reaction":"melt"}],"description":"Burning Melt Ganyu with Dehya. \n\nNot for use with Shim or Amos. \nSet weapon passives, everything else is done by the config\nDehya on totm, Nahida with 875EM. C6 Bennett with Alley Flash. \n\nReplace the EM and Fat ATK buff with whatever buffs your Nahida and Bennett provides"}
Nahida - Dehya - Bennett (Amos)
{"name":"Burning Melt with Dehya","targets":[{"weight":1,"path":["charged","frostflake"],"hitMode":"avgHit","bonusStats":{"atk_":40,"atk":1070,"eleMas":220},"reaction":"melt"},{"weight":1,"path":["charged","frostflakeBloom"],"hitMode":"avgHit","bonusStats":{"atk_":40,"atk":1070,"eleMas":220,"charged_dmg_":24},"reaction":"melt"},{"weight":4,"path":["charged","frostflake"],"hitMode":"avgHit","bonusStats":{"atk_":40,"atk":1070,"eleMas":220,"critRate_":20},"reaction":"melt"},{"weight":4,"path":["charged","frostflakeBloom"],"hitMode":"avgHit","bonusStats":{"atk_":40,"atk":1070,"eleMas":220,"critRate_":20,"charged_dmg_":24},"reaction":"melt"},{"weight":1,"path":["charged","frostflake"],"hitMode":"avgHit","bonusStats":{"atk_":20,"atk":1070,"eleMas":220,"critRate_":20},"reaction":"melt"},{"weight":1,"path":["charged","frostflakeBloom"],"hitMode":"avgHit","bonusStats":{"atk_":20,"atk":1070,"eleMas":220,"critRate_":20,"charged_dmg_":24},"reaction":"melt"},{"weight":1,"path":["charged","frostflakeBloom"],"hitMode":"avgHit","bonusStats":{"critRate_":20},"reaction":"melt"},{"weight":1,"path":["charged","frostflake"],"hitMode":"avgHit","bonusStats":{"critRate_":20,"charged_dmg_":24},"reaction":"melt"}],"description":"Burning Melt Ganyu with Dehya. \n\nFor use with Amos.Set it's weapon passive to 0 or 1 stack.\nSet weapon passives, everything else is done by the config\nDehya on totm, Nahida with 875EM. C6 Bennett with Alley Flash. \n\nReplace the EM and Flat ATK buff with whatever buffs your Nahida and Bennett provides"}
Mono Cryo Configs
Shenhe — Kazuha — Zhongli

Shenhe Kazuha Zhongli (Default)
{"name":"Mono Cryo Ganyu","description":"With Kazuha Zhongli Shenhe\n\nNot for Amos\nSet Blizzard Strayer to Cryo.\nReplace Cryo Damage Increase with Your Shenhe's Quill.\nOnly activate weapon passives and cryo resonance, and artifacts. Everything else is included in the config,\nAssumes AP Zhongli.","targets":[{"weight":1,"path":["charged","frostflake"],"hitMode":"avgHit","bonusStats":{"cryo_dmg_":88,"atk_":20,"cryo_dmgInc":2600,"cryo_enemyRes_":-74}},{"weight":1,"path":["charged","frostflakeBloom"],"hitMode":"avgHit","bonusStats":{"cryo_dmg_":88,"atk_":20,"cryo_dmgInc":2600,"cryo_enemyRes_":-74}},{"weight":1,"path":["skill","dmg"],"hitMode":"avgHit","bonusStats":{"cryo_dmg_":88,"atk_":20,"cryo_dmgInc":2600,"cryo_enemyRes_":-74,"skill_dmg_":15}},{"weight":7,"path":["burst","dmg"],"hitMode":"avgHit","bonusStats":{"cryo_dmg_":88,"atk_":20,"cryo_dmgInc":2600,"cryo_enemyRes_":-74,"burst_dmg_":15}},{"weight":13,"path":["burst","dmg"],"hitMode":"avgHit","bonusStats":{"cryo_dmg_":88,"atk_":20,"cryo_enemyRes_":-74,"burst_dmg_":15}},{"weight":1,"path":["skill","dmg"],"hitMode":"avgHit","bonusStats":{"cryo_dmg_":88,"atk_":20,"cryo_enemyRes_":-74,"skill_dmg_":15}},{"weight":1,"path":["charged","frostflake"],"hitMode":"avgHit","bonusStats":{"cryo_dmg_":73,"cryo_enemyRes_":-74}},{"weight":1,"path":["charged","frostflakeBloom"],"hitMode":"avgHit","bonusStats":{"cryo_dmg_":73,"cryo_enemyRes_":-74}},{"weight":2,"path":["charged","frostflake"],"hitMode":"avgHit","bonusStats":{"cryo_dmg_":58,"cryo_enemyRes_":-60,"critRate_":20}},{"weight":2,"path":["charged","frostflakeBloom"],"hitMode":"avgHit","bonusStats":{"cryo_dmg_":58,"cryo_enemyRes_":-60,"critRate_":20}},{"weight":2,"path":["skill","dmg"],"hitMode":"avgHit","bonusStats":{"cryo_dmg_":58,"cryo_enemyRes_":-60,"skill_dmg_":15}}]}
Shenhe Kazuha Zhongli (Amos)
{"name":"Mono Cryo Ganyu","description":"With Kazuha Zhongli Shenhe\n\nFor Amos, set its passive to 0 or 1 stacks\nSet Blizzard Strayer to Cryo.\nReplace Cryo Damage Increase with Your Shenhe's Quill.\nOnly activate weapon passives and cryo resonance, and artifacts. Everything else is included in the config,\nAssumes AP Zhongli.","targets":[{"weight":1,"path":["charged","frostflake"],"hitMode":"avgHit","bonusStats":{"cryo_dmg_":88,"atk_":20,"cryo_dmgInc":2600,"cryo_enemyRes_":-74}},{"weight":1,"path":["charged","frostflakeBloom"],"hitMode":"avgHit","bonusStats":{"cryo_dmg_":88,"atk_":20,"cryo_dmgInc":2600,"cryo_enemyRes_":-74,"charged_dmg_":24}},{"weight":1,"path":["skill","dmg"],"hitMode":"avgHit","bonusStats":{"cryo_dmg_":88,"atk_":20,"cryo_dmgInc":2600,"cryo_enemyRes_":-74,"skill_dmg_":15}},{"weight":7,"path":["burst","dmg"],"hitMode":"avgHit","bonusStats":{"cryo_dmg_":88,"atk_":20,"cryo_dmgInc":2600,"cryo_enemyRes_":-74,"burst_dmg_":15}},{"weight":13,"path":["burst","dmg"],"hitMode":"avgHit","bonusStats":{"cryo_dmg_":88,"atk_":20,"cryo_enemyRes_":-74,"burst_dmg_":15}},{"weight":1,"path":["skill","dmg"],"hitMode":"avgHit","bonusStats":{"cryo_dmg_":88,"atk_":20,"cryo_enemyRes_":-74,"skill_dmg_":15}},{"weight":1,"path":["charged","frostflake"],"hitMode":"avgHit","bonusStats":{"cryo_dmg_":73,"cryo_enemyRes_":-74}},{"weight":1,"path":["charged","frostflakeBloom"],"hitMode":"avgHit","bonusStats":{"cryo_dmg_":73,"cryo_enemyRes_":-74,"charged_dmg_":24}},{"weight":2,"path":["charged","frostflake"],"hitMode":"avgHit","bonusStats":{"cryo_dmg_":58,"cryo_enemyRes_":-60,"critRate_":20}},{"weight":2,"path":["charged","frostflakeBloom"],"hitMode":"avgHit","bonusStats":{"cryo_dmg_":58,"cryo_enemyRes_":-60,"critRate_":20,"charged_dmg_":24}},{"weight":2,"path":["skill","dmg"],"hitMode":"avgHit","bonusStats":{"cryo_dmg_":58,"cryo_enemyRes_":-60,"skill_dmg_":15}}]}