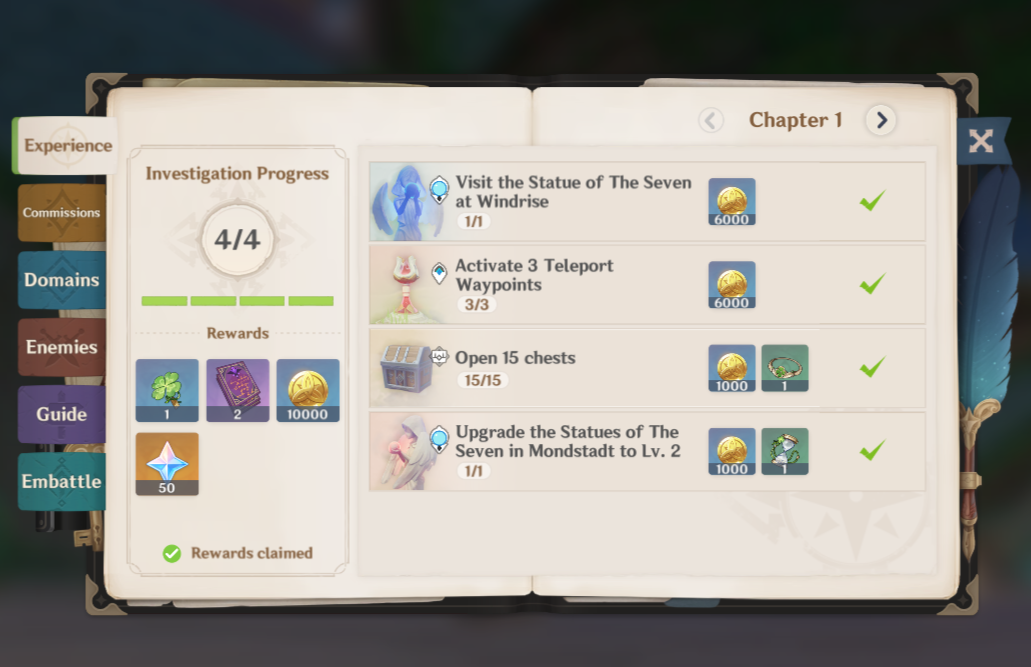
A Genshin Impact Artifacts Guide by KQM
Updated for Version 4.6
Table of Contents
Introduction
Welcome to the official KQM guide on Genshin Impact artifacts! This guide is for novice and veteran players alike who want to expand their knowledge on artifacts in Genshin Impact. This guide is intended to be a comprehensive resource that players can return to.
There are two versions of this guide: an in-depth version with all the information on artifacts and an abridged version which hides basic info.
We suggest reading through the full version at least once, even if you are a veteran player, since there may be some basic info you were not aware of before! You can click the button below to adjust which version you are reading.
The sections Understanding, Accessing, Obtaining, and Enhancing Artifacts contain detailed information on artifacts in general. The section Farming Artifacts provides recommendations on artifact builds and Resin-efficient artifact farming practices. Lastly, the section on Using Genshin Optimizer provides an overview of how to effectively use its tools.
The Appendices detail basic information, suggestions, and potential 4-piece holders of all artifact sets in the game. The section features interactive buttons that make it easier to sort what you’re looking for! Other Useful Resources are also available at the end of this guide.
If you want personalized advice, join our Discord and ask for help from KQM's lovely Guhua!
We hope our guide serves you well on your Genshin Impact journey!
Glossary and Abbreviations
FAQ
Below is a list of common questions regarding artifacts organized by category. Click them to be magically redirected to what you’re looking for!
Getting Started
- Where can I obtain artifacts?
- What artifacts do I use if I just started playing?
- When should I start farming artifacts?
- What should I do with my Resin before farming for artifacts?
- What stats do I need to have on my artifacts?
- How can I access my artifacts?
- Which artifacts should I level first?
Understanding Artifacts
- What are main stats or Major Affixes?
- What are substats or Minor Affixes?
- How do I level up artifacts?
- When should I use a 4-piece set?
- When should I use the Strongbox?
- Do set bonuses or stats matter more?
- What is CV?
Artifact Farming
- What’s the best way to farm artifacts?
- How do I choose which domains to farm?
- Which artifacts should I prioritize?
- How long should I farm?
- What do I do if I’m out of artifact EXP / fodder?
- What should I do with duplicate artifacts?
- What are good artifact XP farming routes?
Artifact Builds
- How do I optimize artifacts for specific characters?
- What are the best artifacts for DPS characters?
- What are the best artifacts for support characters?
- Should I use Fast Equip (Loadouts)?
- What should I do for Goblet main stats?
- Should I level up artifacts evenly or focus on specific ones?
- Where are all the good artifacts?
Understanding Artifacts

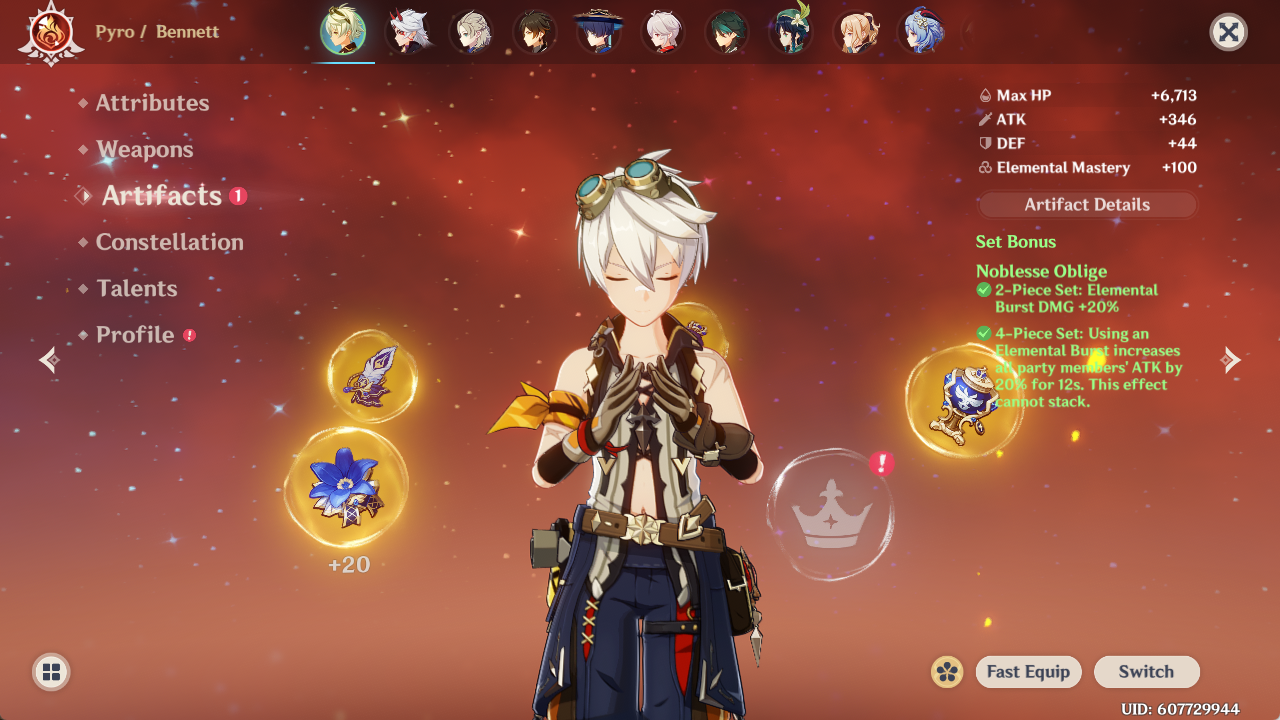
This section of the guide provides comprehensive information on artifact attributes. We provide examples with Bennett and some of his artifacts throughout.
What Are Artifacts?
Artifacts are items in Genshin Impact that can be equipped onto characters. Artifacts are one of the primary ways to enhance a character, with the others being character level, Talents, Constellations, and weapons.
An artifact’s stats are applied to a character’s stats, which can increase their damage, utility, or survivability.
Each artifact also belongs to an artifact set. Artifact sets provide different set bonuses depending on how many artifacts of that set are equipped on a character. These set bonuses further increase a character’s damage, utility, or survivability.
Artifact Types
There are five types of artifacts that may be equipped:
Only one of each artifact type may be equipped on a character at the same time. This means at most five different artifacts can be equipped by one character at any given time.
Artifact types have an equal chance of being dropped or rewarded except from certain sources that give specific, individual artifacts.
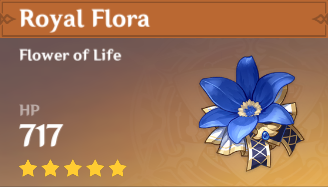
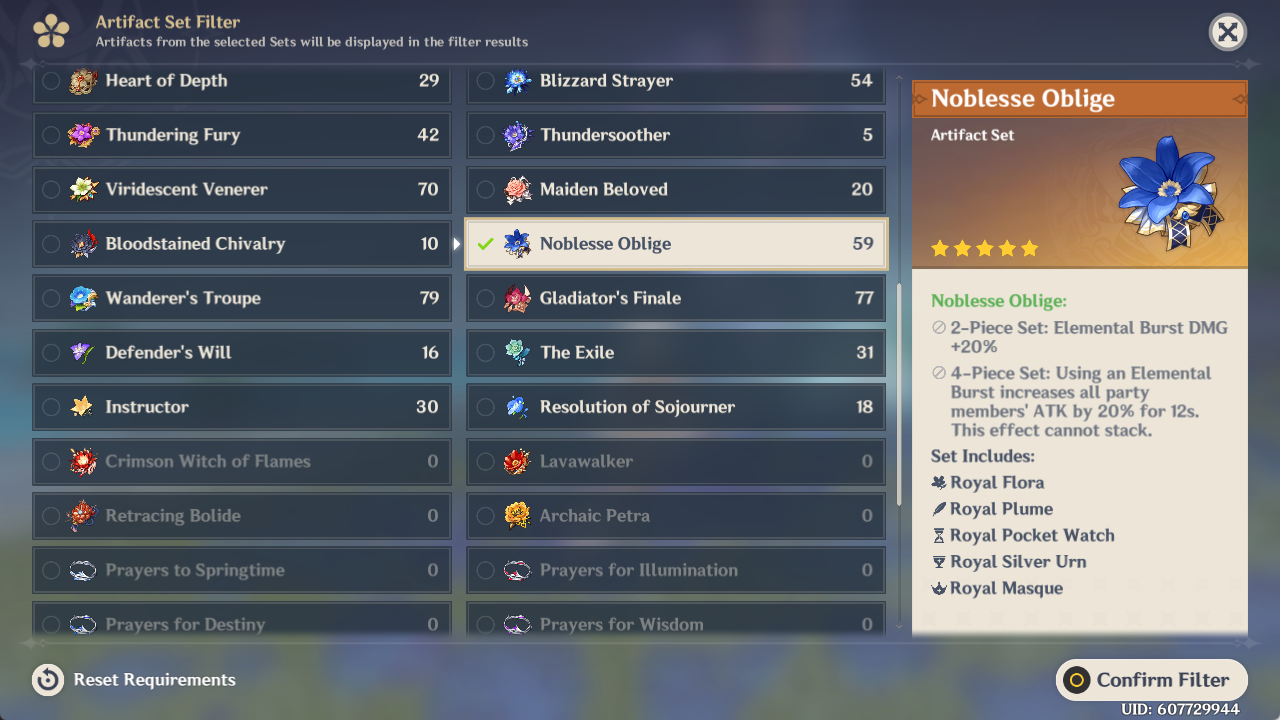
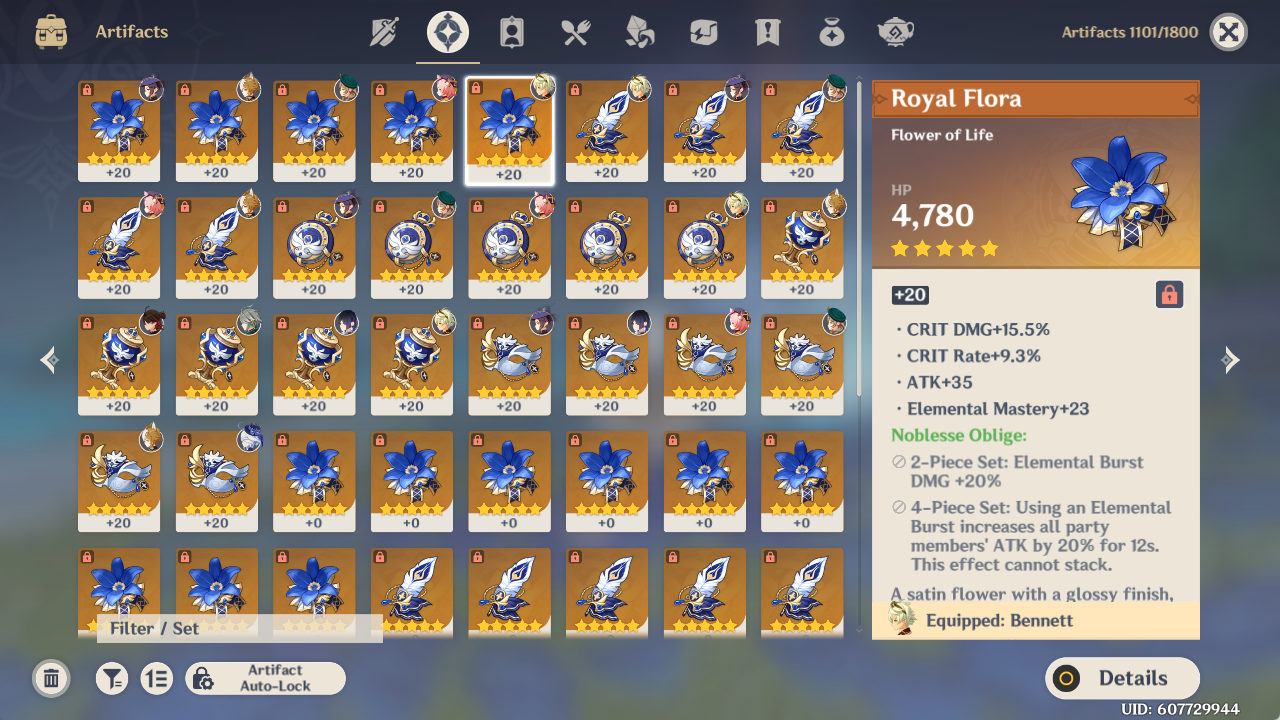
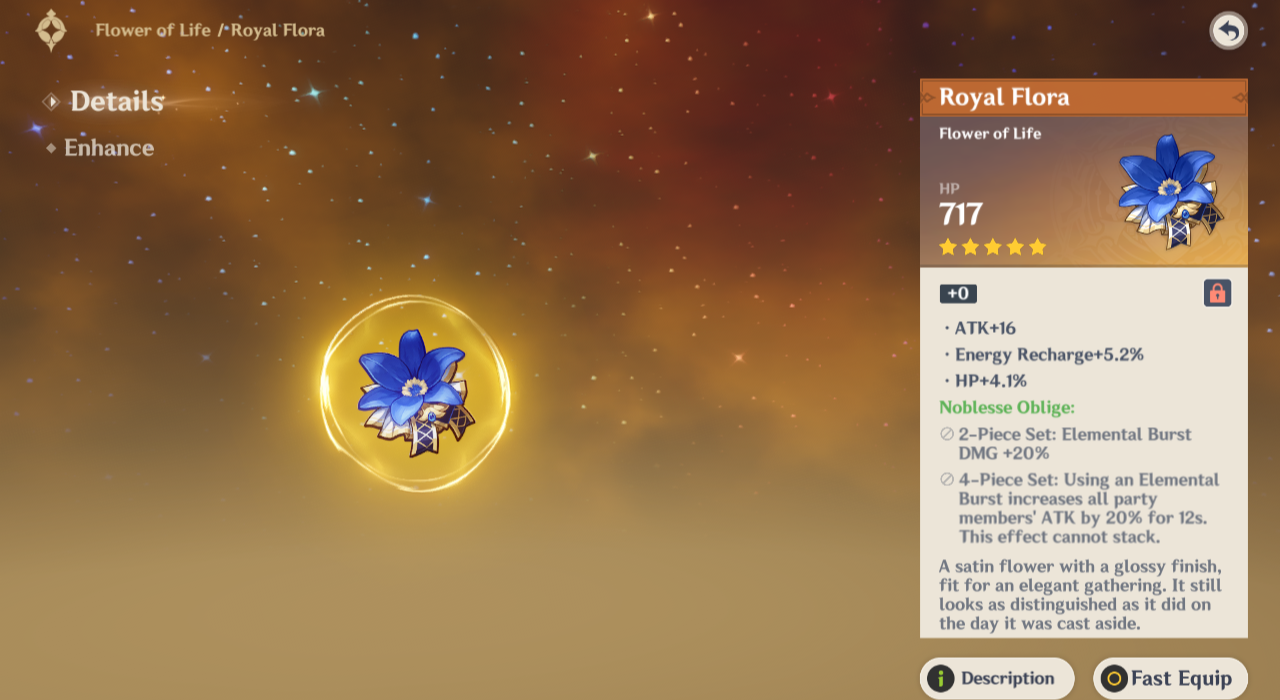
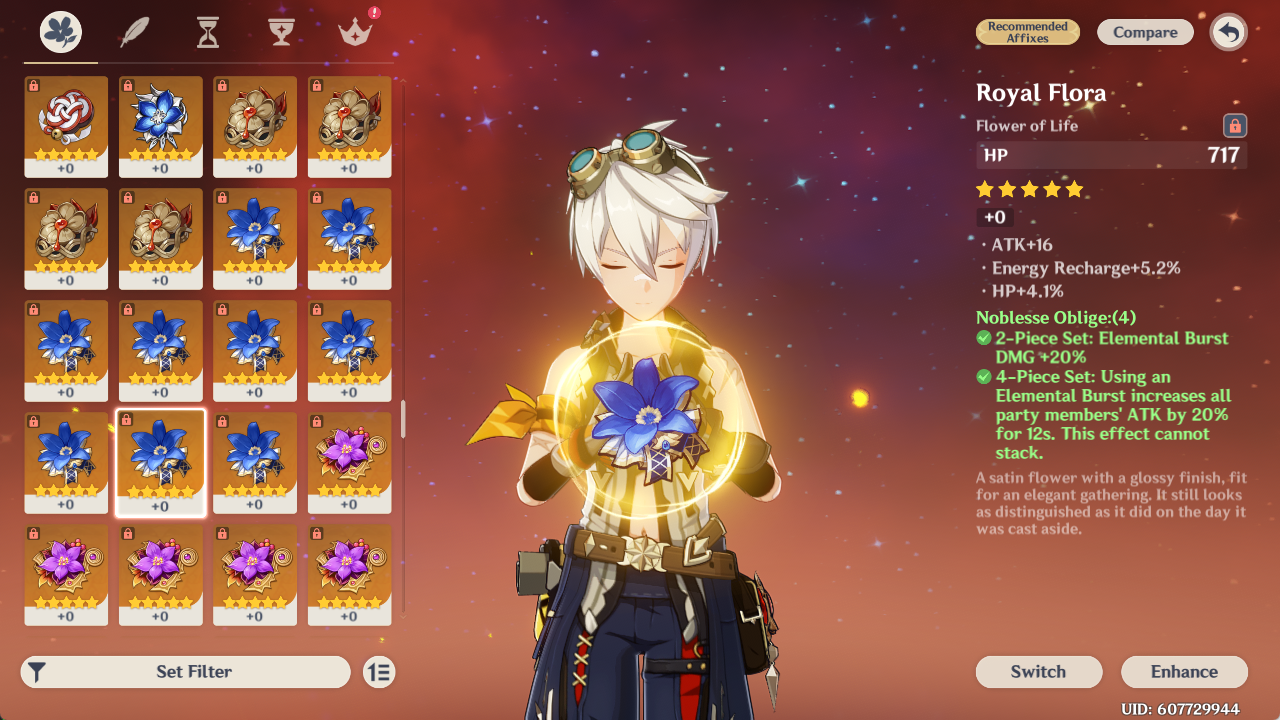
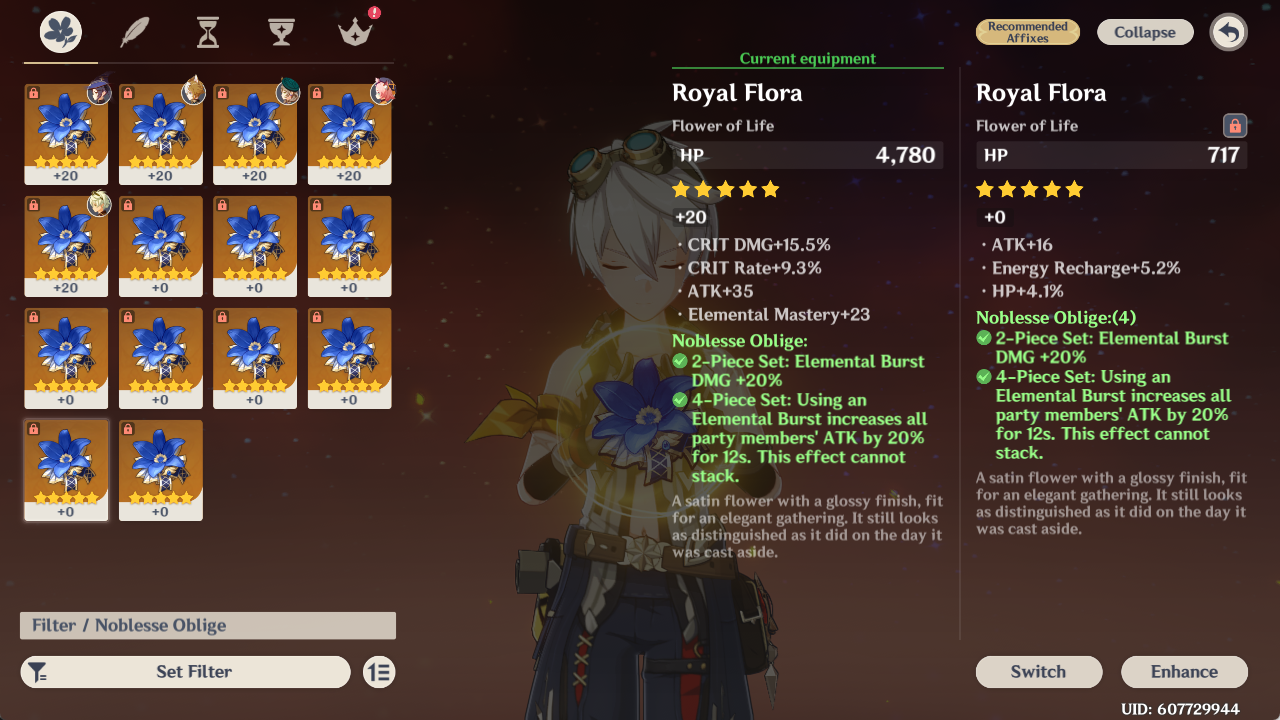
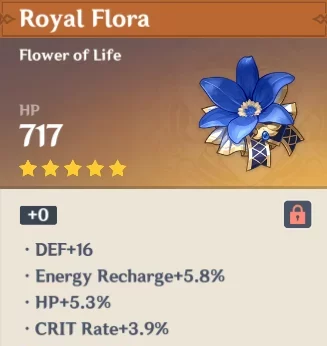
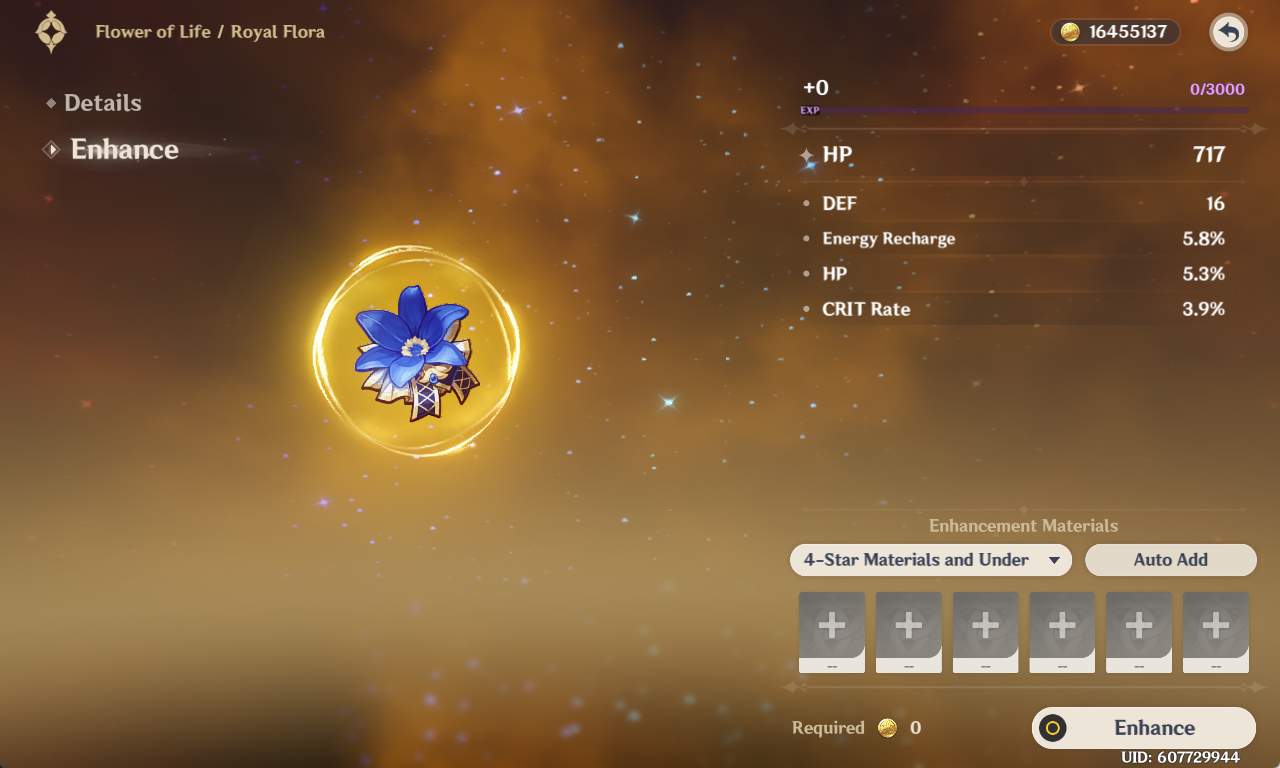
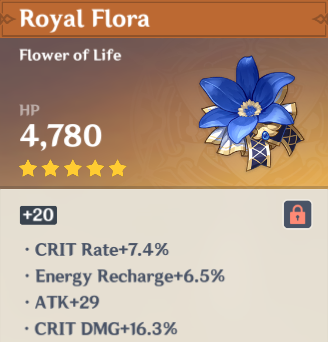
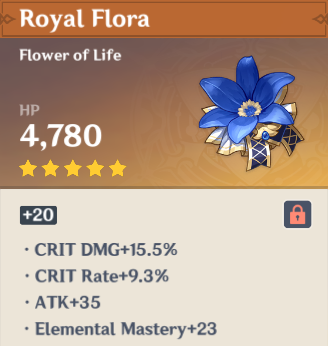
In addition to the general name for each artifact type, each artifact set has a unique name for each type. For example, the Flower of Life for the Noblesse Oblige artifact set is called “Royal Flora.” These names are merely flavor text.
Set Bonuses
What Are Set Bonuses?
Artifact sets can provide set bonuses. Set bonuses enable a specific effect to take place. They are also colloquially called set effects.
Currently, there are only 2-piece, 4-piece, and 1-piece set bonuses in the game. Most artifact sets can provide two bonuses: a 2-piece and a 4-piece bonus.
Set bonuses are important since they provide stats and utility for the holder and potentially the team. However, some characters don’t benefit greatly from set bonuses and instead focus on good stats and applicable 2-piece bonuses. Go to our Farming Artifacts section to learn more about when to go for a 4-piece bonus or opt for another build.
2-Piece Set Bonus
Some 2-piece bonuses are effectively the same, i.e., they provide the same stat buff. For example, Viridescent Venerer and Desert Pavilion Chronicle both provide 15% Anemo DMG Bonus. You receive 30% Anemo DMG Bonus if both artifact sets are equipped.
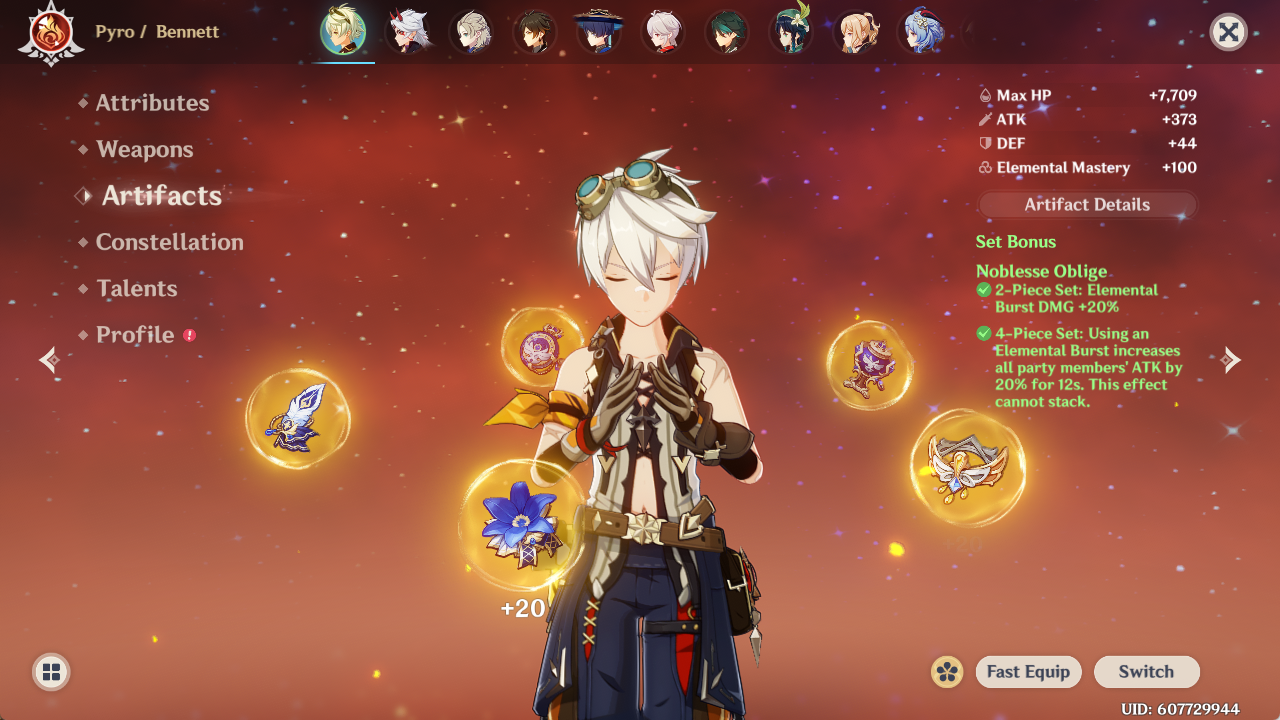
4-Piece Set Bonus
4-piece bonuses that buff characters or debuff enemies do not stack, i.e., using the same 4-piece set on two different characters does not grant double the effect. For example, Noblesse Oblige’s 4-piece bonus gives a teamwide ATK% buff if the wielder uses their Elemental Burst. If two different characters on the same team hold 4-piece Noblesse Oblige and use their Bursts, only one instance of the 4-piece bonus ATK% buff is granted to the team at a time.
Note that 4-piece bonuses do not override 2-piece bonuses from the same set, i.e., they are both active, since equipping four artifacts from the same artifact set also means equipping two artifacts from that set.
1-Piece Set Bonus
1-piece sets are not worth farming, but can be useful if you are lower AR and need help clearing certain Spiral Abyss Floors with enemies that deal high amounts of the same type of Elemental damage.
Artifact Rarity
Artifacts have a rarity ranging from 1-star to 5-star. This rarity generally correlates with how rare it is to obtain the artifact. There is no way to change an artifact’s rarity. However, the probability of receiving artifacts of higher rarity increases with World Level and Domain level.
Artifact rarity determines the initial number of substats, the maximum number of substats, the maximum artifact level, the value of the main stat, and the value of the substats. The base value of each stat increases at higher rarity.
Artifact Rarity Colors
Each artifact rarity has a corresponding background color consistent with the rarities of other items in the game.
Artifact Set Rarities
Different artifact sets have different possible rarities.
- 3 artifact sets have a rarity of 1-star, 2-star, or 3-star.
- 14 artifact sets have a rarity of 3-star or 4-star.
- 34 artifact sets have a rarity of 4-star or 5-star.
Within this guide, as well as in the larger community, artifact sets are distinguished by their highest possible rarity. That is, the three pools of different possible rarity distributions are referred to as 3-star, 4-star, and 5-star artifact sets.
Main Stats
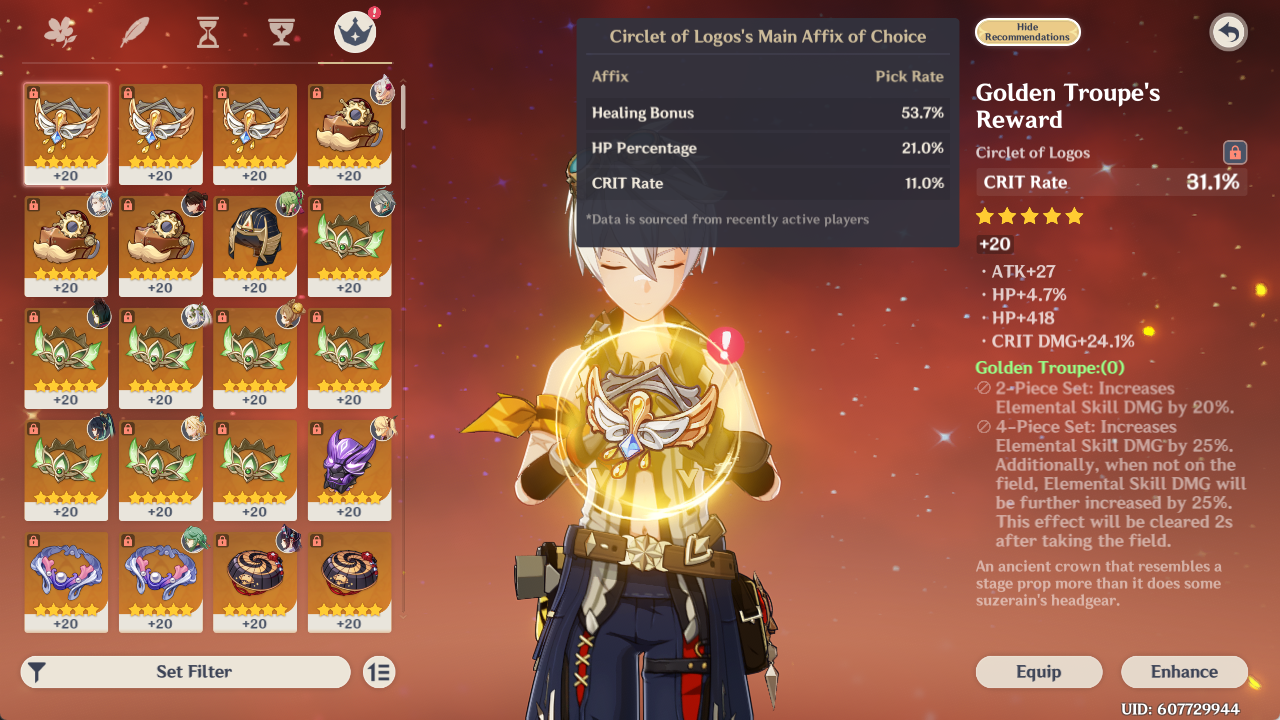
Every artifact has a designated main stat. An artifact’s main stat is the stat displayed at the top of the artifact. The main stat of an artifact increases to a predefined value for every artifact level. In-game, main stats are referred to as Major Affixes, but as the official term is not widely used in the playerbase, we will be referring to Major Affixes as main stats in this guide.
Different artifact types have different possible main stats. For Sands, Goblets, and Circlets, different main stats have different probabilities of occurring.
For more information regarding how these character stats work, go to Scaling.
Substats
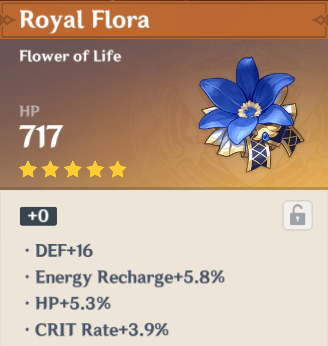
Even though they are called substats, the total value of an artifact’s substats can match or even exceed that of its main stat. This usually means that substats are at least as important to take into consideration as main stats.
Number of Substats
Artifacts inherently have a certain number of substats upon being obtained, dependent on the rarity. The maximum number of substats an artifact can have is 4.
Let n be the rarity of an artifact. Then, the number of substats an artifact at Level +0 has is either n−2 or n−1. For example, a 4-star artifact at Level +0 has either 2 or 3 different substats. 1-star artifacts always start with 0 substats.
If an artifact has fewer than 4 substats at Level +0, it always gains a new substat at Level +4. For artifacts that can be leveled further, they gain a new substat every 4 levels until they reach 4 substats.
For example, a 4-star artifact that has 2 substats at Level +0 gains a new substat at levels +4 and +8, after which it won’t gain new substats. At levels +12 and +16, it rolls again into any of its 4 substats.
The probability of the number of substats an artifact has at Level +0 is determined by the source of the artifact. 5-star artifacts obtained from Domains of Blessing have a lower probability of starting with 4 substats than artifacts obtained from Artifact Strongboxes, Bosses, and Domain Reliquaries.
Below is the table of probabilities for different sources of artifacts.
Possible Substats
The possible substats for artifacts are Flat ATK, Flat DEF, Flat HP, ATK%, DEF%, HP%, CRIT Rate, CRIT DMG, Elemental Mastery, and Energy Recharge.
An artifact cannot have a substat that is the same as its main stat. For example, an ATK% Sands cannot roll an ATK% substat, but can have a flat ATK substat. Since Flowers and Feathers have a Flat main stat, they are slightly more likely to have a percent substat than Sands, Goblets, and Circlets.
The probability of each substat occurring can be found in the Artifact Substat Distribution article in the Genshin Wiki. To summarize, Flat stats are the most likely to occur while CRIT stats are the least likely, with the rest of the stats being in the middle.
Substat Values
Substats have specific values determined by the type of substat, the artifact rarity, and artifact level.
Substats are significant to the hundredths place but appear as rounded figures. Flat substats (ATK, DEF, HP, and Elemental Mastery) appear as whole numbers. Percent-based substats (ATK%, DEF%, HP%, CRIT Rate, CRIT DMG, and Energy Recharge) appear up to the tenths place. All displayed values are rounded half up. For example, an EM stat of 20.98 displays at 21, and an ATK% stat of 10.49 displays at 10.5.
For a table of possible substat values, go to Roll Value.
Calculating the Odds of Rolling a “Good” Piece
The Artifact Farming Calculator by grumd can be used to calculate the odds of obtaining an artifact with specific substat values over a period of Resin spent (defaulting to 160 Resin per day spent on artifact farming).
You can also use this spreadsheet by Vidmilo to calculate the odds of rolling an artifact that starts with a certain number of desired, or “good”, substats. This can help determine how long it will take you to reach your current artifact farming goals and help you maintain realistic expectations.
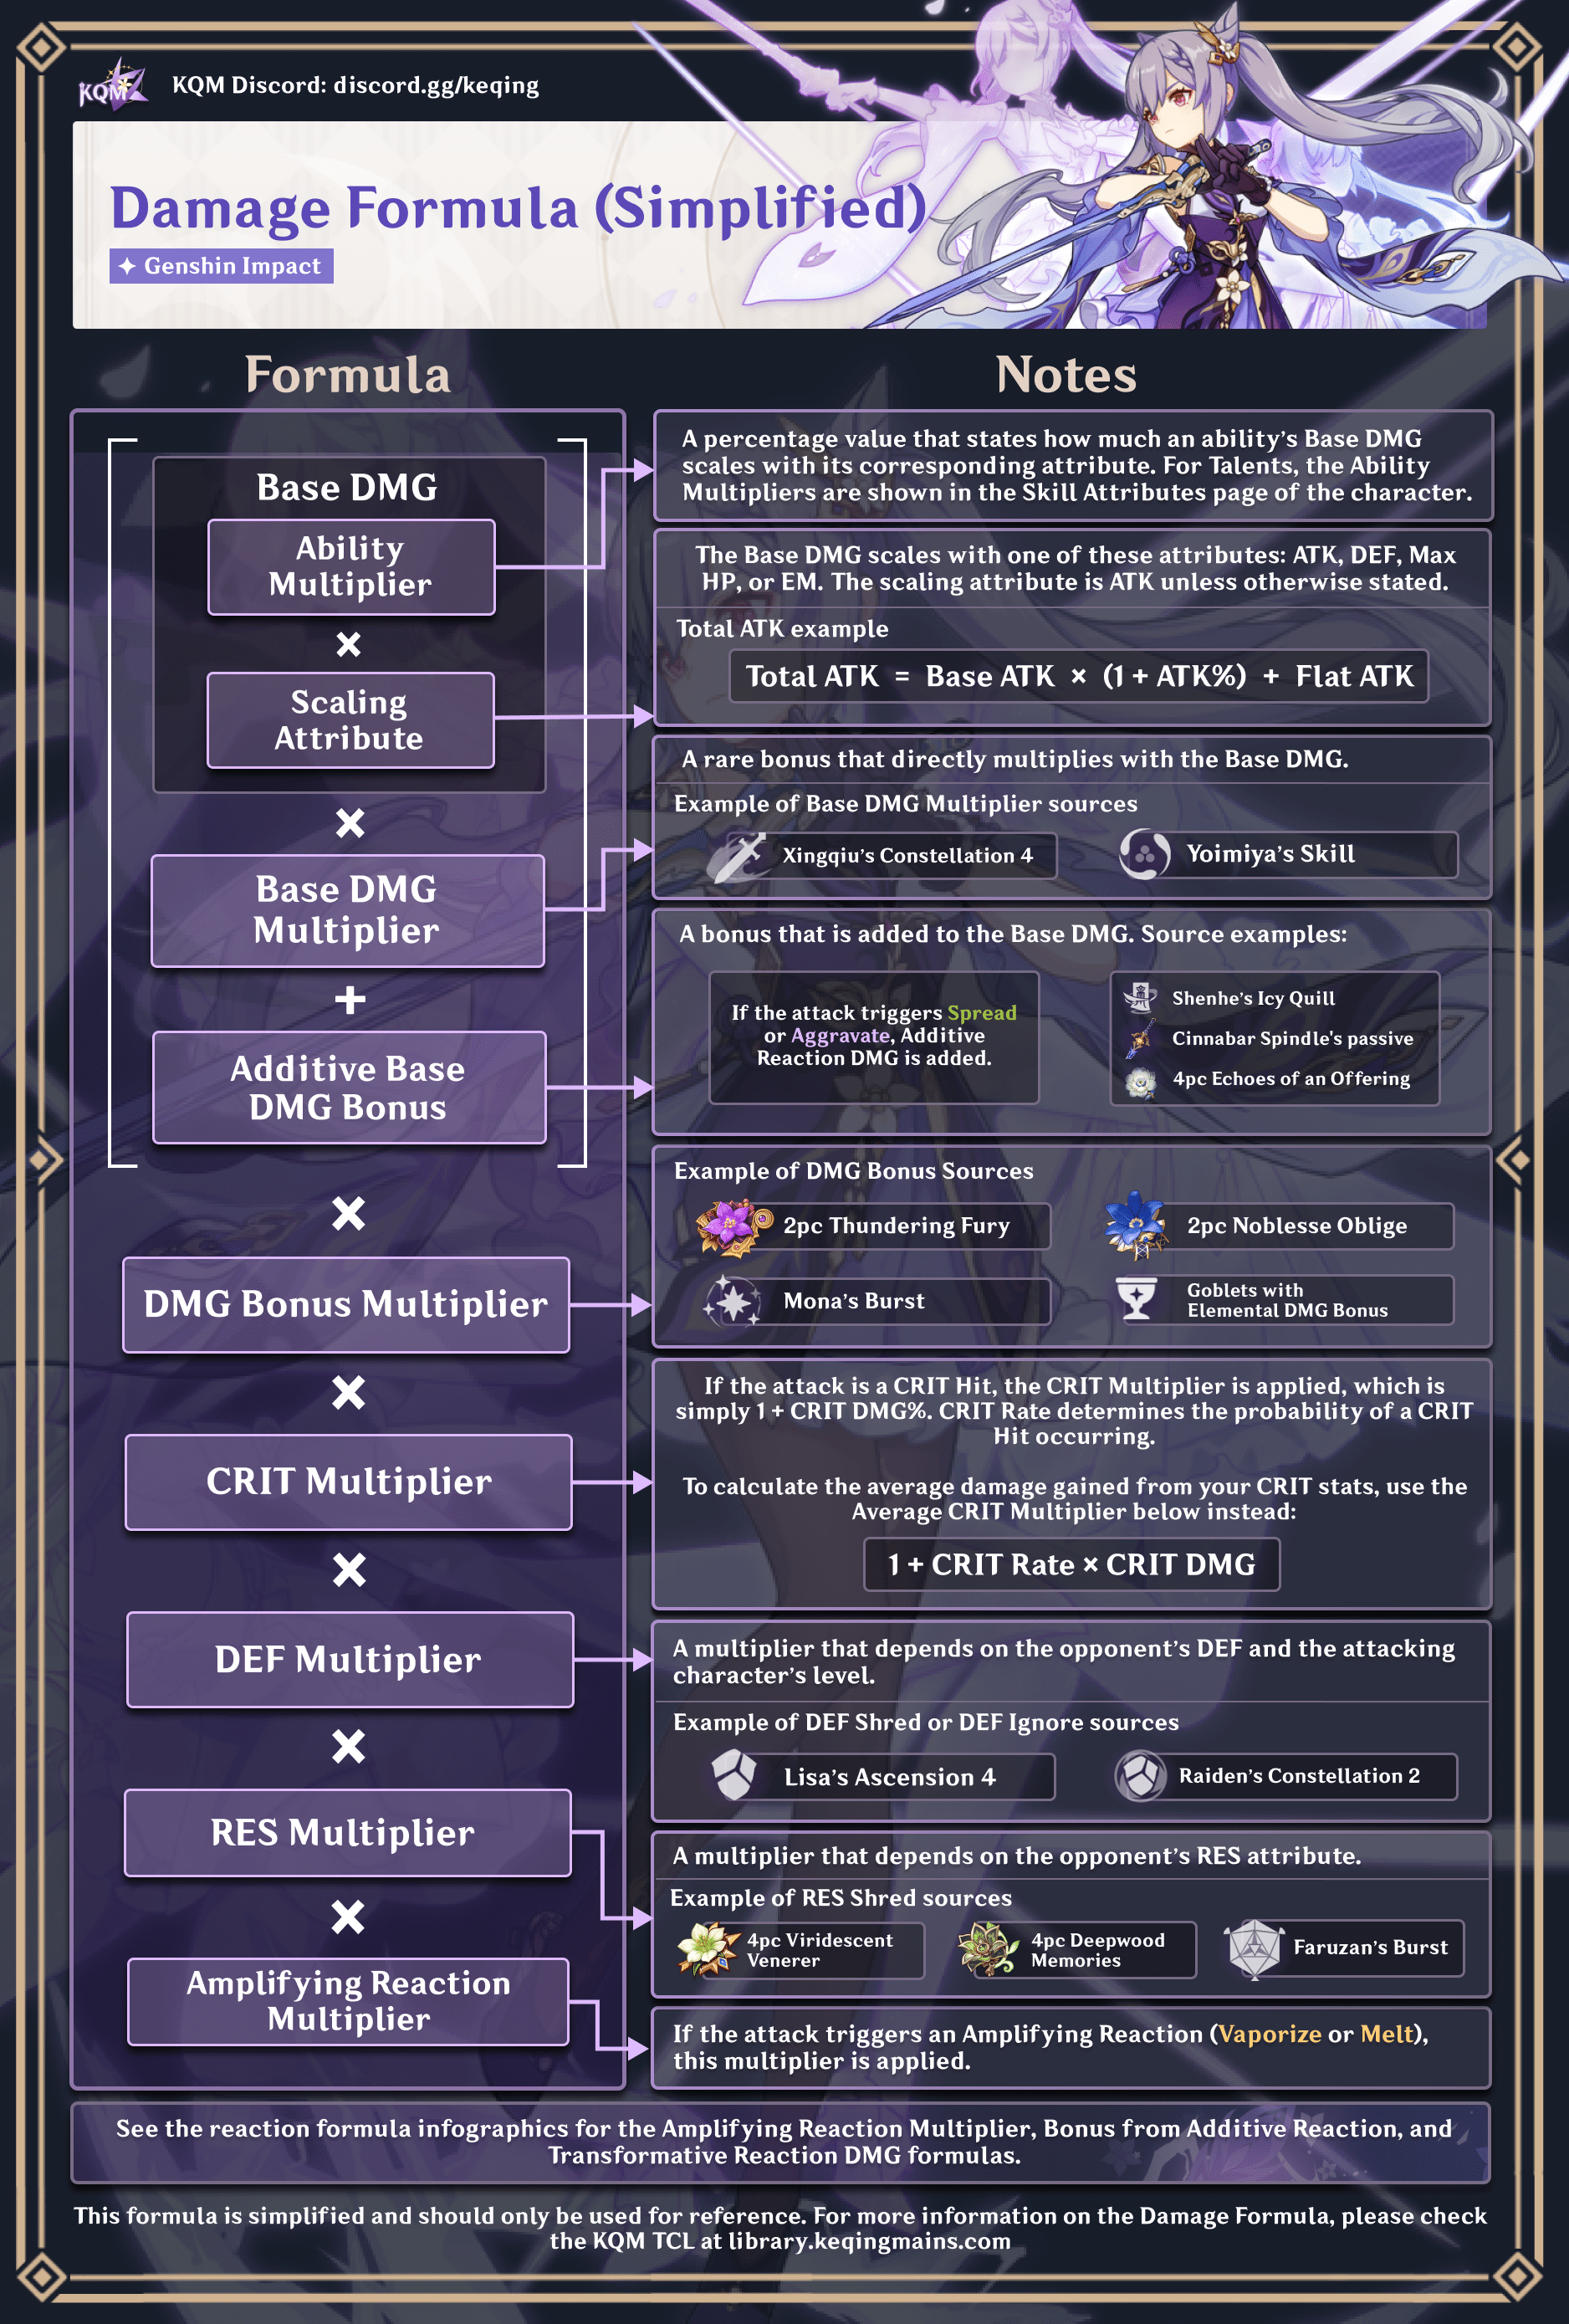
Damage Formula
In this section, we explain how different stats contribute to damage through the in-game damage formula. Understanding damage calculation is useful in understanding optimal character builds.
The damage formula includes the following information to calculate damage:
- The stats and Talents of the attacking character,
- The stats of the opponent being attacked,
- Elemental Reactions, if applicable.
Artifact stats and set bonuses contribute to outgoing damage by increasing a character’s stats and sometimes decreasing the enemy’s Elemental RES stats.
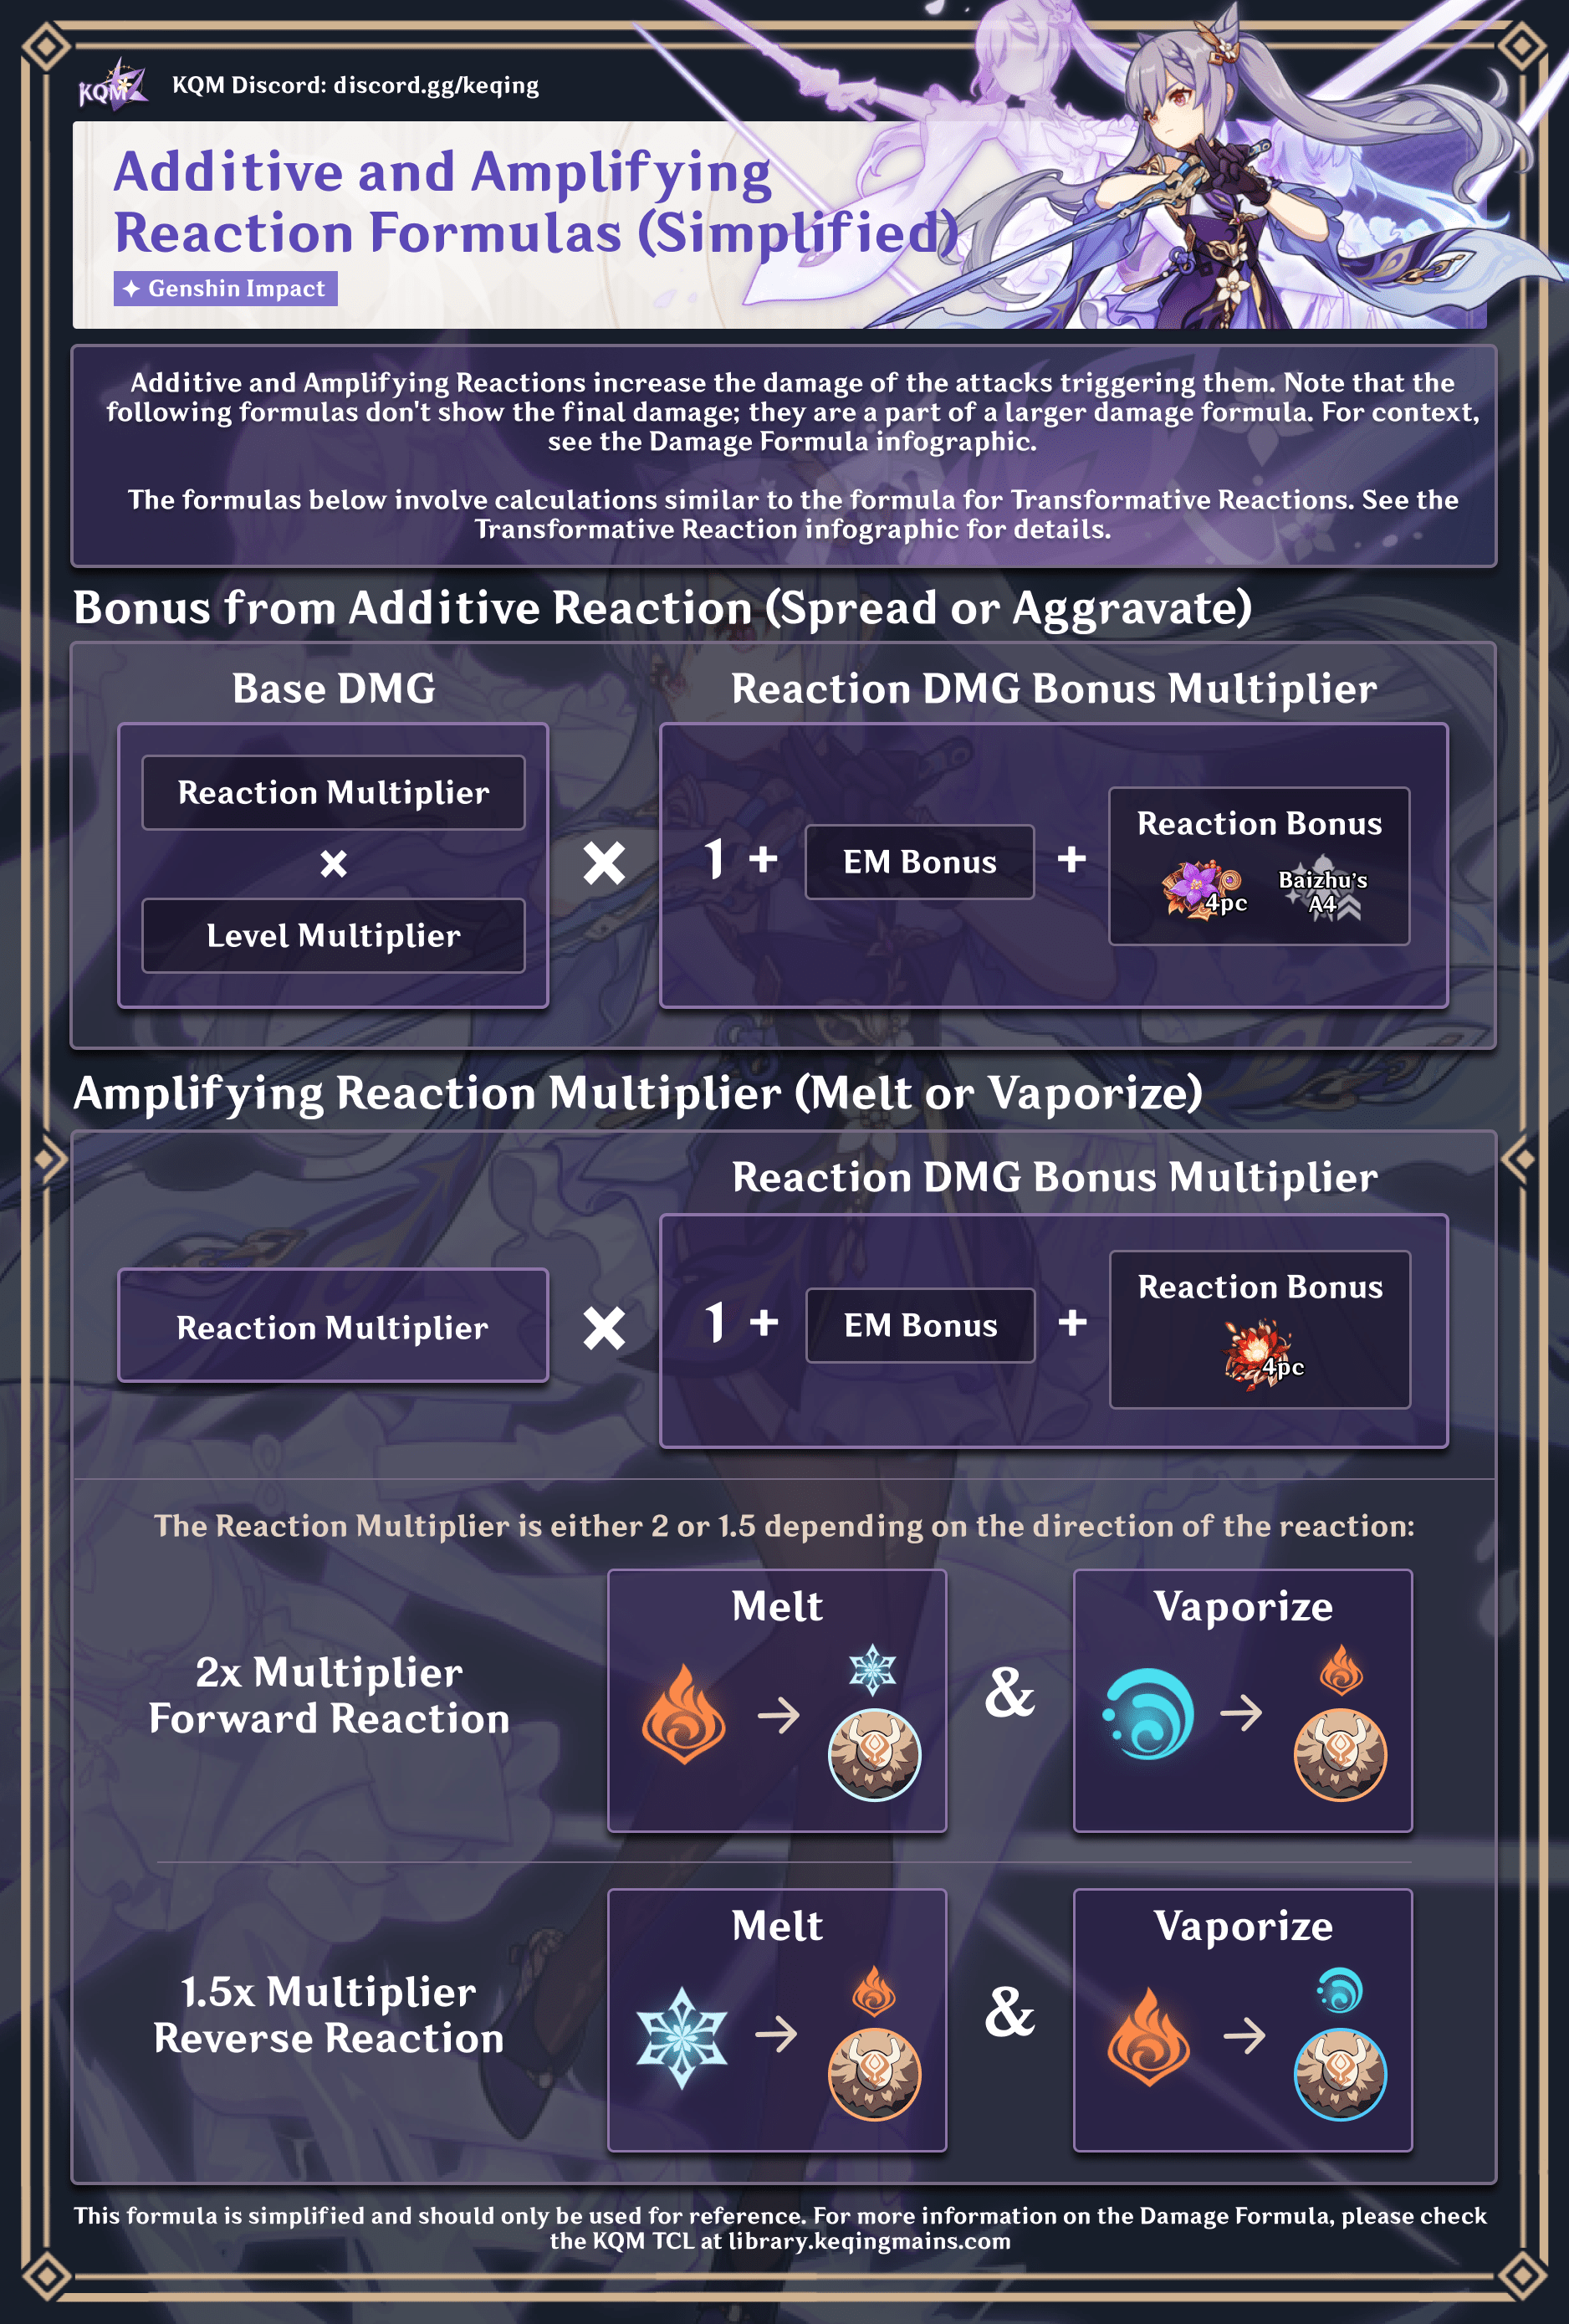
The damage formula contains different modifiers, which are multiplicative with each other. These modifiers are Base DMG, DMG Bonus%, CRIT, Enemy DEF, Enemy RES, and the Amplifying Reaction Modifier. Different reactions make use of different formulas. They are portrayed in different boxes in the infographics below.
Simplified Damage Formula
Additive and Amplifying Reactions
Transformative Reactions
Multiplicative Modifiers
Due to the multiplicative nature of these modifiers, investing modestly into different, relevant modifiers results in greater damage.
For example, Bennett’s Elemental Burst deals Pyro damage to enemies, scales with ATK and Pyro DMG Bonus, and can crit. The outgoing damage would be higher using an ATK% Sands, Pyro DMG% Goblet, and CRIT DMG Circlet than using only an ATK% main stat for all three artifact types. If it were even possible, an ATK% Sands, Pyro DMG% Goblet, and CRIT DMG Circlet would still be better than running Pyro DMG% on all three artifact types.
Not Always So Simple...
There are cases where damage calculation becomes complicated due to a character’s unusually scaling Talents or passives. Some of these characters include Alhaitham, Kokomi, or Nahida. These cases will not be explained in this guide.
Genshin Optimizer (external website) can help with building characters. The KQM Character Guides and Quick Guides provide artifact recommendations that account for a character’s complicated damage calculation.
More information on the damage formula can be found in the KQM Theorycrafting Library page about the Damage Formula.
Elemental Reactions
Elemental Reactions that deal damage can be classified under three categories: Transformative Reactions, Amplifying Reactions, and Additive Reactions. These terms are created by the community and are not explicitly stated in-game.
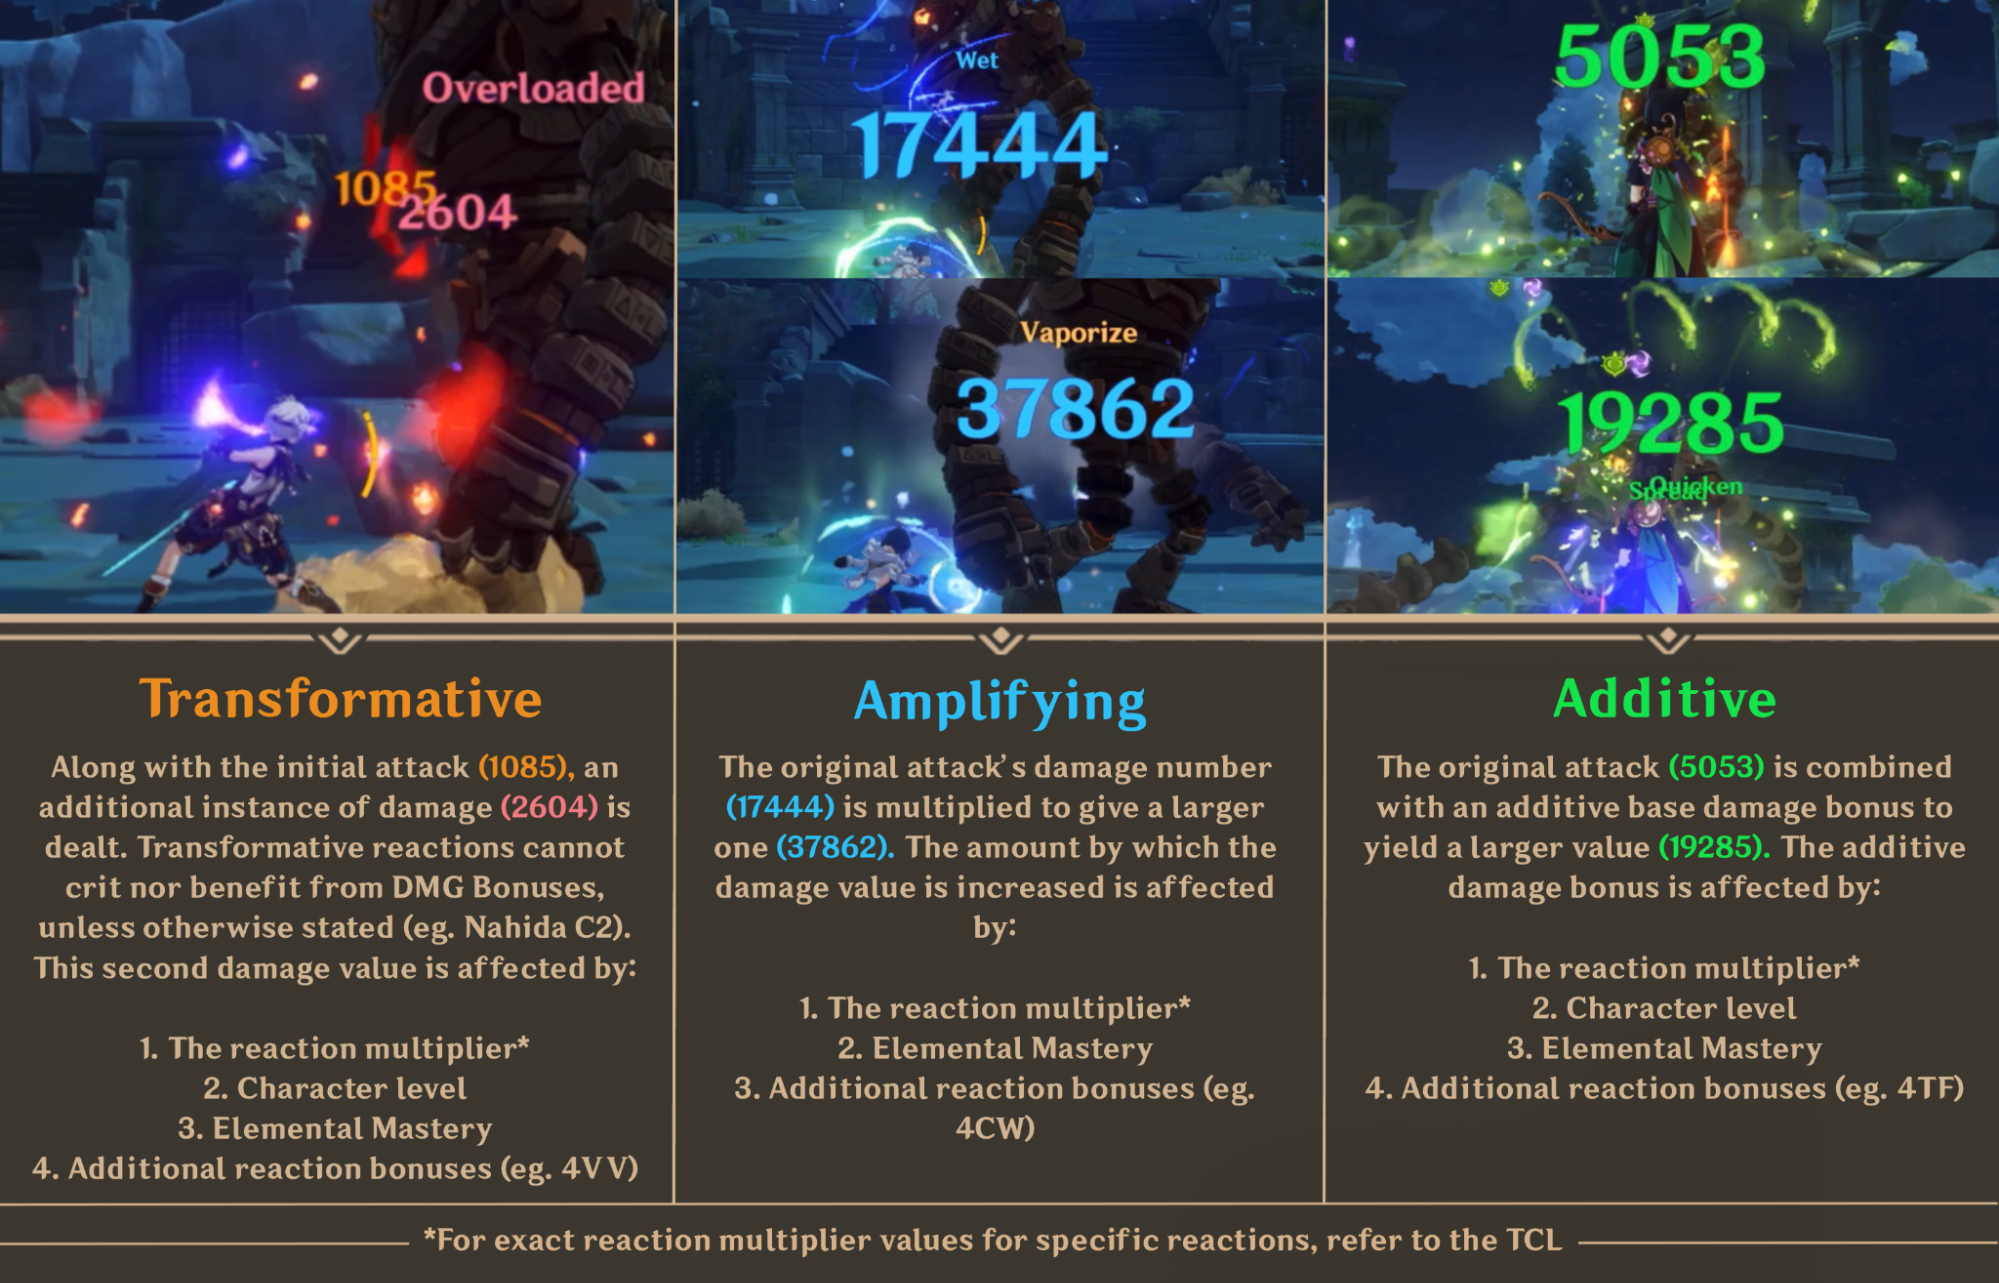
Transformative Reactions
Transformative Reactions (Bloom, Burgeon, Electro-Charged, Overloaded, Shatter, Superconduct, and Swirl) deal damage based on a formula that uses the reaction’s base multiplier, the triggering character’s level, and their Elemental Mastery (EM). They don’t scale with ATK or DMG Bonus and can’t crit.
Amplifying Reactions
Amplifying Reactions (Melt and Vaporize) don’t deal damage by themselves; instead, they multiply the outgoing damage of the triggering character. They benefit from ATK, EM, CRIT Rate, CRIT DMG, Elemental DMG Bonus, and other DMG Bonus modifiers. They have a “forward” and “reverse” version depending on the order of Elemental application, with different base multipliers and Elemental aura consumption.
Additive Reactions
Additive Reactions (Aggravate and Spread) modify the existing damage dealt by a character and scale with the character’s level, EM, CRIT, and DMG Bonus. Unlike Amplifying Reactions, Additive Reactions add to the base damage dealt. Aggravate and Spread are the only Additive Reactions in the game, triggered by applying Electro and Dendro on a Quicken aura, respectively. Note that the initial attack that triggers the Quicken Reaction does not deal increased damage, but a succeeding attack that refreshes Quicken’s duration will get a damage boost.
In summary, understanding the different types of Elemental Reactions and their effects is essential for building effective teams and maximizing damage output. It’s important to consider which type of reaction is occurring and build your characters accordingly.
Scaling
The term “scaling” refers to how Talents and Elemental Reactions use different stats as a base multiplier in the damage formula. This is also known as motion values or MVs. Different Talents scale with different stats. Additionally, some Talents directly scale with two different stats. When building a character, it is important to know what their Talents scale with. Each Talent’s scaling can be viewed via the Talent description on the Character page.
Below is a list of important stats, the common Talents that scale with them, and some ways of obtaining them.
ER Requirements
Use the Energy Recharge Calculator to determine exact requirements for your team and rotation.
An ER requirement is the minimum Energy Recharge stat needed for a character to consistently cast their Elemental Burst in a given team rotation. It is important to prioritize Energy Recharge before other stats when building for characters whose Burst is both necessary and frequently used in their rotations.
Artifacts can provide Energy Recharge stats through a Sands with an Energy Recharge main stat or through substats. The 2-piece set bonus of Emblem of Severed Fate, Scholar, and the Exile grants 20% Energy Recharge to the wearer. Some weapons, Talents, character Ascension Stats, and Constellations can provide additional Energy Recharge, Flat Energy, or Elemental Particles.
For characters with higher ER requirements (above 160%), you can generally equip a weapon that provides Energy Recharge, an Energy Recharge Sands, or both. While reaching ER requirements above 160% through substats alone is possible, it requires multiple ER% rolls on all of your artifact pieces, which takes an incredible amount of Resin. For lower ER requirements, Energy Recharge substats alone can be enough.
To learn about a specific character’s ER requirements, please refer to the KQM Character Guides and Quick Guides. For more information about Energy, please read the article on Energy in the Theorycrafting Library. If you need further assistance with the Energy Recharge Calculator, check out the ERC Guide!
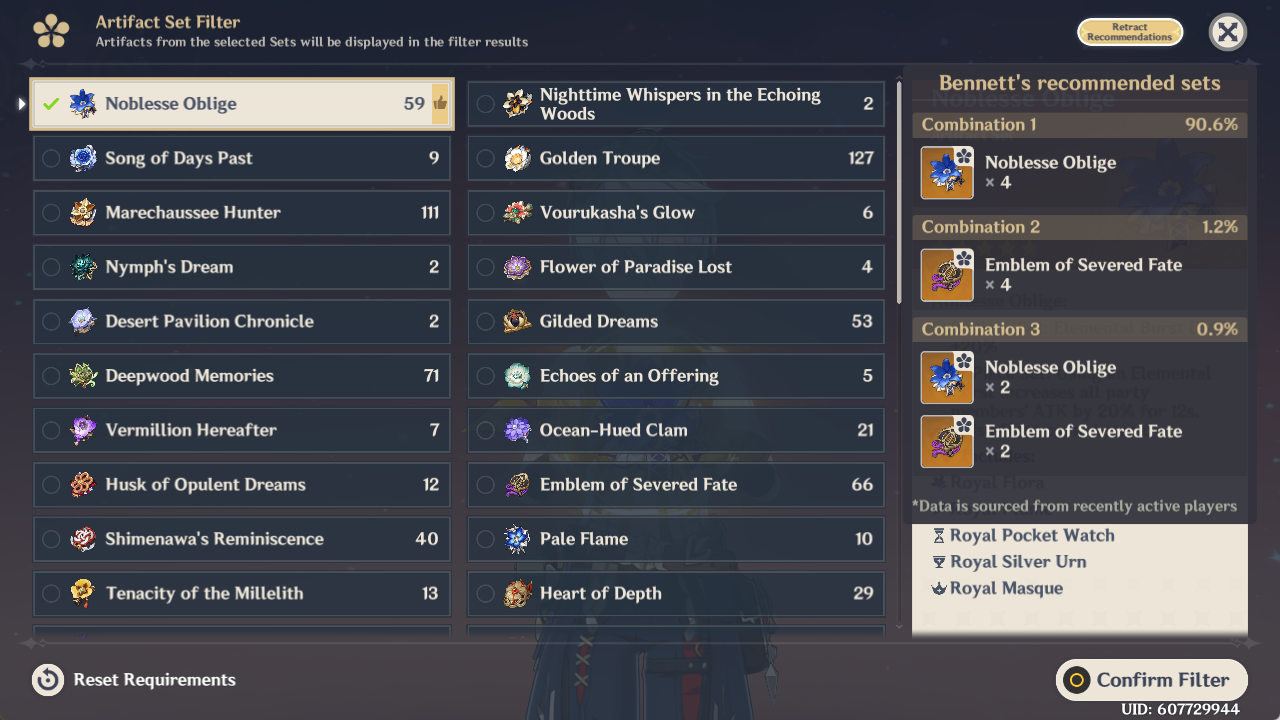
Accessing, Sorting, and Equipping Artifacts
Artifacts can be accessed and equipped from two separate pages in the game. This section provides step-by-step instructions for each method. There are two additional sections on locking artifacts and artifacts in the archive.
Accessing, Sorting, and Equipping Artifacts From the Inventory Page


Accessing, Sorting, and Equipping Artifacts From the Character Page
In-game, community-sourced build info sometimes goes against KQM’s recommendations! Read KQM Character Guides or Quick Guides for reliable and nuanced recommendations for artifact sets and main stats on individual characters.
Fast Equip (Loadouts)
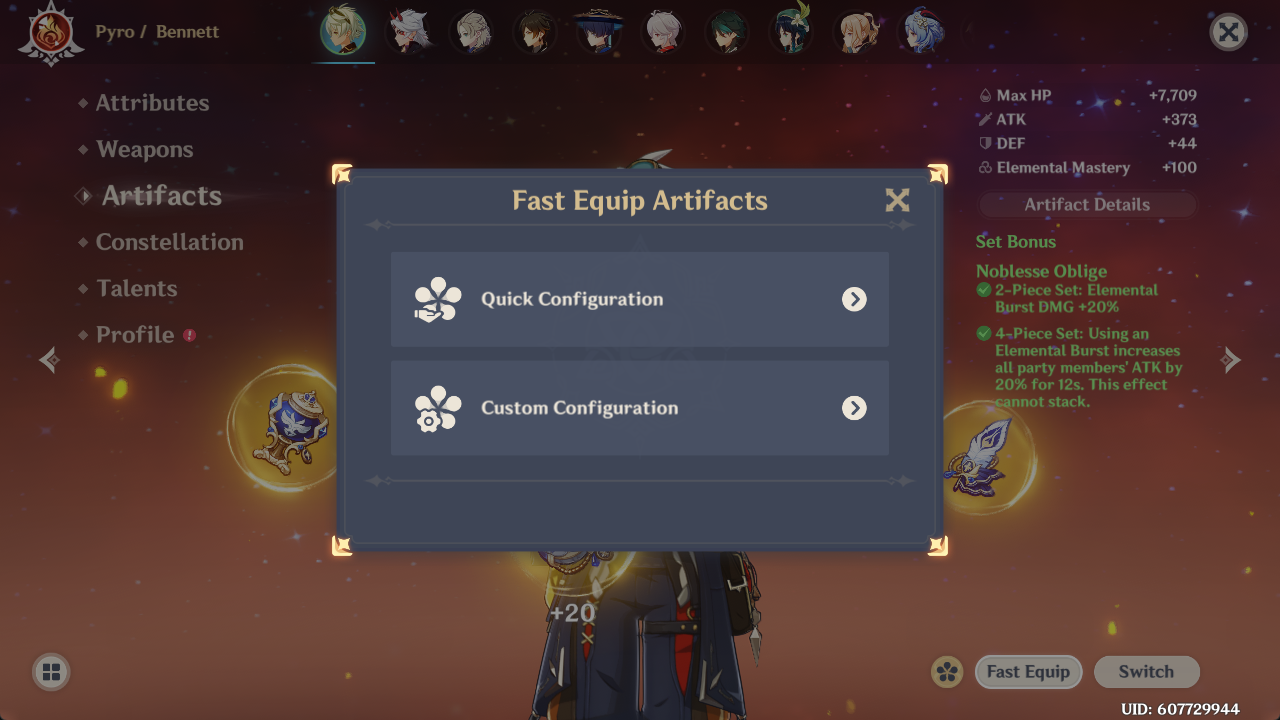
In Version 4.4, a Fast Equip feature was introduced to the game. While described as a “loadout” in the developer preview, it is not the 5-piece “loadout” save feature many players have been asking for since the release of the game. Instead, the Fast Equip feature merely equips artifacts that fit the available criteria.
There are two ways to use the Fast Equip feature, Quick Configuration or Custom Configuration. However, neither of these tools are recommended to use. While they can be convenient, a more robust recommendation provided through Genshin Optimizer (external website) is ideal. Please check out the section on Using Genshin Optimizer.
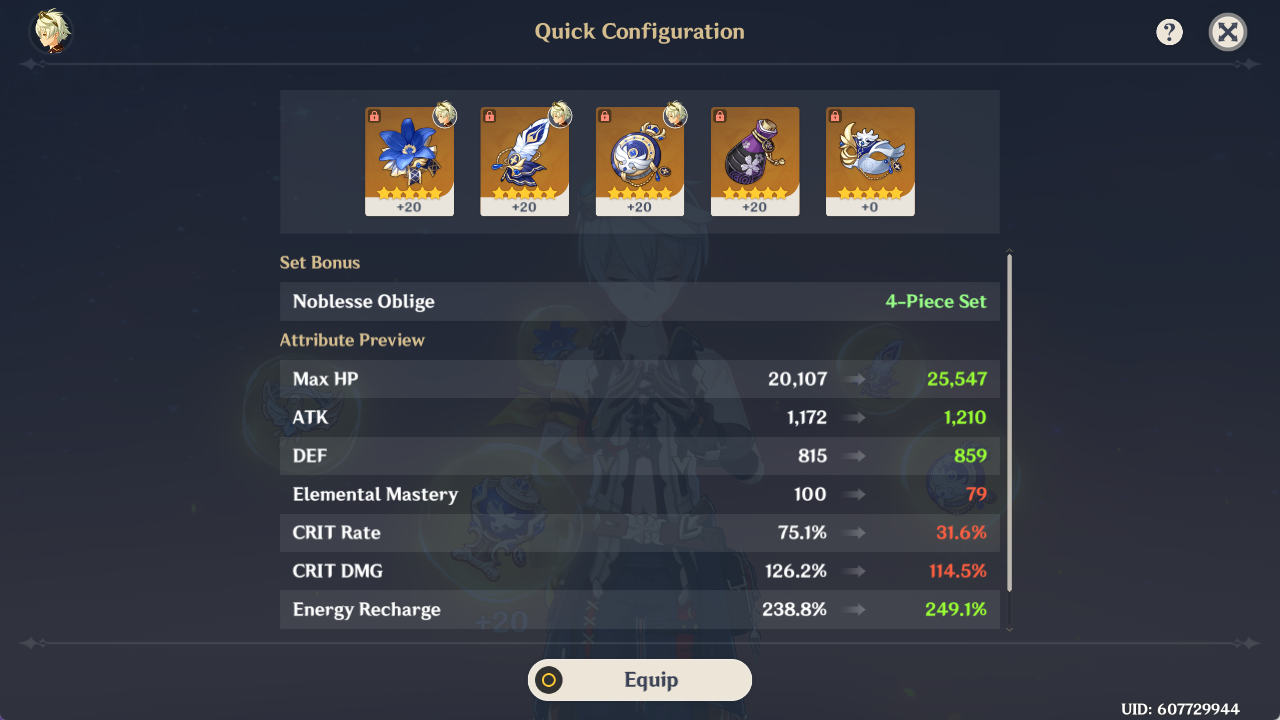
Quick Configuration
The Quick Configuration option for Fast Equip takes artificial recommendations from community data and generates an artifact build that fits. This feature does not take into account ER requirements, weapon choice, team buff, etc., so it is not very helpful unless you just want a “usable” artifact set for your character.
Custom Configuration
The Custom Configuration option for Fast Equip takes your criteria for artifact selection and then generates an artifact build that fits. Just like the Quick Configuration, this feature does not take into account other factors that affect a build’s efficacy. Genshin Optimizer does all of this and more, so you should use it instead.
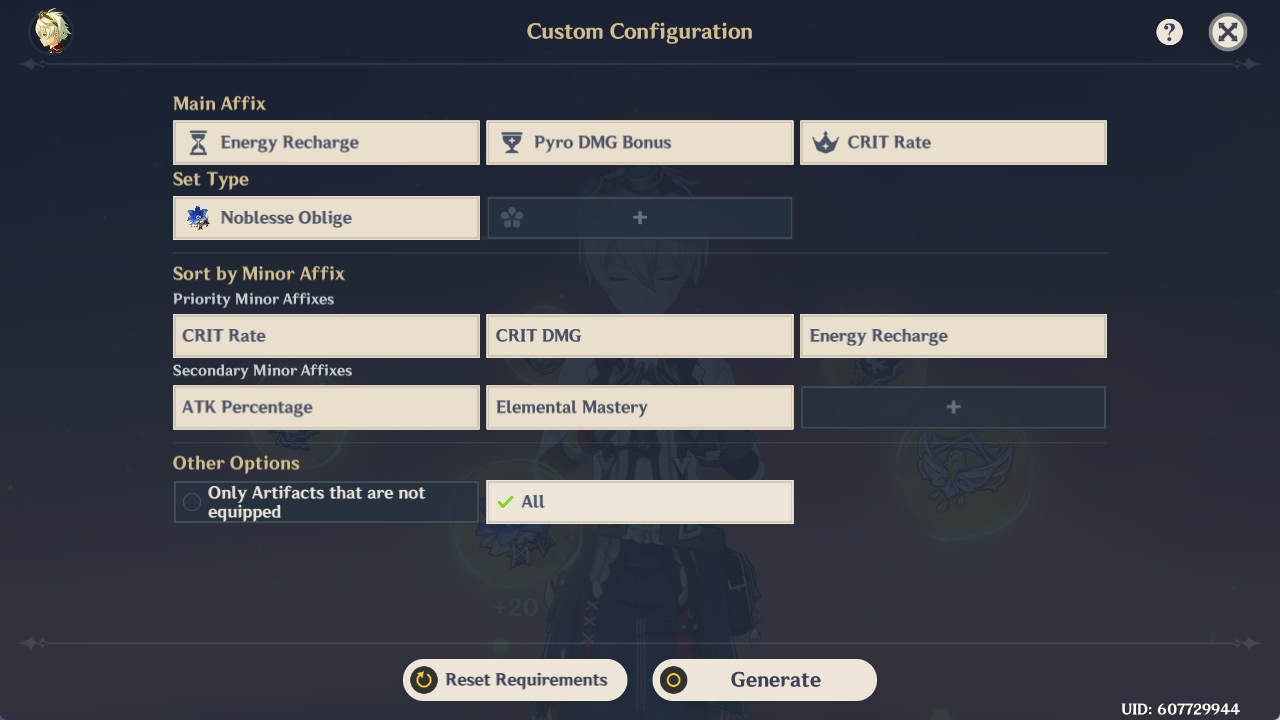
You can select certain criteria, but it doesn’t let you simultaneously pick main stats, specify stat thresholds, or exclude a specific character’s equipped artifacts.
You can check for alternatives with options prioritized by your initial criteria.
While Custom Configuration is slightly more useful than Quick Configuration if you know what stats to look for, Genshin Optimizer (external site) is more flexible and functional. Genshin Optimizer can also optimize without you even needing to know what stats are good as long as you set up your team and pick an optimization target.
Locking Artifacts
Artifacts are unlocked by default. They can be locked by clicking the lock icon located right under the artifact image and above the substats.
Locking artifacts prevents them from being destroyed or used as EXP fodder. This feature is also useful for marking which artifacts have potential and should be leveled later. Furthermore, any artifact currently equipped by a character cannot be used as fodder for another artifact.
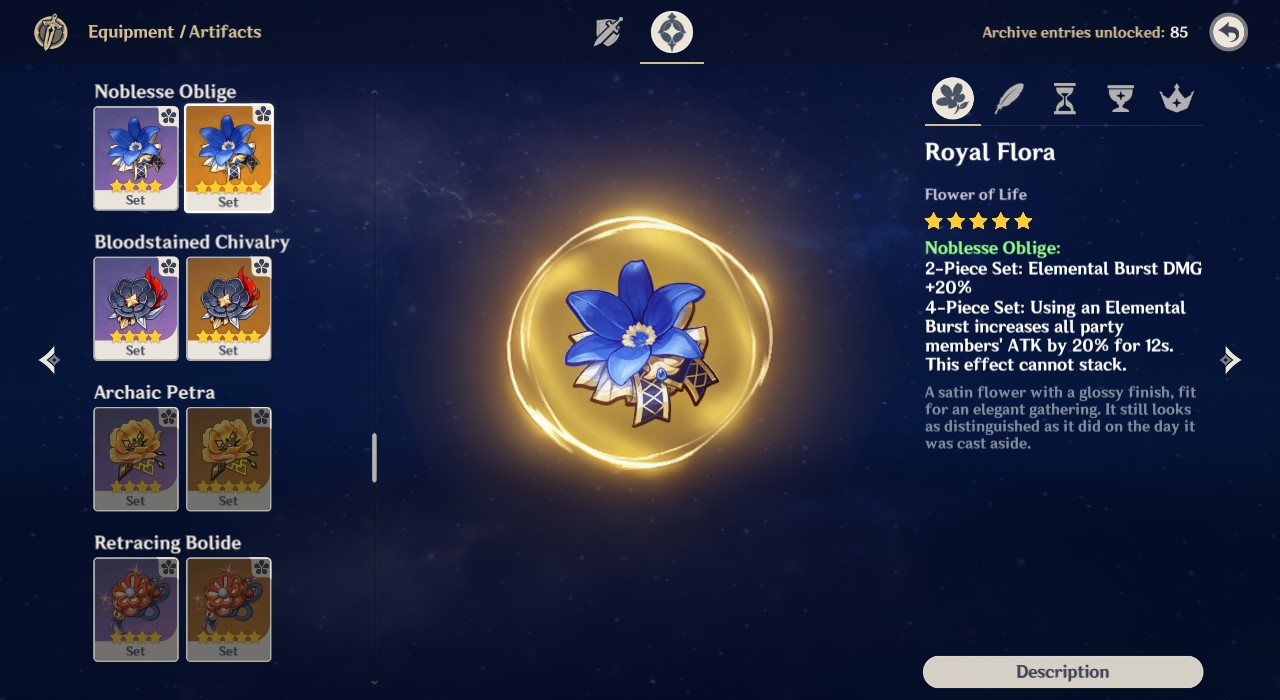
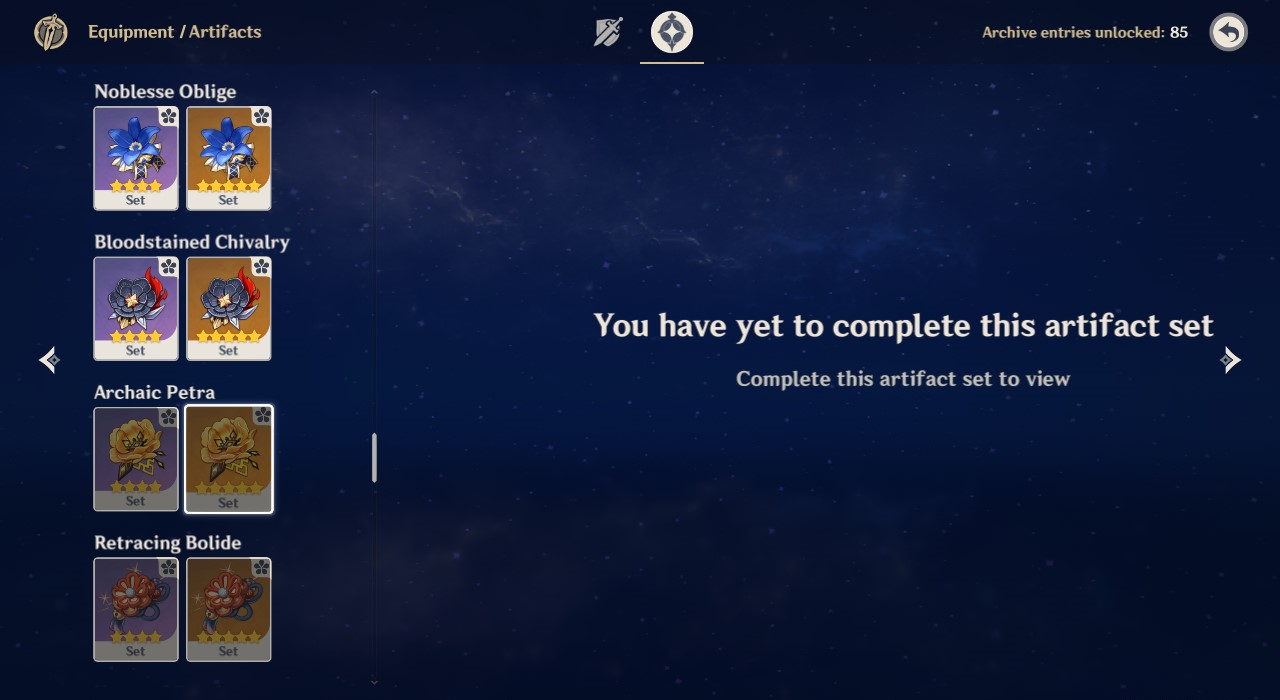
Artifacts Archive
The Archive is another place to learn more about specific artifact sets in the game. You need to obtain at least one of each type of artifact within the set within the same rarity for the information to show up.
The archive will show you the 2-piece and 4-piece set bonuses, the names of each type of artifact within the set, and the lore and story behind each artifact set. The archive option is mostly used to broadly check artifact lore text since the inventory filter shows set bonuses no matter what.
Storage and Destroying Artifacts
Maximum Artifact Storage
Currently, a player may only hold a maximum of 1800 artifacts at any time.
The number of artifacts in a player’s inventory may be viewed in the top-right corner of the Artifacts page in the Inventory.

If the player exceeds the maximum number of artifacts upon receiving artifacts as a reward, they are prompted to remove artifacts to make space. You cannot claim rewards from a Domain until you have at most 1799 artifacts in your Inventory.
Destroying Artifacts
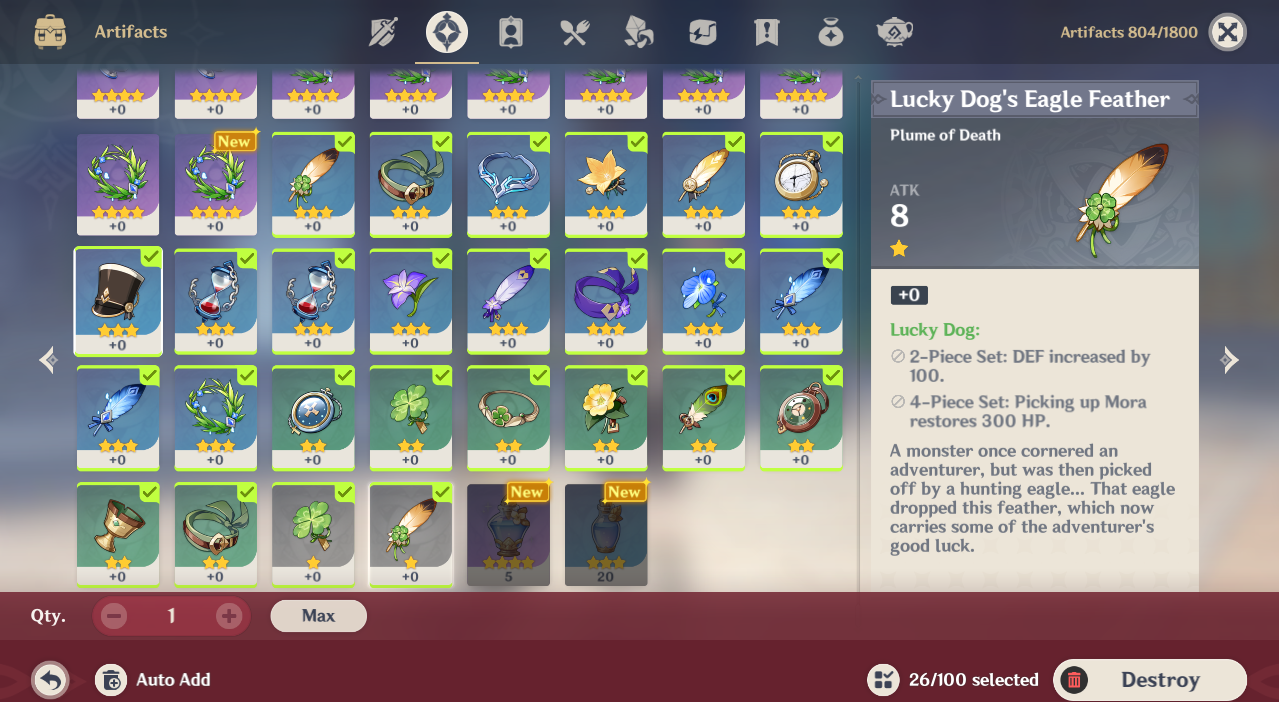
Artifacts can be destroyed in exchange for Mora. The artifacts must be at Level +0 with 0 EXP invested. 5-star artifacts cannot be destroyed. Up to 100 artifacts can be destroyed at a time.
Each destroyed artifact gives the player Mora equal to what it would cost to use the artifact as fodder.
| Rarity | 1-star | 2-star | 3-star | 4-star |
| Mora | 420 | 840 | 1260 | 2520 |
It is not recommended to destroy artifacts since sources of artifact EXP are limited and sources of Mora are plentiful. There are always useful artifacts that can be leveled!
To destroy artifacts:
Open Inventory > Go to the Artifacts page > Click the trash bin icon in the bottom-left corner > Select desired artifacts > Click “Destroy.”
Auto Add can select 1-star, 2-star, 3-star, and 4-star artifacts up to 100 at a time.
Obtaining Artifacts
Artifacts are obtained in a variety of ways. All known possible methods are detailed below. When multiple different artifact sets of the same rarity can be obtained from the same source, they have an equal chance of being obtained, i.e., no artifact set is more likely to be rewarded or dropped over another.
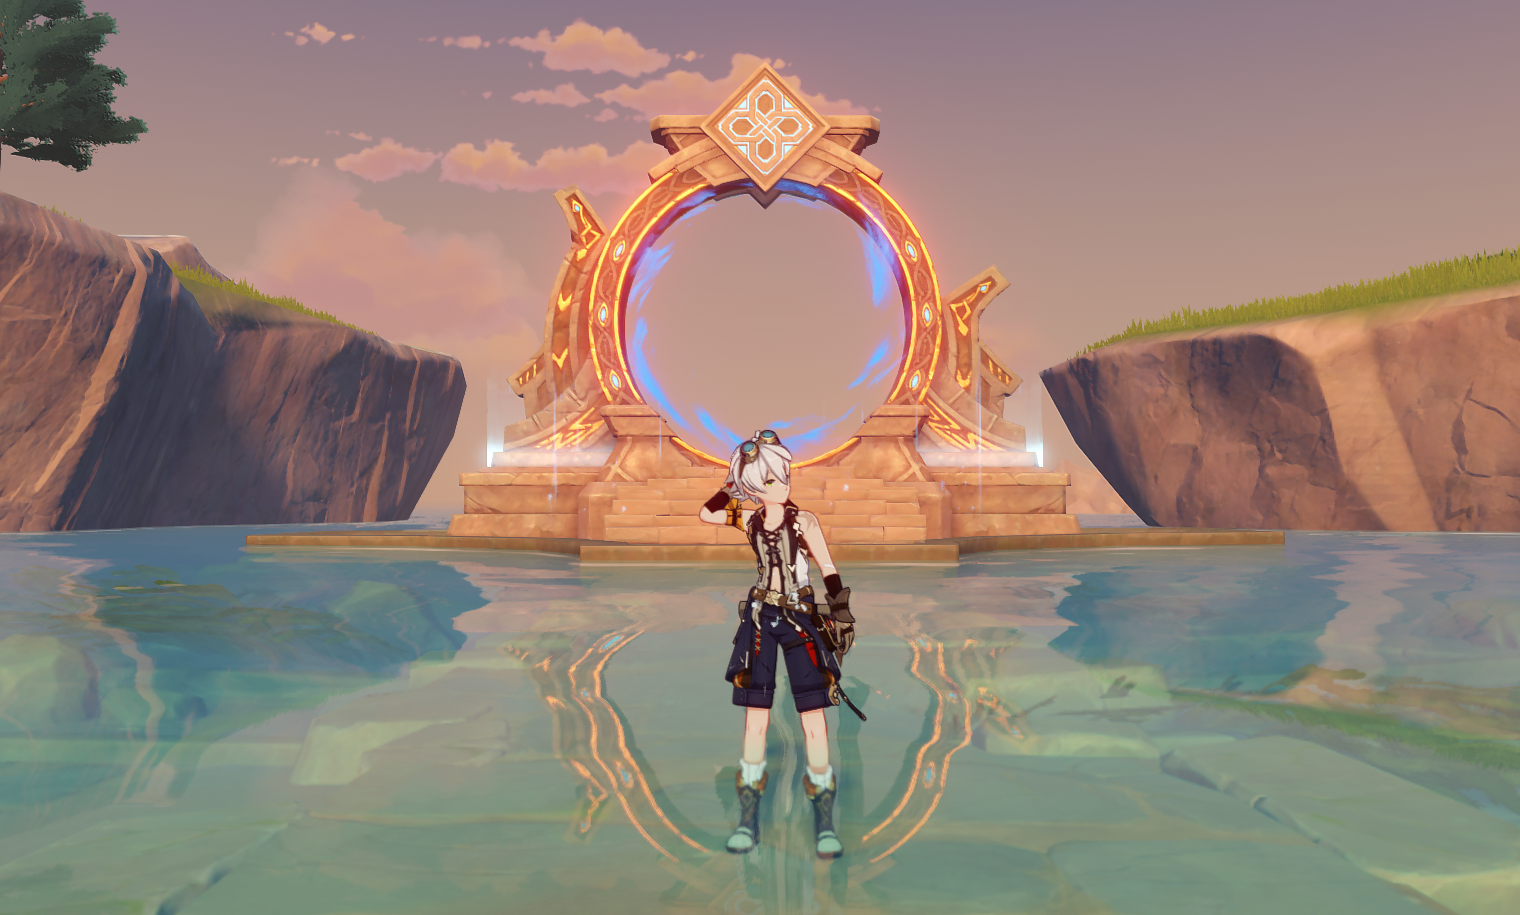
Domains of Blessing
Domains of Blessing are one of the primary ways to obtain artifacts and where players go to farm artifacts. Artifacts are obtained from Domains of Blessing by spending 20 Original Resin. Using Condensed Resin or claiming rewards in Co-Op does not affect reward odds.
Players must reach Adventure Rank (AR) 22 to unlock Domains of Blessing. Higher-level Domains have higher Adventure Rank entry requirements and are more likely to reward artifacts of higher rarity. At AR45, the highest level of each Domain of Blessing is unlocked, which guarantees at least one 5-star artifact per 20 Original Resin used.
Below is a table detailing the average number of artifacts of a given rarity awarded per 20 Original Resin used in Domains of Blessing unlocked at specific Adventure Ranks.
See Table
| AR | 2-star | 3-star | 4-star | 5-star | Total |
| 22 | 4.97 | 2.13 | 7.1 | ||
| 25 | 2.414 | 4.686 | 7.1 | ||
| 30 | 6.39 | 0.71 | 7.1 | ||
| 35 | 5.68 | 1.42 | 7.1 | ||
| 40 | 4.97 | 1.775 | 0.355 | 7.1 | |
| 45 | 3.55 | 2.485 | 1.065 | 7.1 |
Artifact Strongboxes

What Is an Artifact Strongbox?
An Artifact Strongbox is a type of Artifact Reliquary in the Mystic Offering at the Crafting Bench where players sacrifice three 5-star artifacts in exchange for a new 5-star artifact of a selected set. Creating Artifact Strongboxes is commonly known as “Strongboxing”. This feature is unlocked when the player reaches AR45.
More than 3 artifacts can be sacrificed at the same time for multiple new artifacts. A maximum of 39 different artifacts can be foddered at once for a total of 13 new artifacts. There is no limit to the number of times a specific Strongbox can be used.
Any 5-star artifact can be sacrificed regardless of its level or set. Only sacrifice artifacts at Level +0 since additional levels do not provide any extra benefits; undesirable leveled artifacts should instead be used for artifact EXP.
Note that artifacts obtained from the Strongbox have a slightly higher chance of starting with 4 substats.
When Should a Strongbox Be Used?
When farming for artifacts in Genshin Impact, players have the option to use the Artifact Strongbox to target specific artifact sets. It’s important to note that using the Strongbox consumes three 5-star artifacts in exchange for only one. However, if you “re-Strongbox” artifacts obtained from the Strongbox, the efficiency approaches two 5-star artifacts in exchange for one.
The Strongbox is particularly useful for players who only want one set from an artifact Domain, for example, if a player wants Noblesse Oblige artifacts but not the Bloodstained Chivalry artifacts available from the same Domain.
Using the Strongbox can be an efficient way to quickly obtain “good” artifacts of a specific set that belongs to an “inefficient” Domain. However, when initially farming for artifacts, it may not be the most efficient use of artifact EXP after a given team of characters have obtained their chosen artifact sets and main stats. This is because newer players are usually in desperate need of artifact EXP to level their desired artifacts when they begin farming. In this case, the artifact EXP from “bad” 5-star artifacts is better used as fodder for “good” artifacts.
For more information on how to fodder farmed artifacts effectively, go to Foddering Farmed Artifacts.
Available Strongboxes
The sets listed below currently have a Strongbox:
See Table
 Archaic Petra |  Retracing Bolide |  Blizzard Strayer |  Heart of Depth |
 Bloodstained Chivalry |  Noblesse Oblige |  Crimson Witch of Flames |  Lavawalker |
 Maiden Beloved |  Viridescent Venerer |  Thundering Fury |  Thundersoother |
 Gladiator’s Finale |  Wanderer’s Troupe |  Tenacity of the Millelith |  Pale Flame |
 Emblem of Severed Fate | Shimenawa’s Reminiscence |  Husk of Opulent Dreams |  Ocean-Hued Clam |
 Vermillion Hereafter |  Echoes of an Offering |
Bosses
Bosses in the overworld and in Trounce Domains reward players with artifacts if the player chooses to claim the reward after defeating them.
Bosses are not meant to be farmed for artifacts. They only provide an additional source of artifacts when farming Ascension Materials for characters.
Possible Artifact Sets From Bosses
Gladiator’s Finale, Wanderer’s Troupe, and Lucky Dog can be rewarded by all Bosses.
The Exile, Instructor, and Berserker are consistently rewarded by different Bosses (two of the three sets are available from each Boss).
“Prayers” Circlets (Prayers for Wisdom, Prayers for Destiny, Prayers for Illumination, and Prayers to Springtime) are rewarded by Normal Bosses of the corresponding Element.
Refer to the Appendices for information on which artifact set comes from which Boss specifically.
Normal Bosses


Normal Bosses, found in the overworld, reward artifacts. The possible artifacts that may be rewarded scale with the Boss’s level. Bosses increase in level with the player’s World Level.
Below is a table detailing the number of artifacts of a given rarity rewarded by Bosses. This distribution prediction is calculated for the mean of the rarity in different World Levels.
See Table
| World Level[a] | AR Range[b] | 2-star | 3-star | 4-star | 5-star | Total |
| 0 | 1–19 | 1.428 | 2.772 | 4.2 | ||
| 1 | 20–25 | 1.428 | 2.772 | 4.2 | ||
| 2 | 25–29 | 1.428 | 2.772 | 4.2 | ||
| 3 | 30–35 | 3.78 | 0.42 | 4.2 | ||
| 4 | 35–39 | 3.36 | 0.84 | 4.2 | ||
| 5 | 40–45 | 2.94 | 1.05 | 0.21 | 4.2 | |
| 6 | 45–50 | 2.52 | 1.26 | 0.42 | 4.2 | |
| 7 | 50–54 | 2.1 | 1.47 | 0.63 | 4.2 | |
| 8 | 55–60 | 2.1 | 1.47 | 1.00[c] | 4.57 |
[a] Players can lower their World Level by 1 after reaching World Level 5. The rewards scale with the current World Level even if at higher AR.
[b] The displayed AR range is without lowering the World Level.
[c] At World Level 8, exactly one 5-star artifact is guaranteed per Normal Boss reward.
Weekly Bosses


Trounce Domains and the Wolf of the North Challenge also reward artifacts. These rewards can only be claimed once per week and refresh on the weekly server reset. As with Bosses in the overworld, the primary focus of these rewards is not the artifacts themselves.
Below is a table detailing the number of artifacts of a given rarity rewarded by Trounce Domains and the Wolf of the North Challenge. This distribution prediction is calculated for the mean of the rarity in different World Levels.
See Table
| World Level[a] | AR Range[b] | 3-star | 4-star | 5-star | Total |
| 1 | 20–25 | 6.56 | 1.64 | 8.2 | |
| 2 | 25–29 | 6.56 | 1.64 | 8.2 | |
| 3 | 30–35 | 5.74 | 2.05 | 0.41 | 8.2 |
| 4 | 35–39 | 4.92 | 2.46 | 0.82 | 8.2 |
| 5 | 40–45 | 4.1 | 2.87 | 1.23 | 8.2 |
| 6 | 45–50 | 4.1 | 2.87 | 1.23 | 8.2 |
| 7 | 50–54 | 4.1 | 2.87 | 1.23 | 8.2 |
| 8 | 55–60 | 4.1 | 2.87 | 1.23 | 8.2 |
[a] World Level affects the Wolf of the North Challenge directly, whereas lower-level Trounce Domains can always be accessed at higher World Levels.
[b] The displayed AR range is without lowering the World Level.
Investigation Spots
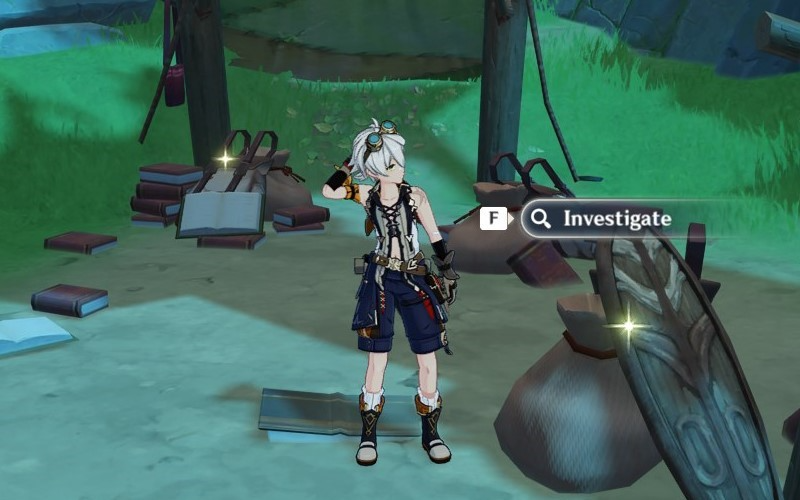
What Are Investigation Spots?
In the overworld, there are locations where the player can “Investigate”. Investigation spots always drop the same kind of item. This means that an investigation spot that drops Carrots only drops Carrots, and a spot that drops artifacts always drops artifacts.
Artifact investigation spots drop up to two artifacts. They can only drop 1-star and 2-star artifacts. Some artifact spots also drop Mora, but the artifact dropped is only 1-star in these spots.
Artifact spots that respawn do so either 12 or 24 hours after being collected. The time it takes to respawn is consistent for each spot.
The KQM Theorycrafting Library article on the Overworld currently has counts and maps of Artifact Spots prior to Version 3.0. The official Teyvat Interactive Map shows investigation spots but does not distinguish them by reward type or the ability to respawn.
Daily Cap
The number of investigations a player can conduct in one day is 100. After the 100th investigation, no further investigation spots in the overworld will load until the daily server reset. However, if a player has loaded investigation spots prior to investigating 100 spots, then they can still Investigate the remaining spots as long as they remain loaded.
For example, if a player has investigated 99 spots but is in an area of the map with 20 loaded uninvestigated spots, then a total of 119 spots can be interacted with and drop artifacts. This allows players to bypass the daily limit to an extent.
Farming Routes
Check out KQM’s Resinless Farming Routes Guide for artifact farming routes!
Players have developed efficient farming routes since artifacts always drop from the same investigation spots. Investigation spots are the only free and daily-repeatable sources of artifacts, which are specifically useful as artifact fodder.
Depending on the route, it is possible to gather about 60,000 EXP from these artifacts. This is roughly equivalent to the EXP awarded from 80 Original Resin of Domains of Blessing. However, it can be somewhat time-consuming at first as you learn the route, so it is important to factor that into your resource management.
Other Overworld Sources
Artifact Shops

There are unmarked shops run by NPCs in the overworld that sell 2-star artifacts. Every artifact shop refreshes weekly at server reset. A total of 30 artifacts can be purchased every week for a total of 25,200 EXP.
In terms of Original Resin, buying shop artifacts for EXP is 70% more efficient than obtaining the equivalent EXP from Domains of Blessing (assuming the Resin-to-Mora ratio of Blossoms of Wealth at World Level 8). If a player has surplus Mora, it may be a good idea to buy these artifacts every week.
Here is a list of available shops, their location, and which set they offer:
See Table
| Vendor | 2-Star Set | Location | Map Image |
| Shiliu | Adventurer | Mondstadt (City), Mondstadt | 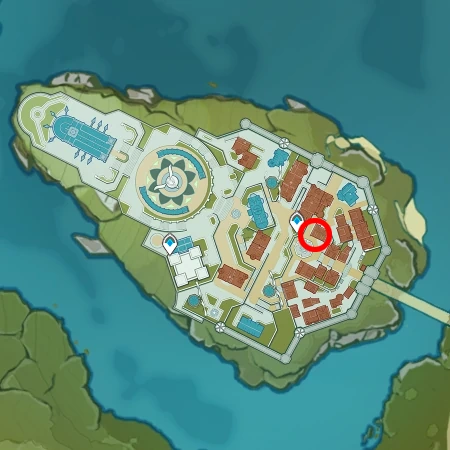 |
| Linlang | Traveling Doctor | Xigu Antiques, Liyue Harbor, Liyue | 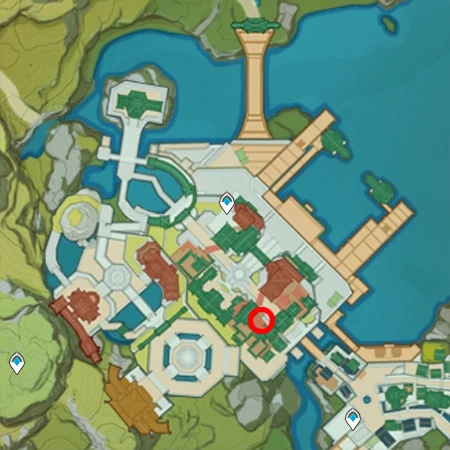 Night (19:00–06:00) |
| Zhang Shun | Lucky Dog | Liyue Harbor, Liyue | 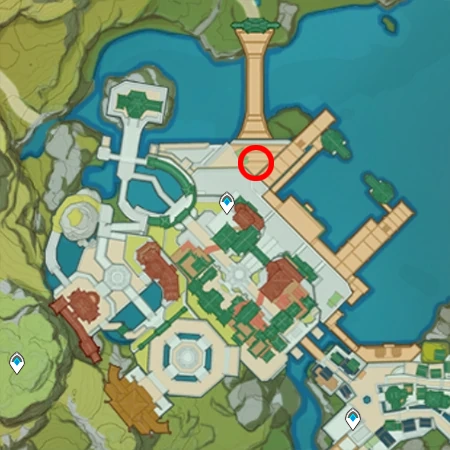 |
| Yamashiro Kenta | Lucky Dog | Ritou, Narukami Island, Inazuma | 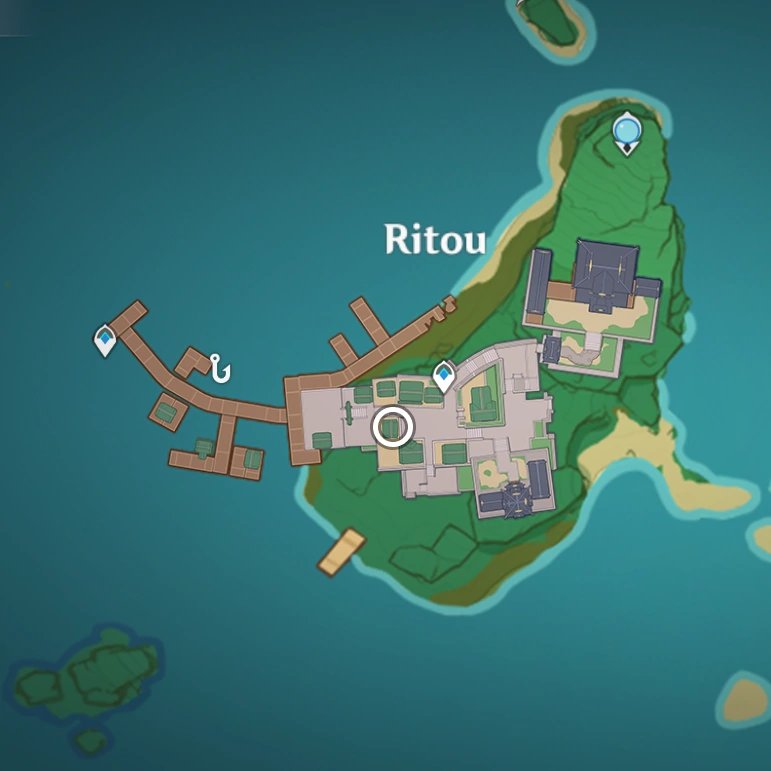 |
| Afshin | Adventurer | Grand Bazaar, Sumeru City, Sumeru | 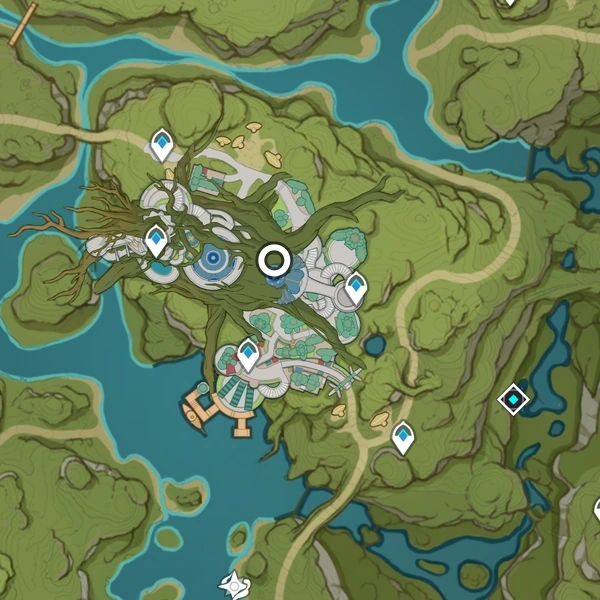 |
| Crossa | Lucky Dog | Court of Fontaine: Fleuve Cendre, Fontaine | 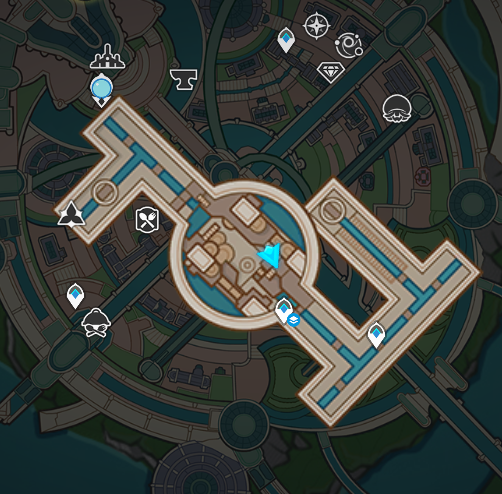 |
Domain Reliquaries and Spiral Abyss
A Domain Reliquary is an inventory item used to obtain a random artifact of a particular set. They can only be obtained by completing Spiral Abyss chambers in the Abyss Corridor (Floors 1–8) and the Abyssal Moon Spire (Floors 9–12).
After clearing an Abyss chamber for the first time, players obtain a bounty that includes one Domain Reliquary. No stars are required to obtain Domain Reliquaries; only a clear within the time limit is necessary.
The rewards for the Abyss Corridor (Floors 1–8) are one time only and do not reset. Progress and rewards for the Abyssal Moon Spire (Floors 9–12) reset on the 1st and 16th day of each month (at server reset).
Domain Reliquary Tiers
Domain Reliquaries come in three tiers: Tier I, Tier II, and Tier III. The Tiers correspond to the rarity of the artifact that may be obtained by opening them. For example, opening a Domain Reliquary of Tier II always gives you a 4-star artifact.
If a player fully clears Floors 9–12 of the Spiral Abyss, they receive 4 Tier I and 8 Tier II Domain Reliquaries.
See Table
| Rarity Given | Possible Sets | Floors and Chambers | |
Tier I | 5-star | Floors 6–8: Gladiator’s Finale, Wanderer’s Troupe Floors 9–12: The two most recently released 5-star artifact sets | Floors 6–12, only Chamber 3 |
Tier II | 4-star | Floors 4–8: Gladiator’s Finale, Wanderer’s Troupe, Berserker, Instructor, The Exile Floors 9–12: The two most recently released 5-star artifact sets, Berserker, Instructor, The Exile | Floors 3–5, only Chamber 3 Floors 6–8, only Chamber 2 Floors 9–12, only Chambers 1 and 2 |
Tier III | 3-star | Berserker, Instructor, The Exile | Floors 1–2, all Chambers Floors 3–5, only Chambers 1 and 2 Floors 6–8, only Chamber 1 |
Elite Enemies


Elite Enemies located in the overworld have a 10% chance to drop an artifact when defeated. They can only drop artifacts from the Traveling Doctor, Berserker, Instructor, and Exile sets.
Only the first 400 Elite Enemies defeated per day per account have a chance to drop rewards, even across worlds. This means you can obtain roughly 40 artifacts per day from Elites if you hit the cap. Elite Enemies respawn daily at server reset.
For Elite farming routes, check out KQM’s Resinless Routes Guide!
The Adventurer Handbook can navigate players to Elite Enemy locations; however, there is a time-gated limit to the number of uses despite there being more enemies in the world. The official Teyvat Interactive Map shows most of the locations.
Tumbleweeds
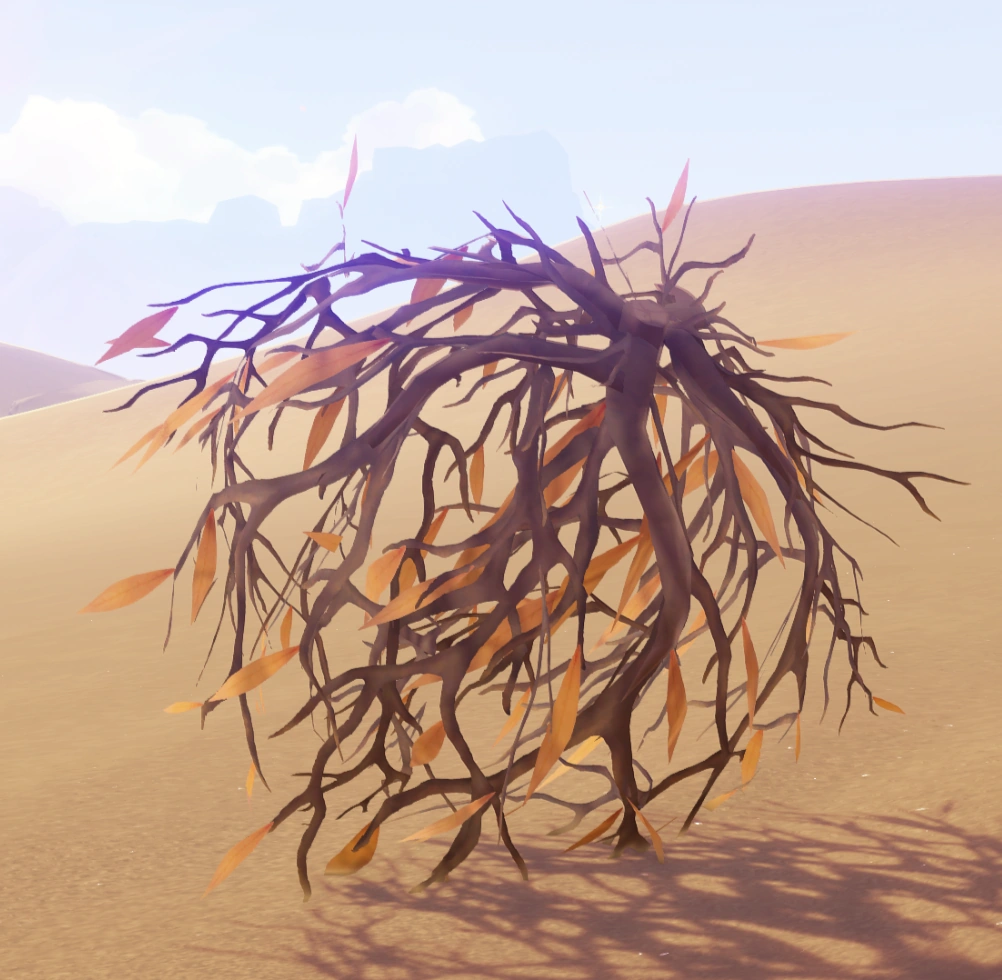
Tumbleweeds are non-damaging environmental objects that spawn in the Great Red Sand and the Desert of Hadramaveth in Sumeru. They are destroyed when touched or attacked, and they have a very small chance to drop an artifact. This artifact can only be of 1-star or 2-star rarity.
Artifacts from Tumbleweeds do not count towards the investigation spot daily cap. It is not recommended to farm Tumbleweeds for artifacts due to their extremely low drop rate and semi-sporadic spawn rate.
Chests

Chests found throughout the game can drop artifacts when opened. Artifacts from chests can be of 1-star, 2-star, or 3-star rarity. Common Chests cannot drop a 3-star artifact. The possible artifact sets from chests are Adventurer, Traveling Doctor, Lucky Dog, Berserker, Instructor, and the Exile.
Some World Quests unlock chests, which are guaranteed to hold an artifact of a specific rarity and type.
Special World Quest Chests (Potential Spoilers)
- The Luxurious Chest from completing “The Chi of Yore” drops a 4–star Martial Artist Feather.
- A 5-star Noblesse Oblige Flower is located beside the chests awarded during “Nine Pillars of Peace.”
- While completing “The Millennial Mountains,” players can pick up a complete 4-star Tenacity of the Millelith set at the Chasm’s Maw.
Adventurer Handbook
The Adventurer Handbook rewards the player with an artifact after completing certain tasks or chapters.
Below is a list of artifacts that can be obtained in each chapter of the Adventurer Handbook.
- 2-star Lucky Dog Sands
- 2-star Lucky Dog Circlet
- 3-star Lucky Dog Flower
- 2-star Lucky Dog Goblet
- 2-star Traveling Doctor Goblet
- 2-star Traveling Doctor Flower
- 2-star Traveling Doctor Circlet
- 3-star Traveling Doctor Feather
- 3-star Resolution of Sojourner Flower
- 3-star Resolution of Sojourner Feather
- 3-star Resolution of Sojourner Goblet
- 3-star Resolution of Sojourner Circlet
- 3-star Martial Artist Feather
- 3-star Martial Artist Sands
- 3-star Martial Artist Circlet
- 3-star Martial Artist Goblet
- 3-star Scholar Sands
- 4-star Scholar Feather
- 4-star Instructor Flower
- 4-star Instructor Feather
- 4-star Instructor Goblet
- 4-star Instructor Circlet
- 4-star Maiden Beloved Circlet
- 4-star Maiden Beloved Flower
- 4-star Maiden Beloved Feather
- 4-star Maiden Beloved Sands
- 4-star Maiden Beloved Goblet
- 5-star Gladiator’s Finale Flower
- 5-star Gladiator’s Finale Sands
- 5-star Gladiator’s Finale Feather
- 5-star Gladiator’s Finale Circlet
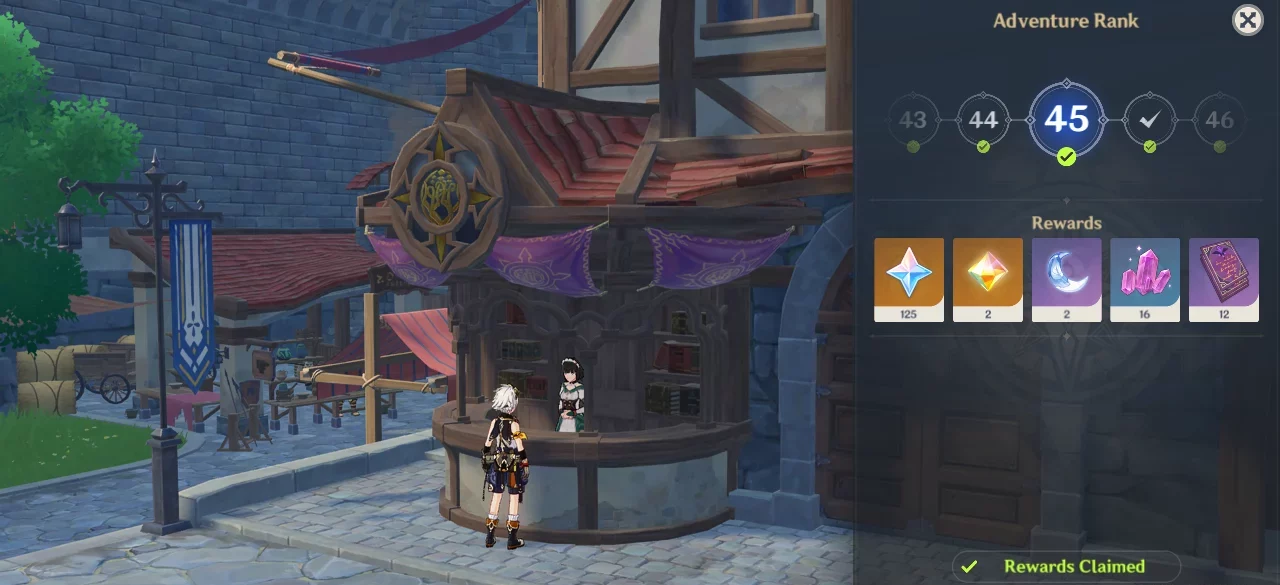
Adventure Rank Rewards
At certain Adventure Ranks, The Adventurers’ Guild rewards specific artifacts, along with other rewards. Upon reaching AR51, the player will have obtained a complete set of 3-star Adventurer, 3-star Resolution of Sojourner, 4-star Scholar, and most notably 5-star Noblesse Oblige.
See Table
| AR | Rarity | Artifact Set | Type |
| 7 | 3-star | Adventurer | Feather |
| 8 | 3-star | Adventurer | Circlet |
| 9 | 3-star | Adventurer | Flower |
| 11 | 3-star | Adventurer | Goblet |
| 17 | 3-star | Resolution of Sojourner | Goblet |
| 19 | 3-star | Resolution of Sojourner | Feather |
| 21 | 3-star | Resolution of Sojourner | Circlet |
| 22 | 3-star | Resolution of Sojourner | Flower |
| 23 | 3-star | Resolution of Sojourner | Sands |
| 29 | 4-star | Scholar | Goblet |
| 31 | 4-star | Scholar | Feather |
| 32 | 4-star | Scholar | Circlet |
| 34 | 4-star | Scholar | Flower |
| 36 | 4-star | Scholar | Sands |
| 43 | 5-star | Noblesse Oblige | Goblet |
| 47 | 5-star | Noblesse Oblige | Feather |
| 48 | 5-star | Noblesse Oblige | Circlet |
| 49 | 5-star | Noblesse Oblige | Flower |
| 51 | 5-star | Noblesse Oblige | Sands |
NPCs
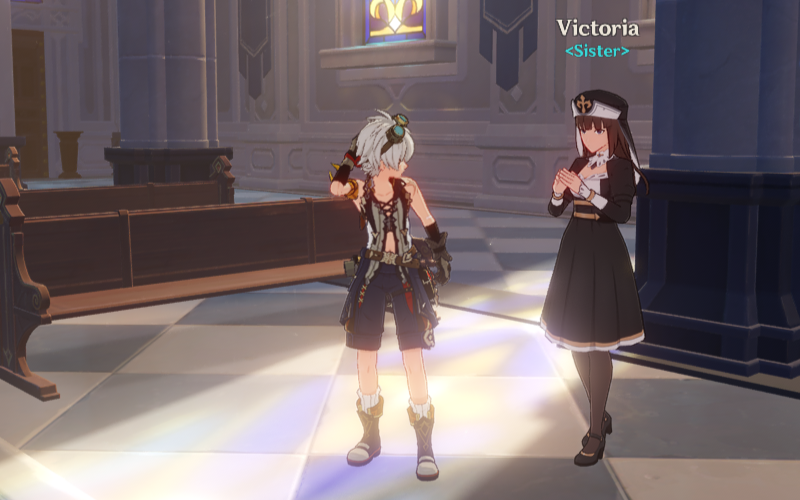
Certain NPCs located in the overworld reward the player with an artifact after following a specific branch in a dialogue tree. Each NPC only gives each reward once.
Below is a table of information for artifact-giving NPCs.
Mondstadt - See Table
| NPC | Rarity | Artifact Set | Type | Map Location Image |
| Hopkins the Marvelous | 1-star | Lucky Dog | Goblet | 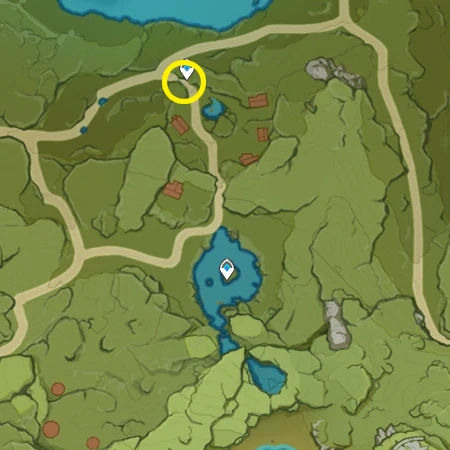 Day 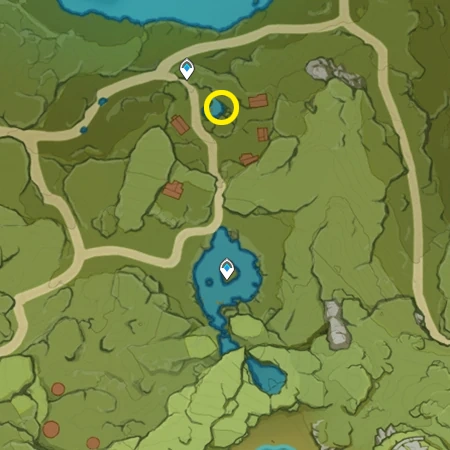 Night |
| Stevens | 4-star | Blizzard Strayer | Circlet |  |
| Timaeus | 2-star | Scholar | Sands | |
| Victoria | 4-star | Bloodstained Chivalry | Goblet |  |
Liyue - See Table
| NPC | Rarity | Artifact Set | Type | Map Location Image |
| Brother Qian | 3-star | Gambler | Flower | 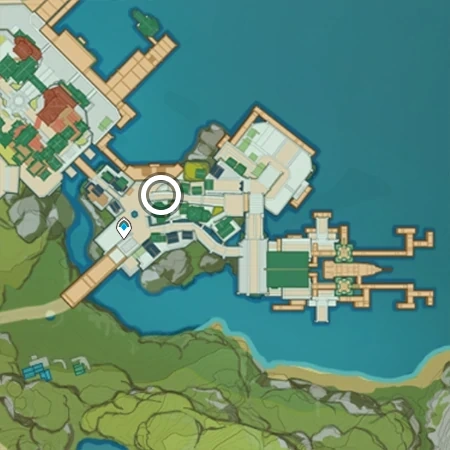 |
| Carpe Diem | 2-star | Berserker | Feather |  |
| Chaonan | 1-star | Lucky Dog | Feather | 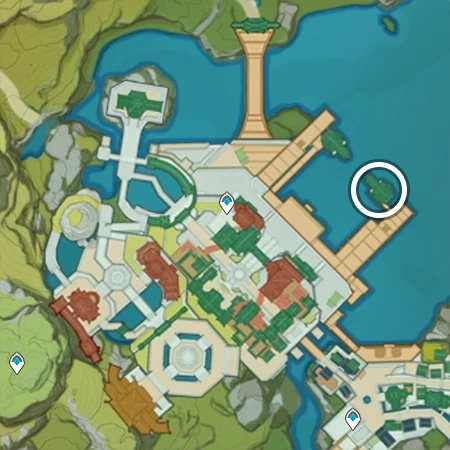 Day |
| Fengyan | 3-star | Instructor | Flower | 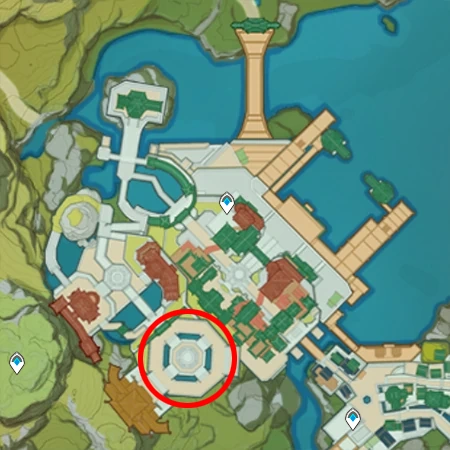 |
| Granny Ruoxin | 1-star | Adventurer | Flower | 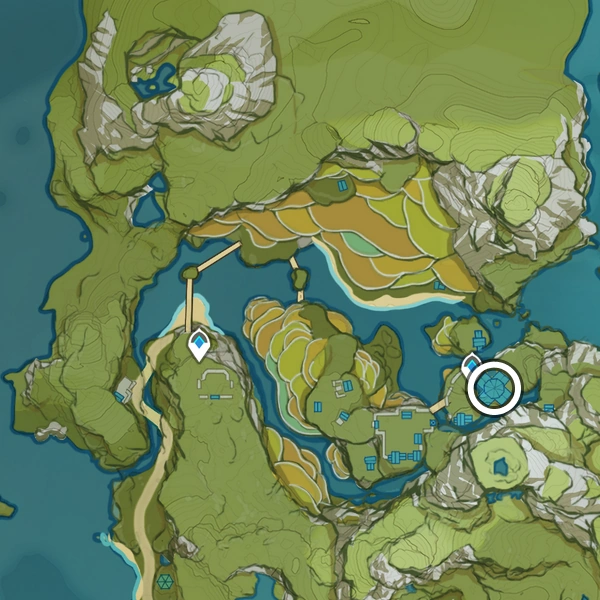 |
| Zhang Shun | 3-star | Brave Heart | Goblet | |
Inazuma - See Table
| NPC | Rarity | Artifact Set | Type | Map Location Image |
| Hiiragi Chisato | 4-star | Emblem of Severed Fate | Sands |  |
| Kanra | 3-star | Lucky Dog | Feather |  |
| Maki | 4-star | Shimenawa’s Reminiscence | Flower | |
| Nishikino Reirei | 3-star | Traveling Doctor | Circlet |  |
| Yoh | 3-star | Lucky Dog | Flower |  Day 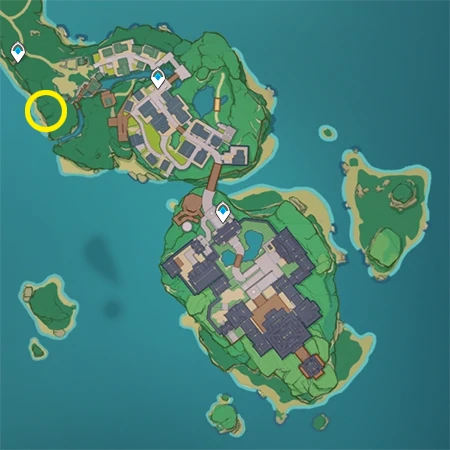 Night |
Sumeru - See Table
| NPC | Rarity | Artifact Set | Type | Map Location Image |
| Ashk | 4-star | Deepwood Memories | Flower |  |
| Darina | 3-star | Lucky Dog | Flower | 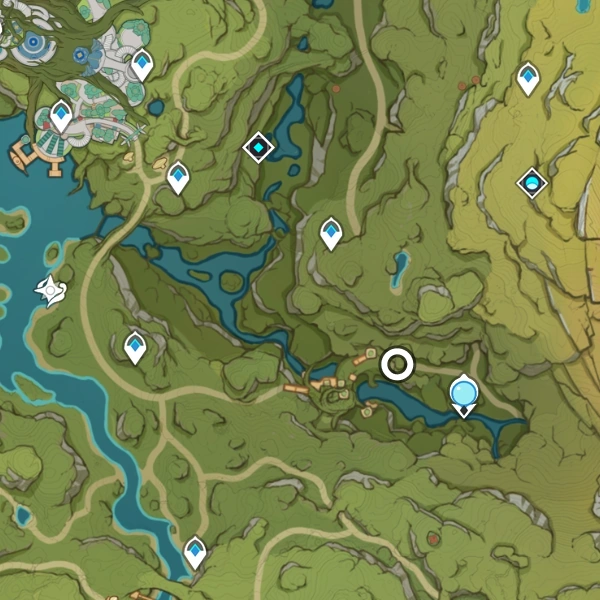 |
| Hatim | 4-star | Gilded Dreams | Flower |  Day  Night |
| Javad | 3-star | Traveling Doctor | Goblet | 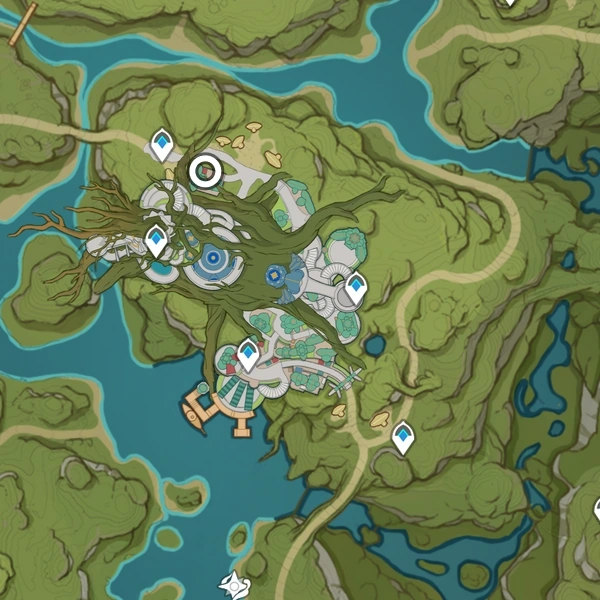 Day 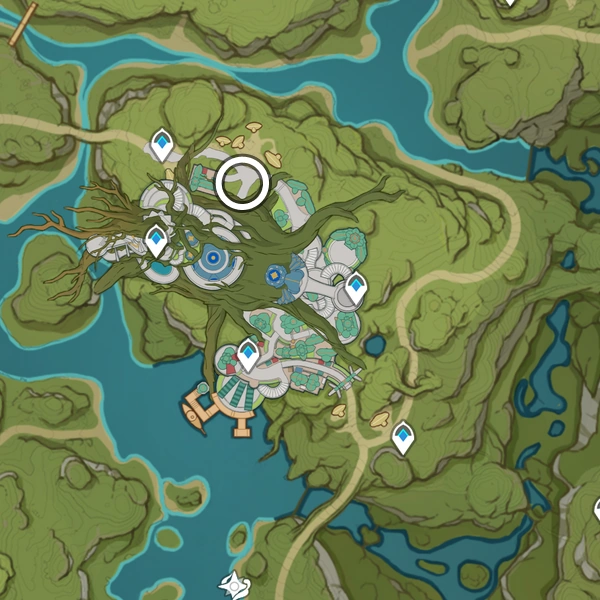 Night |
Fontaine - See Table
| NPC | Rarity | Artifact Set | Type | Map Location Image |
| Mequignon | 4-star | Golden Troupe | Feather |  |
| Serene | 4-star | Marechaussee Hunter | Flower |  |
| Veleda | 4-star | Marechaussee Hunter | Feather |  |
Enhancing Artifacts
Artifacts are leveled using both Mora and artifact EXP. It is important to level desirable artifacts to increase their main stats and substats. Recommendations for which artifacts to enhance are in the Farming Artifacts section.
Artifact Levels and EXP
The maximum level of an artifact is determined by its rarity.
Artifacts require artifact EXP in order to be leveled. The amount of EXP needed per level is determined by the artifact rarity.
Below is a table of the artifact EXP needed to upgrade to the next level per artifact level.
See Table
| Artifact Level | EXP to Current Level (Cumulative EXP Every 4 Levels) | ||||
| 1-star | 2-star | 3-star | 4-star | 5-star | |
| 1 | 600 | 1,200 | 1,800 | 2,400 | 3,000 |
| 2 | 750 | 1,250 | 2,225 | 2,975 | 3,725 |
| 3 | 875 | 1,775 | 2,650 | 3,550 | 4,425 |
| 4 | 1,025 | 2,050 | 3,100 | 4,125 | 5,150 |
| SUM | MAX(3,250) | MAX(6,525) | (9,775) | (13,050) | (16,300) |
| 5 | 3,550 | 4,725 | 5,900 | ||
| 6 | 4,000 | 5,350 | 6,675 | ||
| 7 | 4,500 | 6,000 | 7,500 | ||
| 8 | 5,000 | 6,675 | 8,350 | ||
| SUM | (26,825) | (35,800) | (44,725) | ||
| 9 | 5,525 | 7,375 | 9,225 | ||
| 10 | 6,075 | 8,100 | 10,125 | ||
| 11 | 6,625 | 8,850 | 11,050 | ||
| 12 | 7,225 | 9,625 | 12,025 | ||
| SUM | MAX(52,275) | (69,750) | (87,150) | ||
| 13 | 10,425 | 13,025 | |||
| 14 | 12,125 | 15,150 | |||
| 15 | 14,075 | 17,600 | |||
| 16 | 16,300 | 20,375 | |||
| SUM | MAX(122,675) | (153,300) | |||
| 17 | 23,500 | ||||
| 18 | 27,050 | ||||
| 19 | 31,050 | ||||
| 20 | 35,575 | ||||
| SUM | MAX(270,475) | ||||
×2 and ×5 Bonus Upgrades
When enhancing an artifact, there is a chance to receive ×2 or ×5 the normal amount of EXP. There is no bonus multiplier 90% of the time, a ×2 multiplier 9% of the time, and a ×5 multiplier 1% of the time.
The average bonus multiplier over time is ×1.13. However, this assumes you do not overcap on artifact EXP. Since there is no way to manipulate these odds, it is only something to be cautious of when leveling artifacts near their maximum possible level if you want to be as resource-efficient as possible.
Artifact Enhancement Animation Canceling
When enhancing artifacts, an updated main stat shows at every level. This takes a couple seconds longer and can be a little annoying. You can avoid seeing this screen by clicking “Details” immediately after clicking “Enhance.” This lets you save a few seconds for each upgrade, which amounts to hours over thousands of artifact upgrades. Hopefully this trick can help make artifact grinding a little bit more bearable for you!
Note: While the interface has changed since these videos were recorded, this technique is still possible.
Sources of Artifact EXP
There are only two sources of artifact EXP: Sanctifying Oil and artifact fodder. Notable Resin-less sources of artifact fodder include Investigation Spots and NPC Artifact Shops.
Sanctifying Oil
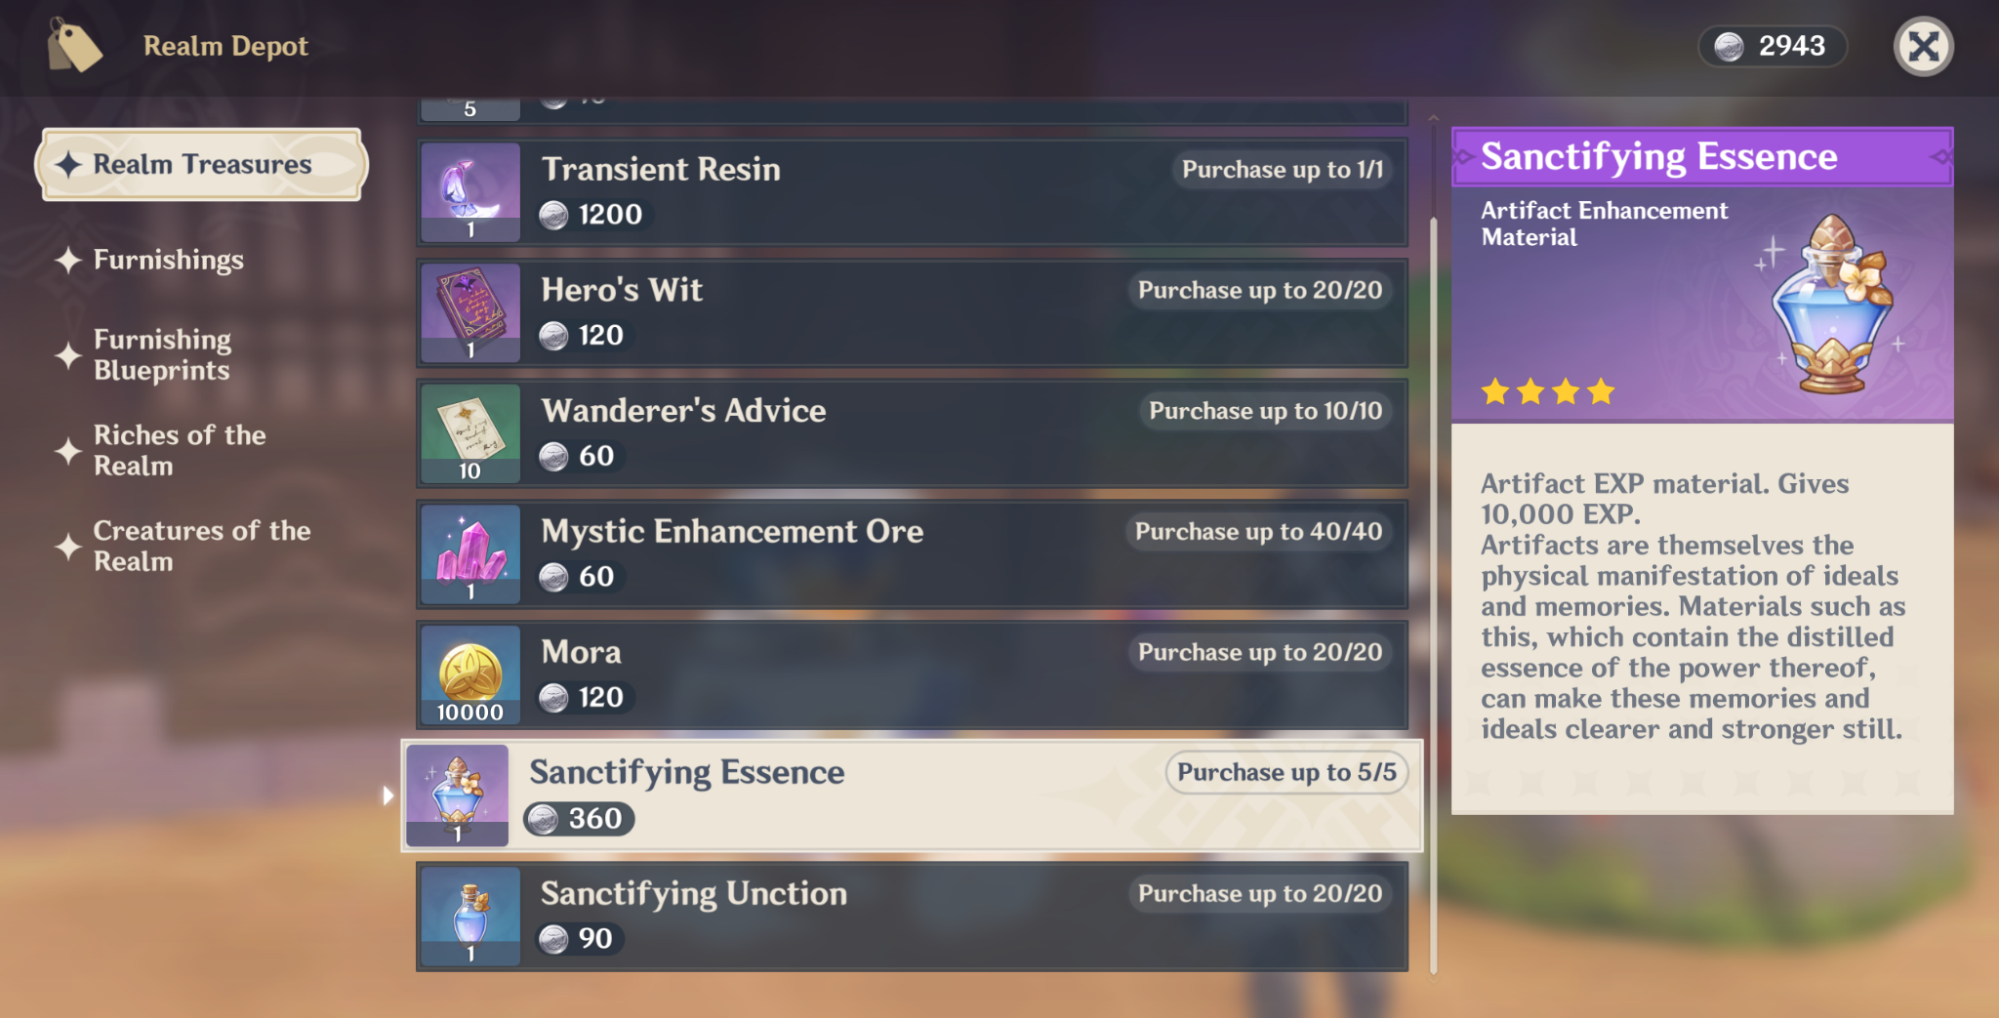
Sanctifying Essence and Sanctifying Unction serve as additional sources of EXP that can be used to level artifacts. Sanctifying Essence gives 10,000 EXP, and Sanctifying Unction gives 2,500 EXP.
They can be purchased through the Serenitea Pot Realm Depot upon reaching Trust Rank 8 with Tubby. Sanctifying Essence costs 360 Realm Currency and Sanctifying Unction costs 90 Realm Currency. Players may only buy a maximum of 5 Sanctifying Essence and 20 Sanctifying Unction per week, with the shop refreshing at server reset on Monday.
Spending Realm Currency on Sanctifying Oil is almost always better than spending it on Mora, unless you are desperate for Mora. For maximum efficiency, do the following:
1. Spend Realm Currency to buy Transient Resin and Sanctifying Oils.
2. Spend Mora (from other sources) on artifacts from NPCs every week.
The maximum amount of Realm Currency accumulated per week is 5,040; however, you need to claim every couple days before it hits the limit (2,400 Realm Currency). To buy 1 Transient Resin, all 5 Sanctifying Essence, and all 20 Sanctifying Unction every week, it costs 4,800 Realm Currency. This gives you a little leeway if you accidentally accrue "Maximum Realm Currency" or want to purchase other items.
Sanctifying Essence and Sanctifying Unction are also obtainable through the Adventurer Handbook by completing various tasks in the Embattle section and Archon Quests in the Guide section. These are one-time rewards.

Artifact Fodder
Artifacts can be used as a source of artifact EXP. At Level +0, they provide the following EXP:
| Rarity | 1-star | 2-star | 3-star | 4-star | 5-star |
| Base EXP | 420 | 840 | 1,260 | 2,520 | 3,780 |
When consuming an artifact for EXP, it costs the same amount of Mora as the Base EXP. If an artifact used for fodder is already enhanced, 80% of the EXP that was used for its upgrades will be transferred to the new artifact for no additional Mora. See the Artifact Levels and EXP section for what artifact level corresponds to total EXP.
For example, a 4-star artifact at Level +16 is worth 100,660 EXP (calculated as 2,520 + 80% × 122,675) and costs 2,520 Mora to use as fodder.
Stat Upgrades
Stats enhance a character’s potential damage and utility. This section details what happens to stats when artifacts are leveled. For information on how these stats work on characters, go to Scaling or Damage Formula.
Main Stat Upgrades
Artifact main stats increase with each level. Main stats increase with artifact rarity as well.
Below is a table of initial and maximum main stat values for each artifact type and rarity. For specific main stat values at each level, read this Genshin Wiki article.
Substat Upgrades
An artifact rolls an upgrade for a substat every 4 levels from +4 up until +20. If an artifact has n−2 substats at Level +0, where n is the rarity of the artifact, it obtains a new substat every 4 levels until it reaches the maximum of 4 substats.
An artifact with the maximum number of different substats “rolls” into one of its substats every 4 levels. The upgraded substat is determined at random with equal probability for each substat, regardless of how many times each substat has been upgraded.
Roll Value (RV)
Substat Roll Value is a percent figure used to determine how much a substat has been rolled into. The higher the RV, the better the substat is relative to the maximum possible outcome.
The roll values for all possible 3-star, 4-star, and 5-star substats are determined via the following:
- X is the highest possible roll value (“Highest”).
- 90% of X is the second highest (“High”).
- 80% of X is the third highest (“Low”).
- 70% of X is the lowest (“Lowest”).
1-star artifacts have roll values of 80% or 100% of X. 2-star artifacts have roll values of 70%, 85%, or 100% of X.
Artifact Roll Value is the percentage sum of the substat rolls for a given artifact. The maximum RV a 5-star artifact can have is 900% (assuming it starts with 4 substats. Artifact RV is useful in comparing the relative value of different artifacts based on their substats. When assessing artifact value, you can exclude undesirable substats from the RV calculation. Evaluating the value of different stats in comparison to each other can be quite difficult, so you should look at KQM character guides for specific information on stat priority.
For example, the artifact below has a sum RV of 650%. This is a sum of the following substat rolls:
- 2 rolls into CRIT Rate: 1 High (90%) and 1 Highest (100%)
- 1 roll into Energy Recharge: 1 Highest (100%)
- 2 rolls into Flat ATK: 1 Lowest (70%) and 1 Low (80%)
- 3 rolls into CRIT DMG: 3 Lowest (70% each).
If we exclude the two rolls into Flat ATK (since we would prefer ATK% or even EM), then this artifact has an effective total artifact RV of 500%.
Alternatively, this could all be calculated automatically via the Genshin Optimizer.
Below is a table of possible values for each individual substat roll. This is equivalently the table for the possible initial values of a Level +0 artifact.
Assessing CRIT Rolls
There are two ways to assess the value of your build’s CRIT. Both of these are heuristics that can only be used to roughly compare artifacts and builds.
- CRIT Multipliers - This method compares the average damage gains you get from a character's total CRIT stats. Use this in comparing damage.
- CRIT Value - This method compares the CRIT rolls between artifacts. While useful, you should use the Roll Value of desired stats instead.
CRIT Multipliers
For comparing build strength in terms of CRIT, it is better to compare the CRIT multipliers of a character’s entire build, which includes artifact main stats, substats, passive effects, weapon secondary stats, team buffs, and character Ascension Stats.
This is not an exact calculation, but a tool used to roughly estimate how much better a build is. For a more accurate damage comparison of your character’s entire set of possible builds, use Genshin Optimizer.
Use this formula to compare the relative value of one build to another in terms of average damage. The output of this formula is the ratio of the average damage of Build A to Build B, which will give you a rough estimation of how much better or worse Build A is to Build B. A number greater than 1 means Build A is better, while a number less than 1 indicates Build B is better.

Total Stat refers to the total amount of the scaling stat attribute the character possesses. For most Talents this should be ATK, but it could also be DEF, HP, or EM.
Example of Damage Comparison
Let’s compare these two Bennett builds in terms of damage with effective CRIT multipliers.
In this example, Build A has roughly twice the damage output of Build B. However, note that Bennett’s Energy Recharge in Build A is insufficient to meet his typical ER requirement. Despite having higher damage, Bennett can’t use his Burst every rotation, which makes the build worse in most cases. Make sure you pay attention to all your stats, not just CRIT!
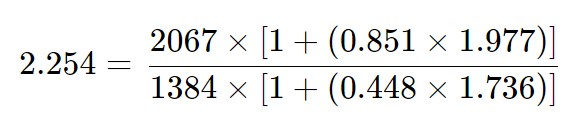
CRIT Value
CRIT Value (CV) is a figure used to determine an artifact’s worth in terms of its CRIT Rate and CRIT DMG substats. Artifact CV is the sum of the CRIT Rate and CRIT DMG substats for a given artifact or a set of artifacts. Artifact CV does not include the CRIT Rate or CRIT DMG from a Circlet’s main stats. The formula below is used since CRIT DMG substat rolls are twice as large as CRIT Rate substat rolls.
CRIT Value = CRIT DMG + (CRIT Rate × 2)
While artifact CV and TCV can be useful tools in comparing artifacts themselves, they are a poorer presentation of actual damage gains than the CRIT comparison method described above.
Characters also scale with other substats and have ER requirements, which are not accounted for by CV. The Roll Value (RV) of useful substats is a more holistic metric for judging relative artifact quality on a specific character.
The novel example presented to the right has an artifact CV of 34.1. The highest possible CV of a single artifact is 54.4, which assumes the artifact rolls into 4 substats with both CRIT substats at Level +0 and obtains the highest possible rolls for either CRIT stat at every roll.
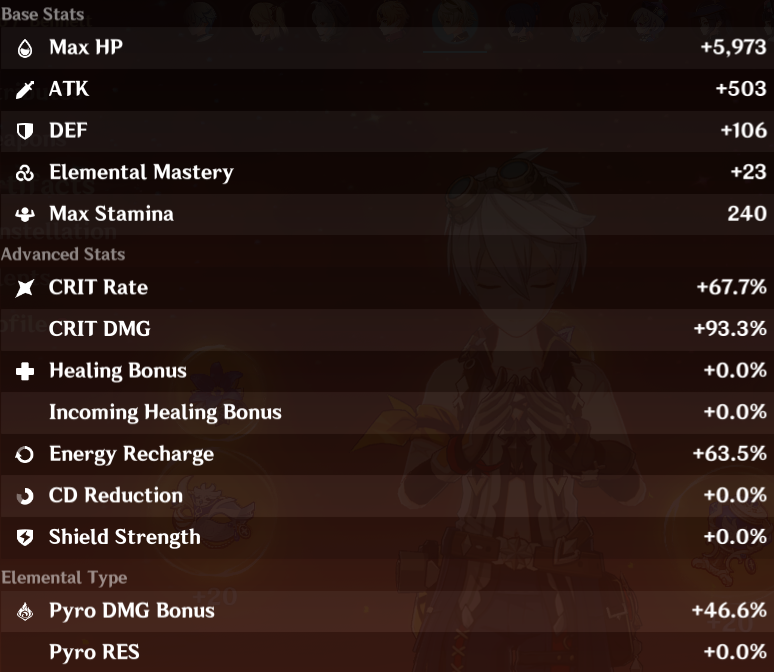
Total CRIT Value (TCV) is the sum of a given character’s equipped artifacts. TCV includes substats and the Circlet’s main stat if applicable. TCV can be easily calculated through a character’s Artifacts page by clicking “Artifact Details,” which shows CRIT Rate and CRIT DMG obtained from only their equipped artifacts.
For example, our Bennett currently has a TCV of 228.7.
CRIT Ratio
CRIT ratio is a community-made concept that is as the name suggests: it is the ratio between a character’s overall effective CRIT Rate and CRIT DMG stats.
CRIT ratio can be best explained through an area and perimeter analogy. The best way to maximize the area of a rectangle, given a fixed perimeter, would be to create a square. In the same way, evenly balancing CRIT Rate and CRIT DMG given a fixed number of CRIT substat rolls maximizes the amount of damage a character can deal on average.
An ideal effective CRIT ratio is 1:2 because CRIT Rate rolls are half of CRIT DMG rolls (in main stats, substats, weapon secondary stats, etc.). That is, CRIT DMG stat values from artifacts are twice those of CRIT Rate stat values. For example, given 300 TCV, a character would deal more overall DPS with a 75:150 CRIT ratio than with a 50:200 ratio, other stats being equal.
Some characters’ Talents and Constellations increase CRIT Rate or CRIT DMG. It is important to factor in these buffs when attempting to optimize your character’s CRIT stats. For example, Keqing’s Elemental Burst increases her CRIT Rate by 15% for 8s, and Gorou’s final Constellation increases the CRIT DMG of his team’s Geo abilities for 12s after using his Skill or Burst.
Note that the 4pc Blizzard Strayer set provides an additional 40% CRIT Rate against Frozen enemies. Combined with Cryo Resonance, the maximum CRIT Rate that a Freeze DPS character should build with their innate stats and artifacts is 45%.
Farming Artifacts
Artifacts improve a character’s ability to deal damage and provide team utility. Artifact farming is a crucial part of character enhancement in the mid-to-late game after reaching AR45.
While character optimization is mostly geared towards Spiral Abyss progress, sufficient character investment is still necessary for in-game events and story progression. Dealing more damage also makes overworld combat quicker and easier. Some players may also find character enhancement intrinsically enjoyable and rewarding.
This section of the guide explains efficient farming practices and provides general recommendations on character building.
When to Farm
Farming for artifacts isn’t necessary in the early game since the game provides adequate enough artifacts in the overworld. The damage requirement to clear overworld content effectively is quite low compared to the Abyss, especially at lower World Levels.
Adventure Rank 45 (AR45)
Wait until AR45 to begin farming artifacts.
Players unlock the highest-level Domains of Blessing at AR45, which guarantees at least one 5-star artifact per 20 Resin spent. The Domain levels before this do not guarantee a 5-star artifact and are less Resin-efficient. 5-star artifacts have greater stat value and have the potential to be significantly stronger than 4-star artifacts, so assuring at least one 5-star artifact per run increases the chances of improving your gear.
Other character resources provide guaranteed and permanent upgrades. Use Resin for the following resources before AR45. These resources are still needed even after AR45 and should still be obtained and used for further character enhancement.
- Character Ascension Materials — obtained from Bosses
- Character Talent Materials — obtained from Domains of Mastery
- Weapon Ascension Materials — obtained from Domains of Forgery
- Mora — obtained from Blossoms of Wealth
- Character EXP Materials — obtained from Blossoms of Revelation
Pre-AR45 Recommendations
Obtaining Pre-AR45 Artifacts
For players who have not yet reached AR45:
- Save your Fragile Resin until after AR45
- Do not worry about 4-piece set bonuses
- Just use what you get from exploration and boss rewards
Prior to reaching AR45, it is not efficient to farm artifacts, as the highest levels of Domains of Blessing are not accessible yet. Instead, artifacts can be obtained from Bosses and other overworld sources. Through moderate exploration and Resin investment into Bosses for Character Ascension Materials, players can accrue enough artifacts to equip usable builds on the characters they use during this period. Transitional 4-star artifacts can be used in the early game. You can use Resin to obtain some artifacts if you need them, but they should not be a priority.
Character levels, Talent levels, Character Ascension Materials, and Weapon Ascension Materials are optimal uses of Resin before AR45.
Do not worry about 4-piece set bonuses at this stage in the game. Rainbow sets and 2pc combinations are perfectly fine.
Pre-AR45 Builds
Regarding stats, Energy Recharge is the most valuable for characters relying on their Elemental Burst for damage or utility. However, it can be quite difficult to reach ER requirements with artifacts before AR45, which makes non–Burst-reliant characters slightly more appealing to play.
Stats that relevant Talents scale with, such as ATK, HP, or DEF, should be prioritized over CRIT. Until DMG% Goblets are obtained, relevant main stats for Talents can be used in the meantime. EM main stats are rare and extremely valuable for Bloom-related teams, so keep them for the future when you are higher AR and will need EM pieces to increase your DPS further.
The Feather is the easiest way to obtain ATK for ATK-scaling characters, and the Flower is best for HP-scaling characters and personal survivability. Min-maxing and CRIT ratios should not be considered in the early game. You can always level your team’s artifacts to +12 before AR45. There is very little relative artifact EXP spent to level an artifact to +12, and you only lose 20% of that artifact’s total EXP when you fodder it later.
Resin Cost and Fragile Resin
Artifact farming uses Resin in Domains of Blessing to obtain artifacts for characters. Domains require 20 Original Resin per run and accept Condensed Resin (40 Original Resin equivalent).
A tremendous amount of Resin is required to obtain a baseline set of “good enough” artifacts for multiple characters. For example, it takes on average 1,280 Resin at the highest Domain level just to obtain a 5-star Pyro DMG% Goblet of any set.
Fragile Resin are non–perishable sources of Original Resin that are equivalent to 60 Original Resin (3 runs in a Domain of Blessing).
Fragile Resin are rewarded through the following means:
See Sources
- Adventure Rank Rewards
- 1 each for ARs 12, 14, 16, 18, 20–24, 26, 28
- 2 each for ARs 25, 27, 29–60
- Battle Pass (resets every Version update)
- Levels 5, 15, 25, 35, 45
- 5 free from Sojourner’s Battle Pass
- 5 paid from Gnostic Hymn
- 5 more when Gnostic Chorus is purchased
- Levels 5, 15, 25, 35, 45
- Sacred Sakura in Inazuma (Sacred Sakura’s Favor)
- 5 total at Levels 1, 11, 21, 31, 41
- Tree of Dreams in Sumeru (Vanarana’s Favor)
- 5 total at Levels 1, 11, 21, 31, 41
- 5 total at Levels 1, 11, 21, 31, 41
- Fountain of Lucine in Fontaine
- 5 total at Levels 1, 11, 21, 31, 41
- 5 total at Levels 1, 11, 21, 31, 41
- Enhance the Lumenstone Adjuvant
- 1 Fragile Resin at Level 1
- 1 Fragile Resin at Level 1
- Cake for Traveler (in-game birthday reward)
- Consuming the cake awards 1 Fragile Resin and a copy of the cake
If you want as much as Fragile Resin and other resources as possible, you should complete the Battle Pass every patch even as a free-to-play player. If a new player saves Fragile Resin obtained from all free permanent sources until AR45, they would have at least 45 Fragile Resin (2,700 Original Resin equivalent).
Since artifact farming is a Resin-intensive and lengthy process, saving Fragile Resin can help kick-start your artifact builds at AR45. You can obviously use your Fragile Resin for what you need, but it will just take longer to get end-game artifact builds for your characters. Saving Fragile Resin for artifact runs is typically the most efficient use of your Resin.
Transient Resin are functionally the same as Fragile Resin, except they expire by the second Monday after obtaining them.
- Serenitea Pot Realm Depot
- 1 Transient Resin is available for purchase in the Realm Depot for 1200 Realm Currency every week.
- Each individual Transient Resin lasts until the second Monday after you purchase it.
- This means you can have up to two Transient Resin saved at a time, but you should make sure to use them before they expire!
Choosing Characters

Before beginning to actually farm for artifacts, it is important to know which characters and artifact sets to farm for.
Disclaimer: we cannot predict what artifacts will be valuable in the future and can only provide guidance on characters and artifacts that are currently released. Saving some artifacts with a variety of different main stats can be a good idea to reduce the amount of Resin spent in the future.
Character Selection
Select characters based on your preferred playstyle and aesthetic preferences. Each character serves a unique role on their team. With enough investment, any character can successfully complete overworld and story content.
For Spiral Abyss, moderate investment and good team synergy are sufficient for clearing up to Floor 10 with any character. However, Floors 11 and 12 require greater consideration for character and team selection. While all characters can technically clear Spiral Abyss with full stars, some may require more Resin investment and team support than others.
Team Selection
Combat in Genshin Impact is a team effort, and understanding a character’s role in a team is essential for effective character building. For instance, Raiden Shogun needs different artifact sets and stats in a hypercarry team versus a Hyperbloom team.
To build optimal teams, it’s important to have a good grasp of game mechanics and character interactions. For more information, check out the KQM Teambuilding Guide. Additionally, KQM’s Dendro Guide provides more specific information about Dendro teams and Dendro-related reactions.
For specific character recommendations, KQM Extended Guides and Quick Guides suggest viable teams that generally perform well in Spiral Abyss content. Any of our recommended teams can clear overworld and story content.
Character Building
This section explains the roles a character may fulfill in a team and how that impacts their potential builds.
It is important to build all members on a team at some point before late-game hyper-investment because the Genshin Impact combat system revolves around team interactions. Investing all your resources into one character and neglecting the others can harm overall team damage. Although min-maxing your DPS characters right out the gate at AR45 might seem appealing, they still require support from their teammates!
Selecting Artifact Sets
When selecting artifact sets, it is important to consider how you intend to use your character in combat, as different sets offer unique bonuses that serve different purposes. Each character benefits from different artifact sets due to their different team roles. Therefore, understanding your character’s role within a team is crucial to selecting the correct sets for them.
Although 5-star artifacts are generally preferable for their set bonuses and superior stats, 4-star artifact sets can also be effective for their 2-piece or 4-piece set bonuses. In certain scenarios, support characters might prefer to use 4-star artifact sets; their teams won’t suffer from a significant damage loss since support units typically don’t focus on dealing damage in the first place.
For instance, Bennett can hold 4-piece Instructor (a 4-star artifact set) to maximize team DPS in certain teams that rely on Elemental Reaction damage. Even though 4-star artifacts offer lower stat values than 5-star artifacts, using Instructor in such scenarios can be more beneficial for Bennett’s team since his personal damage contribution is minimal.
2-piece or 4-piece sets?
2-piece set combinations are viable for many characters. In many scenarios, a desirable 4-piece set bonus provides a 3–15% or more personal DPS increase over a 2-piece set combination, but this difference can be met with better substats on the 2-piece sets. In other scenarios, the difference can be much higher, which makes a 4-piece set more worthwhile to farm for. Moreover, for support characters, 4-piece set bonuses (like Viridescent Venerer or Noblesse Oblige) often enable higher overall team DPS.
To gain insight into artifact selection while farming for multiple characters at the same time, check out the section Artifact Set Selection (Example). For more information regarding specific artifact sets and which characters can use them effectively, please refer to the Appendices.
Rainbow Sets
A rainbow artifact set consists of artifacts that all belong to different artifact sets and thus do not trigger any set bonuses. Technically speaking, useless 2pc and 4pc set bonuses for a specific character may also be considered rainbow, since they don’t provide any additional benefit beyond their stats.
It’s important to keep in mind that, in many cases, main stats are more valuable than set bonuses for DPS characters. If players lack the proper stats on their preferred set, they can run a rainbow set to achieve higher total stats compared to a lower-value 4pc set. This is particularly true for DPS characters who rely on their Bursts, as fulfilling ER requirements takes priority over the set bonus. Although obtaining set bonuses should still be the long-term goal, players can use rainbow sets as a temporary measure until they can farm more artifacts of a specific set.
Additionally, some characters do not necessarily require set bonuses even at higher investment levels. This means that the damage increase from using similar artifacts from a 2-piece or 4-piece artifact set is relatively low. In such circumstances, using any set of artifacts (or at least one 2-piece set) with better main stats and substats is often better than running a 4-piece set with worse stats. Nonetheless, optimal endgame builds still prefer 4-piece sets.
Roles
Understanding the roles of your characters in Genshin Impact is crucial to optimizing their potential within a team. Characters can generally be classified into two main roles: DPS and support. It’s worth noting that while DPS and support characters have distinct roles, every character can still deal damage in some way.
DPS
DPS characters are the primary source of damage output for the team. They excel at dealing damage through their Normal Attacks, Skills, Bursts, and Elemental Reactions. Characters that trigger Bloom-related reactions, like Kokomi, Kuki Shinobu, or Thoma, are also considered DPS units for their team.
In most cases, DPS characters prefer stats over set bonuses. Exceptions would include the CRIT Rate buff from 4-piece Blizzard Strayer for Freeze DPS characters.
Support
On the other hand, support characters are designed to complement and enhance the damage output of DPS characters. They can apply Elements, provide buffs, and offer utility to the team. However, supports can still deal good amounts of damage, especially through off-field abilities or Transformative Reactions like Swirl, Electro-Charged, and Overloaded. Support characters who don’t contribute significant personal damage can be prioritized after your DPS characters.
In most cases, support characters prefer 4-piece set bonuses over stats.
Multiple Roles
Some characters can fulfill multiple roles or be used in very specific ways that do not fit the above descriptions of DPS or support. These archetypes are merely meant as guidelines to gear you towards a baseline understanding of artifact set recommendations. If you want to build a character as a DPS, no one’s stopping you!
Artifact Examples for Different Roles
Here are a few artifact sets and the character roles they benefit. These artifact sets are widely used and are meant as examples. Not all types of characters and builds are represented. These are just examples to illustrate the thought process behind artifact set selection in general.
Noblesse Oblige is a great set for Burst-reliant supports because its 4-piece set bonus allows the character to grant the entire team an ATK bonus after using their Burst. Since most of the DPS units in the game scale with ATK, 4-piece Noblesse Oblige provides an easily accessible damage increase.
Viridescent Venerer, or “VV,” is the premier set for Anemo support characters as its 4-piece set bonus is one of the few sources of Elemental RES Shred in the game. Decreasing RES to the Swirled Element allows Elemental DPS characters to deal more damage against affected enemies.

Deepwood Memories is a fantastic choice for Dendro teams since its 4-piece set bonus shreds enemy Dendro RES, which leads to higher team DPS. This set is quite versatile: it can be used on a solo Dendro DPS, a Dendro support, or even a non-Dendro support in Dendro reaction teams!
Emblem of Severed Fate is a generally good set for Burst-reliant DPS characters. Its 4-piece set bonus gives Burst DMG% based on the character’s Energy Recharge, which they would invest into anyway to reach their ER requirements. ER% stats beyond a character’s ER requirements are not a waste on this 4-piece set since any amount of ER% up to 300% still contributes to their Burst damage. Still, do not feel obligated to build more ER% than required.
Training Guide
Released in Version 4.5, the Training Guide is a consolidation of recommendations based on community data. While nice in theory, it should generally not be trusted. Please read KQM’s character guides for in-depth explanations on how to effectively build specific characters. Popular community builds can be misguided, limit a character’s potential, and waste your time and resources.
Resin-Efficient Farming
Artifact farming can be a daunting and lengthy process. This section intends to alleviate some of the stress, anxiety, and dread of artifact farming and character building by making the process more efficient. We explain Resin efficiency, go through resource management, answer the question “Should I fodder this?,” and provide a detailed mini-guide to incremental character enhancement.
Resin Efficiency
Resin efficiency refers to the value of Resin spent. Each Domain of Blessing offers two different 5-star artifact sets, and the player cannot choose the set from which they receive an artifact. Players may desire one or both of the available sets. When a player wants pieces from only one set, pieces from the other set are far less valuable and could be considered inefficient for the Resin spent.
Some Domains have two usable artifact sets that can be used by many characters, making them generally more Resin-efficient. Conversely, some Domains only have one widely used set, making them generally less efficient. A couple Domains have artifact sets that are rarely used, making them extremely Resin-inefficient.
Nonetheless, what is Resin-efficient for you may not be Resin-efficient for someone else. For example, if your two main teams are Nilou Bloom and Wanderer Hypercarry, then farming for Flower of Paradise Lost and Desert Pavilion Chronicle would be considered Resin-efficient. For someone who doesn’t play those teams, it would clearly be a poor use of Resin.
When building multiple characters, farming Domains that contain two desired artifact sets is recommended. Players can obtain artifacts for multiple characters simultaneously, obtaining 25–33% more “good” artifacts over time (depending on how many 5-star artifacts of each set are given per run). On the other hand, if you’re looking to expedite the process of farming for one particular character, farming a Domain with only one desired artifact set and using the undesired artifact set in the Strongbox for the same desired set will result in obtaining a “good” set 1.5–2.2× quicker (depending on how many 5-star artifacts of each set are given per run).
Some artifact sets don’t have a Strongbox, so farming less-efficient Domains may be necessary. However, any unneeded artifacts can be put into the Strongbox of another set or used as artifact fodder.
Resource Management and Build Priorities
Which artifacts should I level first?
Properly managing your resources is crucial when it comes to artifact upgrading in Genshin Impact. Resin and time are limited resources, so it’s important to prioritize which artifacts need to be leveled on which characters. Suboptimal farming isn’t the end of the world, so don’t sweat it if you can’t figure out precisely the best path for you. Just follow these general recommendations.
First, prioritizing DPS characters is optimal since they deal the majority of their team’s damage. While support characters should not be neglected, they can usually hold lower-leveled artifacts or 4-star artifacts. Burst-reliant supports should still build enough Energy Recharge to meet their ER requirements.
Second, it is not necessary to level artifacts to +20 immediately. Leveling artifacts from +16 to +20 costs roughly the same as leveling an artifact from +0 to +16. Leaving artifacts at Level +16 can be efficient until all equipped artifacts are leveled, since the DPS increase from +16 to +20 is proportionately lower.
Finally, keep some 4-star artifacts! 5-star artifacts are typically much stronger, thanks to their higher stat values, but some 4-star artifact sets are excellent options for supports (e.g., Exile and Instructor) or work-in-progress DPS characters (e.g., Berserker and Martial Artist). 4-star artifacts are also cheaper to level, making them workable transitional gear until you obtain more suitable 5-star artifacts. For many support units, 4-star artifacts with enough ER% (and other desired stats) may remain viable even into the late game.
Foddering Farmed Artifacts
Should I level this artifact?
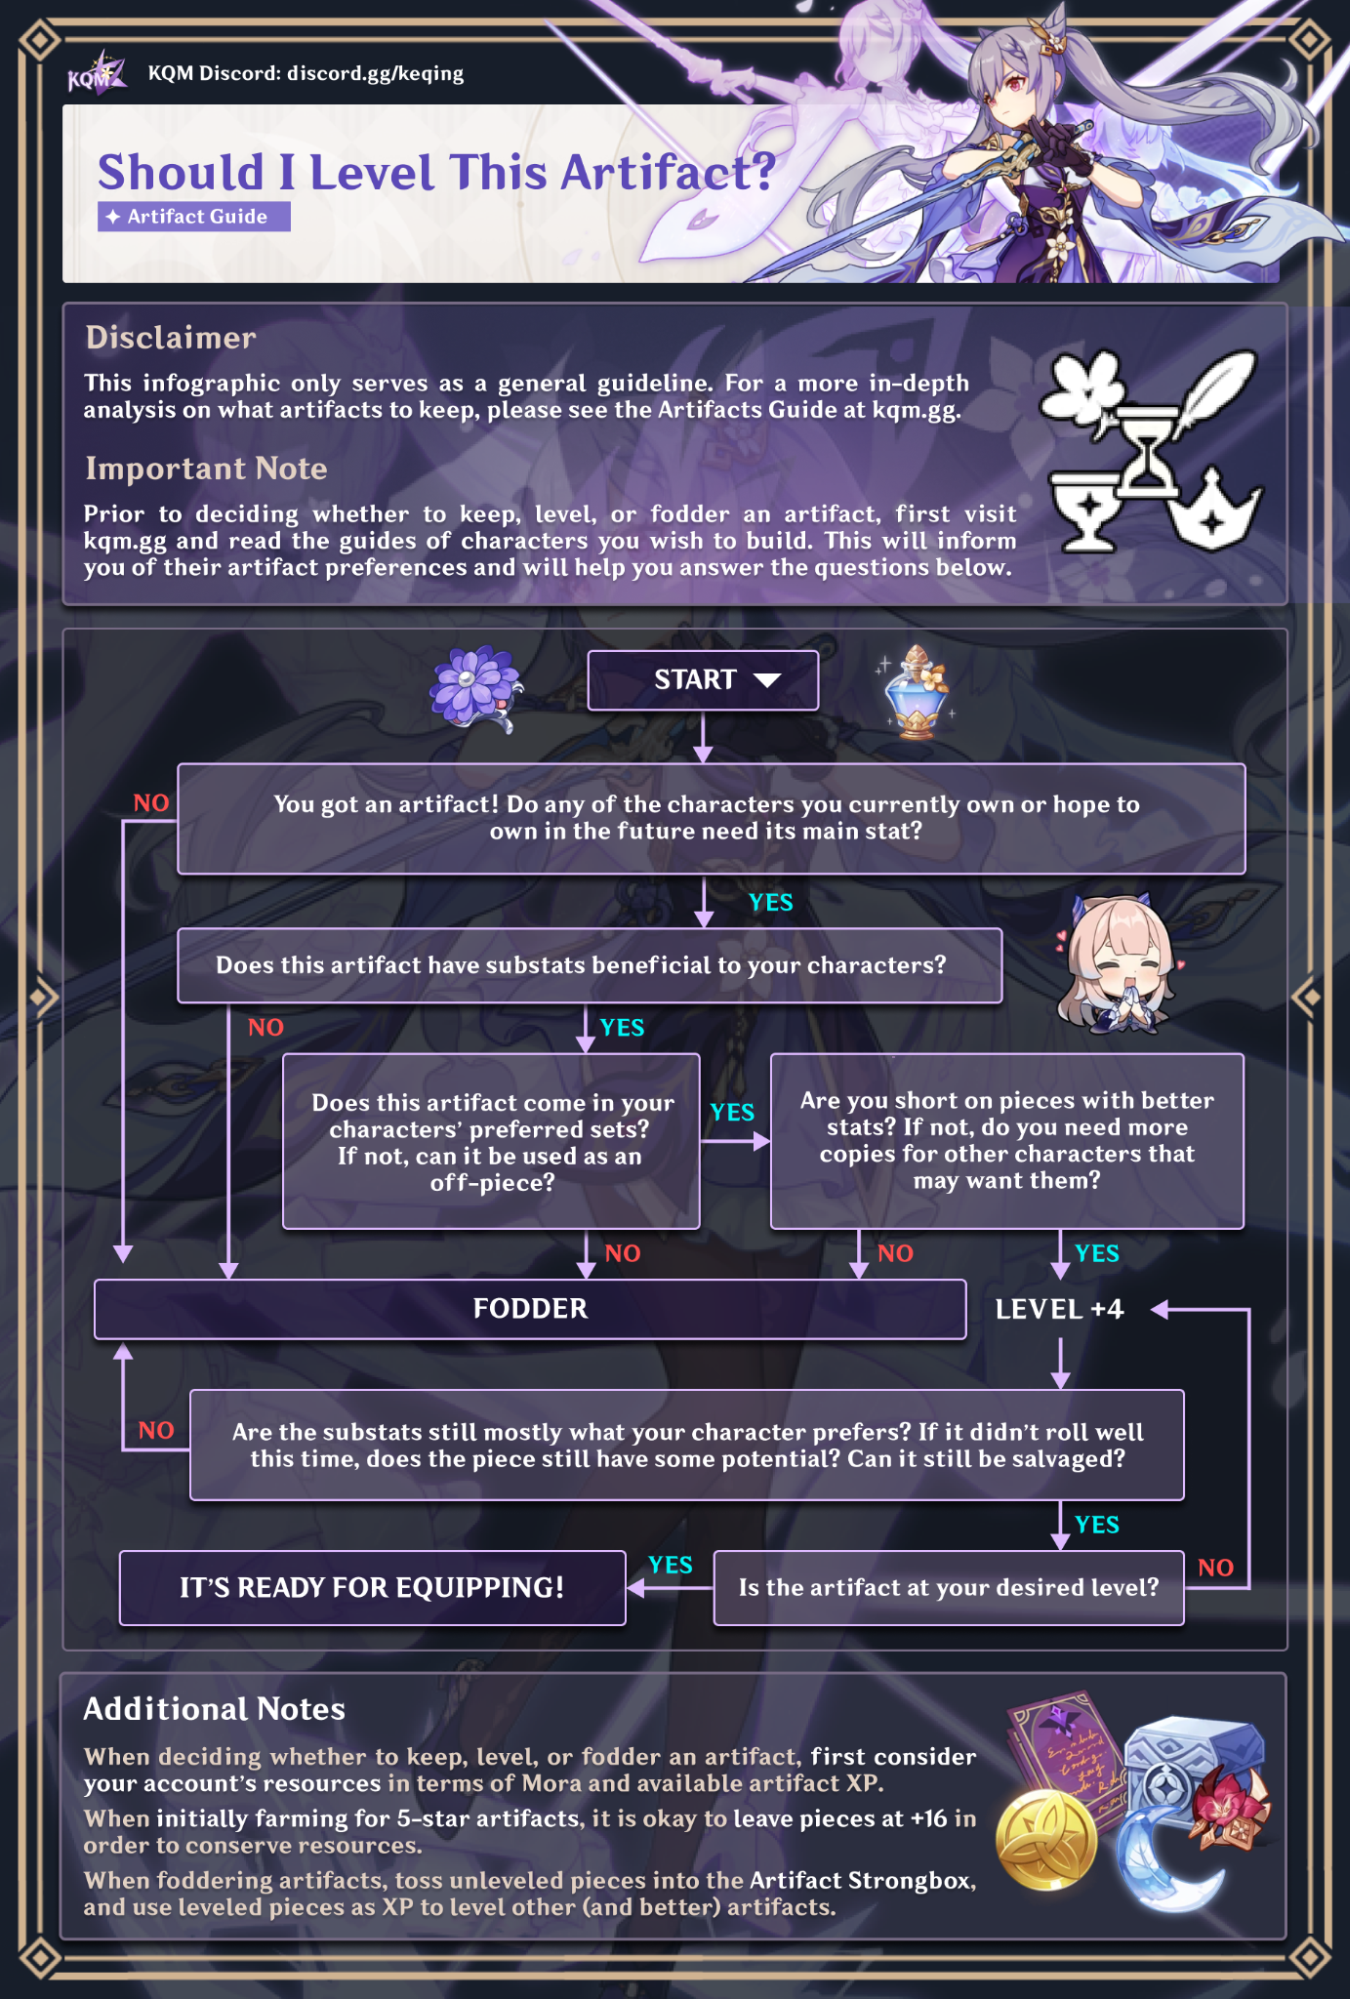
There is no simple answer to this question. Nonetheless, there are generally good practices to prevent future regrets.
First, compare the artifact in question with your current standards in terms of desired main stats, then desired substats, then Roll Value. If no other character you are building can use the artifact and it has few desired stats or low rolls, then it may be safe to fodder it.
Second, save fully leveled artifacts that have a high CRIT Value or a high Roll Value on useful substats. Even if the artifact is not currently needed, a character you build in the future may use it. Your standards for Roll Value will increase as you farm, so setting a lower bound on what you’re willing to keep will depend entirely on your standards. Commonly appreciated stats include ER%, ATK, and EM.
Optionally, lock at least one of each main stat per artifact set to futureproof your account in some capacity. Note that doing this is not a priority, and should really be done only after sufficiently investing resources in your current characters. Proper main stats are incredibly important for most characters, so saving a variety of main stats can ensure you have at least something to get you started on future characters. Artifacts with generally good substats like CRIT Rate, CRIT DMG, and Energy Recharge are especially worth saving. However, be sure to do some critical thinking and avoid saving multiple artifacts of main stats that aren’t synergistic with the set bonus. For example, it’s not necessary to save multiple DEF% Sands on a set intended for EM-scaling characters (e.g., Flower of Paradise Lost).
Ultimately, the decision to fodder an artifact is up to you, based on your current standards of investment and willingness to save for the future. Often, it can be better to keep an unused artifact with good stats than to regret losing it later. Continue reading for a more nuanced look at character enhancement and artifact leveling.
Artifact Organization While Farming
While the current Genshin Impact artifact system does not have artifact set loadouts, you can still keep yourself organized by following these three principles.
- Lock Potential Keepers
Lock any artifact that meets your current standard for starting substat rolls from Level +0. Follow our Should I Fodder This Artifact? infographic to determine when it’s trash.
- Unlock Fodder
Unlock any artifact as soon as you deem it to be fodder-worthy. Level +0 artifacts can be used for the Strongbox, and leveled artifacts can be used for artifact EXP.
- Use Unbuilt Characters As Loadouts
You can use unbuilt characters as “loadouts” for your characters’ unequipped sets. For example, if you play both Freeze and Melt Ganyu, you can equip your unused set onto your Aloy. When you need to swap between builds, just swap Ganyu and Aloy’s artifacts and you won’t have to worry about finding those pieces anymore!
Incremental Character Enhancement Recommendations
Artifacts in Genshin Impact can provide a tremendous improvement in a character’s performance, as demonstrated by the Damage Formula. However, acquiring the right artifacts with the desired stats is a difficult and expensive process due to the randomness of artifact acquisition and substat rolling.
The following section provides information on which artifacts to keep and which ones are good for your characters based on incremental improvements to all characters you play. While tools like Genshin Optimizer help you build your characters, recognizing which artifacts to lock and level up is important!
Keep in mind that artifacts are only one component of incremental character improvement. They should be raised in conjunction with other components such as character level, Ascension, weapon level, and Talent level, which are permanent and consistent upgrades.
Factors Influencing Artifact Quality
The randomness of artifact acquisition leads to acquiring a good artifact at a high Resin cost. The randomness affects the following aspects:
- The type of artifact piece (e.g., Flower, Feather, etc.)
- Whether the artifact belongs to a relevant set
- Whether the artifact is 4-star or 5-star
- Whether the main stat is relevant
- Which substats are assigned to the artifact
- How many substats the artifact starts with at Level +0
- How rolls are distributed to improve substats
As your artifacts improve through a lengthy process of farming, it becomes statistically less likely (and more Resin-intensive) to find artifacts stronger than your existing ones. It is also challenging to judge the Resin efficiency of artifact farming versus other character improvements. Therefore, it is recommended to acquire “good enough” artifacts for all members of the team before focusing on upgrading one character in particular.
Identifying “Good Enough” Artifacts
What constitutes a “good enough” set of artifacts for a character depends on the gameplay mechanics of that character.
DPS characters benefit from damage-scaling stats, especially the main stat due to its guaranteed improvement with every artifact level.
Support characters often rely on their Elemental Burst to provide utility to the team. If they do not rely on their Elemental Burst, they may utilize a 4-piece artifact set to provide utility to the team or a Talent that scales based on a specific stat. Moreover, 4-star artifacts (of a 4-star or 5-star artifact set) are usually “good enough” for most supports.
Determining Good Main Stats
Choosing good main stats depends on the character’s needs. The main stat should align with the character’s role and preferred scaling stat. For example:
- DPS characters should aim for a well-balanced mix of damage-increasing stats based on how the Damage Formula works.
- Support characters should aim for stats matching the scaling of their relevant Talents, whether it be for damage, healing or shielding.
- Some supports may have alternate build priorities to account for their share of reaction-related damage (like in Bloom teams).
- Favonius weapon holders may want a CRIT Rate Circlet to trigger the weapon passive more consistently.
- Characters that rely on using their Elemental Burst regularly should have sufficient Energy Recharge to meet their ER requirements.
The choice of main stat is also influenced by other factors such as the character’s active set bonuses, team buffs, and weapon choice.
Determining Good Substats
Good substats are any stats the character can utilize well. While many players think CRIT is the be-all and end-all of artifact farming, any substat which benefits a character should be used when determining an artifact’s quality. Determining ideal stat distributions and cut-offs requires quite a bit of calculation, so some of our character guides suggest specific substat breakpoints. In the case of Energy Recharge, it is valuable until your ER requirement is met, dropping significantly in value thereafter. Even in the case of 4-piece Emblem of Severed Fate builds, though Emblem may compensate for some damage lost from building ER%, it does not necessarily mean that ER% is better than more offensive stats.
To figure out an artifact’s relative substat quality, you can use the metric known as Roll Value (RV). For example, an ATK-scaling Melt DPS would generally benefit from ATK%, EM, CRIT Rate, CRIT DMG, and ER% (if they use their Burst regularly). These substats should be included in the artifact’s RV calculation, while other substats should not. By comparing artifacts based on the RV sum for relevant substats, you can gauge the relative value of one artifact over another.
Intentionally farming artifacts containing the desired main stat alongside several useful substats is very expensive and can incur an outsized opportunity cost. How far a player chooses to optimize substats depends on the urgency of building other characters and the player’s tolerance for RNG.
Before farming extensively for optimal substats and substat rolls, you should make sure your Talents, weapons, and characters are all properly leveled since these upgrades are guaranteed and permanent.
Why are certain main stats preferred over others?
A CRIT Rate or CRIT DMG Circlet is generally recommended for conventional DPS characters whose damage can CRIT, since they guarantee an increase in CRIT value. While other main stats scale with their damage, there is an outsized opportunity cost in not using a CRIT Circlet since there is a wide gap in the DPS increase compared to other options.
DMG% Goblets are generally recommended for DPS characters because only Goblets have a DMG% main stat. Other stats (like ATK%, EM, etc.) can be obtained from substats, Sands, and weapon secondary stats. In most cases, using a different Goblet would result in lower DPS than using a DMG% Goblet (at similar substat distribution). However, since DMG% Goblets are rare, feel free to use other Goblets or 4-star Goblets with good substats while waiting for a good 5-star one to appear.
Lastly, EM is a preferred main stat for plenty of Anemo, Dendro, and Reaction trigger units because their damage typically stems from Transformative and Additive Reactions such as Swirl, Hyperbloom, Spread, etc. — reactions whose damage scales greatly with EM.
How long should I farm for a character?
There is no exact answer to this question since it depends on your idea of “good enough” artifacts and your artifact luck. If you have obtained the recommended artifact set, main stats, and fairly solid substat rolls and you haven’t seen any improvement in your artifacts after a month or so, it might be a good idea to focus on a different character or artifact domain. Most of a character’s artifact potential is seen after the first few weeks of farming.
The Artifact Farming Calculator by grumd can be used to calculate the odds of obtaining an artifact with specific substat values over a period of Resin spent (defaulting to 160 Resin per day spent on artifact farming).
You can also use this spreadsheet by Vidmilo to calculate the odds of rolling an artifact that starts with a certain number of desired, or “good”, substats. This can help determine how long it will take you to reach your current artifact farming goals and help you maintain realistic expectations.
You can also check out the video How Much Time Should You Spend on Artifact Farming? by Jyo’s Spiral Abyss Guides for examples of farming simulations and Resin-efficient farming behavior.
Example of Resin-Efficient Farming
This section provides an example of an efficient way to farm artifacts for two different teams and eight characters total. The teams were chosen purely for example, and are not an indication of power level.
Character Selection and Teambuilding (Example)
Let’s say we like Bennett, Tartaglia, and Kuki Shinobu. After learning about their possible teams, we decide to build the following two teams for Spiral Abyss.
Artifact Set Selection (Example)
Before beginning to farm, we decide which artifact sets to farm for our chosen characters and teams. If we look at what is optimal without Resin-efficiency being taken into consideration, we might farm for these artifacts.
Team A
- Bennett — 4-piece Noblesse Oblige
- Xiangling — 4-piece Emblem of Severed Fate
- Kazuha — 4-piece Viridescent Venerer
- Tartaglia — 4-piece Heart of Depth
Team B
- Nahida — 4-piece Deepwood Memories
- Xingqiu — 4-piece Emblem of Severed Fate
- Fischl — 4-piece Golden Troupe
- Kuki Shinobu — 4-piece Flower of Paradise Lost
But this would require us to farm 7 different Domains for 8 different 4-piece artifact sets!
Resin Efficiency (Example)
Because we learned about the possible artifact set options from Character Guides, we know there are other comparable artifact sets that are Resin-efficient for Tartaglia and Kuki Shinobu.
In Team A, Tartaglia can hold 2-piece Heart of Depth (+15% Hydro DMG Bonus) and a 2-piece Shimenawa’s Reminiscence (+18% ATK) instead of 4-piece Heart of Depth and achieve very similar strength. Shimenawa’s Reminiscence shares a Domain with Emblem of Severed Fate. This means we can farm for Xiangling, Xingqiu, and Tartaglia at the same time.
In Team B, Kuki Shinobu can alternatively hold 4-piece Gilded Dreams which shares a Domain with Deepwood Memories. This means we can farm for Nahida and Kuki Shinobu at the same time. Kuki Shinobu can also hold 2-piece Gilded Dreams and 2-piece Wanderer’s Troupe in the case that we are unlucky with obtaining EM Gilded Dreams pieces. Additionally, Fischl can run 2pc Shimenawa’s Reminiscence and 2pc Gilded Dreams instead of 4pc Golden Troupe. However, note that 4pc Golden Troupe is Fischl’s best set, and it can be Resin-efficient if you also have Furina or characters who can use 4pc Marechaussee Hunter.
Artifact Farming Plan (Example)
We come up with the following efficient farming plan:
- Farm mostly in Momiji-Dyed Court (Emblem of Severed Fate and Shimenawa’s Reminiscence).
- At least 4 of our characters can benefit from these artifact sets.
- They are all DPS characters, so an increase in damage is more valuable for them.
- At least 4 of our characters can benefit from these artifact sets.
- Use some Resin for Spire of Solitary Enlightenment (Deepwood Memories and Gilded Dreams).
- At least 3 of our characters can benefit from these artifact sets.
- Because Nahida needs relatively low investment to get online with 4-piece Deepwood Memories, less Resin is needed to obtain a suitable set.
- Kuki Shinobu only requires EM main stats and substats. EM Goblets and Circlets are exceptionally rare, however.
- If we already have a suitable 2-piece set of Wanderer’s Troupe, we will stop when we obtain complementary artifact types for a 2-piece set of Gilded Dreams.
- At least 3 of our characters can benefit from these artifact sets.
- Place undesired artifacts in Strongboxes or use some Resin for Viridescent Venerer, Noblesse Oblige, and Heart of Depth.
- Using 4-star artifacts on Bennett is fine, since he does not deal a significant portion of the team’s damage. Considering how rare EM pieces are, Kazuha can get away with 4-star Viridescent Venerer pieces with EM main stats, as the DPS increase may not be worth the Resin.
This plan means we only have to farm three different Domains for five artifact sets, and use the Strongboxes for three artifact sets which belong to inefficient Domain options for us. Thus, every artifact we receive could be equipped on at least one of our characters.
Once we have received a baseline set for each character, we begin to incrementally upgrade our character’s artifacts as described in Incremental Character Enhancement Recommendations.
Using Genshin Optimizer
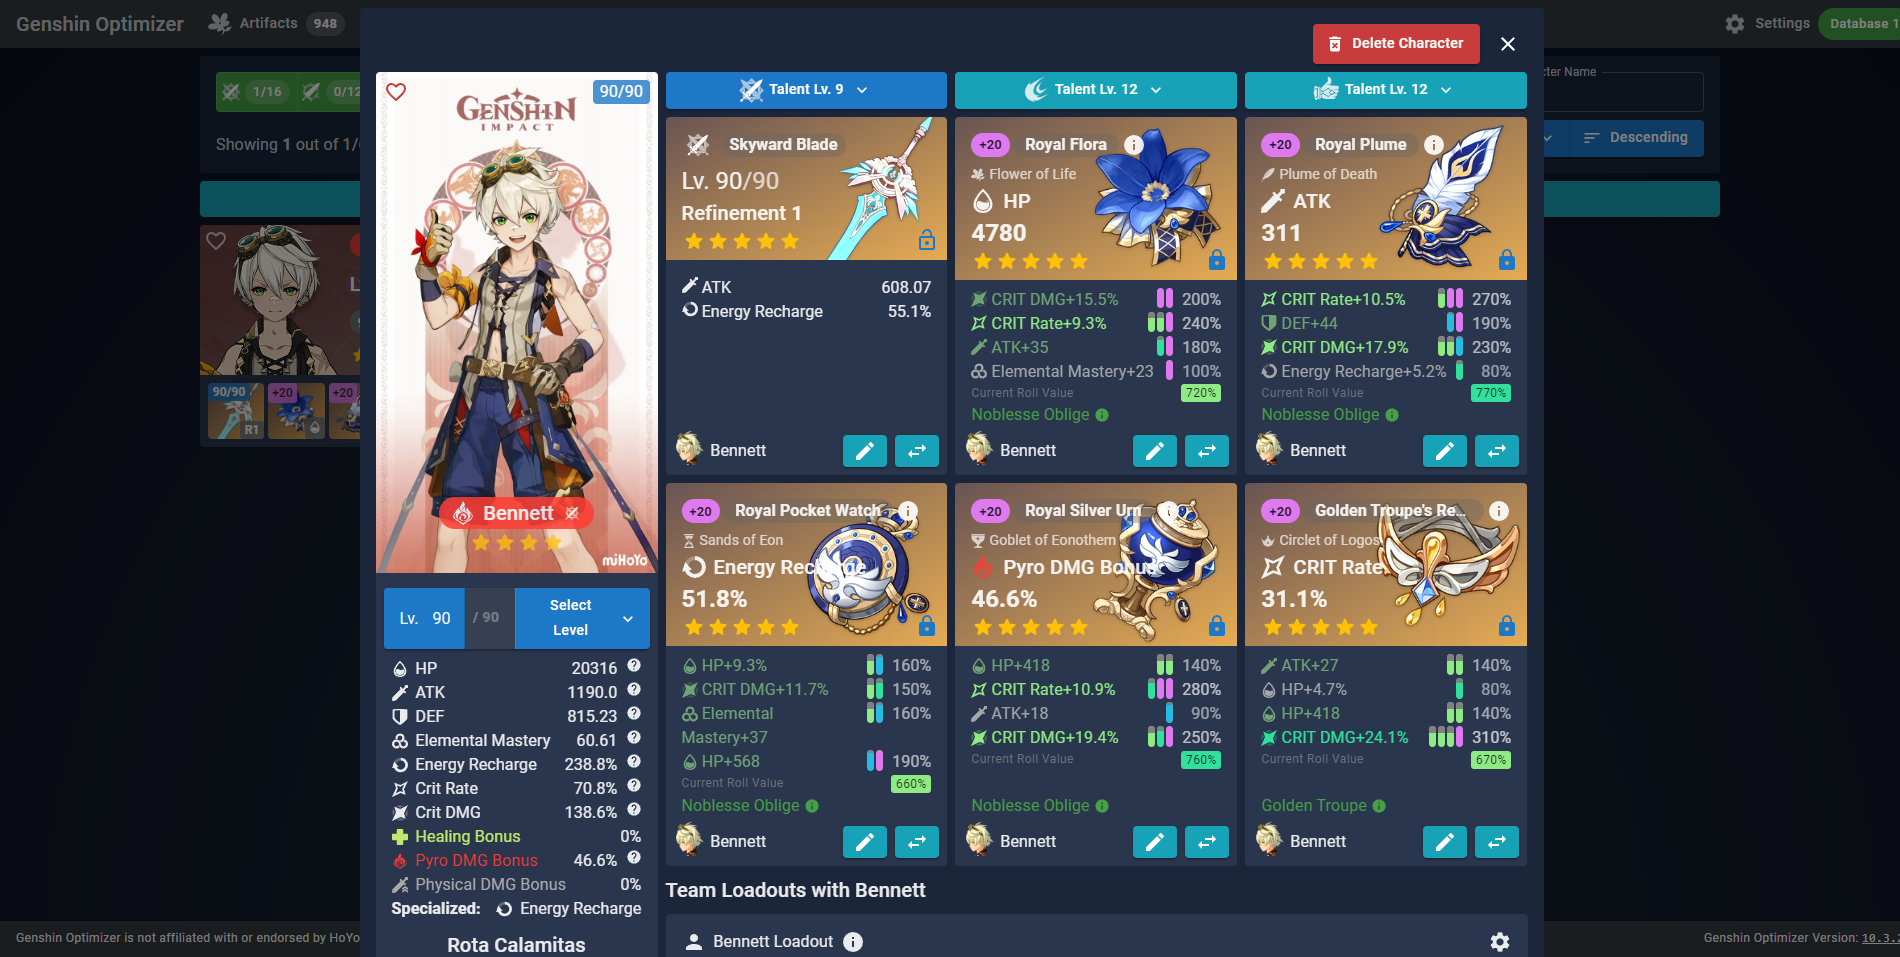
What Is Genshin Optimizer?
Genshin Optimizer (GO) is a free-to-use, open-source web tool that helps you optimize your builds. KQM strongly recommends using GO to optimize your artifact builds.
In short, the working principle of GO is as follows: first, GO generates hundreds of thousands of builds, corresponding to all the different combinations of artifacts that you own. Then, GO determines and tells you the best build among all of them based on how you play that character.
Role of Genshin Optimizer
It’s important to note that Genshin Optimizer does not tell you how to play your characters. Instead, you make decisions within GO’s optimization configuration according to how you play the character, and GO tells you how to build that character based on these decisions. To effectively use GO, it’s therefore important to have a baseline understanding of your characters, which you can do by reading KQM guides or asking for help on KQM’s Discord server.
For GO to recommend builds, it needs information about your characters, artifacts, and weapons. You can manually upload this information to GO. However, it’s recommended to instead use scanners, which are a safe and significantly faster way to upload information. Afterwards, GO can take all this information and analyze it for whatever optimization parameters you like. Its calculations are exactly as they would appear in the game, assuming the exact same conditions and stats are met. Make sure you set everything up correctly or you will get misleading numbers and sub-optimal build recommendations!
You can join Genshin Optimizer’s Discord to ask questions, raise concerns, or contribute to the project. Their GitHub is also available if you care to learn more about its underlying programming or see its changelog.
How Do I Use Genshin Optimizer?
GO’s lead developer, frzyc, has produced and compiled a playlist of short tutorial videos to guide you through the basics. It’s recommended to watch the videos if you’re unfamiliar with Genshin Optimizer. The rest of this section will focus on things beyond these tutorial videos.
There is somewhat of a learning curve, but once you get the hang of things, it is quite easy to use. Initial set up can take over an hour for a new user with two teams in mind, but it’s worth it!
For returning users to Genshin Optimizer, they have recently added a “Team Loadout” feature that has replaced the individual character optimization feature that we were used to before. Now you can optimize for several different teams and save the results!
Scanning Artifacts, Characters, and Weapons
The tutorial videos show you how to upload artifacts, characters, and weapons manually. A much faster process is automatically scanning your game and then uploading that to Genshin Optimizer via a JSON file. Depending on the method you choose and how many artifacts, weapons, and characters you have, scanning an entire inventory can take anywhere from 20 minutes to over an hour. If you only need to scan artifacts, then it can take 5–10 minutes. Manually entering everything would take several days of work.
A list of reliable methods can be found on the GO website here. None of these methods use or have access to your log-in credentials, but all require visual confirmation of the artifacts you have.
Setting It All Up
After you have everything you want to optimize uploaded, there are a few more steps to make sure when you click “Optimize” you get the outcome you want! Check the following five places to prevent future regret and avoid a major headache.
Proper Teammate Builds and Buffs
Genshin Optimizer has added “Team Loadouts”, so be sure to check out this YouTube tutorial before proceeding.
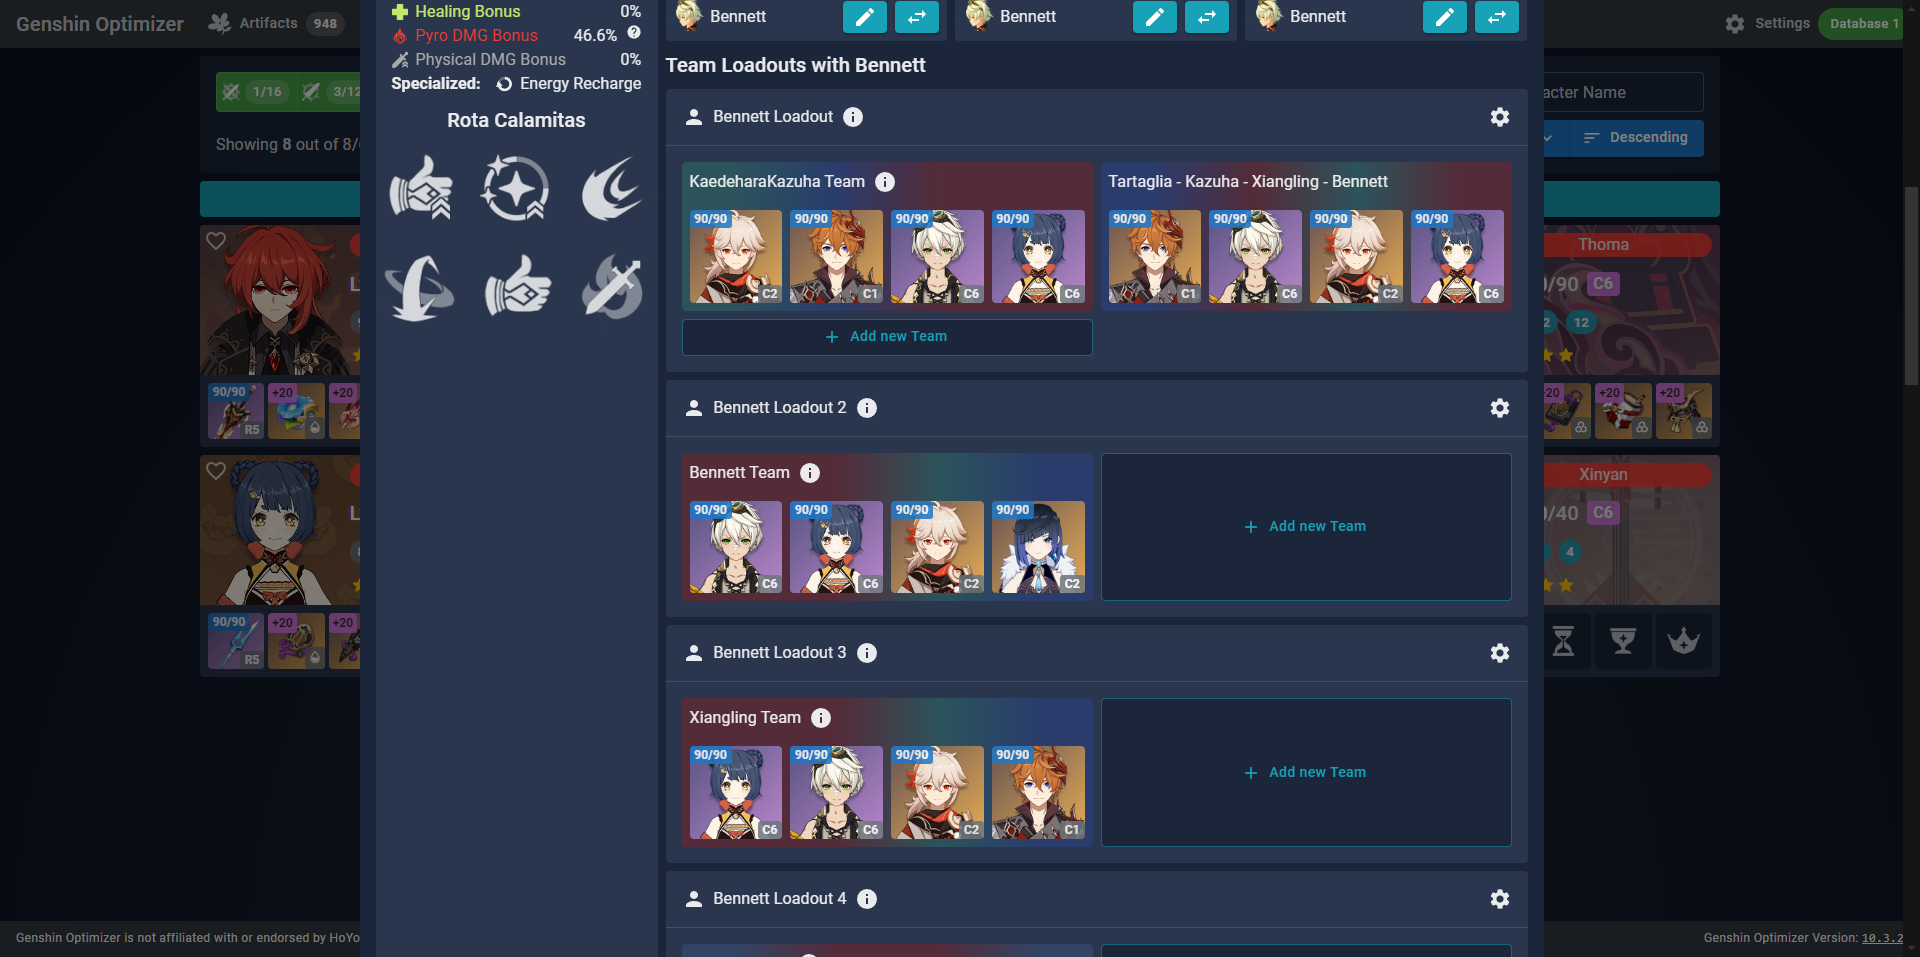
Any team buffs that your character receives will affect artifact optimization. Therefore, first ensure that your character’s teammates are added in from inside the “Team Settings” window in the “Teams” tab. Note that Elemental Resonance buffs are activated only if all party members have been added in. For example, removing Kazuha from the team in the image below would deactivate the Pyro Resonance even if Bennett and Xiangling remain.
While you may not have the optimal builds for your characters yet, it is important to make sure the proper set effects, weapons, and relevant stats are on your teammates. If not, your optimization will be skewed or suboptimal.
In the example below, we are optimizing for Tartaglia and playing Tartaglia — Bennett — Xiangling — Kazuha.
- Bennett is on 4pc Noblesse Oblige, good!
- Xiangling is not on 4pc Emblem of Severed Fate or EM Sands, but this is fine since we don’t care about her build here.
- Kazuha is on 4pc Thundering Fury, oh no! We should change this to 4pc Viridescent Venerer and try to get our target EM goals before proceeding. Also, if we have a weapon like Freedom-Sworn that provides a team buff, its passive buff can be relevant and we should swap to it if we plan on using it.
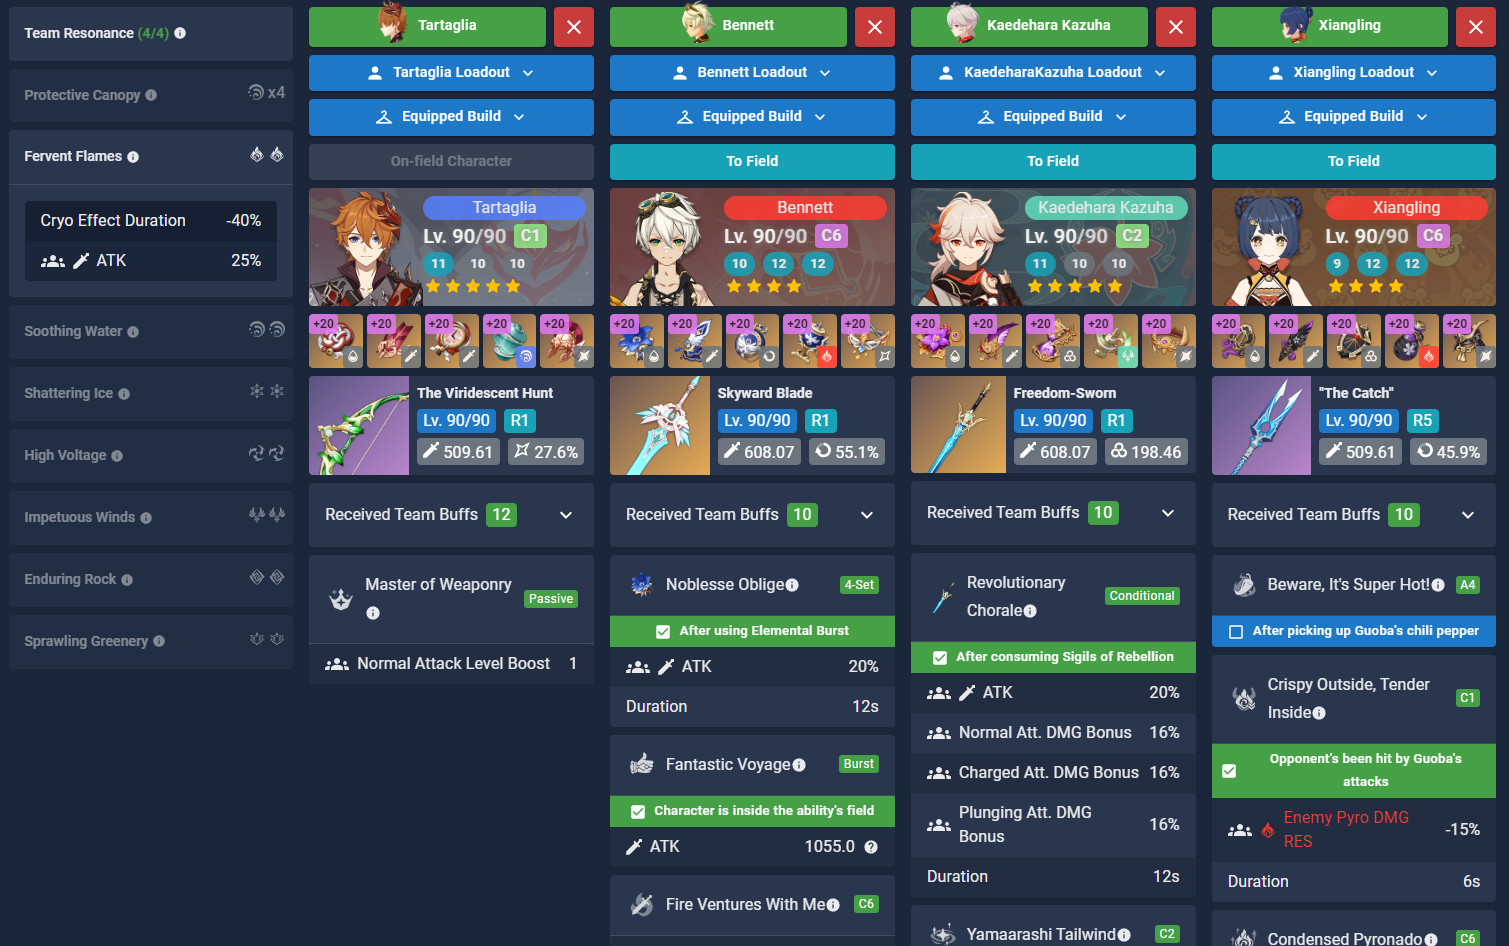
Having the properly activated team buffs is crucial to proper optimization. Talents, Constellations, weapon passives, and artifact set bonuses are all important factors to check if applicable.
Weapon Passives
Your target character’s weapon may need to have its passive activated. You can check this information at the bottom of the “Overview” tab.
In the example below, our Yelan is holding Aqua Simulacra and its conditional passive is unchecked. We’re probably going to be near enemies if we’re fighting, so we should just click it to activate it.
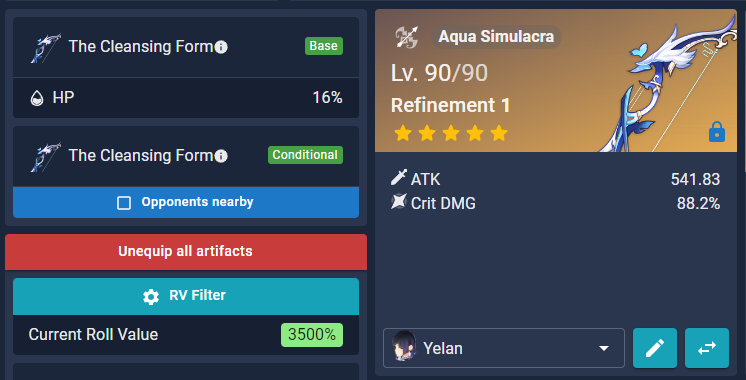
Talents and Constellations
Your target character’s Talent and Constellation effects need to be checked! If they are not active, you can miss out on buffs or even entire aspects of their kit.
In the example below, our Xiao does not have his Burst active. If we want to get his Burst’s Anemo Infusion and DMG Bonus, then we need to check those boxes. Understanding a character’s kit and team rotation is important to knowing how many stacks of an effect would be active. This can be tricky, but asking the KQM and GO Discord communities can help.
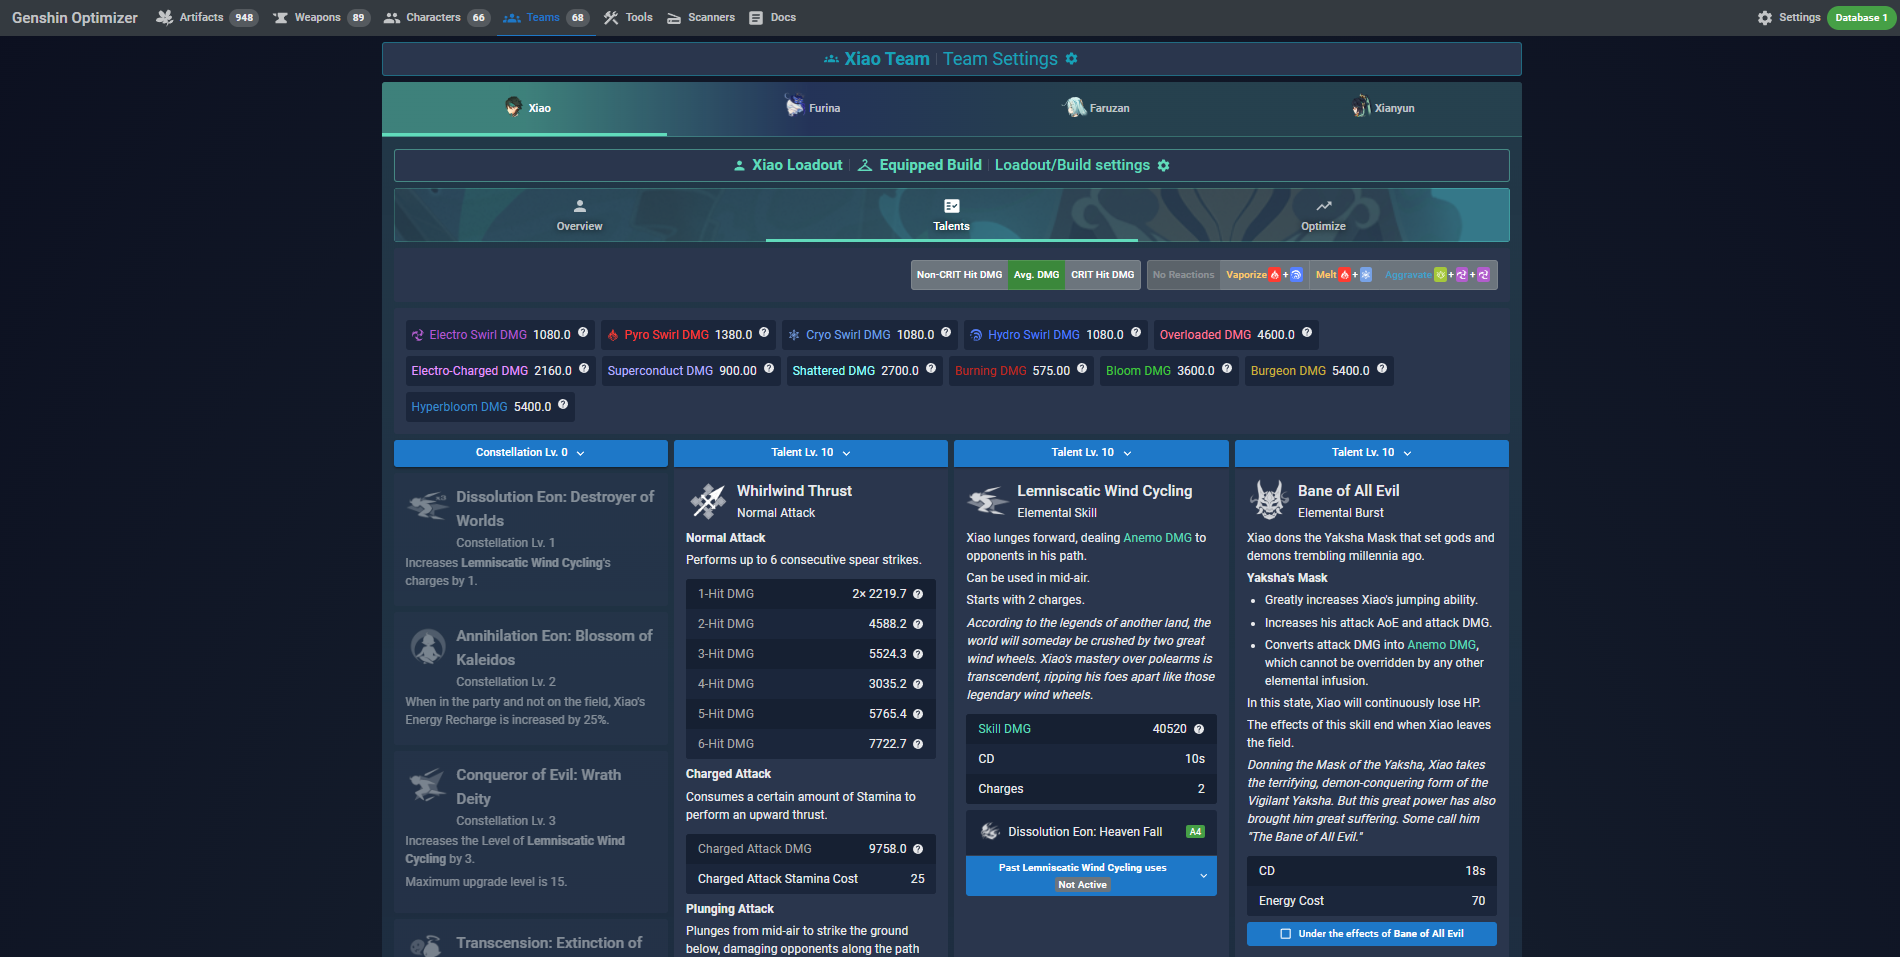
Artifact Sets and Conditions
Our final step of setup before heading to optimization has us defining which artifacts and conditions we want to choose from!
Here are a few points to consider:
- Remember to check for artifact set conditions in Artifact Set Configuration (gear icon). You don’t want to lose out on set bonuses and stacks.
- Set your assumed level to +20. This lets your lower level pieces hypothetically compete with your fully leveled pieces, which may indicate artifact options worth leveling.
- Select only relevant main stats to lower optimization time. If you are unsure, just leave them all open. You never know what might be optimal. Though, if your Itto ends up with a Healing Bonus Circlet, you probably want to farm more. Lacking recommended main stats is an indicator you need more artifacts.
- Exclude artifacts from characters with higher priorities. You don’t want to steal your DPS unit’s optimized artifacts for your support.
- Enable equipped artifacts. A majority of your good artifacts are probably already equipped. Don’t lose that potential!
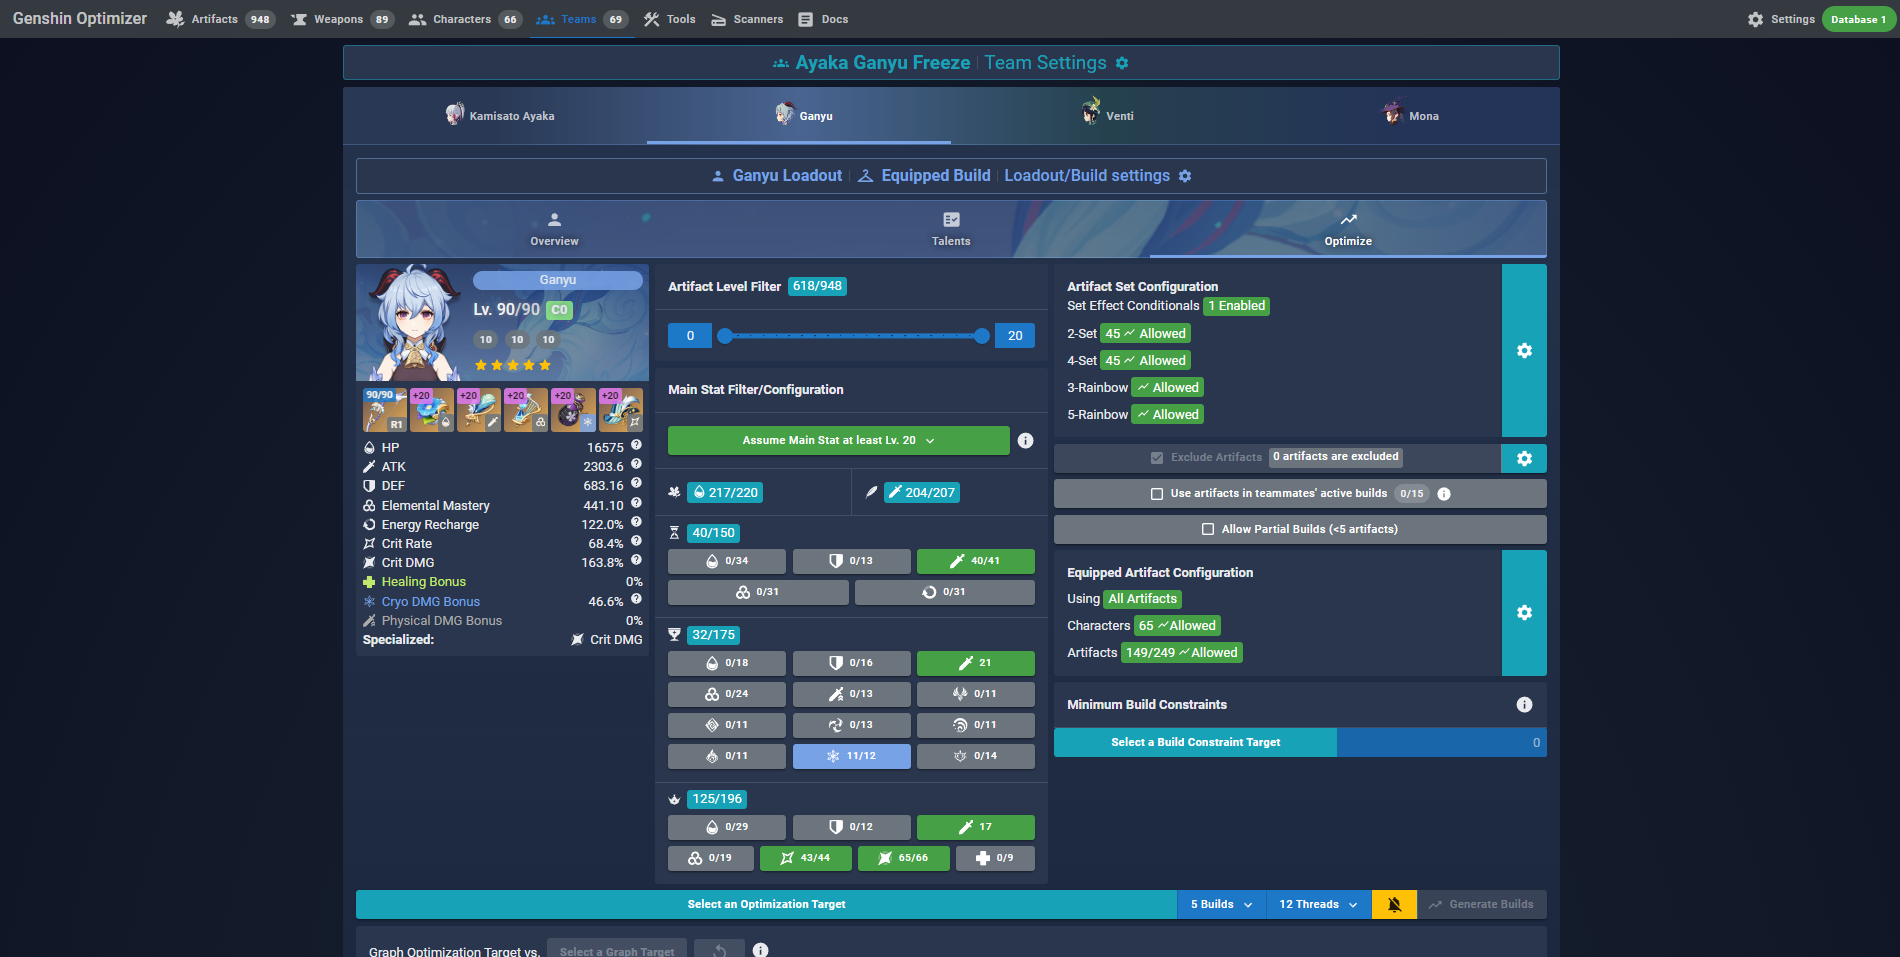
In the example above, we are using Ganyu in a Freeze team (Ayaka — Mona — Venti). We want our Ganyu to take artifacts under these conditions, consistent with the guidelines above:
- We click that the enemies are Frozen in the configuration for the Blizzard Strayer set (gear icon).
- We assume our artifacts are leveled to +20.
- We only want ATK, Cryo DMG%, and CRIT main stats. We can click ATK Goblets and Circlets just in case our other pieces aren’t good enough. We could also allow all main stats, but we might prefer just comparing only these options (which are likely to be better anyway).
- We include equipped artifacts from every character. While we can exclude Ayaka’s artifacts, this makes the calculation take much longer unless they are globally excluded.
You’re finally ready to optimize!
Appropriate Optimization Targets
Once you have everything uploaded to your database and properly set up, you can finally start optimizing! There are several ways to configure your optimization constraints which the following sections go over. It can be a little tricky, so hopefully this is helpful!
Talent DMG, Specific Stats, or Something Else?
As you already know, damage in Genshin Impact is quite complicated. In some cases, your DPS character will only have one primary source of damage that could also have similar scaling with another relevant Talent. For support characters, optimization targets can simply be a stat or Talent to maximize their utility (if it scales with a stat). For advanced optimization strategies or multi-opt configurations, proceed to the next section.
Optimizing DPS Characters
Set your Energy Recharge constraints.
Note that Genshin Optimizer does not know how much Energy Recharge your characters need. By default, it simply recommends the builds that have the highest damage output regardless of ER%. Therefore, if your character relies on their Burst and you need them to meet their ER requirements, you need to introduce ER constraints into Genshin Optimizer.
Under Minimum Build Constraints in the Optimize tab, press “Select a Build Constraint Target” and choose the Energy Recharge stat to set an ER constraint on the builds generated. You can even set multiple ER constraints at the same time; the Genshin Optimizer will always mandate the highest ER constraint. Simply disable the constraint to have the optimizer try the next highest value. If you want to see what your Xiangling’s damage looks like under different ER requirements (depending on how many times you battery with Bennett), you can easily do that!
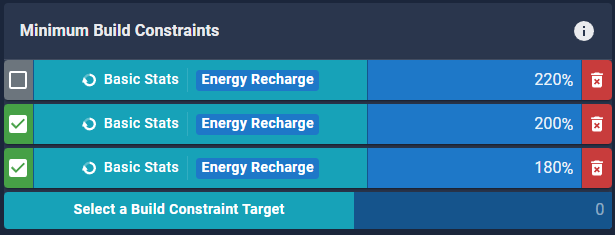
Another common approach to meeting ER requirements is to graph your optimization target against Energy Recharge. Each build at the corner of the Stat Requirement Threshold Line is the build that has the highest damage while meeting an ER requirement that’s higher than the previous such build at the corner. This can help you quickly identify how big the tradeoff is between damage and ER%.
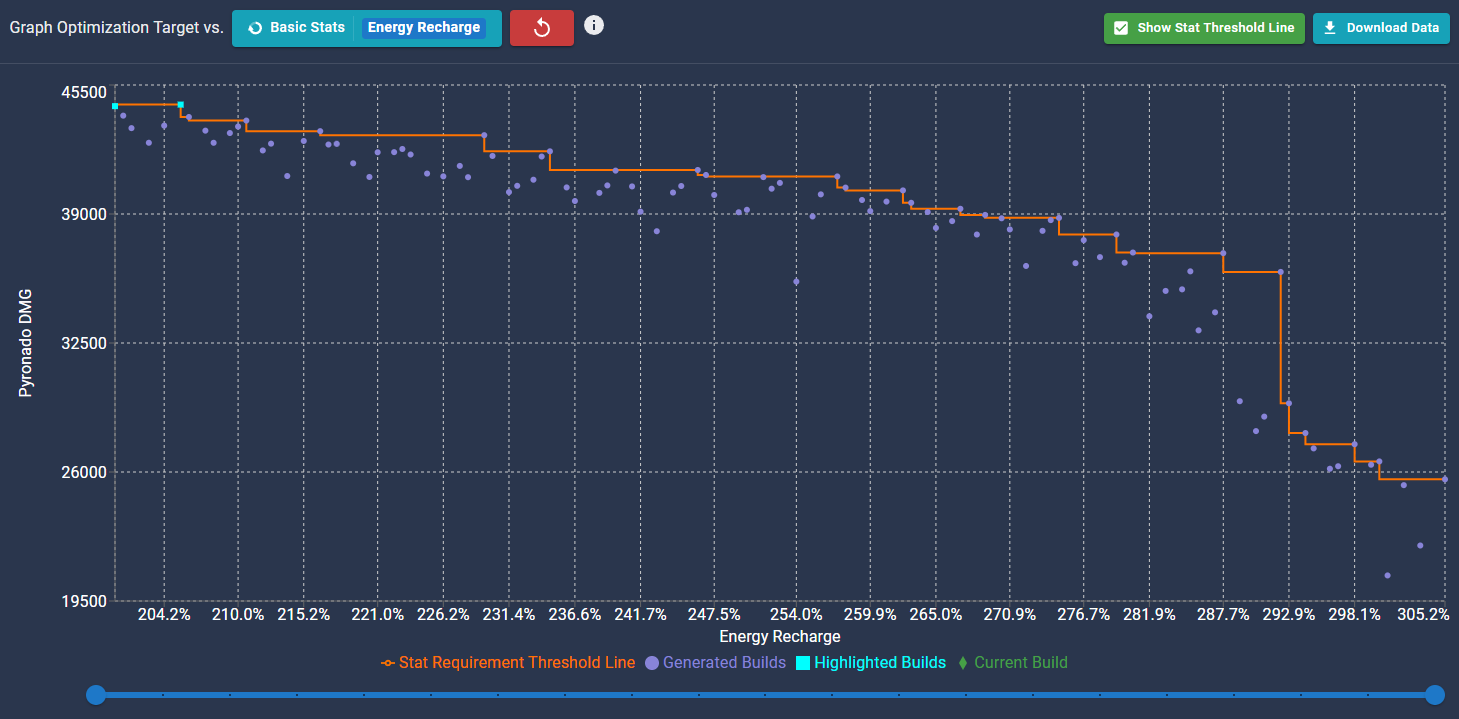
For example, a small dip in the Stat Requirement Threshold Line followed by a long horizontal line segment indicates that the build at the end of this segment sacrifices a small amount of damage for a large increase in ER%. Conversely, a large dip followed by a short horizontal line segment means that increasing ER% at that point costs you a lot of damage.
Identify your primary sources of damage.
For some characters, it can be quite easy to know where most of their damage comes from. For example, a Hyperbloom Kuki Shinobu deals a vast majority of her damage from Hyperbloom. Just select Hyperbloom DMG! However, for many other characters, a single optimization target can’t accurately model the entirety of the character’s damage, e.g., if the character receives dynamic buffs or has multiple sources of damage. In these cases, you should use a multi-opt configuration (see below).
If you don’t know your primary sources of damage, you should read through your character’s Talents and learn about their playstyle. You can find this out easily by reading KQM’s Character Guides! If you aren’t sure about your settings, you can always ask on Discord.
Activate Elemental Reaction modifiers.
For Amplifying and Additive Elemental Reactions, you need to toggle them to be included. In many cases, your character cannot trigger the reaction on every single instance of damage due to Internal Cooldowns (ICD) (TCL entry). For characters with ICD on their primary source of damage, you should use multi-opt configurations so your optimization is not heavily skewed for impossible scenarios. Characters without ICD on their Burst do not need to worry about this generally (as long as you have enough Elemental application from the team).
Optimizing Support Characters
Set your Energy Recharge constraints.
If your character relies on their Burst, you need to meet their ER requirements.
Identify your primary sources of utility.
For most support characters, it’s relatively easy to select an optimization target. For example, if you want to maximize Bennett’s healing, just click his Burst’s healing for optimization. In a slightly more complicated case, Diona’s utility comes from her Skill’s shield and her Burst’s healing. However, since they both scale with the same stat, optimizing for HP will benefit both aspects of her kit.
Consider their DPS potential using graphs.
Some support characters deal fantastic damage with the right builds. For example, Shenhe is a support who can hold 4pc Noblesse Oblige while trying to maximize her ATK stat. However, her Burst also has good scaling. You can optimize for her ATK stat (or use a multi-opt) and graph it versus her Burst DMG. Visit the Shenhe Guide for an example with a video (old Genshin Optimizer UI)!
Similarly, many Anemo supports just want to maximize their EM stat (for buffs and Swirl DMG), but a non-insignificant portion of their damage comes from Talent DMG. With that in mind, you can use a multi-opt with both Swirl DMG and Talent DMG, or graph EM vs. Talent DMG (or the multi-opt).
Hopefully these basic guidelines can help you determine what’s part of your character’s kit to optimize for. If you have any doubts, you can always ask for help on the KQM or GO Discord servers.
Comparing Artifact Builds
You can compare your optimized builds by clicking the “Compare” button.
Comparing DPS for Weapons and Unfarmed 4-Piece Sets
Weapons
Genshin Optimizer does not optimize weapon choice; it only considers the weapon currently set as equipped for your character. To decide which weapon is best for your character, you need to optimize for each one separately.
For example, if you want to see the difference between Polar Star and Aqua Simulacra for your Ganyu, you would need to check damage with Polar Star (ideally using a multi-opt), then swap her weapon to Aqua Simulacra, optimize again, and compare the damage amounts.
4-Piece Sets
If you want to compare your relative DPS gains from your current 4pc set to another one you want to farm, you should use "Theorycraft" and adjust your artifacts accordingly. Click “Copy from Equipped” and change the set. You can also adjust substats for more nuanced comparison. While this isn’t 100% accurate depending on 4pc set bonus uptime and your actual in-game rolls, it can help you roughly gauge how much better your new set would be.
For example, if you want to see the DPS gain of going from a 2pc + 2pc set to 4pc Golden Troupe on Fischl for your account and team scenario, you could optimize first before farming, go to the Theorycraft tab, click “Copy from Equipped”, and change the artifact set.
Advanced Optimization Constraints
We provide some further recommendations on how to effectively use advanced optimization constraints below.
Using Graphs to Your Advantage
In some cases, you may want to optimize for multiple things at the same time. For example, Kazuha wants to maximize his EM while considering his ER requirements, and a Hyperbloom Kuki Shinobu build may want to factor in healing. Advanced optimization when multi-opt configurations are unavailable can take some trial and error. This video by frzyc can give you an idea of how to use build constraints and the well-designed graph interface to determine the best build for your scenario.
Optimizing for Speedruns
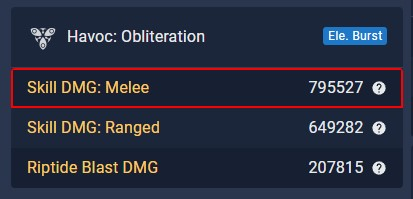
When optimizing your builds for Spiral Abyss speedrunning, it is important to make sure you have enough damage to one-shot enemies. With Genshin Optimizer, you can set up the exact environment your characters and teams are fighting in by modifying enemy stats and adding external buffs from cards (Benediction of the Abyss).
In general, you can set up for speedrunning optimization rather quickly if you know the HP of the enemy or enemies you are facing. Then add in all the team buffs, adjust the enemy RES stats in “Loadout/Build Settings” at the top and select “CRIT Hit DMG” towards the bottom of the page. If your optimization output says your damage is greater than your necessary HP threshold, then you’re set!

Theorycrafting in Genshin Optimizer
For you theorycrafters out there, Genshin Optimizer also has TC builds! This feature is useful for quickly generating hypothetical builds and comparing them to each other.
Substat Solver
A relatively recent addition to the Theorycraft feature is the substat solver. Instead of manually distributing your substats, Genshin Optimizer can find the optimal substat distribution under the constraints you set — just like a sheet solver but in the comfy environment of GO!
To distribute substats consistent with KQM Standards (KQMS), simply select “Use KQMS” and click “Distribute.”
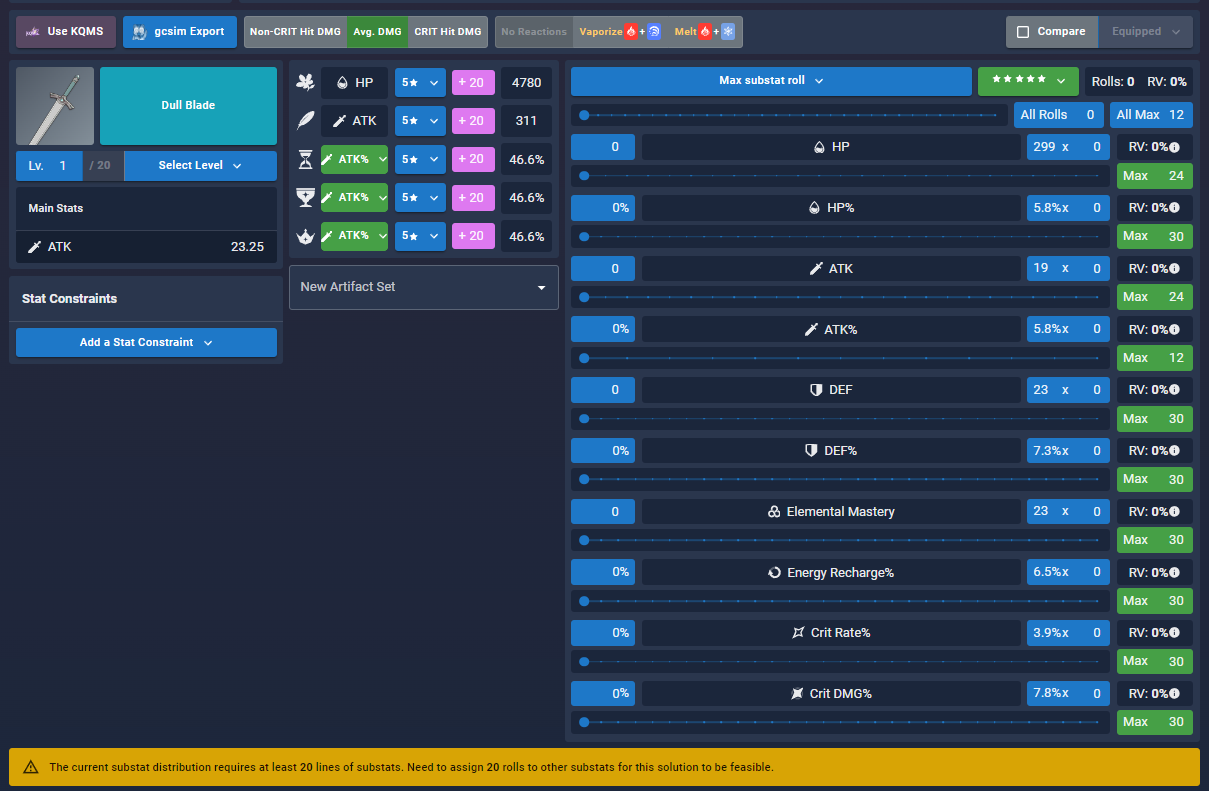
Using Solver to Distribute Substats
While solving according to KQMS is easy and useful for most theorycrafting work, it’s not the only way to use the substat solver. Here’s how to distribute substats using the solver according to the constraints that you set:
- Reset the substats by setting “All Rolls” to 0.
- Change the maximum number of rolls each substat is allowed to have. A common choice is 12 rolls for each attribute, which can be done by setting “All Max” to 12.
- Select the substat quality. This will be the same for each substat roll. You can choose between min, median, and max rolls, and 3-, 4-, and 5-star substats.
- Pre-allocate your substats if you want. The solver will then distribute substats on top of these pre-allocated substats that you manually chose. For example, by pre-allocating 2 ER% substats, you force the final build to have at least 2 ER% substats.
- Select an optimization target.
- Input the number of substats for the solver to distribute. If you didn’t pre-allocate any substats, then the maximum possible substats that can be distributed is 45, which would correspond to the best theoretical build.
- Click “Distribute”!
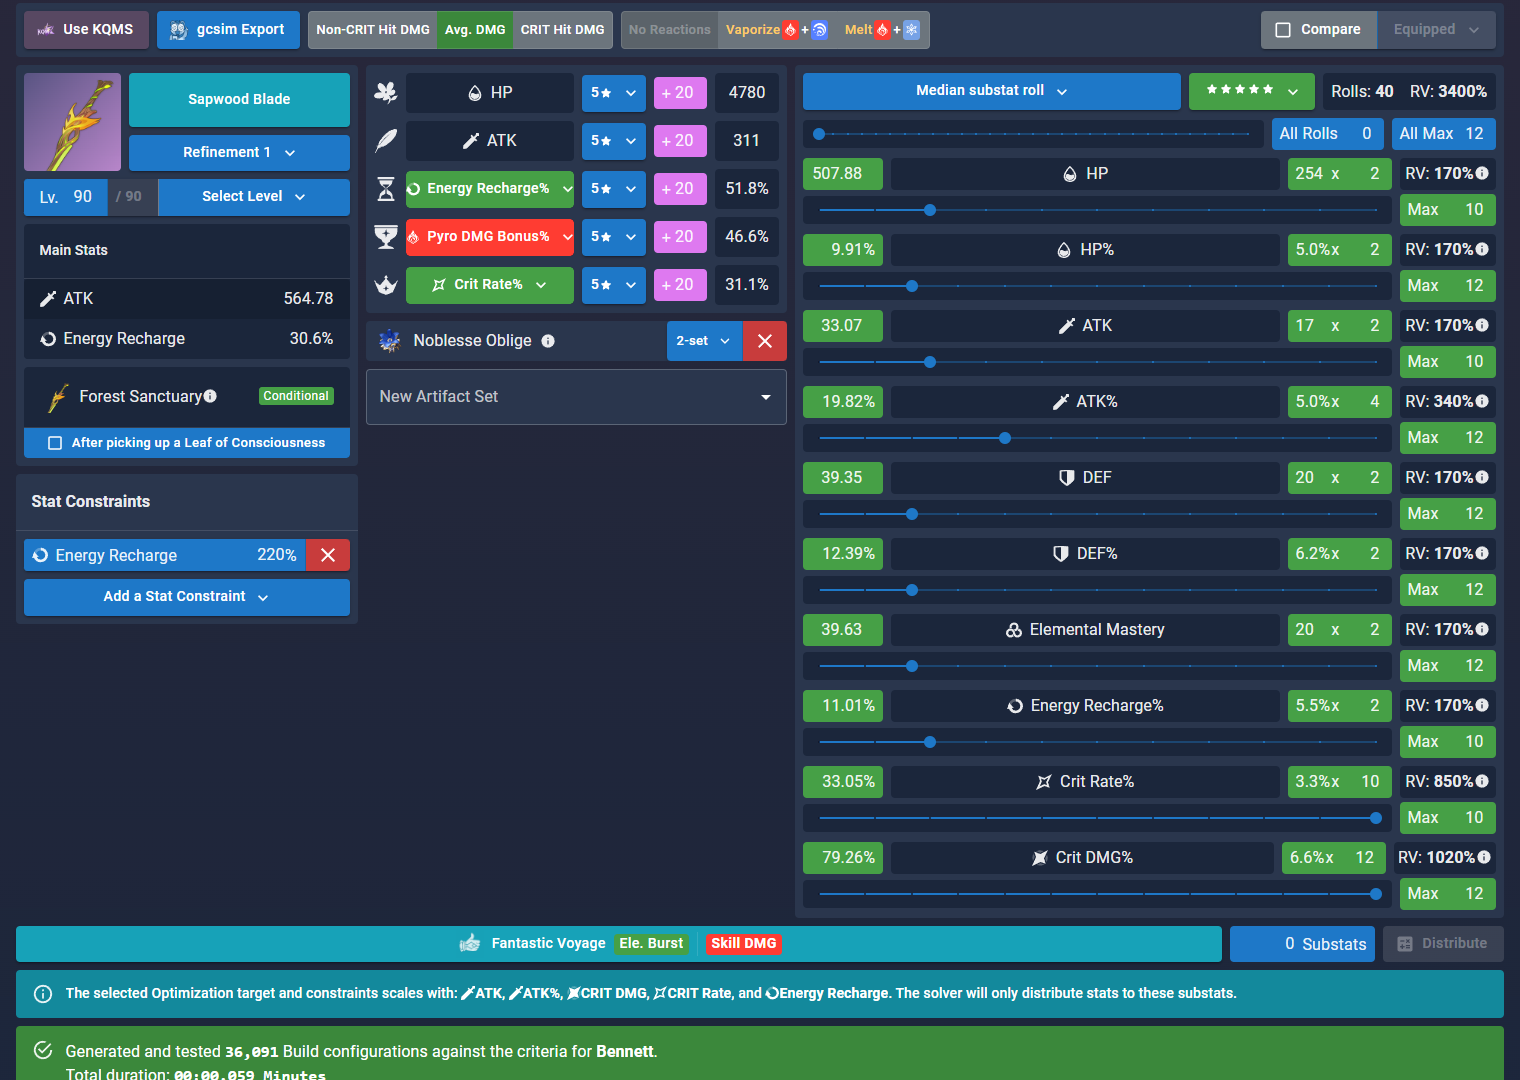
The substat solver will always try to ensure that the final build is possible in-game. Due to this, you may get a warning message that tells you to assign rolls to other substats for the solution to be feasible.
For example, if you put 20 as the number of substats for the solver to distribute, the solver may only be able to distribute 16 of them due to the constraints set. You should then manually distribute the remaining 4 rolls to substats that weren’t used by the solver.
Exporting Builds
You can export KQMS builds from the Genshin Optimizer theorycrafting tool into a format suitable for gcsim.
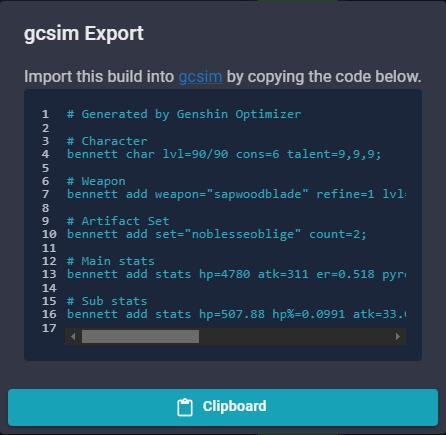
Optimizing with Advanced Configurations (Multi-Opt)

Multi-Optimization (multi-opt) is an advanced method of optimization in Genshin Optimizer that can generate better and more balanced builds. If you are unfamiliar with this feature, here is a basic tutorial by frzyc.
KQM has a Genshin Optimizer Multi-Opt Configuration Guide. It explains how multi-opt works and how you can use it effectively. Additionally, it contains specific JSON configurations for many of the characters in the game within specific teams.
Note that multi-opt configs aren’t necessary in every scenario since a lot of characters have simple damage, healing, or shield mechanisms. However, in cases where it is useful, it is very useful.
Appendices
These Appendices are intended for readers to obtain a baseline understanding of what each artifact set accomplishes and what kind of characters should use them. We may have missed some potential holders of the 4-piece sets, and 2-piece holders are intentionally omitted for space. For newly-released characters, it can take some time to establish what is viable for them. For specific character information, click their name to open their KQM Character Guide or Quick Guide.
The list of potential 4-piece holders is not comprehensive and does not indicate the only possible set option for that character. *Characters with an asterisk use the artifact set in niche circumstances or with caveats.
5-Star and 4-Star Artifacts
4-star artifacts can be quite useful in certain scenarios. Support-oriented characters can still make good use out of Instructor, The Exile, and Scholar. 4-star artifacts are also useful in the transitional phase during initial artifact farming. However, their lower maximum stat values generally make them worse than 5-star artifacts for DPS characters.
Use the search bar or buttons below to help find what you’re looking for. All artifact sets are visible by default, so if you just want to read through, go ahead!
Archaic Petra (AP)
Archaic Petra is a fairly niche set. Its 4-piece bonus is useful for some Geo characters in teams with Pyro, Hydro, Electro, or Cryo DPS characters, particularly if they are “Mono Element” teams. Its 2-piece bonus is beneficial for Geo DPS characters.
Note that, in some speedrunning scenarios in Spiral Abyss, you can pick up an Elemental Shard leftover from the first half with someone in the second half, even if you do not have a Geo unit on your team. This is particularly useful with speedrunning nuke setups.
Set Bonus | TC Notes | Availability
- 2-piece: Geo DMG bonus +15%.
- 4-piece: Upon obtaining an Elemental Shard created through a Crystallize Reaction, all party members gain 35% DMG bonus for that particular Element for 10s. Only one form of Elemental DMG bonus can be gained in this manner at any one time.
- For the 4-piece effect to occur, the equipping character must pick up the Elemental Shard created by Crystallize.
- Shards generated by Geovishap Hatchings don’t activate the 4-piece set bonus.
- Domain of Guyun
- Strongbox
Notable 4-Piece Holders


Blizzard Strayer (BS)
Blizzard Strayer’s 4-piece effect is incredibly powerful for Cryo DPS characters in Freeze teams. In such cases, it is almost always the Best-in-Slot option. It is also a viable option in Mono Cryo teams.
There are a handful of non-Cryo characters which can use this set in Freeze teams as well. Its 2-piece bonus is good for Cryo DPS units not in a Freeze team.
Set Bonus | TC Notes | Availability
- 2-piece: Cryo DMG bonus +15%.
- 4-piece: When a character attacks an opponent affected by Cryo, their CRIT Rate is increased by 20%. If the opponent is Frozen, CRIT Rate is increased by an additional 20%.
- The 4-piece set bonus does not snapshot. The CRIT Rate increase is a direct buff and is applied at the time of damage calculation.
- The 4-piece set bonus does not apply on the hit that triggers Frozen.
- Enemies with the “Frozen” aura do not count as “being Frozen” for the 4-piece set bonus. They need to be literally Frozen. Otherwise, it will be treated as just a Cryo aura, and you get only 20% CRIT Rate.
- Peak of Vindagnyr
- Strongbox
- Stevens (One 4-star Circlet)
Notable 4-Piece Holders


Bloodstained Chivalry (BSC)
Bloodstained Chivalry is a niche set that does not have any notable holders except Xinyan at the moment. It can be situationally good for Charged Attack Physical DPS characters in mid- to high-AoE scenarios. Its 2-piece bonus is good for Physical DPS characters (especially in conjunction with the 2-piece bonus from Pale Flame).
Set Bonus | TC Notes | Availability
- 2-piece: Physical DMG bonus +25%.
- 4-piece: After defeating an opponent, increases Charged Attack DMG by 50%, and reduces its Stamina cost to 0 for 10s.
- The 4-piece bonus does not end when the equipping character swaps out.
- Charged Attacks still require enough Stamina to be executed, even if the cost is reduced to 0. For example, Keqing would still need 25 Stamina to execute her Charged Attack even if BSC’s passive were active.
- If a Co-Op or off-field teammate defeats an opponent, the 4-piece effect will not activate. Also, if the equipping character is not on-field when defeating an enemy, the effect will not occur.
- Also triggers with wild animals such as boars, squirrels and birds.
- Clear Pool and Mountain Cavern
- Strongbox
- Victoria (One 4-star Goblet)
Crimson Witch of Flames (CW)
Crimson Witch of Flames is fantastic for on-field Pyro DPS characters who trigger Vaporize or Melt. Its 2-piece bonus is also quite good for Pyro DPS characters in general.
Set Bonus | TC Notes | Availability
- 2-piece: Pyro DMG bonus +15%.
- 4-piece: Increases Overloaded and Burning, and Burgeon DMG by 40%. Increases Vaporize and Melt DMG by 15%. Using Elemental Skill increases the 2-Piece Set Bonus by 50% of its starting value for 10s. Max 3 stacks.
- Gaining a stack refreshes the duration of previous stacks.
- At 3 stacks of the 4-piece effect, the 2-piece set bonus becomes 37.5% Pyro DMG Bonus.
- Stacks are maintained after swapping characters.
- The Reaction DMG Bonus is still applied even if the set holder is off-field. However, the set holder does need to trigger the Reaction.
- Hidden Palace of Zhou Formula
- Strongbox
Notable 4-Piece Holders
These Pyro DPS units can hold 4-piece Crimson Witch of Flames in teams where they can consistently trigger Vaporize or Melt.


Deepwood Memories (DM)
Deepwood Memories is the premier set for any solo Dendro DPS or support, or a secondary Dendro support. It is currently the only set that shreds Dendro RES. It can also be used by non-Dendro support characters in teams with a Dendro DPS character.
Set Bonus | TC Notes | Availability
- 2-piece: Dendro DMG bonus +15%.
- 4-piece: After Elemental Skills or Bursts hit opponents, the targets’ Dendro RES will be decreased by 30% for 8s. This effect can be triggered even if the equipping character is not on the field.
- The Dendro RES Shred does not count towards the ability that triggers the 4-piece effect.
- Spire of Solitary Enlightenment
- Ashk (One 4-star Flower)
Notable 4-Piece Holders


Desert Pavilion Chronicle (DPC)
Desert Pavilion Chronicle is the premier set for an on-field Anemo DPS Wanderer build. It is also competitive with other recommended sets for Xiao’s Anemo DPS builds. Its 2-piece Anemo DMG Bonus is good for 2pc + 2pc combinations for the aforementioned Anemo DPS characters.
Set Bonus | TC Notes | Availability
- 2-piece: Anemo DMG bonus +15%.
- 4-piece: When Charged Attacks hit opponents, the equipping character’s Normal Attack SPD will increase by 10% while Normal, Charged, and Plunging Attack DMG will increase by 40% for 15s.
- City of Gold
Notable 4-Piece Holders


Echoes of an Offering (Echoes)

The 4-piece effect of Echoes of an Offering is ping-dependent, which makes it unrecommended if you have high ping.
Echoes of an Offering is a functional set for an on-field Hydro DPS Ayato build if your ping is consistently below 100ms. Its 2-piece bonus is universally good, but it is not worth farming this artifact set for that reason alone.
Set Bonus | TC Notes | Availability
- 2-piece: ATK +18%.
- 4-piece: When Normal Attacks hit opponents, there is a 36% chance that it will trigger Valley Rite, which will increase Normal Attack DMG by 70% of ATK. This effect will be dispelled 0.05s after a Normal Attack deals DMG. If a Normal Attack fails to trigger Valley Rite, the odds of it triggering the next time will increase by 20%. This trigger can occur once every 0.2s.
- The 4-piece effect triggers inconsistently at higher ping (above 100ms).
- For more information, go to the Artifacts page of the TCL.
- The Lost Valley
- Strongbox
Notable 4-Piece Holders


Emblem of Severed Fate (Emblem, EoSF, ESF)

Emblem of Severed Fate is the premier artifact set for characters with high ER requirements and whose main source of damage comes from their Bursts. Its 2-piece bonus is situationally useful for meeting ER requirements.
Set Bonus | TC Notes | Availability
- 2-piece: Energy Recharge +20%.
- 4-piece: Increases Elemental Burst DMG by 25% of Energy Recharge. A maximum of 75% bonus DMG can be obtained in this way.
- The base 100% ER and character Ascension ER% is counted towards the bonus.
- Momiji-Dyed Court
- Hiiragi Chisato (One 4-star Sands)
- Strongbox
Notable 4-Piece Holders
Any character whose Burst is a high portion of their damage can use 4-piece Emblem of Severed Fate to maximize their Burst damage, especially if they have high ER requirements.
Typically Best-in-Slot Option


Competitive Option


Niche Build Option


Flower of Paradise Lost (FoPL)

Flower of Paradise Lost is the Best-in-Slot artifact set for Bloom, Hyperbloom, and Burgeon DPS units. However, 4-piece Gilded Dreams and 2-piece EM + 2-piece EM combinations are also good. Its 2-piece EM bonus is also good for EM-scaling DPS characters in general.
Set Bonus | TC Notes | Availability
- 2-piece: Increases Elemental Mastery by 80.
- 4-piece: The equipping character’s Bloom, Hyperbloom, and Burgeon Reaction DMG are increased by 40%. Additionally, after the equipping character triggers Bloom, Hyperbloom, or Burgeon, they will gain another 25% bonus to the effect mentioned prior. Each stack of this lasts 10s. Max 4 stacks simultaneously. This effect can only be triggered once per second. The character who equips this can still trigger its effects when not on the field.
- Each stack gives 10% additional Bloom Reaction DMG Bonus. At max stacks, the 4-piece effect grants a total of 80% Bloom Reaction DMG Bonus — not 140%!
- City of Gold
Notable 4-Piece Holders
Bloom DPS Units


Hyperbloom DPS Units


Burgeon DPS Units


Fragment of Harmonic Whimsy (Whimsy)

Fragment of Harmonic Whimsy is very good for Arlecchino, but there are currently no other characters with an inherent Bond of Life mechanic. There may be some highly niche use cases for characters who can use weapons with a Bond of Life mechanic or against enemies like Fatui Operatives, but further testing is necessary to assess their viability.
Set Bonus | TC Notes | Availability
- 2-piece: ATK +18%.
- 4-piece: When the value of a Bond of Life increases or decreases, this character deals 18% increased DMG for 6s. Max 3 stacks.
- Faded Theater
Notable 4-Piece Holders
Gilded Dreams (GD, Gilded)

Gilded Dreams’ 2-piece and 4-piece effects make it a fantastic choice for EM-scaling and reaction-based DPS units. Since it is farmed in the same Domain as Deepwood Memories, it can be very Resin-efficient for Bloom, Hyperbloom and Burgeon DPS units.
Set Bonus | TC Notes | Availability
- 2-piece: Elemental Mastery +80.
- 4-piece: Within 8s of triggering an Elemental Reaction, the character equipping this will obtain buffs based on the Elemental Type of the other party members, ATK is increased by 14% for each party member whose Elemental Type is the same as the equipping character, and Elemental Mastery is increased by 50 for every party member with a different Elemental Type. Each of the aforementioned buffs will count up to 3 characters. This effect can be triggered once every 8s. The character who equips this can still trigger its effects when not on the field.
- Gilded Dreams’ 4-piece effect does not apply to the hit that triggered it or the reactions triggered by that hit, except for Bloom and Hyperbloom since there is a significant delay between the reaction and its damage.
- Initial Burgeon or Bountiful Bloom damage may also benefit depending on ping and distance from the target.
- The 4-piece effect cannot be refreshed; you must wait for the 8s duration to end before triggering the effect again.
- Spire of Solitary Enlightenment
- Hatim (One 4-star Flower)
Notable 4-Piece Holders
Any character who scales with EM or consistently triggers reactions can use 4-piece Gilded Dreams.
Quicken DPS Units


Melt and Vape DPS Units
Any Pyro DPS who triggers Vaporize consistently can use 4pc Gilded Dreams. This list below is not comprehensive.


Transformative Reaction DPS Units
Anyone who is the trigger for Bloom, Burgeon, Hyperbloom, or Overloaded.
Gladiator’s Finale (Glad, GF)
Gladiator’s Finale is a great artifact set for on-field DPS characters whose damage primarily comes from Normal Attacks. Its 2-piece ATK bonus is useful for ATK-scaling characters.
Set Bonus | TC Notes | Availability
- 2-piece: ATK +18%.
- 4-piece: If the wielder of this artifact set uses a Sword, Claymore or Polearm, increases their Normal Attack DMG by 35%.
- Trounce Domains
- Bosses
- Strongbox
- Artifact Reliquaries
Notable 4-Piece Holders


Golden Troupe (GT)

Golden Troupe is the premier artifact set for characters who deal off-field Skill damage.
Set Bonus | TC Notes | Availability
- 2-piece: Elemental Skill DMG +20%.
- 4-piece: Increases Elemental Skill DMG by 25%. Additionally, when not on the field, Elemental Skill DMG will be further increased by 25%. This effect will be cleared 2s after taking the field.
- Denouement of Sin
Notable 4-Piece Holders


Heart of Depth (HoD)
Heart of Depth is a good set for on-field Hydro DPS characters that use Normal Attacks after using their Elemental Skill. Its 2-piece bonus is generally good for any Hydro DPS build.
Set Bonus | TC Notes | Availability
- 2-piece: Hydro DMG bonus +15%.
- 4-piece: After using an Elemental Skill, increases Normal Attack and Charged Attack DMG by 30% for 15s.
- The effect will still trigger even if the character is interrupted during Elemental Skill cast.
- Peak of Vindagnyr
- Strongbox
Notable 4-Piece Holders


Husk of Opulent Dreams (Husk)
Husk of Opulent Dream is the premier set for DEF-scaling Geo DPS characters. Its 4-piece effect can even make it competitive for Geo DPS characters who do not scale with DEF. Its 2-piece bonus is also good for DEF-scaling support characters.
Set Bonus | TC Notes | Availability
- 2-piece: DEF +30%.
- 4-piece: A character equipped with this Artifact set will obtain the Curiosity effect in the following conditions: When on the field, the character gains 1 stack after hitting an opponent with a Geo attack, triggering a maximum of once every 0.3s. When off the field, the character gains 1 stack every 3s. Curiosity can stack up to 4 times, each providing 6% DEF and a 6% Geo DMG bonus. When 6 seconds pass without gaining a Curiosity stack, 1 stack is lost.
- Stacks from the 4-piece set bonus are gained when hitting an opponent with a Geo attack even when no damage is dealt (vs. shielded or Immune targets).
- Slumbering Court
- Strongbox
Notable 4-Piece Holders


Lavawalker (LW)
Lavawalker is a niche set that is good on DPS characters on Mono Pyro teams with Bennett + Xiangling or Bennett + Jean due to these combinations’ high Pyro application. Reverse Melt DPS characters can also use 4pc LW, although other options may be more Resin-efficient.
Set Bonus | TC Notes | Availability
- 2-piece: Pyro RES increased by 40%.
- 4-piece: Increases DMG against opponents affected by Pyro by 35%.
- The 4-piece set holder does not have to be on-field to receive the 35% DMG Bonus.
- Hidden Palace of Zhou Formula
- Strongbox
Notable 4-Piece Holders
Reverse Melt DPS Units


Mono Pyro DPS Units


Maiden Beloved (Maiden’s)
Maiden Beloved is only beneficial for characters that heal. It is an entirely supportive artifact set.
Set Bonus | TC Notes | Availability
- 2-piece: Character Healing Effectiveness +15%.
- 4-piece: Using an Elemental Skill or Burst increases healing received by all party members by 20% for 10s.
- The 2-piece effect increases the character’s Healing Bonus by 15%.
- Valley of Remembrance
- Strongbox
- Adventurer Handbook
Notable 4-Piece Holders
Any healer can hold 4-piece Maiden Beloved to increase their healing, but it is rarely their best option since it does not directly buff teammates.
Marechaussee Hunter (MH)

Marechaussee Hunter is a niche set applicable to on-field DPS units who have innate HP-drain built into their kits. However, teams with Furina can allow characters who normally can’t effectively use this set, such as Noelle, to use it.
Set Bonus | TC Notes | Availability
- 2-piece: Normal and Charged Attack DMG +15%.
- 4-piece: When current HP increases or decreases, CRIT Rate will be increased by 12% for 5s. Max 3 stacks.
- HP drain, self-damage, self-inflicted damage from Bloom-related reactions, healing, and damage from enemies can all trigger the 4-piece effect.
- Denouement of Sin
Notable 4-Piece Holders
In addition to the characters below, most on-field DPS units in teams with Furina prefer 4-piece Marechaussee Hunter if available. However, their typical DPS builds are still viable.


Nighttime Whispers in the Echoing Woods (Whispers, NWEW)

Nighttime Whispers in the Echoing Woods is a niche artifact set for Geo DPS units in teams where they can frequently gain shields from Crystallize.
Set Bonus | TC Notes | Availability
- 2-piece: ATK +18%.
- 4-piece: After using an Elemental Skill, gain a 20% Geo DMG Bonus for 10s. While under a shield granted by the Crystallize reaction, the above effect will be increased by 150%, and this additional increase disappears 1s after that shield is lost.
- Waterfall Wen
Notable 4-Piece Holders

Noblesse Oblige (NO)
4-piece Noblesse Oblige is a great choice for characters who use their Burst and support a team with an ATK-scaling DPS unit.
Its 2-piece bonus is good for work-in-progress builds for characters whose damage primarily comes from their Burst; however, 4pc Emblem of Severed Fate can out-compete it at higher ER%.
Set Bonus | TC Notes | Availability
- 2-piece: Elemental Burst DMG +20%.
- 4-piece: Using an Elemental Burst increases all party members’ ATK by 20% for 12s. This effect cannot stack.
- The 4-piece effect does not stack with itself; Elemental Bursts only refresh the duration of the effect.
- There are inconsistencies in whether a character wielding 4pc NO can receive the 4pc set bonus on their Elemental Burst or not. Check the Evidence Vault for more details.
- Clear Pool and Mountain Cavern
- Strongbox
- Nine Pillars of Peace World Quest (One 5-star Flower)
- Adventure Rank Rewards
Notable 4-Piece Holders
Typical Option
These units typically hold 4-piece Noblesse Oblige, but some of these characters can hold other viable support sets depending on the team.


Other Option
These units do not typically hold 4-piece Noblesse Oblige unless they are played as a support for an ATK-scaling DPS unit and no other teammate can optimally hold the set. In other circumstances, these characters are often built as a DPS unit or hold other support sets.


Nymph’s Dream (Nymph’s, ND)
Nymph’s Dream is viable for certain on-field Hydro DPS characters like Tartaglia or Ayato. However, other artifact options may be more Resin-efficient since Vourukasha’s Glow is a rather unpopular set.
Set Bonus | TC Notes | Availability
- 2-piece: Hydro DMG bonus +15%.
- 4-piece: After Normal, Charged, and Plunging Attacks, Elemental Skills, and Elemental Bursts hit opponents, 1 stack of Mirrored Nymph will be triggered, lasting 8s. When under the effect of 1, 2, or 3 or more Mirrored Nymph stacks, ATK will be increased by 7%/16%/25%, and Hydro DMG will be increased by 4%/9%/15% Mirrored Nymph created by Normal, Charged, and Plunging Attacks, Elemental Skills, and Elemental Bursts exist independently.
- Normal, Charged, and Plunging Attacks can each grant separate stacks.
- Molten Iron Fortress
- Artifact Reliquaries
Notable 4-Piece Holders


Ocean-Hued Clam (OHC, Clam)
Ocean-Hued Clam provides a greatly appreciated DPS boost to healers with its 4-piece effect. Only a handful of healers can consistently cap out the Sea-Dyed Foam to maximize their DPS.
Set Bonus | TC Notes | Availability
- 2-piece: Healing bonus +15%.
- 4-piece: When the character equipping this artifact set heals a character in the party, a Sea-Dyed Foam will appear for 3 seconds, accumulating the amount of HP recovered from healing (including overflow healing). At the end of the duration, the Sea-Dyed Foam will explode, dealing DMG to nearby opponents based on 90% of the accumulated healing. (This DMG is calculated similarly to Reactions such as Electro-Charged, and Superconduct, but it is not affected by Elemental Mastery, character levels, or Reaction DMG bonuses). Only one Sea-Dyed Foam can be produced every 3.5 seconds. Each Sea-Dyed Foam can accumulate up to 30,000 HP (including overflow healing). There can be no more than one Sea-Dyed Foam active at any given time. This effect can still be triggered even when the character who is using this artifact set is not on the field.
- The 4-piece set bonus bubble damage is considered Physical DMG and can be boosted by Physical RES Shred (e.g., Superconduct).
- The bubble damage does not benefit from Physical DMG Bonus, so don’t use a Physical DMG Bonus Goblet!
- Bubble damage is independent of enemy DEF.
- The 4-piece set bonus only counts healing from the 4-piece set holder; this is also the case with multiple Ocean-Hued sets on the same team.
- Slumbering Court
- Strongbox
Notable 4-Piece Holders


Pale Flame (PF)
Pale Flame is the premier set for Physical DPS characters. Its 2-piece bonus is good for 2pc mixed sets on Physical DPS characters.
Set Bonus | TC Notes | Availability
- 2-piece: Physical DMG bonus +25%.
- 4-piece: When an Elemental Skill hits an opponent, ATK is increased by 9% for 7s. This effect stacks up to 2 times and can be triggered once every 0.3s. Once 2 stacks are reached, the 2-set effect is increased by 100%.
- For the 4-piece The 4-piece set bonus can be maintained indefinitely as long as the character’s cooldown and cast time are less than 7s.
- The 4-piece set bonus persists after swapping characters and does not buff the hit that triggers it.
- The timing for when this buff begins is ping dependent, with higher ping resulting in a longer delay before the buff is applied.
- Ridge Watch
- Strongbox
Notable 4-Piece Holders


Retracing Bolide (Bolide, RB)
Retracing Bolide is a niche set. It has practical applications with primarily Normal Attack DPS characters whose teammates provide a consistent shield.
Set Bonus | TC Notes | Availability
- 2-piece: Increases Shield Strength by 35%.
- 4-piece: While protected by a shield, gain an additional 40% Normal and Charged Attack DMG.
- The 2-piece effect applies only to the equipping character.
- It does not grant a teamwide Shield Strength bonus.
- The 4-piece set has to be equipped to the character you want to buff; in most cases, your DPS character, not the character casting the shield.
- Domain of Guyun
- Strongbox
Notable 4-Piece Holders
4-piece Retracing Bolide is not recommended for any of the following characters, but they can use it if you somehow have a viable set sitting around.


Shimenawa’s Reminiscence (SR, Shim)
Shimenawa’s Reminiscence is useful for on-field DPS characters who are not as reliant on their Bursts to deal damage. It can be competitive with other 4-piece artifact sets in such cases. Its 2-piece bonus is enjoyed by ATK-scaling DPS characters.
Set Bonus | TC Notes | Availability
- 2-piece: ATK +18%.
- 4-piece: When casting an Elemental Skill, if the character has 15 or more Energy, they lose 15 Energy and Normal/Charged/Plunging Attack DMG is increased by 50% for 10s. This effect will not trigger again during that duration.
- Energy will not be drained by using an Elemental Skill while the effect is active.
- The effect, including the Energy drain, will still trigger even if the character is interrupted during Elemental Skill cast.
- Momiji-Dyed Court
- Strongbox
Notable 4-Piece Holders


Song of Days Past (SDP)

Song of Days Past is a niche option for healers in most cases since its 4-piece bonus is consumed very quickly in multi-target scenarios. It is almost never the best option when you have similar 4pc Ocean-Hued Clam or 4pc Noblesse Oblige sets. However, if you want to maximize your on-field DPS unit’s damage and already have other support sets on the team, it can be worth considering.
Set Bonus | TC Notes | Availability
- 2-piece: Healing Bonus +15%.
- 4-piece: When the equipping character heals a party member, the Yearning effect will be created for 6s, which records the total amount of healing provided (including overflow healing). When the duration expires, the Yearning effect will be transformed into the "Waves of Days Past" effect: When your active party member hits an opponent with a Normal Attack, Charged Attack, Plunging Attack, Elemental Skill, or Elemental Burst, the DMG dealt will be increased by 8% of the total healing amount recorded by the Yearning effect. The "Waves of Days Past" effect is removed after it has taken effect 5 times or after 10s. A single instance of the Yearning effect can record up to 15,000 healing, and only a single instance can exist at once, but it can record the healing from multiple equipping characters. Equipping characters on standby can still trigger this effect.
- The 5 instances of buffed damage are consumed per enemy. For example, if you perform 1 Plunging Attack against 5 different enemies at the same time, the 4-piece effect will expire.
- Waterfall Wen
Notable 4-Piece Holders


Tenacity of the Millelith (TotM, Tenacity)
Tenacity of the Millelith is best utilized by characters whose Elemental Skill remains active and targets enemies even while the holder is off-field. Its 4-piece effect provides a good ATK% buff to the team. Its 2-piece bonus is great for many HP-scaling characters.
Set Bonus | TC Notes | Availability
- 2-piece: HP +20%.
- 4-piece: When an Elemental Skill hits an opponent, the ATK of all nearby party members is increased by 20% and their Shield Strength is increased by 30% for 3s. This effect can be triggered once every 0.5s. This effect can still be triggered even when the character who is using this artifact set is not on the field.
- Tenacity of the Millelith’s 4-piece effect activates with Elemental Skills hitting shielded enemies and dealing no damage.
- The 4-piece effect does not stack but its duration can be reset if there are multiple 4-piece TotM wielders.
- Ridge Watch
- The Millennial Mountains World Quest (One complete 4-star set)
- Strongbox
Notable 4-Piece Holders
Typical Option
These units typically hold 4-piece Tenacity of the Millelith in teams with an ATK-scaling DPS unit.


Niche Option
These units typically hold another artifact set, but they can hold 4-piece TotM to maximize another character's damage. Units without a turret like Collei, Diona, and Sara hold 4-piece TotM when an on-field DPS unit can snapshot the ATK% buff.


Thundering Fury (TF)
Thundering Fury is a good set for characters which trigger many Electro-related reactions. In such cases, characters with low Skill cooldowns can use its 4-piece effect to great ends. Its 2-piece bonus is good for Electro DPS characters.
Set Bonus | TC Notes | Availability
- 2-piece: Electro DMG bonus +15%.
- 4-piece: Increases DMG caused by Overloaded, Electro-Charged, Superconduct, and Hyperbloom by 40%, and the DMG bonus conferred by Aggravate is increased by 20%. When Quicken or the aforementioned Elemental Reactions are triggered, Elemental Skill CD is decreased by 1s. Can only occur once every 0.8s.
- The 40% Reaction DMG Bonus is only applied if the set holder triggers the Reaction. However, the set holder doesn’t have to be active on-field.
- The 4-piece set holder has to be active on-field to benefit from the cooldown reduction effect.
- Midsummer Courtyard
- Strongbox
Notable 4-Piece Holders
Electro DPS Units


Electro Reaction Triggers


Thundersoother (TS)
Thundersoother is a niche set for DPS characters on teams with highly consistent Electro application.
Set Bonus | TC Notes | Availability
- 2-piece: Electro RES increased by 40%.
- 4-piece: Increases DMG against opponents affected by Electro by 35%.
- The 4-piece set holder does not have to be on-field to receive the 35% DMG Bonus.
- Midsummer Courtyard
- Strongbox
Notable 4-Piece Holders
4-piece Thundersoother has such a restricted use case that it is almost never worth farming specifically; however, if you've farmed for Thundering Fury and are playing these characters below in teams with highly consistent Electro application, then you could equip it.


Unfinished Reverie (Reverie)
Unfinished Reverie is an extremely niche set that is primarily used as an option for Burnmelt DPS units, Quickburn DPS units, and Solo Hydro Burgeon drivers, but further testing is required to assess its relative viability in such scenarios. It is extremely rare to build a character around Burning damage itself.
Set Bonus | TC Notes | Availability
- 2-piece: ATK +18%.
- 4-piece: After leaving combat for 3s, DMG dealt increased by 50%. In combat, if no Burning opponents are nearby for more than 6s, this DMG Bonus will decrease by 10% per second until it reaches 0%. When a Burning opponent exists, it will increase by 10% instead until it reaches 50%. This effect still triggers if the equipping character is off-field.
- Faded Theater
Notable 4-Piece Holders

Vermillion Hereafter (VH)

Vermillion Hereafter is the premier set for an on-field Anemo DPS Xiao build. Its 2-piece bonus is universally good, but it is not worth farming this artifact set for that reason alone.
Set Bonus | TC Notes | Availability
- 2-piece: ATK +18%.
- 4-piece: After using an Elemental Burst. this character will gain the Nascent Light effect, increasing their ATK by 8% for 16s. When the character’s HP decreases, their ATK will further increase by 10%. This increase can occur this way maximum of 4 times. This effect can be triggered once every 0.8s. Nascent Light will be dispelled when the character leaves the field. If an Elemental Burst is used again during the duration of Nascent Light, the original Nascent Light will be dispelled.
- The Lost Valley
- Strongbox
Notable 4-Piece Holders

Viridescent Venerer (VV)
Viridescent Venerer is the almost always the optimal choice for Anemo characters in teams with Elements that can be Swirled. Its 4-piece bonus is incredibly useful for increasing the damage output of Elemental DPS characters. Its 2-piece bonus is good for Anemo DPS builds.
Set Bonus | TC Notes | Availability
- 2-piece: Anemo DMG bonus +15%.
- 4-piece: Increases Swirl DMG by 60%. Decreases opponent’s Elemental RES to the Element infused in the Swirl by 40% for 10s.
- 4-piece Viridescent Venerer only shreds if the wearer is on-field during a Swirl that they trigger.
- Swirling a single enemy will apply the RES Shred immediately, debuffing the enemy and increasing the damage of the Swirl on that enemy.
- Single-target 4-piece Viridescent Venerer’s RES Shred applies instantly and is unaffected by ping.
- AoE RES Shred to other enemies applies on damage, which is ping-dependent. 4-piece Viridescent Venerer can debuff multiple Elements at a time. Their durations are independent.
- Valley of Remembrance
- Strongbox
Notable 4-Piece Holders
Any Anemo unit can hold 4-piece Viridescent Venerer to shred enemy Elemental RES, just make sure they are on-field when they trigger Swirl.


Vourukasha’s Glow (VG)
This is a niche artifact set primarily seen on Dehya. However, it usually isn’t worth farming for since Emblem of Severed Fate is similarly viable and typically more Resin-efficient.
On-field DPS Nilou could use this set, but she is usually better used off-field.
A 2pc + 2pc combination of Vourukasha’s Glow and Tenacity of the Millelith provides the most HP% from set bonuses alone.
Set Bonus | TC Notes | Availability
- 2-piece: HP +20%.
- 4-piece: Elemental Skill and Elemental Burst DMG will be increased by 10%. After the equipping character takes DMG, the aforementioned DMG Bonus is increased by 80% for 5s. This effect increase can have 5 stacks. The duration of each stack is counted independently. These effects can be triggered even when the equipping character is not on the field.
- Each stack gives 8% additional DMG Bonus. At max stacks, the 4-piece effect grants a 50% DMG Bonus. Do not be fooled, this is not a 400% DMG buff!
- Molten Iron Fortress
Notable 4-Piece Holders
Vourukasha's Glow is only worth farming for the 2-piece in most cases, but you could use 4-piece VG on these characters in uncommon playstyles.


Wanderer’s Troupe (WT)
Wanderer’s Troupe is a great choice for on-field Charged Attack DPS characters that use a Catalyst or Bow. Its 2-piece Elemental Mastery bonus is useful for EM-scaling characters or characters that deal damage through Elemental Reactions.
Set Bonus | TC Notes | Availability
- 2-piece: Increases Elemental Mastery by 80.
- 4-piece: Increases Charged Attack DMG by 35% if the character uses a Catalyst or Bow.
- Trounce Domains
- Bosses
- Strongbox
- Artifact Reliquaries
Notable 4-Piece Holders


Berserker

Berserker’s 2-piece CRIT Rate bonus makes it a great transitional set for DPS characters. Its 4-piece set bonus is great for Hu Tao and Xiao since they lose HP as a part of their kit.
Set Bonus | TC Notes | Availability
- 2-piece: CRIT Rate +12%.
- 4-piece: When HP is below 70%, CRIT Rate increases by an additional 24%.
- Elite Enemies
- Artifact Reliquaries
- Normal Bosses
- Weekly Bosses
- Chests
- Carpe Diem (One 2-star Feather)
Notable 4-Piece Holders
Hu Tao and Xiao should aim for 5-star artifacts, but they work well with Berserker as a transitional 4-star set.

Brave Heart

Brave Heart’s 2-piece set bonus benefits ATK-scaling DPS characters. Its 4-piece set bonus is not that good since it is basically active for half of combat.
Set Bonus | TC Notes | Availability
- 2-piece: ATK +18%.
- 4-piece: Increases DMG by 30% against opponents with more than 50% HP.
- Certain Domains of Blessing
Defender’s Will

The 2-piece set bonus of Defender’s Will benefits DEF-scaling characters. Its 4-piece set effect is largely useless.
Set Bonus | TC Notes | Availability
- 2-piece: DEF +30%.
- 4-piece: For each different Element present in your own party, the wearer’s Elemental RES to that corresponding Element is increased by 30%.
- Certain Domains of Blessing
- Zhang Shun (Shop)
Gambler
Gambler’s 2-piece set bonus can be a useful transition for characters whose Elemental Skill comprises the largest portion of their damage. The 4-piece set effect is incredibly situational and is only really used for memes.
Set Bonus | TC Notes | Availability
- 2-piece: Increases Elemental Skill DMG by 20%.
- 4-piece: Defeating an opponent has 100% chance to remove Elemental Skill CD. Can only occur once every 15s.
- The 15s cooldown of the 4-piece set bonus will start upon any damage output from an Elemental Skill, even if the Elemental Skill is not on cooldown.
- Certain Domains of Blessing
- Brother Qian (One 3-star Goblet)
Notable 4-Piece Holders
See Golden Troupe.
Instructor

Instructor is a great 4-star set for support characters on teams that rely on Elemental Reaction damage or DPS units who scale with EM. It is most notably used in Reverse Vaporize, Forward Melt, and Bloom-related teams.
Set Bonus | TC Notes | Availability
- 2-piece: Increases Elemental Mastery by 80.
- 4-piece: Upon triggering an Elemental Reaction, increases all party members’ Elemental Mastery by 120 for 8s.
- The 4-piece set bonus requires its user to be on the field when the Elemental Reaction is triggered.
- The 4-piece set bonus doesn’t apply to the 1st hit or reaction that triggers it.
- Triggering another reaction on-field during the 4-piece set buff refreshes its duration.
- The 4-piece set bonus will not be activated by reactions on non-enemy entities (environmental objects, self-infused, etc.)
- Elite Enemies
- Artifact Reliquaries
- Normal Bosses
- Weekly Bosses
- Chests
- Adventurer’s Handbook
- Fengyan (One 3-star Flower)
Notable 4-Piece Holders
Typical Option
4-piece Instructor is a typical option for these characters in a lot of their teams.


Niche Option
4-piece Instructor is a niche option for these characters in specific teams or archetypes.


Martial Artist

Martial Artist is a good transitional set for on-field DPS characters that deal a majority of their damage through their Normal and Charged Attacks.
Set Bonus | TC Notes | Availability
- 2-piece: Increases Normal Attack and Charged Attack DMG by 15%.
- 4-piece: After using Elemental Skill, increases Normal Attack and Charged Attack DMG by 25% for 8s.
- Certain Domains of Blessing
- The Chi of Yore World Quest (One 4-star Feather)
- Adventurer’s Handbook
Notable 4-Piece Holders
The following characters can use 4-piece Martial Artist as a transitional 4-star set while farming for their desired 5-star set.


Prayers for Destiny

Prayers for Destiny is quite useful against the notorious Slowing Water Ley Line Disorder, which increases Skill and Burst cooldowns.
Set Bonus | TC Notes | Availability
- 1-piece: Affected by Hydro for 40% less time.
- The Tiara works with Leyline disorders and is additive with Elemental resonances, so you are able to get up to 80% debuff resistance.
- Hydro-Aligned Normal Bosses
- Primo Geovishap may reward depending on aligned Element
Prayers for Illumination
Prayers for Illumination can be useful against Smoldering Flames, which deals Pyro damage to the inflicted character.
Set Bonus | TC Notes | Availability
- 1-piece: Affected by Pyro for 40% less time.
- The Tiara works with Leyline disorders and is additive with Elemental resonances, so you are able to get up to 80% debuff resistance.
- Pyro-Aligned Normal Bosses
- Primo Geovishap may reward depending on aligned Element
Prayers to Springtime
Prayers to Springtime can be useful against Condensed Ice, which increases Stamina Consumption for the inflicted character.
Set Bonus | TC Notes | Availability
- 1-piece: Affected by Cryo for 40% less time.
- The Tiara works with Leyline disorders and is additive with Elemental resonances, so you are able to get up to 80% debuff resistance.
- Cryo-Aligned Normal Bosses
- Perpetual Mechanical Array
- Coral Defenders
- Primo Geovishap may reward depending on aligned Element
Prayers for Wisdom

Prayers for Wisdom can be quite useful against the Engulfing Storm debuff, which continuously drains the inflicted character’s Energy.
Set Bonus | TC Notes | Availability
- 1-piece: Affected by Electro for 40% less time.
- The Tiara works with Leyline disorders and is additive with Elemental resonances, so you are able to get up to 80% debuff resistance.
- Electro-Aligned Normal Bosses
- Not dropped by Coral Defenders
- Primo Geovishap may reward depending on aligned Element
Resolution of Sojourner

Resolution of Sojourner is a useful transitional set for its 2-piece ATK buff that benefits ATK-scaling characters. Its 4-piece set provides a niche buff for Charged Attack DPS characters.
Set Bonus | TC Notes | Availability
- 2-piece: ATK +18%.
- 4-piece: Increases Charged Attack CRIT Rate by 30%.
- Certain Domains of Blessing
- Adventurer’s Handbook
- Adventure Rank Rewards
Notable 4-Piece Holders
These characters can use 4-piece Resolution of Sojourner as a transitional 4-star set while they farm for their desired 5-star set.


Scholar

Scholar is an incredibly niche set since its 4-piece set effect only benefits Bow or Catalyst characters. Its most notable use case is on Diona in a team with Ganyu, Mona, and Venti, and even then it isn't preferred. Its 2-piece set bonus can be good for characters who need extra Energy Recharge.
Set Bonus | TC Notes | Availability
- 2-piece: Energy Recharge +20%.
- 4-piece: Gaining Elemental Particles or Orbs gives 3 Energy to all party members who have a Bow or a Catalyst equipped. Can only occur once every 3s.
- Certain Domains of Blessing
- Adventurer’s Handbook
- Adventure Rank Rewards
- Timaeus (One 2-star Sands)
The Exile

The Exile is an excellent 4-star artifact set for its 4-piece effect. It is best used on support characters who lack personal damage. Its 2-piece set bonus is also nice for supports who generally have high ER requirements.
Set Bonus | TC Notes | Availability
- 2-piece: Energy Recharge +20%.
- 4-piece: Using an Elemental Burst regenerates 2 Energy for all party members (excluding the wearer) every 2s for 6s. This effect cannot stack.
- Energy regeneration doesn’t start immediately, but after 2s. Characters that have longer Energy consumption frames may not receive the first Energy regeneration tick. Rotations can affect the number of received Energy regeneration ticks.
- Elite Enemies
- Artifact Reliquaries
- Normal Bosses
- Weekly Bosses
- Chests
Notable 4-Piece Holders


Tiny Miracle

Tiny Miracle is entirely used for survivability. It lacks any other utility or damage-increasing benefits.
Set Bonus | TC Notes | Availability
- 2-piece: All Elemental RES increased by 20%.
- Incoming Elemental DMG increases corresponding Elemental RES by 30% for 10s. Can only occur once every 10s.
- The 4-piece set bonus does not apply to damage dealt to shields.
- Certain Domains of Blessing
3-Star Artifacts
The 3-star artifact sets are geared more towards survivability than damage — handy when players are starting out, but less useful as they progress through the game. These mainly serve as transitory gear until players receive better artifacts.
Adventurer

Adventurer is useful for its 2-piece set effect that benefits HP-scaling characters in the early game.
- 2-piece: Max HP increased by 1,000.
- 4-piece: Opening a chest regenerates 30% Max HP over 5s.
- The list of actions that can trigger the 4-piece set effect can be seen in this Vault Entry.
Lucky Dog

Lucky Dog can be used for its 2-piece set effect that benefits DEF-scaling characters in the early game.
- 2-piece: DEF increased by 100.
- 4-piece: Picking up Mora restores 300 HP.
Traveling Doctor

Traveling Doctor’s 4-piece set effect is helpful in teams without a healer, as a means to provide extra survivability to the wearer after using their Burst.
- 2-piece: Increases incoming healing by 20%.
- 4-piece: Using Elemental Burst restores 20% HP.
Useful Resources
- Read the official KQM Character Guides or Quick Guides for more specific character build information and advice.
- Join the official KQM Discord to ask for advice, contribute to our theorycrafting projects, or just hang out!
- Access the Theorycrafting Library’s Artifacts Page or the Artifacts Evidence Vault for even more information on artifacts.
- Employ Genshin Optimizer for account-specific character build optimization.
- Peruse the Genshin Optimizer Multi-Opt Configuration Guide for specific multi-opt configs and advice.
- Make a copy of Zakharov’s Energy Recharge Calculator for specific ER requirement calculations.
- Use the Artifact Farming Calculator by grumd to calculate the odds of obtaining an artifact with specific substat values.
- Bookmark the official Teyvat Interactive Map to farm Elite Enemies and locate Chests among many other things.
- Check out the Resinless Farming Routes Guide for artifact routes and other routes.
- Use this spreadsheet by Vidmilo to calculate the odds of rolling an artifact that starts with a certain number of desired, or “good”, substats.
- Watch the video How Much Time Should You Spend on Artifact Farming? by Jyo’s Spiral Abyss Guides for examples of farming simulations and Resin-efficient farming behavior.
Credits
Authors: irokei, cuppacote
Lead Contributors: mr.pillow., caxia5, casdela
Contributors: idkanonymized, infinitefragments, nikatosaurus, leah2212, anoddmedium, kangyouwei, rioau, revycord, .rainfury, itsjaeyou, caramielle., potade, grankrathalos, resintype, rarepossum, .magnusartifex, yukiyafuyu, itslin, fourmana, reens, fritzzes, jamberry, baloopy, sir448
Theorycrafting Verification: caramielle., mr.pillow.
Grammar Verification: lostguide, raf, idkanonymized, polomo
Permissions: cuppacote, fritzzes, polomo, irokei
Artists: @_ladywaltz, @yyantojin
Transcription: irokei
Special Thanks to
- The Genshin Data Gathering Team for the artifact drop rate information (source).
- The Genshin Optimizer (GO) team for their fantastic work!
- The Genshin Impact Wiki team for sourcing artifact, emoji, map, and other in-game images.
Team images made with the KQM portrait generator.