Updated for Version 4.6

Faruzan is a 4-star Anemo Bow character capable of buffing Anemo damage of allies and debuffing the Anemo RES of enemies, which fills the rare niche of a pure Anemo support. Learn about Faruzan’s best builds, Talent priority, best weapons, best artifacts, and best teams in this quick guide.
Note that the information given may change if new discoveries are made. More extensive testing is in progress.
The full-length guide is available here.
Table of Contents
New Content
 Xianyun | Xianyun provides strong healing and a Plunging Attack buff. Combined with Faruzan’s Anemo support abilities, the two are a powerful inclusion to Xiao teams. |
 Furina | Furina provides a potent DMG% buff via her Burst. Because this buff is based on HP changes and her Skill has a teamwide HP drain, she greatly desires a strong healer on the team. Note that in Wanderer teams, running Furina often incentivizes a healer over a shielder. The lack of interruption resistance may result in an uncomfortable experience. |
 Chiori | Chiori is a relatively unobtrusive unit who provides good off-field damage. She is most notable in Double Geo compositions (usually with Zhongli) where she can gain a second Tamoto doll and benefit from Geo Resonance. |
Infographic
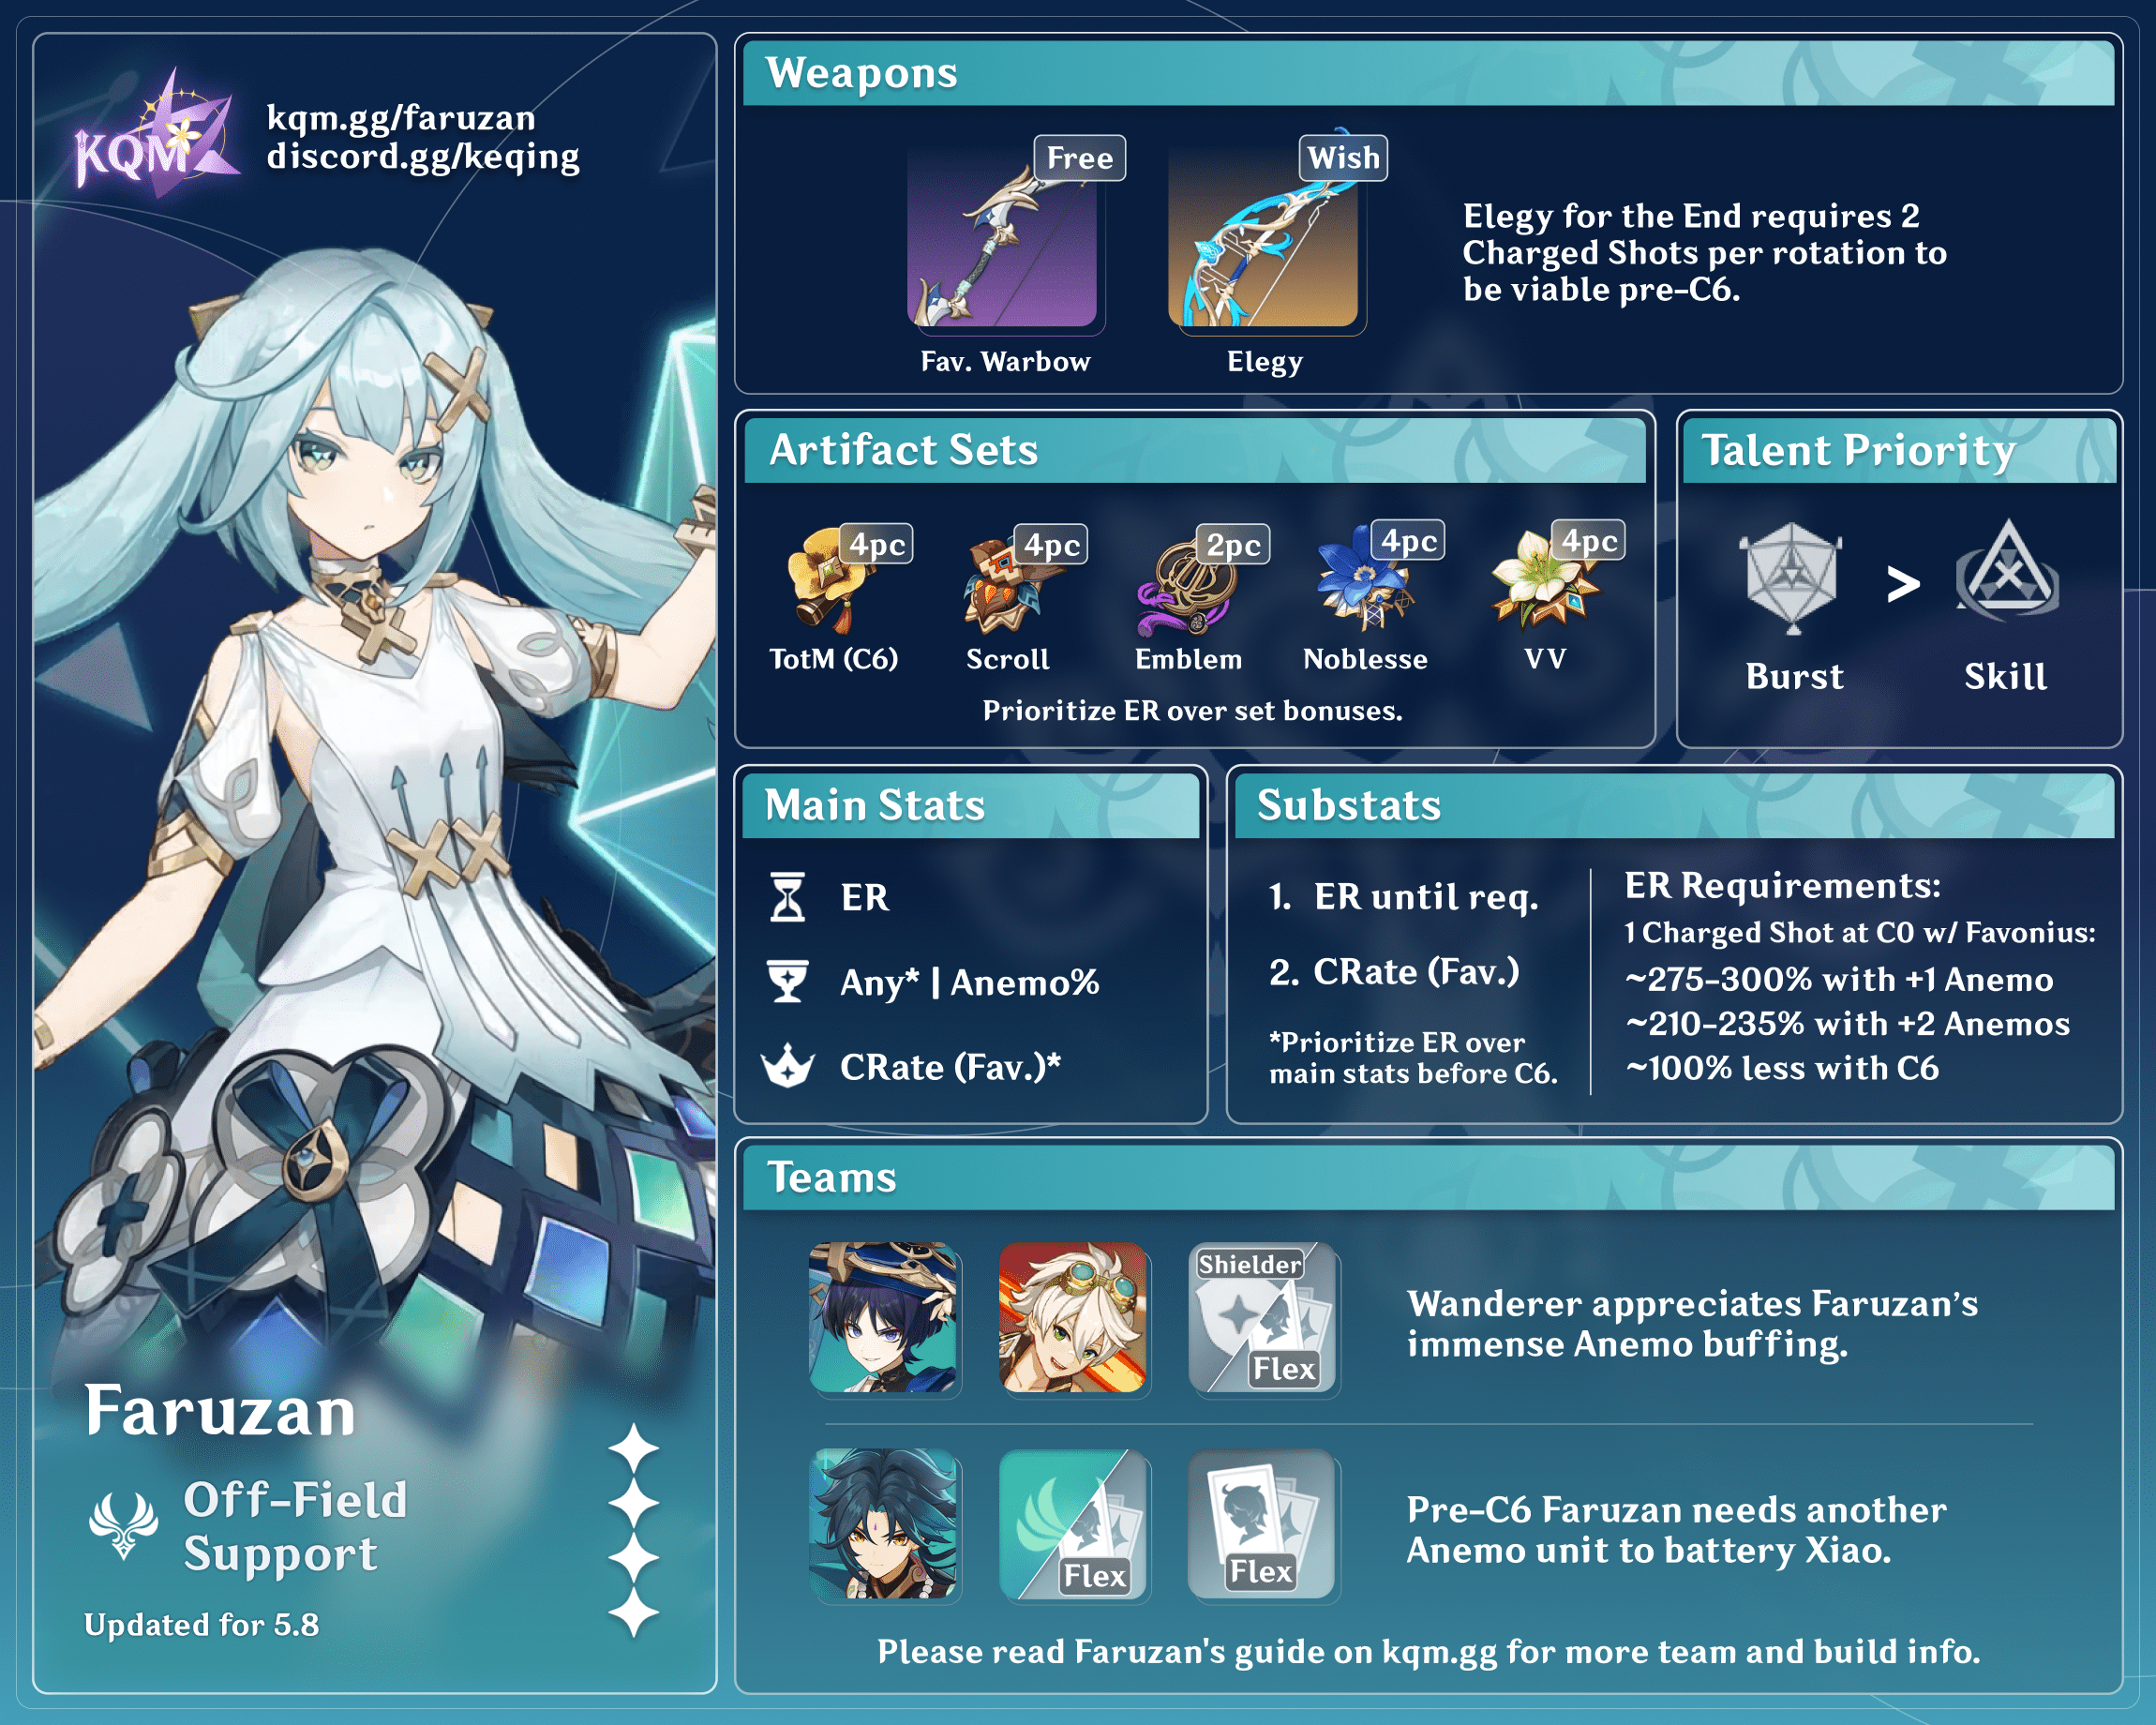
Credits to: kolvii, baloopy, and KQM Staff
Playstyles
Anemo Support
Faruzan excels at enhancing other Anemo characters with her high buff/debuff uptime (which is further increased by her C2 and C6). Her primary role is to support an Anemo on-field DPS unit such as Xiao or Wanderer. This role also extends to more quickswap Anemo teams such as with Heizou.
On-Field Anemo DPS
Faruzan can be built as an on-field Anemo DPS, buffing her own damage. Her C1 in particular synergizes with the Thundering Fury artifact set’s cooldown reduction, allowing her to fire additional Charged Shots. She is often built for EM and reaction damage, but her C6 increases her viability for a CRIT build. Thundering Fury Faruzan will not be covered in this quick guide; please see the full Faruzan guide for more information.
Character Overview
Talent Priority
Burst ≥ Skill > Normal Attack
Reaching Ascension 6 is recommended as Faruzan’s Anemo DMG% buff scales directly with her Burst’s level. Lv. 90 helps to maximize her Ascension 4 Passive bonus damage (and some collateral Swirl damage).
At C6, Faruzan’s Burst periodically applies Pressurized Collapse, which deals Skill DMG — thus, leveling Faruzan’s Skill should be given equal priority to her Burst.
Talents
 Normal Attack | Parthian Shot
Description
Normal Attack
Performs up to 4 consecutive shots with a bow.
Charged Attack
Performs a more precise Aimed Shot with increased DMG.
While aiming, mighty winds will accumulate on the arrowhead. A fully charged wind arrow will deal Anemo DMG.
Plunging Attack
Fires off a shower of arrows in mid-air before falling and striking the ground, hitting opponents along the path and dealing AoE DMG upon impact.
Faruzan’s Charged Shot damage is fairly inconsequential towards her teams’ overall damage. Note that it is still a core part of her combos to trigger her Elemental Skill’s Pressurized Collapses, so players may still find some worth in leveling this Talent.
 Elemental Skill | Wind Realm of Nasamjnin
Description
Faruzan deploys a polyhedron that deals AoE Anemo DMG to nearby opponents. She will also enter the Manifest Gale state.
While in the Manifest Gale state, Faruzan’s next fully charged shot will consume this state and will become a Hurricane Arrow that contains high-pressure currents. This arrow deals Anemo DMG based on the DMG of a fully charged Aimed Shot from “Normal Attack: Parthian Shot.”
Pressurized Collapse
The Hurricane Arrow will apply a Pressurized Collapse effect to the opponent or character hit. This effect will be removed after a short delay, creating a vortex that deals AoE Anemo DMG and pulls nearby objects and opponents in. If the Hurricane Arrow does not hit any opponent or character, it will create a Pressurized Collapse effect at its point of impact.
The vortex DMG is considered Elemental Skill DMG.
Faruzan’s Elemental Skill imbues her Charged Shot the same way Sara’s does; but instead of the Flat ATK buff, it provides grouping and Anemo RES Shred (with A1) from the Pressurized Collapses at the end of said Charged Shot.
Wind Realm of Nasamjnin does not generate Anemo particles on-hit, but rather generates two particles only after Pressurized Collapse hits enemies. Faruzan’s Energy production is further hampered by the 5.5s particle-generation cooldown, which nullifies any potential of spawning extra particles under that window from her C1, C6 or Sacrificial Bow.
 Elemental Burst | The Wind’s Secret Ways
Description
Faruzan deploys a Dazzling Polyhedron that unleashes a Whirlwind Pulse and deals AoE Anemo DMG.
While the Dazzling Polyhedron persists, it will continuously move along a triangular path. Once it reaches each corner of that triangular path, it will unleash 1 more Whirlwind Pulse.
Whirlwind Pulse
·When the Whirlwind Pulse is unleashed, it will apply Perfidious Wind’s Bale to nearby opponents, decreasing their Anemo RES.
·The Whirlwind Pulse will also apply Prayerful Wind’s Benefit to all nearby party members when it is unleashed, granting them an Anemo DMG Bonus.
The focal point of Faruzan’s kit. The Wind’s Secret Ways decreases enemies’ Anemo RES, increases allies’ Anemo DMG% and provides off-field damage, Anemo application, Energy generation and a hefty CRIT DMG buff for Anemo characters with C6.
Even so, Faruzan’s Burst is held back by a few problems. First of all, it possesses an immense but fair 80 Energy Cost; and accordingly, a substantial ER requirement when building her. It is not an exaggeration to say that Faruzan’s ER makes or breaks her effectiveness within a team. Furthermore, this Talent needs good timing and positioning so that enemies are within range. These problems can be somewhat negated with the help of her C6 and A1.
 Ascension 1 Passive | Impetuous Flow
Description
When Faruzan is in the Manifest Gale state created by Wind Realm of Nasamjnin, the amount of time taken to charge a shot is decreased by 60%, and she can apply The Wind’s Secret Ways‘ Perfidious Wind’s Bale to opponents who are hit by the vortex created by Pressurized Collapse.
Reduces Faruzan’s field time and therefore reduces her chances of being interrupted by enemies. This Passive also applies the Anemo RES Shred from her Burst, which grants additional Shred uptime pre-C2 and can result in an increase in her personal damage during setup. Additionally, this Talent works in tandem with her C6 — making up for any lost Shred uptime from her Burst missing the enemy, without having to use her bow. Overall a well-appreciated quality-of-life (QoL) Passive.
 Ascension 4 Passive | Lost Wisdom of the Seven Caverns
Description
When characters affected by The Wind’s Secret Ways‘ Prayerful Wind’s Gift deal Anemo DMG using Normal, Charged, Plunging Attacks, Elemental Skills, or Elemental Bursts to opponents, they will gain the Hurricane Guard effect: This DMG will be increased based on 32% of Faruzan’s Base ATK. 1 instance of Hurricane Guard can occur once every 0.8s. This DMG Bonus will be cleared after Prayerful Wind’s Benefit expires or after the effect is triggered once.
While not game-breaking, A4’s extra on-hit damage does still help other Anemo characters dish out more DPS and makes a much welcomed addition to her kit.
Players should still prioritize Energy-related weapons over high Base ATK weapons without an ER secondary stat or Energy-related passives.
 Utility Passive | Tomes Light the Path
Description
Gains 25% more rewards when dispatched on a Sumeru Expedition for 20 hours.
A simple QoL talent, gaining 25% more resources from every Expedition trip.
Constellations

Faruzan can fire off a maximum of 2 Hurricane Arrows using fully charged Aimed Shots while under a single Wind Realm of Nasamjnin effect.
While seemingly a DPS increase, actively using this Constellation — performing 2 Charged Shots every Skill — actually results in an overall team DPS decrease from extending Faruzan’s field time. This fact is further supported by the 5.5s particle-generation cooldown, which limits any extra Energy from being created with a second Pressurized Collapse within her Skill cooldown time frame. However, C1 can still serve as a backup plan for whenever you miss your Charged Shot and consequently miss the Pressurized Collapse — making it a fine QoL Constellation.

The duration of the Dazzling Polyhedron created by The Wind’s Secret Ways is increased by 6s.
One of Faruzan’s better Constellations and a good stopping point. C2 prolongs her Burst, giving a total of 22s uptime on its Anemo DMG% buff and Anemo RES Shred. This Constellation also grants more flexibility in team rotations as Faruzan can be used at the beginning of a rotation and still maintain full uptime on buffs, allowing for other buffs with shorter uptime to be activated later.

Increases the Level of Wind Realm of Nasamjnin by 3.
Maximum upgrade level is 15.
There’s nothing to write home about giving her Skill extra multipliers as it does not enhance any of her roles within her teams. Its weight, however, can change upon obtaining Constellation 6. Overall a minor buff to Faruzan’s damage pre-C6.

The vortex created by Pressurized Collapses will restore Energy to Faruzan based on the number of opponents hit: If it hits 1 opponent, it will restore 2 Energy for Faruzan. Each additional opponent hit will restore 0.5 more Energy for Faruzan.
A maximum of 4 Energy can be restored to her per vortex.
Supplies Faruzan with 2–4 Flat Energy for every Pressurized Collapse based on the amount of enemies hit. This Constellation somewhat eases her enormous ER requirements but does not solve it fully. With that said, if working in tandem with C6, players will have an easier time building her ER.

Increases the Level of The Wind’s Secret Ways by 3.
Maximum upgrade level is 15.
Increasing Faruzan’s Elemental Burst level means that both the damage of her Burst’s initial hit and her Anemo DMG% buff are boosted. As such, Faruzan’s C5 provides a decent increase to her teams’ DPS potential.

Characters affected by The Wind’s Secret Ways‘ Prayerful Wind’s Benefit have 40% increased CRIT DMG when they deal Anemo DMG. When the active character deals DMG while affected by Prayerful Wind’s Benefit, they will apply Pressurized Collapse to the opponent damaged. This effect can be triggered once every 3s. This CD is shared between all party members.
Hands down Faruzan’s most outstanding Constellation. The additional buff of 40% Anemo CRIT DMG elevates her above any other pure Anemo support. Besides that, this Constellation also helps mitigate Energy and range problems because of the periodic Pressurized Collapses, generating Anemo particles and shredding enemies’ Anemo RES (through her A1).
Combos
| Skill -> Charged Shot -> Burst | Performing a Fully Charged Shot to proc the Pressurized Collapse effect from her Skill and then catching her own Anemo particles after Bursting, alleviating Faruzan’s monstrous ER needs. Highly recommended in most situations, even at C6. |
| Skill -> Burst -> Charged Shot | Swapping immediately after Pressurized Collapse to funnel Anemo particles to another Energy-hungry Anemo character. Recommended in cases where Faruzan herself is equipped with an abundance of ER while the supported Anemo character lacks the needed Energy. |
Artifacts
ER Requirements
Assumes 22s rotations with 1 Favonius weapon proc.
- 100% particles: Faruzan catches all her particles.
- 50% particles: Faruzan catches 1 set of particles (2 particles).
| Scenario | 2 Pressurized Collapse | 1 Pressurized Collapse | ||
| 100% Particles | 50% Particles | 100% Particles | ||
| Double Anemo | Pre-C6 | 220–240% | 245–260% | 275–300% |
| C6 | 175–200% | — | — | |
| Triple Anemo | Pre-C6 | 190–205% | 200–225% | 210–235% |
| C6 | 160–185% | — | — | |
- Each additional Favonius proc reduces ER requirements by ~35% or ~25% when caught by herself or a teammate, respectively.
- 4pc The Exile on a teammate lowers Faruzan’s ER requirements by ~25%.
- Triple Anemo ER requirements highly depend on the third Anemo character in the team.
The values provided above are purely estimations. Use the Energy Recharge Calculator to determine exact requirements for your team and rotation.
Artifact Stats
 Sands |  Goblet |  Circlet | |
| Pre-C6 | ER | Anything with ER | Anything with ER CRIT Rate (Favonius) |
| C6 | ER/ATK% | Anemo DMG% | CRIT Rate/DMG |
Substats: ER >> CRIT Rate > CRIT DMG = ATK%
Faruzan’s main drawback, her high ER requirements, means that ER rolls should be prioritized over all other stats until you reach her recommended ER thresholds. Afterwards, any extra offensive stats (CRIT and ATK%) are welcomed to nudge her damage potential above her baseline.
Artifact Sets
Faruzan’s Burst uptime is most important. Players should prioritize ER over set bonuses, especially if Faruzan is not C6.
 4pc Tenacity of the Millelith (TotM) | At C6, 4TotM is Faruzan’s best support set. C6 Faruzan’s Burst consistently procs Pressurized Collapses and thus the 20% ATK buff. This set is not recommended for pre-C6 Faruzan since she has lackluster uptime on the set bonus. |
 4pc Golden Troupe (GT) | At C6, 4GT is a viable option for personal damage if another teammate already holds 4NO or 4TotM. Otherwise, it is rarely the best choice for team damage. |
 4pc Noblesse Oblige (NO) | Bestows the whole team with a 20% ATK buff for 12s every Burst cast. Pre-C2, Faruzan often uses her Burst immediately before the on-field Anemo DPS, which synergizes well with 4NO. |
  4pc Viridescent Venerer (VV) | A staple choice for an Anemo character. Shredding Pyro, Hydro, Electro and Cryo RES—the set effectively buffs any of Faruzan’s teammates with said Elements as long as they share a good chunk of the team’s DPS. 4VV does not hold any value for the on-field Anemo DPS character but serves as a way to increase team DPS regardless. Note that this set does not trigger from off-field so players should keep in mind the 10s shred duration while rotating her in teams. |
 4pc The Exile | While inherently bottlenecked with 4-star stats, 4pc The Exile can help alleviate Faruzan’s and her teammates’ Energy problems. As 4pc The Exile is hampered with 4-star stat volumes, it is highly recommended to maximize this set with a 5-star off-piece ER Sands. |
 2pc Emblem of Severed Fate/2pc The Exile | Mixing these 2pc sets gives Faruzan a whopping 40% ER and can be a quick fix when building her while offering more 5-star substats vs the 4pc The Exile. Still, its worth is not comparable to 4pc The Exile as it only helps with her own Energy. |
Weapons
 Favonius Warbow | Undoubtedly Faruzan’s BiS 4* choice. Favonius lowers her own and her teammates’ ER requirements with the clear particles from its passive. |
 Elegy for the End | Strong 5-star choice for Faruzan. Provides a substantial ER secondary stat while buffing her whole team. Pre-C6, requires utilizing E > Q > 2CS to activate Millennial Movement: Farewell Song. C6 Faruzan can activate the buff immediately with E > Q > CS or allow the Sigils to build throughout Faruzan’s Burst duration. |
  End of the Line / Fading Twilight | Both weapons have smaller but highly-appreciated ER secondary stats, while possessing negligible offensive passives in Faruzan’s primary use cases. |
 Sacrificial Bow | Good for the same reasons as the above options. It should be noted that the extra Pressurized Collapse from the extra Skill does not produce more particles, as it is gated by the 5.5s particle generation cooldown. |
| Offensive Weapons | Not recommended in cases where Faruzan doesn’t have enough Energy to Burst consistently, which is typically when she isn’t C6 and/or in Solo or Double Anemo teams. Nevertheless, offensive 5-star weapons can give an increase in team DPS through her A4 and have the potential to make Faruzan an off-field DPS with the presence of her buffs. Please see the full Faruzan guide for more information. |
Teams
Anemo Hypercarry Support

This team archetype is centered around the Anemo on-field DPS character with Faruzan supporting them with her buffs. The flex slots can be filled by a third Anemo unit to lower ER requirements, a buffer, a defensive support, and/or an off-field damage contributor. Please see the full Faruzan guide, Wanderer guide, or Xiao guide for more specific flex slot recommendations.
Notable Teammates
| Anemo On-Field DPS: Wanderer, Xiao | Having Faruzan support any of these Anemo DPS units will help them reach their maximum damage potential. Xiao in particular demands significant Energy with his normal on-field DPS build. It is highly recommended to run a Triple Anemo team catering to his Energy needs. |
| Anemo Flex: Sucrose, Venti, Kazuha, Lynette, Jean, Xianyun | A third Anemo unit to lower the ER requirements of Pre-C6 Faruzan and the Anemo on-field DPS. Sucrose can hold TTDS and generates the most particles per rotation while Venti and Kazuha have additional grouping and more off-field damage. Lynette also has decent particle generation and provides some off-field damage. Jean serves as the team’s healer, giving Faruzan and the on-field Anemo much-needed survivability. Xianyun is a notable pick for Xiao teams where she provides a Plunging Attack buff as well as healing. Jean and Venti with Constellations will provide extra Anemo RES Shred/DMG%. |
Example Teams
This is not a comprehensive list of teams. The inclusion or exclusion of any given team does not necessarily reflect its power level.

Faruzan — Wanderer — Yun Jin — Bennett

Faruzan — Xiao — Xianyun — Furina
Anemo Quickswap

Faruzan’s disposition as an Anemo character allows her to be a flex support slot for any team needing a 4VV holder and grouping.
Notable Teammates
| Anemo Flex: Heizou, Venti, Kazuha, Lynette, Jean | Options for quickswap teams, or as a third Anemo unit to lower the ER requirements of Pre-C6 Faruzan and the Anemo on-field DPS. Heizou’s personal damage benefits from Faruzan’s buffs, and his cooldowns slot well in quickswap teams. Venti and Kazuha have additional grouping and more off-field damage. Lynette provides an ATK% buff and, at C1, minor grouping; her Anemo Infusion at C6 works well in quickswap teams. Jean serves as the team’s healer. |
| Flex Options: Bennett, Xiangling, Xingqiu, Yelan | The Bennett-Xiangling and Xingqiu-Yelan pairings are quite powerful and work well in quickswap teams. |
Example Teams
This is not a comprehensive list of teams. The inclusion or exclusion of any given team does not necessarily reflect its power level.

Faruzan — Heizou — Xingqiu — Yelan
Credits
seima, chasing_haze, itslin, .athene., cuzimori, Leah, idkanonymized, .athene., miannes, bakane_, cuppacote, fluffy milk bun
Team images generated by the KQM TCL portrait generator.