Updated for Version 5.6

Arataki Itto is a 5★ Geo Claymore character in Genshin Impact who deals sustained on-field Geo damage through his Normal Attacks and special Charged Attacks. Learn about Itto’s best builds, best weapons, best artifacts, and best teams in this quick guide.
Note that the information given may change if new discoveries are made. More extensive testing is in progress.
The full-length guide is available here. It is not up-to-date for content released after Version 3.1.
Table of Contents
New Content
 Strong Double Geo Teams | With the release of new synergistic characters, Itto has gotten access to strong Double Geo teams and more team variety in general compared to his release. While many Triple Geo and Mono Geo compositions remain more than viable, they should not be assumed to be Itto’s only options. |
 Escoffier | Escoffier deals high personal damage (even outside her typical Pure Hydro — Cryo teams), heals, and maintains Crystallize uptime through her long-lasting Cooking Mek, making her a good off-field DPS in Itto’s Double and Triple Geo Teams. |
 Iansan | Itto does not move enough in his conventional team compositions to maintain Iansan’s Flat ATK buff. While his Plunge teams could maintain the buff, they have a strict core of Geo — Furina — Xianyun and cannot fit Iansan. Furthermore, since Crystallize can only be triggered by dealing Geo damage, Iansan is unable to buff Itto through 4pc Cinder City, making her a suboptimal pick for Itto teams. |
Xilonen | Xilonen’s powerful RES Shred and DMG% buffs make her Itto’s strongest party member provided that you pair them with 2 Pyro / Hydro / Electro / Cryo (PHEC) party members. Additionally, her short Elemental Skill cooldown allows her to use two Skills per rotation, significantly reducing Itto’s ER requirements. Xilonen’s healing enables the use of Furina, another extremely potent buffer and off-field damage dealer in Itto compositions. Xilonen’s C2 is valuable for both Double and Triple Geo teams. Double Geo teams are still preferred, as she will also buff off-field damage dealers for more team damage. |
 Mavuika | Mavuika provides powerful front-loaded damage and off-field damage through her Elemental Burst and Skill, respectively, while also providing Itto with a DMG% buff. This makes her a good support in Itto’s Double and Triple Geo teams. Mavuika functions best in a team with Xilonen and Furina, which provides her with Fighting Spirit for her Elemental Burst, and access to Vaporize. |
Kachina | Kachina provides similar utility to Xilonen in enabling the 4pc Scroll of the Hero Cinder City artifact set, making her an excellent free pick for Triple Geo team compositions. |
 Xianyun | Xianyun, when paired with Furina, enables a fun and quite strong Plunging Attack playstyle for Itto. Note that Itto must use proper combos and animation cancels in order to make effective use of this playstyle. Plunge combos are covered later in this guide. |
 A Thousand Blazing Suns, Fang of the Mountain King | Mavuika’s and Kinich’s signature weapons are not recommended for Itto, and will most often only measure up to an R5 Whiteblind. |
Infographic
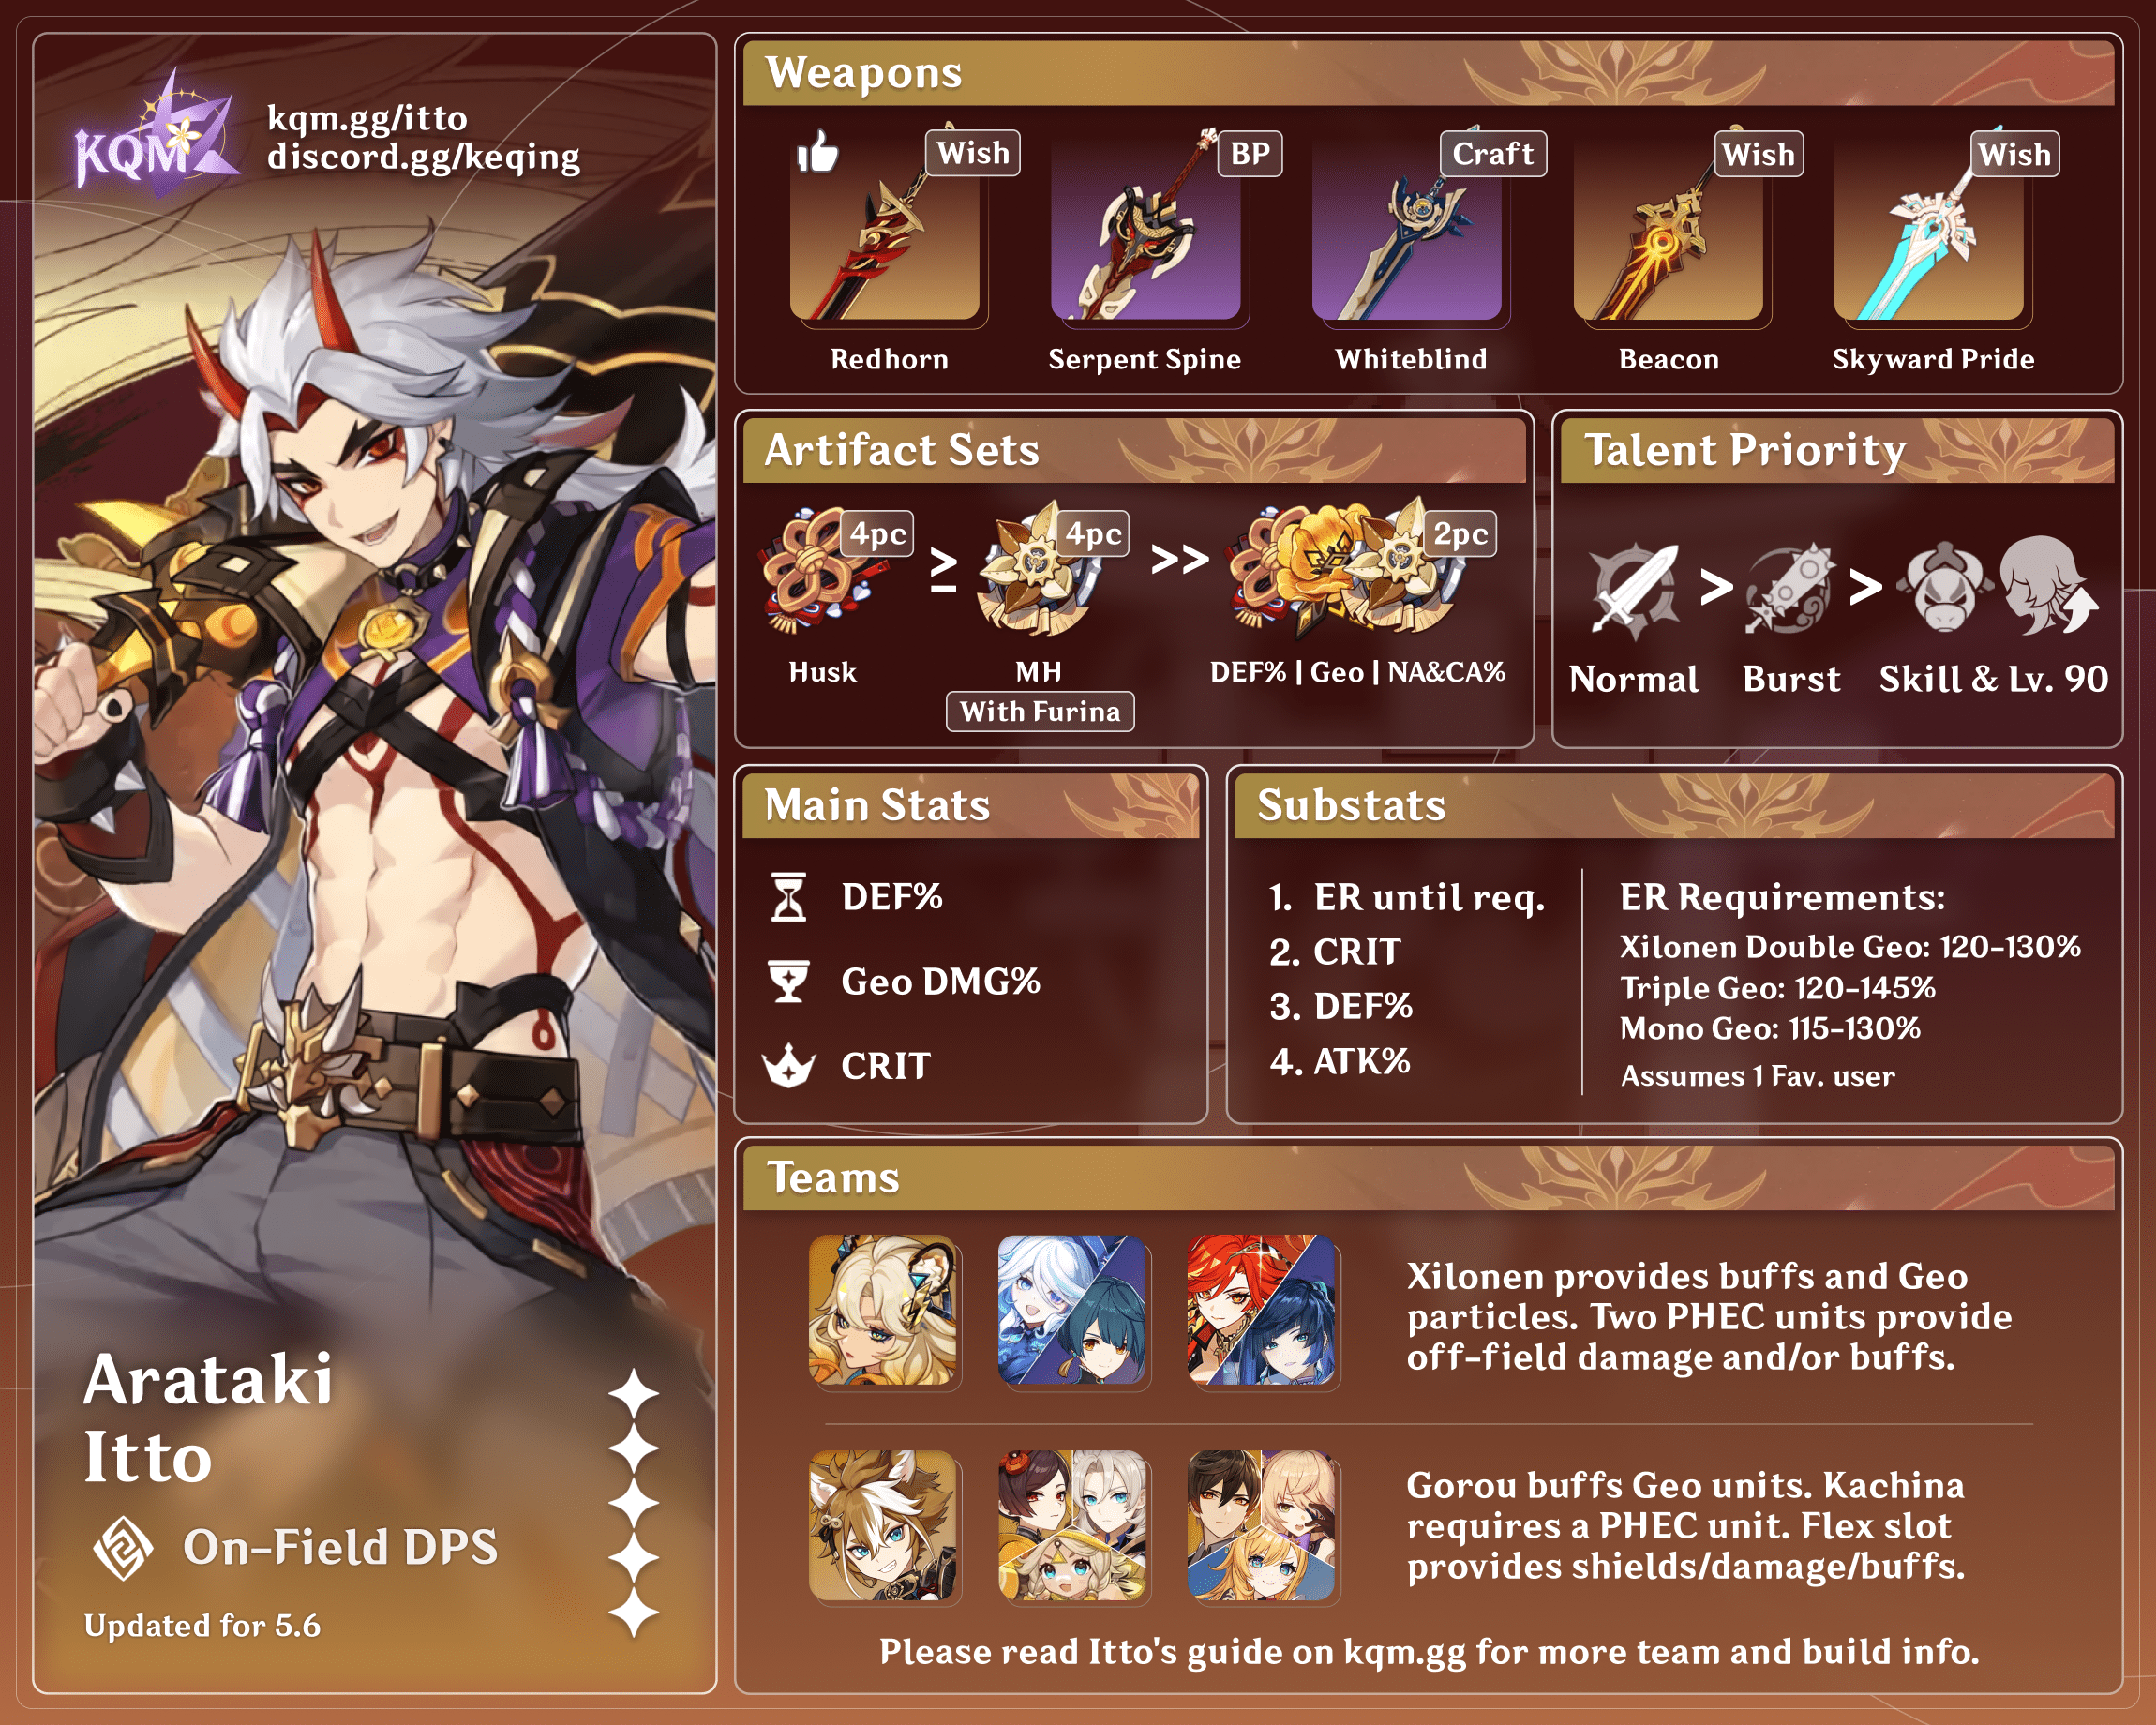
Credits to: kolvii, cegewinne, irokei, mr.pillow., iridescnce, and KQM Staff
Character Overview
Pros
- Solid sustained damage output
- Large AoE that is unique in hitting in front, above and behind him
- Infinite interruption resistance during his Arataki Kesagiri Charged Attacks that consume no Stamina
- One of the most comfortable to play and tanky characters in the game, thanks to his large DEF stat and innate ability to create Crystallize shields
- Has many teams that do not rely on contested support characters
- Unga Bunga — but his combos still allow for skill expression and engaging combat
- The coolest guy in town
Cons
- Reliant on his Elemental Burst, which ends upon swapping out, locking him into one playstyle
- While not very high, his Energy Recharge requirements must be met to ensure damage uptime
- Relatively low-value Constellations before C6
- Lower personal DPS in comparison to some newer hypercarries
- Bean allergy
Playstyles
On-Field DPS
Itto uses his Elemental Burst, builds Superlative Superstength stacks, and consumes them to unleash Arataki Kesagiri Slashes. His on-field combo lasts about 16s. Itto’s teammates should use their buffs and other abilities before you swap to him.
Talents
Level and Talent Priority
Normal Attack > Burst > Skill = Lv. 90
Itto deals a majority of his damage through his Normal Attack Talent, but his Burst should also be leveled to increase his damage during his Burst state. His Elemental Skill deals solid damage and should be leveled as well.
You should level Itto to Lv. 90 to maximize his DEF and other stats.
Talent Overview
 Normal Attack | Fight Club Legend
Talent Description
Normal Attack
Performs up to 4 consecutive strikes.
When the 2nd and 4th strikes hit opponents, Itto will gain 1 and 2 stacks of Superlative Superstrength, respectively.
Max 5 stacks. Triggering this effect will refresh the current duration of any existing stacks.
Additionally, Itto’s Normal Attack combo does not immediately reset after sprinting or using his Elemental Skill, “Masatsu Zetsugi: Akaushi Burst!”
Charged Attack
When holding to perform a Charged Attack, Itto unleashes a series of Arataki Kesagiri slashes without consuming Stamina. Instead, each Arataki Kesagiri slash consumes 1 stack of Superlative Superstrength. When the final stack is consumed, Itto delivers a powerful final slash.
If no stacks of Superlative Superstrength are available, Itto will perform a single Saichimonji Slash.
Plunging Attack
Plunges from mid-air to strike the ground, damaging opponents along the path and dealing AoE DMG upon impact.
Itto’s Normal Attack Talent is his primary source of damage during his Burst state. There are 3 key things to note:
- Superlative Superstrength: These stack up to 5 and allow Itto to perform Arataki Kesagiri slashes instead of a default Charged Attack. These slashes do not consume Stamina.
- Normal Attacks: Itto gains stacks of Superlative Superstrength with the 2nd and 4th strikes of his Normal Attack combo. During his Burst state, all Normal Attacks give Superlative Superstrength.
- Charged Attacks: Itto should never use his default, non-Kesagiri Charged Attacks since they are slow and weak.
 Elemental Skill | Masatsu Zetsugi: Akaushi Burst!
Talent Description
Hurls Ushi, the young akaushi bull and auxiliary member of the Arataki Gang, dealing Geo DMG to opponents on hit.
When Ushi hits opponents, Arataki Itto gains 1 stack of Superlative Superstrength.
Ushi will remain on the field and provide support in the following ways:
- Taunts surrounding opponents and draws their attacks.
- Inherits HP based on a percentage of Arataki Itto’s Max HP.
- When Ushi takes DMG, Arataki Itto gains 1 stack of Superlative Superstrength. Only 1 stack can be gained in this way every 2s.
- Ushi will flee when its HP reaches 0 or its duration ends. It will grant Arataki Itto 1 stack of Superlative Superstrength when it leaves.
Hold
Adjust throwing angle.
Ushi is considered a Geo construct. Arataki Itto can only deploy 1 Ushi on the field at any one time.
Itto’s Elemental Skill can deal considerable damage, taunt enemies, and help build Superlative Superstrength stacks. You should use two Elemental Skills during Itto’s Burst duration, one near the start and one near the end of his Burst duration, and ideally never outside it.
 Elemental Burst | Royal Descent: Behold, Itto the Evil!
Talent Description
Time to show ’em the might of the Arataki Gang! For a time, Itto lets out his inner Raging Oni King, wielding his Oni King’s Kanabou in battle.This state has the following special properties:
- Converts Itto’s Normal, Charged, and Plunging Attacks to Geo DMG. This cannot be overridden.
- Increases Itto’s Normal Attack SPD. Also increases his ATK based on his DEF.
- On hit, the 1st and 3rd strikes of his attack combo will each grant Arataki Itto 1 stack of Superlative Superstrength.
- Decreases Itto’s Elemental and Physical RES by 20%.
The Raging Oni King state will be cleared when Itto leaves the field.
Itto’s Burst is essential to his on-field damage potential. During his Burst state, there are 3 key things to note:
- Geo Conversion to his Normal, Charged, and Plunging Attacks with increased AoE
- Increased ATK based on his DEF
- Superlative Superstrength now also stacks on the 1st and 3rd strike of his Normal Attack string.
Itto’s Elemental Burst snapshots his DEF. After swapping into Itto, it is highly recommended to wait 0.3s or use 1 Normal Attack before using Itto’s Burst in order to snapshot Gorou’s buff. This allows Gorou’s DEF buff to reliably apply to Itto before his Burst snapshots. This recommendation is the same regardless of rotation, ping, or FPS.
 Ascension 1 Passive | Arataki Ichiban
Talent Description
When Arataki Itto uses consecutive Arataki Kesagiri, he obtains the following effects:
- Each slash increases the ATK SPD of the next slash by 10%. Max ATK SPD increase is 30%.
- Increases his resistance to interruption.
These effects will be cleared once he stops performing consecutive slashes.
Itto’s A1 Passive is a quality of life buff that grants his Arataki Kesagiri slashes Attack SPD and grants him complete immunity to interruption while he performs these attacks.
Note that the game text is inaccurate: the resistance to interruption applies to all Kesagiri slashes, not just the consecutive ones.
 Ascension 4 Passive | Bloodline of the Crimson Oni
Talent Description
Arataki Kesagiri DMG is increased by 35% of Arataki Itto’s DEF.
Itto’s A4 Passive is a simple but useful damage buff to his Arataki Kesagiri slashes based on his DEF stat.
 Utility Passive | Woodchuck Chucked
Talent Description
When a party member uses attacks to obtain wood from a tree, they have a 25% chance to get an additional log of wood.
Itto is an excellent party member when farming wood. There are 2 key things to note:
- His Utility Passive effect works with “The Boon of the Elder Tree” (the Sumeru Reputation wood-harvesting gadget).
- The extra wood gathered from this passive does not count towards the 2000 wood daily limit.
Constellations
Itto is fully functional at C0 and does not need Constellations. Itto’s earlier Constellations primarily offer quality-of-life improvements with small damage increases. His Constellation 6 is his strongest by far.
You should prioritize R1 Redhorn Stonethresher over Itto’s Constellations since it provides a larger damage increase up to C4. Alternatively, or in addition, you can invest into his supports, such as Furina’s or Xilonen’s Constellations, which can offer similar or better increases depending on the investment.
 Constellation 1 | Stay a While and Listen Up
Constellation Description
After using Royal Descent: Behold, Itto the Evil!, Arataki Itto gains 2 stacks of Superlative Superstrength. After 1s, Itto will gain 1 stack of Superlative Superstrength every 0.5s for 1.5s.
Itto’s C1 allows him to unleash a few more Kesagiri slashes than before, which changes his combos. C1 combos are easier to perform and have slightly more damage than C0 combos.
 Constellation 2 | Gather ‘Round, It’s a Brawl!
Constellation Description
After using Royal Descent: Behold, Itto the Evil!, each party member whose Element is Geo will decrease that skill’s CD by 1.5s and restore 6 Energy to Arataki Itto.
CD can be decreased by up to 4.5s in this manner. Max 18 Energy can be restored in this manner.
Itto’s C2 lowers his ER requirements; in most cases, he does not need to build any ER with C2. The cooldown reduction is useless since his rotations already have an optimal duration at C0.
 Constellation 3 | Horns Lowered, Coming Through
Constellation Description
Increases the Level of Masatsu Zetsugi: Akaushi Burst! by 3.
Maximum upgrade level is 15.
Itto’s C3 provides a minor damage increase to his Elemental Skill.
 Constellation 4 | Jailhouse Bread and Butter
Constellation Description
When the Raging Oni King state caused by Royal Descent: Behold, Itto the Evil! ends, all nearby party members gain 20% DEF and 20% ATK for 10s.
Itto’s C4 increases his damage only after the first rotation since the buff occurs after his Burst ends. While his C4 can be a decent team DPS increase if multiple rotations are used, it is not recommended to go for specifically.
 Constellation 5 | 10 Years of Hanamizaka Fame
Constellation Description
Increases the Level of Royal Descent: Behold, Itto the Evil! by 3.
Maximum upgrade level is 15.
Itto’s C5 increases his DEF-to-ATK conversion ratio. It provides the largest DPS increase aside from his 6th Constellation.
Constellation 6 | Arataki Itto, Present!
Constellation Description
Arataki Itto’s Charged Attacks deal +70% Crit DMG. Additionally, when he uses Arataki Kesagiri, he has a 50% chance to not consume stacks of Superlative Superstrength.
Itto’s C6 provides a significant straightforward increase to his Charged Attack CRIT DMG. In addition, it introduces the chance of not consuming Superlative Superstrength stacks. Itto’s stack indicator will flash red when an Arataki Kesagiri slash is performed without consuming a stack.
The Constellation effect lets Itto roughly double the number of Arataki Kesagiri slashes he can perform in a rotation, from ~10 at C0 to ~20 on average at C6. Note that, due to the random nature of the Constellation effect, the number of Arataki Kesagiri slashes performed will vary in each rotation; between a couple more or fewer than the average in most cases, though the resulting damage variance is quite small.
Combos and Techniques
This section is a summary of Itto’s most important techniques and recommended combos. Please refer to the Extended Guide for in-depth info and other tips.
Combo Notation
- N = Normal Attack
- N#n = The nth Normal Attack in a Normal Attack sequence
- C = Consecutive Arataki Kesagiri Slashes
- F = Final Arataki Kesagiri Slash
- E = Elemental Skill
- Q = Elemental Burst
- hP = High Plunge Attack
- J = Jump
- D = Dash cancel
Techniques
| N1Q Cancel Video Example | Casting Itto’s Burst during the hitlag of his first Normal Attack (N1Q) grants 1 Superlative Superstrength Stack without cutting into his Burst uptime. N1Q is also the best way to guarantee that Gorou’s DEF buffs snapshot. See more details in this TCL entry. |
| Wait 0.3s Before Burst | When using Gorou, after swapping into Itto, it is highly recommended to wait 0.3s or use 1 Normal Attack before using Itto’s Burst in order to snapshot Gorou’s buff. This allows Gorou’s DEF buff to reliably apply to Itto before his Burst snapshots. This recommendation is the same regardless of rotation, ping, or FPS. |
| Input Buffering | You can input almost all of Itto’s actions in advance while another action occurs, which is commonly referred to as “input buffering.” This makes his combos significantly easier to perform. (You may already have been doing this consciously or unconsciously.) Normal Attacks (N#) Buffer Itto’s Normal Attack inputs by clicking the Normal Attack button once during the hitlag for each NA. Kesagiri Slashes (C#F) Buffer his Kesagiri slash sequence by holding the Normal Attack button as soon as the animation for the final NA of the preceding NA sequence begins. See more details in this TCL entry. |
Standard Combos
Itto’s standard combos follow these three general guidelines:
- Use his Elemental Skill twice during his Burst state.
- Perform exactly 2 Arataki Kesagiri chains during his Burst state.
- Avoid overcapping on Superlative Superstrength stacks.
| Q N1 E N#2 N#3 C3F N3 C3F E F | C0 (Easy) A relatively easy and consistent combo. If there is already 1 Superlative Superstrength stack before using Itto’s Burst, then the first C3F sequence will instead be C4F. |
| N1Q N1 E N#2 N#3 C4F N4 C4F E F | C0 (Recommended) This is the standard C0 Itto combo that is slightly more difficult to perform than the option above. This combo requires prestacking with an N1Q cancel. |
| Q N1 E C6F N4 C4F E F | C1 (Recommended) The recommended combo at C1. The initial N1 can be skipped for ease of gameplay at the cost of some damage. |
Plunge Combos with Xianyun
It teams with Xianyun, Itto should ideally perform dash cancels after every Plunging Attack to cancel the plunge endlag animation.
| Q E 8[DJhP] E N2 | C0+ (Recommended) The recommended plunge combo. It is focused entirely on Plunging Attacks. This combo is more forgiving with slower plunges and missed dash cancels. |
| Q E 8[DJhP] C1F E CF | C0 (Difficult) An optimized but highly difficult combo that requires precise input timing. With high ping or ill-timed inputs, Itto’s final Charged Attack (F) will not be converted to Geo. In any case, you should still perform it to catch the Geo Particles from his Skill. |
| Q E 8[DJhP] C4F E CF | C1 (Difficult) This is a difficult C1 combo. It is virtually the same as the C0 combo above, but you just perform more Charged Attacks. |
Artifacts
ER Requirements
| With Xilonen (2 Skills) | With Xilonen (1 Skill) | With Albedo or Chiori | With Other Geo | |
| Double Geo | 120–130% | 140–150% | 135–145% | 150–160% |
| Triple Geo | 100–120% | 120–130% | 120–140% | 135–145% |
| Mono Geo | – | – | 115–125% | 120–130% |
- All teams assume 1 Favonius proc, which usually comes from Xilonen or Gorou.
- For each additional Favonius proc, the ER requirements decrease by 5—15% depending on the current ER.
- Teams without Xilonen, Albedo, or Chiori assume that you’re pre-funneling Geo Particles to Itto from a teammate like Gorou or Geo Traveler.
- Itto’s ER requirements can be decreased further by around 10% if a teammate is holding 4pc The Exile (e.g., Gorou or Geo Traveler).
Use the Energy Recharge Calculator to determine the exact requirements for your team and rotation. For more details on how Favonius weapons will affect your team, please use Ac1d’s Favonius Mastersheet.
Artifact Stats
 Sands |  Goblet |  Circlet |
| DEF% | Geo DMG Bonus ≥ DEF%* | CRIT Rate / CRIT DMG |
Stat Priority: ER (until requirement) > CRIT > DEF% > ATK%
* A DEF% Goblet should only be considered in scenarios with abundant DMG% buffs, such as Xilonen Double Geo with Furina. With Constellations on Xilonen and/or Furina, a DEF% Goblet can outperform a Geo DMG Bonus one.
We recommend using Genshin Optimizer to build Itto. For more guidance, please read KQM’s GO Multi-Opt Guide and The Handbook to Optimizing Itto.
Artifact Sets
Calcs for most artifact set comparisons can be found here (last updated for Version 3.1).
 4pc Husk of Opulent Dreams | 4pc Husk of Opulent Dreams is Itto’s Best-in-Slot artifact set. It works across all of his team archetypes. Performs best when pre-stacked — achieve this by placing Itto on your 2nd, 3rd, or 4th party slot and waiting ~10s to allow for stacks to accumulate. You can do this before starting a Spiral Abyss chamber, for instance. |
 4pc Marechaussee Hunter | In teams with Furina, this set is comparable to 4pc Husk in terms of strength. It also does not require any pre-stacking. Good to farm if you are already also farming for other characters in the Marechaussee Hunter domain. |
 4pc Retracing Bolide | A decent alternative to 4pc Husk if you already have a good set farmed. |
 4pc Long Night’s Oath | A niche option for Plunge compositions with Xianyun. Its strength is comparable to 4pc Husk. |
 2pc Mixed Sets | 2pc Set Bonuses: Geo DMG Bonus, Normal and Charged Attack DMG Bonus, DEF%, Energy Recharge These 2pc mixed sets are viable placeholders while you farm for a proper 4pc set. Other 2pc combinations aren’t recommended. |
Weapons
Calcs for weapon comparisons can be found here (last updated for Version 5.4).
 5★ Redhorn Stonethresher | Itto’s signature weapon and Best-in-Slot option. It provides CRIT DMG, additional DEF%, and Additive Base DMG Bonus based on Itto’s DEF. This is the only 5-star Claymore worth pulling for Itto. |
 4★ Serpent Spine | Serpent Spine is a strong option for its CRIT Rate secondary stat and DMG% passive, though it requires a Battle Pass purchase. R5 Serpent Spine performs close to R1 Redhorn Stonethresher. When using this weapon with 4pc Husk, prioritize getting the Serpent Spine stacks. |
 4★ Whiteblind | Whiteblind is Itto’s recommended free option. In Itto — Xilonen — Furina teams, an R5 Whiteblind can perform similarly or better than an R1-R3 Serpent Spine. |
 5★ Skyward Pride | Skyward Pride is a solid option, with its ER secondary stat helping meet Itto’s ER requirements, allowing you to focus exclusively on offensive artifact stats. Its value increases if Itto has high ER requirements. |
5★ CRIT Claymores | All of these weapons are decent stat sticks for Itto with high Base ATK, ATK%, and CRIT stats, among other miscellaneous buffs. They generally perform equivalent to or worse than Whiteblind R5. |
 4★ Blackcliff Slasher | While spending Starglitter on weapons isn’t generally recommended, Blackcliff Slasher is a decent option for players who do not wish to craft Whiteblind. Blackcliff Slasher is a good stat stick, comparable in strength to Whiteblind at base, and even stronger in multi-wave scenarios, especially at high refinement. |
 4★ Ultimate Overlord’s Mega Magic Sword | This weapon fulfills a similar role to Skyward Pride. A good option when ER requirements are high. The weapon was only obtainable as part of an event during Version 4.3. |
 5★ Wolf’s Gravestone | Not recommended and outperformed by the free Whiteblind. Itto does not benefit as much from ATK% compared to other valuable stats such as DEF% or CRIT. |
 4★ Fruitful Hook | A strong option for Itto — Xianyun — Furina Plunge compositions, comparable to R1 Serpent Spine. Not recommended otherwise. |
Teams
Rotation Notation
- N = Normal Attack
- C = Charged Attack
- A = Aimed Shot
- P = Plunging Attack
- E = Elemental Skill
- tE = Tap Skill
- hE = Hold Skill
- Q = Elemental Burst
- D = dash (cancel)
- J = jump (cancel)
- W = walk (cancel)
- > = switch character
- ( ) = these actions are optional; please refer to the notes below
- [ ] = repeat these actions the specified number of times
Teambuilding
An Itto team should have:
- At least one other Geo team member to activate the Geo Resonance and provide Geo Particles
- A shield or a Crystallize enabler to maintain the buffs from Geo Resonance.
The rest of the team members should provide support in the form of buffs to Itto and/or the rest of the team, off-field damage, or both.
Furthermore, Itto’s teams fall into two categories: hypercarry and hybrid. Hypercarry compositions aim to increase Itto’s damage as much as possible. Hybrid teams run a mix of buffers and off-field DPS characters. While both are viable, hybrid teams tend to have higher DPS ceilings overall.
Another important classification is based on the number of Geo characters in the team:
- Double Geo teams, where Xilonen is the uncontested Best-in-Slot second Geo character.
- Triple Geo teams with Gorou, whose buffs cap out at 3 Geo members, and where the 4th slot is flexible.
- Mono Geo teams, which are like the Triple Geo teams but the 4th flex spot is Zhongli.
Xilonen Double Geo

This team composition distances itself from Itto’s classic Triple and Mono Geo teams, allowing the use of Xilonen and her powerful RES Shred, DMG% Buff, and Energy generation. The last two PHEC slots allow for powerful buffers and/or damage dealers while also enabling Crystallize.
Notable Teammates
Xilonen | Xilonen is Itto’s uncontested Best-in-Slot support in Double Geo teams. Her short Elemental Skill cooldown allows it to be used twice, satisfying Itto’s Energy demands on her own. Additionally, she provides teamwide DMG% buffs and RES Shred, which conventional Itto teams do not have. |
 Furina | Furina provides powerful off-field damage, DMG% buffs, and Hydro application. She is the Best-in-Slot pick for this team archetype. She also enables the use of 4pc Marechaussee Hunter on Itto. Thanks to Xilonen’s presence, Furina’s healing needs are met, allowing for a fourth character with more damage and/or offensive utility. |
 Mavuika | Similar to Furina, Mavuika provides off-field damage and a DMG% buff through her A4 Passive. Since Xilonen is already present on the team, Mavuika will have no issues maintaining Fighting Spirit for her Elemental Burst. She works best with Furina, who allows her to Vaporize her Elemental Burst and Elemental Skill damage. Mavuika can also take the field to deal damage on her own, which is useful if Itto wants to save his Energy for the next Abyss chamber. |
 Yelan | Yelan synergizes particularly well with Furina, forming a strong Double Hydro core, reducing their respective ER requirements. She also provides a ramping DMG% buff for Itto. Itto performs a handful of Normal Attacks in his combos, allowing Yelan to deal damage. If Itto is Constellation 1 or higher (but not C6), it is recommended to perform his Constellation 0 combos to continue benefiting from Yelan’s off-field damage. |
Escoffier | Escoffier is among the best at dealing high off-field damage. She can be paired with most other characters, though she benefits the most from Furina. It should be noted that Escoffier does not provide Itto with any buffs (unless equipped with supportive artifact sets), and her damage is primarily single-target. Escoffier’s Elemental Burst has good damage and should be used when available, but is not mandatory. Building ER on her is not recommended due to her high ER requirements as the sole Cryo. Xilonen and Escoffier can alternate their Bursts when paired with Furina to cover the needed healing. |
 Bennett | The absence of Gorou makes Bennett’s ATK buff very valuable. His healing is also appreciated to supplement Xilonen’s healing with Furina. Bennett performs best in high-Energy scenarios; otherwise, his low Energy generation means that both Itto and himself would require additional Energy funneling, leading to damage losses. |
 Xingqiu | Xingqiu fulfills a near-identical role to Yelan, but trades some damage and buffs for defensive utility and increased Hydro application. Itto’s high DEF stat combined with Xingqiu’s DMG reduction and Xilonen’s healing makes him near-unkillable, even in extreme, high incoming damage scenarios such as some limited-time events. |
 Fischl | Fischl benefits from Xilonen’s buffs while dealing solid damage, and generating a good amount of Energy. |
Yae Miko | Yae functions similarly to Fischl by providing off-field damage, though it is generally lower than Fischl’s. |
Xiangling | Xiangling works decently well when paired with Mavuika, who provides her with ample Pyro Particles. She is not recommended otherwise, as her ER requirements become very high. She becomes particularly useful against an enemy such as the Hydro Tulpa, where she and Mavuika can Vaporize all of their damage. |
Example Teams
This is not a comprehensive list of teams. The inclusion or exclusion of any given team does not necessarily reflect its power level.

One of the best, if not Itto’s strongest team, with solid vertical investment paths.
Xilonen uses two Elemental Skills to fuel Itto’s, her own, and Mavuika’s Elemental Bursts. Mavuika provides powerful front-loaded damage by Vaporizing her Burst hit.
Sample Rotation
Xilonen E N2 Q > Furina ED Q > Mavuika tE Q CD > Xilonen E N2 > Itto N1 Q Combo

A strong team with powerful off-field damage from a Double Hydro core.
Xilonen uses two Elemental Skills to fuel Itto’s and her own Elemental Bursts. Similarly, the two Hydro characters lower each others’ ER requirements.
Sample Rotation (Yelan)
Xilonen E N2 Q > Furina ED Q > Yelan Q E N1 > Xilonen E N2 > Itto N1 Q Combo
Sample Rotation (Xingqiu)
Xilonen E N2 Q > Furina ED Q > Xingqiu EDQ > Xilonen E N2 > Itto N1 Q Combo

This team trades some off-field damage for more buffs on Itto.
Xilonen uses two Elemental Skills to fuel Itto’s and her own Elemental Bursts.
Sample Rotation
Xilonen E N2 > Bennett E > Xilonen Q > Furina ED Q > Bennett EQ > Xilonen E N2 > Itto N1 Q Combo

A strong team with powerful off-field damage from a Double Hydro core.
Xilonen uses two Elemental Skills to fuel Itto’s and her own Elemental Bursts. Similarly, the two Hydro characters lower each others’ ER requirements.
Sample Rotation
Xilonen E N2 Q > Xingqiu EDQ N1 > Yelan Q E N1 > Xilonen E N2 > Itto N1 Q Combo
Triple and Mono Geo

This is Itto’s classic and most popular team composition archetype.
Running more than 2 Geo in the team lets you generate more Geo Particles for Itto, further lowering his ER requirements. Furthermore, Gorou provides powerful buffs for Geo DEF-scaling characters like Itto, Chiori, and Albedo, but requires 3 or more Geo characters in the party to fully activate his buffs. It is important that the 4th flex character can either consistently apply a PHEC Elemental Aura to enable Crystallize or provide a Shield.
Notable Teammates
Geo
 Gorou | Gorou is an invaluable teammate for Itto. He provides Geo Particles and significant buffs. Gorou should hold 4pc Noblesse Oblige if no one else on the team can. In other cases, 4pc The Exile helps lower Itto’s ER requirements. Gorou should also wield the Favonius Warbow to further decrease Itto’s ER requirements. His team buff becomes stronger at C6 but is fully functional at C0. |
 Chiori | Chiori deals high off-field Geo damage and has great Geo Particle generation. Itto provides C0 Chiori with a Geo Construct through Ushi to enable 2 Tamoto dolls. She also benefits from Gorou’s A1 Passive and C6 buff, but not from his Skill buff while off-field. Chiori is generally an upgrade over Albedo since her dolls deal higher damage and cannot break. Chiori’s Elemental Burst deals a good instance of damage and can be used when available. However, it is optional, and may not lead to a DPS increase. Her Burst can also be used to help finish off opponents if Itto needs to save Energy. |
 Albedo | Albedo provides high off-field damage and great Geo Particle generation. He is also able to fully take advantage of Gorou’s buffs. Chiori generally outclasses Albedo, though, if you have both, the two can be run together, which is a good option if you do not have Gorou’s C6. |
Xilonen | At C0, Xilonen cannot heal nor shred Geo and other Elemental RES in Triple Geo teams, since there are too few PHEC characters in the party. She is still a decent pick, due to her 4pc Cinder City buff and Geo Particle generation. At C2, her Geo RES shred becomes permanently active, with an additional 50% DMG Bonus to Geo party members. Although she remains unable to heal or shred non-Geo RES, her C2 turns Xilonen into a great support for Triple Geo compositions. |
 Zhongli | Zhongli offers one of the strongest shields in the game as well as Universal RES Shred. His shield helps maintain Geo Resonance uptime and can be especially beneficial to players who use Serpent Spine, The Unforged, or 4pc Retracing Bolide on Itto. Zhongli should hold 4pc Tenacity of the Millelith. |
Kachina | Kachina is a strong free and low-investment option with the ability to utilize the 4pc Cinder City artifact set. Other than the 4pc set bonus, she does not require to be built or leveled. Make sure to use her in a Triple Geo team with a PHEC member to activate Cinder City. |
 Noelle | Noelle can be used in teams with Furina as a healer and shielder. She uses an E Q N1 combo before swapping to Itto. Despite spending very little time on the field, she still generates a substantial amount of Fanfare stacks. Noelle is not recommended outside this role. |
 Geo Traveler | Geo Traveler is a free alternative to Chiori and Albedo. They provide a CRIT Rate buff at C1 to the on-field character within their Burst AoE and can battery Itto with their Skill. In Triple Geo, Kachina, another free alternative, performs better in the same slot. |
 Ningguang | Ningguang is the last resort option for players looking for a Geo team member. Her Skill provides Geo Particles and a Geo DMG Bonus via her A4 Passive. She should be played as a pure support holding Favonius Codex or Thrilling Tales of Dragon Slayers. Prototype Amber for Furina Fanfare generation is not recommended, as she needs to spend significant field time to use her Elemental Burst to activate the weapon’s passive. Generally not recommended, as both Kachina and Geo Traveler work better. |
Flex
 Furina | Furina provides off-field damage and a strong DMG% buff through her Burst. Furthermore, she opens up a valuable upgrade path to Itto teams through her Constellations. Furina can function without a healer even at C0, though it is not preferred, as her buff and personal damage will decline. Unfortunately, there is only 1 functional healer in Triple Geo compositions: Noelle. In Abyss chambers with long enemy invulnerability windows (e.g., Perpetual Mechanical Array and Maguu Kenki), you can temporarily switch to her healing mode to remedy this. |
 Escoffier | Escoffier does not provide Itto with any buffs, but she can deal high off-field damage through her Elemental Skill. She is also very simple to utilize as she does not need anything from the other party members. The duration of her Elemental Skill is notable, only second to Furina’s. Escoffier’s Elemental Burst is worthwhile for its damage and provides healing if needed. However, it is recommended to skip building ER on her and to use her Burst only when available. |
Mavuika | The absence of Xilonen means Mavuika will not be able to max out her Fighting Spirit for her Elemental Burst. Despite this, she still deals good Pyro damage from her Elemental Skill and Burst. Note that Crystallize is an Elemental Reaction that can only be triggered by dealing Geo damage, so she cannot use 4pc Cinder City herself. |
 Fischl | Fischl deals good off-field damage even when she will not typically receive many buffs. Due to her long Elemental Skill cooldown, you should alternate between using her Skill and Burst every rotation. |
 Yelan | Yelan provides off-field damage through her Elemental Burst and a ramping DMG% buff for Itto. Itto performs a handful of Normal Attacks in his combos, allowing Yelan to deal damage. If Itto is Constellation 1 or higher, it is recommended to perform his Constellation 0 combos to continue benefiting from Yelan’s damage. |
 Kuki Shinobu | The Arataki Gang’s Deputy Leader is a surprisingly good party member for Itto teams; her ability to hold 4pc Tenacity of the Millelith provides 20% ATK and makes Crystallize shields a fair bit stronger, while also providing solid healing. |
 Xingqiu | Xingqiu fulfills a near-identical role to Yelan, but trades damage and buffs for defensive utility and increased Hydro application. Itto’s high DEF stat combined with Xingqiu’s DMG reduction makes him very tanky. He also provides minor healing through his A1 talent. |
Bennett | Generally less valuable than on other teams, as Bennett’s Flat ATK buff becomes less impactful with the presence of Gorou and the absence of substantial DMG% buffs. Furthermore, you will generally only get one or two Crystallize shields in each rotation, since he cannot apply Pyro from off-field. His Flat ATK buff is nonetheless valuable, as is his healing. Note that Bennett’s C6 does not override Itto’s Geo Conversion. |
 Most PHEC units | Many other characters are viable as Flex units. Examples include Dehya, Layla, Diona, Yae, Charlotte, Rosaria, Baizhu, etc. The main prerequisite is either being a PHEC character with off-field Elemental application and/or providing a shield. The more defensive and offensive utility the character provides, the better. Characters who can trigger 4pc Tenacity of the Millelith, such as Dehya and Layla, stand out. |
Example Teams
This is not a comprehensive list of teams. The inclusion or exclusion of any given team does not necessarily reflect its power level.
Important: Chiori’s Elemental Skill makes her swap automatically to the next character in the party order. Find who Chiori swaps to in your team’s rotation, and make sure you arrange your team accordingly.

A powerful and comfortable Mono Geo team composition. Compared to Double Geo Xilonen team variations, it does not rely as much on contested characters. Chiori is the preferred off-field damage option, with Albedo being closely behind.
Sample Rotation (Chiori)
Zhongli hED > Gorou Q > Chiori (Q)1 2[E] > Gorou E > Itto N1 Q Combo
1 Refer to the explanation under Notable Teammates.
Sample Rotation (Albedo, Simple)
Zhongli hED > Gorou EQ > Albedo E > Gorou E > Itto N1 Q Combo
Sample Rotation (Albedo, Stone Stele Refresh)
Gorou EQ > Albedo E > Zhongli hED > Itto N1 Q Combo > Zhongli tE1
1 Performing Stone Stele refresh results in higher uptime on 4pc Tenacity of the Millelith and more particle generation from Zhongli for the team. This technique can be applied to other Zhongli teams as well.
Sample Rotation (Geo Traveler)
Zhongli hED > Geo Traveler E1Q > Gorou Q E > Itto N1 Q Combo
1 Starting from the second rotation.

Another Mono Geo variation utilizing both Chiori and Albedo for particle generation and off-field damage. If you do not have C6 Gorou, but do have both Chiori and Albedo, this is the preferred option.
Sample Rotation
Zhongli hED > Albedo E > Chiori (Q)1 2[E] > Itto N1 Q Combo
1 Refer to the explanation under Notable Teammates.

A strong and relatively accessible Triple Geo composition.
Kachina slots in well here thanks to her ability to hold 4pc Scroll of the Hero Cinder City, since there is another Element to react off of. She is the recommended option if you do not have Chiori or Albedo.
Sample Rotation (Chiori Yae)
Yae 3[E] > Gorou EQ > Chiori Q 2[E] > Itto N1 Q Combo
Sample Rotation (Albedo Yelan)
Yelan EQ N1 > Gorou EQ > Albedo E > Itto N1 Q Combo
Sample Rotation (Kachina Fischl)
Fischl Q/E1 > Kachina tE (Q)2 > Gorou Q E > Itto N1 Q Combo
1 Alternate every rotation.
2 Use to fill downtime if you need to wait for Itto’s Skill to come off cooldown.

This is currently the only Triple Geo variation that can make full use of Furina.
Importantly, this requires a C1 Noelle using a healing build consisting of Favonius Greatsword, DEF% / DEF% / Healing Bonus main stats, and any artifact set that increases her healing (e.g., any 2pc or 4pc combination of Husk, Song of Days Past, Ocean-Hued Clam, and Maiden Beloved). With this, Noelle can use her Skill, Burst, and then a Normal Attack to generate enough Fanfare stacks.
Additionally, due to building high DEF stats, Noelle will provide Itto with a very strong shield for ~6s after he takes the field.
Another particular quality of this team is the complete absence of “circle impact”, meaning everything this team provides moves with the active character.
Sample Rotation (Gorou)
Furina ED Q > Noelle E Q N1 > Gorou Q E > Itto N1 Q Combo
Sample Rotation (Chiori)
Furina ED Q > Noelle E Q N2 > Chiori (Q)1 2[E] > Itto N1 Q Combo
1 Refer to the explanation under Notable Teammates.

Xilonen’s C2 makes her Geo Source Samples stay permanently active, meaning she will unconditionally provide Geo RES Shred and a 50% DMG Bonus to Itto. Furthermore, her Elemental Burst will deal a total of three ticks of damage, making it worth building Xilonen for damage.
Unfortunately, Xilonen will still not shred the Elemental RES of non-Geo elements, nor provide healing; therefore, Fanfare generation for Furina’s Elemental Burst will decrease after the first rotation. This can be mitigated with Constellations on Furina.
Sample Rotation (Gorou)
Furina ED Q > Gorou Q > Xilonen E N2 > Itto N1 Q Combo > Gorou E > Xilonen Q

Featuring three pure buffers, this is one of the best hypercarry teams for Itto. Bennett’s ATK buff is made fairly valuable thanks to C2 Xilonen’s ample DMG% buffs through her Geo Source Samples and the 4pc Cinder City effect.
A downside is that, unlike other Itto teams, shield uptime can be inconsistent due to Bennett’s low Pyro application rate.
Sample Rotation
Bennett EQ > Gorou Q > Xilonen E N2 > Itto N1 Q Combo > Xilonen E N2 > Bennett E > Gorou E > Xilonen Q
Sample Rotation (High amounts of external Energy scenario)
Bennett EQ > Gorou Q > Xilonen E N2 > Itto N1 Q Combo > Gorou E > Xilonen Q
Xianyun Plunge

This is a unique team where Itto performs Geo Plunging Attacks during his Burst. Though unconventional, this playstyle has high damage potential and can also be refreshingly fun.
Xianyun enables Itto to jump and plunge while healing Furina’s teamwide HP drain. It is recommended that you dash cancel Itto’s Plunging Attack endlag, which can leave enough time in his Burst duration to include Charged Attacks for more damage.
Even at C0, Xilonen stands out as the strongest option by being able to use her Elemental Skill twice to generate more particles, in addition to activating 4pc Cinder City. Still, Chiori and Gorou are viable alternatives.
Sample Rotation (Xilonen)
Xilonen E N2 Q > Furina ED Q > Xianyun EPQ > Xilonen E N2 > Itto Q N1 E 8[JPD] N1 C3F E CF
Sample Rotation (Chiori)
Furina ED Q > Chiori (Q)1 2[E] > Xianyun EPQ > Itto Q N1 E 8[JPD] N1 C3F E CF
1 Refer to the explanation under Notable Teammates.
Sample Rotation (Gorou)
Furina ED Q > Xianyun EPQ > Gorou Q E > Itto N1 Q N1 E 8[JPD] N1 C3F E CF
Credits
iridescnce, mr.pillow., koko, irokei, idkanonymized, konodiada, nxriaki, Leah, polomo, chasing_haze, fluffy milk bun, dianette, markoda, notactualgab, plumetra
Team images made with the KQM portrait generator.
Itto Mastersheet
Itto Extended Guide
Itto Theorycrafting Library