Updated for Version 5.6
Kinich is a 5★ Dendro Claymore character in Genshin Impact who relies on Burning to fire as many Scalespiker Cannons as possible. Learn about Kinich’s best builds, best weapons, best artifacts, and best teams in this quick guide.
Note that the information given may change if new discoveries are made. More extensive testing is in progress.
Join our Discord to check on and participate in the theorycrafting process.
Table of Contents
New Content
Ororon | Ororon can hold 4pc Scroll while providing decent personal damage and a Taunt. |
Mavuika | Mavuika is the premiere off-field Pyro damage dealer, Pyro applier, and buffer for Kinich’s Burning teams. |
 Pyro Traveler | Pyro Traveler brings off-field Pyro application and buffing through 4pc Scroll and their C1 buff. |
Iansan | Iansan is a powerful buffer and 4pc Scroll holder. |
 Citlali / Escoffier | Cryo characters that have situational yet potent use cases with Kinich. |
 A Thousand Blazing Suns | A very decent 5-star stat stick, though with limited uptime. |
Infographic
Character Overview
Pros
- Gives big, satisfying green numbers with his Skill nuke, and everyone likes big numbers
- Does not require high teammate investment
- Easy to pick up and play, while having room for optimization and skill expression
- Provides excellent utility for overworld exploration, especially in Natlan
- Capable of Unleashing the Power of the Almighty Dragonlord, K’uhul Ajaw!
Cons
- Reliant on precise gameplay with most of his damage consolidated into just a few hits, so high ping or input mistakes can cause him to lose significant damage
- Mostly single-target, though his main source of damage can hit small clusters of enemies
- As an extremely mobile unit, has to play around teammates who have limited AoE on their skills, such as Bennett or Xiangling
- Ajaw
Playstyles
On-Field DPS
Kinich has one role: on-field DPS. He uses his Skill to enter the Nightsoul’s Blessing state, where he fires Normal Attacks and Elemental Skills to deal high damage to a single target.
Kinich is unique compared to other early Natlan characters in that he gains Nightsoul points instead of losing them during Nightsoul’s Blessing, and his gimmick lies in gaining significantly more Nightsoul points when enemies take damage from either Burn or Burgeon reactions. He spends Nightsoul points to unleash his Elemental Skill to deal massive damage to opponents.
Talents
Talent Priority
Skill > Burst
Kinich does not need to level his Normal Attack, as his Loop Shot counts as Skill damage and does not scale based on the Normal Attack Talent.
Talent Overview
 Normal Attack | Nightsun Style
Talent Description
Normal Attack
Performs up to 3 rapid strikes.
After using his Elemental Skill “Canopy Hunter: Riding High”‘s mid-air swing, he can perform a Normal Attack in mid-air before landing.
Charged Attack
Consumes a certain amount to spin and throw his Claymore forward to attack opponents.
Plunging Attack
Plunges from mid-air to strike the ground below, damaging opponents along the path and dealing AoE DMG upon impact.
These are Kinich’s Claymore attacks, which are slow and should not be used during combat.
Uniquely, Kinich is the only Claymore user to not have a continuous Charged Attack sequence.
 Elemental Skill | Canopy Hunter: Riding High
Talent Description
Kinich uses his big-game hunting skills to either move swiftly or attack his opponent.
When there is an opponent or object that can be attacked nearby, he will attach a grappling hook to the target and enter Nightsoul’s Blessing with 0 Nightsoul points. If neither is nearby, he fires a grappling hook forward and swings in mid-air, and this Skill’s CD is decreased by 60%.
This skill can be Held to release. When it is Held, Kinich can aim the grappling hook.
Nightsoul’s Blessing: Kinich
Kinich’s Nightsoul’s Blessing lasts 10s and generates 2 Nightsoul points every second.
In this state, Kinich will hook onto a nearby opponent and perform a variable attack:
- When using a Normal Attack, Kinich will fire Loop Shots as he loops around the grappled target based on his current movement direction, dealing Nightsoul-aligned Dendro DMG and generating 3 Nightsoul points. Loop Shot DMG is considered Elemental Skill DMG.
- When Nightsoul points are at max, he can use the Elemental Skill “Scalespiker Cannon”: Consume all Nightsoul points to deal Nightsoul-aligned Dendro DMG. When “Scalespiker Cannon” is Held, Kinich can aim this shot. After firing the Cannon, Kinich will try to grapple to its target.
While in Nightsoul’s Blessing, after grappling an opponent or firing “Scalespiker Cannon,” a Blind Spot will be generated next to the opponent. When Kinich enters this Blind Spot, it will disappear and he will generate 4 Nightsoul points.
If the grapple connection should snap due to exceeding the maximum distance or some other reason, using a Normal Attack will establish a new connection with a nearby opponent before performing Loop Shots.
Kinich’s Elemental Skill is the core part of his kit. When he uses his Skill, he enters the Nightsoul’s Blessing state and latches onto an enemy. He will swing around this enemy in an arc (the direction of which can be controlled by the player), and his Normal Attacks will be converted into Loop Shots, which deal Dendro damage and count as Skill damage.
While in Nightsoul’s Blessing, the goal is for Kinich to fire as many Scalespiker Cannons as possible (at least 4 and as many as 6 in some hyper-optimized rotations). To do this, he must max out his Nightsoul points, which he can generate up to the maximum of 20 in a number of ways:
- They will slowly regenerate on a passive basis throughout his Skill’s duration (2 per second). This guarantees him at least 1 cannon.
- Every sequence of Loop Shots generates 3 Nightsoul points.
- Entering a Blind Spot (a large green zone on the ground, radiating out from his target) will generate 4 Nightsoul points.
- Enemies being affected by damage from Burning or Burgeon will generate 7 Nightsoul points via his A1.
 Elemental Burst | Hail to the Almighty Dragonlord
Talent Description
Unleashes the power of the Almighty Dragonlord, K’uhul Ajaw (on a limited, conditional, restricted, contractual, partial, temporary basis), dealing Nightsoul-aligned AoE Dendro DMG. Ajaw will unleash his Dragon Breath at intervals, dealing Nightsoul-aligned AoE Dendro DMG.
If Kinich is in Nightsoul’s Blessing when this is used, this Blessing’s duration is extended by 1.7s.
Kinich’s Burst summons a giant Ajaw to deal additional damage over time via his Dendro breath. Casting Kinich’s Burst slightly extends the duration of his Nightsoul’s Blessing, which mostly compensates for the long Burst animation.
 Ascension 1 Passive | The Price of Desolation
Talent Description
When Kinich is in Nightsoul’s Blessing state, opponents hit by his Elemental Skill will enter the Desolation state, and when affected by Burning or Burgeon reaction DMG, they will restore 7 Nightsoul points to him. Nightsoul points can be gained this way once every 0.8s. The Desolation state will persist until this instance of Kinich’s Nightsoul’s Blessing state ends.
Kinich now gains significantly more Nightsoul points when enemies take Burn or Burgeon damage, which greatly encourages using him in these team archetypes to maximize his damage potential.
 Ascension 4 Passive | Flame Spirit Pact
Talent Description
After a nearby party member triggers a Nightsoul Burst, Kinich will gain 1 stack of Hunter’s Experience that lasts 15s. Max 2 stacks. When Kinich uses Canopy Hunter: Riding High’s Scalespiker Cannon, all stacks of Hunter’s Experience will be consumed, with each stack consumed increasing the DMG dealt by this Cannon shot by 320% of Kinich’s ATK.
Kinich gains a significant increase to his Scalespiker Cannon damage after a Nightsoul Burst is triggered, which slightly incentivizes using other Natlan characters with him. For a description of what the Nightsoul Burst is and how it works, please see the 5.0 Update at a Glance Guide.
Constellations
 Constellation 1 | Parrot’s Beak
Constellation Description
After Kinich lands from Canopy Hunter: Riding High’s mid-air swing, his Movement SPD will increase by 30% for 6s.
Additionally, Scalespiker Cannon’s CRIT DMG is increased by 100%.
Offers a large mobility boost outside of combat and a whopping 100% CRIT DMG for Kinich’s Scalespiker Cannon, which is a very simple but powerful DPS increase.
 Constellation 2 | Tiger Beetle’s Palm
Constellation Description
When Kinich’s Elemental Skill hits an opponent, it will decrease their Dendro RES by 30% for 6s.
Additionally, the first Scalespiker Cannon Kinich fires after entering Nightsoul’s Blessing has increased AoE, and its DMG increases by 100%.
Buffs his first Scalespiker Cannon and applies a huge Dendro RES decrease to enemies targeted by his Skill. This not only helps his damage, but also other Dendro characters on the team.
 Constellation 3 | Protosuchian’s Claw
Constellation Description
Increases the Level of Canopy Hunter: Riding High by 3.
Maximum upgrade level is 15.
A simple boost to Kinich’s Skill Talent levels, which is a large DPS increase, as his Skill makes up most of his damage.
 Constellation 4 | Hummingbird’s Feather
Constellation Description
When in Nightsoul’s Blessing, Kinich will restore 5 Energy after using his Loop Shots or after unleashing the Scalespiker Cannon. Energy can be regenerated this way once every 2.8s.
Additionally, Hail to the Almighty Dragonlord deals 70% more DMG.
Allows Kinich to Burst every rotation and increases his Burst’s damage. However, his Burst is not the main focus of his kit, so it is a smaller increase than the Constellations before it.
 Constellation 5 | Howler Monkey’s Tail
Constellation Description
Increases the Level of Hail to the Almighty Dragonlord by 3
Maximum upgrade level is 15.
A simple increase to Kinich’s Burst Talent levels, which is a rather small DPS gain, as his Burst makes up a relatively small portion of his damage.
 Constellation 6 | Auspicious Beast’s Shape
Constellation Description
After Scalespiker Cannon hits an opponent, it will bounce between opponents once, dealing 700% of Kinich’s ATK as Dendro DMG.
If this Scalespiker Cannon triggers the buffs that Passive Talent “Flame Spirit Pact” or the Constellation “Tiger Beetle’s Palm” grant to the Cannon, the bouncing attack will also obtain the relevant buffs.
Allows Kinich to overcome his flaw of dealing mostly single-target damage by offering a large 700% multiplier to his Scalespiker Cannons’ additional hit on a second target. Easily Kinich’s best Constellation.
Combos
Combo Notation
- N = Normal Attack
- C = Charged Attack
- A = Aimed Shot
- P = Plunging Attack
- hP = High Plunge
- lP = Low Plunge
- E = Elemental Skill
- tE = Tap Skill
- hE = Hold Skill
- shE = Short Hold Skill
- Q = Elemental Burst
- D = dash (cancel)
- J = jump (cancel)
- W = walk (cancel)
- > = switch character
- ( ) = these actions are optional; please refer to the notes below
- [ ] = repeat these actions the specified number of times
| shE (Q) + dynamic NA & E combo | Kinich’s combo is fairly simple. He casts his Hold Skill — which is slightly faster than a Tap Skill — to enter Nightsoul’s Blessing. He can either use his Burst immediately or later in the rotation after any of his Scalespiker Cannons, depending on when you need the i-frames or the extra time for reactions to proc his A1 Passive for additional Nightsoul points. Once the above steps have been completed, continue using Loop Shots and Scalespiker Cannons whenever available until Kinich’s Nightsoul’s Blessing expires. N2E is the ideal combo, but depending on reaction uptime and Nightsoul point generation, N1E and N3E can be used as needed. Briefly holding his Skill when firing a Scalespiker Cannon will let you manually aim and fire more quickly than Tapping it. This can allow for hyper-optimized rotations with more cannons overall, but at the risk of missing, especially against smaller enemies. |
| shE N2E Q E 3[N2E] | This combo utilizes Kinich’s A1 Passive to gain Nightsoul points during his Burst animation in order to immediately fire an extra Scalespiker Cannon. This combo does extend his field time, which may make him lose buff uptime for his last Scalespiker Cannon and should only be done when his Burst is available. |
| shE 5[N2 shE] | Kinich’s ideal combo, which requires a great deal of skill to perform and is more reliable in pure Burning teams due to these teams having higher uptime on Kinich’s A1 Passive. |
Mechanics
Kinich’s Skill only generates particles the first time his Scalespiker Cannon is used. This allows his particle generation to be frontloaded, so it is not a hindrance if you defeat an enemy or wave partway through his Nightsoul’s Blessing duration.
Kinich’s first Blindspot position can be manipulated by the direction the in-game camera is facing. Additionally, Kinich will move towards the direction he is initially facing if no sideways movement input is provided. This results in being able to guarantee the first Blindspot by merely doing E + Normal Attacks without a directional input.
Artifacts
ER Requirements
Calcs for ER requirements can be found here (last updated for Version 5.1).
Kinich’s Elemental Burst is not a major part of his personal damage. Therefore in teams where his ER requirement is too high to justify Bursting every rotation, you can forego building ER% and simply cast his Burst whenever it’s available (usually every other rotation).
| Burst Every Other Rotation | Burst Every Rotation | |
| Solo Dendro | 100–120% | 200–245% |
| Double Dendro | 100–110% | 175–220% |
- The above tables assume at minimum 1 Favonius proc per rotation.
- Additional Favonius procs reduce Kinich’s ER requirements by ~15%.
Use the Energy Recharge Calculator to determine exact requirements for your team and rotation.
Artifact Stats
 Sands |  Goblet |  Circlet |
| ATK% | Dendro DMG Bonus | CRIT Rate / CRIT DMG |
Stat Priority: CRIT Rate / CRIT DMG > ATK% > ER%
Building Energy Recharge on Kinich is optional if his ER reqs are too high to justify Bursting every rotation.
Artifact Sets
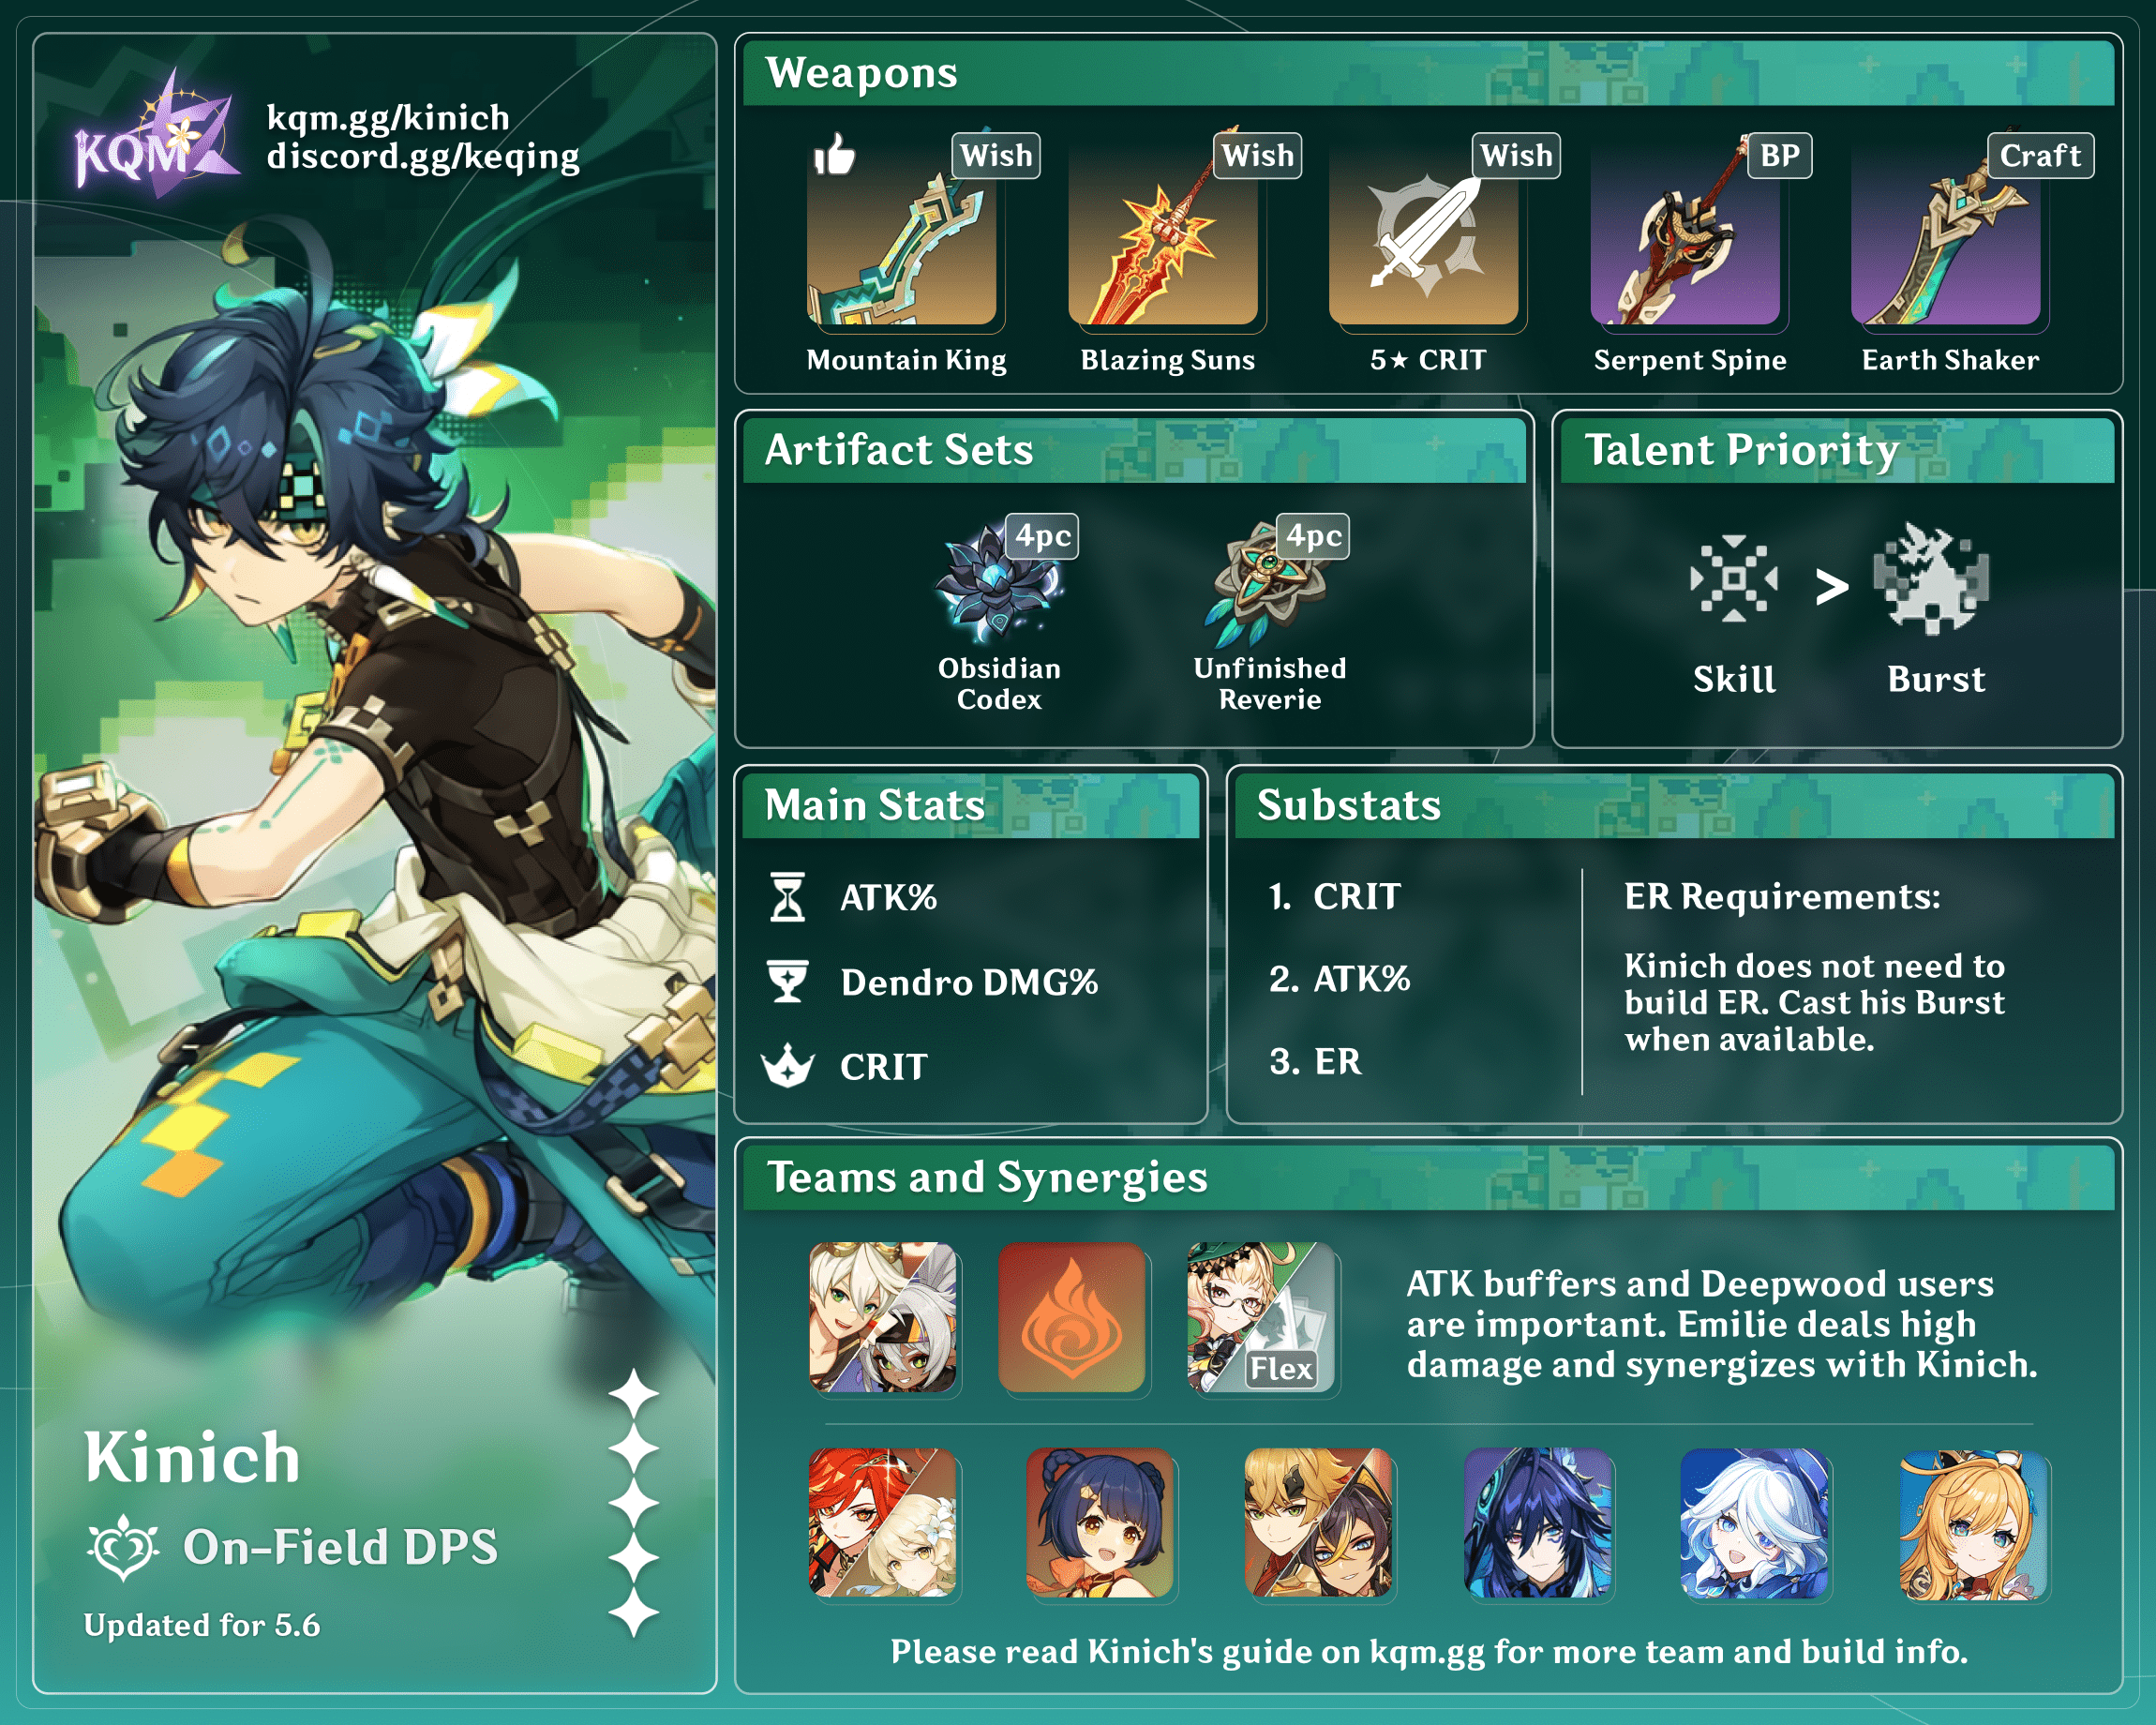
 4pc Obsidian Codex | Kinich’s best set, offering 40% CRIT Rate and 15% DMG. Kinich’s first few Loop Shots will not be affected by Obsidian Codex; however, these do not make up a large portion of Kinich’s damage to begin with. Although the set description’s wording suggests otherwise, his first Scalespiker Cannon does actually benefit from the additional CRIT Rate. |
 4pc Unfinished Reverie | Unfinished Reverie is not too far behind 4pc Obsidian Codex, but the difference is large enough that it’s not worth farming exclusively for Kinich. Use this set if you’re running a weapon with a high CRIT Rate secondary stat (e.g., Serpent Spine) or if you already have a set with good substats available. |
 4pc Marechaussee Hunter | Uptime on this set can be guaranteed with Burn / Burgeon self-damage or Furina. However, it is worse than the above sets even in those cases. As such, it is not recommended to farm this set specifically for Kinich. |
 4pc Golden Troupe | Though most of Kinich’s damage is Skill damage, he cannot get the full benefit of this set’s 4pc bonus since none of his Skill casts occur within the first 2s of his field time. It is not recommended to farm this set specifically for Kinich. |
 2pc Mixed Sets | 2pc Bonuses: Dendro DMG Bonus, Skill DMG Bonus, ATK%, Universal DMG Bonus 2pc + 2pc sets are far worse than the dedicated 4pc sets, but they can be okay for transitioning while farming. |
 4pc Deepwood Memories | Kinich does not want to be the holder of this set; it’s much better for him and the team if another unit holds it instead. Using 4pc Obsidian Codex is better for his damage even if that means having no Deepwood on the team. |
Weapons
 5★ Fang of the Mountain King | Undeniably the best weapon for Kinich. Fang of the Mountain King provides a huge amount of Skill and Burst DMG Bonus on the condition that you use his Skill and trigger Burning / Burgeon reactions, which you should already be doing anyway. Although Fang gives a lower CRIT Rate secondary stat compared to other CRIT options, it offers a high amount of Base ATK to compensate. |
5★ A Thousand Blazing Suns | A very notable 5-star option for Kinich. He is unable to maintain its passive beyond the first 6s after using his Elemental Skill as he doesn’t deal Elemental damage through his Normal or Charged Attacks. This results in his first 2-3 Scalespiker Cannons being buffed. This weapon performs slightly better than Beacon of the Reed Sea on average but is more consistent overall. |
5★ Beacon of the Reed Sea | Beacon of the Reed Sea is most potent when Kinich is played without a shielder for the guaranteed self-damage from Burgeon or Burning (though Burning is less consistent). |
 5★ Verdict, Redhorn Stonethresher, Wolf’s Gravestone | All competitive and viable options for Kinich due to their high base stats, albeit not much better than R5 Earth Shaker. |
 5★ The Unforged | Performs best if Kinich is shielded, in which case it is about equal to R5 Earth Shaker. |
 4★ Serpent Spine | Serpent Spine is a superb option at higher refinements and with a strong shielder, but falls short of other options if these conditions cannot be met. |
 4★ Earth Shaker | Earth Shaker is an amazing F2P weapon that can have 100% uptime in Burgeon teams, but can struggle with uptime in Burning teams due to Burning only counting as a Pyro reaction when it is first applied onto opponents. |
 4★ Tidal Shadow | Last-ditch option if Earth Shaker’s passive cannot be guaranteed, though it requires healing. |
Teams
Rotation Notation
- N = Normal Attack
- C = Charged Attack
- A = Aimed Shot
- P = Plunging Attack
- E = Elemental Skill
- tE = Tap Skill
- hE = Hold Skill
- shE = Short Hold Skill
- Q = Elemental Burst
- D = dash (cancel)
- J = jump (cancel)
- W = walk (cancel)
- > = switch character
- ( ) = these actions are optional; please refer to the notes below
- [ ] = repeat these actions the specified number of times
Teambuilding
- Sources of off-field Pyro application are ideal for Kinich’s teams.
- Kinich greatly benefits from having a 4pc Deepwood Memories holder on his teams, therefore this set should be equipped on the character who can best maximize its uptime.
- Units like Dehya, Thoma, Xiangling, or Lynette are often the best candidates to hold Deepwood.
- If including Hydro units, note that Kinich’s damage benefits most from pseudo-Burgeon setups that include some Burning uptime. True Burgeon lags behind on Nightsoul point generation, resulting in fewer cannons and significantly less damage.
Burning / Burgeon

Kinich shines in teams with high Burning uptime or consistent Burgeons. As such, his teams follow a pretty standard formula.
Notable Teammates
Dendro
Kinich by himself can permanently maintain the Burning aura on enemies through his own Dendro application. This makes additional Dendro teammates not worth considering unless they can provide high personal damage like Emilie or have sustain and some minor buffs like Yaoyao.
 Emilie | Emilie is a superb choice for Kinich as she also benefits from high Burning uptime. Her high damage profile adds a lot to Kinich teams as she deals damage during Kinich’s downtime and the additional Dendro particle generation can also help. Unfinished Reverie is her best set for personal damage. However, 4pc Deepwood can be considered if the off-field Pyro applier is using 4pc Scroll and no one else could hold it while providing sufficient uptime. |
 Kirara / Yaoyao / Baizhu | Sustain options that offer Dendro Particles for Kinich and various small buffs / quality of life. They are prime candidates for holding 4pc Deepwood Memories, though Kirara won’t be able to maintain full uptime. |
 Nahida | Since Nahida’s Tri-Karma Purification doesn’t proc when refreshing Burning, she is unable to meet 4pc Deepwood’s trigger condition or provide significant personal damage for pure Burning teams. Her EM buffs provide little to Kinich, as he does not build EM. She can hold TTDS, but this is often not enough to justify her inclusion. She is more viable for Burgeon as a Deepwood and TTDS holder, but still isn’t a top pick. |
Pyro
 Bennett | Bennett is, as usual, a superb ATK buffer for Kinich and a staple on his teams due to also being a Pyro unit. Because of Kinich’s mobility during his Nightsoul’s Blessing state, it becomes more important to position Kinich closer to enemies to stay within Bennett’s Burst radius. However, Bennett’s buff lingers for about a second after you leave the Burst’s radius, so there is some leeway for distance. As Bennett does not apply Pyro off-field, he should not be the only Pyro unit on a Kinich team. |
Mavuika | Mavuika is Kinich’s best off-field Pyro character due to her high personal damage and buffing from her A4 Passive. Kinich can increase her A4 Passive’s buff as his Scalespiker Cannons consume Nightsoul points. Mavuika usually holds 4pc Deepwood if she’s the only off-field character in the team. Otherwise, 4pc Scroll is a great set on her as she can activate its full effect. Note that due to the inconsistency of proccing 4pc Scroll in a Pure Burning team, especially in Boss fights, alternative sets such as 4pc OC, 4pc TotM and the aforementioned 4pc Deepwood should be considered. |
 Xiangling | Xiangling is a strong off-field Pyro character for Kinich teams due to her high Pyro application and damage profile. Her ER requirements are quite high, so using Favonius Lance, Kitain Cross Spear, or Engulfing Lightning is recommended. Try to move counterclockwise around the enemy during Kinich’s Skill so that Xiangling’s Pyronado hits more often, unless aiming for a Blind Spot. If no one else holds 4pc Deepwood Memories in the team, Xiangling typically uses it. It is better to sacrifice some of her personal damage than to go without Deepwood. In Pure burning teams with Emilie, Xiangling can skip her Elemental Burst if not available and rely exclusively on Guoba for 4pc Deepwood uptime. |
Pyro Traveler | Pyro Traveler can act as a solid off-field Pyro applier for Kinich’s teams, while providing a minor buff through their C1. Normally, you will be using their Tap Skill given its higher AoE, especially in teams where Furina is used in order to get more Burgeons to maximize Kinich’s A1 Passive uptime. Their Hold Skill has more range, which can be convenient against certain Bosses Similarly to Mavuika, Pyro Traveler can have issues using 4pc Scroll, therefore 4pc Deepwood is often preferred. |
  Dehya / Thoma | Both Dehya and Thoma are sustain options that apply Pyro off-field. They are also great 4pc Deepwood users due to their lower personal damage and decent uptime on their respective Skill / Burst. Kinich’s Loop Shots are considered Normal Attack animations and therefore trigger Thoma’s Fiery Collapse. Dehya should usually hold Sacrificial Greatsword to enable shorter rotations, which Kinich prefers. |
  Yanfei / Klee | As Pyro Catalyst characters, they can both contribute to Pyro Resonance and hold TTDS to further buff Kinich. While Yanfei can provide a shield through her C4, it is often too difficult to build sufficient ER to Burst every rotation. Unlike Yanfei, Klee can provide off-field Pyro application through her Elemental Skill, which means she can hold Deepwood. |
Electro
 Iansan | Iansan is a potent buffer for Kinich. He easily keeps her Nightsoul points high, while she provides Flat ATK and ATK% buffs at C0, even more ATK% at C2, and DMG Bonus at C6. Iansan can also equip 4pc Scroll for extra DMG Bonus, though it can be difficult to use. Additionally, Iansan’s healing, while low, helps keep Kinich alive (and can let her use Symphonist of Scents, if available). In teams with Mavuika, Iansan also generates Fighting Spirit, which in turn makes Mavuika’s A4 buff stronger. |
Ororon | Ororon can apply Electro from off-field through his A1 Passive since Kinich’s Loop Shots and Scalespiker Cannon attacks are considered Nightsoul-aligned damage. This makes Ororon a decent buffer through 4pc Scroll and an ATK% buff at C6. He can offer additional utility with his Taunt. His Nightsoul point consumption also generates Fighting Spirit for Mavuika, which in turn makes her A4 buff stronger. |
  Fischl / Kuki Shinobu | Off-field Electro damage dealers, Fischl builds for her personal damage, while Shinobu can build EM to maximise Overloaded damage. Their Electro application can also enable other teammates to trigger Scroll, and they’re potential 4pc Deepwood users. |
Hydro
 Furina | Furina provides a teamwide DMG% buff that greatly benefits Kinich. Her off-field Hydro application can sometimes make Kinich’s combos less consistent, forcing Kinich to do more Loop Shots than preferred, but this is offset by the potency of her buff. She requires a healer on her teams, with Bennett being her most common teammate. |
  Yelan, Xingqiu | They provide off-field Hydro application at a higher rate than Furina, resulting in slightly less Burning uptime but more instances of Bloom (and therefore Burgeon). Yelan provides her own DMG% Bonus buff, while Xingqiu gives additional Interruption Resistance and slightly better Hydro application, leading to more Blooms. |
Cryo
Citlali / Escoffier | Cryo characters are viable teammates for Kinich when paired alongside Pyro 4pc Scroll holders like Mavuika. Through their Skills, they can wipe the Burning aura in order to let the Pyro character activate 4pc Scroll consistently. They will normally use the 4pc Deepwood Memories set thanks to their constant off-field Elemental Skill damage. |
Flex
 Lynette | Lynette is accessible to all players who reach Adventure Rank 25. She can provide an ATK% buff, a Taunt, and off-field Pyro application through her Elemental Burst’s absorption, providing alternative means of consolidating such a role. In some teams where Lynette can trigger Burgeon with her off-field Pyro application, she should maximise her EM stat after meeting her ER requirements. She’s an ideal 4pc Deepwood Memories holder, requiring minimal investment besides meeting her ER requirements. |
 Venti | While Venti does not provide direct buffs to Kinich, he is able to group enemies tight enough for Kinich to hit multiple reliably, as well as providing Energy to Pyro units in the team. He can also hold 4pc Deepwood Memories, and his Burst can apply Pyro aura to new enemies that spawn in after a wave change quickly. |
Zhongli | Zhongli is a powerful defensive unit who can also reduce Elemental RES. However, he often struggles to meet the activation condition of 4pc sets such as Tenacity or Deepwood due to the limited AoE of his Stone Stele. |


Example Teams
This is not a comprehensive list of teams. The inclusion or exclusion of any given team does not necessarily reflect its power level.

A powerful Burning team that uses Mavuika or Pyro Traveler as off-field Pyro appliers and buffers.
Sample Rotation (Mavuika)
Emilie E/Q > Mavuika Q tED1 > Bennett Q E > Kinich shE combo
1Use a Dash so that Bennett catches Mavuika’s Elemental Skill particles
Sample Rotation (Pyro Traveler)
Emilie E/Q > Pyro Traveler E Q > Bennett EQ > Kinich shE combo > Bennett E1
1Do a Bennett Skill if you need the particles

A pure Burning team with Emilie and Xiangling, Thoma, or Dehya to provide off-field Pyro application.
Sample Rotation (Xiangling)
(Emilie E/Q)1 > Bennett Q E > Xiangling Q E > Kinich shE (Q) combo > Bennett E > Xiangling N22
1Q if available, otherwise use E
2Catch Bennett’s particles
Sample Rotation (Dehya)
(Emilie E)1 > Dehya 2[E] > Bennett EQ > (Emilie Q)2 > Kinich shE (Q) combo > Bennett E
1Use Emilie’s E if her Q is not ready
2Use Emilie’s Q if it’s ready
Sample Rotation (Thoma)
(Emilie E)1 > Thoma (EQ/Q E)3 > Bennett EQ > (Emilie Q)2 > Kinich shE (Q) combo
1Use Emilie’s E if her Q is not ready
2Use Emilie’s Q if it’s ready
3Q E with Kitain only

Iansan pairs well with Kinich as she offers her Flat ATK buff and minor healing. Bennett and Emilie are strong 4th slot options. Emilie offers her own high personal damage and more consistent 4pc Scroll setups thanks to her frequent off-field dendro application. However, her only defensive utility is in reducing incoming Burning damage which isn’t as notable.
Bennett locks Kinich into his circle, removing the perk of Iansan offering freedom of movement, but his additional Flat ATK and healing make him a great choice nonetheless. Using Scroll on Iansan when Kinich is the only Dendro character is inconsistent, so it’s better to use Iansan’s abilities later into the rotation to maximise her Elemental Burst’s buffing uptime.
Sample Rotation (Bennett)
(Kinich Q)1 > Mavuika Q tE > Bennett Q E > Iansan E N1 Q > Kinich shE combo
1Use Kinich’s Burst if available
Sample Rotation (Emilie)
Emilie E/Q > Iansan E N1 Q > Mavuika tE Q > Kinich shE combo

Ororon provides buffs to Kinich through 4pc Scroll and defensive utility in the form of his Taunt, while Mavuika or Thoma reduce Dendro RES through 4pc Deepwood and provide their own utility in the form of buffs or shielding.
Sample Rotation (Mavuika)
Ororon EQ > Bennett EQ > Mavuika Q C tE > Kinich shE combo
Sample Rotation (Thoma)
Thoma EQ > Bennett EQ > Ororon EQ > Kinich shE combo

A Burgeon team with Furina to buff Kinich. The whole team has incredibly high ER requirements without 1–2 Favonius procs or extra Skill casts from Bennett.
Sample Rotation (Thoma)
Furina ED Q > Thoma (EQ/Q E)1 > Bennett EQ > Kinich shE (Q) combo > Bennett E > (Thoma N2)²
1Q E with Kitain only
²Catch Bennett’s particles; can skip if Thoma is C4+
Sample Rotation (Xiangling)
Furina ED Q > Bennett Q E > Xiangling Q E > Kinich shE (Q) combo > Bennett E > Xiangling N21
1Catch Bennett’s particles
Sample Rotation (Dehya)
Furina ED Q > Dehya 2[E] > Bennett EQ > Kinich shE (Q) combo > Bennett E

A Burgeon team with Thoma and Xingqiu. Kinich uses his Elemental Burst at the start of the rotation for Dendro application, and Thoma should be built with full EM. Xingqiu’s high Hydro application leads to more Burgeons but may result in fewer Scalespiker Cannons due to lower Burning uptime.
Sample Rotation (Thoma)
Kinich Q > Xingqiu ED Q N1 > Thoma (EQ/Q E)1 N1 > Bennett EQ > Kinich shE combo > Bennett E > (Thoma N2)²
1Q E with Kitain only
²Catch Bennett’s particles; can skip if Thoma is C4+

A Burning team that incorporates Geo characters as sources of damage and additional defensive utility through Crystallize shields.
Sample Rotation (Zhongli)
Zhongli hED > Bennett Q E > Xiangling Q E > Kinich shE (Q) combo > Bennett E > Xiangling N21
1Catch Bennett’s particles
Sample Rotation (Albedo)
Albedo E > Bennett Q E > Xiangling Q E > Kinich shE (Q) combo > Bennett E > Xiangling N21
1Catch Bennett’s particles
Sample Rotation (Chiori)
Chiori 2[E] > Bennett Q E > Xiangling Q E > Kinich shE (Q) combo > Bennett E > Xiangling N21
1Catch Bennett’s particles
Credits
caramielle., quincy, pjeljr, cuppacote, .whalien, madeofseaglass, lostguide, baloopy, sharaths21312, acerbus 114, caxia5, capnharland, plumetra, chasing_haze
Team images made with the KQM portrait generator.
