Updated for Version 3.0
Written by Cuzimori#1535
Table of Contents
TL;DR
Credits to: kolvii, cuppacote, irokei, and KQM Staff
Glossary
Explanation of terms used (in context of this guide)
| Term | Meaning |
| DPS | Refers to units who are responsible for a respectable bulk of the damage on a team. |
| Support | Refers to units who can provide utility such as buffing and healing in order to allow the DPS options to function properly. |
| Single-Target | Refers to damage that is highly, if not totally concentrated on one enemy. |
| AoE | Refers to damage that can hit multiple enemies simultaneously. |
| ICD | Generally refers to any non-visible timers in the game on a particular event. More information on the KQM TCL here. |
| Snapshotting | Property by which an ability uses the stats present on a character during the casting of the ability throughout its duration. More information on the KQM TCL here. |
| BiS | Best in Slot. Refers to the best option for a given composition. |
Introduction
Gorou is a 4* Geo Bow Character whose kit revolves around boosting his teammates’ Defense – a highly unique role for a character in the Genshin roster. This allows him to serve as a staple support alongside units who, as is common in the Geo Element, use their Defense stat to deal damage. After all, the best defense is a good offense, and knowing best how to use the ever-victorious general will allow him to aid your team through the terrains of the Spiral Abyss.
This guide will cover the supportive playstyle his kit works best as; information involving on-field DPS Gorou is generally out of the scope of the guide.
Why play Gorou?
Pros
- Only dedicated Defense buffer in the game, absolutely unique in this role
- Very cheap to build
- Best gear is easily F2P obtainable
- Decent Energy generation
- Constellations are not necessary, but impactful
- Very easy to use
Cons
- Defense buffing is highly niche
- Team compositions are very limited to use his full buffing power
- Extremely low damage output
- Energy generation is still lower than other Geo batteries in Element
- While not necessary, a good portion of his buffing power is locked behind C6
Talents
Talent Priority
 >>
>> >
>
Most of Gorou’s buffing capability scales off his Elemental Skill; thus, it is the only talent worth leveling. While his Burst contributes far more damage than his Normal Attacks, his own personal damage is relatively inconsequential and is not crucial to invest in.
Normal Attack | Ripping Fang Fletching
Description
Normal Attack
Perform up to 4 consecutive shots with a bow.
Charged Attack
Perform a more precise Aimed Shot with increased DMG.
While aiming, stone crystals will accumulate on the arrowhead. A fully charged crystalline arrow will deal Geo DMG.
Plunging Attack
Fires off a shower of arrows in mid-air before falling and striking the ground, dealing AoE DMG upon impact.
Gorou’s Normal Attacks and Aimed Shots are relatively standard for a Bow character. They are generally not worth using, except under a few exceptional circumstances: his Normals can be used to trigger effects such as Favonius, and his Aimed shots can be used to paralyze ruin enemies or apply Geo for Elemental checks.
Elemental Skill | Inazuka All-Round Defense
Description
Deals AoE Geo DMG and sets up a General’s War Banner.
General’s War Banner
Provides up to 3 buffs to active characters within the skill’s AoE based on the number of Geo characters in the party at the time of casting:
- 1 Geo character: Adds “Standing Firm” – DEF Bonus.
- 2 Geo characters: Adds “Impregnable” – Increased Interruption Resistance.
- 3 Geo characters: Adds “Crunch” – Geo DMG Bonus.
Gorou can deploy only 1 General’s War Banner on the field at any one time.
Characters can only benefit from 1 General’s War Banner at a time. When a party member leaves the field, the active buff will last for 2s.
Hold
Adjust the location of the skill.
As mentioned earlier, Gorou’s Elemental Skill is where most of Gorou’s supporting abilities come from. The ability provides the active character standing within the radius of the Skill with buffs depending on the number of Geo characters in the party (Gorou included), with each Geo character adding an additional buff for up to 3 effects. With 1 Geo character, Gorou boosts the Defense of those under the Skill’s effect. With 2 Geo characters, this Skill also provides Interruption Resistance; with 3 Geo characters, the Skill also provides 15% Bonus Damage. This is one of the main reasons Gorou prefers teams with multiple Geo teammates.
It is worth noting that Gorou’s buff can have a short delay to apply to the active character upon switching in, which is dependent on ping – it is generally worthwhile to use a Normal Attack on the active character before casting abilities to give enough time for the buff to apply.
Elemental Burst | Juuga, Forward Unto Victory
Description
Displaying his valor as a general, Gorou deals Aoe Geo DMG and creates a field known as General’s Glory to embolden his comrades.
General’s Glory
This field has the following properties:
- Like the General’s War Banner created by Inuzaka All-Round Defense, provides buffs to active characters within the skill’s AoE based on the number of Geo characters in the party. Also moves together with your active character.
- Generates 1 Crystal Collapse every 1.5s that deals AoE Geo DMG to 1 opponent within the skill’s AoE.
- Pulls 1 Elemental Shard in the skill’s AoE to your active character’s position every 1.5s (Elemental Shards are created by Crystallize Reactions).
If a General’s War banner created by Gorou currently exists on the field when his ability is used, it will be destroyed. In addition, for the duration of General’s Glory, Gorou’s Elemental Skill “Inazuka All-Round Defense” will not create the General’s War Banner.
If Gorou falls, the effects of General’s Glory will be cleared.
Gorou’s Burst applies the buff from his Elemental Skill, while also having some other handy utility effects. The most important of these is that it activates his Ascension 1 Passive, providing further boosts to the party. It also causes the buff radius to be centered around the active character, removing any restrictions in mobility. Finally, it also draws Crystallize shields towards the user: this makes maintaining shield uptime for Geo Resonance much easier in the absence of a dedicated shielder.
 Ascension 1 Passive | Heedless of Wind and Weather
Description
After using Juuga: Forward Unto Victory, all nearby party members’ DEF is increased by 25% for 12s.
A simple and effective team-wide 25% Defense buff with an easy activation condition tied to his Burst cast.
 Ascension 4 Passive | A Favour Repaid
Description
Gorou receives the following DMG Bonuses to his attacks based on his DEF:
- Inuzaka All-Round Defense: Skill DMG increased by 156% of DEF
- Juuga: Forward Unto Victory: Skill DMG and Crystal Collapse DMG increased by 15.6% of DEF
A mild damage amp for a low damage unit. The Passive isn’t completely useless, but its effect is fairly minimal.
 Utility Passive | Seeker of Shinies
Description
Displays the location of nearby resources unique to Inazuma on the mini-map.
Outclassed by interactive maps, but a neat quality of life passive to have in conjunction with it.
Constellations
Gorou’s Constellations offer him additional buffing capabilities, buff duration extensions and minor healing. While very useful, it is generally not worth rolling specifically for, especially given the uncertain nature of rolling for 4*s.
 C1 – Rushing Hound: Swift as the Wind
Description
When characters (other than Gorou) within the AoE of Gorou’s General’s War Banner or General’s Glory deal Geo DMG to opponents, the CD of Gorou’s Inuzaka All-Round Defense is decreased by 2s. This effect can occur once every 10s.
His C1’s cooldown reduction is helpful on certain teams, particularly alongside Noelle to ensure smooth rotations. However, players should note that the effect itself has a 10s cooldown, which means it can only activate every other Skill.
 C2 – Sitting Hound: Steady as a Clock
Description
While General’s Glory is in effect, its duration is extended by 1s when a nearby active character obtains an Elemental Shard from a Crystallize Reaction. This effect can occur once every 0.1s. Max extension is 3s.
Gorou’s C2 increases the duration of his Burst to up to 3 seconds if Crystallize shards are picked up. While helpful, especially for Itto, some of Gorou’s teams are unable to generate Crystallize shards on their own unless fighting an enemy with an innate aura, rendering his C2 situationally useless.
 C3 – Mauling Hound: Fierce as Fire
Description
Increases the Level of Inuzaka All-Round Defense by 3.
Maximum upgrade level is 15.
A nice Talent Level increase to his Skill, which is what his buff scales from.
 C4 – Lapping Hound: Warm as Water
Description
When General’s Glory is in the “Impregnable” or “Crunch” states, it will also heal active characters within its AoE by 50% of Gorou’s own DEF every 1.5s.
C4 offers Gorou some minor healing – while generally not enough to act as a team’s sole source of defensive utility, it can be helpful in healing off chip damage against content like corrosion.
 C5 – Striking Hound: Thunderous Force
Description
Increases the Level of Juuga: Forward Unto Victory by 3.
Maximum upgrade level is 15.
A small boost to Gorou’s Burst, but relatively ignorable in the grand scheme of things.
 C6 – Valiant Hound: Mountainous Fealty
Description
For 12s after using Inuzaka All-Round Defense or Juuga: Forward Unto Victory, increases the CRIT DMG of all nearby party members’ Geo DMG based on the buff level of the skill’s field at the time of use:
- “Standing Firm”: +10%
- “Impregnable”: +20%
- “Crunch”: +40%
This effect cannot stack and will take reference from the last instance of the effect that is triggered.
Gorou’s C6 is a huge boost to Gorou’s supportive capabilities, providing up to 40% CDMG to Geo Damage dealt by Gorou’s teammates. It is worth noting that this buff cannot be snapshotted – nonetheless, it is a solid capstone Constellation.
Gearing
Artifact Stats
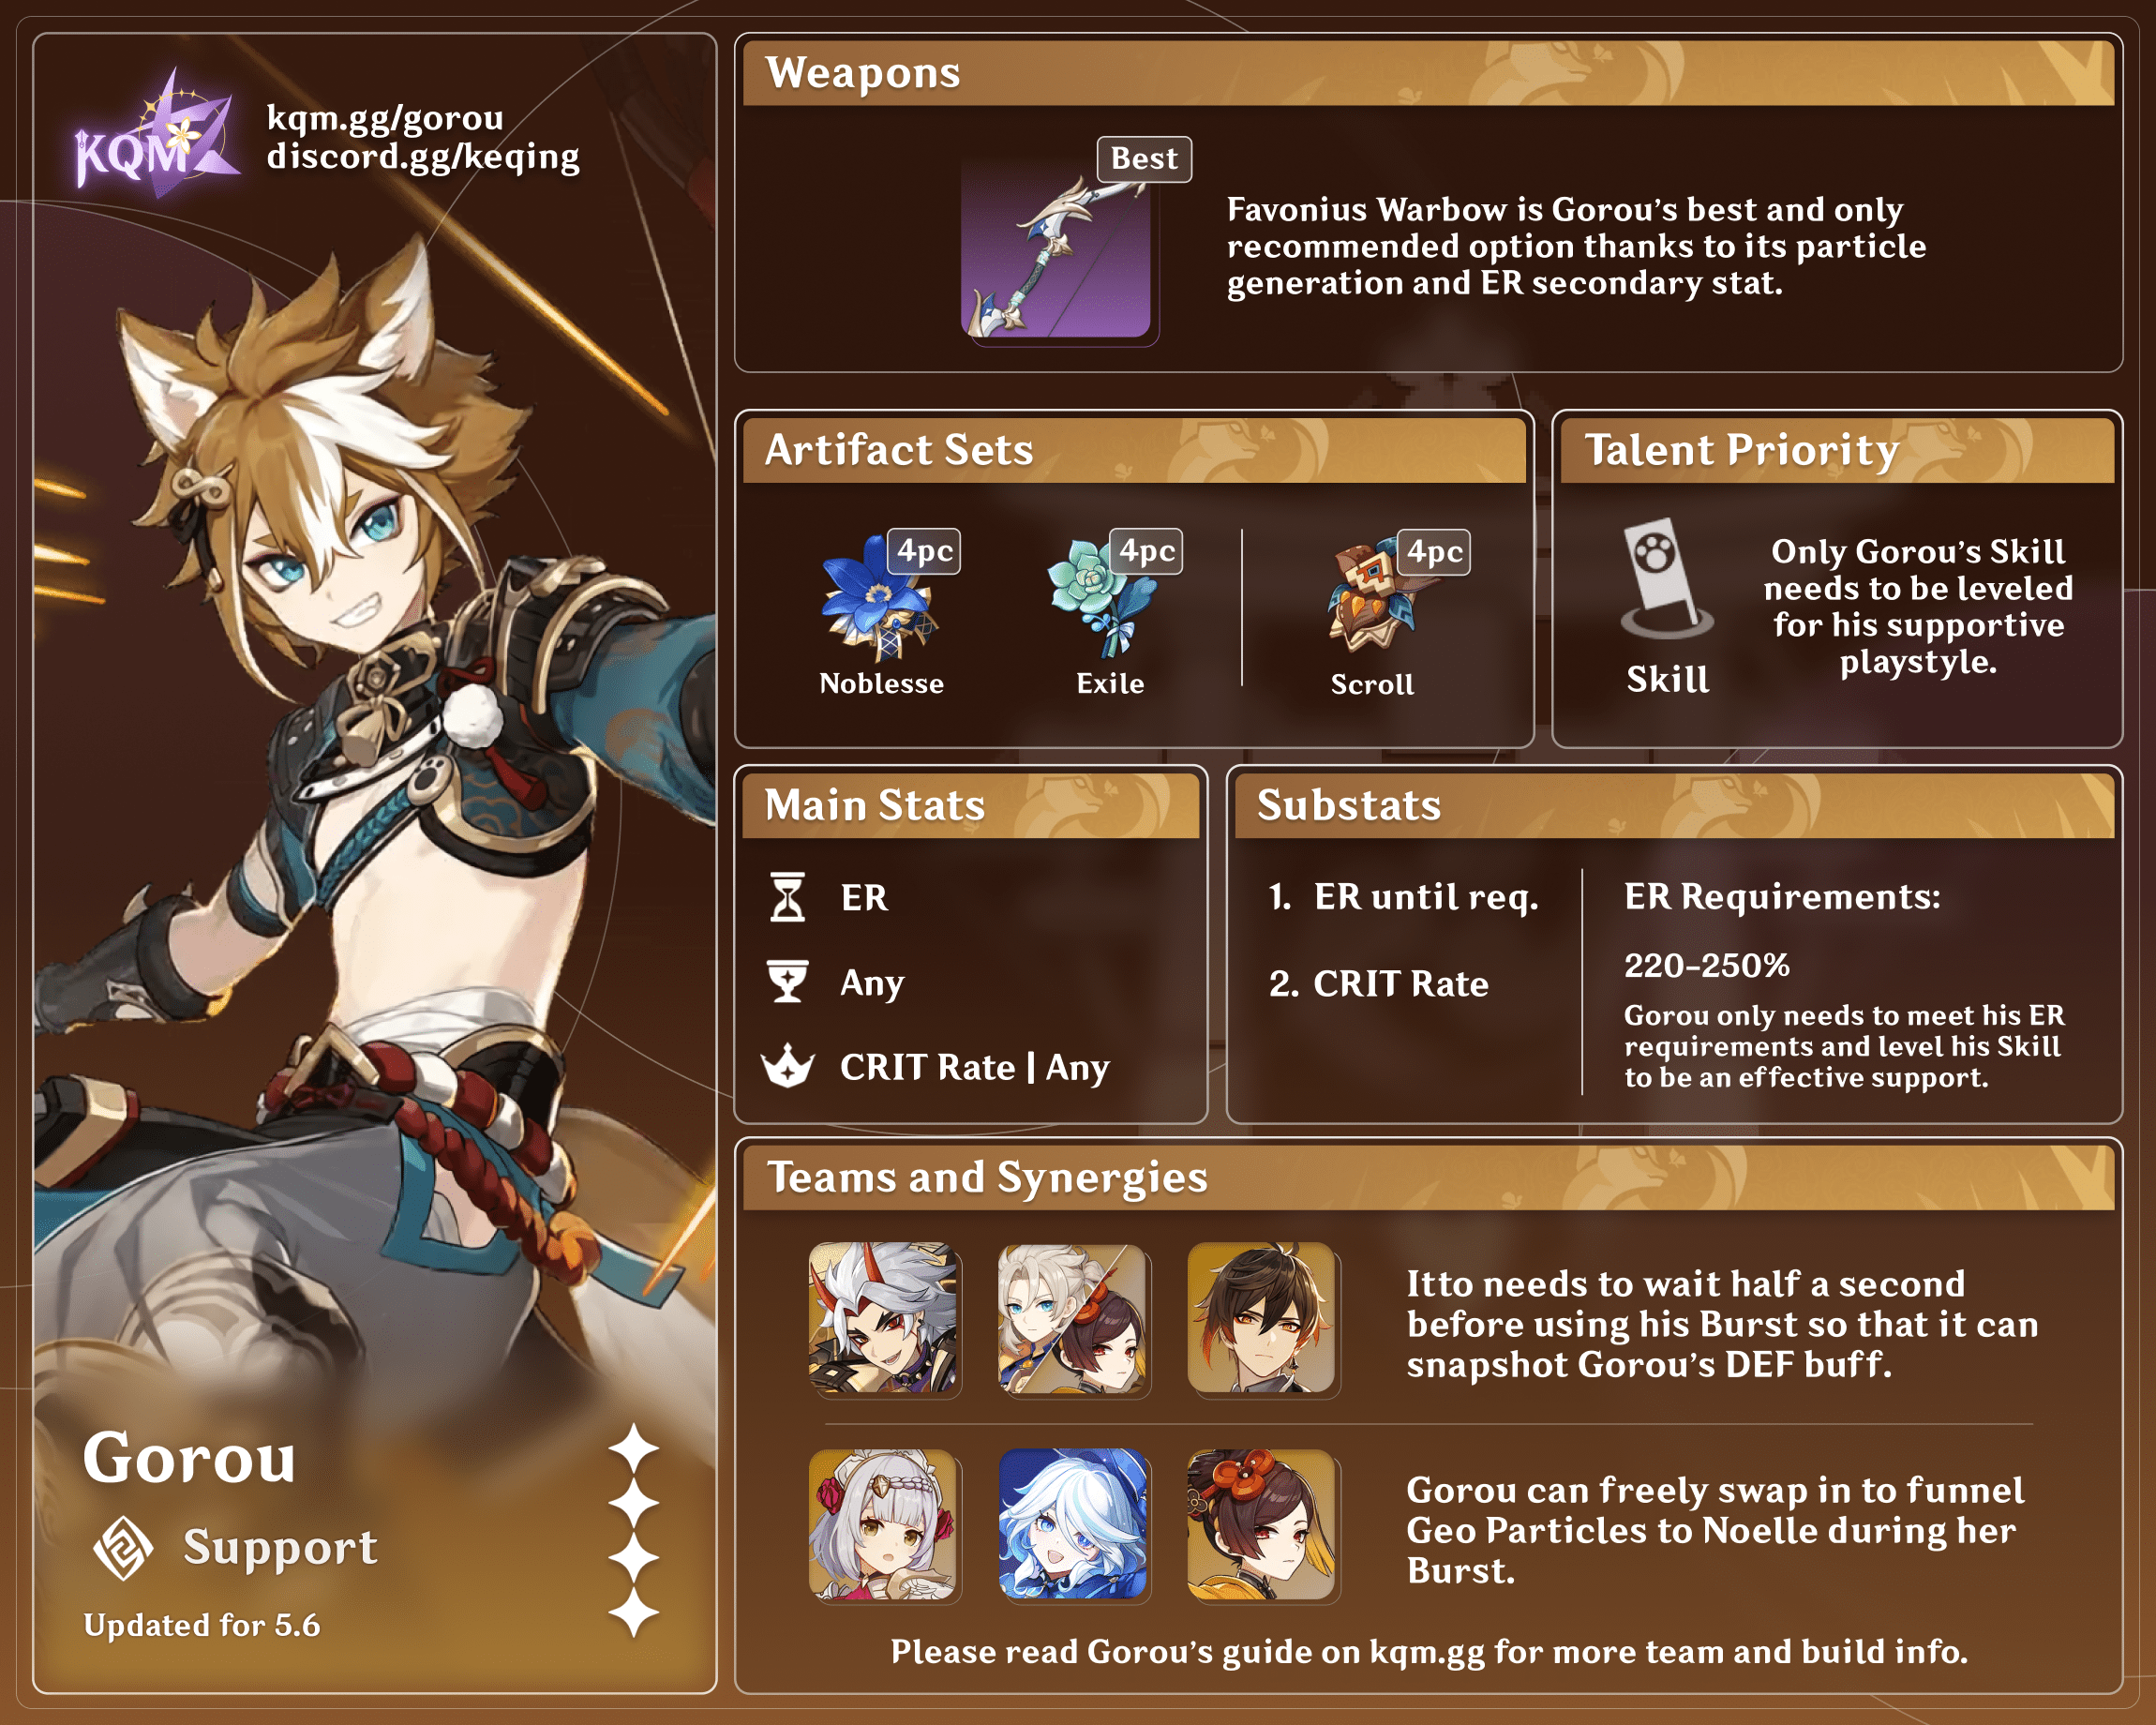
Generally, Gorou will prefer an ER sands to meet his ER requirements, and a CRIT Rate hat to improve his chances of quickly activating Favonius Warbow’s passive. His substats have a similar priority – ER is generally prioritized, followed by CRIT Rate. Beyond this, his other stats are generally up to what the player wants and are relatively inconsequential. A Geo Damage Bonus goblet is optimal for his personal damage, alongside CDMG substats to keep his CRIT Ratio as close to 1:2 as possible and Defense% substats. However, the damage he deals is generally low, and thus investment should be prioritized to other members of the team. Alternatively, players can use a Defense% goblet and focus on Defense% substats to maximize the healing from his C4 for additional comfort.
Gorou will generally want up to 220% ER with Favonius Warbow, and up to 250% without it. This is relatively easy to meet with a 5* ER Sands alongside an ER weapon. The Energy Recharge Calculator can be used to find out Gorou’s exact ER requirements on a specific team.
Artifact Sets
| Set | Notes |
4pc Noblesse Oblige | Noblesse Oblige is one of the artifacts that provide a team-wide buff – however, the Attack it provides is somewhat diluted by Gorou’s tendency to be on teams with characters that scale off of their Defense stat. Nonetheless it remains Gorou’s BiS option provided there are no other holders on the team. |
4pc The Exile | Due to Noblesse Oblige’s Attack buff being diluted in many of Gorou’s teams, 4pc Exile’s Flat Energy restoration can actually be competitive in such teams, while being much cheaper to obtain and not competing with other holders. However, its status as a 4* artifact means that Gorou will be harder pressed to meet his stat requirements with this set – thus, it is generally best to use a 5* off-set ER sands or CRIT Rate hat as needed. |
| Other Sets | Gorou’s other set options do not provide any team utility, and are thus generally worse than either of the above options. However, he can use 4 Husk of Opulent Dreams, 4 Emblem of Severed Fate, two piece combinations of these, or even rainbow sets in order to boost relevant stats for himself to focus on his own damage or utility via C4. |
Weapons
| Weapon | Notes |
Favonius Warbow | Gorou’s undisputed BiS. Players obtain a free Favonius Warbow upon completing the first Archon Quest, and it serves as his best weapon option. The weapon provides a hefty chunk of ER, and its passive turns Gorou into an acceptable battery for his teammates. |
| Other Bows | If the free Favonius Bow is not available for Gorou to use, he can opt for other bows with ER substats such as Elegy for the End, Sacrificial Bow, or End of the Line. While Elegy’s team buff or Sacrificial Bow’s Skill Cooldown reset can be tempting, they tend to come with caveats. Elegy’s buff is inconsistent to activate and is rather wasted in Gorou’s teams, while Sacrificial Bow’s reset requires refines for consistency and extends rotations. Furthermore, in Elegy’s case, it is exceedingly rare that the player’s Favonius Warbow is occupied but their Elegy is free for Gorou. Thus, while they are inferior options, they can nonetheless be made use of as a last resort. |
Team
All team images generated using KQM team portrait generator.

Gorou – On-field Geo – Geo Flex – Flex
Gorou’s teams will generally consist of an on-field Geo DPS and a Geo Flex unit – the last unit generally being variable. Discussed below are Gorou’s teammate options, as well as some sample teams using them. For further information on any of the listed units check out their respective linked character guides.
On-field Geo DPS
| Units | Tier | Notes |
Itto | S | Itto is the game’s first 5* Geo hypercarry, and the unit that Gorou was designed to support. Itto tends to want to stack buffs and have multiple batteries to maximize the damage he can deal while in his Burst state, which converts his Defense to Attack. Gorou’s kit and his team building requirements fit perfectly with this, making Gorou almost indispensable to Itto’s teams. |
Noelle | A | Similar to Itto, Noelle’s Burst converts her Defense to Attack. Unlike Itto, however, she is not a hypercarry – instead, she compresses healing and shielding utility, while also maintaining the ability to swap in her Burst duration. While this comparatively lowers Gorou’s value to her, he is nonetheless a solid addition to Noelle teams and significantly boosts her personal damage. ඞ |
Ningguang | A (Requires C6 Gorou) C (Without C6 Gorou) | Gorou is only recommended with Ningguang when he is C6. Ningguang is an on-field Geo DPS with high single-target damage and flexible field time. At C6, Gorou’s ability to provide Energy and his CDMG buff on a short CD allows him to serve as a potent buffer for her, albeit in very limited compositions. |
Geo Flex
| Units | Tier | Notes |
Albedo | S | Albedo is a generally strong pick due to his reliable off-field damage, low field time and decent Particle generation. However, he is particularly strong in teams with Gorou, who serves as a rare source of Defense buffs to significantly bolster Albedo’s already solid personal damage. While Gorou’s abilities are generally used directly before the main carry, if Albedo is used it is best to use Gorou before Albedo so that Albedo can take advantage of Gorou’s buffs. |
Zhongli | S | Zhongli’s immensely strong shield, inconsistent but existent Particle generation and Universal RES Shred make him a very strong pick alongside most of the on-field Geo DPSes Gorou is commonly paired with. His Stone Stele’s ability to resonate with other Geo Constructs and meaty Burst also give him additional value in teams that let him make use of these traits. |
GMC  | A | GMC’s strong AoE personal damage, 10% CR buff and high Particle generation allows them to serve as a strong option on Geo-centric compositions. They also have further synergy alongside Zhongli due to the large number of Geo constructs they generate, allowing him to achieve a significant number of resonance pulses. |
| Ningguang | B | While primarily an on-field DPS, her decent Particle generation, good Burst damage and ability to hold TTDS or Prototype Amber and 12% Geo Damage Bonus buff allow her to serve as a good support or Burst DPS for other Geo carries. |
Yun Jin  | B | Out of the given options, Yun Jin is only effectively utilized by Noelle. Alongside Noelle, she serves as a solid choice – with Gorou and Yun Jin together offering huge buffs for Noelle’s Normal Attack damage. It is worth noting Yun Jin cannot snapshot Gorou’s buffs. |
General Flex
The last slot in Gorou’s teams depends on the main Geo carry used and can be generally flexed to match content. Usually, the highest damage variants involve using another Geo Flex in this slot: Albedo and Zhongli are particularly noteworthy in this regard. However, other units can be considered if another Geo Flex is not available or if needed for shieldbreaking purposes.
Bennett is a strong option, especially for Ningguang due to condensing healing and a powerful Attack buff, though his ER needs can be staggeringly high. Fischl, Kuki and Diona also serve as potential options if the offensive or defensive utility they can provide are needed. Units such as Chongyun can sometimes be used for their ability to break shields, even if they lack any synergy with the team.
Rotations
Listed below are some sample rotations of some of Gorou’s most ideal teams.
Gorou – Itto – Albedo – Zhongli
Rotation: Zhongli Hold Skill -> Gorou Skill -> Burst -> Albedo Skill -> Itto N1 -> Burst -> Combos -> Repeat
Gorou – Noelle – Albedo – Zhongli
Rotation: Zhongli Hold Skill -> Gorou Burst -> Albedo Skill -> Gorou Skill -> Noelle Skill -> Burst -> 2N3D -> Gorou Skill -> Noelle 2N3D -> Repeat
C1 Gorou – Noelle – Albedo – Zhongli
Rotation: Gorou Skill -> Burst -> Zhongli Hold Skill -> Albedo Skill -> Noelle Skill -> Burst -> N4D N4 -> Gorou Skill -> Noelle N4D N4
Gorou – Ningguang – Albedo – Bennett
Rotation: Gorou Burst -> Skill -> Ningguang N2C -> Albedo Skill -> Bennett Skill -> Burst -> Ningguang Skill -> Burst -> Skill -> Charged Attack -> Bennett Skill -> Ningguang 2x N1C -> Bennett Skill -> Repeat
Afterword
Thank you for reading this guide! It was a pleasure writing about our fluffy-eared friend, and though he may be simple, he is uncontested in the role he performs and does so admirably. For any questions or inquiries regarding the guide, feel free to message me at Cuzimori#1535 on Discord.
Cuzi
Special Thanks
For their work in editing the guide to its final, polished form, a special thanks to:
Seima#4597, Leah, Markoda#5294
For their assistance with the formatting of the guide, I extend my gratitude to:
Latiwings#3308
For their efforts in transcribing the guide, my thanks to:
Seima#4597
And a further thank you to the community in KQM for offering their support and making this possible!