Updated for Version 3.1

“Osmanthus wine tastes the same as I remember… But where are those who share the memory?”
Table of Contents
Glossary
Explanation of terms used (in the context of this guide)
| Term | Meaning |
|---|---|
| On-field DPS | Usually the main damage dealer of a party; often also the character occupying the most field time. The rest of the team is typically chosen to complement the on-field DPS and provide additional damage, reactions, healing and/or other utilities for the on-field DPS. |
| Off-field DPS | A character who provides additional damage via their abilities while being off-field. |
| Support | A character that provides utility via healing, buffs, cleansing, shielding and/or Elemental RES Shred. |
| Driver | An on-field character who uses Normal and/or Charged Attacks to proc the Bursts or Passives of characters like Beidou, Fischl, Xingqiu, and Yelan. |
| Quickswap | Team compositions that involve the rapid switching of characters to cast Skills and Bursts with no extended field time on a single character. |
| GMC | Geo MC/Geo Traveler |
| C# | Constellation Level # |
| Term | Meaning |
|---|---|
| NA | Normal Attack |
| CA | Charged Attack |
| Proc | Effects triggered by a fulfilled condition (e.g. Crescent Pike procs refer to the additional damage dealt by NAs and CAs after the character wielding the Polearm picks up an Elemental Orb/Particle). |
| ICD | Internal Cooldown. Detailed information can be found in KQM's Theorycrafting Library entry. |
| AoE | Area of Effect. Often used to describe abilities that can hit multiple targets at once and are not confined to a single target. |
| ST | Single-target. Situations where there is only one enemy to fight or where attacks can only reasonably hit one target. |
| I-Frames | Invincibility frames. Describes a moment of time during which a character cannot be hurt. |
| Term | Meaning |
|---|---|
| Rainbow (sets) | Using artifacts from different sets to improve overall stats instead of obtaining additional set bonuses. |
| Term | Meaning |
|---|---|
| Shield Bot | Zhongli support build that focuses around his shielding capabilities. |
| Burst Support | Zhongli offensive support build that focuses on his shield and Burst. |
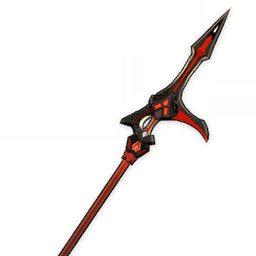
| Pikeli/Physli | Zhongli on-field DPS build that focuses on his Normal Attacks and Physical DMG, generally using Crescent Pike. |
| Hybridli | Zhongli on-field DPS build that has equal distribution between his Physical and Geo DMG. |
| Microwave | Zhongli team comp that focuses on resonance from his Stone Stele and his synergy with Geo Traveler. |
Introduction
Zhongli is a 5-Star Geo Polearm character who was initially released in Version 1.1. While his debut was controversial, his subsequent buffs have allowed him to prove himself as a unit capable of withstanding the test of time.
As the Geo Archon is a flexible unit, this guide will cover the following playstyles for him: Shield Bot, Burst Support, Physical DPS, Hybrid DPS, and Geo DPS (Microwave).
This guide will also go through Zhongli's strengths and weaknesses, in order to help you properly utilize the Geo Daddy's kit.
Why Play Zhongli?

Why not?
Pros
- The strongest shield in the game, in terms of both damage absorption and uptime.
- 20% Universal Resistance (RES) Shred contributes to team damage significantly.
- Provides valuable Interruption Resistance.
- Flexible unit who slots into many teams.
- Great driver for strong off-field units like Beidou and Xingqiu.
- Unique synergy with Geo Constructs. Best ore miner.
- Hot stone massage abs.
Cons
- Players can develop bad habits from Husbando (shield) Reliance.
- Lacks significant personal damage/using his Elemental Burst can be a DPS loss in some teams.
- Unable to protect against damage that bypasses shields (corrosion, vishap Energy drain attack, etc.).
- Inconsistent and generally poor Energy generation outside of specific comps.
TL;DR
Talents

"This is order."
 Normal Attack | Rain of Stone
Talent Description
Normal Attack
Performs up to 6 consecutive spear strikes.
Charged Attack
Consumes a certain amount of Stamina to lunge forward, causing stone spears to fall along his path.
Plunging Attack
Plunges from mid-air to strike the ground below, damaging opponents along the path and dealing AoE DMG upon impact.
Zhongli’s Normal Attacks are notable for being one of the fastest in the game, with many multi-hits. This makes him a good driver and an excellent Crescent Pike user.
Zhongli’s Charged Attack can be easily canceled at multiple points in time. This, coupled with good scaling, means that his Charged Attack can be utilized as an additional damaging or repositioning tool.
 Elemental Skill | Dominus Lapidis
Talent Description
Press
Commands the power of earth to create a Stone Stele.
Hold
Causes nearby Geo energy to explode, causing the following effects:
- If their maximum number hasn’t been reached, creates a Stone Stele.
- Creates a shield of jade. The shield’s DMG Absorption scales based on Zhongli’s Max HP.
- Deals AoE Geo DMG.
- If there are nearby targets with the Geo Element, it will drain a large amount of Geo Element from a maximum of 2 such targets. This effect does not cause DMG.
Stone Stele
When created, deals AoE Geo DMG. Additionally, it will intermittently resonate with other nearby Geo constructs, dealing Geo DMG to surrounding opponents. The Stone Stele is considered a Geo construct that can both be climbed and used to block attacks.
Only one Stele created by Zhongli himself may initially exist at any one time.
Jade Shield
Possesses 150% DMG Absorption against all Elemental and Physical DMG. Characters protected by the Jade Shield will decrease the Elemental RES and Physical RES of opponents in a small AoE by 20%. This effect cannot be stacked.
This is the most significant part of Zhongli’s kit.
When tapped, Zhongli places a Stone Stele, a climbable Geo Construct that deals ticks of AoE Geo damage. While each tick doesn’t deal much damage, they can resonate with other Geo Constructs, increasing their reach and allowing damage to stack up quickly over a large area.
When held, Zhongli’s Skill releases a burst of Geo damage and generates a shield. While holding down his Skill, Zhongli’s own Interruption Resistance is greatly increased. It is one of the rare sources of Geo RES Shred (and one of the few sources of Anemo and Physical RES Shred) available at the time of writing. If the maximum number of Stone Steles has not been reached, holding down the Skill will also place a Stone Stele.
Zhongli’s Stone Stele stays for 30 seconds and can be broken by enemy attacks. At C0, only one Stele exists at a time, but at C1, two may simultaneously co-exist.
On Zhongli’s Energy Generation
Stele creation and resonance tick damage have a 50% chance of generating an Elemental Particle. Coupled with the difficulty of keeping an enemy within the small AoE, this means that Zhongli has unreliable Energy generation.
 Elemental Burst | Planet Befall
Talent Description
Brings a falling meteor down to earth, dealing massive Geo DMG to opponents caught in its AoE and applying the Petrification status to them.
Petrification
Opponents affected by the Petrification status cannot move.
Zhongli brings down a falling meteor that deals Geo Damage in a large AoE and Petrifies his enemies, making them unable to move for a short time. As of patch 2.8, this is the only attack in the game that immobilizes enemies other than the Freeze reaction. Due to the long cast animation of this burst, it can often be a DPS loss. C2 minimizes this problem as it allows foregoing a Hold Skill to instead generate his shield with Burst.
 Ascension 1 Passive | Resonant Waves
Talent Description
When the Jade Shield takes DMG, it will Fortify:
- Fortified characters have 5% increased Shield Strength.
- Can stack up to 5 times, and lasts until the Jade Shield disappears.
This is a very good Passive that increases his effectiveness as a Shield Bot.
Additional Information
While Shield Strength is a character-specific attribute, Fortified is a buff that applies to any on-field unit, and therefore the Shield Strength from this Passive is passed on to any on-field unit.
Extras
- Note that this Passive has no ICD; hence, it is possible to rapidly obtain 5 stacks with quick attacks against the shield (e.g. Cicin Mage summons).
- The Shield Strength gained from the Passive persists upon swap. However, it doesn’t persist upon refresh (by his Hold Skill or C2 Burst).
 Ascension 4 Passive | Dominance of Earth
Talent Description
Zhongli deals bonus DMG based on his Max HP:
- Normal Attack, Charged Attack, and Plunging Attack DMG is increased by 1.39% of Max HP.
- Dominus Lapidis' Stone Stele, resonance, and hold DMG is increased by 1.9% of Max HP.
- Planet Befall's DMG is increased by 33% of Max HP.
A passive that vastly decreases the damage difference between building for HP and for ATK in most situations. This is a flat damage value added on and included in CRIT calculations. While this passive turns HP into a valuable offensive stat, ATK% remains the preferred option for damage over HP%. This is true even with the Staff of Homa, though the difference between HP% and ATK% is smaller with Homa than with other weapons.
 Utility Passive | Arcanum of Crystal
Talent Description
Refunds 15% of the ores used when Forging Polearm-type weapons.
Not particularly useful, but nice to have when forging Crescent Pike 🙂
Constellations

"It seems my strength is returning. Not a lot, but enough."
Zhongli is a complete unit at C0, with his Constellations primarily providing more comfort rather than being significant power spikes or unlocking new playstyles.
 Constellation 1 | Rock, the Backbone of Earth
Constellation Description
Increases the maximum number of Stone Steles created by Dominus Lapidis that may exist simultaneously to 2.
Zhongli’s second-most valuable Constellation. C1 makes it easier to maintain uptime for Tenacity of the Millelith (ToM) and Pale Flame (PF)’s passives (from increased Stele tick coverage). It also indirectly buffs Zhongli’s Energy generation, and it increases damage in Hybrid and Microwave teams.
C1 doesn’t increase Zhongli’s Energy generation directly, as the Particle generation cooldown is shared between the two Steles. Despite this, C1 increases the reliability of his Energy generation by increasing Stele AoE coverage (increasing the chances of hitting an enemy) and lowering the chance of all Steles being destroyed by enemies.
 Constellation 2 | Stone, the Cradle of Jade
Constellation Description
Planet Befall grants nearby characters on the field a Jade Shield when it descends.
Zhongli’s most valuable Constellation.
This Constellation simplifies Zhongli’s rotations by summoning a shield on Burst cast, allowing him greater flexibility in adjusting his Steles’ position while maintaining 100% shield uptime. This fixes its main problem at C0—namely, that it can be a DPS loss in many teams. For more information, please refer to the FAQ.
The shield summoned by his Burst will also protect Co-Op teammates, giving Zhongli a rare Co-Op shielding ability.
 Constellation 3 | Jade, Shimmering through Darkness
Constellation Description
Increases the Level of Dominus Lapidis by 3. Maximum upgrade level is 15.
Stronger shields never hurt. Quite the opposite, actually.
 Constellation 4 | Topaz, Unbreakable and Fearless
Constellation Description
Increases Planet Befall's AoE by 20% and increases the duration of Planet Befall's Petrification effect by 2s.
A quality of life upgrade Constellation, albeit a significant one.
 Constellation 5 | Lazuli, Herald of the Order
Constellation Description
Increases the Level of Planet Befall by 3. Maximum upgrade level is 15.
More damage to his stylish Burst, synergistic with C2.
 Constellation 6 | Chrysos, Bounty of Dominator
Constellation Description
When the Jade Shield takes DMG, 40% of that incoming DMG is converted to HP for the current character. A single instance of regeneration cannot exceed 8% of that character's Max HP.
This Constellation is a double-edged sword. In general, it is helpful but redundant, given Zhongli’s frankly excessive shield health. Most of the time it is a quality of life upgrade, but the HP regeneration can be detrimental in Hu Tao teams.
C6 gains more value in scenarios involving damage that bypasses shields such as Corrosion. While the damage from Corrosion does not trigger the healing, the hits that apply Corrosion do activate this Constellation, which provides extra value on top of the strong shield.
FAQ
"We can discuss matters that fall outside of our contract too. After all, I have been on this land for a time, and have come to know a thing or two. Of course, I do hope you can do some things for me as well. That would only be fair."
Why should I use Zhongli if his Shred is weaker than 4pc Viridescent Venerer (VV)? / Why should I slot in Zhongli if he’s generally a DPS loss?
In addition to survivability and interruption resistance, Zhongli's shield provides Universal RES Shred which generally provides 91% of the effective damage per hit as compared to 4pc VV (for hits affected by 4pc VV) in most situations. Unlike 4pc VV, it also requires almost no setup, has potentially better uptime, and applies to multiple elements at once. Sometimes, it is the only option for Shred.
A more detailed answer to this question can be found in the Shield Bot Zhongli section.
Is there a reference for how much HP my Zhongli should have at [this level]?
This sheet provided by 3.14#2780 of ZhongliMains gives an overview of what kind of HP you should expect with various investment levels and builds.
Why not build for Shield Strength?
Shield Strength only applies to the character with the stat. Thus, equipping Zhongli with Retracing Bolide or Vortex Vanquisher for the Shield Strength is a bad idea, because it will only increase the strength of the shield while Zhongli is on-field.
What is Damage Reduction? How does it interact with shields?
A shield will protect the active character from damage they are about to take: instead of deducting from the character’s HP, it deducts from the HP of all shields present simultaneously.
Damage Reduction is applied to hits before a shield’s HP is deducted. This means that the shield will absorb more hits because each hit deals less damage.
For an in-depth look at how shields work, refer to this KQM Theorycrafting Library page.
I heard that Zhongli’s Burst is a DPS loss. Is this true? What are the situations that I should use his Burst in?
Zhongli’s Burst is notorious in the community as a DPS loss, and this is usually true. While its multipliers and AoE seem impressive, it has a staggering 2.33 second animation time. Accounting for this, the multipliers on his Burst are much less exciting. As a result, his Burst is generally not worth using.
However, there are exceptions.
Zhongli’s C2 makes his Burst worthwhile in virtually all scenarios because it grants Zhongli his shield. This allows him to forgo a Hold Skill for the higher damage Burst at the cost of only slightly more field time.
Even without C2, Zhongli’s Burst can be used for damage if there is sufficient downtime in a rotation (e.g. Vaporize Yoimiya rotations with Xingqiu). Zhongli’s Burst can also be a DPS gain in terms of his personal damage when he is built as an on-field DPS (especially with a more Hybrid-leaning orientation) and is using a weapon other than Crescent Pike. However, higher personal damage from using his Burst may be outweighed by lower overall team DPS in teams where Zhongli is acting as a driver. See the Physical DPS Zhongli and Hybrid DPS Zhongli Combos sections for more details.
Apart from these scenarios, players can choose to use his Burst for the comfort provided by its lengthy invincibility frames and Petrify.
Aren’t Hybrid DPS Zhongli and Burst Support Zhongli the same build? How are they different?
In this guide, Burst Support Zhongli refers to a quickswap support build that focuses on using Zhongli’s shield and Burst. Hybrid DPS Zhongli refers to an on-field DPS build that gives relatively equal investment into his Physical and Geo DMG by utilizing all aspects of his Talents.
Playstyle Overview
Zhongli builds can be divided into the following based on the distribution of damage between his Normal Attacks, Skill, and Burst: Shield Bot, Burst Support, Physical DPS, Hybrid DPS, and Geo DPS (Microwave).
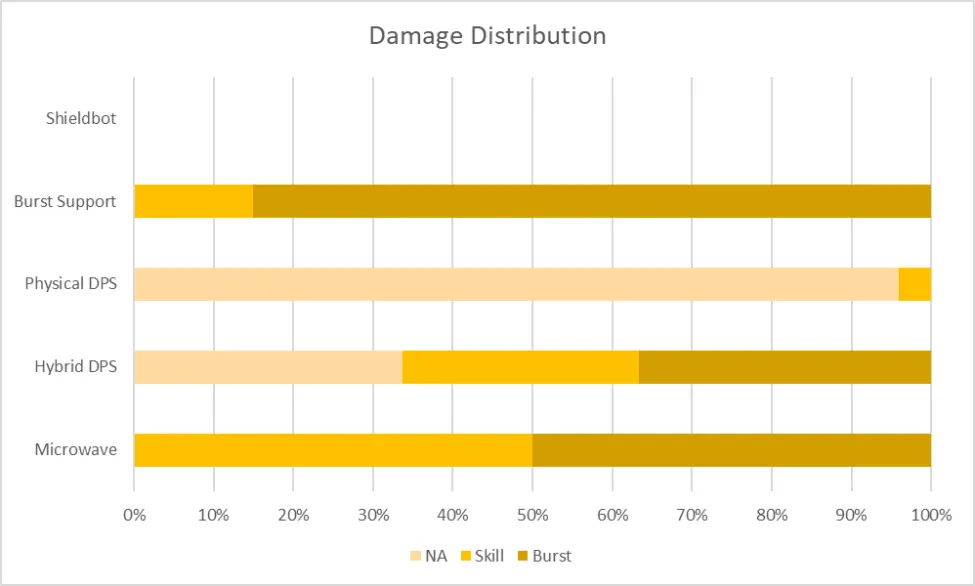
Figures shown are approximates. Values might differ based on playstyle.
Playstyles
Shield Bot

"Solidify."
Shield Bot Zhongli focuses on two things: maximizing Zhongli’s shield’s strength by building HP, and maintaining shield uptime to utilize its Universal RES Shred and other supportive utility.
As a shielder, Zhongli is unmatched. On top of having the strongest shield in the game, it also doesn’t require Energy and can easily be maintained for 100% uptime. This build only requires HP% artifact stats, a 3-Star weapon, and only requires investment into one Talent.
Why Zhongli, and not a more offensively oriented support unit?
As briefly touched upon in the FAQ, Zhongli’s shield provides, in addition to survivability, multiple other types of utility.
Firstly, it provides RES Shred. His Shred reaches further than his talent wording implies. It has an effective radius of about 3 Abyss tiles (similar to the size of Chongyun’s Skill), which is enough for all melee units and a few ranged ones.
Furthermore, while the RES Shred itself is exactly half the value of 4pc Viridescent Venerer (VV), it generally provides 91% of the effective damage per hit as compared to 4pc VV (for hits affected by 4pc VV) in most situations. This is because RES Shred under 0% is only half as effective contributing to 4pc VV Shred’s diminishing returns on damage increase. For a visual representation of this concept, refer to the corresponding charts in the Reference section.
Unlike 4pc VV, Zhongli’s RES Shred has no setup and is universally applicable. His RES Shred only requires a Hold Skill (or Burst at C2), while 4pc VV requires the player to Swirl specific Elements. Moreover, the shield’s Universal RES Shred includes Geo, Anemo and Physical RES Shred—three things that 4pc VV cannot provide. Thus, for units that deal Geo or Anemo (and situationally, Physical) damage, or in teams where 4pc VV Swirl setups are unviable, Zhongli’s shield is a great choice.
Lastly, another reason to choose Zhongli’s shield over a more offensive option is the comfort factor he provides. Interruption Resistance is an underrated aspect of shields which is especially valuable for on-field damage dealers reliant on uninterrupted damage windows. The benefit of Interruption Resistance cannot be readily inferred from damage calculations, as it manifests more obviously in actual gameplay and affects a player’s performance. The shield allows you to perform smoother, uninterrupted rotations that come closer to their maximum calculated potential, and potentially higher than imperfect executions of more complex variants without him.
Pros
- Can easily maintain 100% uptime on shield and RES Shred.
- Easy RES Shred setup (trading in strength of Shred for ease of setup).
- Not reliant on Energy as his shield is not tied to his Elemental Burst.
- Cheap to build.
- Can substitute a healer.
- Provides comfortable gameplay.
- Depending on the situation, Interruption Resistance and ease of setup can increase overall damage.
Cons
- Generally a damage loss due to no personal damage and low utility compared to other off-field/utility units.
- Corrosion and other mechanics can bypass shields.
- If not properly managed, his Stele resonance pulses may interfere with Elemental auras in reaction-dependent teams.
Talent Priority
Elemental Skill. Just the Skill. No Skill issues here.
Elemental Burst and Normal Attacks can be ignored.
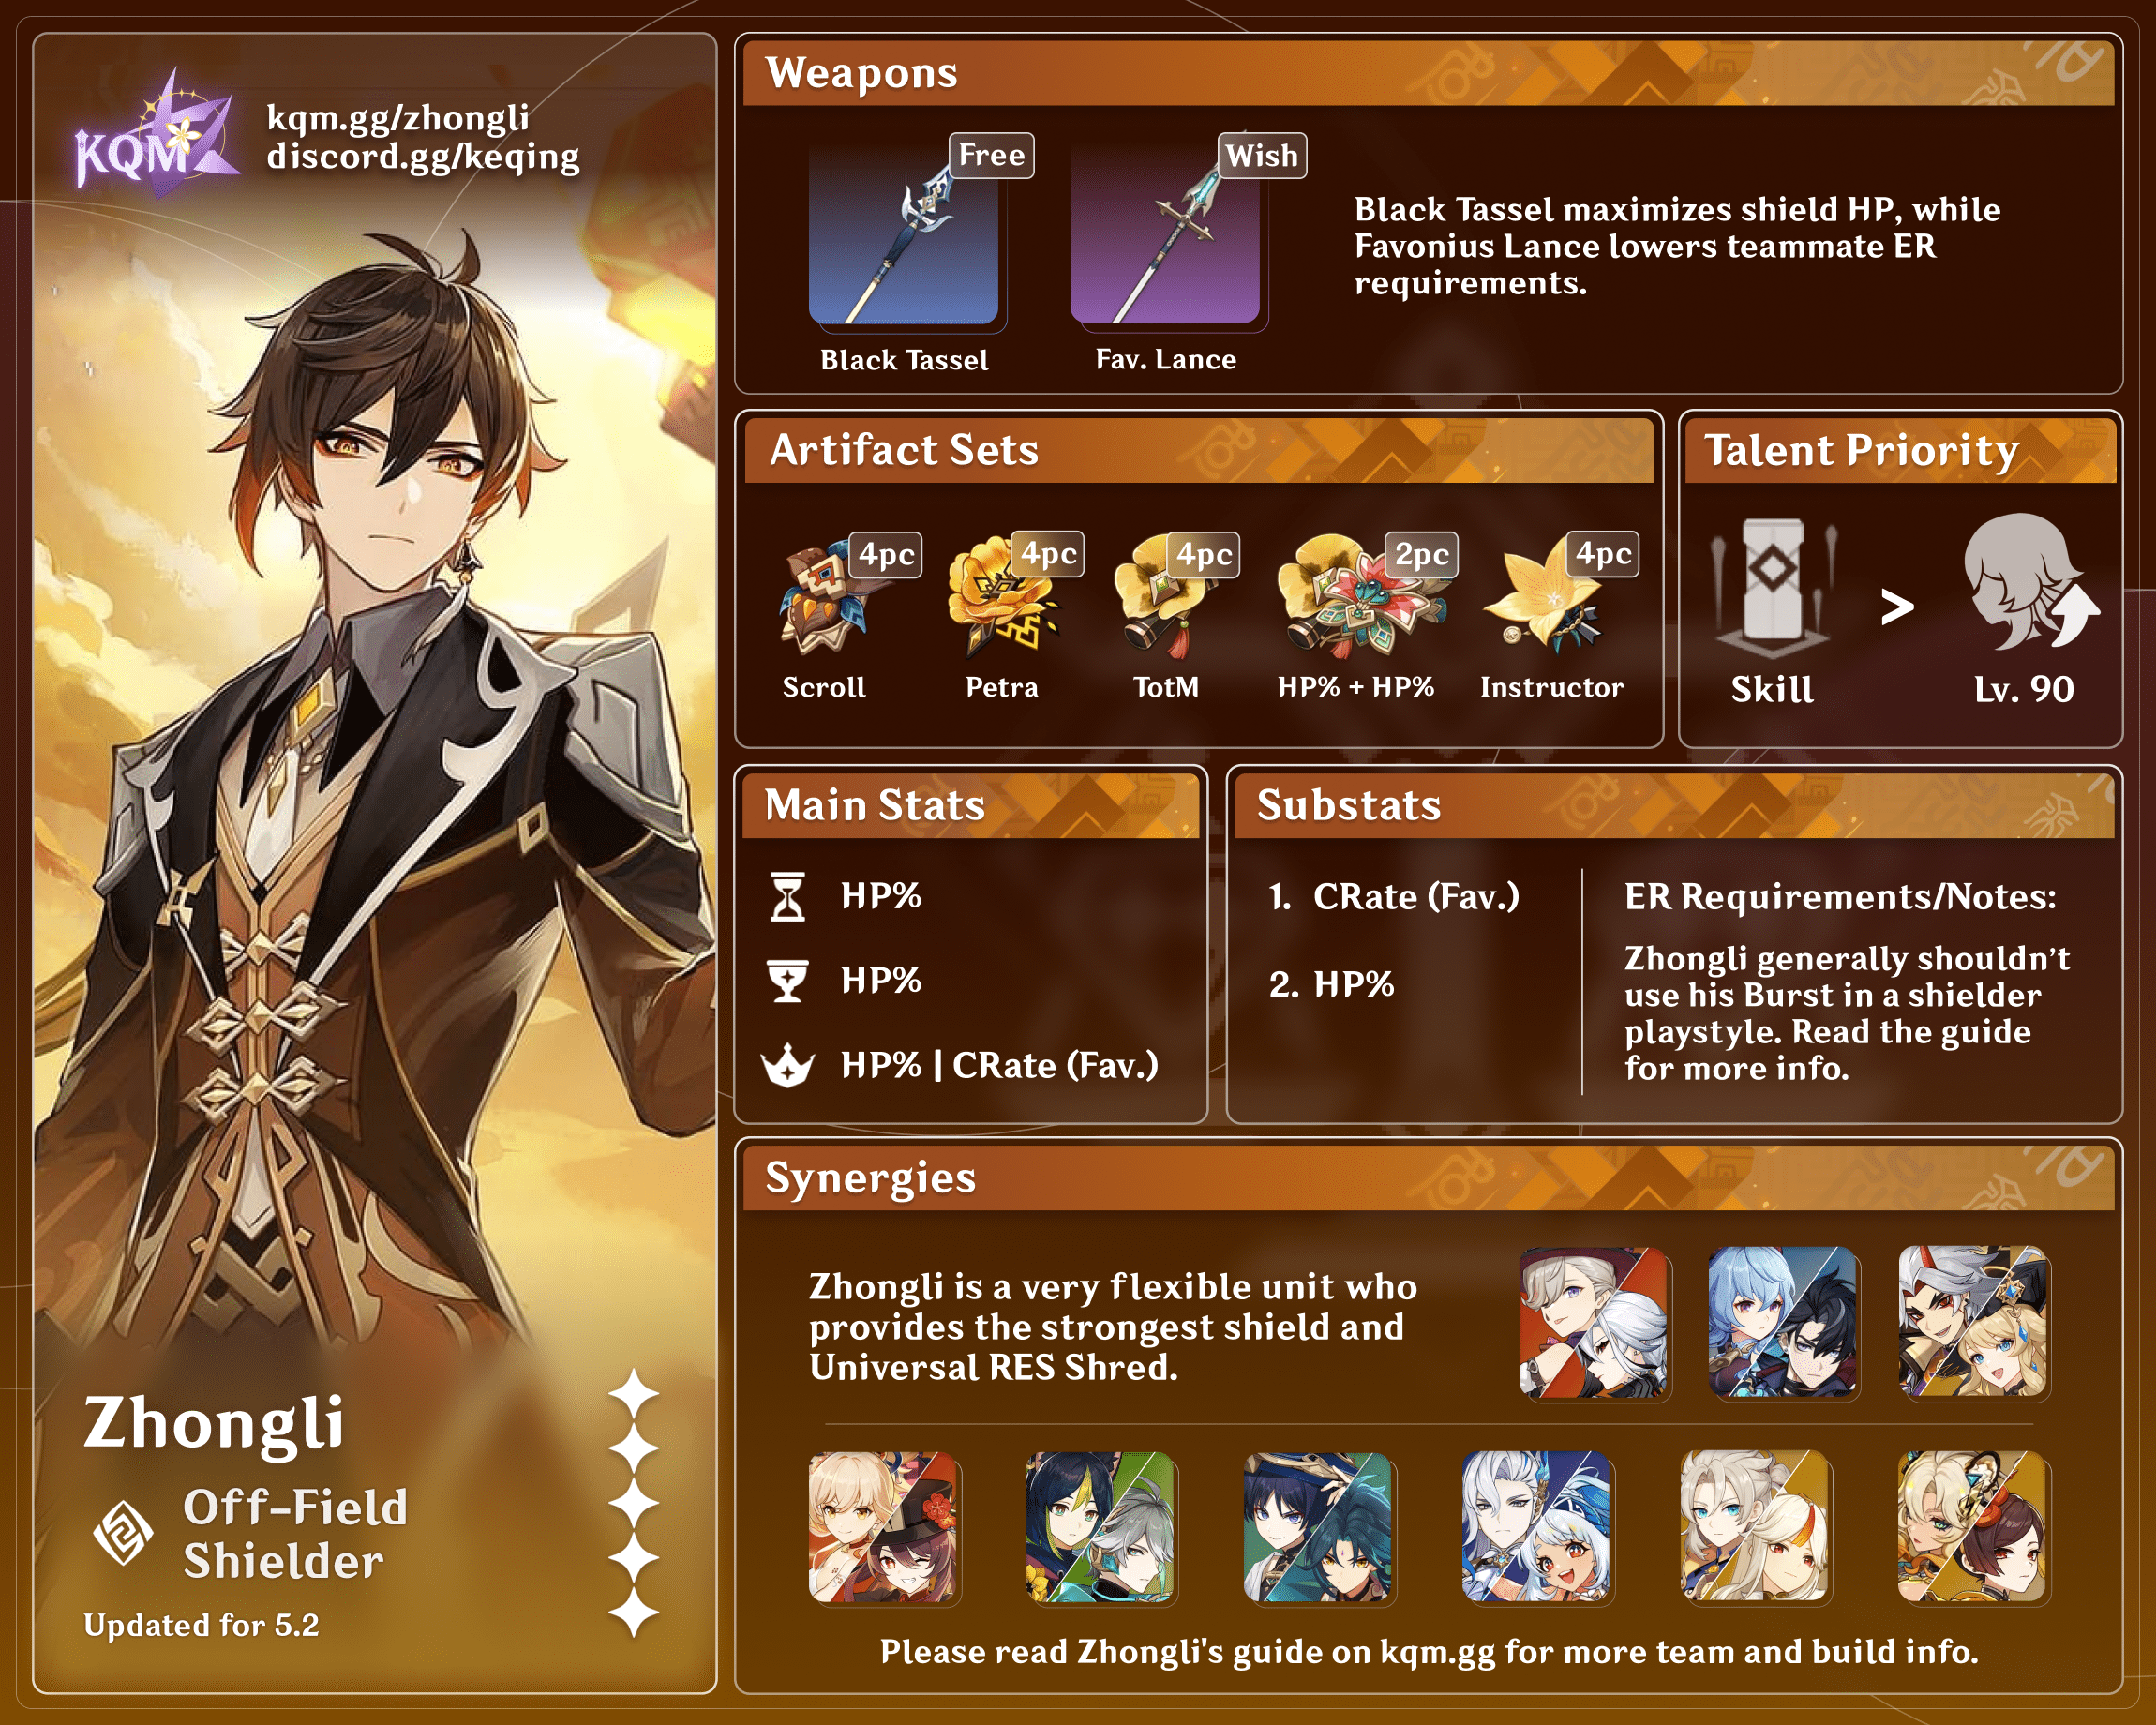
Weapons
Note
Weapons are not listed in order of damage contribution or importance.
| Weapon | Notes |
|---|---|
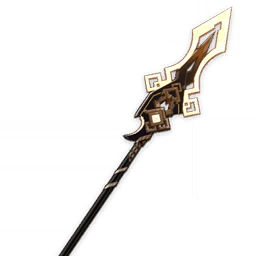
 Black Tassel | The HP% secondary stat gives Zhongli more HP, resulting in a stronger shield. |
 Favonius Lance | Favonius Lance can provide clear Particles for the team, increasing Zhongli’s utility. However, its passive doesn’t work off-field and it also requires players to build CRIT Rate for the passive to proc. The passive becomes more reliable at higher refinements. The ER substat also allows C2 Zhongli to Burst more frequently, dealing more damage than refreshing his shield via his Hold Skill. |
Artifacts
Mainstats

|

|

|
|
Sands
HP%
|
Goblet
HP%
|
Sands
HP%
CRIT Rate% (w/ Fav Lance) |
Substats Priority
HP%/Flat HP > CritRate% (If using Favonious Lance)
Artifact Sets
Note: artifact sets are not listed in order of damage contribution or importance.
| Artifact Set | Notes |
|---|---|
 Rainbow | Any random artifacts with HP% main and substats are good enough for Shield Bot Zhongli, as he doesn’t rely on set effects for a beefy shield. |
 2pc/4pc Tenacity of the Millelith | The 2pc set provides 20% HP for a stronger shield. Monke together strong. The 4pc set provides a general 20% ATK buff for teammates when its passive can be procced. The 4pc set may not be ideal for players who have trouble maintaining his Stele’s longevity, have trouble fighting near or around his pillar, or are using teams that require fine management of Reactions (the resonance can interfere with Elemental auras). All of the above can prevent the 4pc passive from being triggered consistently. However, even in those situations, a snapshotting unit can still take advantage of the 4pc set bonus’ buff by casting their snapshotting Skill immediately after Zhongli’s Hold Skill. Problems in maintaining its uptime can be negated with C1. |
 4pc Instructor | This is a niche set that only benefits specific teams and requires unintuitive or complicated rotations. However, in those scenarios, the buff provided can outweigh the disadvantages of 4-Star attribute scaling to Zhongli. |
 4pc Archaic Petra (AP) | Provides a 35% DMG Bonus to the Element of the Crystallize Shard picked up by its holder. Its setups are somewhat difficult to perform: Zhongli has to personally pick up Shards and only the most recent Element picked up provides a buff. However, this set still provides great value to teams that can utilize its effect. |
 4pc Deepwood Memories | Zhongli is a good candidate for holding this set in teams that deal damage through Dendro abilities and Spread, Bloom, Hyperbloom or Burgeon reactions. If his pillar is managed well, it is possible to get full uptime on the 4pc passive. However, if the player cannot maintain the pillar hitting enemies, it may be prudent to arrange rotations to take better advantage of the 8 second duration on the 4pc debuff. |
Team Comps and Synergies

Shield Bot Zhongli is a generally viable universal flex slot and can be slotted into any team that may appreciate a shielder, Interruption Resistance, and RES shred.
Below are some units and teams he works well with:
| Unit | Description |
|---|---|
 Hu Tao | While pairing Hu Tao with Zhongli may result in a lower damage ceiling than pairing her with certain other units, Zhongli does make Hu Tao much easier to play. This is invaluable due to her HP drain and high mechanical requirements. His setups are also a lot faster and easier to execute than VV setups. It should be noted that Zhongli's Stele resonance hits can interfere with Vaporizing Hu Tao's attacks by reacting with the Hydro aura on enemies. This is particularly problematic with weaker Hydro appliers such as Yelan pre-C2, or in conjunction with other units like Albedo, who also reacts with the Hydro aura. However, the issue can be alleviated by casting his pillar away from enemies or intentionally breaking it (e.g. by casting it directly on top of Albedo’s flower or other Geo Constructs), by using Electro application from units such as Fischl, or by using Xingqiu and Yelan together. See the Hu Tao Guide for more info. |
 Xiao | Zhongli’s beefy shield protects Xiao from being interrupted mid-air so he can take full advantage of his Burst uptime. Additionally, Zhongli's shield allows Xiao to run a team without healers, even with Xiao's HP drain mechanic. Zhongli’s shield also provides rare Anemo RES Shred, with the only other sources of said Shred being C6 Anemo MC, C2 and C6 Venti, and C4 Jean. See the Xiao Guide for more info. |
 Yoimiya | Yoimiya can output strong ranged damage during her Elemental Skill uptime. However, she suffers significantly if her Normal Attack string is interrupted as much of her damage is locked behind her N3 and N5 (especially in Vape teams, as she can only consistently Vape N3 and N5 if she is not interrupted). Thus, Zhongli’s strong shield is invaluable and their mutual synergy with Yun Jin only serves to bolster his role. See the Yoimiya Guide for more info. |
 Ganyu Ganyu | Reverse Melt Ganyu requires considerable time to fully charge and fire her Frostflake Arrows. During this time, she cannot dodge without having to reset her charge time and wasting valuable Pyro application uptime, which makes shielding invaluable for her to consistently output high damage. In this case, Zhongli’s shield is unmatched, both in durability, uptime, and utility via its RES Shred. See the Ganyu Guide for more info. |
  Itto/Ningguang Itto/Ningguang | Itto and Ningguang are on-field Geo DPS units that appreciate Zhongli on their teams. Other than providing a shield for Geo Resonance, Zhongli is the only character who can shred Geo RES, further increasing their damage. Itto’s Ushi and Ningguang’s Jade Screen can also resonate with Zhongli’s Stele, providing additional damage. See the Itto Guide and Ningguang Guide for more info. |

Mostly run with Albedo. This pair provides certain teams with a lot of comfort, providing buffs in the form of Geo Resonance, shield and RES Shred from Zhongli, while Albedo provides strong off-field damage. Notably, Double Geo works well in Hu Tao and Xiao teams, because Hu Tao and Xiao only really require one other unit to perform—Xingqiu for Hu Tao and an Anemo Battery for Xiao—making it easy to slot in the “Geo Bros."
Zhongli can also be paired with Yun Jin in Yoimiya teams and as a side-grade to Albedo in Hu Tao teams. Similarly, Xiao teams can also run Geo Traveler alongside Zhongli, whose Burst can provide CRIT Rate through his C1 and can prevent bosses like Maguu Kenki from dashing away.


Burst Support
"天动万象!"
While Burst Support Zhongli is widely seen as a meme in the community due to his low DPS (and rightfully so, as C0 Zhongli does not perform well in this role), there are exceptions. It is recommended to use his Burst in teams where there is sufficient downtime to accommodate his Burst. Furthermore, at C2 or above, or if players have high investment into Zhongli, this build can actually be a superior offshoot of the previous Shield Bot build. When these conditions are met, his Burst damage can become fairly significant. This build becomes especially strong in teams that can have the time to accommodate his Burst animation.
Note
The Burst Support build is sometimes referred to in the community as a “Hybrid” build. This guide uses “Hybrid” to instead refer to Hybrid DPS Zhongli.
Pros
- Brings a form of extra AoE damage to the team in situations that can accommodate its use.
- Still able to provide utility in the form of shielding and Shred.
Cons
- Generally requires C2 to be on par with other options.
- Generating Energy to recharge his Burst may be harder in Reaction-dependent teams that disfavor letting Stele resonance pulses hit enemies.
Disclaimer
Zhongli’s damage in this build is still not a large portion of team damage, so investment into him is lower priority than investment into the actual DPS units in the team.
Talent Priority
>
Elemental Burst > Elemental Skill
Normal Attacks can be ignored.
Weapons
Assumptions
ATK%/Geo DMG%/CRIT%, 2pc Petra 2pc NO, 132% ER, 2 alternating rotations, one using Hold Skill and the other using Burst. Primary target, 3 Stele resonance hits. KQM Standards.
| Weapon | % ofR1 Wavebreaker's Fin | Conditions and Notes |
|---|---|---|
 Staff of Homa R1 (>50%) | 119.6% | Calculated above 50% HP. Homa caters to all of Zhongli’s desired stats for this playstyle. It has no requirements for the rotation, makes building him easier, and directly increases all of Zhongli’s damage. Additionally, the HP to ATK conversion further minimizes the damage difference between HP and ATK stats on Zhongli. |
 Wavebreaker’s Fin R5 | 110.2% | Calculated with 240 overall team Energy. It has a great passive for Burst damage. |
 Calamity Queller | 106.7% | Calculated at 3 stacks. At 0 stacks, it performs similarly to Primordial Jade Winged-Spear. |
 “The Catch” R5 | 104.1% | Very accessible 4-Star option that increases Burst damage. Its performance relative to non-ER weapons is increased at higher ER requirements, such as when Bursting every rotation. “The Catch” R5 specifically overtakes Wavebreaker’s Fin R5 at around 140-150% ER. However, this is a highly-contested weapon and would be better served on a unit such as Raiden or Xiangling. |
 Deathmatch R1 | 104.1% | Calculated with less than 2 enemies. Provides a significant amount of CRIT Rate. |
 Primordial Jade Winged-Spear R1 (PJWS) | 103.5% | Calculated with 1 stack. It is unrealistic to obtain more than 1 stack in most situations, resulting in its underwhelming performance. |
 Vortex Vanquisher R1 | 101.8% | Calculated with a shield and 1 stack. It has a stacking mechanic similar to PJWS. Zhongli can make good use of the shield-reliant passive, but like PJWS, it is unrealistic to obtain more than 1 stack in most situations. |
 Skyward Spine R1 | 101.4% | This unpopular weapon performs surprisingly well. It may be a better choice than its ranking indicates since it makes use of a fairly underutilized Polearm, potentially freeing up a better Polearm for someone else. Like “The Catch”, it has somewhat better performance relative to non-ER weapons at higher ER requirements. |
Wavebreaker’s Fin R1 | 100% | Calculated with 240 overall team Energy. |
 Lithic Spear R1 | 98.2% | Calculated with 2 stacks. Depending on Zhongli’s teammates, this can be an excellent option. Preferably played with at least one other Liyue teammate. Scales well with stacks and refines. |
 Engulfing Lightning R1 | 97.9% | Useful ER substat and passive, but better utilized on other Polearm units like Xiangling or Raiden. Like “The Catch”, it has somewhat better performance relative to non-ER weapons at higher ER requirements. |
 Blackcliff Pole R1 | 96.1% | Calculated with no stacks, since it is difficult to maintain stacks on Blackcliff weapons. Not worth purchasing this weapon with Starglitter to play this Zhongli build. |
Favonius Lance R1-R5 | 89.7% | Favonius Lance doesn’t directly buff Zhongli’s damage, but it lets Zhongli and his teammates get their Bursts back faster through its passive. The passive becomes more reliable at higher refinements. Like “The Catch”, it has somewhat better performance relative to non-ER weapons at higher ER requirements. |
Artifacts
ER Requirements
Zhongli requires his Stele pulses to hit enemies to generate Energy. As such, ER requirements will fluctuate depending on how many times his Stele resonance is able to hit enemies.
| Situation | ER Requirement |
|---|---|
| Burst every other rotation | Solo Geo & Dual Geo: 100 -110% ER |
| Burst every rotation | Solo Geo: 175 - 220% ER Dual Geo: 120 - 140% ER |
Mainstats
|
|
|
|
|
Sands
ATK% / HP%
|
Goblet
Geo DMG%
|
Sands
CRIT Rate% /
CRIT DMG% |
ATK% Sands or HP% Sands?
Zhongli’s Ascension 4 Passive allows ATK% Sands and HP% Sands to perform similarly. Players may choose to use an HP% Sands instead of an ATK% Sands for a stronger shield. Substats can be a determining factor—a well-rolled HP% Sands can perform better than a poorly-rolled ATK% Sands and vice versa.
Substats Priority
ER% > Crit%/Atk%/HP%
Artifact Sets
Assumptions
R5 “The Catch”, 132% ER, 2 alternating rotations, one using Hold Skill and the other using Burst. Primary target, 3 Stele resonance hits. KQMC.
| Artifact Set | Notes |
|---|---|
 4pc Noblesse Oblige (NO) | Zhongli is an excellent holder of 4pc Noblesse since he usually starts rotations with his Burst. He personally benefits from the 20% ATK buff as his Burst is dynamic, in addition to providing a valuable ATK% buff to his teammates. |
 4pc Emblem of Severed Fate (EoSF) | 4pc EoSF pulls ahead of the other sets for Zhongli's personal damage in situations when Zhongli builds higher ER, such as when he bursts every rotation. However, 4pc EoSF with good offensive substats is a highly contested set and may serve better on another unit. If you already have a good 2pc + 2pc set as below, we do not recommend farming 4pc EoSF specifically for Zhongli. |
4pc Archaic Petra (AP) | Provides a 35% DMG bonus to the Element of the Crystallize Shard picked up by its holder. Its setups are somewhat difficult to perform: Zhongli has to personally pick up Shards and only the most recent Element picked up provides a buff. However, this set still provides great value to teams that can utilize its effect. |
 Mix of 2pc sets NO, EoSF, ATK%, AP | Any combination of 2pc Noblesse Oblige, 2pc ATK sets, and 2pc Archaic Petra will perform fairly similarly to one another and will depend on the substats of each piece. In cases when Zhongli needs to build some Energy Recharge, pairing 2pc EoSF with any of these other sets is also a good option. The best-performing set on Zhongli if building him as a Burst DPS unit will heavily depend on his Energy Recharge requirement and the buffs used in the team. Thus, we recommend using the Genshin Optimizer to determine the best build with the artifacts that you own. |
Team Comps and Synergies
This build shares the same team comps with Shield Bot Zhongli.
Physical DPS
"Emergency countermeasures aren't my thing."
Physical DPS Zhongli (Physli) is an unorthodox build where Zhongli is primarily used on-field to deal Physical DMG. It is also known in the community as Pikeli, a name derived from the best weapon for this build—Crescent Pike. Physical DPS Zhongli’s teams vary greatly: some use him as a driver for strong off-field units, while others focus on maximizing his own personal damage.
Pros
- Has synergies with good off-field units.
- Great F2P weapon option.
- Shield provides innate Interruption Resistance and survivability.
- You can make use of his fast, sexy NA string.
- His spear kick is very sexy, please understand.
Cons
- Underwhelming personal damage.
- Vulnerable to corrosion, like all Zhongli builds.
- Primarily single-target damage.
Why is Zhongli a good driver?
Zhongli’s fast Normal Attacks can easily and frequently proc off-field abilities, such as Fischl’s C6, Xingqiu’s Sword Rain attacks, Yelan’s Exquisite Throws or Beidou’s Stormbreaker lightning discharges. This sheet shows how many procs of Beidou’s Burst various characters can trigger. Zhongli’s most recommended combo string, N5D, easily procs her Burst 11-12 times, an impressive feat given that 12 procs is the current realistic ceiling for Beidou’s Burst in-game.
Team Building: Adjusting damage focus for overall DPS
A key feature of Physli is flexibility—he has many different teams and synergizes with a multitude of supports. With this comes the ability to either run teams where he sacrifices his own damage to act as a driver for powerful teammates, or to run teams that boost his personal damage.
For example, Zhongli can act as a driver for Beidou in multi-target situations, where Beidou shines. Conversely, in scenarios that call for more single-target damage, Beidou can be swapped for Yun Jin.
Talent Priority
≥ >
Normal Attack ≥ Elemental Skill > Elemental Burst
Focus on Zhongli’s Normal Attack Talent. His Elemental Skill shouldn’t be ignored as his shield tends to be the sole, stable source of RES Shred. Thus, its uptime directly affects the team’s damage output. Physli generally does not use his Burst for damage.
Combos
When in combat, prioritize establishing a shield and a Stele. Afterwards, place all turrets and constructs, activate all off-field damage abilities, then use Zhongli on-field to attack while waiting for cooldowns.
Bursting is typically a DPS loss for Physli's personal damage in single-target situations, though it can be a DPS gain in multi-target. It is also typically an overall team DPS loss if he Bursts while acting as the driver for off-field DPS units. However, using his Burst is acceptable if players need its crowd control or its Elemental Gauge application for shield breaking, if they come across downtime in their rotations, or if Zhongli is C2.
Notations
N# – Number of Normal Attacks Perfomed
CA – Charged Attack
J – Jump
D – Dash
P – Plunge
N5D is the recommended combo, as it is very fast and drives off-field units very well.
N5J is a variant where the string is canceled by a jump instead of a dash. This variant can save Stamina to be used for CAs instead.
Since N5 hits multiple times, it can proc Crescent Pike’s passive on every time.
When canceled (by either a dash or a jump), the N5’s multi-hit kick animation and damage instances still go through, letting players squeeze in more combos while stunning smaller enemies and allowing you time to reposition.
Zhongli’s CA is a flexible tool with decent damage and utility to reposition oneself. It can be easily canceled early or late into the animation depending on situational need, giving the player incredible versatility.
Example Videos
A little trickier to pull off and dependent on enemy type, but when done right, this combo sends the enemy flying at the end, causing fall damage.
Some enemies that this works on include Abyss Mages, Cicin Mages, Samachurls and Treasure Hoarders.
Like the above, this combo is tricky to perform and only works on certain enemies. However, it can be used as a dodging tool and can also make use of Zhongli’s plunge.
A trick to performing this combo is to not press on any of the directional buttons while performing his NA string, before dash canceling into a jump. This helps keep the center alignment.
While it is entirely possible to perform only the Dash -> Jump -> Plunge without prior N5, the lack of N5 to ensure your character is aligned correctly makes this even trickier to execute.
Extras
Weapons
Assumptions
ATK%/Physical DMG%/CRIT%. 2pc Bloodstained + 2pc Pale Flame, KQM Standards.
Unbuffed
6N5D unbuffed, 1 Hold Skill, 7 Stone Stele resonance hits, no constructs.
Buffed
Buffs assume C5 Yun Jin with Husk of Opulent Dreams DEF%/DEF%/DEF% and T12 Burst.
3N5D buffed, 1N5D unbuffed, 1N5D semi-buffed (buffs run out during combo), 1 Hold Skill, 7 Stone Stele resonance hits.
Disclaimer
Weapons not mentioned in the table are not worth using.
| Weapon | % of R1 Crescent Pike (Unbuffed) | % of R1 Crescent Pike (Yun Jin Buffed) | Notes |
|---|---|---|---|
 Crescent Pike R5 | 122.83% | 110.14% | Zhongli’s fast Normal Attacks and multi-hits allow him to utilize Crescent Pike’s passive exceptionally well. Note that its procs are not considered Normal Attack DMG and are thus not buffed by Normal DMG bonus, though they are buffed by Physical DMG bonus and general DMG bonuses like Geo Resonance. |
Crescent Pike R1 | 100% | 100% | |
Staff of Homa (>50% HP) | 96.30% | 103.29% | Calculated above 50% HP. Homa caters to all of Zhongli’s desired stats for this playstyle. It has no requirements for the rotation, makes building him easier, and directly increases all of Zhongli’s damage. Additionally, the HP to ATK conversion further minimizes the damage difference between HP and ATK stats on Zhongli. |
Primordial Jade Winged-Spear R1 | 91.93% | 95.61% | It has a high Base Attack and CRIT Rate substat. Zhongli can easily obtain stacks while performing his Normal Attack combo. |
Calamity Queller R1 | 90.59% | 89.46% | Calculated at max stacks. Calamity Queller provides a hefty amount of ATK but very little else. |
Vortex Vanquisher R1 | 87.55% | 92.48% | Calculated with a shield as Zhongli can fully utilize the shield-related passive. Its stacking mechanics are similar to PJWS. |
Deathmatch R1 | 86.67% | 101.33% | Calculated with less than 2 enemies. Provides a significant amount of CRIT Rate. |
 White Tassel R5 | 83.83% | 105.28% | It can be obtained from chests in Liyue. While its Base Attack is low, its CRIT Rate substat along with the Normal Attack DMG Bonus passive is excellent. Yun Jin’s Bonus Flat DMG alleviates the problem of low Base Attack by placing more emphasis on non-ATK stats, causing White Tassel to become one of Physical Zhongli’s best weapons with her. |
Blackcliff Pole R1 | 77.83% | 92.81% | Calculated with no stacks since stacks are both situational and difficult to maintain. Not worth purchasing this weapon with Starglitter. |
Favonius Lance | 62.16% | 76.04% | Significantly worse than other options for Zhongli’s personal damage, but the Particles from the passive can help battery off-field damage dealers with Zhongli as a driver, lowering their ER requirements and potentially leading to higher overall team damage. Its value goes up significantly with refines, with R5 being able to provide Particles every 6 seconds. |
Artifacts
Mainstats
|
|
|
|
|
Sands
ATK%
|
Goblet
Physical DMG%
|
Sands
CRIT Rate% /
CRIT DMG% |
ATK% Sands or HP% Sands?
It is heavily recommended for players to run ATK% sands instead of HP% Sands for Physical Zhongli, as the procs from Crescent Pike contribute a significant amount of damage and aren't affected by Zhongli's Ascension 4 Passive.
Players who are struggling to stay alive can use HP% Sands for more comfort. However, it must be understood that HP% Sands will perform significantly worse compared to ATK% Sands.
We recommend using Genshin Optimizer for specific artifact comparisons.
Substats Priority
Crit% > Atk% > Flat ATK/HP%
Artifact Sets
All the artifact sets listed below are competitive and their actual relative performance will depend largely on the substats on each piece. The rankings are similar even if players are not using Crescent Pike or if Yun Jin is buffing Zhongli.
Assumptions
R1 Crescent Pike, ATK%/Physical DMG%/CRIT%. 4N5D (shielded) and 2N5D (unshielded), 1 Hold Skill, 7 Stone Stele resonance hits. KQM Standards.
| Artifact Set | % of 2 PF + 2 BSC | Notes |
|---|---|---|
 4pc Pale Flame | 106.13% (90.65% without passive) | Calculated assuming 100% uptime. It is difficult to achieve 100% uptime because enemies may leave pillar range or break the pillar. If the passive cannot be triggered, this set loses a lot of value compared to the other sets. However, when the conditions are fulfilled, this is Physli’s best set. More reliable with C1. |
 2pc Pale Flame + 2pc BSC | 100% | Similar to 4pc PF but without the additional 18% ATK. Unlike 4pc PF, this set is not conditional and can be situationally better because of the aforementioned difficulty in maintaining uptime on 4pc PF’s set bonus. |
 4pc Gladiator's Finale (Glad) | 98.24% | Buffs Normal Attacks. It can be farmed naturally through game progression and can be obtained through the Strongbox. Crucially, however, it doesn’t buff Crescent Pike procs, and can be anti-synergistic with some combos involving CAs or footstooling (Plunging Attacks). |
 2pc PF/BSC + 2pc ATK% | 96.73% | A combination of the Physical Sets (Pale Flame/Bloodstained Chivalry) and ATK% Sets. Performance depends on substats. |
 2pc Phys%/2pc ToM/2pc ATK% | 89.25% - 93.43% | A combination of various 2pc sets. Performance depends on substats. |
 4pc Shimenawa's Reminiscence (SR) | 89.36% | Suffers from low uptime when Zhongli’s Hold Skill is used at the start of a rotation. Calculations assume only 1 N5D gets buffed by 4pc set bonus. |
 4pc Retracing Bolide | 88.87% | Increases Normal Attack and Charged Attack damage by 40% when shielded. While good on paper, this set is still conditional as there is always a chance that shields will break or expire. Notably, it also doesn’t buff Crescent Pike procs. On par with 2pc Physical 2pc ATK% sets in comps where it has 100% uptime. |
4pc Tenacity of the Millelith | 87.86% | 4pc Tenacity might not buff Zhongli’s personal damage much, but it provides Zhongli’s teammates with a valuable 20% ATK buff and therefore can be considered when running strong ATK-scaling off-field DPS units in the team. This set also increases shield strength, adding more comfort. However, the 4pc effect is conditional since enemies need to be hit by Zhongli’s pillar. As with 4pc PF, it is easier to maintain uptime at C1. |
Rainbow | 81.31% | Rainbow sets are recommended when they can provide better stats than pieces with set bonuses. |
 4pc Echoes of an Offering | 110.7% | Calculated assuming 3 Echoes procs per N5. 4pc Echoes has a promising passive for Physical DPS Zhongli. Similar to Yun Jin's DMG Bonus, 4pc Echoes can narrow the damage gap between most weapons and Crescent Pike to some extent, though Crescent Pike still generally pulls ahead by a considerable margin (especially at higher refinements). See this sheet for reference. However, 4pc Echoes is difficult to outright recommend because of two problems: First, in-game testing has shown possible correlations between the proc rate of the 4pc set bonus and both player ping and FPS. Based on the limited data collected, there is some indication that Zhongli may actually tend to proc Echoes more often at higher ping, which contrasts to the trend seen with other characters like Ayato. There is also some limited indication that Zhongli may proc Echoes less often at lower FPS settings. Accordingly, the 4pc set's performance may vary significantly from user to user. Second, 4pc Echoes lacks the flexibility of some of Zhongli’s other artifact set options. This is because it does not provide DMG%, causing its relative performance to drop significantly with Yun Jin and/or Crescent Pike. With Yun Jin, 2pc BSC/PF or 4pc PF remains the superior option. Echoes calculations by Valorha#6262 |
Teams

The strong core of Beidou, Fischl and Xingqiu/Yelan paired with Zhongli. Zhongli drives 3 powerful off-field units’ Bursts (and if available, Fischl’s C6). Zhongli retains excellent shield uptime despite not being built as a Shield Bot thanks to the Damage Reduction provided by Beidou (and possibly Xingqiu). Overall a strong and very comfy team for Physli.
Examples by Xreejan#1180

Yun Jin is a great teammate for Zhongli thanks to her Normal Attack buffs. We recommend a Cryo and Electro unit to enable Superconduct. Alternatively, strong off-field damage dealers (like Xingqiu and/or Yelan) are also welcome for overall team damage.
Pikeli Yunjin Fischl Rosaria Rotation by mina#4448
Flex Options
| Unit | Pros | Cons |
|---|---|---|
Kaeya | - Provides Cryo for Superconduct while contributing significant personal damage. - Free unit available to everyone. - His Burst follows the active character, unlike Rosaria. | |
Rosaria | - Provides Cryo for Superconduct while contributing significant personal damage. - Provides a CRIT Rate buff. - Her C6 further shreds Physical RES. | - Her Burst is stationary. |
| Unit | Pros | Cons |
|---|---|---|
Fischl | - Off-field single-target damage, and Zhongli can proc her C6. - Constantly generates Particles for Crescent Pike procs. - Doesn’t take a lot of field time. | - Single-target oriented. |
Yae Miko | - Off-field damage that has a high ceiling with Constellations. - Constantly generates Particles for Crescent Pike procs. - Does not need to use Burst. | - Needs relatively high field-time to deploy her Skill. |
| Unit | Pros | Cons |
|---|---|---|
Bennett | - Bennett provides a huge attack buff that benefits not only Zhongli, but the rest of the team as well. - Provides healing. | - Need to play within a circle to maximize buff uptime. |
| Unit | Pros | Cons |
|---|---|---|
Yelan | - Off-field Hydro damage. - Provides a ramping DMG% buff that benefits all of Zhongli’s kit. | - Single-target oriented. |
Xingqiu | - Off-field Hydro damage. - Damage Reduction for a stronger Zhongli shield. | - Single-target oriented. |
Hybrid DPS
"Ha, this is getting interesting."
Hybrid DPS Zhongli (Hybridli) is an offshoot of Physical DPS Zhongli. Notably, Hybridli is not superior to Pikeli—it’s just a fairly equivalent variant. In practice, their playstyles are quite similar, with comparable stat optimizations, weapon and artifact set recommendations, as well as identical attack string combos.
The one major distinction between these builds comes from Hybridli utilizing both his Physical and Geo damage, spreading his damage distribution equally across his kit. In contrast, Pikeli focuses solely on his Normal Attacks and Physical DMG. Hybridli is built with a Geo Goblet, and usually runs with another Geo unit for construct(s) and Geo Resonance. This means that unlike Pikeli, Hybridli will intentionally play around his Stele resonance and use his Burst consciously, as both abilities contribute to his overall DPS.
Note
This section discusses an on-field Hybrid DPS build. For the quickswap support build using his shield and Burst (which is sometimes referred to as “hybrid Zhongli” in the community), see the Burst Support section.
Pros
- Like Physical DPS Zhongli, Hybridli has a flexible choice of teammates and synergies with good off-field units.
- Utilizing the Geo parts of his kit allows Zhongli to deal AoE damage.
- Great synergy with his Ascension stat and Constellations.
- You can still make use of his fast, sexy NA string.
- You can also make use of his sexy Burst, double win.
Cons
- Underwhelming personal damage.
- Vulnerable to corrosion, like all Zhongli’s builds.
- Requires more investment than other builds as all parts of his kit are utilized.
Talent Priority
= =
Normal Attack = Elemental Skill = Elemental Burst
Players should invest equally in all his Talents, as Hybridli makes use of all three Talents to contribute to the team.
Combos
Hybridli plays similarly to Pikeli, and thus shares similar combos. Players begin with his Hold Skill creating a shield and a Stele, placing constructs on the field, activating all off-field damage abilities, then using Zhongli on-field to attack while waiting for cooldowns.
The main distinction from Pikeli is that both his Stele resonance and Burst contribute to his personal damage.
Players should position enemies near constructs to maximize Stele resonance procs. Maintaining Stele uptime may require recasting if it gets broken, or using a Tap Skill to reposition it if enemies leave its effective radius. In rotations where the pillar does not get broken before it naturally expires, his Tap Skill may be used to refresh the pillar's duration. Zhongli’s Hold Skill will not refresh an existing Stele's duration.
Players are also recommended to use his Burst, even at C0.
Note that Bursting on Hybridli may still be an overall team DPS loss if he Bursts while acting as a driver because it causes him to trigger off-field abilities less, so using Burst outside of driving windows is recommended. Bursting may also be less advantageous for Hybridli’s personal damage when using Crescent Pike at high refinements, since higher refinements more strongly favor using Normal Attacks.
Weapons
Assumptions
4pc Pale Flame, ATK%/Geo DMG%/CRIT%, 125% ER minimum, Geo Resonance. 1 Hold Skill, 3 N5D (shielded), 11 Stone Stele resonance hits (shielded), and 1 Burst (shielded). KQM Standards.
Disclaimer
Weapons not mentioned in the table are not worth using.
| Weapon | % of R1 Crescent Pike | Notes |
|---|---|---|
Staff of Homa R1 (>50% HP) | 118.3% | Calculated above 50% HP. Homa caters to all of Zhongli’s desired stats for this playstyle. It has no requirements for the rotation, makes building him easier, and directly increases all of Zhongli’s damage. Additionally, the HP to ATK conversion further minimizes the damage difference between HP and ATK stats on Zhongli. |
Primordial Jade Winged-Spear R1 | 112.3% | Calculated with dynamic stacks. As rotation begins with Hold Skill, the Stele doesn’t snapshot the stacks. Zhongli can easily obtain stacks while performing his attacks. |
Crescent Pike R5 | 111.5% | Zhongli’s fast Normal Attacks and multi-hits allow him to utilize Crescent Pike’s passive exceptionally well. Note that its procs are not considered Normal Attack DMG and are thus not buffed by Normal DMG bonus, though they are buffed by Physical DMG bonus and general DMG bonuses like Geo Resonance. |
Calamity Queller R1 | 106.7% | Calculated with max stacks on his Normal Attack string and Burst. As rotation begins with Hold Skill, the Stele does not snapshot the stacks. Calamity Queller provides a hefty amount of ATK and synergizes well with typical Zhongli rotations which open with Hold Skill and allow him to start at or close to max stacks when he switches back on-field. |
Vortex Vanquisher R1 | 106.6% | Calculated with dynamic stacks and with a shield, as Zhongli can utilize the shield-related passive very well. Like PJWS, Zhongli can easily build up stacks through his attacks. |
Deathmatch R1 | 103.8% | Calculated with 2 enemies. Provides a high amount of CRIT Rate. |
Crescent Pike R1 | 100% | See R5 above. |
| Lithic Spear R1 | 97.9% | Calculated at 2 stacks. Depending on Zhongli’s teammates, this can be an excellent option. It is preferably played with at least one other Liyue teammate. Scales well with stacks and refinements. |
Blackcliff Pole R1 | 95.7% | Calculated with no stacks since it is difficult to maintain stacks on Blackcliff weapons. Not worth purchasing this weapon with Starglitter. |
White Tassel R5 | 94.4% | Can be obtained by opening chests in Liyue. While its Base Attack is low, its CRIT Rate% stat along with the 48% Normal Attack DMG Bonus passive is really good. |
Favonius Lance | 87.3% | While worse than other options for Zhongli’s personal damage, the Particles from the passive can help battery off-field damage dealers, lowering their ER requirements and potentially leading to higher overall team damage. The passive becomes more reliable at higher refinements. |
Artifacts
Mainstats
|
|
|
|
|
Sands
ATK% / HP%
|
Goblet
Geo DMG%
|
Sands
CRIT Rate% /
CRIT DMG% |
ATK% Sands or HP% Sands?
As mentioned before, Zhongli’s Ascension 4 Passive allows ATK% Sands and HP% Sands to perform comparably. A HP% Sands will allow for a stronger shield, while an ATK% Sands is more offensive by nature. Substats will be an important factor, as a well-rolled HP% Sands can perform better than a poorly-rolled ATK% Sands and vice versa.
However, if Zhongli is using Crescent Pike, it is heavily recommended to run ATK% Sands, as the procs from the weapon contribute a significant amount of damage and aren't affected by Zhongli's Ascension 4 Passive.
Substats Priority
Crit%/ER% > Atk% > HP% > Flat Atk/HP
Artifact Sets
All the artifact sets listed below are fine options and their actual relative performances will depend largely on the substats available on each set. A few artifact sets will perform better with Crescent Pike specifically. As said weapon is one of the best F2P options, if those sets have a major change in relative placement with Pike, it will be noted.
Assumptions
R1 Deathmatch, ATK%/Geo DMG%/CRIT%, 125% ER minimum (except for 4pc SR), Geo Resonance. 1 Hold Skill, 3 N5D (shielded), 11 Stone Stele resonance hits (shielded) and 1 Burst (shielded). KQM Standards.
| Artifact Set | % of 4pc Glad | Notes |
|---|---|---|
4pc Pale Flame | 101.5% (92.8% without passive) | Calculated assuming 100% uptime. Since Hybridli’s playstyle inherently makes use of his Stele for damage, maintaining uptime on 4pc PF’s passive comes fairly naturally. However, it is worth noting that if its passive cannot be triggered, this set performs considerably worse. More reliable with C1, and/or when playing with a teammate capable of deploying Geo Constructs. |
4pc Gladiator's Finale | 100% | A 4pc Gladiator set can be farmed naturally while progressing through the game and can be obtained through Strongbox. One important note: the 4pc set bonus doesn’t buff Crescent Pike procs, and can be anti-synergistic with some combos involving CA or footstooling (plunges). |
| Various 2pc Combinations | 96.5% - 98.0% | Most 2pc artifact combinations perform similarly. Thus, substats will play an important role. For more details, please refer to Hybridli Artifact Comparisons. |
4pc Retracing Bolide | 95.8% | Performs worse than the assorted 2pc sets listed above, even assuming 100% uptime. |
4pc Tenacity of the Millelith | 95.3% | 4pc Tenacity might not buff Zhongli’s personal damage much, but it provides Zhongli’s teammates with the valuable 20% ATK buff and therefore can be considered when running strong ATK-scaling off-field DPS units in the team. As with 4pc PF, the inherent playstyle of Hybridli should make it easier to maintain the passive’s uptime. This is further bolstered by C1 and/or with a Geo teammate capable of deploying constructs. |
4pc Shimenawa's Reminiscence (SR) | 94.7% | Calculations assume full passive uptime with Burst every other rotation and 100% ER minimum; the no-Burst rotation has an extra N5D. With Crescent Pike, this set performs similarly with 4pc Gladiator, assuming full uptime on 4pc SR passive during his NA string. This set’s better relative performance with Pike is due to more NAs in the no-Burst rotation favoring Pike. 4pc SR suffers from low uptime when Zhongli’s Hold Skill is used at the start of a rotation. To ensure maximum passive uptime, Zhongli’s Hold Skill should be used immediately before he begins Normal Attacking on-field, and after his teammates have utilized their abilities. However, note that using his Hold Skill in this manner may not be optimal for overall team damage, because Zhongli’s teammates may not benefit from his shield’s Resistance Shred. |
4pc Archaic Petra | 92.9% | A surprisingly good option for teams with teammates that have snapshot-able skills, or dual element teams such as double Geo/Hydro. This set requires a very conscious playstyle—you have to make sure to pick up the correct crystal with Zhongli or the passive is essentially useless. If Zhongli's teammates have skills that can snapshot, it is best for Zhongli to pick up the crystal for the corresponding element before those teammates cast their abilities. Otherwise, when played with units that have dynamic abilities (notably Xingqiu and Yelan), Archaic Petra is best used in teams with two or more characters of the same Element and no competing Elemental applications. For example, it is better to run a team with double Hydro/double Geo or Double Hydro/Geo/Anemo, rather than a team with Hydro/Geo/Electro. This is to ensure that the correct elemental crystal is available to apply the Archaic Petra buff throughout the rotation, since picking up a crystal of the wrong element will mean dynamic abilities no longer benefit from the 4pc buff. |
Rainbow | 87.8% | Rainbow sets are recommended when they can provide more stats than the pieces with set bonuses. |
4pc Echoes of an Offering | 103.1% | As for Pikeli, 4pc Echoes has great potential for Hybridli. With the assumption that it procs 3 times per N5 string, 4pc Echoes is the best artifact set in the list. However, 4pc Echoes is difficult to recommend because in-game testing has shown a possible correlation between the proc rate of the 4pc effect, player ping, and possibly FPS. There is some limited indication that Zhongli may tend to proc Echoes more often at higher ping, and less often at lower FPS settings. Consequently, performance may vary significantly from user to user. |
Team Comps and Synergies
Zhongli Geo Flex Flex
Hybridli prefers to be played with at least one other Geo character for Geo Resonance, especially ones that have the ability to deploy Geo Constructs. The remaining slots can be filled with characters that provide off-field damage or utility.
Examples
Examples by Latiwings#3308
Flex Options
| Unit | Pros | Cons |
|---|---|---|
Albedo | - Strong off-field damage. - Can provide and benefit from Geo Resonance. | - Like Zhongli’s Stele and other Geo Constructs, his Solar Isotoma can be broken by enemy attacks. However, its short cooldown allows it to be recast quickly. - His Solar Isotoma can lift up the active character, which can hinder the player. |
Yun Jin | - Nice NA buff for Zhongli. Note A Physical build is preferred due to not having a construct for Zhongli’s pillar to resonate off, as well as only buffing his Physical Normal Attacks. | - Single-target oriented. |
Ningguang | - Can offer a Geo DMG Bonus buff. - Can provide decent extra damage to the team, or trade said damage for utility buffs in the form of TTDS or Prototype Amber support. | - However, building her for damage reduces her ability to provide utility significantly, and vice versa. - Single-target oriented. - Her construct has strange hitboxes (at both ends of the Jade Screen) coupled with strange pulse origin (from the center), making it tricky to cast around Zhongli’s pillar. |
GMC  | - Can produce a large number of constructs to trap enemies and resonate with Zhongli’s Stele. - CRIT Rate buff is essentially always active. - Can provide decent extra damage. Note If players want to make use of the construct + Stele resonance playstyle, players are encouraged to look into Zhongli’s Microwave build instead. | - Can block Zhongli from attacking enemies, or make enemies lose aggro due to odd heights. |
| Unit | Pros | Cons |
|---|---|---|
Beidou | - Off-field AoE damage, directly enabled by Zhongli. - Damage Reduction from her Burst for a stronger Zhongli Shield. Note Beidou is best paired with Fischl, addressing her Energy and single-target weaknesses. See the Beidou Guide for further information regarding her Energy needs or use the Energy Recharge Calculator. | - Beidou’s personal damage will suffer as a solo Electro unit because of high Energy Recharge requirements. - Not the ideal pick for single-target content. |
| Fischl | - Off-field single-target damage, C6 directly enabled by Zhongli. - Provides Electro application for Superconduct teams. | - Single-target oriented. |
| Unit | Pros | Cons |
|---|---|---|
| Bennett | - Bennett provides a huge attack buff that benefits not only Zhongli, but the rest of the team as well. - Provides healing. | - Need to play within a circle to maximize buff uptime. |
Xiangling | - Provides excellent off-field damage. - Allows Zhongli to have some flexibility on when to use his Burst, as it doesn’t interfere with her damage output (unlike with units that require driving). | - Usually requires Bennett and requires field time on Bennett to be batteried. |
| Unit | Pros | Cons |
|---|---|---|
| Yelan | - Off-field Hydro damage. - Provides a ramping DMG% buff that benefits all of Zhongli’s kit. | - Single-target oriented. |
| Xingqiu | - Off-field Hydro damage. - Damage Reduction for a stronger Zhongli shield. | - Single-target oriented. |
Geo DPS | Microwave

"Certainly worth the extra mile."
Zhongli’s Stone Stele can be problematic in many teams because of its tendency to interfere with Elemental Reactions. However, it becomes a significant asset when invested into and made use of—this is done so in a unique team core known as “Microwave”, which uses Geo Traveler’s numerous constructs to strategically generate multiple Stele resonance pulses. Both Zhongli and GMC offer high damage over time and Energy generation. As such, they can be used as an off-field DPS mechanic for other carries, or be played as a Quickswap composition to abuse the high multipliers and low cooldowns.
Pros
- Geo MC is a fantastic F2P teammate.
- Strong personal damage.
- Extremely flexible core which can tailor teammates to content.
- You get to learn how to position constructs.
- Satisfying.
Cons
- Struggles against highly mobile or some large enemies and world bosses that can readily move out of Geo Constructs’ damage range or break constructs.
- You have to learn how to position constructs.
Talent Priorities
With Burst
≥ >>>
Without Burst
>>> =
In teams where Zhongli uses his Burst, his Burst serves as a large portion of his damage and also scales better with Talent Levels. However, as his resonance tick damage is significant and his shield is a powerful source of RES Shred and protection, it is usually best to level it in tandem with his Burst.
In teams where Zhongli doesn’t use his Burst, his Skill becomes the only important Talent to level. The focus on Geo DMG in this playstyle means his Normal Attacks tend to be lackluster and not worth using.
Playstyles and Stele Positioning
As this playstyle works around using Zhongli’s unique “resonance” mechanic from his Stone Stele, learning the Stele mechanics can help you optimize its placement in order to achieve maximum value. The Stele itself will resonate with structures up to 3 abyss tiles away, causing them to also resonate. However, each resonance tick will only do damage in about half that radius—with this in mind, one should optimally seek to maximize the amount of resonance ticks hitting a given target. Shown below is a depiction of a Stone Stele’s range.
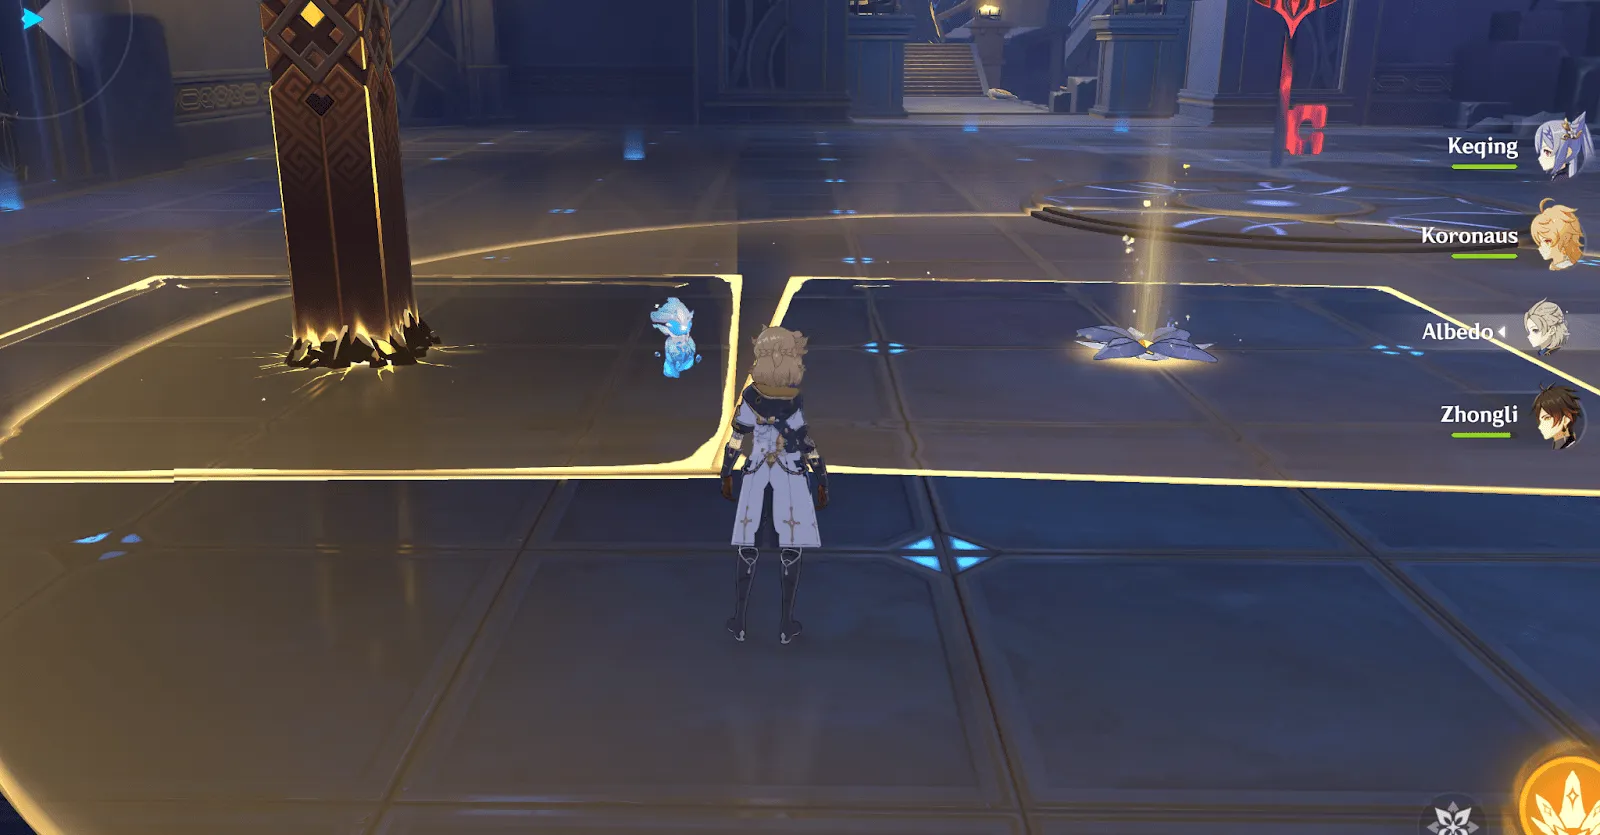
However, only three Geo Constructs can exist on the field at any given time. Moreover, most units can only create one of their respective constructs, limiting the potential for resonance by limiting both the number of resonance pulses as well as the consistency with which they can hit. This brings us to GMC.
GMC functions as a perfect support for Geo DPS Zhongli for multiple reasons—multiple of the constructs that GMC’s Skill creates can exist simultaneously, which is a feature that is relatively unique. Furthermore, GMC’s Elemental Burst, Wake of Earth, creates four constructs that uniquely do not count towards the construct limit but nonetheless resonate with Zhongli’s Stone Stele, and can further help by keeping enemies contained. This dramatically increases both the area and number of resonance pulses that can hit enemies.
As such, GMC allows Zhongli to push past his usual limitations. Shown below are examples of this combined synergy. While Zhongli can be built for Geo DMG even without GMC, such a build will generally function similar to Shield Bot Zhongli in playstyle.
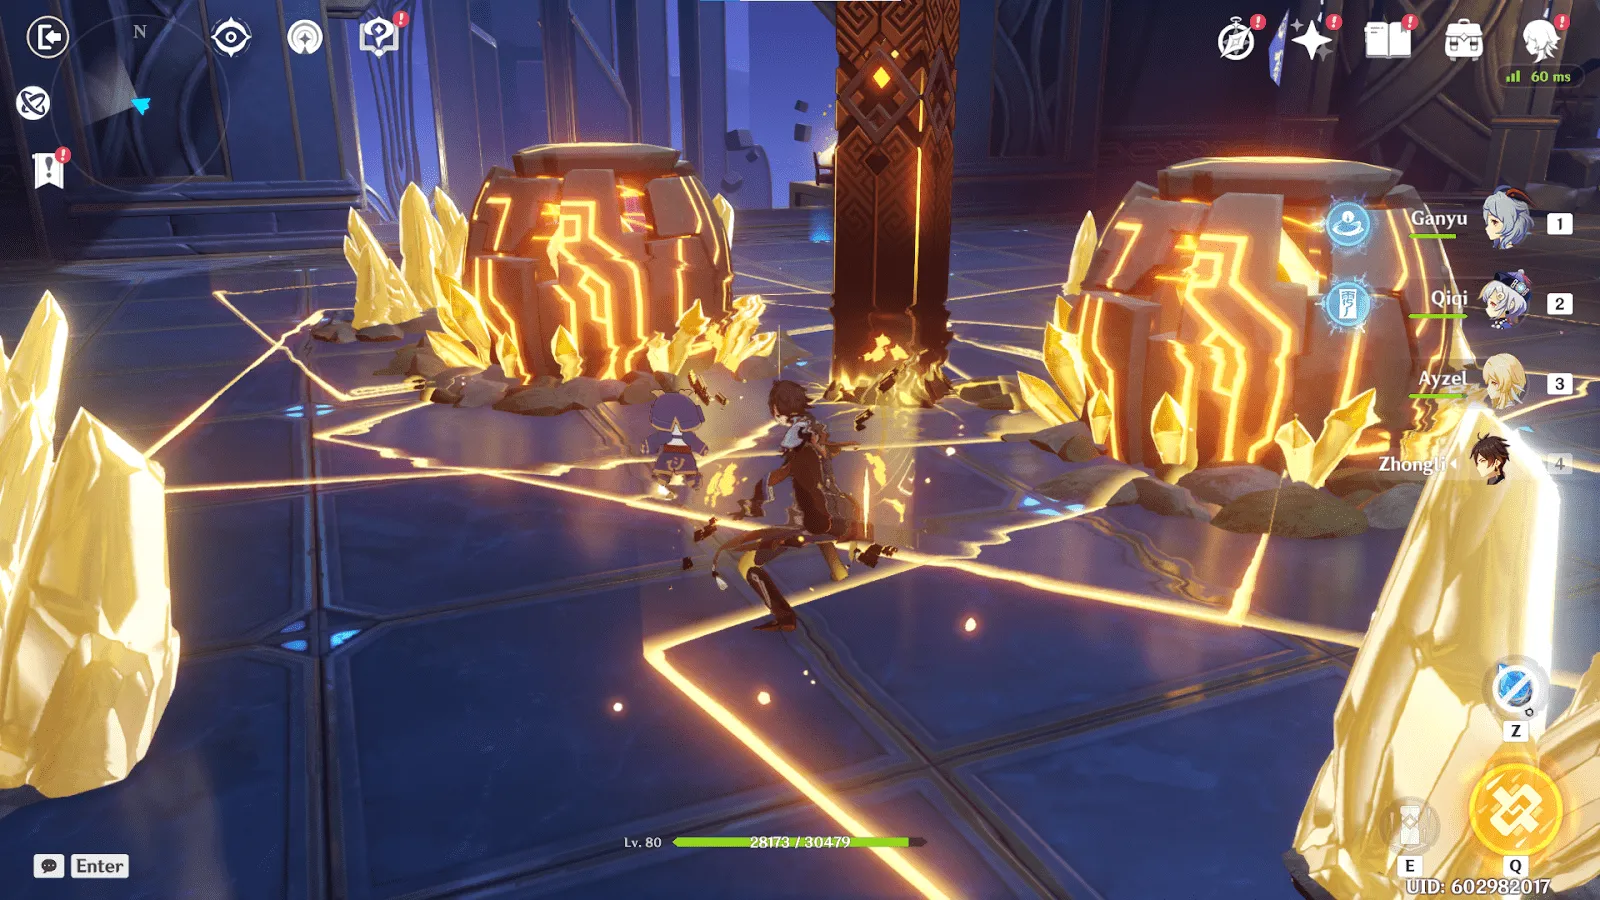
A 1:16 scale recreation of the Neo Armstrong Cyclone Jet Armstrong Cannon
Thus, given their synergy, it is crucial to understand how to make full use of this playstyle. The easiest way to manage positioning is to stand as close to Zhongli’s pillar as possible when using GMC’s Burst to achieve maximum area coverage. The converse also applies—when using Zhongli’s Skill inside GMC’s Burst, it is best to try to center the Stele.
There are also nuances regarding GMC’s Elemental Skill (Starfell Sword) placement which are covered extensively in the GMC Guide. In most teams, GMC must fully generate the construct from all casts of their Starfell Sword to hit the construct limit, thus breaking Zhongli’s Stone Stele and allowing it to be recast every rotation. While placing GMC's Skill between Zhongli's Skill and GMC’s Burst is optimal for damage, you should prioritize hitting enemies instead for Particle generation. Lastly, in teams where there are constructs other than GMC’s and Zhongli’s and another character such as Itto needs uninterrupted field time, it is best to start rotations with GMC’s Skill. This is so that if the construct limit is reached, it is broken first as it has no lingering effects.
Note that Microwave can struggle against large enemies such as bosses that can easily destroy constructs. Thus, it is generally not recommended to use Microwave against such enemies. While it might also seem that this composition struggles with highly mobile enemies due to its tendency of suffering from “Circle Impact”, this is only partly true. While enemies moving out of the resonance area is a significant DPS loss, this composition is also one of the few that has methods to counteract this—with proper utilization of constructs (especially GMC’s Elemental Burst, Wake of Earth) as well as the high stagger this comp provides, it is possible to simply keep enemies locked into the effective radius.
Video of Geo MC’s Burst trapping Maguu by Scrungle Bepis#8760
Weapons
Common Assumptions
ATK%/Geo DMG%/CRIT%, R1 Deathmatch, KQM Standards.
With Burst
4EoSF, 4NO 20% ATK, Bennett 1000 ATK, GMC 10% CR, -40% RES Shred, 130% ER, 18 Stone Stele resonance hits over 17s, 1 Burst, other buff uptime as applicable.
Without Burst
2AP 2ATK, GMC 10% CR, -40% RES Shred, 36 Stone Stele resonance hits over 24s, other buff uptime as applicable.
| Weapon | % of R5 Catch (With Burst) | % of R5 Catch (Without Burst) | Conditions and notes |
|---|---|---|---|
Staff of Homa R1 (>50% HP) | 125.56% | 150.07% | Calculated above 50% HP. Homa caters to all of Zhongli’s desired stats for this playstyle. It has no requirements for the rotation, makes building him easier, and directly increases all of Zhongli’s damage. Additionally, the HP to ATK conversion further minimizes the damage difference between HP and ATK stats on Zhongli. |
Deathmatch R1 | 114.32% | 130.51% | Calculated with 2 enemies. High amount of CRIT helps split-scalers like Zhongli. One of his strongest weapons for personal damage. |
Calamity Queller R1 | 113.69% | 131.58% | Calculated with 6 stacks on-field. No stacks when not Bursting due to rotation length. |
Primordial Jade Winged-Spear R1 | 112.41% | 132.72% | Calculated with 1 stack. |
Lithic Spear R5 | 110.24% | 132.36% | Calculated with 2 stacks. |
Wavebreaker’s Fin R5 | 107.84% | 113.03% | Calculated with 240 overall team Energy. |
Blackcliff Pole R1 | 106.63% | 121.55% | Calculated with 0 stacks. CRIT DMG% is a valuable stat. Thus, this can be worth buying if you have absolutely nothing else to spend your Starglitter on. This means that technically, this is his best “F2P” weapon, but note that Favonius Lance (with Energy-hungry teammates) can perform similarly in a team without the Starglitter cost. It is still a F2P option while Fav Lance is Gacha-locked. |
Vortex Vanquisher R1 | 104.52% | 127.75% | Calculated with 1 stack, shielded. |
Engulfing Lightning R1 | 103.78% | 113.7% | 30% ER active for all attacks. |
Lithic Spear R1 | 102.47% | 122.31% | Calculated with 2 stacks. |
Skyward Spine R1 | 102.19% | 117.93% | |
Wavebreaker’s Fin R1 | 101.81% | 113.03% | Calculated with 240 overall team Energy. |
“The Catch” R5 | 100% | 100% | Strong F2P option for personal damage if you Burst, but your Xiangling probably wants this more. |
White Tassel | 97.74% | 108.62% | It is surprisingly strong for a 3-Star Polearm |
Favonius Lance | 91.78% | 104.09% | Much stronger than its ranking would suggest—it makes up for lower personal damage by reducing team ER costs. Whenever Zhongli is paired with Energy hungry units (for instance, Xiangling), this will be a very strong 4-Star weapon for team damage. |
Artifacts
|
|
|
|
|
Sands
ATK% / HP%
|
Goblet
Geo DMG%
|
Sands
CRIT Rate% /
CRIT DMG% |
ATK% Sands or HP% Sands?
Similarly to other builds, the choice of ATK% Sands and HP% Sands is ultimately up to the player—the former an offensive-oriented choice, while the latter a defensive, more team-oriented option. However, the difference is relatively small, and substats may well be the deciding factor.
Substats Priority
If Using Burst
ER% until requirement > Crit% > ATK% > HP% > Flat ATK > Flat HP
Zhongli will generally need 110-130% ER if Bursting every rotation.
If not using Burst
Crit% > ATK% > HP% > Flat ATK > Flat HP
Artifact Sets
A general note to keep in mind: even though Zhongli deals significant damage in the teams below, it is usually not worth farming specifically for his artifacts, as the difference between his sets is small and many of them are Resin-inefficient. Instead, it is usually more applicable to gear Zhongli while farming for other units in his planned teams.
Common Assumptions
ATK%/Geo DMG%/CRIT%, KQM Standards.
With Burst
4NO 20% ATK, Bennett 1000 ATK, GMC 10% CR, -40% RES Shred, 130% ER, 18 resonance tick damage instances, other buff uptime as applicable
Without Burst
GMC 10% CR, -40% RES Shred, 36 resonance tick damage instances, other buff uptime as applicable
| Artifact | %vs 2AP 2ATK with Burst | %vs 2AP 2ATK with No Burst | Notes |
|---|---|---|---|
4pc Emblem of Severed Fate | 102.56% | — | It's useless when he doesn't Burst. However, when he does Burst, 4pc EoSF is a good option because it absolves his ER requirement and provides Burst DMG Bonus. However, this artifact set is highly contested, and there are other units who can use it better. |
| 2pc ToM/EoSF/NO/AP/ATK% | 96-103% | 96-100% | The difference between combining the 2 piece sets of the listed artifacts is minimal; combinations with the best substats can usually outperform 4pc EoSF. Note that EoSF and NO only have value on teams where Zhongli Bursts; even then, 2 EoSF/2 AP can even rival or outdo 4 EoSF on such teams. |
 4pc Husk of Opulent Dreams (HoOD) | 100.86% | 99.38% | Surprisingly, 4pc Husk is a competitive choice, provided the player has a leftover set, as it is not recommended to farm this for Zhongli. Its main attraction is the 24% Geo DMG Bonus offered by the 4pc set bonus, and if farming for defense-scaling Geo units or Ocean-Hued Clam set, Zhongli can make good use of the usually useless Husk pieces. |
4pc Tenacity of Millelith | 95.51% | 96.36% | While lower in terms of his personal damage, 4pc TotM proves best for team damage in most cases. However, the domain is also Resin-inefficient unless the player also plans to gear Physical units. |
Team Comps and Synergies
Essential
| Unit | Pros | Cons |
|---|---|---|
Geo MC  | - Essentially irreplaceable. - Strong personal damage. - Can create 4 constructs with Wake of Earth that do not contribute to the construct limit, and an additional 3 through using Starfell Sword, which increases resonance damage. - 10% CR buff and good Particle generation. - Completely F2P. | - Steep learning curve for construct placement. |
Synergies
| Unit | Pros | Cons |
|---|---|---|
Albedo | - Low field time. - Has an additional construct in his Solar Isotoma. - Good personal damage and a conditionally strong Burst. | - Can complicate rotations to ensure proper uptime on his Solar Isotoma, which he relies on for his damage. - His A4 Elemental Mastery buff is not useful in this team. |
Itto | - A powerful on-field Geo DPS with very high personal damage. - Good Particle generation. - Ushi counts as a Geo Construct. | - Extended field time can complicate rotations. - Very Energy hungry. |
Noelle | - On-Field Geo DPS with good personal damage, and can also heal. - Can freely switch during Burst to let teammates use abilities. | - No Particle generation, and is very Energy hungry. - Shielding utility is potentially wasted on a team with Zhongli. |
| Unit | Pros | Cons |
|---|---|---|
Bennett | - An extremely powerful and nearly unmatched attack buff. - High Particle generation with Tap Skill. - Strong source of healing to bolster Zhongli’s shielding. | - Extremely contested support. - Buff can be difficult to snapshot in some rotations. |
Xiangling | - Extremely powerful Burst that can make full use of buffs. - Does not require extended field time to function. | - Needs Bennett. - Is extremely Energy hungry. - Her EM Ascension stat is wasted due to the lack of Reactions. |
| Unit | Pros | Cons |
|---|---|---|
Xiao | - Anemo on-field DPS with very high personal damage in AoE. - Has particularly good synergy with Zhongli and GMC. | - High stagger on Burst’s Plunge Attacks. - Very Energy hungry, needs an Anemo battery. |
Example Team Compositions
All teams provided below are sample compositions. GMC is the only mandatory teammate in order to play Microwave—others can be mixed and matched as necessary if they handle content faced better.

This composition seeks to maximize resonance damage through short rotation times and strong external buffs through Bennett and GMC. The final flex slot can be taken up by Albedo or Xiangling—Albedo helps cut rotation time while maintaining strong off-field damage bolstered by Zhongli’s RES Shred and Geo Resonance, whereas Xiangling provides highly significant personal damage. In Xiangling variants, her personal damage can be further improved by using 4pc Archaic Petra on GMC. This team has high survivability due to Zhongli and Bennett providing shielding and healing respectively. While rotations are provided, it is worth noting that, to an extent, they can be modified on the fly with proper practice. However, we recommend sticking to them wherever possible.
Albedo Skill -> Bennett Skill -> Burst -> GMC Skill -> Burst -> Bennett Skill-> Zhongli Hold Skill -> Burst -> Bennett Skill -> GMC Skill -> Repeat (17s)
In the Albedo variant, aim to cast Bennett's final Skill as soon as Bennett’s Burst ends, in order to capitalize on his A4 talent. Furthermore, all constructs in both rotations should be fully generated and should not break upon cast, so as to avoid breaking the wrong construct when hitting the 3 construct limit. Mistakes can usually be rectified by using Zhongli’s Tap Skill —either directly after Bennett’s Burst, or preferably in place of his Hold Skill if shielding is not required for one rotation. Rotations are much more generous with C1.
Bennett Burst -> GMC Skill -> Burst -> ZL Hold Skill -> Burst -> GMC Skill -> Bennett Skill -> XL Burst -> Skill -> Bennett Skill -> XL Funnel -> GMC Skill -> Bennett Skill -> XL Funnel -> Repeat (21s)
At C1, an optional alternate rotation could be performed for marginally higher DPS
Bennett Burst -> GMC Skill -> Burst -> ZL Tap Skill -> Bennett Skill -> XL Burst -> Skill -> ZL Hold Skill -> Burst -> GMC Skill -> Bennett Skill -> XL Funnel -> Bennett Skill -> XL Funnel -> Repeat (20s)
As mentioned in the synergies section, Xiao’s high, consistent AoE Anemo damage is often restricted by limited synergy as most teammates cannot effectively support him for the entire duration of his Burst. Some Geo units, however, tend to have long lasting buffs or effects that synergize well with Xiao’s needs, and Xiao Microwave is one such example.
Together, Zhongli and GMC provide considerable off-field damage, shielding, Anemo RES Shred and a CRIT Rate buff for Xiao’s full field time. Furthermore, GMC’s Burst can be particularly useful for trapping mobs, given Xiao’s high stagger and knockback. The last slot is reserved for an Anemo battery to fuel Xiao’s Burst for proper uptime—Sucrose has grouping, can pass TTDS, and better Energy generation, while Jean can provide additional healing, and, at C4, has a powerful source of Anemo RES Shred. Further details on Xiao and his Energy management can be found in the Xiao Guide.
Flex Options: Sucrose, Jean, Sayu, Venti
Sucrose with TTDS or Sacrificial Fragments is undoubtedly the BiS option for this slot due to the significant amount of Particles and potential buffs she can provide. That said, Jean and Sayu can offer healing for content with corrosion, and Venti’s grouping can prove situationally useful and, as such, outweigh Sucrose’s benefits.
Rotations
Zhongli Tap Skill -> GMC Skill -> Burst -> Zhongli Hold Skill -> Flex -> Xiao Skill x2 -> Burst -> Jet/High Plunges -> Repeat
At Zhongli’s C1, the Tap Skill is no longer necessary.

Itto’s long field time and strong AoE damage is constrained by two major factors—a drought of off-field effects that can last throughout his rotations, and significant Energy needs. Microwave can remedy both of these issues by virtue of GMC’s high Particle generation and the naturally long uptime on constructs. This team is strongly recommended after C1 Zhongli due to the rotation complications caused before C1, with C1 increasing both damage and quality of life. Gorou can further reduce the team’s ER requirements, while also providing Itto with a powerful buff. In addition, his C6 buff applies dynamically and can thus be fully utilized by all members of the team. Further information can be found in the Itto Guide.
Rotation
With C1
Gorou Skill -> GMC Skill -> Burst -> Zhongli Hold Skill -> Gorou Burst -> Itto Combos -> Repeat
Without C1
Zhongli Tap Skill -> Gorou Skill -> GMC Skill -> Burst -> Zhongli Hold Skill -> Gorou Burst -> Itto Combos -> Repeat
Other Mechanics

"One man's stone is another man's gem…"
When paired with Chongyun (for Cryo) or Bennett C6 (for Pyro), Zhongli is an incredible shieldbreaker against Abyss Heralds and Lectors. Even though his NA string has standard ICD, Zhongli attacks fast enough to apply a good amount of the infused Element. Moreover, his CA, like most Polearm users, has no ICD. Coupled with his shield, Zhongli serves as a very comfortable shieldbreaker.
Zhongli's Hold Skill and Stele excels at destroying the Golden Wolflord's Rifthound Skulls. However, Zhongli's Tap Skill is actually more efficient, as it depletes twice as much gauge while also having a much shorter cooldown.
If you are having difficulty aiming consistently—run up to the skull and hug it, before tapping E.
5-Star units have amazing Burst Animation cutscenes. While usually very fun and amazing to look at, they have an unintended side effect of disorienting the player, especially in the heat of combat. This is especially true for units like Zhongli or Jean, where the camera flips very quickly.
Zhongli can cancel the zoom-in for these cutscenes for any unit—simply position yourself near one of his pillars before using a Burst.
Afterword

Zhongli is a pretty simple unit to play but he also has other interesting playstyles as well, so we tried to cover each playstyle with as much depth as we could. It was a great experience writing this guide. I would like to thank my co-writers, everyone who contributed, and NZ for bullying me to open a ticket for this guide for making this possible.
Zhongli is an incredible unit with much versatility and flexibility. I've always known this and yet, I've learned so much more about him during the writing of this guide, directly thanks to the many different perspectives from various other Zhongli players.
My utmost gratitude to Xree for allowing me the chance to help out with this guide, and to everyone else that got roped into the shenanigans that is the Zhongli Guide ticket (looking directly at you, Cuzi and Pot). I hope this guide helps our readers as it had helped me while I was working on it—to reveal more of Zhongli's possibilities other than his most famous role as a Shield Bot, and to help players discover more sides to the Emperor of Geo.
Also listen, you should be using his N5. It’s sexy.
I've spent more than a year staring at that ass. It has not become any less round.
It was a pleasure working on this guide and fully exploring the extent of unique mechanics Zhongli possesses—few other units would be able to claim such versatility as being able to slot in as a competitive and comfortable flex option, being an excellent driver and then on top of that enabling entire unique playstyles. There’s little to left to say that my lovely co-writers haven’t—especially Pick—like, I mean, it's hard to believe this old man is so broke when he’s packing a whole bakery back there, y’know?
"Every journey has its final day. Don't rush."
References/External Links
References
Talents, Constellations, Weapon Stats, Character Lines
Zhongli's Shred compared to 4pc VV
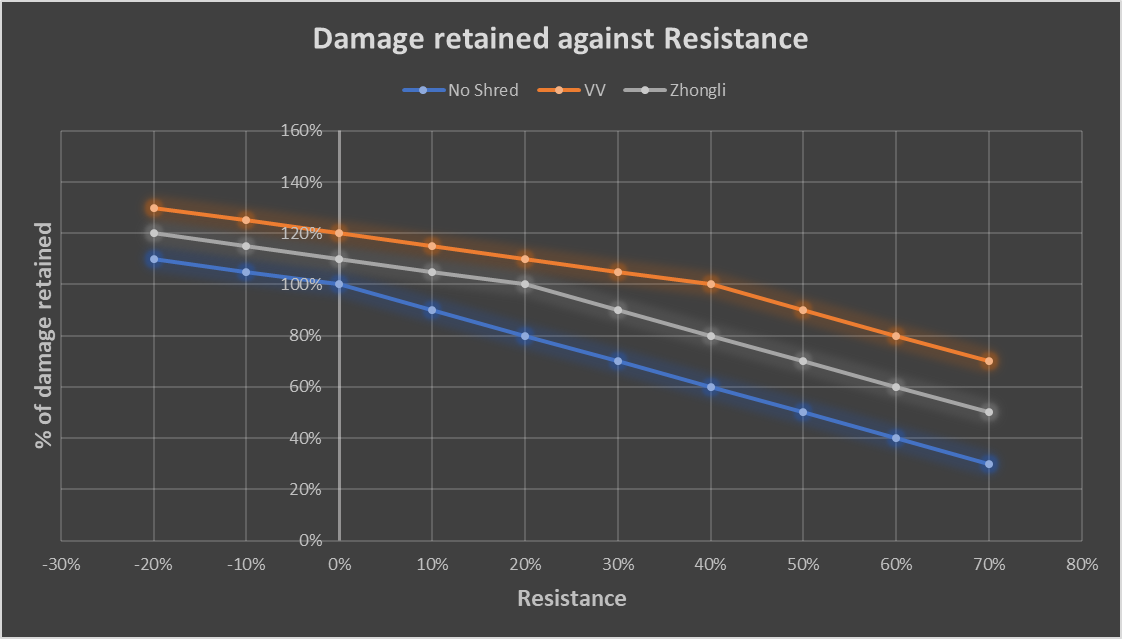
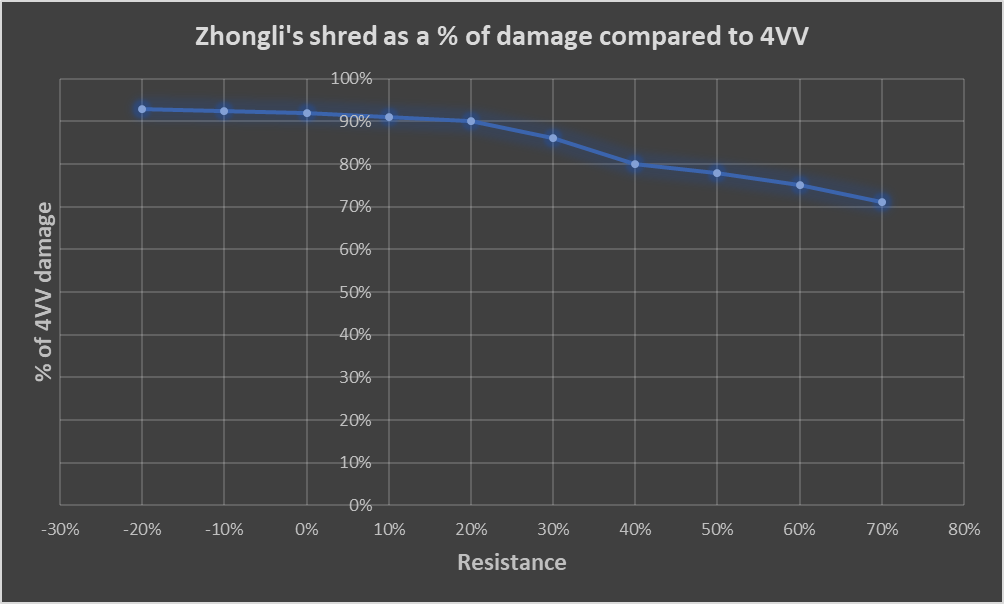
Calculation Sheets
 Burst Support Calculations by Sir_pick_the_prick#2209
- Physli Calculations by Xreejan#1180
- On-field DPS Zhongli Phys vs Geo Comparisons by mina#4448
- Hybridli Artifacts Calculations by mina#4448: (Crescent Pike) (R1 Deathmatch) (Homa >50% HP)
- Hybridli Weapons Calculations by mina#4448
- Echoes vs PF Calculations by Valorha#6262
- Microwave Calculations by Potade#9775
- Energy Calculator by Zakharov#5645
Utility Tools
Other Sheets
- Beidou Driver Proc Counts by elijam#7142
- ZLM’s Shield Strength reference with Calculator by 3.14#2780
External links
Credits

“For those that live too long, the friends of days gone by and scenes from their adventures live on in their memories. As such I have no regrets in meeting you, friend. Should the day ever come that we are not together, you will continue to shine like gold in my memories.”
Authors
Xreejan#1180
Latiwings#3380
Sir_pick_the_prick#2209
Cuzimori#1535
mina#4448
Editors
Leah
5thirty2#6756
Latiwings#3380
Calculations
Xreejan#1180
Sir_pick_the_prick#2209
Potade#9775
mina#4448
valorha#6262
Kurt#5846
Moral Support
Potade#9775
Feedback
Madrigal#7486
nxriaki#6316
Kolibri#7675
valorha#6262
The Golden Man#7947
jamie#9248
Leah
5thirty2#6756
sexyeboy69#2687
Reens#9389
Ayzel#7399
ZSK#5300
Bonus Feedback
kol#1593

More Bonus Feedback
Probably the entire tc-gen tbh at this point
Special Thanks
pai#3602
Rathalos#2875
yao#7082
yolitme0#0579
3.14#2780
Puffin#9920
Scrungle Bepis#8760
Purple Cosmonaut#2386
Special Thanks pt.2
Everyone in KeqingMains who helped us in the guide ticket and ZhongliMains for their previous guide and support
Art
All art in this guide has been added with the explicit permission from their respective artists. Their links are included under each piece—please show them some love if any of them caught your attention! <3
Thank you for reading the guide, and click here for a surprise
Changelog
- 13/05/2023 - Added Artwork Display Toggle
- 13/02/2023 - Reformatted the entire guide
- 30/10/2022 - Added 4pc Deepwood to Shieldbot
- 14/08/2022 - Guide updated
3000 years ago- Guide release