Updated for Version “Luna IV”

Ganyu is a 5★ Cryo Bow character in Genshin Impact who deals great damage using her Charged Attacks and Elemental Burst. Learn about Ganyu’s best builds, best weapons, best artifacts, and best teams in this quick guide.
Note that the information given may change if new discoveries are made. More extensive testing is in progress.
The full-length Ganyu guide is available here.
Table of Contents
New Content
 Astral Vulture’s Crimson Plumage | Chasca’s signature weapon, released in Version 5.2. It gives a massive Charged Attack and Elemental Burst DMG Bonus, making it the best-in-slot for Melt Ganyu. |
 Flower-Wreathed Feathers | A gacha weapon released in Version 5.2. It provides a sizable Charged Attack DMG Bonus, as well as reducing Stamina consumption when gliding by 15%, which helps both in combat and exploration. |
 Unfinished Reverie | A new artifact set, released in Version 4.6, and Ganyu’s best-in-slot in Burnmelt teams. |
 Furina | Furina provides a DMG% buff as well as personal damage. Her Salon Members’ unique HP drain mechanic also allows Ganyu to use 4pc Marechaussee Hunter. |
 Charlotte | Charlotte is a teamwide healer who can provide buffs by holding TTDS, as well as support sets like Noblesse or Tenacity. |
Emilie | Emilie deals excellent damage off-field and enables Ganyu’s Burnmelt playstyle. |
Kachina | Kachina is a free character from Natlan who provides buffs by holding 4pc Scroll. |
Xilonen | Xilonen provides strong RES Shred and healing, as well as buffs from 4pc Scroll. |
 Mavuika | Mavuika provides frontloaded damage with her Elemental Burst, off-field Pyro application, and a DMG Bonus with her A4 Passive. |
Citlali | Citlali provides a shield and buffs by holding weapons such as Starcaller’s Watch or TTDS and artifact sets such as 4pc Scroll. |
Lan Yan | Lan Yan provides shielding, as well as RES Shred by holding 4pc VV and buffs from TTDS. |
 Escoffier | Escoffier deals amazing off-field damage and provides teamwide healing, along with Cryo and Hydro RES Shred. |
 Skirk | Skirk is a Cryo Sword character who can be played as an on-field or quickswap DPS. |
Durin | While Durin does not Shred Cryo RES or provide direct buffs for Ganyu, he can still serve as a Pyro enabler for her Melt teams. |
Infographic
Freeze and Mono Cryo
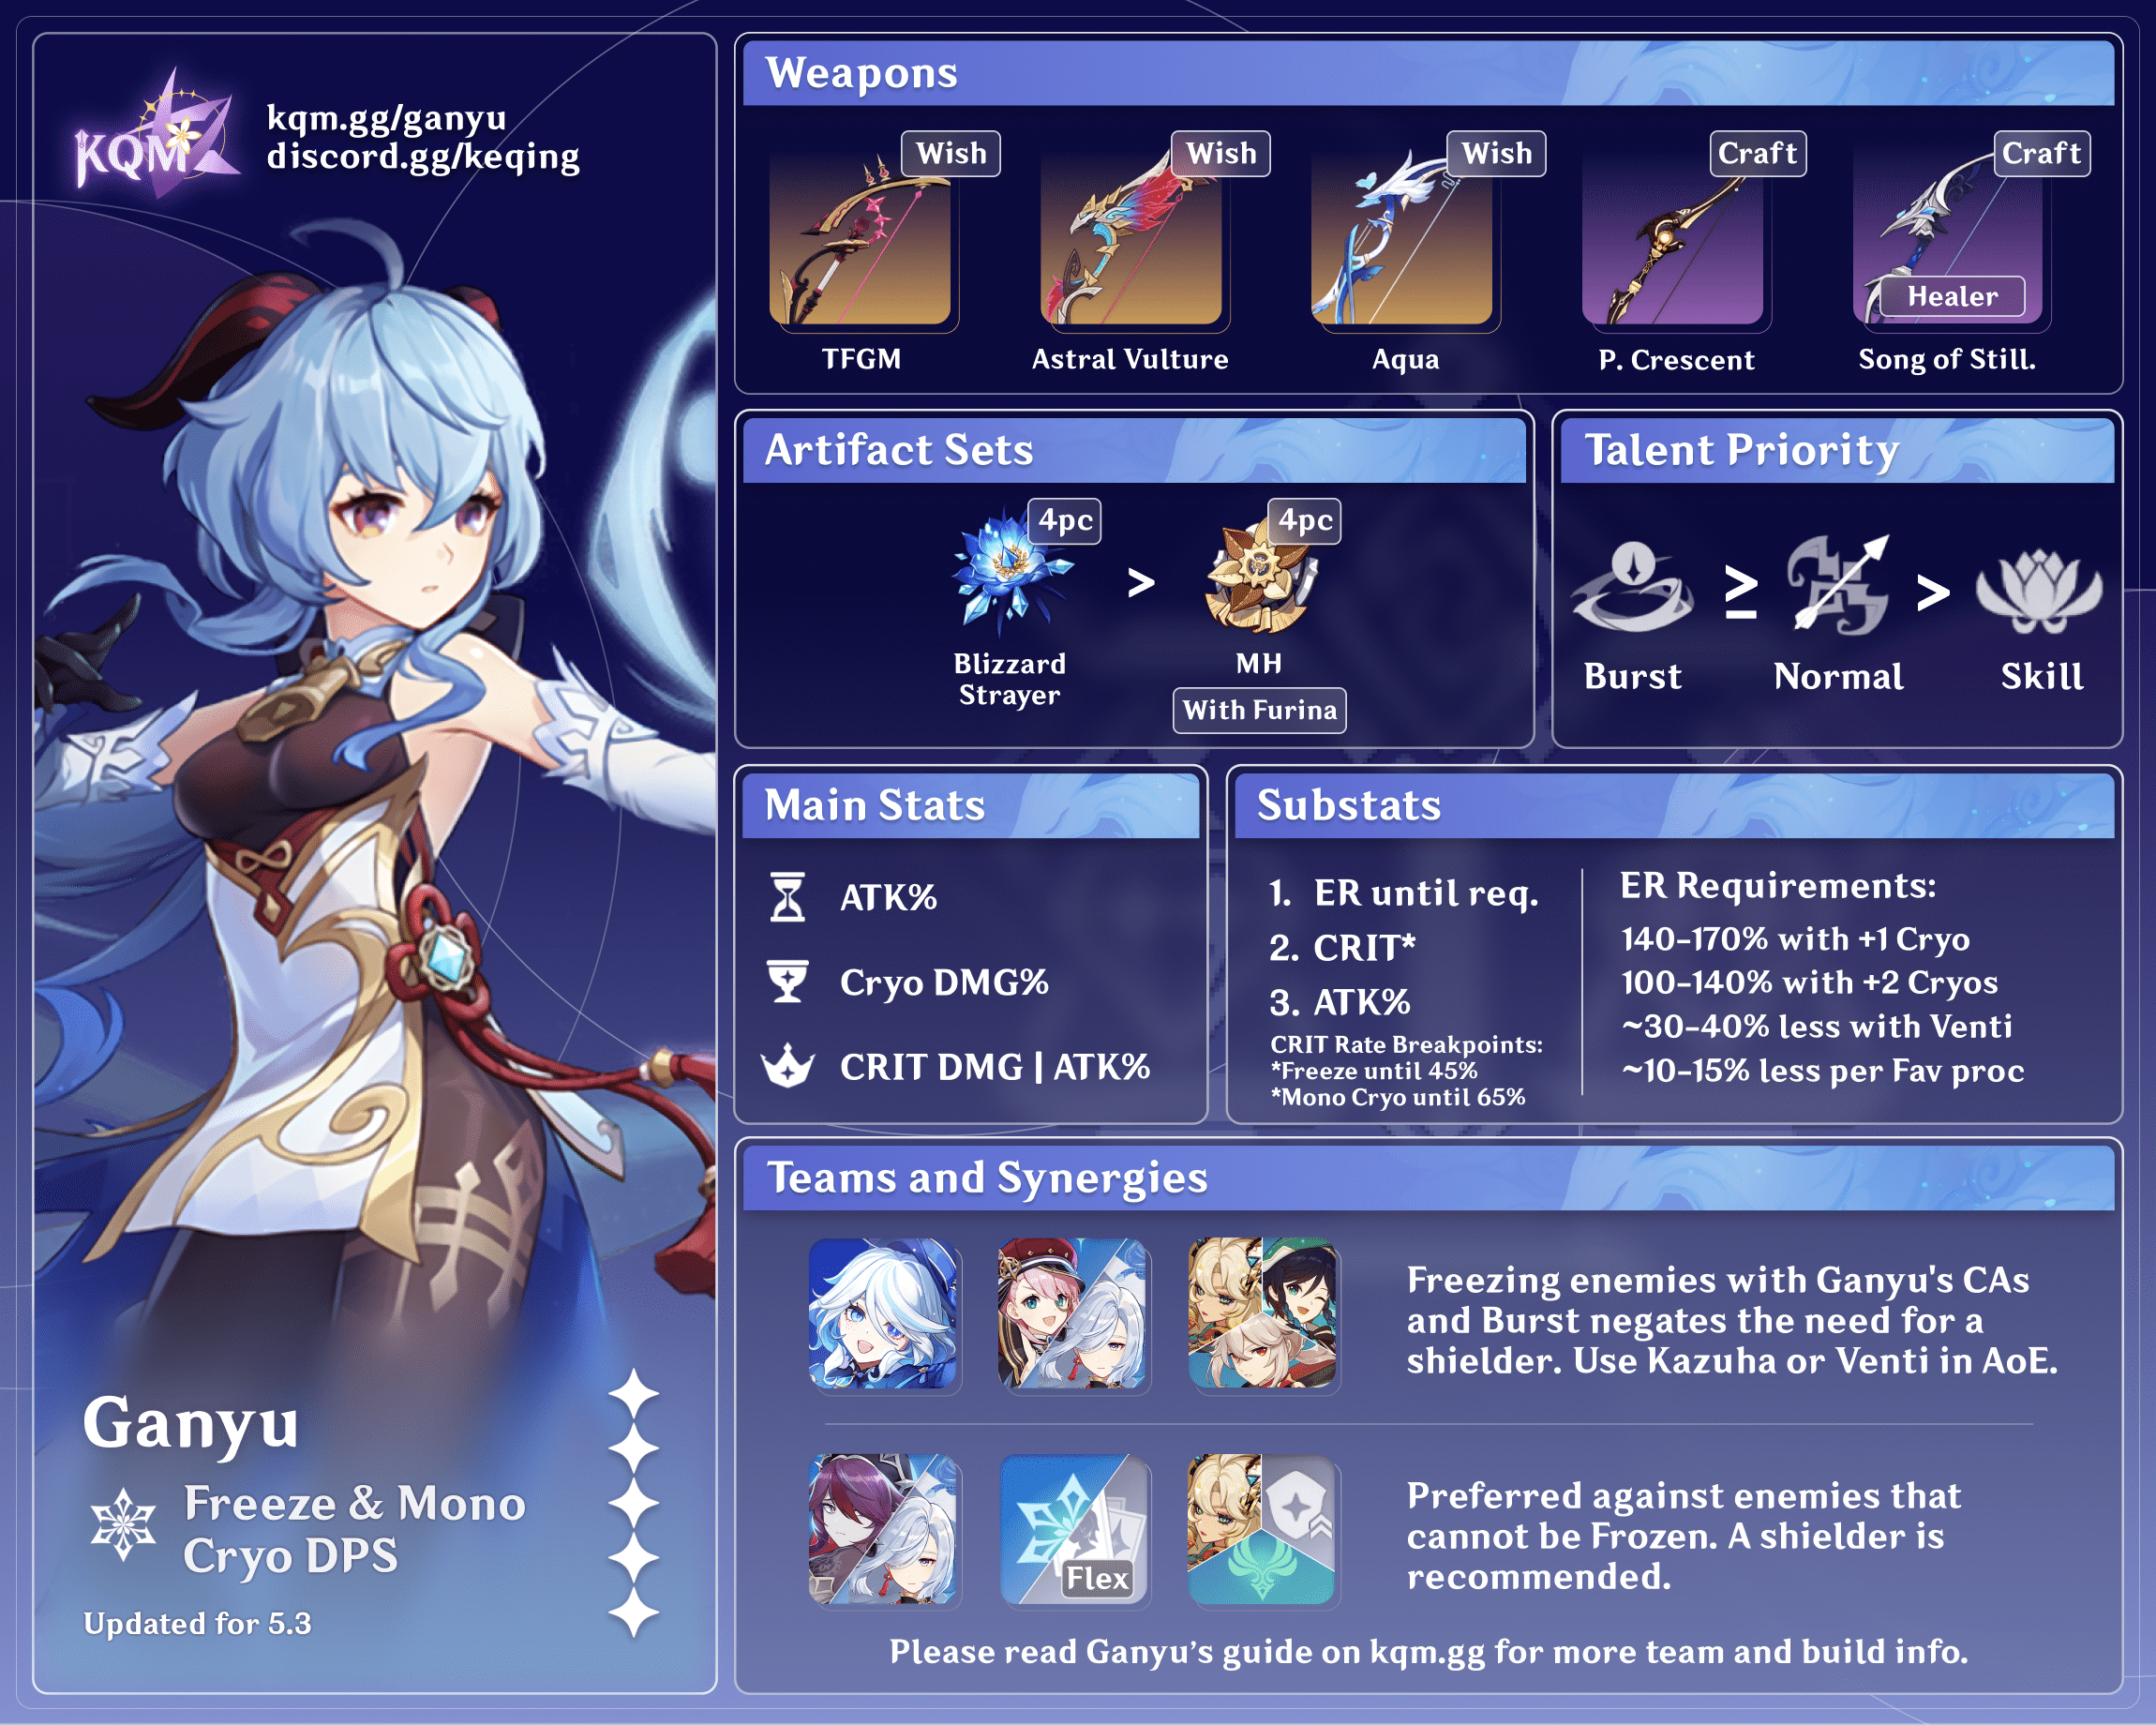
Credits to: euphorysm, cegewinne, nova_licious, haafr, lesterberne and KQM Staff
Melt
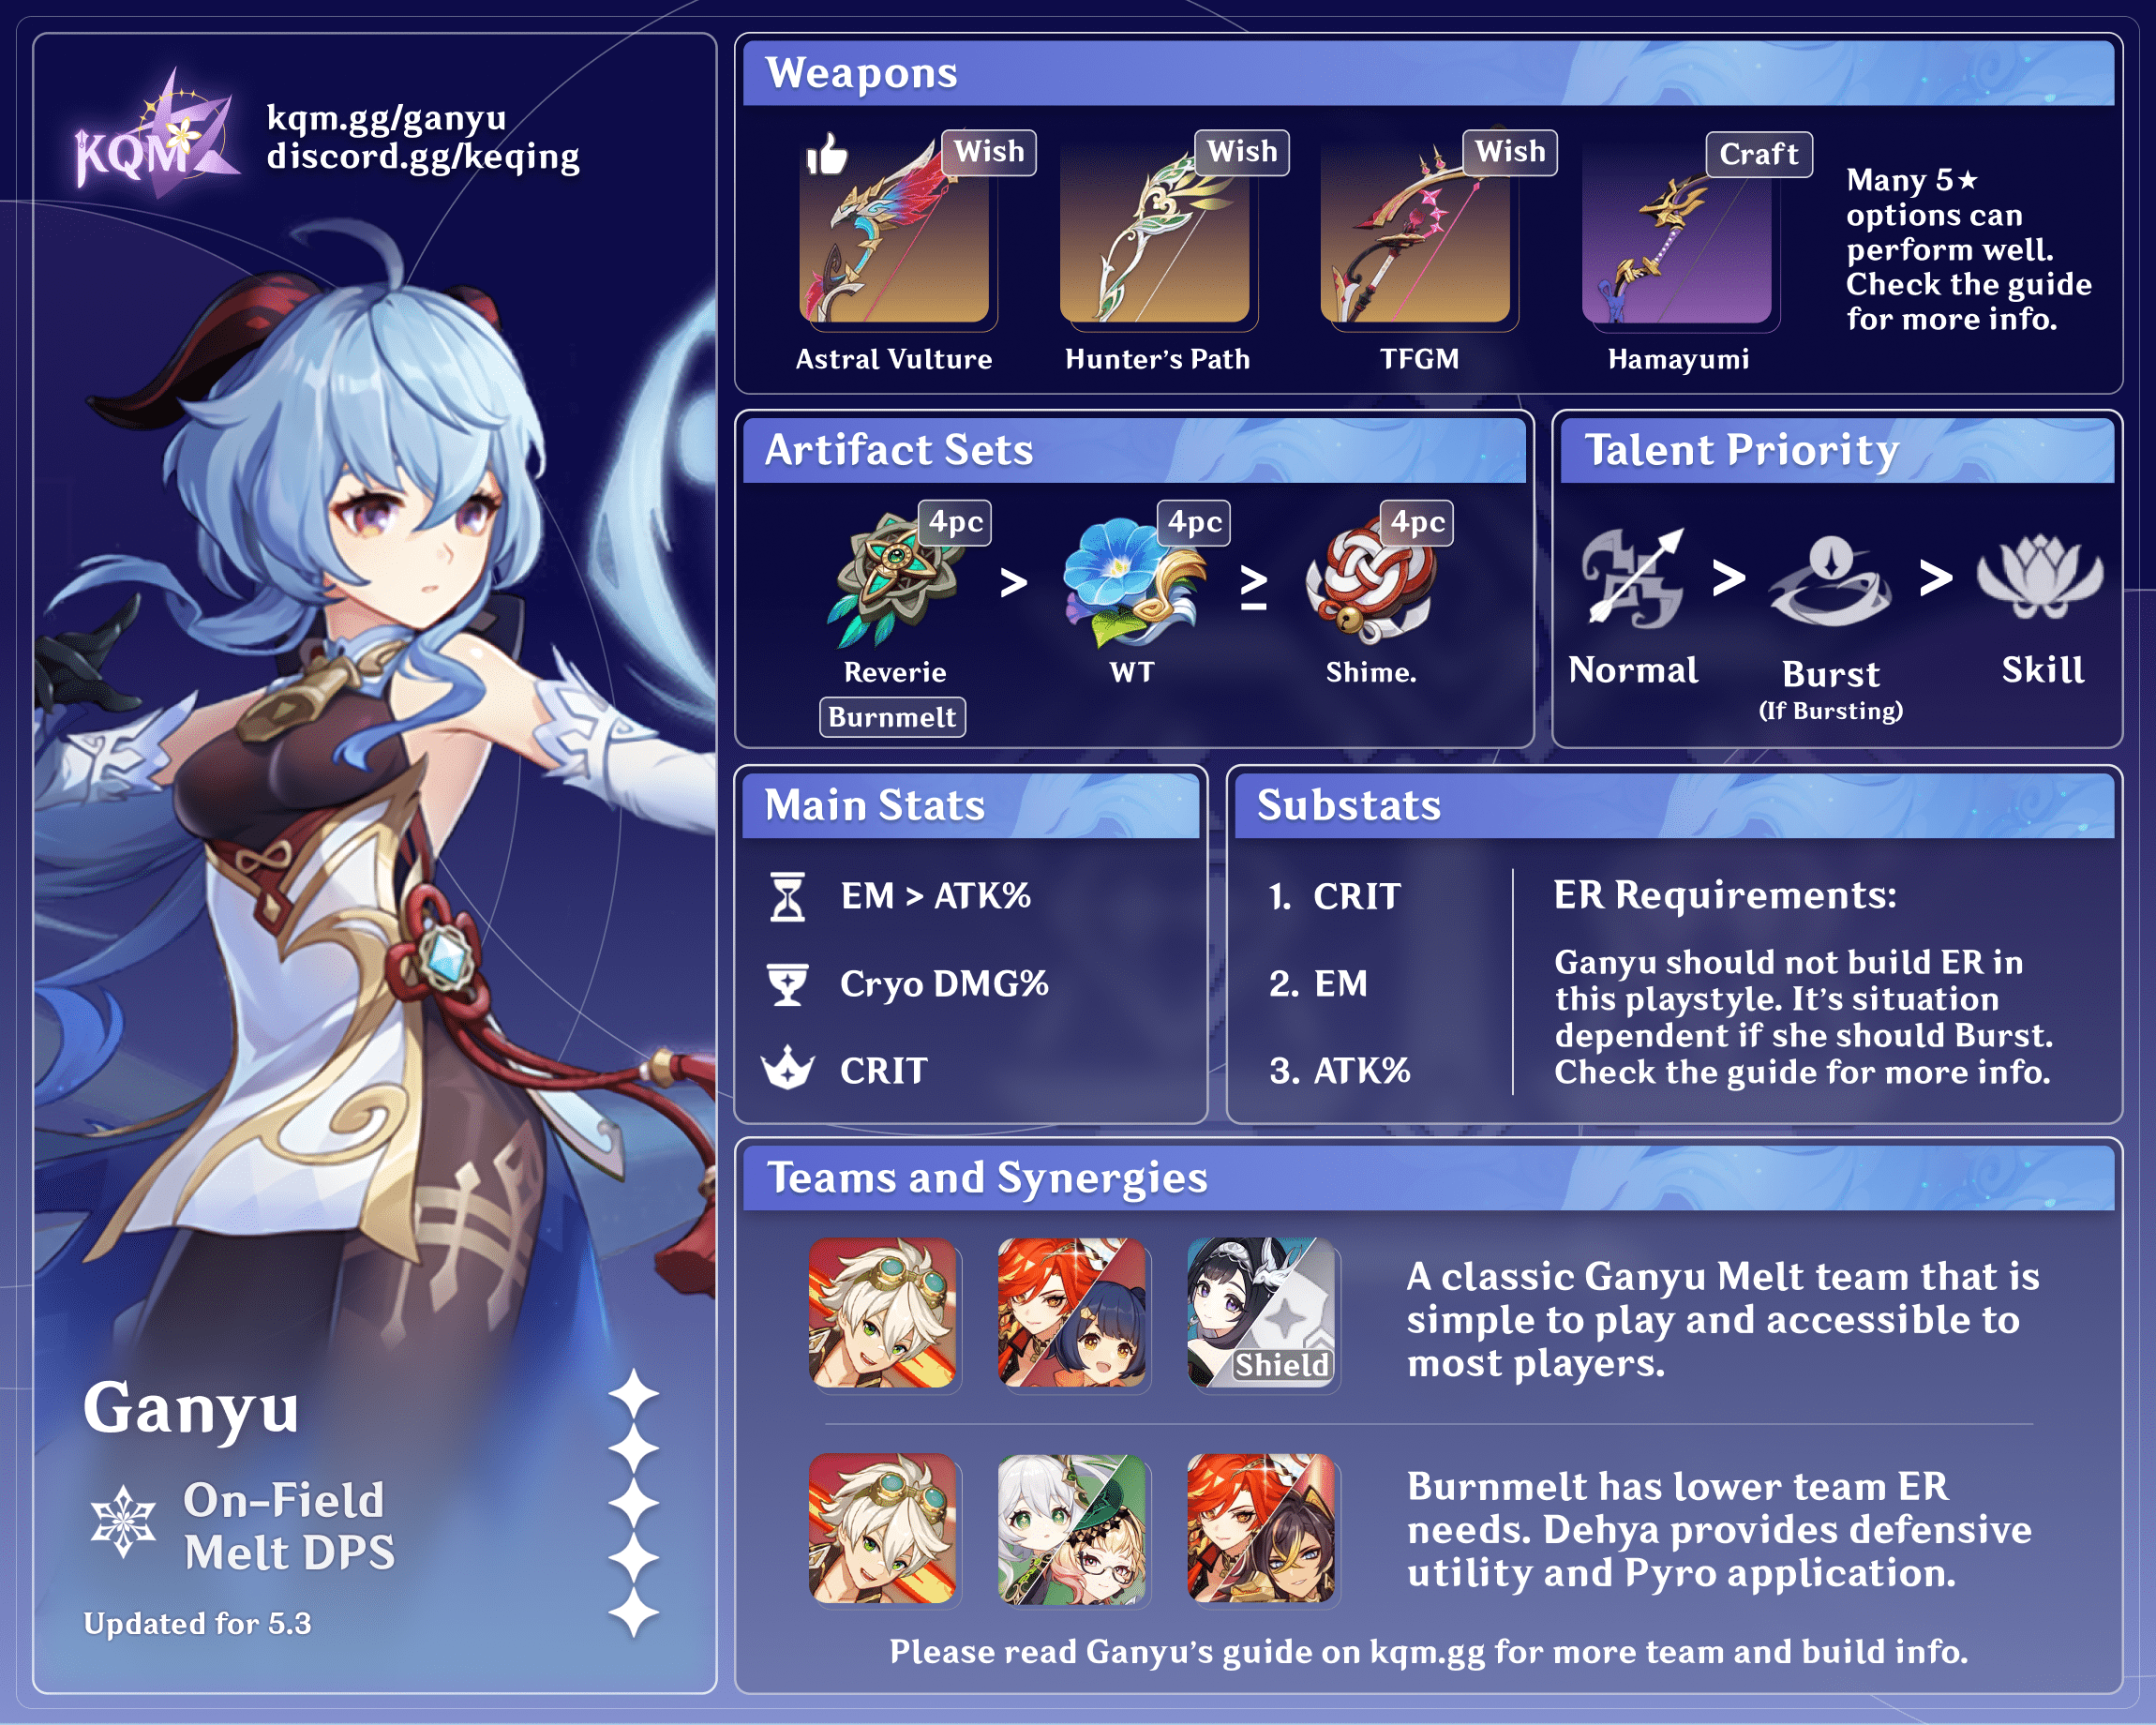
Credits to: euphorysm, cegewinne, nova_licious, haafr, lesterberne and KQM Staff
Character Overview
Pros
- Simple kit that is easy to learn and execute.
- Variety of playstyles, featuring both DPS and Support roles.
- Good AoE.
- Consistent damage output over the rotation.
Cons
- Extremely vulnerable to interruption during her Charged Attacks, as each shot takes 2s to charge.
- Inability to effectively activate abilities that require using Normal Attacks.
- Charged Attacks can miss, which leads to a significant damage loss (e.g. against small, mobile enemies).
- Performing Charged Attacks may be difficult for mobile or console users.
Playstyles
Freeze & Mono Cryo DPS
Freeze teams pair Ganyu with a Hydro character to trigger Freeze. This playstyle excels in AoE content and simplifies gameplay by immobilizing enemies, preventing them from attacking, while still performing adequately — albeit slightly weaker — against enemies that cannot be Frozen. It is also easier to build thanks to Cryo Resonance and artifact sets like 4pc Blizzard Strayer, which provide a large amount of CRIT Rate. However, this playstyle is generally more expensive for Ganyu, as her best Freeze teams often require multiple 5-star characters.
Mono Cryo is another flexible playstyle that involves Bursting when possible and using Charged Attacks during teammates’ downtime. It can be used against bosses or enemies with innate Hydro auras or when your Hydro options are lacking.
Melt DPS
Taking advantage of Reverse Melt, Ganyu is able to Melt both shots from her Charged Attack, dealing great damage. In such setups, Ganyu usually forgoes building ER, allowing for more offensive stats to be built. However, to function properly, it requires better rotation control and mechanical execution, in comparison to the more forgiving Freeze playstyle.
Off-Field
Ganyu works well as an off-field support thanks to the long uptime and wide AoE of her Burst. In teams with another Cryo DPS, she acts as a utility damage dealer, providing a 20% Cryo DMG Bonus through her A4 Passive. In Melt teams, while her Cryo application alone may not be able to sustain a Cryo aura with fast Pyro appliers, pairing her with another Cryo unit can cover that gap. In either team, she can hold Favonius Warbow if the Energy is needed. Overall, she adds reliable extra damage, Cryo application, and utility without needing much field time.
Talents
Talent Priority
Normal Attack ≥ Burst > Skill (Freeze)
Normal Attack > Skill (Melt)
Burst > Skill > Normal Attack (Off-Field Support)
Talent Overview
 Normal Attack | Liutian Archery
Talent Description
Normal Attack
Performs up to 6 consecutive shots with a bow.
Charged Attack
Performs a more precise Aimed Shot with increased DMG.
While aiming, an icy aura will accumulate on the arrowhead before the arrow is fired. Has different effects based on how long the energy has been charged:
- Charge Level 1: Fires off an icy arrow that deals Cryo DMG.
- Charge Level 2: Fires off a Frostflake Arrow that deals Cryo DMG. The Frostflake Arrow blooms after hitting its target, dealing AoE Cryo DMG.
Plunging Attack
Fires off a shower of arrows in mid-air before falling and striking the ground, dealing AoE DMG upon impact.
Ganyu’s Normal Attack Talent consists of a 6-hit Normal Attack string that is very pretty but very rarely used. Her true strength lies in her Charged Shots.
Unlike most other Bow characters, Ganyu’s Level 2 Charged Shot is extremely powerful and has no ICD on either instance of damage, which allows her to trigger reactions on both hits. This is especially important for her Melt teams, as it enables her to Melt both parts of her Charged Shot.
 Elemental Skill | Trail of the Qilin
Talent Description
Leaving a single Ice Lotus behind, Ganyu dashes backward, shunning all impurity and dealing AoE Cryo DMG.
Ice Lotus
- Continuously taunts surrounding opponents, attracting them to attack it.
- Endurance scales based on Ganyu’s Max HP.
- Blooms profusely when destroyed or once its duration ends, dealing AoE Cryo DMG.
The flower taunts all non-Boss enemies for 6s or until enough damage has been dealt to it, after which it explodes and deals another instance of damage. This Skill can generate a total of four particles per cast, two for each hit.
The taunt can group or distract enemies to a degree, but it is not a reliable source of survivability. The dash can be used to reposition Ganyu, allowing her to dodge enemy attacks or gain distance for Amos’ Bow stacks.
 Elemental Burst | Celestial Shower
Talent Description
Coalesces atmospheric frost and snow to summon a Sacred Cryo Pearl that exorcises evil.
During its ability duration, the Sacred Cryo Pearl will continuously rain down shards of ice, striking opponents within an AoE and dealing Cryo DMG.
Ganyu’s Burst is an extremely important part of her kit, but it can be complex to use effectively. Her Burst lasts for 15s and drops 50 Ice Shards that deal Cryo damage in a small AoE, but not all Ice Shards necessarily hit an enemy.
Each Ice Shard targets a random enemy within its field that has not been targeted by one of the four most recent Ice Shards. If there are no such enemies, the next Ice Shard drops randomly within the field.
Ganyu’s Burst is particularly potent against multiple enemies grouped together, as its damage can scale quadratically. If three enemies are grouped, each targeted Ice Shard hits all three enemies because of its AoE, resulting in three times the amount of damage.
Quadratic Scaling Infographic

 Ascension 1 Passive | Undivided Heart
Talent Description
After firing a Frostflake Arrow, the CRIT Rate of subsequent Frostflake Arrows and their resulting bloom effects is increased by 20% for 5s.
Ganyu’s Ascension 1 Passive Talent provides a significant boost to Charged Shots, making it particularly useful for teams that rely heavily on them, such as Melt teams. However, it is less beneficial for teams that rely heavily on Burst damage, such as Freeze teams.
Note that the buff only applies to successive Charged Shots after Ganyu’s first Charged Shot.
 Ascension 4 Passive | Harmony Between Heaven and Earth
Talent Description
Celestial Shower grants a 20% Cryo DMG Bonus to active members in the AoE.
Ganyu’s Ascension 4 Passive adds value to her as a DPS unit and to any Cryo teammates. Additionally, Ganyu can snapshot the Cryo DMG Bonus onto her own Burst on the second rotation and onwards, assuming that the previous Burst is still active upon cast. The window for this is about ~17.5s.
Constellations
 Constellation 1 | Dew-Drinker
Constellation Description
Taking DMG from a Charge Level 2 Frostflake Arrow or Frostflake Arrow Bloom decreases opponents’ Cryo RES by 15% for 6s.
A hit regenerates 2 Energy for Ganyu. This effect can only occur once per Charge Level 2 Frostflake Arrow, regardless if Frostflake Arrow itself or its Bloom hit the target.
Ganyu’s first Constellation provides a great quality of life improvement by further decreasing her already low ER requirements in Freeze and Mono Cryo teams.
The Cryo RES Shred is also valuable, as it can boost both Ganyu’s damage output and the damage of her Cryo teammates, especially in Burnmelt teams, where Shredding Cryo RES is difficult.
 Constellation 2 | The Auspicious
Constellation Description
Trail of the Qilin gains 1 additional charge.
This Constellation grants more flexibility in timing Ganyu’s Ice Lotuses in rotations where she uses her Elemental Skill twice. It allows you to use her Elemental Burst earlier or skip waiting for her Skill to come off cooldown. The Constellation does not grant you an extra Skill use outside of these scenarios. While not game-changing on its own, its true value shines with Ganyu’s sixth Constellation.
Note that using the second charge of Ganyu’s Elemental Skill won’t refresh the buff from the 4pc effect of Shimenawa’s Reminiscence if it is currently active.
 Constellation 3 | Cloud-Strider
Constellation Description
Increases the Level of Celestial Shower by 3.
Maximum upgrade level is 15.
Decent damage increase for Ganyu in Freeze and off-field DPS teams.
 Constellation 4 | Westward Sojourn
Constellation Description
Opponents standing within the AoE of Celestial Shower take increased DMG. This effect strengthens over time.
Increased DMG taken begins at 5% and increases by 5% every 3s, up to a maximum of 25%.
The effect lingers for 3s after the opponent leaves the AoE.
Ganyu’s Constellation 4 is a strong addition to her kit. This Constellation is particularly useful in Freeze and Mono Cryo teams, but it is worthless in Melt teams where Ganyu doesn’t use her Burst. It becomes even more powerful if Ganyu can Burst off cooldown. In that case, the buff never expires, effectively being a 25% DMG Bonus for the entire team after the first rotation until the enemy dies.
 Constellation 5 | The Merciful
Constellation Description
Increases the Level of Trail of Qilin by 3.
Maximum upgrade level is 15.
Ganyu’s Skill is a small portion of her damage. Slightly more damage and taunt durability is nice but is rarely an important difference.
 Constellation 6 | The Clement
Constellation Description
Using Trail of the Qilin causes the next Frostflake Arrow shot within 30s to not require charging.
Ganyu’s final Constellation greatly increases her DPS potential within a short window of time. When combined with her second Constellation, it lets Ganyu fire off up to three Frostflake Arrows in quick succession. In sustained rotations, she can effectively gain an extra “free” Charged Shot for each time her Skill is used. This Constellation is especially good for speedrunning.
An additional benefit is that, with the removal of charging time, there is almost no chance that Ganyu is interrupted, which lets her do away with a shield.
Artifacts
Freeze & Mono Cryo ER Requirements
Calcs for ER requirements can be found here (last updated for Version “Luna IV”).
Assumptions:
- Safe particle RNG.
- 2 Favonius procs per rotation.
- 4-star characters are assumed at C6, 5-star characters are assumed at C0.
| Triple Cryo | Double Cryo | |
| On-Field | 110-115% | 115-130% |
| Off-Field (High Particle Generation) | 105-110% | 115-125% |
| Off-Field (Low Particle Generation) | 150-160% | 160-170% |
Ganyu does not build ER in Melt teams.
Use the Energy Recharge Calculator to determine exact requirements for your team and rotation. For more details on how Favonius weapons will affect your team, please use Ac1d’s Favonius Mastersheet.
Artifact Stats
 Sands |  Goblet |  Circlet |
| EM (Melt) > ATK% | Cryo DMG Bonus | CRIT / ATK%* |
Stat Priority (Freeze / Support): ER% (until requirement) > CRIT DMG ≥ ATK% > CRIT Rate
Stat Priority (Melt): EM > CRIT > ATK%
In Freeze teams, Ganyu uses either 4pc BS or 4pc MH, which both give a massive amount of CRIT Rate when their conditions are met. This allows you to focus more on CRIT DMG and ATK% stats.
In Melt, EM becomes a priority stat as it greatly amplifies Ganyu’s damage from her Melted Charged Attacks.
*An ATK% Circlet may be a competitive option when Ganyu wields CRIT DMG Bows.
Artifact Sets
 4pc Blizzard Strayer | A very strong option in Freeze teams due to the enormous amount of CRIT Rate it provides. This set is Ganyu’s best-in-slot against freezable enemies, however, it performs worse against unfreezable enemies as Ganyu gets 20% CRIT Rate instead of 40% in such scenarios. |
 4pc Marechaussee Hunter (MH) | Ganyu’s best set when paired with Furina. This set outperforms Blizzard Strayer due to the higher amount of CRIT Rate it provides in fights against unfreezable enemies, as well as being much more consistent. Note that this set requires Ganyu to be on-field when HP fluctuations occur, so it’s advised to wait before using Ganyu’s Burst to snapshot Marechaussee stacks. |
 4pc Wanderer’s Troupe (WT) | This set gives 80 EM, which is useful in Ganyu’s Melt teams, as well as an unconditional 35% DMG Bonus to Charged Attacks. In addition, it can be farmed passively by killing World and Weekly Bosses or via Strongbox. |
4pc Shimenawa’s Reminiscence (Shimenawa) | This set, while dealing more damage than Wanderer’s Troupe, is more restrictive with both rotations and weapons (notably Hamayumi), and it requires Ganyu to fire 5 Charged Shots in under 10s to outperform 4pc WT — a feat which is almost impossible to achieve. |
 4pc Unfinished Reverie (UR) | Gives an ATK% buff and a DMG Bonus against enemies afflicted with a Burning aura, which increases over time, up to 50%. This is Ganyu’s best set when played in Burnmelt. |
 4pc Noblesse Oblige (Noblesse) | A supportive set that Ganyu uses alongside another DPS to increase their ATK. The 20% Burst DMG Bonus is also useful for Ganyu’s personal damage. |
 4pc Scroll of the Hero of Cinder City (Scroll) | This is an alternative option for Support Ganyu, where she triggers Elemental Reactions and gives her teammates a 12% Elemental DMG Bonus for the Element she reacts with, as well as for Cryo, when another character already holds 4pc Noblesse. |
 4pc Emblem of Severed Fate (Emblem) | 4pc Emblem of Severed Fate grants Ganyu a DMG Bonus to her Elemental Burst based on her Energy Recharge. An alternative option for Ganyu if a Noblesse holder in the team is already present. |
 2pc Mixed Sets | 2pc Bonuses: ATK%, Cryo DMG Bonus, EM These are transitional sets and can be used while farming for a dedicated 4pc set. |
Weapons
Freeze / Mono Cryo
 The First Great Magic | In Triple Cryo teams, Ganyu is able to get all 3 stacks of this weapon’s ATK buff. Its Charged Attack DMG Bonus, as well as CRIT DMG secondary stat, are greatly appreciated. |
 Aqua Simulacra | A strong CRIT DMG stat stick with an additional 20% DMG Bonus. Depending on the build, an ATK% Circlet may be a viable option to make up for its low Base ATK. |
 Polar Star | An amazing bow that gives a 12% DMG Bonus to Skill and Burst damage, as well as an ATK% buff, stacking up to 48%. Ganyu can easily maintain this weapon’s full passive. Note that it may be difficult to build around due to its CRIT Rate secondary stat. |
 Thundering Pulse | A decent stat stick that gives a high amount of CRIT DMG, alongside a 20% ATK buff. Its Normal Attack DMG Bonus is, however, of no use for Ganyu. |
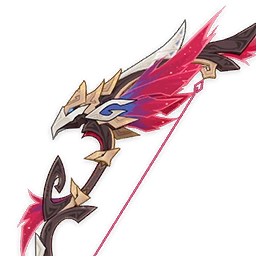
Astral Vulture’s Crimson Plumage | Despite Ganyu being unable to activate this weapon’s ATK% buff, its Charged Attack and Elemental Burst DMG Bonus, alongside a CRIT DMG secondary stat, make it a very powerful option. |
 Amos’ Bow | A nice ATK% stat stick that comes with a Charged Attack DMG Bonus that increases with the distance between Ganyu and her enemies. |
 The Daybreak Chronicles | This weapon, aside from a high CRIT DMG secondary stat, also provides a 60% DMG Bonus to Elemental Skills and Bursts, but requires Ganyu to spend as little field time as possible. |
 Prototype Crescent | A good craftable weapon. Its 72% ATK buff at R5 is extremely valuable in Freeze teams; however, it performs significantly worse if the enemy lacks a weak spot, which prevents the activation of this weapon’s passive. |
 Song of Stillness | Another craftable weapon, from the Fontaine series, that performs excellently. A healer is required to activate its passive. |
 Range Gauge | A gacha weapon that performs well with a healer, giving a nice ATK% buff and a DMG Bonus. However, refinements may be hard to acquire. |
 Scion of the Blazing Sun | A Battle Pass weapon that, aside from a CRIT Rate stat, also applies a powerful debuff on the enemies via its Sunfire Arrow, making them take more damage from Charged Attacks. |
 Chainbreaker | A Natlan craftable weapon. While the EM buff is of no use in Freeze teams, it still provides a nice amount of ATK%. |
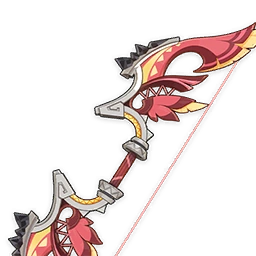
Flower-Wreathed Feather | Another gacha weapon that is a strong option, giving a Charged Attack DMG Bonus. Similarly to Range Gauge, refinements may be difficult to obtain. |
 The Viridescent Hunt | Another Battle Pass weapon. It provides additional grouping. However, the CRIT Rate secondary stat can result in overcapping due to the amount of CRIT Rate Ganyu gets from other sources. |
Melt
Astral Vulture’s Crimson Plumage | By far Ganyu’s best 5-star weapon. It offers high Base ATK, a large amount of CRIT DMG, along with a Charged Attack and Elemental Burst DMG Bonus. |
 Hunter’s Path | An extremely strong option for Melt Ganyu. It provides a huge amount of CRIT Rate, as well as a flat Charged Attack DMG Bonus. Note that due to the limited amount of damage instances buffed by its passive, this weapon performs slightly worse in AoE scenarios. |
The First Great Magic | Even though usually Ganyu only gets 1 stack of this weapon’s passive, it’s enough to be comparable to Hunter’s Path. It also provides a large amount of CRIT DMG and a decent amount of ATK%. |
Aqua Simulacra | Provides a huge amount of CRIT DMG, and a DMG% buff that requires Ganyu to stay close to her enemies, which is not usually a problem. Its low Base ATK can be compensated for by Bennett’s buff. |
Amos’ Bow | Amos’ Bow gives a large amount of ATK% and a Charged Attack DMG Bonus, increasing the longer Ganyu’s arrows spend flying. |
Thundering Pulse | A respectable stat stick offering a high CRIT DMG secondary stat in addition to a 20% ATK increase. However, the Normal Attack DMG Bonus is useless for Ganyu. |
Polar Star | This weapon offers a nice CRIT Rate secondary stat, a 12% DMG Bonus to Skill and Burst, and a 48% ATK increase, which Ganyu has no problems maintaining. With Bennett’s buff, the ATK% from this weapon is of less value. |
 Skyward Harp | Skyward Harp is a nice stat stick, giving a nice amount of CRIT Rate and CRIT DMG. Its passive also has a chance of inflicting an extra attack that deals Physical damage. |
Prototype Crescent | Prototype Crescent is a strong craftable option that falls behind Hamayumi if the passive cannot be activated (i.e. the enemy does not have a weak spot). |
 Hamayumi | An extremely strong option for Melt. Note that to maximize its passive, it requires Ganyu to not use her Burst, which creates an anti-synergy with 4pc Shimenawa. |
Flower-Wreathed Feather | A powerful gacha weapon that boosts Charged Attack damage, though its refinements can be hard to come by. |
Chainbreaker | A Natlan craftable weapon that provides ATK%. If the party consists of characters of 4 different elements, or has 3 characters from Natlan, the weapon will also provide additional EM. |
Scion of the Blazing Sun | A Battle Pass weapon that offers CRIT Rate as its main stat and inflicts a potent Heartsearer debuff on enemies, increasing the damage they receive from Charged Attacks. |
The Viridescent Hunt | A Battle Pass weapon providing a CRIT Rate secondary stat and grouping, which may be useful depending on the scenario or build. |
Off-Field
The First Great Magic | The First Great Magic is Ganyu’s best option in Freeze teams as an off-field DPS or support, due to the nice amount of ATK% and CRIT DMG it provides. |
Polar Star | Despite Ganyu being unable to snapshot most of the ATK% buffs Polar Star offers in her off-field playstyle, it is still an amazing choice for its CRIT Rate secondary stat, and the unconditional 12% increase to Skill and Burst damage. |
Thundering Pulse | Thundering Pulse is a good stat stick, giving CRIT DMG and an unconditional 20% ATK increase. |
Aqua Simulacra | Aqua Simulacra is another great choice as it provides a large amount of CRIT DMG and a 20% DMG Bonus, which Ganyu has no problems maintaining, as it requires being close to the enemies. In addition, the DMG Bonus still remains active when Ganyu is off-field. |
Amos’ Bow | While Ganyu’s off-field playstyle does not use the Charged Attack DMG Bonus from Amos’ Bow, it is still a good stat stick that gives a large amount of ATK%. |
The Daybreak Chronicles | The Daybreak Chronicles gives Ganyu a massive 60% DMG Bonus for Bursts, Skills, and Normal Attacks, and encourages Ganyu to spend less time on-field. |
 Elegy for the End | In teams where Ganyu serves as a Melt enabler, this weapon provides a valuable ATK and EM buff to the on-field DPS, and its ER secondary stat helps with Ganyu’s own ER requirements. |
Song of Stillness | Song of Stillness is a craftable bow that provides a nice DMG Bonus after receiving healing; therefore, a healer is a requirement to trigger this weapon’s effect. |
 Alley Hunter | This weapon’s unique passive encourages Ganyu to spend as much time off-field as possible, which synergizes with her off-field playstyle. |
 Fading Twilight | Fading Twilight was featured as an event weapon in Version 2.7. It gives a nice DMG Bonus, which can be triggered from off-field. |
Chainbreaker | Chainbreaker is a solid craftable option, with its passive ATK% increase not expiring. |
The Viridescent Hunt | The Viridescent Hunt, a Battle Pass weapon, provides a respectable amount of CRIT Rate. Note that in order to summon the Cyclone, which attracts nearby enemies, Ganyu needs to be on-field. |
 Mouun’s Moon | Mouun’s Moon provides a large Elemental Burst DMG Bonus, which makes it a good option for teams where Ganyu focuses on her off-field damage. |
 Favonius Warbow | Favonius Warbow lowers the ER requirements of Ganyu’s entire team, making it a good option for Burst-intensive teams, at the cost of Ganyu’s personal damage. |
Teams
Rotation Notation
- N = Normal Attack
- C = Charged Attack
- A = Aimed Shot
- P = Plunging Attack
- E = Elemental Skill
- tE = Tap Skill
- hE = Hold Skill
- Q = Elemental Burst
- D = dash (cancel)
- J = jump (cancel)
- W = walk (cancel)
- > = switch character
- ( ) = these actions are optional; please refer to the notes below
- [ ] = repeat these actions the specified number of times
Teambuilding
Freeze teams pair Ganyu with a Hydro unit to lock enemies in place, excelling in AoE and offering easy building through Cryo Resonance and 4pc BS, though being slightly weaker against unfreezable enemies and often more expensive due to needing limited 5-star characters.
Mono Cryo Ganyu is played when Hydro character options are limited, or when against unfreezable enemies.
Reverse Melt allows Ganyu to trigger Melt on her Charged Attacks for very high damage, but it comes at the cost of stricter rotations and more precise mechanical play compared to Freeze.
Freeze DPS

Ganyu is used as an on-field damage dealer, focusing on damage from her Charged Attacks and Elemental Burst.
Notable Teammates
Hydro Characters
Hydro characters that provide buffs and Elemental Application not reliant on Normal Attacks are ideal.
 Furina | Furina provides constant Hydro application and a huge DMG Bonus with her Burst, but requires healing to mitigate her Salon Members’ HP drain and stack Fanfare. She also enables 4pc MH for Ganyu and can hold 4pc Tenacity to further buff the team. |

Cryo Characters
These characters activate Cryo Resonance, provide buffs, and lower ER requirements for Ganyu.
 Escoffier | Escoffier provides an enormous 55% RES Shred to Cryo and Hydro when playing a team of only Cryo and Hydro characters, as well as great personal damage and healing that fulfills Song of Stillness’s requirements and helps with Furina’s Fanfare stacking. |


Flex Characters
 Kazuha | Kazuha is a very strong option for the DMG% buff he provides with his A4 Passive, grouping from his Skill, and RES Shred from 4pc VV. Note that Kazuha’s Plunge Attack after his Skill Shatters Frozen enemies, which may displace the affected enemies. |
Xilonen | Xilonen Shreds Cryo and Hydro RES, provides healing, and gives a 40% DMG Bonus via 4pc Scroll. Similarly to Kazuha, Xilonen’s Geo-converted Normal Attacks trigger Shattered, which may lead to dispositioning affected enemies. |
 Venti | Aside from unparalleled grouping in heavy multi-target content and RES Shred from 4pc VV, Venti also provides an Energy refund for characters, lessening ER requirements. In addition, he enables Hexerei characters’ kits and their corresponding buffs, such as Mona’s Omen extension. |


Example Teams
This is not a comprehensive list of teams. The inclusion or exclusion of any given team does not necessarily reflect its power level.

A standard Freeze team. Furina provides Hydro application and a DMG Bonus with her Burst, while Escoffier Shreds RES, deals additional damage, and heals the team to generate Furina’s Fanfare stacks more quickly. The 4th slot provides buffs or Energy, such as Shenhe with her Skill and Burst, or Citlali’s holding 4pc Scroll and TTDS.
Sample Rotation (Shenhe)
Ganyu E > Furina ED N1 Q > Shenhe Q tE > Escoffier EQ > Ganyu C¹ EQ C > Shenhe N1 tE N1 > Ganyu 2[C]
¹ Do a Charged Attack before EQ to snapshot MH stacks.
Sample Rotation (Citlali)
Ganyu E > Furina ED N1 Q > Citlali E N1 > Escoffier EQ > Ganyu C¹ EQ 4[C]
¹ Do a Charged Attack before EQ to snapshot Marechaussee Stacks.

Another variation of a Freeze team with Kazuha as a grouper. Kokomi’s Skill applies Hydro every 2s with no ICD, making it ideal for Freeze. Additionally, Kokomi can hold TTDS and 4pc Tenacity to cumulatively provide a massive 68% ATK buff for Ganyu. Shenhe Shreds RES with her Burst and gives a DMG Bonus through her Skill, while Kazuha offers grouping, an Elemental DMG Bonus through his A4 Passive, and additional RES Shred by holding 4pc VV.
Sample Rotation
Ganyu C > Kazuha tE > Shenhe Q tE > Kokomi ED > Ganyu EQ > Kazuha tEQ > Ganyu C > Shenhe N1 tE N1 > Ganyu C E C

A team that is known as “Morgana”. Mona provides buffing along with Hydro application and can hold supporting sets and weapons like 4pc Tenacity and TTDS. Venti provides grouping and Shreds RES through 4pc VV. Diona sustains through her healing and shield, and Rosaria provides a nice CRIT Rate buff. Either of these characters can hold 4pc Noblesse. Both can wield Favonius for extra Energy.
Sample Rotation (Diona)
Diona hEQ > Ganyu EQ > Venti EQ > Mona E Q N3 > Ganyu 2[C] > Venti E > Ganyu 2[C]
Sample Rotation (Rosaria)
Ganyu E > Mona E > Venti EQ > Rosaria EQ > Ganyu Q > Mona Q N3 > Venti ED > Rosaria E > Ganyu C
Mono Cryo

Mono Cryo teams can work as a solid substitute for standard Freeze teams when enemies can’t be Frozen or already apply Hydro themselves. They’re also a good option if your available Hydro characters aren’t very strong or well-built.
Example Teams
This is not a comprehensive list of teams. The inclusion or exclusion of any given team does not necessarily reflect its power level.

A Mono Cryo team featuring Ganyu and Ayaka. Shenhe provides Skill and Burst DMG Bonuses, Cryo RES Shred, and her Icy Quill buff. Xilonen Shreds RES as well, providing an extra DMG Bonus through 4pc Scroll, and heals, while Ganyu and Ayaka focus on dealing damage.
Sample Rotation
Ganyu C > Xilonen E N2 > Shenhe EQ > Ganyu EQ > Ayaka E D N1 Q¹ > Xilonen E N2 > Shenhe E D > Ganyu C E > Ayaka D N1C E N2
¹ If Ayaka uses Mistsplitter

A Mono Cryo team featuring Kazuha and Zhongli. Rosaria activates Cryo Resonance, reduces Ganyu’s ER requirements, and offers a CRIT Rate buff. She can also equip 4pc Noblesse to provide an additional 20% ATK buff to the team. Kazuha provides grouping via his Skill, a DMG% buff through his A4 Passive and Cryo RES Shred via 4pc VV. Zhongli provides interruption resistance, RES Shred through his shield, and extra buffs through 4pc Tenacity or 4pc Archaic Petra.
Sample Rotation
Ganyu C > Kazuha tEP > Zhongli hE D N1 > Rosaria QE > Ganyu EQ > Kazuha tEP > Ganyu C > Rosaria E
Melt DPS

Unlike Freeze, this playstyle focuses more on Ganyu’s single-target performance. The first slot is usually Bennett alongside an off-field Pyro enabler, and the 4th slot is an Anemo buffer or a flex unit, providing extra utility, such as buffs, shields, etc.
Notable Teammates
Pyro Teammates
These characters provide strong buffs alongside strong off-field Pyro application needed for Ganyu to reliably Melt.
 Bennett | Bennett has the strongest ATK buff in the game and good healing. He enables Pyro Resonance with another Pyro unit, which gives a strong 25% ATK buff. His Burst’s Pyro self-application can be used to enable the “Sunfire” playstyle. |
Mavuika | Mavuika deals high personal damage and provides off-field Pyro application alongside a nice DMG% buff from her A4 Passive. Being a Natlan unit, she can also hold 4pc Scroll to further buff Ganyu and other teammates. |
Durin | Durin provides long-lasting off-field Pyro application with relatively low ER requirements. |
 Dehya | In Burnmelt teams, Dehya provides both off-field Pyro application and a source of interruption resistance. She can also equip 4pc Tenacity to give a 20% ATK buff to Ganyu and the rest of the team. Note that Dehya, on her own, does not apply enough Pyro, but Dendro units like Nahida or Emilie can make up for it. |
Xiangling | Xiangling is a free character that is extremely simple to use and provides enough Pyro application to Melt all of Ganyu’s Charged Attacks, along with nice personal damage. |
Flex Teammates
These characters provide sustain, buffs, personal damage, or Elemental Application.
Zhongli | Zhongli has an extremely strong shield that can be easily refreshed, ensuring Ganyu performs her Charged Attacks without getting interrupted. The 20% Universal RES Shred from his shield is greatly appreciated. |
Xilonen | Xilonen provides strong RES Shred, healing, and a 40% DMG Bonus from 4pc Scroll, which makes her a great flex option. |
Lan Yan | Lan Yan uniquely consolidates shielding, 4pc VV RES Shred, and TTDS buffing, also being able to snapshot Bennett’s ATK buff for an even stronger shield. |
 Jean | When paired with Bennett, Jean produces a unique interaction called “Sunfire” with their Bursts. When a character stands within the overlapping area of their Bursts, Jean’s Burst applies Anemo to the player, Swirling the self-applied Pyro from Bennett’s Burst. The reaction results in a brief yet powerful period of off-field Pyro application and damage. |


Example Teams
This is not a comprehensive list of teams. The inclusion or exclusion of any given team does not necessarily reflect its power level.

In this team, Mavuika provides off-field Pyro application along with some buffing. Xilonen provides additional buffs to both Ganyu and Mavuika, such as RES Shred and Fighting Spirit stacks; on the other hand, Zhongli’s shield is appreciated for survivability. Zhongli’s pillar should be aimed away from enemies to not interfere with Pyro aura.
Sample Rotation (Xilonen)
Ganyu E > Xilonen E N2 > Mavuika tE > Bennett EQ > Ganyu 5[C]¹ > Mavuika Q
¹ Use 4–6 Charged Attacks to make sure Mavuika receives the last tick of Bennett’s Burst
Sample Rotation (Zhongli)
Ganyu E > Zhongli hE > Mavuika E > Bennett EQ > Ganyu 5[C]¹ > Mavuika Q¹
¹ Use 4–6 Charged Attacks to make sure Mavuika receives the last tick of Bennett’s Burst
² Use when available.

This Melt team utilizes a unique interaction between Bennett and Jean called “Sunfire” to apply Pyro for Ganyu to Melt her Charged Attacks.
Sample Rotation
Ganyu E(Q) > Zhongli hE > Bennett Q > Jean EQ > Ganyu 4[C] > Bennett E¹ > Jean N2 E > Bennett E
¹ Wait 0.2s for Bennett’s CD reduction to apply.

Since Dehya’s Pyro application alone is usually not enough for Ganyu to Melt reliably, a Dendro character is needed to make up for it. Nahida can provide an EM buff through her A1 Passive, while Emilie contributes by dealing high off-field damage. Dehya herself can also run a supportive set like 4pc Tenacity for a 20% ATK buff.
Sample Rotation (Nahida)
Nahida E Q > Bennett EQ > Dehya 2[E] > Ganyu 6[C]¹ E
¹ If Dehya isn’t using Sacrificial Greatsword or its effect didn’t trigger, use Ganyu’s Elemental Burst or do an extra Charged Attack.
Sample Rotation (Emilie)
Emilie Q/E > Bennett EQ > Dehya 2[E] > Ganyu 6[C]¹ E
¹ If Dehya isn’t using Sacrificial Greatsword or its effect didn’t trigger, use Ganyu’s Elemental Burst or do an extra Charged Attack.
Limited Roster Alternatives
These teams are meant for newer players whose limited roster prevents them from using the teams above; as such, the teams below result in lower damage output.

A team consisting of free units and Bennett, a unit available two months a year in the Paimon’s Bargains shop.
Sample Rotation
Ganyu E(Q) > Kachina hE N1 (Q) > Bennett Q E > Xiangling ¹QE > Ganyu 2[C] E 4[C]² > Bennett E
¹ Use 4–6 Charged Attacks to make sure Mavuika receives the last tick of Bennett’s Burst
Sample Rotation (Zhongli)
Ganyu E > Zhongli hE > Mavuika E > Bennett EQ > Ganyu 5[C]¹ > Mavuika Q¹
¹ Use Normal Attacks for extra Favonius proc.
² Do one level 1 Charged Attack if the enemy does not have a Cryo aura applied.
Support / Off-Field Enabler

Ganyu can be used as an off-fielder, providing on-field damage dealers with a 20% Cryo DMG Bonus through her A4 Passive. In these compositions, Ganyu can also opt to equip supportive gear like 4pc Noblesse to further improve the on-field Cryo damage dealer’s performance, and Favonius Warbow to reduce their ER requirements.
Ganyu can also act as a Melt enabler for Pyro on-fielders; however, a second Cryo unit is required to sustain the Cryo aura for consistent Melts.
Notable Teammates
Pyro Teammates
These characters provide strong buffs alongside strong off-field Pyro application needed for Ganyu to reliably Melt.
 Ayaka, Wriothesley, Skirk | These Cryo on-fielders appreciate the 20% Cryo DMG Bonus Ganyu gives through her A4 Passive, as well as off-field damage and buffs from sets like 4pc Noblesse and/or particles from Favonius Warbow. |
Pyro DPS Units


Example Teams
This is not a comprehensive list of teams. The inclusion or exclusion of any given team does not necessarily reflect its power level.

A composition where Ganyu takes the role of an off-field damage dealer and support, providing utility through her A4 Passive and supportive gear.
Sample Rotation
Furina ED Q > Ganyu Q E > Escoffier EQ > Ayaka ED (N1)¹ Q N1CD 2[N2C] > Ganyu E > Ayaka ED N1C
¹ If using Mistsplitter Reforged

This team features Wriothesley as the main damage dealer, with Ganyu providing off-field damage and buffs via her A4 Passive, while Furina and Xilonen provide additional buffs.
Sample Rotation
Wriothesley N1¹ > Xilonen E N2 Q > Furina N1 EQ > Ganyu EQ > Xilonen E N2 > Wriothesley combo
¹ First rotation only.

Being a Cryo character, Ganyu allows the team to fulfill the condition of Skirk’s Passive Talent, increasing the Skill Talent level of everyone in the party by 1.
Sample Rotation
Furina ED N1 Q > Escoffier E N1 Q > Ganyu EQ > Skirk combo.

In this Double Cryo team, Ganyu and Diona provide off-field Cryo application for Arlecchino to Melt, while Bennett provides buffing.
Sample Rotation
Arlecchino E > Diona hEQ > Bennett EQ > Ganyu EQ > Arlecchino combo¹
¹ Make sure to cancel Arlecchino’s Charged Attack animation before it lands in order to prevent unnecessary Pyro application.
Credits
Writer(s): previsible, rarepossum, MizuNeko
Contributors: irokei, nociii, casdela, cuppacote, wolfboyfriend, polomo, luke_260, caxia5, pulsar79, auraolis
Team images made with the KQM portrait generator.