
Table of Contents
Introduction
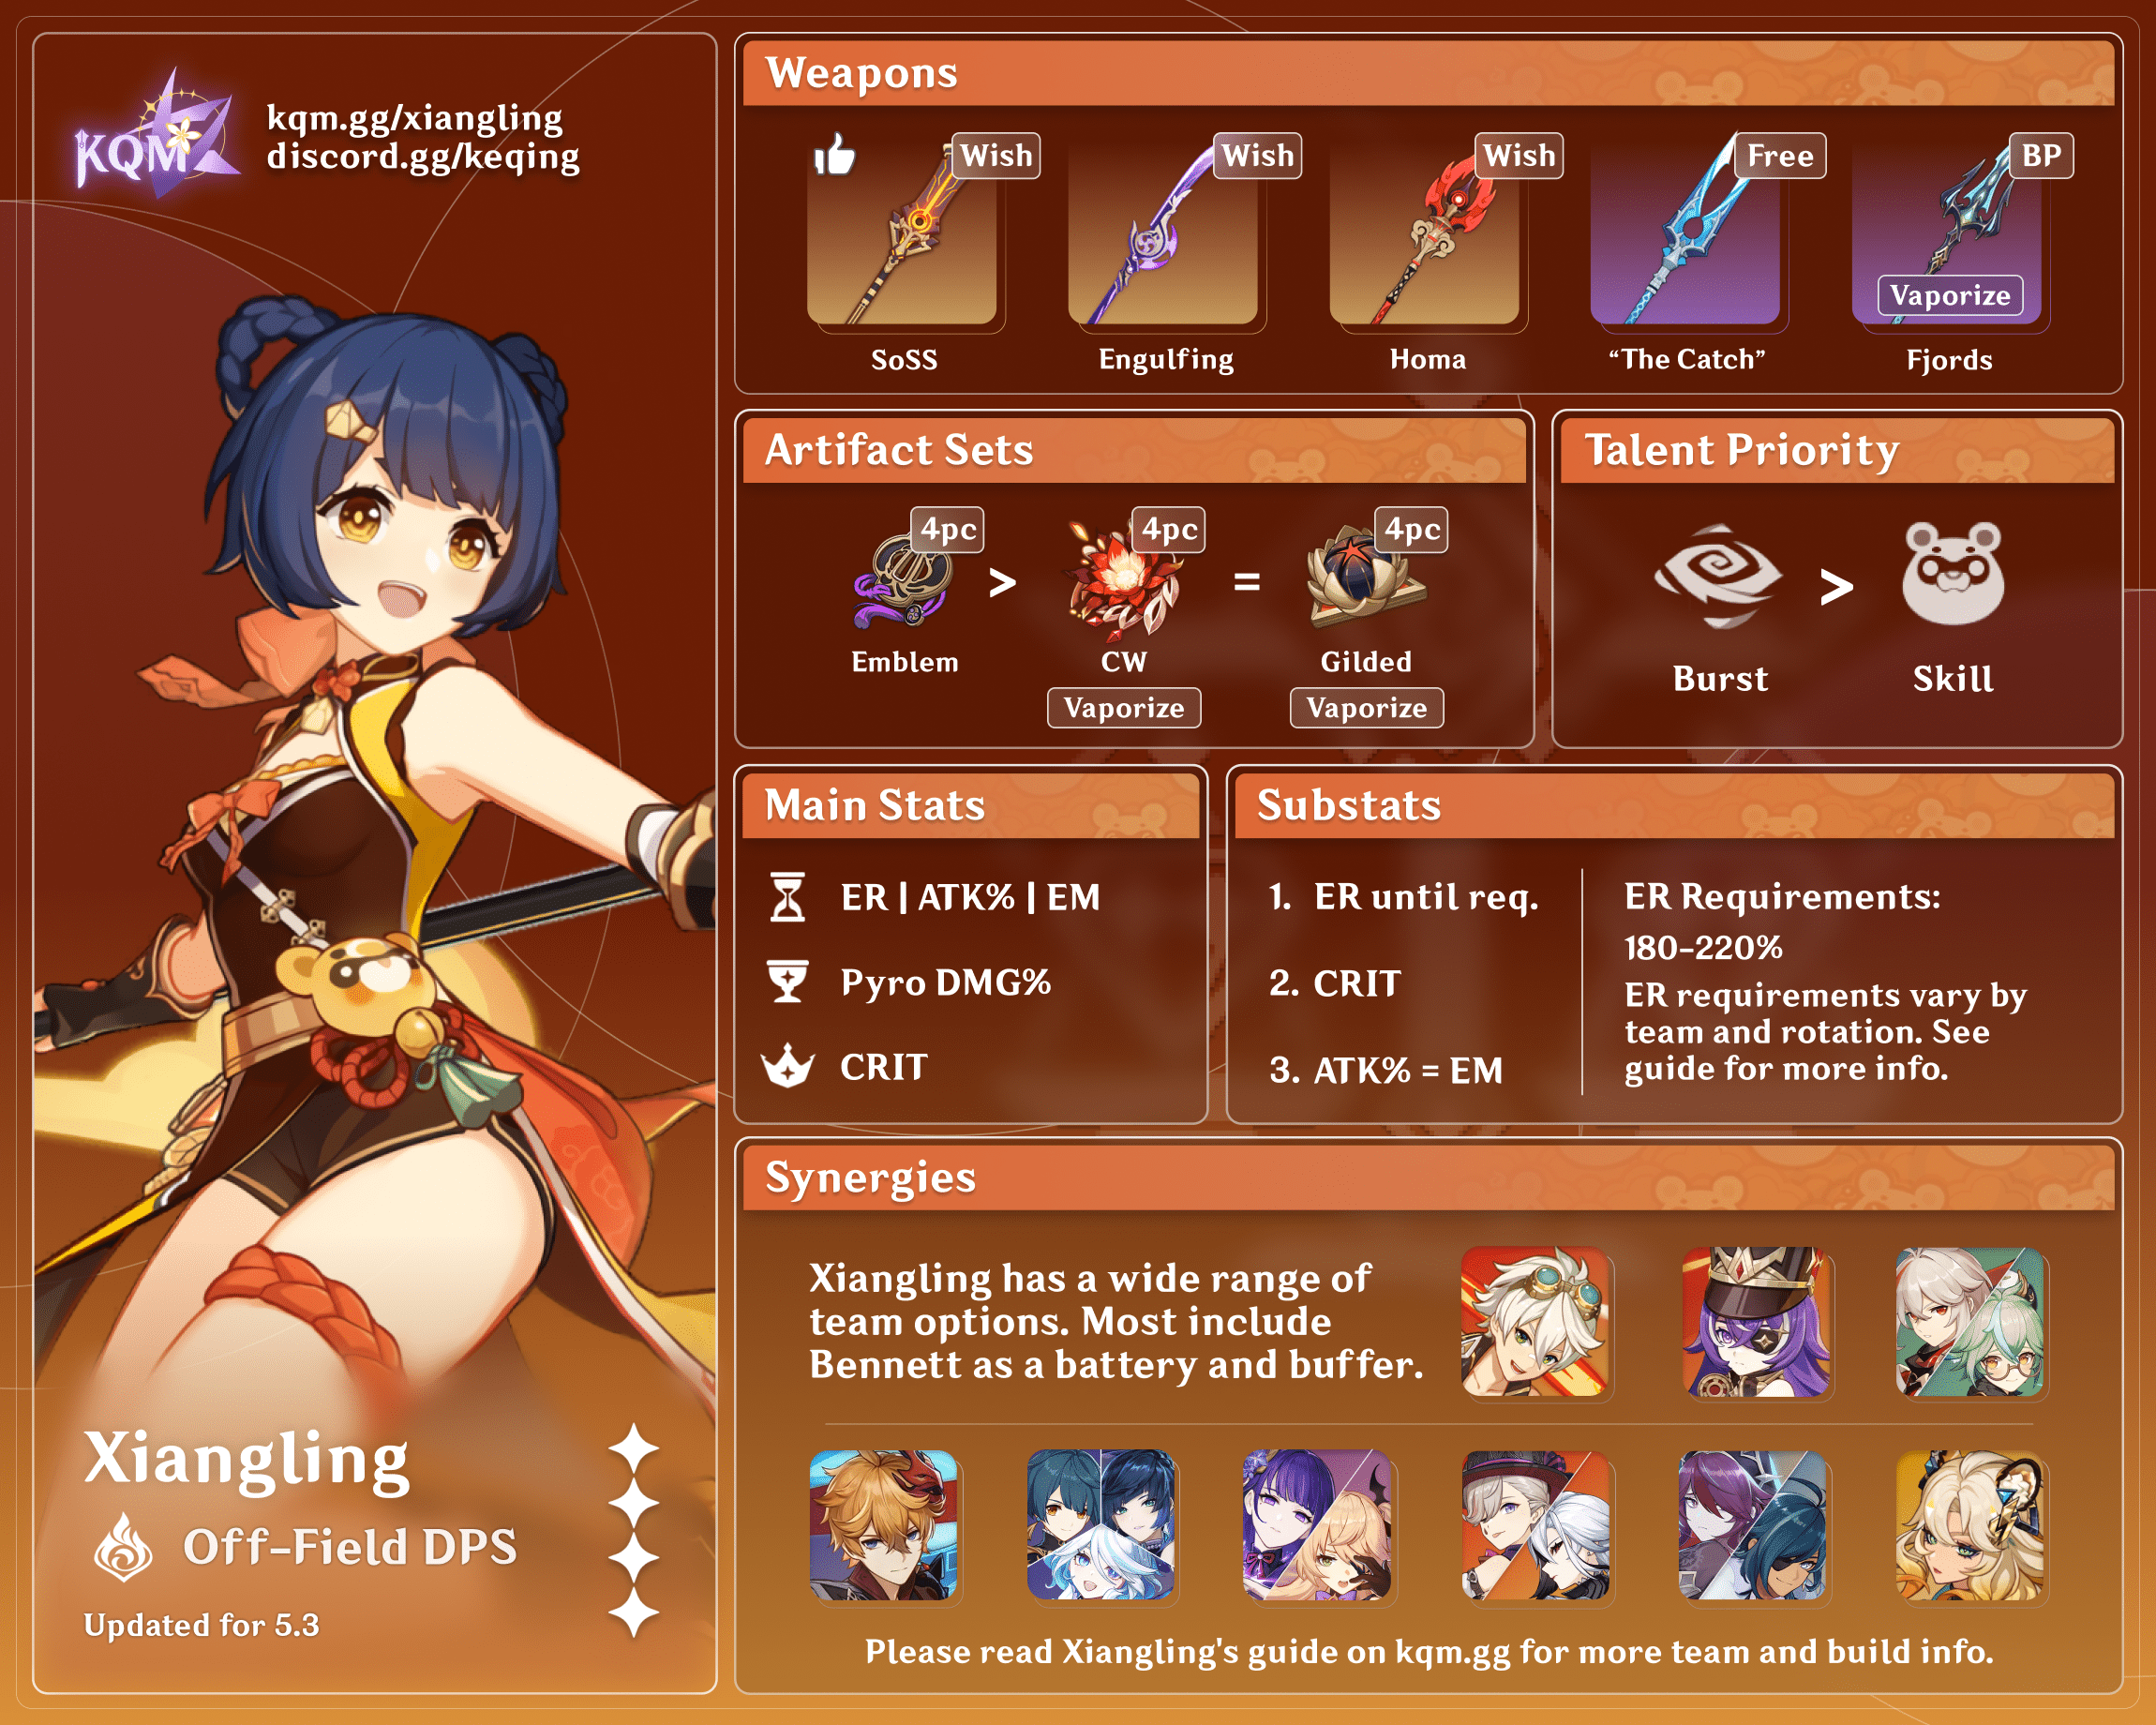
Xiangling defies easy categorization. Her damage can almost all be dealt from off-field, but it is enough to build a team around and enough to carry you through the hardest content in Genshin. She is valuable both as a reaction trigger for the sake of her own damage, and as one of the best sources of Pyro aura in the game.
Xiangling’s build and playstyle will vary significantly between teams, depending on the buffs, Energy, and reactions available to her in these teams. This guide will aim to teach you how to build and play Xiangling based on these factors and other specific synergies and nuances, rather than simply listing out instructions for every team possible.
Important factors to consider for those still choosing whether to build Xiangling:
Pros
- C0 is free for all players upon clearing Floor 3 of Spiral Abyss
- Versatile role thanks to off-field damage and Pyro application makes her a good long-term investment
- Incredible AoE on Burst while possessing strong single-target damage
- Many of her best weapon choices are 4-Star Polearms, including strong F2P options
- Flexible artifact sets make gearing easier
- Scales well with hyper-investment and external buffing
Cons
- 80 Energy cost on her Burst requires good Energy management
- Guoba has limited AoE and inconsistent targeting, which can affect Energy as well as damage
- Most of her best teams will require Bennett for batterying and buffing
- Frequent Pyro application can complicate setups that require other auras
Glossary
Explanation of terms used (in context of this guide)
| Term | Meaning |
| DPS | Refers to units who are responsible for a respectable bulk of the damage on a team. |
| Enabler | Refers to units who facilitate the elemental aura required for their teammates to proc reactions; ‘enabling’ them to deal more damage. |
| Support | Refers to units who can provide utility such as buffing, shielding, and/or healing in order to empower the DPS character(s) or to function comfortably. |
| Single-Target | Refers to damage that is highly, if not totally, concentrated on one enemy. |
| AoE | Refers to damage that can hit multiple enemies simultaneously. |
| ICD | Generally refers to any invisible timers in the game for a particular event, usually used in the context of Elemental application. More information on ICD here. |
| Snapshotting | Property by which an ability uses the stats present on a character during the casting of the ability throughout its duration. More information on the KQM TCL here. |
| VV | Viridescent Venerer |
| NO | Noblesse Oblige |
| TTDS | Thrilling Tales of Dragon Slayers |
| BiS | Best in Slot. Refers to the best option (e.g. weapon, artifact set, etc.) for a given unit or team composition. |
| N(#) | Refers to executing the given amount of Normal Attacks in a string. |
| E | Elemental Skill |
| Q | Elemental Burst |

TL;DR
Credits to: icedsquid, jamberry, haafr, and KQM Staff
Credits to: clevernt, caxia5, haafr, and KQM Staff
Talents
Talent Priority
 >
> >
>
Normal Attack | Dough-Fu
Normal Attack: Performs up to five consecutive spear strikes.
Charged Attack: Consumes a certain amount of Stamina to lunge forward, dealing damage to opponents along the way.
Generally the least important part of Xiangling’s kit. Normal Attacks are used to trigger Xingqiu’s rain sword attacks, stack passives, and fill time while waiting for the swap timer, but generally, on-field time is better spent on other characters — leveling this Talent will not result in a significant increase in damage.
Elemental Skill | Guoba Attack
Summons Guoba the Panda. After 2 seconds, Guoba starts breathing fire at an opponent, dealing AoE Pyro DMG every 1.5 seconds 4 times.
Xiangling’s Skill is her second-most important Talent to level. A single hit from Guoba does about as much damage as a single hit from Pyronado, but he has the disadvantage of being stuck wherever you drop him unless used with an Anemo grouper, and a tendency to mistarget even when he should be within range of an enemy.
Xiangling’s Skill can be dash canceled, and should be in rotations that are limited by Xiangling’s Skill cooldown (particularly Childe and Kokomi teams).
Guoba will produce one Elemental Particle every time he hits at least one enemy, as long as one of them is left alive by the hit. Most of these particles will end up being collected from off-field, but they still make up an important part of Xiangling’s Energy management. Good placement can go a long way towards making sure Guoba hits enemies, both for damage and for Energy.
Elemental Burst | Pyronado
Displaying her mastery over both fire and polearms, Xiangling sends a Pyronado whirling around her. The Pyronado will move with your character for so long as the ability persists, dealing Pyro DMG to all opponents in its path.
Energy Cost: 80
This is the most important part of Xiangling’s kit, and the number one priority for leveling. Pyronado deals substantial AoE damage, and good management of snapshotted buffs and reactions can push that damage even further.
It performs one instance of 1, 2, and 3-Hit Swing DMG during its animation, snapshotting stats and doing a first hit of Pyronado DoT between the second and third swing, and then continues to move around you for about seven and a half full rotations at C0 and eleven and a half at C4 for a total of 8 and 12 Pyronado hits when standing still.
The initial hits are subject to a standard three-hit Internal Cooldown (ICD) on Elemental application, meaning usually only the first one of them will be able to Vape if there is Hydro aura on enemies. However, the actual Pyronado has no ICD on Elemental application and will be able to consistently react every swing.
 1st Ascension Passive | Crossfire
Increases the flame range of Guoba by 20%.
Good improvement to Guoba’s functionality. Operates less as an actual passive and more as just a basic kit feature that somehow got separated out to another Talent.
 4th Ascension Passive | Beware, It’s Super Hot!
When Guoba Attack’s effects end, Guoba leaves a chili pepper on the spot where it disappeared. Picking up a chili pepper increases ATK by 10% for 10s.
Players can choose to have another character, generally an on-field DPS, pick up the pepper or to give it to Xiangling before summoning another Guoba or casting Pyronado, but it is typically not worth it to waste time chasing down the pepper for a relatively minor buff.
Consider it as a nice bonus if you happen to be near it, rather than a rotational necessity.
 Utility Passive | Chef de Cuisine
When a Perfect Cooking is achieved on an ATK-boosting dish, Xiangling has a 12% chance to receive double the product.
Helps with prepping for damage-per-screenshot showcases more efficiently.

Constellations
 Constellation 1 | Crispy Outside, Tender Inside
Opponents hit by Guoba’s attacks have their Pyro RES reduced by 15% for 6s.
A good Constellation to have. It’s more impactful in teams without access to other forms of Pyro RES Shred, like 4pc Viridescent Venerer.
DPS increase over previous Constellation: 9.3%
 Constellation 2 | Oil Meets Fire
The last attack in a Normal Attack sequence applies the Implode status onto the opponent for 2s. An explosion will occur once this duration ends, dealing 75% of Xiangling’s ATK as AoE Pyro DMG.
Xiangling primarily uses her Normal Attacks to proc Xingqiu’s Burst, stack weapon passives, or gap-fill during swap cooldowns. In combat, you will rarely finish your NA sequence, and C2 does nothing to incentivize changing this — her C2 multiplier is relatively low compared to Guoba or Pyronado, it brings the potential to steal Vapes from them, and triggering it requires taking valuable field time away from other team members.
DPS increase over previous Constellation: –
 Constellation 3 | Deep Fry
Increases the Level of Pyronado by 3.
Levels on Xiangling’s primary source of damage are very much appreciated.
DPS increase over previous Constellation: 12.3%
Cumulative DPS increase: 22.8%
 Constellation 4 | Slow Bake
Pyronado’s duration is increased by 40%.
A strong improvement, even in teams where not all additional swings can be Vaporized, an overall improvement in teams without uptime/downtime patterns, like with Xingqiu or in pure Pyro, and even stronger in Reverse Melt teams where it improves not just her own damage but also her capacity as a Pyro aura enabler.
By far Xiangling’s strongest and most impactful Constellation in any team.
DPS increase over previous Constellation: 33.8%
Cumulative DPS increase: 64.3%
 Constellation 5 | Guoba Mad
Increases the Level of Guoba Attack by 3.
Guoba owns a smaller share of Xiangling’s damage compared to Pyronado, but more damage never hurts.
DPS increase over previous Constellation: 2.3%
Cumulative DPS increase: 68.1%
 Constellation 6 | Condensed Pyronado
For the duration of Pyronado, all party members receive a 15% Pyro DMG Bonus.
Pyronado does not snapshot this bonus for its DoT hits. However, the third hit of her initial round up swings occurs after the first Pyronado DoT hit, so it will be buffed. Guoba can also be buffed in a Burst -> Skill rotation.
A relatively lackluster Constellation for Xiangling’s own damage, but the team buff is appreciated in pure Pyro teams and in quickswap Reverse Melt teams where Bennett and/or other Pyro teammates are contributing damage.
DPS increase over previous Constellation: 1.5%
Cumulative DPS increase: 70.6%

Character Synergies
 Pyro
Pyro
 |
Bennett
Guide |
|
Value to Xiangling: S |
Value from Xiangling: – |
Bennett is core to most Xiangling teams.
- His ATK buff allows Xiangling to focus on her many other stat demands.
- His particle generation and short Skill cooldown — especially with his A4 — make him her best option for a Pyro battery.
- His controllable Pyro application and self Pyro aura on the field allow for easy VV setups. On top of all that, he fills an often-needed healer role.
Almost every character in the game will benefit from Bennett, but none to the degree that Xiangling does.
If Bennett is not available or the team does not have space for him, several workarounds are possible. Xiangling should strongly consider running Kitain Cross Spear, Favonius Lance (and/or teammates on Favonius weapons), or Engulfing Lightning for her Energy demands.
Additionally, since ER Sands is often necessary, leaving Xiangling with few sources of ATK, any large ATK buffs such as Thrilling Tales of Dragon Slayers become highly valuable.
 |
Hu Tao
Guide |
|
Value to Xiangling: C |
Value from Xiangling: B |
Xiangling and Hu Tao are often cited as two of the strongest Pyro DPS units in the game. While combining them into one team isn’t recommended, there are situations when it can work well.
As well as each bringing their own damage, both characters have some kit elements which benefit each other.
- Xiangling’s C1 shreds Pyro Resistance, and her C6 grants her teammates a Pyro DMG% buff.
- As for Hu Tao, she shares 12% CR with her team after using her Skill through her A1. This only applies on the second rotation onwards, but is still a valuable buff.
Hu Tao’s particle production is lower than most other Pyro partners, and she cannot funnel her particles to Xiangling as they are produced over time during her Skill. As a result, Xiangling has relatively high ER needs when she has no other Pyro teammates.
In teams
Hu Tao and Xiangling can be combined in Pure Pyro setups, where they both benefit from Bennett and Anemo buffers. Hu Tao has no strong synergy with these teams, but they remain strong enough to be viable.
With the release of Yelan, Double Hydro teams can allow for Hu Tao and Xiangling to be on the same team and both consistently Vape thanks to Yelan and Xingqiu’s combined Hydro application.
This setup lacks a dedicated healer or shielder, but Xingqiu’s damage reduction and healing from A1, Hu Tao’s high HP pool, i-frames from dash cancels (if C1), and healing on her Burst can be sufficient sustain for many players.
 |
Klee
Guide |
|
Value to Xiangling: B |
Value from Xiangling: A |
Klee has a variety of valuable synergies with Xiangling in pure Pyro teams that set her apart from the many other on-field Pyro DPS units.
Xiangling’s C1 reduces enemy Pyro RES, and her C6 buffs Pyro DMG% for the whole team. While Xiangling cannot snapshot her own C6 onto her Burst, Klee’s Burst can.
As the only other Pyro DPS with significant snapshotting abilities (her Skill and Burst both snapshot), Klee can also gain additional benefit from limited uptime buffs. While she does appreciate high buff uptime for the sake of her NA/CA damage, she sacrifices comparatively less damage by giving Bennett buff time to Xiangling to allow Xiangling to snapshot buffs.
Klee’s two charges on her Skill are hard to represent in Energy calculations, which typically assume infinite continuous gameplay, but have incredibly valuable and flexible battery capability in practice. She supplements this Energy with a minor Flat Energy ability on her A4.
Example
To illustrate the value in Klee’s battery capabilities — if a Raiden team happens to finish an Abyss chamber two seconds after she presses Q, her entire team will enter the next chamber with half Energy at best, and players will have to burn 15s just to get their Bursts back. If a Klee team happens to finish an Abyss chamber two seconds after she presses Q, her entire team will enter the next chamber already close to full Energy, at which point she can throw her extra Skill charge, funneling it to Xiangling if necessary, and the team is immediately back on track to perfect infinite loopable rotations.
These factors together enable a relatively flexible rotation after initial setup, with solid theoretical DPS and great practical gameplay value that is difficult to quantify.
For more information on Klee with Xiangling, see ![]() Klee – Xiangling Guide.
Klee – Xiangling Guide.
| Other Pyros | |
|
Value to Xiangling: – |
Value from Xiangling: – |
Xiangling does not have particularly unique synergies with any other Pyro units, but she may still be paired with them in: pure Pyro teams, double Hydro teams which attempt to allow both Pyro units to trigger Reverse Vaporize, or teams where Bennett is not available.
Her C1 RES Shred, C6 Pyro DMG%, as well as Xiangling’s strong off-field damage often make her a viable partner for many Pyro units.
 Hydro
Hydro
 |
Kamisato Ayato
Guide |
|
Value to Xiangling: B |
Value from Xiangling: – |
Ayato offers good AoE Hydro application while both his Skill and Burst are active, as well as powerful personal damage.
Rotations built around two Ayato Skills will typically outperform single Skill rotations as they allow for better Energy economy for both himself and Xiangling.
However, either option still means that Ayato will not have the ability to enable Xiangling for her full Pyronado duration without good enemy grouping or lucky Burst targeting.
For Ayato specifically, it can often be better to use Fischl over Kazuha as the flex slot in Vape teams. This is due to a combination of factors:
- Ayato’s lack of options for setting up double VV with Kazuha for his first Burst and Skill
- Issues with maintaining Hydro aura against Xiangling and Kazuha’s application in single target
- Ayato’s rotational synergy with Fischl working well around his Skill durations and cooldowns
 |
Sangonomiya Kokomi
Guide |
|
Value to Xiangling: A |
Value from Xiangling: – |
Kokomi offers some AoE Hydro application through her jellyfish (provided enemies stay within its range) and CAs, supplemented by single-target Hydro application from her NAs. She also offers buffing for Xiangling from holding Thrilling Tales of Dragon Slayers, and has respectable personal damage when on field.
Kokomi’s C1 boosts both her Hydro application and her personal damage significantly.
Rotations with Kokomi should be built around enabling and buffing Xiangling to her highest potential, managing TTDS swaps, batterying, and AoE Hydro aura. With Kokomi filling the healer role Bennett typically occupies and her being able to hold TTDS for buffing, Xiangling’s Bennett-less teams can become significantly more competitive.
 |
Tartaglia
Guide |
|
Value to Xiangling: A |
Value from Xiangling: A |
Tartaglia (a.k.a Childe) offers incredible AoE Hydro application during his melee uptime, a downtime period which allows for batterying and rotation setup, and very strong frontloaded personal damage. Rotations cleanly set up for a high damage uptime, and then move to a downtime for batterying and setup for the next rotation.
It is not recommended to stay on Childe to Vape all of Pyronado in most cases; doing so will result in an extended downtime, lengthening your rotation. Generally, players should first set up buffs, then cast Xiangling’s Pyronado (if Xiangling is at least C4; otherwise, wait until after casting Childe’s Burst), then Vape with Childe’s ranged Burst, and then finally enter melee with Childe for 8-9s (10-11s if C1), while using Childe’s Burst cooldown as a timer to indicate when to swap off Childe and begin batterying Xiangling.
However, the nature of Childe’s flexible Skill duration and cooldown allows him to overextend his melee uptime to finish off a chamber, which can be helpful for pushing clear times for everyone from competitive speedrunners to players scraping for those last few stars.
 |
Xingqiu
Guide |
|
Value to Xiangling: B |
Value from Xiangling: A |
Xingqiu offers strong single-target oriented Hydro application, flexibility with field time, and good personal damage between his Skill and his Burst.
Xiangling provides him the easiest setup he has to consistently Vape his Skill, and in the absence of an actual on-field DPS, the option to stay on-field himself in order to benefit from Bennett’s buff.
 |
Yelan
Guide |
|
Value to Xiangling: B |
Value from Xiangling: B |
Yelan at C0 can be understood as very similar to C6 Xingqiu, with a few key differences:
- Comparable unbuffed personal damage, but unable to benefit from ATK buffing
- No Interruption Resistance, damage reduction, or healing (not usually relevant to Xiangling or her teams, since Bennett is present for healing and interruption doesn’t prevent Pyronado from dealing damage)
- 18s cooldown on Burst (not usually relevant to Xiangling or her teams)
- Lower Hydro application
- A4 stacking buff for on-field DPS characters (not snapshottable, not relevant to Xiangling herself though it can benefit another team member)
In teams
In teams where the Hydro unit could benefit from Bennett’s buff, such as Xiangling-Xingqiu-Sucrose-Bennett, Yelan will not be an upgrade over Xingqiu.
In teams where ATK buffing for the Hydro is slim and there is one strict on-field DPS, such as Raiden-Xiangling-Xingqiu-Bennett, Yelan can be a competitive option where you end up with lower Vape consistency, but 1s shorter team rotations, a buff for your on-field DPS, and slightly higher personal damage from your Hydro unit.
The only niche where Yelan is truly irreplaceable is as a pair with Xingqiu, as they can enable two Pyro DPS characters in one team to both Vape with reasonable consistency. This pairing comes with some caveats, the most notable being the lack of a healer and a worse Energy economy without Bennett as the second Pyro unit.
 Electro
 |
Beidou
Guide |
|
Value to Xiangling: C |
Value from Xiangling: – |
Beidou has among the highest off-field damage ceilings in the game, but her Energy requirements without a good Electro battery can limit that potential somewhat when building for multi-rotation clears. In two to three target content, her Electro application is strong enough for consistent Overloads to boost Xiangling’s damage.
She remains one of the strongest options for speedrunning with Vape Xiangling teams, and is a solid flex option in general.
 |
Electro Traveler
Guide |
|
Value to Xiangling: B |
Value from Xiangling: – |
Electro Traveler (EMC) is a powerful battery, though their rotations require some management to best utilize their buffing ability and “chase the purple dot” is not necessarily a minigame everyone wants to play. Their Burst is subject to standard ICD, but at higher proc rates it can still enable Xiangling to trigger a decent number of Overloads.
For newer accounts with limited rosters, they can be a strong consideration, particularly for Bennett-less teams, but in the long term other flex slots will typically hold more value.
 |
Fischl
Quick Guide |
|
Value to Xiangling: A |
Value from Xiangling: – |
Fischl is lower maintenance than Beidou, with the trade off of having a lower damage ceiling in AoE.
Her A4 passive deals an instance of Electro damage when the on-field character triggers an Electro reaction while Oz is on the field, which can boost her own damage and be helpful for maintaining Electro aura in some teams. However, this talent will rarely be triggered by Xiangling herself since Xiangling is not usually on-field in most of her teams.
Fischl’s Electro application (which affects how many Overloads Xiangling can trigger) is highly dependent on who the on-field character is in her teams and how many Electro reactions they are triggering.
 |
Raiden Shogun
Guide |
|
Value to Xiangling: A |
Value from Xiangling: B |
Raiden’s personal damage, combined with her buffing and batterying capabilities, make her a strong partner for Xiangling. Her Skill alone has low Electro application, but while on-field during her Burst she can consistently enable Xiangling to trigger Overloads, boosting Xiangling’s personal damage. In return, Xiangling’s high Burst Cost provides Raiden with Resolve stacks.
Rotations with Raiden should involve setting up Bursts and then using Raiden to battery her teammates as an on-field DPS. Raiden will not significantly lower Xiangling’s ER requirements when placed into a team which would otherwise have no on-field DPS, since you are trading time you would have otherwise spent batterying Xiangling with Bennett for Raiden’s field time.
 |
Kujou Sara
Guide |
|
Value to Xiangling: B |
Value from Xiangling: – |
Sara has respectable front-loaded damage on her Burst, though she is generally not worth a team slot for her personal damage alone. Her Electro application is limited to a few instances per rotation, meaning that she does not significantly contribute to enabling Overloads either.
Her true value is in her Flat ATK buff, which can be passed to multiple other team members from her Skill and Burst with well planned rotations, and which can be snapshotted on both Xiangling’s Skill and Burst.
 |
Yae Miko
Guide |
|
Value to Xiangling: C |
Value from Xiangling: – |
Yae will perform similarly to Fischl in most teams, trading higher field time requirements for higher personal damage and better AoE.
Similar to Beidou, her ER requirements as a solo Electro can be steep, but unlike Beidou the majority of her damage comes from her Skill, so she can choose to forego building ER and instead focus on turret damage while only using her Burst every other rotation.
Her Electro application can be lower than Fischl’s if Fischl is consistently triggering her A4 passive, which can occur in teams such as Electro-Charged teams with Sucrose and Kokomi. However, Yae’s Electro application will be more consistent in teams that might struggle to proc Fischl’s A4, which can allow her to serve as a decent Overload enabler.
 Cryo
Cryo
 |
Chongyun
Guide |
|
Value to Xiangling: B |
Value from Xiangling: A |
Chongyun’s Skill infusion field can enable some infrequent Forward Melts when paired with a Hydro enabler. Chongyun can also work in a Reverse Melt team by bringing his own damage and by allowing Rosaria to Melt her CAs as field time and Stamina permit.
Chongyu can also provide some team utility — his C2 cooldown reduction allows for more frequent uses of the Skills and Bursts that make up the vast majority of damage in most of Xiangling’s quickswap teams.
Even outside of pure Reverse Melt teams (i.e. Rosaria-Chongyun-Xiangling-Bennett), players can still Reverse Melt his entire Burst with certain setups. This provides a source of frontloaded damage to a team which otherwise relies mostly on sustained DPS.
 |
Ganyu
Guide |
|
Value to Xiangling: – |
Value from Xiangling: A |
Reverse Melt allows Ganyu to amplify both hits of her Charged Aimed Shot damage, and Xiangling can potentially enable Ganyu to use her Burst as well, depending on enemy count and how grouped enemies are.
A shielder — ideally Zhongli, who can provide the strongest shield possible while still providing some Resistance Shred for both Cryo and Pyro — fills the last slot, allowing Ganyu to deal damage without getting staggered by enemies.
Because of Ganyu’s selfish field time requirements, Xiangling will need to run high ER. She should ideally run a Favonius Lance for additional particles from its passive in order to maintain smooth rotations.
 |
Rosaria
Guide |
|
Value to Xiangling: B |
Value from Xiangling: A |
Rosaria is a strong option for quickswap Reverse Melt teams. Rosaria’s Skills and Burst can Melt every hit, making Xiangling’s Pyro application very valuable for Rosaria’s damage. Though her personal damage ceiling is lower than Ganyu’s and her stationary Burst can become an issue with mobile enemies, her field time requirements are also significantly lower, and she is not dependent on a shielder for Interruption Resistance in order to deal her damage.
Rosaria’s A4 shares 15% of her CR to teammates upon using her Burst. This buff can be snapshot on to Xiangling’s abilities. Doing so will mean missing a few Melts on Rosaria’s initial Burst hits, but it is still typically a DPS gain to plan rotations around this buff.
 |
Kaeya
Guide |
|
Value to Xiangling: B |
Value from Xiangling: A |
Kaeya will generally be a worse Vapemelt enabler than Chongyun and a worse Reverse Melt DPS than Rosaria at C0, but he can pair very well with Rosaria in a Reverse Melt team which is already using her. Rosaria and Kaeya will battery each other, lowering ER requirements, and Kaeya’s Burst damage is still very strong even when limited by ICD issues.
 |
Shenhe
Guide |
|
Value to Xiangling: C |
Value from Xiangling: B |
Most of Shenhe’s buffing utility is geared towards helping other Cryos, though her A4 Passive Skill and Burst DMG% is a minor boost for Xiangling. She should be used in Reverse Melt teams to buff the primary Cryo damage dealer.
 Dendro
 |
Collei
|
|
Value to Xiangling: B |
Value from Xiangling: – |
Collei offers off-field Dendro application through her Burst and A1 Sprout, as well as an EM buff on C4.
Collei’s Dendro application over one full rotation with a single Skill and Burst will be lower than DMC’s at C0, but C2 and C6 each add one extra Dendro application per Skill, bringing her Dendro application past DMC’s application.
However, the frontloaded nature of her Dendro application often means that players can end up with a buildup of Bloom Cores if Collei’s Skill and Burst are cast before Xiangling’s Skill and Burst. This can result in some reactions being wasted if all Dendro Cores are exploded at once, since Burgeon, like most transformatives, is subject to a damage ICD limiting it to two instances of damage per 0.5s.
 |
Dendro Traveler
|
|
Value to Xiangling: B |
Value from Xiangling: – |
Dendro Traveler (DMC) offers off-field Dendro application through their Burst, as well as an EM buff on their A1. Additionally, their Dendro application is very evenly spread over their Burst uptime, allowing for better utilization of Dendro Cores without losing any damage to Burgeon’s damage ICD.
Notes on DMC Burst Pyro transfiguration
DMC’s Burst will, however, explode upon contact with Pyro, preventing any further Dendro application. There are luckily a few consistent ways to manage this issue, since after one transfiguration has been triggered, no further transfigurations can occur.
Unlike Anemo units, DMC’s Burst will not transfigure from characters’ or enemies’ auras. It must be directly hit by an attack applying the Element it will absorb. This means that transfiguration can be controlled by immediately following DMC’s Burst cast with an AoE Hydro ability (including an already cast Hydro ability hitting from off-field) before using Xiangling’s Burst and Skill.
When Burning damage triggering a Pyro transfiguration is a concern, players can turn away from enemies to cast DMC’s Burst, summoning it directly behind them and out of Burning range. This is only recommended when using a Hydro attack with a wide enough AoE to still hit DMC’s Burst from behind, otherwise it can result in the Burst also being out of range for that ability and missing the Hydro transfiguration.
 |
Nahida
|
|
Value to Xiangling: A |
Value from Xiangling: – |
Nahida provides the easiest consistent Dendro application out of all options available, as well as a considerable EM buff.
As Nahida’s A1 only applies to on-fielders, Xiangling will not be able to fully utilize this. Specifically, Pyronado and Guoba will both Snapshot the EM for their Vaporize damage, while any Burgeons triggered off-field will not benefit from it.
While Nahida on-field can in theory provide more Dendro Cores for Burgeon, in practice this is strongly recommended against—since the additional consumption of Hydro aura will quickly set enemies Burning, ruining any chance of Xiangling Vaping and decreasing Burgeon counts. Instead, an on-field Hydro character should be run with another Hydro to supplement their application. Choose your pairing based on their sustain capabilities and ability to maximize Hydro application.
 Anemo
Anemo
 |
Anemo Traveler
Guide |
|
Value to Xiangling: B |
Value from Xiangling: C |
Anemo Traveler (AMC)’s Burst moves away from the on-field character, and has a tendency to drop heavier enemies as it goes. Most teams do not play very well with this setup, so AMC is generally used just for 4pc VV’s RES Shred, if at all.
However, their Burst can also pick up Guoba, and Childe is one of few units who can utilize AMC’s Burst despite its movement by vaping Charged Shots during his downtime, making them a feasible option in some Xiangling teams.
Venti will generally be a better pick for this role for consistency and for batterying, but players without him can utilize AMC as an alternative.
 |
Shikanoin Heizou
Guide |
|
Value to Xiangling: A |
Value from Xiangling: – |
Heizou offers strong personal damage from his Skill and Burst, 80 EM from his A4 buff, easily accessible Anemo application for flexible VV setups, and the potential to run Thrilling Tales of Dragon Slayers (TTDS) to buff Xiangling at a cost to his own damage.
Heizou’s direct buffing capability falls behind Sucrose’s or Kazuha’s, but more Anemo options are still appreciated, and his higher personal damage as a VV support can help turn him into a competitive option.
 |
Jean
Guide |
|
Value to Xiangling: B |
Value from Xiangling: – |
Jean is a generally strong Anemo unit, but lacks any particular synergies with Xiangling other than niche Forward Vape setups.
These rely on her Burst’s self Swirl interacting with Bennett’s self Pyro aura (“Sunfire”) to provide additional consistent Pyro application. However, this same interaction also prevents Xiangling from Vaping, with the end result being theoretically roughly comparable team damage to standard Reverse Vape setups, but with much less consistency.
She can also be used for her Skill alone in Vape teams, or in Pure Pyro teams as a VV carrier; but will generally be a worse option than other Anemos who can bring additional buffing or utility to the team.
 |
Kaedehara Kazuha
Guide |
|
Value to Xiangling: A |
Value from Xiangling: – |
Kazuha’s A4 Passive grants Elemental DMG% equal to 4% of his own EM to all teammates of the corresponding Element upon triggering a Swirl reaction. For example: if he Swirls Pyro, he will provide Pyro DMG%.
His A1 and Burst Elemental Absorptions allow for reliable buffing and VV Shred for multiple Elements by utilizing Bennett’s self aura application for consistent Pyro Absorption.
Managing Burst Absorption and aura
However, Pyro Absorption can also potentially compete with Xiangling for Vapes, as the Pyro application removes some Hydro aura, making it more difficult for Xiangling to Reverse Vape.
In AoE, Kazuha’s Burst can Swirl Hydro between targets to maintain Hydro aura even with Pyro Absorption, and Childe’s Hydro application is generally enough to overtake both Xiangling and Kazuha even in single-target. However, with Hydro enablers other than Childe or Ayato, it is recommended to plan rotations to absorb Hydro instead for single-target scenarios.
For example:
Xingqiu Skill -> Burst -> Kazuha Burst -> Bennett Skill -> Burst -> Kazuha Skill -> N1 -> Xiangling N1 -> Burst -> Skill
In teams
In Pure Pyro teams, Kazuha’s buff is extremely valuable thanks to his A4 Passive providing Pyro DMG% to the large majority of these teams’ damage. In Reverse Vaporize teams, his buff can be comparable to Sucrose’s EM share buff when taking into account the damage share of Hydro enablers. While Sucrose provides stronger buffs to Xiangling personally, Kazuha’s similar contribution to overall team damage allows him to be a good replacement for Sucrose.
His personal damage is also very strong, though Reverse Vaporize teams which maintain Hydro aura on enemies can limit it somewhat as Hydro Swirls do not deal AoE damage.
 |
Sayu
|
|
Value to Xiangling: B |
Value from Xiangling: A |
Sayu is capable of providing VV Shred for multiple Elements. This can be achieved by using Bennett’s self Pyro aura and absorption with Sayu’s roll, similar to Kazuha. And to guarantee absorption, players must Hold her Skill (the Tap version should never be used). For minimal field time and cooldown while maximizing her particle generation, players can perform a short Hold with her Skill and then immediately tap her Skill to then end her roll with an Element-absorbed kick.
Outside of VV Shred and healing, she has limited synergy with Xiangling in most traditional teams.
Additionally, Sayu can use her Skill to move around enemies exceptionally quickly, for additional Pyronado hits (see Backhanding for more details), allowing for many fun team setups.
 |
Sucrose
Guide |
|
Value to Xiangling: S |
Value from Xiangling: S |
After Bennett, Sucrose is generally Xiangling’s best buffer for personal damage in Vaporize teams.
Her A1 Passive shares 50 EM to all teammates of the corresponding Element upon triggering a Swirl reaction (for example, Swirling Pyro grants 50 EM to Pyro party members). On top of that, her A4 Passive shares 20% of her own EM to all other teammates upon hitting an enemy with her Skill or Burst.
Sucrose has easy access to Anemo application with wide AoE on Skill and Burst, making it easy to set up for buffing and VV Shred for multiple Elements against multiple enemies. With Xiangling, she can consistently Swirl Pyro in Reverse Vape teams, even in single-target scenarios, by taking advantage of Guoba’s Pyro self infusion (see Guoba Swirl for more details).
Using Thrilling Tales of Dragon Slayers (TTDS) will always provide a more valuable buff to Xiangling than using Sacrificial Fragments for additional EM, unless another teammate (such as Kokomi) is already using TTDS.
 |
Venti
Guide |
|
Value to Xiangling: B |
Value from Xiangling: – |
Venti’s A4 Passive gives 15 Flat Energy to all teammates of the Element his Burst absorbed (as well as himself) upon his Burst ending.
Venti’s Burst Absorption is less consistent than Kazuha’s due to its smaller AoE and the on-field character being less likely to be within the absorption AoE, but Pyro Absorption can still generally be expected as Venti follows the typical Anemo Absorption priority: Pyro > Hydro > Electro > Cryo.
Pyronado cannot hit enemies lifted by Venti’s Burst. Generally, these smaller enemies will have relatively low health anyways, but if players want to minimize damage loss due to missing Pyronado hits, it is recommended to only bring Venti against enemies which he can drag but not fully lift.
Synergy with Tartaglia
Venti can also be used with Childe. Although Childe’s Normal Attacks cannot hit enemies lifted into Venti’s Burst, it can still be used in Childe’s downtime, avoiding any anti-synergy issues. This also allows him to absorb Pyro into his Burst and Swirl Pyro, which eliminates the issue of Hydro Swirls lacking AoE.
Venti synergizes with Childe even further thanks to his unmatched grouping ability, as the tight grouping of enemies allows Childe to Vape his Burst and Riptide AoE procs to burst down groups of enemies.
 Geo
Geo
 |
Albedo
Guide |
|
Value to Xiangling: B |
Value from Xiangling: – |
Albedo is a strong flexible option for Reverse Vaporize teams thanks to his solid Skill damage and 125 EM share on Burst. He should aim to Burst every rotation for this buff, even if it means sacrificing some personal damage to achieve the ER required to do so.
 |
Zhongli
Guide |
|
Value to Xiangling: C |
Value from Xiangling: – |
Zhongli’s shield is often not necessary in most of Xiangling’s comps outside of Ganyu Reverse Melt thanks to Bennett’s healing, but it can allow for more comfortable gameplay while still providing some Resistance Shred, albeit less than VV would.

Teams
This section will go through Xiangling’s common team compositions, with notes for each team on gameplay variations. Rotations for teams with strict on-field DPS units are generally covered in those characters’ guides (in their respective sections in Synergies), but rotations for teams which are less centered around one on-field DPS will be covered here.
Note: Xiangling is fundamentally a unit that scales with investment into her teams rather than just herself. In fact, investment into her teams can be considered as investment into Xiangling. Her single greatest strength as a DPS is her ability to enable and be enabled by other powerful characters. Do not neglect Xiangling’s co-DPS characters or supports.
Team images generated using KQM TCL portratit generator tool.
Reverse Vape
Xiangling – Hydro – Anemo – Bennett


A very traditional Reverse Vaporize setup. These teams are reliable and flexible, competitive with the best teams in the game at baseline, and scale up to Spiral Abyss speedrun viability with hyper-investment.
Bennett
Bennett provides a strong ATK buff to Xiangling and her teammates, a large amount of Pyro particles necessary for Xiangling to manage her Energy needs, and ample healing.
Hydro Slot
Hydro units provide the aura necessary for Xiangling to trigger Reverse Vaporize reactions, significantly boosting her own personal damage.
Nearly all Hydro units also contribute a significant amount of personal damage, with some units also providing some utility on top of the damage they provide. Some Hydro enablers will have damage contributions comparable to Xiangling’s own. As such, players shouldn’t neglect investment into their Hydro enablers.
Anemo Slot
Anemo units provide 4VV Resistance Shred for Pyro (and ideally Hydro as well), while also bringing additional value in the forms of CC, grouping, buffing, and/or their own damage.
In most cases, VVing both Hydro and Pyro will require either:
- Players to swap to the Anemo unit multiple times during buff setup
- Utilization of off-field Hydro and/or Guoba to change aura while the Anemo is on field.
On Double VV Swirling
Sucrose and Kazuha have access to more complicated Double VV Swirl setups that can improve consistency and avoid requiring multiple swaps.
Sucrose can Swirl both Hydro and Pyro for VV in one ability by using her Skill during an appropriate window for Guoba Swirl (see Mechanics for more) against an enemy affected by Hydro and Guoba.
Kazuha can Swirl both Hydro and Pyro for VV and his Ascension 4 Passive, which provides a DMG% aligned with the Swirled Element to his teammates, in one swap. He does this by using his Skill (and potentially Burst) against an enemy affected by Hydro while in Bennett’s Burst for Pyro Absorption. Kazuha’s Burst initial hit and Hold Skill initial hit are both 2U Anemo, which can clear 1U Hydro in single-target scenarios, allowing him to apply and Swirl Pyro on his plunge or on subsequent Burst hits.
Additional off-field Hydro application can interfere with this, causing potential inconsistencies in setups. For example, Xingqiu’s orbital Rain Swords and Ayato’s Elemental Burst can apply unwanted instances of Hydro, preventing players from Swirling Pyro. In AoE scenarios, Hydro Swirls from nearby enemies will re-apply Hydro, but players can simply set up Pyro aura on one enemy and Hydro aura on another to avoid this. Given that Swirl hits in an AoE, all enemies will have resistance to both Elements shredded (given that they are all hit by both Swirls).
Rotations
Xingqiu
Xiangling teams are one of the rare places where Xingqiu can consistently Vape his Skill (and can fairly easily even Vape both hits), without it having a large impact on other characters’ required field time and rotation length.
Note that this is not true with Kazuha, as Kazuha requires Hydro Absorption on his Burst to guarantee Vapes in single-target with Xiangling and Xingqiu, forcing Xingqiu to use his abilities before Kazuha and Bennett.
Sucrose or Heizou
With Sucrose or Heizou, players can start with Bennett -> Anemo -> Xiangling -> and then Xingqiu, and then move through the rest of their rotation maintaining Hydro and batterying Xiangling.
In single-target, it is helpful to switch Xingqiu on field as much as possible for the duration of Bennett’s Burst, allowing Xingqiu’s Burst damage to benefit from Bennett’s buff since he cannot snapshot it. Additionally, if Xingqiu is using a higher refine Favonius Sword, this can allow for multiple procs per rotation. In AoE, particularly with groupable AoE with Sucrose, it is helpful to switch your Anemo on field as much as possible in order to Swirl Hydro aura and enable higher Vape uptime across multiple targets for Xiangling.
Kazuha
Single-Target
With Kazuha in single-target, players should start with Xingqiu, then use Kazuha’s Burst to absorb Hydro, then Bennett’s Skill and Burst, then a Kazuha Hold Skill to hopefully Swirl Pyro before swapping to Xiangling, and then move through the rest of their rotation maintaining Hydro and batterying Xiangling. Xingqiu can stay on-field for a good portion of this rotation, as it is built for single-target.
Multi-Target
In AoE, Kazuha can be used more similarly to Sucrose or Heizou setups, though even here, Pyro overtaking can become a concern if some enemies end up with Pyro auras and Pyro Swirl begins eating at even your primary target. However, single-target double buff setups will also become less reliable, as Hydro Swirl can interfere with Pyro application and therefore Pyro Swirl. Players can choose which method performs more consistently for them.
Yelan
Sucrose or Heizou
Yelan’s rotations can proceed similarly to Xingqiu’s with Heizou or Sucrose. Vaping her Burst initial or Skill, or potentially both, are significant damage gains for her, even if Bennett buff is worthless for her.
Kazuha
With Kazuha, Hydro absorb is still preferred for the same reasons — to prevent Pyro aura from overtaking and losing Vapes on Xiangling — and even gains more necessity due to her lower Hydro application and more consistency as she lacks Xingqiu’s orbitals.
However, beginning with Yelan will cause issues with her ability to enable Pyronado to vape for its full duration, as her Burst duration is shorter than a C2+ Xingqiu Burst. To avoid this issue, players can begin with Yelan’s Skill, absorb Hydro into Kazuha’s Burst, then follow the rotation as for Xingqiu but adding in Yelan’s actual Burst cast after Xiangling.
Managing Yelan’s Skill cooldown
Yelan’s Skill cooldown does not begin until after her movement finishes, so fitting two Skills into a rotation typically extends the rotation to 21-22s long despite her nominal 10s cooldown. Technically, this is not strictly recommendable, but in practice, as the team has no one with any strict field time requirements, players can simply feel free to desync Yelan’s Skills if they want to use them more often while maintaining a 20s rotation as closely as possible.
Yelan’s A4
Yelan’s A4 buffs on-field characters only, and Xiangling is unable to snapshot it. However, this also means that when swapped on field after her initial Burst cast and during Yelan’s Burst, Xiangling will gain Yelan’s A4 for as long as she is on field. The same is true for any other character in the team whether or not they snapshot, including Yelan herself.
This is rarely impactful enough to be explicitly played around, but for Yelan this incentivizes keeping her on-field, much the same as Bennett buff does for Xingqiu, particularly in single-target where Hydro Swirls do more to limit Vape consistency than aid it. Additionally, if Yelan is using a higher refine Favonius Bow, this can allow for multiple procs per rotation.
Xiangling – Hydro – Geo – Bennett


Similar to the Reverse Vape with VV setup, but replacing the Anemo. This setup tends to be more comfortable thanks to shielding from Zhongli or Crystallize, but does sacrifice, at a minimum, the CC and grouping utility of Anemo units.
Zhongli offers his RES Shred and incomparable Interruption Resistance, while Albedo brings his A4 EM buff and strong personal damage. Any Geo can equip 4AP to additionally buff the team, though Albedo will typically prefer 4p Husk for his own damage.
It is important to note that the unit wearing 4AP needs to pick up the appropriate Elemental crystal themself for the team to benefit from the set effect, and can only buff one Element at a time. This provides an additional gameplay challenge of having to actually go pick up the crystal.
Xiangling – Hydro – Hydro – Bennett


Another variation of a Vaporize setup. This team utilizes two Hydro units to provide more consistent Vapes while lowering the ER requirements for these units, which allows them to more comfortably build offensive stats.
If both Hydros are off-field DPS characters, using them together can enable Bennett to funnel particles to Xiangling as much as possible without risking losing Pyronado Vapes, provided he does not use his Skill immediately before Pyronado hits.
Xiangling – Hu Tao – Xingqiu – Yelan

Xingqiu and Yelan together can enable an on-field Pyro DPS, in addition to Xiangling, to fully Reverse Vaporize their damage. This works with other on-field Pyro DPS characters, but Hu Tao is a recommended pick, for she does not suffer as much from lacking a healer compared to other units.
Losing Bennett hurts Xiangling, both in terms of buffing and in terms of meeting her Energy needs. However, Hu Tao is far less Bennett dependent due to her A4 Pyro DMG% at low HP, and she additionally benefits from Xiangling’s C1 and C6, allowing this to land as one of Hu Tao’s highest damage team options.
Favonius on as many (non-Hu Tao) characters as possible, or Kitain Cross Spear or Engulfing Lightning for Xiangling, are highly recommended.
Burgeon
Xiangling – Tartaglia – Dendro – Bennett

This team is a variation of a Vaporize setup, and attempts to also utilize Burgeon reactions for additional damage on Xiangling.
Childe is the only Hydro unit in the game who can both enable Xiangling to Reverse Vaporize her Elemental Burst and enable a Dendro unit to trigger Bloom. This allows the team to keep Bennett instead of having to use two Hydro units, which improves both Childe and Xiangling’s damage.
If using Dendro MC as your Dendro option, it is vital to trigger Hydro Transfiguration on their Burst before using a Pyro ability that could hit it, in order to prevent the Pyro explosion. For example, players can cast Dendro MC’s Burst after Bennett, then use Childe’s ranged Burst to trigger Hydro Transfiguration, then move on to Xiangling’s Skill and Burst and Childe’s melee uptime. Collei will avoid this issue.
Nahida is not recommended to pair with Childe, as her Dendro application patterns more easily lead to Burning aura with only one Hydro character in the team.
Xiangling – Kokomi – Dendro – Hydro

Most Hydro units in the game are incapable of applying enough Hydro to allow both a Dendro unit to trigger Bloom and Xiangling to trigger Reverse Vaporize, especially beyond single-target. This forces non-Childe Burgeon teams into a double Hydro setup, leaving no space for Bennett.
However, while the team loses Bennett’s buff, it can gain back the damage lost by replacing it with the second Hydro unit’s personal damage, additional Burgeon damage, and higher Vape uptime on Xiangling.
Kokomi is highly recommended for these teams, as her Hydro application and personal damage surpass Barbara’s by a good margin, and Yaoyao’s Dendro application is not sufficient to be a true alternative to Collei or Dendro MC.
Overload
Xiangling – Electro – Electro – Bennett

While Xiangling benefits greatly from teams that focus on enabling her to Vaporize her damage, they are not her only options. As both off-field Hydro enablers in the game are primarily single-target focused, Xiangling’s damage share from Vaporize diminishes in AOE situations, making pure Overload teams competitive in AoE situations (before accounting for grouping/knockback considerations) when running an on-field Electro enabler such as Raiden.
While Kazuha with Electro Absorption can be used as a secondary Electro applier with Raiden in order to maintain Electro aura on enemies for Xiangling to trigger Overload, consistent Double VV and double buff setups in these teams are difficult, particularly without a C6 Bennett. Absorbing Pyro into Kazuha’s burst will make Electro VV nearly impossible on subsequent rotations, so Electro is still generally preferred.
Overvape & Soup
Xiangling – Hydro – Electro – Bennett

Electro-Charge can allow Electro and Hydro aura to coexist on an enemy, allowing Xiangling to trigger both Overload and Vape semi-consistently in teams with Hydro and Electro enablers.
These teams trade VV Shred and other utilities typically brought by Anemo units for a fair amount of damage from Overload procs and the utility and/or personal damage of the Electro unit. Overload knocks enemies away from the player and from each other, which can result in some issues. However, characters who have larger AoE on their attacks and/or attacks which cause them to chase after enemies can mitigate this issue.
Xiangling – Kokomi – Fischl – Sucrose

The infamous “Sukokomon”, and one of the only teams listed without any flex slots. All units in this team are irreplaceable.
Kokomi provides significant healing, Hydro aura for Vaping Xiangling’s Pyronado and Sucrose’s Guoba Swirls (see Mechanics for more details) and Electro-Charged triggers, and buffs from TTDS.
Fischl provides the best off-field Electro application in the game thanks to her A4, which triggers a hit of Electro damage with no ICD on Elemental application when the on-field character triggers an Electro reaction.
Sucrose provides EM buffing, grouping, Hydro Swirls and Hydro Burst Absorption to maintain Vape capability in AoE, her own personal damage through Transformative Reactions, and VV Shred for Fischl, Kokomi, and (ideally) Xiangling through her ability to Swirl Pyro from Guoba.
Notes on Swirling Pyro
Swirling Pyro is very valuable for both Xiangling’s and Sucrose’s damage. Xiangling benefits from the VV Shred and additional EM share, while Sucrose will be able to trigger Overload and Forward Vape Pyro Swirls. Timing Sucrose’s Skill with Guoba’s self Pyro infusion during his flame breath is essential to Swirling Pyro to maximize damage; however, even if players miss an occasional Pyro Swirl, the team won’t completely fall apart. Players shouldn’t hyperfocus on Guoba Swirl to the point of missing the rest of the rotation — sometimes you just try for it, miss it, take the L, and move on.
Rotations are flexible depending on AoE and on ability to absorb Sucrose’s Burst with Hydro. Engulfing Lightning, high refine Favonius Lance, or Kitain Cross Spear are highly recommended to allow Xiangling to optimally run without a Pyro battery — ER requirements will be too high, leading to limited damage capabilities otherwise.
Rotation
In AoE, players should not use Kokomi’s Charged Attack, as it provides little-to-no gain in Hydro application when compared to her much faster Normal Attacks, and does not proc Fischl’s C6.
Other adjustments to the rotation can be made as needed to account for enemy patterns and wave content, but the key factors are (in no particular order):
- Ensuring Hydro aura is present throughout Pyronado via Kokomi’s Hydro application from her Skill and on-field attacks
- Absorbing Hydro with Sucrose’s Burst
- Keeping Oz uptime as consistently as possible
- Casting Guoba off-cooldown
- Only passing TTDS buff to Xiangling
- Swirling Pyro off of Guoba
Reverse Melt
Xiangling – Cryo – Flex – Bennett

Xiangling provides the longest and most consistent off-field Pyro application in the game for Melt-oriented Cryo DPS units. While she does fill a primarily support-oriented role as an aura applier in these teams, she can still contribute a fair amount of damage depending on team and rotation.
Ganyu
With Ganyu, Xiangling’s focus is on Burst uptime, enabling Melt with consistent Pyro application. Players should spend as little time batterying as possible to allow Ganyu to spend more time on field, which gives her more time to Melt her Charged Attacks. This often comes at the cost of sacrificing Xiangling’s personal damage in order to ensure she has enough Energy Recharge to use her Burst off-cooldown. Favonius Lance or Engulfing Lightning are highly recommended for this team.
Other Cryos
Other Reverse Melt teams focus on swapping through units while casting their Skills and Bursts as they come up. These variations allow for more time spent batterying Xiangling. They also potentially offer more buffs for Xiangling (depending on the team composition), so they tend to utilize her damage more fully.
Reverse Melt teams with Ayaka will tend to follow the second pattern more closely, as all of her damage is concentrated into only a few seconds of Burst, but they are typically not recommendable outside of completely unfreezable and ungroupable boss content. Ayaka’s ICD makes Melt a smaller gain for her as compared to other Cryos, and losing grouping and CC hurts her significantly in practice. Players will typically benefit more from splitting their teams into an Ayaka Freeze team and an alternative Xiangling-Bennett team than placing them all together.
Pure Pyro
Xiangling – Anemo – Flex – Bennett

Pure Pyro teams provide consistent and easy damage with very few hard counters. Xiangling requires less ER than normal, thanks to Bennett being able to spam his Elemental Skill without interfering with Elemental aura and/or VV setups, alongside having Energy generation from other teammates. Given that there is only one Element to be Swirled, Viridescent Venerer setups also become much easier. Rotations are generally more flexible, though Klee requires some amount of field time during her Burst given that she loses her Burst if she swaps off.
The only units strictly required for Pure Pyro teams are Xiangling and Bennett. At least one Anemo unit to bring VV is strongly recommended, with Kazuha generally being the best option thanks to his A4 team buff. Zhongli is an acceptable alternative for his RES Shred and his ability to carry 4AP in cases where his shield may be valuable, such as with Klee or Yoimiya.
Any other Pyro, Anemo, or Geo characters can fill the remaining slot, including on-field DPS units such as Klee, and more quickswap options such as Heizou or Albedo.
General Off-field DPS
Xiangling – Flex – Flex – Bennett

Xiangling’s raw damage output makes her a common flex choice for many teams that look to slot Bennett anyway and have space for an additional off-field DPS. These teams should not expect Xiangling to contribute as much as she would in a team built around her damage, but she can remain a strong option even when not at her full personal potential.

Energy
General ER Requirements
The table below provides a general range of ER requirements for Xiangling teams. For specific ER needs, please refer to Zakharov’s Energy Recharge Calculator.
| Teams | Standard | Favonius* | Kitain R5 | Assumptions |
| Kokomi Soup/Burgeon teams** | 220+% | 170-190% | 150-170% | 2 Skill |
| Hu Tao – Xingqiu – Yelan | 270+% | 220+% | 210+% | 1 Skill, 1 Hu Tao Skill |
| Ganyu Melt, Xiao, Wanderer | 240+% | 210-230% | 200-220% | 1 Skill, 2 Bennett Skill |
| Quickswap Xingqiu/Yelan | 180-200% | 160-180% | 140-160% | 1 Skill, 3 Bennett Skill |
| Raiden Shogun teams*** | 160-180% | 140-160% | 120-140% | 1 Skill, 2 Bennett Skill |
| Ayato teams | 180-200% | 140-160% | 120-140% | 2 Skill, 2 Bennett Skill |
| Tartaglia teams | 160-180% | 120-140% | 100-120% | 2 Skill, 3 Bennett Skill |
*Assumes 1 Favonius proc for every Skill use.
**Kokomi – Fischl – Sucrose and Kokomi – Dendro – Hydro.
***Raiden teams assume an extra 20 Flat Energy per rotation from Raiden’s Burst.
Energy Basics
In Genshin, every character’s Burst costs a certain amount of Energy, from 40-90, typically varying based on its cooldown, utility, damage, and Mihoyo’s mood. Xiangling’s Burst costs 80 Energy, which is on the higher end.
Some mechanics will give or take Flat Energy — this is Energy unaffected by ER, immediately affecting total Energy. For example, Venti’s A4 provides 15 Flat Energy, while 4SR drains 15 Flat Energy.
Particles, dropped by Elemental Skills, Favonius weapons, enemies as they reach specific HP thresholds, and a few other assorted mechanics give a certain amount of Energy affected by ER, particle Element, and whether or not a character is on field.
Energy gained from particles/orb
| In Full Party | On-field | Off-field | |
| Elemental Particle | Same Element | 3.0 | 1.8 |
| Different Element | 1.0 | 0.6 | |
| Clear Particle | 2.0 | 1.2 | |
| Elemental Orb | Same Element | 9.0 | 5.4 |
| Different Element | 3.0 | 1.8 | |
| Clear Orb | 6.0 | 3.6 | |
Particle-based sources of Energy will scale better with higher ER than Flat Energy sources will.
For example, an R5 Kitain Cross Spear will always provide 15 Energy regardless of Xiangling’s ER%, but a Favonius Lance will provide 6 Energy at 100% ER, 9 Energy at 150% ER, and 12 Energy at 200% ER.
Xiangling gains the most Energy when catching Pyro-aligned Elemental Particles while she is on-field. This unfortunately has some anti-synergy with Guoba, who produces particles over time. In many of Xiangling’s teams, her on-field time is minimized, preventing her from catching many of the particles that Guoba produces. Additionally, Guoba has issues with hitting enemies — in short, his aim can be terrible, and if he fails to hit enemies then no particles are produced. This limits Xiangling’s ability to battery herself, necessitating a dedicated battery unit for her.
Energy Funneling
Characters will receive more Energy from collecting Particles on-field than they will from off-field, at a conversion rate of 1:0.6 in a four person team. “Funneling” refers to intentionally swapping to another character after using a Skill to allow the other character to catch the Skill Particles on-field.
Some characters, including Xiangling, can also cast their burst upon swap before catching their battery’s particles, allowing them to pre-funnel Energy to be used for the next rotation. Unless Xiangling is using 4CW or a specific rotation does not allow for Bennett to swap directly to Xiangling, players should pre-funnel using Bennett Burst > Skill > Xiangling Burst > Skill. Proper funneling of Bennett’s Particles can significantly reduce Xiangling’s ER requirements.
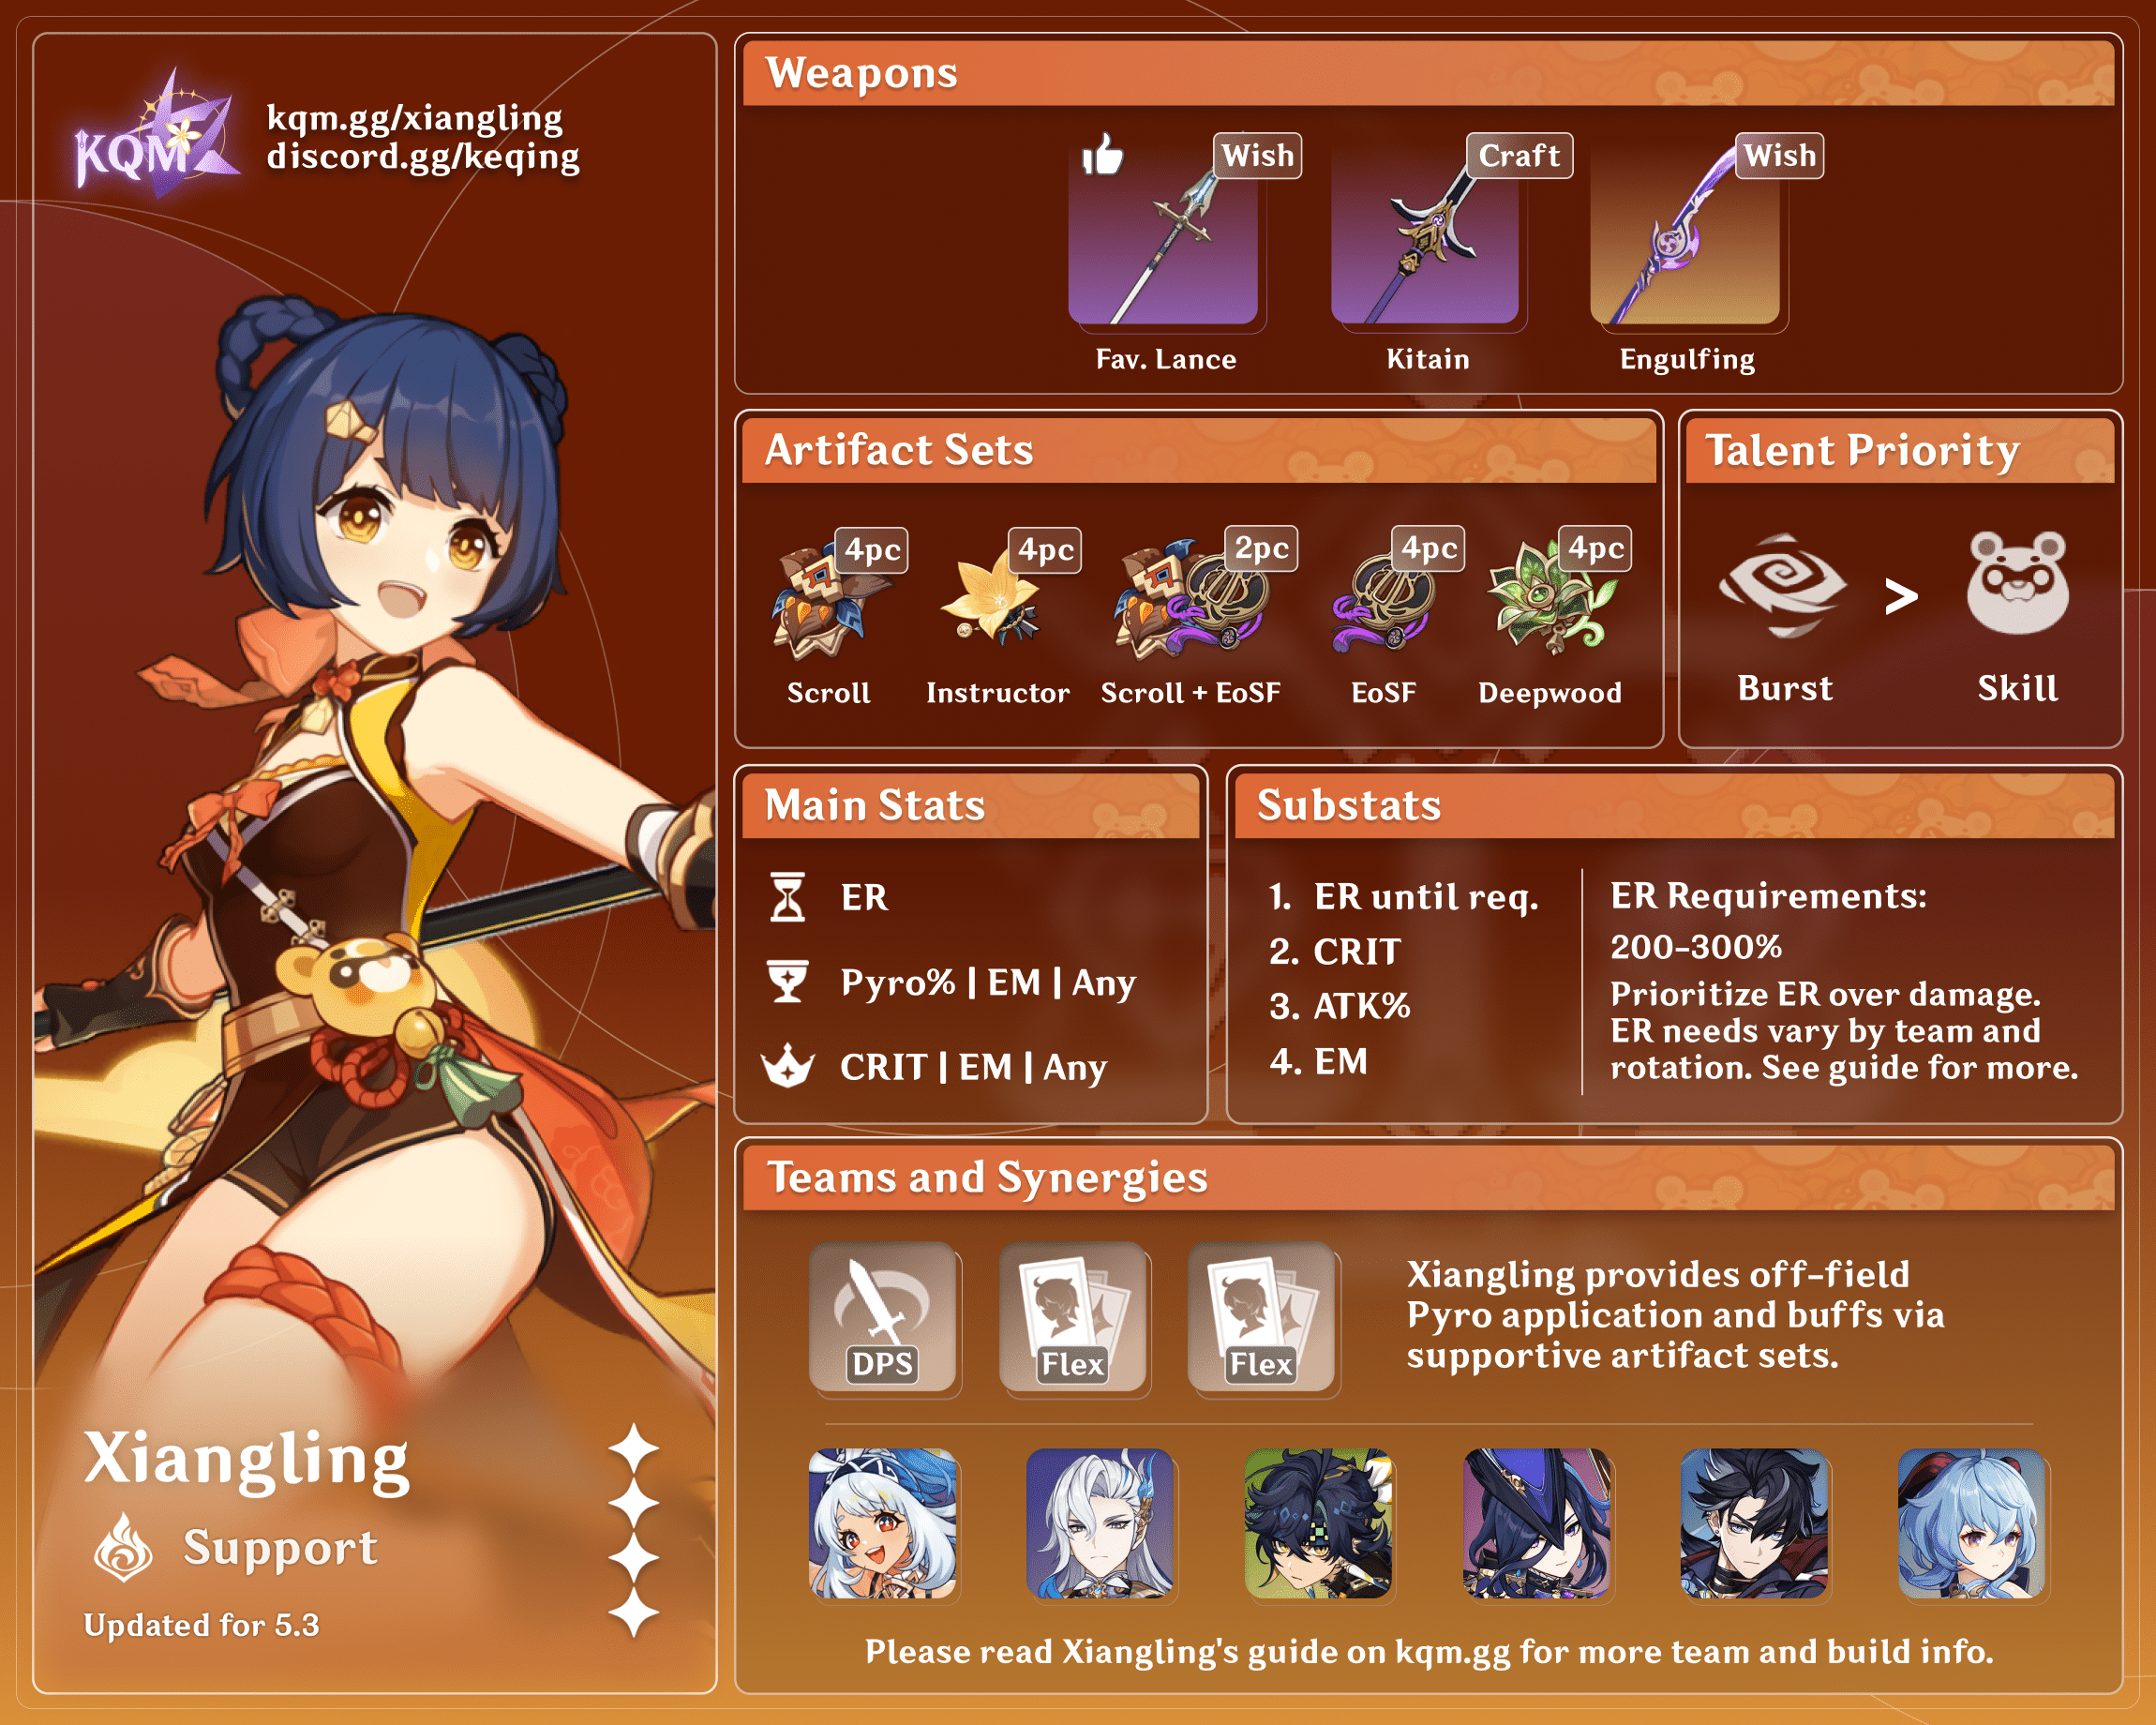
If Xiangling is deployed without a dedicated battery, then Kitain Cross Spear, Favonius Lance, or Engulfing Lightning are highly recommended choices.
Buffing
While all buffs are valuable for Xiangling, some buffs are stronger than others. The relative value of a buff for Xiangling depends on what players are potentially giving up in order to obtain that buff, along with the stats that she already possesses — for example, ATK% buffs are less valuable for Xiangling if she’s being used with Bennett, given that Bennett already provides a ton of ATK for Xiangling.
This section aims to give a general overview of how various team buffs affect Xiangling’s gearing options and priorities; but given how many variables are at play for Xiangling, it is still recommended to use an optimizer or calculator to compare various builds and buff setups.
Flat ATK
Bennett provides 547-1203 Flat ATK depending on his Constellations, weapon, level and Burst Talent Level. This allows Xiangling to run relatively less ATK when paired with him, allowing her to focus on other valuable stats such as ER and EM. Sara provides 460-794 Flat ATK when built. She will not be a recommended Bennett replacement, but she can supplement him or help compensate for the absence of his buffs and utilities if he is not available.
A strong Flat ATK buff will benefit weapons with lower Base ATK and builds which are heavy on DMG%, CRIT, and EM, while reducing the value of weapons with higher Base ATK, weapons with an ATK% secondary stat, and artifacts heavy in ATK% substats.
ATK%
ATK% buffs will benefit higher Base ATK weapons and builds which are heavy on DMG%, CRIT, and EM more than they will benefit weapons with lower Base ATK and artifacts with many ATK% substats. Other ATK% buffs such as Millennial Movement weapons, Wolf’s Gravestone, and Yoimiya’s A4 will similarly affect gearing.
DMG%
DMG% sources are relatively limited, so while DMG% buffs will especially benefit builds low on DMG% from weapons or artifact sets more, DMG% will still remain valuable for any build.
Noticeably, Kazuha provides 30-40 Pyro DMG% from his A4 when built with 750-1000 EM. Other sources of DMG% such as Raiden’s Skill, Bennett C6, and Archaic Petra will affect gearing similarly.
Resistance Shred
Xiangling has some Pyro Resistance Shred built in with her C1, but more is always appreciated. RES Shred will affect all builds for Xiangling the same, since there is no way to affect enemy RES through Xiangling’s builds.
EM
Xiangling’s Ascension stat is EM, and EM is one of very few stats in the game with true diminishing returns; so buffs will be of greater benefit to weapons without EM secondary stats (such as Staff of Homa or Deathmatch) than weapons with EM secondary stats (such as Dragon’s Bane and Kitain Cross-Spear).
Sucrose provides 150-200 EM from her A1 and A4 when built. Other EM buffs such as 4pc Instructor, Elegy for the End, and Kazuha C2 will affect gearing similarly.

Gearing
Because of Xiangling’s tendency to run with significant team buffs, it is very difficult to evaluate her gearing options in a vacuum. Players are highly recommended to use an optimizer to get an accurate understanding of the artifacts and weapons that best fit their conditions. For a tutorial on using Genshin Optimizer, see  Genshin Optimizer Tutorial playlist.
Artifacts
Sets
Assumes Xiangling C6 LVL90/90 T9/12/12, The Catch or Kitain R5 Lv. 90/90, EM or ATK%/Pyro DMG%/CR, KQMC standards.
| % of 4EoSF | VV Vape | Overvape + Bennett | Overvape + Sucrose | No Reaction |
4p Emblem of Severed Fate | 100% | 100% | 100% | 100% |
4p Gilded Dreams | 91.4% | 95.5% | 100.9% | 80.6% |
4pc Crimson Witch of Flames | 93.6% | 95.5% | 105% | 86.4% |
| Mixed Sets | 86.6%-91.6% | 88.1%-92% | 91.3%-91.6% | 84.9%-91.5% |
| No Set | 78.9% | 80.9% | 80.9% | 77.8% |
Stats
 Sands | ER / EM / ATK% |
EM sands recommended for Reverse Vape and Overload/Overvape teams that can guarantee Xiangling as trigger only.
In most cases, Xiangling will use an ER sands with non-ER weapons, and EM/ATK% sands with ER weapons. EM/ATK% sands with non-ER weapon can be considered if sufficient ER can be achieved from substats without significantly sacrificing CRIT, and ER sands with ER weapon can be considered for teams with higher ER requirements, such as with Reverse Melt Ganyu or without Bennett.
EM and ATK% sands will perform comparably well for Xiangling in Vape teams under most circumstances, and the balance between them will depend on existing stats, portion of damage Vaped, and the value of external ATK and EM buffs. With Sucrose or in teams where a significant portion of Pyronado is left unvaped, such as with Childe, ATK sands will generally perform better; in Overload + Vape and Burgeon + Vape teams, EM sands will generally perform better.
 Goblet | Pyro DMG% |
Pyro DMG Bonus will always be Xiangling’s best Goblet stat for all of her teams.
 Circlet | CRIT Rate / DMG |
Choose whichever brings your overall stats closer to a 1/2 ratio between CR and CD.
| Substats | ER to requirement > CR/CD > EM for Reverse Vape/ATK% |
Because Xiangling ascends with EM, and EM and ATK% being much easier to buff from external sources, CRIT will always be Xiangling’s first priority after ER requirements are met.
Weapons
Xiangling has many great choices for weapons, and which is technically best for you is highly dependent on her team and the rest of her build. Generally speaking, as “The Catch” is fully free to play and serves as such a strong option, players should simply use that in most cases unless:
- They have a free Staff of the Scarlet Sands, Staff of Homa, Engulfing Lightning, or high refine Wavebreaker’s Fin, and have found it to offer higher damage based on Genshin Optimizer or in-game experience.
- They are playing Xiangling in a team without Bennett, in which case Kitain and Favonius Lance become significantly more favorable as they can help Xiangling battery herself.
- They need The Catch for another character, or they really really hate fishing, in which case they should look through the below lists for another good option for their Xiangling.
All that said, it is valuable to note that the calculations shown below vary only within about 20% of each other. As such, any option listed is fully viable, and it is of very little importance to worry about “upgrading” Xiangling between weapons that are only separated by a few percent.
Assumptions: Xiangling C6, 4ESF EM or ATK% or ER/Pyro/CR or CD, 180 ER req unless stated otherwise. Rotation Q E, 75% Vape. Bennett C5 Alley Flash, 4NO, Pyro Resonance, 50% Sucrose TTDS A1+A4, 50% Kazuha Fav A4, VV.
| Weapon | % of The Catch R5 | Notes |
 Staff of Scarlet Sands R1 | 106.9% | Stacks on Skill hit, not cast, and can’t stack from off field. Not worth it to stand around waiting for Guoba to hit, just accept that it’s still incredible at 0 stacks and move on with your rotation. |
 Wavebreaker’s Fin R5 | 103.9% | Calculated for 280 cost. The passive gives Burst DMG% based on the total Burst Energy costs of all team members, so its value will vary depending on the team. For example: Childe (60 cost) + Xiangling (80 cost) + Sucrose (80 cost) + Bennett (60 cost) = 280 cost = 33.6 Burst DMG% at R1 or 67.2 Burst DMG% at R5 Most of Xiangling’s best teams will be between 260 cost to 310 cost in total. Scales very well with refines, external buffs, and CRIT heavy artifacts. |
 Staff of Homa R1 | 103.1% | Calculated for over 50% HP. Unlike Xiao or Hu Tao, Xiangling has no independent way of accessing HP drain, and since her Burst snapshots relatively late in her animation even if brought under 50% HP she will likely be healed back over that threshold by Bennett before snapshotting. Despite not being able to make full use of the passive, Staff of Homa still brings a very strong statline. |
 Engulfing Lightning R1 | 100.7% | Calculated with 170ER passive down requirement. Pyronado will snapshot the higher passive up ER for the ER to ATK% passive, and Burst DMG% from 4ESF cannot be snapshot but Pyronado will still receive the higher Burst DMG% from 4ESF for all but its last few swings at C4. Engulfing Lightning performs better compared to other weapons with 4ESF than with other artifacts, particularly at higher ER. Engulfing Lightning and 4ESF also allow Xiangling to run relatively high ER without sacrificing significant damage, a comfort aspect which is an underrated benefit to the weapon. |
 Deathmatch R5 | 100.0% | Calculated for two or more enemies nearby. Small ATK% passive on a low Base ATK weapon is not that useful – almost all of Deathmatch’s value comes from its power as a CRIT stick, which means refines don’t add much, but a powerful CRIT stick it is. |
 The Catch R5 | 100.0% | A massive boost to Xiangling’s main source of damage. Time to go fishing. |
 Primordial Jade-Winged Spear R1 | 97.5% | Stacks have a .3s internal cooldown on gain and are not gained from off-field, and it is generally not worth the field time to fully stack with Normal Attacks before snapshotting. Summoning Guoba and/or using a few NA before using Burst should allow for 2-3 stacks to be snapshot consistently. Even without full stacks, the Base ATK and CR are still appreciated. |
 Dragon’s Bane R5 | 97.5% | Valuable secondary stat and a strong passive that scales very well with refines. Conditionally competitive with top choices at high refine and with CRIT heavy artifacts, but tends to scale worse with external buffs. |
Deathmatch R1 | 96.2% | |
 Lithic Spear R5 | 95.7% | Calculated with two stacks. Recommended for teams with multiple Liyue members only. Conditionally strong passive, limited by the fact that many of Xiangling’s best teams feature her as the only Liyue character and even with others, she can’t reach full stacks with Bennett. |
 Skyward Spine R1 | 95.2% | Passive is next to useless except for a small amount of CR. |
 Calamity Queller R1 | 95.1% | Limited by the fact that Xiangling snapshots and therefore cannot benefit from the off-field bonus portion of the passive, but remains a viable option as a massive ATK statstick. |
 Missive Windspear R5 | 93.4% | Viable alternative option when Catch is busy in teams where Xiangling can proc its passive during setup. |
Wavebreaker’s Fin R1 | 93.2% | |
 Vortex Vanquisher R1 | 92.7% | Calculated unshielded. Stack mechanics are identical to Primordial Jade-Winged Spear. |
Dragon’s Bane R1 | 90.9% | |
 Kitain Cross Spear R5 | 90.5% | Calculated with 120ER requirement. If the passive is triggered while Xiangling is at 0 Energy, it will not dip into negative Energy, so using Burst immediately before Skill (or Skill before Burst provided you can cast Burst before Guoba hits) can save an extra 3 Flat Energy every rotation. Energy passive is very useful at reducing ER requirements, even more so the higher the initial requirement is. Guaranteed Energy also helps make rotations more comfortable for players new to managing funneling and for situations with fewer enemy HP Particles. Kitain’s greatest strength comes from its ability to reduce ER requirements, while Emblem of Severed Fate acts as a cushion for damage loss due to building for higher ER requirements. Both will still be a viable option with each other despite this anti-synergy, but Kitain loses some comparative value with 4ESF and vice versa. |
Lithic Spear R1 | 89.2% | |
Kitain Cross Spear R1 | 88.7% | Calculated with 140ER requirement. |
 Fav Lance R5 | 85.6% | Calculated with 140ER requirement. Passive cannot be triggered from off-field, but Xiangling’s three large AoE hits on Pyronado initial swings usually mean at least one proc per rotation even at low refine. Particles generated benefit everyone on the team, especially valuable when Xiangling is paired with other Energy-hungry units such as Xingqiu or Kazuha. |
Fav Lance R1 | 85.6% | Calculated with 160ER requirement. |
Assumptions: Xiangling C6, 4ESF EM or ATK% or ER/Pyro/CR or CD, 180 ER req unless stated otherwise. Rotation Q E, 75% Vape, 6 Overloads. Bennett C5 Alley Flash, 4NO, Pyro Resonance, Raiden E.
| Weapon | % of The Catch R5 | Notes |
Staff of Scarlet Sands R1 | 101.4% | Stacks on Skill hit, not cast, and can’t stack from off field. Not worth it to stand around waiting for Guoba to hit, just accept that it’s still incredible at 0 stacks and move on with your rotation. |
Engulfing Lightning R1 | 101.0% | Calculated with 170ER passive down requirement. Pyronado will snapshot the higher passive up ER for the ER to ATK% passive, and Burst DMG% from 4ESF cannot be snapshot but Pyronado will still receive the higher Burst DMG% from 4ESF for all but its last few swings at C4. Engulfing Lightning performs better compared to other weapons with 4ESF than with other artifacts, particularly at higher ER. Engulfing Lightning and 4ESF also allow Xiangling to run relatively high ER without sacrificing significant damage, a comfort aspect which is an underrated benefit to the weapon. |
The Catch R5 | 100.0% | A massive boost to Xiangling’s main source of damage. Time to go fishing. |
Wavebreaker’s Fin R5 | 99.4% | Calculated for 310 cost. The passive gives Burst DMG% based on the total Burst Energy costs of all team members, so its value will vary depending on the team. For example: Childe (60 cost) + Xiangling (80 cost) + Sucrose (80 cost) + Bennett (60 cost) = 280 cost = 33.6 Burst DMG% at R1 or 67.2 Burst DMG% at R5 Most of Xiangling’s best teams will be between 260 cost to 310 cost in total. Scales very well with refines, external buffs, and CRIT heavy artifacts. |
Dragon’s Bane R5 | 99.0% | Valuable secondary stat and a strong passive that scales very well with refines. Conditionally competitive with top choices at high refine and with CRIT heavy artifacts, but tends to scale worse with external buffs. |
Staff of Homa R1 | 97.9% | Calculated for over 50% HP. Unlike Xiao or Hu Tao, Xiangling has no independent way of accessing HP drain, and since her Burst snapshots relatively late in her animation even if brought under 50% HP she will likely be healed back over that threshold by Bennett before snapshotting. Despite not being able to make full use of the passive, Staff of Homa still brings a very strong statline. |
Deathmatch R5 | 95.3% | Calculated for two or more enemies nearby. Small ATK% passive on a low Base ATK weapon is not that useful- almost all of Deathmatch’s value comes from its power as a CRIT stick, which means refines don’t add much, but a powerful CRIT stick it is. |
Skyward Spine R1 | 94.5% | Passive is next to useless except for a small amount of CR. |
Dragon’s Bane R1 | 93.2% | |
Kitain Cross Spear R5 | 93.2% | Calculated with 100ER requirement. If the passive is triggered while Xiangling is at 0 Energy, it will not dip into negative Energy, so using Burst immediately before Skill (or Skill before Burst provided you can cast Burst before Guoba hits) can save an extra 3 Energy every rotation. Energy passive is very useful at reducing ER requirements, even more so the higher the initial requirement is. Guaranteed energy also helps make rotations more comfortable for players new to managing funneling and for situations with fewer enemy HP Particles. Kitain’s greatest strength comes from its ability to reduce ER requirements, while Emblem of Severed Fate acts as a cushion for damage loss due to building for higher ER requirements. Both will still be a viable option with each other despite this anti-synergy, but Kitain loses some comparative value with 4ESF and vice versa. |
Missive Windspear R5 | 92.8% | Viable alternative option when Catch is busy in teams where Xiangling can proc its passive during setup. |
Kitain Cross Spear R1 | 92.6% | Calculated with 120ER requirement. |
Primordial Jade-Winged Spear R1 | 92.4% | Stacks have a .3s Internal Cooldown on gain and are not gained from off-field, and it is generally not worth the field time to fully stack with Normal Attacks before snapshotting. Summoning Guoba and/or using a few NA before using Burst should allow for 2-3 stacks to be snapshot consistently. Even without full stacks, the Base ATK and CR are still appreciated. |
Deathmatch R1 | 91.8% | |
Lithic Spear R5 | 91.8% | Calculated with two stacks. Conditionally strong passive, limited by the fact that many of Xiangling’s best teams feature her as the only Liyue character and even with others, she can’t reach full stacks with Bennett. |
Calamity Queller R1 | 89.8% | Limited by the fact that Xiangling snapshots and therefore cannot benefit from the off-field bonus portion of the passive, but remains a viable option as a massive ATK statstick. |
Wavebreaker’s Fin R1 | 89.4% | |
Vortex Vanquisher R1 | 88.7% | Calculated unshielded. Stack mechanics are identical to Primordial Jade-Winged Spear. |
Fav Lance R5 | 87.2% | Calculated with 140ER requirement. Passive cannot be triggered from off-field, but Xiangling’s three large AoE hits on Pyronado initial swings usually mean at least one proc per rotation even at low refine. Particles generated benefit everyone on the team, especially valuable when Xiangling is paired with other Energy hungry units such as Xingqiu or Kazuha. |
Fav Lance R1 | 87.2% | Calculated with 160ER requirement. |
Lithic Spear R1 | 85.7% |
Assumptions: Xiangling C6, 4ESF EM or ATK% or ER/Pyro/CR or CD, 220 ER req unless stated otherwise. Rotation Q E (12s) E, 100% Vape, 8 Overloads. Sucrose Sac Frags A4, VV, TTDS, 4TotM.
| Weapon | % of The Catch R5 | Notes |
Engulfing Lightning R1 | 117.3% | Calculated with 210ER passive down requirement. Pyronado will snapshot the higher passive up ER for the ER to ATK% passive, and Burst DMG% from 4ESF cannot be snapshot but Pyronado will still receive the higher Burst DMG% from 4ESF for all but its last few swings at C4. Engulfing Lightning performs better compared to other weapons with 4ESF than with other artifacts, particularly at higher ER. Engulfing Lightning and 4ESF also allow Xiangling to run relatively high ER without sacrificing significant damage, a comfort aspect which is an underrated benefit to the weapon. |
Kitain Cross Spear R5 | 108.7% | Calculated with 140ER requirement. If the passive is triggered while Xiangling is at 0 Energy, it will not dip into negative Energy, so using Burst immediately before Skill (or Skill before Burst provided you can cast Burst before Guoba hits) can save an extra 3 Energy every rotation. Energy passive is very useful at reducing ER requirements, even more so the higher the initial requirement is. Guaranteed Energy also helps make rotations more comfortable for players new to managing funneling and for situations with fewer enemy HP particles. Kitain’s greatest strength comes from its ability to reduce ER requirements, while Emblem of Severed Fate acts as a cushion for damage loss due to building for higher ER requirements. Both will still be a viable option with each other despite this anti-synergy, but Kitain loses some comparative value with 4ESF and vice versa. |
Staff of Homa R1 | 106.2% | Calculated for over 50% HP. Unlike Xiao or Hu Tao, Xiangling has no independent way of accessing HP drain, and since her Burst snapshots relatively late in her animation even if brought under 50% HP she will likely be healed back over that threshold by Bennett before snapshotting. Despite not being able to make full use of the passive, Staff of Homa still brings a very strong statline. |
Wavebreaker’s Fin R5 | 105.0% | Calculated for 300 cost. The passive gives Burst DMG% based on the total Burst Energy costs of all team members, so its value will vary depending on the team. For example: Childe (60 cost) + Xiangling (80 cost) + Sucrose (80 cost) + Bennett (60 cost) = 280 cost = 33.6 Burst DMG% at R1 or 67.2 Burst DMG% at R5 Most of Xiangling’s best teams will be between 260 cost to 310 cost in total. Scales very well with refines, external buffs, and CRIT heavy artifacts. |
Calamity Queller R1 | 103.7% | Limited by the fact that Xiangling snapshots and therefore cannot benefit from the off-field bonus portion of the passive, but remains a viable option as a massive ATK statstick. |
Skyward Spine R1 | 102.4% | Passive is next to useless except for a small amount of CR. |
Staff of Scarlet Sands R1 | 102.2% | Stacks on Skill hit, not cast, and can’t stack from off field. Not worth it to stand around waiting for Guoba to hit, just accept that it’s still incredible at 0 stacks and move on with your rotation. |
Kitain Cross Spear R1 | 102.2% | Calculated with 160ER requirement. |
Fav Lance R1-5 | 96.6% – 101.2% | Calculated with 160ER requirement. Passive cannot be triggered from off-field, but Xiangling’s three large AoE hits on Pyronado initial swings usually mean at least one proc per rotation even at low refine. Particles generated benefit everyone on the team, especially valuable when Xiangling is paired with other Energy hungry units such as Xingqiu or Kazuha. |
Primordial Jade-Winged Spear R1 | 100.3% | Stacks have a .3s internal cooldown on gain and are not gained from off-field, and it is generally not worth the field time to fully stack with Normal Attacks before snapshotting. Summoning Guoba and/or using a few NA before using Burst should allow for 2-3 stacks to be snapshot consistently. Even without full stacks, the Base ATK and CR are still appreciated. |
Dragon’s Bane R5 | 100.2% | Valuable secondary stat and a strong passive that scales very well with refines. Conditionally competitive with top choices at high refine and with CRIT heavy artifacts, but tends to scale worse with external buffs. |
The Catch R5 | 100.0% | A massive boost to Xiangling’s main source of damage. Time to go fishing. |
Vortex Vanquisher R1 | 99.8% | Calculated unshielded. Stack mechanics are identical to Primordial Jade-Winged Spear. |
Deathmatch R5 | 99.2% | Calculated for two or more enemies nearby. Small ATK% passive on a low Base ATK weapon is not that useful- almost all of Deathmatch’s value comes from its power as a CRIT stick, which means refines don’t add much, but a powerful CRIT stick it is. |
Missive Windspear R5 | 98.8% | Viable alternative option when Catch is busy in teams where Xiangling can proc its passive during setup. |
Wavebreaker’s Fin R1 | 96.1% | |
Dragon’s Bane R1 | 94.6% | |
Deathmatch R1 | 94.0% |
Assumptions: Xiangling C6, 4ESF ATK% or ER/Pyro/CR or CD, 180 ER req unless stated otherwise. Rotation Q E. Bennett C5 Alley Flash, 4NO, Pyro reso.
| Weapon | % of The Catch R5 | Notes |
Staff of Scarlet Sands R1 | 105.2% | Stacks on Skill hit, not cast, and can’t stack from off field. Not worth it to stand around waiting for Guoba to hit, just accept that it’s still incredible at 0 stacks and move on with your rotation. |
Wavebreaker’s Fin R5 | 103.6% | Calculated for 260 cost. The passive gives Burst DMG% based on the total Burst Energy costs of all team members, so its value will vary depending on the team. For example: Childe (60 cost) + Xiangling (80 cost) + Sucrose (80 cost) + Bennett (60 cost) = 280 cost = 33.6 Burst DMG% at R1 or 67.2 Burst DMG% at R5 Most of Xiangling’s best teams will be between 260 cost to 310 cost in total. Scales very well with refines, external buffs, and CRIT heavy artifacts. |
Staff of Homa R1 | 102.5% | Calculated for over 50% HP. Unlike Xiao or Hu Tao, Xiangling has no independent way of accessing HP drain, and since her Burst snapshots relatively late in her animation even if brought under 50% HP she will likely be healed back over that threshold by Bennett before snapshotting. Despite not being able to make full use of the passive, Staff of Homa still brings a very strong statline. |
The Catch R5 | 100.0% | A massive boost to Xiangling’s main source of damage. Time to go fishing. |
Deathmatch R5 | 99.9% | Calculated for two or more enemies nearby. Small ATK% passive on a low Base ATK weapon is not that useful- almost all of Deathmatch’s value comes from its power as a CRIT stick, which means refines don’t add much, but a powerful CRIT stick it is. |
Engulfing Lightning R1 | 99.7% | Calculated with 170ER passive down requirement. Pyronado will snapshot the higher passive up ER for the ER to ATK% passive, and Burst DMG% from 4ESF cannot be snapshot but Pyronado will still receive the higher Burst DMG% from 4ESF for all but its last few swings at C4. Engulfing Lightning performs better compared to other weapons with 4ESF than with other artifacts, particularly at higher ER. Engulfing Lightning and 4ESF also allow Xiangling to run relatively high ER without sacrificing significant damage, a comfort aspect which is an underrated benefit to the weapon. |
Primordial Jade-Winged Spear R1 | 96.7% | Stacks have a .3s internal cooldown on gain and are not gained from off-field, and it is generally not worth the field time to fully stack with Normal Attacks before snapshotting. Summoning Guoba and/or using a few NA before using Burst should allow for 2-3 stacks to be snapshot consistently. Even without full stacks, the Base ATK and CR are still appreciated. |
Deathmatch R1 | 96.0% | |
Skyward Spine R1 | 94.7% | Passive is next to useless except for a small amount of CR. |
Calamity Queller R1 | 94.7% | Limited by the fact that Xiangling snapshots and therefore cannot benefit from the off-field bonus portion of the passive, but remains a viable option as a massive ATK statstick. |
Wavebreaker’s Fin R1 | 92.8% | |
Vortex Vanquisher R1 | 92.5% | Calculated unshielded. Stack mechanics are identical to Primordial Jade-Winged Spear. |
Lithic Spear R5 | 88.8% | Calculated with one stack. Conditionally strong passive, limited by the fact that many of Xiangling’s best teams feature her as the only Liyue character and even with others, she can’t reach full stacks with Bennett. |
Lithic Spear R1 | 85.6% | |
Fav Lance R5 | 84.6% | Calculated with 140ER requirement. Passive cannot be triggered from off-field, but Xiangling’s three large AoE hits on Pyronado initial swings usually mean at least one proc per rotation even at low refine. Particles generated benefit everyone on the team, especially valuable when Xiangling is paired with other Energy hungry units such as Xingqiu or Kazuha. |
Fav Lance R1 | 84.6% | Calculated with 160ER requirement. |
Missive Windspear R5 | 82.2% | Viable alternative option when Catch is busy in teams where Xiangling can proc its passive during setup. |

Mechanics
Snapshot
Many abilities will snapshot on-cast or at a certain point during their initial animation, recording current stats and using those stats to determine damage for the rest of the duration regardless of any changes to those stats.
Both Guoba and Pyronado snapshot, allowing for Xiangling to gain greater value from buffing that would otherwise expire or be conditional upon staying in Bennett’s circle. Team buffs should always be set up so that Xiangling’s stats are at their strongest as she casts Pyronado in order to maximize her main source of damage.
Stats which are conditional upon enemy state such as RES, DEF, Mona’s Omen buff, and the Lavawalker and Dragon’s Bane passives cannot be snapshot. Some stats which are not shown in characters’ stat pages can be snapshot, but not all- notable exceptions include DMG% which applies to certain abilities such as Burst DMG% and the Geo Resonance buff.
Backhanding
Backhanding refers to counterclockwise movement on-field in order to allow Pyronado to hit an enemy again before it has fully circled the on-field character, increasing the maximum number of hits achievable with one Pyronado cast.
It is generally never increased damage to prioritize this over maintaining Hydro aura, batterying, or just dealing damage with an on-field character, but it can be added in when it doesn’t interfere with anything else in the rotation. For example, players can dash cancel counterclockwise with Childe provided this allows them to stay in Bennett’s circle, or move counterclockwise as possible between abilities in a quickswap Reverse Melt team since auto attacks are of minimal importance there unless the player has Bennett’s C6.
In most cases, the primary practical use of backhanding will be for shield breaking, particularly against Abyss Lectors, since the only goal during shield phase is to fit in as much Pyro application as possible.
Footage from EdisonsMathsClub#6469
Left side shows an Abyss Lector’s shield being broken by Bennett on-field using his skill as often as possible with Xiangling’s Pyronado and Guoba helping from off-field.
Right side shows the same fight but with Bennett moving counterclockwise around the lector in between skill uses. A timer from Pyronado cast is shown on both, with the right side finishing over 2.5s faster than the left.
Guoba Swirl
When Guoba initiates an attack, he briefly self infuses with Pyro as he breathes Pyro onto enemies. This Pyro can be Swirled by Sucrose’s Skill and Faruzan’s Pressurized Collapse—both to deal damage to enemies, but also importantly to maintain Pyro RES Shred uptime with VV in teams which would otherwise struggle to Swirl Pyro due to consistent Hydro application.
Guoba Swirls operate like typical Swirls off of an enemy with Pyro aura in all but a few ways. Sucrose’s A1 currently only triggers when she Swirls the relevant Element off of an enemy; environmental Swirls such as off of torches or campfires and Guoba Swirls do not proc it. Otherwise, players can generally expect any Swirl effects such as Pyro VV and Pyro application to occur as usual.
Sucrose’s access to Guoba Swirl is essential to allowing her buffing to remain competitive with Kazuha’s as a support given his access to more involved double buff and double shred set ups, and it provides a means of triggering Overload for significant personal damage to Sucrose as a DPS.
Players should aim to cast Sucrose’s Skill exactly as Guoba starts breathing—it is recommended to practice this against a target and look for Pyro Swirl numbers (just one from Guoba if the enemy has another aura, or two from Guoba and the enemy itself if the enemy has Pyro aura) or to look for the Pyro Swirl animation around Guoba to ensure that the Swirl was actually successful.
Faruzan’s access to Guoba Swirl is typically irrelevant to regular gameplay, as she has little to no other synergy with Xiangling. Pressurized Collapse is also much harder to time into Guoba’s breath as it is not directly cast by players but happens as a follow up to her Charged Attack after a Skill use or a Burst hit if C6.
Other Anemo units can absorb Pyro into their Skills and Bursts off of Guoba’s self-infusion, but no others can directly Swirl him.
Footage from Risuke#6743
An example single-target Double VV setup with Sucrose using Guoba Swirl. Childe uses his stance change to apply Hydro (note that this may cause issues with melee cooldown, particularly without C1- a ranged Charged Attack may be used as an alternative), Xiangling summons Guoba, and Sucrose uses her Skill right as Guoba breathes fire to Swirl the Pyro he self infuses and the Hydro on the enemy.

Credits
For contributions to previous version of this guide, Xreejan#1180, Charliex3000#9403, and Greyhound#7836.
For help with feedback and editing, Awowogei#1971, Cuzimori#1535, Leah, _Maxi#1776, baloopy#5597, Seima#4597, and Reens#9389.
For help with drafting character synergies and teams sections, Eris#6748.
For help with analysis of Klee and pure Pyro, jamie#9248, Childe teams, Mystathi#9705, Traveler (Anemo, Dendro and Electro), Rathalos#2875, Hu Tao and Yelan teams, jstern25#1399, and Kokomi Burgeon teams, Silvershine2#5439.
References
![]() Artifact and Weapon Calculations by jamberry#7142.
Artifact and Weapon Calculations by jamberry#7142.
![]() Team Energy Recharge Calculator (ERC) by Zakharov#5645.
Team Energy Recharge Calculator (ERC) by Zakharov#5645.
Genshin Optimizer Tutorial by frzyc#1337.
Basic Sucrose National Team Guide by uNEven/EdisonsMathsClub#6469.
Childe Reverse Vape Rotation Demo by Crow | WL8#1761.
Ganyu Reverse Melt rotation by Yukarix#6534.
Various Team Showcases (mostly) without Bennett by Terraflop/Terrapin#8603.
