Updated for Version “Luna I”
Yoimiya is a 5★ Pyro Bow character in Genshin Impact who focuses on doing single-target Pyro damage via her ranged Normal Attacks. Learn about Yoimiya’s best builds, best weapons, best artifacts, and best teams in this quick guide.
Note that the information given may change if new discoveries are made. More extensive testing is in progress.
The full-length guide is available here.
Table of Contents
New Content
 Aino | Aino is a Nod-Krai character with slow off-field Hydro application. Paired with a second Nod-Krai character, her Hydro application is improved, and she helps activate 4pc Night of the Sky’s Unveiling’s full effect. |
 Dahlia | Dahlia provides a shield and some Attack SPD. In Vaporize teams, he alleviates the Hydro unit’s ER requirements and enables Hydro Resonance. |
 Ineffa | Ineffa has strong AoE damage, enables Lunar-Charged and provides a shield. She is one of Yoimiya’s best partners for comfort and damage. |
 4pc Night of the Sky’s Unveiling | 4pc Night of the Sky’s Unveiling is a strong set for Yoimiya in teams that can activate its full effect. This is possible in an Overvape team with both Ineffa and Aino. |
Infographic
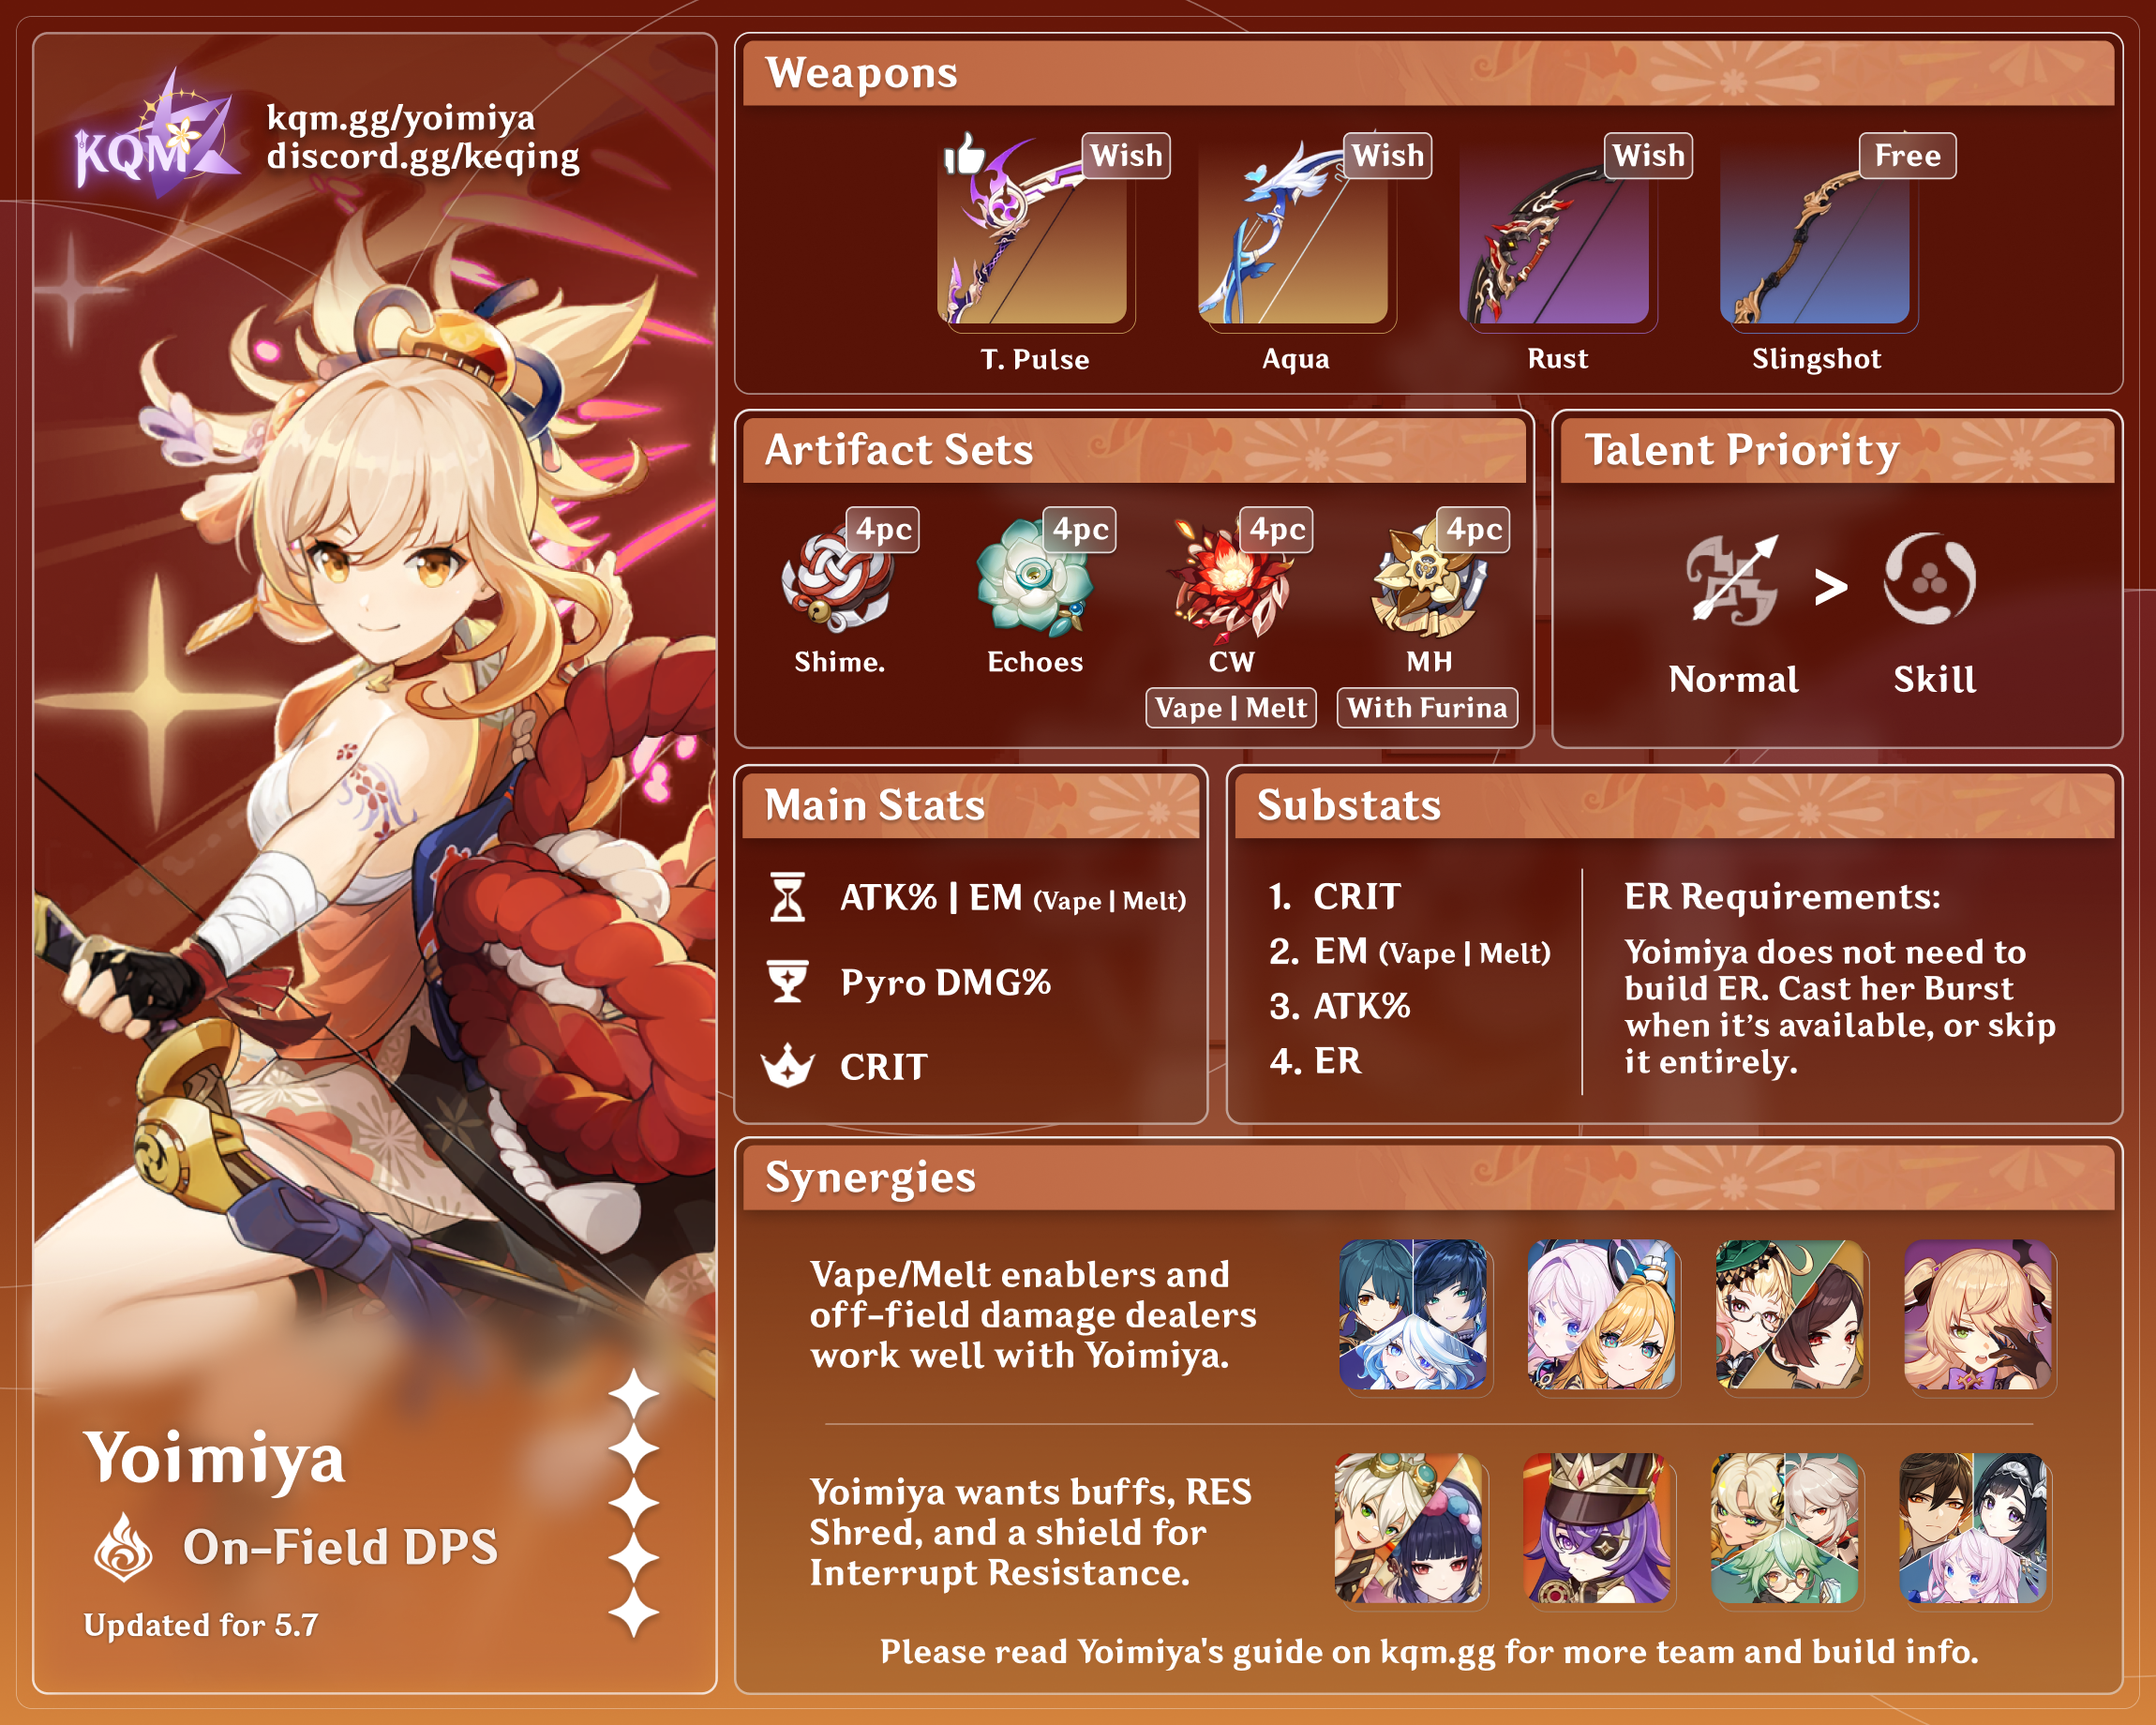
Credits to: cuppacote, auraolis, irokei, caxia5, and KQM TC Staff
Character Overview
Pros
- Decent single-target damage and range
- Easy gameplay and execution
- Accessible weapons and flexible artifact set options
- Diverse team compositions for different scenarios
- Cutest character in the game
- Only character in the game that has armpit texture
Cons
- Tough competition in the Pyro DPS role
- Weaker performance in multi-target scenarios since her damage is strictly single-target
- High vulnerability to interruption, which favors a strong shield
- Higher investment requirement for certain teams to be competitive
Playstyles
Vaporize
Yoimiya’s most popular team archetype revolves around using a Hydro character so Yoimiya can Reverse Vaporize her Normal Attacks. This is a beginner and mobile-friendly team composition when played with a shield. An off-field damage dealer or buffer (such as Fischl, Furina or Kazuha), can be included to improve the team’s damage; however, they often come at the expense of a shielder.
Overloaded
With Chevreuse, this composition is competitive with Yoimiya’s Vaporize teams while offering a good comfort-to-damage ratio. Yoimiya’s Overloaded teams focus on her raw Pyro damage with the added bonus of AoE Overloaded damage. As such, her damage is no longer reliant on single-target Hydro application and she can dodge more freely, which leads to better performance in multi-target encounters. Chevreuse provides an ATK% buff and RES Shred for Pyro and Electro characters, at the expense of the team being limited to only these two Elements.
Mono Pyro
This archetype focuses on Yoimiya’s raw Pyro damage while relying on buffs and off-field damage from teammates such as Kazuha, Xiangling, Chiori, or Emilie. These teams are relatively easy and flexible to play.
Talents
Talent Priority
Normal Attack >> Skill > Burst
If Yoimiya does not use her Elemental Burst, it does not need to be leveled.
Yoimiya’s Normal Attacks constitute almost all of her damage even when her Elemental Burst is used. The Normal Attack levels improve her damage a lot more than the Elemental Skill levels and thus should be prioritized first.
Talent Overview
![]() Normal Attack | Firework Flare-Up
Normal Attack | Firework Flare-Up
Talent Description
Normal Attack
Performs up to 5 consecutive shots with a bow.
Charged Attack
Perform a more precise Aimed Shot with increased DMG.
While aiming, flames will accumulate on the arrowhead before being fired off as an attack. Has different effects based on how long the energy has been charged:
- Charge Level 1: Fires off a flaming arrow that deals Pyro DMG.
- Charge Level 2: Generates a maximum of 3 Kindling Arrows based on time spent charging, releasing them as part of this Aimed Shot. Kindling Arrows will home in on nearby opponents, dealing Pyro DMG on hit.
Plunging Attack
Fires off a shower of arrows in mid-air before falling and striking the ground, dealing AoE DMG upon impact.
Yoimiya’s Normal Attacks, in her Elemental Skill state, make up the vast majority of her damage — even when she uses her Elemental Burst, her Normal Attacks still account for 92-96% of her damage.
Yoimiya’s Normal Attack string has 5 attacks, with the 1st and 4th being split into 2 hits each, for a total of 7 hits. Her Normal Attacks have standard ICD, meaning Yoimiya can trigger reactions like Vaporize on the 1st, 4th, and 7th hits (N1-1, N3, and N5 respectively). The 7th hit (N5) in particular makes up for 25-30% of her Normal Attack string damage. As a result, Yoimiya wants to perform her complete Normal Attack string, so she often prefers teammates who provide interruption resistance.
Yoimiya’s Charged Shot and Kindling Arrows see minimal use and contribute little to her overall kit.
![]() Elemental Skill | Niwabi Fire-Dance
Elemental Skill | Niwabi Fire-Dance
Talent Description
Yoimiya waves a sparkler and causes a ring of saltpeter to surround her.
Niwabi Enshou
During this time, arrows fired by Yoimiya’s Normal Attack will be Blazing Arrows, and their DMG will be increased and converted to Pyro DMG.
During this time, Normal Attack: Firework Flare-Up will not generate Kindling Arrows at Charge Level 2.
This effect will deactivate when Yoimiya leaves the field.
Yoimiya’s Elemental Skill converts her Normal Attacks to Pyro Attacks and multiplies their damage by a percentage that scales with the Elemental Skill’s Talent levels.
The damage Yoimiya does with her Normal Attacks while in Niwabi Fire-Dance is considered Normal Attack damage, meaning that it can be buffed by other Normal Attack buffs like Rust and Thundering Pulse’s passives.
During the Elemental Skill’s uptime, if Yoimiya performs 3 full Normal Attack strings, she will generate 4-5 Pyro particles.
![]() Elemental Burst | Ryuukin Saxifrage
Elemental Burst | Ryuukin Saxifrage
Talent Description
Yoimiya leaps into the air along with her original creation, the “Ryuukin Saxifrage,” and fires forth blazing rockets bursting with surprises that deal AoE Pyro DMG and mark one of the hit opponents with Aurous Blaze.
Aurous Blaze
All Normal/Charged/Plunging Attacks, Elemental Skills, and Elemental Bursts by any party member other than Yoimiya that hit an opponent marked by Aurous Blaze will trigger an explosion, dealing AoE Pyro DMG.
When an opponent affected by Aurous Blaze is defeated before its duration expires, the effect will pass on to another nearby opponent, who will inherit the remaining duration.
One Aurous Blaze explosion can be triggered every 2s. When Yoimiya is down, Aurous Blaze effects created through her skills will be deactivated.
Yoimiya’s Elemental Burst applies a mark called Aurous Blaze to an enemy. Any damage dealt by Yoimiya’s team members (but not Yoimiya herself), even if they are off-field, can trigger the mark, which causes it to deal AoE Pyro DMG. If the enemy with the mark is defeated, the mark jumps to another nearby enemy. Aurous Blaze can be triggered every 2s but has standard ICD (2.5s/3 hits), meaning it often only applies Pyro every other damage instance.
Yoimiya’s Elemental Burst is fairly subpar. It is an insignificant portion of her damage in most teams (about 4-8%) and has a long animation. Moreover, Aurous Blaze is not applied to any enemy if her Elemental Burst’s initial hit misses, nor does it jump to a new enemy when a new wave spawns.
However, Yoimiya can use her Elemental Burst for other reasons. For example, it can fill rotation downtime, activate Thundering Pulse’s passive (especially if not using 4pc Shimenawa’s Reminiscence), provide i-frames, or apply Pyro without using her Normal Attacks.
![]() Ascension 1 Passive | Tricks of the Trouble-Maker
Ascension 1 Passive | Tricks of the Trouble-Maker
Talent Description
During Niwabi Fire-Dance, shots from Yoimiya’s Normal Attack will increase her Pyro DMG Bonus by 2% on hit. This effect lasts for 3s and can have a maximum of 10 stacks.
Yoimiya’s A1 Passive gives her a 2% Pyro DMG buff when her Normal Attacks hit opponents. Multi-hit attacks give two stacks, so Yoimiya’s 1st and 4th Normal Attacks (2 hits each) give her a 4% Pyro DMG buff. Each stack has a duration of 3s, which is refreshed when a new stack is gained. Yoimiya can obtain a maximum of 10 stacks, which translates to a 20% Pyro DMG buff. This Passive can also boost her Elemental Burst damage while Yoimiya is on-field using her Normal Attacks.
![]() Ascension 4 Passive | Summer Night’s Dawn
Ascension 4 Passive | Summer Night’s Dawn
Talent Description
Using Ryuukin Saxifrage causes nearby party members (not including Yoimiya) to gain a 10% ATK increase for 15s. Additionally, a further ATK Bonus will be added on based on the number of “Tricks of the Trouble-Maker” stacks Yoimiya possesses when using Ryuukin Saxifrage. Each stack increases this ATK Bonus by 1%.
Yoimiya’s A4 Passive provides her teammates with a 10% ATK buff immediately after using her Elemental Burst. An additional 1% ATK Bonus is given for every stack of her A1 Passive, for a total maximum of 20% ATK. If Yoimiya’s teammates are off-field damage dealers who scale with ATK — such as Xingqiu, Fischl, Xiangling, or Beidou — this Passive can slightly buff team damage. Since Yoimiya does not use her Elemental Burst frequently, the damage increase is small on average.
Constellations
Calcs for Constellation DPS increases can be found here (last updated for Version 4.8).
![]() Constellation 1 | Agate Ryuukin
Constellation 1 | Agate Ryuukin
Constellation Description
The Aurous Blaze created by Ryuukin Saxifrage lasts for an extra 4s.
Additionally, when an opponent affected by Aurous Blaze is defeated within its duration, Yoimiya’s ATK is increased by 20% for 20s.
Increases the duration of her Elemental Burst marker. Also gives a 20% ATK buff to Yoimiya upon defeating an enemy marked with her Burst. Underwhelming Constellation due to her Burst being a small portion of her overall damage and the buff being extremely conditional.
![]() Constellation 2 | A Procession of Bonfires
Constellation 2 | A Procession of Bonfires
Constellation Description
When Yoimiya’s Pyro DMG scores a CRIT Hit, Yoimiya will gain a 25% Pyro DMG Bonus for 6s.
This effect can be triggered even when Yoimiya is not the active character.
Gives Yoimiya an almost permanent 25% Pyro DMG buff. This Constellation is the largest DPS increase aside from her C6.
![]() Constellation 3 | Trickster’s Flare
Constellation 3 | Trickster’s Flare
Constellation Description
Increase the Level of Niwabi Fire-Dance by 3.
Maximum upgrade level is 15.
Yoimiya does not gain much from Talent Levels on her Elemental Skill, making this Constellation rather weak.
![]() Constellation 4 | Pyrotechnic Professional
Constellation 4 | Pyrotechnic Professional
Constellation Description
When Yoimiya’s own Aurous Blaze triggers an explosion, Niwabi Fire-Dance’s CD is decreased by 1.2.
This effect is only effective if Yoimiya’s Elemental Burst is used consistently and her Elemental Skill cooldown is the limiting factor for the rotation length, which is rarely the case. Generally a small QoL buff in Co-Op and combat events.
![]() Constellation 5 | A Summer Festival’s Eve
Constellation 5 | A Summer Festival’s Eve
Constellation Description
Increases the Level of Ryuukin Saxifrage by 3.
Maximum upgrade level is 15.
Yoimiya’s Elemental Burst is a very small portion of her damage even when used, making this Constellation rather weak.
![]() Constellation 6 | Naganohara Meteor Swarm
Constellation 6 | Naganohara Meteor Swarm
Constellation Description
During Niwabi Fire-Dance, Yoimiya’s Normal Attacks have a 50% chance of firing an extra Blazing Arrow that deals 60% of its original DMG. This DMG is considered Normal Attack DMG.
This is easily Yoimiya’s best Constellation; it gives her anywhere from a 20-30% DPS increase in non-Vaporize teams. Note that since the additional arrow shares ICD with Yoimiya’s Normal Attacks, it can mess up her Vaporize pattern (not being able to Vaporize her 5th attack), leading to around a 12-15% DPS gain instead. For a more detailed explanation, read the Constellations section in the Yoimiya Extended Guide.
Combos
- N = Normal Attack
- D = dash (cancel)
Yoimiya’s highest damaging combo in most teams is her entire Normal Attack string repeated 3 times. This sequence allows Yoimiya to Vaporize her N1-1, N3 and N5 if not interrupted.
| N5D | This combo incorporates dashing to let Yoimiya reposition and dodge enemy attacks. It may also let you fit in a couple of extra Normal Attacks after the 3rd N5. |
Artifacts
ER Requirements and Elemental Burst Use
Yoimiya’s Elemental Burst should only be used when it is available (typically every 2 or 3 rotations) or skipped entirely (especially if using 4pc Shimenawa’s Reminiscence). It is not necessary to build ER.
One notable exception is if using both Thundering Pulse and an artifact set other than 4pc Shimenawa’s Reminiscence. In order to keep the third stack from Thundering Pulse’s passive, Yoimiya should use her Elemental Burst even if it extends the rotation, as it is the only way to decrease Yoimiya’s Energy.
Artifact Stats
 Sands |  Goblet |  Circlet |
| ATK% / EM (Reactions) | Pyro DMG Bonus | CRIT Rate / CRIT DMG |
Stat Priority: CRIT > ATK% ≥ EM (Reactions) > ER
An EM Sands is preferred over an ATK% one if Yoimiya triggers Vaporize or Melt and she’s receiving ATK stats from other sources (like with Bennett). If she is triggering Overloaded, EM stats are also valuable.
We recommend using Genshin Optimizer to compare your actual artifacts.
Artifact Sets
Calcs for artifact set comparisons can be found here (last updated for Version 4.8).
4pc Shimenawa Reminiscence | 4pc Shimenawa’s Reminiscence (SR) is Yoimiya’s most consistent option. While other sets can technically outperform depending on the scenario, 4pc SR is the baseline recommendation for almost all of Yoimiya’s possible teams. |
 4pc Echoes of an Offering | 4pc Echoes of an Offering (Echoes) is the best alternative option. With 4pc Echoes, Yoimiya’s damage may fluctuate, especially on Vaporized hits. The proc rate of the 4-piece effect is affected by ping; the higher the ping, the lower the proc rate. However, the exact losses between different pings have not been investigated in detail. |
 4pc Marechaussee Hunter | 4pc Marechaussee Hunter is only viable with Furina, but it is by far the best option in such teams. An ATK% or EM Goblet can be viable depending on substats and external buffs. |
4pc Night of the Sky’s Unveiling | 4pc Night of the Sky’s Unveiling is a strong set for Yoimiya in teams that can activate its full effect. This is possible in an Overvape team with both Ineffa and Aino. |
 4pc Crimson Witch of Flames | 4pc Crimson Witch of Flames is an alternative option that can be used in Vaporize-related teams, but is not worth using otherwise. Yoimiya gains 1 stack of its 4-piece effect in a typical rotation. |
 4pc Gilded Dreams | 4pc Gilded Dreams is similar to 4pc CW in usage and performance. It is effective in Vaporize-related teams thanks to the EM it provides, but falls behind otherwise. An ATK% Sands is preferred with this artifact set. |
 2pc Mixed Sets | 2pc Set Bonuses: ATK%, Pyro DMG Bonus, Normal Attack DMG Bonus, Elemental Mastery (Reactions) These 2-piece combinations are great generalist or transitional sets while farming for 4pc SR. Depending on substats, 2-piece mixed sets can even outperform the 4-piece sets. |
 4pc Retracing Bolide | 4pc Retracing Bolide is not recommended. It performs worse than 4pc SR even with a shielder. Additionally, 100% shield uptime is not guaranteed in practice, since even Zhongli’s shield can break in the hardest content. |
Weapons
Calcs for weapon comparisons can be found here (last updated for Version 4.8).
 5★ Thundering Pulse | Thundering Pulse is Yoimiya’s best option. This is the only 5-star Bow worth pulling for Yoimiya. It is relatively easy to maintain three stacks since Yoimiya’s Elemental Burst is not up frequently. The Energy consumption from 4pc SR also helps maintain stacks. |
 5★ Aqua Simulacra | Aqua Simulacra is Yoimiya’s 2nd-best 5-star option, performing slightly better than R5 Rust. The passive requires you to be within 8 meters from the enemy, which can be inconvenient against multi-wave content or mobile enemies. |
 4★ Rust | Rust is Yoimiya’s best 4-star weapon at R5, providing a huge 80% Normal Attack DMG Bonus. It performs better than every 5-star Bow except Thundering Pulse and Aqua Simulacra. |
 3★ Slingshot | Slingshot is a 3-star Bow that performs better than every 4-star Bow except R4+ Rust, on the condition that either Bennett or Yun Jin are in the team. Slingshot can even outperform R5 Rust if Yoimiya is buffed by both Bennett and Yun Jin. Slingshot does have a range requirement, but it is not too difficult to maintain. |
 Solid 5-star weapons | The First Great Magic, Skyward Harp, Hunter’s Path, Polar Star These 5-star weapons provide Yoimiya with some CRIT stats and other offensive buffs. They generally perform close to R5 Slingshot, with The First Great Magic sometimes performing slightly better than R5 Rust. |
Teams
Rotation Notation
- N = Normal Attack
- C = Charged Attack
- A = Aimed Shot
- P = Plunging Attack
- E = Elemental Skill
- tE = Tap Skill
- hE = Hold Skill
- Q = Elemental Burst
- D = dash (cancel)
- J = jump (cancel)
- W = walk (cancel)
- > = switch character
- ( ) = these actions are optional; please refer to the notes below
- [ ] = repeat these actions the specified number of times
Teambuilding
- Yoimiya’s most popular teams revolve around Vaporizing her Normal Attacks using an off-field Hydro unit. It’s recommended to have a form of interruption resistance in such teams to allow her to Vaporize her N5.
- When Yoimiya is used with multiple teammates that deal damage from off-field, or when she’s in Mono Pyro and Overloaded teams, interruptions to her Normal Attack string result in less of a DPS loss but should still be avoided.
Vaporize
Yelan’s and Xingqiu’s consistent off-field Hydro application allows Yoimiya to trigger Reverse Vaporize with her Pyro-converted Normal Attacks, while also contributing their own off-field damage. The last two slots are generally occupied by buffers, off-field damage dealers, or shielders according to preference. A shielder like Zhongli is strongly recommended in order for Yoimiya to properly Vaporize her Normal Attack string.
Yoimiya teams can sacrifice shielding for more offensive options if the player is skilled enough or if Yoimiya contributes a lower portion of team damage. Replacing the shielder with an Anemo unit or Xilonen leads to one of Yoimiya’s highest damage ceiling teams, provided you can maintain Yoimiya’s Normal Attack Vaporize sequence. To trigger 4pc Viridescent Venerer or 4pc Scroll of the Hero of Cinder City (Scroll) in such teams, a second Pyro unit, like Bennett, who applies Pyro earlier in the rotation is often required.
Similarly, a second Hydro or an Electro unit can supplement Yoimiya’s damage at the expense of some defensive utility. Double Hydro teams with Furina and Overvape teams with C6 Fischl are such examples. In Overvape teams, the combined Electro and Hydro application enables an Electro-Charged aura on which Yoimiya can trigger Overloaded and Vaporize simultaneously, further improving her damage.
Notable Teammates
Off-Field Hydro
Hydro units who provide good off-field damage and Hydro application.
 Yelan | Yelan provides strong off-field Hydro damage, especially in Double Hydro teams, and a ramping DMG% buff to Yoimiya. Her cooldowns enable perfectly loopable rotations without any downtime (in contrast to Xingqiu). In solo Hydro teams where she only uses one Elemental Skill, her ER requirements are extremely high. |
 Xingqiu | Xingqiu is a more defense-oriented alternative to Yelan. He provides interruption resistance, damage reduction, minor healing, and stronger Hydro application at C6 (compared to C0 Yelan). His longer cooldowns are often a downside for rotation length. |
 Furina | Furina provides off-field damage and a strong teamwide DMG% buff while requiring the team to run a healer (Xilonen and Bennett are the two notable ones). Furina’s Hydro application is inconsistent as the sole Hydro unit in the team; hence, she is usually paired with a second Hydro unit like Xingqiu or Yelan. |
Aino | Aino is a Nod-Krai character with slow off-field Hydro application. Paired with a second Nod-Krai character, her Hydro application is improved and she helps activate 4pc Night of the Sky’s Unveiling’s full effect. Aino should only be used when paired with Ineffa, but without a second Hydro unit, the team will have inconsistent Vaporizes. |
Strong Buffers
Units who significantly buff Yoimiya’s damage.
 Bennett | Bennett provides a strong Flat ATK buff, a self-applied Pyro aura that is useful for Swirl setups involving Elemental Absorption, and healing for the on-field character. Yoimiya’s combo usually incorporates dashes, which allows her to stay in Bennett’s Elemental Burst comfortably. |
 Yun Jin | Yun Jin provides a potent Normal Attack buff (Additive Base DMG Bonus to Normal Attacks). Her buff is comparable to Bennett’s at equal Constellation levels but this only applies to Double Geo Vaporize. Additionally, Yun Jin is unable to buff other off-field damage dealers in the team like Fischl or Beidou. Yun Jin faces drastically higher ER requirements if she’s the only Geo unit in the team. |
Iansan | Iansan provides a Flat ATK buff that gets weaker over time as Yoimiya does not have significant movement during her combo. Nonetheless, Iansan is still a good teammate for Yoimiya as she provides her with an ATK% buff at C2 and a DMG% buff through 4pc Scroll. |
 Chevreuse (C6) | While Chevreuse usually requires a full team of Pyro and Electro units, she can still be used at C6 to provide a DMG% buff. She also provides an ATK% buff in Overvape teams. |
Off-Field DPS
Units who mostly provide good off-field damage and/or some utility.
Ineffa | Ineffa has strong AoE damage, enables Lunar-Charged, provides a shield and an occasional EM buff for herself and Yoimiya. She is one of Yoimiya’s best partners for comfort and damage, and improves her viability in multi–target scenarios. |


Shielders
Units who provide interruption resistance via a shield while also providing some offensive utilities.
 Zhongli | Zhongli provides the strongest shield in the game and can RES Shred all elements if enemies are close enough to the active character. |
Lan Yan | Lan Yan has a good shield that scales off ATK; this shield can be improved by snapshotting Bennett’s Flat ATK buff. She gains an edge compared to other 4-star shielders by being able to hold 4pc Viridescent Venerer and Thrilling Tales of Dragon Slayers (TTDS) to further improve Yoimiya’s damage. |
Citlali | Citlali’s shield is on the weaker side, but she compensates for it offensively by having good Cryo application and strong buffing. She can RES Shred Pyro and Hydro, and provide buffs through 4pc Scroll and TTDS. It is worth noting that against enemies that can’t be Frozen, Citlali’s Cryo application is detrimental to Vapemelt teams; in such cases, it’s better to skip Citlali’s Elemental Burst to minimize Cryo application. |


RES Shred Characters
Units whose primary purpose is to provide a significant amount of RES Shred. Anemo units should hold 4pc Viridescent Venerer.


Example Teams
This is not a comprehensive list of teams. The inclusion or exclusion of any given team does not necessarily reflect its power level.

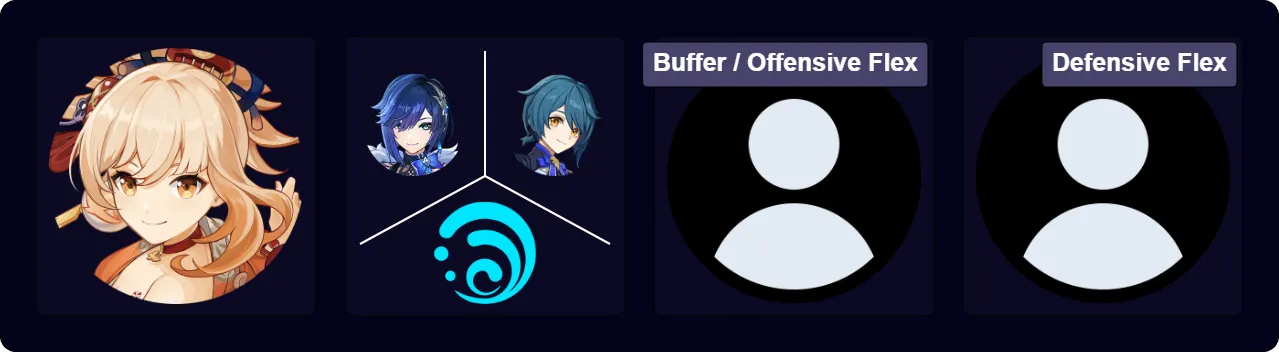
A shielded Overvape team that also has solid AoE potential thanks to Ineffa’s personal damage. Ineffa provides a comfortable shield that can be stronger if her Elemental Skill is cast inside Bennett’s Burst. Ineffa casts her Elemental Burst every other rotation to provide an EM buff for Yoimiya.
Sample Rotation
Ineffa E (Q) > Yelan EQ N1 > Bennett EQ > Yoimiya E combo > Bennett E

A comfortable Vaporize team where Yoimiya has access to a lot of buffs including Yelan’s ramping DMG% buff, Yun Jin’s Normal Attack buff, Geo Resonance, and any buffing set Zhongli holds. Zhongli’s shield also universally shreds RES of nearby enemies, which both Yoimiya and Yelan can take advantage of. Note that Yun Jin can use her Hold Skill versions based on her ER needs. Casting two Tap Skills leads to cooldown issues especially without Yun Jin’s C1.
Sample Rotation
(Yoimiya Q) > Zhongli hED > Yelan EQ N1 > Yun Jin hEQ > Yoimiya E combo

A Vapemelt team that allows Yoimiya to trigger Forward Melt against freezable enemies. Yoimiya is buffed by Bennett’s Flat ATK buff and Pyro Resonance on top of Citlali’s Pyro RES Shred, 4pc Scroll and TTDS. Xingqiu’s damage reduction helps strengthen Citlali’s weak shield. This team is not recommended against unfreezable enemies.
Sample Rotation
Xingqiu EDQ N1 > Bennett ED1Q > Citlali EQ2 N1 > Yoimiya E combo > Bennett E N1 > (Yoimiya Q)3
1Dash away to prevent applying Hydro with Xingqiu.
2Against unfreezable enemies, skip Citlali’s Burst.
3Use if available. Otherwise use some Normal Attacks while waiting for cooldowns.

A Vaporize team that greatly enhances Yoimiya’s personal damage output at the cost of interruption resistance. The rotation is easy to execute apart from performing Yoimiya’s full combo, as she can easily get staggered, leading to a big DPS loss. If you find yourself struggling, you may have more success with a shielded Vaporize team.
Sample Rotation
Yelan EQ N1 > Bennett Q > Kazuha hEP N1 > Yoimiya E combo > Kazuha tEP > Bennett E

A Double Hydro Vaporize team with Furina where all 3 of Yoimiya, Yelan and Furina deal a similar amount of damage. This alleviates the issue of Yoimiya losing a lot of damage by being interrupted during her Normal Attack string. Xilonen RES Shreds nearby enemies and provides a 40% DMG buff to Hydro characters in the team via 4pc Scroll.
Sample Rotation
Xilonen Q > Furina ED Q > (Yoimiya Q)1 > Xilonen E N2 > Yelan Q N1 E N1 > Yoimiya E combo > Yelan E N2
1Use if available.
Limited Roster Alternatives
These teams are meant for new players whose limited roster prevents them from using the teams above and will result in lower damage output.

An Overvape team where Yoimiya triggers both Vaporize and Overloaded. At C6, Fischl enables a constant Electro-Charged aura as solo Electro and Yoimiya acts as both a damage dealer and a driver for Fischl’s C6.
Sample Rotation
Xingqiu EDQ N1 > Bennett EQ N1 > (Yoimiya Q)1 > Fischl N2 E/Q > Yoimiya E combo > Bennett E
1Use if available and if not holding 4pc SR.

A comfortable Vaporize team with more accessible units. Lan Yan snapshots Bennett’s Flat ATK buff for a stronger shield and holds TTDS to further buff Yoimiya. Xingqiu’s damage reduction makes the shield even sturdier. Lan Yan’s C1 helps improve Pyro Swirl consistency.
Sample Rotation
Xingqiu EDQ N1 > Bennett ED1Q > Lan Yan2 2[E] N1 > Yoimiya E combo > Bennett E N1 > (Yoimiya Q)3
1Dash away to prevent applying Hydro with Xingqiu.
2Wait slightly for Bennett’s ATK buff and self-Pyro aura.
3Use if available and if not holding 4pc SR.
Overloaded

Chevreuse makes Overloaded teams a highly competitive archetype for Yoimiya, provided the team consists of only Pyro and Electro units. Her ability to conveniently shred both Pyro and Electro RES from off-field is especially valuable against enemies whom it is difficult to set up Swirls for and in multi-wave scenarios. Moreover, against enemies with an innate Hydro aura, Overloaded teams transform into Overvape teams, significantly boosting their performance.
Yoimiya does not Vaporize her Normal Attack string in this archetype; as such, she can dash during her combo without losing significant damage. Using an offensive option like Bennett or Mavuika over a Pyro shielder is highly recommended, as dodging is not a significant damage loss and they more than make up for it through their buffs and damage. Bennett provides a massive Flat ATK buff while Mavuika provides a DMG% buff and deals great personal AoE damage.
Notable Teammates
Chevreuse is a key component of Overloaded teams. Teams that exclude her are not covered due to their low damage output.
 Chevreuse | Chevreuse provides an ATK% buff to the team, some healing for the on-field character, and Pyro and Electro RES Shred from off-field. At C6, Chevreuse provides an additional instance of teamwide healing and a Pyro and Electro DMG% buff to healed teammates. |
Off-Field Electro
Electro units who provide consistent off-field Electro application alongside their own damage or buffs.
 Fischl | Fischl provides strong off-field Electro damage and consistent single-target Electro application, thanks to her A4 Passive and C6. Yoimiya is also one of the best drivers for Fischl’s C6, since each of Yoimiya’s 5 Normal Attacks trigger an additional attack from Oz. Fischl’s high particle generation lowers ER requirements for non-Electro teammates by 5–10%. She is also a valuable battery for other Electro units, if used. |
Iansan | While Iansan does not provide any off-field Electro, she still provides a solid Flat ATK buff, an ATK% buff at C2, and a DMG% buff through 4pc Scroll. However, her Flat ATK buff is much lower than Bennett’s as Yoimiya does not move a lot during her combo. Paired with another Electro, Iansan also enables Electro Resonance for the team. |
Ineffa | Ineffa loses a lot of her damage when not paired with a Hydro applier; however, she still provides a shield and off-field Electro application. She can be built full EM, which weakens her shield but improves her Overloaded damage, and she can hold 4pc Tenacity of the Millelith to further buff the team. |
Ororon | Ororon cannot trigger his A1 Passive without Electro-Charged or another Natlan character in the team. His A1 Passive allows him to enter the Nightsoul’s Blessing state, increasing his damage output and fully triggering 4pc Scroll’s effect. Currently, Ororon is not worth using without Mavuika in the team. |
 Raiden Shogun | Raiden provides off-field Electro application through her Elemental Skill with minimal field time. The Elemental Burst buff she gives teammates is often irrelevant. Raiden cannot use her Elemental Burst without significantly increasing rotation length. |
   Beidou, Yae Miko, Lisa | Beidou provides good off-field Electro damage in AoE scenarios and some defensive utility. Lisa decreases enemies’ DEF and can hold TTDS to buff Yoimiya. Beidou and Lisa should be run with Fischl to reduce their ER requirements, while Yae can forgo her Elemental Burst but requires more field time. |
Pyro
Pyro units who complement Yoimiya with buffing, defensive utility, or damage.


Example Teams
This is not a comprehensive list of teams. The inclusion or exclusion of any given team does not necessarily reflect its power level.

A strong and accessible Overloaded team that sacrifices defensive utility for Bennett’s strong buff. Both Yoimiya and Fischl benefit from Bennett’s Flat ATK buff, Chevreuse’s various buffs and debuffs as well as Pyro Resonance.
Sample Rotation (Support Build Chevreuse)
(Fischl E)1 > Chevreuse Q hE > Bennett N1 Q E > Fischl N2 E/Q > Yoimiya E combo (Q) > Bennett E
1,2First rotation only.
Sample Rotation (Quickswap DPS Build Chevreuse)
(Fischl E)1 > Bennett EQ > Chevreuse Q 3[hE]2 > Fischl N2 E/Q > Yoimiya E combo (Q)
1First rotation only.
2Use one Hold Skill if pre-C4 Chevreuse.

A Dual DPS Overloaded team that sacrifices some of Yoimiya’s personal damage in favor of Mavuika’s personal damage. The team has multiple sources of AoE damage, which makes it one of Yoimiya’s best teams in multi-target scenarios. Ororon’s taunt, Chevreuse’s healing and the knockback from the Overloaded reaction alleviate the lack of strong defensive utility or shielding.
Sample Rotation
Ororon E Q > Chevreuse Q hE > Mavuika tE Q 2[C2D] > Yoimiya E combo (Q)
Mono Pyro
Yoimiya’s Mono Pyro teams prioritize different buffs or off-field damage rather than Vaporized Normal Attacks. This archetype is much more forgiving to play since interrupting Yoimiya’s Normal Attack string is less devastating to team DPS. Setups to trigger 4pc Viridescent Venerer (VV), 4pc Archaic Petra (AP) and 4pc Scroll of the Hero of Cinder City (Scroll) are much easier since Pyro is the only aura.
Against enemies with an innate Hydro aura, Mono Pyro teams transform into Vaporize, significantly boosting their performance. However, this also hinders Pyro Swirls and Crystallizes, restricting corresponding buffs.
Notable Teammates
Bennett is not always required for Mono Pyro teams; however, he is often the best and most consistent option.
Bennett | Bennett provides a strong Flat ATK buff and healing for the on-field character. Yoimiya’s combo usually incorporates dashes, which allows her to stay in Bennett’s Elemental Burst comfortably. |
Off-Field DPS / Utility
Units who mostly provide good off-field damage and/or some utility.

RES Shred Characters
Units who provide RES Shred. Anemo units should hold 4pc Viridescent Venerer.

Example Teams
This is not a comprehensive list of teams. The inclusion or exclusion of any given team does not necessarily reflect its power level.

A comfortable Double Geo Mono Pyro team where Yoimiya and Chiori both contribute to team damage while having access to both Pyro and Geo Resonance alongside Zhongli’s universal RES Shred. Zhongli can hold 4pc AP to provide a Pyro DMG Bonus to Yoimiya or 4pc Scroll to provide a smaller Pyro and Geo DMG Bonus to both Yoimiya and Chiori.
Sample Rotation
Bennett E > Zhongli hED1 > Chiori 2[E] > Bennett Q E > Yoimiya E combo > (Yoimiya/Chiori Q)2
1Pick up Pyro Crystallize shard if holding 4pc AP.
2Use either Elemental Burst if available.

A Burning team where Yoimiya and Emilie both contribute to team damage while having access to Pyro Resonance. Kazuha’s DMG% buff and Pyro RES Shred improve Yoimiya’s damage, while his grouping lets Emilie deal significant AoE damage with her Elemental Burst.
Sample Rotation
Bennett Q E > Emilie E > Kazuha Q > Yoimiya E combo > Bennett E > Yoimiya Q > Bennett Q E > Emilie Q > Kazuha tEP > Yoimiya E combo > Bennett E > Kazuha tEP
Miscellaneous Teams
Example Teams
This is not a comprehensive list of teams. The inclusion or exclusion of any given team does not necessarily reflect its power level.

This Forward Melt team has great performance but can be inconsistent if Cryo applications don’t line up with Yoimiya’s Pyro application. Citlali provides RES Shred for Yoimiya, a shield for comfort, and DMG% for both Yoimiya and Escoffier. Escoffier has solid off-field personal damage.
Sample Rotation
Escoffier N1 E > Bennett Q E (N1)1 > Citlali EQ > Yoimiya E combo > Bennett E N2
1Use if Bennett is C6 and reapplying Pyro is needed to trigger Scroll with Citlali.

This team is similar to Yoimiya’s double Hydro teams with Xilonen or Bennett. Yoimiya receives less buffs but in turn can trigger some Forward Melts. The rest of the team benefits from some Hydro and Cryo RES Shred provided by Escoffier.
Sample Rotation
Furina ED Q > Yelan Q N1 > Escoffier N1 EQ N1 > Yelan N1 E N1 > Yoimiya E combo (Q) > Yelan E N2

Yoimiya alongside Xiangling or Emilie apply enough Pyro for Furina to Forward Vaporize her Skill. Furina can forgo building ER and Burst every other rotation to maximize her damage.
Sample Rotation (Xiangling – Furina with ER)
Furina ED Q > Bennett Q E > Xiangling Q E > Yoimiya E combo (Q) > Bennett E > Xiangling N2
Sample Rotation (Emilie – Furina without ER)
Furina ED > (Furina/Yoimiya Q)1 > Bennett EQ > Emilie Q/E > Yoimiya E combo > Bennett E
1Alternate between Furina’s and Yoimiya’s Burst.

All of Yoimiya, Emilie and Fischl can use 4pc Unfinished Reverie. Similarly, one of Bennett, Fischl or Emilie should hold 4pc Deepwood Memories. Fischl triggers a high amount of Overloaded but there’s no Quicken uptime.
Sample Rotation
Bennett EQ > Emilie E/Q1 > Fischl N2 E/Q > (Bennett E)2 > Yoimiya E combo (Q)1
1Alternate between Emilie’s and Yoimiya’s Burst.
2Use if holding 4pc Deepwood Memories.
Credits
Writer(s): .reimu., lesterberne
Contributors: nikatosaurus, leah, chasing_haze, nickjr, mishkaxp, caxia5, idkanonymized, staryy_, frankdgaf, cinders_pear, mystathi, plumetra, caramielle
Extended Guide Contributors: irokei, mishkaxp, caxia5, nociii, luno_, edisonsmathsclub, ayzel, cuzimori, rockidayo, euphorysm, jan, leahcalculations, latiwings, reens, davjac123
Team images made with the KQM portrait generator.