Updated for Version “Luna I”
Dehya is a 5★ Pyro Claymore character in Genshin Impact who deals Pyro damage with her Burst and provides off-field Pyro application and defensive utility with her Skill. Learn about Dehya’s best builds, best weapons, best artifacts, and best teams in this quick guide.
Note that the information given may change if new discoveries are made. More extensive testing is in progress.
The full-length guide is available here. It is currently being updated.
Table of Contents
New Content
Lauma | Lauma is an amazing support for Bloom teams, buffing the reactions and allowing them to crit. |
Aino | Aino is a Nod-Krai character who applies off-field Hydro that gets faster with another Nod-Krai character on the team. She helps activate the full effects of 4pc Night of the Sky’s Unveiling and 4pc Silken Moon’s Serenade. |
 Ineffa | Ineffa has strong AoE damage and enables Lunar-Charged, allowing Dehya to trigger both Vaporize and Overloaded in her teams. Ineffa’s Elemental Skill provides a shield, which weakens Beacon of the Reed Sea’s damage but improves the consistency of Serpent Spine stacks. Additionally, she’s often used with Furina, allowing Dehya to still use 4pc MH despite not taking any damage. |
 Master Key | Master Key is a 4-star craftable weapon that provides 240 EM, but only when paired with 2 Nod-Krai characters; otherwise, it provides a mere 120 EM. If the full effect is active, it’s a good weapon for Burgeon and on-field DPS Dehya. |
 4pc Silken Moon’s Serenade | 4pc Silken Moon’s Serenade provides an EM buff to teams with at least 1 Nod-Krai character. With 2 Nod-Krai characters, this set is better than 4pc Instructor, providing a similar buff with no downtime and no drawbacks of being a 4-star set. |
 4pc Night of the Sky’s Unveiling | 4pc Night of the Sky’s Unveiling is a strong set for on-field DPS Dehya in teams that can activate its full effect. This is possible in an Overvape team with both Ineffa and Aino. |
Infographic
Off-Field Support
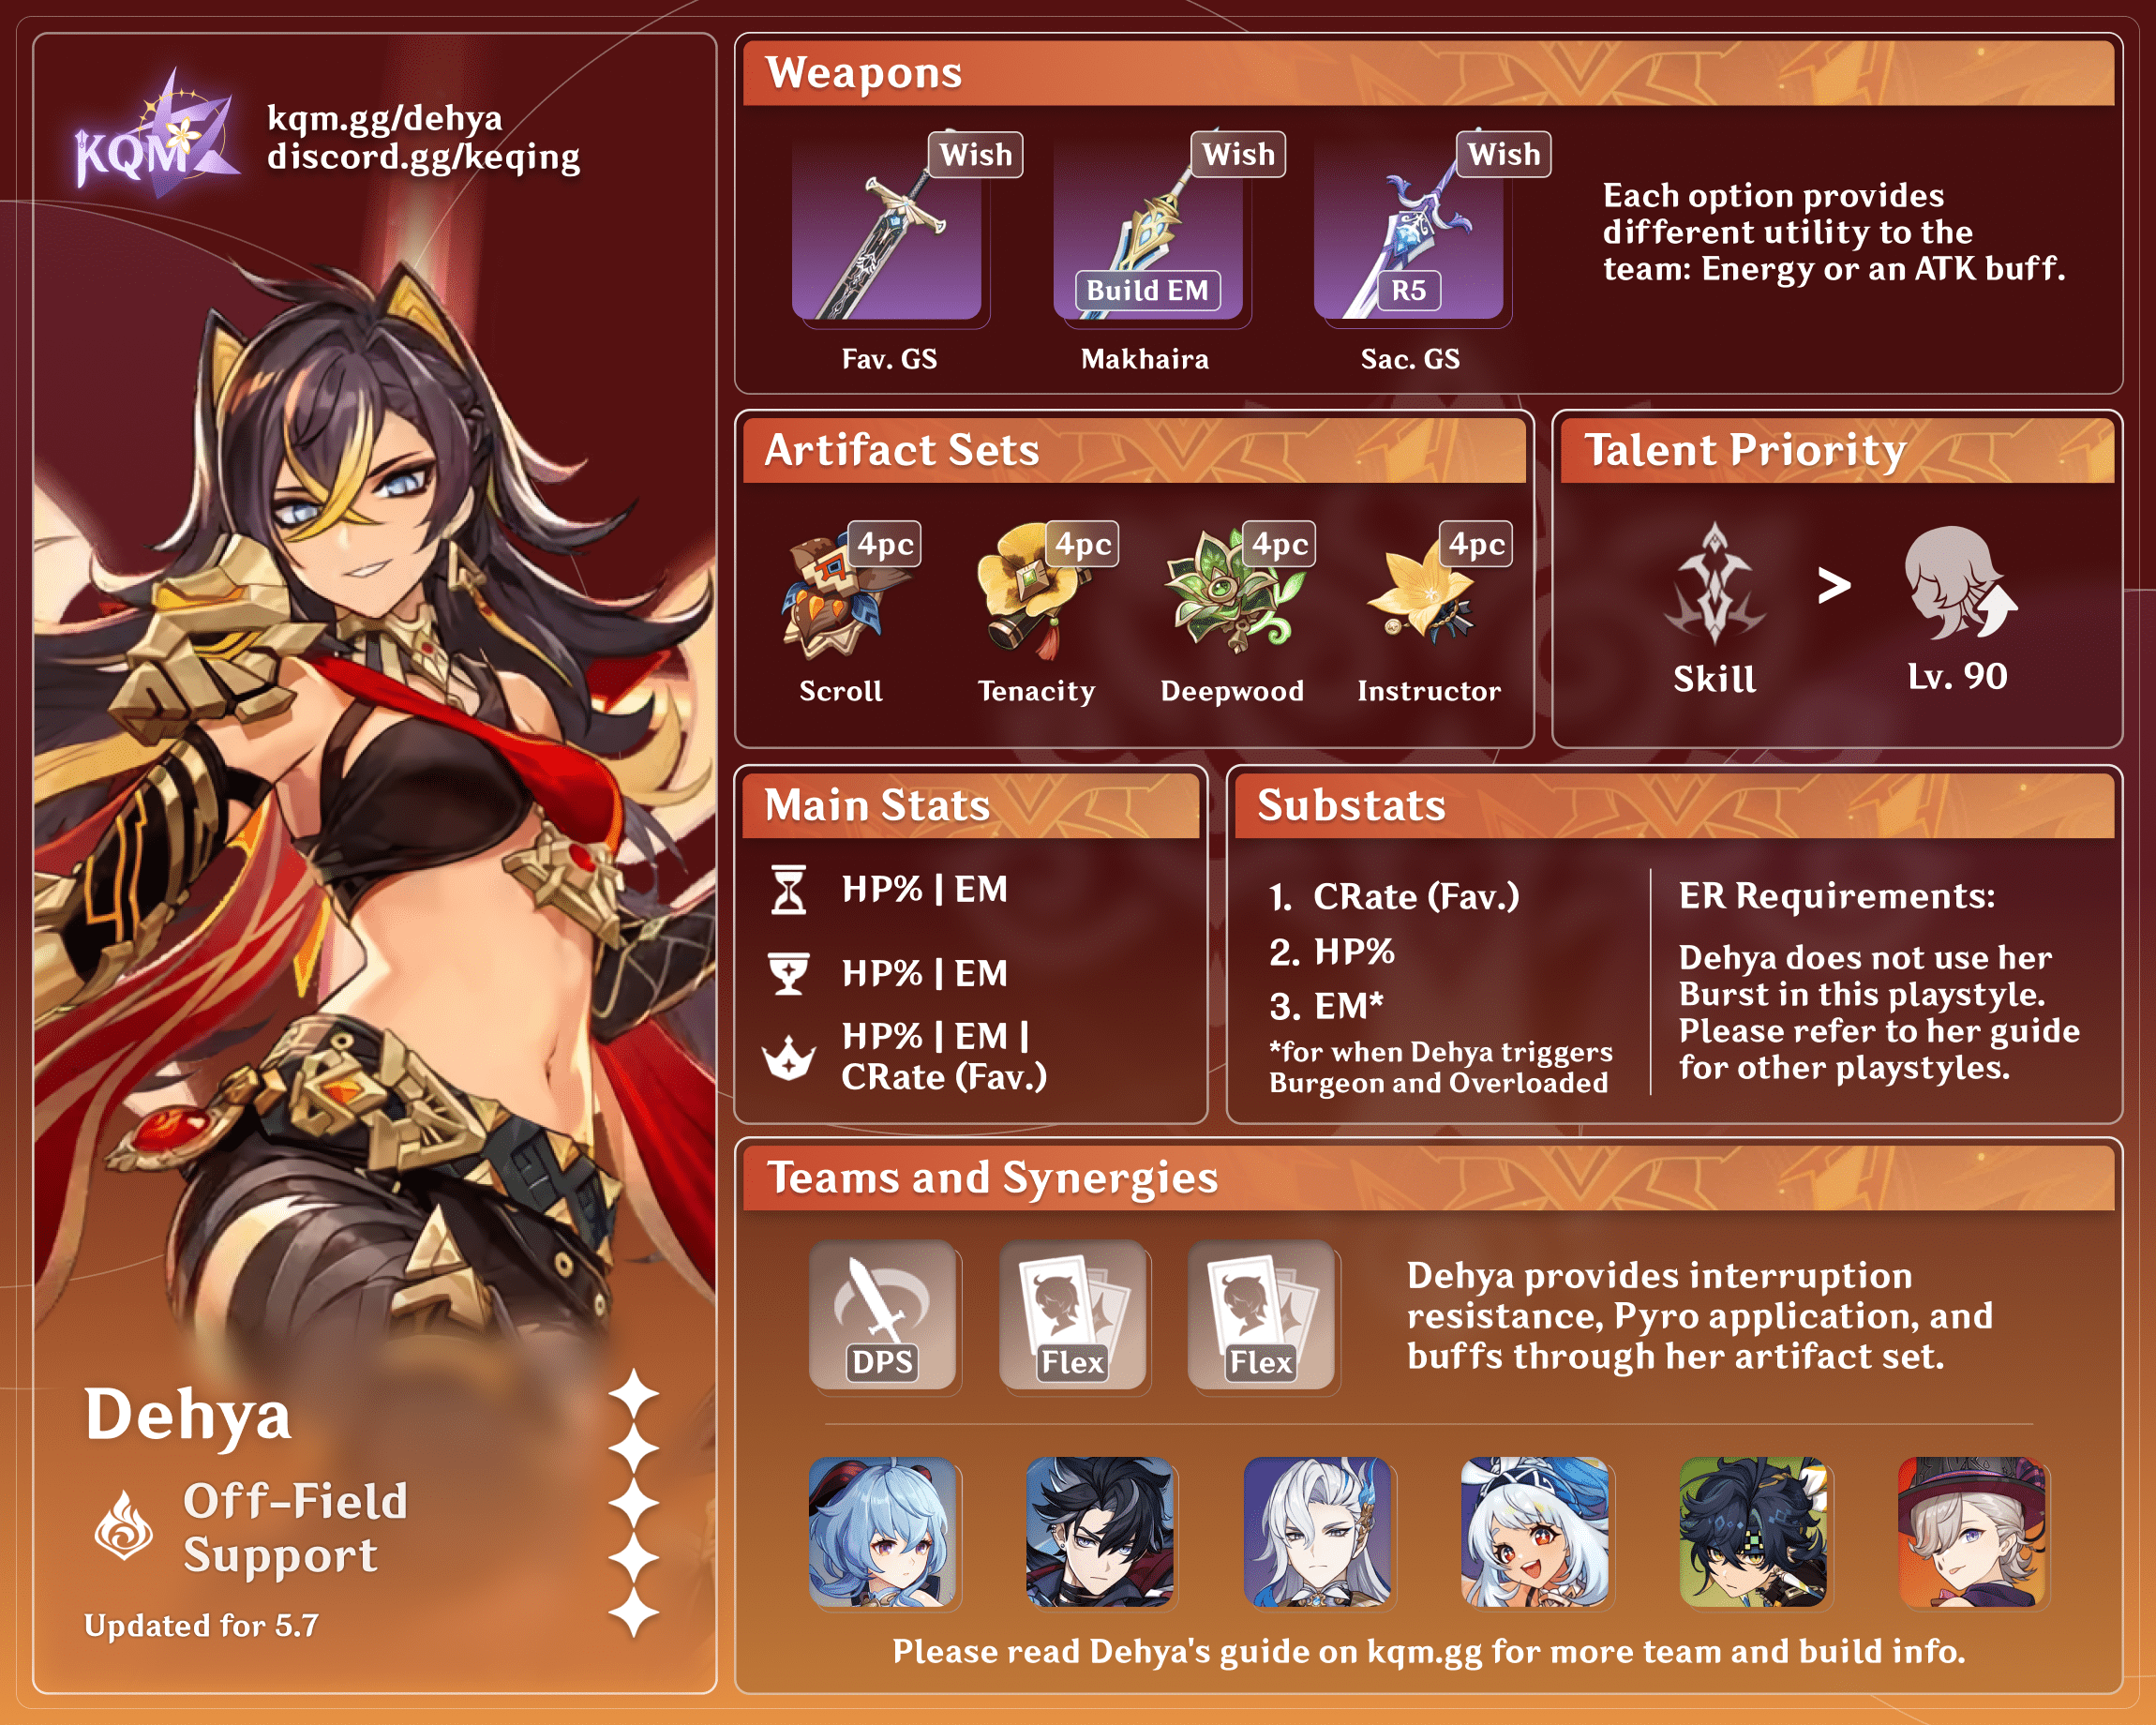
Credits to: kolvii, cegewinne, cuppacote, snowwwwww. & Lesterberne
On-Field DPS
Credits to: kolvii, cegewinne, cuppacote, snowwwwww. & Lesterberne
Character Overview
Pros
- Diverse playstyles lead to a variety of teams
- Easy gameplay and execution
- Off-field Pyro application and interruption resistance
- Self-healing aids with exploration
Cons
- Subpar on-field performance at low Constellations
- Burst does not trigger Normal Attack-based abilities like Xingqiu’s Sword Rain attacks, limiting teammate options
- Off-field Pyro application is slow and mostly single-target
- Damage mitigation is not enough survivability to solo sustain a team
- 20s Skill cooldown is limiting for some teams
- Risk of dying to redirected damage if it outpaces self-healing
Playstyles
Off-Field Support
Dehya provides damage mitigation, interruption resistance, slow Pyro application via her Elemental Skill, and buffs via her artifact sets.
Burgeon
Dehya triggers Burgeon from off-field with her Elemental Skill’s coordinated attacks. However, she is not an efficient Burgeon trigger due to the slow attack rate of her coordinated attacks, so the damage she provides this way is mostly supplemental.
On-Field DPS
On-field Dehya makes full use of both her Elemental Burst and Elemental Skill to deal damage. It is not recommended to use her on-field without significant investment, including but not limited to Constellations (notably her C1 and C6) and her signature weapon.
Talents
Level and Talent Priority
Burst* >> Character Level ≥ Skill
*Dehya’s Burst should only be leveled for her on-field playstyle.
Unless played with Xianyun and C6 Bennett, Dehya’s Normal Attack Talent should not be leveled. Leveling her Skill should be done mainly to increase damage mitigation, as it does not contribute significant damage.
Since Dehya’s damage and defensive utility both scale with her Max HP, it is recommended to level her to 90. This is particularly important when playing her as a Burgeon trigger, as it also provides a significant increase to Transformative Reaction damage.
Talent Overview
 Normal Attack | Sandstorm Assault
Talent Description
Normal Attack
Performs up to 4 consecutive strikes using her Claymore and her martial arts.
Charged Attack
Drains Stamina over time to perform continuous slashes.
At the end of the sequence, performs a more powerful slash.
Plunging Attack
Plunges from mid-air to strike the ground, damaging opponents along the path and dealing AoE DMG upon impact.
Dehya’s Normal Attacks are usually not used for damage, except with Xianyun.
 Elemental Skill | Molten Inferno
Talent Description
This art of Dehya’s own invention changes its method of use depending on the combat situation.
Indomitable Flame
This skill will be unleashed should there be no Fiery Sanctum field created by Dehya herself present at the time.
Deals AoE Pyro DMG, and creates a field known as Fiery Sanctum.
Ranging Flame
This skill will be unleashed should a Fiery Sanctum field created by Dehya herself already exist.
Dehya will perform a leaping attack, dealing AoE Pyro DMG before recreating a Fiery Sanctum field at her new position.
A Fiery Sanctum field created this way will inherit the remaining duration of the previous field.
Ranging Flame can be used only once throughout a single Fiery Sanctum field’s duration.
Fiery Sanctum
When an opponent within a Fiery Sanctum field takes DMG, the field will unleash a coordinated attack, dealing AoE Pyro DMG to them based on Dehya’s ATK and Max HP. This effect can be triggered once every 2.5s.
Active characters within this field have their resistance to interruption increased, and when such characters take DMG, a portion of that damage will be mitigated and flow into Redmane’s Blood. Dehya will then take this DMG over 10s. When the mitigated DMG stored by Redmane’s Blood reaches or goes over a certain percentage of Dehya’s Max HP, she will stop mitigating DMG in this way.
Only 1 Fiery Sanctum created by Dehya herself can exist at the same time.
Dehya’s Elemental Skill creates a Fiery Sanctum field, which unleashes a coordinated attack whenever an enemy within the field takes damage with a 2.5s cooldown. These coordinated attacks deal damage and apply Pyro in a small AoE, but are too slow to maintain a consistent Pyro aura without help. Her second Skill cast only does damage and repositions the field; at C2, it also extends the field’s duration. She generally casts both Skills in her rotations.
The active character in the Fiery Sanctum field has increased interruption resistance as well as damage mitigation. The damage taken is reduced by 30-50% and redirected to Dehya over 10s in the form of a DoT (Damage over Time). This damage mitigation is capped at 200% of Dehya’s Max HP.
Coordinated attacks generate 1 Pyro particle per hit, usually 4-5 in total.
 Elemental Burst | Leonine Bite
Talent Description
Unleashing her burning anger and casting her inconvenient blade aside, Dehya enters the Blazing Lioness state and increases her resistance to interruption.
In this state, Dehya will automatically and continuously unleash the Flame-Mane’s Fists, dealing Pyro DMG based on her ATK and Max HP, and when its duration ends, she will unleash an Incineration Drive, dealing AoE Pyro DMG based on her ATK and Max HP.
If a Fiery Sanctum field created by Dehya’s own Elemental Skill “Molten Inferno” exists when this ability is unleashed, Dehya will retrieve it, and then create another field once Blazing Lioness’s duration expires. This field will take on the retrieved field’s duration at the moment of its retrieval.
In this state, Dehya will be unable to cast her Elemental Skill, or perform Normal, Charged, and Plunging Attacks. “Normal Attack: Sandstorm Assault” and Elemental Skill “Molten Inferno” will be replaced by “Roaring Barrage.”
Roaring Barrage
Unleashing Roaring Barrage within 0.4s after each Flame-Mane’s Fist strike will increase the speed at which the next Flame-Mane’s Fist strike will be triggered.
Dehya’s Elemental Burst retrieves her Fiery Sanctum field (if present) and triggers the Blazing Lioness state, replacing her Normal Attacks with Flame-Mane’s Fists and making her immune to interruption. Dehya automatically unleashes 6 attacks during this state, but with proper timing (or just mashing the Normal Attack or Skill button), she can reach up to 10 attacks at C0, or 15-16 at C6. The Burst ends with an Incineration Drive finisher.
Since Dehya retrieves her Skill’s field when unleashing her Burst, she cannot generate particles while on-field. This combined with her Burst’s cost (70 Energy) leads to high ER requirements for her on-field playstyle.
Note that players should NOT jump while Dehya’s Burst is active, as doing so cancels it and puts it on cooldown. Using a dash into a jump skips straight to her Incineration Drive kick. If Dehya gets Frozen, her Elemental Burst will also abruptly end.
Furthermore, Dehya’s Flame-Mane’s Fists are considered Elemental Burst hits and not Normal Attacks; therefore, they cannot trigger various off-field abilities such as Xingqiu’s Sword Rain attacks or Beidou’s Lightning discharges, limiting her potential teammates.
 Ascension 1 Passive | Unstinting Succor
Talent Description
Within 6 seconds after Dehya retrieves the Fiery Sanctum field through Molten Inferno: Ranging Flame or Leonine Bite, she will take 60% less DMG when receiving DMG from Redmane’s Blood. This effect can be triggered once every 2s.
Additionally, within 9s after Dehya unleashes Molten Inferno: Indomitable Flame, she will grant all party members the Gold-Forged Form state. This state will further increase a character’s resistance to interruption when they are within the Fiery Sanctum field. Gold-Forged Form can be activated once every 18s.
Dehya’s A1 Passive improves her Elemental Skill’s interruption resistance for 9s after the initial cast, making characters inside the field immune to interruption. This effect can only be activated every 18s, and is not reset by Sacrificial Greatsword.
Additionally, redirected damage taken is reduced after Dehya retrieves the Fiery Sanctum field through her second Skill cast or her Burst. Since Dehya’s damage redirection ceases completely once capped, this reduction boosts its uptime.
 Ascension 4 Passive | Stalwart and True
Talent Description
When her HP is less than 40%, Dehya will recover 20% of her Max HP and will restore 6% of her Max HP every 2s for the next 10s. This effect can be triggered once every 20s.
Dehya’s A4 Passive provides emergency healing, which can prevent her from dying off-field from her damage mitigation. However, Dehya can still die off-field in rare instances since her damage mitigation DoT can outpace this healing.
This passive only heals Dehya herself, meaning her teams generally still require a second form of defensive utility like a healer or shielder.
Constellations
 Constellation 1 | The Flame Incandescent
Constellation Description
Dehya’s Max HP is increased by 20%, and she deals bonus DMG based on her Max HP when using the following attacks:
– Molten Inferno’s DMG will be increased by 3.6% of her Max HP.
– Leonine Bite’s DMG will be increased by 6% of her Max HP.
Increases Dehya’s Max HP and improves her damage’s HP scaling. This Constellation is a big damage boost for Dehya and makes her on-field playstyle more viable. At C1, ATK% and HP% Sands are comparable, and the difference in damage is determined mostly by substats.
 Constellation 2 | The Sand-Blades Glittering
Constellation Description
When Dehya uses Molten Inferno: Ranging Flame, the duration of the recreated Fiery Sanctum field will be increased by 4s.
Additionally, when a Fiery Sanctum exists on the field, DMG dealt by its next coordinated attack will be increased by 50% when active character(s) within the Fiery Sanctum field are attacked.
Upon casting Dehya’s Skill a second time, her Fiery Sanctum field’s duration is increased by 6s, extending her defensive utility. This allows for 2 more coordinated attacks, leading to more reactions, damage, and particles. The bonus damage on her Elemental Skill is negligible and inconsistent, but this Constellation is a nice upgrade for support Dehya. This also allows up to 2 more coordinated attacks, leading to more Pyro application and particles generated. The bonus damage on her Elemental Skill is negligible and inconsistent. This Constellation can be a nice upgrade for support Dehya, provided the additional Pyro application does not interfere with setups (this can occur in 16s rotations with R5 Sacrificial Greatsword).
For DPS Dehya, the extension is often around 1–2s instead of 6s in her teams, so she only gets 0 or 1 more particle from her C2, which is a minimal increase to her damage.
 Constellation 3 | A Rage Swift as Fire
Constellation Description
Increases the Level of Leonine Bite by 3.
Maximum upgrade level is 15.
Dehya’s Burst is her main source of damage in her on-field playstyle, making this Constellation a nice increase to her damage output.
 Constellation 4 | An Oath Abiding
Constellation Description
When Flame-Mane’s Fist and Incineration Drive attacks unleashed during Leonine Bite hit opponents, they will restore 1.5 Energy for Dehya and 2.5% of her Max HP. This effect can be triggered once every 0.2s.
Reduces Dehya’s ER requirements by ~40% pre-C6 and ~60% at C6 (assuming no rotation changes), allowing her to build more offensive substats. The HP regeneration is a nice touch to aid her survivability and stack Fanfare if paired with Furina.
 Constellation 5 | The Alpha Unleashed
Constellation Description
Increases the Level of Molten Inferno by 3.
Maximum upgrade level is 15.
Dehya’s Skill is a very small portion of her damage, making this Constellation rather weak. Her damage mitigation is increased by a small amount.
 Constellation 6 | The Burning Claws Cleaving
Constellation Description
The CRIT Rate of Leonine Bite is increased by 10%.
Additionally, after a Flame-Mane’s Fist attack hits an opponent and deals CRIT Hits during a single Blazing Lioness state, it will cause the CRIT DMG of Leonine Bite to increase by 15% for the rest of Blazing Lioness’s duration and extend that duration by 0.5s. This effect can be triggered every 0.2s. The duration can be extended for a maximum of 2s and CRIT DMG can be increased by a maximum of 60% this way.
This is Dehya’s best Constellation, giving a total of 10% CRIT Rate and 60% CRIT DMG to her Elemental Burst at full stacks. The duration increase to her Burst also allows Dehya to do 5-6 extra Burst hits with correct timing. At C6, Dehya can make full use of her C4, lowering her ER requirements even further.
Off-Field Support
Artifacts
Artifact Stats
 Sands |  Goblet |  Circlet |
| EM* / HP% | EM* / HP% | CRIT Rate (Favonius) / EM* / HP% / Healing Bonus |
Stat Priority: CRIT Rate (Favonius) > EM* > HP%
*If Dehya triggers Transformative Reactions like Burgeon or Overloaded, Elemental Mastery can be a good stat to improve team DPS.
Dehya does not use her Elemental Burst, meaning she has no ER requirements.
Stacking HP improves Dehya’s damage mitigation. She can use a Healing Bonus Circlet if paired with Furina, as the HP drain triggers her A4 Passive more reliably. If Dehya is using Favonius Greatsword, prioritize CRIT Rate to trigger it reliably.
Artifact Sets
 4pc Tenacity of the Millelith | 4pc Tenacity of the Millelith (TotM) is a good support set for teams that benefit from the ATK% buff. Dehya can maintain full uptime during her Skill’s duration via her coordinated attacks. The 20% HP aids Dehya’s damage mitigation capabilities. |
 4pc Scroll of the Hero of Cinder City | 4pc Scroll of the Hero of Cinder City (Scroll) is an alternative option to 4pc TotM in teams that would benefit more from its DMG% buff. Dehya can trigger this set from off-field to give a 12% DMG Bonus to Pyro and any other Element she reacts with. |
 4pc Instructor | 4pc Instructor gives a 120 EM buff that is appreciated in reaction-based teams. To get the effect, Dehya needs to trigger a reaction while on-field, and the effect only lasts for 8s. Her damage mitigation is reduced with this set due to 4-star artifacts having lower stats. |
4pc Silken Moon’s Serenade | 4pc Silken Moon’s Serenade provides an EM buff to teams with at least 1 Nod-Krai character. With 2 Nod-Krai characters, this set is better than 4pc Instructor, providing a similar buff with no downtime and no drawbacks of being a 4-star set. |
 4pc Deepwood Memories | 4pc Deepwood Memories is an obligatory set for teams that deal significant Dendro damage. Dehya can maintain high uptime on the 4pc effect, allowing Dendro damage dealers to equip more offensive artifact sets. |
Weapons
 4★ Sacrificial Greatsword (R5) | Sacrificial Greatsword allows Dehya to bypass her Elemental Skill’s 20s cooldown restriction, especially at R5 (down to 16s). However, her A1 Passive’s increased interruption resistance can only trigger once every 18s, limiting her shorter rotations potential. |
 4★ Favonius Greatsword | Favonius Greatsword allows Dehya to generate clear particles for her teammates, lowering their ER requirements. Note that this weapon’s passive does not proc off-field. Stacking CRIT Rate is optimal to provide a higher proc chance. |
 4★ Makhaira Aquamarine | Makhaira Aquamarine gives Dehya some EM to improve her reaction damage while also providing a small teamwide Flat ATK buff. |
 4★ Portable Power Saw, The Bell | Portable Power Saw and The Bell serve as HP% stat sticks for additional sturdiness, but don’t provide any other utility. |
Teams
Rotation Notation
- N = Normal Attack
- C = Charged Attack
- A = Aimed Shot
- P = Plunging Attack
- E = Elemental Skill
- tE = Tap Skill
- hE = Hold Skill
- Q = Elemental Burst
- D = dash (cancel)
- J = jump (cancel)
- W = walk (cancel)
- > = switch character
- ( ) = these actions are optional; please refer to the notes below
- [ ] = repeat these actions the specified number of times
Teambuilding

Dehya provides some defensive utility, interruption resistance and has short field time. She is also half of Pyro Resonance.
She can be a good off-field Pyro applier for Cryo and Hydro characters who want to Melt or Vaporize their attacks. However, her Pyro application is slow, which often requires her to pair with a Dendro character to sustain a Pyro aura. Dehya’s Elemental Skill is also stationary and mostly single-target compared to other Pyro alternatives.
Her off-field Pyro application can be useful for Chevreuse Overloaded teams; however, it can also be detrimental for Pyro characters who want to trigger Vaporize or Melt, as Dehya might react with the auras instead.
Notable Teammates
Cryo / Hydro DPS
These Cryo and Hydro units utilize Reverse Melt and Forward Vaporize reactions respectively to improve their damage.


Off-Field Dendro
These Dendro units provide consistent off-field Dendro application to help maintain a Pyro aura on enemies while dealing solid damage or providing buffs.
 Emilie | Emilie deals good off-field single-target damage and provides Dendro application for consistent Burning uptime. Her frequent hits alongside Burning ticks allow Dehya to trigger her Elemental Skill frequently and reliably. |
 Nahida | Nahida provides an EM buff and has strong off-field AoE Dendro application that procs whenever a reaction occurs. Unlike Emilie, Nahida needs to reapply her mark on newly spawned enemies, making her a worse option in multi-wave content. The condition for triggering her Elemental Skill can make timings awkward when paired with Dehya without another source of consistent hits. It is not recommended to pair Nahida with Dehya in a Mualani team without Emilie in the fourth slot. |
Other DPS Options
These DPS units often benefit from Dehya’s interruption resistance and off-field Pyro application.


Example Teams
This is not a comprehensive list of teams. The inclusion or exclusion of any given team does not necessarily reflect its power level.

Mualani has slow Hydro attacks that can easily Vaporize with consistent off-field Pyro application. Dehya and Emilie are a strong combination in single-target situations, providing damage and some defensive utility. Xilonen can RES Shred Hydro and provide a buff on the first rotation via 4pc Scroll or hold 4pc Instructor instead. Nahida provides an EM buff and Dendro Resonance. Nahida can use Prototype Amber to help with her Energy needs and heal the team to counteract Burning damage.
Sample Rotation (Xilonen – 4pc Scroll)
(Mualani N1)1 > Xilonen EQ N2 > Emilie E/Q2 > Dehya 2[E] > Mualani (Q)2 E combo
1First rotation only.
2Use Emilie’s Burst if Mualani’s Burst is not available.
Sample Rotation (Nahida)
Nahida E Q > Dehya 2[E] > Emilie E/Q1 > Mualani (Q)1 E combo
1Use Emilie’s Burst if Mualani’s Burst is not available.

Ganyu’s Melt teams usually run into ER issues and are constrained by Xiangling’s cooldowns. Dehya paired with Nahida or Emilie form a duo that bypasses the aforementioned issues, especially if an R5 Sacrificial Greatsword is used. Nahida might require stricter timing of Charged Shots compared to Emilie.
Sample Rotation (Nahida)
Nahida E Q > Bennett EQ > Dehya 2[E] > Ganyu 6[C]1 E
1If Dehya isn’t using Sacrificial Greatsword or its effect didn’t trigger, use Ganyu’s Elemental Burst or do an extra Charged Attack.
Sample Rotation (Emilie)
Emilie Q/E > Bennett EQ > Dehya 2[E] > Ganyu 6[C]1 E
1If Dehya isn’t using Sacrificial Greatsword or its effect didn’t trigger, use Ganyu’s Elemental Burst or do an extra Charged Attack.

Kinich is a single-target damage dealer whose damage gets improved through Burning and Burgeon, hence favoring an off-field Pyro applier. Dehya’s single-target Elemental Skill is less of a hindrance in this team; however, it is more stationary than other options. Dehya should use 4pc Deepwood Memories in this team. Her slow Pyro application paired with Iansan’s ability to apply 3 consecutive instances of Electro help remove Burning and Pyro auras to react with the Dendro for 4pc Scroll.
Sample Rotation
Emilie E/Q > Dehya 2[E] > Iansan E N11 Q > Kinich shE combo
1Even with C2, cast Iansan’s enhanced Charged Attack to get Dendro Scroll.

Lyney is a Charged Shot damage dealer who likes interruption resistance and Pyro teammates for his A4 Passive. This would make Dehya a perfect fit had she not been restricted by her long cooldowns. While Lyney prefers to do short 15s rotations, he would rather have Dehya’s immunity to interruption, which limits the team’s rotation to 18s with R5 Sacrificial Greatsword.
Sample Rotation
(Lyney C)1 > (Kazuha Q) > Dehya 2[E] > Bennett EQ > Kazuha tEP > Lyney 2[C] (Q E)2 C E 2[C]
1First rotation only.
2Use Lyney’s Elemental Burst if available followed by an Elemental Skill. If it’s not, do an extra Charged Attack instead.

Clorinde’s Overloaded teams with Chevreuse lack a good off-field Pyro applier who fits into her 16s rotations. Mavuika and Xiangling are good for damage while Thoma and Dehya are more comfortable options. Do note that even with R5 Sacrificial Greatsword, it might still be preferred to extend the rotation to 18s in order to benefit from Dehya’s immunity to interruption.
Sample Rotation (C2+ Kujou Sara)
Opener:
Sara E > Chevreuse Q hE > Dehya 2[E] > Sara Q > Clorinde E combo
Repeating Rotation:
Sara C > Chevreuse hE > Clorinde Q > Chevreuse Q > Dehya 2[E] > Sara E (Q) > Clorinde E combo
Sample Rotation (Fischl)
Fischl E/Q > Chevreuse Q hE > Dehya 2[E] > Clorinde E combo Q (N4)1
1To extend the rotation for Dehya’s A1 Passive.

Neuvillette’s teams can use Dehya in place of a shielder. Even though Dehya’s immunity to interruption is short, it is enough for Neuvillette to kite to safety while he’s using his Charged Attacks.
Sample Rotation
Neuvillette E > Furina ED > Kazuha tEPQ > Dehya 2[E] > Furina Q > Neuvillette C E C Q > Kazuha tEP > Neuvillette 2[C]
Burgeon
Artifacts
Artifact Stats
Sands | Goblet | Circlet |
| Elemental Mastery | Elemental Mastery | Elemental Mastery |
Stat Priority: EM > CRIT Rate (Favonius) > HP%
Dehya does not use her Elemental Burst, meaning she has no ER requirements.
Dehya should not be relied upon as the sole sustain against Burgeon damage. However, if more defensive utility is needed, using one HP% mainstat is a viable option. In most cases, stacking as much EM as possible is much preferred to increase Burgeon damage.
Artifact Sets
 4pc Flower of Paradise Lost | 4pc Flower of Paradise Lost (FoPL) is tailor-made for Bloom reactions and is Dehya’s best set if she triggers mostly Burgeons. However, Dehya usually does not trigger Burgeon frequently enough to make this set significantly better than 4pc Gilded Dreams. |
 4pc Gilded Dreams | 4pc Gilded Dreams provides EM, improving Burgeon and other reactions. It can outperform 4pc FoPL if Dehya triggers Overloaded consistently. |
4pc Deepwood Memories | 4pc Deepwood Memories is an obligatory set for Burgeon teams. Dehya should equip this set if there are no better holders. |
 2pc Mixed Sets | 2pc Set Bonuses: Elemental Mastery These 2pc combinations are the bare minimum for a Burgeon playstyle. |
4pc Silken Moon’s Serenade | 4pc Silken Moon’s Serenade provides an EM buff to teams with at least 1 Nod-Krai character. It provides less stats than 2pc mixed sets but could be worthwhile if multiple characters benefit from the EM buff. |
Weapons
4★ Master Key | Master Key is a 4-star craftable weapon that provides 240 EM, but only when paired with 2 Nod-Krai characters; otherwise, it provides a mere 120 EM, making it worse than all other alternatives. |
 4★ Mailed Flower | Mailed Flower is a 4-star event weapon and a great option for Dehya’s Burgeon compositions. It gives a total of 206 EM. |
4★ Makhaira Aquamarine | Makhaira Aquamarine gives Dehya some EM to improve her Burgeon damage while also providing a small teamwide Flat ATK buff. This weapon can be better than Mailed Flower if the team has ATK-scaling damage dealers. |
 3★ Bloodtainted Greatsword | Bloodtainted Greatsword is a decent and widely accessible 3-star EM weapon. |
 4★ Rainslasher | Rainslasher gives less EM than both Mailed Flower and Bloodtainted Greatsword. Despite having a better passive, it is not relevant for this playstyle. |
Teams
Rotation Notation
- N = Normal Attack
- C = Charged Attack
- A = Aimed Shot
- P = Plunging Attack
- E = Elemental Skill
- tE = Tap Skill
- hE = Hold Skill
- Q = Elemental Burst
- D = dash (cancel)
- J = jump (cancel)
- W = walk (cancel)
- > = switch character
- ( ) = these actions are optional; please refer to the notes below
- [ ] = repeat these actions the specified number of times
Teambuilding

Dehya’s Elemental Skill can trigger Burgeon every ~2.5s from off-field, if Dendro Cores are close enough (a bit less than two Abyss tiles) to the enemies hit. While she doesn’t require using her Elemental Burst like Thoma and can focus on building EM, her slow Elemental Skill procs lead to wasted Dendro Core damage as enemies can only take damage from 2 Burgeons every 0.5s. It is therefore better to prioritize damage through other sources rather than focusing on maximizing Dendro Core generation. Running a Hyperbloom trigger is also a viable option to make sure Dehya isn’t wasting Dendro Core procs.
Note that the coordinated attacks unleashed by Dehya’s Elemental Skill hit in a small AoE at the center of the enemy’s hitbox, which makes it unable to trigger Dendro Cores against large enemies like Ruin Graders.
Notable Teammates
Dendro
Dendro units provide good Dendro application alongside their own damage, buffs or sustain.
 Lauma | Lauma is the premier option to buff Bloom damage. She provides off-field Dendro application, shreds Dendro RES, and allows Dendro Cores to crit. This greatly enhances Dehya’s Burgeon contribution in such teams. Warning: Avoid pairing Lauma with another Nod-Krai character if you want Dendro Cores to crit. |
Nahida |  Alhaitham |  Baizhu |  Dendro Traveler |  Other Dendro |
Hydro
Hydro units provide good Hydro application alongside their own damage, buffs or sustain.


Hyperbloom Trigger or Flex
These units help improve the team’s damage and reduce Burning uptime.


Example Teams
This is not a comprehensive list of teams. The inclusion or exclusion of any given team does not necessarily reflect its power level.

A Hyperburgeon team that triggers both Hyperblooms and Burgeons. Dehya’s slower Elemental Skill hits allow Kuki and Raiden to trigger Hyperbloom in between the Burgeons. This leads to less wasted Dendro Core damage as they have a cap per enemy. The extra Electro application can reduce Burning aura for better Dendro Core generation. Lauma allows both Bloom reactions to crit and provides Dendro and Hydro RES Shred to the team.
Sample Rotation (Kuki Shinobu)
Lauma hE Q > Dehya 2[E] > Xingqiu EDQ > Kuki E > Lauma 7s on-field
Sample Rotation (Raiden Shogun)
Lauma hE Q > Raiden E > Dehya 2[E] > Xingqiu EDQ > Lauma 7s on-field

A Burgeon team that focuses less on maximizing Dendro Core damage and more on other teammates’ damage. Kokomi serves as a healer to both counteract self-Burgeon damage and Furina’s HP drain. Fischl can sometimes trigger Hyperbloom through her A4 procs.
Sample Rotation (Fischl)
Fischl E > Nahida E Q > Kokomi E > Dehya 2[E] > Nahida N2 E N2C > Fischl Q > Kokomi Q combo > Nahida E N2C
Sample Rotation (Furina)
Furina ED Q > Nahida E > Kokomi E > Dehya 2[E] > Nahida N2C N2 E > Kokomi Q combo > Nahida N2C
On-Field DPS
Combos
- N = Normal Attack
- E = Elemental Skill
- Q = Elemental Burst
| C0-C5: E > Team > Q N10 > Team > E C6: E > Team > Q N15–16 > Team > E | Default on-field combo Starting the rotation with Dehya’s Elemental Skill helps generate Pyro particles while teammates are using their abilities. Dehya has flexibility for casting her 2nd Skill. It can be done at the start of the rotation, right after her Burst combo or at the end of the rotation. Players can use either Normal Attack or Skill inputs to unleash Dehya’s Burst attacks. |
ER Requirements
Calcs for ER requirements can be found here (last updated for Version 5.8).
Dehya’s on-field ER requirements are immensely high, as she needs to Burst every rotation. It is always recommended to run Dehya with other Pyro characters to provide her with additional particles.
The following table assumes Favonius procs when applicable. Dehya’s ER requirements are up to ~5% lower at C2, ~40% lower at C4, or ~60% lower at C6 (assuming no rotation changes).
| Scenario | ER Requirement |
| Furina Vaporize | 160–210% |
| Melt | 180–225% |
| Mono Pyro / Burning | 160–180% |
| Chevreuse Overloaded | 150–175% |
| Chevreuse Overloaded (with Raiden) | 115–135% |
Use the Energy Recharge Calculator to determine exact requirements for your team and rotation. For more details on how Favonius weapons affect your team, please use Ac1d’s Favonius Mastersheet.
Artifacts
Artifact Stats
Sands | Goblet | Circlet |
| ER / EM / ATK% / HP% (C1) | Pyro DMG Bonus | CRIT Rate / CRIT DMG |
Stat Priority: ER (until requirement) > CRIT > EM (Reactions) > ATK% ≥ HP% (C1)
Outside of Chevreuse teams and before C4, Dehya struggles to use her Elemental Burst every rotation without an ER Sands or an ER weapon.
Avoid building HP on Dehya at C0. At C1, HP becomes a more viable stat, performing similarly to ATK and providing additional defensive utility. EM stats should be prioritized over both ATK and HP if Dehya triggers Vaporize or Melt.
We recommend using Genshin Optimizer to compare your actual artifacts.
Artifact Sets
 4pc Marechaussee Hunter | 4pc Marechaussee Hunter (MH) is Dehya’s best set when paired with Furina. This set can be used outside of Furina teams, with varied results. Teammates taking damage when Dehya’s Skill is active (before casting her Burst) creates a 10s self-DoT, which helps maintain the 4pc uptime. Conversely, shielders make this condition hard to meet. Additionally, if a CRIT Rate weapon is used, its performance may fall behind other sets due to overcap. |
 4pc Vourukasha’s Glow | 4pc Vourukasha’s Glow (VG) performs similarly to 4pc MH in non-Furina teams. However, 4pc VG can be more reliable since its passive stacks off-field from Dehya’s self-DoT damage. Like 4pc MH, this set is unreliable with a shielder, as Dehya needs to take damage to gain stacks. |
 4pc Emblem of Severed Fate | 4pc Emblem of Severed Fate (Emblem) can be Dehya’s best artifact set in teams with very high ER requirements, or with a shielder. On average, it performs slightly worse than 4pc MH and 4pc VG, but 4pc Emblem nevertheless remains Dehya’s most universal, consistent and comfortable option. |
4pc Night of the Sky’s Unveiling | 4pc Night of the Sky’s Unveiling can be Dehya’s best set in teams that can activate its full effect. This is possible in an Overvape team with both Ineffa and Aino. |
 4pc Unfinished Reverie | 4pc Unfinished Reverie is Dehya’s best set in a Burning team with Emilie. |
 4pc Long Night’s Oath | 4pc Long Night’s Oath is a niche set for Dehya’s plunging playstyle with Xianyun. Dehya does not stack it very well, as her Elemental Skill should only be active outside her field time to prevent losing Vaporize procs. |
Weapons
Rankings are based on C1 Dehya, since her first Constellation increases the viability of this playstyle significantly. At C0, weapons with higher Base ATK or ATK% substats may be higher on the list.
5★ Beacon of the Reed Sea | Beacon of the Reed Sea is Dehya’s best option for general use. Its passive encourages players to forgo a shielder for increased buffs. Note that the passive lasts only 8s after the wielder’s Skill hits enemies; with C6 Dehya, its uptime may not cover her extended Burst duration entirely. |
 5★ Verdict, Redhorn Stonethresher, A Thousand Blazing Suns | Verdict and Redhorn Stonethresher are very competitive CRIT stat sticks. A Thousand Blazing Suns can perform similarly in teams with a 10s gap between Dehya’s Elemental Skill and Burst. If its uptime is inconsistent, it performs similarly to non-CRIT 5-star stat sticks. |
 4★ Akuoumaru | Akuoumaru is a strong weapon with variable performance based on refinements. At R5, it is competitive with 5-star options above. If Akuoumaru is less than R3, consider the weapons below instead. |
 4★ Rainslasher, Mailed Flower | Rainslasher is one of Dehya’s best 4-star options in Vaporize teams, and at R5 it is second only to R5 Akuoumaru. Mailed Flower is an event weapon that can work in both Vaporize and Melt teams. |
 4★ Serpent Spine, Ultimate Overlord’s Mega Magic Sword, Talking Stick, Blackcliff Slasher | These 4-star weapons perform similarly to one another, except for Serpent Spine performing better depending on the number of stacks Dehya can maintain. If Dehya is shielded, Serpent Spine is her strongest weapon at R5. Ultimate Overlord’s Mega Magic Sword is a good event weapon that helps Dehya meet her ER requirements. |
4★ Master Key | Master Key is a good weapon that offers a lot of stats, provided 2 Nod-Krai characters are on the team. Even without its full effect, it’s still the best craftable weapon for Dehya, provided she can make full use of its ER and EM stats. |
 5★ Wolf’s Gravestone, Skyward Pride, The Unforged, Fang of the Mountain King | These 5-star weapons provide Dehya with some decent offensive stats but have mediocre passives. With C1 Dehya, they perform equally to an R1 Akuoumaru. With C0 Dehya, they outperform above options due to their high ATK stats. In a Burning team with Emilie, Fang of the Mountain King is Dehya’s 2nd best weapon. If Wolf’s Gravestone’s passive activates during Dehya’s Elemental Burst, it can perform better than some of the above listed weapons. |
4★ Favonius Greatsword | Favonius Greatsword reduces Dehya’s ER requirements by approximately 15% per proc. At higher refinements, Dehya can trigger its effect multiple times while on-field, allowing her and her teammates to build more offensive stats due to decreased ER requirements. In teams with high ER requirements, Favonius Greatsword can become one of Dehya’s strongest options for team damage, rivaling and even outperforming 5-star CRIT weapons. |
 4★ Katsuragikiri Nagamasa, Luxurious Sea-Lord, Tidal Shadow | Unless players skipped the event offering Ultimate Overlord’s Mega Magic Sword, there’s no reason to use Luxurious Sea-Lord over it. Tidal Shadow is a good default craftable option, while Katsuragikiri Nagamasa should only be considered if Dehya has high ER requirements and no access to Favonius Greatsword. |
4★ Portable Power Saw, The Bell | Not Recommended. Portable Power Saw is deceptively bad for Dehya. At C0, Dehya scales poorly with HP compared to ATK. Furthermore, it is usually impossible for Dehya’s Elemental Burst to benefit from the weapon’s EM buff when paired with Bennett as the only source of healing. The Bell similarly suffers from its HP% stat and unreliable passive. |
 4★ Fruitful Hook | Fruitful Hook is a niche but strong option for Dehya’s plunging playstyle with Xianyun. |
Teams
Rotation Notation
- N = Normal Attack
- C = Charged Attack
- A = Aimed Shot
- P = Plunging Attack
- E = Elemental Skill
- tE = Tap Skill
- hE = Hold Skill
- Q = Elemental Burst
- D = dash (cancel)
- J = jump (cancel)
- W = walk (cancel)
- > = switch character
- ( ) = these actions are optional; please refer to the notes below
- [ ] = repeat these actions the specified number of times
Teambuilding

On-Field DPS Dehya is generally not recommended for players struggling in the Spiral Abyss due to her low damage output. This section is for players who want to play her on-field regardless or have Constellations unlocked.
Bennett is Dehya’s best support to improve her personal damage, but Iansan can be a solid alternative in Chevreuse Overloaded teams.
Dehya’s Vaporize and Melt teams are strong, but her teammates are limited due to her inability to drive abilities triggered by Normal Attacks (e.g. Xingqiu’s and Yelan’s Bursts). Avoid pairing Hydro and Cryo units, as Dehya will prioritize triggering Shatter instead of Melt or Vaporize. Chevreuse Overloaded and Mono Pyro / Burning teams are easy to use and have 2 other Pyro teammates or Electro Resonance to lower Dehya’s ER requirements.
Notable Teammates
Strong ATK Buffers
 Bennett | Bennett provides a strong Flat ATK buff, Pyro particles, and healing for the on-field character. Dehya’s pre-C6 field time is very short, which leaves enough time for Bennett to funnel particles to her, and for other teammates to benefit from Bennett’s buff. |
Iansan | Iansan provides a Flat ATK buff that gets weaker the less a character moves, an ATK% buff with her C2, and a DMG% buff with 4pc Scroll. In Chevreuse teams with a second Electro, she can also activate Electro Resonance to reduce ER requirements. Due to Dehya’s high ER requirements necessitating a second Pyro unit, Iansan is only viable in Chevreuse teams. Without Iansan’s C4, the strong Flat ATK buff doesn’t last for the entirety of Dehya’s Burst, making Bennett the preferred option. |
Hydro and Cryo Appliers
A single Hydro unit provides enough Elemental application for Dehya to Vaporize her Elemental Burst attacks, while Cryo units often need to be paired with another source of Cryo application for Dehya to Melt.
Avoid pairing Hydro and Cryo units, as Dehya will prioritize triggering Shatter instead of Melt or Vaporize.
 Furina | Furina is a stellar option for maximizing Dehya’s damage. She provides good off-field damage and a strong teamwide DMG% buff, but requires the team to run a healer. Furina’s Hydro application is consistent enough for Dehya to Vaporize, but can make it difficult for Anemo units to Swirl Pyro for VV RES Shred setups. |
 Escoffier | Escoffier is a strong single-target damage dealer who, with additional Cryo application from a second unit, allows Dehya to Melt her Burst hits. Her team with Citlali rivals Furina’s Vaporize team. |
  Citlali, Rosaria, Kaeya | Citlali, Rosaria, and Kaeya can provide enough Cryo application for Dehya to Melt her Burst if paired with another Cryo unit or supplemental application from Anemo Absorption. However, such teams have poor performance and Anemo variants require careful aura management. Citlali teams scale very well with her Constellations and Dehya’s investment. |
 Aino | Aino should only be considered in an Ineffa team. She provides a partywide EM buff at C1, which boosts both Dehya and Ineffa’s damage, and further buffs Ineffa with her C6. Paired with Ineffa, she enables the full effects of the Master Key weapon and the Night of the Sky’s Unveiling artifact set, which are solid options for Dehya. Note that Vaporize procs are not consistent in Overvape teams. |
 Mona | Not Recommended. Mona provides a strong DMG% buff to the on-field character for a short amount of time and has a very low amount of Hydro application from her Elemental Skill. Luckily, her buff and Hydro application can cover the entirety of Dehya’s Elemental Burst (pre-C6) in a proper rotation. However, Mona’s ER requirements are usually very high, which makes it hard to hold TTDS and a buffing artifact set at the same time. Additionally, her lack of personal damage proves detrimental, especially with a lower Constellation Dehya. |
Off-Field DPS
These units mostly provide good off-field damage and/or some utility. They can also fill downtime in rotations if they have short field time requirements.


RES Shredders
These units provide Pyro RES Shred. Anemo units should hold 4pc Viridescent Venerer.
 Chevreuse | Chevreuse restricts teams to only Pyro and Electro units but in turn offers valuable buffs. She provides RES Shred, ATK%, and DMG% (at C6) alongside good Pyro particle generation and some healing. Pair Dehya with strong off-field Electro damage dealers in Chevreuse teams. |


Example Teams
This is not a comprehensive list of teams. The inclusion or exclusion of any given team does not necessarily reflect its power level.

Vaporize teams enhance Dehya’s personal damage. Furina provides solid off-field damage and can Vaporize some of her hits during setups. Xilonen’s RES Shred is more consistent than Kazuha’s due to Furina’s continuous Hydro application.
If Bennett is C6, an N1 can be added to improve Pyro Crystallize and Swirl reliability.
Sample Rotation (Xilonen)
Dehya E > Furina ED Q > Xilonen Q > Bennett EQ > Xilonen E N2 > Dehya Q combo > Xilonen E N2 > Bennett E > Dehya E
Sample Rotation (Kazuha)
Dehya E > Furina ED Q > Bennett Q E > Kazuha tEP > Dehya Q combo > Bennett E > Kazuha Q tEP > Dehya E

When paired together, Escoffier and Citlali provide enough Cryo application for Dehya to Melt all her Elemental Burst hits in single-target situations. Escoffier herself can Melt some Skill hits during setup phases, leading to high personal damage. Citlali buffs both Dehya and Escoffier with a DMG% buff via 4pc Scroll and provides Pyro RES Shred. Her shield reduces the reliability of 4pc MH and 4pc VG; however, Dehya’s high Energy needs make 4pc Emblem desirable regardless.
Sample Rotation
Dehya E > Escoffier E(Q) N1 > Bennett EQ > Citlali EQ > Bennett E > Dehya Q combo > Bennett E > Dehya E
Sample Rotation (TTDS Rotation)
Dehya E > Escoffier E(Q) N1 > Bennett EQ > Citlali EQ > Dehya Q combo > Bennett E > Dehya E N1 > Bennett N2 E

Overvape teams allow Dehya to trigger both Vaporize and Overloaded, but inconsistently. Furina and the Electro unit provide solid off-field damage to make up for the lack of RES Shred. Ineffa notably has very strong off-field damage and provides high AoE coverage. Ineffa’s shield clashes with Beacon of the Reed Sea and 4pc VG; however, she can avoid generating a shield on some rotations by casting her Elemental Burst instead of her Elemental Skill.
Sample Rotation (Ineffa)
Dehya E > Furina ED Q > Bennett Q E > Ineffa Q/E > Bennett E > Dehya Q combo > Bennett N2 E > Dehya E
Sample Rotation (Fischl)
Dehya E > Furina ED Q > Bennett Q E > Fischl N2 E/Q > Bennett E > Dehya Q combo > Bennett N2 E > Dehya E

Chevreuse Overloaded is a good archetype for a Dehya with low investment. Dehya’s ER requirements are reduced tremendously whether she has two other Pyro teammates or two Electro teammates for Electro Resonance. Fischl rotations have some downtime, so a C4+ Chevreuse with a DPS build is preferred. Raiden on the other hand, can utilize her Elemental Burst to fill rotation downtime.
Sample Rotation (Fischl – Quickswap DPS Build C6 Chevreuse)
(Fischl E)1 > Dehya E > Bennett Q E > Chevreuse Q 3[hE] > Fischl N2 Q/E > Bennett E > Dehya Q combo > Bennett N3 E > Dehya E N1
1First rotation only.
Sample Rotation (Raiden Shogun)
Raiden E > Chevreuse Q hE > Dehya 2[E] > Bennett Q E > Dehya Q combo > Raiden Q combo1
1Raiden’s combo can be cut short.

Mono Pyro / Burning is, similarly to Chevreuse Overloaded teams, a solid archetype for a Dehya with low investment. Pyro teammates help reduce her ER requirements and off-field DPS characters like Emilie and Xiangling can make up for Dehya’s low personal damage.
Sample Rotation (Emilie)
Dehya E > Emilie E/Q > Bennett EQ > Kazuha tEPQ > Bennett E > Dehya Q combo > Kazuha tEP > Bennett E > Dehya E
Sample Rotation (Xiangling)
Dehya 2[E] > Kazuha tEPQ > Bennett Q E > Xiangling Q E > Kazuha tEP > Bennett E > Dehya Q combo > Bennett E

Xianyun Plunge teams ignore Dehya’s Elemental Burst entirely. With the help of C6 Bennett’s Pyro Infusion, Dehya is able to Vaporize or Melt her Plunging Attacks. Dehya casts her Elemental Skill early in the rotation to avoid losing Vaporize or Melt procs (only cast it once if Dehya is C2+). Dehya should use a set that buffs her Plunging Attacks, like 4pc Long Night’s Oath, although 4pc MH is still an option with Furina.
Note: with proper Plunging Attack execution by dashing after a Plunge lands, 1 extra Plunging Attack can be performed in both rotations.
Sample Rotation (Furina)
(Dehya E)¹ > Furina ED Q > Xianyun EPQ > Bennett EQ N1 > Xianyun N3 > Dehya 7[JP] E > Bennett E
¹First rotation only.
Sample Rotation (Citlali)
(Dehya E)¹ > Xianyun EPQ > Bennett EQ N1 > Xianyun N3 > Citlali EQ (N1)² > Dehya 6[JP] E > Bennett E
¹First rotation only.
²Use if struggling to Melt Dehya’s first Plunging Attack.
Credits
Writers: sew, lesterberne
Contributors: natc, nikatosaurus9, cyn, polomo, kb, seima, euphorysm, reens, mystathi, capnharland, madeofseaglass, idkanonymized
Extended Guide Contributors: .athene., cynematic, erk_kimbo, .reimu., emiliabyss, natc, sew, snowscliped, reddraegon, arbutus_unedo, cuppacote, idkanonymized, nociii
Team images made with the KQM portrait generator.