Updated for Version 3.6
Baizhu is a 5-star Dendro Catalyst character in Genshin Impact who provides healing, pseudo-shielding, and off-field Dendro application. Learn about Baizhu’s best builds, Talent priority, best weapons, best artifacts, and best teams in this in-depth review.
Note that the information given may change if new discoveries are made. More extensive testing is in progress.
Join our Discord to participate in the theorycrafting process.
Table of Contents
Infographic
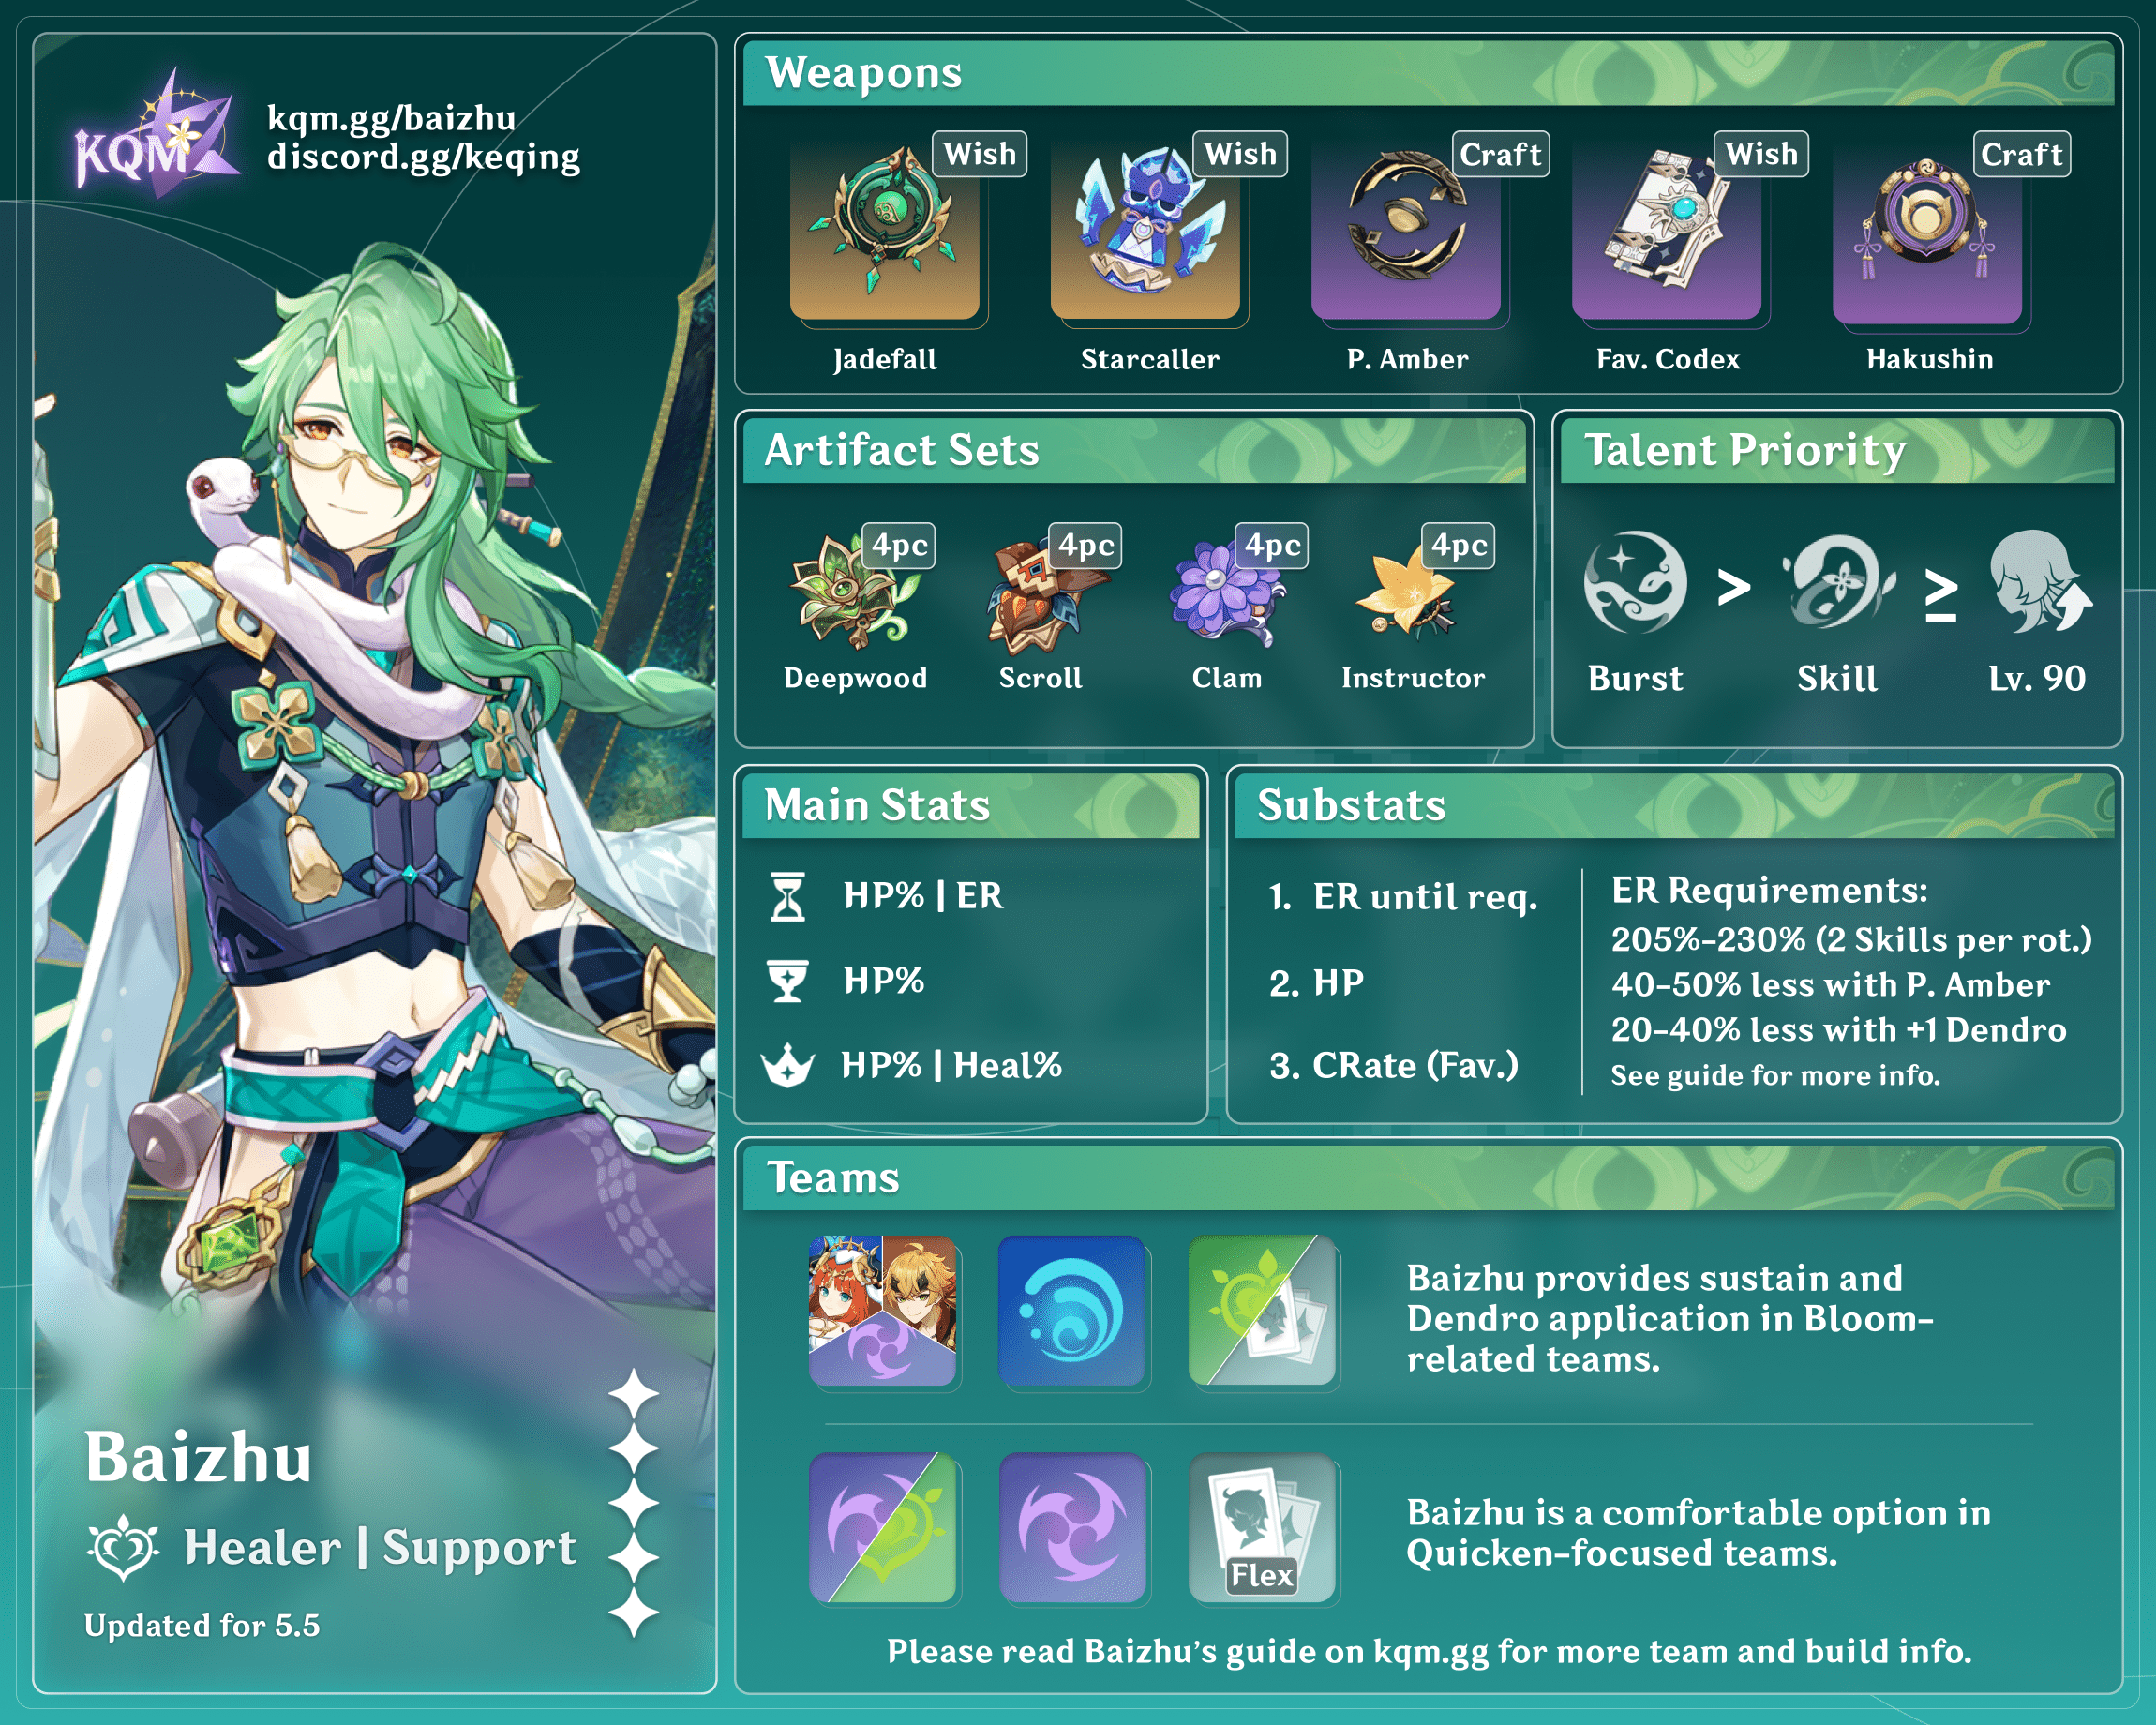
Credits to: lapsy, cegewinne, irokei, and KQM Staff
Character Overview
Talents
Level and Talent Priority
Talent Priority
Burst > Skill >>> Normal Attack
- Level 90 is recommended as it maximizes Baizhu’s healing and A4 Passive buff.
- Baizhu’s Normal Attacks may be left unleveled, as they have poor damage scaling and are often unused in his teams.
Talent Overview
![]() Normal Attack | The Classics of Acupuncture
Normal Attack | The Classics of Acupuncture
Talent Description
Normal Attack
Performs up to 4 attacks that deal Dendro DMG to opponents in front of him.
Charged Attack
Consumes a certain amount of Stamina to deal AoE Dendro DMG to opponents in front of him after a short casting time.
Plunging Attack
Calling upon the might of Dendro, Baizhu plunges towards the ground from mid-air, damaging all opponents in his path. Deals AoE Dendro DMG upon impact with the ground.
A simple set of Dendro melee attacks. They deal poor damage, but can be used to comfortably apply Dendro if he is played on-field. That being said, their small AoE and low damage output make Baizhu suboptimal in this role.
![]() Elemental Skill | Universal Diagnosis
Elemental Skill | Universal Diagnosis
Talent Description
Controls a Gossamer Sprite that cruises and attacks nearby opponents, dealing Dendro DMG.
After it performs 3 attacks or if there are no opponents nearby, the Sprite will return, healing all nearby party members based on Baizhu’s Max HP.
Fires a homing projectile that deals three instances of Dendro damage. It can hit one enemy three times, or bounce between multiple enemies (similarly to Beidou’s Burst) in multi-target. After dealing damage, the Sprite returns and provides teamwide healing. This Skill is notable for its rapid teamwide healing, which is commonly restricted to Elemental Bursts.
![]() Elemental Burst | Holistic Revivification
Elemental Burst | Holistic Revivification
Talent Description
Enters the Pulsing Clarity state, creating a Seamless Shield that absorbs Dendro DMG with 250% effectiveness.
While in this state, Baizhu will generate a new Seamless Shield every 2.5s.
The Seamless Shield will heal your own active character based on Baizhu’s Max HP and attack opponents by unleashing Spiritveins, dealing Dendro DMG under the following circumstances:
- When a character is under the protection of a Seamless Shield and a new Seamless Shield is generated.
- When the Seamless Shield’s effects expire, or when it is shattered.
Baizhu generates a shield that refreshes and heals every 2.5s. While the shields generated are rather weak, even against Dendro damage, they nonetheless protect against interruption — even from hits that break them. Note that it is still possible to get interrupted if hit by consecutive attacks.
This Talent deals unremarkable damage, but does provide a source of mobile off-field Dendro application.
Overall provides good survivability and comfort for the active character, alongside modest single-target off-field Dendro application.
![]() Ascension 1 Passive | Five Fortunes Forever
Ascension 1 Passive | Five Fortunes Forever
Talent Description
Baizhu gains different effects according to the current HP of your current active character:
- When their HP is less than 50%, Baizhu gains 20% Healing Bonus.
- When their HP is equal to or more than 50%, Baizhu gains 25% Dendro DMG Bonus.
Baizhu is either able to heal the active character more effectively, or gain a slight increase to his negligible damage, depending on the active character’s HP.
![]() Ascension 4 Passive | All Things Are of the Earth
Ascension 4 Passive | All Things Are of the Earth
Talent Description
Characters who are healed by Seamless Shields will gain the Year of Verdant Favor effect: Each 1,000 Max HP that Baizhu possesses that does not exceed 50,000 will increase the Burning, Bloom, Hyperbloom, and Burgeon reaction DMG dealt by these characters by 2%, and will increase the DMG Bonus provided by Aggravate and Spread by 0.8%. This effect lasts 6s.
This passive increases the Dendro reaction damage of characters healed by Baizhu’s Burst. This buff is primarily to the on-field character, but can be maintained on multiple characters in quickswap teams. Note that in quickswap, you must wait for a shield to break or expire before swapping to benefit from the buff.
Constellations
Baizhu is a complete unit at C0. His Constellations are good but fairly unnecessary, and are not as impactful as many other limited 5-star Constellations.
![]() Constellation 1 | Attentive Observation
Constellation 1 | Attentive Observation
Universal Diagnosis gains 1 additional charge.
This gives Baizhu an extra charge on his Elemental Skill, which gives slightly more Dendro application and healing, while also making his rotations more flexible and forgiving. Being able to use an extra Elemental Skill in a rotation also helps with his Energy issues.
![]() Constellation 2 | Incisive Discernment
Constellation 2 | Incisive Discernment
When your own active character hits a nearby opponent with their attacks, Baizhu will unleash a Gossamer Sprite: Splice.
Gossamer Sprite: Splice will initiate 1 attack before returning, dealing 250% of Baizhu’s ATK as Dendro DMG and healing for 20% of Universal Diagnosis’s Gossamer Sprite’s normal healing.
DMG dealt this way is considered Elemental Skill DMG.
This effect can be triggered once every 5s.
This Constellation adds negligible damage, but provides a decent amount of healing. It also adds an extra instance of Dendro application every 5s, which can be very helpful for reaction teams that rely on off-field Baizhu for Dendro application.
This Constellation’s only trigger requirement is that Baizhu is in the team and the on-field character hits an enemy; such hits do not have to deal damage or apply an Element: examples include Bloom damage, 4pc Ocean-Hued Clam damage, and Alternate Sprints. The ability to apply more Dendro without taking any extra field time makes this Constellation great, particularly when Baizhu is teamed up with characters that spend a long time on-field, such as Cyno.
![]() Constellation 3 | All Aspects Stabilized
Constellation 3 | All Aspects Stabilized
Increases the Level of Holistic Revivification by 3.
Maximum upgrade level is 15.
A straightforward Burst Talent increase. Provides Baizhu with a minor increase in damage, Shield Absorption, and healing. However, his shields are still very weak and his healing is already sufficient without this Constellation.
![]() Constellation 4 | Ancient Art of Perception
Constellation 4 | Ancient Art of Perception
For 15s after Holistic Revivification is used, Baizhu will increase all nearby party members’ Elemental Mastery by 80.
This Constellation adds 80 EM to Baizhu’s team, which does increase team damage; however, a similar effect can also be obtained through artifacts.
![]() Constellation 5 | The Hidden Ebb and Flow
Constellation 5 | The Hidden Ebb and Flow
Increases the Level of Universal Diagnosis by 3.
Maximum upgrade level is 15.
A straightforward Skill Talent increase. Grants a small increase to Baizhu’s damage and a slightly greater increase in healing; unnecessary, as his healing is already sufficient at C0.
![]() Constellation 6 | Elimination of Malicious Qi
Constellation 6 | Elimination of Malicious Qi
Increases the DMG dealt by Holistic Revivification’s Spiritveins by 8% of Baizhu’s Max HP.
Additionally, when a Gossamer Sprite or Gossamer Sprite: Splice hits opponents, there is a 100% chance of generating one of Holistic Revivification’s Seamless Shields. This effect can only be triggered once by each Gossamer Sprite or Gossamer Sprite: Splice.
Adds HP% scaling to Baizhu’s Elemental Burst, which increases his damage. When his Elemental Skill or his C2 hits an opponent, a new shield is created on his Elemental Burst, increasing his Dendro application rate — roughly six more instances of Dendro application in 20s rotations. A decent Constellation, but overall underwhelming compared to final Constellations of other limited 5-stars.
Combos
E = Elemental Skill
Q = Elemental Burst
| E(E)Q | Standard Combo for off-field units, allowing Baizhu to pre-funnel the particles from his Skill. With C1, you can use both Skill charges before his Burst. |
| EQ > Swap out (10s) > Swap in > E | In teams that do not have strict rotations, try to cast Baizhu’s Skill off cooldown (twice per Burst) to reduce his ER requirements. |
Artifacts
ER Requirements
| Situation | Solo Dendro | Double Dendro |
| No team Favonius procs | ~180–200% | ~120–135% |
| 1 team Favonius proc | ~160–180% | ~115–125% |
| Electro Resonance with Fischl | ~140% | ~115% |
| Electro Resonance with Fischl + 1 Favonius proc | ~130% | ~105% |
Baizhu’s ER requirements are quite high due to his 80 Energy Burst cost, but they can change depending on his team and weapon. Each Favonius proc tends to lower his ER requirements by 15–20%. A second Skill use, either with his C1 or via quickswapping, can lower his requirements by up to 30% assuming he can catch its particles.
Use the Energy Recharge Calculator to determine exact requirements for your team and rotation.
Artifact Stats
 Sands |  Goblet |  Circlet |
| HP% or ER | HP% | HP% or Healing Bonus |
Substats: ER% (until requirements) > HP% (up to 50k) > EM
Since Baizhu doesn’t deal a lot of personal damage, his stats should focus on his defensive and buffing utility. Once Baizhu has enough ER to Burst every rotation, his stat priorities shift to HP until he hits the A4 buff cap at 50k HP.
As Baizhu has a high Burst cost and low Energy generation, you may need an ER Sands to hit his ER requirements. Additionally, an HP% Circlet tends to be better than a Healing Bonus Circlet, since it increases his A4 buff, and Baizhu’s healing is quite high regardless.
Artifact Sets
 4pc Deepwood Memories (DM) | An essential for Dendro teams and a good set for Baizhu, particularly if another unit doesn’t already equip it, as it provides a very valuable 30% Dendro RES Shred. However, Baizhu can struggle to consistently apply this effect to all enemies in AoE scenarios in comparison to other possible 4pc DM holders, such as Nahida, Kuki Shinobu, or Kokomi. This is due to his Skill only targeting 3 enemies and his Burst’s projectiles being primarily single-target. In Quicken teams where Baizhu is the only Dendro unit, this set is not very useful, as only Baizhu’s damage benefits from this set and his damage contribution is rather negligible regardless. |
 4pc Ocean-Hued Clam (OHC) | This artifact set can be a decent upgrade to Baizhu’s personal damage, as he can consistently deal Bubble damage while his Burst is active due to his large amount of healing. However, other artifact sets may be more beneficial to team damage according to the scenario; these include Quicken teams, which often benefit more greatly from teamwide ATK or EM buffs. |
 4pc Instructor | Gives lower stats than 5-star artifact sets but provides a teamwide EM buff, which compensates for the smaller A4 buff due to lower-leveled pieces. The 4pc set bonus can only be activated on-field, and is generally more valuable in teams with more flexible rotations. |
 4pc Noblesse Oblige | Provides a teamwide ATK% buff, but has little value for Baizhu himself. ATK% buffs are also less valuable in many of Baizhu’s teams when compared to EM buffs. |
 4pc Maiden Beloved | Generally unadvised as Baizhu’s healing is already incredibly high, meaning this set’s effects are of little significance. |
 2pc HP% / Healing Bonus / ER% | Throwing together high HP% pieces from 2-piece sets that grant the mentioned stats can also work for those who are still farming artifacts. |
Weapons
 Jadefall’s Splendor | Baizhu’s signature weapon and Best-in-Slot. While its DMG Bonus is inconsequential on Baizhu, he greatly appreciates its HP% substat and the passive Energy restoration. However, it is not a very significant improvement over Prototype Amber, a craftable option. Furthermore, this weapon is currently only useful on Baizhu himself. |
 Prototype Amber | Baizhu’s best Free-to-Play option, it is essentially a budget version of Jadefall’s Splendor. Baizhu appreciates refinements on this weapon if you are looking to meet his ER requirements. |
 Favonius Codex | Reduces the ER requirements of both Baizhu and his teammates. However, it does not provide any benefit to his healing or A4 buff and Baizhu rarely builds enough CRIT Rate to reliably proc its passive. |
 Everlasting Moonglow | A HP% and Healing Bonus stat stick. Its Energy refund passive only functions if Baizhu is used on-field. Overall unimpressive, especially in comparison to Prototype Amber. |
 Hakushin Ring | Provides a useful ER% stat and an Elemental DMG% buff for Electro and Dendro teammates. However, it is difficult to take full advantage of this buff due to its short duration and on-field requirement for activation. |
 Thrilling Tales of Dragon Slayers | An easily-accessible HP% stat stick that also provides an ATK% buff to a single teammate. However, Thrilling Tales does not assist in meeting Baizhu’s high ER requirements and its ATK% buff is not as beneficial in many Dendro teams. |
 A Thousand Floating Dreams | While Floating Dreams provides 40 EM to the team, its offensive stats are underutilized due to Baizhu’s low damage output and infrequent Dendro application. This weapon also does not assist in fulfilling ER requirements. |
Teams
Teambuilding
- Baizhu consolidates healing, mild interruption resistance, and moderate Dendro application within various Dendro teams.
- His slow, single-target Dendro application even when used on-field encourages bringing a second Dendro unit in Bloom-based teams, particularly for AoE scenarios. A second Dendro unit also helps lower his ER requirements.
- His A4 Passive is best utilized by on-field damage dealers who consistently trigger Dendro reactions. Teammates that can fulfill this role include Keqing, Cyno, and Alhaitham.
Quicken

Baizhu competes strongly in this team archetype with other defensive and healing characters like Zhongli and Yaoyao. Yaoyao and Baizhu both maintain Dendro application and healing, with Baizhu increasing Aggravate and Spread’s Base DMG Bonus by up to 40%. This allows the team to comfortably slot in more offensive Electro and Anemo units while still having good survivability.
Baizhu’s personal damage in Quicken teams is still rather negligible due to his low multipliers and slow Elemental application that limits his ability to trigger Spread.
Notable Teammates
 Nahida, Alhaitham, Tighnari, Dendro Traveler, Collei | Usually a high-DPS character that benefits from Baizhu’s Dendro Particles and healing. For a Spread-focused comp, Alhaitham, Nahida, and Tighnari are top picks. Dendro Traveler and Collei function mostly to enable Dendro Resonance in Aggravate teams. |
 Keqing, Raiden, Fischl, Yae Miko, Kujou Sara, Beidou | Electro application is needed to enable Quicken. Aggravate teams tend to bring two Electro units, with one often acting as the on-field DPS. Fischl’s A4 Passive is particularly powerful in Aggravate teams. |
 Kazuha, Sucrose, Heizou | In Aggravate teams, a 4VV holder will greatly bolster the Electro units’ damage. They also provide grouping and buffs such as TTDS, Sucrose’s A4, or Kazuha’s A4. |
Example Teams


This is not a comprehensive list of teams. The inclusion or exclusion of any given team does not necessarily reflect its power level.
Hyperbloom and Burgeon

Baizhu provides healing, interruption resistance and Dendro application for Bloom Reactions. The defensive utility provided by Baizhu allows for more damage-oriented teammates such as Raiden and Ayato to be used while maintaining survivability.
Baizhu’s substantial healing and slight protection from Dendro damage are particularly appreciated in Burgeon teams due to prevalent self-damage. However, his rather slow Dendro application, especially in AoE, can encourage bringing a second Dendro character to improve Dendro Core generation, especially if he is used primarily in an off-field role.
Notable Teammates
Raiden, Kuki Shinobu, Cyno, Fischl | Apply Electro to trigger Hyperblooms. Raiden is the premier pick due to her high-uptime off-field Electro application. Kuki works as a 4-star alternative, but her healing is somewhat redundant with Baizhu. Fischl is rather inconsistent as a Hyperbloom trigger, but synergizes well with other Electro units. |
 Thoma | Thoma’s relatively controlled off-field Pyro application makes him the primary pick in Burgeon teams. |
 Xingqiu, Yelan, Ayato, Candace | A Hydro unit is required to trigger Bloom, enabling Hyperbloom or Burgeon. |
Nahida, Alhaitham, Dendro Traveler, Collei, Kaveh | Additional Dendro units complement Baizhu’s slower Dendro application while also enabling Dendro Resonance. |
Example Teams


This is not a comprehensive list of teams. The inclusion or exclusion of any given team does not necessarily reflect its power level.
Nilou Bloom

Similarly to Burgeon teams, Baizhu provides much needed survivability against Bountiful Core self-damage in Nilou teams thanks to his high healing and shields that slightly mitigate Dendro damage. This is especially useful as the current roster of suitable healers for this team archetype is rather limited, since non-Hydro or non-Dendro healers cannot be slotted in without disabling Nilou’s essential A1 Passive.
However, similarly to Hyperbloom and Burgeon teams, Baizhu’s slow, single-target Dendro application makes him hard to recommend as a Solo Dendro driver in Nilou Bloom. Nevertheless, he is still helpful for supplementing another Dendro character’s application, such as by triggering Nahida’s Skill.
Notable Teammates
Xingqiu, Yelan, Kokomi, Candace, Ayato, Tartaglia | Preferably characters who have good Hydro application, particularly in AoE, and may also contribute high personal damage. |
Nahida, Alhaitham, Dendro Traveler, Collei, Kaveh, Yaoyao | Due to Baizhu’s slow Dendro application, it is highly recommended to bring another Dendro unit to trigger more Blooms. |
Example Teams


This is not a comprehensive list of teams. The inclusion or exclusion of any given team does not necessarily reflect its power level.
Credits
Leifa#1359, gerryoat#6790, NatC#9175, KB#1111, fritzzes#2211, Nikatosaurus#5639, Reens#9389, Chasing Haze#3014, Polomo#8430, Seima#4597, idkanonymized#4166, sexyeboy69#2687, Cinders (possibly a pear) 🍐#6749.
Team images courtesy of the KQM Portrait Generator.