By Jamberry#7142
Last updated: 7/31/2023
Version: 3.4
Table of Contents
※ Introduction ※
Raiden is a strong and flexible on-field DPS who can offer utility in the form of Energy, buffs, and Electro application to the rest of her team. While not as widely able to slot into other existing teams as the two archons preceding her, Zhongli and Venti, she offers the potential to build a full team around her.
Important factors to consider when choosing to build or pull for Raiden:
Pros
- Universal battery, can help make up for batterying time lost due to her field time requirements or allow teammates to run lower ER.
- Teamwide full uptime Burst DMG% buff from Skill.
- Flexible with teammates that might otherwise see less use such as Sara or Lisa while still synergizing well with powerful units such as Bennett or Kazuha.
- Respectable baseline personal damage condensed into a short + easy to buff uptime makes her a powerful DPS even from C0.
- Quality weapon options, including a strong F2P option and 5* upgrades that are valuable but not necessary.
- Early Constellations are major upgrades.
- Wide AoE on Burst initial hit and attacks, with convenient chase that can avoid DPS loss from running after enemies that have been knocked away.
- Good on-field Electro application for units such as Xiangling or Kazuha to react with from off-field, as well as sufficient off-field Electro application for VV setups or Superconduct enabling for units such as Eula.
- Consistent, long-lasting, AoE off-field Electro application makes her an excellent candidate for triggering Hyperbloom.
- A4 + ESF + EL if used allow her to build ER beyond requirements to personal comfort without sacrificing significant damage.
Cons
- Many other Elements already have good battery units; Raiden may not be an upgrade for some comps.
- Cannot drive some units (Beidou & Electro Traveler) or benefit from some buffers (Yun Jin) at all while in Burst, limiting synergy with one of the best same-element units who would otherwise appreciate her batterying greatly.
- Off-field damage is low, requires field time to battery and do damage.
- Condensed damage profile can lead to situations where you overkill an enemy and have no way to regain Energy, or almost kill an enemy and have no way to finish it off without wasting Bursts—good for speedrunning, but bad for the next chamber or multi-wave content.
- Personal damage may be lower than other 5* on-field DPS characters, though ease of buffing and synergy with strong off-field DPS characters brings team damage up.
- “The Catch” and ESF can be in high demand for other units.
- Overloaded can introduce issues with knockback with lighter enemies.
- Electro application can complicate setups for forward Vaporize for some units.
Raiden Guide TL;DR
“As I’m sure you’ve heard many times before, the Almighty Shogun seeks Eternity — an existence beyond the dominion of thought and longing. ‘Abandon mortal ties, strive for an unchanging Eternity’… The Almighty Shogun’s manner is always resolute, and I do not always fully grasp the meaning of her words. But this is her decision, and I trust her.”
– Kujou Sara
※ Talents ※
※ Talent Priority
Burst > Skill >>> Normal Attack

Normal Attack: ORIGIN
Talent Description
Normal Attack
Performs up to 5 consecutive spear strikes.
Charged Attack
Consumes a certain amount of Stamina to perform an upward slash.
Fairly standard polearm Normal Attacks with a Charged Attack more unique to her and Xiao, pretty animations but unimpressive damage. You will not use these in ideal rotations except potentially weaving in a hit or two to proc abilities such as Xingqiu’s Burst or Fischl’s C6.
The Talent Level of this Normal Attack does not increase the damage of her Normal Attacks during Burst.

Transcendence: BALEFUL OMEN
Talent Description
The Raiden Shogun unveils a shard of her Euthymia, dealing Electro DMG to nearby opponents, and granting nearby party members the Eye of Stormy Judgment.
Eye of Stormy Judgment
- When characters with this buff attack and deal DMG to opponents, the Eye will unleash a coordinated attack, dealing AoE Electro DMG at the opponent’s position.
- Characters who gain the Eye of Stormy Judgment will have their Elemental Burst DMG increased based on the Energy Cost of the Elemental Burst during the Eye’s duration.
The Eye can initiate one coordinated attack every 0.9s per party.
Coordinated attacks generated by characters not controlled by you deal 20% of the normal DMG.
Raiden’s Elemental Skill’s perks include permanent uptime, large range, DMG% buffs, and damage. Always try to start a fight by casting her Elemental Skill to ensure maximum uptime.
Elemental Skill Mechanics
Coordinated Attacks only trigger on damage. Hitting a shield or anything that does not show a damage number will not trigger her Skill. Baleful Omen does not snapshot, meaning any stat changed to Raiden— positive or negative—will dynamically affect the damage of the current Baleful Omen. While snapshotting can be desirable for some units or rotations, Raiden typically casts her Skill at the beginning of rotations to set up buffs like 4VV or cast at the start of a fight and then recasts at the end of her uptime when some buffs have already worn off, so for her it is better that her Skill can at least partially benefit from buffs applied later on. Additionally, not having to worry about snapshotting can make rotations much more fluid, as you can cast or refresh her Skill whenever is useful without having to specifically set up for it.
Burst DMG% Buff
All party characters including those off-field and Raiden herself gain a Burst DMG% buff based on how much Energy their Elemental Bursts cost. Making sure Raiden’s Skill is active at the very start of rotations means every character can benefit from this bonus, but Burst DMG% cannot snapshot, so even if the Skill is cast late it can still benefit units with off-field Bursts.
| Burst Cost | DMG Bonus at TL9 |
|---|---|
| 40 (ex. Zhongli, Keqing) | 12% |
| 60 (ex. Bennett, Venti) | 18% |
| 70 (ex. Kokomi) | 21% |
| 80 (ex. Sara, Xingqiu) | 24% |
| 90 (ex. Yae) | 27% |
Particle Production
The initial slash of Baleful Omen does not generate Energy. Each coordinated attack has a 50% chance to produce one Electro Particle. Since it can be triggered every 0.9s, this puts her average Particle generation at 33 Particles per Minute (P/M) when triggered perfectly off cooldown. The realistic amount can go lower to 30P/M when triggered once per second, or 27P/M when triggered every 1.1 seconds. For reference, Beidou full countering off cooldown is 32P/M, and C6 Fischl with perfect Oz uptime is 35P/M.
Elemental Gauge
The initial cast applies a strong Electro gauge, while subsequent procs apply weaker gauge with a 2.5s/3-hit ICD.
Because of Baleful Omen’s triggering mechanism (hits slightly after the attack that activates it), it can react with the aura applied by the triggering attack, or reapply aura after the triggering.
Understanding Raiden’s Skill’s Elemental application mechanics will be crucial to building her rotations, as reactions and some buffs such as 4VV or Kazuha’s A4 can depend on proper manipulation of her Skill. This will be covered in more depth in the rotations section of the guide.
For more information on Elemental Gauges, check out the KQM Library page.

Secret Art: MUSOU SHINSETSU
Talent Description
Gathering truths unnumbered and wishes uncounted, the Raiden Shogun unleashes the Musou no Hitotachi and deals AoE Electro DMG, using Musou Isshin in combat for a certain duration afterward. The DMG dealt by Musou no Hitotachi and Musou Isshin’s attacks will be increased based on the number of Chakra Desiderata’s Resolve stacks consumed when this skill is used.
Musou Isshin
While in this state, the Raiden Shogun will wield her tachi in battle, while her Normal, Charged, and Plunging Attacks will be infused with Electro DMG, which cannot be overridden. When such attacks hit opponents, she will regenerate Energy for all nearby party members. Energy can be restored this way once every 1s, and this effect can be triggered 5 times throughout this skill’s duration.
While in this state, the Raiden Shogun’s resistance to interruption is increased, and she is immune to Electro-Charged reaction DMG.
While Musou Isshin is active, the Raiden Shogun’s Normal, Charged, and Plunging Attack DMG will be considered Elemental Burst DMG.
The effects of Musou Isshin will be cleared when the Raiden Shogun leaves the field.
Chakra Desiderata
When nearby party members (excluding the Raiden Shogun herself) use their Elemental Bursts, the Raiden Shogun will build up Resolve stacks based on the Energy Cost of these Elemental Bursts.
The maximum number of Resolve stacks is 60.
The Resolve gained by Chakra Desiderata will be cleared 300s after the Raiden Shogun leaves the field.
The defining feature of Raiden and the most important part of her kit. While in the Burst, she gains a unique set of special attacks similar to Childe’s Elemental Skill or melee form, but for a “fixed” duration of 7 seconds. However, unlike Childe, her Normal and Charged Attacks in her Burst form are considered Elemental Burst DMG rather than Normal and Charged Attack DMG. Additionally, Raiden also generates Flat Energy, meaning the Energy is funded directly and does not benefit from Energy Recharge, for all party members (including herself) up to once every second, 5 times.
Resolve
Teammate Bursts give Raiden an amount of Resolve stacks based on how much their Bursts cost. Raiden herself does not contribute to this amount. At C0 with a leveled Burst, after accounting for A1 procs, most of Raiden’s teams will leave her at somewhere from 42-54 Resolve stacks with all teammates using their Bursts once before her.
Note that Resolve does include Energy that is directly refunded; for example, even though Jean’s A4 can effectively lower her Burst Cost to 64, Raiden will still consider her as an 80 Burst Cost unit.
| Example Team | Total Burst Cost (excl. Raiden) | Resolve Stacks at TL9 with 3 A1 Procs |
|---|---|---|
| Mona-Kazuha-Kokomi | 190 | 42.1 |
| Sucrose-Fischl-Bennett | 200 | 44.0 |
| Xiangling-Xingqiu-Bennett | 220 | 47.8 |
| Yae-Sara-Jean | 250 | 53.5 |
When Raiden casts her Burst, she gains additional damage to her initial slash and each attack afterwards based on how many Resolve stacks she had beforehand. This damage bonus is an additive talent value for both attacks. In the Talent page, the larger number refers to the talent value bonus to the initial slash, whereas the smaller number is for Normal, Charged, and Plunging Attacks.
At TL10, the Talent Value Bonus caps at 7%/1.31%. This translates to +420%/78.6% additional talent values for the respective attacks. These damage bonuses are not considered DMG%, neither additive nor multiplicative, they simply add to the shown talent values.
For example, the TL10 initial slash does 721%. At 60 stacks of Resolve, it increases to 1141%. When it comes to each Normal, Charged, or Plunging Attack, the additional talent value is added to each attack per hit. As such, N4 and Charged Attack each benefit from this bonus twice (once per hit).
As such, it is crucial for Raiden to cast her Burst after allies have Bursted first.
Mechanics
Like Baleful Omen, nothing about Musou Shinsetsu snapshots. Changes to Raiden’s stats during the Burst will dynamically affect the damage of her sword attacks. Make sure you set up any buffs before swapping to Raiden such that they’ll last throughout her Burst duration as much as possible, otherwise you’ll be losing a lot of her damage potential.
All damage dealt through her Burst is considered Burst damage, including the Normal and Charged Attacks.
This means she does not benefit from Normal/Charged/Plunging Attack DMG% such as White Tassel or 4pc Shimenawa’s Reminiscence, but can fully take advantage of Elemental Burst DMG% such as her Skill buff or “The Catch” instead. Generic DMG% or Electro DMG Bonuses work as usual.
Additionally, this means that Raiden cannot trigger units that require Normal/Charged Attacks to actually hit enemies, such as Beidou or EMC. However, attacks in her Burst are coded as Normal/Charged Attack movements, even if they cannot deal that type of damage, so she can proc units that only require Normal/Charged Attacks to be initiated regardless of whether or not they hit, such as Fischl’s C6 or Xingqiu.
Hitlag Extension
Most stance skills benefit from hitlag extension, where the time spent in hitlag is added to the total time of the stance. This occurs because hitlag would essentially “cheat” you out of time, so the extension acts to balance it out. This is the reason why the 7 second duration is only “fixed”, as the extension is variable, which is the reason you’ll sometimes see it last as much as 8-9 seconds.
Additionally if Raiden is in an attack animation while her Burst were to end, the Burst will extend itself until the attack finishes.
The exact intricacies of how it works are still not completely clear, with certain effects such as FPS or dash canceling having an effect over it.

WISHES UNNUMBERED
Talent Description
When nearby party members gain Elemental Orbs or Particles, Chakra Desiderata gains 2 Resolve stacks.
This effect can occur once every 3s.
Passively grants Raiden with 2 Resolve stacks whenever a party member gains an Elemental Orb or Particle. Due to the ICD of 3 seconds, you can normally expect 2 or 3 procs of this in teams that set up buffs at the start then swap to Raiden early. In teams where Raiden Bursts at the very end of rotations, 3 to 4 procs can occur. Overall a solid Talent but shouldn’t be something you alter your rotations for. To illustrate the impact of this Talent, each proc increases Raiden’s personal DPS output by ~1.3%.
This talent’s consistent AoE off-field Electro application, combined with its long duration can also allow Raiden to act as a good trigger for the Hyperbloom reaction – offering her even more playstyle and team versatility.

ENLIGHTENED ONE
Talent Description
Each 1% above 100% Energy Recharge that the Raiden Shogun possesses grants her:
- 0.6% greater Energy restoration from Musou Isshin
- 0.4% Electro DMG Bonus.
Extremely important Talent that increases Raiden’s synergy with Energy Recharge. While ER is a very desirable stat to build on Raiden because of this conversion, it’s important to remember that ER as an offensive stat still scales worse than CRIT Rate/DMG. If you have Engulfing Lightning, ER is roughly equivalent to ATK%; otherwise ATK% will still scale better. As such, unless you have her signature weapon, you should only go as much ER as you need to Burst consistently; additional ER% is welcome but you shouldn’t be prioritizing it.
However, because of this Talent, Raiden loses less damage in comparison to other characters from building ER and she also has the added benefit of generating more Flat Energy for the team. In other words, she effectively shares a small portion of her ER with her allies in the form of her Burst Flat Energy generation.
To determine how this talent affects Raiden’s Flat Energy generation, you can use the formula:
(Flat Energy based on Burst Talent Level * (1 + (ER – 100) * .6%) * number of procs)
For example, given Raiden at T9 with 208 ER, triggering her Energy refund the maximum of 5 times:
(2.4 * (1 + (208 – 100) * .6%) * 5) = 19.78 Flat Energy
※ Optimal Combos
Raiden can only stay in her Mushou Shinsetsu state for 7 to 9 seconds, depending on hitlag extension. The primary goal of a combo is to maximize her damage in that time window while still performing combos consistently. Making a mistake in a high ceiling combo will usually result in damage loss compared to correctly performing a more consistent but lower ceiling combo. As a result, you should prioritize the reliability of execution over damage ceiling when choosing your combo.
Notations will be under the form of:
Number of Times Combo is Executed x Combo
Where combo marks are as follows:
N = Normal Attack
Nx = Normal Attack x amount of times
E = Skill Cast
C = Charged Attack
D = dash
As an example, 3N3C N2C will mean 3 Normal Attacks into a Charged Attack, repeated 3 times, then 2 Normal Attacks into a Charged Attack.
An extensive write-up of known combos and their performance can be found in the Raiden Combos Document — detailed below are Raiden’s most recommended combos. Most of the below combos are not ceiling combos, but easy and reliable to perform consistently and thus are the most recommended. That said, players can look into the attached document if they wish to experiment or push their boundaries.
All video credits to BowTae#0141 unless stated otherwise.
Raiden Combos without Attack and/or Movement Speed Buffs
3N3C + N1C
[Recommended with Attack Speed]
While Raiden can theoretically perform this combo without Attack Speed, the extremely low leeway to do so means that it is much more recommended for players to use this combo with sources of Attack Speed, such as from Jean’s C2 or Skyward Spine. The combo itself is very easy on muscle memory, and due to involving Charged Attacks can be input buffered or “button-mashed”.
Players comfortable with this combo can look into practicing 3N3C + N2C and 4N3C, with the latter absolutely requiring Attack Speed.
4N4D
[Recommended for general use]
4N4D is an extremely potent combo; it competes with 3N3C + N1C and can be performed rather reliably without Attack Speed, while also having higher Electro application and triggering more Rainsword waves from Xingqiu and Yelan. That said, it cannot be input buffered well, and dash canceling the N4 properly can be tricky, as players must be careful to not dash before they land the second hit from her 4th NA.
Players comfortable with this combo can try attempting N4E + 3N4D, particularly if they have Attack Speed; fitting in this Skill cast during her Burst duration is optimal for overall damage due to not casting it afterwards and thus increasing her field time unnecessarily.
2N4C + N2C
[Recommended for general use]
This is the combo recommended for general use. It is very forgiving and can be input buffered, making it very easy to perform. Messing up the combo is also very forgiving, as players can simply opt to use N1C instead of N2C at the end if they feel they have made a mistake or that their Burst duration is about to end.
N1C Spam
[Venti Combo]
As Charged Attacks have a higher chance of hitting within Venti’s Burst, players are recommended to simply opt for N1C spam if playing with him and the mobs are picked up in his Burst.
This combo is also competitive for general use, and outdoes 3N3C+N1C if players can manage to fit in 6N1C; however, it is also very stamina intensive and drops in value significantly if missing the last Charged Attack.
※ Dash Canceling: To Dash, or not to Dash?
TL;DR: Don’t dash cancel unless you have Jean C2
Correctly performed dash cancels save 1-2 frames without Movement Speed buffs per cancel. If you screw them up and cancel too early and miss out on a CA hit, the damage loss is devastating. Saving those frames does not justify learning and performing dash cancels unless they are absolutely required.
However, for some players performing dash cancels can feel more natural. Especially players who are used to Hu Tao C1 cancels might feel more comfortable performing them. The second case of when you should perform dash cancels is if you have Jean C2 and are going for higher ceiling combos. The movement speed buff lets you save more frames and makes dash canceling worth it. If you are performing dash cancels, record your gameplay and check if you are getting both CA hits to make sure you are not canceling too early.
Timing dash cancels can be tricky but to provide you some pointers, first you should familiarize yourself with the VFX of the CA. There are two distinct “hit marker” sounds, and they always occur in the same interval. Then, time your dash to occur right after the second hit marker sound plays.
Example of good dash cancel
Example of bad dash cancel
※ Dash Cancel Tech
If you have decided you are more comfortable performing dash cancels and are getting consistent when doing them, there is one more tech you can add to your arsenal. Welcome to dash cancel hold N1 buffering.
Dash cancel hold N1 buffer:
By holding your attack button after dashing, Polearm and Sword users will perform N1 on the first possible frame after the dash. Normally, people use this to do perfect N1C after dash. However, you can slightly modify this tech to perform frame perfect longer strings such as N3C after the dash.
To execute, follow these steps:
1. Dash cancel your CA
2. While holding a directional key, hold your attack button about halfway through the dash
3. The moment the N1 animation starts, release your Normal Attack input
4. Start pressing or mashing Normal Attack again to do N2
※ Constellations ※

C1: Ominous Inscription
Chakra Desiderata will gather Resolve even faster. When Electro characters use their Elemental Bursts, the Resolve gained is increased by 80%. When characters of other Elemental Types use their Elemental Bursts, the Resolve gained is increased by 20%.
More Resolve is more damage. Allows you to reach max Resolve stacks fairly easily with a second Electro or with 3x non-Electro 80 cost Bursts.
DPS Increase: 5% – 12%

C2: Steelbreaker
While using Musou no Hitotachi and in the Musou Isshin state applied by Secret Art: Musou Shinsetsu, the Raiden Shogun’s attacks ignore 60% of opponents’ DEF.
Raiden’s best Constellation by far, at just C2. This Constellation is not necessary for Raiden to be a good DPS by any means, it just takes her from strong to even stronger.
On its own, the DEF Ignore equates to around 43% increased damage for hits affected by it (anything during her Burst). DEF Shred, unlike RES Shred, does get better the more you stack it, but Raiden’s C2 is not exactly DEF Shred. It’s considered DEF Ignore which interacts with the enemy DEF modifier after other sources of DEF Shred are factored in.
DPS Increase: 43%
Total DPS Increase vs C0: 51-61%

C3: Shinkage Bygones
Increases the Level of Secret Art: Musou Shinsetsu by 3.
Maximum upgrade level is 15.
+3 levels to Burst. Very strong, very straightforward.
DPS Increase: 16-18%
Total DPS Increase vs C0: 76-88%

C4: Pledge of Propriety
When the Musou Isshin state applied by Secret Art: Musou Shinsetsu expires, all nearby party members (excluding the Raiden Shogun) gain 30% bonus ATK for 10s.
Very situationally useful. You never want to use Raiden’s Burst first in a rotation, as all of her Energy will go to waste. So, this Constellation only really benefits her teams 2nd rotation, which may or may not be useful depending on the content and how invested you are.
DPS Increase: N/A
Total DPS Increase vs C0: 76-88%

C5: Shogun’s Descent
Increases the Level of Transcendence: Baleful Omen by 3.Maximum upgrade level is 15.
+3 levels to Skill. Fairly useless.
DPS Increase: 1%
Total DPS Increase vs C0: 78-91%

C6: Wishbearer
While in the Musou Isshin state applied by Secret Art: Musou Shinsetsu, attacks by the Raiden Shogun that are considered part of her Elemental Burst will decrease all nearby party members’ (but not including the Raiden Shogun herself) Elemental Burst CD by 1s when they hit opponents.
This effect can trigger once every 1s, and can trigger a total of 5 times during the state’s duration.
This Constellation is the hardest to evaluate, as currently there isn’t much to any application for it beyond lowering rotation time for a few teams by about 2 seconds, but there is a lot of uncertain potential to it with future released characters. Until then, this is not a very relevant Constellation.
DPS Increase: N/A
Total DPS Increase vs C0: 78-91%
※ Should you pull her Constellations?
Raiden’s good Constellations are concentrated into C1-3. While it may be tempting to “max out” your Raiden by going for 2 or 3 more copies of her, consider this:
- Raiden’s full team damage at C0 is comparable to most other teams without 5* Constellations, and C3 with C6 5* teams; pulling for her early Constellations is essentially a cheaper buy for a different carry’s max potential, but only in terms of damage and without a gameplay change.
- Since they offer no gameplay change, they really only translates to faster clear times. If you already have the investment to clear content at C0, her Constellations won’t do anything for you beyond speed.
At the end of the day, it’s your primos and your money. But know that there is no pressure to pull her Constellations in order to make her a good unit. Raiden is very strong regardless of Constellations and can help your account right out of the box if you put in the effort.

“The Inazuman arts of polearm and sword combat, as well as the blade-forging process itself, primarily originated with me. Since then, they have branched out and blossomed into a variety of techniques according to each master’s individual aptitude.”
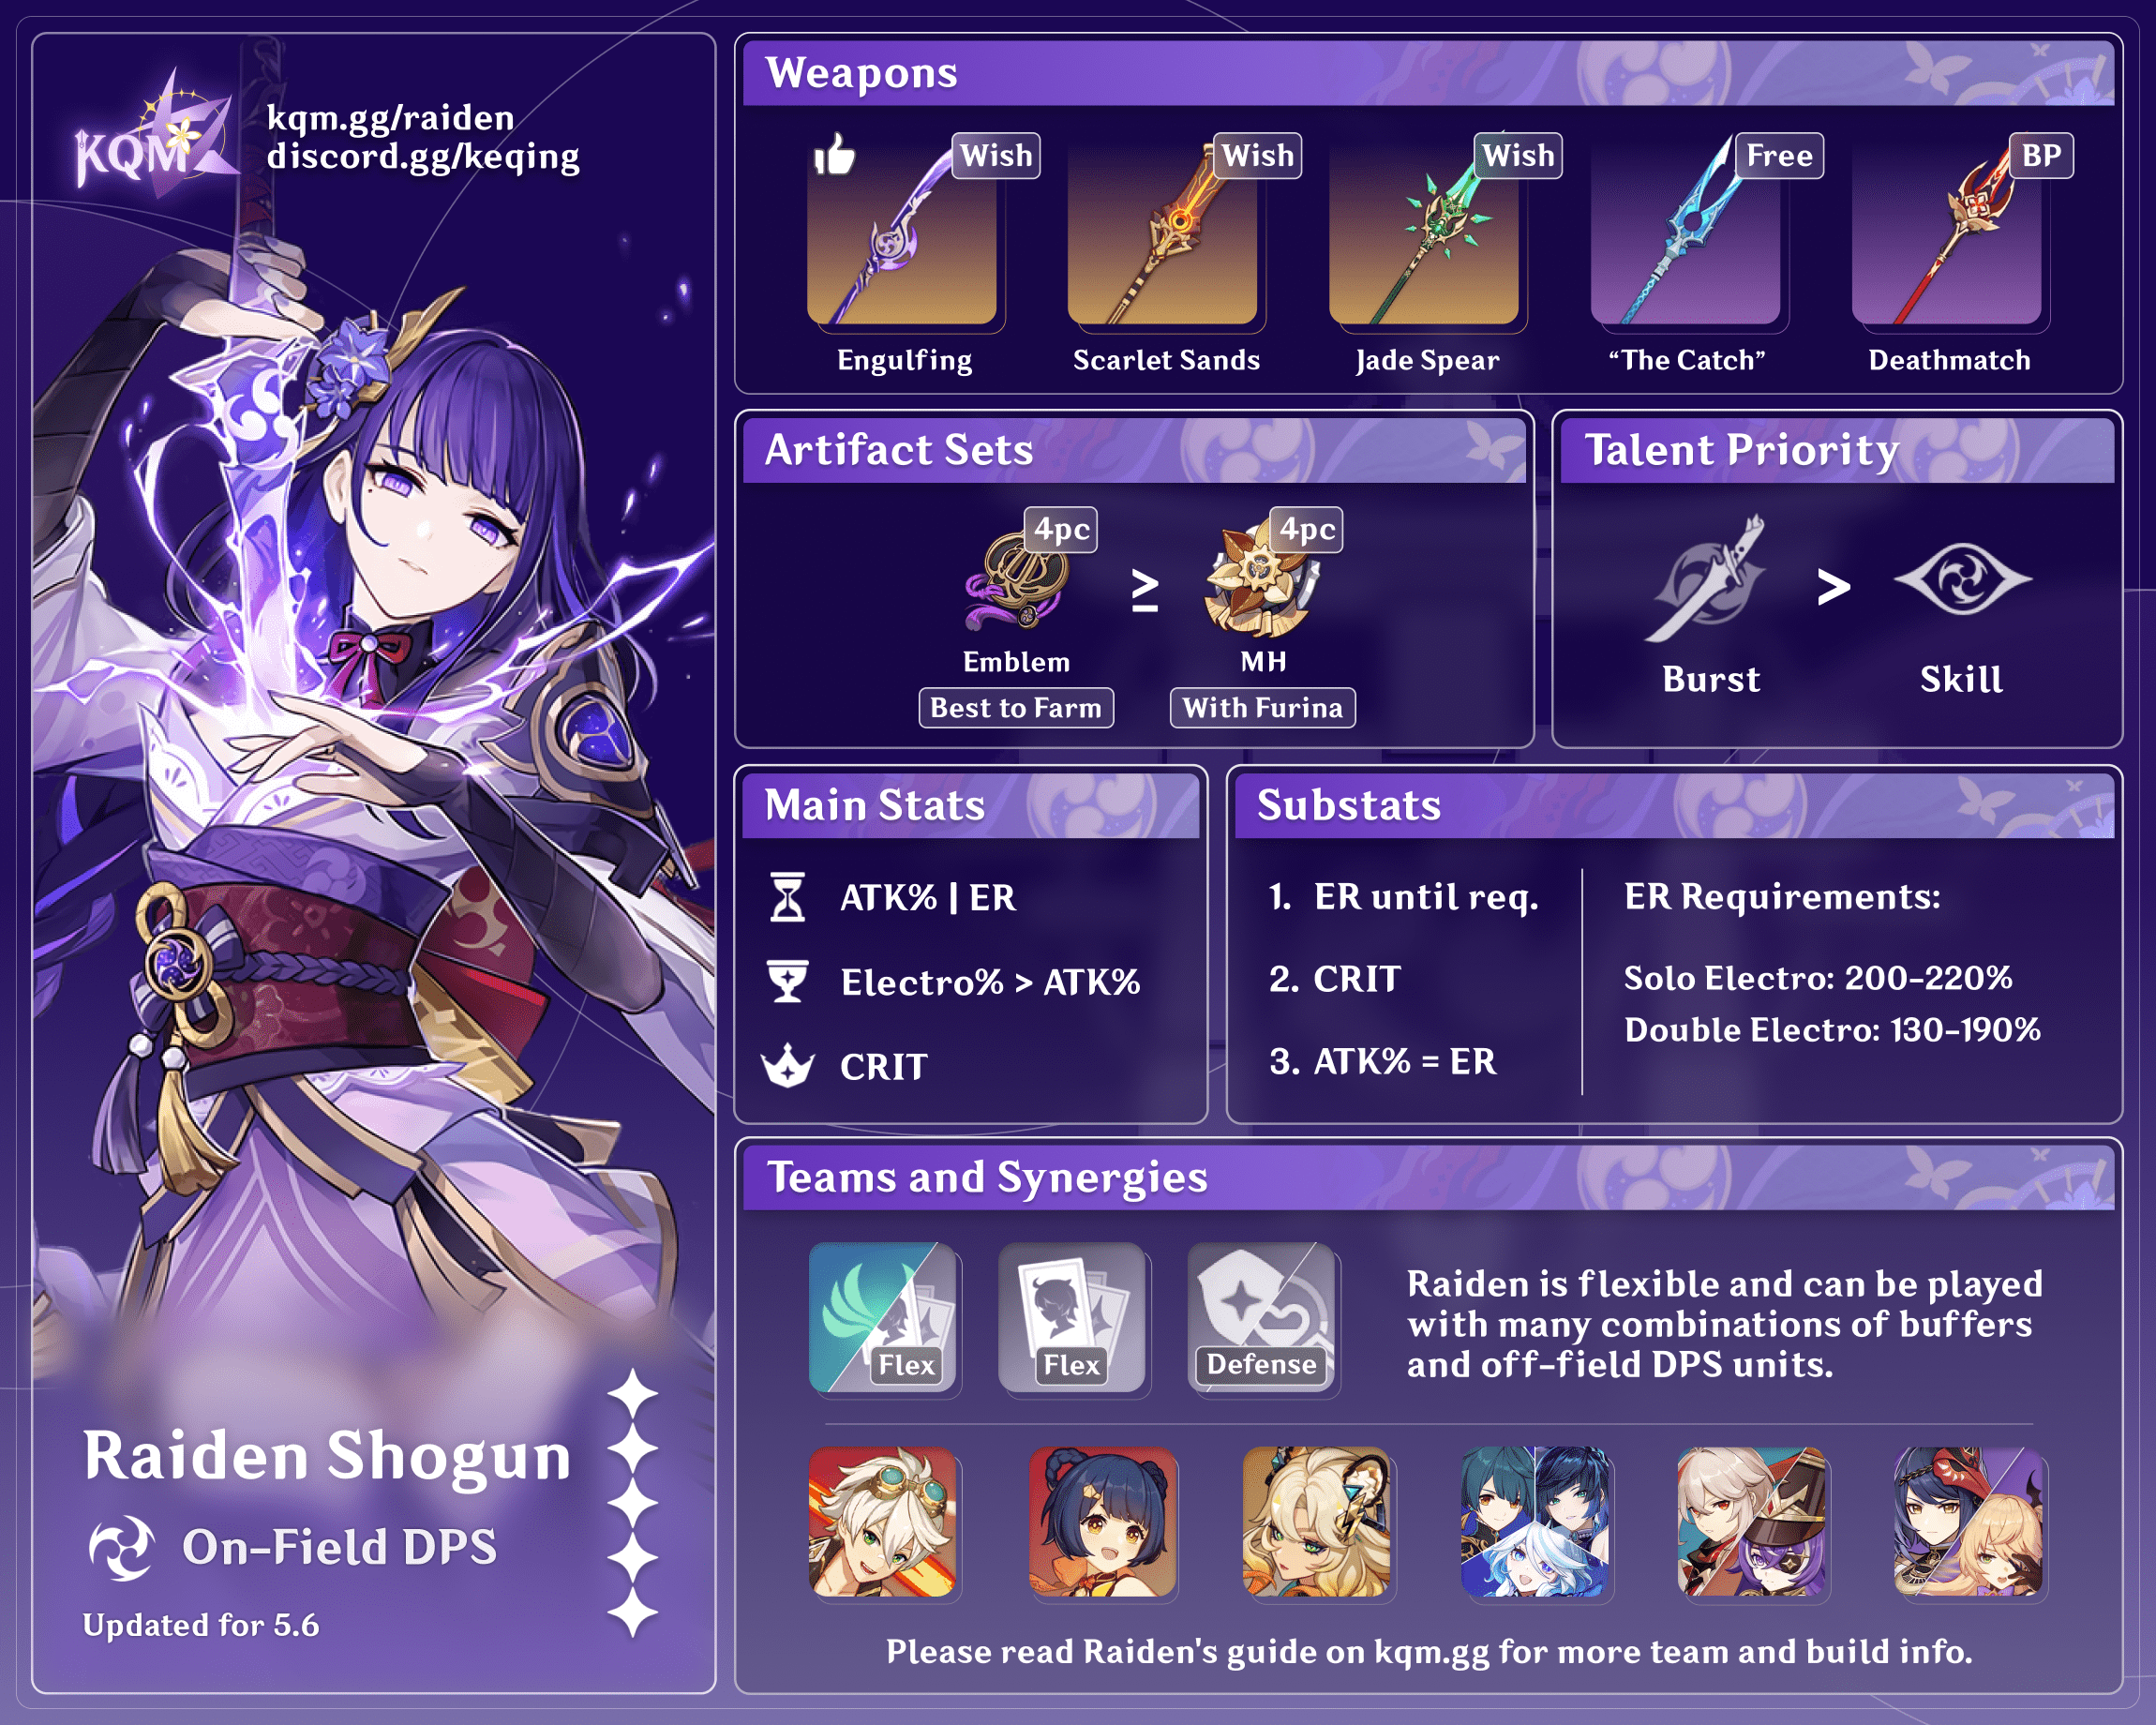
※ Artifacts ※
Raiden’s gearing process is more complicated than the average unit, as her kit brings a hard to maintain balance between DMG%, ATK%, and ER% which translates to comfort, DMG%, and potentially ATK%; to find your own balance head over to the Genshin Optimizer. Discussed below are primarily gearing choices for on-field Raiden. For EM Raiden, click here.
Sands: ER% or ATK%
Thanks to Raiden’s A4, Emblem of Severed Fate, a part of ER% is converted into DMG%, as well as helping generate more Flat Energy with her Elemental Burst. That being said, ATK% sands will be the preferred choice for her personal damage in most scenarios, but ER% sands can range from 10% less personal damage to a negligible <1% difference depending on outside buffs. Engulfing Lightning will additionally convert ER to ATK%, which leads ER sands to pull ahead with it.
Goblet: Electro DMG% or ATK%
The prevalence of DMG% sources in Raiden’s kit can allow an ATK Goblet to be a comparable option in some narrow situations, such as without external ATK buffers, with significant external DMG% buffers, without ATK Sands, and/or with high Base ATK weapons, but in most cases Electro DMG% will be her best choice given equal substats.
Circlet: CRIT Rate or CRIT DMG
Pick whichever brings you closer to a ½ ratio of CR/CD, taking into account other sources of CR and CD such as “The Catch” or Sara’s C6.
Substats: CR = CD > ATK% ≥ ER > Flat ATK
The balance between ER% and ATK% can vary as discussed with her Sands choices, but CRIT will always be more valuable than both.
Elemental Mastery on Raiden?
With the advent of Dendro, Elemental Mastery has become a more valuable stat for Raiden due to her ability to trigger Aggravate and Hyperbloom reactions. However, its value varies heavily on how many of these reactions she is able to trigger; generally, sticking to standard builds for Raiden in an on-field role is a safe option. That said, if reactions can be triggered consistently then Elemental Mastery can gain value and the stat should not be considered as wasted if played in such teams.
Moreover, Raiden can also more comfortably now assume a mostly off-field role as a Hyperbloom trigger – in these styles of teams, it is recommended to build Raiden fully focusing on Elemental Mastery.
ER requirement?
There is no “correct” answer to this, as it depends on what you wish to accomplish. Raiden as a unit will value ER beyond just a requirement to cast her Elemental Burst, as ER% will translate into both DMG% and Flat Energy refund to both herself and her teammates. As such, her ER can fluctuate a lot depending on the chosen weapon and sands.
Typically, 200%+ ER will be enough for her to battery herself even as solo Electro in most teams that don’t have atrocious Energy generation. This is easy to reach with an ER Sands or weapon, and hits a nice breakpoint of 20 Energy per Burst at TL10. Due to its ER secondary stat and propensity to value ER sands, Engulfing Lightning will often reach 250%+ ER before the bonus ER from the passive.
Sets: 4pc Emblem of Severed Fate

Undisputed BiS set for on-field Raiden, giving you everything she wants in one package: ER on 2pc, as well as ER conversion to Burst DMG% on 4pc. Combined with her A4 passive, it allows Raiden to build ER while strengthening her damage. Simply equipping ESF onto Raiden will grant 20% ER, 38%+ Burst DMG, 8% Electro DMG and 1.5 extra Energy generation. All of these stats may seem small at first, but they add up and get better the higher her ER goes.
If you ever find that another set can give you higher damage, either in Genshin Optimizer or in game, that does not mean it is a good alternative. It means you need to farm ESF more.
Other Sets
As an off-field Hyperbloom trigger, Raiden can potentially make use of different artifact sets. She can boost her own reaction damage with 4 Gilded Dreams, or 2pc combinations of Gilded Dreams and Wanderer’s Troupe. Alternatively, she can also opt to use more supportive artifacts such as 4 Tenacity of the Millelith if her team has power Attack-scaling units. While 4 Deepwood Memories increases both Hyperbloom damage and her teammates’ Dendro damage, there are typically better users for the set — however, if there are no other holders, it becomes Raiden’s best option.

“The profoundest of the profound is the Musou no Hitotachi. A sword art without parallel in all the world. With you as my sparring partner, I can perfect that technique even further.”
※ Weapons ※
Hyper/On-field Raiden
Averaged across a variety of buff options: unbuffed, TTDS, Kazuha, Kazuha + TTDS, C6 Sara + 4NO, Bennett + C6 Sara + 4NO, Bennett + Kazuha + TTDS + 4NO, Bennett + Kazuha + C6 Sara + 4NO, Bennett + Pyro resonance + 4NO
4ESF. ER weapons use either ATK or ER Sands depending on which is higher damage, non ER weapons use ER Sands. It may be possible to run non ER weapons without ER sands in teams with Electro resonance, particularly with other Electro characters contributing Particles such as Fischl, Yae, or Sara if she uses her Charged Attack.
Rotation used is 3x N3C + N1C unless otherwise specified. KQMC Standard
| Weapon Image | Weapon | % of “The Catch” R5 | Notes |
|---|---|---|---|
 | Engulfing Lightning R1 | 114.2% | Raiden’s BiS and signature weapon. Comes with the added benefit of incentivizing building more ER for damage, removing any need to compromise between damage and comfort and improving her capacity to battery the rest of her team. Matches her outfit. |
 | Staff of Homa R1 | 104.6% | Calculated above 50% HP. Raiden has no innate HP drain built into her kit, so it is unlikely she will ever benefit from the low HP passive. However, raw stats still make this a great option. |
 | Primordial Jade Winged-Spear R1 | 103.1% | Zero stacks on Raiden’s initial slash hurts this weapon, but she will still be able gain stacks over the duration of her Burst, and the high Base ATK and CR secondary stat are definitely appreciated too. |
 | Calamity Queller R1 | 102.6% | Raiden’s rotation patterns (Skill to set up > period off of Raiden > Burst > on-field damage window) actually lend themselves fairly well to this weapon, and while her off-field Skill damage is fairly minimal, she is technically one of the few Polearm users who can benefit from the off-field portion of the passive for at least a little bit of her damage. Other 5* may offer more desirable stats, but a ridiculous mountain of ATK is still nothing to complain about. |
 | Wavebreaker’s Fin R5 | 102.3% | Calculated with 290 total Burst cost. Wavebreaker’s value will be highly variable depending on refine, team Energy cost, and buffs, but it can be a competitive 4* option and it can help free up “The Catch” for another unit if needed. |
 | Skyward Spine R1 | 101.9% | Calculated with 3x N3C + N2C. Better base stats than The Catch, but a worse passive. Raiden cannot trigger the Phys procs in her Burst, but she can still benefit from the ATK speed. If this allows you to access higher damage combos, Skyward Spine can end up an upgrade for Raiden. |
 | Deathmatch R5 | 101.2% | Calculated against 2+ enemies. A very expensive upgrade over a fully F2P option, but worth considering if you already own it or need “The Catch” for another unit. |
 | Lithic Spear R5 | 100.0% | Calculated with 2 stacks. Only worth considering at high refine and with multiple Liyue teammates, but it can be a fine option under those circumstances. |
 | “The Catch” R5 | 100.0% | Valuable passive well paired to Raiden’s damage profile. Go fish. |
 | Vortex Vanquisher R1 | 97.7% | Calculated unshielded. All the stacking caveats of PJWS, but without any crit or DMG% to sweeten the deal and with a conditional that Raiden teams rarely fulfill. |
| Deathmatch R1 | 96.0% | Decent alternative option if necessary. |
| Wavebreaker’s Fin R1 | 93.3% | Not really worth considering without refines. |
| Lithic Spear R1 | 92.2% | Not really worth considering without refines. |
 | Favonius Lance R1-5 | 84.8% | Favonius limits Raiden’s damage, and even in teams with other Energy hungry units making up a higher portion of team damage than her it will still at best draw even with “The Catch” and in most cases still be a downgrade. Not recommended. |
EM/Off-field Raiden
| Weapon Image | Weapon Name | Notes |
|---|---|---|
 | Dragon’s Bane | Dragon’s Bane on Elemental Mastery builds provides the highest amount of EM of any polearm — as Raiden has essentially no other stat requirements on such a build, Dragon’s Bane will generally serve as the best option for her personal damage, despite the essentially wasted passive. |
 | Moonpiercer | Moonpiercer serves as EM Raiden’s strongest F2P option — it can also be situationally better for team damage than Dragon’s Bane when Raiden is paired with strong Attack-scaling teammates who can make use of its passive. |
| Favonius Lance | While Raiden does not need the Energy Recharge on an EM build, Favonius Lance can be considered if paired with exceptionally energy-hungry teammates in order to battery them. |

“All the world holds dear is but a backdrop of constant motion. I stand before it alone and unchanging.”
※ Team Building ※
Consider the units you have, and what your other team might need. Given Raiden’s flexibility, you should be able to build a team for her that ensures both your teams will be able to reach their potential with minimal compromises.
Your goal is to create a team that can meet any DPS checks thrown its way through some combination of buffing Raiden’s damage, bringing in additional damage from off-field DPS units and/or buffing those units as well, while still being able to survive any content it comes across through some combination of healing, shielding and/or damage reduction.
※ Buffs
Buffers should be chosen so as to offer as much benefit to Raiden’s entire team as possible without contesting roles or complicating rotations.
4pc Viridescent Venerer, held by an Anemo unit who will Swirl Electro and potentially other Elements as well in order to shred enemy resistances, is a very powerful buff to Raiden and her teammates. Most teams should look to slot a 4VV user.
The only exception to this rule would be teams where Raiden is paired with Xiangling, as her high rate of Pyro application and the inability of Pyro and Electro to coexist as auras like Hydro and Electro means consistently Swirling both Elements for 4VV, while technically possible, is difficult.
Some buffs require directly swapping to Raiden from the buffer either as a condition of the buff, such as Thrilling Tales of Dragon Slayers or (excepting some impractical setups with tight swaps) Sara’s Tengu Juurai buff, or in order to take maximum advantage of very limited uptime, such as Mona’s Omen buff.
Most teams will take at most one of these buffers if they choose to use one, as bringing multiple would introduce unnecessary swaps and limit uptime on buffs.
Sara can be used to buff units other than Raiden in some teams, such as Yae or Fischl in pure Electro setups or Xiangling with Bennett, but even in these cases she should not be paired with a TTDS holder.
Bennett’s Burst allows him to buff on-field units through any number of swaps for a limited uptime. The field will last for 12s, with a tick applying all buffs (and Pyro) to whoever is on-field once a second, and the buff will linger for a couple seconds after the final tick applying it. As such, you can expect 13-14s effective Bennett Burst uptime.
However, Raiden is required to stay in Bennett’s field to receive his buff; this can be challenging with enemies that move a lot or enemies that can be knocked back by Raiden’s attacks or Overloaded, particularly without off-field grouping.
Resolve stacks are a mechanic built into Raiden’s kit, not a buff given to her by other units, but they are an increase in Raiden’s damage that is dependent on the composition of the rest of her team. This gives her additional synergy with high Burst Cost units, beyond the Energy she can provide them.
※ Additional Damage Dealers
Raiden’s Burst DMG% buff from her Skill, Energy refund from her Burst, and relatively short field time requirements as compared to many other on-field DPS units allow her to pair well with characters that can deal significant damage in short windows or from off-field, particularly those who deal talent damage through their Burst, have higher ER requirements, and/or have higher Burst Costs.
Reactions such as Electro-Charged and Overloaded can add some damage to Raiden’s teams, but they will be relatively unimportant for most units who would not otherwise seek to build EM. As such, Raiden will not build around them, but her team can. However, Aggravate and Hyperbloom serve as reactions Raiden can directly take advantage of – the ways this affects her build is discussed in Artifacts.
Xiangling has innate EM from ascension, and thus serves as a better Overloaded trigger than most other units who would seek to build for talent damage rather than Transformative Reaction damage. Raiden alone can struggle to keep up Electro against Xiangling’s Pyro application, so additional application from Yae or Fischl can help maintain Electro as aura and Pyro as trigger.
Electro-Charged allows both Hydro and Electro to persist as auras, which can allow Xiangling to Vaporize her Burst and Skill damage and gain further value from EM to the point where she can consider looking for it on her Sands or weapon and in substats. Electro-Charged does consume some Electro gauge, but it will not typically do so fast enough to reduce Overloaded procs, and Hydro can serve as a means to wipe Pyro if Xiangling does happen to overtake and become aura.
Most Anemo supports with the exception of Jean outside of Sunfire setups will trigger enough Swirls to make building EM ideal for their personal damage, even without any other Reactions. However, because Swirl applies Elemental Gauge in AoE and because many Anemo units are able to absorb Elements into their Skills and/or Bursts, Anemo units are additionally capable of serving as triggers for Electro-Charged and Overloaded. Because they would have high EM built already, these Reactions can be significant gains for their personal and team damage.
While Overloaded has a higher base multiplier, Electro-Charged can allow Anemo units to additionally increase their damage by offering two auras they can potentially Swirl.
In single-target, Swirl will consume Gauge without reapplying it, which can complicate questions of reaction ownership and reduce Anemo units’ contributions even beyond halving their Swirl damage.
Jean does not have any abilities that can absorb an Element, and she triggers relatively few Swirls per rotation. However, her Burst field will apply Anemo to the on-field character, allowing her to take advantage of a unique synergy with Bennett’s Pyro self-application to trigger up to 10 additional Pyro Swirls every rotation provided units stay within her and Bennett’s Bursts—this interaction is often called “Sunfire” after a League of Legends item with a design reminiscent of a Pyro Swirl animation.
These Pyro Swirls can also be Vaporized when paired with a Hydro enabler and can trigger Overloaded to further leverage whatever EM she builds. Similarly to Xiangling, Raiden alone can struggle to maintain Electro aura against Sunfire, but Yae, Fischl, or a Hydro enabler can help keep Jean as Overloaded trigger.
Reactions
※ Survivability
Extra damage will always be nice for faster and more consistent clears, while extra survivability can provide comfort to a point but is typically unnecessary. Thus, most teams will limit themselves to one healer or strong shielder as a support, and will ideally look for units for this slot that can bring any additional utility.
Often, strong shielding can be favored outside of corrosion matchups as a source of survivability, as it provides interrupt resistance that can enable smoother rotations and prevent DPS loss from being staggered by enemies or needing to dodge. However, as Raiden’s Burst already grants her infinite interrupt resistance, this benefit does not apply to her, so healing and shielding just end up as alternative means of not dying, with shielding being limited against enemies that can apply corrosion.
※ Character Synergies
This is not a comprehensive list of all characters; characters listed have some potential value with Raiden in teams built around her. Some units can be played with Raiden, but their teams will function differently, so they will be addressed separately after this section.
Builds are detailed only when they have relevant support value. For units who should simply build for their own personal damage, please refer to their own KQM guides!
Pyro
| Unit | Build | Notes |
|---|---|---|
Bennett Grade: S | Weapons: Sword with the highest Base Attack, e.g.: Aquila Favonia Skyward Blade Prototype Rancour Artifacts: 4 Noblesse Oblige 4 Instructor can be used with Xiangling if she is Vaporizing ER/HP/HB If healing is sufficient, ER/Pyro/CR or CD can be used to maximize damage. | Role(s): Healer/Buffer Bennett is one of Raiden’s most valuable teammates. Being able to condense healing and a huge Attack buff in one slot is already phenomenal, however he is also capable of bolstering other teammates’ damage by enabling some Anemo units to trigger Overloads, as well as benefiting other units who can snapshot or front load their damage during their limited field time. If Bennett is available, he should always be your first choice for Raiden’s team. |
Xiangling Grade: A | “The Catch” is a strong option for both Raiden and Xiangling, but only one can run it. If Vaping, Xiangling’s damage should be prioritized over a C0 Raiden’s, but Kitain Cross Spear serves as an alternative F2P option for Xiangling that Raiden is not recommended to use, so it may be best to leave “The Catch” on Raiden. If she is not Vaping, Raiden’s damage should be prioritized, and Prototype Starglitter can serve as a last resort option. | Role(s): Damage Xiangling is recommended to be run alongside Bennett, since she can snapshot to fully benefit from his ATK buff and because even with Raiden she will face Energy issues as solo Pyro. Her Pyro application can make consistent Electro VV challenging in most teams, as Raiden will struggle to keep up Electro aura without additional off-field application. Intentionally absorbing Kazuha’s Burst with Electro can avoid this issue, or Xiangling can be used in place of a VV unit. Despite these limitations, Xiangling’s personal damage is significant enough to justify her placement with Raiden in many teams. |
 Yanfei (C4) Grade: C | Weapons: Thrilling Tales of Dragon Slayers Favonius Codex Prototype Amber Artifacts: 4 Noblesse Oblige 2 Tenacity of the Millelith/2 Emblem of Severed Fate ER/HP/HP or CR with Favonius Codex | Role(s): Shielder/Healer/Buffer Yanfei gains a relatively powerful shield at C4, but her ER requirements are stiff and she lacks the Pyro self-application that Thoma and Bennett have. She is capable of running TTDS, but will likely struggle to find enough ER to do so as solo Pyro even paired with Raiden. Her synergy is limited to being one more of many mediocre options for providing survivability. |
 Thoma Grade: C | Weapons: Favonius Lance Kitain Cross Spear Black Tassel Artifacts: 4 Noblesse Oblige 2 Tenacity of the Millellith/2 Emblem of Severed Fate ER/HP/HP or CR with Favonius Lance | Role: Shielder Thoma’s shield has the potential to be the second strongest shield in the game, beaten only by Zhongli. Furthermore, with proper setup, he can apply Pyro for certain Anemo units to absorb to trigger Overloads with. However, his synergy is extremely limited otherwise—Raiden cannot benefit from his C6 buff, and he thus lacks the buffing capability of many competitors. Moreover, his shield’s unique method of stacking providing unparalleled stagger resistance is undermined by Raiden’s infinite poise. Thus, while he is an option, he faces stiff competition for his slot. |
Hydro
| Unit | Build | Notes |
|---|---|---|
Xingqiu Grade: A | Weapons: Primordial Jade Cutter Favonius Sword Lion’s Roar Raiden will lower Xingqiu’s ER requirements, reducing the value of Sacrificial Sword and Favonius Sword as compared to his typical teams. Favonius Sword still matches his ER requirements before C6 nicely and may still provide some utility to the rest of the team, but Sacrificial Sword will only serve to increase rotation length and is recommended against at any con. Xingqiu Guide Artifacts: 4 Emblem of Severed Fate ATK/Damage/CRIT | Role(s): Damage/Enabler Xingqiu stands to provide a significant amount of value for Raiden teams. Firstly, his personal damage is very significant, further bolstered by Raiden’s Burst Damage Bonus and teamwide batterying as well as potential VV. Furthermore, due to his significant off-field Hydro application, he can consistently enable Electro-Charged even with other elements being applied, thus allowing for Hydro and Electro auras to persist simultaneously. Thus, he can allow Pyro units like Xiangling or Anemo units like Kazuha or Sunfire Jean to Vaporize and Overload against enemies consistently, bolstering team damage. While his contribution is significant, his Hydro application being single-target lowers his value in AoE, and he is a highly contested unit which Raiden does not require in order to function. Additionally, his 21s Skill cooldown can slightly increase rotation lengths. However, when available, he is undoubtedly worth considering. |
 Yelan Grade: A | Weapons: Aqua Simulacra Elegy for the End Favonius Warbow Fading Twilight Artifacts: 4 Emblem of Severed Fate ER or HP/Hydro Damage Bonus or HP/CR or CD or HP Do not use more than 2 HP% artifacts. | Role(s): Damage/Enabler While Xingqiu and Yelan tend to perform similar roles in Raiden teams, there are a few nuances to note between using them. Yelan can provide more personal damage while contributing her ramping A4 buff, as well as possessing shorter cooldowns which can allow for tighter rotations in some teams.. That said, Xingqiu’s extra 3 seconds of Burst duration, higher Hydro application and added defensive utility are all important and situationally crucial – particularly in the case of when used alongside Xiangling. However, both units will tend to perform similarly – and can be especially potent when used together, albeit highly limited to single target damage. |
Mona Grade: B | Weapons: Thrilling Tales of Dragon Slayers Artifacts: 4 Noblesse Oblige (if no other holder) 4 Emblem of Severed Fate Rainbow ER/Hydro/CR or CD | Role(s): Buffer Mona is a potent buffer for Raiden, bolstering her damage significantly. While her Omen duration is short, this is alleviated to some degree by Raiden frontloading significant damage in her initial slash. As a TTDS holder, she faces strong competition for her slot. Both C6 Sara and Lisa will be an improvement over her once buff uptimes are taken into account, but Mona can be better than Lisa for initial slash screenshots. Her Hydro application is relatively limited, but it can allow for some Electro-Charged procs from Anemo teammates, though not nearly to the degree of Xingqiu or Kokomi. |
 Kokomi Grade: A | Weapons: Thrilling Tales of Dragon Slayers Hakushin Ring Prototype Amber Artifacts: 4 Tenacity of the Millelith 4 Ocean-Hued Clam HP or ER/HP or Hydro/HB | Role(s): Healer/Buffer/Enabler While outclassed in any individual role, Kokomi provides nearly unrivaled role compression in Raiden teams. She is able to hold TTDS in order to buff Raiden, and either provide further buffs through ToM or some off-field damage via OHC. Her healing is significant, and she can maintain full uptime on her jellyfish, which also allows for off-field Hydro application, potentially enough to sustain some Anemo units to consistently Vaporize or Overload. As such, she is a valuable member for Raiden teams. |
 Barbara Grade: C | Weapons: Thrilling Tales of Dragon Slayers Hakushin Ring Prototype Amber Artifacts: 4 Ocean-Hued Clam ER/HP/HB | Role(s): Healer/Buffer A downgrade from Kokomi in healing, Particle generation, and Hydro application, though still a functional sustain support. She may struggle to Burst every rotation with TTDS, forcing you to choose between depriving Raiden of Resolve stacks or depriving the team of the little utility she can bring. |
Electro
| Unit | Build | Notes |
|---|---|---|
 Yae Grade: A | Weapons: Kagura’s Verity Skyward Atlas The Widsith Oathsworn Eye Artifacts: 4 Thundersoother 4 Emblem of Severed Fate 4 Tenacity of Millelith Any Combination of: 2 Thundering Fury/2 Gladiator’s Finale/2 Emblem of Severed Fate/2 Shimenawa’s Reminiscence/2 Vermillion Hereafter/2 of an Offering Atk/Electro/CR or CD Yae Miko Guide | Role(s): Damage Yae possesses high off-field damage and a powerful Elemental Burst, whose ER needs are made manageable by pairing her with Raiden. Thus, she can achieve a high damage profile, with Raiden/Yae teams being able to compete with other maximum potential Raiden teams. Due to providing a source of consistent damage, Yae allows Raiden teams to deal significantly better with multi-wave content, while their combined Burst damage allows them to still deal well with limited DPS windows. |
Fischl Grade: A | Fischl guide :modCheck: | Role(s): Damage While she lacks Yae’s immense Burst damage, Fischl also provides significant off-field damage through Oz. Her role is simple, but nonetheless quite effective—though it is worth noting that her damage is constrained significantly to Single Target. |
 Sara Grade: A (pre-C6) / S(C6) | Weapons: Elegy of the End (easier to proc with C2, C4) Highest base ATK weapon, eg: Skyward Harp Sacrificial Bow Artifacts: 4 Emblem of Severed Fate 4 Noblesse Oblige ER or ATK/Electro/CR or CD | Role(s): Buffer The Shogun’s right-hand woman, and her premiere buffing option. Pre C6, in terms of raw buffing potential, she faces stiff competition from TTDS Lisa and Mona, who are cheaper to build and typically better single unit buffers. Sara can pull ahead of her competitors if using Elegy, and at C6, Sara’s buffing power is entirely unmatched and she becomes a prime pick for Raiden. Sara is also able to buff multiple units using her Skill, C2, and Burst, which can be an added advantage when paired with secondary damage dealers such as Yae, Fischl, or Xiangling. Further, Sara’s Burst damage can be relevant on Raiden teams due to being able to benefit from many of the buffs being directed to Raiden. As such, while Raiden can work without her, they have excellent synergy together that is always worth consideration. Since Sara’s buff uptime is limited, it can be a small optimization to switch your Raiden combo to 2x N3C + N1C + N3C to buff an extra CA; however, simply doing your normal preferred combo is still perfectly fine. |
Lisa Grade: A | Weapons: Thrilling Tales of Dragon Slayers Personal damage oriented weapons can become better with C3-4 on Lisa and significant buffing and investment, but are generally recommended against given the low returns on investment compared to using TTDS and focusing on Raiden. Artifacts: 4 Noblesse Oblige 4 Emblem of Severed Fate ER/Electro/CR or CD | Role(s): Buffer Despite being perhaps unfairly frowned upon as a unit, Lisa can offer a lot to Raiden teams. With her ER issues solved by Raiden’s Energy restoration, Lisa can use her Burst to provide a full uptime 15% Defense shred and can hold TTDS to further buff Raiden. Her buff is competitive with Mona and pre-C6 Sara, while possessing the benefits of being completely F2P, extremely cheap to build and gear, and being relatively uncontested. Even with TTDS, her personal damage is not negligible, particularly when she is able to benefit from many of the buffs being directed to Raiden. |
 Kuki Shinobu Grade: B | Weapons: Freedom Sworn Favonius Sword Artifacts: 4 Tenacity of the Millelith 4 Noblesse Oblige HP/Electro or HP/CR or CD or HB | Role(s): Healer Kuki serves as an excellent healer option on Aggravate and/or Hyperbloom teams, as she can contribute reasonable personal damage through these reactions while also providing healing and buffs through 4TotM. Outside of these teams, however, she is rarely ever the best option — even then, the teambuilding flexibility she provides is helpful. |
Cryo
| Unit | Build | Note |
|---|---|---|
Qiqi Grade: B | Weapons: Favonius Sword Artifacts: 4 Ocean-Hued Clam ER/ATK/CR or HB | Role(s): Healer Qiqi’s healing is nothing short of incredible, and able to provide copious amounts of survivability to the team. With 4 Ocean-Hued Clam, she also has the capacity to convert this healing into off-field damage, bolstered further by Superconduct. That said, her lack of Particle generation is a hole the rest of the team will have to work around, and even with Raiden Qiqi requires an extremely significant amount of ER in order to Burst every rotation. |
 Diona Grade: C | Weapons: Elegy for the End Favonius Bow Recurve Bow Artifacts: 4 Noblesse Oblige 2 Tenacity of Millelith/2 Maiden’s Beloved 4 Ocean Hued Clam ER or HP/HP/HB | Role(s): Shielder/Healer Diona provides a great amount of survivability to Raiden through her shielding and healing, and combined with her stamina reduction, she can make Raiden very comfortable to play. That said, she lacks any sort of synergy with Raiden, her healing ticks are slow, and her utility through shielding is greatly diminished by Raiden’s infinite poise during Burst. As such, other options can often outperform her. |
Anemo
| Unit | Build | Notes |
|---|---|---|
Kazuha Grade: S | Weapons: Freedom-Sworn Iron Sting Favonius Sword Artifacts: 4 Viridescent Venerer EM/EM/EM | Role(s): Buffer/Damage Kazuha is the premier anemo buffer for Raiden teams, and it is easy to see why- his DMG% buff boosts Raiden and other damage dealers, he contributes significant personal damage himself, especially when enabled to trigger Electro-Charges and Overloads, and his grouping is valuable to Raiden in AoE. |
Venti Grade: B | Role(s): Damage Venti’s unparalleled grouping allows him to consistently trivialize floors where his suction works. Outside of this, he can struggle with his Burst missing, but his personal damage and Energy refund are still valuable enough to be worth consideration. | |
 Heizou Grade: B | Weapons: Solar Pearl The Widsith Thrilling Tales of Dragon Slayers Prototype Amber Hakushin Ring Note: Only use TTDS if Heizou can reliably pass it to Raiden without complicating rotations. Artifacts: 4 Viridescent Venerer Attack/Anemo/Crit | Role(s): Damage Heizou has some versatility aside from his access to VV shred that allow him to function as a decent budget Anemo option on Raiden teams. Where applicable, he can use TTDS, Prototype Amber or Hakushin Ring to provide additional team utility – alternatively, with proper investment, his personal damage with his fully stacked Elemental Skill can be significant. Furthermore, he has access to decent grouping at C2. That said, his low Burst cost limits the amount of resolve stacks Raiden can gain, and his utility options and damage are still usually worse than what Kazuha or Jean can provide in his place. |
Sucrose Grade: B | Weapons: Thrilling Tales of Dragon Slayers Hakushin Ring Sacrificial Fragments Magic Guide Prototype Amber Note: Sucrose can use TTDS when she will be switching to an off-field DPS or to Raiden, but should choose other weapons in teams where Sara or another TTDS holder are already there for Raiden and no other damage dealers are present. Artifacts: 4 Viridescent Venerer ER% or EM/EM/EM | Role(s): Buffer While often considered a budget option on Raiden teams, Sucrose can apply VV, provide buffs via TTDS or Hakushin Ring, and offer good grouping as Raiden enables her to be able to Burst every rotation, albeit needing to build ER. Unfortunately, in most teams she cannot pass TTDS to Raiden without creating rotation conflicts, and her EM buff is of minimal value. Her C6 can be significant for Raiden, but it is difficult to consistently absorb her Burst with the right element. |
Jean Grade: A (pre-C2) / S (C2+) | Role(s): Healer/Damage Jean has significant utility for Raiden – alone, she has reasonable personal damage, healing, and VV all in one slot, compressing the roles a Raiden team needs. Further, her C2 buff can be valuable to execute better combos on Raiden. Her damage contribution sees a dramatic increase when paired with Bennett – their self-elemental application allows for consistent Pyro swirls, giving Jean high personal damage and the ability to control chain reactions. In such a case, she shifts towards preferring to build EM. | |
Sayu Grade: B | Weapons: Wolf’s Gravestone Favonius Greatsword Katsuragikiri Nagamasa Rainslasher Artifacts: 4 Viridescent Venerer ER or EM/EM/Healing Bonus or EM | Role(s): Healer Similar to Jean, she can compress multiple rolls on a team – being able to perform healing and VV in one slot, while having her own damage. However, she lacks Sunfire or the value Jean’s constellations have for Raiden. |
Geo
| Unit | Build | Notes |
|---|---|---|
 GMC Grade: B | Role(s): Buffer/Damage GMC’s Skill and Burst deliver high impact hits with low field time and ER requirements, and their C1 offers a respectable team buff. Their field can work to prevent enemy knockback, allowing Raiden to take full advantage of her AoE capacity, though they do require players to be aware of construct placement to avoid the field turning into another obstacle for the player. | |
Albedo Grade: B | Role(s): Damage Albedo’s role in Raiden teams is straightforward—he is a free source of additional off-field damage, and a conditionally powerful Burst. However, he lacks much particular synergy with Raiden, and his Burst has a low cost of 40 thus limiting the Resolve stacks she gains. | |
Zhongli Grade: C | Weapons: Favonius Lance Black Tassel Artifacts: 4 Archaic Petra 4 Tenacity of the Millelith 4 Noblesse Oblige HP/HP/HP or CR with Favonius Lance | Role(s): Buffer/Shielder Zhongli provides the strongest shield in the game, as well as universal Res shred, but Raiden gains little from the quality of life shielding can otherwise provide thanks to her complete interruption resistance, and has access to easy VV setups that offer greater Res shred. Zhongli’s Burst animation is long, for limited damage as a return on investment, and his Burst cost is low. He can provide survivability for Raiden, but not much else. |
Dendro
Dendro units are primarily used in order to enable various Catalyze and/or Hyperbloom reactions that add a considerable boost to Raiden’s damage. While the current roster does not have characters that can match Raiden’s best buffers or off-field DPS units, the power boost they provide is nonetheless appreciable and can be considered for team building flexibility. However, they tend to come with additional drawbacks – other elements such as Pyro can trigger reactions that remove Catalyze, reducing these units’ value, and the other Dendro reactions outside those mentioned are generally not optimal for Raiden to make use of.
It is worth noting that though the reactions triggered here allow Raiden to benefit from EM, whether this warrants a change in her gearing is undergoing further testing. It is recommended that for now players build Raiden as they normally would, as her performance on such a build is known and remains strong. This said, Raiden can also be used in a mostly off-field role in Hyperbloom teams, using her Elemental Skill to trigger reactions – if played in such a capacity, a full EM build is warranted.
| Unit | Build | Notes |
|---|---|---|
Nahida Grade: A (S with C2) | Weapons: A Thousand Floating Dreams The Widsith Sacrificial Fragments Magic Guide Artifacts: 4 Deepwood Memories 4 Gilded Dreams EM/EM or Dendro/EM or Crit | Role(s): Off-field DPS/Enabler/Buffer/On-Field Driver Nahida’s unique AoE mechanics, good personal damage, strong EM buff and high Dendro application all cement her as a very potent option on all styles of Raiden teams looking to use Dendro reactions, allowing them to be competitive with Raiden’s best teams. She is mostly used in an off-field capacity for an on-field Raiden; however, the archons can choose to switch roles in some Hyperbloom teams where Nahida can provide on-field Dendro application to produce Dendro cores for Raiden to react off of. In this role, Nahida is relatively uncontested due to her mix of strong on-field and off-field Dendro application. Nahida’s C2 causes her value to further skyrocket, and cements her as one of Raiden’s best teammates. It is worth noting that while she is very strong, Nahida further increases some of Raiden’s struggles with handling wave-based content. |
 Yaoyao Grade: A | Weapons: Favonius Lance Black Tassel Dragon’s Bane Kitain Cross Spear Moonpiercer Artifacts: 4 Tenacity of the Millelith 4 Deepwood Memories | Role(s): Healer/Enabler Yaoyao provides healing and off-field Dendro application for Raiden; this allows Raiden to play Dendro-based teams without having to worry about fitting in proper defensive utility. It is worth noting that in Hyperbloom teams it is worth pairing Yaoyao with an additional Dendro unit, as her poor solo application will result in a low rate of Dendro Core generation. |
 Alhaitham Grade: B | Weapons: Light of Foliar Incision Primordial Jade Cutter Iron Sting Toukabu Shigure Artifacts: 4 Gilded Dreams 4 Deepwood Memories Any combination of: 2 Deepwood Memories, 2 Gilded Dreams, 2 Flower of Paradise Lost, 2 Wanderer’s Troupe | Role(s): On-field DPS/Burst DPS/Enabler Raiden and Alhaitham will generally compete too much for field time if both are used on-field, requiring one of them to change their roles; Alhaitham can act as a Quickswap DPS for an Aggravate Carry Raiden, or Raiden can act as an off-field Hyperbloom trigger for an on-field Quickbloom Alhaitham. |
 Collei ColleiGrade: A | Weapons: Elegy for the End Favonius Warbow Artifacts: 4 Noblesse Oblige ER/Dendro/Crit | Role(s): Enabler/Buffer Collei and DMC perform very similarly – both offer steady off-field Dendro application to enable reactions, alongside providing minor buffs. They are mostly interchangeable, with minor nuance’s over one another. Collei’s advantages are her ability to hold Elegy for the End, if available, for a significant team buff, as well as being able to slot into shorter 18s rotations where applicable. |
 DMC Grade: A | Weapons: Freedom Sworn Favonius Sword Artifacts: 4 Noblesse Oblige ER/Dendro/Crit | Role(s): Enabler/Buffer As mentioned above, Collei and DMC are relatively interchangeable, with the differences between them being minor. DMC’s advantages are his higher Burst cost, which generates more resolve for Raiden, as well as having a longer lasting Dendro application. When using him, however, care should be taken to let his lamp absorb Hydro or Electro, as absorbing Pyro will pre-emptively disrupt his Dendro application. |
 Tighnari Grade: B | Weapons: Hunter’s Path Elegy for the End Slingshot Windblume Ode Artifacts: 4 Deepwood Memories EM or Attack/Dendro/Crit | Role(s):Damage/Enabler Tighnari can seem like an appealing option for Raiden teams – his personal damage with Spread reactions is significant, something that the other Dendro units cannot match. However, his low Burst cost does not generate much resolve for Raiden; furthermore, while his required field time is low it nonetheless conflicts with Raiden, causing rotations to become awkward. |
※ Example Teams
These are not an exhaustive list of Raiden’s teams by any means, or a ranking of her best teams. They were selected for their potential to illustrate team building strategies- the best teams for your account will depend on your account and your goals.
Sara provides an ATK buff and at C6 a powerful Electro Crit DMG buff for Raiden, plus some limited Burst damage capacity of her own. Kazuha provides VV and his A4 Electro DMG% buff to both Sara and Raiden, as well as dealing significant personal damage through Swirls and Overloads from his Pyro absorbed Burst. Bennett provides the strongest ATK buff in the game, healing, and a means for Kazuha to absorb Pyro into his Burst. Raiden batteries her team, buffs their Burst damage- though the DMG% means little to Kazuha and Bennett’s damage is negligible without any reactions or any other buffs, so this means the most to Sara, provides a source of Electro aura for Kazuha, and deals enough damage to build a team around.
Yae deals strong Burst and off field damage, as well as serving as a second source of Electro particles for Raiden and Sara. Sara provides her ATK and at C6 her Electro Crit DMG buff for Yae’s Burst and for Raiden, as well as her own Burst damage. Jean provides VV and healing. All three teammates have high Burst costs, with Yae tied with Raiden for the highest cost in the game, allowing Raiden to generate substantial Resolve stacks. Raiden batteries her team, especially valuable here as beyond just her flat energy refund her high particle generation means more to Electro teammates, buffs their Burst damage, and deals her own damage on field.
Xiangling Vaporizes her Skill and Burst damage from off field, as well as triggering Overloads, allowing this to become the only team built around Raiden on field where a unit other than Raiden makes up the highest share of team damage. (Note that Raiden will end up overtaking Xiangling’s damage again with C2-3.) Xingqiu enables Xiangling to Vape through his Hydro application, as well as dealing significant personal damage. Bennett buffs both Xiangling and Raiden, heals, and provides an additional source of Pyro particles for Xiangling. Raiden batteries her team, buffs their Burst damage, provides a source of Electro aura for Xiangling, and deals her own damage on field.
Sucrose provides VV, and is able to carry TTDS for Raiden. Her Burst absorption can be inconsistent, but if she absorbs Pyro she can trigger Overloads for a respectable personal damage contribution, and if she absorbs Electro then she has the opportunity to provide an Electro DMG% buff to Raiden if she is C6. Fischl deals Skill damage from off field and generates additional Electro particles for Raiden. Bennett buffs Fischl and Raiden and serves as a healer. Raiden batteries her team and deals her own damage on field.
Lisa provides her A4 Def shred and is able to carry TTDS for Raiden. She can deal some damage with her Burst as well, but it will be very limited using TTDS and without significant buffs. Venti provides VV, his A4 energy refund likely for Kokomi, the best grouping in the game, and deals significant personal damage through Swirls and Electrocharge chain reactions. Kokomi enables Venti to trigger Electrocharge with her Hydro application, provides healing, and can choose to run either 4pc Ocean Hued Clam for additional off field damage or 4pc Tenacity of the Millelith to buff Raiden and Lisa. She can additionally run Hakushin Ring, though it will realistically have very limited uptime for Raiden, or TTDS to pass to Venti, though the ATK% will be less impactful for the full EM builds preferred in teams where he can sometimes trigger Electrocharge reactions. Raiden batteries her team, buffs their Burst damage, together with Lisa provides a source of Electro aura for Venti, and deals her own damage on field.
An off-field Raiden team using on-field Kokomi alongside Nahida and DMC to trigger Hyperbloom. Kokomi consolidates good Hydro application, damage and healing, the last of which is especially necessary in these styles of teams due to the high Dedro Core production. Nahida and DMC together provide significant off-field Dendro application, enough to achieve good Dendro Core production even in Single Target situations; Nahida also contributes a decent amount of personal damage in her own right to the team. It is worth noting that while Electro transfiguration on DMC’s Burst is optimal for Dendro Core production in Single Target, Hydro transfiguration can be useful in AoE situations and the choice between the two is not overly significant.
※ Raiden with other on-field DPS units or drivers
Though Raiden’s field time requirements and strong personal damage lead her to function best as an on-field DPS, her utility as a battery and buffer can still allow her to slot into teams with other on-field DPS units with varying success.
Additionally, while Beidou can deal her damage from off-field, Raiden’s inability to proc Beidou’s Burst during her Burst leads teams with the two of them paired to function more similarly to this set up, with a driver who can proc Beidou’s Burst taking up field time alternating with Raiden.
These teams are not typically Raiden’s highest damage potential, but they can still potentially serve the characters she is paired with well. However, the opportunity cost of not being able to use Raiden for her own team should not be neglected.
Eula benefits significantly from Raiden, who provides significant amounts of buffs and utility for her; Raiden’s Burst Damage Bonus buffs the largest portion of Eula’s damage, her Energy generation significantly lowers Eula’s ER requirements, and her Electro application enables consistent Superconduct, all while Raiden contributes significant personal damage to fill Eula’s downtime.
However, the reverse cannot necessarily be said—most Eula teams lack the capability to buff Raiden in any significant manner. Moreover, it should be noted Raiden’s inclusion does not mean Eula can run without a Cryo battery. While the pairing is quite powerful and can outperform using Fischl in the same slot and allow far more diverse compositions, Eula/Raiden teams are more mechanically intensive, as well as possessing a higher risk of extending rotations more than necessary.
Beidou has a devastatingly powerful Elemental Burst in AoE, only held back by its high Energy Cost of 80. As such, at first glance, it would seem as if Raiden would be a perfect pairing with her—providing significant Energy for Beidou while powering up Beidou’s damage through her Burst Damage Bonus, while Raiden benefits from gaining resolve stacks and being able to make use of most of the effects Beidou would be able to snapshot onto her Burst. Unfortunately, this potential synergy is held back by Raiden being unable to trigger Beidou’s Burst’s Stormbreaker procs while in her Musou Isshin state. Therefore, to be able to run the two together, their respective Burst uptime cannot intersect, thus extending rotations – while this can potentially be worthwhile, it is nonetheless a significant drawback to the strength of the pairing.
Xiao’s personal synergy with Raiden is rather limited, as Xiao’s damage in Burst does not count as Burst Damage, and as such, Raiden’s Burst Damage Bonus from her Elemental Skill does not increase his damage, leaving Raiden as for the most part simply a battery to Xiao.
Nonetheless, her significant personal damage means that Xiao/Raiden teams can perform comparably to using other batteries, while requiring far less skill as the need for funneling is removed. It is worth noting that Raiden’s Energy restoration being team wide allows Xiao to utilize a wider roster of supports. Additionally, Raiden teams remain more Energy sustainable in content requiring many rotations, as her battery capability does not vary rotation to rotation like C1 Sucrose’s does. Therefore, while Xiao/Raiden teams require more investment into multiple units, the flexibility introduced into team building and sustain capabilities make the team worth considering if Raiden is available.
That said, she does not provide any significant benefits that necessitates her use with Xiao, and it may be more worthwhile to use them in their own separate teams.
Raiden is usually a suboptimal choice for Childe teams. Running her on Reverse Vape teams as a flex slot prevents units who can offer more significant buffs or other values such as shielding or grouping from being run, and extends rotations. In Electro-Charged teams, she can more easily interfere with Childe’s ability to Forward Vape his Burst, and is still outclassed by other units who can offer more buffing or more consistent damage without extending rotations.
However, what this does not account for is the high ease of play Raiden brings to Tartaglia teams, as her batterying helps ease the complicated rotation management Tartaglia otherwise requires to play smoothly. While she is a definitive damage loss on paper, she is still usable and can be possibly better for those who struggle to play Tartaglia’s teams properly, and she can potentially free a valued flex to be used for a second team that requires them more.
“I declare you my chamberlain. In other words, according to my judgment, you are useful to the Shogunate and loyal to me.”
※ Rotations ※
Rotations in game will very rarely mirror their theory perfectly. Different fights may require different strategies, and Energy conditions may require additional batterying or allow you to skip it entirely.
Consider the skills you need to use and the buffs you need to set up. Your goal in a typical rotation is to use all characters’ Bursts before Raiden’s Burst, use Skills as relevant for Energy, buffing, damage, and survivability, buff and enable all damage dealers as much as possible with priority to Raiden in most teams, while still keeping your rotation as short as possible.
※ Rule of Durations
Abilities should typically be used with those of longest duration first and those of shorter durations later so as to maximize their uptime for the rest of the rotation. This is more important for units who depend on limited uptime buffs that will be concentrated around Raiden’s peak DPS, such as Fischl benefiting from Kazuha and Bennett, and for units where Energy is dependent upon guaranteeing as many hits of possibility of their ability occur if the rotation happens to be cut short, such as C6 Xingqiu.
※ Minimizing Swaps
Sequencing of abilities should be organized so as to minimize unnecessary swaps whenever possible, as the swap itself can take some frames and as swap cooldowns will require a character to stay on-field for at least one second even if any ability animations can be shorter than that.
※ Setting Up Buffs
Raiden’s Skill should be used at the beginning of any fight so as to increase uptime for Energy generation, buffing, and damage. For teams where her Skill is not relevant to setting up Electro aura for VV, it can simply be refreshed at the end of her uptime. For teams where her Skill is used to set up VV, rotations should either loop directly from the end of Raiden’s uptime allowing her to refresh her Skill then, or her Skill should be refreshed at the beginning of every rotation after any downtime batterying finishes.
Abilities that snapshot will reference character stats on cast to determine damage for the duration of the ability. Some stats cannot be snapshot, such as Burst DMG%, Electro CRIT DMG, EM for transformative reactions, and anything dependent on enemy status such as Mona’s Omen.
Characters that can snapshot should cast their abilities after buffs accessible to them have been set up whenever possible.
Abilities that are dynamic will reference current character stats throughout the duration of the ability to determine damage. If they swap off-field, they cannot benefit from bonuses that are for on-field units only.
Characters that cannot snapshot should cast off-field long duration abilities before any buffs so as not to waste buffs on cast time, though it may be worthwhile to cast on-field short duration abilities after buffs have been set up if the value of those buffs to their damage can outweigh the loss of buff uptime for Raiden.
One of Raiden’s defining characteristics as a DPS is her ability to condense her damage into a shorter, easier to buff time frame. Success with Raiden will depend on your ability to take advantage of this trait.
VV should ideally be used within a few seconds of Raiden’s Burst. It lasts for 10s from trigger and benefits from hitlag extension, so most reasonable setups can provide Raiden full or close to full uptime. Kazuha should be used before any short duration on-field or snapshotting abilities he is buffing.
Sara/Mona/TTDS should be used directly before Raiden’s Burst. Any additional swaps will be a damage loss.
Bennett should be used before any short duration on-field or snapshotting abilities that contribute significantly to team damage, but still as close to Raiden’s Burst as possible. Additionally, it may be necessary to use Bennett’s Burst before an Anemo unit in order to enable them to absorb Pyro into their abilities, or in Jean’s case in order to not lose potential Pyro self-Swirls, so that they can serve as Overload trigger against Raiden’s Electro application.
All character’s Bursts should be used before Raiden’s Burst in order to generate Resolve stacks. In some instances some other complication may lead it to be better to use a character’s Burst after Raiden, which can still build Resolve for future rotations, or every other rotation, but this should be avoided as a general rule.
※ Triggering Off-Field Abilities
Abilities that trigger on any damage such as Raiden’s Skill can typically be ignored and expected to trigger as a natural consequence of moving through the rotation, but some units have more specific requirements to be fulfilled. In particular, Raiden can be paired with units that trigger on Normal Attack movement (see Talents section > Musou Shinsetsu > Mechanics for details), which does not require Normal Attacks to hit enemies but does require them to at least be initiated.
In order to maximize these units’ damage, care should be taken to continuously weave in Normal Attacks through swaps and casts. These Normal Attacks can be canceled as soon as they are initiated by swapping or casting another ability in order to avoid extending rotations.
※ Auras
Anemo units can always Swirl for VV directly following Raiden’s Skill, but this may prevent them from Swirling other elements for VV shred or consistently absorbing the right element into their abilities, or it may be too far from Raiden’s Burst and result in losing VV uptime for Raiden.
Hydro, Geo, or another Anemo if two are being used will rarely interfere with Electro aura. They can be used before Swirling for VV.
Pyro will trigger Overload which can potentially remove Electro aura. However, one Pyro ability used immediately after Raiden’s Skill cast as long as her Skill initial damage hit enemies can still allow for VV setups to work, as it will trigger a coordinated attack to reapply Electro. Multiple Pyro abilities should not be used before VV unless you can otherwise guarantee Electro will be reapplied. While Raiden’s synergy with most Cryo characters is limited, the same is true of setups with Cryo and Superconduct.
Other Electro characters’ abilities can be used to reapply Electro to set up VV. However, care should be taken that this does not prevent those characters from benefiting from VV RES Shred or buffs associated with VV supports such as Kazuha’s A4.
Xiangling’s Pyro application will generally risk overtaking Raiden’s Electro in the absence of any other sources of Electro or Hydro, particularly with any additional Pyro added in. Due to her high synergy with Bennett, this typically leaves no space for an Anemo unit to VV.
Anemo units which absorb Elements into their Bursts (Venti, Sucrose, Kazuha) can act as additional Electro appliers, but this leaves Venti with no way to consistently VV Pyro, and Sucrose struggles to consistently absorb the intended element into her Burst due to its strange aura check AoEs and timings.
Using Kazuha with Raiden and Xiangling and intentionally absorbing Electro into his Burst and then using his Skill within Bennett’s Burst to absorb Pyro can allow for a reliable double VV Pyro and Electro setup.
Players must also desync Raiden’s coordinated attack Electro application from when Kazuha needs to apply Pyro with his plunge to Swirl it, or risk losing Pyro VV in AoE. This can be done using the rotation:
Raiden E > Kazuha Q > Bennett E Q > Kazuha N2 E > Xiangling Q E > Raiden Q (NA/CA)
Rotation Demonstration
Credits to Vye#9195
C6 Bennett will allow for an extra instance of Pyro with Kazuha’s N1, which makes the setup more foolproof, but this should still work even without C6 Bennett by changing the way Raiden’s Skill attacks line up with the rest of the rotation.
Extra Bennett Skills after Raiden will risk creating a Pyro aura and should be avoided, meaning Xiangling must run higher ER here. Favonius Sword on Kazuha will meet his ER requirement and allow him to funnel his Skill Particles to Xiangling, significantly easing her requirements as well.
This setup is not recommended over other options such as Xingqiu, Sara, Yae, or Fischl with Xiangling except for skilled players committed to double VV and in instances where Kazuha is not needed for a second team.
Electro-Charged can maintain both Hydro and Electro aura, allowing reverse Vaporize reactions to occur without significant interference from Raiden’s Electro application. However, forward Vape setups can struggle with establishing and maintaining Pyro aura, even just for one hit.
Just as ensuring Raiden’s Skill initial damage hits enemies and limiting Pyro abilities to one use before VV can help maintain Electro aura, intentionally missing enemies with Raiden’s Skill initial and using multiple Pyro abilities can help with setting up Pyro aura.
It is almost impossible to guarantee Electro-Charged ownership to any particular unit. However, likelihood of ownership for Anemo units can be increased by using more single target enablers such as Xingqiu so that Swirl can be responsible for the majority of application in AoE, and potentially by intentionally absorbing Hydro into Anemo abilities.
Raiden has relatively high Electro application during her uptime, which can be further supplemented by units such as Yae or Fischl adding additional Electro or supported by Hydro enablers such as Xingqiu preventing Pyro from becoming aura in order to ensure that Xiangling or Anemo units can be Overload triggers.
Ensuring Raiden’s Skill initial and Burst initial damage are able to apply Electro to enemies is important, as they are her only sources of strong Electro Gauge application.
In order for most Anemo units to trigger overload, they must intentionally absorb Pyro into their abilities, or in Jean’s case cast her Burst on top of Bennett’s Burst, typically leveraging Bennett’s self Pyro application as a source of Pyro aura.
※ Batterying and Funneling
Some units may benefit from additional Skill uses on their or a teammate’s part (batterying) or from being swapped to directly following a teammate’s Skill to catch Particles on-field (funneling) in order to fulfill their Energy needs beyond what Raiden alone can do.
Most damage dealers with higher Energy requirements lack a way to fit in these extra Skills or a partner who can easily put out Particles for them on demand. One exception is Xiangling, who can benefit from Bennett as a battery. As rotations allow, Bennett should cast his Burst, then Skill, then swap to Xiangling to cast her Burst so that she can catch his Particles immediately after her Energy is drained. An additional Bennett Skill can be fit in after Raiden’s uptime in most teams, which can also be funneled to Xiangling.
It is generally not worth it to extend rotations beyond what is required by character cooldowns in order to fit in more batterying. If you find yourself doing this frequently, you may need to run higher ER on Raiden’s teammates.
※ Example Teams ※
These are not an exhaustive list of Raiden’s teams by any means, or a ranking of her best teams. They were selected for their potential to illustrate team building strategies—the best teams for your account will depend on your account and your goals.
Rotation Notations
| NA | Normal Attack |
| CA | Charged Attack |
| PA / P | Plunging Attack / Plunge |
| (t/h) E | (tap/hold) Elemental Skill |
| Q | Elemental Burst |
Example Team #1
Raiden | Sara | Kazuha | Bennett

Team Description
Sara provides an ATK buff and at C6 a powerful Electro CRIT DMG buff for Raiden, plus some limited Burst damage capacity of her own. Kazuha provides VV and his A4 Electro DMG% buff to both Sara and Raiden, as well as dealing significant personal damage through Swirls and Overloads from his Pyro absorbed Burst. Bennett provides the strongest ATK buff in the game, healing, and a means for Kazuha to absorb Pyro into his Burst. Raiden batteries her team, buffs their Burst damage- though the DMG% means little to Kazuha and Bennett’s damage is negligible without any Reactions or any other buffs, so this means the most to Sara, provides a source of Electro aura for Kazuha, and deals enough damage to build a team around.
Team Rotation
Rotation#1: Raiden E > Bennett Q > Kazuha Q > Sara Q > Raiden Q NA/CA > Bennett E > Kazuha hEP
Rotation#2: Raiden E > Kazuha hEP > Sara E CA > Bennett Q > Kazuha Q > Sara Q > Raiden Q NA/CA > Bennett E
Use Raiden’s Skill to set up Electro aura. Use Bennett Burst only, not Skill, in order to ensure a coordinated attack will be able to reestablish Electro aura. Use Kazuha Burst, swirling the Electro on enemies and absorbing Pyro off of Kazuha thanks to Bennett’s Pyro self application. Save Kazuha’s Skill for later to maximize Bennett uptime for Raiden. While it is generally best to stick to this rotation, Kazuha’s skill can be used earlier in the rotation alongside his Burst in situations where grouping is needed – however, it is important to not use Skills between Raiden and Kazuha, or the Electro aura can be disrupted. After Kazuha, use Sara’s Burst, then swap directly into Raiden and Burst. After Raiden’s uptime, use Bennett and Kazuha’s Skills in order to generate Energy for them.
This rotation will leave enough filler time for a couple dodges, but a skilled player can choose to use an alternate rotation that allows Sara to buff herself before Bennett uses his Burst, and ensures better Energy economy and a more guaranteed Elegy proc. Whether or not this is a damage gain depends on how long it ends up extending your rotation by.
Example Team #2
Raiden | Yae | Sara | Jean

Team Description
Yae deals strong Burst and off-field damage, as well as serving as a second source of Electro Particles for Raiden and Sara. Sara provides her ATK and at C6 her Electro Crit DMG buff for Yae’s Burst and for Raiden, as well as her own Burst damage. Jean provides VV and healing. All three teammates have high Burst costs, with Yae tied with Raiden for the highest cost in the game, allowing Raiden to generate substantial Resolve stacks. Raiden batteries her team, especially valuable here as beyond just her Flat Energy refund her high Particle generation means more to Electro teammates, buffs their Burst damage, and deals her own damage on-field.
Team Rotation
Raiden E > Yae EEE > Jean Q > Sara E > Yae Q EEE > Jean E > Sara Q > Raiden Q NA/CA
Set up Raiden’s Skill and Yae’s totems. Use Jean’s Burst to set up VV. Use Sara’s E (plus CA if not C2 or if you need the Particles), then swap into Yae and Burst. Recast totems and refresh VV with a Jean Skill. Use Sara’s Burst, then swap directly into Raiden and Burst.
Example Team #3
Raiden | Xiangling | Xingqiu | Bennett

Team Description
Xiangling Vaporizes her Skill and Burst damage from off-field, as well as triggering Overloads, allowing this to become the only team built around Raiden on-field where a unit other than Raiden makes up the highest share of team damage. (Note that Raiden will end up overtaking Xiangling’s damage again with C2-3.) Xingqiu enables Xiangling to Vape through his Hydro application, as well as dealing significant personal damage. Bennett buffs both Xiangling and Raiden, heals, and provides an additional source of Pyro Particles for Xiangling. Raiden batteries her team, buffs their Burst damage, provides a source of Electro aura for Xiangling, and deals her own damage on-field.
Team Rotation
(Raiden E) > Xingqiu E Q > Bennett Q E > Xiangling Q E > Raiden Q NA/CA E > Bennett E > Xiangling
Set up Raiden’s Skill first rotation; after this it can be refreshed after her uptime. Use Xingqiu’s Skill and Burst as he has the longest duration and is unable to snapshot buffs. Use Bennett’s Burst then Skill, then Xiangling’s Burst then Skill in order to funnel energy to Xiangling. Use Raiden’s Burst. After Raiden’s uptime, use Bennett’s Skill and funnel the energy to Xiangling. Weave NAs throughout, with the exception of Bennett Skill and Xiangling Burst which should occur in tight sequence, in order to trigger Rainswords.
Example Team #4
Raiden | Sucrose | Fischl | Bennett

Team Description
Sucrose provides VV, and is able to carry TTDS for Raiden. Her Burst absorption can be inconsistent, but if she absorbs Pyro she can trigger Overloads for a respectable personal damage contribution, and if she absorbs Electro then she has the opportunity to provide an Electro DMG% buff to Raiden if she is C6. Fischl deals Skill damage from off-field and generates additional Electro Particles for Raiden. Bennett buffs Fischl and Raiden and serves as a healer. Raiden batteries her team and deals her own damage on-field.
Team Rotation
(Raiden E) > Bennett E Q > Fischl Q > Sucrose E Q > Raiden Q NA/CA E > Fischl E/Sucrose E every other rotation
Set up Raiden’s Skill first rotation; after this it can be refreshed after her uptime. Use Bennett’s Skill and Burst as Fischl will be able to reestablish Electro aura. Use Fischl’s Burst to summon Oz. Use Sucrose’s Skill and Burst, then swap directly into Raiden for TTDS and Burst. Fischl’s Skill has a 25s CD, and Sucrose’s Skill has a 15s CD but gains an extra charge with C1. As such, they cannot consistently be used every rotation, but it is fine to alternate them every other rotation after Raiden’s uptime for extra Energy and damage. If Fischl is C6, weave NAs throughout in order to trigger C6 procs.
Example Team #5
Raiden | Lisa | Venti | Kokomi

Team Description
Lisa provides her A4 Def shred, and is able to carry TTDS for Raiden. She can deal some damage with her Burst as well, but it will be very limited using TTDS and without significant buffs. Venti provides VV, his A4 Energy refund likely for Kokomi, the best grouping in the game, and deals significant personal damage through Swirls and Electro-Charged chain reactions. Kokomi enables Venti to trigger Electro-Charged with her Hydro application, provides healing, and can choose to run either 4pc Ocean Hued Clam for additional off-field damage or 4pc Tenacity of the Millelith to buff Raiden and Lisa. She can additionally run Hakushin Ring, though it will realistically have very limited uptime for Raiden, or TTDS to pass to Venti, though the ATK% will be less impactful for the full EM builds preferred in teams where he can sometimes trigger Electro-Charged Reactions. Raiden batteries her team, buffs their Burst damage, together with Lisa provides a source of Electro aura for Venti, and deals her own damage on-field.
Team Rotation
(Raiden E) > Kokomi E Q > Venti E Q > Lisa Q > Raiden Q NA/CA > Venti E
Set up Raiden’s Skill first rotation; after this it can be refreshed after her uptime. Set up Kokomi’s Jellyfish in order to enable Venti to absorb Hydro into his Burst, and then Burst on Kokomi for Resolve. Use Venti’s Skill for Energy , damage, and VV, and Burst for Energy from his A4, grouping, and damage. Use Lisa’s Burst, then swap directly into Raiden for TTDS and Burst. After Raiden’s uptime, you can use Venti’s Skill for Energy and damage and move his Skill to after his Burst on subsequent rotations if CD becomes an issue, or it can be skipped for extra time if dodging or repositioning is needed.
Example Team #6
Raiden | Kokomi | Nahida | DMC

Team Description
An off-field Raiden team using on-field Kokomi alongside Nahida and DMC to trigger Hyperbloom. Kokomi consolidates good Hydro application, damage and healing, the last of which is especially necessary in these styles of teams due to the high Dedro Core production. Nahida and DMC together provide significant off-field Dendro application, enough to achieve good Dendro Core production even in Single Target situations; Nahida also contributes a decent amount of personal damage in her own right to the team. It is worth noting that while Electro transfiguration on DMC’s Burst is optimal for Dendro Core production in Single Target, Hydro transfiguration can be useful in AoE situations and the choice between the two is not overly significant.
“The final stage of my journey, or Kaiden, is the study of the most profound techniques. Unavoidably, these draw heavily on elemental power, rendering them beyond the capabilities of most mortals. Most practitioners of other traditions are unable to ever reach this level.”
※ Conclusion & Credits ※
This guide has evolved significantly as our community has continued to work on optimizing Raiden and her teams, but some portions of it have still been adapted or pulled directly from prior versions of the guide.
For their work on prior versions of Raiden’s guide, including that which is still helping people now and that which has helped many players in the past, thank you to:
Greyhound#7836
ZΛNTO#4984
For their commitment to pushing the boundaries of Raiden’s on-field damage by taking on the challenge of evaluating her attack strings, thank you to:
Greyhound#7836
Vye#9195
BowTae#0141
quaxni
For their work on teambuilding and full team damage calculations and sims, thank you to:
Veggie#0581 (for various teams in gcsim)
Terrapin#8603 (for Transformative Reaction based teams with Kazuha)
Vladone ツ#9281 (for Mommy Team in Guide, aka pure Electro teams)
Greyhound#7836 (for Raiden on-field teams)
TWICE#9958 (for Eula teams)
Risuke#6743 (for Childe teams)
Felician#5771 and Coded#2644 (for Xiaoden teams)
For his work on weapon, artifact, and constellation calculations, thank you to:
Charisma#5567
For his help filling out the character synergy analysis portions of this guide and valuable editing to improve communication and clarity, thank you to:
Cuzimori#1535
