By ZΛNTO#4984 | Updated for 3.1
Table of Contents
Infographic

Credits to: kolvii, snowwwwww., and KQM Staff
Glossary
Expand
| Term | Explanation |
|---|---|
| 2ATK | 2-piece sets that provide 18% ATK (i.e. Echoes of an Offering, Gladiator’s Finale, Shimenawa’s Reminiscence and Vermillion Hereafter) |
| 4NO | 4-piece Noblesse Oblige |
| 4TF | 4-piece Thundering Fury |
| 4ToM | 4-piece Tenacity of the Millelith |
| 4VV | 4-piece Viridescent Venerer |
| C# | Constellation Level # |
| CA | Charged Attack |
| Driver | An on-field character who uses Normal and/or Charged Attacks to proc the Bursts or passives of characters like Beidou, Fischl, Xingqiu and Yelan |
| ICD | Internal Cooldown. Detailed information on the ICD of Elemental applications can be found in KQM’s Theorycrafting Library entry. ICD may also refer to the cooldown on triggering a certain ability or passive (e.g. Beidou’s Burst discharges) |
| N# | Number of Normal Attacks performed |
| NA | Normal Attack |
| Proc | Effects triggered by a fulfilled condition (e.g. proccing Beidou’s Burst means triggering a Stormbreaker lightning discharge) |
| TTDS | Thrilling Tales of Dragon Slayers |
Preface

Original art by flowersblood
Ahoy! Welcome aboard to the official Beidou guide brought to you by ZΛNTO#4984 of BeidouMains! Feel free to ask me on Discord about anything related to the guide or Beidou.
This guide will cover everything you need to know about Genshin’s one and only pirate queen, from basic mechanics to builds to team comps, and everything in between! The ultimate purpose of this guide is to do our Beidou justice, because she deserves it.
Before we go further into the guide, I would just like to express my thanks.
Thanks to all the dedicated pirates over at BeidouMains, you’ve all made the server a great place to be.
To all the contributors of visual aid for this guide, and to all my fellow theorycrafters and guide writers over at KeqingMains and across the Genshin community, thanks for all that you do.
Why should you play Beidou?
Pros:
- Very reliable pseudo-AoE damage due to her massive counter hitbox and “hitscan” Burst discharges (meaning her discharges are not projectiles and simply inflict the damage to an enemy in range)
- Interesting and dynamic playstyle with her counter. Mastering her counter gives a sense of pride and accomplishment
- She does a lot of damage in the scenarios she is best suited for
- Great survivability, both for herself and whoever has her Stormbreaker
- Her Burst doesn’t trigger Dendro Cores (can guarantee a dedicated trigger for Hyperbloom like Kuki, Raiden, Sucrose), making her one of the best units to slot into a Hyperbloom team for damage without stealing Hyperblooms
- Needs only C2 to reach most of her potential
- The rest of her cons just offer more damage, C4 helps with niche playstyles
- Many competitive artifact sets, all within a few percentage points of one another
- Synergizes very well with other off-field units
Cons:
- She is fundamentally a situational character: strong in some content, but underwhelming in others
- Beidou’s performance drops sharply in single-target scenarios, making her rely on other team members to mitigate this weakness
- Is practically a different character without C2
- Full counter efficacy relies on both player skill and enemy AI, making it unreliable to consistently pull off
- Has some strict teambuilding requirements to justify her slot, as she needs a dedicated battery to help fund her 80 Energy Burst or requires you to make heavy compromises to her damage by building high ER
- Needs good investment into her personal gear and artifacts to function; she has no real budget “support” builds
There is one team (Anemo Hyperbloom) addressed later which uses Beidou as a support/enabler, but that’s the only team
Original image by koko
Chapter 1: Character Breakdown
“Before you step foot on The Alcor, you need to answer one question. When the sea is full of perils — why is it that you still wish to come aboard my ship?”
Beidou is a character that is not explained very well in the game. She is deceptively complex, and her effectiveness cannot be fully understood until you explore some of the “hidden” mechanics regarding her skills.
There are a plethora of myths about Beidou spread across the Genshin Community, simply due to a misunderstanding of her kit.
I’m just going to go ahead and list out a few:
- “Beidou needs too much ER.”
- Beidou does have an 80 cost Burst, but unlike other units with similar costs, Beidou’s own particle generation ranges from decent to amazing. However, this scales with how many full counters you can perform.
- Beidou is not designed to be used without another Electro unit to reach max damage, just like how Xiangling without Bennett falls far short of her max potential.
- When paired with another Electro, Beidou’s ER requirements can go as low as 120% depending on the unit, averaging out to around 140%.
- Comparatively, Xiangling often needs to run 170%+ ER even with Bennett, her only reliable battery.
- “Beidou’s damage is bad when there are a large number of enemies.”
- It is true that Beidou’s damage per target peaks at 2 enemies and drops at 1 enemy, but her total damage at C2 is still 5x her single-target damage at 2+ enemies.
- Her damage only stops scaling once you are in 5+ enemy encounters, but the only mobs that tend to come in such large quantities are weak and will get destroyed by Beidou’s hard hitting and wide-reaching counter.
- Beidou’s AoE is very consistent.
- Each Burst discharge has an individual bounce range (of around 3 Abyss tiles) making Beidou’s effective AoE radius extremely large.
Talents
 Normal Attack | Oceanborne
Talent Description
Normal Attack
Performs up to 5 consecutive strikes.
Charged Attack
Drains Stamina over time to perform continuous slashes.
At the end of the sequence, perform a more powerful slash.
Plunging Attack
Plunges from mid-air to strike the ground, damaging opponents along the path and dealing AoE DMG upon impact.
Overview
Beidou’s Normal Attack combo is the most unique out of all the Claymore users, as she performs a 5-hit combo rather than 4-hit. The first two hits and last hit all hit vertically, and her attack speed during some parts of her combo are extremely slow, leaving much to be desired as a DPS tool. Her frame data is also very misaligned with the Stormbreaker ICD. You cannot just do the full combo string if you want a good proc rate.
Cancels and Proccing Stormbreaker
As with any character, you can utilize certain movement options like walking, dashing, or jumping to “cancel” parts of Beidou’s animations and speed things up. Generally speaking, the only cancel worth using is her N1 walk cancel. If you time it so that her N1s are around 1 second apart, she can proc her Burst upwards of 11-12 times, which is a significant improvement over other combos. Combo shown below:
 Elemental Skill | Tidecaller
Talent Description
Press
Accumulating the power of lightning, Beidou swings her blade forward fiercely, dealing Electro DMG.
Hold
Lifts her weapon up as a shield. Max DMG absorbed scales off Beidou’s Max HP.
Attacks using the energy stored within the greatsword upon release or once this ability’s duration expires, dealing Electro DMG. DMG dealt scales with the number of times Beidou is attacked in the skill’s duration. The greatest DMG Bonus will be attained once this effect is triggered twice.
The shield possesses the following properties:
- Has 250% Electro DMG Absorption Efficiency.
- Applies the Electro element to Beidou upon activation.
“Back at ya!”
Overview
Beidou’s counter is the flashiest part of her kit, and is usually what draws players to her in the first place. Mastery of her counter should be your first priority, as timing it right increases not only damage output, but also Energy generation.
Damage Scaling
During the counter, Beidou gets a shield equal to a hefty chunk of her HP. The HP scaling on the shield only influences the shield strength and nothing more. It is a common misconception that the amount of damage absorbed increases the damage of the counter, but counter damage scales with the number of times hit, not damage taken. Taking 1 damage twice will yield a stronger counter than taking 10000 damage once. The damage of the counter scales like any other damage instance; however, the multiplier has 3 separate levels. By just tapping the Skill, it will deal the base damage (170% at Talent Level 6). If you hold the Skill and get hit once, it will deal the base damage plus the damage bonus % (total of 170% + 224%). If you get hit a second time or “perfect” counter, then it adds the bonus damage a second time (total of 170% + 224% + 224%).
In summary (Talent Level 6):
Full: 618% Half: 394% Base: 170%
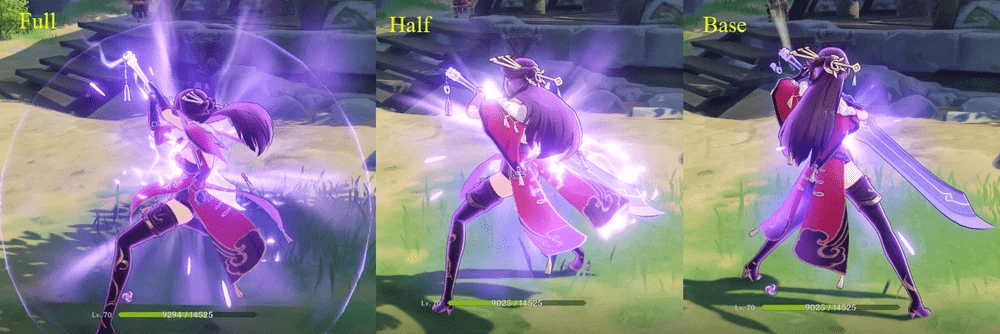
Visualization of the different levels, courtesy of the Genshin Wiki.
Interactions
While under the effects of her counter shield, damage blocked is still considered as “taking damage” for the sake of Beidou’s Talents and Constellations. However, for weapons like Serpent Spine, it is not considered “taking damage” unless the shield breaks from the attack and directly hits Beidou. The shield also cleanses her of Pyro and Cryo auras by applying 1U of Electro to herself, which can trigger Elemental Reactions in the process.
Attributes
Particle Generation
Gauge Value
2 + 1 per counter level, up to 4
2U
 Elemental Burst | Stormbreaker
Talent Description
Thunderbeast’s Targe
- When Normal and Charged Attacks hit, they create a lightning discharge that can jump between opponents, dealing Electro DMG.
- Increases the character’s resistance to interruption, and decreases DMG taken.
A maximum of 1 lightning discharge can be triggered per second.
“To ashes!”
Overview
Probably one of the most misunderstood skills in the entire game, due in no small part to its vaguely-worded description in game. However, this is an incredibly powerful Burst with huge multipliers that keeps you hooked on playing Beidou after being pulled in by her counter. Stormbreaker is what solidifies her position as a potent off-field DPS.
Lightning Discharges
The game says that her discharges can “jump between enemies,” but it doesn’t say how many times.
At C0: 2 jumps, 3 instances of damage including the first target
At C2: 4 jumps, 5 instances of damage including the first target
It’s a matter of semantics if you want to include the first target as a “jump,” but the main point is that she deals damage 3 times with 1 discharge (5 times at C2), as long as there are at least 2 enemies nearby. These jumps can also chain back to the previous target, meaning her discharges will always deal full damage as long as there are at least 2 enemies. These discharges do not target Dendro Cores produced by Bloom.
C2 bouncing 5 times per discharge between 2 targets. Original video by Drizet#8559.
Internal Cooldown
The ICD of her lightning discharges is said to be 1 second in-game, and this is mostly true. The timer of the ICD starts from the very first hit of the discharges, making it possible to chain back to back discharges once you factor in the bounces. However, due to Beidou’s slow Normal Attacks, she herself cannot proc a discharge per second normally.
On average, Beidou can look for about 9 procs in a single use of Stormbreaker. When used by a unit with attack strings that are more optimal for proccing the 1-second timer for Beidou’s Burst discharges, it is possible to go beyond that. However, because Stormbreaker discharges cannot be buffered, and only trigger on Normal Attack damage, it is noticeably more difficult to get 100% of the procs in comparison to Xingqiu’s Raincutter.
When it comes down to reaction ICD, it follows standard ICD rules (every 3 hits, 2.5 second reset timer). In other words, the tick rate of the discharge damage is faster than the tick rate of any reactions it procs. This means it is much better to gear Beidou towards increasing her raw damage instead of reaction damage. Also, since hit rate increases in AoE, Beidou’s single-target Electro application is very poor.
Damage Scaling
| 2 Targets | Total Damage (Talent Levels 6 – 13) |
|---|---|
| C0 single discharge | 402 – 612% |
| C2 single discharge | 670 – 1,020% |
| C0 12 discharges | 4,824 – 7,344% |
| C2 12 discharges | 8,040 – 12,240% |
| C0 10 discharges | 4,020 – 6,120% |
| C2 10 discharges | 6,700 – 10,200% |
Energy Cost
Such a strong Burst is balanced by one glaring weakness: Energy Cost. Beidou has a hard time funding her own Burst without building decent ER and performing full counters, which is not possible to consistently pull off due to the nature of enemy AI. As such, the main way to remedy her 80 cost is through the use of battery units.
THAT BEING SAID, community perception of Beidou’s Energy situation is greatly overblown, and a good Beidou team will rarely have Energy issues. She does have an 80 cost Burst, but her personal Energy generation is fairly good in comparison to other 80 cost DPS units if you can consistently counter.
Recommended ER
Recommended ER values are in a range to account for kill/damage orbs as well as Energy provided by other party members. These values also assume that Beidou collects her own counter particles. Around 4 procs of Electro Resonance particles are included. As getting full counters off consistently can be difficult depending on enemy AI, additional values are provided for ER ranges under the assumption that only tap counters are performed. You should try to swap Beidou back in so she gets at least two counters per rotation, if possible.
These values are approximate. To get more accurate values for your situation and team, use Zakharov’s Energy Recharge Calculator.
| Battery |
Recommended ER with 2–1 full counters |
Recommended ER with 2–1 tap counters |
|---|---|---|
| Solo Electro | 180–240%+ | 240%–290%+ |
| Raiden (no Burst) | 120–140% | 140–160% |
| C4 Electro MC | 100–120% | 120–140% |
| C6 Fischl | 120–140% | 140–160% |
| C0 Fischl | 130–150% | 150–170% |
| Yae Miko | 135–160% | 160–180% |
| Keqing | 140–180% | 180–210% |
| 4TF Keqing | 120–140% | 140–160% |
| Razor | 130–150% | 150–170% |
| Sara | 140–180% | 180–210% |
| C4 Kuki Shinobu | 140–160% | 160–190% |
Showcase
C6, high investment, T12 Stormbreaker with Serpent Spine.15k per bounce.
Clip by Kikouma #1098
Snapshotting
Stormbreaker is snapshotted, meaning her stats are “locked” at the start of the skill until the end. Any changes in her stats (other than Elemental Mastery), positive or negative, will not change the current damage of her Stormbreaker. Beidou snapshots at the very start of her Burst animation, so make sure all applicable buffs are present on her. In the case of Bennett, his field buffs in intervals so it is recommended to use Beidou’s Skill before casting her Burst to create a delay and ensure her Burst snapshots Bennett’s buff.
Certain effects that read “if the enemy is affected by x” bypass this snapshot. This means that the Thundersoother artifact set still works with her Burst, as well as Rainslasher’s passive, and so on. Sara’s C6 also cannot be snapshotted, but can be reapplied during Stormbreaker.
Attributes
Initial Cast Gauge Value
Initial Cast ICD
Discharge Gauge Value
Discharge ICD
Lightning Discharge Bounce Range
4U
None
1U
3 hits/2.5s
3 abyss tiles
 Ascension 1 Passive | Retribution
Counterattacking with Tidecaller at the precise moment when the character is hit grants the maximum DMG Bonus.
Beidou’s A1 Talent allows her to gain the damage of a full counter as long as she is attacked within a certain time frame from the initial button press of the counter, regardless of how many times she is hit. As long as you tap within 20 frames of the move hitting, the counter will come out as perfect. You don’t need to hold the button.
The timing is about 1/3rd of a second. This may seem daunting but is only slightly harder to pull off than dashing through an attack, which is another worthwhile skill to learn. Keep in mind that there are no i-frames at all, even if you Perfect Counter.
T11 full counter with Wolf’s Gravestone.
By Drazatis#7439
 Ascension 4 Passive | Lightning Storm
Gain the following effects for 10s after unleashing Tidecaller with its maximum DMG Bonus:
- DMG dealt by Normal and Charged Attacks is increased by 15%. ATK SPD of Normal and Charged Attacks is increased by 15%.
- Greatly reduced delay before unleashing Charged Attacks.
 Utility Passive | Conqueror of Tides
Decreases swimming Stamina consumption of your characters in the party by 20%.
Not stackable with Passive Talents that provide the exact same effects.
Constellations
Overall, Beidou gets a whopping 85% DPS increase purely from going to C6. Her DPS gain from Constellations is one of the largest out of all the 4-star units, and even more than some 5-stars. A large portion of this damage is loaded into her C2, but she still benefits greatly from going all the way to C6. Thankfully, Beidou has been given for free three times from events, rotates into the Starglitter shop twice a year, and so far has been featured on multiple banners. Eventually, you will max out your Beidou.
 Constellation 1 | Sea Beast’s Scourge
When Stormbreaker is used:
Creates a shield that absorbs up to 16% of Beidou’s Max HP for 15s.
This shield absorbs Electro DMG 250% more effectively.
A transferable shield that has good uptime as long as you have good Burst uptime. It is currently the only Electro shield in the game, and lasts 15 seconds. It is by no means comparable to any of the stronger shields in the game unless facing Electro enemies, which means it usually ends up breaking very fast. However, the shield HP does scale with damage reduction, meaning Beidou + Xingqiu can end up boosting the shield’s effective durability to up to 14k in effective HP. In these cases, this Constellation provides valuable defensive utility, particularly for healerless team comps.
C1 shield, from the Genshin Wiki.
 Constellation 2 | Upon the Turbulent Sea, The Thunder Arises
Stormbreaker’s arc lightning can jump to 2 additional targets.
Cumulative DPS increase over C0: 38%*
*DPS increase only considering damage done to 1 target. Total DPS increase is 47% at 10 procs.
Beidou’s bread and butter Constellation, easily her strongest Constellation and one of the strongest in the entire game. Additional bounces increase her Burst damage values by 66%. Since 2 targets is all it takes for her Burst to get off all its bounces, it can now hit the initial target 3 times and a second target 2 times per proc. Additionally, this Constellation is crucial for Beidou’s Electro application and usage of the Aggravate reaction. Since her Burst has a hit-based ICD, increasing the total hit count by 66% drastically increases the amount of reactions she can trigger. A very crucial Constellation that makes her a different character than C0.
 Constellation 3 | Summoner of Storm
Increases the Level of Tidecaller by 3.
Maximum upgrade level is 15.
DPS increase over C2: 2.4%
Cumulative DPS increase over C0: 41.4%
Talent Level increase for Tidecaller. Overall fine to have like any other Talent increase, but is generally much less valuable than boosting her Stormbreaker.
 Constellation 4 | Stunning Revenge
Upon being attacked, Beidou’s Normal Attacks gain an additional instance of 20% Electro DMG for 10s.
DPS increase is too situational to calculate. Less than 2% in most situations.
The main use of this Constellation is to give Beidou slightly more Electro application for the purposes of reactions and reaction-based effects like Fischl’s A4 and 4TF. The raw damage increase purely from the additional damage is fairly negligible. However, if you can consistently get more Aggravates, Fischl A4s, and 4TF procs, the damage gained can be noticeable. This Constellation shares ICD with Beidou’s Burst. In some cases, Beidou’s Normal Attacks can end up stealing Aggravates due to her C4, which may cause you to lose a small amount of damage since they do not benefit from Burst DMG%. However, this can also reduce the ICD on her Burst and allow for more Aggravates.
C4 on charged attacks, clip by EternalDream#5503
 Constellation 5 | Crimson Tidewalker
Increases the Level of Stormbreaker by 3.
Maximum upgrade level is 15.
DPS increase over C4: 14.8%
Cumulative DPS increase over C0: 62.4%
Talent Level increase for Stormbreaker. Solid to have due to it boosting Beidou’s already insane scaling on her Burst. If you decide to go past C2, this should be your next goal.
Constellation 6 | Bane of Evil
During the duration of Stormbreaker, the Electro RES of surrounding opponents is decreased by 15%.
DPS increase over C5: 13.8%
Cumulative DPS increase over C0: 85%
Beidou’s capstone Constellation, which is great but a bit underwhelming (worse version of Xingqiu’s C2). Nonetheless, AoE Electro RES Shred is still quite good and gets great value when you run multiple Electro characters (which you should). The radius is rather small if you use her with ranged characters, at around 1 Abyss tile.
Original art by anna_drw01
Chapter 2: Playstyles
“If you can change something, change it. If you can’t, don’t waste time thinking about it. That’s how I go about things. But, really if you get stuck, come find me. I’ll help you deal with it.”
Beidou’s intended playstyle is hard to pinpoint, due to how her Constellations and Talents support both on-field and off-field playstyles. But her playstyles can still be evaluated for viability to help you decide which suits your gameplay ideals the most.
Generally speaking, playing Beidou as an off-field Electro DPS is her best role, with some niche situations where on-field Electro DPS can work, too. Never play Beidou as a Physical DPS.
Off-Field Electro DPS
Overall Effectiveness: 10/10

Pros:
- Can use an on-field unit that has better Normal Attack strings for proccing Stormbreaker (See Drivers section for more info)
- Greatly benefits from most of her Constellations
- Does not need screen time
- Capitalizes on her AoE damage potential with Stormbreaker
- Very versatile in artifact selection and highly resin-efficient to farm
- More flexible in team building
- Enables on-field units to play comfier and more aggressively due to Interruption Resistance and damage reduction
Cons:
- Requires more Energy Recharge to maintain Stormbreaker uptime
- Full potential is locked behind getting C2
- Wants priority of Fischl over other characters
- Weak single-target damage
- Reliant on Stormbreaker uptime
Overview
Playing Beidou as an off-field DPS is her most efficient playstyle. She keeps the vast majority of her damage through her transferable Stormbreaker and good usage of switch Countering. She effectively adds DPS to what your on-field DPS is providing, allowing 2 characters to do damage at once. However, because Beidou is off-field, she does not receive full Energy from particles, meaning more investment into ER.
The biggest benefit of playing Beidou off-field is to give Stormbreaker to a unit that has better frame data on their Normal Attacks. Due to how reliant Beidou is on Stormbreaker for DPS and how little DPS her Normal Attacks provide, it’s a very big boost in damage if you can proc more Stormbreaker discharges AND do more on-field damage as well.
Notable Constellations
- C2 for overall damage.
- C3 for swap counter damage.
- C5 for overall damage.
- C6 for RES shred.
Talent Priority
Stormbreaker > Tidecaller >>>> Normal Attack
Gameplay and Rotations
It is vital that you weave Normals between every character swap, to ensure you are continuously proccing Stormbreaker. The last thing you want is 2+ seconds of not proccing Stormbreaker.
The optimal Normal chains for each character are different, but you generally want to avoid the hits that have long gaps between it and the previous hit.
When swapping Beidou in to counter, make sure to wait a bit and allow Beidou to collect the particles.
Original art by Bitter Nai-GA38
On-Field Electro DPS
Overall Effectiveness: 7/10

Pros:
- Can utilize the Thundering Fury set by triggering Aggravate reactions through her C4, Burst, and Skill to deal more damage and lower ER costs
- Benefits greatly from all of her Constellations
- Capitalizes on her AoE damage potential with Stormbreaker
- Great survivability
- Lower ER requirements
- Flexible team compositions
- Very versatile in artifact selection
- Still has the option to switch to supports and normal with them to maintain value with Stormbreaker
Cons:
- Beidou has mediocre frame data for proccing Stormbreaker unless optimized
- Doesn’t really add much DPS by being on-field aside from niche situations
- Weak single-target damage
- Reliant on Stormbreaker uptime
- Countered by high Electro RES enemies
Overview
Playing Beidou as your on-field DPS is a fairly easy way to play her. It has lower ER requirements due to Beidou collecting on-field particles. In terms of damage, she is still carried by her abilities, as her Normal Attacks are lackluster for damage. While it may be tempting to invest into her Normal Attacks to improve their damage, the increase is very minuscule.
On-field DPS also has the option to run unorthodox artifact sets, namely 4-piece Thundering Fury. The ability to drop Tidecaller to a 3-4 second cooldown can be useful in certain pieces of content, due to the higher DPS, Energy generation, and ability to trigger more reactions. The best way to use 4TF is with the Aggravate reaction, since you can guarantee that Beidou will be triggering it.
Constellation Power Spikes
- C2 for overall damage.
- C4 for reactions and additional damage.
- C5 for overall damage.
- C6 for RES shred.
Talent Priority
Stormbreaker > Tidecaller > Normal Attack
Gameplay and Rotations
Before doing anything on Beidou, it’s important to set up buffs that Beidou can snapshot.
Then, as with any Beidou rotation, you ideally want to start off with a perfect counter (enemies usually always attack at the start of combat) then immediately cast Burst. This allows you to save some time and get the counter particles to contribute to the next Burst.
When Normal Attacking, you must remember that Beidou’s full N5 combo is pretty bad at proccing Stormbreaker. As such, it is recommended to do her N1 walk cancel to maximize discharges.
Original art by anhmaruwu
Chapter 3: Gearing
“You want to know of my legendary tales? Hahaha, that’s just my men exaggerating, adding in their own little details. Although, if you were to ask me if I’m afraid of what monsters lurk in the deep, I’d tell you I have no fear of them.”
Beidou’s gearing process can be as simple or as complex as you want it to be. There are “best in slot” options but these are not always the best in all situations. Energy Recharge requirements, buff usage, and team compositions all affect what gear suits Beidou the best. As such, this guide will give you as much information as possible to decide what gear to use to suit your needs.
But if you just want a nice and easy answer, her generally recommended options are:
Weapon: Serpent Spine
Artifact Set: 4 Emblem of Severed Fate
Main Stats: ATK%/Electro DMG%/CDMG%
Proceed below for more details on all her gearing choices.
Artifacts
Main Stats
Aim to have these main stats:
Sands: ATK%/ER%
Goblet: Electro Damage%
Circlet: CRIT Rate/CRIT DMG
Substat Priority
- ER% (see below)
- CRIT Rate/CRIT DMG
- ATK%
- EM
- ER%
- ATK
ATK% vs ER% Sands
In general, Beidou will likely not need the full 51.8% ER provided by ER% Sands as long as she is placed in a team that can generate Energy for her. In Double Electro teams, Beidou will only need around 140% ER, which can be achieved through substats and set bonuses. In solo Electro teams, Beidou may need anywhere from 160% to 180% ER, in which case an ER% Sands is justified. Overall, it’s recommended to try to build a team that minimizes her ER requirements, reserving ER% Sands for specific teams that run solo Electro.
ATK% vs EM Sands
When using Aggravate, some Electro characters like Keqing, Lisa, Kuki, and Fischl may see damage increases or similar output with EM Sands over ATK% Sands. This is because the above characters have low Talent percent scaling per hit but high hit rate and Electro application. For Beidou, this is not the case and ATK% is better 99% of the time (the 1% being teams where Beidou triggers Transformative Reactions). Beidou has comparatively much larger Talent percent scalings which makes increasing her raw damage through ATK% Sands more worthwhile. That being said, Aggravate is still a good reaction for Beidou; you just do not build specifically for it.
Artifact Sets
TL;DR ARTIFACT RECOMMENDATIONS:
4EoSF ≥ 2TF/2NO/2ATK/2EoSF > 4TS > 4TF (check table)
All of Beidou’s main artifact sets are comparable in terms of raw damage. As such, refer to the notes below regarding which sets to pick. Ultimately, use Genshin Optimizer to determine the best artifacts for your situation.
| 4Emblem of Severed Fate (4EoSF) | Generally considered to be BiS. Both effects of this set are very useful for Beidou, as she generally wants at least 20% ER and most of her damage comes from her Burst. Since this is a “perfect” 4-piece set for Beidou, it is recommended to focus on obtaining this set. The domain is also highly resin efficient. |
|
2Thundering Fury (2TF)/ 2Noblesse Oblige (2NO)/ 2 ATK% sets (2ATK)/2EoSF |
If you already have strong 2TF, 2NO, 2ATK or 2EoSF pieces, you can consider these mixed set options. The overall damage is similar to 4EoSF depending on the situation:
|
| 4Thundersoother (4TS) | While it does have a higher damage ceiling compared to the other sets by 2-5%, 4TS does rely on Electro uptime. You can only play it in Electro-Charged or Aggravate teams. While these are a large portion of her teams, it is still a situational set. |
| 4Thundering Fury (4TF) | Useful when played on-field ONLY in an Aggravate team. Getting Beidou to trigger Aggravate is extremely consistent due to the nature of the Quicken aura, and the benefits of casting more Skills are increased Energy generation, increased survivability, and more damage. |
Weapons
The following calculations assume:
- C6 Beidou
- 140% minimum ER
- 4EoSF, ATK%/Electro DMG%/CRIT main stats
- Damage done to primary target in a 2-target setting (30 discharge hits)
- 1 perfect counter, 1 tap counter, 1 Burst cast, 10 discharge procs
- KQM Standards for investment
- Buffs:
- Bennett 1000 Flat ATK, 20% ATK 4NO
- Sucrose 20% DMG C6, 20% DMG R5 Hakushin, 210 EM
Overall Recommendations
Serpent Spine (SS): If you plan on buying the Battle Pass, Serpent Spine is usually the best weapon to pick up. SS is a consistently good choice for Beidou and becomes the undisputed BiS when paired with a substantial ATK buffer like Bennett or Sara, or when utilizing Aggravate. SS has the highest refine value out of all the BP weapons if you plan on buying multiple BPs, and at high refines it’s universally top 1 or 2.
Wolf’s Gravestone (WGS): Consistently one of the best if you don’t pair Beidou with ATK buffers or Aggravate. Its raw stats are still competitive to this day and it scales best with Sucrose and Kazuha’s DMG% buffs. Not good enough to justify pulling on weapon banners for, but if you happen to get WGS then you can definitely use it.
Akuoumaru: Virtually identical to Serpent Spine in most situations while unbuffed. At equal refines it’s worse than SS when using an ATK buffer or Aggravate, but generally you can consider this an F2P-accessible alternative (if you pull on weapon banners).
Skyward Pride: Only good if Beidou needs to be the Solo Electro with 180%+ ER. Otherwise, it’s a step down from the other weapons above.
R5 Luxurious Sea-Lord: A slight direct upgrade to Archaic. This is the ultimate F2P option if you played the 2.1 event.
Prototype Archaic: The normal F2P option.
R5 Rainslasher: In Aggravate teams only, this weapon is an upgrade over the other F2P options. Still worse than anything similar in strength to Akuoumaru or better.
Unbuffed 140% ER
| Rank | Weapon | % of R1 Archaic | Notes |
|---|---|---|---|
| 1 | R5 Akuoumaru | 126.17% | 260 Energy |
| 2 | R5 Serpent Spine | 126.15% | Full stacks |
| 3 | R1 Wolf’s Gravestone | 123.85% | No passive |
| 4 | R3 Serpent Spine | 121.11% | Full stacks |
| 5 | R3 Akuoumaru | 119.62% | 260 Energy |
| 6 | R1 Unforged | 116.44% | 1 stack |
| 7 | R1 Serpent Spine | 116.07% | Full stacks |
| 8 | R1 Redhorn Stonethresher | 116.01% | No procs |
| 9 | R1 Akuoumaru | 113.07% | 260 Energy |
| 10 | R1 Skyward Pride | 109.29% | No procs |
| 11 | R5 Luxurious Sea-Lord | 109.00% | No procs |
| 12 | R5 Prototype Archaic | 100.00% | No procs |
| 13 | R5 Rainslasher | 98.13% | Full uptime |
Buffed 140% ER
| Rank (Bennett) |
Weapon | % Archaic | Rank (Sucrose) |
Weapon | % Archaic |
|---|---|---|---|---|---|
| 1 | R5 Serpent Spine | 131.62% | 1 | R1 Wolf’s Gravestone | 123.85% |
| 2 | R3 Serpent Spine | 126.37% | 2 | R5 Serpent Spine | 121.96% |
| 3 | R5 Akuoumaru | 125.71% | 3 | R5 Akuoumaru | 121.81% |
| 4 | R1 Serpent Spine | 119.98% | 4 | R3 Serpent Spine | 117.76% |
| 5 | R3 Akuoumaru | 119.19% | 5 | R1 Unforged | 116.44% |
| 6 | R1 Redhorn Stonethresher | 116.49% | 6 | R3 Akuoumaru | 116.35% |
| 7 | R1 Wolf’s Gravestone | 114.80% | 7 | R1 Redhorn Stonethresher | 116.01% |
| 8 | R1 Akuoumaru | 112.66% | 8 | R1 Serpent Spine | 113.56% |
| 9 | R1 Unforged | 110.29% | 9 | R1 Akuoumaru | 110.89% |
| 10 | R5 Luxurious Sea-Lord | 108.60% | 10 | R1 Skyward Pride | 108.15% |
| 11 | R1 Skyward Pride | 108.10% | 11 | R5 Luxurious Sea-Lord | 107.34% |
| 12 | R5 Rainslasher | 102.39% | 12 | R5 Prototype Archaic | 100.00% |
| 13 | R5 Prototype Archaic | 100.00% | 13 | R5 Rainslasher | 95.65% |
Unbuffed 140% ER [Aggravate]
| Rank | Weapon | % of R1 Archaic | Notes |
|---|---|---|---|
| 1 | R5 Serpent Spine | 129.38% | Full stacks |
| 2 | R5 Akuoumaru | 126.19% | 260 Energy |
| 3 | R3 Serpent Spine | 124.22% | Full stacks |
| 4 | R1 Wolf’s Gravestone | 119.95% | No passive |
| 5 | R3 Akuoumaru | 119.64% | 260 Energy |
| 6 | R1 Serpent Spine | 119.06% | Full stacks |
| 7 | R1 Redhorn Stonethresher | 116.82% | No procs |
| 8 | R1 Unforged | 113.75% | 1 stack |
| 9 | R1 Akuoumaru | 113.08% | 260 Energy |
| 10 | R5 Rainslasher | 110.74% | Full uptime |
| 11 | R5 Luxurious Sea-Lord | 109.18% | No procs |
| 12 | R1 Skyward Pride | 108.77% | No procs |
| 13 | R5 Prototype Archaic | 100.00% | No procs |
Buffed 140% ER [Aggravate]
| Rank (Bennett) |
Weapon | % Archaic | Rank (Sucrose) |
Weapon | % Archaic |
|---|---|---|---|---|---|
| 1 | R5 Serpent Spine | 135.33% | 1 | R5 Serpent Spine | 126.69% |
| 2 | R3 Serpent Spine | 129.93% | 2 | R3 Serpent Spine | 122.33% |
| 3 | R5 Akuoumaru | 125.78% | 3 | R5 Akuoumaru | 121.84% |
| 4 | R1 Serpent Spine | 124.53% | 4 | R1 Wolf’s Gravestone | 118.15% |
| 5 | R3 Akuoumaru | 119.24% | 5 | R1 Unforged | |
| 6 | R1 Redhorn Stonethresher | 6 | R3 Akuoumaru | 116.37% | |
| 7 | R1 Wolf’s Gravestone | 113.23% | 7 | R1 Redhorn Stonethresher | |
| 8 | R1 Akuoumaru | 112.71% | 8 | R1 Serpent Spine | 117.97% |
| 9 | R1 Unforged | 9 | R1 Akuoumaru | 110.91% | |
| 10 | R5 Rainslasher | 112.87% | 10 | R1 Skyward Pride | |
| 11 | R1 Skyward Pride | 11 | R5 Luxurious Sea-Lord | 107.60% | |
| 12 | R5 Luxurious Sea-Lord | 108.76% | 12 | R5 Rainslasher | 106.42% |
| 13 | R5 Prototype Archaic | 100.00% | 13 | R5 Prototype Archaic | 100.00% |
Original art by su9er
Chapter 4: Team Building
Beidou may be strong on her own, but what’s a Pirate Queen without her faithful crew? Team building is crucial for bringing out the maximum potential of all your characters, but it is also the trickiest part of Genshin optimization. While it is certainly possible to just brute force your way through Abyss with stacked C6 5-stars, the majority of players will need to think carefully about their team choices and which characters to invest in.
Beidou already has some great team compositions that have been discovered and playtested, but it is important to highlight exactly which units she synergizes with, and what functions are desired in a team. Understanding synergy is the first step in creating your own teams.
Something that should be emphasized before proceeding onto individual unit synergies is the importance of SLOT EFFICIENCY. This is the ability for a unit to perform multiple functions/roles at the same time, also known as “role consolidation”. A unit that can give Energy while also providing DPS for the team will generally be much more valuable than a unit that just does one of the above.
Below, a Synergy rating has been included for each character. This rating is a reflection of how synergistic that unit is with Beidou. It does factor in the raw power of that unit, but most importantly, it takes into account the overall usability of that unit when paired with Beidou. A unit that is stressful, unintuitive, and doesn’t play smoothly with Beidou may not receive a high rating even if they are powerful on paper. Additionally, how much damage a unit brings is also considered. In Genshin, the importance of damage for newer players is high, as Abyss is essentially a DPS check and a valuable source of Primogems.
Reactions
Prior to 3.0, it wasn’t really important to talk about the reactions Beidou could utilize because she frankly did not care. However, with Dendro, Beidou can actually make meaningful team building decisions based around reactions.
Aggravate
The main way to exploit Aggravate is to have fast Electro application. In AoE situations and with C2, Beidou can certainly apply Electro extremely fast (upwards of 25 times against 2 targets over 15 seconds). However, because Aggravate does not scale with Beidou’s high Talent Multipliers, she is still better off just building normally by following all the information above, as opposed to building specifically for Aggravate damage.
Since Aggravate requires a Dendro unit, there is an opportunity cost to running Aggravate. You can view the average damage increase Beidou gains from Aggravate using the 3 main weapon archetypes below: High Multipliers (Serpent Spine), High ATK (Wolf’s Gravestone), and Balanced (Akuoumaru). Same assumptions as weapon calcs, with 13 Aggravate procs to primary target. Additionally there is a comparison to the damage increase from running Sucrose + Bennett, but no Aggravate.
| Weapon | Unbuffed damage increase with Aggravate | Buffed damage with Aggravate (Sucrose) | Buffed damage with Aggravate (Bennett) | Buffed damage with Sucrose + Bennett |
|---|---|---|---|---|
| R1 Serpent Spine | +22.66% | +91.47% | +97.37% | +138.32% |
| R1 Wolf’s Gravestone | +15.81% | +79.71% | +68.18% | +118.43% |
| R1 Akuoumaru | +19.59% | +84.79% | +83.39% | +130.28% |
Aggravate on its own is not a very large increase to Beidou’s damage, but when combined with a buffer the results are pretty significant. Essentially, because Aggravate is affected by DMG% and EM multipliers and not ATK, Sucrose becomes an equal if not better raw damage buffer than Bennett regardless of weapon. Stack EM on Sucrose with R5 Hakushin.
Aggravate + Buffer has a lower damage ceiling than Buffer + Buffer but has less opportunity cost since Sucrose, Kazuha and Bennett are some of the most contested units in the game. Meanwhile, most Dendro units can realistically enable Aggravate.
Hyperbloom
In the pros section, it was stated that Beidou is one of the best units for Hyperbloom, despite not being able to trigger Hyperbloom very well at all. In order to understand why she’s the best, we need to look at how a Hyperbloom team is built:
- A Dendro unit
- A Hydro applier
- A Hyperbloom trigger (usually an Electro unit that’s not Beidou)
These are the 3 units you need to have to make Hyperbloom work. Who do you put in the 4th slot?
- An Anemo unit is generally not optimal, because their 4VV bonus does not affect Hyperbloom damage. They could buff the Hydro applier’s personal damage with it, but in general the Hydro unit contributes the second-least amount of damage (more than the Dendro unit). All they’d really do is compete for Hyperbloom procs with your Electro trigger, not really adding DPS in the process.
- A second Hydro unit is usually redundant and would not really give you more Blooms. The bottleneck for Hyperblooms is the Dendro unit’s Dendro application and Hyperbloom ICD, not the Hydro application.
- A second Dendro unit similarly adds little value. This is because, due to the particular properties of Dendro application on EC auras, Hyperbloom teams already create a decent amount of Dendro Cores even with just a single Dendro applier. Increasing the amount of Dendro cores may lead you to run into Hyperbloom ICD. On top of this, the current Dendro enablers in the game (Dendro Traveler and Collei) don’t provide much personal damage.
- A Pyro unit will inevitably trigger Burning, or steal Hyperblooms and turn them into Burgeon. For every Burgeon triggered, you lose value with your Electro trigger.
- Most second Electro units will end up stealing Hyperblooms. Yae and Fischl are the main culprits. While Yae and Fischl do add raw damage, they tend to steal Hyperblooms and cause the team’s overall damage to drop since neither of them should be built full EM. In single target, though, they are notably better than Beidou as a 4th unit.
Beidou is the perfect 4th unit for Hyperbloom — she does not interfere with Hyperbloom reactions while also dealing raw damage. Her Burst will not interfere with Hyperbloom and her Skill will only steal 1-2 Hyperblooms throughout a rotation. You want to ensure that Hyperblooms are being triggered primarily by the dedicated trigger unit so that their 900+ EM is put to good use.
Drivers
The driver usually dictates the overall archetype of the team, so it will be covered first.
If played as an off-field DPS, Beidou wants a driver that can work well with her Stormbreaker. Due to the unique triggering mechanics and ICD of Stormbreaker, a character that can consistently hit the 1-second ICD is vital. In some cases, picking a DPS with lower personal damage but high proc rate can outweigh a unit that has higher damage but worse procs due to how powerful Beidou’s Burst is. The inclusion of the following drivers aims to balance the unit’s personal damage with their ability to increase Beidou’s discharge amount. It also takes into account how the synergy feels, as awkward rotations are less than ideal. Finally, being considered a viable driver also factors in the overall efficiency of their teams. There is little point in having them drive Beidou if the opportunity cost is too high. Discharge count details from here.
 |
Beidou Synergy: :thinking: |
| Average Discharges | 9 |
| Peak Discharges | 12 |
| Easiest Combo | N5 Dash cancel |
| Optimal Combo | N1 walk cancel |
Pros:
|
Cons:
|
 |
Sucrose
Sucrose Guide Synergy: S |
| Average Discharges | 10 |
| Peak Discharges | 12 |
| Easiest Combo | N4 |
| Optimal Combo | N2 walk cancel |
Pros:
|
Cons:
|
 |
Cyno
Quick Guide Synergy: S |
| Average Discharges | 9-10 |
| Peak Discharges | 11 |
| Easiest Combo | Q Normal and Skill Spam |
| Optimal Combo | N1 E N1 Q Normal and Skill Spam |
Pros:
|
Cons:
|
 |
Kokomi
Kokomi Guide Synergy: S |
| Average Discharges | 10* |
| Peak Discharges | 11* |
| Easiest Combo | N3 spam |
| Optimal Combo |
N2 walk cancel
*During Burst |
Pros:
|
Cons:
|
 |
Ayato
Ayato Guide Synergy: S |
| Average Discharges | 6* |
| Peak Discharges | 6* |
| Easiest Combo | N1 spam |
| Optimal Combo | N1 spam *Discharge rate during Ayato’s 6-second Skill duration |
Pros:
|
Cons:
|
 |
Keqing
Keqing Guide Synergy: A |
| Average Discharges | 9 |
| Peak Discharges | 11* |
| Easiest Combo | EE 6N1C N2 EE 5N1C |
| Optimal Combo | 9N1C 2N5C*
*While optimal for discharges, Keqing loses her Electro Infusion |
Pros:
|
Cons:
|
 |
Yoimiya
Yoimiya Guide Synergy: A |
| Average Discharges | 10 |
| Peak Discharges | 10 |
| Easiest Combo | N5 |
| Optimal Combo | N5 |
Pros:
|
Cons:
|
 |
Heizou
Heizou Guide Synergy: A |
| Average Discharges | 10 |
| Peak Discharges | 12 |
| Easiest Combo | N4 Dash cancel |
| Optimal Combo | N2 Dash cancel or N4C |
Pros:
|
Cons:
|
 |
Candace
Synergy: B |
| Average Discharges | 10-11 |
| Peak Discharges | 12 |
| Easiest Combo | 4 N4 |
| Optimal Combo | N1Q N3 E N4W N4 E N4 or N4 E N4 W N4 E N4 or 4 N4W |
Pros:
|
Cons:
|
 |
Tartaglia
Tartaglia Guide Synergy: B |
| Average Discharges | 11* |
| Peak Discharges | 12* |
| Easiest Combo | N6 |
| Optimal Combo | N6 dash cancel *Discharge amount is if he stayed the full duration. Generally, Tartaglia should only be on the field for ~8 seconds to minimize E CD. |
Pros:
|
Cons:
|
 |
Yae Miko
Yae Guide Synergy: B |
| Average Discharges | 10 |
| Peak Discharges | 12 |
| Easiest Combo | N3 |
| Optimal Combo | N2 jump cancel or N2 dash cancel* *N2 dash cancel requires weaving some jump cancels in to avoid running out of Stamina |
Pros:
|
Cons:
|
 |
Yelan
Yelan Guide Synergy: B |
| Average Discharges | 10 |
| Peak Discharges | ~11 |
| Easiest Combo | N4 |
| Optimal Combo | N1W or N4 |
Pros:
|
Cons:
|
 |
Tighnari
Tighnari Guide Synergy: B |
| Average Discharges | ~9 |
| Peak Discharges | — |
| Easiest Combo | — |
| Optimal Combo |
E N1 Q 3N1C N1 or E 3N1C N1 Q N1 *These are typical Tighnari combos except with NA weaves to increase Beidou procs |
Pros:
|
Cons:
|
 |
Itto
Itto Guide Synergy: B |
| Average Discharges | 10 |
| Peak Discharges | 11 |
| Easiest Combo | N1 Q N1 E N2 N3 C3F N4 C4F E CF |
| Optimal Combo | N1 Q N3 E C4F (0.1s delay) N4 C4F E Note: See Itto guide for explanation of rotation notations |
Pros:
|
Cons:
|
 |
Zhongli
Zhongli Guide Synergy: B |
| Average Discharges | 11 |
| Peak Discharges | 12 |
| Easiest Combo | N6 |
| Optimal Combo | N5 dash cancel |
Pros:
|
Cons:
|
 |
Qiqi
Qiqi Guide Synergy: C |
| Average Discharges | 11 |
| Peak Discharges | 12 |
| Easiest Combo | N5 dash cancel |
| Optimal Combo | N2 jump cancel |
Pros:
|
Cons:
|
 |
Eula
Eula Guide Synergy: C |
| Average Discharges | 7 |
| Peak Discharges | 9 |
| Easiest Combo | E Swap N1 Q N3 (wait) N4 Hold E N3 (wait) N4 |
| Optimal Combo | E Swap N1 Q N4 hE N5 (with delays) |
Pros:
|
Cons:
|
 |
Raiden Shogun
Rating: Mihoyo, WHY? |
| Average Discharges | 0 |
| Peak Discharges | 11 |
| Easiest Combo | CRY + SOB |
| Optimal Combo | N1C spam |
Pros:
|
Cons:
|
Batteries
Beidou greatly benefits from a battery unit to provide particles for her, allowing her to decrease her ER needs and make rotations smoother. Having a battery is especially important at lower levels of investment, as one of the largest DPS gains you can receive is to make your rotations faster and having your Burst up more often.
“Beidou Standard ER” is the approximate ER needed for rotations with 1-2 tap counters. “Optimized ER” is with 1-2 full counters per rotation (which is not always realistic as it hinges on enemy AI and player skill).
The ER values provided are approximate. To get more accurate values for your situation and team, use Zakharov’s Energy Recharge Calculator.
 |
Fischl
Quick Guide Synergy: S |
| Fischl ER | 110% |
| Beidou Standard ER (C0/C6) | 150-170% / 140-160% |
| Beidou Optimized ER (C0/C6) | 130-150% / 120-140% |
Pros:
|
Cons:
|
 |
Raiden Shogun
Raiden Guide Synergy: A+* |
| Raiden ER | 250% |
| Beidou Standard ER | 140-160%* |
| Beidou Optimized ER | 120-140%*
*Raiden’s Energy gen solely from her Skill is comparable to Fischl’s. This rating assumes Raiden does not Burst. |
Pros:
|
Cons:
|
 |
Keqing
Keqing Guide Synergy: A |
| Keqing ER | 100% |
| Beidou Standard ER | 140-160%* |
| Beidou Optimized ER | 120-140%* *With 4TF |
Pros:
|
Cons:
|
|
Yae Miko
Yae Guide Synergy: A |
| Yae ER | 160% |
| Beidou Standard ER | 160-180% |
| Beidou Optimized ER | 135-160% |
Pros:
|
Cons:
|
 |
Kuki Shinobu
Synergy: A |
| Shinobu ER | 160% |
| Beidou Standard ER (C0/C2/C4) | 200%/180%/160% |
| Beidou Optimized ER (C0/C2/C4) | 180%/160%/140% |
Pros:
|
Cons:
|
 |
Kujou Sara
Sara Guide Synergy: B |
| Sara ER | 180% |
| Beidou Standard ER | 180-210%
Assumes no funneling to Beidou |
| Beidou Optimized ER | 140-180%
Assumes funneling to Beidou |
Pros:
|
Cons: |
 |
C6 Electro Traveler (EMC)
EMC Guide Synergy: C |
| EMC ER | 250%+ |
| Beidou Standard ER | 120-140% |
| Beidou Optimized ER | 100-120% |
Pros:
|
Cons:
|
 |
Lisa
Lisa Guide Synergy: D |
| Lisa ER | 200%+ |
| Beidou Standard ER | 200% |
| Beidou Optimized ER | 180% |
Pros:
|
Cons:
|
Buffers
Beidou is a great unit to apply buffs to, due to her high multiplier as well as the ability to snapshot with her Burst. A Buffer is not expected to have high personal damage since their ability to bolster Beidou’s damage is usually good enough compensation. Still, the best Buffers are those that are slot-efficient. Beidou is assumed to have 4EoSF, R1 Serpent Spine, and 140% ER when considering her damage increase. Buff effects that depend on gear rarity, such as EM gear and Base ATK weapons are assumed to be less than the absolute max.
 |
Sucrose
Sucrose Guide Rating: S |
| Sucrose ER | 200% |
| Buffs |
|
| Beidou Damage Increase |
+30% below C6
+40% at C6 +56% at C6 with Aggravate |
Pros:
|
Cons:
|
 |
Kazuha
Kazuha Guide Rating: A (S at C2) |
| Kazuha ER | 180% |
| Buffs |
|
| Beidou Damage Increase |
+38% below C2
+53% at C2 with Aggravate |
Pros:
|
Cons:
|
 |
Bennett
Bennett Guide Rating: A |
| Bennett ER | 200% |
| Buffs |
|
| Beidou Damage Increase | +70% |
Pros:
|
Cons:
|
 |
Kujou Sara
Sara Guide Rating: B |
| Sara ER | 180% |
| Buffs |
|
| Beidou Damage Increase |
+49% below C6
+ 79% at C6 |
Pros:
|
Cons:
|
 |
Zhongli
Zhongli Guide Rating: B |
| Zhongli ER | 100% |
| Buffs |
|
| Beidou Damage Increase | +20% |
Pros:
|
Cons:
|
 |
Mona
Mona Guide Rating: C |
| ER | 180% |
| Buffs |
|
| Beidou Damage Increase | +20% |
Pros:
|
Cons:
|
Any Anemo unit with 4VV can grant a 20% damage increase to Beidou. Particularly useful when put on a healer (Jean, Sayu).
Any unit with a 20% ATK set can grant a 9% damage increase to Beidou. On weapons other than SS, this increase is slightly smaller. Any unit with Hakushin can grant a 9% damage increase to Beidou. On weapons other than SS, this increase is slightly larger.
Any unit with TTDS can grant a 22% damage increase to Beidou. Note that this buff is only for Beidou, which is why Hakushin is preferred if other units can also benefit. On weapons other than SS, this increase is smaller.
Enablers
Prior to 3.0, Beidou did not need an Enabler to set up Elemental Reactions simply because Beidou did not gain much from building for Electro-related reactions. However, Aggravate changes that. This section will be short since it will primarily comprise Dendro units.
 |
Dendro Traveler (DMC)
Rating: A |
| DMC ER | 200%+ |
| Function |
|
| Beidou Damage Increase | +30% with 4NO and Aggravate |
Pros:
|
Cons:
|
 |
Collei
Rating: C |
| Collei ER | 200% |
| Function |
|
| Beidou Damage Increase | +30% with 4ToM and Aggravate |
Pros:
|
Cons:
|
Teams
Electro-Charged
Sucrose/Fischl/Beidou/Xingqiu [Taser]
A simple team that essentially runs 4 damage dealers and no dedicated healer (aside from Xingqiu’s microheals). The team can get away without a dedicated healer because of Beidou’s Burst + Xingqiu’s Orbitals both granting damage reduction and Interruption Resistance that stack with each other, and Xingqiu’s microheals providing a little bit more sustain. The team is very comfortable to run, rotates easily, and can thrive in both single-target and AoE situations. However, because multiple units are dealing damage you really need to invest into all 3 off-field DPS units (rather equally) to achieve good results.
- Rotation Video: Suc/Fish/Bei/XQ
- Estimated DPS with KQM standards: around 50k using gcsim.app
| Unit | Role | Description | Flex |
|---|---|---|---|
|
|
Driver |
|
|
|
|
Off-Field DPS |
|
|
|
|
Off-Field DPS |
|
|
|
|
Off-Field DPS |
|
|
Ayato/Fischl/Beidou/Flex [Better Fireworks]
Another Electro-Charged team that runs multiple damage dealers. While EC is the main reaction happening in this team, it is never built for (no EM on any unit) unlike Taser Sucrose. Ayato is generally preferred over Childe for 2 reasons: 1. Ayato’s uptime is significantly higher with 4TF, which makes his personal DPS higher and rotations smoother 2. Ayato’s overall reach and AoE is larger than Childe’s, which makes him more consistent in AoE situations.
- Rotation Video: Ayato/Fischl/Beidou/Bennett
- Estimated DPS with KQM standards: Ayato/Fischl/Beidou/Bennett, ~40k DPS
| Unit | Role | Description | Flex |
|---|---|---|---|

|
Driver |
|
|
|
|
Off-Field DPS |
|
|
|
|
Off-Field DPS |
|
|
|
|
Flex |
|
|
Aggravate
Beidou/Fischl/Dendro/Flex [Lightning Fish]
Takes advantage of Aggravate to boost Beidou and Fischl’s damage. Right now this team is limited by the small selection of Dendro units, of which none are healers or provide any form of defensive utility. Aggravate on its own does not provide as big of a damage increase as dedicated buffers like certain Anemo units, which means you may still want to run them. You can run Dendro + Sucrose/Kazuha, but then you don’t have a healer. If you want a healer then Bennett is your best option, but Jean/Sayu can also fill this role at lower opportunity cost.
- Rotation Video: Beidou/Fischl/DMC/Sucrose, Beidou/Fischl/DMC/Jean
- Estimated DPS with KQM standards: Beidou/Fischl/DMC/Sucrose – 65k DPS
| Unit | Role | Description | Flex |
|---|---|---|---|
|
|
Driver / Off-Field DPS |
|
|
|
|
Off-Field DPS |
|
|
|
|
Enabler |
|
|
|
|
Healer |
|
|
Keqing/Beidou/Dendro/Healer [Keidou]
Keqing is usable after 3.0 changes due to Aggravate. “In theory,” Keqing always had good synergy with Beidou due to her functions as a Driver + Battery. However, Keqing never really did both things too well because her optimal combos involved dropping her Electro infusion and her Energy generation wasn’t all too great either. Moreover, she just never did as much damage as Fischl to really justify using her. With Aggravate and 4TF, most of these problems are alleviated and BeiQing can work to a pretty good degree.
- Rotation Video: Keqing/Beidou/DMC/Jean
| Unit | Role | Description | Flex |
|---|---|---|---|

|
Driver |
|
|
|
|
Off-Field DPS |
|
|
|
|
Enabler |
|
|
|
|
Healer |
|
|
Hyperbloom
Xingqiu/Beidou/Raiden/Dendro [Raidou]
RaiDou is back, but not in the way you would expect. You don’t use Raiden’s Burst, instead relying on her Skill to reliably proc Hyperblooms in an AoE. Beidou provides a lot of damage and Electro application with no risk of stealing many Hyperblooms because her discharges do not affect Dendro Cores. The team has no healer but the defensive core of Xingqiu + Beidou.
- Rotation Video: Bei/Rai/DMC/XQ, Bei/Kuki/DMC/Candace
- Estimated DPS with KQM standards: Bei/Rai/DMC/XQ – 61k, Bei/Kuki/DMC/Candace – 54k (credit to Aftermath#7658)
| Unit | Role | Description | Flex |
|---|---|---|---|
|
|
Enabler |
|
|
|
|
Off-Field DPS |
|
|
|
|
Off-Field DPS |
|
|
|
|
Enabler |
|
Ayato/Beidou/Kuki/Dendro [Kudou]
Ayato driver with Kuki as the Hyperbloom trigger. Has direct heals instead of damage reduction like Raidou.
- Rotation Video: Aya/Bei/Kuki/DMC
| Unit | Role | Description | Flex |
|---|---|---|---|
|
|
Enabler |
|
|
|
|
Off-Field DPS |
|
|

|
Off-Field DPS |
|
|
|
|
Enabler |
|
Kokomi/Beidou/Raiden/Dendro [Quickbloom]
Kokomi driver for heals and slower Hydro application. Slow hydro means more Quicken uptime at the cost of Hyperblooms. Since Raiden contributes less DPS, this team should be used primarily in AoE, rather than other Hyperbloom teams that can function in both.
| Unit | Role | Description | Flex |
|---|---|---|---|

|
Enabler |
|
|
|
|
Off-Field DPS |
|
|
|
|
Off-Field DPS |
|
|
|
|
Enabler |
|
Anemo/Beidou/Hydro/Dendro [Anemo Hyperbloom]
This team only exists because of Beidou’s unique feature of possessing good AoE Electro application while also not having any Hyperbloom ownership because her discharges don’t target Dendro cores. She can reliably set an Electro auro on multiple enemies for an Anemo unit to Swirl it and trigger Hyperbloom. Letting Anemo units do this is extremely efficient since they already build EM to boost their chain reaction Electro-Charged and Swirl damage. Do note that Beidou needs to run very high ER in this comp, so this is the only real “Enabler Beidou” build.
| Unit | Role | Description | Flex |
|---|---|---|---|
|
|
Driver |
|
|
|
|
Enabler |
|
|
|
|
Enabler |
|
|
|
|
Enabler |
|
Overloaded
Pyro driver/Fischl/Beidou/Bennett [Firecrackers]
Pyro driver this time. Overload is not specifically built for. Ranged Pyro units are preferred since they don’t get affected as much as melee units. However, Overload is still a drawback in some situations. Situationally, building your Pyro unit with full EM for maximum AoE Overload damage can be ideal since they are typically not Vaporizing.
- Rotation Video: Klee/Beidou/Fischl/Bennett
- Estimated DPS with KQM standards: Yoimiya/Beidou/Fischl/Xingqiu, ~42k DPS
| Unit | Role | Description | Flex |
|---|---|---|---|

|
Driver |
|
|
|
|
Off-Field DPS |
|
|
|
|
Off-Field DPS |
|
|
|
|
Flex |
|
|
Physical
Physical Unit/Fischl/Beidou/Flex [Physical]
A nice and easy team comp to run. Realistically any Physical unit can drive, Zhongli and Qiqi are the most efficient because they also fulfill the healer/defensive role and have good discharge rates.
| Unit | Role | Description | Flex |
|---|---|---|---|
|
|
Driver |
|
|
|
|
Off-Field DPS |
|
|
|
|
Off-Field DPS |
|
|
|
|
Flex |
|
|
Afterword
“After all this training, I feel like I’m finally at my best. Thank you… But please, I’d still like for you to keep me on my toes.”
… And that’s it! After 70 pages I think I’ve finally addressed everything I needed to talk about. Hopefully this has been enough to teach you about Beidou, and maybe convince you to build and use her!
If you still want more, the BeidouMains Discord server and I are happy to answer your questions. You can even find me in KeqingMains if you need to ask any questions. My DM’s are always open so feel free to directly ask me questions as well. I hope to see many new Beidou mains in the future!
As for the future of this guide, I’ll be keeping it updated for new weapons, artifacts, or discoveries whenever they appear. The Team Templates will be updated with new videos when I can find/get to them. For now though, I think this is as comprehensive as it gets.
Anyways, that’s it from me.
– ZΛNTO#4984
My other stuff:
My YouTube where I post Beidou Abyss clears
Network Resources:
Keqing Mains website
Discord Links:
BeidouMains
KeqingMains
Change Log
2/19/21 – release
2.0 release
7/15/21 – added Emblem of Severed Fate to the Artifacts breakdown, reformatted gearing section, added gameplay notes in playstyles section
7/19/21 – updated team building section
7/22/21 – Electro traveler, Katsuragikiri Nagamasa
7/24/21 – updated weapon rankings to reflect low/high ER rather than main/sub dps
8/23/21 – updated Playstyles section and some other stuff
9/03/21 – Added Sara and Raiden synergy descriptions, added Luxurious Sea Lord to weapon rankings
9/23/21 – Added graphs for weapon section
3.0 release
8/17/22 – Updated for 3.0
10/26/22 – Updated ER requirements section; added 2EoSF to artifact options; added synergy descriptions for certain units; added Glossary