A Kazuha Handbook
by Ayzel, Cuzimori, Irokei, Reens & Vlad
Updated for Version 4.5
Solitary cloud,
Shadow in the setting sun,
Stirs the drifter’s heart.

Table of Contents
Introduction
Kazuha is a 5-star Anemo Sword character in Genshin Impact who boasts strong crowd control, team buffs, and Elemental application. These traits solidify Kazuha as one of the strongest supports in the game. In fact, it’s hard to find a team that he doesn’t work well in! On top of that, his playstyle is fun in both Spiral Abyss and overworld exploration.
This guide examines Kazuha’s kit in-depth to help you better understand his best builds, best teams, best weapons, best artifacts, synergies, Talents, Constellations, and more!
TL;DR
Credits to: cuppacote, irokei, and KQM Staff
Why Play Kazuha?
Pros
- Great buffing ability from both his Ascension 4 Passive DMG buff and 4pc Viridescent Venerer RES Shred
- Off-field Elemental application, both Anemo and absorbed Elements, with his Elemental Burst
- Strong off-field damage with the ability to trigger dozens of reactions per rotation
- On-demand grouping through his low-cooldown Elemental Skill
- Does not need high investment into Talents to deal damage or provide higher-scaling buffs
- Large AoE on his Elemental Skill and Burst
- Extremely flexible unit, and a common choice in “meta” teams
- Has many accessible 4-star weapon options (Iron Sting, Favonius Sword, Sacrificial Sword)
- Allows you to have two incredibly strong Anemo options if you already have Sucrose or Venti, which is useful for teambuilding in Spiral Abyss
Cons
- Needs EM main stat artifacts to perform optimally, which are difficult to farm
- DPS potential is weaker in single-target scenarios due to reliance on Swirl
- Can require complex rotations to maximize buffs and personal damage
- High investment cost to level to 90 for Transformative Reaction damage
Glossary
Talents
There are leaves around - and I know just the tune to accompany them, if you wish to hear it.

Talent Overview
 Normal Attack | Garyuu Bladework
Talent Description
Normal Attack
Performs up to 5 rapid strikes.
Charged Attack
Consumes a certain amount of Stamina to unleash 2 rapid sword strikes.
Plunging Attack
Plunges from mid-air to strike the ground below, damaging opponents along the path and dealing AoE DMG upon impact. If this Plunging Attack is triggered by Chihayaburu, it will be converted to Plunging Attack: Midare Ranzan.
Plunging Attack: Midare Ranzan
When a Plunging Attack is performed using the effects of the Elemental Skill Chihayaburu, Plunging Attack DMG is converted to Anemo DMG and will create a small wind tunnel via a secret blade technique that pulls in nearby objects and opponents.
Kazuha’s Normal Attack Talent is just as useful as his other Talents despite his tendency to be played off-field, where he mostly relies on his Elemental Skill and Burst. This is because Midare Ranzan, Kazuha’s Anemo-converted Plunging Attack, scales with his Plunging Attack Talent multiplier.
Normal Attack Talent levels and Skill Talent levels offer Kazuha comparable damage gain.
 Elemental Skill | Chihayaburu
Talent Description
Unleashes a secret technique as fierce as the rushing wind that pulls objects and opponents towards Kazuha’s current position before launching opponents within the AoE, dealing Anemo DMG and lifting Kazuha into the air on a rushing gust of wind.
Within 10s of remaining airborne after casting Chihayaburu, Kazuha can unleash a powerful Plunging Attack known as Midare Ranzan.
Press
Can be used in mid-air.
Hold
Charges up before unleashing greater Anemo DMG over a larger AoE than Press Mode.
Plunging Attack: Midare Ranzan
When a Plunging Attack is performed using the effects of the Elemental Skill Chihayaburu, Plunging Attack DMG is converted to Anemo DMG. On landing, Kazuha creates a small wind tunnel via a secret blade technique that pulls in nearby objects and opponents.
Midare Ranzan’s DMG is considered Plunging Attack DMG.
Kazuha’s Elemental Skill, Chihayaburu, is his main source of crowd control since it pulls enemies towards him. Using this Skill launches Kazuha into the air, letting him perform a Plunging Attack called Midare Ranzan. The launch also allows him to dodge certain enemy attacks.
Note that Midare Ranzan scales with Kazuha’s Plunging Attack multiplier and deals Anemo damage. The Anemo Conversion cannot be overridden by another Element. Additionally, any Elemental Skill DMG Bonus buff affects only the initial instance of Anemo DMG at the beginning of the Skill.
Elemental Absorption
Kazuha’s Elemental Skill can absorb an Element, allowing him to deal Elemental damage alongside Anemo damage. Absorption is distinct from the Element that Kazuha Swirls.
The Element absorbed follows Kazuha’s general Absorption priority:
Pyro > Hydro > Electro > Cryo
For example, if there are two enemies next to Kazuha — one affected by Pyro, the other by Hydro — Kazuha’s Skill absorbs and Swirls Pyro but also Swirls Hydro, causing him to deal Pyro damage when he Plunges. (Unfortunately, if no Pyro Swirl occurs, then only Hydro RES is shredded.) In a typical team rotation with Tartaglia — Xiangling — Bennett, Kazuha absorbs Pyro into his Skill but Swirls Hydro if there is a Hydro aura on the enemy.
Tap and Hold Skill Variants
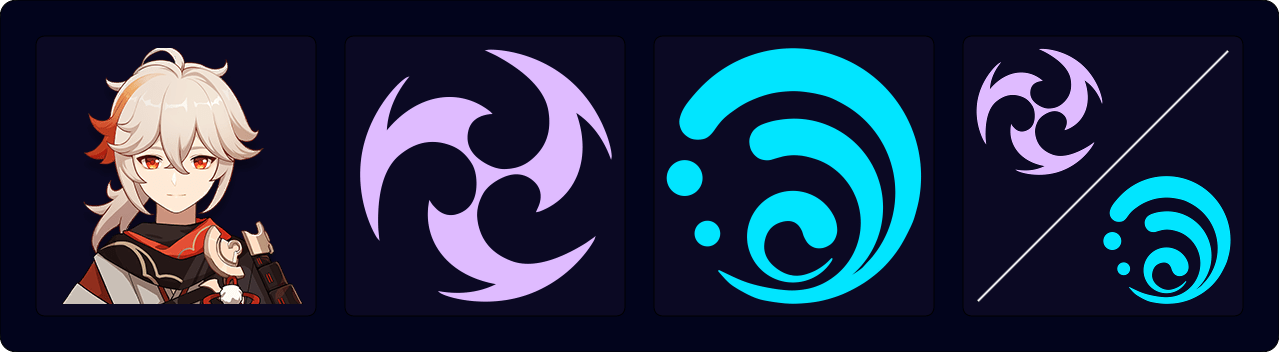
Kazuha’s Elemental Skill has two variants: Tap Skill (tE) and Hold Skill (hE). They have different cooldowns, animation duration, crowd control ability, damage, Elemental application, and particle generation.
Which version Kazuha should use depends on a large variety of factors. Consider some of the following scenarios.
| Scenario | Tap or Hold? |
| There are many scattered enemies. | Kazuha should use his Hold Skill to gather all the enemies into one spot. |
| His team wants a Double Swirl. | Kazuha should use his Hold Skill to take advantage of the 2U Anemo application in order to Swirl multiple Elements. |
| Kazuha is in a quickswap team where he can use his Skill multiple times in a rotation. | He should use his Tap variant to allow multiple Skill uses in quick succession. |
| Kazuha has C1. | Kazuha can use his Hold variant before his Burst since his Skill’s cooldown is reset after using his Burst. |
As a general rule, Kazuha should use his Hold Skill for grouping and increased particle generation. Kazuha should use his Tap Skill in quickswap teams, as it deals only slightly less damage than Hold Skill with a 3s-shorter cooldown.
Here’s a full comparison between the two variants of his Elemental Skill:
Tap Skill
- 6s cooldown
- Generates 3 Anemo Particles
- ~0.5s field time
- Slightly lower Talent scaling
- The difference is small when accounting for Swirl damage
- 1U Anemo application
- Useful in teams which only require one Element to be Swirled, without completely clearing auras
Hold Skill
- 9s cooldown
- Generates 4 Anemo Particles
- ~1s field time
- Slightly higher Talent scaling
- The difference is small when accounting for Swirl damage
- 2U Anemo application
- Useful for Double Swirl setups and Electro-Charged teams
Long Tap Skill
Kazuha’s Tap Skill may be held for approximately 0.5s to perform his “Long Tap Skill”. This variation shares all the properties of the typical Tap Skill except that it has a slightly larger AoE on the initial hit and takes slightly longer to perform. If you hold Kazuha’s Skill any longer, you get the Hold Skill variation.
The video below demonstrates the AoE grouping difference between all the variations: Tap Skill, then “Long Tap Skill”, then Hold Skill. The Tap Skill does not move the dropped items, the “Long Tap Skill” moves them slightly, and the Hold Skill groups the items completely.
At that range, the typical Tap Skill would not hit or Swirl the enemies but the “Long Tap Skill” would be able to. However, the “Long Tap Skill” is mostly impractical in combat since it can easily be held too long and turn into the Hold variation (which has a 3s longer cooldown and may prolong rotations that only plan for a Tap Skill).
The slightly larger AoE on its initial hit is often unnecessary since you can simply reposition to ensure you hit the enemies with Kazuha’s Tap Skill. Additionally, Kazuha’s Anemo-converted Plunging Attack, Midare Ranzan, has the same grouping AoE regardless of the variation.
Double Swirl
Kazuha can Swirl multiple Elements in quick succession with his Elemental Skill. The absorbed Element deals damage before Midare Ranzan, allowing Kazuha to Swirl if the Elemental application maintains the Elemental aura (i.e. doesn’t trigger an Elemental Reaction that removes the aura).
This opens the potential for setups where Kazuha Swirls one Element on his initial Skill cast and another Element on Midare Ranzan. For example, in some Vaporize teams, Kazuha can Swirl Hydro going up and Pyro going down by absorbing Pyro from Bennett's Elemental Burst.
In Elemental Gauge Theory, Anemo has 0.5× effectiveness in removing an aura. For example, 2U Anemo removes 1U of Cryo, Hydro, Electro, or Pyro. Removing one aura to apply another aura to Swirl is necessary for most Double Swirl setups, given that enemies need to not have an aura in order for Kazuha's absorbed Plunging Attack to apply one. As such, Kazuha should use his Hold Skill to ensure that the aura is completely removed. Note that this setup only works in single-target scenarios since Kazuha can re-apply Elements by Swirling auras from other enemies.
For Electro-Charged teams, Kazuha’s 2U Hold Skill is more effective at Swirling both Electro and Hydro simultaneously off an enemy, which also triggers a chain reaction of Electro-Charged to other enemies. A similar interaction can happen against Frozen enemies as well. For more details, see the KQM TCL entry on How to Get Double Swirls.
Infinite Climbing
Kazuha can cast his Skill in mid-air, which allows him to climb infinitely high vertical surfaces by climbing to a certain point, then letting go and casting his Skill, then re-grabbing the wall and waiting for his Skill to come off cooldown.
The combo sequence is X + E + W (Drop + Skill + Walk Forward). If you go too early, you can walk forward again, but it can be difficult if you have slow reaction time.
 Elemental Burst | Man’you no Ittou
Talent Description
The signature technique of Kazuha’s self-styled bladework — a single slash that strikes with the force of the first winds of autumn, dealing AoE Anemo DMG. The blade’s passage will leave behind a field named “Autumn Whirlwind” that periodically deals AoE Anemo DMG to opponents within its range.
Elemental Absorption
If Autumn Whirlwind comes into contact with Hydro/Pyro/Cryo/Electro, it will deal additional elemental DMG of that type. Elemental Absorption may only occur once per use.
No, we’re not calling this “Kazuha Slash.”
Kazuha’s Elemental Burst is an extremely important part of his kit and makes up the largest portion of his damage.
His Burst costs 60 Energy and creates a field that persists for 8s and can absorb an Element, dealing both Anemo and absorbed Elemental damage in a large AoE.
When casting his Burst, Kazuha first performs a large slash that deals Anemo damage. The field generated by the Burst then deals 5 ticks of absorbed Elemental damage and Anemo damage. The Burst’s initial slash also applies Anemo, triggering a total of 6 Swirls (in single-target) through its duration. The damage dealt by each tick is snapshot on Burst cast.
At higher game quality, Kazuha’s Burst makes it quite difficult to see beyond its AoE. You can turn off Bloom in the game settings to see more clearly.
Burst Mechanics
Kazuha’s Burst has several important mechanics that make it valuable:
- Its Absorption priority follows similarly to his Elemental Skill’s:
Pyro > Hydro > Electro > Cryo
- To control Absorption, you need to pay attention to the auras of enemies and objects around Kazuha as well as the aura of Kazuha himself. For example, in a multi-target scenario, having Pyro on even a single enemy always guarantees a Pyro Absorption. If another Element is needed, you can try to remove Pyro aura from enemies using other units in the team.
- The initial slash of Kazuha’s Elemental Burst applies 2U Anemo, which can be useful for clearing Elemental auras to perform Double Swirl setups, such as in Electro-Charged or Freeze teams.
- Kazuha’s Elemental Burst ticks apply 1U of the absorbed Element, which works well to set up teams that require constant aura application (i.e. Diluc Forward Melt, in which Kazuha absorbs his Elemental Burst with Cryo).
- Kazuha’s Elemental Burst triggers Amplifying Reactions before triggering Swirl, but can still trigger both with a single tick. This allows him to, for example, absorb Pyro on his Elemental Burst while still Swirling Hydro to maintain Hydro aura.
- Kazuha can absorb Elements he is affected by; for example, if Bennett’s Burst applies Pyro to Kazuha, Kazuha can then absorb that Pyro Element from himself.
Note that Kazuha’s Elemental Burst can also interfere with reactions instead of enabling them. For example, in Hu Tao VV Vape teams, you need to ensure that Kazuha’s Burst absorbs Hydro, not Pyro. If his Elemental Burst absorbs Pyro, it interferes with Hu Tao’s Vapes. For this reason, some of Kazuha’s teams have complicated or extended rotations in order to Swirl and absorb the correct Elements.
Simultaneous Reaction Priority (SRP)
One last thing to note about Kazuha’s Elemental Burst is the reaction and application priority of the Elemental DoT. Kazuha’s Burst deals both Anemo and the absorbed Elemental damage at the same time. Hence, there is a priority list that determines what happens when two Elements are applied to a target simultaneously
For enemies with an existing Elemental aura, the order of priority is as follows:
- Non-Swirl Transformative Reactions
- Amplifying Reactions
- Swirl
For example, if an enemy has a ≤1U Electro aura and Kazuha’s Burst absorbed Pyro, then only Overloaded occurs since non-Swirl Transformative Reactions have a higher priority than Swirl reactions. No Electro Swirl occurs.
For enemies without an aura or with an aura that cannot be reacted with, the absorbed Elemental DoT applies an aura at the same time as the Anemo DoT deals damage. At this point, only an aura application occurs, not a Swirl.
For example, if a hilichurl with no aura is hit by a Pyro-absorbed Kazuha Burst DoT tick, only Pyro is applied and no Swirl occurs. However, once Pyro has been applied, the next DoT tick Swirls and re-applies a Pyro aura.
 Ascension 1 Passive | Soumon Swordsmanship
Talent Description
If Chihayaburu comes into contact with Hydro/Pyro/Cryo/Electro when cast, Chihayaburu will absorb that element and if Plunging Attack: Midare Ranzan is used before the effect expires, it will deal an additional 200% ATK of the absorbed elemental type as DMG. This will be considered Plunging Attack DMG.
Elemental Absorption may only occur once per use of Chihayaburu.
This Ascension Passive enables Kazuha’s Elemental Skill to absorb an Element and deal additional Elemental damage with his Plunging Attack, Midare Ranzan. These aspects of his kit are explained under his Elemental Skill section.
 Ascension 4 Passive | Poetics of Fuubutsu
Talent Description
Upon triggering a Swirl reaction, Kaedehara Kazuha will grant all party members a 0.04% Elemental DMG Bonus to the element absorbed by Swirl for every point of Elemental Mastery he has for 8s. Bonuses for different elements obtained through this method can co-exist.
Possibly the most important aspect of Kazuha’s kit. By Swirling an Element on a full EM build, Kazuha provides a substantial Elemental DMG Bonus to his teammates.
Since the buff can co-exist for multiple Elements at the same time, some of Kazuha’s teams (notably those that utilize Vaporize and Melt reactions) have specific rotations to provide simultaneous Elemental DMG Bonus for different Elements.
 Utility Passive | Cloud Strider
Talent Description
Decreases sprinting Stamina consumption for your own party members by 20%.
Not stackable with Passive Talents that provide the exact same effects.
This passive is fantastic for overworld exploration. While in combat, the decreased Stamina consumption can be a nice quality-of-life upgrade for on-field DPS characters that rely on sprinting to dodge or to utilize an aspect of their kit.
This passive does not work with Alternate Sprints!
Level and Talent Priority
 >
>  >
>  =
= 
Level > Burst > Normal Attack = Skill
Level 90 is strongly recommended to maximize Kazuha’s damage through Swirls and other Elemental Reactions. Talents contribute about a third of Kazuha’s overall damage, so they have lower priority.
Level and Talents Comparison
Calcs: Kazuha Mastersheet by Vlad (vladutsu)

Constellations
Stagnancy dulls both my connection with nature and the blade I wield.

 Constellation 1 | Scarlet Hills
Decreases Chihayaburu’s CD by 10%.
Using Kazuha Slash resets the CD of Chihayaburu.
Kazuha’s first Constellation allows him to situationally require less ER and allocate more EM through the extra Skill cast particle generation. However, one potential issue with this Constellation is that spending more time on Kazuha with multiple Skill casts either lengthens a rotation or reduces field time for Kazuha’s teammates. This makes utilizing Kazuha’s first Constellation a DPS loss in some teams.
The additional Skill use also helps better group enemies. In some scenarios, multiple enemies may be spaced too far apart for a single Hold Skill to group them all. Instead, you can use his Skill to group some enemies, and then move and use his Skill again to group them with the rest. For example, if you have enemies A, B, and C in a straight line, you can group enemies A and B first, Burst, and then position to group C to the other two.
Kazuha’s C1 isn’t necessarily bad, but you should recognize that using the additional Skill cast can be detrimental in some scenarios. For example, in a Hu Tao Double Hydro team, it's generally not worth it to re-cast Kazuha's Skill given that it eats into Xingqiu or Yelan's Burst uptime and Kazuha's personal damage is pretty insignificant in the team.
 Constellation 2 | Yamaarashi Tailwind
The Autumn Whirlwind field created by Kazuha Slash has the following effects:
• Increases Kaedehara Kazuha’s own Elemental Mastery by 200 for its duration.
• Increases the Elemental Mastery of characters within the field by 200.
The Elemental Mastery-increasing effects of this Constellation do not stack.
Kazuha’s second Constellation is extremely powerful — not only does it make him a better support than Sucrose for reaction-reliant units, but it also buffs his personal damage and increases his Ascension 4 DMG% buff. The EM buff only applies to the on-field character, however, as opposed to the teamwide buffs that other characters like Sucrose provide.
It is recommended to stop at this Constellation unless going for C6.
 Constellation 3 | Maple Monogatari
Increases the Level of Chihayaburu by 3.
Maximum upgrade level is 15.
Kazuha’s Elemental Skill is an important part of his kit, but his Elemental Burst is a bigger portion of his damage. This Constellation increases the damage on Kazuha’s Elemental Skill; however, it has low value since only a third of his damage comes from Talents.
 Constellation 4 | Oozora Genpou
When Kaedehara Kazuha’s Energy is lower than 45, he obtains the following effects:
• Pressing or Holding Chihayaburu regenerates 3 or 4 Energy for Kaedehara Kazuha, respectively.
• When gliding, Kaedehara Kazuha regenerates 2 Energy per second.
The first part of this Constellation can be used in conjunction with Kazuha’s first Constellation to grant him a large amount of Energy at once. This allows him to run even less Energy Recharge in exchange for more damage-focused stats.
While the gliding effect of Kazuha’s fourth Constellation has little practical use in combat, it can actually be useful outside of combat. The gliding ability is useful in the overworld, where Kazuha glides to travel between locations frequently.
Note: In Version 4.6, they moved the pillars in the Spiral Abyss outside of the combat area, so the former pillar trick is no longer possible.
 Constellation 5 | Wisdom of Bansei
Increases the Level of Kazuha Slash by 3.
Maximum upgrade level is 15.
Another Talent upgrade Constellation. This Constellation is better than Constellation 3 since Kazuha’s Burst is the largest portion of his Talent damage, but you should only go for it if you’re also going for C6. This Constellation also has the same issue that C3 does, in that it has low value because Kazuha’s Talents don’t particularly matter.
 Constellation 6 | Crimson Momiji
After using Chihayaburu or Kazuha Slash, Kaedehara Kazuha gains an Anemo Infusion for 5s. Additionally, each point of Elemental Mastery will increase the DMG dealt by Kaedehara Kazuha’s Normal, Charged, and Plunging Attacks by 0.2%.
Kazuha changes quite significantly at C6, which opens up an additional on-field DPS playstyle. He can still be played as an off-field DPS at C6, just with significantly higher damage on his Plunging Attack, as both Midare Ranzan (the Anemo-converted Plunging Attack) and Soumon Swordsmanship (Kazuha’s Ascension 1 Talent) benefit from Kazuha’s C6 damage boost.
On-field DPS C6 Kazuha
While Kazuha gains a tremendous DMG% boost at Constellation 6, he still benefits quite a lot from off-field DPS units like Fischl, given that his Normal Attacks can now trigger Swirls, and off-field DPS units such as Fischl, Xingqiu, and Beidou can apply Elements for Kazuha to Swirl. Moreover, Faruzan can further increase Kazuha’s personal damage.
Off-field DPS and Quickswap C6 Kazuha
As an off-field DPS at C6, Kazuha should be played in teams that allow him to freely use his Anemo-infused Plunging Attack without consequence since it becomes a significantly larger portion of his damage at C6.
Some example teams that do this include Pure Pyro (Kazuha, Venti, Bennett, Xiangling) and 4TF Kazuha. The first team doesn’t have an on-field DPS unit, allowing Kazuha to swap in freely to use his Elemental Skill and subsequent Plunging Attack. The second team is based around Kazuha spamming his Elemental Skill, making it not only freely usable but also the entire premise of the team.
C6 Swirl Tech
Since Kazuha applies Anemo to his weapon, he can Swirl Elements off it to trigger effects such as 4pc Viridescent Venerer. This technique sometimes allows for faster 4VV Shred setups. For example, if Kazuha has Pyro infused into his Sword via Bennett C6, he can use his C6 Anemo Infusion to shred Pyro RES after applying Pyro without Bennett's Skill. It's also worth noting that this Swirl tech allows Elemental Swirls on enemies with permanent Elemental auras.
With Candace, Chongyun, and C6 Bennett, he can Swirl off their Elemental Infusions; however, their rate of Elemental application causes Kazuha to lose his. Kazuha’s Anemo Infusion only occurs on cast, meaning it is impossible to get the Infusion back after it has been completely overridden.
Note that the Swirl damage from weapon infusion scales with the character who provides the second instance of Elemental application, usually Kazuha. 4VV RES Shred also only occurs if the Anemo Infusion occurs second (e.g. Chongyun Skill > Kazuha Skill even without hitting enemies).
C6 Multi-Optimization
C6 Kazuha can be difficult to optimally build, but thankfully mimithiz has created verified multi-opt configurations to use in Genshin Optimizer. Check them out in KQM's GO Multi-Opt Guide!
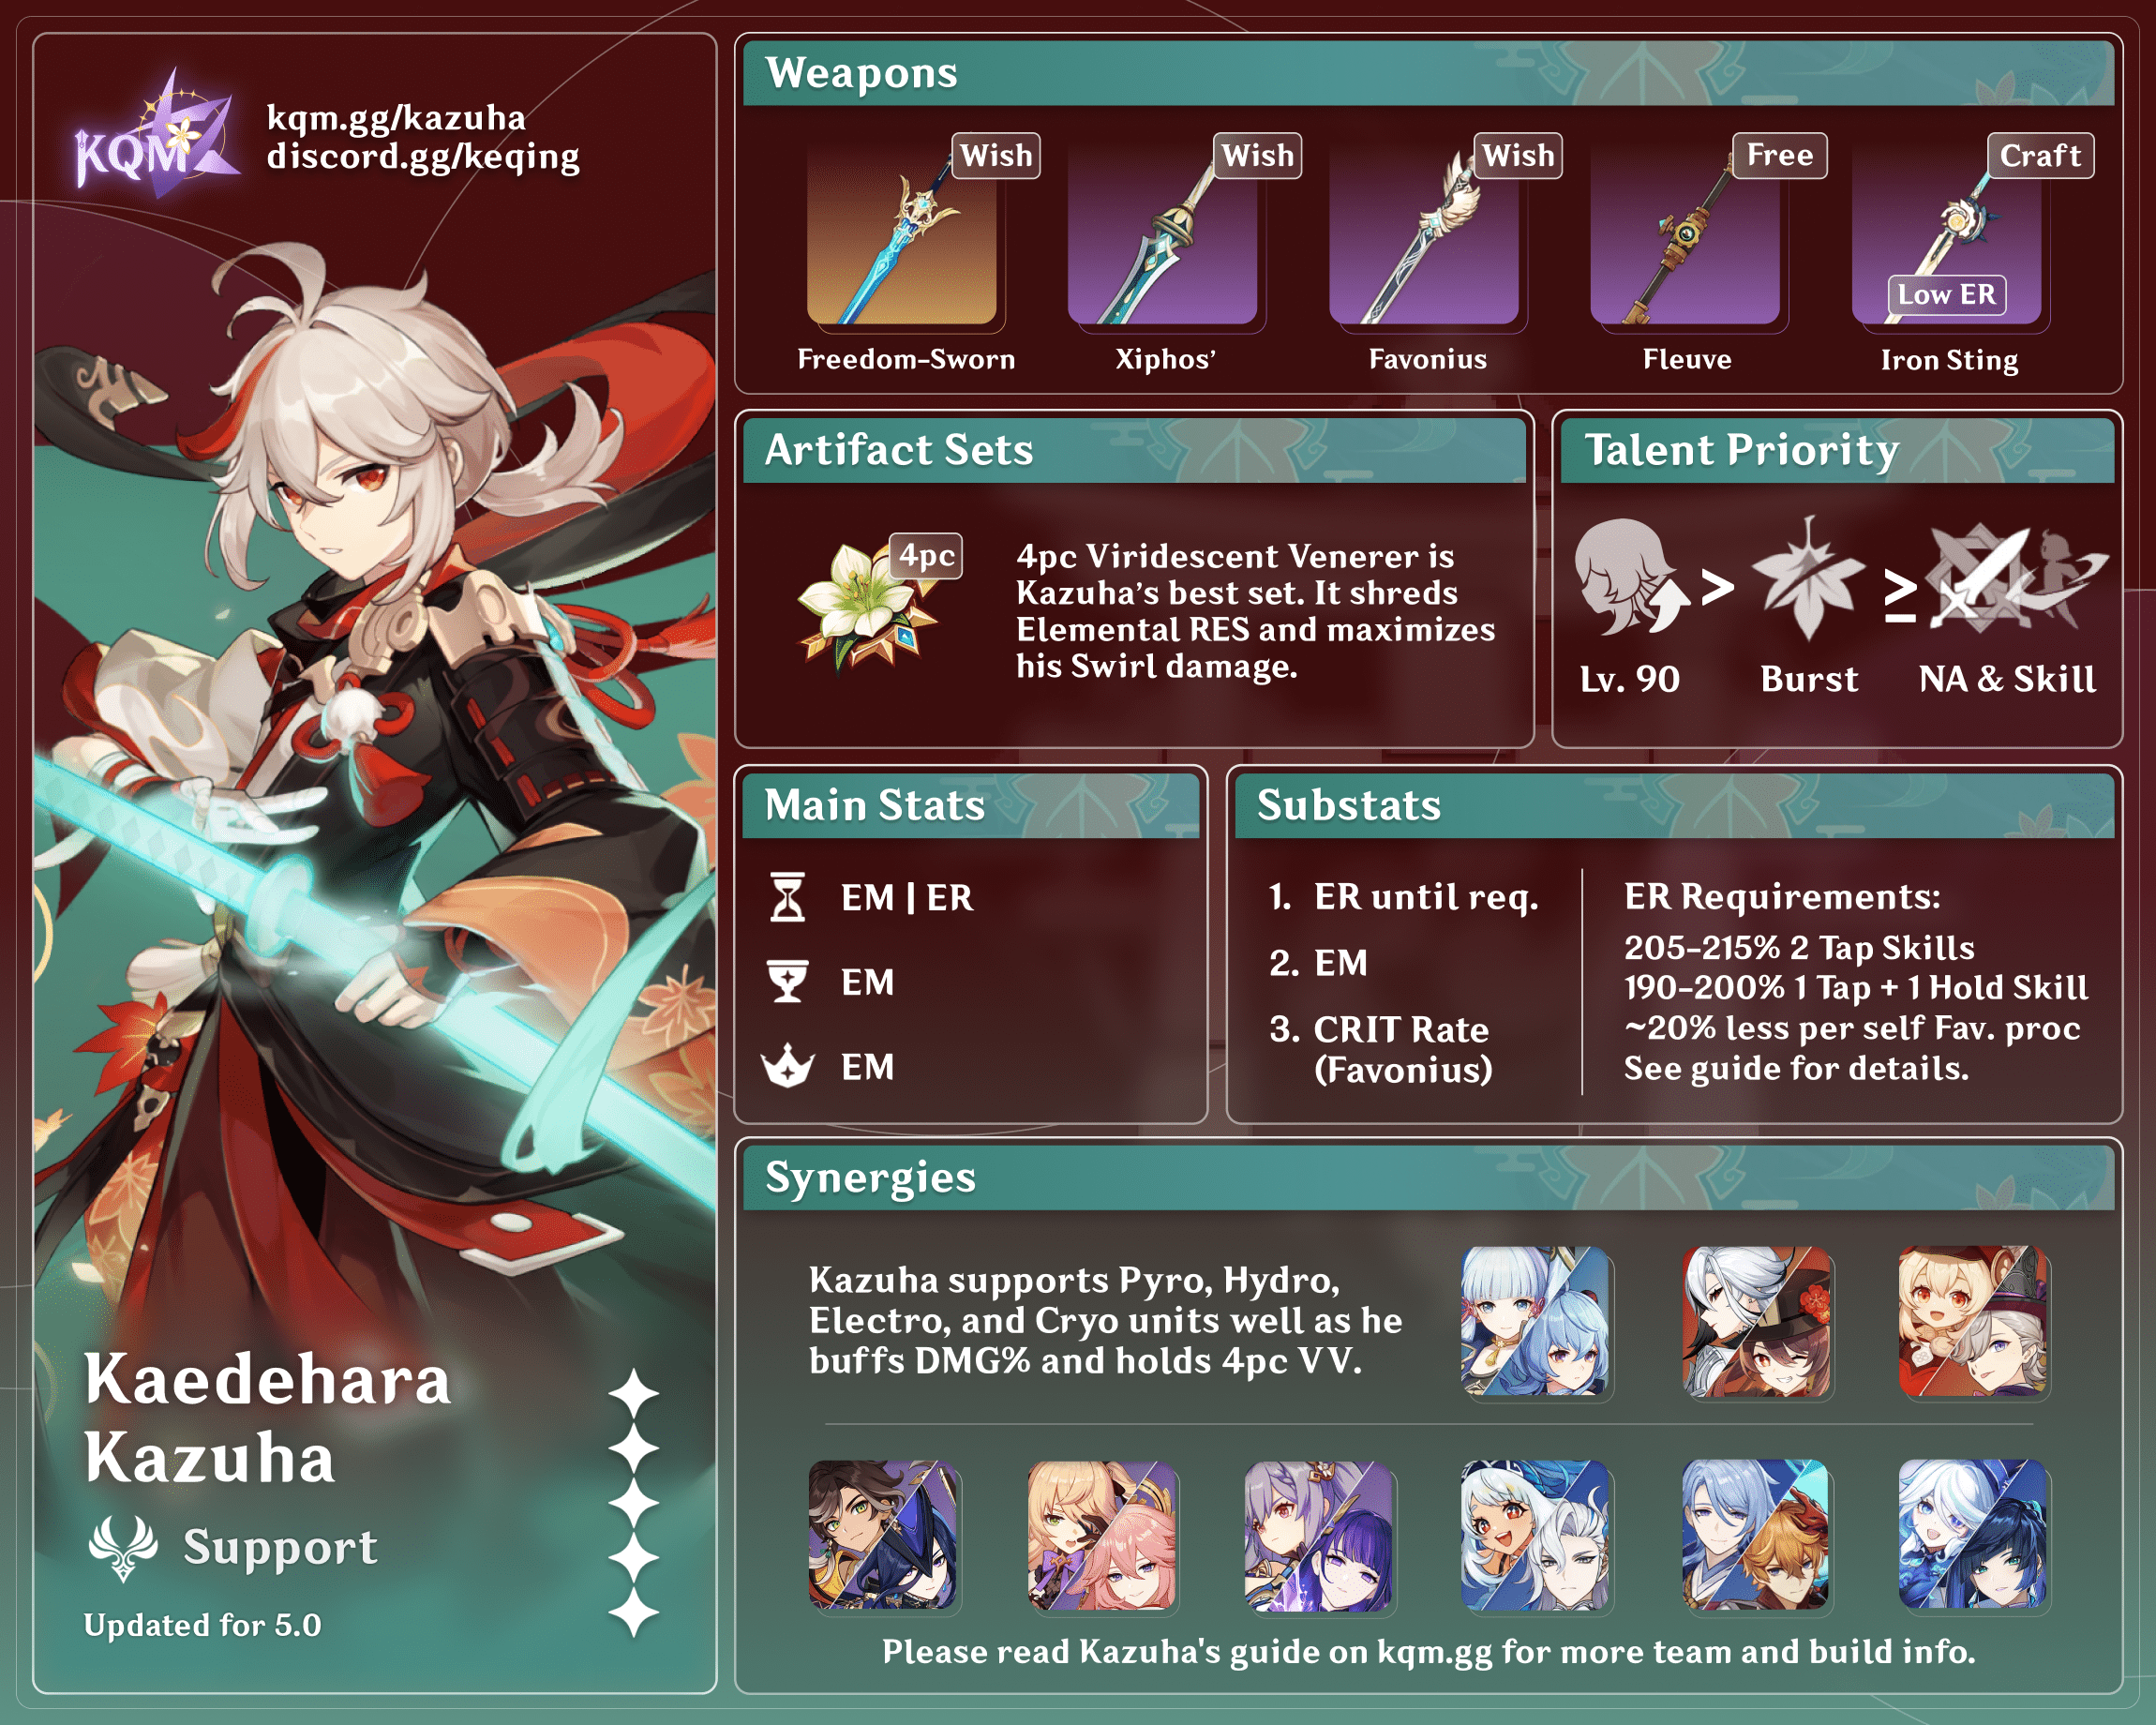
Artifacts
You'd like to know more about me, you say? Well, as you see, I am but a wandering samurai that you could have run into just about anywhere.

Artifact Sets
Recommended Set
 4pc Viridescent Venerer (4VV) | 4pc Viridescent Venerer (4VV) is the artifact set that Kazuha uses in almost all of his teams. Not only does it allow him to shred Elemental RES to buff his team members, but it also boosts his personal damage by buffing Swirl and Anemo damage. The RES Shred offered by 4VV massively increases Kazuha’s teammates’ damage, providing a 27.78% increase against an enemy with the base 10% Elemental RES. Against enemies with higher Elemental RES, the set only increases in effectiveness; for example, against an enemy with 70% RES, Kazuha increases damage by 133%. |
Niche Sets
 4pc Thundering Fury (4TF) | 4pc Thundering Fury (4TF) can be used in specific Aggravate or Electro-Charged teams, in which Kazuha can frequently trigger the 4pc set effect (Elemental Skill cooldown reduction when triggering an Electro-related reaction on-field). In these teams, Kazuha’s ability to constantly trigger Aggravate or Electro-Charged or Overloaded with his Elemental Skill and Burst allows him to drastically lower his Elemental Skill cooldown to deal tremendous amounts of damage as a quickswap DPS. |
 4pc Emblem of Severed Fate (4ESF) | 4pc Emblem of Severed Fate (4ESF) is Kazuha’s best set when used as an off-field DPS in Triple Anemo teams since the majority of his personal damage comes from his Burst. 4ESF also assists him in meeting his ER requirements while turning any ER he already builds into damage. An ADC build is recommended in a Triple Anemo playstyle, even if Kazuha can absorb Elements and trigger Swirl. |
Artifact Stats
 Sands |  Goblet |  Circlet |
| EM / ER | EM | EM |
Stat Priority: ER (until requirement) > EM >> ATK% = CRIT
Kazuha prefers ATK% over CRIT substats if used without Bennett, given that he builds full EM and generally has quite little ATK, and ATK scales better at low CRIT investment. However, Kazuha prefers CRIT over ATK% if he is used in a Quicken team or one with Bennett.
With Favonius Sword, Kazuha also benefits heavily from CRIT Rate to trigger its effect. However, there are two reasons why he doesn’t need a significant amount of CRIT Rate:
- Kazuha has many chances to proc Favonius’s passive. For each Skill use, Kazuha has three chances to trigger the passive (Skill hit, Midare Ranzan, Ascension 1 Passive).
- With his Elemental Burst and N1, he has a total of 5 chances to trigger Favonius Sword per N1 E Q sequence. At 20% CRIT Rate and R1, that amounts to a 47.2% chance of proccing. At R5, it has a 67.2% chance.
- With his Elemental Burst and N1, he has a total of 5 chances to trigger Favonius Sword per N1 E Q sequence. At 20% CRIT Rate and R1, that amounts to a 47.2% chance of proccing. At R5, it has a 67.2% chance.
- Kazuha can damage multiple enemies. Kazuha’s Skill has a strong grouping effect, and Favonius Sword’s proc chance increases per enemy — a single hit has two chances to trigger its passive if it hits two enemies.
- Against just two enemies at 20% CRIT Rate and R1, a single N1 E Q sequence has a 72.1% chance of triggering Favonius Sword’s passive. At R5, that increases to 89.3%.
Energy Recharge
Kazuha’s Elemental Burst is an integral part of his kit, providing a consistent source of off-field Elemental application and personal damage. His Burst also refreshes his A4 DMG buff. As such, you want enough Energy Recharge to Burst consistently every rotation.
Run an EM Sands with Favonius Sword, Xiphos’ Moonlight, or Sacrificial Sword. On the other hand, with Iron Sting or Toukabou Shigure, Kazuha typically needs an ER Sands, which actually results in a lower total ER and EM (not accounting for substats).
Most Kazuha rotations can be broken down by how many times he uses his Elemental Skill. The table below lists Kazuha’s ER requirements for a variety of his team comps, with outliers being listed separately.
ER Requirements
| Team | Kazuha’s ER (without Favonius Sword) | Kazuha’s ER (with Favonius Sword) |
| Solo Anemo (Tap Skill + Hold Skill) | 190–200% | 160–170% 140–150% (2 Fav procs) |
| Solo Anemo (2 Tap Skills) | 205–215% | 170–180% 155–165% (2 Fav procs) |
| Double Anemo (4TF with 4 Tap Skills) | 105–110% | 100–105% |
| Triple Anemo (Tap Skill + Hold Skill) | 145–155% | 115–125% |
| Solo Anemo (1 Hold Skill) | 270–280% | 215–225% 190–200% (+1 Team Fav) |
| Rev Melt Ganyu (23s with 2 Tap) | 245–255% | 200–210% 175–185% (2 Fav procs) |
| Raiden + Kazuha (1 Hold Skill) | 155–170% | 120–130% |
- Most Common Scenario: Kazuha's typical rotation is 1 Tap Skill + 1 Hold Skill.
- Unrecommended Scenario: 1 Hold Skill without Raiden is not recommended due to high ER requirements.
- Additional Favonius Procs: With a second Favonius user in the team, Kazuha’s ER requirements decrease by an additional 15% at lower ER requirements and up to 25% at higher ER requirements (per proc).
- Use the Energy Recharge Calculator to determine exact requirements for your team and rotation.
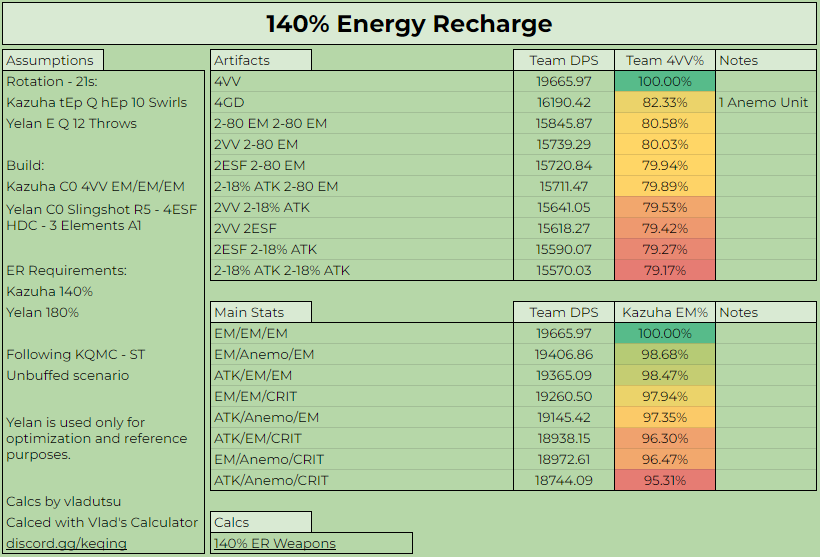
EM vs. ADC
One of the most hotly contested topics on Kazuha is whether he should use a full EM build, an ADC build, or something in-between.
In short, you should almost always build Kazuha with EM main stat artifacts. EM provides Kazuha with not only increased personal damage through his Swirls but also increased team damage from his Ascension 4 Passive.
Kazuha should almost never use an ADC build, with the only primary exception being in Triple Anemo teams. This is for a few main reasons:
- Swirls: Kazuha triggers a large number of Swirls in many of his teams, especially in multi-target scenarios.
- These Swirls have the potential to trigger chain reactions that deal even more AoE damage.
- A4 Passive Scaling: Kazuha’s Ascension 4 Talent, Poetics of Fuubutsu, scales with Kazuha’s EM.
- This buff is extremely valuable to both Kazuha’s teammates and Kazuha himself, as the absorbed Elemental damage also benefits from his own buff.
- Weapon Base ATK: Kazuha generally uses Favonius Sword or other 4-star weapons with EM or ER secondary stats, which have subpar Base ATK.
- This makes Kazuha’s non-Transformative Reaction damage relatively low, especially if he’s in a team without many ATK buffs.
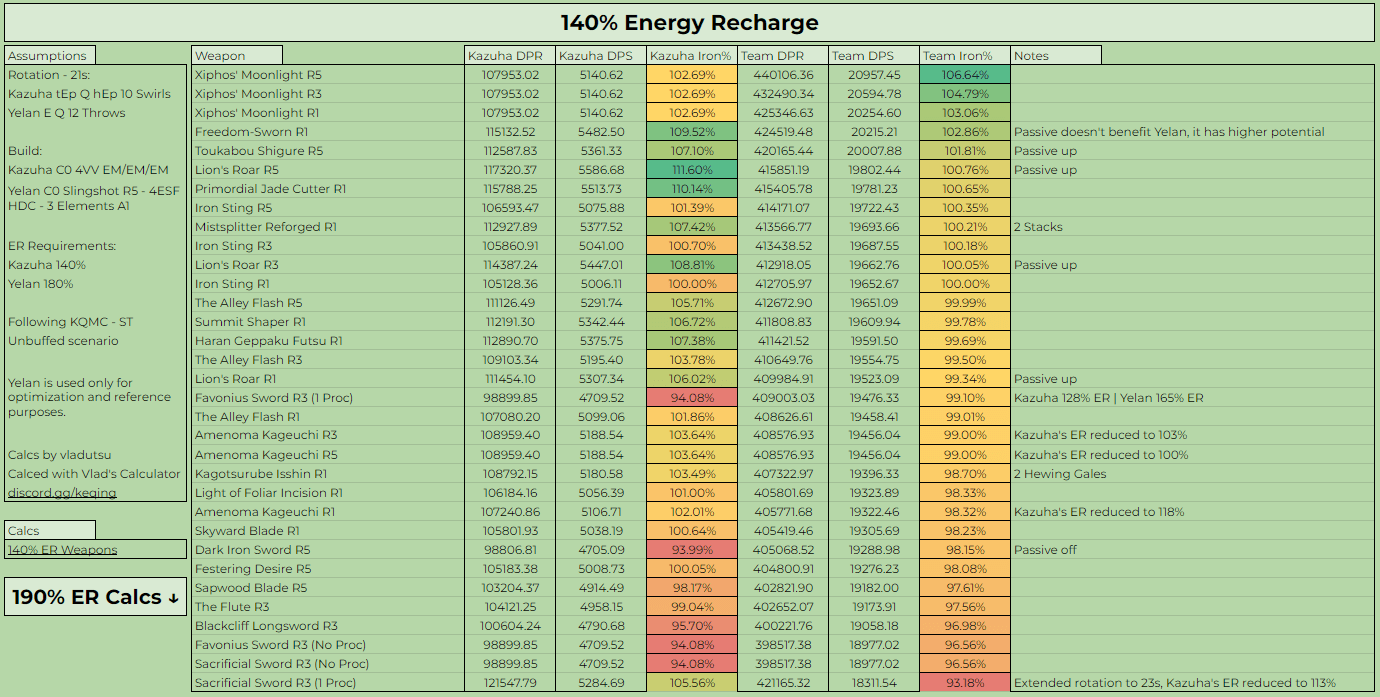
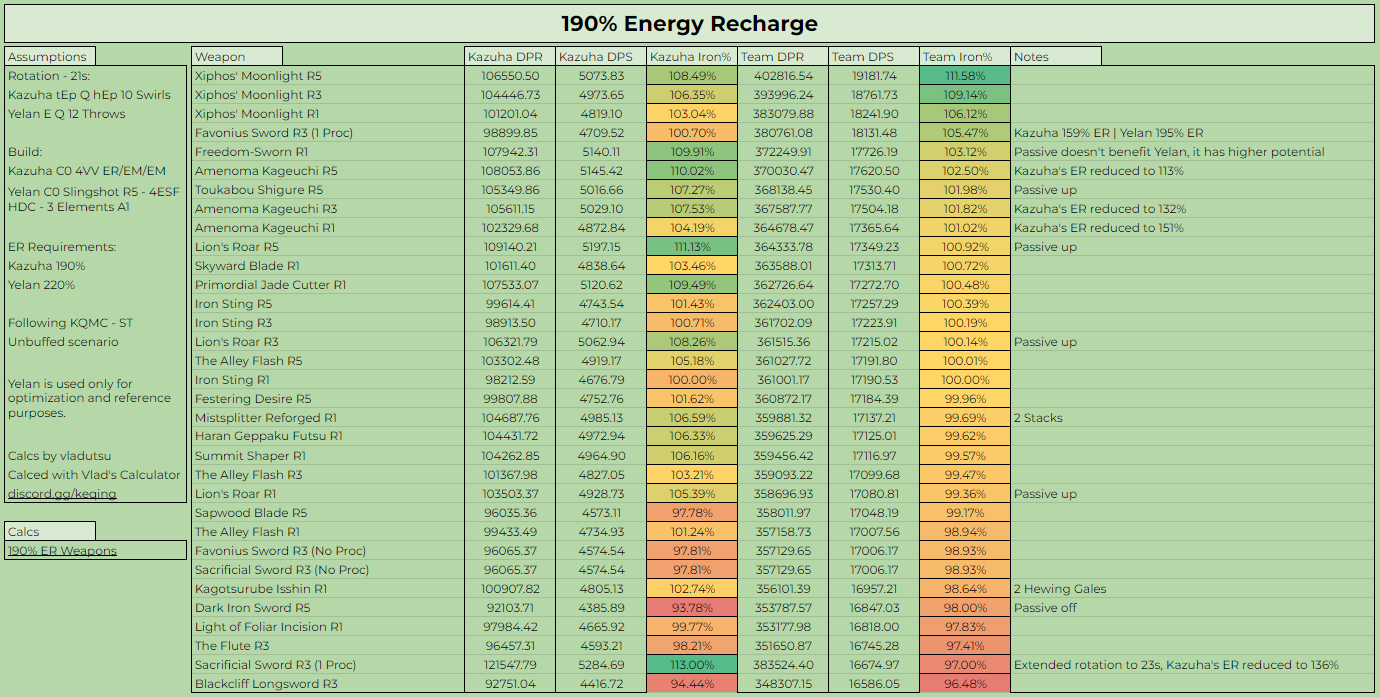
Here are some calculations that show the differences in team damage depending on Kazuha’s build:
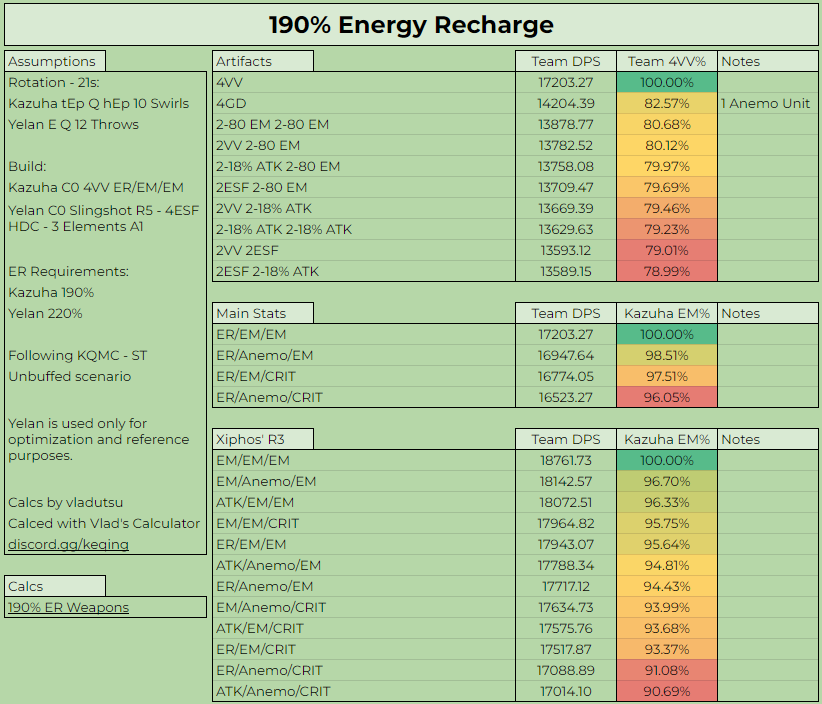
Artifact Build Comparison at 140% ER
Calcs: Kazuha Mastersheet by Vlad (vladutsu)
Artifact Build Comparison at 190% ER
Calcs: Kazuha Mastersheet by Vlad (vladutsu)
Weapons
Wherever in this world I roam, I carry memories of my home… This blade… It is the last link I have to the land of my birth.
Weapon Overview
Kazuha’s personal damage should not be the only priority when choosing a fitting weapon, since he also plays an important support role. Thankfully, Kazuha’s preferred weapons synergize with both his offensive and supportive capabilities.
ER or EM Secondary Stat?
Kazuha prefers weapons with an EM secondary stat as long as he can meet his ER requirements. His build and kit center on having a lot of Elemental Mastery, making this choice rather obvious. Despite this, he also needs Energy Recharge to consistently use his Burst, making weapons with an ER secondary stat worth considering.
Weapons with ER secondary stats are recommended when you cannot reach ER requirements from artifact substats alone. It can take quite a long time to get EM artifact pieces with sufficient ER substats since EM Goblets and Circlets are exceptionally rare.
Note that Kazuha has greater ER and EM stat value by using Favonius Sword with an EM Sands versus Iron Sting with an ER Sands, not accounting for substats or Fav’s passive.
Recommended Weapons
Freedom-Sworn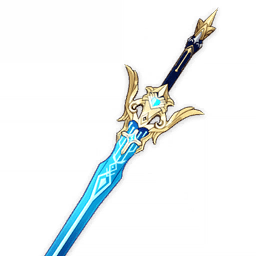 | Freedom-Sworn almost always outperforms other options, although Xiphos' Moonlight can outperform the weapon when Kazuha's teammates don't benefit from Freedom-Sworn's buffs. If Kazuha can reach ER thresholds and has teammates who benefit from Freedom-Sworn's buff, then it's a good idea to use the weapon. Otherwise, Xiphos or Favonius may be a better choice. |
Xiphos’ Moonlight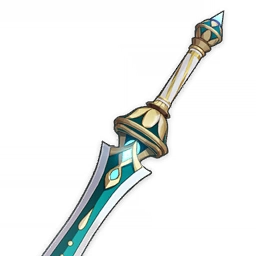 | Xiphos' Moonlight is one of Kazuha’s top 4-star choices and arguably Kazuha's best weapon at high refinements. This weapon performs well even at Refinement Rank 1. An ER Sands is usually unnecessary due to its passive, so Kazuha should use an EM Sands. Favonius Sword performs exceptionally well in teams where Kazuha requires high Energy Recharge. While higher refinements make it stronger, an R1 Xiphos’ with sufficient ER substats on artifacts is competitive with Favonius Sword. In addition, this weapon also performs well if Kazuha’s teammates require a lot of Energy Recharge, even if Kazuha’s requirements are lower. |
Favonius Sword | Recommended weapon for teams where Kazuha or other party members require high amounts of Energy Recharge. Favonius Sword benefits the entire team while still allowing you to build a lot of Elemental Mastery. Using this weapon can decrease Kazuha’s buffing and damage potential, but it’s worth it if it means you can use your team’s Bursts consistently. Its value slightly falls if you own a high refinement Xiphos’ Moonlight. Favonius Sword also performs worse than the weapons mentioned above if the ER requirements are extremely low. With Favonius Sword, Kazuha also benefits heavily from CRIT Rate to trigger its effect. However, he does not need significant investment into CRIT Rate for two reasons: • Kazuha has many chances to proc Favonius’s passive. In an N1 E Q sequence at 20% CRIT Rate and R1, it has a 47.2% chance of proccing against one enemy. At R5, it’s a 67.2% chance. • Kazuha can damage multiple enemies. Against just two enemies at 20% CRIT Rate and R1, a single N1 E Q sequence has a 72.1% chance of triggering the passive. At R5, that increases to 89.3%. |
Fleuve Cendre Ferryman | Fleuve Cendre Ferryman is Kazuha’s best free Sword when you cannot reach ER requirements from substats alone. If you already possess a high refinement Favonius Sword, then you should still use that since its teamwide Energy generation is better. Fleuve Cendre Ferryman is available for free from the Fontaine Fishing Association after catching the following: • 4 Maintenance Mek: Platinum Collection • 10 Rippling Heartfeather Bass • 10 Blazing Heartfeather Bass • 12 Streaming Axe Marlin Each refinement costs: • 2 Maintenance Mek: Platinum Collection • 5 Rippling Heartfeather Bass • 5 Blazing Heartfeather Bass • 6 Streaming Axe Marlin |
Sacrificial Sword | Sacrificial Sword allows Kazuha to cast another Skill, which increases his personal DPS, lowers his ER requirements, and provides him another opportunity to group enemies. The additional Skill use affects rotation time and buff uptime, so it should be used with care. Sacrificial Sword is a nice alternative if you cannot use Favonius Sword. Equipping Sacrificial isn’t a priority, but it shouldn’t be overlooked either. In some Anemo Overvape teams, it's an option to both run Sacrificial Sword and use Kazuha's C1 effect, because Kazuha's chain reactions from his Skill can deal tremendous damage. However, in teams focused on a single hypercarry (e.g. Hu Tao, Wanderer, and Ayaka teams), there won't be enough leftover field time to justify using both Skill resets. |
Iron Sting & Toukabou Shigure | Kazuha’s most recommended free-to-play weapons at low ER requirements. Generally a solid choice. Iron Sting is not worth refining. Despite the small difference in performance in single-target and AoE scenarios, they perform practically the same. Nonetheless, Toukabou Shigure does match Kazuha’s outfit and doesn’t require a billet unlike Iron Sting. |
Dark Iron Sword | Dark Iron Sword is a solid free-to-play option if you cannot craft Iron Sting or didn’t get Toukabou Shigure. Dark Iron Sword is available from Chen the Sharp in Liyue Harbor near the Waypoint in the south of the city. |
Primordial Jade Cutter & Mistsplitter Reforged | Despite being CRIT weapons, Primordial Jade Cutter and Mistsplitter Reforged still perform well due to how strong they are. These weapons increase Kazuha’s personal damage and can deliver in both EM and ADC builds. However, this does not mean Kazuha should use an ADC build with these weapons. A triple EM build still performs better in every team except Triple Anemo. Prioritize using these weapons on your DPS units instead of Kazuha. |
Weapon Calculations
Weapon Comparison at 140% ER
Calcs: Kazuha Mastersheet by Vlad (vladutsu)
Weapon Comparison at 190% ER
Calcs: Kazuha Mastersheet by Vlad (vladutsu)
Kazuha vs. Other Supports
What say you join me out at sea someday when the weather's fine?
Comparison Overview

While Kazuha competes with some of these units for the “buffer” slot in a team, he can also perform well with these units. For example, Kazuha and Venti together form an extremely strong team core that can demolish nearly all multi-target content, especially against lighter enemies.
Additionally, these comparisons are heavily dependent on content, investment level, rotations, etc. You should use these comparisons as soft recommendations and take into account your unit investment and availability to make your own decisions.
For example, while Sucrose might outperform Kazuha as a buffer in a certain team, you might prefer to use Kazuha if he is at a higher level of investment, opting to use Sucrose in a different team instead.
Kazuha vs. Sucrose


Kazuha and Sucrose are the game’s two premier Anemo supports with buffing capabilities. They are both excellent users of 4VV, providing their teams with valuable 40% RES Shred. Kazuha additionally provides an Elemental DMG Bonus with his A4 Passive, while Sucrose provides EM from her Ascension Passives and different stat buffs depending on her weapon (ATK% with TTDS or DMG% with Hakushin Ring).
Kazuha vs. Venti

Kazuha and Venti are two very strong Anemo units. They can both provide 4VV Shred, but Kazuha is more effective at buffing his teammates and grouping heavier enemies whereas Venti provides stronger Burst grouping against small enemies. Furthermore, Venti provides an extremely valuable Energy refund with his Burst.
While Kazuha provides better buffs than Venti, it’s also important to examine their grouping abilities.
Kazuha vs. Heizou


Heizou is similar to Sucrose; they're both 4-star Catalyst users who can buff EM. However, he has a weaker buff, weaker grouping, shorter range, and requires field time to use his Elemental Skill to its maximum potential. Nonetheless, Heizou can provide higher personal damage. Even in Heizou’s best use cases as a support (Freeze teams), Kazuha and Sucrose still perform better.
Despite his shortcomings, Heizou and Kazuha have good synergy together. They both have low cooldowns and a DPS Heizou build works in Triple Anemo or Mono Pyro (Kazuha — Heizou — Bennett — Xiangling).
Kazuha vs. Jean or Sayu


While Kazuha and Jean are both Anemo units with high-damage Elemental Skills and Bursts that can buff Elemental DPS units with 4VV, the similarities stop there. Jean is a role consolidator — she can heal the team, battery Anemo teammates, and provide 4VV RES Shred. Most notably, she enables the Sunfire interaction with Bennett, where Jean’s Burst Swirls the self-applied Pyro aura from Bennett’s Burst.
Both units can be used in the flex slot for many teams; however, Kazuha is almost always the better choice unless you need survivability but lack another healer. Jean can be a viable alternative in scenarios requiring the rapid Pyro application provided by Sunfire. For example, the Sunfire effect can be extremely valuable against enemies with Elemental shields (like Cryo Abyss Heralds). Against enemies with a permanent Elemental auras (like Thundering Manifestation), Kazuha cannot achieve a Pyro Swirl, but Jean can due to Sunfire.

The comparison between Kazuha and Sayu is mostly the same as the one between Kazuha and Jean with two differences exceptions.
- Sayu does not have the Sunfire interaction.
- Sayu can absorb Swirl-able Elements into her Skill and Burst to trigger reactions (e.g. Aggravate in Quicken teams).
Kazuha is almost always a better choice unless you need the healing that Sayu provides.
Kazuha vs. Zhongli


Kazuha and Zhongli are vastly different support units, only sharing the ability to shred Elemental RES. However, they are both options for the flex slot in many teams, making the comparison important to analyze.
Teams
The waves rise high out in the open seas. I, too, must reach new heights of strength.

Kazuha is viable in many possible teams. The order of team archetypes and team examples is not necessarily indicative of their relative strength.
Read the Character Synergy section for more information on specific character interactions.
Aggravate & Spread Teams
Quicken

Kazuha is an excellent Anemo support in Quicken teams with two Electro teammates. In teams with two Dendro or only one Electro, Kazuha cannot consistently Swirl and absorb Electro. While Kazuha does not buff Dendro units (unless at C2), his Electro DMG buff and 4VV Electro RES Shred significantly increase the DPS of his Electro teammates. Moreover, his Electro-absorbed Skill and Burst can trigger Aggravate off of a Quicken aura. Kazuha is best utilized in multi-target scenarios, since his Swirl damage takes a hit in single-target.
Notable Quicken Teammates
All Electro and Dendro characters are viable with Kazuha to varying degrees in Quicken teams.
See the Synergies section for more details.
Example Quicken Teams

(Keqing EE) > Kazuha tEP Q > Kirara (Q) hE > Fischl Q > Keqing E Q E N1C N1 E 3[N1C] > repeat
Keqing starts the rotation with her Skill if there is no Electro aura on the enemy. Kirara uses her Burst only if she is on 4pc Noblesse Oblige. In other cases, Kirara's Burst can be used every other rotation or in AoE scenarios. Kirara only holds her Skill briefly (short hold).
Video Demonstration

Raiden E > Kazuha N1 tEP > Nahida E Q > Sara E CA > Kazuha N1 tEP Q > Sara Q > Raiden Q 3[N3C] N1C > repeat
4TF Kazuha (Aggravate)
Kazuha can serve as a quickswap Aggravate DPS with the Thundering Fury artifact set (4TF), whose 4pc set effect (which triggers off Aggravate) reduces the Skill cooldown of the holder. This works particularly well with Kazuha’s already low Skill cooldown. Kazuha should be used with another 4VV Anemo unit and a highly consistent Electro applier like Fischl. Aggravate 4TF Kazuha performs better in AoE scenarios since an Aggravated Swirl deals damage to multiple enemies at the same time. His increased particle generation also lowers ER requirements significantly.
Notable 4TF Kazuha (Aggravate) Teammates


Electro Options


Example 4TF Kazuha (Aggravate) Teams

Venti Q > Fischl E/Q > Collei Q > Kazuha tEP Q N1 tEP N1 tEP > Venti E > Collei E > Kazuha N2 tEP > repeat
Hyperbloom Teams
Hyperbloom teams use Electro application on Dendro Cores to deal Hyperbloom damage. Kazuha provides multiple functions in the archetype:
- Dendro Core production through Hydro Swirls and a Hydro-absorbed Burst
- Hyperbloom triggers with Electro Swirls (and rarely an Electro-absorbed Burst)
- Additional damage through Swirls
- Dendro Core grouping with his Skill
- At C2, a 200 EM buff to the on-field character and himself
Kazuha’s Electro application is slower than dedicated Hyperbloom units like Raiden Shogun and Kuki Shinobu. It is difficult to consistently absorb Electro into his Burst, so Kazuha will primarily trigger Hyperbloom with Electro Swirls off enemy auras.
Some Hyperbloom teams can be considered “Quickbloom”, in which slow Hydro application leads to increased Quicken uptime, resulting in lower Dendro Core production in exchange for more consistent Aggravate and Spread reactions.
In general, Sucrose is a better Anemo unit to use in a Hyperbloom + Anemo team since she provides EM buffs to her teammates even while they are off-field. Nonetheless, Kazuha can still be played since the Hyperbloom core is already so strong.
Electro-Charged Swirls with Dendro
With insufficient Hydro or Electro application, it is impossible to maintain a Hydro or Electro aura, which prevents Kazuha from Swirling either Element. This issue can be mitigated by following proper rotations and using characters with appropriate amounts of Elemental application. For this reason, Nahida in particular isn’t recommended since her 1.5U Dendro application can be too much.
Kazuha can Swirl Electro-Charged by utilizing the 2U Anemo application on his Hold Skill and Burst initial hit to apply Electro-Charged to multiple enemies, which enables multiple Dendro Cores to be generated on each enemy.
The Electro-Charged Multi-Bloom mechanic works as follows:
- Applying Dendro to an Electro-Charged aura triggers Bloom and also Quicken, which can also react with another Hydro application to trigger another instance of Bloom and generate another Dendro Core.
This doesn’t always occur and there are conditions under which it does not happen, but in general this happens.
Notable Hyperbloom Teammates


Electro Options


Example Hyperbloom Team

Kokomi E > Traveler E Q N1 > Fischl E > Kazuha N1 hEP Q > Kokomi Q 3[N3D] > Fischl Q > Traveler E > Kazuha tEP > Kokomi 4[N3D] > repeat
In this team, it is very difficult to control whether Kazuha absorbs Hydro or Electro into his Elemental Burst. This depends on the frames when each teammate uses their abilities (i.e. Kokomi Skill, Traveler Burst, Fischl Skill, Kazuha Burst). Hydro absorption is more likely to occur since Electro absorption is possible only if there is no Hydro on any enemy (due to Kazuha’s absorption priority).
Burgeon Teams
Burgeon teams are complicated and sensitive in nature due to interactions between Pyro and Dendro. Burning (Dendro + Pyro) consumes Dendro auras and limits Dendro Core production. As such, there must be sufficient Hydro application through a Hydro unit like Tartaglia or with Kazuha’s Hydro-absorbed Burst. Slow and consistent Pyro application is necessary to avoid creating too much Burning. Burgeon teams also require a healer or shielder due to Burgeon’s self-damage. That said, their incredible AoE scaling still makes Burgeon teams a strong option.
In Burgeon teams, Kazuha can be a strong support with his grouping, which allows more enemies to be hit by the Burgeon reaction. However, his Skill and Burst’s tendency to absorb Pyro is also a massive weakness, as doing so can cause Burning to occur. Despite that, this can be used to his advantage when paired with Bennett, allowing him to act as the sole Burgeon trigger.
Notable Burgeon Teammates


Example Burgeon Teams
Kokomi E > Kazuha N1 tEP Q > Nahida E Q > Thoma E Q > Kokomi Q 5[N3D] > Kazuha N1 tEP > Nahida E N2C > Kokomi N3D N3 > repeat
Xingqiu E Q N1 > Traveler E Q N2 > Kazuha N1 tEP Q > Thoma E Q N1 > Normal Attacks > Traveler E N2 > Kazuha N1 tEP > repeat
Anyone can realistically drive Thoma’s Burst. After the initial set-up, the rotation is flexible as long as you get in another use of Traveler’s and Kazuha’s Skill and avoid absorbing Pyro into Kazuha’s Burst.
Freeze Teams

Kazuha is a premier pick for Freeze teams due to his buffs and grouping. However, his Plunging Attack limits Freeze uptime with certain Hydro teammates like Mona. This issue is mitigated by using a sufficient Hydro applier or opting out of his Plunging Attack after using his Skill. Nonetheless, Kazuha’s priority to build EM allows his incidental Shatter reactions to provide additional team damage.
Notable Freeze Teammates
Cryo DPS Options


Example Freeze Teams
Ayaka Freeze
Kazuha is uniquely strong with Ayaka given his short-cooldown grouping and A4 buff. He also allows Ayaka to take on both AoE and single-target damage, while Ayaka-Venti teams are more specialized in dealing with large groups of enemies.
Example Ayaka Freeze Team
Ayaka D (1st Rotation) > Kazuha tEP Q > Shenhe tE Q > Kokomi E > Ayaka D N1 E Q > Kazuha tEP > Shenhe tE N1 > Ayaka D N2C N2 E N2C
Ganyu Freeze
Ganyu appreciates Kazuha’s buffing and grouping, given that her damage in Freeze teams increases heavily when enemies are grouped, and the buffs which Kazuha offers make him one of the strongest support options for her. However, since Venti has stronger grouping, you can use him as a potentially stronger substitute for Kazuha in these teams.
Example Ganyu Freeze Team

Ganyu C > Kazuha tEP Q > Diona hE > Ganyu E Q > Kazuha hEP > Mona EQ > Ganyu 2[C] > Kazuha tEP
Rosaria / Kaeya Freeze
Rosaria and Kaeya can both be used as quickswap DPS units for a Freeze team to great effectiveness, especially if you have their Constellations. Given that both their Bursts are off-field, it’s possible to use an on-field Hydro unit such as Ayato or Tartaglia.
Example Rosaria / Kaeya Freeze Team

Ayato Q > Rosaria E > Kazuha N1 hEP Q > Rosaria Q E > Kaeya E Q > Ayato E N15 > Kaeya E > Rosaria E > Kazuha N1 tEP > Ayato E N15 > repeat
This rotation is quite flexible due to their low cooldowns, and other rotations may be better based on wave content. It is possible to skip Ayato’s Burst every other rotation to accommodate a 15s rotation, which also helps alleviate his ER requirements.
Reverse Vape Teams

Kazuha is a top choice for Reverse Vape teams, competing directly with Sucrose for damage potential. He trades her raw EM share for the powerful DMG buffs he provides to both Pyro and Hydro characters while offering comfortable grouping and significant personal damage.
Kazuha’s unique Elemental Skill and Burst allow him to shred Hydro and Pyro RES with Double Swirl setups, which buffs both the Hydro and Pyro DPS unit. The setups for these teams can be difficult, and it’s recommended to practice them a bit before performing them in hard content.
Notable Reverse Vape Teammates

Example Reverse Vape Teams

First Rotation
Tartaglia E > Bennett Q > Kazuha Q tEP (N1) > Xiangling Q E > Tartaglia Q E 5[N2CD] N2CJ > Downtime
For Double Swirl in multi-target, Tartaglia’s Skill cast must make contact with at least one enemy, and Bennett’s Burst must hit at least one different enemy.
Downtime
Bennett E > Xiangling (N2 / E) > Kazuha tEP / Tartaglia C > Second Rotation
Repeat this sequence until Xiangling’s Burst is almost full (usually 2–3 times).
Second Rotation
Tartaglia C > Xiangling E > Kazuha hEP Q (N1) > Bennett Q E > Xiangling Q > Tartaglia Q E 5[N2CD] N2CJ > Downtime
Tartaglia’s Charged Shot must hit an enemy marked with Riptide or without a pre-existing Pyro aura. This rotation is also used for subsequent rotations if necessary.

Single-Target Setup
Xingqiu E Q (E) > Kazuha Q > Bennett E Q > Kazuha hEP > Xiangling Q E
Multi-Target Setup
Bennett E Q > Kazuha tEP > Xiangling Q E > Xingqiu E (E) Q > Kazuha Q (outside of Bennett’s Burst)
Xingqiu E Q (E) > Thoma E Q > Kazuha N1 tEP (N1) Q > Hu Tao / Yoimiya E Normal Combo (Q) > repeat
Video Demonstration
Kazuha needs to animation cancel his first N1 with his Skill. The second (N1) can be used if additional Hydro application is necessary to absorb Hydro into his Burst. Xingqiu needs to be at C6 in order to apply enough Hydro for Hu Tao to consistently trigger Vaporize (since Thoma’s Burst can steal Vapes).
Reverse Melt Teams

Similar to Reverse Vape teams, Reverse Melt teams focus on using Amplifying Reactions by reacting Cryo on Pyro to increase damage. These teams require Bennett due to the amount of role compression and buffs he provides. Aside from his buffing capabilities and personal damage, Kazuha can absorb his Burst with Pyro through Bennett’s self application, increasing the consistency with which Melts can be performed.
Notable Reverse Melt Teammates
Cryo DPS Options

Example Reverse Melt Teams
Rosaria Reverse Melt
This team archetype revolves around Reverse Melting Rosaria’s damage through Pyro application. While Kazuha is not always a prime pick in such teams because of the difficulty of Swirling both Pyro and Cryo from the second rotation onwards, even Swirling one Element is a significant boost that it can warrant his inclusion.
Note that with C6 Bennett and Kazuha, there is enough Pyro application that Xiangling can be replaced for a buffer such as Shenhe. Though the damage is good, this is nonetheless relatively niche.
Example Rosaria Burnmelt Team

Rosaria E > Nahida E Q > Kazuha N1 tEP > Bennett E Q > Rosaria E Q > Kazuha Q tEP > Rosaria N2 E > Bennett E > Nahida N3 E N3 > Kazuha tEP N1 > repeat
Ganyu Reverse Melt
Ganyu Reverse Melt with Kazuha is not recommended unless you can achieve near-perfect inputs. The window for error for a 5 Charged Shot rotation is less than 0.08s. Missing the Melt on the last Charged Shot is a significant DPS loss. It is also quite easy to lose the Pyro aura. While possible, it requires significant amounts of time and practice. If you want to play Reverse Melt Ganyu before C6, just use Xiangling instead of Kazuha to save yourself the headache.
Before C6, Ganyu requires a shield to function. With C6 Ganyu, Kazuha can be recommended with additional Pyro application from a unit like Xiangling or Jean.
If you insist on playing it, feel free to read the section in our Ganyu Guide for more information.
Example Ganyu Reverse Melt Team

5 Charged Shot Rotation (Unrealistic)
Zhongli hE > Ganyu E C > Kazuha tEP > Bennett Q > Kazuha Q > Ganyu 5[C] > Kazuha tEP > Bennett E > repeat
Video Demonstration
4 Charged Shot Rotation (Realistic)
Zhongli hE > Ganyu E C > Kazuha tEP > Bennett Q > Kazuha Q > Ganyu 4[C] > Bennett E > Kazuha tEP > Bennett E > repeat
Video Demonstration
Forward Melt Teams

Forward Melt teams employ an on-field Pyro DPS with off-field Cryo appliers. While viable Forward Melt teams are rare, Kazuha’s buffing capability and ability to absorb Cryo into his Burst make him a strong choice. So far, only Diluc and Bennett (before C6) are effective Forward Melt on-field DPS options.
Notable Forward Melt Teammates
Example Forward Melt Teams

Pre-C6 Bennett
Kaeya E > Kazuha Q > Bennett Q E > Kazuha N1 hEP > Kaeya Q E > Diluc Q 3[N1E] N1 > repeat
C6 Bennett
Kaeya E > Kazuha E > Bennett Q E > Kazuha N1 hEP > Kaeya Q E > Diluc E N2 E N1 E Q N4 > repeat
Initial Rotation
Bennett E > Kazuha N1 tEP > Chongyun Q E > (Kazuha Q) > Bennett Q N1 E > Rosaria Q E > Bennett 4–5[N1E] > Subsequent Rotation
Subsequent Rotations
Bennett Q N1 E > Kazuha N1 tEP > Chongyun Q E > Bennett 4-5[N1E] > Rosaria E Q > Bennett 2[N1E] > repeat
Kazuha can use his Burst in the first rotation after Chongyun, but it should not be used after since it absorbs Pyro. Bennett should only use his Tap Skill. Note that this team is impossible to play with C6 Bennett.
Electro-Charged & Anemo Overvape Teams
Electro-Charged
Electro-Charged teams use Hydro and Electro units to let Kazuha trigger high-damage Swirls and Electro-Charged reactions. Kazuha’s ability to apply AoE Hydro and Electro through Elemental Absorption and Swirls allows him to act as the trigger for Electro-Charged reactions.
Occasionally, Kazuha can Swirl both Hydro and Electro with a single Anemo application, which further increases his Elemental application. However, his consistency in being the trigger for reactions can vary greatly depending on his teammates.
Notable Electro-Charged Teammates
Example Electro-Charged Teams

Xingqiu E Q N1 > Beidou E > Kazuha hEP Q N1 > Fischl E/Q N1 > Beidou Q E > Kazuha 12[N2D] tEP > repeat
With consistent inputs and dash cancels, Kazuha can proc Beidou’s Burst 12 times with 12 consecutive N2D combos. With slower inputs, only 11 procs occur.

Sample Rotation
Neuvillette E > Furina E(D) > Kazuha tEP Q > Yae Miko 3[E] > Furina Q > Neuvillette C Q C E > Kazuha tEP > Yae Miko 3[E] > Neuvillette 2[C]
A highly potent 5-star team. Neuvillette’s HP fluctuation gains a sufficient amount of Fanfare stacks to make Furina worthwhile without a healer. Neuvillette's C1 increases his interruption resistance and gives him an additional stack of his passive.

Raiden E > Shinobu Q > Yelan E > Kazuha hEP Q > Yelan Q > Shinobu E > Raiden Q 3[N3C] N1C > Kazuha tEP > repeat

Ayato Q > Fischl E/Q > Kazuha hEP Q > Beidou E Q > Ayato E N15 E N15 > Beidou E > Kazuha tEP > repeat
This rotation assumes Ayato is on 4pc Thundering Fury. On another set, the rotation is extended by a few seconds to accommodate Ayato’s downtime.
4TF Kazuha (Electro-Charged)
4TF Kazuha is a Electro-Charged team archetype that excels against multi-target content and can clear mobbing content with ease. The 4pc set effect of Thundering Fury (which triggers off Electro-Charged) reduces the Skill cooldown of the holder. This works particularly well with Kazuha’s already low Skill cooldowns.
Kazuha should be used with another 4VV Anemo and a highly consistent Electro applier like Fischl. 4TF Kazuha performs better in AoE scenarios since an Electro-Charged Swirl deals damage to multiple enemies at the same time. His increased particle generation also lowers ER requirements significantly.
Notable 4TF Kazuha (Electro-Charged) Teammates
Electro Options
Example 4TF Kazuha (Electro-Charged) Teams

Fischl Q > Kokomi E > Venti Q > Kazuha tEP Q N1 tEP N1 tEP > Fischl E > Kokomi Q > Venti E > Kazuha N2 tEP N1 tEP > repeat
This is just one of many possible rotations. The team is pretty flexible as long as you maintain a consistent Electro-Charged aura on enemies with Fischl’s Oz and Kokomi’s Bake-Kurage.
Anemo Overvape

Anemo Overvape is like an Electro-Charged Kazuha team with Bennett added for additional Elemental Reactions from Pyro reacting with Hydro and Electro aura from Electro-Charged. This team may be known as "Soup" in some communities.
Kazuha can provide multiple Elemental DMG buffs and almost always absorbs Pyro into his Burst, which lets him proc Overloaded, Reverse Vape, and Electro-Charged Swirls. The Hydro or Electro unit can serve as the on-field DPS unit, or they can both be off-field units with Bennett or Kazuha serving as an on-field driver.
Notable Anemo Overvape Teammates
Example Anemo Overvape Teams

Ayato Q > Fischl E > Kazuha N1 tEP > Ayato E N15 > Bennett E Q > Fischl Q > Kazuha N1 tEP Q > Ayato E N15

Initial Rotation
Tartaglia E > Bennett Q > Kazuha N1 hEP Q > Tartaglia Q > Fischl E > Tartaglia E 5[N2CD] > Subsequent Rotation
Subsequent Rotation
Bennett E N2 > Kazuha N1 tEP > Bennett E Q > Tartaglia C > Kazuha Q hEP > Tartaglia Q > Fischl Q/E > Tartaglia E 5[N2CD] > repeat

Raiden E > Yelan E Q > Kazuha hEP > Bennett Q > Kazuha Q > Raiden Q 3[N3C] N1C > Bennett E > repeat
Mono Element & Hypercarry Teams

Mono Element (Pyro | Cryo | Hydro | Electro) teams use synergies between characters of the same Element, as well as Anemo and Geo buffers. Kazuha is uniquely poised to buff these teams through his Ascension 4 Passive’s Elemental DMG% buff. Additionally, because these teams use units of the same Element, characters enjoy lower ER requirements than usual. Generally, Kazuha’s Mono Element teams have an on-field Elemental DPS, off-field Elemental unit, and an off-field unit that is of the same Element, Geo, or Anemo.
Hypercarry teams are a related archetype that opt for multiple supports to funnel a single Elemental DPS unit. While not technically a Mono Element team depending on the Element of the supports, they are mentioned in this section due to their similarities in units and teambuilding.
Mono Pyro
Mono Pyro teams are highly competitive with their reaction-based counterparts due to the availability of artifact sets like Lavawalker and Emblem of Severed Fate combined with Bennett’s incredible Flat ATK buff. Bennett is irreplaceable in this archetype — his buffs, healing and Energy cannot be replicated by any other unit.
Notable Mono Pyro Teammates

Example Mono Pyro Teams

Bennett E > Kazuha tEP Q > Bennett Q E > Xiangling Q E > Kazuha hEP > Klee N1 E Q 4[N1C] N1 > repeat
This is just one of several possible rotations.

(Yoimiya Q) > Zhongli hE (Q) > Bennett E Q > Kazuha hEP Q > Yoimiya E 3[N5] > Bennett E > Kazuha tEP > repeat
Mono Cryo

Mono Cryo becomes a potent team archetype with Shenhe. A shift from Freeze to Mono Cryo can allow such teams to increase their DPS against enemies that cannot be Frozen (such as Bosses). Nonetheless, Freeze tends to outperform Mono Cryo in AoE.
Notable Mono Cryo Teammates
Cryo DPS Options


Example Mono Cryo Teams

Ayaka D (first rotation) > Kazuha tEP Q > Shenhe tE N1 Q > Layla Q N1 E > Ayaka D E N 1Q > Kazuha tE > Shenhe E > Ayaka D N2CD E N2C > repeat
Ganyu E > Zhongli hE > Shenhe tE Q > Kazuha tEP Q > Ganyu CA E Q > Shenhe E N1 > Ganyu C > Kazuha tEP > Ganyu 2[C] > repeat
Mono Hydro

While formerly difficult to justify, the introduction of multiple new Hydro units has given Mono Hydro teams a chance to shine, particularly due to the highly Energy-hungry nature of these units being resolved by running them together. However, these teams tend to be highly single-target oriented due to the nature of Yelan, Xingqiu, and Hydro Swirls.
Notable Mono Hydro Teammates

Example Mono Hydro Teams
Xingqiu and Yelan

The Double Hydro core of Xingqiu and Yelan provides incredibly strong single-target, off-field damage. Their combined particle generation also lowers their ER requirements, which are typically quite high alone. An on-field Hydro DPS like Kokomi, Ayato, or Tartaglia can potentially be used, or a defensive Anemo or Geo unit like Jean or Zhongli.
Example Team

Yelan E > Kazuha tEP > Kokomi E > Xingqiu E N1 Q > Yelan Q N1 > Kazuha tEP Q N1 > Yelan N1 E N1 > Kokomi Q 5[N3D] > repeat
Kokomi can use N3 combos if she is C1+.
Neuvillette and Furina

The Double Hydro core of Neuvillette and Furina provides incredibly high damage in both single-target and multi-target scenarios. Neuvillette can build enough Fanfare stacks via his own HP fluctuation to make a healer unnecessary. A shielder is highly recommended at C0. Despite this, you can still play with a teamwide healer in the last team slot.
Example Team
Neuvillette E > Furina ED > Kazuha tEPQ > Zhongli hED > Furina Q > Neuvillette C E C Q > Kazuha tEP > Neuvillette 2[C]
Neuvillette and Furina form an exceptional pairing that is amplified by Kazuha’s Hydro DMG% buff. Zhongli provides a valuable shield for C0 Neuvillette and for the team as a whole. Although this team lacks a healer, Neuvillette’s personal HP fluctuation is enough to stack Furina’s Fanfare.
Ayato Hypercarry

Ayato Q > Bennett E Q > Candace E Q > Kazuha N1 tEP Q > Ayato E N15 > Kazuha N1 hEP > Candace E > Ayato E N15 > repeat
This playstyle for Ayato is not recommended unless you have significant investment towards his build.
Mono Electro
While Mono Electro teams do not deal as much damage as Aggravate, Electro-Charged, or Hypercarry alternatives, they free up highly-contested units for another team in Spiral Abyss. We do not suggest running Mono Electro teams when you can run Aggravate instead.
Example Mono Electro Teams
Yae E E E > Kazuha N1 tEP Q > Fischl E/Q > Kuki Shinobu E Q > Yae 3[N2CJ] > Kazuha N1 tEP > (Yae Q) > repeat
Yae uses her Burst every other rotation. Fischl alternates using her Skill and Burst.
Electro Hypercarry
Kazuha can enable some Electro units to play a hypercarry playstyle where all the team's buffs increase that Electro character’s damage. His A4 Electro DMG buff, 4VV Electro RES Shred, and grouping make him a vital support for Electro hypercarries.
Raiden and Keqing hypercarry teams are the most popular of this archetype. If Kazuha absorbs Pyro into his Burst (which happens in preferred rotations), the team also procs significant amounts of Overload, which can become a nuisance in mob content.
Example Electro Hypercarry Team

Raiden E > Kazuha hEP > Bennett Q > (Kazuha Q) > Lisa Q > Raiden Q 3[N3C] N1C > repeat
This rotation lets Lisa use TTDS to further buff Raiden.
Triple Anemo Teams
These teams lack units who can utilize the Elemental DMG Bonus from Kazuha’s A4, which allows him to fully commit to an ADC build. Kazuha can then utilize the range of available buffs and act as an off-field DPS, providing solid damage and valuable grouping.
At C0, Faruzan provides healthy amounts of Anemo RES Shred and Anemo DMG Bonus, already making her potent. At C6, however, she gains huge boosts to her Energy generation, personal damage, and grouping capabilities as well as a 40% CRIT DMG buff for Anemo DMG.
Bennett is by far the best option to round out these teams, as he provides additional buffs and healing; if he is firmly unavailable, units such as Thoma, Layla, or Zhongli can be considered.
Notable Triple Anemo Teammates
Example Triple Anemo Teams

Faruzan E CA Q > Kazuha hEP > Bennett E Q > Kazuha Q > Wanderer CA E [preferred NA/CA combo] Q > Kazuha tEP > Bennett E > repeat

Zhongli hE > Faruzan E CA Q > Kazuha Q hEP > Xiao E E Q [preferred Plunging Attack combo] > Kazuha tEP > repeat

Bennett E Q > Faruzan E CA Q > Venti Q > Kazuha tEP Q > Venti E > Bennett E > Kazuha hEP > repeat
Character Synergies
While I am still able to, I want to travel far and wide and meet all sorts of different people.
This section discusses Kazuha’s synergies with notable teammates in most of their common team archetypes. If a character or team archetype is not listed, then Kazuha is not commonly played or recommended with them. Units are listed alphabetically, irrespective of their viability or damage output.
Synergies are given a general rating of Excellent, Good, and Poor.
- Excellent indicates that Kazuha is a Best-in-Slot option for that unit in a variety of that character’s teams.
- Good means that Kazuha is viable with that unit.
- Poor means that you should avoid playing Kazuha with that character unless you lack other options.
Please do not feel obligated to read everything in the synergy tables. They are intended to be a reference if you want to play a certain character with Kazuha.


Cryo
 Ayaka | Synergy: Excellent Freeze Kazuha is uniquely strong with Ayaka given his short-cooldown grouping, which allows him to promptly group the next wave of enemies. Ideal rotations with Ayaka and Kazuha let her use Kazuha’s buffs during her entire field time. Mono Cryo Ayaka greatly appreciates Kazuha’s buffs in Mono Cryo teams. With proper play, they allow Ayaka to better tackle Boss content that typically poses a roadblock for her. |
 Charlotte | Synergy: Good Freeze Charlotte is primarily used with Furina in Freeze teams. There is little reason to run her over other Cryo support options otherwise. Mono Cryo Charlotte’s healing could be valuable in Mono Cryo teams; however, Layla’s or Diona’s shields are preferred defensive utility for their additional interruption resistance. |
 Chongyun | Synergy: Good Chongyun’s unique C2 effect offers team cooldown reduction, which increases team DPS through shorter rotations or additional Skill uses (depending on the character). Reverse Melt In single-target scenarios in Reverse Melt Teams, absorbing Cryo into Kazuha’s Burst can prevent Chongyun from triggering Melt on every hit of his Burst. Forward Melt Chongyun’s Cryo Infusion lets Bennett or Diluc trigger Forward Melts with their Skill after their Normal Attacks. You should try to absorb Cryo into Kazuha’s Burst. If you want to play a Melt DPS Bennett playstyle with Chongyun, do not unlock Bennett’s C6 since it overrides Chongyun’s Cryo Infusion. Mono Cryo In a niche circumstance with C6 Shenhe, Chongyun is uniquely poised to enable many on-field Mono Cryo DPS units. For example, Zhongli can infuse Cryo into his Normal Attacks and utilize C6 Shenhe’s Icy Quill effect along with Kazuha’s A4 Cryo DMG buff to deal tremendous damage. |
 Diona | Synergy: Good Diona’s Burst at C6 increases Kazuha’s EM by 200 if he is on-field. The buff can snapshot onto his A4 Passive, but once he Swirls while off-field with his Burst, he loses Diona’s buff. It is not recommended to play around this mechanic. Freeze & Mono Cryo Freeze teams generally don’t require defensive utility since enemies cannot attack, making Diona less necessary. Mono Cryo teams on the other hand can benefit greatly from a shield since enemies are no longer Frozen. Reverse Vape (Hu Tao) Diona can replace Zhongli as a shield option if you do not have him. Her shield is tied to her Elemental Skill, which makes it easy to maximize HP since you do not need to invest in ER. |
 Freminet | Synergy: Good Freeze (Shatter) Kazuha is fantastic in Freminet’s Cryo DPS teams. Their Burst cooldowns are both 15s and Kazuha’s A4 buff is incredibly strong. C2 Kazuha’s EM buff provides a small DPS increase when Freminet triggers Shatter on-field; however, note that Freminet should not build full EM. |
 Ganyu | Synergy: Excellent Freeze Ganyu appreciates Kazuha’s buffing and grouping, given that her damage in Freeze teams increases when enemies are grouped. Furthermore, Kazuha’s buffs make him one of the strongest support options for her, since Ganyu can snapshot them onto her Burst. Kazuha’s short field time and 15s Burst cooldown let Ganyu run 15s rotations so she can snapshot her own Cryo DMG buff into subsequent Bursts. In general, Ganyu prefers Venti over Kazuha to enable her pseudo-quadratic scaling and to refund her Energy with his Burst. But, Kazuha can definitely still be used! Mono Cryo Kazuha is key to making Ganyu’s Mono Cryo teams work (primarily with Shenhe or Rosaria) due to his A4 Passive. Mono Cryo gives weight to both Ganyu’s Burst and Charged Attacks while maintaining competitive damage. However, the loss of Freeze means she requires a shielder to reliably use her Charged Shots, with Layla, Diona, and Zhongli as options. Reverse Melt Ganyu Melt teams with Kazuha are not recommended unless you can play near-perfectly or have C6 Ganyu. If you insist on playing it, feel free to read the section in our Ganyu Guide. Forward Melt (Bennett DPS) Ganyu can provide additional off-field damage and Cryo application with her Burst in Forward Melt Bennett teams. Her 20% Cryo DMG Bonus also benefits the other Cryo character, usually Rosaria or Chongyun. |
 Kaeya | Synergy: Excellent Kazuha plays well with Kaeya since they share the same Skill and Burst cooldowns. Kaeya’s Burst follows Kazuha when he uses his Elemental Skill and leaps into the air. Freeze Kaeya’s high Energy generation, strong personal damage and short cooldowns work well in a Freeze team, whether as an on-field DPS with Chongyun, a quickswap DPS alongside Shenhe or Rosaria, or as an off-field support for Ayaka. Mono Cryo Kaeya can be a good off-field Cryo DPS in Mono Cryo teams, especially with Ayaka. However, using him over a defensive unit like Layla can make gameplay more difficult. Reverse Melt Kaeya’s Burst can only trigger Melt a third of the time, but he still provides good off-field damage. While not as effective as Rosaria due to his Burst's ICD, Kaeya is still a functional option. Forward Melt Kaeya is still sufficient to Melt all of Diluc and Bennett’s important hits. Additionally, his Burst orbits the active character, allowing for greater flexibility compared to Rosaria’s static Burst AoE. |
 Layla | Synergy: Excellent Layla’s short cooldowns work very well with Kazuha’s cooldowns. She provides the second strongest shield in the game (after Zhongli). Freeze Layla’s shield is mostly redundant if playing with a Hydro healer like Kokomi, so she may only be valuable with inconsistent Hydro appliers or with Ganyu. Mono Cryo Mono Cryo teams benefit greatly from Layla’s shield since enemies are no longer Frozen. For 100% shield uptime, rotations should be 24s. Triple Anemo Layla can be used as a shielder in Triple Anemo teams, opening up Bennett to be used in another team. |
 Rosaria | Synergy: Excellent Rosaria benefits greatly from Kazuha’s buffs. They share the same Skill and Burst cooldowns, which allows for very smooth quickswap rotations. Kazuha’s grouping is especially important since Rosaria’s Burst AoE radius is quite small. Freeze Rosaria’s low cooldowns, good particle generation, AoE Cryo damage, and CRIT Rate share through her A4 Passive make her a tremendous off-field Freeze DPS or support. Mono Cryo Rosaria can be an excellent choice for Mono Cryo compositions. Without Freeze, her CRIT Rate share is even more appreciated. However, using her with Shenhe and another Cryo DPS causes the team to lack a healer or shielder. Reverse Melt Rosaria is the most recommended option for this team as she can Melt all ticks of her Burst and Skill while providing buffs with her CRIT share. With both Cryo and Pyro Swirled by Kazuha, Rosaria and Xiangling tend to contribute an equal sum of damage with equal investment at C6. With only Pyro Swirled, Xiangling’s damage contribution is higher and it is recommended to invest accordingly. Kazuha, Bennett, and Nahida together enable a BurnMelt playstyle, where Rosaria is dealing a majority of the team’s damage. Forward Melt Rosaria is highly recommended to be at C2+ for Forward Melt teams. |
 Shenhe | Synergy: Excellent Kazuha can trigger Shenhe’s Icy Quill effect by absorbing Cryo with his Elemental Skill and Burst, which offers a significant boost to his personal damage. Kazuha’s synergy with Shenhe is further improved by his Cryo DMG buff, which increases the damage done by her Icy Quill. Freeze Shenhe is a fantastic choice in Freeze teams. However, Shenhe’s 20s Burst cooldown forces extended rotations, thereby preventing 15s Ganyu rotations. Despite this, her buffs more than make up for it. Mono Cryo Shenhe is the premier Cryo unit for a Mono Cryo team, due to her 15% Cryo RES Shred, various DMG Bonuses, and Icy Quill effect. Shenhe makes Cryo DPS units much more effective against enemies that cannot be Frozen (like Bosses). Reverse Melt Shenhe provides substantial buffs to quickswap Cryo DPS units like Rosaria or Kaeya. She lets them front-load their damage, which can be useful for enemies with short DPS windows. In turn, they help lower her ER requirements. |
 Wriothesley | Synergy: Excellent (Poor in Reverse Melt) It is strongly recommended to play with a healer or shielder in all of Wriothesley’s teams with Kazuha. Mono Cryo Wriothesley’s Mono Cryo teams with Kazuha are strong, especially with Shenhe in the party. Kazuha’s grouping is incredibly valuable due to Wriothesley’s limited range and AoE. Freeze Wriothesley can be played in Freeze teams with Kazuha, typically with Xingqiu, Yelan, or Kokomi as the off-field Hydro applier. Reverse Melt Kazuha is not as strong in Wriothesley’s Reverse Melt teams since it is basically impossible to get a consistent Cryo Swirl immediately before Wriothesley’s damage window. Kazuha is essentially there for additional Pyro application and to buff Xiangling (or Thoma). A Burnmelt team with Wriothesley — Nahida — Bennett — Kazuha is possible, but Kazuha is primarily there for Pyro application to maintain Burning. You’re better off using Xiangling or Thoma instead of Nahida. |
Electro
 Beidou | Synergy: Good Beidou excels in multi-target scenarios (particularly against two enemies) and takes good advantage of Kazuha’s grouping and buffs. To play Beidou optimally, you need to weave in Normal Attacks throughout the rotation to trigger her Burst. If Kazuha is driving Beidou’s Burst, he should use N2D combos. He can proc Beidou’s Burst up to 12 times with consistent inputs and dash canceling. Aggravate Beidou can work in Aggravate teams, particularly against multiple enemies. Note that Beidou still uses a typical ADC build due to her extremely high Talent multipliers. Hyperbloom Beidou’s Burst does not target Dendro Cores after its initial cast, unlike other Electro off-field options. Her enemy-focused Electro application lets Kazuha consistently trigger Hyperblooms with his Electro-absorbed Burst and Electro Swirls. In these teams, she needs a lot of ER as the sole Electro, although Favonius Sword on Kazuha and other teammates can alleviate this issue. Electro-Charged Beidou’s rapid AoE Electro application from her Burst can steal Electro-Charged triggers from Kazuha. However, her personal damage more than compensates for this. Mono Electro & Electro Hypercarry Beidou is an effective off-field DPS in Mono Electro teams, especially in multi-target scenarios. With Kujou Sara and Bennett, Beidou can act as a Hypercarry against two enemies; however, this still requires significant investment to compete with other Electro options. |
 Cyno | Synergy: Poor Aggravate Cyno in Aggravate with Kazuha can be difficult to play without a shielder, where the only recommended Dendro option is Baizhu. Without a shield, Cyno would deal less damage because frequent dodging disrupts his Normal Attacks and Skill uses. Hyperbloom Cyno can be an on-field Electro unit for Hyperbloom. However, opting for Kazuha in the last team slot prevents you from using an Electro battery like Fischl. Furthermore, Cyno’s long field time prevents Kazuha from getting two Skill uses in without extending the rotation. For these reasons, Favonius weapons are highly recommended in the team, perhaps even on every teammate. |
 Dori | Synergy: Poor Aggravate, Electro-Charged, & Mono Electro Dori can serve as a healer in teams with Kazuha, albeit worse than Kuki Shinobu. Dori’s inefficacy with 4pc TotM, poor reaction triggering, limited Burst range, and high ER requirements prevent her from being a worthwhile option. Despite these drawbacks, her C6 still lets her work as a quickswap unit alongside Kazuha and Fischl. |
 Fischl | Synergy: Excellent Fischl is an extremely strong Electro option in Kazuha’s teams due to her high personal damage and rate of Electro application. She also helps battery the team with her particle generation. Fischl’s unique Skill cooldowns and Burst refresh means that she has three primary rotation lengths with Kazuha. • A 15s rotation is used if every character on the team can fit that rotation window. Fischl can alternate Skill and Burst uses in these rotations. • A 20s rotation is used with on-field DPS units who have a 20s Burst cooldown. There is usually downtime with Oz in these rotations. • A 25s rotation is used primarily with Keqing or Tighnari, who have a 12s Burst cooldown. This rotation allows for maximum Oz uptime and lowers Kazuha’s ER requirements. Aggravate & Spread Fischl’s high rate of Electro application allows Kazuha to more consistently Swirl and absorb Electro, even with high rates of Dendro application from a single Dendro unit. Hyperbloom Fischl’s Electro application and Oz’s tendency to prioritize enemies allows Kazuha to obtain a significant ownership of Hyperbloom reactions, making her a strong option in these teams. Electro-Charged Fischl is the premier Electro unit for Electro-Charged, condensing unmatched single-target Electro application and particle generation alongside high personal damage. Her Electro application being single-target is significant, as it allows Kazuha to reliably Swirl Electro from one target onto surrounding ones. Alongside the AoE Hydro application from Kazuha’s Burst, he can trigger Electro-Charged reactions, which deal high damage due to his EM build priority. Anemo Overvape Fischl is the standard Electro option for Anemo Overvape teams due to her high Electro application and personal damage. With many Electro reactions taking place, Fischl can maximize the potential of her A4 Passive. Her strength in this team is unmatched. Reverse Vape (Overvape Hu Tao) Fischl is a strong off-field DPS option for Hu Tao since her Electro application allows Hu Tao to trigger both Overload and Vaporize. Note that playing Fischl, Kazuha, and Xingqiu together with Hu Tao renders the team without a shield. Mono Electro & Electro Hypercarry Fischl’s high personal damage and unmatched Electro Particle generation make her an excellent choice to pair with Electro DPS units. Fischl is also a viable alternative to Lisa or Sara in Raiden Hypercarry teams. |
 Keqing | Synergy: Excellent Keqing’s low Skill and Burst cooldowns align well with Kazuha’s cooldowns, allowing for a 15s or 25s rotation. Aggravate Keqing is an excellent Aggravate on-field or quickswap DPS that coordinates well with Kazuha’s short cooldowns. She offers high personal damage due to her frequent Aggravate procs. She can use 4pc Thundering Fury well. Mono Electro & Electro Hypercarry Keqing does not have the raw strength of other DPS units; nonetheless, she can still be played in a Hypercarry playstyle alongside Bennett and Kujou Sara. |
 Kujou Sara | Synergy: Excellent Mono Electro & Electro Hypercarry Sara is fantastic for Electro DPS units due to her buffs, especially at C6. She can also hit quite hard with her Elemental Burst. Sara is Raiden’s premier Electro support particularly at C6, and she is strong with Keqing, who can make full use of her buffs with her flexible field time. Aggravate Aggravate’s Additive Reaction DMG does not scale with Sara’s Flat ATK buff, but it does scale with her C6 CRIT DMG buff. Sara is best used as an additional buffer for on-field Keqing and Raiden Aggravate team compositions. However, her buffs generally won't provide as much damage for the team as an off-field DPS like Fischl. |
 Kuki Shinobu | Synergy: Good While Kuki Shinobu’s off-field damage and particle generation is not as great as Fischl’s, her role consolidation as a good healer and consistent AoE Electro applier comfortably opens up other teammate options. Aggravate & Spread Kuki Shinobu is a good option if you require healing but want to run a non-healer Dendro unit. While she can build purely for support, a more DPS-oriented Aggravate build can increase her team’s DPS potential. Hyperbloom Kazuha and Kuki Shinobu can be played together in a Hyperbloom team, where Kazuha provides grouping, 4VV RES Shred, and his A4 Passive Elemental DMG Buff (mostly for the Hydro applier). They “steal” Hyperbloom reactions from each other if Kazuha absorbs Electro into his Burst, but since he should build for EM anyway, this isn’t a significant DPS loss. Electro-Charged Shinobu’s role consolidation as a good healer and consistent Electro applier with low cooldowns lets her work incredibly well in quickswap Electro-Charged teams. Mono Electro & Electro Hypercarry In Kazuha’s Mono Electro teams, Kuki Shinobu’s healing and particle generation can leverage lower ER requirements for units such as Beidou and Yae Miko. As one of two Electro defensive units, she is much appreciated in Mono Electro where the only other defensive options are found in Geo and Anemo units. In Hypercarry teams, she can be used for her 4pc TotM buff, but it is a severe downgrade from options like Sara or Lisa. |
 Lisa | Synergy: Good Aggravate & Spread / Electro-Charged / Mono Electro / Electro Hypercarry While often overlooked, Lisa is a good option; her personal damage isn't terrible and her DEF Shred is a nice boost to team damage. Moreover, she can hold TTDS to give an ATK% buff to the primary DPS. She is particularly potent in AoE scenarios at C4, which alongside Kazuha’s grouping, gives her pseudo-quadratic scaling. While Lisa is competitive with pre-C6 Kujou Sara on Raiden Hypercarry teams, she is not as recommended in Keqing’s Hypercarry teams. |
 Raiden Shogun | Synergy: Excellent Aggravate Raiden’s Aggravate teams can be competitive with her other non-Hyperbloom options. Despite Aggravate scaling with EM, Raiden should still focus on ATK%, CRIT, and ER stats. Hyperbloom Raiden is the premier off-field Electro applier for the Hyperbloom archetype. Raiden’s frequent Electro application ensures her a greater share of Hyperbloom procs than Kazuha with an Electro-absorbed Burst. Nonetheless, Kazuha provides grouping, 4VV RES Shred, and his A4 Passive Elemental DMG buff for the Hydro appliers. While Raiden doesn’t benefit much from them, these buffs can still be worthwhile if you lack other options. Mono Electro & Electro Hypercarry Raiden is an extremely potent on-field DPS unit, scaling incredibly with Kazuha’s buffs. Not only does she battery Kazuha to massively decrease his ER requirement, she also has a roughly 10s DPS window that lets her take near full advantage of his A4 buff and 4VV RES Shred, provided Kazuha Swirls Electro immediately before she takes the field. Electro-Charged While generally outclassed by Fischl as an off-field Electro unit in Electro-Charged teams, Raiden can be a decent on-field DPS with appropriate buffs. Raiden’s Electro application, while frequent and consistent, still results in lower team damage than Fischl at similar investment. Anemo Overvape Raiden can serve as an on-field DPS unit in Anemo Overvape teams when paired with an off-field Hydro unit like Xingqiu or Yelan. While on-field in her Burst state, she applies Electro on-field and procs her Hydro unit’s Burst, which leads to high uptime on Electro-Charged auras that Kazuha’s Pyro-absorbed Burst can react with. |
 Razor | Synergy: Poor Aggravate Razor can trigger Aggravate on his Skill, Burst, and C6. Notably for Razor, he can still deal good Physical DMG with his Normal Attacks on top of his Aggravated Electro damage. However, Razor’s long field time means he cannot make use of 4VV Electro RES Shred for the entirety of his Burst. Hyperbloom Razor can be used as an on-field Hyperbloom trigger, but in teams with Kazuha, Razor's ER requirements will be extremely high since Kazuha takes the place of an Electro battery like Fischl. |
 Yae Miko | Synergy: Good Yae Miko’s Totems do not snapshot, so Kazuha can Swirl Electro before or after she places them, which allows for more flexible rotations. Aggravate & Spread / Electro-Charged / Mono Electro / Electro Hypercarry Yae Miko greatly appreciates Kazuha’s buffs. Her 14s Skill duration aligns with Kazuha’s Burst cooldown nicely. Her high ER requirements mean it may be best to use her Burst every other rotation. Hyperbloom Yae Miko’s Skill prioritizes enemies before Dendro Cores, meaning Kazuha’s Electro-absorbed Burst would be the primary Hyperbloom trigger for the team. However, Yae can still steal some Hyperbloom procs occasionally. Note on Burst: • Burst every two rotations: Yae Miko’s high ER requirements mean it is better to just use her Burst when you have it available. • If you want to use Yae’s Burst while her totems are still up, you need to modify your rotation to fit the Burst in time. • In 15s rotations, you need to drop 1s of the rotation to fit her Burst in before the Totems expire and extend the following rotation by 1s prior to using Kazuha’s Burst (due to its 15s cooldown). |
Hydro
 Ayato | Synergy: Excellent Ayato deals a good amount of on-field damage with his Skill and off-field damage with his Burst, especially with Kazuha’s grouping. Additionally, Ayato’s field time and cooldowns synergize well with Kazuha. Anemo Overvape Ayato is an excellent choice in Anemo Overvape teams since his field time and cooldowns allow Bennett, Fischl, and Kazuha time to use their Skills without cutting into team DPS. Electro-Charged Ayato’s fast Normal Attacks work well to drive off-field teammates like Fischl or Beidou. However, he requires specific rotations to play optimally due to his Skill cooldown. Additionally, 4TF Ayato builds are possible and fun, extending his field time and increasing his rotation flexibility. Reverse Vape Ayato is a competitive on-field Hydro enabler in Reverse Vape teams. Kazuha generally Swirls Pyro and Hydro at different points in the rotation, limiting the windows when Ayato can use Kazuha’s buffs. Nonetheless, Ayato’s smooth patterns of 6s of uptime and 6s of downtime combined with his ease of use remove much of the rotation difficulties other options can possess. Hyperbloom Ayato is a good Hydro unit in Hyperbloom teams due to his AoE Hydro application and personal damage. Ayato should use his Skill twice per rotation to meet his ER needs. Burgeon Ayato slots well into Burgeon teams with Thoma or Bennett with Kazuha being the Burgeon trigger. Ayato can usually get in 2 Skill uses per rotation. Favonius weapons can help alleviate his ER requirements if he only uses 1 Skill per rotation.. Mono Hydro & Hydro Hypercarry Ayato is a suitable on-field or quickswap DPS unit in these teams. Freeze While other Ayato teams generally deal more damage, Ayato benefits heavily from Kazuha’s consistent grouping in Freeze teams since Frozen enemies are immobile. Ayato can serve as an off-field Burst DPS or as a quickswap DPS in certain rotations. Despite his availability, other units like Mona or Kokomi provide better buffs or AoE Hydro application, leading to more damage or Freeze uptime. |
 Barbara | Synergy: Poor Barbara can be used as an on-field Hydro applier and healer. Her off-field Hydro application is quite poor and should not be heavily considered in teambuilding. Hyperbloom Barbara can work in Kazuha’s Hyperbloom teams as an on-field Hydro applier and healer. Burgeon Barbara’s healing is particularly valuable in Burgeon teams due to the self-inflicted damage. Her poor off-field Hydro application means she should remain on-field, with Kazuha’s Burst absorbing Hydro if there is a different Burgeon trigger. Barbara is not recommended in teams where Kazuha is the Burgeon trigger. Electro-Charged Barbara is a suboptimal choice in Electro-Charged due to her insufficient off-field Hydro application in terms of frequency and range. Nonetheless, she still allows the bare minimum for a traditional Electro-Charged team or 4TF Kazuha team to function. With Hakushin Ring, she can buff the Electro units. Freeze Barbara is a free-to-play Hydro option for Freeze, but her poor Hydro application, long cooldowns, and non-existent damage make her generally worse than every other option. Nonetheless, her ability to hold TTDS can buff her Cryo DPS partner. |
 Candace | Synergy: Good Candace’s Hydro application is functional yet difficult to optimize, requiring frequent swapping between melee characters to apply Hydro with their Normal Attacks. At C6, her Hydro application increases and becomes more manageable to play with. Mono Hydro & Ayato Hypercarry Candace is a viable unit to play with Hypercarry Ayato, beating out Yun Jin in multi-target scenarios. While her Hydro Infusion creates unique opportunities for non-Hydro characters like Kazuha or Zhongli to deal Hydro DMG with their Normal Attacks, this is mostly a gimmick in Mono Hydro. Other units like Xingqiu, Yelan, or Kokomi should be used instead. Hyperbloom Candace’s slow Hydro application allows high Quicken uptime to boost damage through Aggravate and Spread. At C6, there is a shift to lower Quicken uptime in exchange for higher Dendro Core production. Burgeon Candace’s low rate of Hydro application can potentially cause Burning to occur, limiting Dendro Core production. Quickswapping with weaved Normal Attacks is necessary to mitigate Burning uptime. Reverse Vape (Hu Tao) C6 Candace is a viable Hydro support for Hu Tao with Yelan or Xingqiu, which allows one of them to be used on another team. Double Hydro Resonance provides a large buff for both Hu Tao’s and Yelan’s damage. Candace also provides a moderate buff to Hu Tao’s Normal Attacks, which Hu Tao can take greater advantage of by doing N2C combos. |
 Furina | Synergy: Excellent Most teams with Furina require a strong healer; however, teams with Neuvillette in particular function fine without one thanks to his own HP fluctuation. Mono Hydro & Electro-Charged Furina pairs excellently with on-field DPS units like Neuvillette and Kokomi. Freeze Furina works as a Hydro support for units like Ayaka, Ganyu, and Wriothesley; however, these teams basically require Charlotte or Mika as the Cryo support for her teamwide healing since running Kazuha makes running an Anemo healer impossible. Reverse Vape Furina’s Hydro application and DMG% buff makes her a good unit to bring along in Reverse Vape teams. For teams that require a healer, Bennett is the go-to option. One notable exception is Hu Tao, thanks to her Burst HP regeneration; Hu Tao can safely play in a team like Hu Tao — Furina — Yelan — Kazuha (Kazuha only consistently Swirls Hydro). Note that Furina’s variable Hydro application means she will often want a second Hydro teammate to ensure consistent Vapes. Other Teams Furina is a general buffing support option in a variety of other archetypes with strong healer options. She can buff “hypercarries” like Raiden, pair with Alhaitham in a “Quickbloom” team, or serve in “Mono Pyro” teams with Yoimiya and Klee. |
 Kokomi | Synergy: Excellent Kazuha’s grouping and buffs can maximize Kokomi’s potential. Kokomi can provide buffs through her artifact set (4pc TotM, 4pc Deepwood Memories, etc.) and weapon choice (TTDS or Hakushin RIng). Freeze Kokomi’s consistent AoE Hydro application and significant ATK buff through TTDS and 4pc TotM make her an amazing option for Freeze teams, if not the best. However, Kokomi’s longer Skill cooldown can lengthen Ganyu’s rotations with Kazuha. Electro-Charged Kokomi is a decent on-field driver or off-field Hydro applier for Electro-Charged. With Hakushin Ring, she can further buff her Electro teammates’ Electro DMG. Rotations involving Kokomi can be tight if attempting to maintain high uptime on her Bake-Kurage, which is important for her Energy management. Kokomi’s AoE Hydro application is extremely valuable for 4TF Kazuha, allowing him to consistently proc Electro-Charged. She is a fantastic option for this playstyle. Mono Hydro Kokomi is an incredibly strong option in Mono Hydro teams due to her role consolidation. As one of the few defensive options available, she is strongly recommended for comfort and as an on-field driver if played with Xingqiu and Yelan in Mono Hydro. Hyperbloom Kokomi’s AoE Hydro application allows consistent and frequent Dendro Core production. Her healing can also help offset the errant self-inflicted damage from Hyperbloom. Burgeon Kokomi is a strong option in Burgeon teams due to her fantastic healing, AoE Hydro application, and on-field driving potential (if played with Thoma). She is good with Kazuha Burgeon but will need to stay on-field to apply enough Hydro. |
 Mona | Synergy: Good Freeze You should be careful when using Kazuha with Mona. Kazuha can trigger Shatter during his Plunging Attack which limits Freeze uptime, so it is best to use only his Skill and drop to the ground without plunging if you are using his Skill after Mona in the rotation. |
 Neuvillette | Synergy: Excellent Electro-Charged Kazuha’s short field time and ability to Double Swirl Hydro and Electro off an Electro-Charged aura is incredibly powerful in Neuvillette’s Electro-Charged teams. Kazuha typically uses three Skills per rotation. Hyperbloom Neuvillette’s personal damage is buffed tremendously by Kazuha’s A4 Hydro DMG buff and 4pc Viridescent Venerer RES Shred. However, getting consistent Hydro Swirls can be almost impossible with Nahida on the team. Vaporize Neuvillette’s Vaporize teams with Xiangling in particular benefit greatly from Kazuha’s ability to Double Swirl Hydro and Pyro. Kazuha’s Burst should absorb Pyro in rotations to allow Neuvillette to trigger Vaporize consistently. Freeze Neuvillette is a viable on-field Hydro unit in Freeze teams with two off-field Cryo units like Rosaria, Ganyu, or Layla. Mono Hydro (Hypercarry) Neuvillette’s Mono Hydro (Hypercarry) team options with Kazuha and Furina are great. The last team slot is quite flexible with options like Zhongli, Baizhu, and Fischl. |
 Tartaglia | Synergy: Excellent (Reverse Vape Only) / Good Reverse Vape Tartaglia is the premier on-field Hydro option for Xiangling Reverse Vape teams. He applies so much Hydro that he can enable both Xiangling and Kazuha to near-consistently Reverse Vaporize their Pyro damage. Moreover, Tartaglia can also Vape his Elemental Burst for huge upfront damage. Hyperbloom Tartaglia’s Hyperbloom teams, while viable, may not be the best use case for him due to his Skill’s downtime. His extremely high rates of Hydro application prevent Quicken uptime for off-field Electro units like Fischl. Burgeon Tartaglia’s on-field Hydro application greatly diminishes Burning uptime, which enables more Dendro Core production. However, downtime without Charged Shots can limit his viability. Tartaglia’s lack of off-field presence is less noticeable with Kazuha due to Kazuha’s low uptime on his Pyro application. You can also Vaporize Tartaglia’s Burst in this team. Anemo Overvape Tartaglia’s Ranged Burst allows him to frontload a massive amount of damage if you successfully Vaporize it. His tremendous Hydro application enables highly consistent uptime on both Hydro and Electro auras on enemies, allowing Kazuha’s Pyro-absorbed Elemental Burst to trigger many chain reactions. Freeze Similar to Ayato, Tartaglia Freeze tends to not be among his highest damage teams, but the gameplay advantages they provide may make them worthy of consideration. |
 Xingqiu | Synergy: Excellent While Xingqiu cannot snapshot buffs onto his Burst, he can enjoy the Hydro RES Shred from 4VV and the Hydro DMG buff from Kazuha’s A4 Passive. Note, however, that Xingqiu’s damage reduction does not increase with Kazuha’s A4 buff. Xingqiu and Yelan pair excellently together to enable Hydro Resonance and lower each other’s ER requirements. This core is commonly known as “Double Hydro” and is incredibly potent in Mono Hydro, Reverse Vape, and Electro-Charged teams. Reverse Vape Xingqiu is a great option for off-field Hydro enabler in Reverse Vape teams, but even at C6 his Hydro application is not strong enough to maintain Hydro aura on enemies if Kazuha’s Burst is absorbed with Pyro. However, some rotations allow Kazuha to absorb Hydro into his Burst. Mono Hydro Xingqiu’s Double Hydro core with Yelan is key to the Mono Hydro archetype. Hyperbloom Xingqiu's high off-field single-target damage and Hydro application make him very valuable for Hyperbloom teams. Burgeon Xingqiu’s high rate of off-field Hydro application combined with defensive utility from his Rain Swords make him a strong option in both quickswap variants of Burgeon or if using on-field Nahida in tandem with a Hydro-absorbed Kazuha Burst. However, Xingqiu’s single-target Hydro application can cause Burning to occur in multi-target scenarios, which limits Dendro Core uptime. Also note that Xingqiu’s damage reduction does not mitigate self-inflicted Burgeon damage. Freeze Xingqiu’s single-target Hydro application limits Freeze uptime considerably against multiple targets. Even with Kazuha’s grouping to apply Hydro via his orbitals, it is still insufficient uptime for Cryo DPS units. Electro-Charged Xingqiu’s damage and high rate of single-target Hydro application allow him to slot comfortably into this archetype. Furthermore, his damage reduction and increased interruption resistance (especially when paired with Beidou) can enable his team to be played without a healer or shielder. In a 4TF Kazuha team, Xingqiu is suboptimal to Kokomi since you need to weave in Normal Attacks to proc his Burst, which limits the number of Kazuha’s Skills you can perform in a certain timeframe. Anemo Overvape Xingqiu’s high amount of Hydro application and good personal damage let him slot in well with an on-field Electro unit like Raiden Shogun. With Fischl, he can attack on-field to take advantage of Bennett’s buff. |
 Yelan | Synergy: Excellent Yelan is an incredibly potent single-target off-field Hydro DPS unit that also provides a ramping DMG buff to her team. Absorbing Kazuha’s Burst with Hydro helps supplement Yelan’s Hydro application, especially in AoE scenarios. Additionally, Kazuha’s Hydro DMG buff can allow Yelan to run an HP Goblet (depending on substats and available options, of course). Xingqiu and Yelan pair excellently together to enable Hydro Resonance and lower each other’s ER requirements. This core is commonly known as “Double Hydro” and is incredibly potent in Mono Hydro, Reverse Vape, and Electro-Charged teams. Reverse Vape Yelan and Kazuha work well together in Reverse Vape teams as they reliably maintain the Hydro aura. Rotations where you Swirl both Hydro and Pyro are still possible. Depending on who the other two units are, the rotation can be shortened to 18s, with varying difficulty. Yelan’s single-target Hydro application before C2 puts her at odds with Xingqiu, who has higher Hydro application with his orbitals and at C6. Note that Yelan can make Double Swirl setups easier than Xingqiu since she doesn’t have orbitals. Nonetheless, Kazuha’s Hydro-absorbed Burst can supplement the gaps in her application. Mono Hydro Yelan is great in Mono Hydro, especially when paired with Xingqiu and Kokomi who can drastically reduce her ER requirements, which allows her to invest more into damage. Her ramping A4 DMG buff also increases the on-field character’s damage significantly. Hyperbloom Yelan’s Hydro application is enough to produce Dendro Cores in single-target scenarios. With Alhaitham or on-field Nahida, she allows a simultaneous Quicken aura. Electro-Charged Yelan’s damage and single-target Hydro application allow her to be viable in Electro-Charged teams. Furthermore, her A4 DMG buff is quite welcome. With consistent procs of her Burst, Kazuha can Swirl Electro-Charged auras and create chain reactions. She can also serve as an on-field driver. Note that Electro-Charged teams with on-field units (like Kokomi) benefit more greatly from Yelan’s ramping A4 buff, while quickswap-oriented teams (like 4TF Kazuha) do not. Anemo Overvape Much like Xingqiu, Yelan can be slotted into Anemo Overvape teams with an on-field Electro DPS unit like Raiden Shogun. Freeze While Yelan’s A4 buff can seem desirable for Cryo DPS units, it only applies to the on-field character and cannot be snapshot. This means that a Cryo DPS like Ayaka would have to stay on-field to take full advantage of the buff, when she could swap off during her Burst’s duration to allow Kazuha or Shenhe to refresh their buffs. |
Pyro
 Amber | Synergy: Good Reverse Vape (Hu Tao) Amber is a great support for Hu Tao due to her ability to fully clear Hydro auras with her Burst, which enables Kazuha to consistently get Pyro Swirls before swapping to Hu Tao. She can hold Elegy for the End or Favonius Warbow. However, Amber’s lack of defensive utility makes her Hu Tao teams more difficult to play. |
 Bennett | Synergy: Excellent Bennett is an incredible Pyro unit, capable of providing healing, a Flat ATK buff, and strong Pyro application. His short Skill cooldown allows him to battery Pyro units like Xiangling. Bennett enables many of Kazuha’s team compositions with Pyro-related reactions. To take full advantage of his buffs, you must consistently stay within his Burst AoE, which means Kazuha can be valuable to group enemies closer. In many team compositions, Kazuha snapshots Bennett’s Flat ATK buff into his Burst, leading to higher personal damage. Note that Bennett’s C6 overrides Kazuha’s C6. Mono Pyro Bennett is an essential part of almost all Mono Pyro teams with his healing, buffs, and Pyro application. At C6, he can enable units like Xinyan, Dehya, or Kazuha himself to deal Pyro damage with their Normal Attack Talent. Elemental Hypercarry & Triple Anemo Bennett is the premier support unit for ATK-scaling DPS units that can serve as a team’s on-field Hypercarry, such as Raiden Shogun, Wanderer, or Xiao. Reverse Vape Bennett is fantastic in Reverse Vape teams due to his aforementioned utility. However, his self-applied Pyro aura from his Burst requires specific setups so Kazuha can Swirl both Hydro and Pyro. Forward Melt This playstyle is not possible with Chongyun if Bennett is at C6, since his Pyro Infusion overrides Chongyun’s. Even with other Cryo options, his Pyro Infusion steals Melts from his higher-damage Skill. Bennett’s Pyro short Tap Skill cooldown within his Burst allows him to consistently trigger Melt with off-field Cryo units like Chongyun and Rosaria. Kazuha’s Pyro-absorbed Burst steals Melts from Bennett, so you should avoid using it. Reverse Melt Bennett is essential to Reverse Melt teams of any variation. In quickswap Reverse Melt teams (like with Rosaria, Chongyun, or Kaeya), C6 Bennett and Kazuha provide enough Pyro application that Xiangling can be replaced with someone like Shenhe. Anemo Overvape Bennett, as usual, is essential to Anemo Overvape teams, as he allows Kazuha to absorb Pyro into his Burst, leading to many reactions. Burgeon With Bennett, Kazuha can act as the primary Burgeon trigger by absorbing Pyro into his Burst. Kazuha’s Burst duration is much shorter than Bennett’s; this causes DPS windows to condense to a short time that should be played around. |
 Dehya | Synergy: Good Mono Pyro Dehya can be played as an on-field Pyro DPS in Mono Pyro compositions; however, her personal damage share is lower than other on-field DPS options like Klee or Hu Tao. Reverse Melt (Ganyu) Dehya’s Skill, in conjunction with Kazuha’s Pyro-absorbed Burst, provides enough Pyro application for Ganyu to consistently Melt her Charged Shots. Her interruption resistance is incredibly valuable for Ganyu, but it has shorter uptime than other defensive options like Zhongli. As an off-field support, she does not need to use her Burst and should use 4pc TotM. Reverse Vape Dehya can be used as a defensive Pyro support with her Skill. However, without sufficient Hydro application from the Hydro unit or a Hydro-absorbed Kazuha Burst, she can steal Vapes and deplete the Hydro aura, resulting in a DPS loss. |
 Diluc | Synergy: Excellent Reverse Vape Absorbing Kazuha’s Elemental Burst with Hydro is key to preventing Diluc from losing Reverse Vapes. This setup can be difficult because Kazuha will need to cast his Elemental Burst with no Pyro on enemies before Bennett's Burst since he would absorb Pyro otherwise. Forward Melt Diluc’s slow and controlled Pyro application lets him Forward Melt a good portion of his damage. The playstyle requires strict rotations and adherence to combos since it is difficult to re-establish a Cryo aura on the enemy if Diluc overtakes it with Pyro. Furthermore, Kazuha absorbs Pyro into his Burst in subsequent rotations if the Cryo aura is lost. Mono Pyro Diluc is a viable on-field Pyro DPS in Mono Pyro teams; he also benefits greatly from C6 Bennett in this composition. |
 Gaming | Synergy: Good Gaming prefers Xianyun over Kazuha in any of his teams. Xianyun’s Additive Plunging Attack DMG Bonus and ability to enable additional Gaming Plunging Attacks results in higher damage output. Nonetheless, if Kazuha can trigger a Pyro Swirl, he is a viable alternative. Mono Pyro Gaming’s Mono Pyro teams with Kazuha are among his easiest to play with viable damage. Xiangling and Bennett are usually the preferred teammates. Reverse Vape Kazuha must Swirl Pyro and avoid absorbing Hydro into his Burst when played with Gaming in a Vape team. Furina and Bennett are usually the preferred teammates. |
 Hu Tao | Synergy: Excellent Reverse Vape Kazuha is one of Hu Tao’s preferred Anemo supports for her Vape teams, along with Sucrose. In VV Vape teams, Kazuha Swirls Pyro to buff Hu Tao and absorbs Hydro to maintain Hydro auras on enemies. To consistently Swirl Pyro, Hu Tao requires a Pyro support for Kazuha to Swirl. However, while Hu Tao VV Vape has a high damage ceiling, it can be difficult for you to consistently perform Double VV setups and stay alive depending on the Pyro support. In teams without a Pyro support, like Double Hydro, Hu Tao does not benefit much from Kazuha since he cannot reliably Swirl Pyro; however, units like Yelan and Xingqiu do. For more information on Hu Tao VV Vape setups with Kazuha, visit the Hu Tao Extended Guide. Mono Pyro Hu Tao is viable in Mono Pyro team compositions, taking advantage of Bennett’s and Kazuha’s buffs. |
 Klee | Synergy: Excellent Mono Pyro Mono Pyro is Klee’s most recommended playstyle, and Kazuha’s A4 DMG buff contributes greatly to its high damage floor. |
 Lyney | Synergy: Excellent Mono Pyro Kazuha’s A4 Passive is incredibly powerful in Lyney’s Mono Pyro teams. In single-target scenarios, Kazuha should alternate using his Skill and Burst every other rotation since it lets Lyney fit in 1 more Charged Shot, which results in higher team DPS. In multi-target scenarios, the Pyro Swirls from Kazuha’s Burst are powerful enough to warrant its use every rotation. |
 Thoma | Synergy: Good Burgeon Kazuha can use his Elemental Skill to group Dendro Cores and enemies, allowing Thoma to deal Burgeon damage more easily. In this team, Kazuha should absorb Hydro with his Elemental Burst, which prevents Burning from occurring and makes Thoma the sole Burgeon trigger. Reverse Vape Kazuha’s Hydro-absorbed Burst can compensate for his additional Pyro application in Hu Tao and Yoimiya teams. Despite this, some units like Diluc or Hu Tao may still not Vape all of their hits with a pre-C6 Xingqiu or pre-C2 Yelan. Triple Anemo Thoma is a decent shielder with Wanderer. His Pyro application lets Wanderer gain an ATK% buff via his A4 Passive and lets Kazuha absorb Pyro into his Elemental Burst. Using Thoma can also free up Bennett for another team, although the team’s damage generally suffers. |
 Xiangling | Synergy: Excellent Xiangling is a potent off-field Pyro DPS that can snapshot Kazuha’s and Bennett’s buffs onto her Burst. Her lack of ICD on her Burst (after its ramping hits) allows her to trigger reactions on every hit. However, her high ER requirements mean she also requires Bennett in all of her teams with Kazuha. Reverse Vape Xiangling is the premier off-field Pyro DPS in Reverse Vape teams. In conjunction with strong Hydro application from units like Tartaglia or Xingqiu and buffs from Bennett and Kazuha, Xiangling can deal tremendous and consistent damage in both single-target and AoE scenarios. Reverse Melt In Reverse Melt teams, Xiangling and Kazuha provide more than enough Pyro application for a Cryo DPS to trigger Melt. It is not recommended to run Kazuha and Xiangling together with pre-C6 Ganyu since the team lacks a shield. Mono Pyro Xiangling benefits from increased Pyro Particle generation in Mono Pyro, which lowers her ER requirements and allows her to invest more into CRIT and ATK stats. Furthermore, her C6 buff, which her own Burst cannot enjoy, provides a nice buff for her Pyro teammates. Overload Xiangling can be used in an Overload team with Kazuha and Bennett with an Electro DPS, usually Fischl or Raiden (who uses this more as a Hypercarry alternative). |
 Xinyan | Synergy: Good Reverse Vape (Hu Tao) Xinyan enables VV Vape Hu Tao with her Burst’s Pyro application. However, her Shield Strength is subpar compared to other options, and her level 3 shield’s Pyro application generally steals Vapes unless you have a Hydro-absorbed Kazuha Burst. At C2, Xinyan needs to use her Elemental Burst before her Skill, to avoid this issue. Her Elemental Burst triggers a level 3 shield and casting her Skill afterwards overrides it with a lower-level shield. Reverse Melt (Ganyu) Xinyan works as an additional Pyro applier in Ganyu’s Melt teams with Kazuha, but she requires C2 or higher to reliably fulfill this role. Mono Pyro With C6 Bennett, Xinyan can be played as an on-field Pyro DPS, albeit worse than other options. |
 Yanfei | Synergy: Good Mono Pyro Yanfei is a viable on-field Pyro DPS in Mono Pyro teams. Her flexible field time also synergizes well with Kazuha and Bennett. Reverse Vape Yanfei is a viable Reverse Vape on-field Pyro DPS character with Kazuha. In subsequent rotations, it can be difficult for Kazuha to absorb Hydro into his Burst before using Bennett. At C4, Yanfei can serve as a shielder with her Burst in VV Vape setups (usually with Hu Tao, if ever). However, her ER requirements are incredibly high and she requires Favonius Codex or R5 Prototype Amber to manage them; an ER Sands should realistically be used as well. Double VV setups and Hydro Absorption into Kazuha’s Burst are possible, but difficult in practice. Reverse Melt (Ganyu) At C4, Yanfei can be the shielder for Reverse Melt Ganyu teams with Kazuha. For more information, read the Ganyu Extended Guide. |
 Yoimiya | Synergy: Excellent Reverse Vape VV Vape teams with Yoimiya and Kazuha vary in difficulty to pull off proper Double Swirl setups. With Xingqiu, they are highly technical and difficult in single-target scenarios. With Yelan, the setups are much easier in any scenario. Yoimiya — Kazuha — Yelan — Bennett is Yoimiya’s potential damage ceiling, and the Double Swirl setup is incredibly easy. Mono Pyro Yoimiya works well in Mono Pyro teams with Kazuha without a significant loss in personal damage compared to her Reverse Vape teams. Her Mono Pyro teams typically require Bennett, with flex options for the fourth slot being another Pyro character like Xiangling or a Geo unit like Zhongli. |
Anemo
 Faruzan | Synergy: Good Triple Anemo Faruzan is the crux of Triple Anemo teams, providing an Anemo DMG buff and Anemo RES Shred. She can also hold 4pc Noblesse Oblige or 4pc TotM (at C6) to further buff the team. However, her high ER requirements before C6 make Favonius Warbow almost obligatory. At C6, Elegy for the End is a good option to provide additional buffs to the team, although Favonius is still highly recommended. Kazuha can make good use of Faruzan’s buffs on an ADC build viable only in her Triple Anemo teams. |
 Heizou | Synergy: Good 4TF Kazuha (Aggravate or Electro-Charged) Heizou’s EM buff and potential to use Hakushin Ring make him a good option with 4TF Kazuha. While his EM buff is lower than Sucrose’s, his personal damage can compensate at high enough investment. Heizou can also hold Prototype Amber to provide supplemental healing for the team. Triple Anemo Heizou is a decent option in Triple Anemo teams as an on-field or quickswap Anemo DPS. His short Skill and Burst cooldowns sync nicely with Kazuha’s own cooldowns. |
 Jean | Synergy: Poor 4TF Kazuha (Aggravate or Electro-Charged) Jean is a decent option for 4TF Kazuha through her healing. Compared to Venti or Sucrose, she is unable to trigger nearly as many reactions. Her lack of grouping outside of aimed uses of her Skill make Jean a suboptimal choice overall. |
 Lynette | Synergy: Good Triple Anemo At C6, Lynette can become a viable on-field Anemo DPS with her Anemo-infused Normal Attacks. Lynette's Burst also provides a modest 12% ATK buff to the team thanks to her A1 Passive as well as a Taunt that can help with survivability. Lynette almost always runs with Bennett here. 4TF Kazuha (Aggravate or Electro-Charged) Lynette's Burst can be useful in 4TF Kazuha due to its Taunt, 16% ATK buff, and ability to deal additional Electro (or Hydro) damage. Nonetheless, other Anemo options like Venti or Sucrose are preferred. At C4, her second Skill charge helps maintain 4VV RES Shred uptime. |
 Sayu | Synergy: Poor 4TF Kazuha (Aggravate or Electro-Charged) Sayu is a decent defensive Anemo option for 4TF Kazuha, able to trigger Aggravated Swirls or Electro-Charged in AoE with her Electro-absorbed Skill. |
 Sucrose | Synergy: Good 4TF Kazuha (Aggravate) Sucrose can be used to buff Kazuha and other team members. Her EM buffs and potential to use Hakushin Ring make her a great option. Furthermore, her ability to absorb Electro into her Burst can increase Fischl’s A4 procs. She can also hold Prototype Amber to provide supplemental healing for the team. 4TF Kazuha (Electro-Charged) Sucrose is competitive with Venti in 4TF Kazuha Electro-Charged teams due to her EM buffs, decent crowd control, and ability to hold TTDS or Hakushin Ring. |
Venti | Synergy: Excellent Venti and Kazuha’s combined grouping is incredibly powerful in AoE content, especially against mobs of lighter enemies. Venti’s tight grouping allows Kazuha to trigger Swirl on multiple enemies, increasing his personal damage contribution. 4TF Kazuha (Aggravate or Electro-Charged) Venti is 4TF Kazuha’s best Anemo pairing. He provides significant off-field DPS, incredibly strong AoE grouping, and reapplication of Electro through his Burst and Swirls. His frequent Electro Swirls also trigger Fischl’s A4 Passive, further increasing team DPS. His Energy refund for Fischl lets her get away with no additional ER investment. If you require a defensive option, a Dendro unit like Baizhu, Yaoyao, or Kirara is your best bet, since Electro units like Kuki Shinobu or Dori would be a significant downgrade from Fischl. Electro-Charged Venti can be used in conjunction with Kazuha in AoE scenarios to deal many Electro-Charged Swirls with an Electro or Hydro-absorbed Burst. |
 Wanderer | Synergy: Good Triple Anemo Wanderer can take advantage of Kazuha’s grouping to hit multiple enemies at once with his Charged Attack in the Windfavored state. However, Venti’s grouping may be more valuable in high AoE content. In single-target, Kazuha’s personal damage is significantly lower and his crowd control becomes irrelevant. Other options like Xingqiu, Yelan, or Fischl are better off-field DPS options for Wanderer in single-target scenarios. |
 Xianyun | Synergy: Good Triple Anemo, Reverse Vape, & 4TF Kazuha (Electro-Charged) Xianyun lets Kazuha become a viable Plunging Attack DPS with either his own C6 (Anemo Infusion) or with C6 Bennett (Pyro Infusion). She also buffs his Anemo-infused Plunging Attack called Midare Ranzan, so a 4pc Thundering Fury build may be possible with teammates like Fischl and Furina. |
 Xiao | Synergy: Good Triple Anemo Kazuha provides personal damage and valuable grouping for Xiao. Unlike Venti whose Burst can lift enemies out of reach, Kazuha groups targets so they can all be hit. It is generally best to use Kazuha’s Skill and Burst before Bennett’s Burst to maximize buff uptime with Xiao. |
Dendro
 Alhaitham | Synergy: Poor Aggravate & Spread Alhaitham is a great on-field Spread DPS, but with Kazuha, he cannot benefit from a Dendro battery since Kazuha cannot consistently Swirl or absorb Electro with two Dendro units in the team. Additionally, Alhaitham’s long field time and rotations make it difficult for him to coordinate with Kazuha. Hyperbloom With an Electro-absorbed Kazuha Burst, there is enough Electro application to allow Alhaitham to consistently trigger Spread. However, there may be Dendro Core production issues if the Hydro applier cannot apply Hydro quickly enough. He is best paired with Xingqiu or Yelan. |
 Baizhu | Synergy: Good Baizhu is a good defensive option in Kazuha’s Dendro teams. However, his poor AoE Dendro application and 20s Burst cooldown make him a suboptimal choice when you can play without his defensive utility. Aggravate Baizhu allows two DPS-oriented Electro units to be used comfortably in Aggravate teams. His typical rotations with Keqing and Fischl are 25s long. Hyperbloom & Burgeon Baizhu is a viable on-field driver in Hyperbloom and Burgeon teams, but he should not be relied upon as an off-field Dendro applier due to his slow application, i.e. he should be played on-field. |
 Collei | Synergy: Excellent Collei’s short cooldowns allow her to synergize quite well with Kazuha. She also provides rapid Dendro application in a short period of time, which can be useful against enemies with short vulnerability windows. At C4, her Burst increases the team’s EM by 60, which Kazuha appreciates. If Collei is holding Sacrificial Bow (R4+), then the team’s rotation should extend to 20s to accommodate the effect cooldown. 4TF Kazuha (Aggravate) Collei fits very nicely into 4TF Kazuha teams and is a great choice since her Dendro application cannot overtake Electro auras in subsequent rotations (unlike Nahida). She is best used with Venti and Fischl. Aggravate In Kazuha’s other Aggravate teams, Collei is a viable choice if you can play without heals or shields. Otherwise, you will need Kirara, Yaoyao, Kuki Shinobu, or Dori to fulfill your defensive needs. Hyperbloom & Burgeon Collei works in Hyperbloom teams, especially ones that play shorter rotations or have a quickswap playstyle. For teams with longer rotations (like with Xingqiu), she falls off in comparison to other Dendro options like Nahida or Traveler. |
 Kirara | Synergy: Excellent Aggravate & 4TF Kazuha (Aggravate) Kirara’s short cooldowns on her Skill and Burst make her a great fit in quickswap Aggravate teams with Kazuha. However, her poor off-field Dendro application forces her to act as a quickswap Dendro enabler with her short Hold Skill technique or as an on-field Dendro enabler with her long Hold Skill. |
 Nahida | Synergy: Good Nahida is a great Dendro option in most of Kazuha’s Dendro teams due to her 1.5U Dendro application, strong personal damage, and flexible field time. Her 5–6s Skill cooldown and 13.5s Burst cooldown let her slot in comfortably in Kazuha’s teams. Aggravate & Spread A strong Electro applier like Fischl is necessary for Kazuha to have consistent Electro Swirls. 4TF Kazuha (Aggravate) Nahida is a good unit for 4TF Kazuha teams, but her 1.5U AoE Dendro application can make it difficult to Swirl or absorb Electro in subsequent rotations. Her solid EM buffs and personal damage make her a worthwhile unit to use nonetheless, especially at higher Constellation levels. Hyperbloom Nahida is great for Hyperbloom teams, allowing for high Dendro Core production and good Quicken uptime. However, her 1.5U Dendro application can make it difficult for Kazuha to Swirl Electro and Hydro. Burgeon Nahida is a great choice for Burgeon due to her aforementioned benefits. Note that in multiple rotations, it can be difficult for Kazuha to absorb and Swirl Hydro due to her 1.5U Dendro application, which consumes more Hydro aura and allows Burning to occur more often. Reverse Melt Nahida’s highly consistent Dendro application and EM buff allow her to serve as an additional support in Reverse Melt teams through Burning. Rosaria takes the most advantage of this interaction due to her lack of Burst ICD, but C6 Ganyu also enjoys this playstyle with Kazuha. Note that C1 Nahida has lower Burning uptime than C0 due to the added Electro buff. |
 Tighnari | Synergy: Good Aggravate & 4TF Kazuha (Aggravate) Tighnari’s short cooldowns work well with Kazuha; however, Tighnari’s damage is more single-target focused while Kazuha tends to specialize in AoE. Furthermore, his lack of defensive utility can force you to run an Electro healer since Tighnari’s Skill alone is not enough for survivability. Regardless, Tighnari’s Electro teammates greatly appreciate Kazuha’s buffs. |
 Traveler (Dendro) | Synergy: Good Traveler is a great option in teams with rotations lasting at least 20s. Their consistent off-field Dendro application allows on-field DPS units to fully use Kazuha’s buffs. Aggravate & 4TF Kazuha (Aggravate) Traveler is a viable option in Aggravate teams due to their consistent and long-lasting AoE Dendro application. However, in quickswap variations, Collei is a better free-to-play option. Hyperbloom Traveler is a good choice in Hyperbloom. Their Burst’s Electro transfiguration is optimal in single-target, while the Hydro transfiguration is situationally more useful in AoE. That said, the difference is generally not too significant. Burgeon In Traveler’s Burgeon team, you must ensure Hydro is applied to their Burst, since a Pyro transfiguration causes their off-field Dendro application to end. |
 Yaoyao | Synergy: Excellent Yaoyao is a good healer option in Kazuha’s teams due to her 15s Skill cooldown and pseudo-random AoE Dendro application. However, without her Burst, she may fail to apply enough Dendro in some teams, resulting in lower Quicken uptime or Dendro Core production. In teams with 20s rotations, she can use her Burst to apply more Dendro without extending the rotation. Aggravate Yaoyao allows two DPS-oriented Electro units to be used comfortably in Aggravate teams. 4TF Kazuha (Aggravate) Yaoyao’s role consolidation as healer and Dendro application lets you use Venti and Fischl comfortably. Her Skill’s 15s cooldown fits nicely into the team’s rotation. Hyperbloom Yaoyao is a great option in Kazuha’s Hyperbloom teams, comfortably enabling DPS-oriented units like Fischl while being used on-field. |
Geo
 Albedo | Synergy: Good Mono Element Albedo can deal significant, consistent off-field Geo damage. However, he is often subpar to other units that can take advantage of Kazuha’s A4 DMG buff and 4VV RES Shred. Forward Melt (Bennett) Albedo is a solid choice in Forward Melt teams with Bennett and Kazuha since his A4 Passive provides 125 EM. His short field time, long Skill duration, and low rates of Geo application afford him a place in the last team slot. Electro-Charged Albedo provides consistent, off-field Geo damage through his Skill that doesn’t cut heavily into simultaneous Electro and Hydro auras. His 125 EM buff, short field time, and long Skill duration make him a good fit into Electro-Charged teams, despite his inability to take advantage of Kazuha’s buffs. |
 Chiori | Synergy: Poor Mono Element Chiori deals very strong off-field Geo damage. At C0, she prefers a Geo Construct character like Zhongli or Albedo, which severely limits team options with Kazuha. At C1, she becomes slightly more flexible since she no longer requires Geo Constructs for 2 Tamoto dolls, but she still requires a Geo teammate. As such, other options that can take advantage of Kazuha’s buffs are likely better teammates. |
 Yun Jin | Synergy: Poor Ayato Hypercarry In single-target scenarios, Yun Jin is a good choice for a Hypercarry Ayato playstyle. In multi-target scenarios, her Additive Base DMG Bonus can expire quickly, so she is outclassed by Candace who provides a longer-lasting buff and also takes advantage of Kazuha’s buffs. Mono Pyro & Pyro Hypercarry (Yoimiya) Yun Jin offers similar strength to Bennett in Yoimiya’s teams, depending on Constellations. When paired with Zhongli, she can enable Geo Resonance and enjoy slightly lower ER requirements. |
Zhongli | Synergy: Excellent Zhongli is the best shielder in the game in terms of duration and strength. He also provides 20% Universal RES Shred and can employ buffing sets like Archaic Petra, TotM, and Instructor. However, his Geo application can interfere with the reactions of teams with precarious Elemental application, which forces you to place his stele away from enemies or in a way that it would be destroyed. Mono Element Zhongli’s shield is fantastic for Mono Element teams that would lack defensive options otherwise. With Archaic Petra, he can provide a 35% DMG Bonus to his Elemental teammates if you can pick up a Crystallize Shard. Reverse Melt (Ganyu) In Melt Ganyu teams with Kazuha, Zhongli is the best shielder option. Read that section of Ganyu’s Extended Guide for more details. Forward Melt (Bennett) While Zhongli is a lower damage option compared to other flex options, his shield provides comfort and his RES Shred can increase team DPS. Electro-Charged & Triple Anemo Zhongli’s Elemental RES Shred is a welcome bonus. His shielding is valuable if you require the defensive utility. |
Credits

Authors — Ayzel, Cuzimori, irokei, Reens, & Vlad
Talent, Artifact, & Weapon Calcs — Vlad
Project Coordinator — irokei
ER Requirements — reens, irokei
Theorycrafting — caxia, leah, kb, Prévisible, reimu, revy, jay s, caramielle., mishkaxp, mimithiz, baloopy
Readability — lostguide, nikato, emiliabyss, juko, fritzzes, epiccake808
TC Verification — kb, Leah, nikato, caramielle.
Readability Verification — emiliabyss, nikato, idk
Calc Verification — redd, athena
Transcription — alix.sh, uhinf, irokei
QC — koko
Art Perms — Casdela, Prévisible
Combined Weapon Art — Casdela
Leaf Divider Art — kol
Team Images — Made with the KQM portrait generator
References
