Updated for Version 5.6

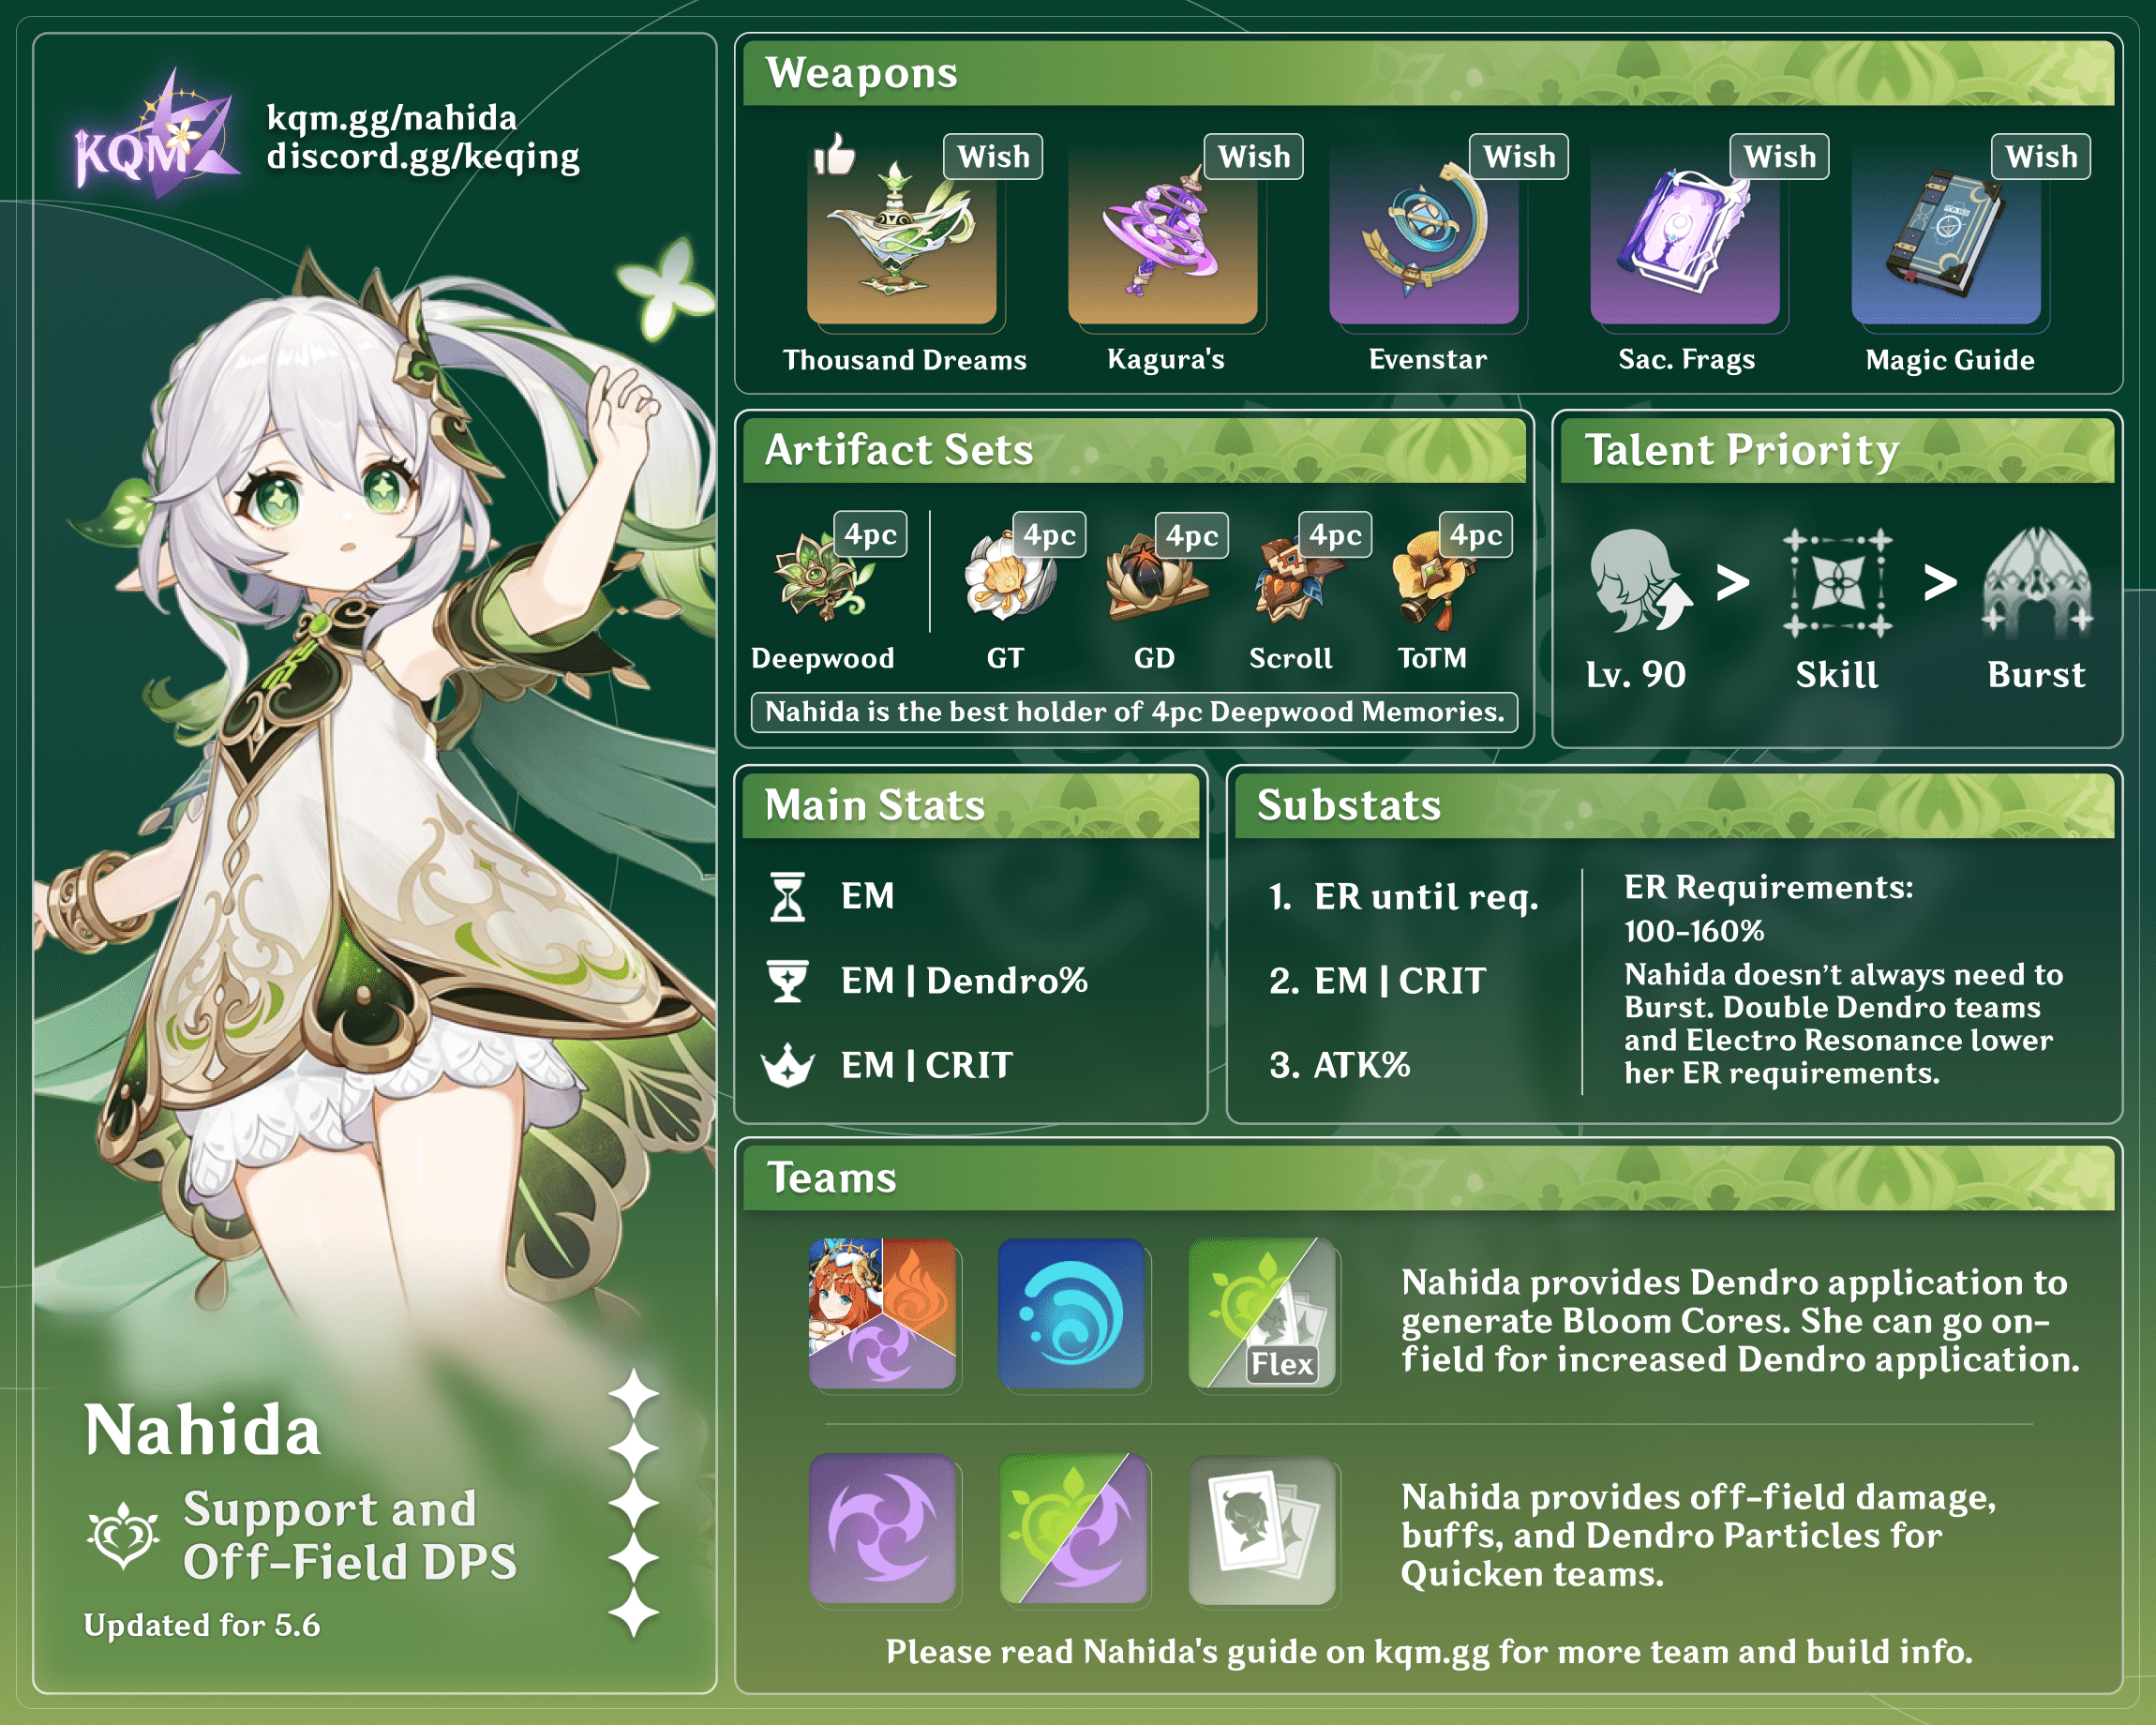
Nahida is a 5★ Dendro Catalyst character in Genshin Impact who provides consistent and frequent Dendro application and damage both on-field and off-field, with a heavy focus on Dendro Elemental Reactions. Learn about Nahida’s best builds, Talent priority, best weapons, best artifacts, and best teams in this quick guide.
Note that the information given may change if new discoveries are made. More extensive testing is in progress.
The full-length guide is available here.
Join our Discord to check on and participate in the theorycrafting process.
Table of Contents
Infographic
Credits to: kolvii, cegewinne, haafr, baloopy, and KQM Staff
Character Overview
Playstyles
Off-Field Focus
Relies on the Tri-Karma Purification from Nahida’s Skill to periodically apply Dendro while a damage-dealer or driver is on-field.
On-Field Focus
Uses Nahida’s Normal Attacks, Charged Attacks, and Tri-Karma Purification from her Skill to constantly apply Dendro and trigger/enable reactions.
Talents
Level and Talent Priority
Level 90 is recommended to maximize Nahida’s reaction damage in teams where she triggers a lot of reactions.
Skill > Burst > Normal Attack
Most of Nahida’s damage comes from her Skill and reactions. Upgrading Nahida’s Normal Attacks is only recommended if using her on-field, and even then, she does not deal a significant amount of damage with them.
While her Burst is important, its value and the value of Talent levels for it can vary significantly based on the team she is used in. This is detailed further below in the Elemental Burst section.
Talent Overview
 Normal Attack | Akara
Talent Description
Normal Attack
Performs up to 4 attacks that deal Dendro DMG to opponents in front of her.
Charged Attack
Consumes a certain amount of Stamina to deal AoE Dendro DMG to opponents in front of her after a short casting time
Plunging Attack
Calling upon the might of Dendro, Nahida plunges towards the ground from mid-air, damaging all opponents in her path. Deals AoE Dendro DMG upon impact with the ground.
Nahida’s Normal and Charged Attacks are used primarily for their high-frequency Dendro application. Outside of triggering reactions, their raw damage is negligible. As with most characters, her Normal and Charged Attacks have different ICDs.
The high Stamina cost of her Charged Attacks makes them generally not worth using unless their larger AoE or range are needed. As such, Nahida typically does not require any specific combos when being played on-field.
 Elemental Skill | All Schemes to Know
Talent Description
Sends forth karmic bonds of wood and tree from her side, dealing AoE Dendro DMG and marking up to 8 opponents hit with the Seed of Skandha.
When held, this skill will trigger differently.
Hold
Enters Aiming Mode, which will allow you to select a limited number of opponents within a limited area. During this time, Nahida’s resistance to interruption will be increased.
When released, this skill deals Dendro DMG to these opponents and marks them with the Seed of Skandha.
Aiming Mode will last up to 5s and can select a maximum of 8 opponents.
Seed of Skandha
Opponents who have been marked by the Seed of Skandha will be linked to one another up till a certain distance.
After you trigger Elemental Reactions on opponents who are affected by the Seeds of Skandha or when they take DMG from Dendro Cores (including Burgeon and Hyperbloom DMG), Nahida will unleash Tri-Karma Purification on the opponents and all connected opponents, dealing Dendro DMG based on her ATK and Elemental Mastery.
You can trigger at most 1 Tri-Karma Purification within a short period of time.
Nahida’s main source of damage, her only source of off-field Dendro application, and another source of on-field Dendro application. Tri-Karma Purification has no ICD and can proc as often as once every 2.5 seconds at base. Nahida only generates particles from her Skill procs; the Energy generation can occur every 7 seconds and makes 3 particles each time.
The range of the Tap variant is a small circle around Nahida, while the range of the Hold variant spans across all enemies marked while in aiming mode. Enemies can be marked extremely quickly simply by panning the camera onto them while the Skill is held; however, this may be difficult to perform on some devices.
 Elemental Burst | Illusory Heart
Talent Description
Manifests the Court of Dreams and expands the Shrine of Maya.
When the Shrine of Maya field is unleashed, the following effects will be separately unleashed based on the Elemental Types present within the party.
- Pyro: While Nahida remains within the Shrine of Maya, the DMG dealt by Tri-Karma Purification from “All Schemes to Know” is increased.
- Electro: While Nahida remains within the Shrine of Maya, the interval between each Tri-Karma Purification from “All Schemes to Know” is decreased.
- Hydro: The Shrine of Maya’s duration is increased.
If there are at least 2 party members of the aforementioned Elemental Types present when the field is deployed, the aforementioned effects will be increased further. Even if Nahida is not on the field, these bonuses will still take effect so long as party members are within the Shrine of Maya.
Nahida’s Elemental Burst creates a large AoE field and grants buffs to Nahida’s Tri-Karma Purification and the Burst itself depending on the current elements in the party. Nahida’s Burst costs 50 Energy, has a 13.5s CD and a 15s base duration; this allows her to maintain full uptime on her Burst if needed.
The value of Nahida’s Elemental Burst depends largely on the team she’s being used in. There are two situations where her Burst provides notable value:
- In teams where the on-field unit benefits from Nahida’s A1 EM buff.
- In teams with one or more Electro units, where the decrease in her Skill’s trigger interval actually makes a difference to the amount of reactions triggered.
Outside of these two scenarios, her Burst does not provide much value and may not be worth using or investing in. This is compounded by her Burst’s long 1.9s cast time and its lack of direct damage or upfront Dendro application. Nevertheless, it is low-cost and may be worth using for the generous amount of i-frames it provides. If using Prototype Amber, her Burst can also be used for small teamwide healing.
 Ascension 1 Passive | Compassion Illuminated
Talent Description
When unleashing Illusory Heart, the Shrine of Maya will gain the following effects:
The Elemental Mastery of the active character within the field will be increased by 25% of the Elemental Mastery of the party member with the highest Elemental Mastery.
You can gain a maximum of 250 Elemental Mastery in this manner.
Provides a sizable EM buff to the on-field character, including Nahida herself if she is the character on-field. This is particularly valuable if the on-field character is triggering reactions, or has Talents that benefit from EM such as Nahida’s own Skill and A4. It is worth noting that the buff is based on the character with the highest EM in the party, which might not necessarily be Nahida.
Flat EM from external sources — such as 4pc Instructor, Sucrose’s A1 Passive, and Dendro Resonance — are included in this EM buff. However, EM buffs based on a percentage, such as Sucrose’s A4 Passive and Key of Khaj-Nisut, are not.
 Ascension 4 Passive | Awakening Elucidated
Talent Description
Each point of Nahida’s Elemental Mastery beyond 200 will grant 0.1% Bonus DMG and 0.03% CRIT Rate to Tri-Karma Purification from All Schemes to Know.
A maximum of 80% Bonus DMG and 24% CRIT Rate can be granted to Tri-Karma Purification in this manner.
A significant stat boost for Nahida that further incentivizes building EM. All EM from external sources is included in this buff.
 Utility Passive | On All Things Mediated
Talent Description
Nahida can use All Schemes to Know to interact with some harvestable items within a fixed AoE. This skill may even have some other effects…
The long reach combined with the short Skill cooldown makes it perfect to collect any plants such as Qingxin, Violetgrass, Kalpalata Lotuses, or anything else that is hard to reach.
This Talent can also be used to discover special dialogue from Sumeru NPCs, including playable characters during quests.
Constellations
 Constellation 1 | The Seed of Stored Knowledge
Constellation Description
When the Shrine of Maya is unleashed and the Elemental Types of the party members are being tabulated, the count will add 1 to the number of Pyro, Electro, and Hydro characters respectively.
Can result in a longer Burst duration along with more damage and Dendro application, but its overall performance varies largely based on Nahida’s team.
 Constellation 2 | The Root of All Fullness
Constellation Description
Opponents that are marked by Seeds of Skandha applied by Nahida herself will be affected by the following effects:
• Burning, Bloom, Hyperbloom, and Burgeon Reaction DMG can score CRIT Hits. CRIT Rate and CRIT DMG are fixed at 20% and 100% respectively.
• Within 8s of being affected by Quicken, Aggravate, Spread, DEF is decreased by 30%.
An extremely significant damage increase for most of Nahida’s teams, namely Quicken and Bloom-based teams. A good point to stop at if wishing for Constellations.
 Constellation 3 | The Shoot of Conscious Attainment
Constellation Description
Increases the Level of All Schemes to Know by 3.
Maximum upgrade level is 15.
While at first seemingly a substantial boost to Nahida’s main damage source due to her best teams utilizing Spread and Bloom, this Constellation becomes less relevant as it only increases Talent multipliers and not reaction damage.
 Constellation 4 | The Stem of Manifest Inference
Constellation Description
When 1/2/3/(4 or more) nearby opponents are affected by All Schemes to Know‘s Seeds of Skandha, Nahida’s Elemental Mastery will be increased by 100/120/140/160.
Sizeable reaction damage increase that also provides some stat leniency by making it easier to achieve the recommended EM benchmark of around 1000 EM. See the Artifacts section for details.
 Constellation 5 | The Leaves of Enlightening Speech
Constellation Description
Increases the Level of Illusory Heart by 3.
Maximum upgrade level is 15.
Negligible damage and/or quality-of-life increase depending on Nahida’s teams and teammates’ Elements.
 Constellation 6 | The Fruit of Reason’s Culmination
Constellation Description
When Nahida hits an opponent affected by All Schemes to Know‘s Seeds of Skandha with Normal or Charged Attacks after unleashing Illusory Heart, she will use Tri-Karma Purification: Karmic Oblivion on this opponent and all connected opponents, dealing Dendro DMG based on 200% of Nahida’s ATK and 400% of her Elemental Mastery.
DMG dealt by Tri-Karma Purification: Karmic Oblivion is considered Elemental Skill DMG and can be triggered once every 0.2s.
This effect can last up to 10s and will be removed after Nahida has unleashed 6 instances of Tri-Karma Purification: Karmic Oblivion.
This Constellation can significantly increase the damage Nahida deals in teams where she is used on-field and can increase the number of Tri-Karma Purification procs she gets per rotation by upwards of 60%. A fitting capstone of a Constellation.
Combos
Note: See the Elemental Burst tab in the Talents section for information on the value of using Nahida’s Burst.
Off-Field Focus
Off-field Nahida simply casts Skill into Burst before promptly exiting the field. In quickswap teams, Nahida can also swap in more frequently to recast her Skill for higher Dendro application.
On-Field Focus
On-field Nahida’s main goal is to apply as much Dendro as possible with her Attack string while also driving the rest of the team.
Most rotations typically start with Skill into Burst, followed by some sequence of Normal Attacks. Mixing in Charged Attacks may yield slightly more AoE Dendro application, but is more stamina-intensive.
A second cast of her Skill can be used for additional Dendro application during her field-time.
Artifacts
ER Requirements
| Off-Field | On-Field | |
| Double Electro | 100–120% | 100–120% |
| Double Dendro | 120–140% | 110–130% |
| Nilou Bloom (Solo Dendro) | — | 120–140% |
| Hyperbloom | 130–140% | 100–120% |
| Burgeon | 140–160% | 130–140% |
Generally, ER requirements tend to be lower if using batteries (such as Fischl or Raiden) or a second Dendro unit, funneling teammates’ particles to Nahida, running Favonius weapons, using her Burst every other rotation, etc. ER requirements tend to increase dramatically if Nahida must Burst every 15s, though teams where she does so are rare.
Use the Energy Recharge Calculator to determine exact requirements for your team and rotation. For more details on how Favonius weapons will affect your team, please use Ac1d’s Favonius Mastersheet.
Artifact Stats
 Sands |  Goblet |  Circlet |
| Elemental Mastery | Elemental Mastery / Dendro DMG Bonus | Elemental Mastery / CRIT |
Stat Priority
Off-Field
ER (until requirement) > EM ≥ Dendro DMG% ≥ CRIT
Nahida’s off-field role revolves around dealing Skill damage, potentially boosted by Spread. EM makes up the majority of her Skill’s scaling, increases Spread damage, and provides CRIT Rate and DMG% via her A4 Passive — this makes it a vital stat for her damage. In addition, she can be the unit with the most EM on a team; in such cases, you should aim for 900–1000 EM to maximize her A1 buff if the on-field character benefits from it.
However, Nahida can also share a team with units that are even more reliant on EM, such as certain Anemo units or Bloom triggers, in which case they may be the basis of her A1. This reduces the need for Nahida to build EM, allowing her to build other important stats like CRIT. Her weapon options may also shift her stat priorities. Lastly, EM artifacts are relatively rare and may be lacking in good substats compared to CRIT Circlets or Dendro DMG% Goblets.
Ultimately, the difference between main stats isn’t very significant, so use the pieces with the best substats you have available. Having 1000 EM to cap out Nahida’s A4 Passive is not mandatory to have a good build. Use tools such as the Genshin Optimizer to find specific build recommendations given your available artifacts.
On-Field
ER (until requirement) > Dendro DMG% ≥ CRIT ≥ EM > ATK%
EM for on-field Nahida is slightly devalued since she already gains a large amount of EM from her A1 Passive. Also, her Normal Attacks do not scale with EM, increasing the value of Dendro DMG% and CRIT. Regardless, EM is still a valuable stat, and you can still use the same build for both on- and off-field playstyles.
Nilou Bloom
ER (until requirement) > EM >> Dendro DMG% > CRIT
In Nilou Bloom teams, there is some merit to building more than 1000 EM to increase Nahida’s Bloom damage. However, this is not particularly necessary and her typical builds are still effective. Note that Nahida’s Talent damage is reduced in Nilou teams, as she cannot trigger Spread.
Artifact Sets
Calcs for artifact set comparisons can be found here (last updated for Version 3.8).
4pc Deepwood Memories | A useful generalist set. It increases Nahida’s personal damage and shreds enemy Dendro RES, increasing Spread, Bloom, Hyperbloom, and Burgeon damage teamwide. Only one character on the team needs to hold this set; Nahida is often the best for this role, since she easily maintains the 4pc effect and thus allows other units (who usually deal more damage) to equip better sets. |
 4pc Scroll of the Hero of Cinder City | Natlan’s supportive artifact set is a very potent one that provides Elemental DMG Bonus when the wearer triggers an Elemental Reaction related to their Element. In Nahida’s case, she can provide 12% Dendro DMG Bonus when triggering any Dendro reaction, and 12% Pyro, Electro, or Hydro DMG Bonus when triggering Burning, Quicken, or Bloom, respectively. |
 4pc Tenacity of the Millelith | A great option if the team has ATK-scaling characters who deal disproportionately more damage than Nahida (e.g., Yae Miko, Fischl), as Nahida can easily maintain its buff with 100% uptime. |
 4pc Golden Troupe | This set is generally the best for Nahida’s personal damage, even in teams without a 4pc Deepwood holder. It is best used if another teammate is already holding 4pc Deepwood, or if she is the only party member dealing Dendro damage. This set does lose some effectiveness if she is played on-field. However, in teams with another Dendro damage dealer, such a Spread or Hyperbloom DPS, Nahida’s ability to maintain Deepwood’s 4pc effect is often preferred over maximizing her personal damage. |
 4pc Gilded Dreams | An alternative option to Golden Troupe for maximizing Nahida’s personal damage. However, it loses value in teams where Nahida does not trigger many reactions or can only receive a portion of its EM buff. |
 4pc Instructor | Instructor can be useful if paired with teammates who deal the majority of team damage and benefit from EM, but do not deal Dendro damage. This set requires Nahida to be on-field frequently to maintain full uptime on its effect. |
 2pc Mixed Sets | 2pc Set Bonuses: Elemental Mastery, Dendro DMG Bonus, Skill DMG Bonus These 2-piece combinations can be used while farming for a full set. However, it may be preferable for team damage to simply force any 4pc Deepwood set you have, even without the right main stats. |
Weapons
Calcs for weapon comparisons can be found here (last updated for Version 3.8).
Nahida’s wide variety of teams and playstyles means each weapon’s performance is highly dependent on the specific team composition. Additionally, weapons with team utility can result in better team damage than weapons that only increase her personal damage.
Nahida’s free and 4-star options are considerably strong. Additionally, relative to her teammates, her own damage output is not as impactful. As such, there is no need to pull for weapons specifically for her outside of personal interest.
Damage-Focused
These weapons serve to increase Nahida’s personal damage output.
 5★ A Thousand Floating Dreams | Nahida’s signature weapon and typically her Best-in-Slot for personal damage. However, it is not a massive increase compared to her other options, and other options may provide better team utility. |
 5★ Kagura’s Verity | Competitive with Floating Dreams, particularly for on-field Nahida. |
  5★ Starcaller’s Watch, Sunny Morning Sleep-In | Both these weapons provide a high amount of EM, leading to good performance in any scenario. |
 CRIT Catalysts | 5★ Lost Prayer to the Sacred Winds, Tome of the Eternal Flow, Cashflow Supervision, Surf’s Up, Tulaytullah’s Remembrance, Vivid Notions; 4★ The Widsith, Solar Pearl, Sacrificial Jade Various CRIT stat sticks. Each weapon’s performance is highly dependent on whether its passive can be utilized in a given playstyle. Weapons like Solar Pearl work best in on-field playstyles, while Sacrificial Jade works best for off-field. |
  5★ Skyward Atlas, Memory of Dust | Perform similarly to CRIT weapons if Nahida is on-field and not triggering many reactions. |
 4★ Sacrificial Fragments | Good EM stat stick, though the extra Skill use doesn’t do much since Nahida does not generate particles on cast. |
 3★ Magic Guide | Baseline F2P option. Surprisingly good, though its effectiveness depends on maintaining a Hydro or Electro aura reliably. |
 4★ Mappa Mare | A craftable F2P option, though it only beats Magic Guide for on-field Nahida. |
Support-Focused
These weapons are not particularly competitive for Nahida’s personal damage, but they provide useful team buffs or utility.
 4★ Wandering Evenstar | A competitive option for Nahida. It often performs similarly to Floating Dreams in terms of team damage, assuming she has teammates who can benefit from Evenstar’s Flat ATK buff. |
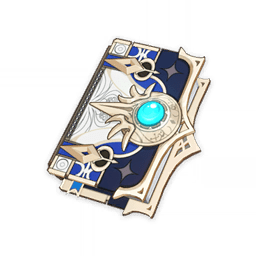 4★ Favonius Codex | On-field Nahida can trigger a high-refinement Favonius Codex multiple times per rotation, greatly lowering team ER requirements and significantly boosting overall team DPS. Its value is slightly decreased for off-field Nahida, who triggers its passive less frequently. |
 4★ Hakushin Ring | A strong option when the team has strong Electro damage dealers, assuming high uptime on its buff. This requires off-field units who can snapshot or for Nahida to be on-field frequently to refresh the buff. It also helps Nahida meet her ER requirements. |
 4★ Prototype Amber | While Prototype Amber is rather poor for Nahida’s personal damage, it lowers her ER requirements, and its teamwide healing allows her to consolidate defensive utility. The healing is especially impactful in Furina teams to generate more Fanfare stacks. |
 3★ Thrilling Tales of Dragon Slayers | A niche supportive option. It greatly reduces Nahida’s personal damage in exchange for a strong ATK% buff to a single teammate. |
Teams
Rotation Notation
- N = Normal Attack
- C = Charged Attack
- A = Aimed Shot
- P = Plunging Attack
- E = Elemental Skill
- tE = Tap Skill
- hE = Hold Skill
- Q = Elemental Burst
- D = dash (cancel)
- J = jump (cancel)
- W = walk (cancel)
- > = switch character
- ( ) = these actions are optional; please refer to the notes below
- [ ] = repeat these actions the specified number of times
Teambuilding
- Nahida can be played on- or off-field. If there is no dedicated on-field unit in a Bloom-based team, she should be on-field to generate more Dendro Cores.
- The long duration of her Skill’s mark is well suited to units who require long, uninterrupted field time; however, this can pose a problem in multi-wave content, where Nahida must swap back in to apply the mark to new enemies.
- Nahida synergizes well with other Dendro units since she generates plenty of Dendro Particles, enables Dendro Resonance, easily maintains full uptime on 4pc Deepwood, and grants a sizable EM buff.
- Nahida’s Burst should only be used if the on-field unit benefits from EM, e.g., if they are an on-field Quicken DPS or a Hyperbloom trigger.
Quicken

In Quicken teams, Nahida functions either as an off-field support or as an on-field driver and DPS herself.
Off-field Nahida applies Dendro to allow Electro teammates to trigger Aggravate, while also generating particles and enabling Dendro Resonance when paired with another Dendro unit. Her A1 buff is also a well-appreciated buff for the on-field unit.
On-field Nahida uses Normal and Charged Attacks in combination with her Skill and Burst to maximize her own Spread triggers, while driving off-field Electro units and allowing them to trigger Aggravate.
Notable Teammates
On-Field Electro
On-field Electro damage dealers and drivers that benefit from the Aggravate reaction.
On-Field Dendro
On-field Dendro damage dealers that benefit from the Spread reaction.
Off-Field Electro
Off-field Electro units that provide various utilities and/or benefit from the Aggravate reaction.
Off-Field Dendro
Dendro units that offer defensive utility, enable Dendro Resonance, and generate additional Dendro Particles.
Anemo
Anemo units provide 40% Electro RES Shred via 4pc Viridescent Venerer as well as an assortment of other buffs, grouping, and/or healing. However, it is often difficult to Swirl Electro in certain setups due to Nahida’s Tri-Karma Purification easily consuming Electro auras.
Pyro
Pyro units allow Electro units to trigger Overloaded alongside Quicken. Additionally, occasional Burning enables 4pc Unfinished Reverie as a possible artifact set for both Electro and Dendro units that lack better options.
Geo
Xilonen and Zhongli act as flex slots, providing some defensive utility and additional buffing.
Example Teams
This is not a comprehensive list of teams. The inclusion or exclusion of any given team does not necessarily reflect its power level.

Sample Rotation (Fischl – 4pc Thundering Fury)
Fischl Q > Xilonen E N2 > Nahida E Q > Clorinde E combo > Fischl E > Xilonen E N2 > Clorinde E combo Q
Sample Rotation (Kujou Sara – 4pc Fragment of Harmonic Whimsy)
(Sara E C)1 > Xilonen E(Q)2 N2 > Nahida E (Q)2 > Sara Q > Clorinde E combo > Sara E > Clorinde Q > Xilonen E N2 > Nahida E > Sara C > Clorinde E combo
¹First rotation only.
2Skipping Xilonen and Nahida’s Bursts on the first rotation is preferable.

Sample Rotation (Lan Yan)
(Keqing E)1 > Lan Yan 2[E]2 > Nahida E (Q) > Fischl E/Q > Keqing EQ E N1C N1 E 3[N1C]
¹First rotation only.
2Second rotation onwards, if Nahida’s Burst is available, use Lan Yan after Nahida.
Sample Rotation (Kazuha – 4pc Thundering Fury)
(Nahida E Q > Kazuha tEPQ)1 > Fischl E > Keqing EQ E N1C N1 E 3[N1C] > Kazuha tEP > Nahida E > Fischl Q > Keqing EQ E N1C N1 E N1C
1In the first rotation, do (Keqing E > Kazuha tEPQ > Nahida E Q) instead.

Sample Rotation
Zhongli hED > Nahida E Q > Fischl E > Tighnari combo > Zhongli hED Q > Fischl Q > Tighnari combo

Sample Rotation
Yae 3[E] > Nahida E Q N1C > Kuki Q > Alhaitham hEP 3[N4CD] > Yae N1 (Q) 3[E] > Kuki E > Alhaitham Q N3D N3CD 2[N3D]

Sample Rotation (Thoma – 4pc Thundering Fury)
Nahida E (Q) > Fischl E > Thoma EQ > Clorinde E combo > Fischl Q > Clorinde E combo Q
Sample Rotation (Mavuika – 4pc Fragment of Harmonic Whimsy)
Nahida E (Q) > Mavuika tE (Q) > Fischl E/Q > Clorinde E combo Q
Hyperbloom / Quickbloom

These teams are extremely powerful and flexible; they are able to use a diverse array of units while maintaining respectable damage. They have two objectives that can be focused on to various degrees — maximizing Dendro Core generation and maintaining good Quicken uptime.
The former style of teams, referred to as Hyperbloom, typically have significant amounts of both Dendro and Hydro application alongside a single trigger; the latter will usually have slower Hydro application compared to the rate of Dendro application to maximize Quicken uptime, hence referred to as Quickbloom.
Notable Teammates
Off-Field Electro
Electro units that are typically built with full EM to act as Hyperbloom triggers. Raiden Shogun and Kuki Shinobu tend to be the best-performing characters in this slot. Other characters might require some ER to charge their Burst reliably.
 Raiden Shogun | The Raiden Shogun’s Skill has a large range, frequent Electro hits to trigger Hyperbloom, a long duration, and an Elemental Burst DMG bonus that benefits characters like Xingqiu and Yelan. However, her Electro coordinated attacks do not proc on shielded enemies. |
 Kuki Shinobu | Kuki Shinobu consolidates the role of a healer and a Hyperbloom trigger in one, leaving an extra team slot for more offensive units. She can trigger Hyperbloom, even if the enemy is shielded. C2 is required to maintain full uptime on her Electro application, but she performs well at C0. |
On-Field Electro
On-field triggers can either focus entirely on Elemental Mastery or incorporate DMG% and CRIT to deal more Talent and Aggravate damage.
Hydro
These units apply Hydro on- or off-field to trigger Bloom; they can also consolidate other roles such as healing. For on-field Nahida teams, a second Hydro unit can be used to keep up with Nahida’s Dendro application.
Dendro
A second Dendro unit provides a small buff through Dendro Resonance, and, depending on the Hydro unit, can allow for improved Dendro Core generation. They can also deal additional damage or offer defensive utility.
Flex
Cryo units can help Dendro Core generation if Dendro application is slow. Due to Nahida’s high Dendro application, this interaction does not benefit her teams; however, she still appreciates the added comfort of Freezing enemies.
Anemo units can provide Electro and Hydro RES Shred through 4pc VV as well as other utilities. Catalyst Anemo units such as Sucrose can act as Hyperbloom triggers themselves when on-fielded through their Swirls. However, Nahida’s strong Dendro application often consumes other auras, leaving Anemo units with nothing to Swirl.
Electro units like Fischl and Beidou don’t steal many Hyperblooms while providing additional damage or utility.
Geo units act as flex slots providing some defensive utility, buffing or damage.
Example Teams
This is not a comprehensive list of teams. The inclusion or exclusion of any given team does not necessarily reflect its power level.

Combining the Double Hydro core with Hyperbloom unsurprisingly yields a team that deals immense single-target damage. If you do not need Kuki’s healing, replacing her with Raiden further increases this team’s damage output thanks to her teamwide Burst DMG Bonus that benefits both Xingqiu and Yelan.
Sample Rotation
Nahida E Q > Xingqiu Q N1 > Kuki E N1> Yelan E N1 Q > Nahida N3 E N3D N3 > Xingqiu N1 E N2 > Nahida N1 E N3D N3 > Yelan E N1 > Kuki Q N1 > Nahida N3D N3

Alhaitham’s inclusion enables Dendro Resonance, reduces his and Nahida’s ER requirements, and makes the team more effective in AoE. Higher Quicken uptime also rewards investment into Nahida’s personal damage as she can trigger Spread more frequently.
Sample Rotation
Nahida E Q > Xingqiu EDQ N1 > Kuki E N1 > Alhaitham Q 2[N3D] N2 E 2[N3D] N1C 4[N3D]

Sample Rotation
Furina ED Q > Nahida E Q > Baizhu N1 EQ > Cyno EQ N1 E 6[N4E]¹
¹Cyno must equip 4pc Thundering Fury to use this combo.

Sample Rotation (Furina)
(Raiden E)1 > Nahida E Q > Kokomi N2 E N2D > Furina ED Q > Raiden E > Kokomi N1 Q combo
1First rotation only.
Sample Rotation (Fischl)
Fischl E > Nahida E Q > Kokomi E > Raiden E > Kokomi 3[N2C] > Fischl Q > Kokomi N1 Q combo
Nilou Bloom

Nilou Bountiful Bloom teams are some of the most potent AoE teams in the game, if their lack of grouping can be managed. Nahida provides convenient and consistent Dendro application, and her A1 Passive is also much appreciated. There are two approaches to team compositions for this archetype: Double Dendro (Double Hydro) and Solo Dendro (Triple Hydro) compositions.
In an on-field role, Nahida can use her Normal Attacks alongside her Skill to provide enough Dendro application to maintain an aura even with three sources of off-field Hydro application. Since Nahida’s Skill procs rely on Elemental Reactions being triggered, it is not recommended to use her off-field in Triple Hydro compositions.
In Double Dendro compositions, a second Dendro character can trigger additional reactions to proc her Skill without the need for Nahida to use her Normal Attacks, and also grants the team EM through Dendro Resonance. Due to her Skill’s improved consistency, teams can afford to use Hydro characters with longer on-field presence.
Find more information on building Nilou’s teams here.
Notable Teammates
Nilou
The essential foundation of Bountiful Bloom teams. Nilou converts Dendro Cores to Bountiful Cores with her A1, increases Bountiful Core damage with her A4, and has both off-field and on-field Hydro application to generate a decent amount of Bountiful Cores herself.
Healer
At least one healer is highly recommended in the team due to Bountiful Core self-damage. They also act as Element appliers: Dendro units also help maintain Dendro aura, whereas Hydro healers can double as damage dealers by building EM. Note that it is fine (or even recommended) to run two healers in the same team.
Hydro
Since Hydro is the “weak” side of the Bloom reaction, Hydro units are able to trigger Bloom more times than Dendro units, resulting in more damage overall even if the team’s Hydro characters are not fully built with EM.
Dendro
These units provide additional Dendro application. If running off-field Nahida, another Dendro unit must be used to guarantee Skill procs. Bloom ownership skews highly towards Hydro when running Double Dendro with on-field Nahida; this further encourages building them with high EM.
Example Teams
This is not a comprehensive list of teams. The inclusion or exclusion of any given team does not necessarily reflect its power level.

This team does not require very strict rotations; instead swap to characters to use relevant Skills off cooldown and/or apply the appropriate Elements. Kokomi can use her Burst for its full duration if Collei’s off-field Dendro application (via her Skill and/or Burst) is active.

Yaoyao’s teamwide healing and self–Dendro RES during her Burst are so potent that she can build for EM without compromising much survivability.
Sample Rotation
Nilou E N2 E¹ (Q)² > Nahida E Q N1 > Candace N1 EQ > Yaoyao Q 4[N4D] E > Candace E N2 > Nahida E N2
¹4[E] can be used instead for an easier but slightly slower setup.
²You can use Nilou’s Burst starting from the 2nd rotation, if it is available.

Neuvillette uses his normal Hydro DPS build, dealing tremendous personal damage while still triggering a fair amount of Blooms.
Sample Rotation
Nilou E N2 E¹ > Nahida N1 E Q > Kirara Q shE²> Neuvillette E C Q C > Kirara shE¹ > Neuvillette C E C > Nahida N1C
¹4[E] can be used instead for an easier but slightly slower setup.
²Use Kirara’s “Short-Hold Skill”.

Sample Rotation
Nilou E N2 E1 > Nahida N1 EQ > Xingqiu EDQ N1 > Kaveh Q combo2
14[E] can be used instead for an easier but slightly slower setup.
²Spam Normal Attacks while also performing at least 2 Skills.
Burgeon

Burgeon teams scale phenomenally in AoE — not only is the reaction damage itself AoE, but multi-target scenarios also increase Dendro Core generation. This makes Burgeon teams a potent option for such scenarios, with some teams still maintaining relevant single-target damage. If an off-field Electro unit is added, Hyperbloom can be triggered between Burgeon procs.
Burning can impede Dendro Core generation and should be avoided. Hydro, Electro, Cryo, and Geo are generally effective at reducing Burning uptime, with Cryo notably Freezing enemies when paired with fast Hydro application. If Nahida is used on-field, significant amounts of Hydro application are needed to match her extremely high rate of Dendro application. Note that Burning enables 4pc Unfinished Reverie as a possible artifact set for units that lack better options.
Due to the frequent self-damage inflicted by Burgeon, it is highly recommended to include units that provide strong healing or shielding to keep the team alive in sustained combat.
Notable Teammates
Pyro
Pyro units that act as Burgeon triggers, building as much EM as possible, as well as enough ER to Burst consistently.
 Thoma | Thoma can trigger Burgeons frequently with relatively low Pyro application, avoiding high Burning uptime. He also provides a shield, which can help mitigate Burgeon’s self-damage. However, his Pyro application and shield are tied to his Burst, making his builds a tough balance between ER, EM and HP. If Burgeons are not the team’s main source of damage, it may be preferred to focus on improving his shield’s strength. |
 Pyro Traveler | Pyro Traveler can trigger Burgeons at a similar frequency to Thoma. While their Pyro application is tied to their Skill, using their Burst is paramount to maintaining high uptime for Burgeons. Therefore, their ER requirements cannot be ignored. |
 Xiangling | Xiangling’s Pyro application via her Burst is faster than others, leading to higher Burning uptime and less Burgeons without fast enough Hydro and Dendro application. Her high ER requirements leave less room for building EM. Despite all this, Xiangling is still a usable option, especially in Neuvillette teams. |
Hydro
Hydro appliers to consistently create Dendro Cores. Fast application, particularly in AoE combat, is highly valued to improve Dendro Core generation as well as minimize the frequency of Burning.
Dendro
Adding a second Dendro unit can allow for improved Dendro Core generation while also providing a small buff through Dendro Resonance. However, to ensure Burning does not occur, high Hydro application is required. Some of these units provide helpful sustain, such as Kirara’s Dendro-resistant shield.
Electro
Electro units can mitigate Burning by triggering Overloaded, and they allow for some Quicken uptime. Additionally, they can sometimes trigger Hyperblooms.
Cryo
The interaction between Cryo, Hydro, and Dendro allows Freeze to be triggered before Bloom. This improves Dendro Core generation in teams with fast Hydro application. Cryo also helps minimize Burning uptime, should it take over.
Geo
Geo units can provide various utilities such as shields and damage; they also mitigate Burning by triggering Pyro Crystallize. Zhongli’s strong shield and Universal RES Shred are a solid boost to a team’s offense and defense. Noelle drives off-field teammates and provides defensive utility, but she will need to run Favonius Greatsword as a Solo Geo.
Example Teams
This is not a comprehensive list of teams. The inclusion or exclusion of any given team does not necessarily reflect its power level.

While Fischl fits well with Ayato’s cooldowns in a 25s+ rotation, the team lacks survivability and Thoma would need to sacrifice some of his damage for defensive utility while Nahida would hold Prototype Amber.
Sample Rotation (Baizhu)
Nahida E > Ayato Q > Thoma Q E N2 > Baizhu EQ > Ayato E N15 > Nahida E > Thoma E N2 > Baizhu E > Ayato E N15
Sample Rotation (Fischl)
Nahida E (Q) > Ayato Q > Fischl E > Thoma Q E N2 > Ayato E N15 > Fischl Q > Nahida E > Thoma E N2 > Ayato E N15

A Burgeon team that focuses less on maximizing Dendro Core damage and more on other teammates’ damage. Kokomi serves as a healer to both counteract self-Burgeon damage and Furina’s HP drain. Fischl can sometimes trigger Hyperbloom through her A4 procs.
Sample Rotation (Fischl)
Fischl E > Nahida E Q > Kokomi E > Pyro Traveler tE Q > Nahida N2 E N2C > Fischl Q > Kokomi Q combo > Nahida E N2C
Sample Rotation (Furina)
Furina ED Q > Nahida E > Kokomi E > Pyro Traveler tE Q > Nahida N2C N2 E > Kokomi Q combo > Nahida N2C

Razor’s unique Burst mechanics allow him to trigger various Transformative Reactions simultaneously, completely disregarding his Physical damage. This team excels in AoE content, assuming you can keep enemies within Bennett’s Burst.
Sample Rotation
Razor E > Nahida E Q > Xingqiu EDQ N1 > Bennett EQ N1 > Razor EQ 2[N3ED N3D] > Bennett E

Klee’s permanent access to Pyro Normal Attacks allows her to freely swap to her teammates. This can be used to refresh Nahida’s Skill, regenerate Kirara’s shield, or trigger Favonius weapon passives more often.
Sample Rotation
Nahida E Q > Xingqiu EDQ N1 > Kirara (Q) shE¹ > Klee combo²
¹Use Kirara’s “Short-Hold Skill”.
²Spam Klee’s Normal Attacks, using her Skill when possible.
Burnvape / Burnmelt

Nahida can maintain a Burning aura to enable Cryo and Hydro characters to trigger Melt and Vaporize respectively. Additionally, Burning enables 4pc Unfinished Reverie as a possible artifact set for units that lack better options.
However, Nahida’s reliability at maintaining a Burning aura fluctuates based on the Pyro character, the team, and the player’s execution. A good Pyro applicator or an Anemo unit with Pyro Absorption can help mitigate any issues faced.
Notable Teammates
Hydro
Hydro damage dealers who can consistently trigger Forward Vaporize.
Cryo
Cryo damage dealers who can consistently trigger Reverse Melt.
Pyro
A Pyro unit is needed to start Burning; those with off-field application can also help sustain it.
 Dehya | On paper, Dehya appears to be a practical unit for Burning uptime, providing damage mitigation and Pyro application on-hit. However, her Pyro application is stationary, lacks AoE and, when paired with Nahida, can lead to a volatile Burning aura. Dehya’s on-hit Skill activation can sometimes depend on Nahida’s Skill activation. However, refreshing Burning and Burning ticks do not count as reactions for Nahida’s Skill condition, which can impair this combination in Mualani teams, among others. |
Flex
While Xilonen and Anemo units offer RES Shred and other buffs, they tend to struggle to provide good buff uptime for the Hydro and Cryo damage dealers. A unit like Kazuha also provides off-field Pyro application through his Pyro-absorbed Burst if needed.
Zhongli offers Universal RES Shred and a shield that prevents interruption. His pillar can interfere with Burning, so it should intentionally be placed away from enemies. Other shielders can be used in lieu of Zhongli, but they may risk ruining Burning aura, resulting in lost Melts.
Example Teams
This is not a comprehensive list of teams. The inclusion or exclusion of any given team does not necessarily reflect its power level.

The Nahida and Xiangling pairing allows Neuvillette and Furina to Vaporize some of their hits reliably. Since this team produces a decent amount of Dendro Cores, Xiangling can build some EM to increase Burgeon damage.
Sample Rotation
Neuvillette E > Nahida E Q > Xiangling Q ED > Furina ED Q > Neuvillette C E C Q > Nahida E N1C > Xiangling ED N1 > Neuvillette 2[C]

Burning (enabled by Nahida and Dehya’s Skills) allows Ganyu to more effectively Melt her Charged Shots at longer ranges than in teams with Xiangling or Kazuha.
Sample Rotation
Nahida E Q > Bennett EQ > Dehya E N1 > Ganyu 6[C] E

Sample Rotation (Mavuika)
(Wriothesley N1)1 > Nahida E Q > Mavuika Q ED > Bennett EQ > Wriothesley E combo (Q)
1First rotation only.
Sample Rotation (Thoma)
Thoma EQ > Nahida E Q > Bennett EQ > Wriothesley E combo (Q) > Bennett E

Sample Rotation
Nahida E Q > Chongyun E > Bennett EQ > Rosaria EQ > Bennett E > Chongyun Q > Bennett E > Nahida E > Rosaria E > Bennett E
Credits
cuzimori, nikatosaurus, jamberry, Kuro_kami91#6652, leifa, nzpieface, ayzel, sir_pick, miannes, cuppacote, leah, seima, reddraegon, idkanonymized, nociii, polomo, fritzzes, chasing_haze, leifa, grankrathalos, rarepossum, raikh, .pweep, _demomain, .athene., alix.sh, irokei, haafr, plumetra, catto7281, lesterberne, acerbus114, radish.yy, auraolis
Team images courtesy of the KQM portrait generator.

