Updated for Version 3.8

“Share in my knowledge.”
Table of Contents
Introduction
Nahida is the Dendro Archon of Genshin Impact and has a kit that more than lives up to her title. She is almost unmatched in her ability to slot into practically every Dendro team, and often is one of the better, if not the best, options. Do not underestimate her; the God of Wisdom knows well how to bring ruin to her enemies.
She is certainly one of the Dendro units of all time.
TL;DR
Credits to: kolvii, cegewinne, haafr, baloopy, and KQM Staff
Why Play Nahida?
“Curiosity deserves a reward.”
Pros
- Extremely unique and powerful AoE capabilities with Elemental Skill
- Highly consistent on-field and off-field Dendro application
- Highly effective at free-to-play levels of investment
- Very flexible team compositions and rotations
- High personal damage ceiling with investment
- Phenomenal Constellations (C2 and C6)
- Low Burst cooldown and Energy Cost.
Cons
- Lower Base HP, Base DEF, Movement Speed and poise compared to other characters, meaning care must be taken when played on-field
- Anti-synergy with Anemo in some teams — strong Dendro application makes Swirling Electro or Hydro harder
- Her personal damage can be lower compared to dedicated Dendro DPS units
- Her off-field playstyle can struggle in wave-based content due to her Dendro application being tied to the enemy instead of persisting on-field as a turret.
- Her Hold Skill’s Aim Mode can be difficult to use on some devices.
Glossary
| AoE | Area of Effect. A property of certain abilities that allows them to affect multiple entities within a certain range. It can also refer to the effective range of said abilities, usually indicated visually, e.g. the Shrine of Maya AoE indicates where characters can benefit from Nahida’s A1. |
| TKP | Tri-Karma Purification, the damage dealt by Nahida’s Elemental Skill when reactions are triggered on enemies marked by her Skill or when enemies take damage from Dendro Cores. |
| BiS | Best-in-slot. Typically refers to equipment that is the best possible option for a given scenario. |
| GD | Gilded Dreams, an artifact set which boosts Elemental Mastery with the 2-piece effect and boosts both ATK% and EM depending on team members with the 4-piece effect. |
| DM | Deepwood Memories, an artifact set which boosts Dendro DMG with the 2-piece effect and decreases Dendro RES upon Skill or Burst hits with the 4-piece effect. |
| ICD | Internal Cooldown. A mechanic that limits how frequently certain game effect instances can occur in a short period, it is often used to describe the rate at which attacks can apply their Element or trigger reactions. Standard ICD for Elemental application is every 3 hits or 2.5s. |
| RES | Resistance. A stat that reduces the damage received from attacks of a certain Element (including Physical). |
| Shred | Effect that reduces defensive stats on enemies. It is commonly used to refer to reducing enemy resistance against specific Elemental damage, such as with the Deepwood Memories artifact set. It can also refer to effects that reduce enemy Defense. |
| Proc | Effects triggered by a fulfilled condition (e.g., Elemental Reactions or Bloom-based damage on marked enemies proccing Nahida’s TKP) |
| snapshot | Property by which an ability uses the stats present on a character during the casting of the ability throughout its duration. More information on the KQM TCL here. |
| (on-field) driver | Character that can effectively trigger abilities of off-field teammates while contributing to the team’s total DPS when they are on-field. |
| enabler | Refers to units who allow (“enable”) their teammates to trigger reactions through frequent Elemental application. |
Combo Notation
| N# | Normal Attack. # indicates the number of Normal Attacks used before a different action is performed. |
| CA | Charged Attack or Charged Shot (for Bow users). |
| P | Plunging Attack. |
| E | Elemental Skill. ‘tE’ indicates the Tap variant, while ‘hE’ indicates the Hold variant. |
| Q | Elemental Burst. |
| D | Dash. |
| 2(N2C) E N2C | Example Combo Notation: N2C refers to using two Normal Attacks followed by a Charged Attack. ‘2(N2C) E N2C’ denotes performing the N2C twice before using an Elemental Skill, followed by another N2C. |
FAQ
What’s her best free-to-play weapon?
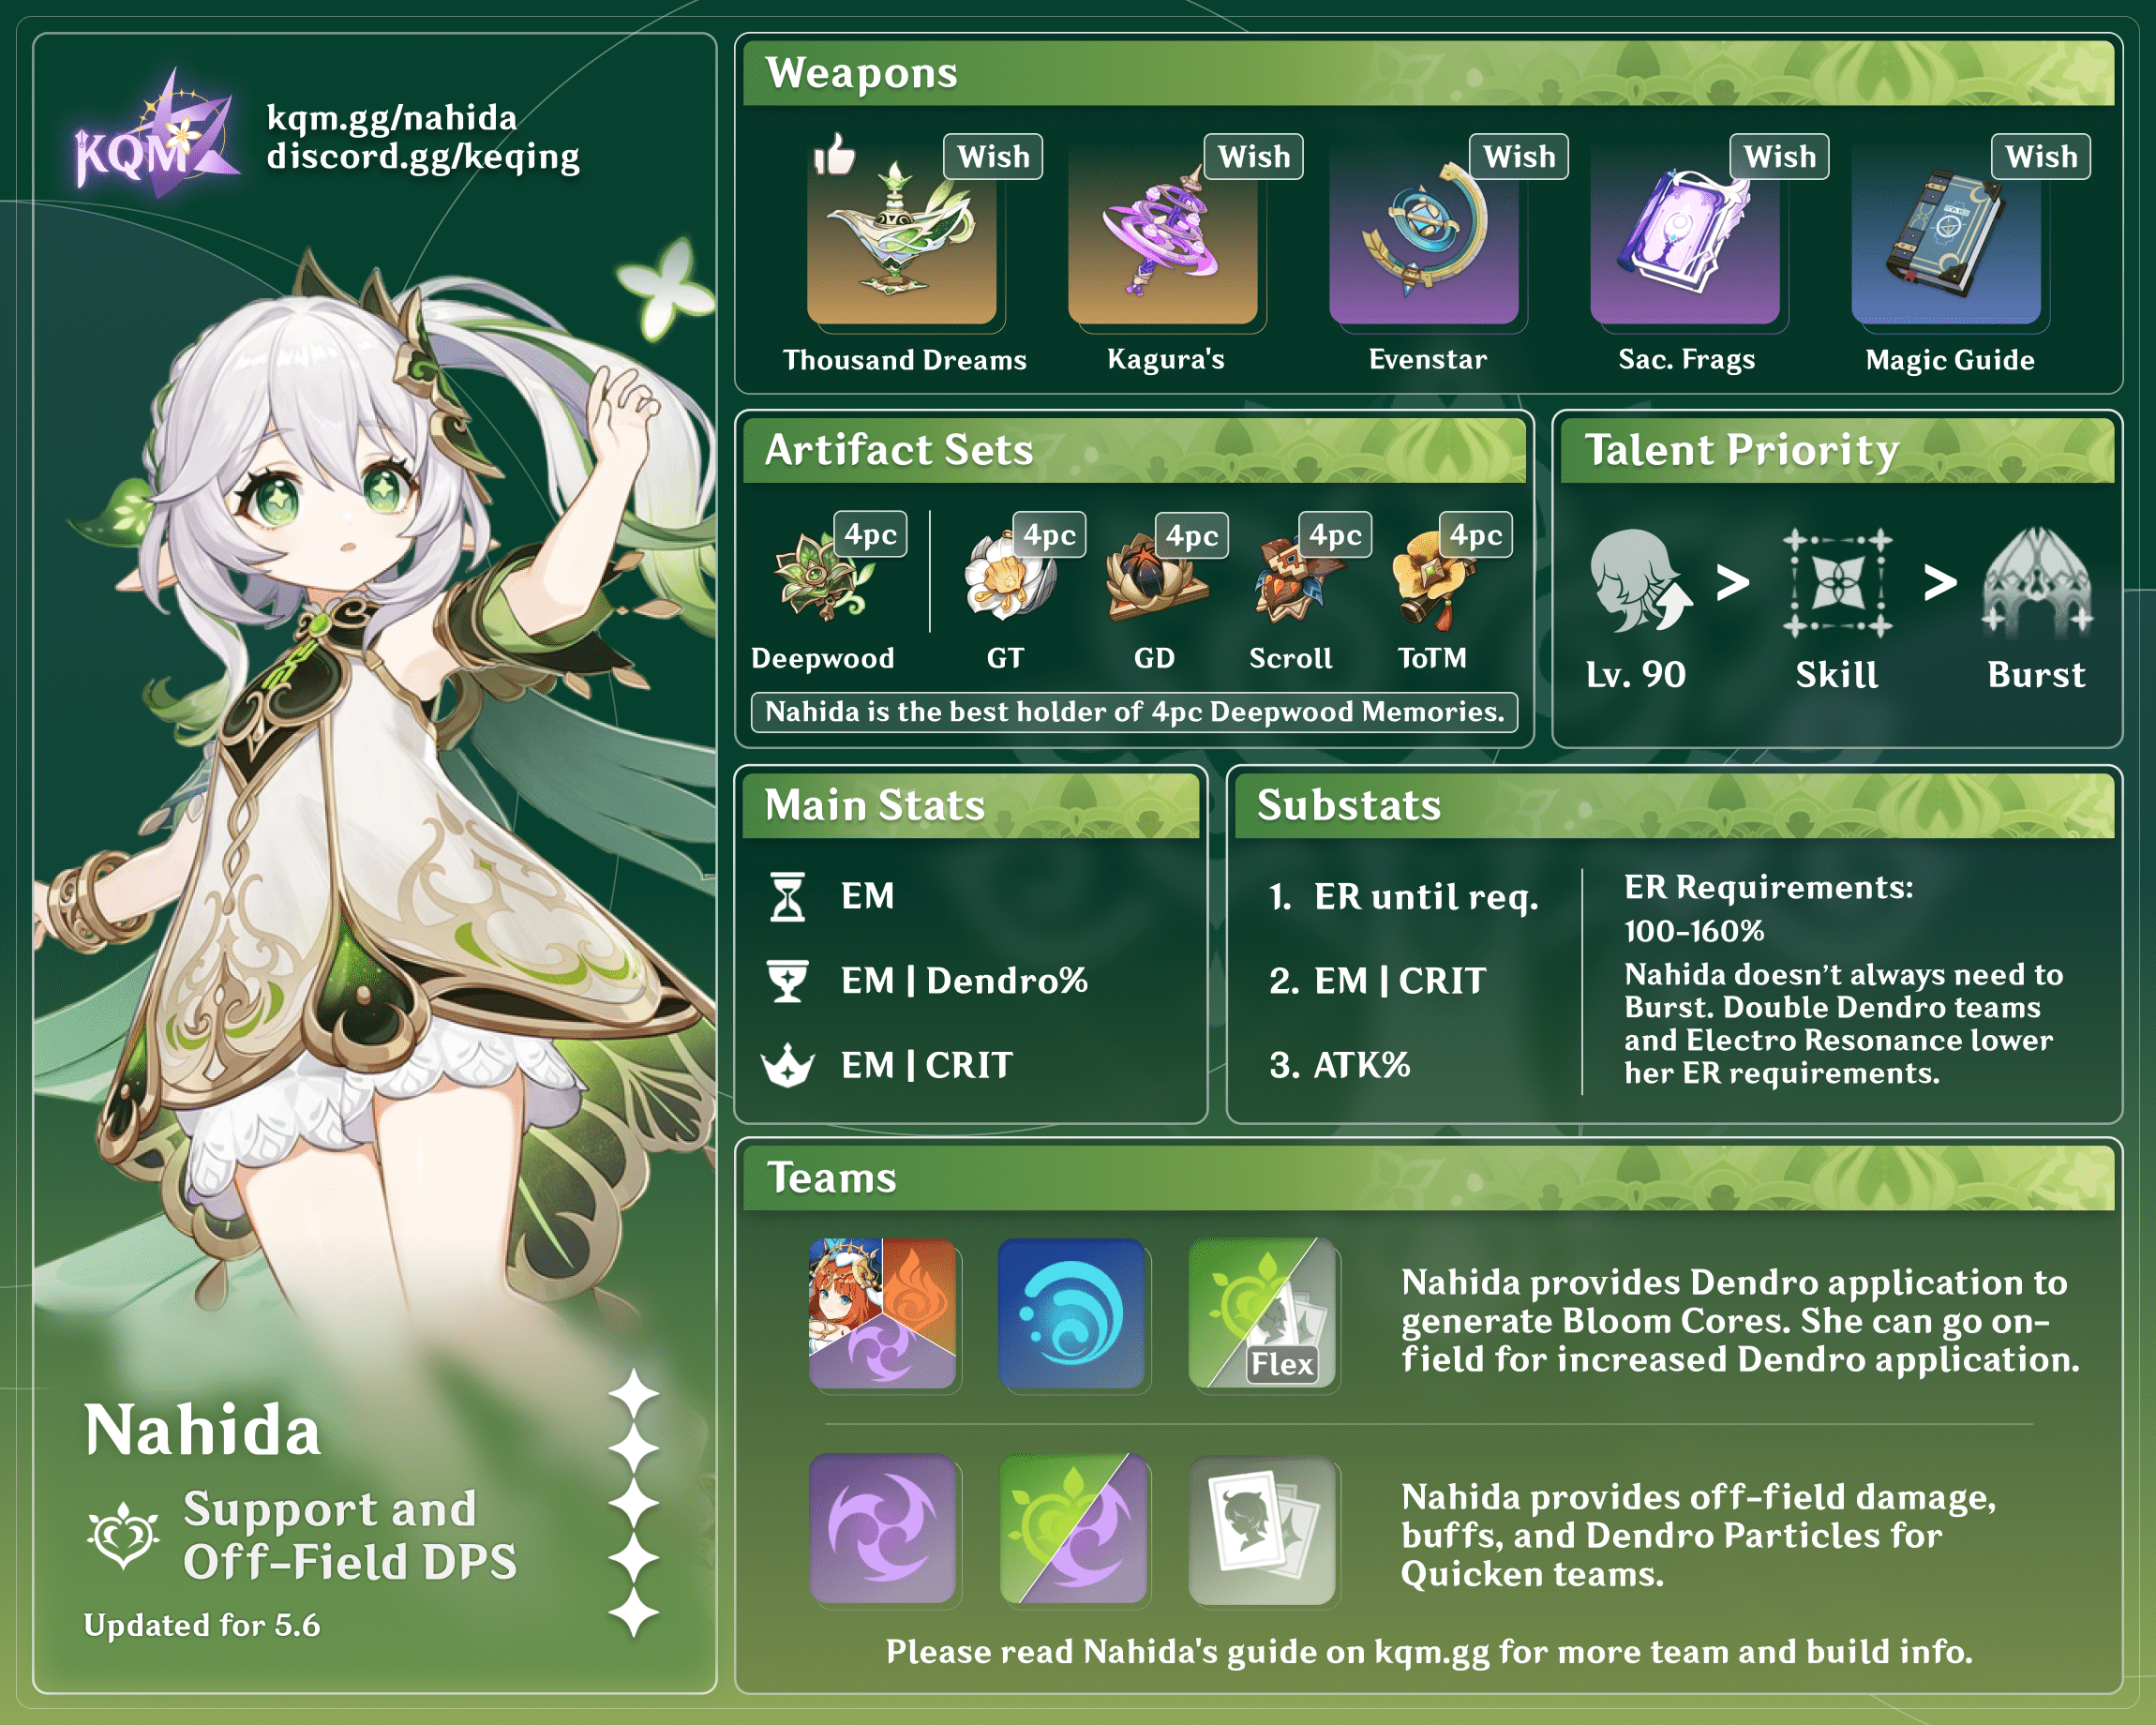
Magic Guide is an easily obtained 3-star weapon that is well-suited for Nahida and beats even 5-star alternatives. It has a high EM secondary stat (even higher than the 4-star Mappa Mare) that is greatly valued on Nahida due to her Talent scaling and Ascension 4 Passive.
Its passive can also have value in teams that can maintain Electro or Hydro aura on enemies, although this may be inconsistent due to Nahida’s strong Dendro application.
That said, there are a few exceptions: Mappa Mare can beat out Magic Guide for on-field Nahida if the latter’s passive cannot be used at all. Hakushin Ring can also be incredibly potent in the right teams, provided that Nahida needs the ER% it provides and teammates benefit significantly from its buffs.
What teams should I play with Nahida?
Nahida is a powerful option in practically every team archetype that uses Dendro Reactions due to her consistent Dendro application both on-field and off-field.
Quicken teams allow her to deal considerable personal damage via Spread, while Bloom-based teams like Hyperbloom, Burgeon, or Nilou Bloom teams make good use of her high Dendro application rate to increase Dendro Core generation.
What teammates should I use with Nahida?
Nahida can work with a wide variety of characters that can use Dendro Reactions, specifically Hydro, Electro, Pyro, and Dendro characters.
Electro and Dendro units can be run in Quicken teams for an easily-maintained damage increase. Hydro units with consistent application can generate Dendro Cores to allow Electro or Pyro units built with high EM to trigger high damage Hyperblooms or Burgeons. The aforementioned Electro or Pyro units simply need to consistently hit the Dendro Cores with their respective Element. This is because triggering Dendro Cores is not limited by ICD mechanics as they are each considered separate entities.
Nilou teams remove the need for Electro or Pyro characters by replacing the standard Bloom “Rupture” with a stronger and quickly detonating variant, allowing for competitive performance from exclusively Hydro-Dendro teams.
Nahida’s synergy with specific characters will be discussed in greater detail in later sections of this guide.
Should I get C2? How good is her C2?
Nahida’s C2 is an incredibly potent Constellation that raises the damage ceiling of her teams by a noticeable amount, and lets her work well in unconventional uses such as Eula teams. However, C2 is not a “must-have” at all, as Nahida’s kit is already very powerful and fully complete at C0.
C2 does not add any significant utility to Nahida’s kit, but simply rewards players who highly invest into Nahida’s Constellations for larger damage numbers. That said, it can allow her to slot into teams she would otherwise be highly suboptimal in.
Talents
 Normal Attack | Akara
Talent Description
Normal Attack
Performs up to 4 attacks that deal Dendro DMG to opponents in front of her.
Charged Attack
Consumes a certain amount of Stamina to deal AoE Dendro DMG to opponents in front of her after a short casting time.
Plunging Attack
Calling upon the might of Dendro, Nahida plunges towards the ground from mid-air, damaging all opponents in her path. Deals AoE Dendro DMG upon impact with the ground.
As a Dendro Catalyst user, Nahida has the ability to apply Dendro at will without the use of a Skill or Burst, which is highly valuable in teams that desire large amounts of Dendro application. The high rate of Dendro application also allows her Normal Attacks to greatly benefit from Spread. However, the raw damage of her Normal Attacks and Charged Attacks without Spread is very underwhelming due to her mediocre multipliers. Even with Spread, they do not make up a large portion of her damage.
The high Stamina cost of her Charged Attacks makes them generally not worth using except if you need slightly more AoE Dendro application or greater range. As such, Nahida typically does not require any specific combos as an on-field unit.
 Elemental Skill | All Schemes to Know
Talent Description
Sends forth karmic bonds of wood and tree from her side, dealing AoE Dendro DMG and marking up to 8 opponents hit with the Seed of Skandha.
When held, this skill will trigger differently.
Hold
Enters Aiming Mode, which will allow you to select a limited number of opponents within a limited area. During this time, Nahida's resistance to interruption will be increased.
When released, this skill deals Dendro DMG to these opponents and marks them with the Seed of Skandha.
Aiming Mode will last up to 5s and can select a maximum of 8 opponents.
Seed of Skandha
Opponents who have been marked by the Seed of Skandha will be linked to one another up till a certain distance.
After you trigger Elemental Reactions on opponents who are affected by the Seeds of Skandha or when they take DMG from Dendro Cores (including Burgeon and Hyperbloom DMG), Nahida will unleash Tri-Karma Purification on the opponents and all connected opponents, dealing Dendro DMG based on her ATK and Elemental Mastery.
You can trigger at most 1 Tri-Karma Purification within a short period of time.
Nahida’s Elemental Skill is her main source of damage, her only source of off-field Dendro application, and another source of on-field Dendro application. It can either be tapped to mark surrounding enemies in a small circle around Nahida, or held down to mark up to 8 enemies in aiming mode. Enemies can be marked extremely quickly by simply panning the camera onto them while the Skill is held. The Tap Skill has a short cast time, while the Hold version is preferred if not all enemies are in range of her Tap Skill AoE.
All marked enemies (within a large area) will be linked with a chain. When a marked enemy has any reaction triggered on them or takes damage from a Dendro Core or Bountiful Core, all linked enemies will take Tri-Karma Purification damage (see clip below). Enemies stay marked for 25s; due to the Skill’s short 5s cooldown, it is easy to maintain full uptime on enemy marks.
Tri-Karma Purification has no Elemental ICD and can trigger as often as once every 2.5s at base. Each hit applies 1.5U Dendro, giving her a significant advantage in terms of Dendro application. Nahida only generates particles from her Tri-Karma Purification procs; Energy generation instances have a 7s cooldown and make 3 particles each time.
Notably, her Skill relies on reactions to trigger, which may lead to an inconsistent proc rate as it is unlikely to proc exactly off cooldown.
 Elemental Burst | Illusory Heart
Talent Description
Manifests the Court of Dreams and expands the Shrine of Maya.
When the Shrine of Maya field is unleashed, the following effects will be separately unleashed based on the Elemental Types present within the party.
- Pyro: While Nahida remains within the Shrine of Maya, the DMG dealt by Tri-Karma Purification from "All Schemes to Know" is increased.
- Electro: While Nahida remains within the Shrine of Maya, the interval between each Tri-Karma Purification from "All Schemes to Know" is decreased.
- Hydro: The Shrine of Maya's duration is increased.
If there are at least 2 party members of the aforementioned Elemental Types present when the field is deployed, the aforementioned effects will be increased further.
Even if Nahida is not on the field, these bonuses will still take effect so long as party members are within the Shrine of Maya.
Nahida covers a huge area with an illusory domain, capable of covering most of an Abyss Chamber. Within this area, her Talents gain different effects based on the Elements of her teammates.
The buffs provided by her Burst are not as valuable as they appear:
- Pyro: The damage buff is miniscule.
- Electro: The value of the decreased TKP trigger cooldown is highly dependent on rotations and teams.
- Hydro: The Burst extension is potentially useful, but generally lacks value as many on-field units cannot make use of her A1 Passive’s EM buff and Nahida’s Burst already has a long base duration.
An increased TKP trigger rate can also be problematic to the overall DPS of certain teams that are sensitive to Dendro application frequency; this may include certain Hyperbloom teams or Burgeon teams with an Electro applier, where faster Dendro application may cause fewer reactions to be triggered. The same can be said in certain Aggravate teams, where increased Dendro application could cause fewer Electro Swirls or Fischl A4 procs.
In spite of this, there are two scenarios where her Burst provides notable value:
- In teams where the on-field unit benefits from Nahida’s A1 EM buff, including Nahida herself
[and/or] - In teams with Electro unit(s) or Nahida’s C1, where the decrease in her Skill’s trigger interval increases the amount of reactions triggered, improving DPS.
Outside of these two scenarios, her Burst does not provide much value and may not be worth using or investing in. This is compounded by her Burst’s long 1.9s cast time and its lack of direct damage or upfront Dendro application. Nevertheless, it is low-cost and extremely pretty, and may be worth using just for the aesthetics or the generous amount of i-frames it provides. If using Prototype Amber, her Burst can also be used for small teamwide healing.
Examples Illustrating the Value of Nahida’s Burst:
In most Burgeon teams, Nahida’s Burst provides minimal value because the Burgeon trigger (usually Thoma) is generally off-field and consequently does not receive Nahida’s A1 buff. Additionally, the damage buff to Nahida’s TKPs as a result of having a Pyro unit is not significant to overall team DPS.
In a Hyperbloom team in single-target where Nahida is on-field and can maintain a Dendro aura on her own, neither the A1 buff nor the increased TKP trigger rate provide much value, since Nahida is not triggering reactions and the faster Dendro application is not needed. Conversely, in multi-target when driver Nahida is paired with single-target Hydro appliers like Xingqiu/Yelan, the A1 buff and increased TKP proc rate may be valuable because Nahida may be triggering Spreads on any secondary target(s).
If Nahida is off-field in a Hyperbloom team, the increased TKP trigger rate may allow for more Hyperblooms to be triggered, and the extension of her Burst duration would allow Nahida to gain the Electro buff for longer.
Ultimately, the benefit of her Burst is highly context-dependent.
For a discussion of the value of leveling Nahida’s Burst, see the Talent Priority section.
 Ascension 1 Passive | Compassion Illuminated
Talent Description
When unleashing Illusory Heart, the Shrine of Maya will gain the following effects:
The Elemental Mastery of the active character within the field will be increased by 25% of the Elemental Mastery of the party member with the highest Elemental Mastery.
You can gain a maximum of 250 Elemental Mastery in this manner.
While Nahida’s Burst is active, this Passive provides a sizable EM buff to the on-field character, including Nahida herself if she is on-field. This is the strongest part of her Burst and is particularly valuable if the on-field character triggers reactions or has Talents that scale or benefit from EM — such as Nahida’s own Skill and A4 Passive. It is worth noting that this buff snapshots based on the character with the highest EM in the party when it is cast, which might not necessarily be Nahida.
Flat EM from external sources — including weapons, 4pc Instructor, and flat EM character buffs like Albedo’s A4 Passive — are factored into Nahida’s A1 EM share. However, EM buffs scaling off a percentage of other characters' stats, such as Sucrose’s A4 or Key of Khaj-Nisut, are not.
 Ascension 4 Passive | Awakening Elucidated
Talent Description
Each point of Nahida's Elemental Mastery beyond 200 will grant 0.1% Bonus DMG and 0.03% CRIT Rate to Tri-Karma Purification from All Schemes to Know.
A maximum of 80% Bonus DMG and 24% CRIT Rate can be granted to Tri-Karma Purification in this manner.
This Passive is extremely powerful: it increases the value of Elemental Mastery on Nahida until the cap of 1000 total EM. The Passive also benefits from any external EM buffs such as Sucrose A4, Diona C6, etc. This increases her damage output and diversifies her build options.
 Utility Passive | On All Things Meditated
Talent Description
Nahida can use All Schemes to Know to interact with some harvestable items within a fixed AoE. This skill may even have some other effects...
10/10 best exploration Passive. The long reach combined with the short Skill cast and cooldown makes it perfect to collect any plants and specialities (except Scarabs). Good for gathering Qingxin, Violetgrass, Kalpalata Lotuses, or anything else that is hard to reach.
This Talent can also be used to play special dialogue from Sumeru NPCs, including characters from quests.
Talent Priority
Off-field
>> ≥
Skill >> Burst ≥ Normal Attack
On-field
> >
Skill > Normal Attack > Burst
Most of Nahida’s damage comes from her Skill Talent damage and reactions. Upgrading Nahida’s Normal Attacks is only recommended if using her on-field; even then, they do not deal a significant amount of damage.
As discussed in the Talents section, the use of Nahida’s Elemental Burst varies in value depending on what team she’s played in and whether she has C1, both of which in turn affect the value of her Burst Talent levels. Leveling Nahida’s Burst is typically beneficial in teams with Electro teammate(s) or Nahida’s C1, where an increased TKP trigger rate allows for a greater amount of reactions to be triggered.
Ultimately, however, the impact of Nahida’s Burst Talent levels on team DPS (whether this impact is positive or negative) is relatively small. Thus, players should not feel pressured to either level or refrain from leveling her Burst.
Constellations

Nahida has some of the strongest Constellations in the game; C2 is incredibly potent, C6 is a huge boon to her personal damage, C4 is a helpful EM buff and even C1 has situational use.
Nahida’s Constellations highly vary in the value they provide depending on the team; the numbers shown below are calculated specifically with respect to a Nahida/Kuki/Yelan/Fischl team as shown here.
 Constellation 1 | The Seed of Stored Knowledge
When the Shrine of Maya is unleashed and the Elemental Types of the party members are being tabulated, the count will add 1 to the number of Pyro, Electro, and Hydro characters respectively.
Surprisingly low-impact Constellation, since it buffs the most inconsistent part of Nahida’s kit. One thing to note: even if the party has no teammate of an Element, this Constellation does give the respective Element buff to her Burst. The value of this Constellation can vary from fairly helpful to absolutely useless depending on the value of Nahida’s Burst in a team.
| Personal DPS increase from previous Constellation: 9% | Team DPS increase from previous Constellation: 2% |
| Personal Cumulative DPS increase: 9% | Team Cumulative DPS increase: 2% |
 Constellation 2 | The Root of All Fullness
Opponents that are marked by Seeds of Skandha applied by Nahida herself will be affected by the following effects:
- Burning, Bloom, Hyperbloom, and Burgeon Reaction DMG they receive can score CRIT Hits. CRIT Rate and CRIT DMG are fixed at 20% and 100% respectively.
- Within 8s of being affected by Quicken, Aggravate, Spread, DEF is decreased by 30%.
The most impactful Constellation, possibly in the entire game. This is essentially a multiplicative 20% increase in Burning and Bloom-based Reaction damage, and a multiplicative 18% increase in Quicken team damage excluding Transformative Reactions. This Constellation is so impactful that it can allow Nahida to slot in teams she would otherwise have no business with, such as Eula teams with an Electro unit. It has further utility by allowing Bloom-based Reactions to trigger Favonius weapons. Nahida’s C2 is the best of the bunch, and it is fully worth your time if you plan on investing significant Primogem value into Nahida.
| DPS increase from previous Constellation: 16% | Team DPS increase from previous Constellation: 18% |
| Cumulative DPS increase: 27% | Team Cumulative DPS increase: 20% |
 Constellation 3 | The Shoot of Conscious Attainment
Increases the Level of All Schemes to Know by 3.
Maximum upgrade level is 15.
Less impactful than C2, but still valuable to have. Talent levels matter less with Dendro Reactions, but they still increase the damage dealt.
| DPS increase from previous Constellation: 7% | Team DPS increase from previous Constellation: 1% |
| Cumulative DPS increase: 36% | Team Cumulative DPS increase: 22% |
 Constellation 4 | The Stem of Manifest Inference
When 1/2/3/4 (or more) nearby opponents are affected by All Schemes to Know's Seeds of Skandha, Nahida's Elemental Mastery will be increased by 100/120/140/160.
A decent increase in EM for Nahida, all things considered. Not much else to say.
| DPS increase from previous Constellation: 5% | Team DPS increase from previous Constellation: 1% |
| Cumulative DPS increase: 43% | Team Cumulative DPS increase: 23% |
 Constellation 5 | The Leaves of Enlightening Speech
Increases the Level of Illusory Heart by 3.
Maximum upgrade level is 15.
Not a very good Constellation, as the Talent upgrade for Nahida’s Burst does not decrease its inconsistency. For reasons explained in the Talents section, the Constellation can be useful, useless, or sometimes even actively detrimental; as such, it has extremely poor value.
| DPS increase from previous Constellation: 6% | Team DPS increase from previous Constellation: 1% |
| Cumulative DPS increase: 51% | Team Cumulative DPS increase: 25% |
 Constellation 6 | The Fruit of Reason's Culmination
When Nahida hits an opponent affected by All Schemes to Know's Seeds of Skandha with Normal or Charged Attacks after unleashing Illusory Heart, she will use Tri-Karma Purification: Karmic Oblivion on this opponent and all connected opponents, dealing Dendro DMG based on 200% of Nahida's ATK and 400% of her Elemental Mastery.
DMG dealt by Tri-Karma Purification: Karmic Oblivion is considered Elemental Skill DMG and can be triggered once every 0.2s.
This effect can last up to 10s and will be removed after Nahida has unleashed 6 instances of Tri-Karma Purification: Karmic Oblivion.
This Constellation can significantly increase the damage Nahida deals in teams where she is used on-field, and can increase the number of Tri-Karma Purification procs she gets per rotation by upwards of 60%. A fitting capstone of a Constellation.
| DPS increase from previous Constellation: 41% | Team DPS increase from previous Constellation: 10% |
| Cumulative DPS increase: 112% | Team Cumulative DPS increase: 38% |
Gearing
“I feel like a Nilotpala Lotus that's been reunited with its leaves, or a Sango Pearl that's found its shell.”
Artifacts
ER Requirement
These numbers are approximate; ER requirements will vary depending on team and context. For a more accurate estimate of your ER requirements, use the Energy Recharge Calculator.
| Situation | Off-field | On-field |
| Aggravate, Double Electro | ~100–120% | ~100–120% |
| Double Dendro | ~120–140% | ~110–130% |
| Bloom (Solo Dendro) | N/A | ~120–140% |
| Hyperbloom/Quickbloom | ~130–140% | ~100–120% |
| Burgeon | ~140–160% | ~130–140% |
Generally, ER requirements tend to be lower if using batteries (such as Fischl or Raiden) or a second Dendro unit, funneling teammates’ particles to Nahida, running Favonius weapons, using her Burst every other rotation, etc. ER requirements tend to increase dramatically if Nahida must Burst every 15s, though teams where she does so are rare.
Artifact Stats
 Sands |  Goblet |  Circlet |
| EM | EM or Dendro DMG Bonus | EM or CRIT |
Nahida’s substat priorities heavily depend on the team and role she is used in. These can be broadly divided into three categories: off-field, on-field, and Nilou Bloom teams.
Off-field:
ER until requirement > as close to 900-1000 total EM as possible* > Dendro DMG% > CRIT > EM
Nahida’s off-field role revolves around her Skill damage, potentially boosted by Spread, alongside her A1 buff. This puts a high emphasis on building EM until she reaches as close to 900-1000 EM as possible, including EM provided by external buffs. Once she has met her desired EM threshold, stats such as DMG% and CRIT become more valuable.
* Note that aiming for 900-1000 EM is optimal for off-field Nahida’s personal damage even when her A1 buff is irrelevant. This is due to how her A4 buffs her Skill damage based on EM. However, the amount of EM that you can realistically reach with a non-EM weapon is limited, especially without external EM buffs. Additionally, the difference is fairly minimal in Nahida’s personal damage between an off-field build maximizing EM and one balancing CRIT and DMG% stats.
This means a well-built off-field Nahida does NOT need 900-1000 EM to be “good.” It is more important to balance your stats given your weapon and actual artifacts, which is why we recommend using Genshin Optimizer.
On-field:
ER until requirement > Dendro DMG% ≥ CRIT ≥ EM > ATK%
On-field Nahida incorporates Normal Attacks to her damage profile alongside her Skill — as her Normal Attacks do not scale off of EM, this slightly devalues the stat.
Furthermore, on-field Nahida typically does not trigger many reactions, or tends to trigger Spread, which scales off of DMG% and CRIT.
Finally, on-field Nahida benefits from her own A1 Passive, which provides her with further EM; this is particularly notable if another unit is the source of the EM share instead of Nahida. All of this tends to make her prefer DMG% and CRIT — that said, Elemental Mastery is still valuable, and players should still try to focus on it where possible.
Nilou Bloom:
ER until requirement > EM >> Dendro DMG% > CRIT
If in a Nilou Bloom team where Nahida can trigger some Blooms, it can be worthwhile to build EM on Nahida even past the typical 1000 EM limit of her A4. However, Dendro DMG% and CRIT still remain viable. Note that Nahida’s Talent damage is much less prominent in Nilou teams as she cannot trigger Spread.
Artifact Sets
 4pc Deepwood Memories | Nahida is arguably one of the best holders of 4pc Deepwood Memories (DM) and has great uptime on its 4pc set effect. It increases Nahida’s personal damage in addition to shredding enemy Dendro RES, increasing Spread, Bloom, Hyperbloom, and Burgeon damage for her team. This makes the set generally useful for all of Nahida’s teams. Note that only one character on the team needs to hold 4pc Deepwood Memories. It is very often the case that Nahida is the better holder. |
 4pc Gilded Dreams | 4pc Gilded Dreams can be situationally better for Nahida’s personal damage if another character already holds 4pc Deepwood. However, Nahida is such a great 4pc Deepwood Memories holder that there are few cases where the 4pc Gilded’s personal damage increase is preferred over 4pc Deepwood’s utility. If considering 4pc Gilded Dreams, it is not recommended in scenarios where Nahida does not trigger reactions very often. This can often occur in teams without Quicken, as Nahida’s strong Dendro application can cause her to act as the enabler for reactions instead. Thus, 4pc Gilded Dreams' value is rather team-dependent: it is strong if her teams allow for some Quicken uptime or have significant Hydro application (such as with Xingqiu+Yelan), but otherwise falls flat. It also takes a significant hit in Double Dendro teams, where Nahida does not receive the full 210 EM this set would otherwise provide. |
 4pc Tenacity of the Millelith | 4pc Tenacity of the Millelith (ToTM) can be a potential BiS if the team has ATK-scaling characters who deal disproportionately more damage than Nahida (e.g., Yae Miko, Fischl), as Nahida can easily maintain its buff with 100% uptime. |
 4pc Instructor | Similar to ToTM, Instructor can be useful if Nahida is paired with teammates who contribute a larger share of damage than Nahida and benefit from EM. If said teammates deal Dendro damage either through their Talents or reactions, it is still a much higher priority to have a DM user on the team, most likely Nahida. However, unlike ToTM, this set’s effect can only be triggered and maintained if Nahida is on-field to while triggering reactions. |
 4pc Noblesse Oblige | 4pc Noblesse Oblige is an alternative to 4pc Tenacity of the Millelith but has lower uptime on its buff and requires more ER investment. However, her Burst has a long cast time, does not deal damage, and is not needed by some teams, which makes this set less effective overall than ToTM. |
 2pc combination (EM/Dendro DMG%) | 2-piece combinations can be situationally stronger than 4pc Gilded Dreams as they provide unconditional stats. Possible 2pc combinations include: Deepwood Memories, Gilded Dreams, Wanderer’s Troupe, and Flower of Paradise Lost. |
 4pc Flower of Paradise Lost | 4pc Flower of Paradise Lost is niche, but serves as a passable option in Nilou Bloom teams where Nahida can trigger at least a portion of Blooms if you happen to have a spare set available. |
Weapons
Due to Nahida being played both on-field and off-field as well as having high or low reaction ownership depending on the team composition, weapon performance can vary considerably. Nahida’s F2P options are quite strong; it is likely not worth rolling weapons specifically for her.
The weapons below are loosely arranged in order of recommendation, as the best option will vary according to team. Off-field Nahida may prefer using EM weapons if she has less than 900 EM, as she does not benefit from her A1 Passive. Conversely, CRIT weapons increase in value if Nahida is used on-field or receives significant external EM buffs. The support options such as Favonius Codex, Wandering Evenstar and Hakushin Ring are also incredibly strong in the teams that best utilize their buffs.
Sample scenario weapon calculations can be found here: Nahida Weapon Comparison (by .athene.)
 A Thousand Floating Dreams (TFD) | Nahida’s signature weapon and typically her BiS for team damage and off-field personal damage. Provides lots of EM and DMG Bonus for Nahida, in addition to a bit of EM for the team. However, it doesn’t always provide a huge damage increase compared to her other options. In shorter fights, TFD tends to outperform Kagura’s Verity for on-field Nahida because TFD doesn’t need to ramp up. |
 Kagura’s Verity | On par with or marginally better than TFD in extended fights for on-field Nahida, and very competitive for off-field Nahida. While on-field, Nahida can easily obtain full stacks going into the 2nd rotation with her short Skill cooldown. Off-field Nahida gets less benefit since Kagura's stacks are only obtained via her initial Skill cast, but Kagura is usually still a strong runner-up to BiS even with 1-2 stacks per rotation. |
 Sacrificial Fragments | Good EM stat stick for off-field Nahida, though the extra Skill cast doesn’t provide much benefit since Nahida does not generate particles on Skill cast. |
 Wandering Evenstar | Very competitive option for Nahida, particularly for off-field. Tends to tie with TFD as her BiS in teams with characters who benefit significantly from Wandering Evenstar’s Flat ATK buff. |
 The Widsith, Lost Prayer to the Sacred Winds, Solar Pearl | The Widsith, Lost Prayer to the Sacred Winds and Solar Pearl are decent options for on-field Nahida, but weaker for off-field Nahida. Skyward Atlas and Memory of Dust perform similarly to these three weapons when Nahida is on-field and not triggering many reactions, but are weaker when Nahida triggers more reactions. |
 Favonius Codex | On-field Nahida can trigger a high-refinement Favonius Codex multiple times per rotation, greatly lowering team ER requirements and significantly boosting overall team DPS. This can make Favonius Codex highly competitive for on-field Nahida. However, off-field Nahida gets less benefit as she has less opportunities to trigger its passive and typically prioritizes EM over CRIT Rate. |
 Magic Guide | Baseline F2P option. Surprisingly good, though its passive uptime varies heavily between teams due to Nahida’s Dendro application overtaking Hydro and Electro auras in certain teams. |
 Mappa Mare | A craftable F2P option. Slightly better or worse than Magic Guide for on-field Nahida depending on Magic Guide’s passive uptime. It is worse than Magic Guide for her off-field build, since Mappa Mare’s passive can’t be maintained off field and it gives less EM than Magic Guide. |
 Hakushin Ring | Grants ER to Nahida and a DMG Bonus to both Nahida and her Electro allies. A strong option when the team has Electro damage dealers, especially those that can snapshot the DMG Bonus (such as Fischl), or when Nahida needs the ER to meet her requirements. |
 Prototype Amber | While Prototype Amber is rather poor for Nahida’s personal damage, the teamwide healing it provides can allow Nahida to consolidate roles in teams that otherwise lack sufficient defensive utility, allowing more offensive teammates to be included. The self-Energy generation is also a nice bonus to maintaining Burst uptime. |
 Thrilling Tales of Dragon Slayers | Greatly reduces Nahida’s personal damage in exchange for a strong ATK% buff on a single teammate. Generally not worthwhile, but can be a decent supportive option for off-field Nahida. |
Teams

“I hear that playing games is a good way to quickly bring people closer together. I'm sure it must work for gods, too.”
Quicken

When Dendro and Electro come in contact with each other, the Quicken reaction occurs and creates an underlying aura on enemies. When attacking an enemy affected by Quicken, you can trigger either Aggravate or Spread, both of which are Additive Reactions. These reactions add bonus damage to the ability that triggered them based on the triggering unit’s EM, in a similar manner to Shenhe’s Icy Quill or Yun Jin’s Flying Cloud Flag Formation. Thus, the damage this reaction adds also scales off of DMG% and CRIT; you can learn more about Quicken and how it inserts into the damage formula here.
On-field Nahida teams revolve around her capacity to drive other units' abilities (typically Electro units) while benefiting from Spread and dealing respectable damage herself. Off-field Nahida teams use Nahida’s TKP to apply Dendro rapidly while buffing Electro or Dendro units' damage through Aggravate/Spread and her A1 Passive.
On-Field Electro (Aggravate)
 Keqing | Keqing’s short cooldowns, good personal damage, flexible field time and high rate of on-field Electro application make her an excellent option for an on-field Aggravate carry. Aggravate teams also alleviate her Stamina issues by allowing frequent Skill casts via the 4pc Thundering Fury set. |
 Cyno | Cyno provides reasonable personal damage and a high rate of on-field Electro application. Care should be taken with his rotations due to his long field time. |
 Raiden | Raiden is a strong on-field Aggravate carry, with additional utility due to her teamwide battery and Burst DMG% buff; this makes her both potent and flexible. |
 Lisa | Lisa’s good Electro application on her Burst and Normal/Charged Attacks, DEF Shred from A4, and potent Skill nuke make her a good option for an Aggravate carry available to all players. |
 Yae Miko | The strong turret damage and Electro application on her Skill, powerful Burst nuke, and additional Electro application on Normal Attacks all make Yae Miko a solid choice. |
 Razor | While not nearly as strong as other options since his Normal Attacks can only deal Physical damage, Razor can still be a decent choice due to the Electro application from his Skill, Burst, and C6. His C4’s DEF Shred is also quite valuable. |
 C6 Dori | Dori requires C6 and the 4pc Thundering Fury set to even function as an Electro on-field DPS, and still has lower personal damage output than other options. However, her ability to condense healing and Electro application into one team slot allows her to use more damage-oriented teammates. |
On-Field Dendro (Spread)
 Nahida | Nahida can make use of her own Burst buff combined with her good rate of Dendro application to act as a solid on-field Dendro unit while enabling powerful off-field teammates such as Yae and Fischl. |
 Alhaitham | Alhaitham is a highly potent on-field Spread DPS, and Nahida is one of his best partners; her Energy generation is appreciated in alleviating his high Energy needs, her EM buff is highly valuable thanks to his multiple EM scalings, and her personal damage is helpful in bolstering his teams’ output. There is a ~2s delay between his Burst’s initial cast and the moment he receives Mirror stacks; this allows another teammate to swap-in and perform abilities before swapping back to Alhaitham. In Nahida’s case, it is possible to sneak in an EN1C combo to trigger several Spreads, as her Charged Attack can be swapped out from very early. However, this “Q-swap tech” may be difficult or impractical to perform especially at higher ping or against aggressive enemies. It is recommended to forgo this tech if it cannot be done consistently, as failing to swap back to Alhaitham in time is very punishing to team DPS. |
 Tighnari | Tighnari’s short field time and cooldowns combined with his condensed damage window make him an excellent Dendro quickswap DPS and enabler; that said, his true strength is often in Double Electro compositions, where Nahida typically does not slot in. However, she can somewhat compensate through her potent EM buff, good personal damage, and Energy generation allowing him to reliably Burst off cooldown. |
 Other Dendro units | Units with Dendro Normal Attacks like Kaveh or Baizhu (especially with a damage build) can still work as on-field Spread damage dealers and drivers for off-field units. However, they typically do not provide much of an advantage compared to simply letting Nahida or another unit take the field. |
Off-Field Electro
 Fischl | Fischl is an absolutely phenomenal unit in Quicken teams for a multitude of reasons. Her low field time, steady Electro application and great particle generation are all of note, but her most defining quality is her sheer damage potential. While Oz’s damage is already impressive with just Aggravate, Fischl synergizes well with on-field units like Keqing who can proc her A4 (and C6), allowing her to trigger Aggravates even more frequently. While Spread from an on-field unit will not trigger Fischl’s A4, she is nonetheless potent. |
 Kuki Shinobu | Kuki is the primary healer option for these teams, and she also provides good particle generation. In Quicken teams, she can be built for Electro DMG and CRIT to deal reasonable AoE Aggravate damage. Furthermore, her Burst’s rapid Electro application allows Anemo units to easily Swirl and absorb Electro. |
 Beidou | While Beidou does not benefit from Aggravate as much as other units due to her staggeringly high Talent multipliers in multi-target, she is nonetheless a strong off-field Electro DPS when paired with a suitable battery such as Fischl. |
Yae Miko | Yae also makes excellent use of Aggravate in an off-field capacity. Because her turrets cannot snapshot, she can struggle to fully use on-field buffs. She can opt to use her Burst every rotation, use it every other rotation, or ignore it altogether depending on her teammates and Energy requirements. |
Lisa | Lisa is also a strong off-field Aggravate DPS through her Burst and its accompanying DEF Shred. However, her Burst requires significant ER investment to use consistently. In rotations that allow for it, using her fully-charged Hold Skill helps alleviate Energy concerns. Going for Double Electro teams with high Energy generation units (such as Raiden or Fischl) can potentially lower her ER requirements enough that she can skip her Hold Skil. |
 Sara | Sara’s Flat ATK buff, while devalued in Quicken teams, is nonetheless potent; her C6 and Elegy for the End further improve her buffing capabilities by a significant amount. She is especially advantageous if paired with a well invested on-field Electro unit like Keqing to frontload a high amount of damage, especially in AoE scenarios. |
Dori | Dori performs all the same functions as Kuki, but is generally inferior in comparison. That said, she provides comfy healing, and her Electro self-application is unique in enabling self-Electro Swirl interactions alongside Jean. |
Off-Field Dendro
Nahida | Since much of her damage comes from her Skill, Nahida still functions effectively as an off-field unit, giving field time to strong on-field Quicken units like Keqing, Alhaitham, or Tighnari while supporting them with her A1 Passive. In an off-field role as Solo Dendro, Nahida can run Deepwood Memories to improve her own damage, or a supportive set like ToTM, which can be more potent with highly invested teammates. |
   Yaoyao / Baizhu / Kirara | Yaoyao and Baizhu serve as healer options in Quicken teams, with Baizhu also providing slight interruption resistance and a Dendro Reaction DMG buff. Kirara serves as an alternative to the aforementioned healers via her high-uptime shield that also gives interruption resistance. She is also a decent Dendro battery for units like Alhaitham. However, Quicken teams generally do not need more than one off-field Dendro unit to maintain a Quicken aura, making these picks somewhat redundant with Nahida. Choosing one of these characters instead of Nahida sacrifices her offensive potential. However, in Double Electro Aggravate teams, they are more comfortable picks, as they provide defensive utility and allow for easier Electro Swirls with their weaker Dendro application. |
Anemo Flex
Provide 40% Electro RES Shred via 4pc Viridescent Venerer (VV) and an assortment of other buffs, grouping, and/or healing. However, it may be difficult to Swirl Electro in some setups due to Nahida’s Tri-Karma Purification wiping Electro aura with its strong Dendro application. Anemo units fare better in Double Electro teams, as Dendro units cannot benefit from VV Shred (or Kazhua’s A4), lowering their value in Double Dendro teams.
 Kazuha | Kazuha is one of the strongest options for these teams assuming he can Swirl consistently; he has excellent grouping, provides good personal damage from Aggravated Swirls, and his DMG% buff is especially potent. That said, he is somewhat limited as his buffs (apart from his C2 and sometimes Freedom-Sworn) only boost the Electro units in the team, making him stronger in Double Electro setups. |
 Venti | Venti is somewhat similar to Kazuha, trading his potent buff for better grouping and an Energy refund. While this makes him situationally better, he is generally outdone in content that is invulnerable to his Burst’s crowd control. |
 Sucrose | Sucrose is both a good on-field and off-field Anemo unit; unlike most teams she slots in, almost all members of Quicken teams can benefit from the EM buff she provides. While her Burst provides grouping and her C6 buffs Electro teammates, she requires significant ER to Burst every rotation and proper usage may be inconsistent without practice. For more information on how to best utilize Sucrose’s Crowd Control and Absorption, please see the Sucrose guide. When choosing Sucrose’s weapon: Favonius Codex reduces team ER requirements, Prototype Amber provides some trace healing, and Hakushin Ring further increases the buffs she can provide. TTDS has no benefit for herself, but grants a potent ATK% buff for a single teammate. |
 Heizou | Heizou is similar to Sucrose, albeit worse in these teams due to his smaller EM buff and worse grouping. He also has no off-field Anemo application. |
 Sayu | Sayu’s ability to heal and provide some additional damage through Aggravated Swirls makes her a good option in Quicken teams. She can increase her field time to flexibly fit her teams through rolling with her Skill for additional Swirls. |
 Jean | While usually worse than Sayu due to her lower off-field Anemo application, Jean can heal and has a unique self-Swirl interaction with Dori detailed above. While her Skill does have a pulling effect on light enemies, it is time consuming to use and can knock enemies further away if not aimed properly. |
Other Flex
 Zhongli | Zhongli’s main selling point is his strong, long-lasting shield. If slotted into your Quicken team, he will often replace an Anemo character, in which you trade 40% Electro RES Shred and grouping for Zhongli’s 20% Universal RES Shred and comfort. This means that in Spread teams with two Dendro units, Zhongli’s value increases compared to Aggravate teams, due to Anemo characters not being able to provide RES Shred to Dendro. Although Zhongli doesn’t contribute as much to team damage as someone like Kazuha, his ease of use is particularly noticeable as Swirling Electro can be inconsistent in practice, since Nahida’s 1.5U Dendro application makes maintaining an Electro aura (to trigger Swirl with) difficult. 4pc Archaic Petra is highly recommended for Double Electro teams due to its DMG Bonus buff after picking up a Crystallize Shard. 4pc Tenacity of The MiIlelith is another option for its ATK% buff. While 4pc Instructor does reduce his shield’s strength since 4-star artifacts have lower stats, if players can consistently trigger Crystallize when Zhongli is on-field, it is potent for team damage. |
 Bennett | Bennett’s ability to condense healing alongside providing a powerful Attack buff makes him a generally strong choice; however, it is worth noting the power of his buff is highly diminished in Quicken teams. Further, Bennett’s Pyro self-application can cause Anemo units to absorb Pyro into their abilities; while it does not necessarily do so, this can stymie Quicken uptime. Nonetheless, when paired with units that scale significantly with Attack such as Raiden he retains great value. |
 Albedo | While not noteworthy, Albedo’s unintrusive, steady, off-field damage and potential EM buffs through his Burst make him a reliable flex. |
Example Teams

Keqing E* (1st rotation only) > Zhongli hE > Nahida EQ > Fischl Q/E > Keqing E Q E N1C N1 E N1C N1C N1C
*If using Archaic Petra on Zhongli

Raiden E > Nahida EQ > Fischl Q > Jean EQ > Raiden Q 3[N3C] N1C > Jean E > Fischl E (if available)

Zhongli hE > Nahida EQ > Fischl E > Tighnari Combos > Zhongli hEQ > Fischl Q > Tighnari Combos
Rotation Video
Video by cuzimori
Yae Miko 3E > Nahida EQ N1C > Kuki Q > Alhaitham hEP 3[N4CD] > Yae Miko N1 Q (if available) 3E > Kuki E > Alhaitham Q > N3D N3CD 2[N3D]
Hyperbloom / Quickbloom

Nahida’s Dendro application alongside Hydro from another character is used to generate Dendro Cores for an Electro unit to trigger. These teams are extremely powerful and flexible; they are able to use a diverse array of units while maintaining respectable damage. They have two objectives that can be focused on to various degrees — maximizing Dendro Core production and maintaining good Quicken uptime.
The former style of teams, referred to as Hyperbloom, typically have significant amounts of both Dendro and Hydro application alongside a single trigger; the latter will usually have slower Hydro application compared to the rate of Dendro application to maximize Quicken uptime, hence referred to as Quickbloom.
Note on Auras
Applying Dendro to an Electro-Charged (Electro + Hydro) target can result in two reactions: Quicken between Dendro and Electro, and Bloom between Hydro and Dendro. Since Quicken acts as a Dendro aura when reacting with Hydro or Pyro, the Quicken aura created by Dendro + Electro-Charged can trigger Bloom again to create a second Dendro Core. This interaction allows players to create two Dendro Cores at the same time.
In practice, this means that, when playing Hyperbloom teams, it is helpful to maintain either a Quicken or Electro-Charged aura on enemies. With a Quicken aura, Nahida can trigger Spread and Electro / Anemo characters can trigger Aggravate; with an Electro-Charged aura, more Dendro Cores can be created.
Assuming sufficient Electro application, on-field Nahida will ensure Quicken aura except in certain Double Hydro teams. Off-field Nahida can maintain Quicken aura against more limited Hydro application such as Kokomi’s Skill, but is outpaced by fast Hydro application such as from Tartaglia, C6 Xingqiu, or Double Hydro.
Regardless of aura, on-field Nahida means more instances of Dendro application and more opportunities for her or a Hydro character to create Dendro Cores.
Electro
Electro units typically build EM to act as triggers for Hyperbloom. They can also provide additional damage or utility while maintaining useful Quicken or Electro-Charged auras.
Off-field Triggers
Kuki | Kuki is a phenomenal off-field Hyperbloom trigger; her consistent AoE off-field Electro application is well-suited to triggering the reaction, she has good particle generation (particularly with her C2 and C4), and she brings healing utility (that partially scales with EM), which opens up teambuilding options significantly. Her Burst is generally worth using in Hyperbloom teams to cover her Skill’s downtime, but is not strictly necessary. |
Raiden | Raiden is one of the premier Hyperbloom trigger units, and can be used both off-field and on-field. As an off-field unit, she builds Elemental Mastery to consistently trigger Hyperbloom and buffs her teammates' Burst DMG with her Elemental Skill. In an on-field role, she can also choose to build DMG% and CRIT in addition to Elemental Mastery, dealing considerable damage through Hyperbloom, Aggravate and her own Talent Base DMG. |
 Electro Traveler | The Electro Traveler can use their Burst to serve as a good off-field trigger for Hyperbloom while providing energy for the on-field unit; while their Burst’s higher downtime causes them to lose out to the above options, they are nonetheless a good option available to all players. Players should collect the amulets from their Skill at least once to alleviate their ER requirements. Even when doing so, however, their Energy needs can be hefty yet manageable when played as solo Electro — often requiring Fav or Xiphos alongside ER from artifacts. On-field Nahida using Favonius Codex is also a viable option to help alleviate Electro Traveler’s Energy needs. |
Dori + Jean | While Dori is a viable trigger on her own (as explained below), her Electro self-application can be used in tandem with Jean’s Anemo self-application to get consistent Electro Swirls that can trigger Hyperbloom and Aggravate. The duo also provides substantial teamwide healing. It is worth noting, however, that Dori + Jean is incredibly restrictive in terms of mobility, making it somewhat difficult to play. |
On-field Triggers
It is worth noting that for most on-field triggers, they can either focus entirely on Elemental Mastery or incorporate DMG% and CRIT to additionally maximize Talent and Aggravate damage.
Cyno | Cyno’s AoE Electro application as well as reasonable personal damage in his Burst state, even when built with Elemental Mastery, make him a strong on-field Hyperbloom trigger. That said, his relative fragility combined with his Energy needs means it is generally worth running Kuki alongside him. In such teams, Kuki occasionally triggers Hyperbloom instead of Cyno; she should be built with full EM to maximize her reaction damage while still providing good healing. |
Lisa | Lisa’s Electro application through her Normal Attacks combined with her off-field application through Burst and teamwide 15% DEF Shred from her A4 Passive allow her to deal considerable damage through Aggravate and Hyperbloom. However, the relatively small AoE of her attacks makes triggering Hyperbloom inconsistent, especially against larger enemies. It is worth noting that Lisa needs to use her Hold Skill to generate particles, which can deal respectable damage in hybrid builds. |
Yae Miko | Similar to Lisa, Yae Miko has on-field application through her Normal Attacks with some AoE application through her Skill. However, the small AoE of her Normal Attacks and turrets make her a less than ideal Hyperbloom trigger. She has a powerful AoE nuke with her Burst, though it is not worth building the ER needed to Burst every rotation as a solo Electro. |
Keqing | Keqing’s quickswap playstyle makes her rotations quite flexible. In Quickbloom teams, she takes good advantage of the Quicken uptime to deal respectable Aggravate damage. |
Razor | Similar to Cyno, Razor has wide AoE Electro application in his Burst state, but has better Energy self-sufficiency. Razor tends to maximize Elemental Mastery in Hyper/Quickbloom teams, as he does not get an Electro Infusion or Conversion. This means it can be difficult to maximize his raw Talent damage. |
Dori | Dori is a usable Hyperbloom trigger on her own, and her ability to condense healing alongside this role can prove useful. Her Skill has a short cooldown — when combined with her A1 and the Thundering Fury set — allowing her to weave it between teammate abilities. Her Burst’s connection can also trigger Hyperblooms, although it is usually inconvenient to run around and do so. When compared to Kuki, Dori provides less consistent off-field Electro application, but she is nonetheless serviceable and has higher healing and a unique quickswap playstyle. It is worth noting that she does value her C6’s Electro infusion in such a role, though it is not required. |
Electro Flexes
Fischl | While Fischl is a poor Hyperbloom trigger, her excellent rate of Electro application, high personal damage and phenomenal particle generation make her a strong flex option in Hyperbloom teams. It is worth noting that with good Quicken uptime, Fischl’s damage can skyrocket through Aggravate. Her high Electro application helps generate additional Dendro Cores by maintaining Electro-Charged and Quicken auras, which offsets the small number of Hyperblooms that she does ‘steal’ from the dedicated trigger. |
Beidou | Beidou’s Burst discharges only target enemies, not Dendro Cores. This is a blessing in disguise: when paired alongside a battery, she can contribute significant damage without stealing Hyperbloom procs from the dedicated trigger. |
Hydro
 Ayato | Ayato’s mix of on-field and off-field AoE Hydro application combined with his reasonable personal damage makes him a strong option. That said, he has poor cooldown alignment with Kuki, and can otherwise struggle to fit a healer in his teams. |
 Kokomi | Kokomi’s condensing of on-field and off-field Hydro application and strong healing makes her a great option, particularly if paired with Raiden as Hyperbloom trigger. Furthermore, she can serve as a good option in Quickbloom teams due to her slow off-field Hydro application; this results in fewer Hyperblooms, but assures excellent Quicken uptime. If paired with units that scale with ATK, Kokomi can also hold TTDS to provide a potent buff, as well as carry either 4ToTM, 4DM, or 4Instructor. |
 Barbara | Barbara is similar to Kokomi, albeit being a generally worse choice; that said, given how potent Kokomi is, Barbara is also worthy of consideration for an on-field role with a more quickswap-esque playstyle. Without a high refinement Sacrificial Fragments, she does not perform very well in an off-field capacity due to her Skill’s smaller AoE and longer cooldown. |
 Xingqiu | Xingqiu’s unmatched rate of off-field Hydro application allows him to enable a variety of units to be used on-field, including Nahida herself. While his single-target Hydro application can be restrictive, he applies Hydro quickly enough that this is generally not an issue. He also provides some appreciated defensive utility in his damage reduction and minor healing. |
 Yelan | Yelan trades Xingqiu’s defensive utility, longer uptime and higher rate of application (without her C2) for higher personal damage and a strong ramping DMG% buff from her A4. While Xingqiu is generally preferred for Hyperbloom, the two of them can be run together to create a formidable core. |
 Tartaglia | Tartaglia has decent personal damage, an unmatched rate of on-field Hydro application during his Skill uptime as well as the ability to flexibly modify this as necessary for rotations. That said, Childe’s personal damage is generally more reliant on ATK buffs compared to other Hydro units and his DPS can take a hit when they are unavailable, especially since he cannot Vaporize his Burst in these teams. Additionally, he lacks significant off-field Hydro application, lowering his effectiveness. |
 Candace | Candace can provide a good amount of application through her Burst’s Hydro Infusion as well as her C6. While she is a solid option for the role, her value can diminish without C6 or with on-field units who cannot make use of her Hydro Infusion. |
Dendro
Adding a second Dendro unit allows for improved Dendro Core generation with off-field Nahida, while also providing a small but helpful buff through Dendro Resonance.
Alhaitham | Alhaitham’s flexible field time, high rate of on-field Dendro application, and high personal damage with Spread make him an excellent option in these types of teams. His rate of Dendro application is high enough that when paired alongside Nahida, he can support C6 Xingqiu’s rate of Hydro application to have both good core generation and high Quicken uptime. |
Baizhu | Baizhu provides powerful sustain through his healing and small intermittent shields, as well as some additional off-field single-target Dendro application through his Burst. He also gives a Dendro Reaction DMG buff for the on-field unit, which is useful for units like Cyno or Alhaitham. While he can function as an on-field driver, his Dendro application is limited due to the short range of his Normal Attacks. |
  DMC / Collei | Both DMC and Collei can fulfill the role of providing additional off-field Dendro application and Resonance, as well as their own minor buffs. DMC is generally preferred due to their longer uptime and more consistent application, but Collei fits better in shorter rotations. |
Yaoyao | A 4-star alternative to Baizhu, condensing healing and additional off-field Dendro application. Her Skill remains when Yaoyao is off-field, but her Burst requires her to be on-field. While she does not do much damage while using her Burst, its high rate of Dendro application and teamwide healing make her a comfortable on-field unit. |
Kirara | Kirara's usefulness lies more in her sturdy and consistent shielding, as her Dendro application is rather limited without using her Hold Skill. While her Hold Skill state does apply Dendro quickly, it is also anti-synergistic with off-field units whose abilities require Normal Attacks to be triggered, notably Xingqiu and Yelan. This causes her to be a rather underwhelming Dendro driver for this archetype. She is still viable as an off-field defensive support when paired with another Dendro applier (in this case, Nahida). |
 Kaveh | While Kaveh can still be used as an on-field Dendro driver, he is rather lackluster in Hyperbloom compositions; since Hyperbloom only has a miniscule AoE, it is difficult for him to receive self-damage to trigger his A1 healing. Additionally, detonating Dendro Cores with his Skill, Burst, and C6 tends to be a DPS loss as it prevents the team’s Electro unit from triggering them. Overall, he is not recommended as a Dendro driver in a Nahida Hyperbloom team, as she performs the role more effectively. |
Tighnari | Tighnari is a very poor option for focused Hyperbloom teams due to his short field time and lack of off-field application; however, he has some merit when used alongside Kokomi in his typical compositions to enable Quickbloom. |
Anemo
Anemo units can provide RES Shred with the 4VV set effect, grouping, and buffs while allowing for AoE Hydro or Electro application as well as damage through Swirls. However, Nahida’s strong Dendro application often consumes other auras, leaving Anemo units with nothing to Swirl; this can highly neuter their effectiveness, thus requiring proper teambuilding with high Elemental application from other teammates.
With sufficient Electro application and/or reliable Electro Absorption, Anemo units can also act as reliable Hyperbloom triggers in their own right; however, this can be difficult to guarantee with Nahida, as TKP’s high Dendro application easily removes the Electro aura needed to trigger Electro Swirls.
Sucrose | Sucrose is the primary on-field Anemo unit to consider for Hyperbloom teams due to her potent EM buff and decent grouping. For tips on how to properly utilize Sucrose’s Crowd Control and Absorption, please see the Sucrose guide. |
 Heizou / Wanderer | Heizou’s EM buffs are much weaker than Sucrose’s and his grouping is generally worse. But in teams where it is difficult to Swirl Electro consistently, Heizou still provides a significant raw damage contribution if he fully stacks his Skill and builds ATK/DMG%/CRIT. Wanderer can act as an Aggravate driver or Hyperbloom trigger, but does not offer any significant upsides compared to the 4-star options; he notably lacks reliable grouping and has stricter field time requirements. |
Kazuha / Venti | Kazuha and Venti provide potent grouping and a significant amount of off-field Elemental application, both for Anemo as well as the Element absorbed in their Bursts. Venti’s grouping is much more potent and he provides an Energy refund for characters of the Element his Burst absorbs; Kazuha trades this for an extremely powerful DMG% buff for Elements he Swirls. |
Jean / Sayu | Jean and Sayu provide VV Shred and healing in most teams, with Sayu also providing off-field Anemo application and Swirls. While useful, neither Jean nor Sayu are usually the best option. |
Geo
Zhongli | Zhongli is rarely optimal for these teams, but the strength of his shield combined with his 20% Universal RES Shred make him a solid slot-in with unparalleled comfort. |
Albedo | While not particularly noteworthy, Albedo’s unintrusive, steady, off-field damage and potential EM buffs through his Burst make him a reliable flex. |
Example Teams

Nahida EQ > Xingqiu Q N1 > Kuki E N1> Yelan E N1 Q > Nahida N3E N3D N3 > Xingqiu N1 E N2 > Nahida N1 E N3D N3 > Yelan E N1 > Kuki Q N1 > Nahida N3D N3
Rotation Video
Video by miannes

Nahida EQ > Xingqiu EQ N1 > Kuki E N1 > Alhaitham Q 2N3D N2E 2N3D N1C 3N3D N3
Rotation Video
Video by nikatosaurus

Nahida EQ > Xingqiu EQ N1 > Kuki E N1 > Beidou E N1 Q > Nahida E 3[N3D] E > Beidou E N1 > Kuki Q N1
Rotation Video
Video by nikatosaurus

Raiden E > Nahida N1E > Kokomi E > Dendro Traveler E N1Q > Kokomi Q 5[N3D]
Bountiful Bloom

Nilou Bountiful Bloom teams are some of the most potent AoE teams in the game, if their lack of grouping can be managed. Nahida provides convenient and consistent Dendro application, and her A1 Passive is also much appreciated. There are two approaches to team compositions for this archetype: Double Dendro/Hydro and Solo Dendro/Triple Hydro compositions.
In an on-field role, Nahida can use her Normal Attacks alongside her Skill to provide enough Dendro application to maintain aura even with three sources of off-field Hydro application. Since Nahida’s TKP procs rely on Elemental Reactions being triggered, it is not recommended to use her off-field in Triple Hydro compositions, as her TKP may stop applying Dendro without supplementary Dendro application from her Normal Attacks.
In Double Dendro compositions, a second Dendro character can cause additional reactions to proc TKP without the need for Nahida to use her Normal Attacks, and also grants the team EM through Dendro Resonance. Due to TKP’s improved consistency, teams can afford to use Hydro characters with longer on-field requirements with less risk of losing Bountiful Cores.
Note that it can be difficult to survive against Bloom self-damage with on-field Nahida, particularly if she and the dedicated healer are both built for EM. A more quickswap rotation style can alleviate this issue by using frequent Burst i-frames to avoid both self-damage and enemy attacks and dispersing damage throughout the team instead of on a single character.
Nilou
Required to make Pure Bloom teams competitive.
Nilou converts Dendro Cores to Bountiful Cores with her A1, increases Bountiful Core damage with her A4, and has both off-field and on-field Hydro application to generate a decent amount of Bountiful Cores herself.
Healer Options
At least one healer is highly recommended in the team, as dodging Bountiful Core self-damage consistently is difficult due to their near instant detonation and large AoE.
Kokomi | Kokomi has notable value in Bloom teams, condensing off-field AoE Hydro application and healing — two things Bloom teams crucially need. She can also supplement her Skill’s Hydro application when on-field with her Normal Attacks; doing so also makes excellent use of Nahida's A1 Passive. Kokomi can build full EM to maximize her Bloom damage, run her usual builds for greater single-target damage and healing, or even use a hybridized build. She can also equip the Ocean-Hued Clam set for an additional source of damage while improving her already excellent healing. Her Burst can be used for its whole duration in Double Dendro teams to provide substantial teamwide healing and significantly increase her single-target damage, or simply to refresh her Skill’s duration. |
Barbara | Much like Kokomi, Barbara offers much needed Hydro application as well as healing. While Kokomi is generally preferred for Bloom due to her more consistent healing, better AoE and faster Hydro application, Barbara enables more mobility and is still a viable F2P alternative. Barbara struggles in a purely off-field role due to her weaker healing, but her Charged Attack’s heals and lack of ICD are quite notable on-field. Sacrificial Fragments is recommended for its high EM stats and more importantly its ability to reset Barbara’s long Skill cooldown by hitting enemies with her Skill cast. |
Yaoyao | Yaoyao consolidates healing with AoE Dendro application, opening up more team options with non-healer Hydro units. If you find her healing to be insufficient, especially while she is off-field, she may need more investment and/or specialized artifact sets like 4pc Maiden Beloved. If using her Burst, her potent teamwide healing and Dendro RES make her an incredibly durable on-field unit, supplemented by fast AoE Dendro application. |
Baizhu | Baizhu brings healing, some off-field Dendro application, and slight interruption resistance through small shields. His Reaction DMG buff is useful for on-field Hydro units, and the quickswap nature of Nilou teams also lets him use his Skill more frequently. However, he can struggle to consistently apply Dendro in AoE. This somewhat diminishes his value in Nilou teams, which are most effective in AoE content. |
Hydro Flex
Since Nahida’s high-frequency 1.5U Dendro application easily depletes Hydro aura to maintain Dendro aura, steady (but not necessarily fast) Hydro application is highly preferable to trigger consistent Blooms. Since Hydro is the "weak" side of the Bloom reaction, Hydro trigger units generate more Bountiful Cores than if using Dendro trigger units, resulting in more damage overall. Thanks to her preference for building EM, Nahida herself still deals good damage with the portion of Bountiful Cores she does generate.
If the team does not use a Dendro defensive option, slotting in either Kokomi or Barbara is strongly recommended due to reasons covered above.
As Bountiful Bloom teams are highly geared towards a multi-target focus, they can struggle in single-target scenarios. This issue can be alleviated by pairing on-field Nahida with Xingqiu or Yelan using their typical damage builds— the team still retains good performance in AoE (due to Bountiful Cores especially those generated by an EM-stacking teammate), but has an easier time handling single-target content through their powerful personal damage.
Xingqiu | Xingqiu offers an unmatched rate of off-field Hydro application as well as defensive utility from damage reduction and his small healing. Note that his damage reduction does not actually reduce Bountiful Core self-damage. |
Yelan | Yelan trades Xingqiu’s defensive utility, longer uptime and higher rate of application for higher personal damage; unfortunately, her ramping buff from her A4 is of little benefit in this team archetype. She can hold Elegy for the End, allowing increased access to EM buffs which benefit the entire team’s damage. |
Ayato | Ayato provides off-field Hydro application within a large AoE with his Burst, which he can supplement with his Skill. If using his Skill, his fixed field time requirements may warrant a greater focus on off-field healing. |
Candace | Candace’s AoE Hydro application, especially with her C6, makes her a potent option for triggering Blooms in AoE, which is the type of content where this team excels. Her Hydro Infusion allows melee characters to apply Hydro with their Normal Attacks; this is most notable with Yaoyao, who provides high Dendro application with her Burst but has no built-in Elemental application on her Normal Attacks. |
Tartaglia | Tartaglia is an unconventional choice restricted by his on-field requirement and adaptive Skill cooldown. It will generally be better to run an off-field Hydro unit with on-field Nahida than to use Tartaglia. However, Tartaglia can make use of buffs that require the unit to be on-field (e.g., Nahida's EM buff and Baizhu's Bloom DMG buff) and he applies plenty of AoE Hydro. His extremely fast Hydro application can skew Bloom ownership in favor of Dendro units, which can increase the value of team EM or reaction buffs like Key of Khaj-Nisut's passive. If you wish to try this playstyle, it is definitely viable for the Abyss, even if it may not be optimal. |
Dendro Flex
Provides additional Dendro application.
If running off-field Nahida, another Dendro unit must be used to guarantee TKP procs. As covered above, due to Bloom self-damage, a Dendro defensive option is strongly recommended if the team otherwise lacks one.
When running Double Dendro with Nahida on-field, Bloom ownership skews highly in favor of the Hydro teammates; this encourages building them with high EM. Even if the team’s Hydro characters are not fully built with EM, the sheer quantity of Blooms triggered makes up for the decreased reaction damage; this is helpful if players prefer to build Kokomi or Barbara with more healing stats if they struggle to survive against Bountiful Core self damage.
Including Dendro defensive options such as Yaoyao or Baizhu also reduces the risk of dying due to self-damage, while still allowing Kokomi or Barbara to comfortably build EM for their reaction damage.
However, if using other Hydro units like Xingqiu, Yelan, or Ayato, it may still be worthwhile to use their normal builds instead due to their high personal damage. In such cases, team EM buffs become especially useful to make up for reduced reaction damage.
Note that even though she triggers a portion of Blooms, Nilou should prioritize increasing her Max HP, as this directly increases the entire team’s Bloom damage via her A4 Passive.
Collei | Collei offers Dendro application whilst requiring less Energy than DMC. Her Sprout effect brings off-field Dendro application that follows the active character, and her Skills Dendro application is staggered, allowing for more Blooms to be generated in AoE; the high value of her Skill makes Sacrificial Warbow an excellent option for her. She can also bring teamwide EM buffs through Elegy for the End and her C4. However, note that her Burst AoE and duration is more limited. Her Skill and Burst can also easily miss their targets if not aimed carefully. |
DMC | DMC brings off-field AoE Dendro application with high uptime, enabling the use of Hydro on-field units. The large area of their Burst once transfigured with Hydro reduces the risk of enemies leaving the targeted area. |
Kaveh | Kaveh functions as a durable Dendro driver, owing to his automatic self-healing when hit by Bloom self-damage. While his Burst does provide a teamwide Bloom damage increase, it is dwarfed by the already massive bonus granted by Nilou’s A4 Passive. His ability to instantly detonate Bloom Cores is also made redundant by Nilou’s A1 Passive. Kaveh greatly appreciates Nahida’s particle generation to lower his own ER requirements, and he in turn can maintain Dendro aura in AoE in tandem with TKP. Since Kaveh can only heal himself, a dedicated healer may be useful for keeping his teammates healthy. |
Kirara | Kirara provides additional survivability through her Dendro-resistant shield, which she can easily refresh in quickswap playstyles. However, it is still recommended to bring a dedicated Hydro healer if you run into survivability issues. In most cases, Kirara’s Dendro application is front-loaded in her short Hold Skill and Burst (with some off-field application through her Burst and C4), with the team relying on on-field Nahida for sustained Dendro application. Kirara can also act as an on-field Dendro driver using her full Hold Skill duration and running past enemies. While on-field, she can exploit 4pc ToTM or 2pc Retracing Bolide for an even stronger shield. However, she will be reliant on Hydro application that is not tied to Normal Attacks, with Barbara’s Skill and Ayato’s Burst being her most effective options. This playstyle is mostly done for its comfort and novelty, as using Kirara in a quickswap playstyle is generally more versatile. |
Alhaitham | Alhaitham can provide significant AoE Dendro application through his Projection Attacks while on-field. He greatly benefits from being teamed up with Nahida as she lowers his ER requirements and grants him valuable EM through her A1 and Dendro Resonance. However, Alhatitham requires strong healing to survive Bountiful Core detonations during his fairly long field time, and his personal damage takes a huge toll as he cannot trigger Spread at all. |
Example Teams


Nilou 4E or EN2E> Nahida EQ N1 > Candace EQ > Yaoyao Q 4[N4D] 2E > Candace E N2 > Nahida E N2 > Nilou Q (if available)
Rotation Video
Video by nikatosaurus
Burgeon

Burgeon teams use Nahida and a Hydro teammate to generate Dendro Cores, which are subsequently hit by a Pyro teammate to deal high Burgeon damage. Burgeon teams scale phenomenally in AoE — not only is the reaction damage itself AoE, but AoE scenarios also facilitate higher Dendro Core production. This makes Burgeon teams a potent option for such scenarios, with some still maintaining relevant single-target damage. It is also worth noting that if an off-field Electro unit is added, Hyperbloom can be triggered between Burgeon procs.
Nahida is primarily used in this playstyle for her strong Dendro application. While her Burst can be used, its effect is marginal in Burgeon teams and it is often not worth using. This is mainly because the on-field unit in these teams rarely uses Nahida’s A1 EM buff, and the buffs for her Skill are not worth the cast time. While her personal damage in Burgeon teams is not as high as in some other teams (as Nahida cannot trigger reactions herself), it is nonetheless relevant and the utility she provides by enabling reactions is immense.
Burning can impede Dendro Core generation and should be avoided. This is particularly an issue if Nahida is used on-field, where she needs significant amounts of Hydro application to match her extremely high rate of on-field Dendro application.
Due to the frequent self-damage inflicted by Burgeon, it is highly recommended to include units that provide strong healing or shielding to keep the team alive in sustained combat.
Burgeon Trigger
Apply sustained Pyro to detonate Dendro Cores to deal AoE Burgeon damage. Burgeon triggers are not strictly limited to Pyro units, so long as they have alternative methods of Pyro application to exploit. These units should generally aim to build as much EM as possible, as well as enough ER to Burst consistently if needed.
 Thoma | Thoma’s kit is almost perfect for him to act as a potent Burgeon trigger — he has long-lasting, off-field AoE Pyro application on his Burst with standard ICD, which prevents it from easily overwhelming existing Hydro or Dendro auras. His shield is also helpful for mitigating damage and providing a high amount of Interruption Resistance. Thoma can choose to build full EM for maximum damage, or go for a hybrid build with EM and HP artifacts if greater survivability is needed. |
 Klee / Yanfei | As Pyro Catalyst users, Klee and Yanfei are viable on-field Burgeon triggers when given sufficient off-field Hydro and Dendro application; while their Pyro application is strictly on-field, they are nonetheless competitive. A notable upside is that their Pyro application is not constrained by Energy or cooldowns, making for a rather flexible palystyle. Being on-field also allows them to benefit greatly from certain buffs like Nahida’s A4 Passive. Due to their high rate of Pyro application, extra care should be taken to prevent Burning. Klee’s various attacks have large AoEs that easily detonate Dendro Cores, but have a limiting range. Her A4 Passive is also useful for supporting Energy-hungry teammates. In this playstyle Klee’s Burst is not as crucial, and she can freely swap out if needed. The frequency of explosions in Burgeon teams is also thematically appropriate for Klee. Yanfei has greater range on her Normal Attacks, but their tracking can cause them to miss Dendro Cores when fighting taller enemies. Her C4 does provide a shield that can help mitigate any Burgeon or Burning self-damage received. |
 Dehya | While Dehya’s Skill applies Pyro off-field, its slow 2.5s proc rate heavily diminishes her effectiveness as a Burgeon trigger. Her Skill also fails to trigger Burgeon at all when fighting certain tall enemies such as Ruin Graders. Her high ER requirements and inability to trigger Xingqiu and Yelan’s Bursts during her own Burst duration make her a very subpar on-field Burgeon trigger. |
Kazuha | Kazuha can serve as a good Burgeon trigger if paired alongside Bennett to reliably absorb Pyro on his Burst — providing grouping, high personal damage, and team buffs all at once. It is worth noting that Kazuha highly prefers shorter rotations, as his Burst uptime is much shorter than other options. |
 Pyro-Infused Melee Characters | Any Sword, Polearm, or Claymore character can potentially fit this role by exploiting Bennett’s Burst Pyro Infusion at C6. However, the actual practicality of doing so varies greatly as the Pyro Infusion is limited to Bennett’s Burst duration and AoE; this is especially problematic if light enemies are knocked out of the circle due to Overloaded. This also requires activating Bennett’s C6, which currently cannot be undone and may ruin certain teams. The most notable makeshift Burgeon trigger is Razor due to his ability to also rapidly trigger Overloaded and Hyperbloom, but other Electro characters with coordinated attacks can also function similarly. |
 Xiangling | While Xiangling is not particularly good as a Burgeon trigger, her high personal damage can compensate for it in many teams. However, her exceptional rate of off-field Pyro application warrants sufficient Hydro application to extinguish Burning. It is worth noting, however, that she has exceptionally high ER requirements. Xiangling will generally be built similarly to her Vaporize teams, although Burgeon highly improves the value of Elemental Mastery. |
 Other Pyro Units | Other Pyro units can still include Nahida in their teams to break Hydro shields, with Burgeon providing additional AoE damage. Pyro Bow units such as Yoimiya and Amber are able to aim at Dendro cores with their Charged Shots to trigger Burgeon, although this is generally not recommended over the other options. Yoimiya is able to use her Skill and Normal Attack as usual, but she may be inconsistent at hitting Dendro cores this way. Hu Tao is also able to trigger Burgeon. The team often consists of Yelan, Xingqiu, and Nahida with a focus on Vaporize rather than Burgeon. This team can struggle with survivability and is not recommended over Hu Tao’s other teams. |
Hydro
Apply Hydro to enemies to create Dendro Cores that can be detonated by the Burgeon trigger. Fast application, particularly in AoE, is highly valued to improve Dendro Core generation as well as minimize the frequency of Burning.
Kokomi | Kokomi has significant value in Burgeon teams: she condenses AoE Hydro application and healing into one team slot — two things Burgeon teams crucially need. She can also deal significant personal damage in her own right as well as bolster her Skill’s Hydro application when on-field. |
Xingqiu | Xingqiu’s unmatched rate of off-field Hydro application enables a variety of units to be used on-field, including Nahida herself. While his single-target Hydro application can be restrictive, he applies Hydro quickly enough that this is generally not an issue. He also provides some appreciated defensive utility in his damage reduction and micro-healing; note that damage reduction does not reduce Burgeon self-damage. |
Ayato | Ayato’s flexible rotations, strong personal damage, high rate of on-field AoE Hydro application with his Skill and steady off-field AoE application with his Burst make him an excellent candidate for Burgeon teams. He does have fairly high ER requirements especially if run as a Solo Hydro. In such cases, it may be preferable to run equipment that better facilitates Burst uptime, as the added Hydro application can often make up for his lowered personal damage. |
Barbara | Barbara is generally similar to Kokomi, but her Skill has worse uptime, shorter range of Hydro application, and cannot generate any particles; that said, given how potent Kokomi is, Barbara is also worthy of consideration for an on-field role. Unfortunately, she performs poorly in an off-field capacity due to the disadvantages of her Skill relative to other options. |
Tartaglia | Tartaglia has an unmatched rate of on-field Hydro application during his Skill uptime as well as the ability to flexibly modify this as necessary for rotations. He also has good personal damage through his Vaporized Burst and strong Melee Stance Normal and Charged Attacks. That said, Childe’s personal damage is more reliant on ATK buffs compared to other Hydro units and his DPS can take a hit when they are not available. |
Yelan | Yelan trades Xingqiu’s defensive utility, longer uptime, and higher rate of application (without her C2) for higher personal damage and a strong ramping buff from her A4. While Xingqiu is generally preferred for Burgeon, Yelan forms a formidable pairing alongside him. |
Candace | Candace can provide a good amount of application through her Burst’s Hydro Infusion as well as her C6. While she is a solid option for the role, her value can diminish without C6 or with on-field units who cannot make use of her Hydro Infusion. |
Flex
In on-field Nahida teams, a second Hydro unit is highly recommended in the Flex spot to keep up with Nahida’s Dendro application and ensure consistent Dendro Core generation.
While a second Dendro unit’s application can theoretically create more Dendro Cores, you must ensure that there is also enough Hydro application to prevent Burning from occurring.
 Hydro Unit | A second Hydro unit can be used to improve the consistency of Dendro Cores created, especially with high rates of Pyro application from Hu Tao or Xiangling, or Dendro application from on-field Nahida. If the team already has a dedicated on-field unit, a second Hydro unit should be a unit with off-field application. |
Zhongli | Zhongli’s strong shield and Universal RES Shred serve as a solid boost to a team’s offensive and defensive capabilities. While not always optimal, he is nonetheless very convenient. |
Kuki | Kuki can be used as an additional damage dealer through Hyperblooms. Kuki’s Electro application is somewhat slow, which can cause Dendro Cores to accumulate and be triggered at the same time, leading to lost damage due to Hyperbloom’s damage limit. This problem can be alleviated somewhat by having the Burgeon trigger detonate Cores between Kuki’s Skill hits. Kuki also consolidates much needed healing, and can allow for some Quicen uptime to occur. Her Electro application can also trigger Overloaded for additional AoE damage whilst also mitigating Burning. |
Fischl | Fischl’s rapid off-field Electro application helps improve the generation of Dendro Cores as detailed here, while also allowing for occasional Quicken uptime, which she and Nahida can take advantage of. This combined with her high personal damage and good Energy generation makes her a solid choice. Note that while she does occasionally trigger Hyperbloom, this is fairly minimal since Oz primarily targets enemies before hitting Dendro Cores. |
Bennett | Bennett is crucial alongside Kazuha to enable Pyro Absorption. While his ATK buff is not as valuable with most Burgeon triggers, it can nonetheless be very potent alongside teammates such as Tartaglia. His C6’s Pyro Infusion notably allows practically any melee character to become a Burgeon trigger, to varying degrees of effectiveness. |
Kazuha | Kazuha can also serve as a flex option for another reaction trigger such as Thoma, offering additional Hydro application through his Absorption, buffs, damage and grouping. However, if he is not meant to be the Burgeon trigger, absorbing Pyro onto his Burst can disrupt Burgeon setups as excessive Pyro application triggers Burning; this hampers Dendro Core generation and should be avoided. |
   Kaeya / Rosaria / Ganyu | Cryo does not interact with Dendro, allowing both auras to exist simultaneously — when Hydro reacts with an enemy in this state, Freeze is triggered before Bloom. This essentially “protects” the Dendro aura to a degree while also creating Dendro Cores, improving their production rate. Further, Cryo units can also react with a Burning aura, reducing its uptime should it overtake. Rosaria, Ganyu and Kaeya serve as good offensive off-field Cryo appliers who can enable this. |
  Layla / Diona | Layla and Diona also enable the interaction detailed above and serve as defensive options to allow for more offensive teammates. Diona’s C6 increases her value if the on-field unit benefits from Elemental Mastery. |
DMC / Collei | Adding a second Dendro unit allows for improved Dendro Core generation with off-field Nahida, while also providing a small but helpful buff through Dendro Resonance. Both DMC and Collei fulfill this role as well as provide their own minor buffs. DMC is generally preferred due to their longer Burst uptime and more consistent application, but Collei fits better in shorter rotations and does not have to worry about her Burst prematurely detonating due to a Pyro Transfiguration. |
Yaoyao / Baizhu | Yaoyao and Baizhu act as alternatives to DMC and Collei. They contribute some off-field Dendro application and enable Dendro Resonance while also providing much-needed healing. Baizhu’s A4 Passive isn’t very useful if the Burgeon trigger is off-field. |
Kaveh | Kaveh’s self-healing upon receiving Dendro Core damage and the large AoE of his Normal Attacks during his Burst make him a fairly comfortable driver for Burgeon teams. When paired with Nahida, he greatly appreciates her particle generation and EM buff that increases his self-healing. While he is very effective at keeping himself alive, a dedicated healer can still be appreciated for team survivability. However, his ability to detonate Dendro Cores with his Skill, Burst, and C6 can actually be detrimental, as this prevents your Pyro unit from triggering Burgeon with those Cores. |
Kirara | Kirara’s Dendro-resistant shield finds much value in providing survivability in Burgeon teams. Her poor off-field Dendro application can even be considered an advantage, as it reduces the likelihood of Burning from occurring. It is not recommended to use her as an on-field Dendro driver with her long Hold Skill, as she has anti-synergy with units who require Normal Attacks to proc their Bursts; the most notable of these is Thoma, who is the most effective off-field Burgeon trigger for Double Dendro teams. |
Sucrose | Sucrose’s EM buff, ability to hold 4VV, grouping against lighter enemies, and Hydro application through Absorption allow her to serve as an excellent Burgeon support as long as care is taken that her Burst absorbs Hydro and not Pyro. She can also act as a reasonable on-field driver, especially if Hydro can be Swirled consistently. |
Heizou | Heizou serves as a strong Burgeon driver if Hydro can be Swirled consistently. He provides good personal damage, VV support and a teamwide 80 EM buff. |
Jean / Sayu | Sayu and Jean both serve as reasonable healers who can also provide VV support. Care should be taken when using Jean and Bennett together as they cause rapid Pyro Swirls due to their mutual Elemental self-application (known as Sunfire), which can disrupt Burgeon setups. |
Albedo | Albedo’s good personal damage and EM buff are useful in Burgeon teams, and his Geo application can increase Dendro Core generation by both preventing Hydro from overtaking and reducing Burning aura by reacting with it to Crystallize. |
 Noelle | Noelle’s Geo application is beneficial for avoiding Burning. She drives off-field teammates and also provides defensive utility. Her flexible field time allows teammates to use Skills more frequently; this is especially useful in Nahida’s case for reapplying TKP to newly spawned enemy waves. However, her ER requirements are quite high as a solo Geo. It is near mandatory to run Favonius Greatsword; while this does reduce her personal damage, it also alleviates team ER requirements. |
Example Teams

Nahida EQ > Ayato Q > Thoma QE N1 > Baizhu EQ > Ayato E N15 > Nahida E > Thoma E N1 > Baizhu E > Ayato E N15
Rotation Video
Video by miannes

Nahida EQ > Xingqiu EDQ N1 > Yanfei N2 > Yelan EN1 Q N1 > Yanfei Q N1C (if Burst is available) EN1C 3[N3C] EN1C
Rotation Video
Video by nikatosaurus

Razor E (1st rotation) > Nahida EQ > Xingqiu EQ N1 > Bennett EQ N1 > Razor EQ N3ED N3D N3ED N3 > Bennett E
Rotation Video
Video by nikatosaurus
Burning

Burning is a fairly underwhelming reaction; its constant consumption of Dendro and reapplication of Pyro make it limiting and the rewards for using it are rather unworthwhile. Further, no units exist that currently are able to fully take advantage of the reaction and Nahida’s inability to trigger her TKP procs by reapplying Burning makes her rather anti-synergistic with many Burning teams. Burnmelt teams as discussed below are finicky yet viable; outside of this, actively using the reaction is not recommended.
Burnmelt

Nahida can provide Burning aura to enable Cryo characters like Ganyu or Rosaria to trigger Melt. This means they are less reliant on characters like Xiangling or Kazuha to Melt consistently. However, Burnmelt is delicate, since Burning is susceptible to being ruined by even the slightest amount of excess application of any Element other than Pyro, including Dendro. Due to the fragility of Burnmelt, running an Anemo character to support the team, whether for buffing or CC, is still a very good option since they also supplement Pyro application.
Cryo Flex
Ganyu | Ganyu provides high and consistent Cryo damage without the need to use her Elemental Burst or Skill, which makes building Energy Recharge less important compared to other Cryo units. Due to her playstyle, Ganyu greatly appreciates units that provide strong shielding to prevent her from getting interrupted, as well as units that provide enough off-field Pyro application for her to Melt her Charged Shots. Because of this, Ganyu desires highly sought-after units such as Zhongli, Xiangling, or Kazuha to perform well. While Ganyu is one of the best users for this team, this doesn't mean she doesn't have her fair share of issues when trying to use Burning. Ganyu may have to delay her Charged Shots in order to avoid overwhelming Burning aura and account for TKP's proc ICD. This issue can be avoided by slotting in Kazuha or Venti, although survivability becomes a concern as pre-C6 Ganyu highly prefers a shield. Furthermore, the difficulty of maintaining Burning means Ganyu often does not use her Burst in these teams at C0; this can be worked around with additional Pyro application. |
Rosaria | Rosaria is a strong option for Burnmelt. While her setups are arguably more finicky than Ganyu without C6 Bennett, she is nonetheless a strong option. Particularly notable is Nahida’s short cooldowns allowing Rosaria to run shorter rotations, though her Energy requirements are considerable and often mandate “The Catch” + 4pc Emblem of Severed Fate alongside teammates with Favonius weapons. Kazuha can be used alongside her to ensure consistency with her setups, or Chongyun can be used to supply Energy while contributing decent damage. |
Kaeya | Kaeya is fairly similar to Rosaria in Burnmelt teams; while weaker due to his standard ICD limiting the portion of his damage he can Melt, he is nonetheless viable. |
Offensive Flex
Kazuha | Kazuha is a great flex unit since he can provide CC, Elemental DMG%, 4VV RES Shred as well as reliably help Nahida proc her TKP, which allows your Cryo characters to Melt more of their attacks. He is the primary flex option assuming a defensive flex is not needed, though he requires significant Energy Recharge to function. |
 Chongyun | Chongyun is a good partner for Burnmelt Rosaria, as he can fit in her short rotations while providing her with Energy, reducing cooldowns with his C2, and contributing reasonable damage without interfering with the team’s Pyro aura. It is worth noting his Infusion is not particularly made use of here and it is encouraged to play him in a quickswap style, especially as Bennett’s C6 overrides his Cryo Infusion. |
Sucrose | Sucrose grants an EM buff, which is valuable for both Melt and Burning damage. She also provides grouping, which is useful for gathering weaker enemies, but can be unreliable against larger enemies. An issue with Sucrose is that she has a high Energy Cost, which makes Bursting every rotation difficult. Furthermore, due to her Burst’s Absorption mechanics, there will be inconsistent uptime for its Pyro application, which may lead to issues for the Cryo unit. |
Xiangling | While Xiangling’s inclusion does make Nahida’s place fairly redundant due to her ability to enable Reverse Melt by herself, she can still be considered for players who do not want to deal with the hassle of Burnmelt setups. |
Defensive Flex
Zhongli | Zhongli remains a good flex unit in this team, offering Universal RES Shred and a shield to help out characters like Ganyu who are very dependent on defensive utility. It is worth noting that Zhongli does not aid in proccing Nahida’s TKP and his pillar can interfere with the Pyro aura; thus, it is best to intentionally miss his pillar placement. |
Dehya | Dehya’s Elemental Skill provides the on-field character with damage mitigation and substantial Interruption Resistance. It also performs coordinated attacks (every 2.5s), which maintains the effect of 4p TotM and applies Pyro off-field to sustain Burning alongside Nahida. This allows her to serve as a valuable support to the Ganyu variant of this composition, which makes full use of the aforementioned qualities. Note that her Skill’s Interruption Resistance buff is much weaker after 9s, and its 20s cooldown extends the team’s rotation. She can also die off-field due to mitigated damage. Dehya should avoid using her Burst in this role. |
Kirara | Kirara provides a decently strong shield and her lack of off-field application pre-C4 works to her advantage to prevent her from disrupting the Melt reactions from the team’s Cryo DPS. These two factors make her a good shielder option in Burnmelt Ganyu teams if 5-star alternatives are not available. While her C6 provides an alluring Universal DMG% buff for her team, her C4 Dendro application can actually mess up the delicate balance of Elemental auras needed in Burnmelt Ganyu, which ends up in lost Melts. |
Layla | Layla can be a decent replacement for Zhongli with a few notable caveats. If Layla's shield breaks, her Skill’s particle generation is also lost. Furthermore, her Cryo application can further complicate Burning uptime and potentially steal Melts. |
Diona | Diona consolidates shielding and healing while also providing Cryo Energy on demand. However, if Diona's weak shield breaks, you can lose uptime on your Cryo carry's DPS window due to enemy interruption. Additionally, Diona's C6 can also buff EM for the on-field unit, though the buff is tied to your active character’s current HP; the Burst may also steal some Melts, making your DPS lose out on some damage. |
 Xinyan | Xinyan functions as a shielder who also provides off-field Pyro application. She will almost entirely focus on building DEF and ER% in these teams; C2 is highly recommended for the forced Level 2 Shield generation and its guaranteed CRIT aiding Favonius proc chance. |
Thoma | Thoma’s shield, like Xinyan’s, provides additional off-field Pyro application, but with higher potential durability. While his shield can be strong, it needs to be stacked in order to perform well; if it cannot gain many stacks, Thoma is not worth using compared to other listed options. Since Thoma’s shield requires Normal Attacks in order to build stacks, it’s anti-synergistic with Ganyu, who prefers dealing damage with Charged Attacks rather than Normal Attacks, or Ayaka who risks applying excessive Cryo with her Infusion. |
Example Teams

Nahida E Q > Bennett E Q > Dehya E N1 > Ganyu 6CA E
Rotation Video
Video by crimson__

Nahida EQ > Chongyun E > Bennett EQ > Rosaria EQ > Bennett E > Chongyun Q > Bennett E > Nahida E > Rosaria E > Bennett E
Rotation Video
Video by cuzimori
Fridge
Cryo does not interact with Dendro, allowing both auras to exist simultaneously — when Hydro reacts with an enemy in this state, Freeze is triggered before Bloom. This essentially “protects'' the Dendro aura to a degree while still allowing for Bloom to be triggered. However, this mechanic is almost always wasted on Nahida teams — her strong Dendro applications means that preserving a Dendro aura typically needs very little additional help, and other teammate options almost always provide significantly more than the Cryo units that can be used to enable Fridge. Because of this, Cryo units tend to only contribute their own personal damage and added comfort via Freeze in Nahida teams. An exception to this is in Burgeon teams, where the Cryo units’ additional ability to reduce Burning makes them a much more worthwhile pick; this is covered in the Burgeon section.
Closing Words

“As the God of Wisdom, I grant to you my blessing: From here onward, may your journey be free from confusion that clouds your mind and obstacles that block your path.”
Thank you so much for reading this guide! Nahida is an incredibly complex, versatile, and powerful character — her in-game performance perfectly fits her place in the lore. We hope that this guide has aided you in learning a little more about this often-misunderstood God of Wisdom. If you have any questions or concerns, feel free to message or ping me on Discord at @cuzimori. Once again, thank you for reading!
Credits
Authors
cuzimori, nikatosaurus
Co-Authors
jamberry, Kuro_kami91#6652, leifa, nzpieface, ayzel, sir_pick, miannes
Editors
cuppacote, Leah, seima, reddraegon, idkanonymized, nociii, polomo, fritzzes, chasing_haze, leifa, grankrathalos
Contributors
rarepossum, raikh, .pweep, _demomain
Transcribers
nyteshadows, not.logic
Calc Repository
KQM Nahida Guide Weapon Comparison by .athene.