Updated for Version 5.4

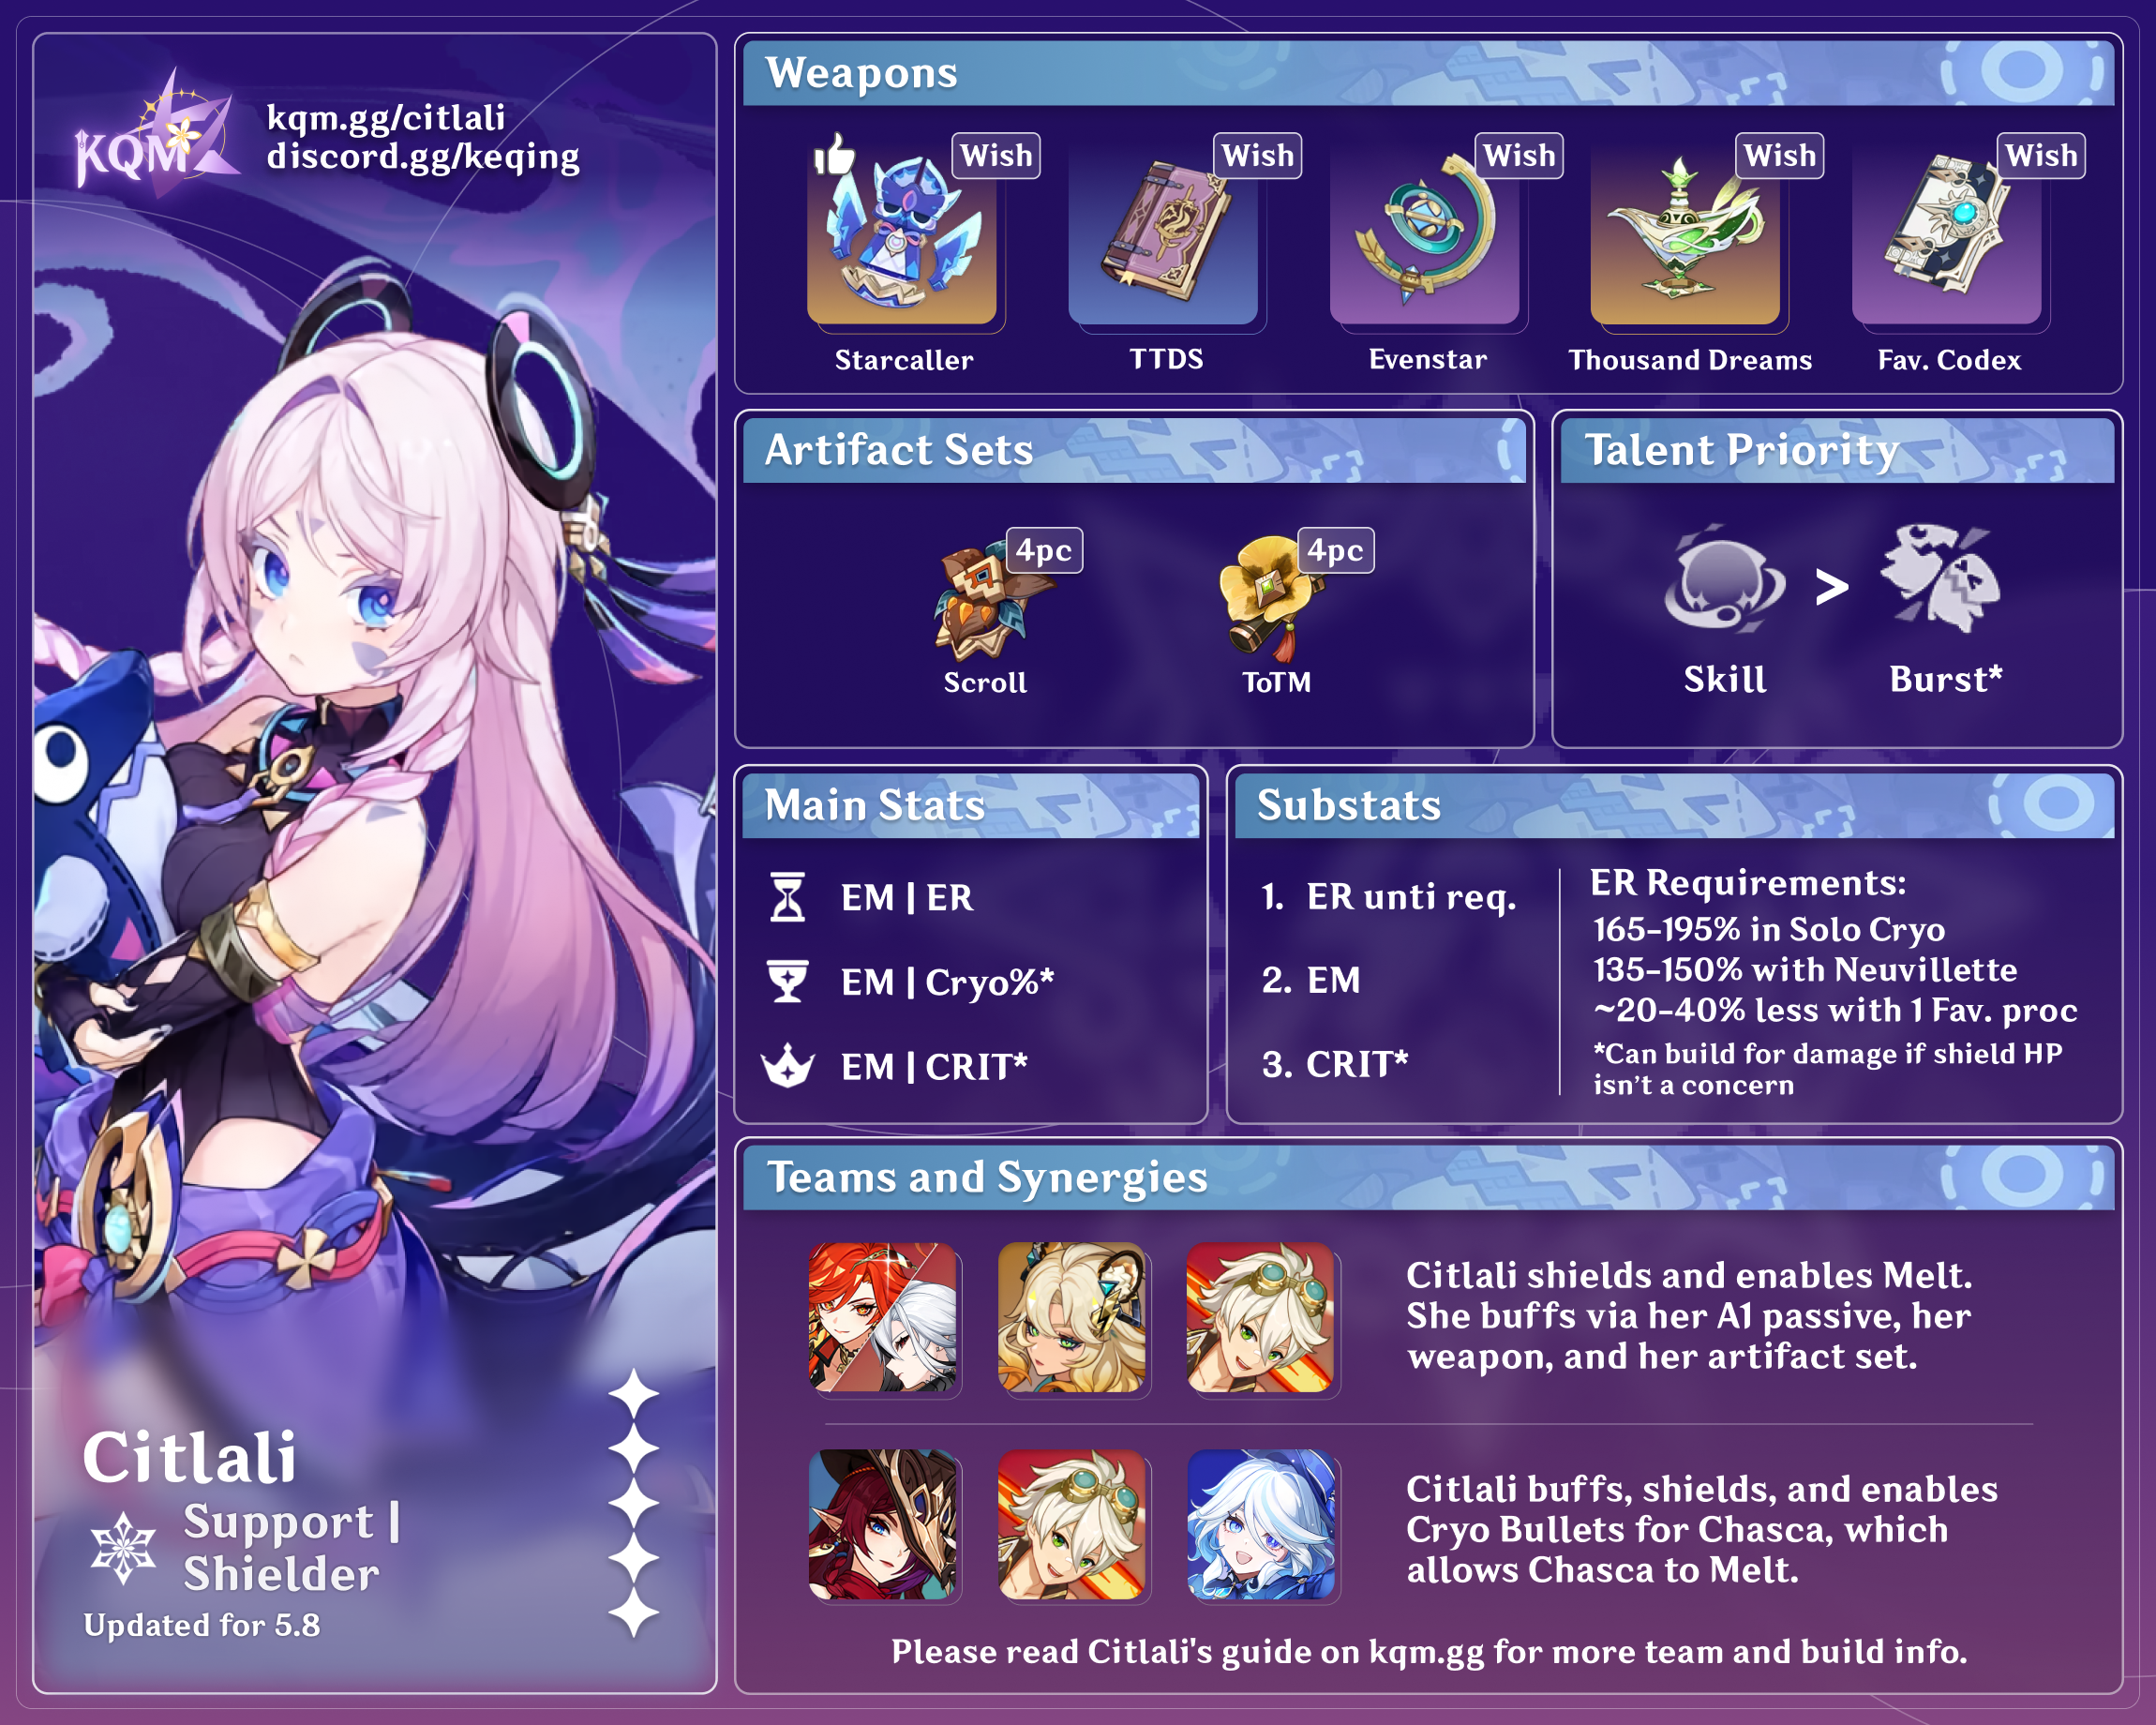
Citlali is a 5★ Cryo Catalyst character in Genshin Impact who provides a long-lasting shield, Pyro and Hydro RES Shred, buffing through 4pc Scroll of the Hero of Cinder City and supportive weapons such as TTDS, and off-field Cryo application. By consolidating buffing, shielding, and application in one slot, Citlali serves as a powerful support for many teams. Learn about Citlali’s best builds, best weapons, best artifacts, and best teams in this quick guide.
Note that the information given may change if new discoveries are made. More extensive testing is in progress.
Join our Discord to participate in the theorycrafting process.
Table of Contents
Infographic
Credits to: icedsquid, haafr
Character Overview
Pros
- Supplies a shield with good uptime.
- Able to make full use of 4pc Scroll of the Hero of Cinder City to give a 40% DMG Bonus.
- Has easy access to Hydro and Pyro RES Shred.
- Able to hold supportive weapons such as Thrilling Tales of Dragon Slayers or Starcaller’s Watch.
- Enables Melt for Pyro damage dealers or Freeze for Hydro damage dealers with her off-field Cryo application.
- Provides quality of life compared to other Cryo appliers as her application follows you around and has a large AoE.
- Scales well with Constellations.
Cons
- Shield is on the weaker side, especially when running TTDS.
- Melt teams with Citlali require more meticulous combos and rotations to work than the traditional Vape teams for those Pyro DPS units.
- Her A1 only increases the damage of Pyro and Hydro characters.
Playstyles
Shield Support
Citlali provides a shield with her Skill as well as buffing through 4pc Scroll, her A1 Passive’s RES Shred, and supportive weapons such as Thrilling Tales of Dragon Slayers or Starcaller’s Watch. Her off-field Cryo application enables some on-field Pyro characters to Melt or Hydro characters to Freeze.
Talents
Level and Talent Priority
Skill > Burst
Leveling Citlali’s Normal Attack Talent is unnecessary.
Talent Overview
 Normal Attack | Shadow-Stealing Spirit Vessel
Talent Description
Normal Attack
Calls upon secret arts passed down through the Masters of the Night-Wind from generation to generation, performing up to three strikes that deal Cryo DMG.
Charged Attack
Enters Aiming Mode, and after Holding, consumes a certain amount of Stamina to call forth a Frost Star that deals Cryo DMG to opponents in its path.
Plunging Attack
Gathers the power of Cryo and plunges towards the ground from mid-air, damaging all opponents in her path. Deals AoE Cryo DMG upon impact with the ground.
Pretty but otherwise unremarkable. Citlali’s Charged Attack can be used to scan Nightspirit Graffiti, allowing her to solve puzzles around the Masters of the Night-Wind areas.
 Elemental Skill | Dawnfrost Darkstar
Talent Description
Invoking secret pacts passed down by her tribe over the millennia, Citlali deploys an Opal Shield and calls forth “Obsidian Tzitzimitl: Itzpapa,” a creature that is (reputedly) terrifying beyond compare, dealing Nightsoul-aligned AoE Cryo DMG.
The Opal Shield’s DMG absorption scales based on Citlali’s Elemental Mastery, and absorbs Cryo DMG with 250% efficiency. When it is deployed, it will cause Citlali to briefly be affected by Cryo.
After using this skill, Citlali gains 24 Nightsoul points and enters the Nightsoul’s Blessing state.
Nightsoul’s Blessing: Citlali
When Itzpapa leaves the field, Citlali exits the Nightsoul’s Blessing state.
Itzpapa
- Itzpapa will follow the character.
- If Citlali has at least 50 Nightsoul points, Itzpapa enters the Opal Fire state and continuously consumes Nightsoul points to whip up a Frostfall Storm that follows the character around and attacks opponents within its AoE, dealing Nightsoul-aligned Cryo DMG.
- When Citlali’s Nightsoul points are fully depleted, Itzpapa’s Opal Fire state also ends.
Citlali summons her Opal Shield and Itzpapa, lasting for 20s, and deals Cryo damage. Her shield HP scales with EM. With its 16s cooldown, this Skill will only be cast once per rotation; however, the shield’s long 20s duration means it will cover the majority of your rotation.
On cast, Citlali will also gain 24 Nightsoul points and enter the Nightsoul’s Blessing state. This Skill’s cast damage occurs in the Nightsoul’s Blessing state, allowing her to trigger 4pc Scroll with her cast damage. When Citlali’s Nightsoul points exceed 50, Itzpapa enters the Opal Fire state, dealing AoE Cryo damage in 1s intervals. Since this attack has an ICD of 1.5s, Itzpapa will apply Cryo every other attack for once every 2s.
While Itzpapa is on the Opal Fire state, it drains 8 Nightsoul points every second it’s on-field. Once Nightsoul points are depleted, Itzpapa will exit the Opal Fire state and cease attacking. Itzpapa’s attacks do not deal much damage and are mainly useful for their Cryo application.
Citlali can gain Nightsoul points in the following ways at C0:
- 24 on Skill cast
- 24 on Burst cast
- 3 per Spiritvessel Skull summoned by Burst (up to 9 points)
- 16 whenever Frozen or Melt is triggered with an 8s cooldown from her A1
- 4 whenever a party member triggers a Nightsoul Burst
With Skill, Burst, and 1 Nightsoul Burst, Citlali will gain a minimum of 55 Nightsoul points, letting Itzpapa attack for a minimum of 6s. When accounting for additional Nightsoul points from her A1 Passive, Itzpapa’s Cryo application lasts for around 12–13s with both Skill and Burst used.
 Elemental Burst | Edict of Entwined Splendor
Talent Description
Summons “allies” from the starry skies and the vast earth, hurling forth an ice storm to bombard the area in front and deal Nightsoul-aligned AoE Cryo DMG. This restores a set amount of Nightsoul points for Citlali, and also summons a Spiritvessel Skull near a maximum of 3 opponents within the AoE, with 1 Skull for each opponent. Spiritvessel Skulls explode after some time, dealing Nightsoul-aligned AoE Cryo DMG and restoring a set amount of Nightsoul points for Citlali.
Citlali’s Burst deals Cryo damage and restores Nightsoul points. The initial hit deals a decent chunk of damage and restores 24 Nightsoul points. For each nearby opponent, up to three, Citlali summons a Spiritvessel Skull, which then explodes to deal Cryo damage and restore 3 Nightsoul points each.
 Ascension 1 Passive | Mamaloaco’s Freezing Rain
Talent Description
While Itzpapa is on the field, after nearby party members trigger the Frozen or Melt reactions, the Pyro and Hydro RES of opponents affected by that reaction decreases by 20% for 12s.
Additionally, Citlali will regain 16 Nightsoul points. Nightsoul can be restored this way once every 8s.
Provides 20% Hydro and Pyro RES Shred whenever Melt or Freeze is triggered. Note that both types of RES Shred will be given when either of the reactions is triggered.
This passive also restores 16 Nightsoul points whenever Melt or Freeze is triggered, with a cooldown of 8s. This passive triggers around two times in most rotations, adding 4s of Cryo application per rotation.
Overall, this passive incentivizes running Citlali with Pyro or Hydro DPS units through its RES Shred and Nightsoul point gain.
 Ascension 4 Passive | Itzpapalotl’s Star Garments
Talent Description
During the Elemental Skill Dawnfrost Darkstar, Itzpapa’s Frostfall Storm DMG is increased by 90% of Citlali’s Elemental Mastery. During the Elemental Burst Edict of Entwined Splendor, Ice Storm DMG is increased by 1200% of Citlali’s Elemental Mastery.
In addition, when nearby party members trigger Nightsoul Bursts, Citlali regains 4 Nightsoul points.
Adds EM scaling to Citlali’s Burst and Skill. Though her Skill damage is still not particularly impactful, this boosts her Burst into a source of front-loaded damage when Melted. With this passive, EM is now useful for Citlali’s shield HP, Talent scaling, and Melt damage.
Additionally, Citlali will regain 4 Nightsoul points whenever a teammate triggers a Nightsoul Burst. This is not particularly impactful.
 Utility Passive | Songs of Profound Mystery
Talent Description
While in an area with Phlogiston Mechanics within Natlan, triggering “Nightsoul Burst” restores 20 Phlogiston. This cannot take effect in Domains, Trounce Domains, or the Spiral Abyss.
Triggering a Nightsoul Burst will restore 20 Phlogiston. With this ability, other Natlan damage dealers can stay in their enhanced states longer during battle when in Natlan.
 Night Realm’s Gift Passive | Smoke, Mirrors, and the Flowing Winds
Talent Description
While in an area with Phlogiston Mechanics within Natlan, can use Nightsoul Transmission: Citlali. When the active character is currently high enough in the air, the following will trigger when switching to Citlali: Citlali will leap up high, and will deploy “White Obsidian Tzitzimitl: Citlalin” to float in the air. Nightsoul Transmission can be triggered once every 10s by your party.
Holding Aiming Mode will cause Citlali to enter the “Spiritspeaker” state, which will allow her to interact with “Nightspirit Graffiti” and “Nightspirit Sigils,” extracting information and power from them. The rules for interacting with these objects follow the same rules as those governing Iktomisaurus interactions.
Additionally, holding the jump button will cause Citlali to consume 75 Stamina and leap. In areas within Natlan where Phlogiston mechanics are present, Citlali will prioritize consuming 5 Phlogiston to leap to a height higher still.
When in the air, Citlali can Hold her Normal Attack to consume Phlogiston or Stamina and enter Aiming Mode and trigger Charged Attacks. When initiating Charged Attacks in mid-air, Citlali will prioritize consuming 20 Phlogiston.
Citlali is able to hold the jump button and launch into the air. Normally this consumes 75 Stamina, but in Natlan she will consume 5 Phlogiston instead and be launched even higher. If Citlali uses this ability to jump, she has a unique gliding animation of lying on a pillow and glides down slower than usual.
Citlali can also trigger this jump with Nightsoul Transmission in Natlan. When she is paired with another Natlan character who can fly, you can swap between them for near-infinite airtime.
While in midair, Citlali can use her Charged Attack, which is able to interact with Nightspirit Graffitis and Sigils, like the Iktomisaurus ability. While using her Charged Attack, Citlali will not descend and instead hover in midair while consuming Stamina or Phlogiston (with Phlogiston prioritized).
Constellations
 Constellation 1 | Radiant Blades of Centzon Mimixcoah
When she uses the Elemental Skill Dawnfrost Darkstar, Citlali gains the “Opalstar Vestments” effect until Itzpapa leaves the field. During this time, she will obtain 10 Stellar Blades. When a nearby active character other than Citlali deals DMG using Normal, Charged, or Plunging Attacks, or Elemental Skills and Bursts, consume 1 Blade to increase the DMG dealt by 200% of Citlali’s Elemental Mastery.
After nearby party members trigger Frozen or Melt, Citlali will gain another 3 Stellar Blades. This effect can trigger once every 8s..
Using the Elemental Skill Dawnfrost Darkstar will reset Stellar Blade stacks.
Additionally, when Citlali is using her leap, or is Aiming or using her Charged Attack in mid-air, her Phlogiston consumption is decreased by 45%.
After using her Elemental Skill, Citlali gives a buff to the active character other than herself. This buff scales with her EM and has 10 procs that are consumed when the active character deals damage through Normal, Charged, or Plunging Attacks, Skills, or Bursts. Once every 8s, 3 more procs of this buff can be gained when a Frozen or Melt reaction is triggered.
This Constellation further enhances Citlali’s support strength by a sizable amount. Note that this buff applies to all types of Elemental or Physical damage, as long as they are Normal / Charged / Plunging / Skill / Burst attacks. This also means special attacks such as Emilie or Ororon’s A1 do not benefit from it. This buff is considered an Additive Base DMG Bonus, and further information regarding how it fits into the damage formula can be found here.
Additionally, Citlali’s C1 decreases her Phlogiston consumption when doing the special jump or aiming or performing her Charged Attacks. This is a mild quality of life improvement in Natlan’s overworld
 Constellation 2 | Heart Devourer’s Travail
Citlali gains 125 Elemental Mastery, and other characters shielded by her Opal Shield, or who have Itzpapa following them, gain 250 Elemental Mastery.
Additionally, when the Elemental Skill Dawnfrost Darkstar is used, nearby active characters will also be granted an Opal Shield
Also, the Passive Talent “Mamaloaco’s Frigid Rain” has its effects enhanced:
While Itzpapa is on the field, after nearby party members trigger Frozen or Melt, the opponent(s) affected by this reaction will have their Pyro and Hydro RES additionally decreased by 20% for 12s. You must first unlock the Passive Talent “Mamaloaco’s Frigid Rain” to gain access to the above effect.
Permanent 125 EM increase for Citlali, as well as a 250 EM buff to the active characters with 20s uptime. Also increases her A1’s Pyro and Hydro RES Shred from 20% to 40%. Together, this Constellation greatly increases Citlali’s buffing capability, especially for Melt teams where the damage dealers can capitalize on the EM buff.
Additionally, with C2, Citlali also grants an Opal Shield to the active characters of your Co-Op members when her Skill is cast. Note that the 250 EM increase applies to your Co-Op members as well.
This is a good stopping Constellation for Citlali.
 Constellation 3 | Cloud Serpent’s Feathered Crown
Increases the Level of Dawnfrost Darkstar by 3.
Maximum upgrade level is 15.
Traditional Talent level increase. This Constellation strengthens her shield and Skill damage.
 Constellation 4 | Death Defier’s Spirit Skull
While the Elemental Skill Dawnfrost Darkstar is active, when Itzpapa’s Frostfall Storm hits opponents, an additional Obsidian Spiritvessel Skull is summoned. When a Spiritvessel Skull summoned this way explodes, it deals 1800% of Citlali’s Elemental Mastery as Nightsoul-aligned AoE Cryo DMG and restores 16 Nightsoul points and 8 Energy for Citlali. This effect can trigger once every 8s. This DMG is not considered Elemental Burst DMG.
Adds a strong additional proc of damage on Citlali’s Skill that can trigger once every 8s. When this damage triggers, it will also restore 16 Nightsoul points and 8 Energy. This can trigger twice per Skill. This Constellation gains more value with her C6.
 Constellation 5 | Nemontemi’s Hex
Increases the Level of Edict of Entwined Splendor by 3.
Maximum upgrade level is 15.
Burst level increase. Only relevant for Citlali’s personal damage.
 Constellation 6 | Teoiztac’s Secret Pact
After being summoned with the Elemental Skill Dawnfrost Darkstar, Itzpapa will always be in the Opal Fire state, and when Nightsoul points are exhausted, this state will not end.
Additionally, when Dawnfrost Darkstar is used, Itzpapa will consume all Nightsoul points, and while it is on the field, it will continuously consume Nightsoul points. Each Nightsoul point consumed in this way will grant Citlali 1 “Cifra of the Secret Law” point.
A maximum of 40 such points can be gained, and each point Citlali possesses will grant all nearby party members a 1.5% Pyro and Hydro DMG Bonus, and increase the DMG Citlali deals by 2.5%.
When Itzpapa leaves the field, or upon using Citlali’s Elemental Skill again, all “Cifra of the Secret Law” points she has will be removed.
Itzpapa will always be in the Opal Fire state. It also consumes the Nightsoul points (generated before or after Itzpapa is summoned) to increase the entire team’s Pyro and Hydro DMG Bonus by up to 60% and her personal damage by up to 100%, which is equal to 40 Nightsoul points consumed. In practice, with just a Skill cast and one C4 proc, Citlali can max out this buff almost instantly, allowing her to skip the Burst and resulting in a faster setup. This DMG Bonus buff lasts until Itzpapa’s duration ends or when Citlali recasts her Skill.
Overall, a very strong C6.
Combos
Combo Notation
- N = Normal Attack
- C = Charged Attack
- A = Aimed Shot
- P = Plunging Attack
- hP = High Plunge
- lP = Low Plunge
- E = Elemental Skill
- tE = Tap Skill
- hE = Hold Skill
- Q = Elemental Burst
- D = dash (cancel)
- J = jump (cancel)
- W = walk (cancel)
- > = switch character
- ( ) = these actions are optional; please refer to the notes below
- [ ] = repeat these actions the specified number of times
| EQ | The default combo for Citlali, allowing the funnel of her Skill’s particles into her next Burst. Casting Burst after Skill would also delay the front-loaded Cryo application from her Burst’s initial hit, Spiritvessel Skull explosions, as well as Itzpapa’s Opal Fire state’s first hit, which is important for many Melt setups. |
| E | If off-field Cryo application is unneeded or unwanted, Citlali does not need to Burst every rotation. |
Artifacts
ER Requirements
| C0–C3 | C4 | |
| Solo Cryo | 170–195% | 145–165% |
| Double Cryo | 170–185% | 145–160% |
| With Neuvillette | 125–150% | 100–125% |
| With Xilonen + 1 Natlan unit | 145–150% | 120–125% |
Assumptions:
- Citlali uses 4pc Scroll.
- 1 Favonius proc from teammates.
- 2 Favonius procs from teammates in Neuvillette teams.
Citlali’s ER requirements with Favonius Codex are less than 160%, thus she does not need to build for ER with Favonius Codex.
Use the Energy Recharge Calculator to determine exact requirements for your team and rotation. For more details on how Favonius weapons will affect your team, please use Ac1d’s Favonius Mastersheet.
Artifact Stats
 Sands |  Goblet |  Circlet |
| EM | ER | EM | Cryo DMG Bonus | EM | CRIT |
Stat Priority: ER (until requirements are met) > EM > CRIT > ATK%
Prioritize meeting Citlali’s ER requirements if using Burst is important for Nightsoul point gain. When Citlali’s shield is not needed, she can use Cryo DMG Bonus and CRIT main stats for her personal build; however, an EM build is still recommended due to her lacking personal damage and EM damage scaling from A4. If she Melts her Burst, EM provides even more since it increases Melt damage.
Artifact Sets
 4pc Scroll of the Hero of Cinder City | Citlali’s best set, providing a 40% DMG Bonus buff whenever she triggers a reaction. It needs some planning to make sure she triggers the right reaction. However, since this set’s buff for the same Element does not stack when two members of the team use it, Citlali will sometimes use a different set. The 2pc effect of Scroll also gives Flat Energy to Citlali, which is helpful for meeting her ER requirements. |
 4pc Tenacity of the Millelith / 4pc Noblesse Oblige | Citlali easily triggers its passive with Itzpapa’s Opal Fire state. Although its ATK% buff is weaker and less universal than 4pc Scroll’s DMG% buff, it can be used when another character uses Scroll. Noblesse Oblige provides the same buff but less shield HP, and is often already used by another character on her team. |
 4pc Archaic Petra | An alternative buffing set when run with Xilonen. Citlali will pick up Xilonen’s Crystallize shards. Her best option after Scroll if a Geo unit is on her team. |
 4pc Instructor | Another viable option to run in teams with Xilonen who is already on Scroll. Note that due to Instructor’s lower 4-star stats, Citlali will have a hard time meeting her ER requirements and/or building a good shield. |
Weapons
 5★ Starcaller’s Watch | Citlali’s best weapon, providing high EM to herself and an easy-to-trigger DMG% buff to the on-fielder in the team. However, the weapon requires the active character to be close to the enemies for it to work, thus limiting its usefulness on ranged DPS characters. |
 3★ Thrilling Tales of Dragon Slayers | Her best weapon after Starcaller’s Watch in general. This weapon provides a strong ATK% buff for your ATK-scaling DPS. Make sure to use Citlali right before your desired DPS unit’s field time. |
 4★ Wandering Evenstar | This weapon’s passive synergizes with Citlali’s EM stat. It provides a teamwide Flat ATK buff but is generally behind TTDS unless there is a rotational issue or lack of a dedicated on-field DPS. |
 5★ A Thousand Floating Dreams | Providing high EM and a minor teamwide EM buff, this weapon is viable, though not better than TTDS for Citlali when buffing ATK-scaling teammates. |
 4★ Favonius Codex | Provides Energy for the whole team, but not worth it unless there are no ATK scalers on her team and you do not own Starcaller’s Watch. |
 4★ Mappa Mare, Sacrificial Fragments, 3★ Magic Guide | These EM stat-sticks can be used when you lack the above options. |
Teams
Rotation Notation
- N = Normal Attack
- C = Charged Attack
- A = Aimed Shot
- P = Plunging Attack
- E = Elemental Skill
- tE = Tap Skill
- hE = Hold Skill
- Q = Elemental Burst
- D = dash (cancel)
- J = jump (cancel)
- W = walk (cancel)
- > = switch character
- ( ) = these actions are optional; please refer to the notes below
- [ ] = repeat these actions the specified number of times
- Citlali’s Cryo application enables Melt and Freeze.
- She is incentivized to run with Pyro and Hydro characters due to her A1 Passive.
- She provides a variety of buffing through 4pc Scroll, her A1 Passive, and supportive weapons.
Melt / Vapemelt

Citlali’s off-field Cryo application enables Melt for some Pyro DPS units, such as Arlecchino or Gaming. She also bolsters their damage via buffs such as her A1 Passive, 4pc Scroll, TTDS, or Starcaller’s Watch. Her shield is helpful for characters that are easily interrupted or lose a lot from interruption.
For Pyro DPS units with faster application, such as Yoimiya, Hu Tao, one or two Hydro characters should run with Citlali for Amplifying Reaction consistency, forming a Vapemelt team. However, this archetype may not work against Bosses as Frozen reactions leave no aura behind, resulting in neither Vape nor Melt.
Notable Teammates
Pyro
Pyro units enjoy Citlali’s buffing and Cryo application.
 Bennett Bennett | Bennett is one of the best supports to Pyro characters with his massive Flat ATK buff, Pyro Resonance, and Pyro DMG Bonus from C6. His healing also lessens the need to maximize Citlali’s shield HP. |
 Mavuika Mavuika | Mavuika with correct combos can Melt most of her attacks with just Citlali’s Cryo application. Citlali also helps Mavuika stack her Fighting Spirit to deal more damage. In return, Mavuika being a Natlan unit decreases the cooldown of Nightsoul Bursts to trigger the 2pc Scroll effect more often, which can result in more Energy refund for Citlali. |
 Arlecchino Arlecchino | With careful combo execution, Arlecchino can Melt with just Citlali’s Cryo application alone. She appreciates Citlali’s 16s cooldown to enable a shorter rotation compared to her usual 18s or 21s rotation with Yelan or Xingqiu. Furthermore, Citlali’s shield greatly benefits Arlecchino as she cannot be healed by other sources in combat. |
 Gaming Gaming | Gaming pairs well with Citlali as her application is fast enough to allow all of Gaming’s Plunging Attacks to Melt. |


Anemo
Anemo characters support the team via their own buffs, ability to hold 4pc Viridescent Venerer, or grouping.
Chasca | Although an Anemo character, Chasca’s Infusion mechanisms make her a DPS for every other Element in disguise. In this case, Chasca is masquerading as a Pyro DPS by Melting or Vaping her Pyro bullets. |


Geo
Geo characters who provide buffs, personal damage, or other utility without interfering with the reactions can also be used.


Hydro
Using Hydro characters enables Vapemelt teams where Pyro units trigger both Vape and Melt damage. Hydro characters are needed to ensure an Amplifying Reaction for DPS units that have more application, such as Hu Tao or Yoimiya. However, characters that deal blunt damage (i.e. Claymore users) have anti-synergy with this playstyle as they Shatter the Frozen aura instead of triggering Melt on it.


Cryo
Additional Cryo application ensures more reliable Melt patterns for Pyro DPS units. Cryo characters also deal extra damage or offer more buffs on their own.


Example Teams
This is not a comprehensive list of teams. The inclusion or exclusion of any given team does not necessarily reflect its power level.

Citlali allows Mavuika to Melt while also batterying her Burst. Citlali holds 4pc Scroll in the Anemo support variants, whereas with Xilonen, she can also use 4pc Instructor, TotM, or 4pc Archaic Petra if Xilonen is already on 4pc Scroll. However, it is easier to meet Citlali’s ER requirements if she holds Scroll instead.
Sample Rotation (Xilonen)
Mavuika tE > Xilonen E N2 > Bennett EQ > Citlali EQ > Mavuika Q Melt Combo
Sample Rotation (Sucrose)
Mavuika tE > Bennett EQ > Sucrose E(E) > Citlali EQ > Mavuika Q Melt Combo
Sample Rotation (Kazuha)
Mavuika tE > Bennett EQ > Kazuha tEP > Citlali EQ > Mavuika Q Melt Combo

Citlali is an upgrade to C6 Kaeya for Arlecchino’s Melt team thanks to her shield and more offensive buffs. Players have to be careful with Arlecchino’s combos to ensure Pyro does not override as an aura and ruin the Melt setup.
With Crimson Moon’s Semblance, do a Charged Attack with Arlecchino at the start of the rotation.
Sample Rotation (Sucrose)
Arlecchino E > Bennett EQ > Sucrose E > Citlali EQ > Arlecchino CD1 3[N5D]
1Cancel the Charged Attack before it hits the enemy by dashing
Sample Rotation (Kazuha)
Arlecchino E > Bennett EQ > Kazuha tEP > Citlali EQ > Arlecchino CD1 3[N5D]
1Cancel the Charged Attack before it hits the enemy by dashing
Sample Rotation (Xilonen)
Arlecchino E > Xilonen E N2 > Bennett EQ > Citlali EQ > Arlecchino CD1 3[N5D]
1Cancel the Charged Attack before it hits the enemy by dashing

Citlali is a good support for Chasca. Not only does she convert Chasca’s bullets into Cryo to trigger Melt, but she also increases the damage dealt by her Cryo, Pyro, and Hydro (with Furina) bullets via various buffs. Bennett is still a staple for many ATK-scaling characters, including Chasca. Mavuika with her great personal damage and buff fits as the fourth slot. Furina deals less personal damage; however, her buff is more potent and she makes Chasca’s Pyro bullets react (Reverse Vape or Forward Melt) more consistently, taking advantage of Citlali’s Pyro RES Shred.
Sample Rotation (Mavuika — Melted Burst)
Mavuika E > Bennett EQ > Citlali EQ > Mavuika Q > Chasca E 4[C] (C/Q)1
1Burst when available, otherwise hold Chasca’s Charged Attack until she falls to the ground
Sample Rotation (Mavuika — No Melted Burst)
Mavuika E > Bennett EQ > Mavuika Q > Citlali EQ > Chasca E 4[C] (C/Q)1
1Burst when available, otherwise hold Chasca’s Charged Attack until she falls to the ground
Sample Rotation (Furina)
Furina ED Q > Bennett EQ N11 > Citlali EQ > Chasca E 4[C] (C/Q)2
1To make Scroll setup on Citlali more consistent. If your Bennett is not C6, skip this
2Burst when available, otherwise hold Chasca’s Charged Attack until she falls to the ground

Gaming greatly benefits from Amplifying Reactions, especially the Melt reaction. Citlali is an upgrade to his previous Melt teams thanks to her adequate application and powerful buffs.
Sample Rotation (Xianyun)
Bennett EQ > Xianyun EPQ > Citlali EQ > Gaming Q 5-6[EP]
Sample Rotation (Sucrose)
Bennett EQ > Sucrose E > Citlali EQ > Gaming Q 5-6[EP]
Sample Rotation (Kazuha)
Bennett EQ > Kazuha tEP > Citlali EQ > Gaming Q 5-6[EP]

Similar to Gaming, Diluc also gains a lot from Citlali. Due to how Citlali’s application is concentrated at the start, Diluc can spam around 3 Plunges in quick succession, resulting in more front-loaded damage output. After that, players need to wait around 2s between each Cryo application before Plunging, else Diluc will apply Pyro aura instead.
Sample Rotation
Xianyun EP (N2-3)1 > Bennett EQ > Xianyun Q > Citlali EQ > Diluc 6[JP] E
1Optional, to catch her particles

Citlali alone is not enough Cryo application for Yoimiya to Melt. Pairing a Hydro such as Yelan or Xingqiu stabilizes the reactions by ensuring Yoimiya will Vape the hits that are unreacted otherwise. In this team, Citlali acts as more of a shielder and buffer that occasionally gives Yoimiya some Melt rather than a full-time Melt enabler.
Sample Rotation (Yelan)
Bennett E > Yelan Q N1 E N3-41 > Bennett Q E > Citlali EQ > Yoimiya E 3[N5D]
1Use some Normal Attacks until Yelan catches her particles
Sample Rotation (Xingqiu)
Xingqiu EDQ > Bennett ED1Q > Citlali EQ N1 > Yoimiya E 3[N5D]
1Bennett’s E and Q lunge himself slightly forwards, so dash backwards to avoid applying Hydro to enemies with Xingqiu’s Rain Sword orbitals

A classic Double Hydro Hu Tao team featuring Citlali. Citlali is a good shielder who can buff all the Pyro and Hydro damage dealers in the team.
Sample Rotation
Xingqiu EDQ N1 > Yelan EQ N1 > Citlali EQ N1 > Hu Tao E Combo
Freeze / Flex Shielder

Outside of Melt / Vapemelt teams, Citlali’s role remains roughly the same: an off-field shielder with buffing through TTDS, 4pc Scroll, and her A4 Passive. She brings the most to Hydro-focused teams due to her Hydro RES Shred and ease of triggering 4pc Scroll. Her off-field application allows for Freeze, which enhances survivability and executing combos. Nonetheless, she serves the same role in non-Hydro teams, just with less buffs.
Despite being Cryo herself, Citlali is unreliable in Cryo-focused Freeze teams due to the unpredictability of triggering Freeze for 4pc Scroll. In Mono Cryo teams, Citlali most likely can not trigger any Cryo reactions, again locking her out of 4pc Scroll. For Cryo damage dealers, Citlali is only viable as a support in Melt teams.
Outside of Cryo damage dealers, Citlali brings 4pc Scroll for Electro damage dealers. For Geo and Anemo damage dealers, she can not trigger 4pc Scroll but nonetheless brings 4pc ToTM and TTDS or other supportive weapons. Although you can often find a better shielder than Citlali for those teams, Citlali is nonetheless viable.
Notable Teammates
 Neuvillette | Neuvillette lacks access to buffs due to his HP scaling; thus, Citlali proves a potent option with her 40% DMG Bonus and 20% RES Shred. Her shield provides strong quality of life for C0 Neuvillette. |
Mualani | Mualani often struggles to find sustain in her teams. Citlali’s buffs and shield make her valuable for teams with Xilonen; however, her off-field Cryo application makes her viable only in teams with Xiangling. |
Hydro
Hydro damage dealers who profit from Citlali’s Hydro RES Shred and various other buffs.


Cryo
These Cryo damage dealers like Citlali in their Melt teams.


Other
These damage dealers make use of Citlali’s shield and/or her buffs.


Example Teams
This is not a comprehensive list of teams. The inclusion or exclusion of any given team does not necessarily reflect its power level.

Citlali with her shield, 4pc Scroll, and Hydro RES Shred works well as Neuvillette’s teammate.
Sample Rotation (Kazuha)
Neuvillette E > Furina ED > Kazuha tEPQ > Citlali EQ > Furina Q > Neuvillette C E C Q > Kazuha tEP > Neuvillette 2[C]
Sample Rotation (Lynette)
Neuvillette E > Furina ED > Lynette Q E / Q N11 > Citlali EQ > Furina Q > Neuvillette C E C Q > Lynette E N1 > Neuvillette 2[C]
1Use Lynette Q E if she is C4+, otherwise Q N1

A simple but effective team where all three Hydro units contribute to team damage while Citlali supports them from backstage with her buffs.
Sample Rotation
Ayato Q > Xingqiu Q N1 ED N1 > Yelan Q N1 E N1 > Citlali EQ N1 > Ayato E N15 > Yelan E

Citlali’s Cryo application is not fast enough to override the Pyro aura applied by Xiangling’s Burst, so she is a good shielder and buffer for this Mualani Vape team. With her A1 and A4 Passive, Itzpapa will enter the Opal Fire state so make sure to time that to rotations where you use Xiangling’s Burst.
Sample Rotation (Simple / AoE)
Mualani N1 > Kazuha tEP / Sucrose ED > Citlali E > Xiangling Q E > Mualani E Combo (Q / N1C)1
1Use Burst when available. Otherwise, use N1C.
Sample Rotation (Single-Target)
Mualani N1 > Kazuha tEP / Sucrose ED > Citlali E > Xiangling E N2 > Kazuha Q / Sucrose Q > Mualani E Combo N1 > Kazuha tEP / Sucrose ED > Citlali E > Xiangling Q E > Mualani E Combo Q

Similar to the team above, Citlali performs well as a support who provides Wriothesley a shield and the buffs from 4pc Scroll and TTDS / Starcaller’s Watch. However, Citlali’s off-field Cryo application, which happens every other rotation, can interfere with Wriothesley’s Melt. Avoid this by not using a jump or dash cancel while her off-field application is present.
Do not Burst with Citlali in this team.
Sample Rotation
Bennett Q E > Xiangling Q E > Citlali E > Wriothesley E Combo (Q)1 > Bennett E > Xiangling catch particles > Bennett N2
1Burst when available
Credits
baloopy, acerbus114, caramielle., haafr, caxia5, vorpalraven, pjeljr, lostguide, Lesternberne, mystathi, jamccleskey
Team images made with the KQM portrait generator.