Updated for Version 4.2

A Candace Guide
by Athena#2444
Welcome, weary Traveler from afar. Nights in the desert are cruel. You should rest here tonight. Sleep soundly, and know that I am watching over you.
Table of Contents
Introduction
Candace is our first Hydro Polearm character and the first unit who provides Hydro Infusion for melee characters. Her unique kit enables creative new options for various team compositions. This guide will go in-depth about Candace’s kit, helping you explore and better understand her best weapons, best artifacts, best teams, synergies, Talents, Constellations, and more!
TL;DR
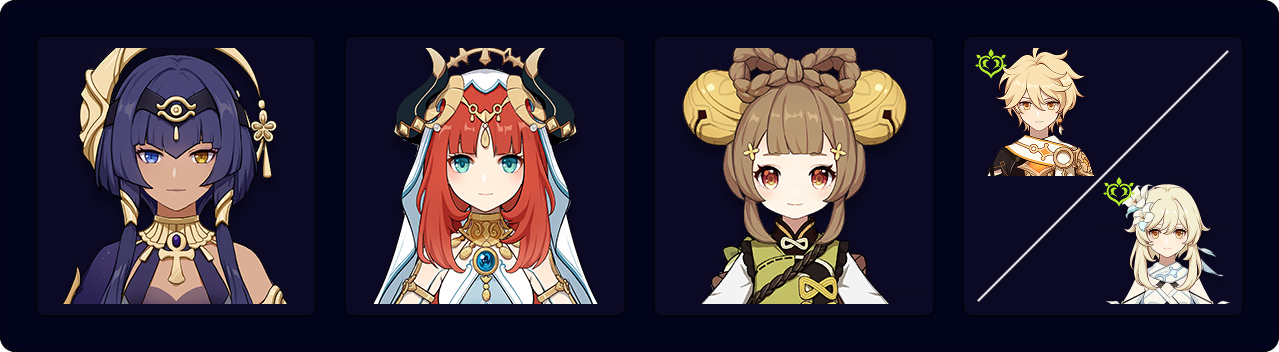
Support
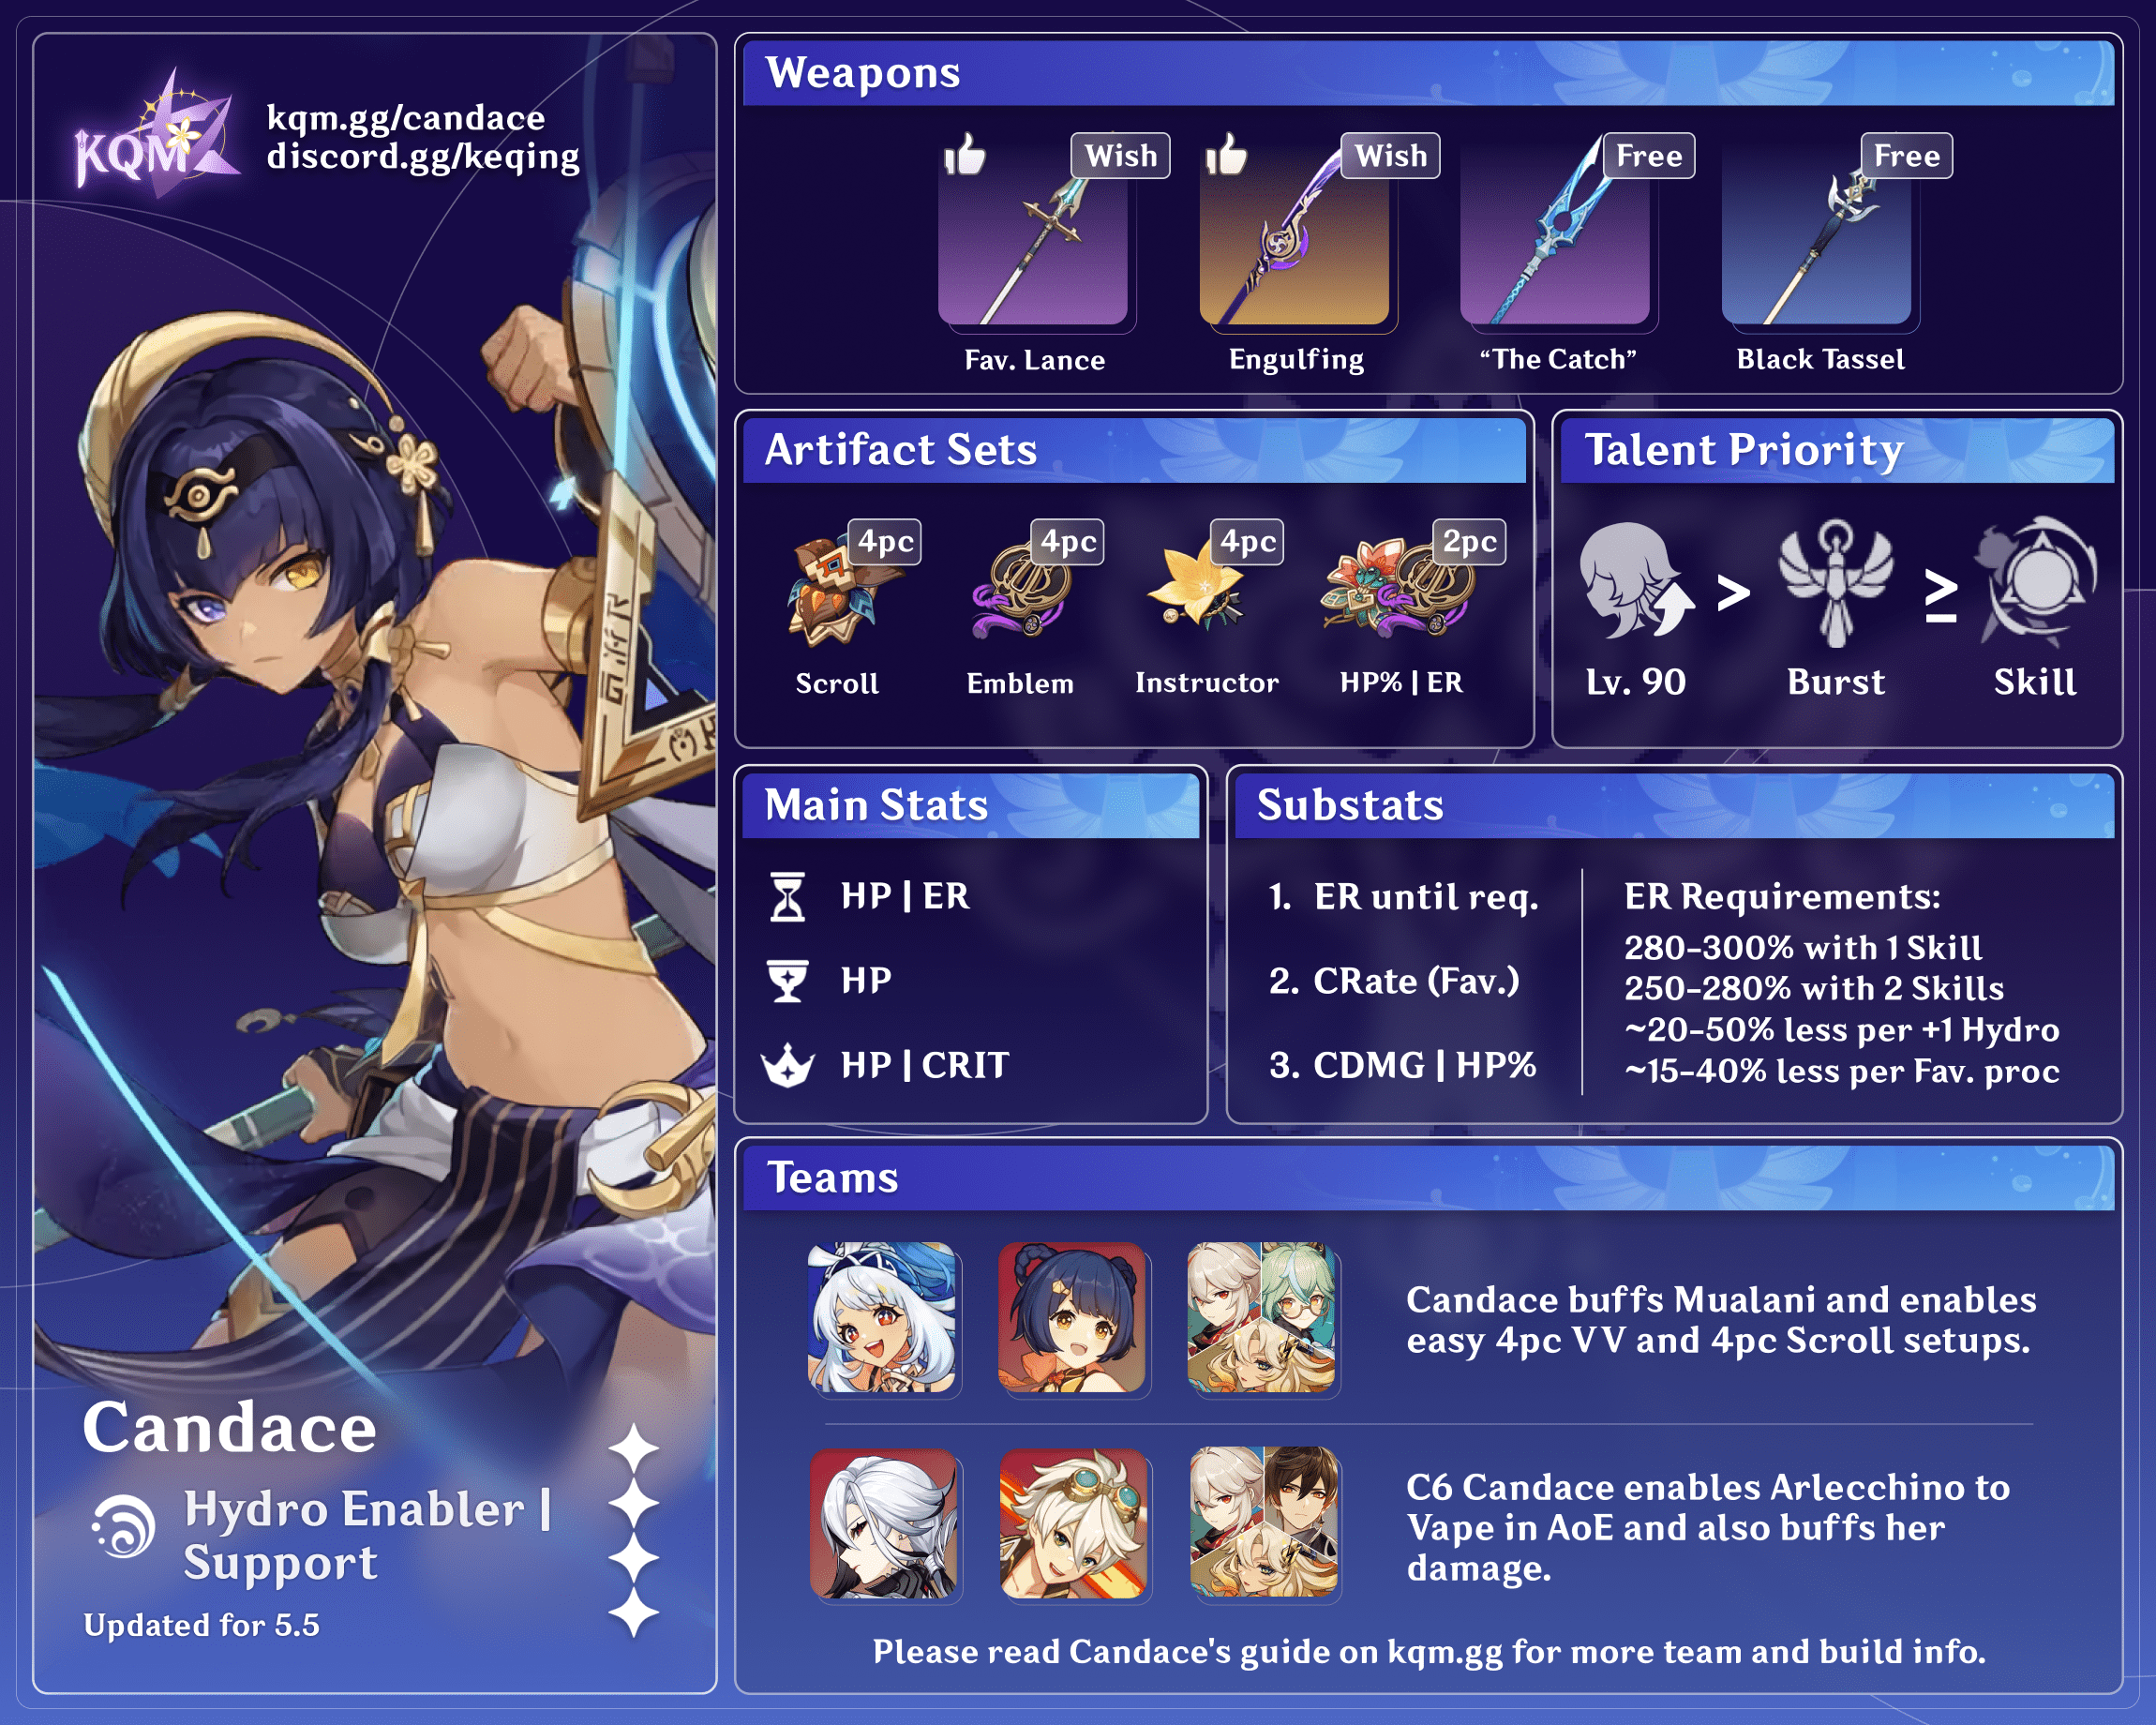
Credits to: euphorysm, icedsquid, nova_licious, and KQM Staff
On-Field DPS
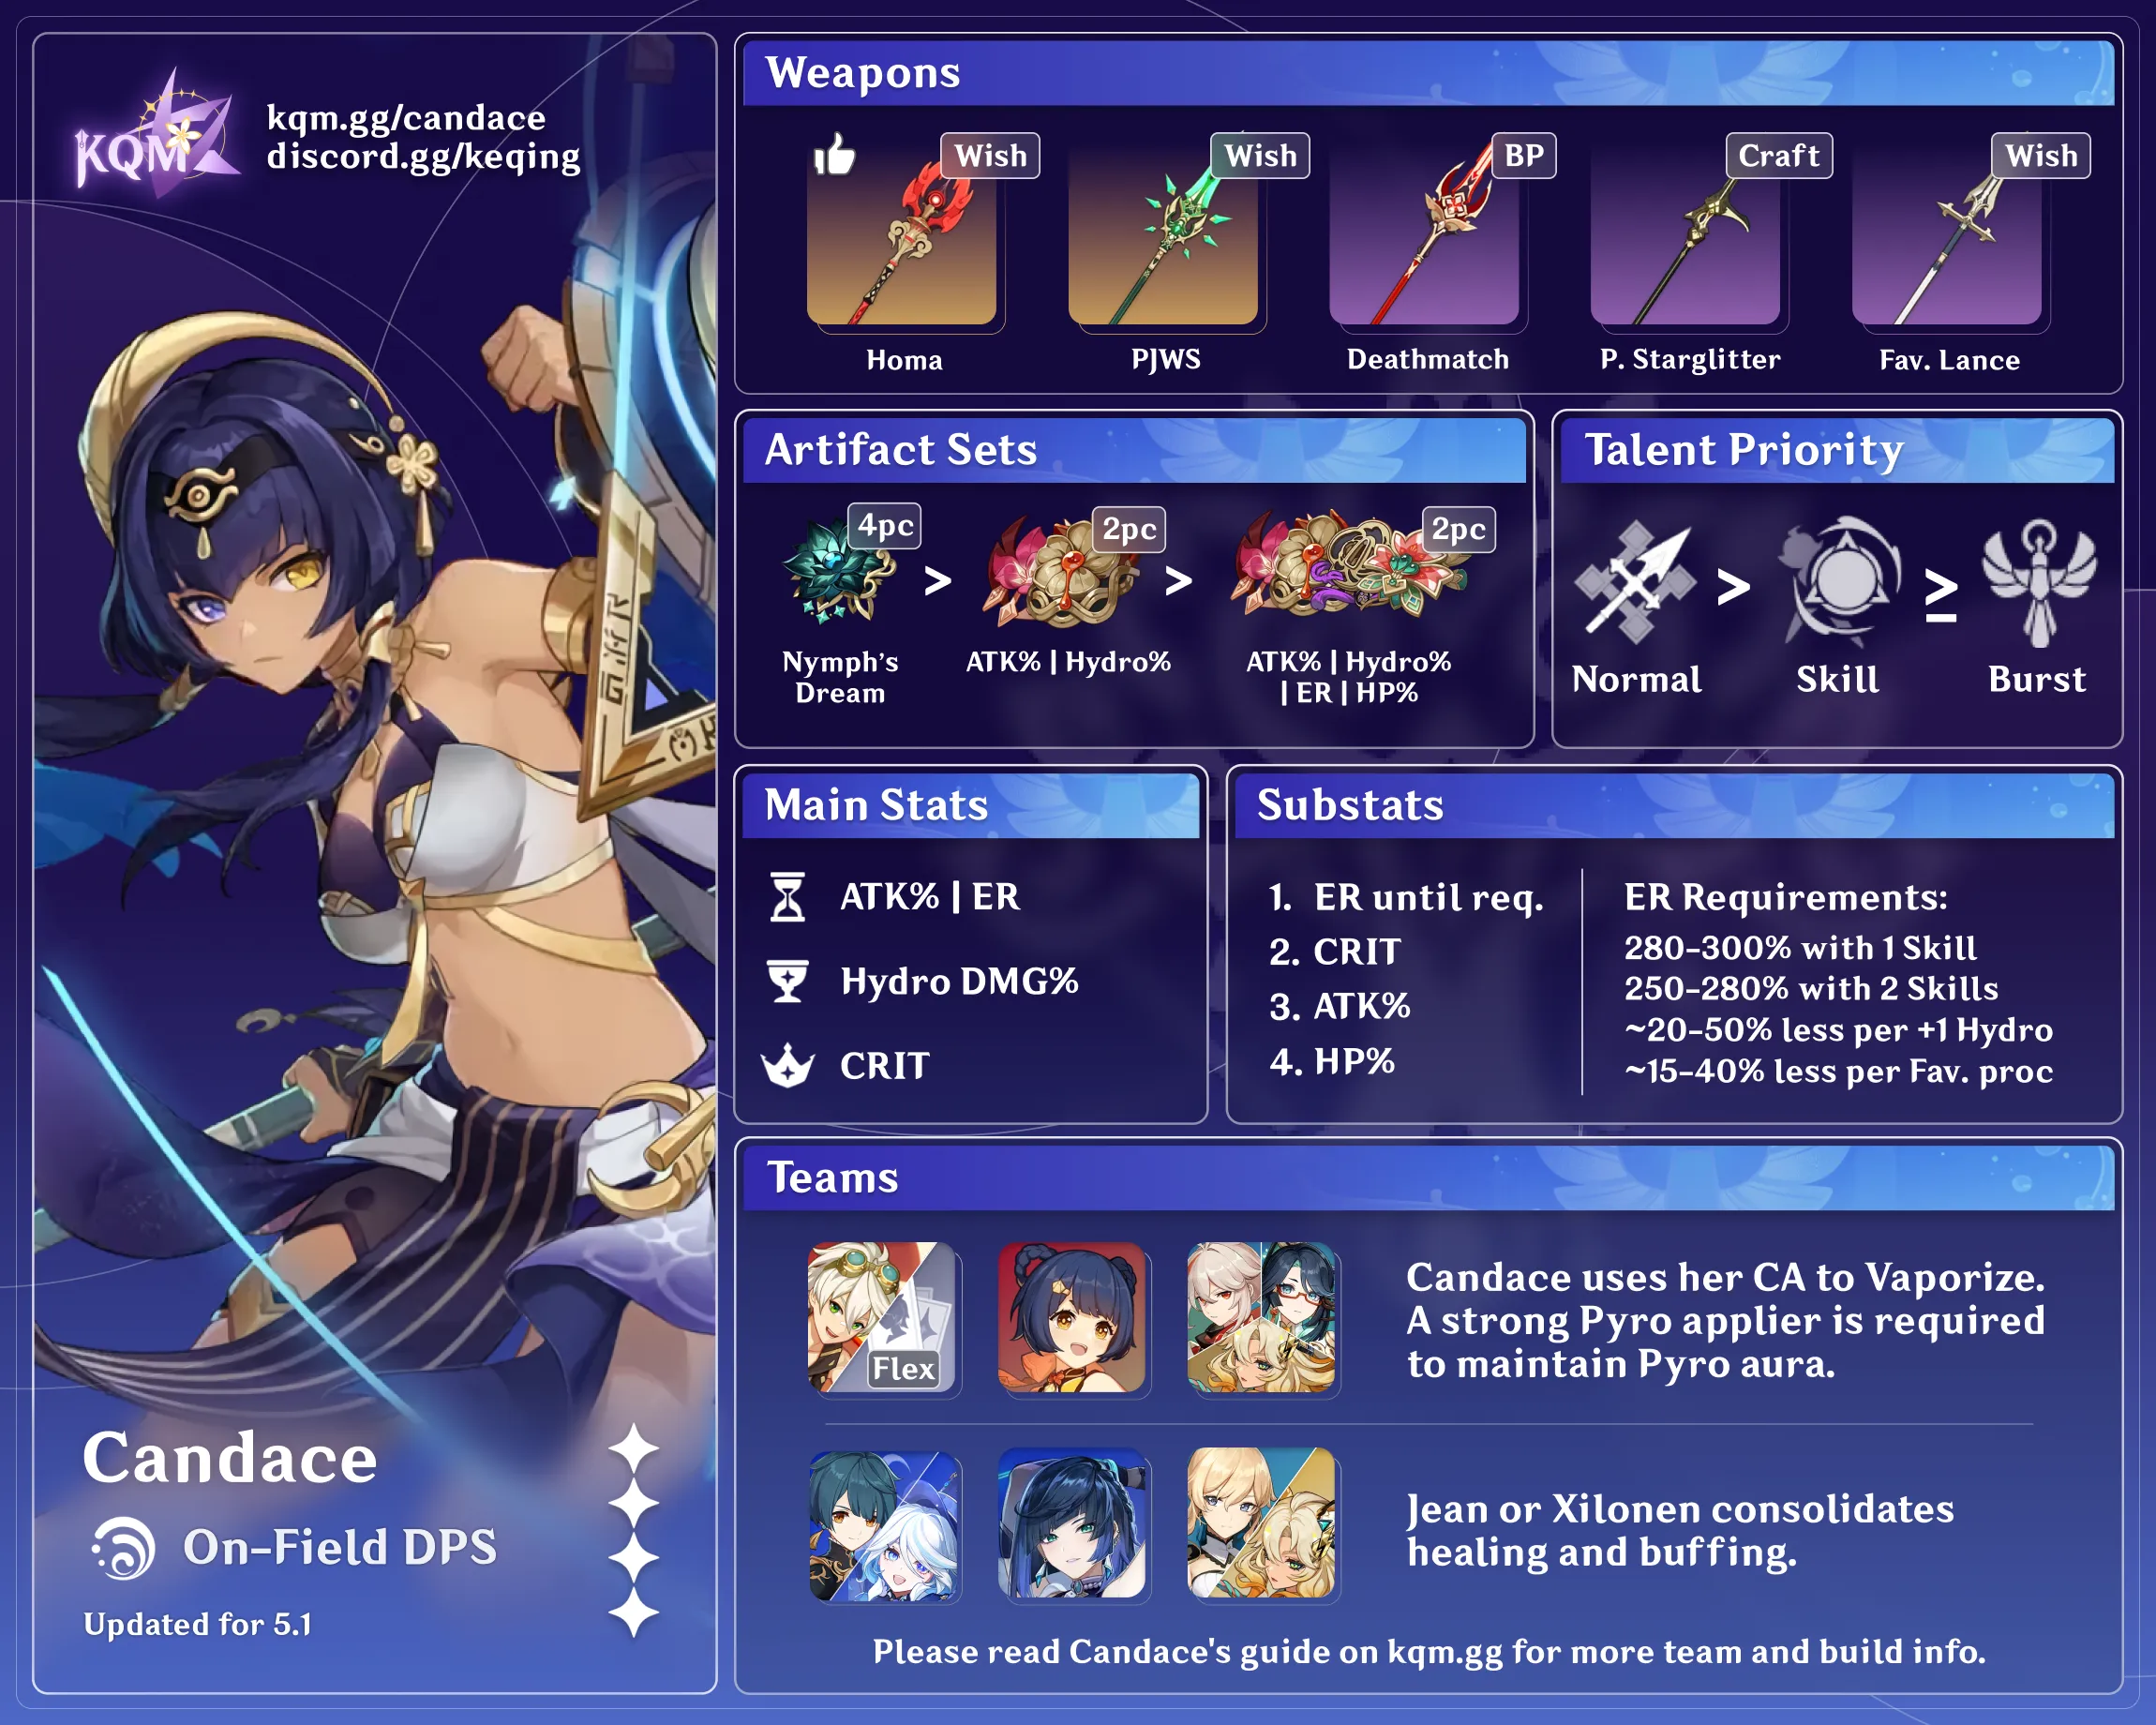
Credits to: euphorysm, icedsquid, nova_licious, and KQM Staff
Bloom DPS
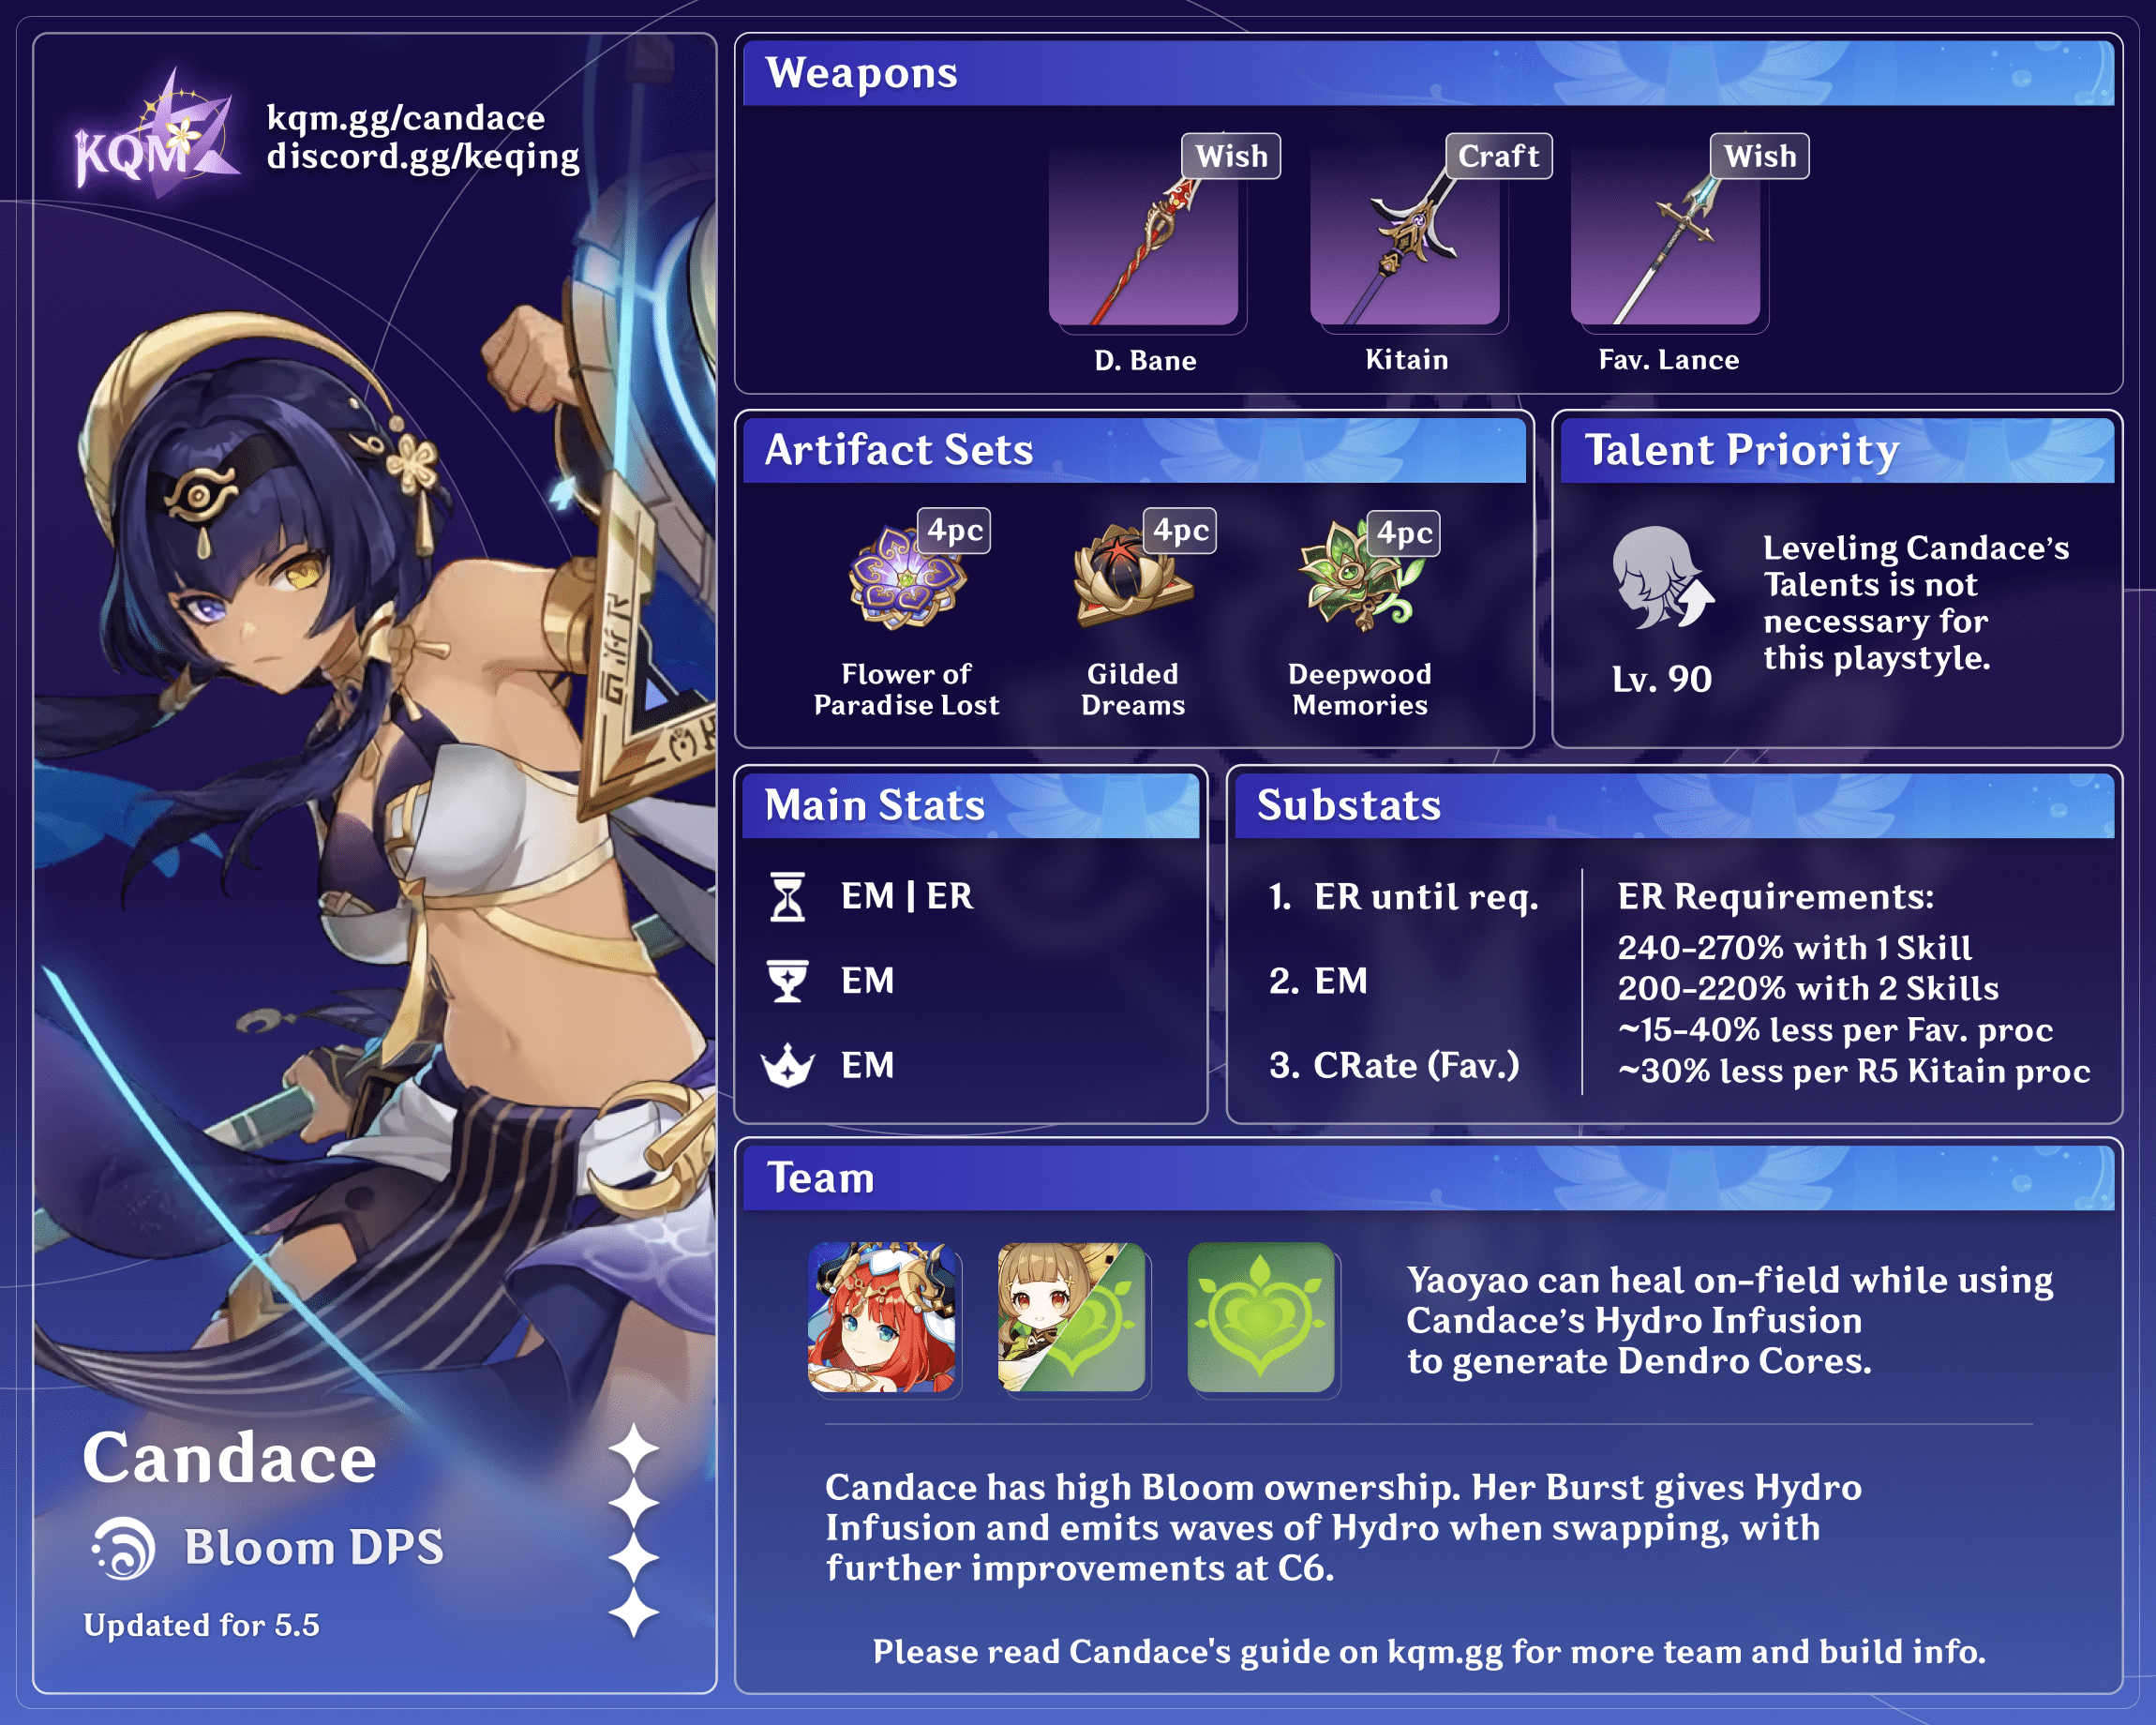
Credits to: euphorysm, cuppacote, haafr, madeofseaglass, and KQM Staff
Glossary
General Terms
| C# | Constellation Level # |
| A# | Ascension Level # |
| R# | Weapon Refinement Level # |
| On-field | Active character |
| Off-field | Non-active character |
| EM | Elemental Mastery |
| ER | Energy Recharge |
| AoE | Area of Effect. Refers to abilities that can affect multiple targets at once. |
| BiS | Acronym for “Best-in-Slot” — the best available equipment for a character. This doesn’t mean “this character can use the equipment to its fullest potential,” but instead, “this equipment is currently the best available for the character.” |
| Snapshot | When an ability snapshots, it uses the stats of the character at the time of cast throughout the whole duration, regardless of whether the character gains/loses buffs during that time. The opposite of this is dynamic. A list of all snapshot/dynamic abilities as well as more information about snapshotting can be found here. |
| Aura | When an enemy is not affected by any Element, the next Elemental application to hit them will apply an aura of that Element. More information here. |
| ICD | Internal Cooldown, generally referring to the timer that limits Elemental application — a Skill with no ICD can apply the Element every usage, while one with a 2.5s ICD can only apply the Element once every 2.5 seconds. You can read more about ICD here. |
| Elemental Infusions | Elemental Infusion changes the damage from the Normal, Charged, and Plunging Attacks of a Sword, Claymore, or Polearm user into Elemental damage. |
| Elemental Conversions | Conversions replace a character’s Normal, Charged, and Plunging Attacks with a different set of Elemental attacks, which cannot be overridden by Elemental Infusions. |
Combo Notation
| E | Elemental Skill |
| Q | Elemental Burst |
| NA | Normal Attack |
| N# | Number of Normal Attacks |
| C | Charged Attack |
| P | Plunging Attack |
| hP | High Plunge |
| D | Dash Cancel |
| #[Combo] | Number of times to perform that combo |
Artifact & Weapon Abbreviations
| TotM | Tenacity of the Millelith. An artifact set whose 2-piece set bonus increases the holder’s HP% by 20% and 4-piece set bonus increases the ATK% of all nearby party members by 20% when an Elemental Skill hits an opponent. |
| VV | Viridescent Venerer. An artifact set known for its 4-piece set bonus which decreases enemies’ Elemental RES by 40% to the Element Swirled. |
| TTDS | Thrilling Tales of Dragon Slayers. A 3-star Catalyst that provides a 48% ATK buff (at Refinement Rank 5) to the next character swapped into by the holder of this weapon. |
Types of Playstyles
| ADC | Acronym for builds using an ATK% Sands, Elemental DMG% Goblet, and CRIT Rate/CRIT DMG Circlet. |
| Driver | The on-field character who triggers abilities such as Xingqiu’s Rain Swords, Beidou’s Lightning discharges, and Fischl’s C6, usually by Normal Attacks. More information in the “Infusion Impact” section. |
| Fridge | Fridge teams utilize the (lack of) interaction between Dendro and Cryo. Since both auras can co-exist on a target, applying Hydro onto the enemy will trigger Freeze first, then reduce the amount of Dendro consumed when triggering Bloom (more info here). These teams focus on maximizing the number of Dendro Cores created, which you can further react with Pyro or Electro. Alternatively, you can just use Bloom by itself, since Dendro Cores will automatically explode when there are more than five of them on the field. |
| Quickbloom | This team slots a character with slow Hydro application into an otherwise Quicken-based team (Aggravate and Spread) to allow for the production of Dendro cores while still maintaining Quicken uptime. These Dendro cores are then typically used to trigger Hyperbloom by an Electro character suited to the role. More info in the Quickbloom section. |
| Quickswap | A playstyle where you constantly swap between characters with low cooldowns and low field time requirements. |
| Sunfire | A unique interaction between Bennett’s and Jean’s Bursts. As Bennett’s Burst continuously self-applies Pyro and Jean’s Burst continuously self-Swirls, the enemy will constantly be applied with Pyro through Swirl until either Burst expires. In this case, Jean would build triple EM instead of ADC to maximize the Pyro Swirl DMG. |
FAQ
Why should you play Candace?
Pros
- Unique kit with Hydro Infusion (see below).
- Cheap to build, with many artifact and weapon choices.
- F2P friendly.
- Flexible field time.
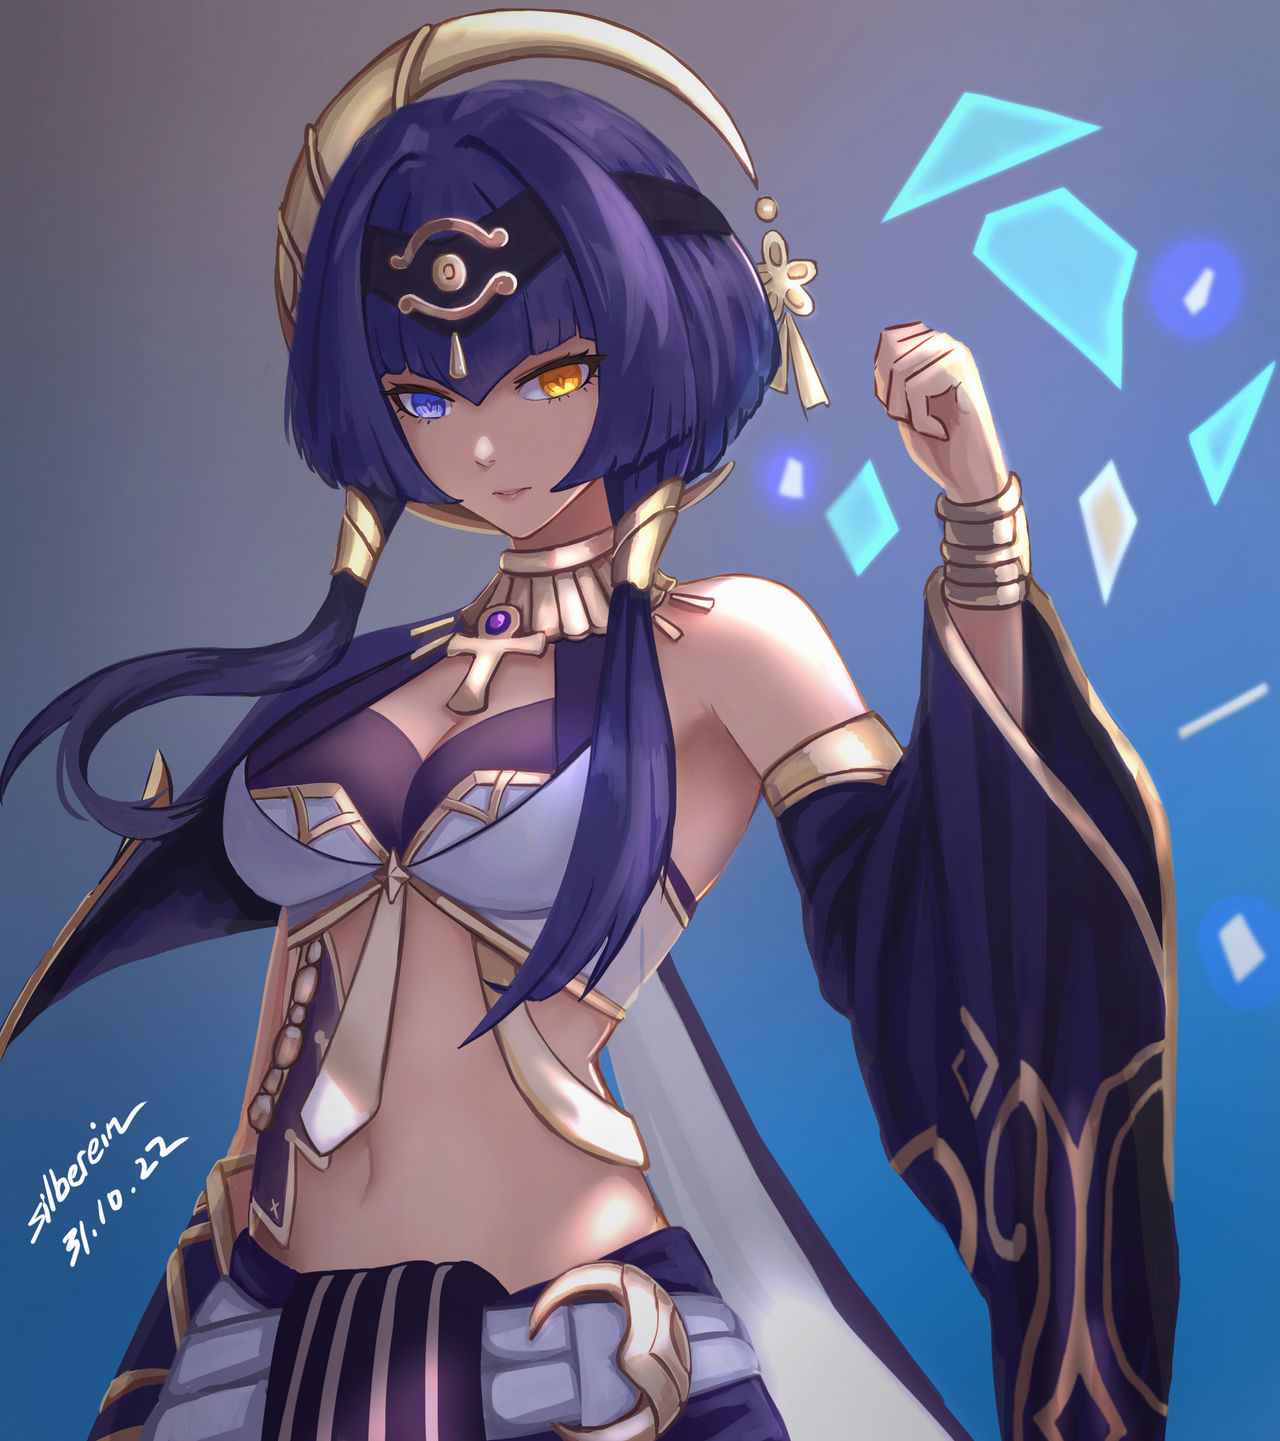
- Her heterochromia looks extremely cool.
Cons
- Energy-hungry.
- Split scaling between her Normal Attacks and Skill / Burst.
- Low personal damage.
- Wants Constellation 1 and 6 to reach her full potential.
Hydro Infusion — should you use it?
It’s hard to evaluate the power of external Elemental Infusions, since they both open up new team compositions and restrict others. One simple yet widespread example is Bennett’s C6, where his Pyro Infusion will elevate certain Pyro teams while destroying his synergy with some Physical teams.
On top of that, characters who desire specific Elemental Infusions often have their own from their Talents (e.g. Hu Tao’s Skill), making external Elemental Infusion a possible disruption instead. Nevertheless, if you can build around the Infusion, the benefits will outperform the drawbacks. Unlike Bennett, Candace is built around her Hydro Infusion, so any team that doesn’t want Hydro Normal Attacks should simply not run her.
Candace vs. Yun Jin?

- Enables Hydro Resonance.
- Provides Hydro Infusion.
- Has higher personal damage.
- Gives decent NA DMG%.
- Has a 10s duration at C0, 13 at C1+.

- Enables Geo Resonance.
- Doesn’t provide Infusion.
- Has lower personal damage.
- Gives Additive Base DMG Bonus, Attack SPD, and some minor NA DMG%.
- Has a 12s duration and a 30-hit quota limit.
Talents
A shield is not enough to protect the most important things. That’s why I must also wield a spear.
 Normal Attack | Gleaming Spear: Guardian Stance
Talent Description
Normal Attack
Performs up to 4 consecutive spear strikes.
Charged Attack
Consumes a certain amount of Stamina to lunge forward, dealing damage to opponents along the way.
Plunging Attack
Plunges from mid-air to strike the ground below, damaging opponents along the path and dealing AoE DMG upon impact.
Candace’s Normal Attacks are relatively standard and should not be leveled if you are playing her as anything other than an on-field damage dealer (which is not her best role). This is also the only part of her kit that scales with ATK and not HP; usually, it’s not worth sacrificing both your resources and her Skill and Burst damage for slightly larger Normal Attack numbers. If you insist on using them, however, N3D is her best combo.
It is worth mentioning that Candace’s N2 is a Blunt Attack — it functions similarly to a Claymore user’s attack. This speeds up mining in the overworld and shatters Frozen enemies (which will be discussed more in the Teams section).
 Elemental Skill | Sacred Rite: Heron’s Sanctum
Talent Description
Candace’s fighting style is capable of warding off an entire tide of foes.
Tap
Rushes forward with her shield, dealing Hydro DMG to opponents in front of her.
Hold
Raises her shield to block incoming attacks from nearby opponents, forming a barrier that absorbs DMG based on her Max HP and absorbs Hydro DMG 250% more effectively. This barrier lasts until the Elemental Skill is unleashed.
After holding for a certain period of time, Candace will finish charging, and when the Skill button is released, the Skill duration expires, or when the barrier is broken, she will perform a leaping strike that deals Hydro DMG to opponents in front of her.
Candace’s Tap Skill should be your preferred option in almost every situation since the damage difference between her Tap and Hold Skill is generally negligible.
Candace’s Hold Skill generates one more particle than her Tap version, but takes almost 3 times longer. Due to its long cast time, this variation is generally not recommended to use, apart from in specific rotations. Oddly enough, Candace’s Skill does NOT count as a shield despite its similar wording to other Talents such as Beidou’s Skill. Thus, if you use weapons or artifacts with shield-related effects such as Vortex Vanquisher or Retracing Bolide, you must have an external shielder on your team to take advantage of such buffs.
Candace’s Skill is also a Blunt attack — it will also speed up mining and shatter Frozen enemies.
Similar to Yun Jin and Beidou, Candace will instantly release a Hold Skill if she gets hit at the same time she casts her Tap Skill after Ascension 1.
Candace Perfect Counter Example by Aftermath
 Elemental Burst | Sacred Rite: Wagtail’s Tide
Talent Description
Raising her weapon on high, Candace calls upon a divine blessing that deals AoE Hydro DMG based on her Max HP and continuously confers the Prayer of the Crimson Crown on your active character.
Prayer of the Crimson Crown
This effect has the following properties:
- Characters deal increased Elemental DMG with their Normal Attacks.
- Whenever a character takes the field, they will unleash a rippling wave of water that deals Hydro DMG to nearby opponents. There is a limited number of waves that can be triggered in the duration of this Skill.
- Sword, Claymore, and Polearm characters under this effect will obtain a Hydro Infusion.
Candace’s Elemental Burst is her bread and butter, providing Hydro Infusion, NA DMG Bonus, and Hydro damage when swapping. At C6, Candace’s Burst can provide additional Hydro application every 2.3s. Note that Candace’s Infusion follows the trigger ICD of the active character, but you can front load it by weaving Normal Attacks between continuous swaps. For a more in-depth view, please refer to the “Infusion Impact” section.
 Ascension 1 Passive | Aegis of Crossed Arrows
Talent Description
If Candace is hit by an attack in the Hold duration of Sacred Rite: Heron’s Sanctum, that Skill will finish charging instantly.
Candace’s Ascension 1 Passive allows her to perform a Hold Skill with a shorter cast time. However, pre-C4, it sometimes interferes with rotations due to the longer Skill cooldown. This can be solved by swiping your credit card to get her C4 forgoing this Passive and tapping the Skill button very quickly. An example by Aftermath can be found here.
 Ascension 4 Passive | Celestial Dome of Sand
Talent Description
Characters affected by the Prayer of the Crimson Crown caused by Sacred Rite: Wagtail’s Tide will deal 0.5% increased DMG to opponents for every 1,000 points of Candace’s Max HP when they deal Elemental DMG with their Normal Attacks.
This is a nice addition to her Burst. Combining the Passive with the base 20% NA DMG bonus results in a total 30% to 40% more NA DMG% for the main active character.
 Utility Passive | To Dawn’s First Light
Talent Description
Decreases climbing Stamina consumption for your own party members by 20%.
Not stackable with Passive Talents that provide the exact same effects.
A nice bonus for world exploration; shared with Xiao.
Constellations

I will always seek to protect the things that are most important, no matter what it takes… even when it looks futile.
 Constellation 1 | Returning Heiress of the Scarlet Sands
The duration of Prayer of the Crimson Crown effect triggered by Sacred Rite: Wagtail’s Tide is increased by 3s.
This Constellation doesn’t directly increase her damage, but the 33% increased buff uptime and Hydro application allow for more flexible rotations, indirectly leading to a higher damage output.
 Constellation 2 | Moon-Piercing Brilliance
When Sacred Rite: Heron’s Sanctum hits opponents, Candace’s Max HP will be increased by 20% for 15s.
Basically a free and almost permanent 20% HP buff in almost every team comps, since Candace should use her Skill before Burst at least once per rotation.
 Constellation 3 | Hunter’s Supplication
Increases the Level of Sacred Rite: Wagtail’s Tide by 3.
Maximum upgrade level is 15.
A simple and minimal Burst damage increase.
 Constellation 4 | Sentinel Oath
Shortens the Hold CD of Sacred Rite: Heron’s Sanctum to be the same as that of the Tapping CD.
This is largely a quality of life Constellation, allowing you to use 2 Skills in 15 seconds, no matter which variation. Your rotations will no longer be ruined by accidental perfect counters.
 Constellation 5 | Heterochromatic Gaze
Increases the Level of Sacred Rite: Heron’s Sanctum by 3.
Maximum upgrade level is 15.
A simple and minimal Skill damage increase.
 Constellation 6 | The Overflow
When characters (excluding Candace herself) affected by the Prayer of the Crimson Crown caused by Sacred Rite: Wagtail’s Tide deal Elemental DMG to opponents using Normal Attacks, an attack wave will be unleashed that deals AoE Hydro DMG equal to 15% of Candace’s Max HP.
This effect can trigger once every 2.3s and is considered Elemental Burst DMG.
This is Candace’s most noticeable Constellation, providing more personal damage and Hydro application, the latter of which can make huge differences in certain team compositions (e.g. ensure Hydro aura for Hu Tao with Yelan, create more Bountiful Cores in Nilou Bloom and create more Dendro Cores for Hyperbloom in Quickbloom teams). Keep in mind that Candace herself cannot proc this Constellation while driving on-field. Therefore if players need more Hydro application, another character driving would be more optimal.
Playstyles and Gearing
When I received my Vision, people in the village kept telling me it was a blessing from Ahmar… but that doesn’t matter to me. I swore to protect the village, and I will do it with or without a Vision.
Candace’s many uses can be sorted into two major categories: on-field and off-field. Although she has split scaling, the overall team damage difference between either build is negligible. In quickswap teams or in teams where you have a dedicated driver, an off-field build would be more favored.
Note: When playing Candace in either Nilou or Fridge teams, building her with EM gains more value compared to other builds due to her high Bloom ownership. As always, using Genshin Optimizer (GO) is the way to go if you are trying to min-max the potential of a character, including Candace.
ER Requirements
Candace’s Burst is the core of her kit; therefore, having enough ER to Burst off cooldown is very essential. Her Skill only generates 2 to 3 Hydro Particles per Skill use and, due to her lack of personal damage, it is not advisable to funnel particles to her. Thus, her ER requirements are quite high for a 60 Energy Cost character. If possible, using 2 Skills per Burst is highly recommended to reduce her high ER requirements.
Zakharov’s Energy Recharge Calculator is recommended to figure out how much ER Candace needs in your specific team comp.
| Solo Hydro | Double Hydro | Triple Hydro | |
| 1 Skill Use | 280–300% | 240–270% | 200–220% |
| 2 Skill Uses | 250–280% | 200–220% | 170–185% |
General ER requirements for a 20-second rotation.
- Each Favonius proc will further reduce Candace’s ER requirements by 15 – 25% if she doesn’t receive the particles, and 20 – 40% if she receives them.
- Each R5 Kitain Cross Spear proc will reduce Candace’s ER requirements by ~30%
- Each set of particles Candace receives through her Tap Skill will reduce her ER requirements by 20 – 25%, and by 30% from Hold Skill.
On-Field Builds
On-field Candace will dish out most of her damage with her Hydro-infused Normal Attacks, with the addition of some Skill damage. Note that she cannot proc her own C6 when on-field.
Pros
- Decent driver
- Has a special Blunt Attack
- Lower ER requirements
- She looks gorgeous
Cons
- Relatively low damage output
- Cannot proc C6
On-Field Talent Priority
> ≥
Normal Attack > Skill ≥ Burst
On-Field Weapons
Note that 5-star weapons are not required for Candace and may be better utilized by other characters.
Assumptions: KQMS, 4-piece Heart of Depth, 180% ER with 2nd Hydro, Combo: E > Q > N3D > N3D > N2E > N3
Please refer to the mastersheet for more precise numbers.
 Staff of Homa R1 608 Base ATK | 66.2 CD% | General BiS. Do note that it is not recommended to force Candace under 50% HP for the additional ATK buff. |
 Staff of the Scarlet Sands R1 542 Base ATK | 44.1 CR% | CRIT Rate stat stick. Even without focusing EM on Candace, the large amount of CR is substantial. |
 Primordial Jade Winged-Spear R1 674 Base ATK | 22.1 CR% | A contender for BiS, providing a decent amount of ATK% and DMG% through almost all of Candace’s Burst window. |
 Engulfing Lightning R1 608 Base ATK | 55.1 ER% | Its huge ER substat helps Candace meet her ER requirements, allowing for more offensive artifact options. |
 Vortex Vanquisher R1 608 Base ATK | 49.6 ATK% | ATK stick. As mentioned in the Talents section, Candace’s Skill does not create a shield. Still an okay option for its raw stats. |
 Deathmatch R1 454 Base ATK | 36.8 CR% | The best 4-star option in terms of personal damage. However, it is not recommended to get extra refinements from the Battle Pass just for Candace’s personal damage. |
 Calamity Queller R1 741 Base ATK | 16.5 ATK% | Another ATK stat stick, making an ATK% Sands even less valuable. |
 Skyward Spine R1 674 Base ATK | 36.8 ER% | A decent 5-star ER stat stick that boosts Attack SPD, leading to more hits during her Burst. |
 The Catch R5 510 Base ATK | 45.9 ER% | The best F2P option despite Candace being unable to proc her own C6. However, it is not recommended on Candace as there are other characters who utilize this weapon better. |
 Favonius Lance R5 565 Base ATK | 30.6 ER% | Arguably Candace’s 4-star BiS in terms of overall team damage. When driving, she can trigger the passive more than once at higher refinements, best at R3+ when Candace usually stays for around 12 seconds and can proc the passive twice, which can significantly reduce both her and her teammates’ ER requirements. |
 Prototype Starglitter R1 510 Base ATK | 45.9 ER% | Another F2P option for an ER Polearm with a decent passive. |
 White Tassel R5 401 Base ATK | 23.4 CR% | Great F2P option for damage and extremely cheap refinements. |
 Kitain Cross Spear R5 565 Base ATK | 110 EM | Great option if Candace Vaporizes her Normal Attacks and Skill. Also helps with her ER requirements. |
 Black Tassel R5 354 Base ATK | 46.9 HP% | Black Tassel is an inferior choice to White Tassel, despite the HP% increase contributing to her Ascension 4 buff. Also help Candace deal more damage when facing Slimes /hj. |
On-Field Artifacts
On-Field Artifact Stats
 Sands |  Goblet |  Circlet |
| ATK% | ER% | Hydro DMG% | CRIT Rate | CRIT DMG |
| An ER% Sands is always preferred if ER requirements are not met; otherwise, ATK% Sands can be used for more personal damage. | Hydro DMG% benefits all of her damage, including her Skill and Hydro-Infused Normal Attacks. | Adjust the Circlet’s main stat to keep a 1:2 CR:CD ratio. |
Note that Candace cannot proc either her Burst or her C6 damage when staying on-field; therefore, an HP% Sands is not recommended.
Due to most of her damage coming from her Normal Attacks, which scale with ATK, the substat priorities are:
Substat Priority
ER% (until requirement) > CRIT Rate = CRIT DMG > ATK% > HP% ≥ EM
On-Field Artifact Sets
Please refer to the mastersheet for more precise numbers.
4-piece Nymph’s Dream | Candace’s BiS option if ER requirements are met by increasing her Hydro DMG% after attacking. Not recommended to farm the set specifically for her due to the minimal damage increase compared to other options. |
4-piece Gladiator’s Finale / 4-piece Heart of Depth | Competitive alternative to 4pc Nymph’s Dream, with just a ~3-5% DPS loss at equal substats. |
2-piece combinations (ATK%, Hydro DMG%, ER%, HP%) | Any 2-piece combinations of these sets can be strong options, provided they have good substats. |
Off-Field Builds
Off-field Candace offers NA DMG Bonus to the active character and deals AoE Hydro application when swapping between characters. The difference between building off-field Candace as a pure Hydro support with more NA DMG Bonus and a Hydro Burst DPS is almost non-existent before C6. At C6, an [HP or ER] / Hydro DMG / CRIT build is more recommended for a balance between damage and buffing.
Pros
- Needs little field time
- Enables better drivers
- Allows proccing her C6
Cons
- Higher ER requirements
- Ignores her special Blunt Attack
Off-Field Talent Priority
≥ >
Burst ≥ Skill > Normal Attack
Off-Field Weapons
Note that 5-star weapons are not required for Candace and may be better utilized by other characters.
Assumptions: KQMS, 4-piece Emblem of Severed Fate, 180% ER with 2nd Hydro, Combo: E > Q
Please refer to the mastersheet for more precise numbers.
Staff of Homa R1 608 Base ATK | 66.2 CD% | Off-field Candace’s BiS option, providing both CRIT and HP%. |
Staff of the Scarlet Sands R1 542 Base ATK | 44.1 CR% | Competitive with Staff of Homa. The higher CRIT value compensates for the useless passive. |
Skyward Spine R1 674 Base ATK | 36.8 ER% | A decent 5-star ER stat stick that helps you reach Candace’s ER requirements. |
Engulfing Lightning R1 608 Base ATK | 55.1 ER% | Its huge ER substat helps Candace meet her ER requirements, allowing for more offensive artifact options. |
Primordial Jade Winged-Spear R1 674 Base ATK | 22.1 CR% | Off-field Candace mainly scales with HP; however, the CRIT substat is still useful. |
The Catch R5 510 Base ATK | 45.9 ER% | The best F2P option for damage. However, it is not recommended since there are other characters who utilize this better. |
Prototype Starglitter R1 510 Base ATK | 45.9 ER% | Another F2P option for an ER Polearm with a useless passive — not worth refining, save your billets. |
Deathmatch R1 454 Base ATK | 36.8 CR% | The best 4-star option in terms of personal damage. However, it is not recommended to get extra refinements from the Battle Pass, especially since off-field Candace does not benefit much from ATK% |
 Wavebreaker’s Fin R5 620 Base ATK | 13.8 ATK% | Strong if Candace can meet her ER requirements through artifacts alone. Its passive buffs Candace’s Burst and C6, which is her main source of damage. Nevertheless, it is not recommended to pull for this weapon for Candace when it is locked behind the weapon banner gacha. |
Favonius Lance R5 565 Base ATK | 30.6 ER% | Arguably Candace’s 4-star BiS in terms of overall team damage. The passive helps her ER requirements significantly and can decrease team members’ ER needs as well. |
Kitain Cross Spear R5 565 Base ATK | 110 EM | A notable choice to reduce Candace’s ER needs, especially when combined with 4pc The Exile to reduce the rest of the team’s ER demands. The weapon also provides EM if she is the main Bloom trigger. |
 Moonpiercer R5 565 Base ATK | 110 EM | An option to buff other teammates in some Dendro – Transformative Reaction related teams such as Quickbloom; also viable for Fridge. |
Black Tassel R5 354 Base ATK | 46.9 HP% | Extremely cheap F2P option, increasing Candace’s NA DMG Bonus buff. |
 Rightful Reward R5 565 Base ATK | 27.9% HP | Alleviates Candace’s ER problem, but needs a healer in the team for the passive to proc. High ATK is often useless for off-field Candace, but the HP% substat does help with her NA DMG Bonus. |
Off-Field Artifacts
Off-Field Artifact Stats
You can get away with triple HP main stats for cheap investment, but with higher investment and/or Constellation 6, Hydro DMG% + CRIT should give better results.
Sands | Goblet | Circlet |
| HP% | ER% | Hydro DMG% | HP% | CRIT Rate | CRIT DMG | HP% |
| An ER% Sands is always preferred if ER requirements cannot be met. Otherwise, use an HP% Sands for more personal damage and buffs. | Using a Hydro DMG% Goblet lets her deal more damage, while an HP% one provides a greater NA DMG% buff to the on-field character. | CRIT Circlet is the default choice, but a good HP% Circlet can also be an alternative. CRIT Rate is important if Candace wields Favonius Lance. |
Most of her damage comes from her Skill and Burst, which scale with HP, so the substat priority is as follows:
Substat Priority
ER% (until requirement) > CRIT Rate (for Favonius) ≥ CRIT DMG > HP% > ER = EM
Off-Field Artifact Sets
Please refer to the mastersheet for more precise numbers.
4-piece Emblem of Severed Fate | Her BiS set for dishing out most of her damage, with a useful +20% ER from the 2-piece set bonus. |
4-piece Noblesse Oblige | BiS option for buffing ATK% to teammates with high buff uptime, provided Candace meets her ER requirements to Burst off cooldown. |
2-piece combinations (Hydro DMG%, HP%, ER%, Burst DMG%) | Any 2-piece combinations of these sets can be strong options for Candace’s personal damage, provided they have good substats. |
4-piece Gilded Dreams / 4-piece Flower of Paradise Lost | These sets are used specifically in either Fridge or Nilou Bloom team comps where Candace has decent Bloom ownership. In this scenario, the goal is to maximize EM while still having enough ER to Burst off cooldown. CR substats are required if equipping Favonius Lance. |
4-piece Deepwood Memories | Use this set if the team needs Dendro RES Shred but the other teammates have better artifact options (like DMC with 4pc Flower of Paradise Lost in Nilou Bloom). However, this is unlikely to happen since, at the time of writing, most Dendro characters synergize with this set better than Candace does. |
4-piece Instructor | This set drastically buffs reaction-based team compositions. However, 4-star artifacts suffer from fewer stats overall, sacrificing some damage and making it harder to reach ER requirements. The Instructor buff can be worth it, but a 5-star ER Sands is highly recommended. |
4-piece The Exile | Similar to 4pc Instructor, this set provides less damage but more utility for the team, in this case lowering teammates’ ER requirements and allowing them to build more offensively. Again, a 5-star ER Sands is practically a must here. |
Synergies
I’d really love to look into your future with my amber eye, if I could… Something tells me everything would be golden… somewhere between the color of sunlight and honey. A color filled with hope. Your journey will be a smooth road ahead. I give it my blessing.
Infusion Impact
How does Infusion work?
Elemental Infusions function by applying an Elemental aura onto the player’s weapon. When multiple Infusion abilities are used at once, there are multiple factors that will affect how they “react” and which Infusion overrides, and that’s what makes Infusion confusing but also interesting.
- Infusion Frequency: Certain characters re-apply their Infusions at fixed intervals (e.g., Candace, Bennett), while others apply them only once and don’t re-apply (e.g., Kamisato Ayaka, Keqing). Infusion sources with higher frequencies are more likely to take over. For Candace, the frequency is quite high at one tick every 0.5s.
- Infusion Duration: Duration per application affects rotations and gameplay when you intend to make use of the Infusion. For Candace, her Hydro Infusion lasts 1s for each instance it is re-applied. This, combined with her Infusion Frequency, makes the total Hydro Infusion time 10s at C0 and 13s at C1 onwards — 1s longer than what is written in the Talent description.
- Reaction Cost: As with Elemental Gauge Theory of normal reactions, “reactions” caused by multiple Infusions on the same weapon also have different aura costs depending on the Reaction Coefficient (which can be found here). This is one of the reasons why Candace’s Hydro Infusion overrides Bennett’s Pyro Infusion, and why Candace and Ayaka can have a pretty Frozen Sword.
Note that Infusion cannot override nor react with Elemental Conversions (Hu Tao, Itto, Xiao) because Conversions do not apply an Elemental aura on the active character’s weapon.
Driving
What is driving?
A driver is marked by their ability to proc other units’ abilities, usually on Normal Attacks and usually to trigger reactions. For example, in a team of Sucrose, Xingqiu, Fischl, and Beidou, Sucrose is the on-field driver who triggers Xingqiu’s Sword Rain attacks, Beidou’s Stormbreaker lightning discharges, and Fischl’s A4 and C6.
Most of the time, the Normal Attack damage of drivers is irrelevant, since their purpose is to proc the high-damaging abilities of other characters. Moreover, the character’s Normal Attacks usually deal Physical damage (with the exception of Catalyst users) and usually do not synergize well with their Goblet of choice.
With Candace’s Hydro Infusion, the triggered abilities can interact with the Hydro application, allowing additional Hydro Reactions, and for drivers of the Hydro element, they can benefit from their Hydro DMG% Goblet. This opens up three options for drivers in Candace teams: Candace herself driving, a different Hydro character driving, or a non-Hydro character driving. They will all receive buffed NA DMG% as well.
Candace As On-Field Driver
When using Candace on-field to drive, her role will generally be to support your off-field units who will deal the majority of damage, rather than being a notable damage dealer herself. The benefit to this setup is that Candace can use Favonius Lance — potentially proccing its passive multiple times to lower team Energy requirements — and run 4-star sets like Instructor without Energy issues.
The general idea is to cycle through all your Bursts before Candace’s, do a short combo with her, swap to your other members to funnel mid-combo (which also procs her Burst waves), then go back to Candace to finish the rotation with another short combo.
Potential Drivers
Hydro Drivers
 Xingqiu Xingqiu | Xingqiu can further take advantage of his kit with Candace by staying on-field driving with Hydro-Infused Normal Attacks. This way, he can benefit from on-field buffs, and his NAs can benefit from his Hydro DMG% Goblet and his C2. |
Anemo Drivers
 Kazuha Kazuha | Hydro Normal Attacks help proc more Transformative Reactions and potentially more multi-Element Swirls. |
 Jean Jean | Jean usually acts as a great healing option while debuffing enemies with 4pc VV. By using her Normal Attacks with Candace, she can heal more with her Ascension 1 Passive and keep higher VV debuff uptime. Her kit also does not create many reactions beside Sunfire compared to other Anemo units, which can be improved with Hydro Infusion. |
Cryo Drivers
 Ayaka | Ayaka can Normal Attack before sprinting so that she can Freeze the enemies by dealing both Hydro and Cryo Normal Attacks. She also has a cool Cryo-infused sword by herself. |
 Kaeya | Similar to Ayaka; however, unlike Ayaka, Kaeya would not be losing any Elemental DMG Bonus. |
 Rosaria | Rosaria shares similar traits with Kaeya; however, she is worse than him at driving on-field because of her longer Normal Attack animations. |
 Chongyun | The special interaction between Candace’s Burst and Chongyun’s Skill allows the on-field character to use a Frozen weapon (which looks extremely cool), letting any enthusiast play their favorite driver with it. Do note that the Frozen weapon acts as a Cryo-infused weapon but cannot Freeze enemies by itself. Example by Mystathi |
Dendro Drivers
 Dendro Main Character (DMC) | DMC can fully take advantage of the Hydro Infusion to create Dendro Cores by staying on-field and attacking. This gives DMC more Bloom ownership in Fridge / Nilou teams, capitalizing on the fact that DMC wants to build EM. |
Yaoyao | In a Nilou Bloom team where healing is much needed, Yaoyao can stay on-field for her Burst’s healing the whole team while utilizing Candace’s Hydro Infusion to still trigger Blooms herself. |
Electro Drivers
 Razor | Within his Burst, Razor’s high Attack SPD allows him to apply Hydro quickly, and the simultaneous Electro damage makes him a good Electro-Charged driver or Hyperbloom trigger. |
Geo Drivers
 Zhongli | Zhongli’s incredible defensive kit has considerable utility when building team comps. Candace can also utilize his high Attack SPD for better Hydro application. |
Pyro Drivers
 Bennett | Bennett’s Tap Elemental Skill has a relatively low cooldown, allowing him to consistently Vaporize as well as provide Pyro Energy particles. Even if Bennett is C6, Candace’s Burst still overrides the Pyro Infusion, letting him Vape his Skills when weaving his Normal Attacks in between. |
 Diluc | Diluc can be paired with Candace for some fun team comps that involve using Hydro Normal Attacks to Vaporize his Skills or vice versa. Performance wise, there exist better characters that pair with Batman here. |
Normal Attack DPS Characters
Candace can be played as a Normal Attack buffer in teams where her Hydro Infusion is not a problem and you have an on-field unit who uses Normal Attacks as their primary source of damage. Attacks from Catalyst and Bow characters and some characters’ built-in Elemental Conversions cannot be overridden by Candace’s Elemental Burst, which can help avoid unwanted reactions. Hydro characters are able to actually benefit from the Hydro Infusion.
Hydro Normal Attack DPS
 Ayato Ayato | Although it seems viable to keep Ayato on-field while his Skill is on cooldown, this is not recommended due to his slow Normal Attack string. However, Candace’s Elemental Burst can still increase Ayato’s Normal Attacks empowered by his Elemental Skill. |
 Kokomi Kokomi | Kokomi acts as a great healing option. She provides ATK% to the team (through 4pc TotM and TTDS) and deals decent damage with 4pc Clam and her Burst’s Normal Attacks, which gets further buffed by Candace’s Burst. Kokomi also greatly benefits from Hydro Resonance. |
Anemo Normal Attack DPS
 Wanderer Wanderer | In scenarios where Wanderer tends to use multiple Normal Attack strings, Candace can buff Normal Attacks, apply Hydro (at C6) for additional Swirls, and help Wanderer extend his field time with his Ascension 1 Passive. |
Cryo Normal Attack DPS
 Aloy | She is an outlier for Bow characters, where she benefits from the NA DMG increase and the additional Hydro instances from Candace’s C6 to Freeze enemies. |
 Wriothesley | Wriothesley appreciates Candace’s NA DMG Bonus. At C6, Candace also provides off-field Hydro application that helps with Freeze. |
Geo Normal Attack DPS
 Noelle | Assuming Geo Resonance is still applicable, Candace can be an alternative option to Yun Jin, especially in AoE content. While Candace might face some Energy problems as the sole Hydro unit, she can be swapped in to use Skills in between Noelle’s Normal Attack combos because Noelle’s Geo Conversion is not lost when swapping out. |
Pyro Normal Attack DPS
 Yoimiya | Yoimiya’s main source of damage comes from her Normal Attacks, which can be buffed by Candace’s Burst. However, Candace alone can not enable Yoimiya to Vaporize all of her attacks, even at C6. |
 Hu Tao | Most of Hu Tao’s damage comes from her Charged Attacks. However, Candace can still both directly buff her Normal Attacks and indirectly give Hydro Resonance for increased HP. C6 Candace with Yelan also provides enough Hydro for Hu Tao, freeing Xingqiu for another team. |
Off-Field Characters
Although not all characters benefit from Candace’s Hydro Infusion or Normal Attack DMG% buff, some characters still benefit from having Candace in the team by having exceptional synergy with the driver, helping trigger more reactions (Beidou in Quickbloom, Kazuha in Burgeon), having access to Hydro Resonance (Hu Tao, Yelan), or simply replacing a Hydro unit who is needed for another team.
Hydro Off-Field Characters
 Yelan Yelan | Candace does not have any noticeable synergies with Yelan besides Hydro Resonance, which benefits both of their kits. Yelan can also pair with Xingqiu to make a strong Hydro core for other teammates. Yelan’s Ascension 4 Passive also buffs Candace’s damage if you want to play on-field Candace. C6 Candace also supplements Yelan’s Hydro application for more demanding characters (e.g. Hu Tao). |
 Nilou Nilou | Nilou can already apply Hydro both on-field and off-field, and so does not directly benefit from Candace. Instead, Candace allows DMC and Yaoyao to drive in the team with Hydro Normal Attacks, giving them more Bloom ownership which benefits from their EM builds. Yaoyao especially can take advantage of the Infusion during her 4s on-field Burst duration to create Bountiful Cores while healing the team. Candace also gives Hydro Resonance, increasing Nilou’s Bountiful Core damage. |
 Furina | The Hydro Archon! Candace’s Hydro particles lower Furina’s ER requirements, while Furina’s DMG% buff from Fanfare lets Candace deal more damage. Furina’s HP drain also allows Candace to use 4pc Marechaussee Hunter in an on-field playstyle. |
Anemo Off-Field Characters
| Kazuha | Kazuha also fits in a quickswap team archetype, which allows for more of Candace’s Hydro waves and more Skills used, lowering ER requirements. He provides DMG% buffs, access to 4pc VV, damage from Swirls, and grouping, overall enabling more units including Candace. |
 Sayu Sayu | Sayu can absorb an Elemental aura into her Skill, allowing for more reactions when combined with her quickswap nature; Sayu’s also a great taxi for overworld exploration. |
 Sucrose | Sucrose’s AoE Swirls and EM buff are a valuable asset in teams that deal significant amounts of damage using Transformative Reactions. |
Cryo Off-Field Characters
 Ganyu | Ganyu’s Charged Attacks have no synergy with Candace’s kit. However, she can play a more supportive role by providing off-field Cryo application and damage through her Burst. |
Dendro Off-Field Characters
 Nahida | Nahida is the prime Dendro unit for all Dendro-related teams. Her Burst and Ascension 1 Passive also boost Candace in Fridge and Nilou Bloom teams by increasing her EM when she’s on-field, allowing for more Bloom damage. |
 Collei | Similarly to Nahida, Collei does not work with Candace’s kit, but she is still a valuable teammate in many Dendro teams. |
 Baizhu | Baizhu acts as a healer/shielder for Bloom teams, allowing Yaoyao to build more EM for larger Dendro Core damage. |
Electro Off-Field Characters
 Beidou | Excellent for multi-target scenarios. On-field Candace can reliably trigger 12 Stormbreaker discharges to bring out Beidou’s potential. Beidou is also special in that her Stormbreaker’s lightning discharges do not target Dendro Cores. allowing a traditional ADC build and ensuring she will not steal Hyperblooms from another Electro unit. This, combined with Candace’s slow Hydro application in Quickbloom, enables more Aggravate hits for Beidou. However, she desperately needs an Electro battery to lower her ER requirements. |
 Kuki Shinobu | Kuki Shinobu can be built as either a pure healer with an HP build or a Quicken / Hyperbloom trigger with an EM build. Frontloaded Hydro application from Candace’s Burst allows for more Dendro Cores to be created in Hyperbloom or more Aggravate hits in Quickbloom. |
 Dori | Dori provides great sustainability and decent Electro application for Hyperbloom with her Burst, but she struggles to recharge her Burst as a solo Electro unit. |
Fischl | Fischl provides both damage and high Electro application off-field while being self-sufficient and having high uptime on her Skill. Additionally, her high particle generation lowers Energy requirements for the whole team. |
 Yae Miko | Similar to Fischl, but Yae Miko deals more damage and has better Electro coverage in AoE content; however, Yae Miko takes up more field time and requires more ER if she is the solo Electro character and Bursting off cooldown, compromising personal damage. |
 Lisa | Lisa can provide Electro consistently as well as a unique DEF Shred with her Burst, which helps increase overall team damage with an Electro battery. |
Pyro Off-Field Characters
 Xiangling | Candace simply helps with providing a Hydro aura on enemies to let Xiangling’s Pyronado deal substantial Pyro damage through Vaporize. |
 Thoma | Similar to Kuki, Thoma can be built with EM for a Burgeon build. Candace extra Hydro application helps to ensure Burning would not happen on enemies. |
 Dehya | Candace’s good friend; Dehya can also proc Burgeon with an EM build through her coordinated attacks from her Skill. |
Teams

Reverse Vaporize

Candace’s Elemental Burst enables Pyro carries to Vaporize their Pyro abilities with their Hydro Normal Attacks. The 2 last slots are quite flexible: Anemo characters with 4pc Viridescent Venerer to debuff enemies and enhance overall team damage; Hydro characters to provide more Hydro application, Hydro Resonance, and battery capability; supportive Pyro characters to enable the Pyro Resonance ATK% increase and battery the Pyro carry. Bear in mind that in most cases, 2 Pyro characters is usually more than enough; more Pyro characters can interfere with the Hydro aura on the enemies, leading to lost Vaporizes on important abilities.
Candace can be the driver here, but with Bennett, Yoimiya, or Hu Tao in the team, usually they or another character who can fully utilize Bennett’s Flat ATK buff will want to stay on-field.
Notable Reverse Vaporize Teammates


Reverse Vaporize Example Teams & Rotations

In this team, Candace enables both Bennett and Xingqiu to be on-field without losing too much damage. Xingqiu can receive Bennett’s Flat ATK buff and further benefit from his own Constellation 2, while Bennett — even with his Constellation 6 — can still do Hydro Normal Attacks to Vaporize his Elemental Skills.
Candace E Q > Xingqiu Q N1 > Bennett E N1 Q > Xiangling N1 Q N1 E > Xingqiu N3 > Bennett N1 E > Xingqiu E D N3 > Bennett N2 E > Xingqiu N2 > Bennett N2 E N3 E N1 > Xiangling N3
Rotation Video

In this team, Candace mainly acts as a NA buffer for Yoimiya, as well as providing Hydro Resonance and Hydro Particles for Yelan. Bennett will further buff Yoimiya and provide survivability for the whole team.
Yelan Q N1 E N1 > Candace E N1 Q N1 > Bennett E Q > Yelan E > Yoimiya E 3[N5D] > Candace E N3
Rotation Video
Freeze

Candace’s Elemental Burst allows Cryo characters to Freeze (and trigger 4pc Blizzard Strayer) when weaving their Normal Attacks between the Cryo applications. In Freeze teams, an Anemo character who can group and hold 4pc Viridescent Venerer — like Kazuha or Venti — is recommended, although other Anemo characters are still viable. The last slot should be a character who does not interfere with the Frozen aura on the enemies; therefore, Hydro / Cryo is ideal here, with Cryo having higher priority due to being able to hold 4pc Blizzard Strayer, enable Cryo Resonance, and potentially act as a battery for Ayaka.
Notable Freeze Teammates


Freeze Example Teams & Rotations
This is a quickswap team, involving each character using minimal field time to use Skills and Bursts, with a few Normal Attacks woven in between. Both Shenhe and Rosaria hold 4pc Blizzard Strayer, while Candace carries 4pc Noblesse Oblige. Kazuha holds 4pc VV and Swirls Cryo to both decrease enemies’ Cryo RES and use Shenhe’s Icy Quill effect with the Absorption.
Shenhe E Q > Candace E Q > Kazuha N1 E P Q N1 > Rosaria N1 E Q N1 > Shenhe E N2 > Candace E N2 > Kazuha N1 E P N2 > Rosaria N1 E N3 > Candace N3
Electro-Charged

Candace’s Elemental Burst allows certain characters like Kazuha or Zhongli to trigger more Electro-Charged reactions. An Anemo character with 4pc Viridescent Venerer is highly recommended to shred both Hydro and Electro RES and provide additional Swirl damage. The last slot should be either a Hydro / Electro character for more damage, or a driver with additional utilities like Zhongli.
Notable Electro-Charged Teammates
Electro Support

Electro-Charged Example Teams & Rotations

Candace is an excellent Beidou driver that can reliably proc 12 Stormbreaker discharges. The Hydro Infusion also lets Kazuha own more Electro-Charged reactions, leading to more Fischl’s A4 instances.
Fischl N1 Q > Candace E Q N1 > Beidou Q E > Kazuha N1 E P N1 Q > Candace N3 E N3 > Fischl E > Beidou E N2 > Kazuha E P > Candace E N3 > Beidou E N1 > Kazuha E P
Rotation Video
Nilou Bloom

Nilou is the queen of Bloom with her special Bountiful Cores; however, she restrains the team to comprise only Dendro and Hydro characters. With the large amount of Hydro supplied by Nilou and Candace, only DMC and Yaoyao can currently fully utilize Candace’s Infusion to ensure they will have Bloom ownership, making them the main on-field units in this team. The last slot depends on the situation, but usually another Dendro character would be ideal to funnel each other.
Notable Nilou Bloom Teammates
Nilou Bloom Example Teams & Rotations
With Candace’s Infusion, DMC can also be fully built with EM for higher Bloom damage. Yaoyao can use her Burst every rotation to keep the team healthy without losing Bloom damage by applying Hydro with Normal Attacks. Do keep in mind that Yaoyao needs a certain amount of ER to Burst every rotation and HP to heal herself and other units.
Nilou 4[E] (Q every other rotation) > Yaoyao E > DMC E N1 Q > Candace E N1 Q N1 > DMC 2[N3D] E N3 > Yaoyao Q 2[N3D] > Candace E N2
Rotation Video
Hyperbloom & Quickbloom

Electro can interact with the Dendro Cores created by Bloom to trigger Hyperbloom, which creates a projectile that will target the closest enemy and deal Dendro damage. Quickbloom is where applying Hydro and Electro to a Quicken aura can result in a Bloom reaction — producing more Dendro Cores for Hyperbloom — and Aggravate reaction. Candace’s slow Hydro application is uniquely able to maintain high Quicken uptime to help boost damage through Aggravate and Spread.
Notable Hyperbloom Teammates
Hyperbloom Trigger
Hyperbloom Example Teams & Rotations
In this team, Candace has very little damage contribution and therefore should use the 4-piece Instructor set to further boost Beidou and Kuki Shinobu. With how Beidou’s Stormbreaker discharge works, Beidou can proc Aggravate while barely stealing any Dendro Cores, allowing Kuki Shinobu to build full EM and have high ownership over the Hyperblooms.
Kuki E > DMC E N1 Q > Beidou E Q > Candace N1 Q N1 E N4 > DMC E N1 > Beidou E > Kuki N1 Q > Candace N3 E N4
Rotation Video
Replacing Kuki Shinobu with Raiden will increase Beidou’s damage, and Nahida can provide more than enough Dendro to keep producing Dendro Cores.
Raiden E N1 > Nahida E Q N1 > Beidou E Q > Candace N1 Q N3 E N1 > Nahida E N2C > Beidou N1 E N2 > Raiden N3 > Candace N3 E N3
Rotation Video
Burgeon

Pyro can interact with the Dendro Cores created by Bloom to trigger Burgeon, an explosion that deals AoE Dendro damage. However, this archetype has a unique drawback — namely, Burning can the Dendro aura and preventing Bloom from occurring. Therefore, slow Pyro application is recommended to ensure Burgeon ownership and prevent Burning. Alternatively, Burning can be extinguished by weaving Hydro-infused Normal Attacks and utilizing Candace’s Hydro waves to apply enough Hydro. The last slot can be flexible but generally should follow the caveats mentioned above, especially with Anemo characters and the Absorption priority.
Notable Burgeon Teammates
Anemo Flex
Burgeon Example Teams & Rotations

In this team, we rotate through all the characters to use their short-cooldown skills and weave Hydro Normal Attacks in between to create more Dendro Cores. Collei will provide Dendro off-field for Bloom, and Kazuha would be the main Burgeon trigger by Swirling Pyro.
Bennett E N1 (no N1 at first rotation) Q > Candace E Q > Collei E Q > Kazuha N1 E P Q > Bennett E N2 > Candace E N2 > Kazuha E P N3
Rotation Video

This team relies on Ayato’s Skill to create Bloom for Thoma to trigger. Nahida will provide off-field Dendro with her Skill, while Candace’s main role is to buff Ayato’s personal damage.
Ayato Q > Candace E > Nahida E Q > Thoma E Q > Ayato E N15 > Nahida E N1 C > Candace E Q > Ayato N2 E N15
Rotation Video
Due to Dehya slow Pyro application, Beidou can proc more Aggravate with her Burst while still leaving Dendro Cores for Dehya. With Candace’s Hydro Infusion, characters when weaving Normal Attacks for Beidou’s Stormbreaker discharges or when swapping will also apply Hydro, create Dendro cores and distinguish Burning if existed.
Nahida E Q > Candace E Q N1 > Beidou E Q N1 > Dehya E N1 > Candace E N3 > Nahida N1 E N3 > Dehya E N1 > Beidou E N1 > Candace E N4
Rotation Video
Mono Hydro

Xingqiu and Yelan, or Double Hydro, have been dominating meta comps since the pair was discovered — and now Candace can elevate it even further with her Infusion and Normal Attack buff. Xingqiu is basically mandatory for his great synergy with Candace and utilities provided (healing, damage reduction, Hydro RES Shred at C2). If Yelan is not available, there are still other choices to fill the remaining slots. The last slot is usually for an Anemo character that utilizes the 4-piece VV effect.
Notable Mono Hydro Teammates
Mono Hydro Example Teams & Rotations

Candace enables Zhongli to be a Hydro driver, who holds 4-piece Archaic Petra that can further boost Hydro damage and proc both Xingqiu’s Sword Rain attacks and Yelan’s Exquisite Throw waves.
Zhongli hE > Xingqiu Q N1 E N1 > Yelan Q N1 E > Candace N1 E N1 Q > Zhongli 3[N5D] > Yelan N1 E N1 > Candace E N1 > Zhongli N5D
Rotation Video

Jean can give high debuff and heal uptime by staying on-field driving, using the 4pc Viridescent Venerer and Swirling Hydro with her Skill.
Candace N1 E > Xingqiu Q N1 E D N2 > Yelan Q N1 E N1 > Candace N1 E Q N1 > Jean E 4[N3D] > Yelan N2 E N1 > Jean N3D N3 E
Rotation Video
Niche Teams
Note that team archetypes in this section do not have DPS output comparable to the options above. This section is for more dedicated Candace enjoyers that want to explore the “nicher” options.
Shatterbloom

Shatterbloom (Fridge) is only recommended in AoE scenarios where it is easier to generate more Dendro Cores with the addition of Cryo. We can utilize the interactions between Cryo, Dendro, and Hydro to create more Dendro Cores, leading to more Burgeons, Hyperblooms, or in this case, Blooms. Candace has a special Blunt Attack, her N2, which can Shatter Frozen enemies. Because Shatter damage scales off of EM and Candace has high Bloom ownership due to her slow Hydro application, Candace is able to focus more on building EM with 4pc Gilded Dreams to deal damage through those reactions.
The Dendro character should equip 4pc Deepwood Memories to reduce Dendro RES, while the Cryo unit can use 4pc Blizzard Strayer to maximize their damage. Anemo characters who utilize the 4pc VV artifact set usually focus on EM, increasing Swirl damage and allowing them to steal Blooms without too much of a DPS loss, in return for fewer Dendro Cores in AoE. Their grouping also helps gather both the enemies and Dendro Cores together. A healer / shielder is usually preferred in the last slot, since Dendro Cores will deal damage to both the enemies and the on-field driver.
Notable Shatterbloom Teammates

Shatterbloom Example Teams & Rotations

This team focuses on cycling through all the characters, using their Elemental Skills while Normal Attacking in between to deal damage and generate many Energy particles. Candace will be the main Bloom trigger, Kazuha will group the enemies while they are also Frozen with Rosaria’s kit and ensure that the enemies receive the Bloom damage.
Nahida E N1 C D > Rosaria E > Kazuha E P Q > Candace E N1 Q N1 > Rosaria E N1 Q > Kazuha N1 E P N2 > Nahida N1 E C > Candace N1 E N3
Rotation Video
Candace Forward Vaporize
Candace has quite a high multiplier on her Charged Attacks, and they have no ICD, which means with high enough investment she can reliably Vaporize her Charged Attacks and deal good damage by herself. Do keep in mind that Hydro when interacting with Pyro will remove all of the Pyro aura; thus, a good Pyro applier is mandatory for Candace to consistently Vaporize her kit.
Notable Forward Vaporize Teammates
Physical Candace

Candace enthusiasts can further enjoy her beauty and not worry about her ER requirements by ignoring her Burst, giving her Crescent Pike and playing Physical Candace. An Electro and Cryo duo is always recommended to trigger Superconduct, while the last slot can be practically anyone who either supports Candace or deals damage.
Notable Physical Candace Teammates
Afterword
I am now capable of venturing ahead of you, and fending off all dangers that would seek to come your way. If you trust me, then I invite you to close your eyes and leave the enemies to me.
Hopefully this Candace guide has been enough to convince you to use her. You can find me in KeqingMains if you need an answer for any question. I will also keep updating the guide for new content, but for now, enjoy her to the fullest. – Athena.
Credits
Author: .athene
Editing:
- idkanonymized
- jukoist
- Nociii
- anoddmedium
Theorycrafting:
- Emilyabyss
- miannes
- Aftermathrar
- a1izee
- Potade
Formatting:
- Reddraegon
Transcribing:
- irokei
Infographics:
- angtahimik
Special Thanks:
- Your Local Milkman#9692
- Sew
- puffin.9920
- Halleyscomet08#8285
- leah2212
- Mystathi
- .pweep
- Jyro10
- flamescion
- NatC
- Rarepossum
- Cynematic
- Chasing_haze
- Not.logic
- And everyone that helps me along the journey!
- Team images courtesy of the KQM Team Portrait Generator.