Updated for Version 3.4

“An alchemist with an insatiable curiosity towards the world and everything in it. Attached to the Knights of Favonius as an assistant to Albedo, her area of focus is “bio-alchemy.” She strives to enrich the world by transforming living things with the power of alchemy. Granted, the products of her research sometimes prove to be more weird than wonderful — but on the whole, she has made monumental contributions to the field of bio-alchemy.”
– Official Genshin Website
Table of Contents
TL;DR
Design: angtahimik
Content: baloopy
Glossary
| AoE | Area of Effect |
| CC | Crowd control |
| CD | Cooldown |
| DoT | Damage over Time |
| Double Swirl | The act of Swirling two Elements during a rotation, leading to triggering Viridescent Venerer Resistance Shred for two Elements instead of one (as well as other buffs including Sucrose A1 and Kazuha A4) |
| E | Elemental Skill |
| EC | Electro-Charged |
| EM | Elemental Mastery, more information can be found in 2. |
| ICD | Internal Cooldown |
| NA | Normal Attack |
| On-field Driver | Character that can effectively drive abilities of off-field teammates while contributing to the team’s total DPS when they are on-field |
| Q | Elemental Burst |
| Snapshot | The ability to snapshot your current character’s stats (including temporary buffs) for the entirety of an ability’s duration |
| TTDS | Thrilling Tales of Dragon Slayers |
| VV | Viridescent Venerer |
Introduction

Sucrose is a 4-star Anemo Catalyst user whose playstyle centers around one stat: Elemental Mastery. Whether she drives reactions with her own Elemental Mastery or supplies Elemental Mastery buffs to other characters, Sucrose’s abilities shine brightest when your team composition is able to bring forth Elemental application and cause copious amounts of reaction damage. Additionally, her 2-charge Elemental AoE Skill (at Constellation 1, potentially 3 charges with Sacrificial Fragments + C1) and DoT AoE Burst can keep multiple light/mid-weighted enemies grouped together for your team to secure a solid wipe.
Pros
- Great team EM buff
- Strong driver
- Flexible role assignment
- Decent CC Skill and Burst
- Reliable VV application
- No Talent investment required
- Good Anemo battery
- Catalyst user: can hold TTDS; has Elemental-infused Normals with good frame data
Cons
- Burst can be difficult to absorb the desired Element
- Burst can scatter enemies in some cases
- Burst has 80 Energy Cost
- Prefers C1 and C4 which help Energy-hungry teams
Elemental Mastery
The biggest misconception that players had back in 1.0 (and some do even to this day) is that Sucrose does not contribute to the team’s damage and only provides crowd control. This was due to the fact that Elemental Mastery was not a well-studied stat and most of Sucrose’s buffs were more behind-the-scenes.
What is Elemental Mastery?
To learn how Sucrose works, players must first understand the concept of Elemental Mastery. Reaction damage triggered by characters increases with their EM. How much of an increase depends on the type of reaction being triggered.
Types of Reactions
Genshin Impact contains various Elemental Reactions that can be categorized as Transformative, Amplifying, or Additive. This guide will not go through all properties of every reaction, but here is a short table of what is related to Sucrose’s Elemental Mastery application. As Sucrose is generally built to maximize her Elemental Mastery without regard for CRIT stats, she tends to focus on doing Transformative/Additive Reactions when on-field.
Check out the TCL page on Elemental Effects for more information.
Transformative
Bloom, Burgeon, Burning,
Electro-Charged, Hyperbloom, Overloaded, Shatter, Superconduct, Swirl
- Reaction damage is solely based on Elemental Mastery and character level
- Ignores Defense stat but is still affected by Elemental Resistances
- Cannot crit (excluding Nahida’s C2)
- Creates another instance of damage that is separate from the attack that triggered it
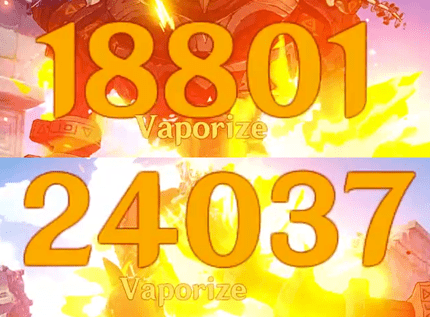
Amplifying
Melt, Vaporize
- Crits when base hit crits
- Reaction damage scales off every offensive stat involved in dealing damage
- Character’s normal damage is multiplied by the reaction multiplier when triggered
Additive
Aggravate, Spread
- Can crit (except for Aggravated Swirls)
- Reaction damage scales off Elemental Mastery and character level, but also benefits from DMG% bonuses and CRIT
- Adds an additional amount of damage on top of normal damage
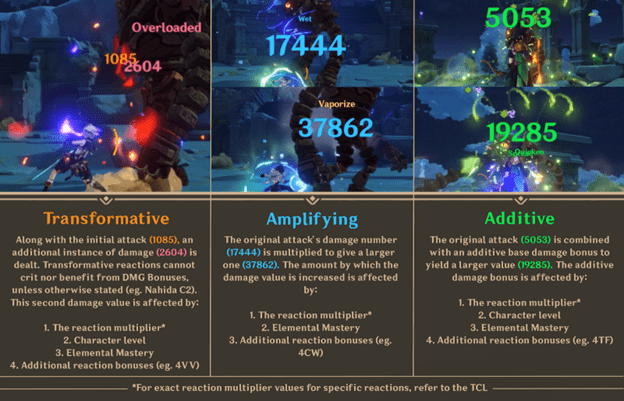
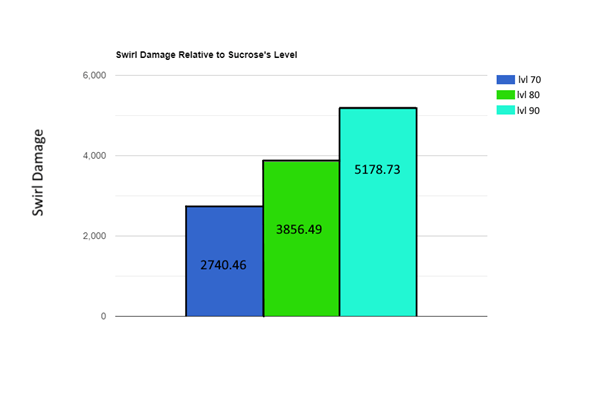
Enemy Resistance and other reaction buffs not accounted for.
Enemy Resistance and other buffs not accounted for.
Significance: As shown in the graph, reaction damage increases exponentially as her level increases. The 80 -> 90 level jump creates a roughly 34% increase in her Transformative Reaction damage, and hence it is ideal to prioritize Sucrose’s character level over both her Talents and her artifacts, assuming you already have a VV 4pc set bonus. This can be seen a bit more clearly in her Swirl damage in the graph below.
Chain Reactions
Chain reactions occur when different Elemental auras that react with Anemo are Swirled. The AoE from the Swirl triggers a reaction with other Elements nearby. For example, if one enemy has a Pyro aura and another one has an Electro aura, applying Anemo on the enemy with a Pyro aura will trigger a Pyro Swirl, and when this Pyro Swirl hits the enemy with the Electro aura, it will trigger an Overloaded chain reaction.
The capability of triggering chain reactions is one of the many attributes that make Anemo characters so strong. Chain reactions use the Anemo character’s EM to calculate the reaction damage. Because many Anemo characters are optimally built with full EM and leveled to 90, this can cause Transformative chain reactions to do massive damage since they only scale with EM and character level. Additive and Amplifying chain reactions also contribute good damage, although not as high as Transformative since they scale with other stats as well.
Sucrose’s ability to spam chain reactions on her Normals, Skill, and Burst is one of her key features that separates her from other Anemo units.
FAQ

My Sucrose’s Burst didn’t absorb any Elements when they were everywhere, what happened?
Sucrose’s Burst is occasionally inconsistent for not obvious reasons. This is why most C6 Sucrose owners do not depend on her C6, as it requires her to absorb the right Element. Read the Absorption section for more info.
Is Sucrose worth using without her C6 (or other Constellations for that matter)?
Despite Sucrose’s C6 looking extremely strong on paper, it can be rather inconsistent regarding what Element it absorbs and when it will absorb a certain Element, leading to not always getting the proper Absorption even if you are playing well. Sucrose is a 4-star unit that is not very Constellation-locked with her best Constellation being her C1 and her C4 only mattering in teams where she has high field time, so you shouldn’t worry too much about whether she is C0 or C6. The only thing that is really Constellation-locked for Sucrose is her Energy generation.
Why would I use my Sucrose on-field if she is a support?
Although Sucrose is commonly classified as a “support” by many players, she can also put out a lot of damage by spamming reactions when she is on-field and paired with the right teammates. While Sucrose is supporting and buffing the off-field DPS’s on her team when she is on-field, she is also contributing a good amount of personal damage. Read the On-field Driver section for more info.
Talents
 Normal Attack | Wind Spirit Creation
Talent Description
Normal Attack
Performs up to 4 attacks using Wind Spirits, dealing Anemo DMG.
Charged Attack
Consumes a certain amount of Stamina and deals AoE Anemo DMG after a short casting time.
Plunging Attack
Calling upon the power of her Wind Spirits, Sucrose plunges towards the ground from mid-air, damaging all opponents in her path. Deals AoE Anemo DMG upon impact with the ground
Sucrose’s Normal Attack is a 4-hit combo with relatively low base damage. Her Charged Attack however is fairly strong with decent range and pushing strength. It should also be noted that Normal and Charged Attacks have separate Internal Cooldowns (ICD), meaning that using a mix of NAs and CAs in Sucrose’s attack string can allow her to trigger more reactions.
See the On-field Driver section for details on her optimal combos.
 Elemental Skill | Astable Anemohypostasis Creation – 6308
Talent Description
Creates a small Wind Spirit that pulls opponents and objects towards its location, launches opponents within its AoE, and deals Anemo DMG.
Each cast of Sucrose’s Elemental Skill has an independent ICD from the rest of Sucrose’s kit, and thus it will always Swirl and trigger reactions. Unlike most of the roster, Sucrose gets 2 charges of her Skill at Constellation 1. It is an AoE attack that can pull and launch, giving small CC properties. The AoE from her Skill allows for easy chain reactions from Swirls in multitarget. It can also interact with objects like Klee’s and Aloy’s bomblets.
See the Managing Skill Charges section for information on how to manage Sucrose’s Skill charges.
 Elemental Burst | Forbidden Creation – Isomer 75 / Type II
Talent Description
Sucrose hurls an unstable concoction that creates a Large Wind Spirit.
While it persists, the Large Wind Spirit will continuously pull in surrounding opponents and objects, launch nearby opponents, and deal Anemo DMG.
Elemental Absorption
If the Wind Spirit comes into contact with Hydro/Pyro/Cryo/Electro energy, it will deal additional elemental DMG of that type.
Elemental Absorption may only occur once per use.
Sucrose throws a projectile which Bursts into a giant Crystalfly that can pull and launch enemies periodically for a certain time. It will deal Anemo DMG on every pulse. Sucrose’s Burst can also absorb ONE Element and deal Additional Elemental DMG of the type absorbed. Her Burst, however, has some consistency issues regarding Elemental Absorption, with more information in the Absorption section. Sucrose’s Burst has no ICD, and every pulse can trigger Elemental Reactions as well as chain reactions.
Both the Elemental Skill and Burst have CC abilities. However, some enemies are less prone to the CC effect if their level is a lot higher than the player’s level. The CC effectiveness increases if the enemy is less than 20 levels higher than the player. Light enemies will still be CC’d regardless of the level difference.
If her Burst can’t lift an enemy, it staggers them instead, which leads to enemies potentially getting knocked away from the center of her Burst.
Example of how to group enemies using Burst. Credit to Terrapin#8603.
 Ascension 1 Passive | Catalyst Conversion
Talent Description
When Sucrose triggers a Swirl reaction, all characters in the party with the matching element (excluding Sucrose) have their Elemental Mastery increased by 50 for 8s.
When Sucrose triggers a Swirl reaction with a certain Element, characters with a matching Element (excluding Sucrose) will gain 50 Elemental Mastery for 8 seconds. You can apply this Talent for multiple Elements at the same time and the cooldown will reset every time you trigger Swirl. While the buff is not a lot of EM transfer, every little bit counts.
 Ascension 4 Passive | Mollis Favonius
Talent Description
When Astable Anemohypostasis Creation – 6308 or Forbidden Creation – Isomer 75 / Type II hits an opponent, increases all party members’ (excluding Sucrose) Elemental Mastery by an amount equal to 20% of Sucrose’s Elemental Mastery for 8s.
When Sucrose hits an opponent with her Elemental Skill or Elemental Burst, all party members (excluding Sucrose) will gain 20% of Sucrose’s EM for 8s. Once again, the cooldown will reset every time this effect is triggered. This Talent is a huge part of why it’s important to stack as much EM on Sucrose as possible.
 Utility Passive | Astable Invention
Talent Description
When Sucrose crafts Character and Weapon Enhancement Materials, she has a 10% chance to obtain double the product.
Sucrose’s Utility Passive can provide a nice bonus to Enhancement Material crafting when it activates.
Level & Talent Priority
A very small portion of Sucrose’s damage is from her actual Talent Levels. In most cases, her damage comes from Swirls, which scale off of Elemental Mastery and character level, so prioritize these first before Talents.
However, if Talents are still desired, the priority depends on what role she is playing. Some players do not use her Burst, as it can interfere with the enemy’s aura (i.e. if you are playing a team revolving around Vaporize, Sucrose’s Burst absorbing Pyro can steal Vapes from your Pyro DPS). Considering that viewpoint, her Talent priority would be:
E > NA > Q
Based on pure Anemo DMG, Sucrose’s Burst takes priority over her Skill:
Q > E > NA
Constellations

 Constellation 1 | Clustered Vacuum Field
Constellation Description
Astable Anemohypostasis Creation – 6308 gains 1 additional charge.
Sucrose’s Elemental Skill gains 1 additional charge. This is one of the two best Constellations Sucrose can get. If you are able to get an extra Constellation for Sucrose at C0, it is highly recommended due to more Swirl opportunities and better Energy generation, especially for an Energy-hungry Anemo DPS. If you plan to use Sucrose as a pure off-field EM buffer, this is where you can stop.
 Constellation 2 | Beth: Unbound Form
Constellation Description
The duration of Forbidden Creation – Isomer 75 / Type II is increased by 2s.
Sucrose’s Elemental Burst gains 2 additional seconds of duration (essentially one more pulse). This can help extend the duration of your EM buff and crowd control capabilities; it’s not much, but it helps.
 Constellation 3 | Flawless Alchemistress
Constellation Description
Increases the Level of Astable Anemohypostasis Creation – 6308 by 3. Maximum upgrade level is 15.
Increases Sucrose’s Elemental Skill Talent Level by 3. Constellations based on increasing Talent Levels on Sucrose only matter if you are seeking builds not focused on Elemental Mastery, which isn’t recommended.
 Constellation 4 | Alchemania
Constellation Description
Every 7 Normal and Charged Attacks, Sucrose will reduce the CD of Astable Anemohypostasis Creation – 6308 by 1-7s.
The Constellation which unlocks on-field Sucrose’s full potential. For every 7th Normal/Charged Attack, Sucrose’s Elemental Skill cooldown will get reduced by 1~7s. This makes her double charge Elemental Skill more readily available with constant reduced cooldown. This is her most impactful Constellation if Sucrose is being used in an on-field role. Read the Combos section for more info.
 Constellation 5 | Caution: Standard Flask
Constellation Description
Increases the Level of Forbidden Creation – Isomer 75 / Type II by 3. Maximum upgrade level is 15.
Increase Sucrose’s Burst Talent Level by 3. Constellations based on increasing Talent Levels on Sucrose only matter if you are seeking builds not focused on Elemental Mastery, which isn’t recommended.
 Constellation 6 | Chaotic Entropy
Constellation Description
If Forbidden Creation – Isomer 75 / Type II triggers an Elemental Absorption, all party members gain a 20% Elemental DMG Bonus for the corresponding absorbed element during its duration.
When Sucrose’s Burst absorbs an Element, characters with the matching Element will gain a 20% Elemental DMG Bonus. While on paper it sounds good, the practical application is tough, as an undesirable Elemental Absorption can occur outside of the player’s control. Being able to consistently absorb the desired Element can be achieved by playing her more and understanding her Burst mechanics. Read the Absorption section for more info.
Artifacts

Artifact Sets
 4-Piece Viridescent Venerer | 4-Piece Viridescent Venerer is by far Sucrose’s best artifact set. It decreases enemy Elemental RES to the Element that is Swirled while also increasing her Anemo and Swirl DMG. |
 4-Piece Instructor | 4-Piece Instructor can be used on teams where you can’t Swirl the correct Element, for example in Hu Tao teams without another Pyro character. It is also used in teams where you want to buff a Dendro character. Due to the set not being available at 5-star rarity, you should have your Sands, Goblet or Circlet be an off-set 5-star piece. There is also a good chance that 4-piece Instructor will be the best artifact set for early game players (pre-AR 45) due to its ease of access. |
Artifact Stats
The artifact main stats should be:
 Sands |  Goblet |  Circlet |
| EM | EM | EM |
Substat Priority: ER% until requirement > EM
I don’t have a 4VV set with EM/EM/EM, it takes too long to get it. What can I do?
There are 3 ways to go about this.
- You can use 4-star VV pieces with EM main stats; they will still give the 4pc VV effect and also provide quite a bit of EM. This is better than the alternatives below.
- You can use off-pieces with EM main stats to compensate. Doing this will lose your 4pc VV effect if you off-set more than a single piece, which is not ideal.
- You can passively farm for VV by using the VV Strongbox, accessible using a Crafting Table. This can be done in conjunction with actively farming the Valley of Remembrance Domain to increase your likelihood of getting a VV EM piece, or with farming a different artifact Domain if you’re simply looking for an upgrade.
Energy Requirements
| Playstyle | Energy Requirement |
| On-field | 120-140% |
| Off-field | 160-180% |
Both Energy Recharge calculations are assuming no Favonius weapon procs.
On-field playstyle assumes 3-4 E’s per rotation (varies depending on C4).
Off-field playstyle assumes 2 E’s per rotation.
While it is recommended to hit her desired ER thresholds, her teams can function very well even without using her Burst every rotation. For an off-field playstyle in teams where your Burst could mess up reactions, you can ignore ER completely and focus on EM.
If you want to know the ER requirements for your exact team, use Zakharov’s Energy Recharge Calculator.
Playstyles

One of the greatest benefits of Sucrose is that she does not need to be fully invested in to be effective in a team. She also has strong compatibility with multiple Catalysts depending on what role she is fulfilling.
On-field Driver
Being an on-field driver means that Sucrose will trigger Swirls and chain reactions in order to deal many small instances of Transformative Reaction damage. Additionally, she can buff her teammates to deal more off-field damage, and her fast Normal Attacks make her good at triggering effects like Xingqiu’s Burst, Yelan’s Burst, or Beidou’s Burst.
However, note that due to being Anemo, her on-field damage will be reduced in single-target situations, since you are not able to Swirl as many enemies as you would in AoE.
Combos
It is perfectly acceptable to simply spam whichever attack string comes naturally to you. However, there are certain combos that you can opt for if you want to maximize the value of Sucrose’s attack strings.
Mixed Combo
Performing a mixed combination of Normal Attacks and Charged Attacks can yield a greater number of Swirls due to the separate ICDs of NAs and CAs.
N4 Spam
When it comes to driving Beidou’s Burst, you can opt to simply spam N4. This string yields a consistent 10 Beidou’s Burst procs and is the simplest string you could do.
N2 Walk Cancel
Sucrose’s optimal attack string for driving Beidou’s Burst is N2 walk cancel. It can consistently yield up to 12 Beidou’s Burst procs. This string is also the fastest way to proc Sucrose’s Constellation 4 effect.
N2 jump cancel or N2 dash cancel can also be used, though these cancels take longer than optimally-performed walk cancels. If using dash cancels, it is also important to manage your Stamina properly so you don’t run out of it at crucial moments.
Note that poorly-performed N2 walk cancels will yield worse results than consistently performed N2 jump/dash cancels or N4 spam, so it is better to use whichever attack string is most comfortable for you. It’s worth noting that Catalyst users tend to have buffering issues when it comes to inputting their Normal Attacks after certain inputs (such as dashing or walking) so in practice it can be difficult to fully utilize N2 walk/dash cancels.
For more information, check out the TCL page on Catalyst Buffer Issues.
Weapon Priority
Sucrose’s top weapons as an on-field driver:
 Sacrificial Fragments Sacrificial Fragments | Sacrificial Fragments provides the highest 4-star EM value and gives an extra Skill charge, which grants more grouping, reactions and damage. This also helps Sucrose gain more Energy, lowering her ER needs. |
 A Thousand Floating Dreams | Being a 5-star Catalyst with the highest EM substat, this weapon performs well as a stat stick but has an essentially useless passive for Sucrose and the rest of her team. With that being said, this weapon is nearly identical to a Sacrificial Fragments in terms of damage in most scenarios with Sucrose as an on-field driver. Despite A Thousand Floating Dreams performing similarly to Sacrificial Fragments, it lacks the extra grouping and particle generation that the latter gives you. |
 Wandering Evenstar | In teams where the main damage contributions are from ATK% scaling characters (e.g. Sucrose/Xingqiu/Beidou/Fischl), this weapon can be quite solid, especially at high refinements. This weapon also doesn’t require strict rotations and snapshotting when compared to other buffing weapons (such as TTDS), as the buff Wandering Evenstar gives is unconditional. That being said, with proper rotations, all the buffing weapons in this category are relatively similar in value. |
 Thrilling Tales of Dragon Slayers (TTDS) | Despite being an HP weapon, TTDS is an amazing Catalyst for Sucrose to hold, giving a large ATK% buff to a character with snapshottable off-field abilities (e.g. Beidou or Fischl). |
 Magic Guide | An alternative choice for this playstyle if none of the above weapons are available. If you do not have Sacrificial Fragments, Magic Guide is the third-highest EM substat Catalyst. The low Base Attack won’t matter as she is driving reactions with Swirl. |
 Hakushin Ring Hakushin Ring | Only becomes competitive at high refinements in Electro teams, so if you don’t want to use your billets, you don’t have to worry about it. The ER substat can be valuable, allowing you to build more EM in artifacts. The weapon becomes fairly good at R5 in Aggravate teams. |
Taser & Soup

The most basic team for Sucrose in this archetype is the Taser comp, in which she constantly triggers Swirl and Electro-Charged for reaction damage. This comp will not grant players huge screenshot damage, but rather produce countless damage numbers on a screen. Taser comps can also opt to add in a Pyro unit for Overloaded and Vaporize, which can cause a lot of chain reactions in multitarget scenarios. This is commonly referred to as “Soup”, but they are grouped together as they play very similarly and use similar units.
In this kind of team, it is crucial to discuss the Electro-Charged (EC) reaction. EC ownership is complicated and difficult to understand and explain, but there are certain trends discovered so far. Specifically, if a unit has application with a better AoE (Beidou, Kokomi, Sucrose), they have a better chance of ownership than a unit with application against one enemy (Fischl, Xingqiu).
This means that we can maximize EC ownership on Sucrose by teaming her with units that have single-target application, thus gaining the most damage possible. When Sucrose is able to proc EC with her Swirls, it causes a chain reaction that scales off of her EM (which she is stacking) and character level (which ideally should be 90), leading to high EC damage.

Notable Teammates
 Xingqiu | Xingqiu honestly does everything; if you ever have a doubt about who you need to fill in a Hydro slot, just pick Xingqiu. From high single-target damage, extremely fast Hydro application to even damage reduction and healing that can replace a healer when paired with Beidou, Xingqiu has it all and you can basically never go wrong with slotting him into your team. Roles: Off-field damage dealer, Elemental applicator, Defensive utility |
 Kokomi | Kokomi’s sustained AoE Hydro application is second to none and in situations where that matters, she can even outperform the likes of Xingqiu and Yelan. This combined with her ability to keep your team healthy allows Kokomi to be an extremely strong and comfortable pick in many teams. When on the Ocean-Hued Clam artifact set, she can even have potential driver or dual-driver opportunities in her team with some impressive damage. Kokomi’s ability to consolidate so many roles into one unit is very valuable when it comes to team building, so she is someone who should not be overlooked. Roles: Off-field Elemental applicator, Healer, On-field driver |
 Yelan | Yelan’s high damage and fast Hydro application makes her a premier choice as a Hydro flex slot. Her performance (at C0) in teams is relatively similar to Xingqiu’s (at C6), which should be seen as a positive due to how difficult it is for any unit to even be comparable to Xingqiu. She can also be paired with Xingqiu for impressive single-target damage while both characters help alleviate each other’s Energy needs. A major drawback for slotting in Yelan is that your team may lack in defensive options such as healing or shielding, which is important to note when building a team if these defensive slots are something that you value. Roles: Off-field damage dealer, Elemental applicator |
 Fischl | Fischl’s ability to quickly apply Electro on top of her single-target damage makes her the premier Electro choice for Taser teams. Sucrose’s ability to proc Fischl’s A4 with Electro Swirls allows amazing synergy between the two. On top of all this, she also acts as an effective battery for all of her teammates, especially Electro ones. Roles: Off-field damage dealer, Battery, Elemental applicator |
 Kuki Shinobu | If you want to opt into an Electro healer, Kuki is your best bet. Kuki’s damage is quite low in Taser, but she can hold the Tenacity of the Millelith artifact set and a Favonius Sword to provide more utility than just healing alone. Her healing can allow you to play more comfortably, especially if you already have the damage to clear content. Roles: Healer, Elemental applicator |
 Beidou | Beidou is a unit that excels in AoE, where her Burst can bounce back and forth between enemies. Beidou and Fischl have great synergy together as well, with Fischl helping to recharge Beidou’s expensive Burst. Sucrose is quite good at driving Fischl’s Oz and Beidou’s Burst simultaneously. At C1, Beidou can provide a small amount of defensive utility in the form of an Electro shield, which when combined with the damage reduction and Interruption Resistance from her Burst can prove very useful. This damage reduction and shield are even more effective when used with Xingqiu’s damage reduction and healing, resulting in a tanky team despite not having a healer. Do note that Beidou does have a tendency to steal Electro-Charged ownership from Sucrose. See Combos section for optimal combos to drive Beidou’s Burst. Roles: Off-field damage dealer, Elemental applicator, Defensive utility |
 Yae Miko | Yae Miko’s role in this team archetype is similar to that of Fischl’s as they both perform quite similarly to each other in regards to both damage and role consolidation. While Yae’s Energy generation is quite low especially for her high-cost Burst, it is important to know that you can opt for Bursting whenever it’s available as opposed to building enough ER to Burst every rotation. Fischl can also help battery her Burst. Roles: Off-field damage dealer, Elemental applicator |
 Xiangling | Xiangling provides raw damage and adds Overloaded and Vaporize reactions into the mix. Since Xiangling already wants to build some EM to increase her Vaped Pyronado damage, she will be doing decent Overloaded DMG as well. Additionally, Sucrose is one of two characters that can Guoba Swirl, but only she uses it effectively. (see the Guoba Swirl section) This technique is used to particularly good effect in the Sukokomon team. Note that when Xiangling is slotted into this team archetype, she will have Energy problems and need a way to compensate for it (Favonius weapons, Kitain Cross Spear or even Engulfing Lightning are basically required to meet her Energy needs). Roles: Off-field damage dealer, Elemental applicator |
 Thoma | When running quick off-field Hydro and Electro applicators (ex: Xingqiu and Fischl), Thoma can reliably proc Overloaded and Vaporize simultaneously, leading to decent damage in a full EM build. When Sucrose is driving this team, she is able to give a lot of value to Thoma through her EM share and grouping, and Thoma provides some defensive utility in return. Roles: Elemental applicator, Defensive utility |
This slot tends to be another Electro character for Energy purposes, but it can also be another Hydro character or anyone else that doesn’t interfere too much with Electro-Charged reactions (e.g. Zhongli, Albedo) if you want to stay in the Taser team archetype.
 Albedo | Good off-field damage dealer that doesn’t interrupt reactions and has low field time requirements. While his Burst can give 125 EM for 10s, in some cases the time it takes to cast Albedo’s Burst isn’t worth the benefits or damage. Roles: Off-field damage dealer, Buffer |
 Zhongli Zhongli | Arguably the best option for keeping your team alive with his enormous shield allowing you to play very comfortably. His universal Resistance Shred can have pretty good value in a lot of teams as well. Roles: Defensive Utility, Elemental RES Shredder, Buffer |
Example Teams
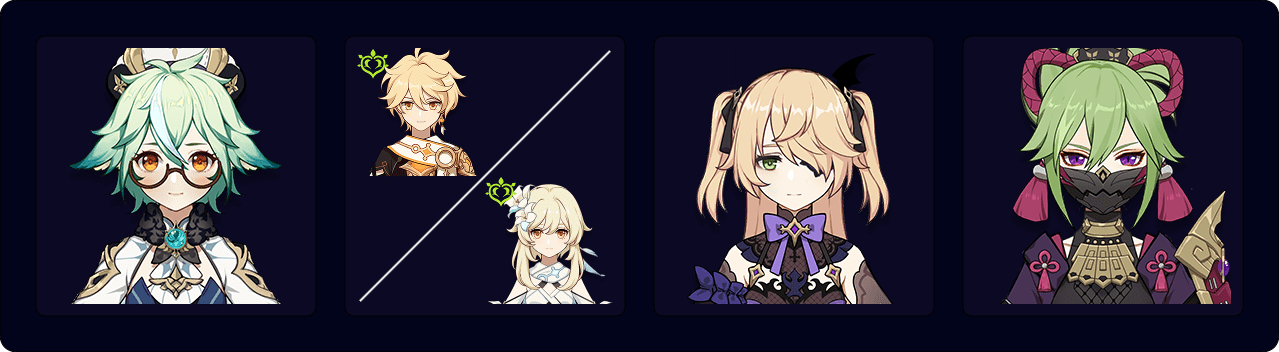
Sucrose — Xingqiu — Fischl — Beidou

In this team, the interaction between Xingqiu’s and Beidou’s defensive utility is also worth mentioning. They both provide damage reduction and all the sources of damage reduction are added together. A level 9 Beidou’s Burst provides 32% damage reduction, and a typical Xingqiu build with a level 9 Skill provides 41% damage reduction, for a total of 73% damage reduction. If you combine this with Beidou’s shield on her Burst at C1 and with Xingqiu’s healing from his Rain Swords, you can actually take quite a lot of damage without dying, and playing without a healer isn’t such a bad idea.
Sucrose — Kokomi — Fischl — Xiangling

Sucrose can also use the “Sukokomon” team comp in which Sucrose aims to Swirl multiple Elements, trigger Elemental Reactions, and utilize Guoba Swirl. For more information on this team, visit Xiangling’s Character Guide.
Off-field Support
In this build, Sucrose provides 4VV and buffs to other team members. This build increases the damage of her teammates via 4VV Shred, her EM share and possibly her C6.
Weapon Priority
By now, you’re probably wondering why the stats for a support and an on-field driver build don’t seem to have a lot of a difference. This just attests to how little investment her builds require. Elemental Mastery is the core stat that Sucrose utilizes in her main kit regardless of her role. However, the weapon priority changes slightly with her support build.
A Thousand Floating Dreams | A Thousand Floating Dreams has the highest EM value for EM sharing, as well as more EM on the weapon’s passive. This makes it a good choice for people who do not want to learn TTDS rotations and for quickswap teams that have more than one character dealing a significant portion of the team’s damage (assuming they both benefit from the EM). |
Wandering Evenstar | In teams where the main damage contributions are from ATK% scaling characters (e.g. Childe International), this weapon can be quite solid, especially at high refinements. As the buff is unconditional, it does not require strict rotations and snapshotting compared to other buffing weapons such as TTDS. That being said, with proper rotations, all the buffing weapons in this category are relatively similar in value. |
Thrilling Tales of Dragon Slayers (TTDS) | Despite being an HP weapon, TTDS is an amazing Catalyst for Sucrose to hold, giving a large ATK% buff to a character and requiring minimal investment to use. |
Sacrificial Fragments | Sacrificial Fragments holds the highest 4-star EM value for EM sharing and gives an extra Skill charge, which is another ICD-less reaction trigger. This also helps Sucrose gain more Energy, lowering her Burst downtime. |
 Favonius Codex | This weapon can be considered when you need the extra Energy for your team or value the comfort that the extra particles provide during your rotation. Do note that you will need some CRIT Rate substats to trigger the passive reliably, and it is not worth using a CRIT Rate Circlet over an EM Circlet to achieve this. |
Magic Guide | If you do not have A Thousand Floating Dreams or Sacrificial Fragments, Magic Guide is the third highest EM substat Catalyst. The low Base Attack won’t matter as her main role is to share EM and apply VV. |
 Prototype Amber | Prototype Amber allows Sucrose to heal her teammates, providing some sustainability. However, Prototype Amber’s healing is not large and is locked behind a character’s Burst; with Sucrose’s Burst having an 80 Burst Cost and a 20s cooldown, heals are infrequent. Overall, it hinders her ability to fully buff her team. |
Pyro DPS Teams

Notable Teammates


All on-field Pyro damage dealers value Sucrose’s EM share to increase the damage of their Vaporized hits. Generally, characters who Vaporize more of their attacks will value EM more than those who Vaporize less. (i.e. Hu Tao values EM more than Klee).
Hydro Options
 Xingqiu | High damage, fast Hydro application, damage reduction and healing — really, what doesn’t he do? Very good at consolidating team slots and works with every Pyro carry. |
 Yelan | Strong off-field Hydro applicator that provides a decent buff to the active character through her A4 Passive. Pairing Xingqiu and Yelan together allows for extremely strong off-field damage and fast Hydro application. It is not recommended to run Yelan as the only source of Hydro for Hu Tao when Yelan is below C2, since she does not consistently apply enough Hydro for Hu Tao to Vaporize. For more info about Yelan and Hu Tao, check out the KQM Hu Tao Guide. |

Xiangling has no ICD on her Pyronado, allowing her to Vaporize most, if not all of her Burst hits when paired with a fast Hydro applicator. Combine this with a character that can give you the TTDS buff and even more EM to increase your damage and your Xiangling will be very happy.
Do note that if you choose to run Xiangling, your flex slot will almost ALWAYS be Bennett since he can battery her high-cost Burst and she can snapshot his enormous ATK buff. Although she is Genshin’s only off-field Pyro DPS, she is damn good at it. It is recommended that you learn to Swirl Guoba when playing Sucrose and Xiangling together to enable double VV Swirling.
Hydro Options
 Tartaglia | Fast and consistent on-field AoE Hydro application can allow you to Vape a large majority of Xiangling’s Burst while he is on-field. Also benefits from Sucrose’s EM share since Childe Vaporizes his Burst in this comp, which can nuke enemies. |
 Ayato | Despite not applying as much Hydro as Childe on-field and having lower Hydro uptime, Ayato is still a decent option for enabling Xiangling. |
 Xingqiu | Off-field Hydro applicator option where you can actually on-field your Sucrose for a bit before switching to Bennett to battery Xiangling or Xingqiu for more Rain Sword damage and still Vaporize most, if not all of Xiangling’s Burst. |
Flex Slots by Team Archetype
This team aims to keep both a Hydro and Electro aura on the enemy, allowing Pyro attacks that come into contact with the dual aura to proc both Overloaded and Vaporize simultaneously. Sucrose’s EM share makes this interaction even more valuable due to reactions scaling with EM.
 Fischl | Strong single-target damage along with fast and consistent Electro application. If the on-field character is a Pyro character, you can pretty consistently proc her A4. Fischl also serves as a decent battery even if her teammates aren’t Electro. |
 Kuki Shinobu | Sacrifices damage for the ability to have a healer who can apply Electro. Kuki’s Elemental Skill applies Electro relatively slowly and requires you to stay close to enemies to consistently Overvape. For this reason she is not recommended with characters who primarily attack from range. |
By combining the raw damage and Hydro application from Xingqiu and Yelan, players are able to have an extremely strong core for any Pyro unit. Do note that since Xingqiu and Yelan are mostly single-target, this team may lack in AoE.
 Xingqiu | High particle generation combined with the fact that he can act as a pretty good defensive option basically allows him to compensate for all of Yelan’s weaknesses. Xingqiu and Yelan play off of each other very well. |
 Yelan | Both can run lower ER and invest into other offensive stats, allowing for increased damage. They also trigger Hydro Resonance, giving a notable increase to Yelan’s HP and damage (Hydro Resonance can also benefit other HP scaling units such as Hu Tao/Zhongli). Yelan’s A4 Passive can also give a good buff to the on-field character as well. |
Adding another Pyro unit comes with a few added benefits: the ability to battery each other, easier VV setups, and Pyro Resonance.
 Bennett | Premier ATK buffer and healer with a strong ability to battery any Pyro unit. Bennett brings so much to the team while only taking up one slot. If you are running Xiangling, it is highly recommended to run Bennett with her as the two synergize extremely well. |
 Thoma Thoma Xinyan  Yanfei (C4+) | Pyro shielding options that allow you to easily have VV setups for your Pyro unit while providing defensive utility. In most cases, these units will be picked for comfort rather than damage. Note that Xinyan and Thoma can steal some Vapes. |
 Amber | Amber’s main selling point for her slot in this team archetype is that she is able to hold the 5-star Bow, Elegy for the End, and proc its passive with just her Burst, making VV setups extremely easy. She also has a relatively low ER requirement when compared to other Pyro units that are desired for VV setups. While she can still be used as a support without Elegy, she won’t reach her full potential without it. |
Using an off-field Cryo applicator allows for some Freeze, which is useful for letting the Pyro DPS occasionally proc Melt (which has higher multipliers than Vaporize). However, Vaporize will still be the more frequent reaction as no Cryo character at present allows for consistent Cryo uptime with a Pyro DPS. Diluc, Klee and Yanfei will end up proccing Shatter before Melt in these teams, so it is not recommended to run them in this archetype.
 Rosaria | CRIT Rate buff along with good off-field Cryo application on her Burst can allow for a solid option in Vapemelt teams. Her major drawback is that you are limited to her Burst circle if you really want to get all of her value. |
 Kaeya | While Kaeya’s off-field Cryo application isn’t anything special, his Burst does stay on top of the active character, allowing the player a lot more freedom to move around and dodge. |
 Ganyu | Ganyu’s Burst can have 100% uptime in a large area while dealing a good amount of damage from off-field. This combined with her decent Cryo application and her ability to hold and proc Elegy for the End can actually make her a surprisingly strong choice in Vapemelt teams. However, this comes at a loss to Ganyu’s personal damage, as her kit shines with her using Charged Shots on-field or taking full advantage of her Burst in team comps such as “Morgana”. |
 Diona | Defensive Cryo option that has relatively slow off-field Cryo application on her Burst combined with an 8s downtime, but for those who value her healing and shielding, she can be a possibility. Her C6 EM buff can also contribute to team damage in this archetype as well, but doesn’t work for Hu Tao teams as she wants to stay below 50% HP. Her ability to reduce Stamina consumption can have value in some teams but isn’t strong enough to solely justify her usage. |
 Layla | Functions similarly to Ganyu with lower damage, but provides strong shielding, especially with Constellations. Her Shooting Stars combined with her Burst can allow for a decent amount of Melts on enemies. |
Teammates that aren’t in any particular team archetype and don’t have any particular synergy with other teammates but can still be viable options.
 Albedo | Good off-field damage dealer that doesn’t interrupt reactions and has low field time requirements. While his Burst can give 125 EM for 10s, in some cases the time it takes to cast Albedo’s Burst isn’t worth the benefits or damage. |
 Zhongli Zhongli | Arguably the best option for keeping your team alive with his enormous shield allowing you to play very comfortably. His universal Resistance Shred can have pretty good value in a lot of teams as well. |
 Barbara | Slow Hydro application but is an accessible healer that every player is able to get. If healing is something that is of value to you, feel free to slot her in. |
Example Pyro DPS Comps


Freeze Teams

Despite Sucrose’s kit lacking innate synergy with Freeze due to her EM share being essentially useless, she is still a strong unit because of her AoE Anemo application allowing for a lot of Swirls, good grouping, ability to hold TTDS, and the Viridescent Venerer artifact set. At C6, she can even give an Elemental DMG Bonus to her teammates, which many Cryo characters in Freeze appreciate a lot. With that being said, Sucrose generally gets outperformed by other Anemo grouping options (e.g. Venti, Kazuha) in Freeze since their kits offer much more to the Freeze team archetype.
Xiao Battery

Xiao is a unique case of a unit that can depend on Sucrose. While he is Anemo and a Hypercarry, Sucrose can still benefit him by providing significant amounts of Energy and buffs via TTDS. In terms of artifact sets, Sucrose should ideally run 4pc Noblesse Oblige or 4pc The Exile, but holding them won’t affect team performance that much. More information is provided in the Xiao Guide.
Melt
Where are the Melt teams with Sucrose? Don’t Melt carries love EM?
A lot of the time the main core of these teams are made up of 2 Pyro and 2 Cryo teammates that are generally hard to replace without some kind of caveat (e.g. taking away Bennett from Xiangling). Generally having two of the same Element allows characters to battery (e.g. Kaeya + Rosaria) each other, so attempting to slot in Sucrose can be pretty punishing. While Melt DPS’s appreciate EM a lot, the core of the team is so set in stone that it’s quite difficult for Sucrose to have a place in the team.
Sucrose in Dendro Teams
Anemo & Dendro
How does Anemo interact with Dendro?
Despite Anemo not having any direct reactions with Dendro, Anemo units can play an important part in many Dendro teams. Anemo’s inability to directly interact with Dendro can be seen as both a negative and a positive, but we can take advantage of the fact that the two Elements do not have direct interactions.
Many Anemo abilities will Swirl other Elements that DO want to directly interact with Dendro. For this reason, Anemo actually excels with Dendro despite their lack of immediate reactions with one another.
Aggravate Swirls
One of the stand out examples of Anemo in a Dendro team would be Aggravate teams. In an Aggravate team that is typically made up of 1 Anemo, 1 Dendro and 2 Electro characters, the only Element that Anemo units will Swirl and absorb is Electro. The Absorption of Electro allows for more consistent procs of Aggravate and ensures Sucrose’s C6 is buffing the Electro characters on the team effectively.
Sucrose’s EM share, on the other hand, benefits everyone in the team, including the Dendro units. When triggering Electro Swirls onto an enemy with Quicken, characters are able to cause a chain reaction that will also trigger Aggravate. Since Anemo characters are usually on full EM builds, this would also allow them to deal a significant amount of damage, as Aggravate scales pretty well with EM.
Creating Dendro Cores With Swirl
Dendro Cores are created from the Bloom reaction, where Hydro comes into contact with Dendro or vice versa. What can actually happen in some teams is that your Anemo unit will Swirl Hydro onto an enemy that has a Dendro aura, which will create a Core. This can be relevant in some Hyperbloom and even Burgeon teams, especially if you do not have an AoE Hydro applicator, since this will allow you to create even more Dendro Cores for your Electro/Pyro characters to proc Hyperbloom/Burgeon, leading to more damage.
Swirling Pyro or Electro onto Dendro Cores
When a Dendro Core is on the field and it reacts with Pyro or Electro, they will trigger their sub-reactions of Bloom, Burgeon and Hyperbloom, respectively. As a result of this, Anemo characters are able to use their Swirls and Absorptions of either Pyro or Electro to also trigger these sub-reactions.
Due to these reactions being considered transformative, the only thing they will scale with is your characters’ EM and level, which can cause your Anemo units who are built full EM to do massive damage when they trigger these sub-reactions.
Dendro Teams
Aggravate

Sucrose is a highly desirable unit in Aggravate teams due to both her role consolidation and her accessibility as a 4-star unit. Sucrose’s ability to share EM is extremely valuable in such teams due to the damage formulas scaling quite well with EM. Adding this on top of the fact that she brings grouping, VV Shred, and added damage with her Swirls proccing Aggravate consistently, it is pretty easy to see why her value has only increased since the release of Dendro. On top of all this, Sucrose can excel as a driver for some Aggravate comps as well, especially for teams that want a good on-field option due to her ability to trigger chain reactions with Aggravate.
Notable Teammates
 Dendro Traveler (DMC) | Traveler has a higher Burst uptime than Collei, allowing for longer Dendro application without having to swap back to them. This can be beneficial in teams where you don’t want to swap out of a carry and have longer rotations (e.g. Cyno teams). Roles: Off-field Elemental applicator |
 Collei | Collei’s kit fits pretty well into Aggravate quickswap teams due to her Burst only having a 15-second cooldown and Skill having a 12-second cooldown (lining up quite well with Keqing’s 12-second cooldown Burst and Fischl’s Oz duration). On the other hand, characters who require more field time such as Cyno can end up having downtime on the Quicken aura since she won’t get swapped in as often. Roles: Off-field Elemental applicator |
 Tighnari | Tighnari functions as a good Dendro applicator within Aggravate teams where he also has a good amount of personal damage. He functions quite well with the off-field Electro supports such as Yae Miko and Fischl. This means Sucrose’s VV Shred still gets a lot of value, and everybody on the team can benefit from her EM share. Tighnari mainly shines within single-target scenarios where he actually is a very competitive option, but he can fall off compared to other Dendro options within AoE content. Roles: On-field damage dealer, Elemental applicator |
 Nahida | Nahida is the premier Dendro support with her ability to apply Dendro being far above the rest of the current roster while buffing the team with good personal damage. With that being said, Nahida’s 1.5U Dendro application can sometimes be too much Dendro, which can lead to difficulty triggering Swirl without fast application of other Elements. Characters such as Kuki and non-C6 Fischl can have issues keeping an underlying Electro aura, so it is important to adapt your rotations properly. Nevertheless, they both play with each other very well, Sucrose being a strong driver in AoE while Nahida can be a driver for single-target. Roles: On-field or Off-field damage dealer, Elemental applicator, Buffer |
Yaoyao | Yaoyao is an extremely valuable part of Aggravate teams with her currently being our only Dendro healer. Her ability to consolidate the role of a Dendro applicator and healer allows players to more comfortably run more damage- oriented Anemo units such as Kazuha or Sucrose. On top of this, her Dendro application and uptime fits quite well into most Aggravate teams. Roles: Off-field Elemental applicator, Healer |
Alhaitham | Alhaitham can be a strong on-fielder for Aggravate teams when accompanied by two off-field Electro characters. This allows Sucrose to give VV Shred to the Electro characters. Alhaitham also benefits from Sucrose’s EM share. Alhaitham’s major downsides compared to other Dendro units is his Dendro application; it is mostly locked to his field time, meaning he has little off-field presence. Roles: On-field damage dealer, Elemental applicator |
Fischl | Fischl’s ability to quickly apply Electro on top of her single-target damage in Dendro teams makes her the premier Electro choice for many Dendro teams. Sucrose’s ability to proc Fischl’s A4 with Electro Swirls and Aggravate procs allows for amazing synergy between the two. On top of all this, she also acts as an effective battery for all of her teammates, especially Electro ones. Roles: Off-field damage dealer, Battery, Elemental applicator |
Kuki Shinobu | The best Electro healer you can slot into for your flex option. With Kuki in an EM/DMG/CRIT build, her damage can actually be quite good, especially with the fast Electro application on her Burst. On top of that, her EM scaling on her healing allows you to have relatively good healing even when building for damage, which makes for a strong safety net. Roles: Healer, Elemental applicator |
Beidou | Beidou is a unit that excels in AoE, where her Burst can bounce back and forth between enemies. Beidou and Fischl have great synergy together as well. Sucrose is quite good at driving Fischl’s Oz and Beidou’s Burst simultaneously. At C1, Beidou can provide a small amount of defensive utility in the form of an Electro shield, which when combined with the damage reduction and Interruption Resistance from her Burst, can prove very useful. Roles: Off-field damage dealer, Elemental applicator, Defensive utility |
 Yae Miko | Excels in AoE since her totems can constantly proc Aggravate on different enemies, but still performs quite well in single-target. Yae Miko’s Burst has no ICD, meaning that each bolt can proc Aggravate as well. Fischl is also a really good battery for her, which helps alleviate some Energy Recharge desperately needed for her 90 Burst Cost. The major drawback for slotting in Yae Miko is that generally it is hard to slot in a defensive option. Roles: Off-field damage dealer, Elemental applicator |
 Keqing | Keqing is a great on-field driver for Aggravate teams due to her fast Electro application. She fits very well into teams that have short cooldowns, especially when she is on 4-Piece Thundering Fury. She can not only increase her Aggravate damage but also decrease her Elemental Skill cooldown, fitting even more into the quickswap playstyle. Roles: On-field damage dealer, Elemental applicator |
 Cyno | Similar to Keqing, Cyno is also a good on-fielder for Aggravate teams; where the two differ from one another is in their field time requirements. Cyno generally requires a lot more field time than Keqing, making it harder to keep up Sucrose’s buffs/debuffs as well as Fischl’s Oz without sacrificing his personal damage. Roles: On-field damage dealer, Elemental applicator |
Similarly to Taser teams, units that don’t interfere with reactions (e.g. Zhongli, Albedo) may be slotted in, particularly if you don’t want/need another Electro character for Aggravate damage or battery purposes. However, it is recommended to stick to the Sucrose + 2 Electro + 1 Dendro formula.
 Albedo | Good off-field damage dealer that doesn’t interrupt reactions and has low field time requirements. While his Burst can give 125 EM for 10s, in some cases the time it takes to cast Albedo’s Burst isn’t worth the benefits or damage. Roles: Off-field damage dealer, Buffer |
 Zhongli Zhongli | Arguably the best option for keeping your team alive with his enormous shield allowing you to play very comfortably. His universal Resistance Shred can have pretty good value in a lot of teams as well. Roles: Defensive Utility, Elemental RES Shredder, Buffer |
Example Teams & Rotations

Sucrose — DMC — Fischl — Yae Miko
Sample Rotation
Sucrose — DMC — Fischl — Kuki Shinobu
Sample Rotation
Sucrose — Nahida — Fischl — Kuki Shinobu
Sample Rotation

Sucrose — Collei — Keqing — Fischl
Sucrose — Nahida — Cyno — Kuki Shinobu
Hyperbloom

Sucrose Hyperbloom has quickly become a standout team when it comes to Dendro teams. The general core of this team consists of a off-field Dendro applicator, an off-field Hydro applicator, and an off-field Electro applicator. For the Electro unit in this team, Fischl is highly recommended for high damage and fast off-field Electro application. However, other Electro options such as Beidou, Kuki, or Yae can also work. Sucrose occasionally creates Dendro Cores through Swirling Hydro onto Dendro-affected enemies then Swirls Electro onto the Dendro Cores and enemies, proccing Hyperbloom and Aggravate alike.
With Sucrose being built full EM, she not only allows for huge Hyperbloom DMG and good Aggravate DMG, but also buffs Fischl’s Aggravate DMG while applying VV Shred and making really good use of Fischl’s A4 Passive. This team performs exceptionally well in content where the enemies can be grouped by Sucrose, but still works surprisingly well in single-target.
Due to Hyperbloom taking a minimum of 3 different Elements to trigger its reaction, being able to consolidate roles can allow for a more comfortable and better performing team. For example, Xingqiu provides fast Hydro application and a very noticeable amount of damage reduction along with a small amount of healing. If you decide to use Beidou as your Electro option with Xingqiu, you can become very tanky with their combined damage reduction and Beidou’s C1 shield. Check the flex slots table for more info about what role characters can fulfill in a team.
Notable Teammates
 Dendro Traveler (DMC) | Traveler has a higher Burst uptime than Collei, allowing for longer Dendro application without having to swap back to them. For Hyperbloom teams, this is largely beneficial due to your teammates usually having a long uptime on their Elemental application, e.g. Xingqiu, Fischl, or Kokomi. Roles: Off-field Elemental applicator |
 Collei | Collei’s short uptime on her Dendro application is much more of a downside in Hyperbloom teams in comparison to Aggravate due to how important it is to have consistent Dendro application over the course of the rotation. With that being said, Hyperbloom is such a strong reaction that Collei can still perform decently in the team despite being a downgrade to other options. Roles: Off-field Elemental applicator |
 Nahida | Nahida is the premier Dendro support with her ability to apply Dendro being far above the rest of the current roster while buffing the team with good personal damage. With that being said, Nahida’s 1.5U Dendro application can sometimes be too much Dendro, which can lead to difficulty triggering Swirl without fast application of other Elements. Characters such as Kuki and non-C6 Fischl can have issues keeping an underlying Electro aura, so it is important to adapt your rotations properly. Having fast Hydro application (e.g. Xingqiu, Yelan) can help you chew through Nahida’s 1.5U Dendro application, which allows more consistent Electro Swirls. Roles: On-field or Off-field damage dealer, Elemental applicator, Buffer |
Yaoyao | Yaoyao can be an extremely valuable part of Hyperbloom teams since she is currently our only Dendro healer. Her ability to consolidate the roles of a Dendro applicator and healer allows players to more comfortably run more damage-oriented Anemo units such as Kazuha or Sucrose. Her Elemental Skill’s targeting in AoE is random, which leads to more Dendro Core production due to her ICD. Similar to Collei, Yaoyao will also have some downtime in her Dendro application in Hyperbloom. Roles: Off-field Elemental applicator, Healer |
Electro units have a bit more nuance in Hyperbloom teams than in Aggravate due to some units’ ability to target Dendro Cores and potentially steal Hyperblooms from characters who have more EM than them, leading to less overall damage.
 Fischl | Oz will generally not target Dendro Cores with his main attacks, but Oz’s summons on both Fischl’s Skill and Burst are able to hit Dendro Cores. Fischl’s A4 will occasionally steal Hyperblooms as well. A non-C6 Fischl with Nahida can have issues with not applying enough Electro to keep an Electro aura behind the Quicken aura on the enemy, which can cause Sucrose to have difficulty Swirling Electro onto the Cores to trigger Hyperbloom. Fischl will also need some ER to ensure that she can use her Burst every rotation to maintain Oz’s uptime. With that being said, Fischl’s performance in Hyperbloom teams with on-field Sucrose is extremely good due to her high damage and Electro application. Roles: Off-field damage dealer, Battery, Elemental applicator |
 Kuki Shinobu | Having Sucrose and Kuki in the same team makes both of them compete for Hyperblooms. In this setting, you want to have your EM Kuki buffed by Sucrose since she will have more EM. It is important to note that while Sucrose and Kuki will have overlap in their roles, when putting them together in a Hyperbloom team, it grants healing, allowing for more comfortable gameplay, so the healing would be the main selling point of using her in this slot compared to someone like EM Raiden. Do note that due to Kuki’s slow Electro application on her E, it can be difficult to Swirl Electro if you are using Nahida. Roles: Healer, Elemental applicator |
Beidou | Hyperbloom Specific: Beidou is an amazing pick in Sucrose Hyperbloom teams due to her Burst not targeting Dendro Cores while applying Electro to the enemies. This allows Sucrose to easily proc Hyperbloom on almost all the Dendro Cores. Keep in mind that Beidou will be solo-Electro in this Hyperbloom team, so you will need a relatively high amount of ER on her to reliably Burst on cooldown, which can impact her DPS. Roles: Off-field damage dealer, Elemental applicator, Defensive utility |
 Yae Miko | Yae’s totems can actually steal a decent amount of Hyperblooms, which can be annoying if you are trying to trigger them with Sucrose since she will generally have more EM than Yae. Despite this, Yae’s performance in the team is pretty solid. Roles: Off-field damage dealer, Elemental applicator |
Xingqiu | Xingqiu honestly does everything; if you ever have a doubt about who you need to fill in a Hydro slot, just pick Xingqiu. From high single-target damage, extremely fast Hydro application to even damage reduction and healing that can replace a healer when paired with Beidou, Xingqiu has it all and you can basically never go wrong with slotting him into your team. Roles: Off-field damage dealer, Elemental applicator, Defensive utility |
 Kokomi | Kokomi’s sustained off-field AoE Hydro application is second to none, and in situations where that matters, she can even outperform the likes of Xingqiu and Yelan. This combined with her ability to keep your team healthy while being able to hold TTDS allows Kokomi to be an extremely strong and comfortable pick in many teams. When on the Ocean-Hued Clam artifact set, she can even have potential driver or dual-driver opportunities in her team with some impressive damage. Kokomi’s ability to consolidate so many roles into one unit is very valuable when it comes to team building, and she is someone who should not be overlooked. Roles: Off-field Elemental applicator, Healer, On-field driver |
Yelan | Yelan’s high damage and fast Hydro application makes her a premier choice as a Hydro flex slot. Her performance (at C0) in teams is relatively similar to Xingqiu’s (at C6), which should be seen as a positive due to how difficult it is for any unit to even be comparable to Xingqiu. A major drawback for slotting in Yelan is that your team may lack in defensive options such as healing or shielding, which is important to note when building a team if these defensive slots are something that you value. Roles: Off-field damage dealer, Elemental applicator |
Examples Teams & Rotations

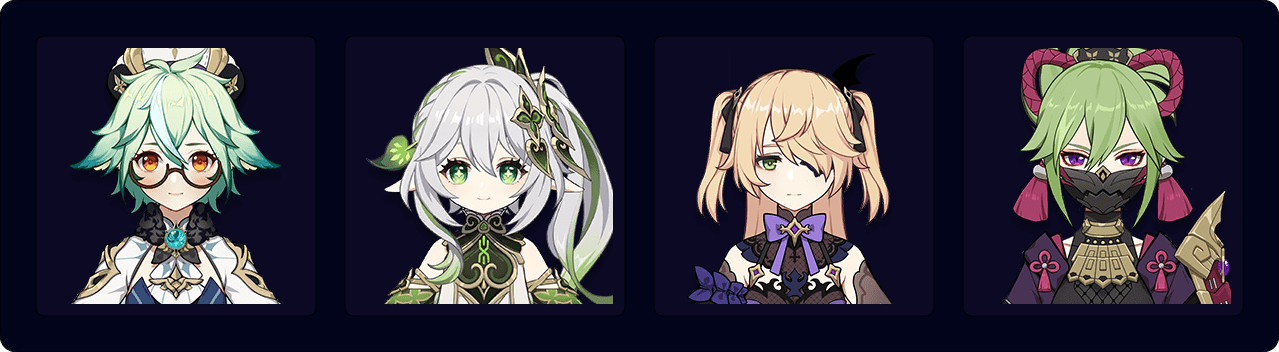
Sucrose — Nahida — Fischl — Kokomi
Sample Rotation

Sucrose — DMC — Fischl — Xingqiu
Sample Rotation
Mechanics and Tricks

There are multiple quirks about Sucrose that players should know. These pointers will help future players utilize Sucrose’s kit much better in most team comps. This section is subject to change in future updates.
Crowd Control
Anemo abilities capable of crowd control typically do so through using what the community has termed ‘Pulling Vacuum Fields’ — effects that pull enemies within their radius, or Area of Effect (AoE), towards their center. Pulling Vacuum Fields affect enemies based on their weight; if an enemy is too heavy for that particular ability, it will not be pulled.
Additionally, Pulling Vacuum Fields produced by characters are most effective when the enemy is less than 20 levels higher than them. This is one of the reasons it is recommended to level Sucrose to 90.
Sucrose’s Skill is a typical example of a Pulling Vacuum Field. In the video below, you can see that it pulls Eremites within its AoE towards its center.
Sucrose’s Burst, while being a Pulling Vacuum Field, has some unique traits to it.
Firstly, pullable enemies within it are never pulled entirely to the center; the vacuum field stops pulling them once they reach a certain distance from the core of her Crystalfly. This makes for a more scattered distribution of light enemies.
Secondly, pullable enemies within Sucrose’s Burst are launched up and down alternatively. Typically, this does not affect gameplay unless using Bow Aimed Shots.
Finally, and perhaps most importantly, Sucrose’s Burst has a tendency to stagger enemies that are too heavy to pull but have low Interruption Resistance. Staggering them may interrupt their attacks, but it can also cause them to move backwards, away from the center of her Burst. This may force you to waste Stamina to reach melee range when on-field with another character; in multi-target situations, it may scatter them.
This makes positioning Sucrose’s Burst especially important when dealing with enemies that are heavy and have low Interruption Resistance, such as Bathysmal Vishaps and Geovishaps. Avoid placing her Burst in the middle of such enemies; instead, use her Burst with all enemies on one side of it, so that they are pushed in the same direction rather than away from each other.
Absorption
Sucrose’s Elemental Burst can absorb one Element and apply its Elemental DMG along with Anemo. However, which Element ends up being absorbed follows several rules:
- Both enemies’ and the player’s inflicted Element can be absorbed.
- Absorption priority: Pyro > Hydro > Electro > Cryo
- Environmental Elements can be absorbed (e.g. if there is water nearby, the Burst will absorb its Hydro Element). This does not apply if the Element is Cryo.
- Her Burst only checks for what to absorb when it ticks, so if you are trying to time your application for the Burst to absorb a specific element, you should try to time it with the Burst tick.
- Sucrose’s Burst can absorb the self-applied Element from certain Talents (e.g. Bennett’s Burst imbues the active character with Pyro). This means you can walk into the middle of Sucrose’s Burst and cause it to absorb the Element your character has applied to them. This is more so a gimmick than a practical way to get an Element applied to her Burst.
- Elemental Infusions (e.g. Chongyun, Keqing, etc.) cannot apply Elements to the Burst.
- Non-Crystallized Element shields (e.g. Xinyan and Diona) can also apply Elements to the Burst because they actually infuse the character with said element. You need the infusion on yourself to get the Burst Absorption, not just the shield.
- Firing Elemental arrows through Sucrose’ Burst (at its core a.k.a. the Crystalfly) allows it to absorb the element applied to them (similar to how a character would). However, Cryo arrows do not have this characteristic so they will not be absorbed this way.
- HOWEVER, in the case of Absorption from items with aura, it is the opposite. Sucrose’s Burst will absorb the Cryo Element when it has been applied on an item, such as Amber’s doll.
Elemental Mastery Stack
In addition to Sucrose’s Passive Talents providing Elemental Mastery to her team, any other EM Sucrose gains can also be given to the team as long as it is not % sharing EM (ex. Nahida’s A1 Passive).
Overall, the EM a team member can gain from Sucrose is represented by this equation:
50 + [(Sucrose EM + Additional Party EM Buffs)×0.2] + Additional EM Buffs
However, note that this buff snapshots Sucrose’s EM at the time of cast. For example, if Sucrose receives an EM buff from Albedo after she has already buffed the team, the additional party EM buff will not be applied to the equation.
Managing Skill Charges
Sucrose’s ability to group enemies with just her Skill is relatively weak, so having only one charge of your Skill at C0 can be quite detrimental in scenarios where the grouping can largely benefit your team’s damage output. When Sucrose is at least at C1 with Sacrificial Fragments, she is actually capable of having up to 3 uses of her Skill, which compensates quite well for the lack of grouping with 1 individual Skill. With that being said, knowing how to properly manage your Skill charge(s) is extremely important when trying to get the most out of Sucrose’s kit.
As a general rule for managing Sucrose’s Skill charges, it is ideal to space out your Skill usage since enemies can only take 2 instances of Swirl DMG for every 0.5s. For this reason, you want to avoid using your Skill at the same time as your Burst pulses or spamming them back to back, especially when you animation cancel your Skill with a dash or jump. By separating Swirl instances on the enemy, you can get more Swirls and more damage.
C0 without Sacrificial Fragments (1 Skill Charge)
For those who have Sucrose at C0 and haven’t been fortunate enough to get a Sacrificial Fragments or are choosing to run another weapon such as TTDS or Favonius Codex, making sure that you’re able to get the most out of your single Skill is extremely important. When you use your Skill, you always want to make sure you are hitting as many enemies as possible, not only to group them more effectively, but to also get more damage due to Swirl being able to multiply based on the amount of enemies hit. On top of this, you also want to make sure you are using Sucrose’s Skill at a time that will line up with the rest of your team’s rotation.
In quickswap heavy teams, Sucrose may tend to feel like a more “clunky” option when compared to someone like Venti or Kazuha, due to her having a 15-second cooldown on her Skill with no extra charges at C0 and not able to get any cooldown reduction from her C4. On the other hand, in rotations where Sucrose does not want to spend much time on-field and only wants to cast Skill and/or Burst and then leave the field, she can feel much smoother to play.
Example Team Rotation

Sucrose — Rosaria — Mona — Ayaka
Rosaria E Q > Sucrose E Q > Mona Q E > Ayaka Dash E Q > Rosaria E > Ayaka NA/CA Spam > Repeat (20s rotation)
Due to Sucrose’s long cooldowns, being able to get the most out of your party members in a rotation is extremely important. With Rosaria having a short cooldown on her Skill, it is easy to swap into her to get multiple Skills off in a rotation and make use of Ayaka’s Charged Attacks while waiting for cooldowns from Sucrose to come back before starting your next rotation.
C1 without Sacrificial Fragments (2 Skill Charges)
Sucrose’s Skills recharge one at a time. If you use both charges within the first rotation, your second Skill charge’s cooldown will begin ticking down by rotation length minus her Skill’s cooldown, which is 15s. If you have a 20s rotation, you will only get 2 Skill charges up again in the fourth rotation. If you have a 22.5s rotation, you will have 2 Skill charges available every other rotation. Only if your rotation is 30s minimum will you have 2 Skill charges available every rotation.
This means players need to think about when to use their Skills a lot more, especially in scenarios where the extra Skill charge may matter. If you can kill the enemy in one rotation or don’t need 2 Skills in your second rotation, feel free to use both within the first rotation. In the scenario you are not able to one-rotate the enemy, planning out when to use your Skills to get the most value out of them can be beneficial.
Sacrificial Fragments Interactions with Sucrose Skill Charges
There are some key interactions with Sucrose’s kit and Sacrificial Fragments, and understanding what they are and how to use them to your advantage can play in your favor.
- Sacrificial Fragments’ cooldown reset has a chance to proc for each hit that deals damage to an enemy. This essentially means that the chance to refund your Skill cooldown is actually a lot higher in multi-target situations than the 40-80% chance at R1-R5 listed in the weapon description.
- Sacrificial Fragments’ passive resets the cooldown of the current Skill charge. If you have 1 Skill charge available and 1 Skill charge still on cooldown, Sacrificial Fragments’ passive will reset the available Skill charge rather than the Skill on cooldown, meaning that you don’t get the benefit of the banked reduced cooldown time. If your second Skill charge has 5s remaining on its cooldown and you use your available Skill charge, you only get 5s refunded, as opposed to your Sacricial Fragments refunding the full 15s on the available Skill charge.
- At low refinements, the passive cooldown on Sacrificial Fragments (30s at R1 and 26s at R2) is longer than most rotation lengths. What this means is that if you have a 20s rotation, your Sacrificial Fragments will not be able to proc after your first rotation until halfway into your second rotation.
C1+ or C0 with Sacrificial Fragments (2+ Skill Charges)
When Sucrose has C1 and/or Sacrificial Fragments, Sucrose’s rotations become a lot more flexible while giving more particle generation, more grouping and more damage. With that being said, the way in which you want to use your Skills is still similar to that of a C0 Sucrose, but the extra Skill charges give you many more options in how you want to execute rotations. (For example, a unit such as Xiao greatly benefits from Sucrose’s C1 since you can funnel an extra Skill’s worth of particles into your Xiao). T
he most important thing to note is that you do not want to excessively spam your Skill without a good reason. There are a lot of scenarios in which players will spam their Skill and not be able to crowd control another wave of enemies. If you only need her Skill for the grouping, it is likely you will not have to spend more than one Skill to be able to get the enemies close enough for your AoE to hit everything. By doing this, you are able to have extra Skill charges for another wave of enemies and don’t have to wait for your Skill before you do another rotation.
Example Team Rotation
Sucrose — Rosaria — Mona — Ayaka
Rosaria E Q > Sucrose E Q > Mona Q E > Ayaka Dash E Q > Rosaria E > Ayaka CA > Sucrose E > Ayaka CA/NA Spam > Repeat (20s rotation)
Similar rotation to previous C0, but Sucrose is able to fit in an extra Skill if you need to maximize damage.
Animation Cancelling Sucrose’s Skill
Due to her Skill’s long animation time, it is recommended to cancel it using a jump or dash cancel in order to save time. You can also choose to swap cancel but there is a good chance you will swap off of Sucrose before you Swirl so it will not apply 4pc VV effect which is a huge DPS loss.
Sucrose N1 Bug
Under certain circumstances, Sucrose’s N1 may sometimes not come out despite her doing the animation for it. This bug can cause you to lose DPS by potentially delaying your Swirl. Luckily, there are some workarounds to make sure this doesn’t happen. The key concept to know is that you want to avoid spamming your N1 input as the bug only occurs when you are attacking quickly with Sucrose by continuously spamming her Normals.
For more information, read BowTae’s TCL entry discussing the N1 bug and how to avoid it.
Gravity
Sucrose’s Elemental Skill has a property that attracts enemies and items towards the center of the AoE. However, this can be abused. A falling enemy can impact the ground at a faster rate with a little bit of help from Sucrose’s Elemental Skill, thus getting more damage from falling. This works with characters that are able to lift enemies up very high. Jean + Sucrose combination is such an example.
Jean can lift enemies up using her Charged Attack and Elemental Skill, and when they fall, Sucrose can be used to increase their falling velocity and the damage they take.
However, it is possible to mistime using Jean’s Skill with respect to Sucrose’s Burst pulses, in which case fall damage would unfortunately be reduced instead.
Guoba Swirl
Sucrose can perform a mechanic referred to as “Guoba Swirl”. If Sucrose uses her Skill while Guoba is about to shoot fire (when Guoba has an exclamation mark over its head), she can Swirl Pyro off of Guoba onto nearby enemies. You can also see when Guoba is affected with Pyro if you use Elemental Sight, which will show Guoba turning red to indicate he is infused with Pyro. This can be used to activate chain reactions while not requiring a Pyro aura to be present on enemies. This is used to proc both Overloaded and Vaporize chain-Swirls, allowing Sucrose to deal considerable damage. With Sucrose on 4VV, Guoba Swirls also Shred Pyro RES on enemies hit by the Pyro Swirl.
Sucrose is one of two characters that can Guoba Swirl, but only she uses it effectively.
Note that Swirling Guoba alone is not sufficient to trigger Sucrose’s Ascension 1 Passive.
Sucrose vs. Other Anemo Units
Heizou


As both are Anemo Catalyst users, comparisons between Sucrose and Heizou are inevitable. In general, they can often be used interchangeably, though there are some nuances to keep in mind.
Though Heizou has a weak suction built into his Burst, Sucrose is the better grouper overall. She has crowd control as part of her Skill and Burst, and her Skill is more spammable with multiple charges. Heizou’s pull does get stronger with his C2, but it is still weaker than Sucrose’s combined kit.
Sucrose will offer a more potent EM buff than Heizou can with his A4 Passive. This makes her a slightly better choice for teams that use Amplifying or Additive Reactions. In practice though, this can change based on player investment into Sucrose, Heizou, and other teammates. There are some exceptions: in Xiangling teams, Sucrose will have the edge due to her ability to Swirl Pyro off of Guoba. In Freeze teams, Heizou has the advantage as his lower EM buff matters less than his greater personal damage.
As with buffing, Sucrose and Heizou are fairly interchangeable in this role. It mostly comes down to playstyle preferences and who you would rather invest more into. Sucrose’s advantages come in the form of her range and larger AoE on her Charged Attacks. However, Heizou’s Normal Attacks can feel more fluid to some, and his Charged Attacks have a lower Stamina cost than Sucrose’s.
Sucrose requires less field time than Heizou, as Heizou needs to build up Declension stacks before using his Skill. However, Heizou offers more personal damage and a cheaper Burst. Although Heizou’s Burst offers comparatively less crowd control than Sucrose’s, it may sometimes be easier to use if you don’t want to risk absorbing the wrong Element and interfering with your team’s reactions. If looking for a unit to provide Energy for Xiao, Sucrose will generate more particles.
Kazuha


Kazuha and Sucrose share some overlap in their roles. Both are powerful Anemo units who can do respectable AoE damage while simultaneously buffing teammates and providing crowd control. However, they differ in some key respects.
Kazuha has stronger, more consistent grouping than Sucrose. Though Sucrose has more charges for her Skill and has crowd control built into both her Skill and Burst, the grouping she offers comes in short bursts and can be difficult to control. Kazuha’s grouping provides a more consistent pull and centers around his position when he uses his Skill and the subsequent Plunging Attack.
Sucrose shares a portion of her EM with the team while Kazuha provides an Elemental DMG% buff. Sucrose excels in Amplifying and Transformative Reaction based compositions. Kazuha, on the other hand, is a lot more general due to his buff being Elemental DMG%, but can be limited when it comes to buffing Dendro and Anemo DPS. Sucrose is able to buff these other Elements that Kazuha can’t due to her EM share being team-wide and her ability to hold TTDS.
When played optimally in the same teams, Kazuha and Sucrose are both able to Double Swirl and Kazuha will generally win out versus Sucrose, especially in teams where more than one Element is doing the damage. When it comes to other teams, such as Freeze, Mono-Element teams and other teams that lack reactions, Kazuha beats out Sucrose by quite a bit. It should be noted that if Kazuha is C2 he will basically always beat out Sucrose.
Sucrose is often a “driver” for her teams, meaning that she spends time on-field using her Normal Attacks to apply Anemo and trigger coordinated attacks like Xingqiu’s Rain Swords. As a Catalyst user, all of Sucrose’s Normal and Charged Attacks are Anemo by default. This allows her to trigger more Swirls when on-field than C0 Kazuha even if her Skill has a longer cooldown than Kazuha’s. However, if a character other than Sucrose is being used as a driver in your team (e.g. Kokomi), you should consider their off-field damage potential instead.
Kazuha does significantly more off-field damage than Sucrose, as he triggers more reactions and has higher multipliers. He will also outperform Sucrose in teams where the goal is to trigger as many reactions as possible, all at once (i.e. “Soup” teams). Despite having longer animations on his hold Elemental Skill and his Elemental Burst, the extra reactions he triggers result in higher damage output.
Sucrose generally has higher ER requirements than Kazuha when using her Burst every rotation. This usually means that Kazuha can invest more easily into EM after reaching his lower ER threshold.
Damage output should not be the sole defining factor when choosing the best teammate. Please keep the other aspects mentioned above in mind when choosing between Kazuha and Sucrose.
Setups with Sucrose vs. Kazuha
In regards to other rotations and setups that aren’t mentioned, there are just way too many to compare to each other, so these rotations in specific were picked out to show the nuances that come with playing one unit over the other.

Xiangling — Tartaglia — Bennett — Sucrose / Kazuha

Hu Tao — Xingqiu — Pyro Support — Sucrose / Kazuha
When Sucrose doesn’t have the option of abusing Guoba Swirl for her rotations, pulling off Double Swirl setups can be a lot trickier. Alternatively, Kazuha’s setups never needed this in the first place so it won’t be that much different from other Kazuha rotations in terms of how the player will approach their setup. A good example of this would be Hu Tao Double Swirl setups. Getting a Hydro Swirl with Sucrose can be awkward especially if you aren’t familiar with when to N1 on Sucrose to proc Xingqiu’s Rain Swords and when to follow it up with her Skill.
It’s worth noting that as a result of Kazuha being melee, Xingqiu’s Rain Swords can actually mess up rotations at times due to them applying Hydro when it comes into contact with enemies. Sucrose doesn’t have this issue as much since she is ranged.
Venti


Though comparisons between Sucrose and Venti were common in the early days of Genshin, it has become clearer over time that the two are suited to different roles in their teams. Venti offers significantly more powerful crowd control against certain enemies, while Sucrose provides more potent buffs and acts as a better driver.
Venti has a much more powerful and consistent grouping ability in the form of his Burst. Sucrose has some crowd control too, but Venti’s sustained pull that packs enemies tightly together is difficult to compete with.
It should be noted that Venti has a tendency to lift lighter enemies out of melee reach. If this is a concern, then Sucrose (or Kazuha) may be better suited for your grouping needs. Consider also that the types of enemies that are lifted tend to be ones that are easier to defeat.
For a full list of which characters and enemies are affected by Venti’s Burst, see here.
For all his grouping potential, Venti cannot provide buffs like Sucrose can without Constellations. This makes Sucrose strictly the better buffer, especially for teams that use Amplifying or Additive Reactions. Even if Venti holds Elegy for the End, Sucrose provides more EM with greater uptime on her buffs. She can even give a larger ATK% buff if she holds Thrilling Tales of Dragon Slayers.
Venti often makes up for this with his higher personal damage, but your needs may vary. Venti also has a unique Energy refund mechanic whereby he grants 15 Energy to characters of the same Element he absorbs in his Burst (Anemo, Dendro, and Geo characters cannot benefit from the refund since these Elements cannot be absorbed).
As a Catalyst user, Sucrose’s Normal and Charged Attacks deal Anemo damage by default. This makes her Anemo application while on-field much greater than Venti’s. Combined with poor scalings on Venti’s Normal Attacks, this makes Sucrose the preferred driver for teams that want one.
In general, Venti has higher personal damage than Sucrose, but damage is not the primary concern when choosing between Sucrose or Venti. The teams they each excel in have little overlap, and Sucrose’s buffs often make up for her lower personal damage. This is primarily true for teams that can make use of her EM buffs and ability to hold TTDS. In teams that do not benefit from this (e.g. Freeze or Mono-Element), Venti’s higher personal damage will have more value.
Credits
Writers
- Reimu#1626
- EggsD#9603
- Faranight#0001
- Sir_pick_the_prick#2209
- Nociii#0111
- juko#9385
- mian#8650
Contributors
- Rare Possum#0511, Terrapin#8603, Hatsuharufan#4291 and everyone else who helped with TC for this guide
- brliron#0478, acie#1290, pweep#0150, Sew#2409, idkanonymized#4166, Leah, ZchryRbbt#3752, thunderoath#2211, Raf#7220, an odd medium#6288, Seima#4597, Casdela#5121, Rathalos#2875, jamie#9248, konodiada#4956, Xreejan#1180, fritzzes#2211, Mystathi#9705, Reddraegon#0019, QuarkMark#7728 for help with the guide
- Cuzimori#1535 and Ayzel#7399 for information in the KQM Kazuha Guide
- Cuzimori#1535 for information in the KQM Heizou Guide
- Team images courtesy of the KQM portrait generator
Transcribers
- irokei#6189
- flamescion#9370
