Updated for Version 4.7

Lynette is a 4-star Anemo Sword character in Genshin Impact who deals off-field Anemo damage, offers various support utilities, and gains on-field capabilities with her sixth Constellation. Learn about Lynette’s best builds, Talent priority, best weapons, best artifacts, and best teams in this in-depth review.
Note that the information given may change if new discoveries are made. More extensive testing is in progress.
Join our Discord to participate in the theorycrafting process.
Table of Contents
New Content
 Arlecchino, Sethos, Clorinde, Sigewinne | New units who benefit from 4pc Viridescent Venerer. Lynette can slot into their teams as an off-field Anemo support who also provides some quality of life with her Taunt. |
 Uraku Misugiri, Absolution | Chiori and Clorinde’s respective signature weapons. CRIT-stat stick options if building Lynette for personal damage, with Uraku also offering a strong passive. |
Infographic
Credits to: euphorysm, cuppacote, baloopy, and KQM Staff
Character Overview
Playstyles
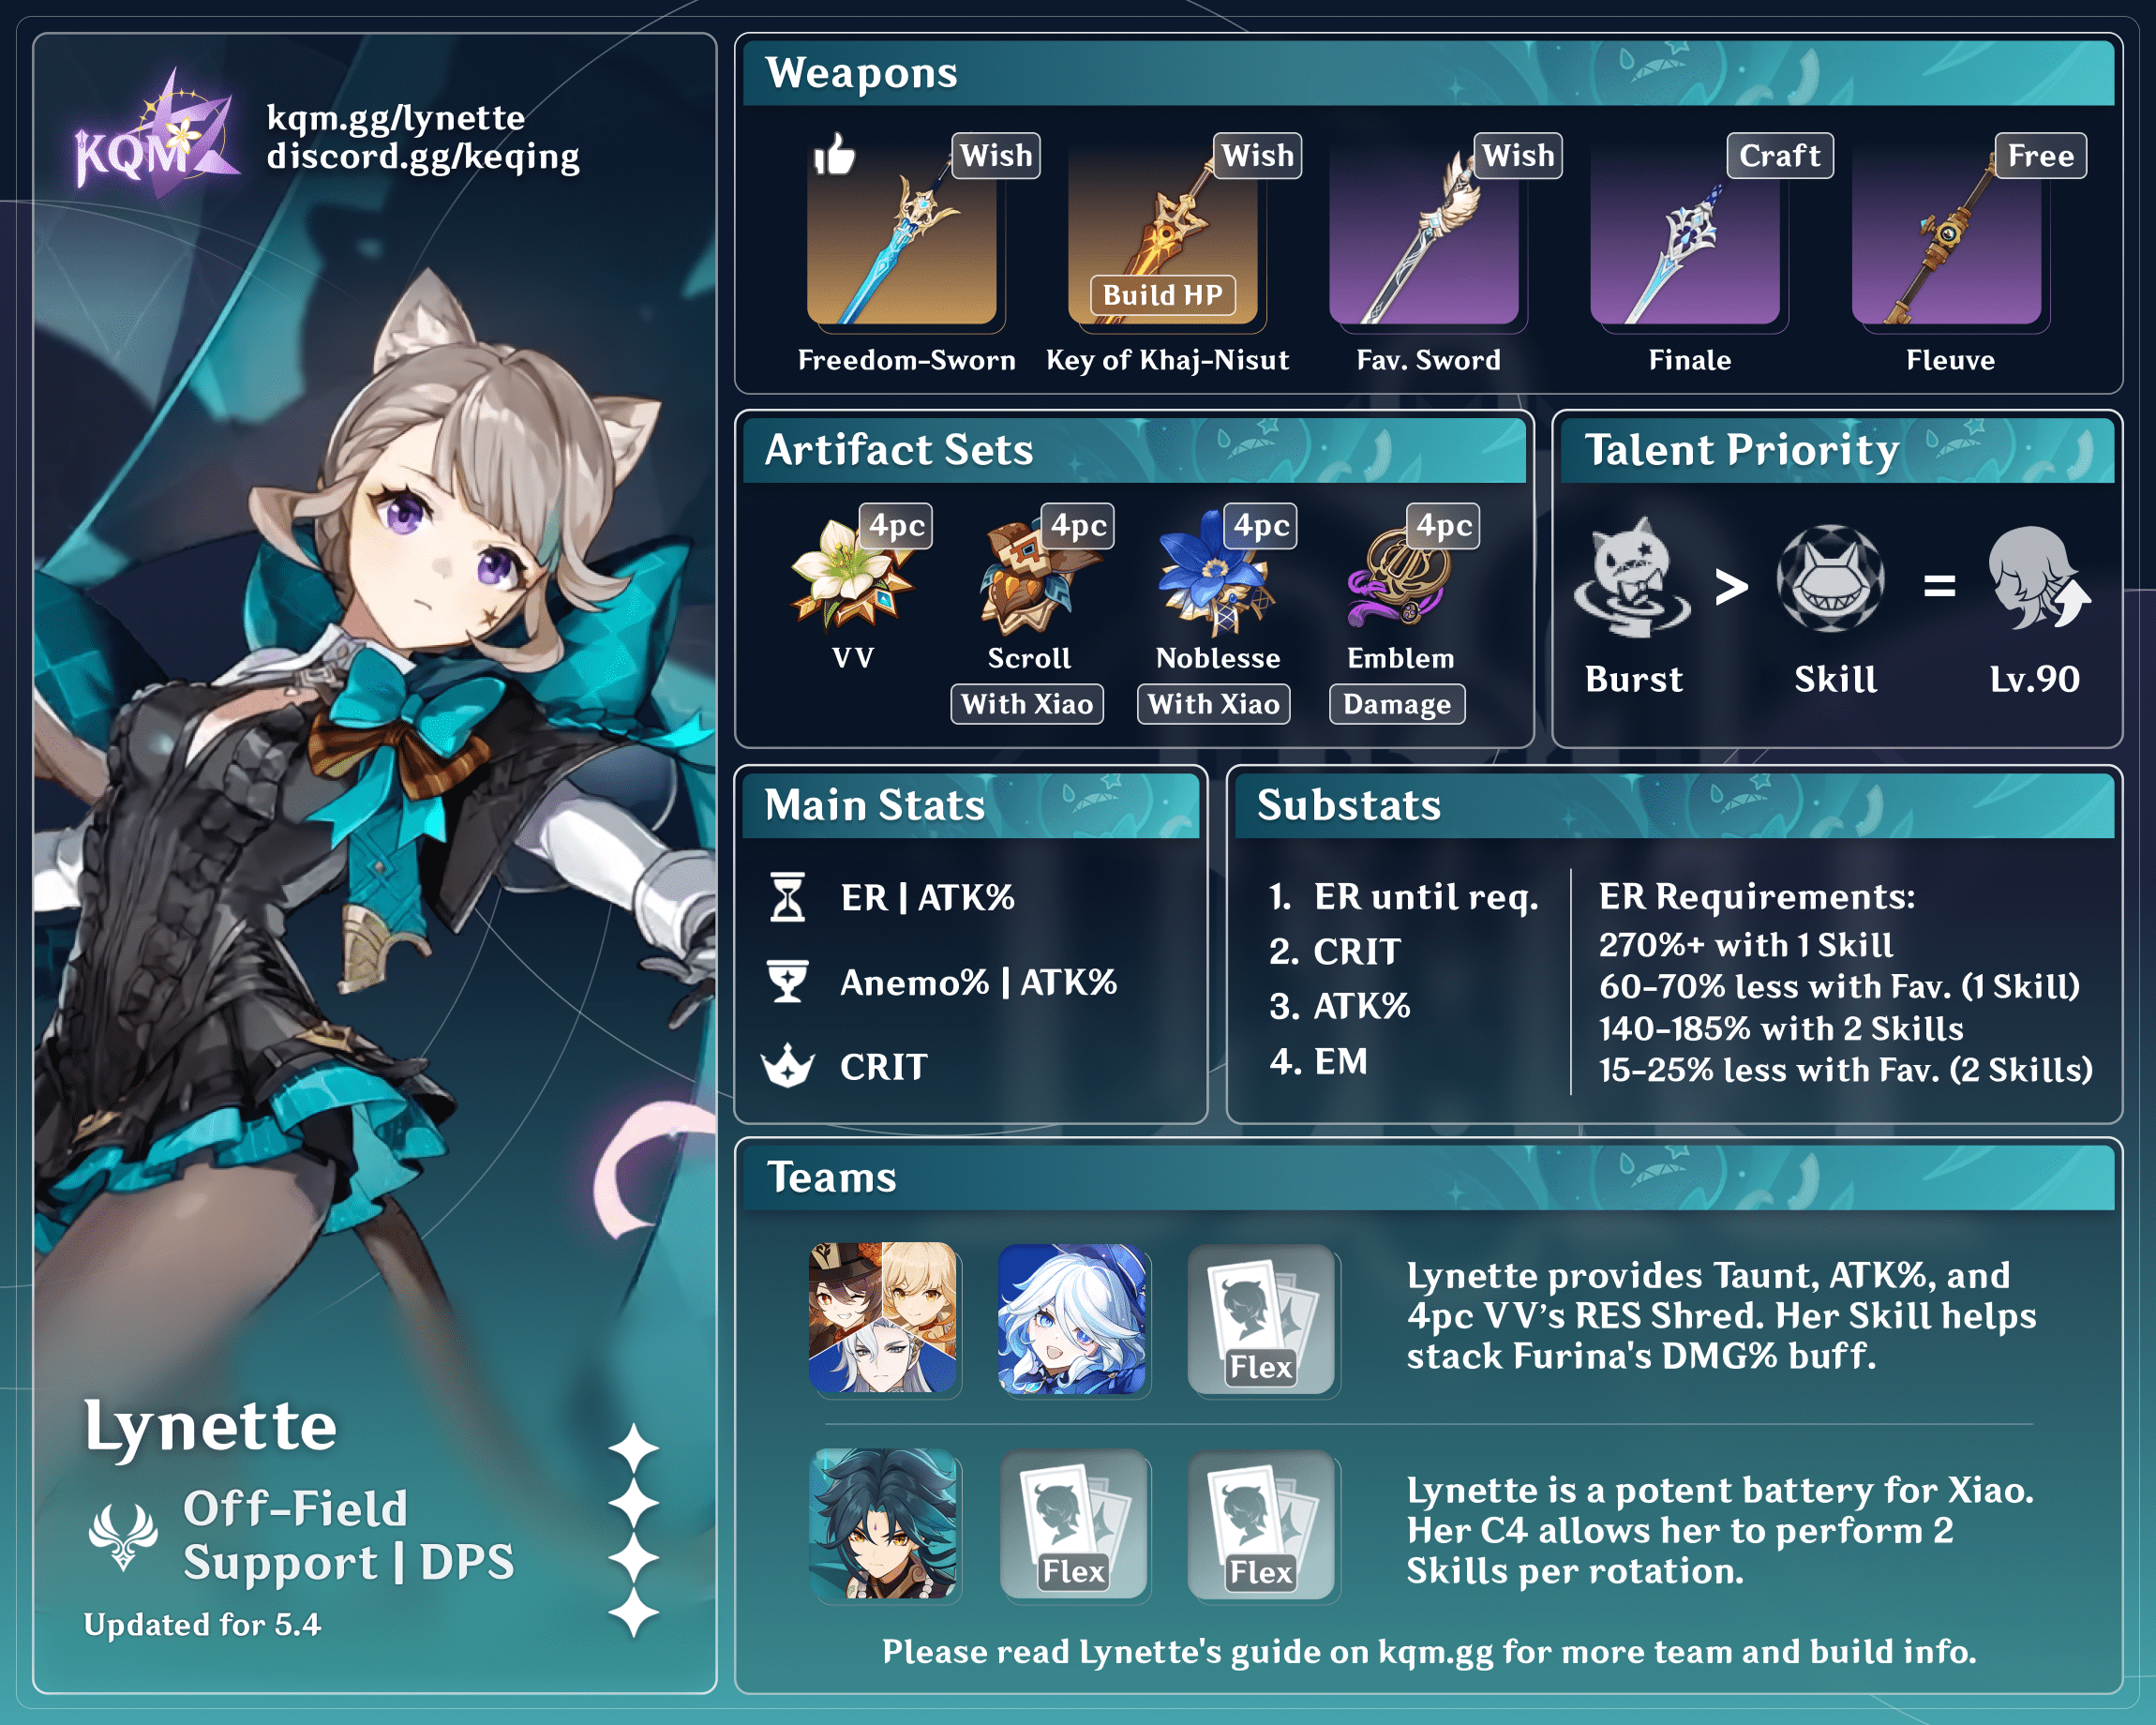
Off-Field DPS / Support
Lynette’s Burst creates a turret that applies Anemo and an absorbed Element from off-field, while also taunting enemies. She can also buff her teammates’ damage with her Ascension 1 Passive and VV Shred.
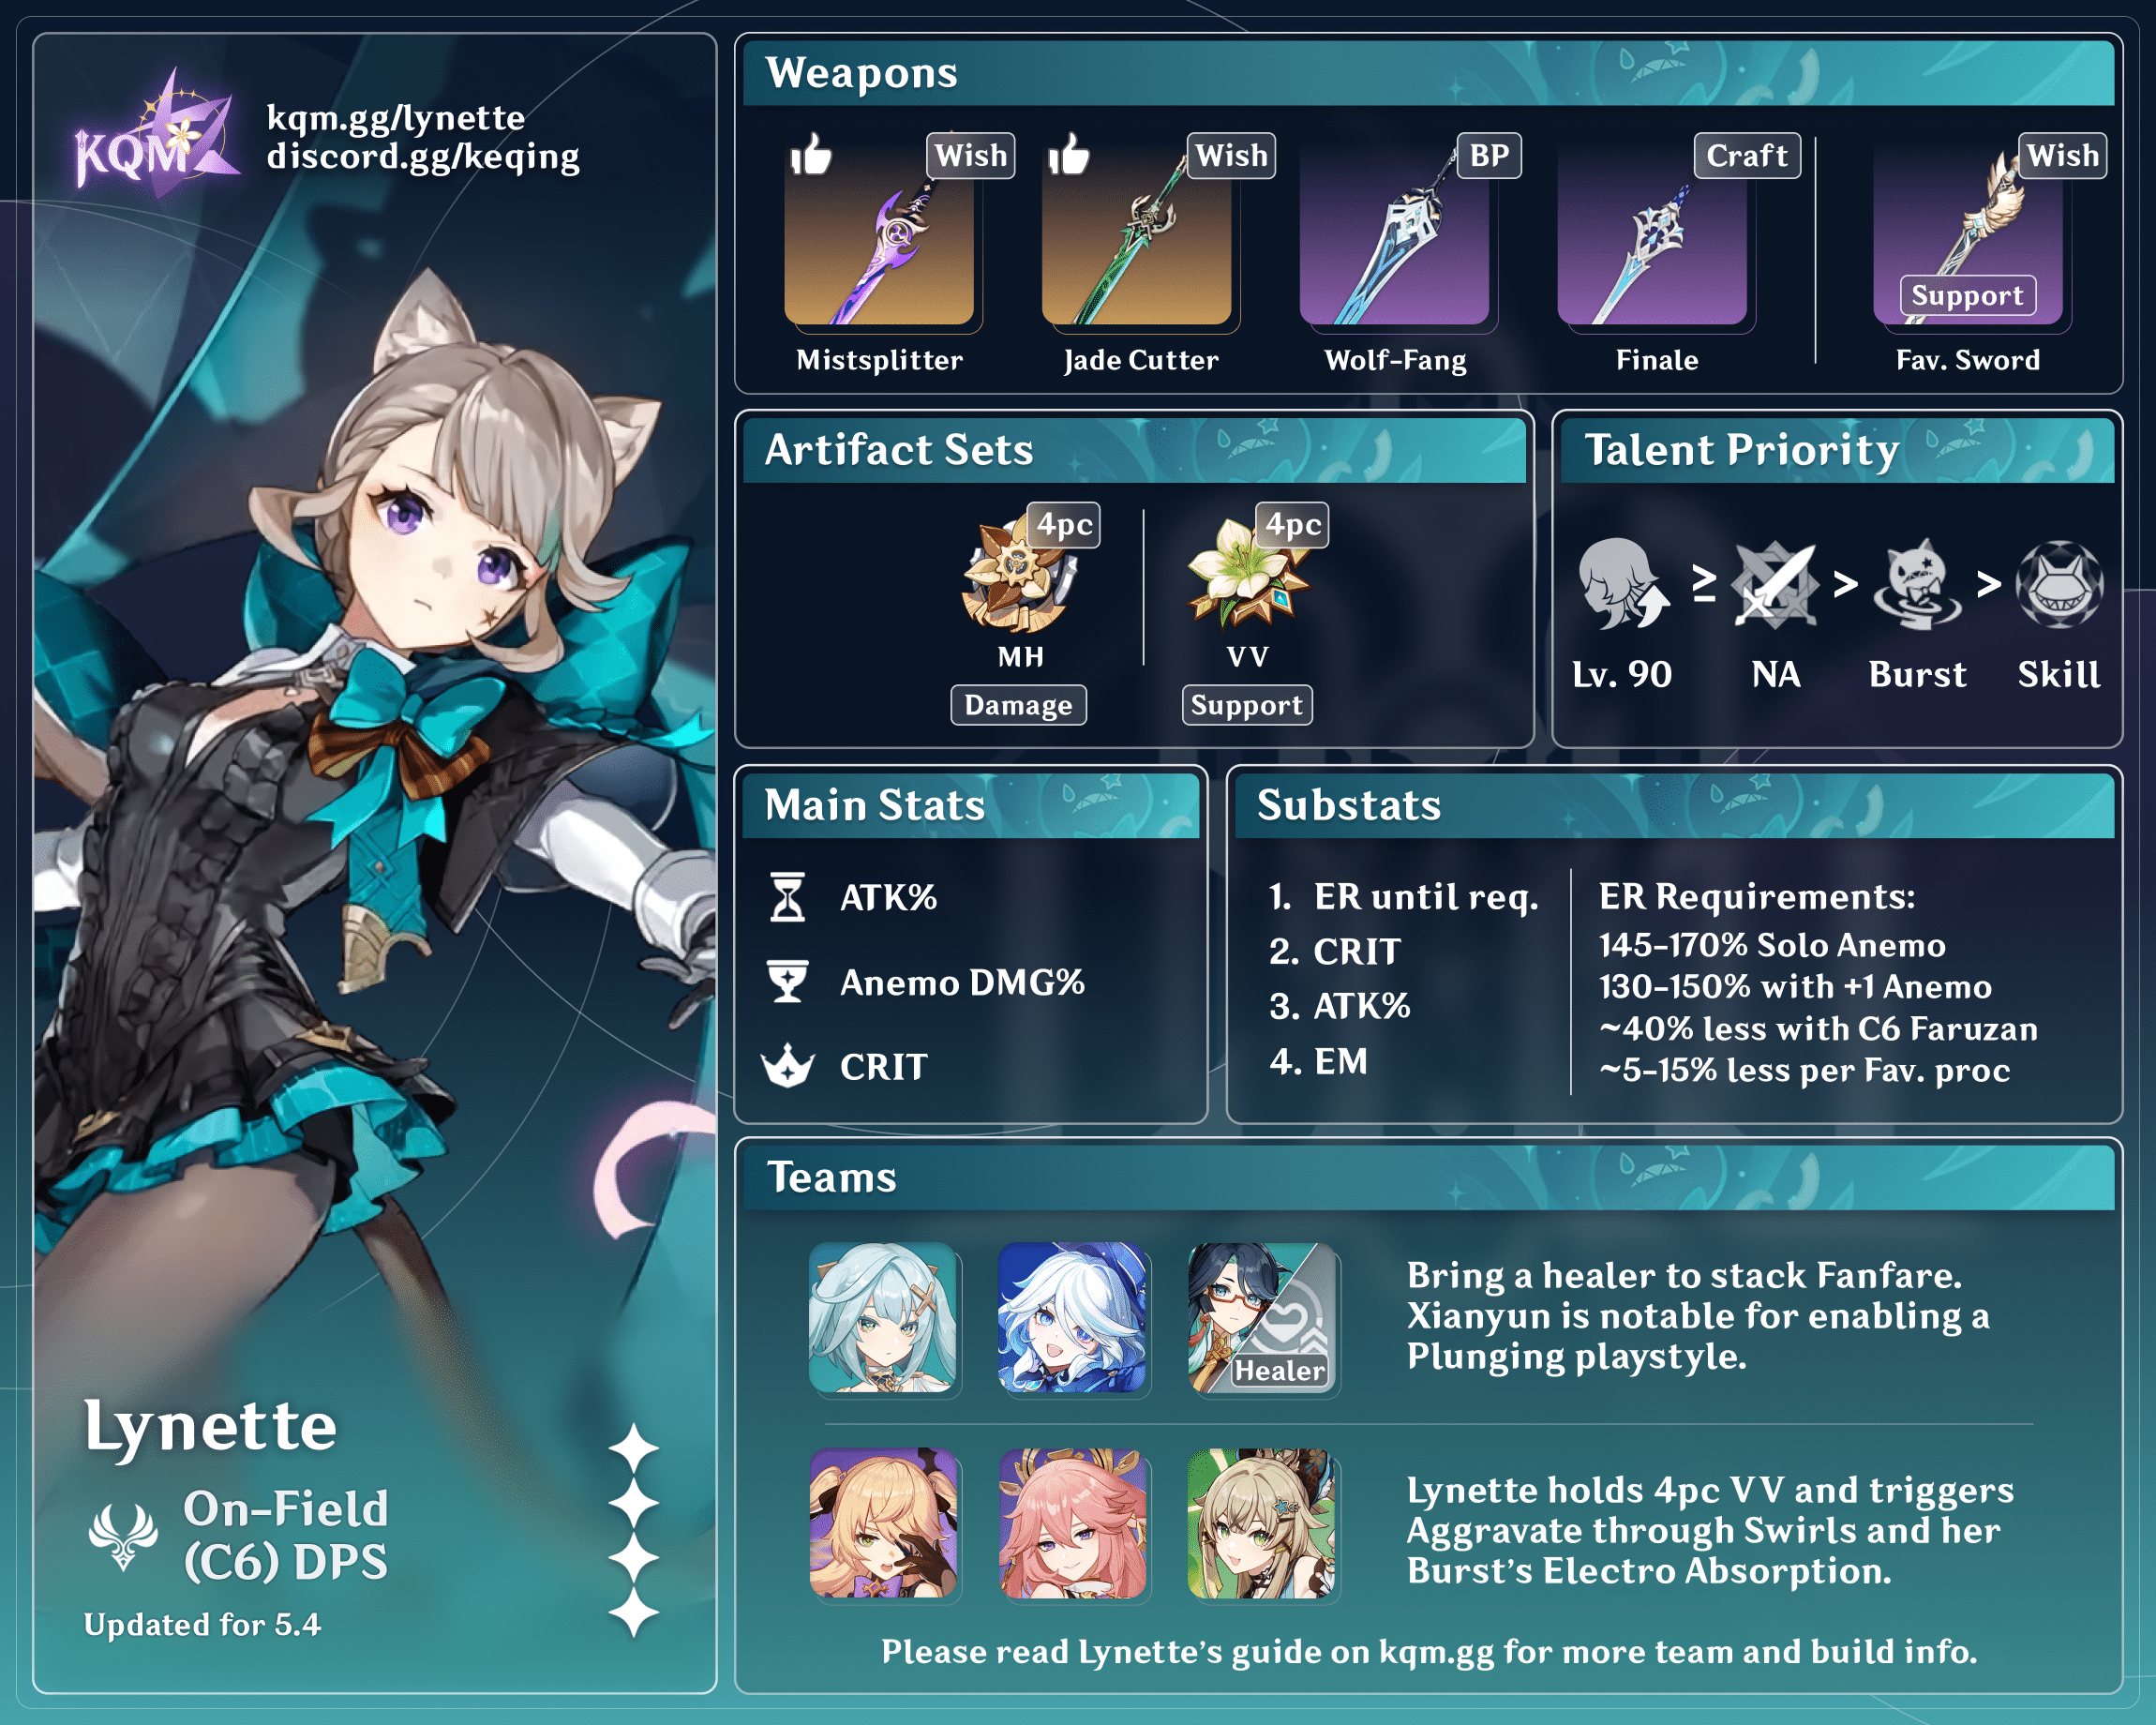
On-Field Anemo / Hyperbloom DPS
Lynette’s C6 provides her with up to 12s of Anemo Infusion. She can act as an on-field Anemo DPS or as a driver for off-field teammates while triggering Swirl and other chain reactions like Hyperbloom.
Talents
Level and Talent Priority
If you’re using a Transformative Reaction build that utilizes reactions like Swirl and Hyperbloom, leveling Lynette to 90 is preferable.
Burst > Skill ≥ Normal Attack
It is only recommended to level Lynette’s Normal Attack if she has her C6. For Hyperbloom playstyles, Talent levels are not necessary.
Talent Overview
 Normal Attack | Rapid Ritesword
Talent Description
Normal Attack
Performs up to 4 rapid strikes.
Charged Attack
Consumes a certain amount of Stamina to unleash 2 rapid sword strikes.
Plunging Attack
Plunges from mid-air to strike the ground below, damaging opponents along the path and dealing AoE DMG upon impact.
A flashy set of melee attacks that is otherwise unremarkable pre-C6. They gain some value with Lynette’s C6 if you’re using her as an Anemo on-field driver, thanks to her fast Normal Attacks allowing her to trigger Swirl and chain reactions frequently.
 Elemental Skill | Enigmatic Feint
Talent Description
Flicks her mantle and executes an Enigma Thrust, dealing Anemo DMG.
When the Enigma Thrust hits an opponent, it will restore Lynette’s HP based on her Max HP, and in the 4s afterward, she will lose a certain amount of HP per second.
Based on whether you press or hold this ability, she will use Enigma Thrust differently.
Press
She swiftly uses an Enigma Thrust.
Hold
Lynette will enter a high-speed Pilfering Shadow state and apply Shadowsign to a nearby opponent. You can control her movement direction during this state, and you can end it prematurely by using this skill again.
When this high-speed state ends, Lynette will unleash her Enigma Thrust. If there is an opponent with Shadowsign applied to them nearby, Lynette will approach them in a flash before using Enigma Thrust.
A maximum of 1 opponent can have Shadowsign at any one time. When this opponent gets too far from Lynette, the Shadowsign will be canceled.
Arkhe: Ousia
At specific intervals, Lynette will unleash a Surging Blade when she uses Enigma Thrust, dealing Ousia-aligned Anemo DMG.
This Skill has two variants: Tap and Hold. The Tap variant simply deals Anemo damage, while the Hold variant causes Lynette to enter a high-speed state and marks a single nearby enemy. Upon ending this state by pressing Skill again or after 2.5s, she rushes to the marked enemy and deals an instance of Anemo damage identical to the Tap Skill. Care should be taken when aiming the Hold Skill, as it is possible to miss the marked target.
This Skill generates a fixed 4 Anemo Particles for either usage. It will heal her and then subsequently drain her HP; this lets her make use of equipment reliant on HP changes.
Every 10s, this Skill launches an Arkhe hit that deals Anemo damage but cannot trigger Swirl. This damage is Ousia-aligned, and can be used to weaken Pneuma-aligned enemies. Arkhe attacks are not guaranteed to hit the enemy.
 Elemental Burst | Magic Trick: Astonishing Shift
Talent Description
Lynette raises her mantle high, dealing AoE Anemo DMG, using skillful sleight of hand to make a giant Bogglecat Box appear!
Bogglecat Box
- Taunts nearby opponents, attracting their attacks.
- Deals Anemo DMG to nearby opponents at intervals.
- When the Bogglecat Box comes into contact with Hydro/Pyro/Cryo/Electro, it will gain the corresponding element and additionally fire Vivid Shots that will deal DMG from that element at intervals.
Elemental Absorption of this kind will only occur once during this ability’s duration.
Lynette’s Elemental Burst makes up the majority of her damage and utility in many teams. After dealing Anemo damage once, she spawns a turret called a Bogglecat Box. The Bogglecat Box deals damage to enemies in range while taunting enemies for its duration. It can be moved by other entities, but unlike many other taunts, the Bogglecat Box is indestructible for its duration.
If the Bogglecat Box comes into contact with Hydro, Pyro, Cryo, or Electro, it absorbs the Element and begins firing additional projectiles known as Vivid Shots that deal damage of the absorbed Element. The Element absorbed depends on the first instance of Elemental damage that hits the Bogglecat Box. Throughout its duration, the Box deals 12 instances of Anemo damage, along with 4-5 (8-10 with C2) Vivid Shots, depending on how early it absorbs an Element.
This ability does not snapshot; its damage changes dynamically as Lynette receives or loses buffs while on-field or off-field.
 Ascension 1 Passive | Sophisticated Synergy
Talent Description
Within 10s after using Magic Trick: Astonishing Shift, when there are 1/2/3/4 Elemental Types in the party, all party members’ ATK will be increased by 8%/12%/16%/20% respectively.
A simple teamwide buff that scales with Element diversity in the team. Do not specifically build your team around this passive.
 Ascension 4 Passive | Props Positively Prepped
Talent Description
After the Bogglecat Box summoned by Magic Trick: Astonishing Shift performs Elemental Coversion, Lynette’s Elemental Burst will deal 15% more DMG. This effect will persist until the Bogglecat Box’s duration ends.
A straightforward damage buff for her Burst.
Constellations
 Constellation 1 | A Cold Blade Like a Shadow
When Enigmatic Feint’s Enigma Thrust hits an opponent with Shadowsign, a vortex will be created at that opponent’s position that will pull nearby opponents in.
Adds a moderate grouping effect to her Hold Elemental Skill.
 Constellation 2 | Endless Mysteries
Whenever the Bogglecat Box summoned by Magic Trick: Astonishing Shift fires a Vivid Shot, it will fire an extra Vivid Shot.
Doubles the number of Vivid Shots fired by her Burst, allowing for greater damage and Elemental Application.
 Constellation 3 | Cognition-Inverting Gaze
Increases the Level of Magic Trick: Astonishing Shift by 3.
Maximum upgrade level is 15.
A simple increase to her Burst damage.
 Constellation 4 | Tacit Coordination
Increases Enigmatic Feint’s charges by 1.
Adds an additional use for Lynette’s Elemental Skill. Two consecutive Skills can be used to:
- deal additional Anemo damage and trigger an additional Swirl
- generate additional Anemo Particles
- provide additional grouping via another instance of her C1’s vortex effect
- extend the uptime of her C6’s Anemo Infusion
In shorter rotations, Lynette can only use both Skills consecutively every other rotation, due to their 12s cooldown.
 Constellation 5 | Obscuring Ambiguity
Increases the Level of Enigmatic Feint by 3.
Maximum upgrade level is 15.
A simple increase to her Skill damage; this is less significant than levels for her Burst.
 Constellation 6 | Watchful Eye
When Lynette uses Enigmatic Feint’s Enigma Thrust, she will gain an Anemo Infusion and 20% Anemo DMG Bonus for 6s.
Allows Lynette to act as an on-field Anemo DPS and enabler, as she is now able to apply Anemo with her Normal and Charged Attacks. Staggering two Skill uses allows her to maintain this Infusion for up to 12s. Additionally, the Anemo DMG Bonus provided by the Constellation buffs not only her Normal and Charged Attacks, but also her Elemental Burst.
Even in quickswap or off-field playstyles, this Constellation still has value, since Lynette can weave in Normal Attacks to trigger Swirls during her field time. She can also enable certain Swirl setups in conjunction with Elemental Infusions granted by teammates, as she will Swirl the other Element applied to her weapon. Note that Lynette’s Anemo Infusion can be overridden by other Elemental Infusions.
On-Field Combos
N = Normal Attack
C = Charged Attack
D = Dash
| N3D | Has the highest Swirl count when using Anemo-infused Normal Attacks. Recommended for Hyperbloom trigger playstyles. |
| N2C | C6 Lynette’s highest-damage combo when using Normal Attacks with her Infusion. Recommended for Triple Anemo. |
Artifacts
ER Requirements
Calcs for ER requirements can be found here (last updated for Version 4.7).
Off-Field
| Favonius Sword | Other Weapons | |||
| Solo Anemo | 1 Skill | ~180–200% | ~240%+ | |
| 2 Skills | ~115–160% | ~140–175% | ||
| Double Anemo With Xiao | 1 Skill | ~190–205% | ~210–225% | |
| 2 Skills | ~145–160% | ~160–175% | ||
| Triple Anemo | With C0 Faruzan or Xianyun | 1 Skill | ~160–210% | ~200–240% |
| 2 Skills | ~130–155% | ~150–170% | ||
| With C6 Faruzan | 1 Skill | ~120–160% | ~145–175% | |
| 2 Skills | ~105–120% | ~120–130% | ||
On-Field
| +1 Team Favonius Proc | No Team Favonius | |||
| Solo Anemo | 2 Skills | ~130–160% | ~145–170% | |
| Double Anemo | 2 Skills | ~105–145% | ~115–150% | |
| Triple Anemo | 2 Skills | With C0 Faruzan | ~100–150% | ~105–155% |
| With C6 Faruzan | ~100–110% | ~105–115% | ||
Favonius weapons reduce Lynette’s ER needs by approximately 10–20% per proc. These numbers are approximate; ER requirements vary depending on team and context. For a more accurate estimate of your ER requirements, use the Energy Recharge Calculator.
Rotations with only 1 Skill and no Favonius on the team tend to have highly impractical ER requirements and are not recommended. Note that Lynette requires C4 to use 2 Skills every rotation. She can achieve 2 Skills per rotation before C4 by using a refined Sacrificial Sword, although it may be inconsistent at lower refinements due to her Skill only having two hits.
Artifact Stats
General Support / Damage Dealer
 Sands |  Goblet |  Circlet |
| Energy Recharge or ATK% | Anemo DMG Bonus or ATK% | CRIT Rate or CRIT DMG |
Stat Priority: ER% (until requirement) > CRIT > ATK%
Lynette generally prefers a CRIT Circlet and an Anemo DMG% Goblet, with her Sands being either ATK% or ER% depending on her ER requirements. At C2+, an ATK% Goblet is often comparable to Anemo DMG%, especially when using an ER% Sands.
Transformative Reaction–Focused
Sands | Goblet | Circlet |
| Elemental Mastery or Energy Recharge | Elemental Mastery | Elemental Mastery |
Stat Priority: ER% (until requirement) > EM
In Hyperbloom and other reaction-focused teams, Lynette’s Circlet and Goblet should both be EM. While an EM Sands is preferable, an ER% Sands may be necessary to meet her ER requirements for bursting every rotation.
Substat-wise, Lynette primarily wants EM and ER%. EM should be prioritized once her ER requirements are met.
Artifact Sets
In teams that can benefit from Pyro, Electro, Cryo, or Hydro RES Shred, Lynette should equip 4pc Viridescent Venerer.
 4pc Viridescent Venerer | Recommended option for general usage. It is Lynette’s Best-in-Slot set in nearly all her playstyles, as it greatly increases the damage of any Pyro, Cryo, Hydro, or Electro teammates. It also increases her Swirl damage considerably, which is still useful in C6 driver playstyles. |
If the team does not need VV (or has another Anemo character running the set), Lynette can use artifacts that increase her personal damage.
 4pc Emblem of Severed Fate | Lynette’s Best-in-Slot for personal damage, especially at lower Constellations. Her Burst makes up a significant portion of her damage and she tends to build ER anyway due to her Burst’s high Energy Cost. At higher Constellations, other sets start pulling ahead. |
 4pc Noblesse Oblige | Lynette can hold 4pc Noblesse Oblige to buff both herself and her teammates, while also benefiting from the set’s Burst DMG Bonus. |
 4pc Marechaussee Hunter | Lynette’s HP drain mechanic and corresponding healing lets her activate the 4pc set effect. Her C6 lets her take further advantage of the 36% CRIT Rate buff with her Normal Attacks. |
 4pc Desert Pavillion Chronicle | A decent option at C6, as Lynette can take advantage of both its 2pc and 4pc effects. |
 2pc Mixed Sets | • Anemo DMG% • ATK% • ER% (Emblem of Severed Fate) • Burst DMG% (Noblesse Oblige) Any 2pc combination can be used as a placeholder. |
For C6 Transformative Reaction focused playstyles, Lynette should equip artifacts that increase her EM, or otherwise buff her Transformative Reaction damage.
4pc Viridescent Venerer | VV remains a recommended set. While not as impactful for Hyperbloom as other sets, it increases her Swirl damage considerably, which is still useful in Hyperbloom-focused playstyles. It also significantly increases the damage dealt by teammates like Fischl and Xingqiu, increasing overall DPS. |
 4pc Gilded Dreams | As the go-to set for maximizing Bloom-related reaction damage, Gilded Dreams is a solid option for Lynette in Hyperbloom teams. |
 4pc Flower of Paradise Lost | The best option for Hyperbloom damage, at the cost of less Swirl damage and a somewhat Resin-inefficient Domain. |
 2pc Mixed Sets | • EM • ER% (Emblem of Severed Fate) Any 2pc combination can be used as a placeholder. Since EM main stats are rare, it is much easier to get all three main stats with a mixed set. |
Weapons
Anemo DPS / Support
It is generally unrealistic to meet Lynette’s ER requirements as an off-field support without an ER% Sword. Swords without an ER% secondary stat are best used in on-field DPS playstyles.
 Favonius Sword | Lynette’s general Best-in-Slot, covering her ER requirements while also providing valuable Energy to the team. |
 Sacrificial Sword | An alternative to Favonius Sword that emulates the effect of her C4. Refinements allow her to use its passive more consistently in shorter rotations. |
 Freedom-Sworn | Can be a good option for teams that appreciate its teamwide ATK% and buffs to Normal/Charged/Plunging Attacks. It is also the best choice for Transformative Reaction damage. |
 Fleuve Cendre Ferryman | Free option that provides a large amount of ER% and a modest Skill CRIT Rate buff. |
 Amenoma Kageuchi | Craftable option that lowers her ER requirements and provides some ATK%. |
 Skyward Blade, Skyrider Sword | Energy Recharge stat sticks with negligible passives. |
 5-Star CRIT Swords | Primordial Jade Cutter, Mistsplitter Reforged, Haran Geppaku Futsu, Light of Foliar Incision, Uraku Misugiri, Absolution CRIT stat sticks to increase her personal damage, assuming her ER requirements are already met. C6 Lynette makes better use of their passives with her Anemo-infused Normal Attacks. |
 Wolf-Fang | A decent choice for Battle Pass buyers, having performance that trails just behind 5-star CRIT weapons. |
 Finale of the Deep | A free-to-play damage-focused option for when Lynette has low ER requirements. Since this weapon grants 25% Bond of Life on using Skill, and Lynette heals herself for 25% of her Max HP when using Skill, she’ll always heal the Bond and get the buff immediately. |
Hyperbloom DPS
Freedom-Sworn | The best choice for raw Swirl and Hyperbloom damage. Its passive can increase the damage of ATK-scaling teammates like Xingqiu. |
 Xiphos’ Moonlight | A potent option that gives both EM and ER%, while also helping her teammates fulfill their ER requirements. |
 Iron Sting, Toukabou Shigure | EM stat sticks that can be used for this reason, assuming Lynette’s ER requirements have already been met. |
 Sapwood Blade | Gives a mix of both ER% and EM, although picking up the passive’s Leaf may be impractical or even impossible to do in combat. |
Favonius Sword | Covers her ER requirements while also providing valuable Energy to the team with its passive. However, it can be difficult to trigger its passive without substantial CRIT Rate investment. |
Fleuve Cendre Ferryman | Free option that provides a large amount of ER% and a modest Skill CRIT Rate Buff. |
Teams
Rotation Notation
- N = Normal Attack
- C = Charged Attack
- A = Aimed Shot
- P = Plunging Attack
- hP = High Plunge
- lP = Low Plunge
- E = Elemental Skill
- tE = Tap Skill
- hE = Hold Skill
- Q = Elemental Burst
- D = dash (cancel)
- J = jump (cancel)
- W = walk (cancel)
- > = switch character
- ( ) = these actions are optional; please refer to the notes below
- [ ] = repeat these actions the specified number of times
Teambuilding
- Lynette buffs the team with 4pc Viridescent Venerer and her A1 Passive.
- Her Elemental Skill can weaken enemies vulnerable to Ousia-aligned damage.
- Her Burst offers some defensive utility with its taunt, though this generally won’t replace shielders or healers.
- While her Burst can apply Elements other than Anemo, this application is fairly slow and is best used to supplement a dedicated Element applier.
Generalist Anemo Support

Lynette can slot into most teams that want a 4pc Viridescent Venerer holder, shredding Elemental RES to enhance the team’s Pyro, Electro, Hydro, and Cryo damage dealers. She also provides a modest teamwide ATK% buff with her A1 Passive, off-field Elemental application and taunting with her Burst, and some grouping with her C1.
In teams with Furina, Lynette’s HP fluctuations also let her help stack Fanfare. She pairs especially well with characters with innate HP fluctuation (e.g., Wriothesley, Hu Tao) and teams with weaker or single-target healers. She can also help speed up Fanfare stacking in teams that stack Fanfare fully on their own (e.g., Neuvillette teams).
Pre-C6 Lynette does not apply enough Anemo to trigger reactions like Hyperbloom frequently. However, C6 makes her more effective at triggering Swirl and Hyperbloom; see the C6 Transformative Reaction Trigger section for more details. Lynette can also be used as a generalist Anemo on-fielder at C6.
Example Teams
This is not a comprehensive list of teams. The inclusion or exclusion of any given team does not necessarily reflect its power level.

Sample Rotation (Zhongli)
Arlecchino E > Zhongli hED (N1) > Bennett E Q > Lynette E(Q) > Arlecchino N1C 6[N3D] N1
Sample Rotation (Xiangling)
Arlecchino E > Lynette N1 Q N1 E > Bennett EQ > Xiangling Q ED > Lynette N1 E > Arlecchino N1C 6[N3D] N1 > Bennett E

Sample Rotation
(Ayaka D)¹ > Lynette (E)²Q > Shenhe tEQ > Kokomi E > Ayaka D E N1 Q N2C > Lynette E (N2)³ > Shenhe tE N1 > Ayaka D N2CD N2 E N2CD N2C
¹First rotation only.
²C4+ Lynette can use her Skill if available.
³Catch particles.

Sample Rotation (Zhongli)
Neuvillette E > Furina ED Q > Zhongli hED > Lynette EQ > Neuvillette C Q E C > Zhongli hED > Lynette E > Neuvillette 2[C]
Sample Rotation (Lisa)
Neuvillette ED > Furina ED N1 > Lynette Q > Lisa hEQ > Lynette E N1 > Furina Q > Neuvillette C Q E C > Lynette E > Neuvillette 2[C]

Sample Rotation
Lyney C > Zhongli hED > Bennett EQ > Lynette Q/E¹ > Lyney 3[C] Q/C² E > Bennett E
¹Burst if available, use Skill otherwise.
²Burst if available, use a 4th Charged Shot otherwise.

Sample Rotation
Nahida E N1 Q N1 > Bennett EQ > Lynette (E)1Q N1 > Wriothesley E 5[N3CJ] N4C > Lynette E N1
¹C4+ Lynette can use her Skill here to reduce her ER requirements.


Double and Triple Anemo

Lynette can slot into Double or Triple Anemo teams to deal damage, battery, or play as an on-field DPS at C6 with her Anemo-infused Normal Attacks. As Faruzan greatly increases the personal damage output of any Anemo teammates, she is practically mandatory for these teams.
Bennett is highly recommended for the team’s flex slot, although he has severe drawbacks if he has his C6. In lieu of Bennett, any other off-field damage dealer, healer, or shielder can function well. Preferably they should be Pyro, Electro, or Cryo for some extra Swirl damage, though this is not necessary. Furina is another highly recommended option thanks to her strong buffs, which Lynette helps stack with her innate healing and HP drain; Furina also deals significant personal damage.
Notable Teammates
 Faruzan | Faruzan is currently unmatched as a support for Anemo damage dealers, providing both Anemo RES Shred and Anemo DMG Bonus. Her C6 is helpful (though not necessary): it reduces her own steep ER requirements and greatly increases her support potential, as her Burst now provides a CRIT DMG buff to Anemo damage, while also enabling it to generate particles and group enemies. |
 Furina Furina | Furina offers an unmatched, partywide DMG Bonus through her Burst, which Lynette’s HP fluctuations can help stack. She also deals solid personal damage from off-field with her long-lasting Skill. |
 Xianyun | Xianyun buffs Plunging Attacks and allows you to play any unit as a Plunge DPS. She especially synergizes with units who have access to Elemental Infusions, such as C6 Lynette. Lynette’s Anemo Particles further decrease Xianyun’s ER requirements compared to other Xianyun teams. Xianyun teams are among C6 Lynette’s strongest carry teams. |
 Bennett | Bennett remains the premier ATK buffer available while also providing healing. His Pyro application not only enables Pyro Swirls, but also allows certain abilities like Lynette’s Burst to absorb Pyro and deal additional damage. However, Bennett’s C6 Pyro Infusion overrides Lynette’s C6 Anemo Infusion, causing her to deal some Pyro damage while his Burst is active. |
 Kazuha | Kazuha’s strong personal damage and grouping make him a solid pick for Triple Anemo teams. His short cooldowns fit well in quickswap-oriented teams and his Burst lets him deal significant damage from off-field, especially if it absorbs another Element. |
 Jean | Jean consolidates healing and cleansing while generating particles for her teammates with her low-cooldown Skill. While she doesn’t especially shine, the QoL and survival she brings make her a comfortable pick. At C4 Jean becomes a luxury support for Anemo DPS units, providing a rare source of Anemo RES Shred. |
 Heizou | Heizou offers respectable personal damage through his hard-hitting Skill and his relatively low-cost Burst. His short Skill and Burst cooldowns make him a flexible option for Triple Anemo teams. Although his Burst offers some grouping, it is much weaker than those of other Anemo options. |
 Sucrose | Sucrose lacks some of the personal damage that other Anemo options contribute, and her EM buff is less useful in Triple Anemo teams. However, she compensates with grouping and excellent battery capabilities that help lower her team’s ER requirements. Note that Sucrose’s Burst can occasionally ungroup enemies. |
 Venti | While Venti provides both significant personal damage and strong grouping, his Burst lifts enemies out of reach for Lynette’s Normal Attacks. As such, he is not recommended for C6 Lynette. |
 Zhongli | Zhongli brings an incredibly sturdy shield with high uptime that also packs Universal RES Shred. However, he does not enable any Elemental Absorptions, and generally contributes less to team damage than other options. |
Example Teams
This is not a comprehensive list of teams. The inclusion or exclusion of any given team does not necessarily reflect its power level.
Sample Rotation (Xianyun)
Furina ED Q > Faruzan Q > Xianyun ElP Q > Lynette Q E 6[JhPD] E 2[JhPD] 2[N1C] > Faruzan E N1
Sample Rotation (Bennett)
Furina ED Q > Bennett Q E > Faruzan E CQ > Lynette Q E 2[N2C] > Bennett E N2 > Faruzan E C > Lynette E 4[N1C]

Sample Rotation (Xiao)
Faruzan Q E > Lynette EQ > Bennett EQ > (Lynette E)¹ > Xiao 2[E]Q combo
¹With her C4 or Sacrificial Sword, Lynette can use her additional Skill here.
Sample Rotation (Wanderer)
Faruzan E Q > Bennett EQ > Lynette EQ > Wanderer (Q) N1 E combo E > Bennett E
Sample Rotation (Xiangling)
Bennett Q E > Xiangling Q ED > Faruzan E (C)¹Q > Lynette Q E 4[N2C] > Bennett E > Faruzan E C > Lynette E N1C
¹Pre-C6 Faruzan should use a Charged Shot.
Sample Rotation (Kazuha)
Faruzan E Q > Bennett EQ > Kazuha tEP Q > Lynette Q E 2[N2C] > Kazuha tEP > Bennett E N2 > Lynette E 2[N2C] N1C > Kazuha tEP > Lynette N1C
C6 Hyperbloom Trigger

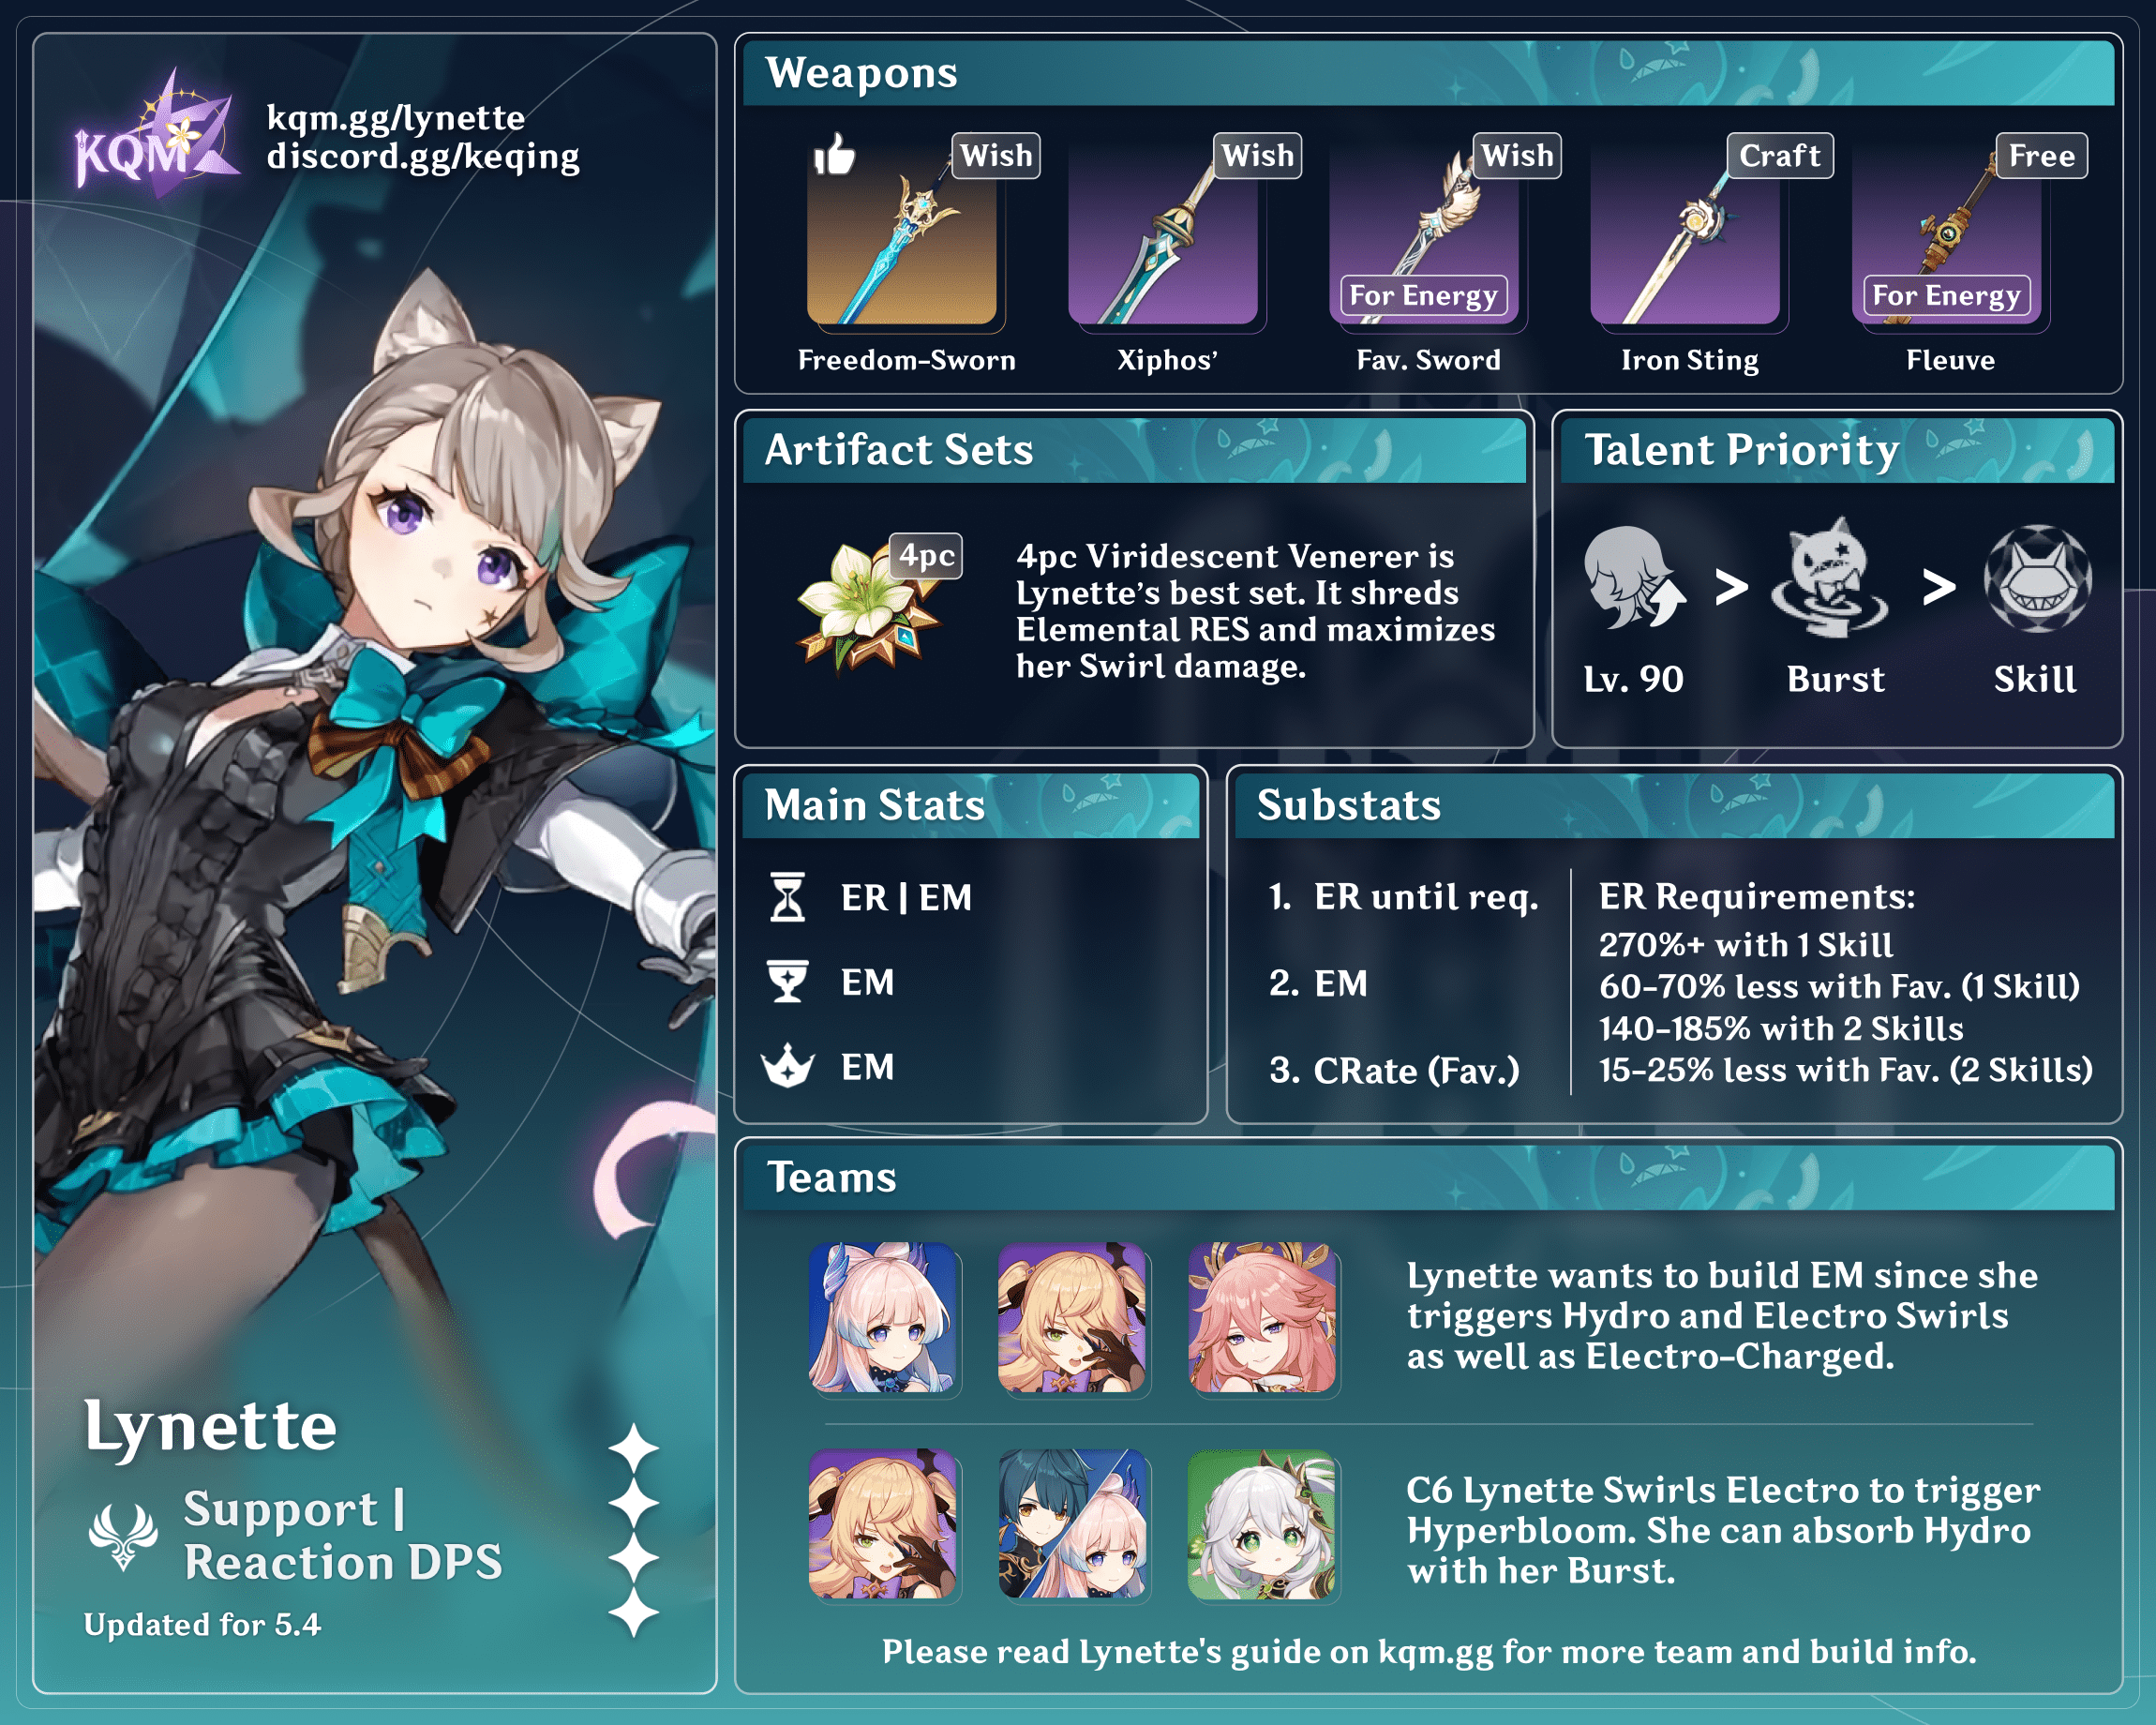
Lynette can act as an on-field Hyperbloom trigger by Swirling Electro through her Burst and Anemo-infused Normal Attacks. Her Burst can also absorb Electro to trigger even more Hyperblooms and maintain higher Quicken uptime. Her A1 Passive provides a respectable partywide ATK% buff, and she can carry 4pc VV to further buff her Electro and Hydro teammates’ damage. However, this playstyle requires Lynette’s C6 to function.
It is also possible to run Lynette as a flex Anemo support for teams with Electro units triggering Hyperbloom; this role does not require her C6. See the Generalist Anemo Support section for more information.
Notable Teammates
 Fischl | Fischl offers an unmatched rate of Electro application and contributes significant personal damage. She also tends to hit Dendro Cores infrequently, allowing Lynette to trigger a larger portion of Hyperblooms. |
 Beidou | Beidou provides strong off-field Electro damage that excels in AoE. Beyond its initial cast, her Burst doesn’t target Dendro Cores and lets Lynette maintain Hyperbloom ownership. Due to her high Burst cost, Beidou may struggle as a solo Electro, so consider running Favonius where possible. |
 Yae Miko | An off-field damage dealer who provides Electro application for Lynette to Swirl. She contributes respectable personal damage. While her totems will not target Dendro Cores directly, their small AoE will still steal some Hyperblooms, albeit not enough to be a concern. Yae Miko has high ER requirements when Solo Electro and will often prefer to Burst every other rotation. |
  Xingqiu, Yelan | Both Yelan and Xingqiu provide Hydro application and respectable personal damage from off-field. Xingqiu appreciates Lynette’s ATK% buff, and both Xingqiu and Yelan benefit from 4pc VV. Xingqiu has greater Hydro application than a pre-C2 Yelan, and also provides damage reduction with his Rain Swords. Yelan’s A4 DMG% buff for the on-field character is not as impactful, as Lynette’s Talent damage is minimal in this team. |
 Kokomi | While Kokomi’s off-field Hydro application is slower than Xingqiu and Yelan’s, it is more effective in AoE. In addition, Kokomi provides a strong source of healing. She should either build a high amount of Energy Recharge (to Burst consistently), or equip Sacrificial Fragments to maintain high uptime on her Skill. |
 Collei | Collei provides mobile, off-field Dendro application, which she can further increase by holding Sacrificial Bow. She has fairly manageable ER requirements even as solo Dendro. |
 Dendro Traveler | Dendro Traveler has good off-field Dendro application and high uptime. While their Burst is stationary, its large AoE provides solid coverage. Since their Dendro application is tied to their high-cost Burst, the Traveler struggles with high ER requirements as a solo Dendro. |
 Nahida | Nahida provides excellent off-field Dendro application and a sizable EM buff through her Burst. However, her strong Dendro application risks interfering with Lynette’s ability to Swirl Electro to trigger Hyperbloom. |
 Yaoyao | Yaoyao offers off-field Dendro application and much appreciated healing. While her Skill’s Dendro application may struggle in single-target, its random targeting lets her perform well in multi-target scenarios. |
 Baizhu | Baizhu provides off-field Dendro application, modest interruption resistance, and strong healing. However, his slow, single-target Dendro application leaves the team unable to generate many Dendro Cores with him as the sole Dendro unit. |
 Kuki Shinobu | While Kuki consolidates both healing and Electro application, she will also be triggering most of the Hyperblooms. As such, Lynette is left feeling out of place with little to contribute to her team, as she will not be triggering many Swirls either. |
Example Teams
This is not a comprehensive list of teams. The inclusion or exclusion of any given team does not necessarily reflect its power level.

Sample Rotation
Nahida Q E N1 > Fischl N1 Q > Xingqiu EDQ N1 > Lynette Q E 2[N3D N2D] N2 > Nahida E C > Fischl N1 E > Lynette E N2J N3J N2D N1C
Credits
nikatosaurus, caramielle., leifa, emiliabyss, sigurd3854, polomo, sexyeboy69, cozen., frankdgaf, irokei, cuppacote, baloopy, haafr, staryy_, clevernt, spphrs