Updated for Version 5.6

Ifa is a 4★ Anemo Catalyst character in Genshin Impact who deals on-field damage while healing his teammates. Learn about Ifa’s best builds, best weapons, best artifacts, and best teams in this quick guide.
Note that the information given may change if new discoveries are made. More extensive testing is in progress.
Join our Discord to check on and participate in the theorycrafting process.
Table of Contents
Infographic
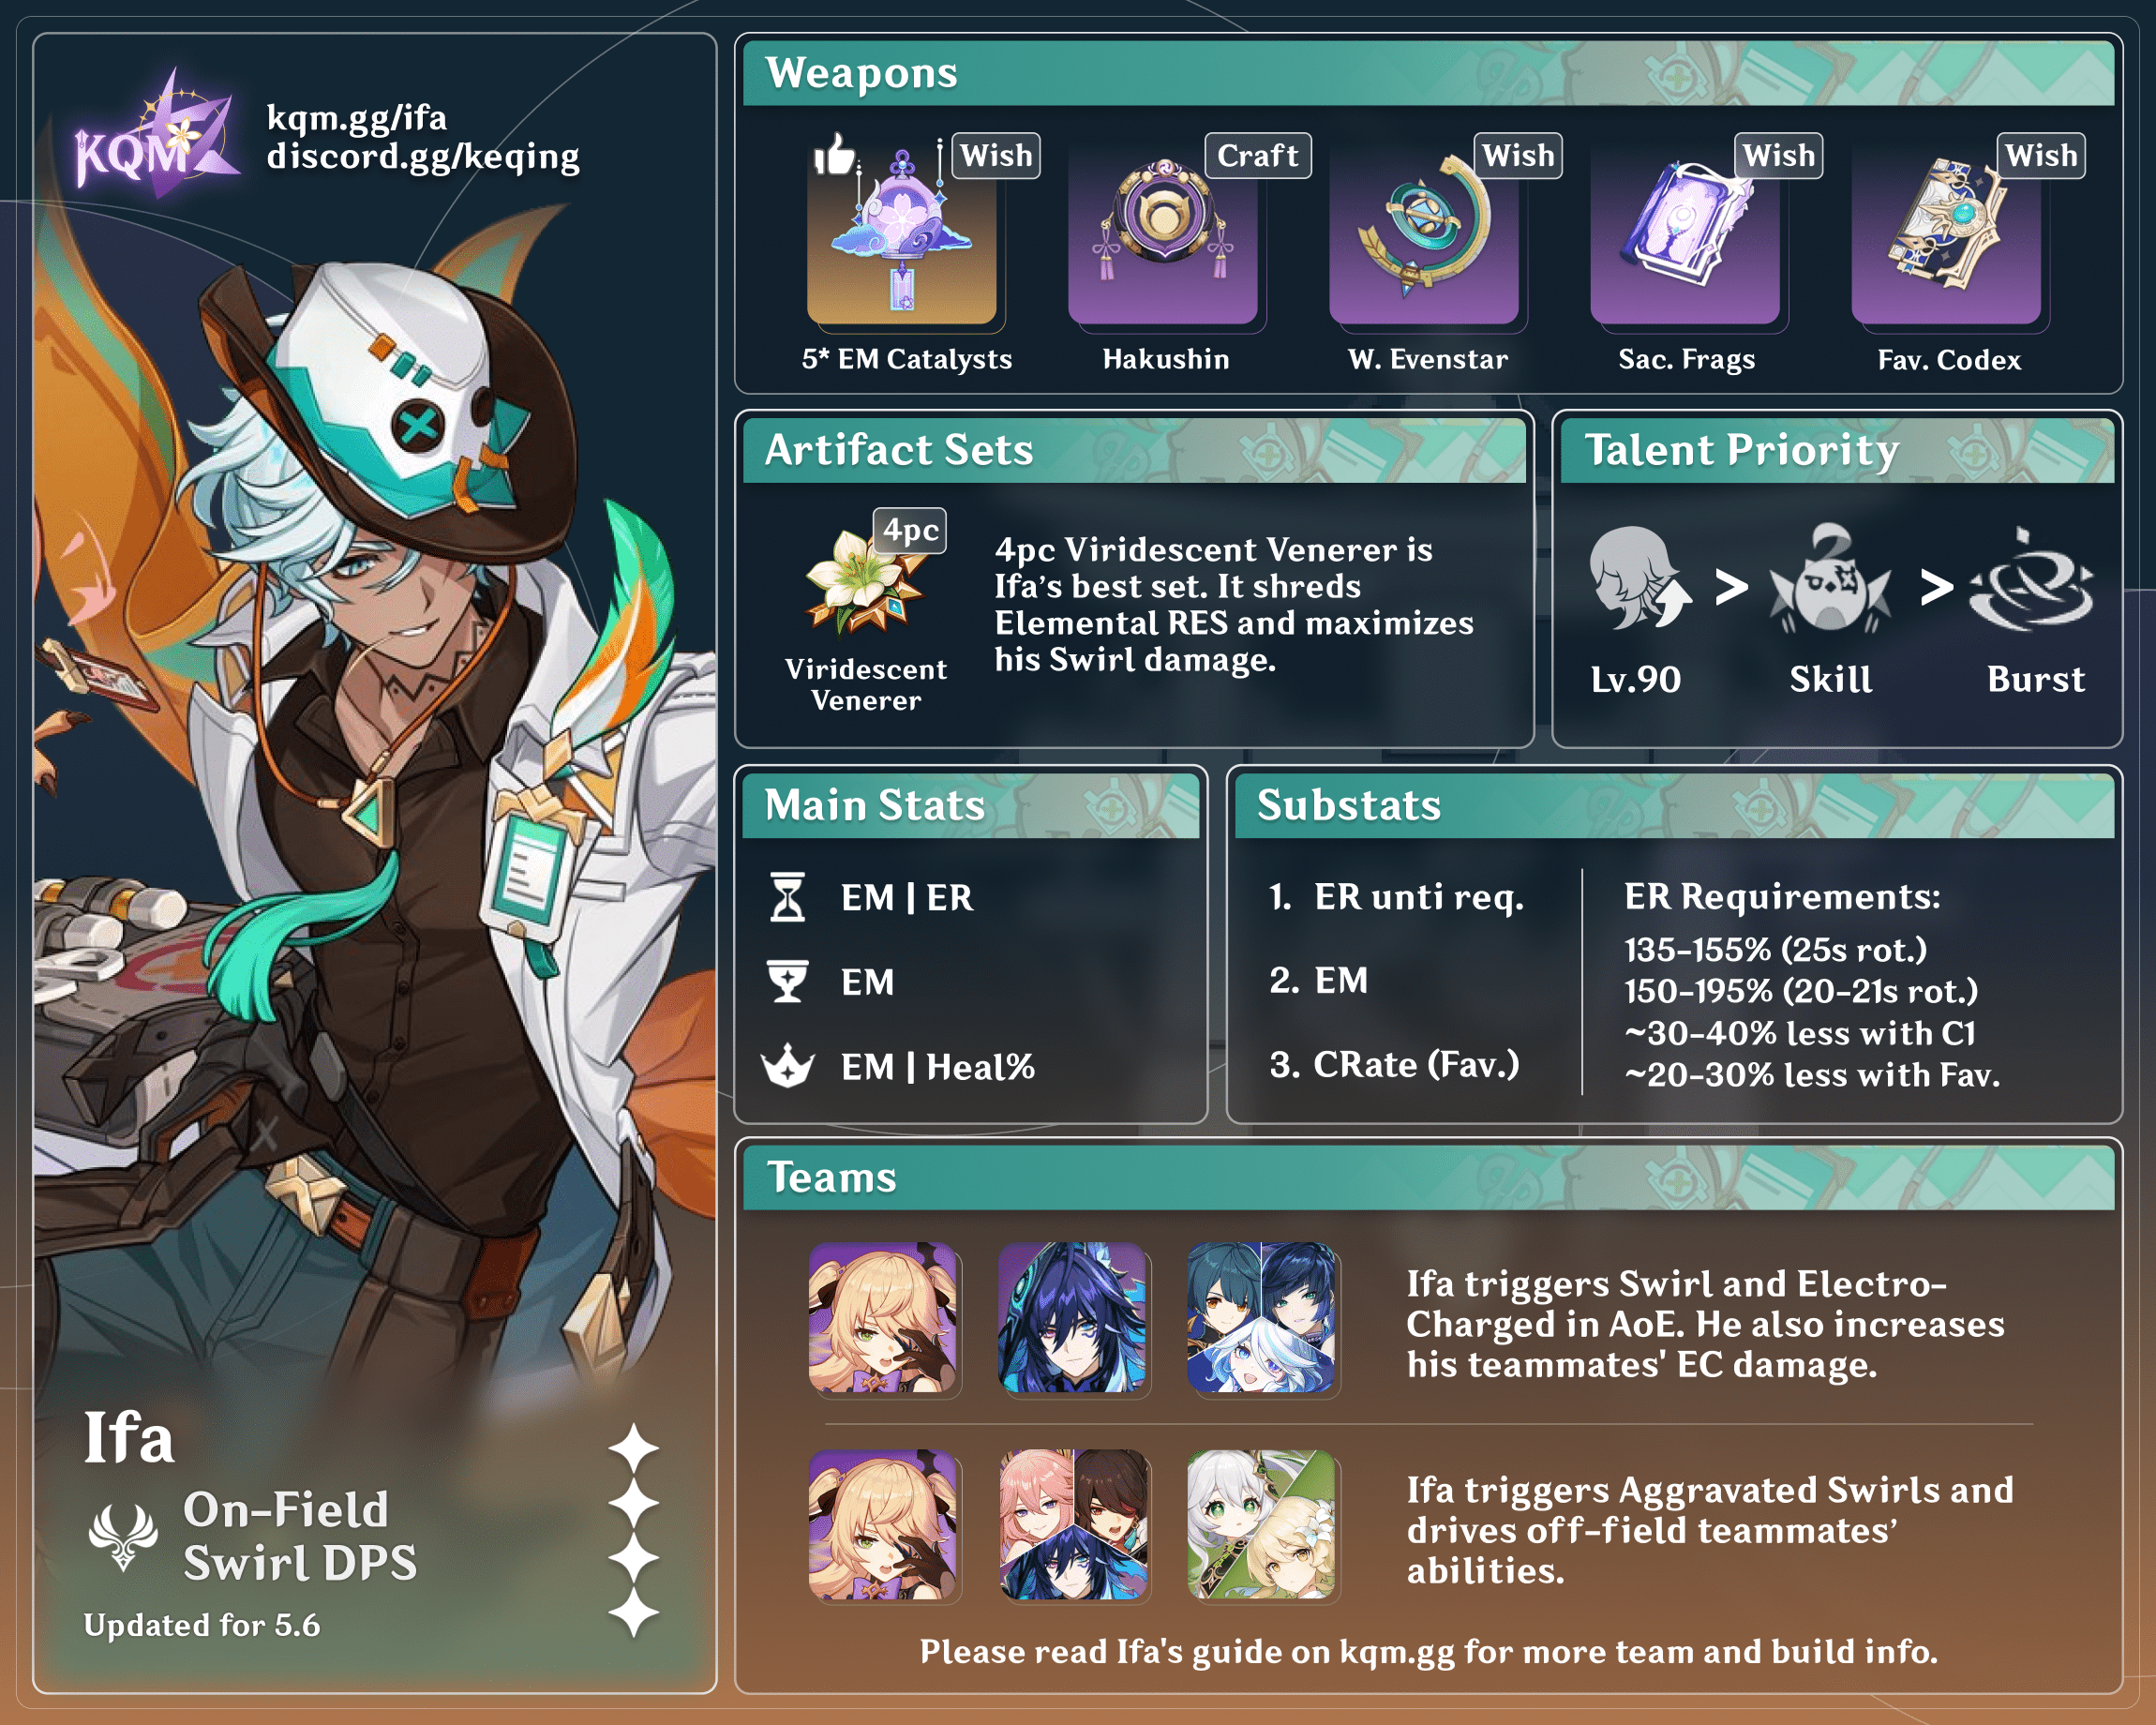
Swirl DPS
Credits to: kolvii, acerbus, and KQM Staff
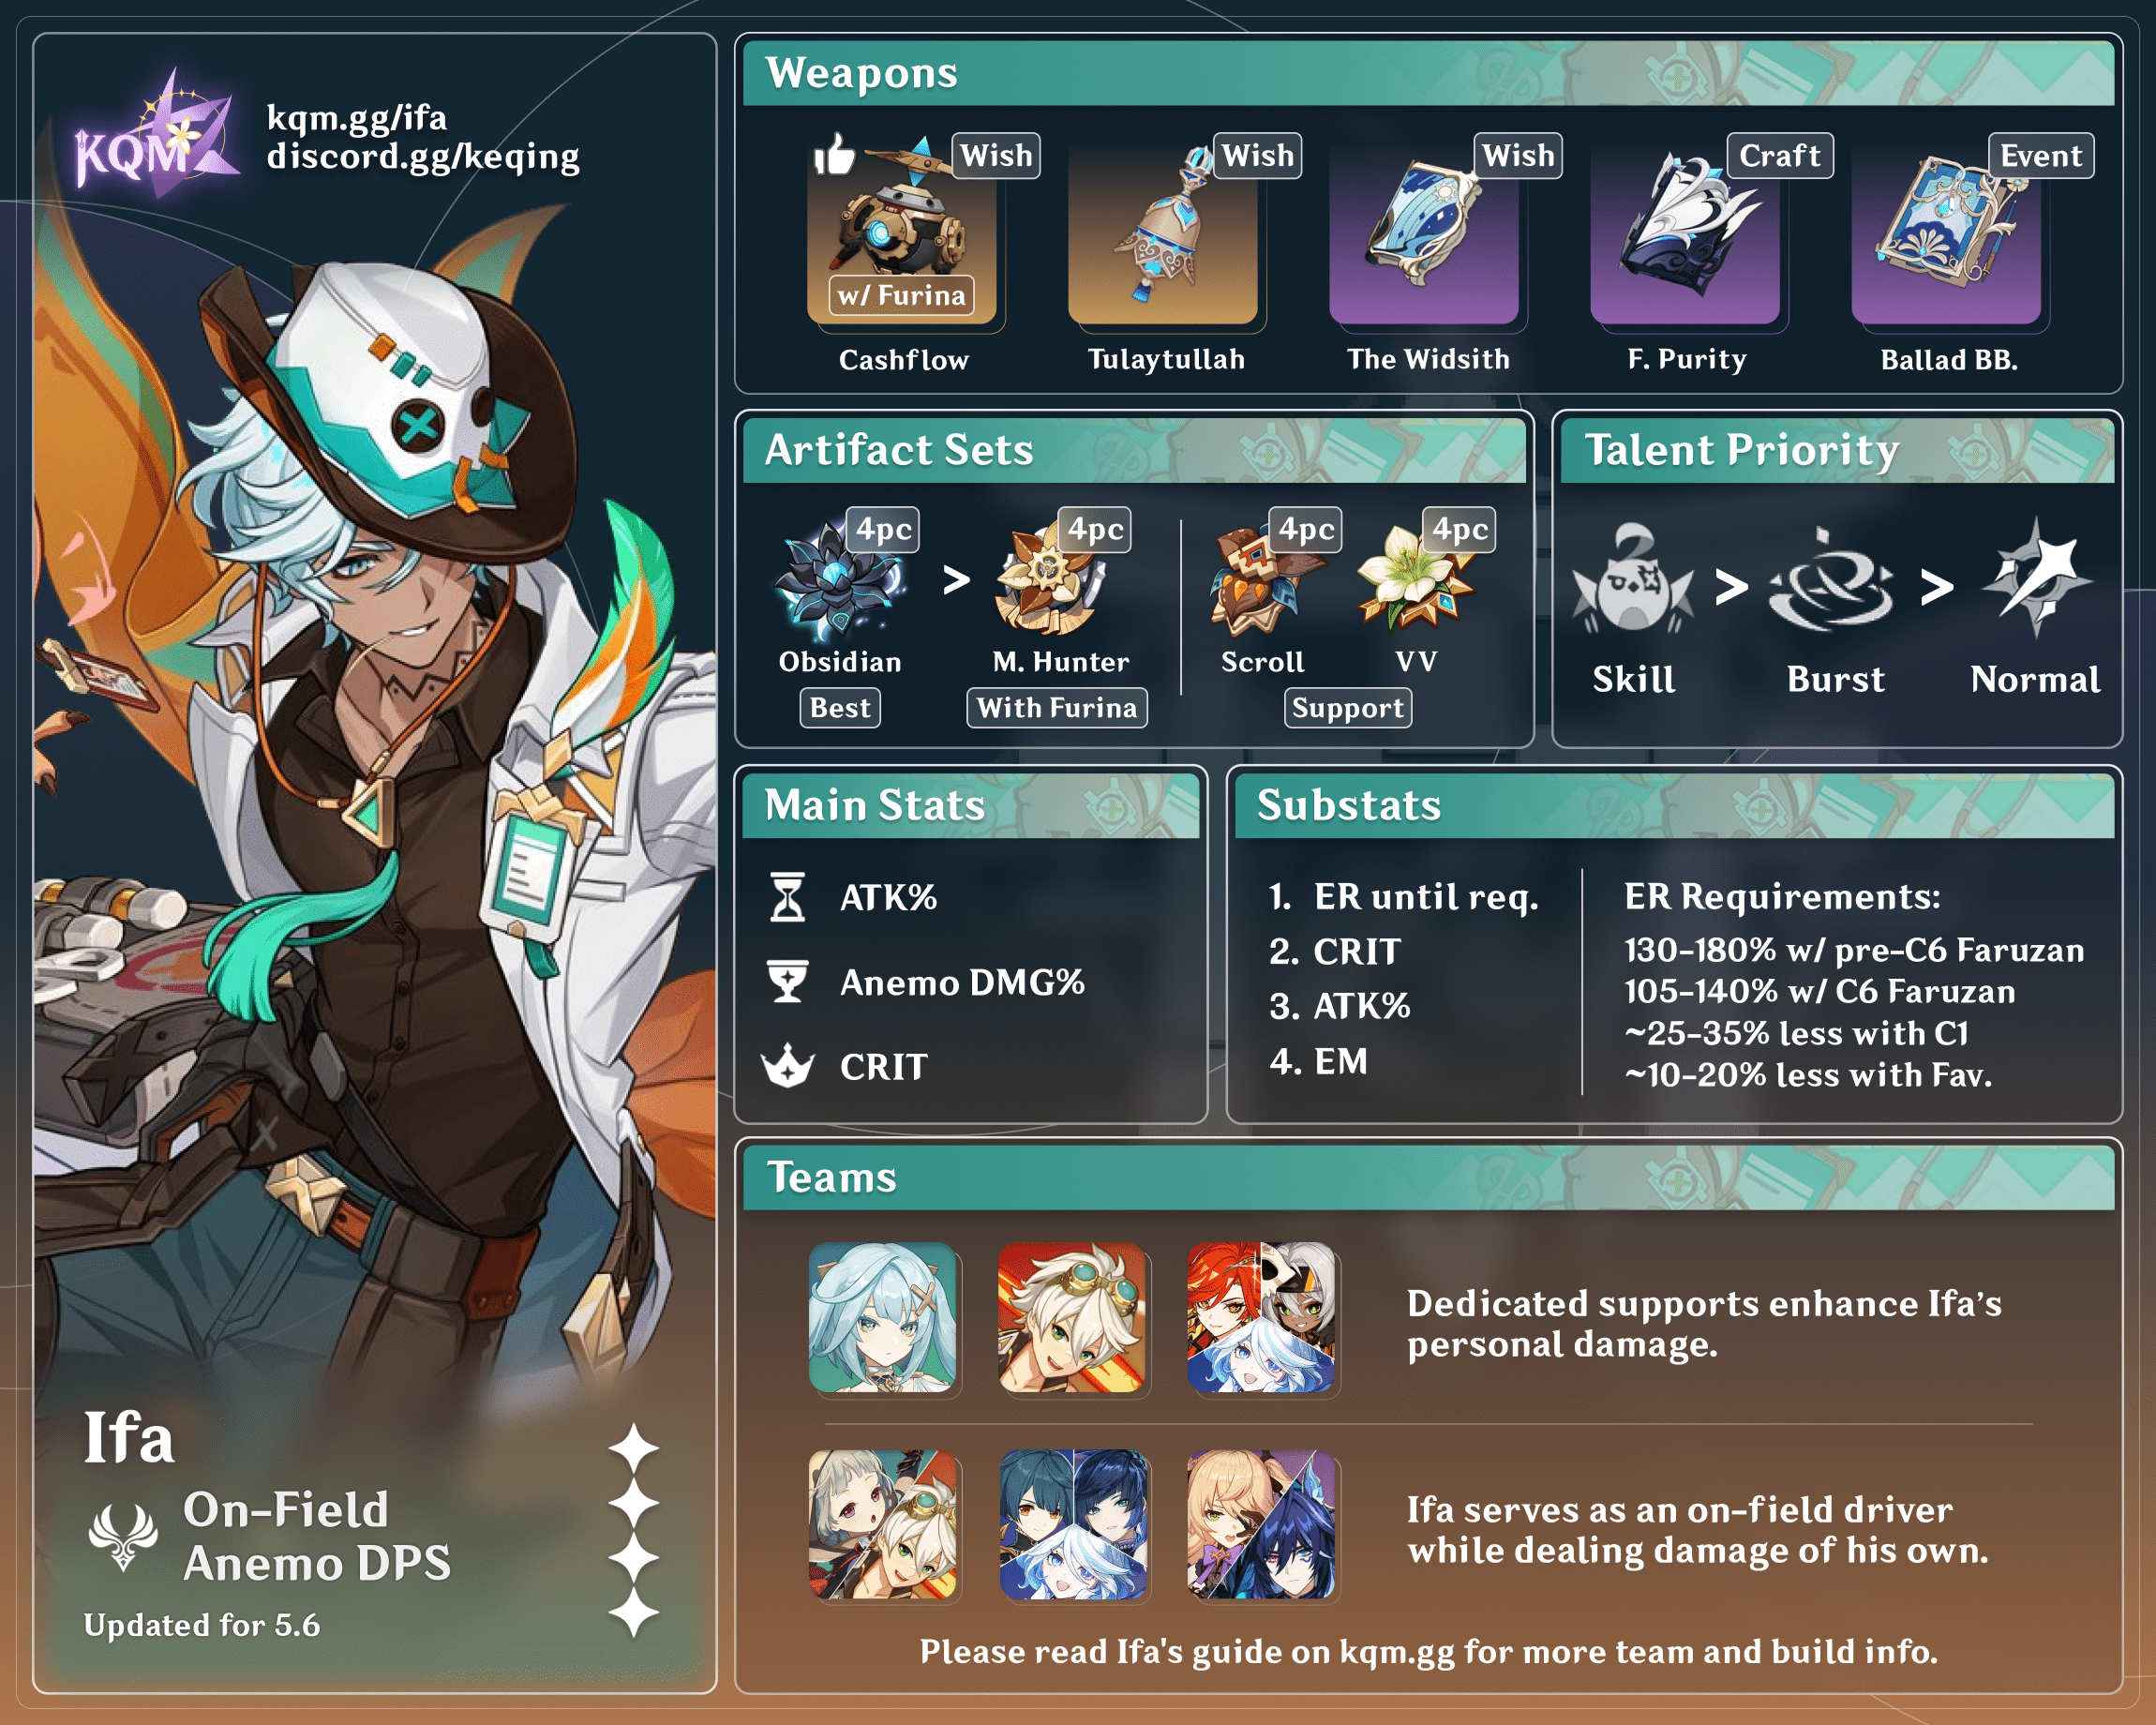
Anemo DPS
Credits to: kolvii, acerbus, and KQM Staff
Character Overview
Pros
- Good at driving teammates’ abilities, such as Xingqiu’s and Yelan’s coordinated attacks
- Buffs Swirl and Electro-Charged reaction damage
- Heals the whole team during his field time
- Requires minimal investment as a healer/Swirl DPS
Cons
- Weaker grouping than Sucrose, another on-field Swirl DPS
- Needs uninterrupted field time to deal damage and heal
- Healing has low multipliers and struggles to keep up with Furina’s HP drain
- Swirl and Electro-Charged buffs are rather small and are reliant on Natlan teammates
Playstyles
Healer/On-Field Swirl DPS
Ifa stays on-field to trigger Swirl while supporting the team with his healing and 4pc Viridescent Venerer debuff.
Anemo DPS
Ifa can deal decent damage using a Talent damage build when paired with good buffers such as Faruzan.
Talents
Level and Talent Priority
Character Level > Skill > Burst >> Normal Attack
Ifa’s Level is important for his Swirl and chain-reaction damage, so leveling him to 90 is a high priority. His Normal Attack has poor scaling, so leveling it should not be prioritized even when used.
Talent Overview
 Normal Attack | Rite of Dispelling Winds
Talent Description
Normal Attack
Performs up to 3 attacks, dealing Anemo DMG.
Charged Attack
Consumes a certain amount of Stamina and fires off a shot, dealing AoE Anemo DMG.
Plunging Attack
Plunges towards the ground from mid-air, damaging all opponents along the path. Deals AoE Anemo DMG upon impact with the ground.
A simple set of 3 Normal Attacks. While useful for certain setups, Ifa generally does not care much about his Normal, Charged or Plunging Attack damage. See his Skill description for his modified Normal Attacks (Supporting Fire) during the Nightsoul’s Blessing state.
 Elemental Skill | Airborne Disease Prevention
Talent Description
It’s time for the real bash bros to step up! Ifa calls Cacucu in as backup.
After using this skill, Ifa gains 80 Nightsoul points and enters the Nightsoul’s Blessing state. In the Nightsoul’s Blessing state, Ifa will hover with Cacucu’s help. When he uses Normal Attacks in this state, he will use different kinds of Supporting Fire depending on whether you Tap or Hold, firing Tonicshots that are capable of healing all party members.
Additionally, Holding the Elemental Skill Airborne Disease Prevention while Ifa is in Nightsoul’s Blessing will cause him to use a Nightsoul-aligned Plunging Attack. Letting go of the skill button will interrupt this Plunging Attack to maintain his hover. If Ifa lands due to this Plunging Attack, his Nightsoul’s Blessing state will end.
Ifa’s Skill causes him to gain 80 Nightsoul points and enter his Nightsoul’s Blessing state, during which he hovers off the ground for approximately 10s before running out of Nightsoul points. Though this has visual similarities to fellow tribemate Chasca’s Skill, Ifa’s Skill lacks an initial hit on cast, and he hovers much closer to the ground than she does. Still, it does provide comparable overworld utility.
During the Nightsoul’s Blessing state, Ifa gains access to Supporting Fire in place of his Normal Attacks. Supporting Fire shoots Tonicshots at enemies, dealing Anemo damage and healing all party members on hit for an amount that scales with Ifa’s EM. This is also the main source of Ifa’s damage in both Anemo DPS and Swirl DPS builds. Tapping Normal Attack causes Ifa to fire a single shot, whereas holding it allows him to fire shots continuously. Without any Attack SPD buffs, Ifa can shoot up to 11 Tonicshots by tapping Normal Attack, and 13 Tonicshots by holding it. Note that the Tap variation cannot proc Ifa’s C6, should you have it.
Since Ifa cannot execute a normal Plunging Attack to dismount from his hovering state, he instead uses a special Plunging Attack by holding the Skill button. When he lands on the ground, he will exit the Nightsoul’s Blessing state. Alternatively, you can continue firing Tonicshots until his Nightsoul’s Blessing state expires and Ifa falls down on his own. His Skill will start its 7.5s cooldown when the Nightsoul’s Blessing state ends.
 Elemental Burst | Compound Sedation Field
Talent Description
Fires a Therapeutic Sedative at a (temporarily aggressive) opponent. The sedative will explode on impact, creating a restraining wind current that pulls nearby objects and opponents in while dealing Nightsoul-aligned AoE Anemo DMG.
When the Therapeutic Sedative hits an opponent affected by Hydro/Pyro/Cryo/Electro, it will apply a Sedation Mark to them.
The initial Anemo hit from Ifa’s Burst has a very high multiplier and a relatively short cooldown, giving it some potential as a nuke if building Ifa for Talent damage. If his initial Burst hit makes contact with an enemy affected by Pyro, Hydro, Electro, or Cryo, it will deal additional damage of the corresponding type after a brief delay. It also provides some short-duration grouping that improves at C4.
 Ascension 1 Passive | Field Medic’s Vision
Talent Description
When Ifa is in the Nightsoul’s Blessing state, every 1 Nightsoul point out of the total in his entire party will grant him 1 Rescue Essentials point. Rescue Essentials will increase the Swirl and Electro-Charged DMG dealt by all nearby party members.
Ifa provides a party-wide Swirl and Electro-Charged DMG buff by stacking Rescue Essentials points. He gains 1 Rescue Essentials point for every Nightsoul point the party has, incentivizing running him alongside other Natlan characters (or the Pyro Traveler), and each Rescue Essentials point gives a 1.5% buff to Swirl and Electro-Charged damage. Ifa can have up to 150 Rescue Essentials points and 225% Reaction DMG Bonus this way. For reference, 1000 EM gives Ifa 533% DMG Bonus to Swirl and Electro-Charged damage.
 Ascension 4 Passive | Mutual Aid Agreement
Talent Description
When nearby party members trigger Nightsoul Bursts, Ifa’s Elemental Mastery increases by 80 for 10s.
Ifa gains a small EM buff when a Nightsoul Burst is triggered, lasting 10s. With one additional Natlan character, Ifa has around 2s downtime on this buff, and with two he reaches full uptime.
 Utility Passive | Tactical Warm Compress Bandaging
Talent Description
While in an area with Phlogiston Mechanics within Natlan, when the current active party member or indwelt saurian has less than 40% HP, Ifa will consume 10 Phlogiston and restore 40% of their HP. This effect can trigger once every 10s, and does not take effect in Domains, Trounce Domains, or the Spiral Abyss.
When in Natlan, if the active party member (or indwelt saurian) falls below 40% HP, Ifa heals them for 40% of their HP by consuming 10 Phlogiston. This effect has a cooldown of 10s. While not hugely impactful, the bonus healing can be nice for fighting certain Local Legends while in Natlan.
Constellations
 Constellation 1 | Vitiferous Elixir’s Concoction
Constellation Description
When Supporting Fire hits an opponent, it will restore 6 Energy for Ifa. One such Energy restoration can be triggered once every 8s.
Restores 6 Energy to Ifa when he hits an enemy with a Tonicshot during his Nightsoul’s Blessing state. The 8s cooldown means that Ifa can trigger this effect twice per Skill if he stays on-field for the entire duration. This massively lowers his ER requirements, improving his grouping and nuke damage potential by allowing him to Burst more often.
 Constellation 2 | Guiding Spirit of Ballistic Prayer
Constellation Description
When Ifa is in the Nightsoul’s Blessing state, every Nightsoul point the party has above a total of 60 will grant Ifa 4 additional Rescue Essentials points.
Additionally, Ifa’s Rescue Essentials limit is increased by 50.
You must first unlock the Passive Talent Field Medic’s Vision
Increases Ifa’s Rescue Essentials maximum points by 50.
Multiplies fivefold the number of Rescue Essentials points Ifa can stack for every Nightsoul point over 60 possessed by the party. In teams with other Nightsoul characters, this can be a substantial increase in the efficacy of Ifa’s teamwide Swirl and Electro-Charged DMG buff, as each Nightsoul point over 60 will give a 7.5% increase. In teams where Ifa is the only character with Nightsoul points, however, his C2 uptime will be limited to the first few seconds of his Skill state.
 Constellation 3 | Rebuttal in Negotiations With the Night
Constellation Description
Increases the Level of Airborne Disease Prevention by 3.
Maximum upgrade level is 15.
A simple Talent level increase for his Skill, boosting Tonicshot damage and healing.
 Constellation 4 | Decayed Vessel’s Permutation
Constellation Description
The restraining wind current created by the Elemental Burst Compound Sedation Field has its duration extended to 3s.
Additionally, Ifa gains 100 Elemental Mastery for 15s after using his Elemental Burst Compound Sedation Field.
A nice quality of life Constellation that increases the duration of Ifa’s Burst grouping by 3s. He also gains 100 EM for 15s after using his Burst, increasing his healing and Swirl damage and further incentivizing casting his Burst before his Skill.
 Constellation 5 | Vow of Universal Coexistence
Constellation Description
Increases the Level of Compound Sedation Field by 3.
Maximum upgrade level is 15.
A straightforward Talent level increase for his Burst, making it an even stronger nuke if building for Talent damage.
 Constellation 6 | Oath on a Feathered Knot
Constellation Description
When Ifa uses the Hold version of his Supporting Fire, there is a 50% chance that he will fire an additional Tonicshot that deals 120% of Ifa’s ATK as Anemo DMG. This DMG is considered Normal Attack DMG.
Additionally, when he is not in combat, Ifa will consume 20% less Nightsoul points and Phlogiston in his Nightsoul’s Blessing state.
Ifa’s C6 gives him a 50% chance to fire an additional Tonicshot when holding his Normal Attack during the Nightsoul’s Blessing state, resulting in what is effectively a 50% increase to his total healing as well as a good chunk of additional damage (though not 50%, as the extra Tonicshots have lower base scaling).
Combos
Combo Notation
- N = Normal Attack
- C = Charged Attack
- A = Aimed Shot
- P = Plunging Attack
- hP = High Plunge
- lP = Low Plunge
- E = Elemental Skill
- tE = Tap Skill
- hE = Hold Skill
- Q = Elemental Burst
- D = dash (cancel)
- J = jump (cancel)
- W = walk (cancel)
- > = switch character
- ( ) = these actions are optional; please refer to the notes below
- [ ] = repeat these actions the specified number of times
| Q E N13 (P) | Standard combo. Ifa’s most basic and easiest combo where he holds his Normal Attack to constantly shoot Tonicshots. He can perform a Plunging Attack at the end by releasing the Normal Attack button and swiftly tapping the button again |
| Q E N10 (P) | Xingqiu / Yelan / Beidou driver. By tapping the Normal Attack button instead of holding it, Ifa can shoot Tonicshots around every 1s instead of faster than that. This allows him to proc Xingqiu’s, Yelan’s or Beidou’s coordinated attacks with every Tonicshot instead of every other Tonicshot with the holding Normal Attack combo. |
| E N13 Q (P) | Best for Anemo DPS. An alternative combo that places Ifa’s Burst at the end. This allows it to benefit from ramping buffs (e.g. Yelan, Furina) and, most crucially, the full CRIT Rate bonus from 4pc Obsidian Codex. Players should be cautious of timing so as not to let buffs fall off before Ifa can use his Burst. |
| E N1 Q hE or Q E N1 hE | Best for supporting another Anemo unit. A niche combo for when Ifa is used as a 4pc Scroll support for on-field Anemo DPS units. You can have him catch his own particles or funnel them to another teammate. |
ER Requirements
Calcs for ER requirements can be found here (last updated for Version 5.6).
| C0 | C1+ | |
| Solo Anemo, ~20-22s rot | 160–195% | 125–155% |
| Solo Anemo, ~25s rot | 135–150% | 110–120% |
| Anemo DPS teams, pre-C6 Faruzan | 130-180% | 105-145% |
| Anemo DPS teams, C6 Faruzan | 105-145% | 100-115% |
These ER requirements assume Ifa Bursts every rotation. If Bursting every other rotation, he does not need to build ER. Solo Anemo / Swirl DPS ER requirements assume the presence of either Fischl or Ororon in the team (or both).
If using Ifa as an Anemo DPS, you should build enough ER to Burst every rotation as long as his total ER needs are under 150%. As a Swirl DPS, it is not necessary to Burst every rotation, although it can be helpful for grouping.
In Furina teams, Ifa holds Prototype Amber as the only healer. His ER requirements are 105-130% at C0 and he does not need ER stats at C1.
Holding Favonius Codex reduces Ifa’s ER requirements by 15-30% per proc.
Use the Energy Recharge Calculator to determine exact requirements for your team and rotation. For more details on how Favonius weapons will affect your team, please use Ac1d’s Favonius Mastersheet.
Healer/On-Field Swirl DPS
With this playstyle, Ifa focuses on EM stats for his Swirl damage and healing output. His artifact and weapon choices are also more supportive instead of offensive.
Artifacts
Artifact Stats
 Sands |  Goblet |  Circlet |
| Elemental Mastery / Energy Recharge | Elemental Mastery | Elemental Mastery / Healing Bonus |
Stat Priority: ER (until requirement) > EM ≥ CRIT Rate (Favonius)
Ifa builds EM for his healing as well as Swirl and chain-reaction damage. A Healing Bonus Circlet results in more healing at a cost of lower reaction damage.
If Ifa wields Favonius Codex, it is important to have a few CRIT Rate substats on him.
Artifact Sets
 4pc Viridescent Venerer (VV) | The go-to option for his Swirl DPS playstyle, providing RES Shred to increase both his Swirl damage and teammates’ output. Ifa has an easy time shredding Pyro / Hydro / Electro / Cryo RES as an on-field unit. |
 4pc Scroll of the Hero of Cinder City (Scroll) | Ifa can use 4pc Scroll to further buff teammates with its DMG Bonus in cases where there is already a VV holder in the team. However, he should ideally carry 4pc VV for Shred uptime instead, especially in multi-wave fights. |
 4pc Gilded Dreams (GD) | With a different VV user in the team, Ifa can use 4pc GD to increase both his healing and Swirl damage thanks to the EM buff. |
Weapons
 5★ Sunny Morning Sleep-In | Easily Ifa’s best weapon for Swirl damage. He can reliably maintain its full passive, obtaining a massive total of 513 EM. |
 5★ Starcaller’s Watch | This weapon is just a stat stick at 365 EM and nothing else. |
 5★ A Thousand Floating Dreams | Thousand Floating Dreams offers less EM (265, Solo Anemo) for Ifa in exchange for a small 40 EM buff for his teammates. |
 4★ Wandering Evenstar | A good gacha-exclusive 4-star Catalyst that gives a Flat ATK buff to the entire team based on Ifa’s EM. |
 4★ Sacrificial Fragments | Sacrificial Fragments has the highest EM stat among 4-star options, but its passive is useless on Ifa since his Skill cooldown does not start until his hovering state is over. |
 4★ Fruit of Fulfillment | At R5, this Catalyst provides a good amount of EM to boost Ifa’s healing and reaction damage. Its Energy Recharge secondary stat also helps him cast his Burst more frequently. |
 4★ Hakushin Ring | Hakushin Ring is a good support weapon for Ifa in teams with Electro characters, such as Aggravate or Electro-Charged. In multi-target scenarios, Ifa’s Swirl damage can trigger chain reactions to grant multiple DMG Bonus buffs: Electro DMG%; Hydro DMG% with Electro-Charged; Dendro DMG% with Aggravate and Hyperbloom. However, it could be difficult for characters with snapshotting abilities to take advantage of this short-lived buff. |
 4★ Prototype Amber | Prototype Amber increases his teamwide healing, which could be crucial for Furina teams. The weapon’s passive also helps Bursting every rotation more easily. |
 4★ Favonius Codex | Favonius Codex mitigates any need to build ER on Ifa and alleviates his teammates’ ER requirements by a decent amount. As Ifa stays on-field and has ample chance to trigger the passive, he only needs to build some CRIT Rate through artifact substats. |
 3★ Magic Guide | An accessible weapon with decent EM stat. Its passive’s impact is minor. |
Anemo DPS
Ifa can build for his Talent damage by investing in ATK%, DMG Bonus and CRIT stats. This build tends to perform better in single-target scenarios or when Ifa has access to good teammate buffs.
Artifacts
Artifact Stats
Sands | Goblet | Circlet |
| ATK% | Anemo DMG Bonus | CRIT Rate / CRIT DMG |
Stat Priority: ER (until requirement) > CRIT > ATK%
Ifa should build enough ER to Burst every rotation as long as his total ER requirement is below 150%. Above this, it is better to Burst every other rotation.
Artifact Sets
 4pc Obsidian Codex | Ifa’s unquestioned BiS in an on-field Anemo DPS playstyle; there is little reason to use anything else. To take full advantage of its powerful CRIT Rate boost, Ifa should Burst at the end of his rotation. |
 4pc Marechaussee Hunter (MH) | A viable alternative in teams with Furina, but 4pc Obsidian Codex is generally the superior choice. |
4pc Viridescent Venerer (VV) | A great option in teams with strong off-field damage dealers (like Electro-Charged teams). Ifa sacrifices some of his damage to provide RES Shred, increasing both his Swirl damage and teammates’ output. |
Weapons
 5★ Cashflow Supervision | Cashflow Supervision is Ifa’s best option in teams with Furina. It provides high Base ATK, some CRIT Rate and a good amount of Normal Attack DMG Bonus. The Attack SPD only allows Ifa to deal one extra Normal Attack during his Skill uptime, but it can still be nice for when he attacks out of his Skill state. Cashflow remains a decent stat stick without Furina or reliable HP changes. |
 5★ Tulaytullah’s Remembrance | Tulaytullah’s Remembrance offers similar stat lines to Cashflow, but without the HP change requirement. It only performs slightly worse than a full stack Cashflow, and surpasses Cashflow with no passive. |
 5★ Surf’s Up, Tome of the Eternal Flow, Vivid Notions | Best options for Ifa if you don’t have either of the weapons above, performing about on par with a passive-less Cashflow (i.e. in teams without Furina). Their passives vary in usefulness. |
 Other 5-star Weapons | Lost Prayers to the Sacred Winds, Kagura’s Verity, Skyward Atlas, Memory of Dust Good options for Ifa’s damage with passives that vary in usefulness. Memory of Dust is only worth using with a shielder. |
 4★ The Widsith | Best 4-star Catalyst with averaged buffs, and can outperform the lower-tier 5-star options at R5. The EM buff is mostly useless on Ifa, so players can choose to reset the fight for the other two buffs. |
 4★ Solar Pearl | Better than Flowing Purity, but notably worse than Widsith. Ifa cannot reliably trigger the Normal Attack buff in a typical rotation, but it can be worth using for the Burst DMG buff, assuming you are Bursting every rotation. |
 4★ Flowing Purity | Best free weapon on Ifa. However, as Ifa’s healing is terrible with an ATK/Anemo/CRIT build, a good healer is required to heal up the Bond of Life for the DMG% buff. |
 4★ Ballad of the Boundless Blue | Good option for players who do not want or cannot afford to craft Flowing Purity, or when Ifa is played in a team without a proper healer to trigger Flowing Purity’s passive. |
Teams
Rotation Notation
- N = Normal Attack
- C = Charged Attack
- A = Aimed Shot
- P = Plunging Attack
- E = Elemental Skill
- tE = Tap Skill
- hE = Hold Skill
- Q = Elemental Burst
- D = dash (cancel)
- J = jump (cancel)
- W = walk (cancel)
- > = switch character
- ( ) = these actions are optional; please refer to the notes below
- [ ] = repeat these actions the specified number of times
Teambuilding
- Ifa is an on-fielder, so teammates with off-field application or other utilities are essential.
- Off-field damage dealers are also encouraged to increase team DPS.
Healer/On-Field Swirl DPS

Ifa is a decent on-field Swirl damage dealer who can hold 4pc Viridescent Venerer to buff the off-field Pyro / Hydro / Electro / Cryo units. His A1 Passive gives a buff to Swirl and Electro-Charged damage dealt by the entire team based on his EM, securing his role as a Swirl DPS, especially in Electro-Charged teams.
Notable Teammates
Electro
Electro characters deal damage, apply Electro for Electro-Charged and other chain reactions triggered by Ifa in multi-target scenarios. Two Electro units also enable Electro Resonance, reducing the ER requirements of all team members.
Ororon | As Ifa’s Anemo damage is Nightsoul-aligned, Ororon can trigger his A1 Passive to deal damage without relying solely on Electro-Charged reactions. This allows Ororon to proc 4pc Scroll more freely, opening more team options. Ororon supports Ifa via his Energy refund from A4 and his Nightsoul points to increase Ifa’s buff. |


Hydro
Hydro characters are used for their damage, application and other utilities. They are also necessary to form an Electro-Charged team where Ifa can double Swirl for more damage.
 Furina | While Ifa heals the team during his field time, his healing is not enough to offset Furina’s HP drain over multiple rotations prior to his C6, especially with other teammates with high Max HP such as Yelan. Still, Furina is a good teammate for Ifa teams thanks to her considerable DMG Bonus buff and respectable damage and application. Use Prototype Amber on Ifa or play an additional healer in the team with Furina. |
  Xingqiu, Yelan | Ifa’s Tonicshots can trigger Xingqiu’s and Yelan’s coordinated attacks, but there is a catch. If Ifa holds the Normal Attack button to shoot his Tonicshots, he can at most trigger these coordinated attacks every other shot, for a total of 7 waves per his Skill state. On top of that, because of how reaction gauge works, Ifa might not be able to trigger Hydro Swirl with Xingqiu or Yelan using his hold Normal Attack version. These issues can be alleviated by pressing Ifa’s Normal Attack at 1s intervals or slightly longer. |

Cryo
Ifa can be paired with Cryo units in Freeze or Mono Cryo teams, providing teamwide healing, VV RES Shred and some Swirl damage.
 Escoffier | While Escoffier is better off in a pure Cryo / Hydro team, she is still viable in an Ifa team with two other Cryo / Hydro units as 4pc VV makes up for the loss of 40% RES Shred from using a non Cryo / Hydro teammate. Ifa also heals the team, which lessens the need to build enough ER to Burst every rotation on Escoffier. |


Pyro
Ifa can be played as an on-field healer support with 4pc VV and TTDS for Pyro damage dealers such as Xiangling. Vaporize and Overvape are some viable team archetypes with Pyro units.


Dendro
Dendro characters can enable Aggravate for Ifa’s Electro teammates as well as his own Aggravated Swirls in multi-target scenarios. He can also Swirl Electro onto nearby Dendro Cores to trigger Hyperbloom in a team with a Dendro, a Hydro and an Electro unit.


Anemo
As Ifa increases all party members’ Swirl damage, a second Anemo unit can be used for their added Swirl damage. This Anemo unit can hold 4pc VV while Ifa holds 4pc Scroll to improve the damage dealt by his teammates. Alternatively, he can use an Anemo DPS build to increase his personal damage.


Xilonen | Xilonen provides RES Shred and 4pc Scroll buff to the team with relatively good uptime and easy setups. Her healing also lets Ifa stay on-field more comfortably and helps him counter Furina’s HP drain to gain more Fanfare stacks. Note that Xilonen does not increase Ifa’s buff as she does not carry Nightsoul points while off-field. |
 Zhongli | Zhongli boasts one of the sturdiest shields while also shredding Universal RES for the team. |
Example Teams
This is not a comprehensive list of teams. The inclusion or exclusion of any given team does not necessarily reflect its power level.

Sample Rotation
Furina ED Q > Ororon EQ > Fischl N2 E/Q > Ifa Combo N3

Sample Rotation
Xingqiu EDQ N1 > Beidou EN1Q > Fischl N2 Q > Ifa N1 Combo > Beidou E > Fischl E > Ifa N3D N3

Sample Rotation
Xingqiu EDQ N1 > Yelan Q N4 > Ororon EQ > Yelan N1 E > Ifa Combo > Yelan E N4

Sample Rotation
Nahida E Q > Yae 3[E] > Fischl E > Ifa Combo > Yae Q 3[N1 E] > Fischl N2 Q > Ifa 3[N3CJ]

Sample Rotation
Xingqiu EDQ N1 > Dendro Traveler EQ N1 > Fischl E N1 > Ifa Combo > Dendro Traveler E N2 > Fischl Q > Ifa 3[N3CJ]

Sample Rotation
Furina ED Q > Escoffier EQ > Rosaria EQ > Ifa Combo > Rosaria E N2
Anemo DPS

Although Ifa is not intended to be played as an on-field Anemo damage dealer, this playstyle can still be viable with sufficient investment for players who wish to see more team damage contribution coming from Ifa.
Faruzan is almost a must for this archetype with her irreplaceable buffs to Anemo DPS units. Additional buffers further increase Ifa’s damage while off-field damage dealers offer their own damage.
Notable Teammates
 Faruzan | Faruzan provides RES Shred, Anemo DMG Bonus (and Anemo CRIT DMG at C6), allowing Ifa to deal decent damage. She can also hold 4pc Scroll, 4pc Noblesse Oblige or 4pc Tenacity of the Millelith (at C6) to further buff Ifa. Favonius Warbow and Elegy for the End are her most notable weapons for their team utility and Faruzan’s ER requirements. |
 Bennett | Bennett gives a hefty Flat ATK buff and healing to sustain Ifa as Ifa’s healing is weak with a Talent damage build. Bennett also buffs ATK-scaling units such as Xiangling, Mavuika or Fischl. |
 Iansan | Iansan can easily maintain her highest Flat ATK buff uptime with Ifa’s Nightsoul consumption and airborne movement. |
Furina | Furina deals good damage and buffs Ifa with a significant amount of DMG Bonus. A decent healer (such as Bennett) is required to stack Furina’s Fanfare as Ifa does not heal much without his EM build. |
 Mavuika | With Ifa’s Nightsoul point consumption, Mavuika can stack her Fighting Spirit to deal more Burst damage while giving more buffs to Ifa via her A4 Passive. |
 C4+ Jean | Jean at C4 shreds Anemo RES, which makes her a notable option for Ifa teams. She also heals, which is beneficial for Furina’s Fanfare generation. |
 Yun Jin | Yun Jin increases Ifa’s output by a decent amount through her Additive Base DMG Bonus buff as well as Normal Attack DMG Bonus and Attack SPD from C2 and C6, respectively. However, the only thing holding her back is her immense ER requirements as the solo Geo unit in Ifa teams. |
 Yelan | Yelan buffs Ifa with her ramping DMG Bonus buff while still dealing considerable personal damage. |
 Mika | Mika provides healing and boosts Ifa with an Attack SPD buff, which allows him to dish out more Normal Attacks per Skill uptime. |
 Zhongli | Zhongli prevents Ifa from getting interrupted and consequently losing damage with his long-lasting, tanky shield. His Universal RES Shred is also a nice bonus. |
  Thoma, Dehya | Thoma and Dehya provide interruption resistance, activate Pyro Resonance (with Bennett) and give out some small buffs (Thoma’s C6 and Dehya’s 4pc TotM). |
Off-field DPS


Example Teams
This is not a comprehensive list of teams. The inclusion or exclusion of any given team does not necessarily reflect its power level.

Sample Rotation (C6 Faruzan)
Furina ED Q > Bennett Q E > Faruzan E Q > Ifa Combo > Bennett E
Sample Rotation (C0-C5 Faruzan)
Furina ED Q > Faruzan Q E > Bennett EQ > Faruzan C > Ifa Combo > Faruzan E C

Sample Rotation (Bennett)
Faruzan E Q > Bennett Q E > Mavuika Q E > Ifa Combo > Bennett E
Sample Rotation (Iansan)
Faruzan E Q > Mavuika E > Iansan E C Q > Mavuika Q > Ifa Combo
“Anemo DPS Support”
As a Natlan unit, Ifa has access to 4pc Scroll of the Hero of Cinder City. Coupled with TTDS, he can act as an unorthodox support for Anemo damage dealers such as Wanderer or Xiao. However, this playstyle ignores the rest of his kit and gives little field time to appreciate his handsomeness.
Example Teams
This is not a comprehensive list of teams. The inclusion or exclusion of any given team does not necessarily reflect its power level.

Sample Rotation
Faruzan E (C) Q > Bennett EQ > Ifa E N1 E (Q)1 > Wanderer E Combo > Bennett E
1 Burst when available. Can be skipped entirely
Credits
madeofseaglass, acerbus114, lesterberne, idkanonymized, ausshuu
Team images made with the KQM portrait generator.
