Updated for Version “Luna V”

Venti is a 5-star Anemo Bow character in Genshin Impact who can serve as an off-field Anemo support with unparalleled grouping or, as of the new Hexerei kit buffs in version “Luna III,” an on-field Anemo DPS or driver. Learn about Venti’s best builds, best artifacts, best weapons, and best teams in this quick guide.
Note that the information given may change if new discoveries are made. More extensive testing is in progress.
Join our Discord to check on and participate in the theorycrafting process.
Table of Contents
New Content
 Hexerei Passive | Completing Venti’s “Witch’s Homework” quest unlocks his new Hexerei passive and augments several of his Constellations. The passive’s primary effect is transforming his Normal Attacks into Windsunder Arrows that deal Anemo damage, allowing him to be played as an on-field DPS or driver. However, the passive requires another Hexerei character in the team to activate. |
Varka | Venti is one of Varka’s best teammates. See Varka’s guide for more details. |
Durin | Durin and Venti have great synergy in any playstyle, and he is Venti’s best Hexerei teammate as an on-field DPS. |
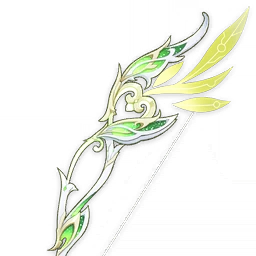
 5★ The Daybreak Chronicles | Venti’s shiny new signature is also his new BiS in the vast majority of scenarios, even when serving purely as an off-field support. For his on-field Anemo DPS playstyle, it is significantly ahead of other 5-star weapons. |
Infographic
On-Field DPS
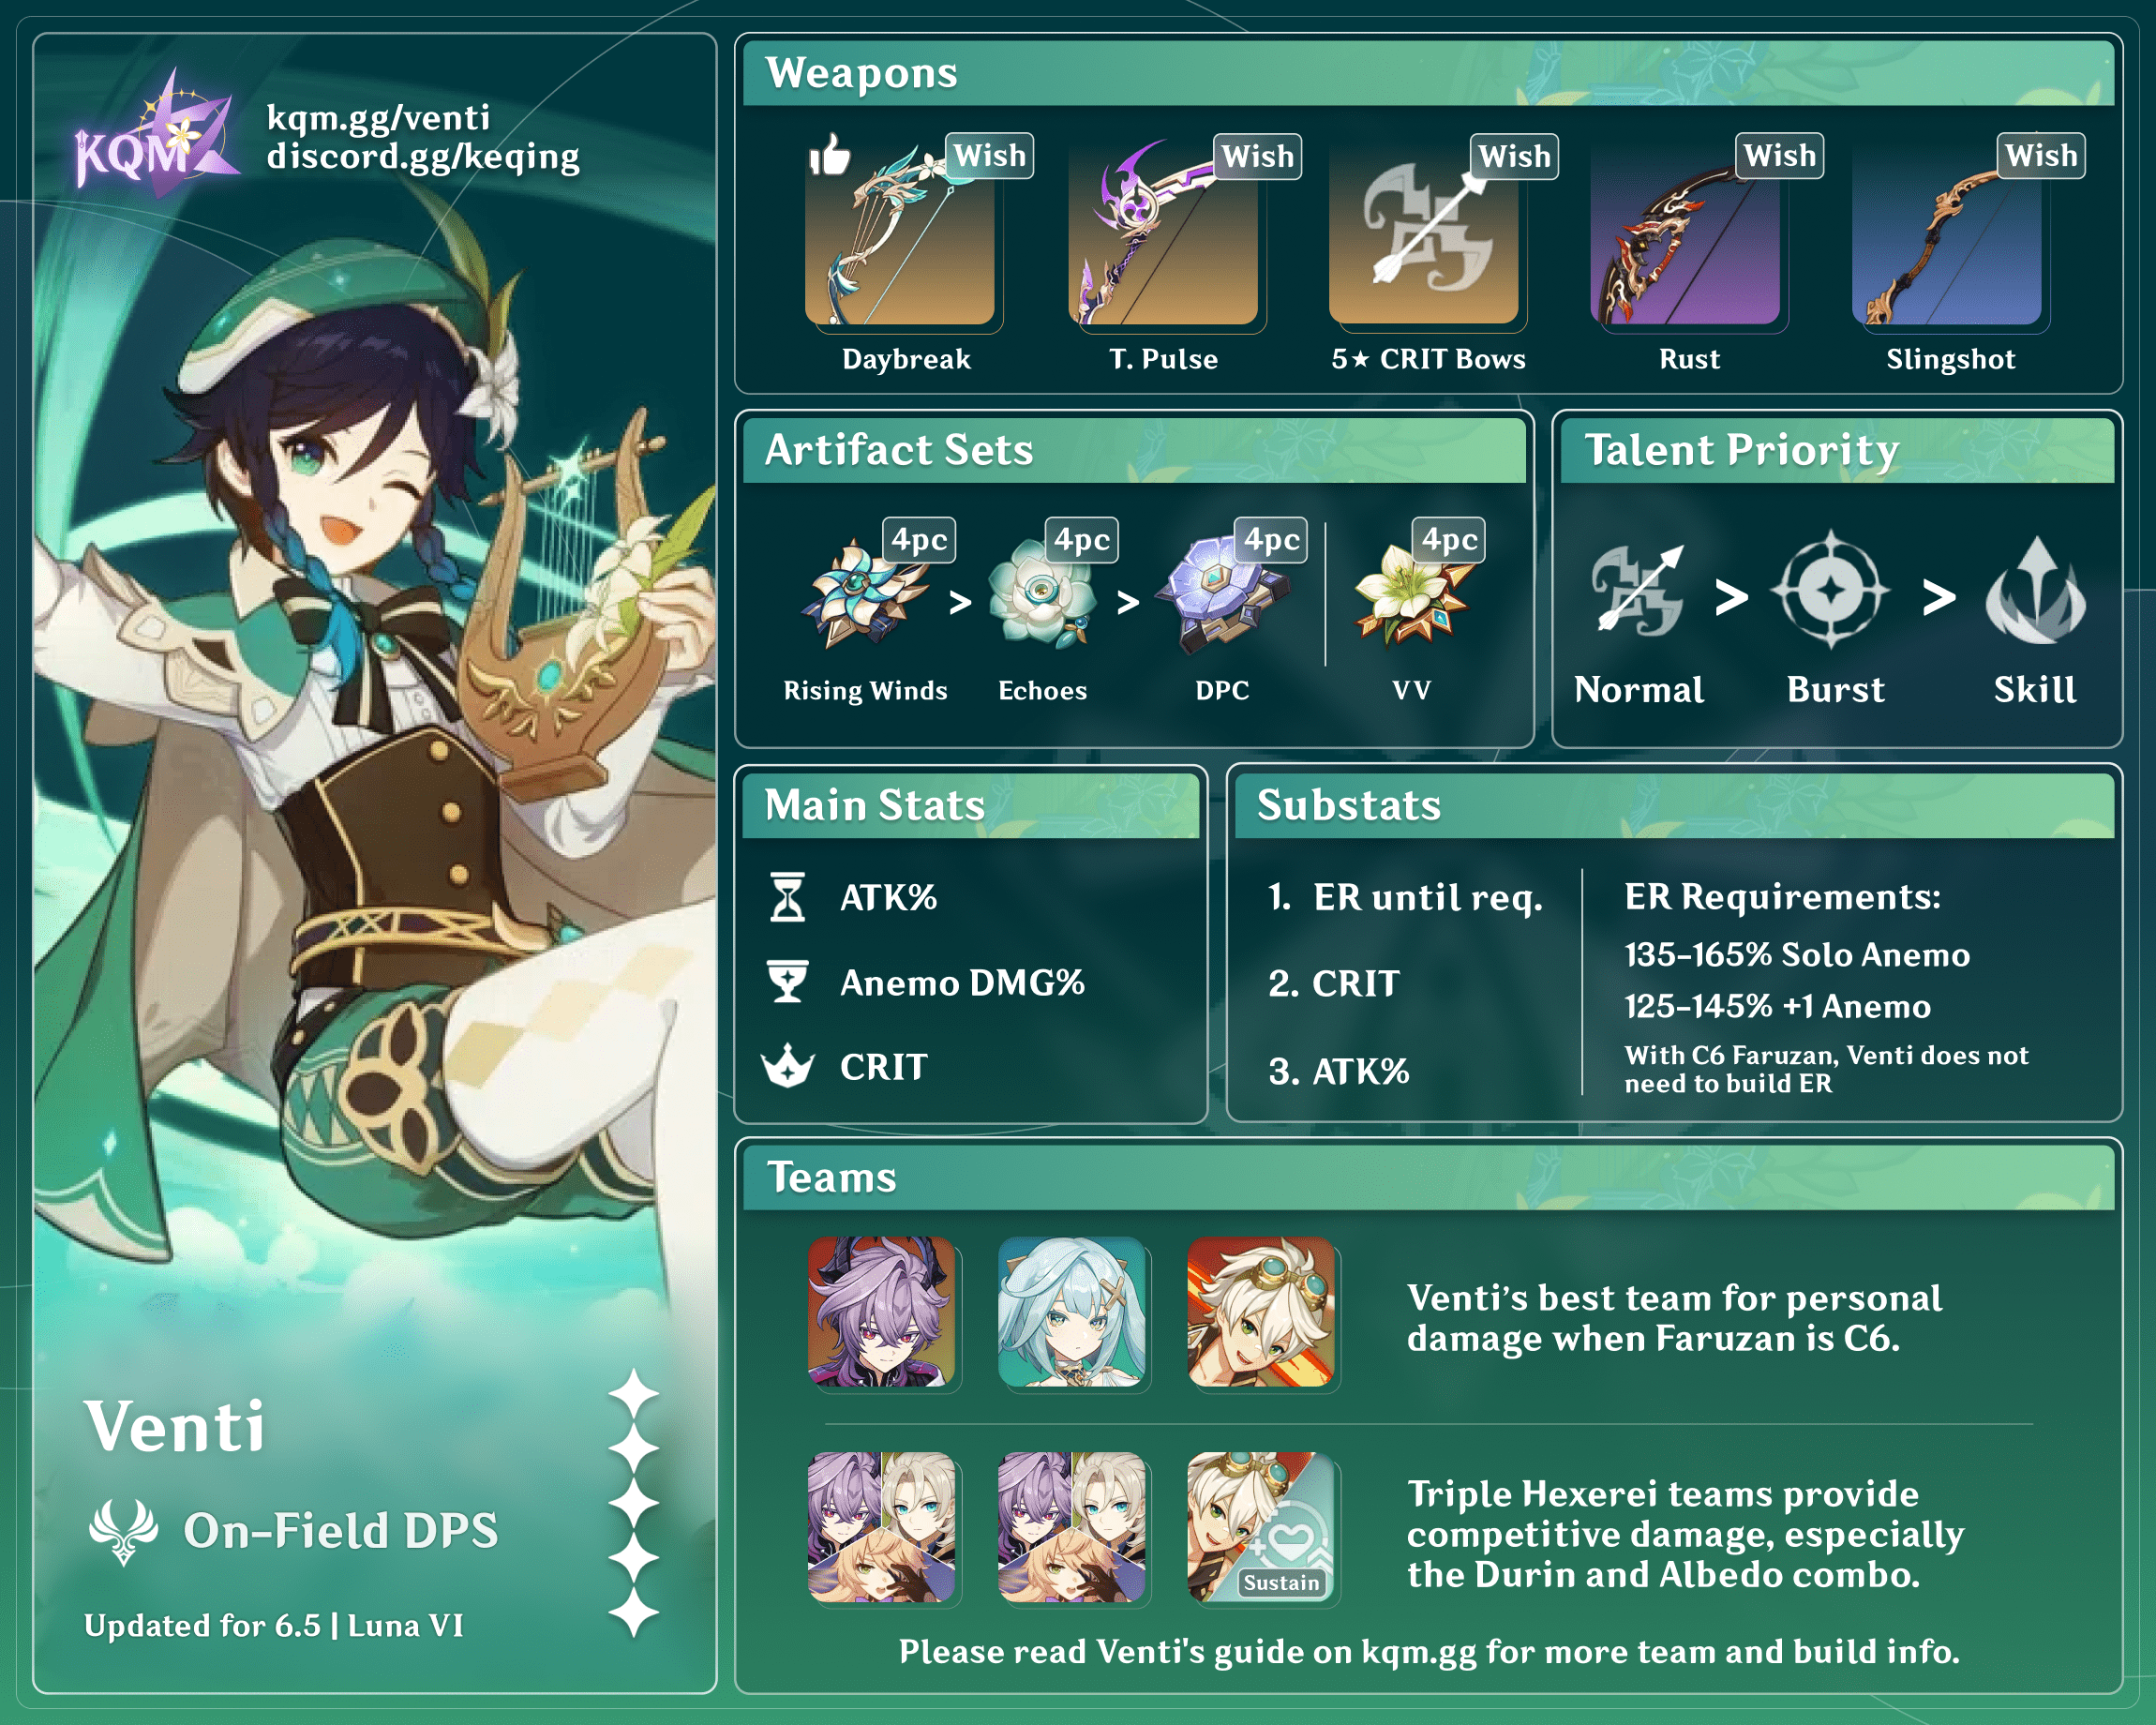
Credits to Irokei, shade.645, madeofseaglass and KQM Staff
Off-Field Support
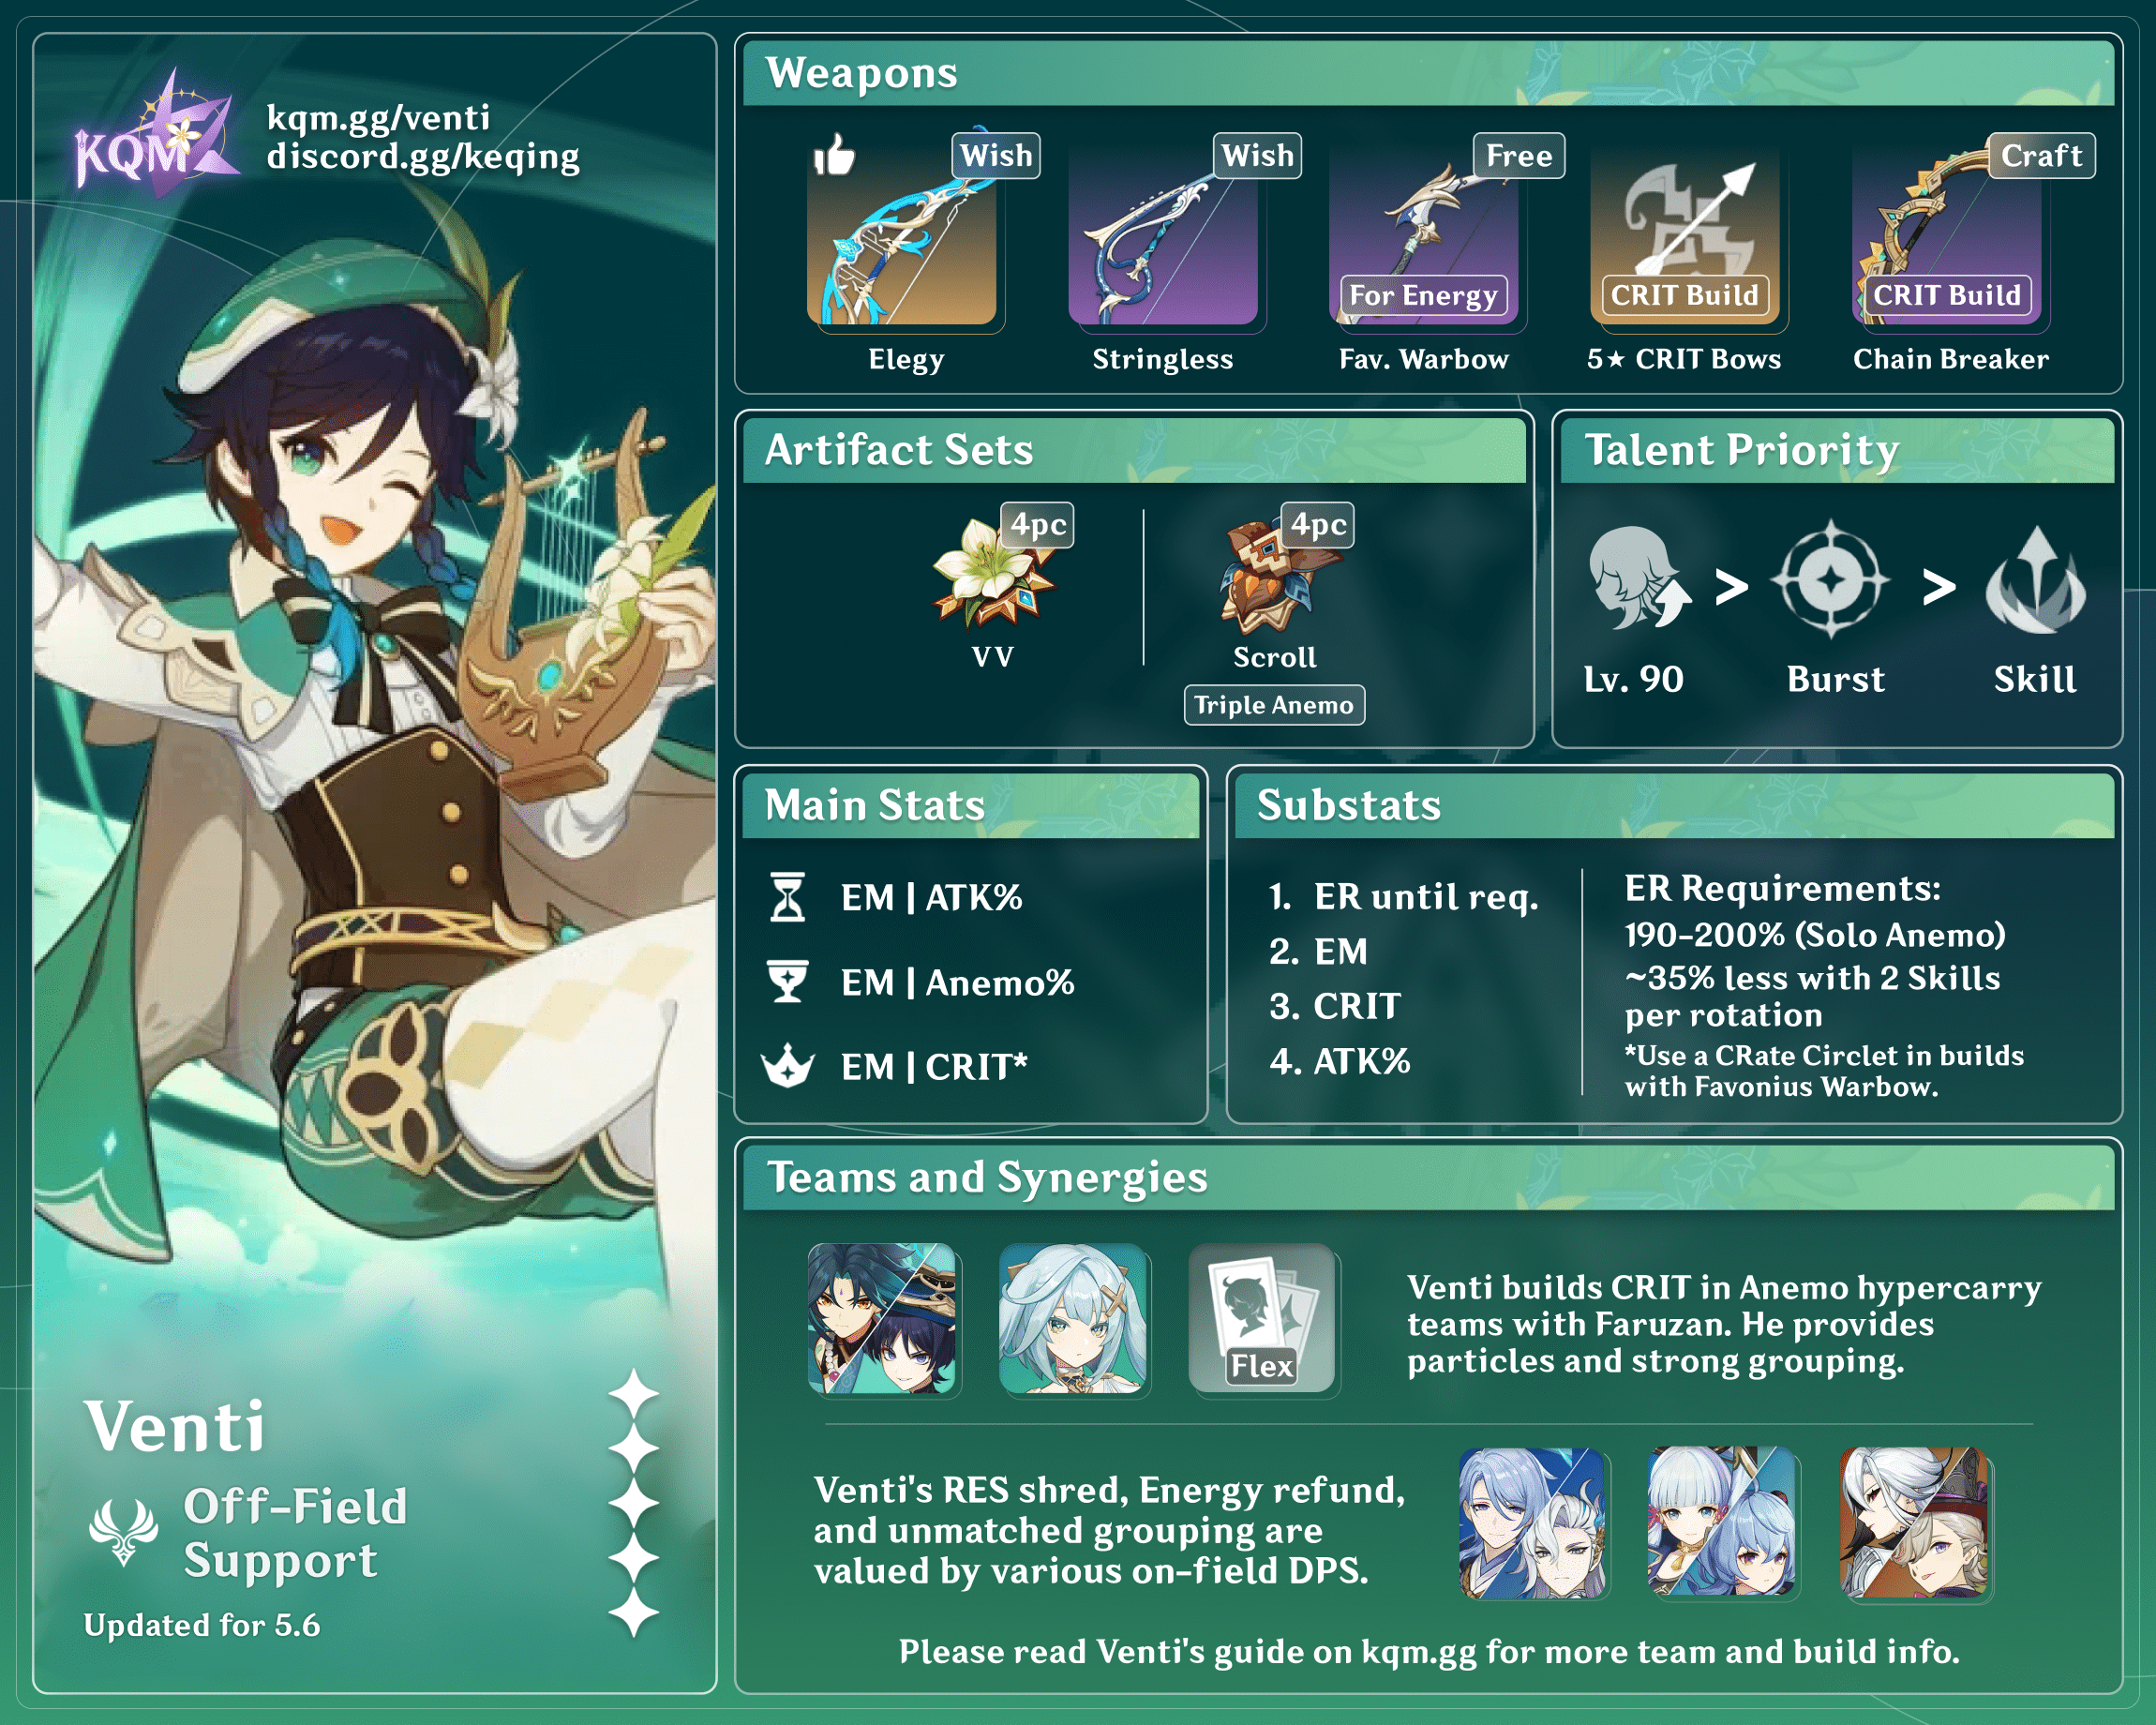
Credits to kolvii, mocha_biscuit, shade.645 and KQM Staff
Character Overview
Pros
- Provides the strongest grouping and crowd control in the game to date.
- Easily maintains Viridescent Venerer uptime as an off-field support due to his Skill’s short cooldown.
- Refunds Energy to PHEC (Pyro, Hydro, Electro, Cryo) teammates, alleviating their ER requirements.
- Can fill a Hexerei slot to enable teammates’ corresponding abilities.
- Hexerei teammates unlock Venti’s potential as a potent on-field DPS or driver, making him more versatile and giving Venti fans a viable way to play him on-field.
- Less dependent on Faruzan than other on-field Anemo DPS units due to the powerful buffs and damage provided by stacking Hexerei teammates.
- Will work for alcohol.
Cons
- Lacks the innate buffing capabilities of other go-to Anemo supports like Kazuha or Sucrose.
- Some characters struggle to hit small enemies lifted into Venti’s Burst.
- Hexerei buffs only affect his damage and do not add to his supportive capabilities (except for on-field Anemo DPS units).
- Prefers specific teammates and a 5-star Bow to maximize on-field DPS output.
- Wouldn’t gliding be faster? : )
Playstyles
Off-Field Support
Venti fills a Hexerei slot where applicable and supports his teammates with strong grouping and Energy regen from his Burst, as well as RES Shred from 4pc Viridescent Venerer. He contributes respectable damage from off-field, mostly via his Burst and any Swirls and chain reactions it procs. He can build for either EM or CRIT; an EM build favors AoE scenarios with high Swirl counts and chain reactions like Aggravate or Electro-Charged, while a CRIT build is better when reactions are few and his Burst can snapshot buffs from characters like Bennett or Faruzan.
On-Field Anemo DPS
As long as a second Hexerei character is included in the team, Venti can now be played as an on-field DPS, dealing significant Anemo damage via his Normal Attack’s Windsunder Arrows. A long-awaited gift for Venti fans! He uses a standard CRIT build in this playstyle and can ignore EM.
On-Field Reaction Driver
In reaction teams with no dedicated on-fielder, Venti’s Hexerei passive allows him to fill this role, providing full VV uptime from on-field and a high Swirl count to proc chain reactions. In this playstyle, the focus is less on Venti’s personal damage and more on his ability to support the off-field DPS, although he can be a major contributor in some teams.
Talents
Level and Talent Priority
Off-Field Support (EM build): Level 90 >>> Burst > Skill
Off-Field Support (CRIT build): Burst >>> Level 90 > Skill
On-Field Anemo DPS: Normal Attack > Burst > Skill > Level 90
On-Field Driver: Level 90 >>> Burst > Skill > Normal Attack
For Support Venti, the importance of Level 90 depends on whether he builds for EM or CRIT. For an EM build, Level 90 is top priority, as it has a significant effect on Transformative Reaction scaling, while his Talents can be skipped entirely for minimal investment. On a CRIT build, his Burst’s Talent level is the most important, with Level 90 and Skill significantly less so.
As an on-field DPS, his Normal Attacks are top priority, but his Burst and Skill still make up around 40% of his overall damage and should be leveled as well. Level 90 is recommended as it represents a small damage increase, but leveling his Talents should come first.
Talent Overview
 Normal Attack | Divine Marksmanship
Talent Description
Normal Attack
Performs up to 6 consecutive shots with a bow.
Charged Attack
Perform a more precise Aimed Shot with increased DMG.
While aiming, favorable winds will accumulate on the arrowhead. A fully charged wind arrow will deal Anemo DMG.
Plunging Attack
Fires off a shower of arrows in mid-air before falling and striking the ground, dealing AoE DMG upon impact.
Hexerei: Secret Rite
While the Stormeye created by the Elemental Burst Wind’s Grand Ode is active, Venti will gain additional buff effects:
- Venti’s Normal Attacks will be converted into enemy-piercing Windsunder Arrows that deal even more Anemo DMG to opponents along the path.
- When Venti’s Normal Attacks hit opponents, Stormeye’s duration is increased by 1s, and its CD is increased by 0.5s. This effect can be triggered once every 0.1s and up to 2 times after each use of the Elemental Burst Wind’s Grand Ode.
Venti’s Normal Attack Talent does not hold much value for his support playstyle. However, in his new on-field playstyles, it takes center stage: with another Hexerei character, his Normal Attacks become Anemo-converted Windsunder Arrows as long as his Burst is active. These arrows deal significant damage and pierce through enemies to damage all opponents in their path. They also extend his Burst by 2 seconds, allowing him a full 10s of on-field uptime.
 Elemental Skill | Skyward Sonnet
Talent Description
Press/Tap
Summons a Wind Domain at the opponent’s location, dealing AoE Anemo DMG and launching opponents into the air.
Hold
Summons an even larger Wind Domain with Venti as the epicenter, dealing AoE Anemo DMG and launching affected opponents into the air.
After unleashing the Hold version of this ability, Venti rides the wind into the air.
Opponents hit by Skyward Sonnet will fall to the ground slowly.
Venti uses the Tap version of his Skill in combat for tighter rotations. This launches small enemies into the air and generates 3 Anemo Particles. Because of its 6s cooldown, it can often be used multiple times in a rotation.
His hold Skill is useful for exploration, allowing players to reach high places and grab some otherwise difficult-to-reach oculi.
 Elemental Burst | Wind’s Grand Ode
Talent Description
Fires off an arrow made of countless coalesced winds, creating a huge Stormeye that sucks in opponents and deals continuous Anemo DMG.
Elemental Absorption
If the Stormeye comes into contact with Hydro/Pyro/Cryo/Electro, it will deal additional elemental DMG of that type.
Elemental Absorption may only occur once per use.
Venti’s Burst is vital to his kit. The Stormeye it summons used to be generated at a fixed distance from Venti’s position, requiring careful positioning to avoid tanking his damage due to larger enemies being out of range. However, this was updated in the Luna III and the Stormeye now appears roughly on top of the nearest enemy.
The Stormeye snapshots his stats on cast and deals a total of 20 ticks of Anemo damage over its 8s duration. If it comes into contact with Pyro, Hydro, Electro, or Cryo, it will absorb and deal additional damage instances of that Element (roughly 13-15). If multiple Elements come into contact with Venti’s Burst, the Absorption priority is Pyro > Hydro > Electro > Cryo. In Hexerei teams, Venti’s Windsunder Arrows can extend the Stormeye’s duration by 2 seconds to a total of 10 seconds, earning him a few more ticks of damage and a chance at additional Swirls.
Venti’s Burst has exceptionally strong crowd control, with the Stormeye drawing groupable enemies toward its center throughout its duration. It will also lift smaller enemies, which may put them out of reach of certain characters’ attacks; a somewhat outdated list of compatibilities and incompatibilities with Venti’s Burst can be found here.
 Ascension 1 Passive | Embrace of Winds
Talent Description
Holding Skyward Sonnet creates an upcurrent that lasts for 20s.
Useful mostly for exploration and not combat.
 Ascension 4 Passive | Stormeye
Talent Description
Regenerates 15 Energy for Venti after the effects of Wind’s Grand Ode end. If an Elemental Absorption occurred, this also restores 15 Energy to all characters of that corresponding element in the party.
Further bolsters his Burst’s utility by granting a generous 15 Flat Energy to himself and party members of the absorbed Element. This gives Venti tremendous utility as a team battery, as long as he can reliably absorb the correct Element.
 Hexerei Passive | Temporal Wind’s Eulogy
Talent Description
After completing Witch’s Homework: Of the Waking of Wind, Venti will become a Hexerei character. When the party includes at least 2 Hexerei characters, you will gain the Hexerei: Secret Rite effect, which enhances Hexerei characters.
Hexerei: Secret Rite
While the Stormeye created by the Elemental Burst Wind’s Grand Ode is active, for 4s after a nearby active character triggers a Swirl reaction, that character’s DMG is increased by 50%, and Venti’s Stormeye deals 135% of its original DMG.
The crux of this passive is that it opens up Venti’s on-field playstyles by allowing him to deal Anemo damage with his Windsunder Arrows during his Burst uptime. It also provides a decent buff for his Burst.
For off-field support Venti, the personal impact is minimal, though firing off a quick N2 to extend his Burst can be optimal in some teams. The more important facet is his ability to enable the Hexerei passives of other characters, many of whom can provide new buffs or augment the ones they already have when paired with Venti.
 Utility Passive | Windrider
Talent Description
Decreases gliding Stamina consumption for your own party members by 20%.
Not stackable with Passive Talents that provide the exact same effects.
A basic utility passive. Nice for reaching certain out of the way locations like Mondstadt’s Nameless Island.
Constellations
Venti’s new Hexerei-buffed Constellations are very powerful for his on-field playstyles, and a welcome upgrade from their former versions. They are less impactful when Venti is played as an off-field support.
 Constellation 1 | Splitting Gales
Constellation Description
Fires 2 additional arrows per Aimed Shot, each dealing 33% of the original arrow’s DMG.
Additionally, 2 extra arrows that track opponents will be fired per Windsunder Arrow, each dealing 20% of the original arrow’s DMG. This effect can be triggered once every 0.25s.
The first part of this Constellation is pretty useless, as Venti does not use Charged Shots in any of his common playstyles. The second part, however, provides a sizable increase to Venti’s damage as an on-field DPS or driver, making it one of his better Constellations.
 Constellation 2 | Breeze of Reminiscence
Constellation Description
Skyward Sonnet decreases opponents’ Anemo RES and Physical RES by 24% for 10s.
Additionally, after unleashing the Elemental Burst Wind’s Grand Ode, Venti gains the Wherever a Breeze Blows effect, and the cooldown for his Elemental Skill Skyward Sonnet is reset. After a Windsunder Arrow hits an opponent, there is also a 25% chance for Venti to gain the Wherever a Breeze Blows effect.
Wherever a Breeze Blows
When pressing to unleash the Elemental Skill Skyward Sonnet, 300% of the original amount of DMG is dealt. This effect lasts for 15s and is removed after Venti presses to use the Elemental Skill Skyward Sonnet.
This is Venti’s second best Constellation for on-field DPS output. In addition to the 24% RES Shred, it makes Venti’s Skill a more powerful nuke, and allows him to replace some of his on-field N5D combos with N5E instead. An excellent stopping point for those not seeking C6.
 Constellation 3 | Ode to Thousand Winds
Constellation Description
Increases the Level of Wind’s Grand Ode by 3.
Maximum upgrade level is 15.
Burst Talent levels are always welcome for Venti.
 Constellation 4 | Hurricane of Freedom
Constellation Description
After unleashing his Elemental Skill Skyward Sonnet or Elemental Burst Wind’s Grand Ode, Venti and his own active party members gain a 25% Anemo DMG Bonus for 10s.
The Anemo DMG% buff is particularly useful for Venti’s damage in teams that do not provide much DMG Bonus from teammates. In teams with buffers like Yelan or Furina, however, this Constellation’s impact is lessened.
 Constellation 5 | Concerto dal Cielo
Constellation Description
Increases the Level of Skyward Sonnet by 3.
Maximum upgrade level is 15.
This Talent provides only a small increase to Venti’s overall damage.
 Constellation 6 | Storm of Defiance
Constellation Description
Targets who take DMG from Wind’s Grand Ode have their Anemo RES decreased by 20%.
If an Elemental Absorption occurred, then their RES towards the corresponding Element is also decreased by 20%.
Additionally, the DMG Venti deals to these opponents will gain a CRIT DMG Bonus of 100%.
Even more RES Shred for Venti, in addition to a huge CRIT DMG buff. As an on-field DPS, this is a massive increase to Venti’s damage, more than doubling it compared to C0. Unsurprisingly, C6 is by far Venti’s best Constellation.
It is less impactful when Venti is used as an off-field support, but still quite good as it further buffs teammates and increases his damage.
C1 vs R1
For off-field support Venti, R1 Daybreak is unquestionably the better option, as his C1 only really affects his on-field DPS performance.
As an on-field DPS, it depends on what weapon Venti is currently wielding. C1 is slightly better if you already have one of the recommended 5-star weapons, but if you’re using a 4-star weapon or one of the less preferred 5-stars, getting R1 will be a bigger upgrade.
As a driver, C1 is more impactful, but it is recommended to prioritize investment into off-field DPS teammates instead of Venti’s personal damage.
Combos
Combo Notation
- N = Normal Attack
- C = Charged Attack
- A = Aimed Shot
- P = Plunging Attack
- hP = High Plunge
- lP = Low Plunge
- E = Elemental Skill
- tE = Tap Skill
- hE = Hold Skill
- Q = Elemental Burst
- D = dash (cancel)
- J = jump (cancel)
- W = walk (cancel)
- > = switch character
- ( ) = these actions are optional; please refer to the notes below
- [ ] = repeat these actions the specified number of times
RR cancels (entering and then leaving Aiming Mode) are not considered for the purposes of this quick guide. Though they are a valid hyperoptimization technique, they are very challenging to execute correctly and unforgiving of mistakes, especially if you don’t play on controller. Testing regarding their efficacy is still ongoing, but the vast majority of players will get better results using the combos below.
| EQ (N2) | As a support, Venti simply uses his Skill and Burst before leaving the field. On teams with another Hexerei character, he can optionally perform N2 to extend his Burst by 2s. It is possible for Venti to extend his Burst from his N1 alone, since it hits twice. He must be on-field for both hits, however, which requires players to pause briefly before swapping out. Since it’s easy to mess this up and accidentally swap out too early, N2 is the more recommended method. |
| (h)E N1 | When Venti’s Skill is not followed by his Burst (e.g. in 2E rotations or during his on-field attack sequences), using a Normal Attack immediately after casting Skill cancels its lengthy animation, allowing for faster swaps and tighter rotations. Holding Venti’s Skill and then immediately using a Normal Attack causes him to perform his Tap Skill instead while skipping the animation even faster than the tE N1 variant, though the difference is marginal. |
| N5D | This is Venti’s optimal on-field combo for both DPS and Swirl count. If Venti’s Skill is off cooldown, execute N5E instead, but don’t interrupt the combo before the fifth Normal Attack as this is a DPS loss. His sixth Normal Attack is not worth using due to its long animation. |
ER Requirements
Calcs for ER requirements can be found here (last updated for Version “Luna IV”).
Off-Field Support
| 1 Skill | 2 Skills (short rot.) | 2 Skills (long rot.) | |
| Solo Anemo | 175–210% | 145–165% | 115–145% |
| Triple Anemo | 125–160% | 110–135% | |
On-Field DPS
| Solo Anemo | 135–165% |
| Double Anemo | 125–145% |
| With C6 Faruzan | 100–105% |
On-Field Driver
| 2 Skills | 125–140% |
| 3 Skills | 100–110% |
Venti has 132% base ER when fully ascended thanks to his Ascension stat, making these numbers generally easy to reach. If using Favonius Warbow, his ER requirements will be met with the weapon’s secondary stat and passive alone.
Use the Energy Recharge Calculator to determine exact requirements for your team and rotation. For more details on how Favonius weapons will affect your team, please use Ac1d’s Favonius Mastersheet.
Off-Field Support
This playstyle focuses on using Venti’s supportive abilities to group enemies, refund Energy, and shred Elemental RES with 4pc Viridescent Venerer.
Venti can build for either EM or CRIT depending on the team and scenario. In teams with high Swirl counts, especially where Venti triggers auxiliary Transformative Reactions such as Aggravated Swirl or Electro-Charged, players should build for EM. In teams with significant buffs for Venti’s Talent damage and few or no auxiliary reactions, a CRIT build can be better, especially in single-target situations. Lunar-Charged (LC) teams favor a combination build emphasizing both CRIT and EM to benefit from LC’s multifaceted scaling; please see the Lunar Reaction guide for more details.
Artifacts
Artifact Stats
 Sands |  Goblet |  Circlet |
| EM / ATK% / ER | EM / Anemo DMG% / ATK% | EM / CRIT |
Stat Priority (EM Build): ER (until requirement) > EM > CRIT/ATK
Stat Priority (CRIT Build): ER (until requirement) > CRIT > ATK% ≥ EM
Stat Priority (Lunar-Charged): ER (until requirement) > CRIT ≥ EM
For an EM build, Venti wants triple EM stats if possible. An ER Sands should only be considered if Venti’s ER needs are very high and he’s not using an ER weapon. Even then, try to meet ER needs with substats if possible.
In Lunar-Charged teams, EM / EM / CRIT is Venti’s best option, though once again an ER sands can be used if absolutely necessary.
On a CRIT build, an EM Sands can still be Venti’s best option in multi-target scenarios with high Swirl counts, though 5-star weapons favor an ATK% Sands regardless. As in other builds, an ER Sands is possible but generally not recommended. An ATK% Goblet can be competitive with an Anemo DMG% Goblet when using a lower Base ATK weapon with few external ATK buffs (e.g., if Venti is equipped with The Stringless or Favonius Warbow in a team without Bennett). In all other cases, though, Anemo DMG% is better. Use whichever CRIT Circlet gets you closer to the ideal 1:2 CRIT ratio.
Artifact Sets
Hover over artifact images for more information.
 4pc Viridescent Venerer (VV) | Uncontested BiS in the vast majority of scenarios. The whopping 60% Swirl DMG Bonus maximizes Venti’s reaction damage, while the 40% RES Shred for the Swirled Element buffs his teammates. |
4pc Scroll of the Hero of Cinder City (Scroll) | In Anemo Hypercarry teams where Venti runs alongside an on-field Anemo DPS like Wanderer, he can use this set to provide 12% Anemo DMG Bonus by Swirling any Element, whether on or off-field. |
 4pc Gilded Dreams (GD) | A niche option for teams with a second Anemo who is a better holder of 4pc VV than Venti (e.g. Mizuki). |
Weapons
Hover over weapon images for more information.
 5★ Elegy for the End | All builds. Indispensable for its teamwide buff, though it tends to lag behind other options for Venti’s personal damage, performing better with higher ER needs. If using Venti in teams with rotations shorter than 20s, this weapon’s passive will not trigger every rotation. |
5★ The Daybreak Chronicles | All builds. Venti’s new signature weapon is his BiS for personal damage in most scenarios, especially with another Hexerei team member. However, it lacks the team buffs of Elegy. |
    5★ Astral Vulture’s Crimson Plumage, Polar Star, Aqua Simulacra, Hunter’s Path | All builds. Solid options for Venti regardless of build due to the various buffs they provide, but equipping Venti with them is only recommended when the team lacks any units who can use them better. For EM builds, Astral Vulture is the only 5-star weapon other than Daybreak that can compete with R5 Stringless. Aqua Simulacra and Hunter’s Path rank much lower than the first two when there are strong DMG% buffs on the team (e.g. with Furina). |
   5★ Thundering Pulse, The First Great Magic, Skyward Harp | CRIT and Lunar-Charged builds. Not recommended for EM builds, but better than The Stringless in Lunar-Charged and CRIT builds. TFGM is notable for its higher performance in Triple Anemo teams with Faruzan. |
 4★ The Stringless | All builds. Unconditional EM stat stick that also gives a massive Skill and Burst DMG Bonus. An excellent option for Venti in most scenarios, often beating out 5-star options on an EM build, even at lower refinements. It still performs well in CRIT and Lunar-Charged builds, but 5-star weapons tend to pull ahead in those cases due to their higher Base ATK and CRIT stats. |
  4★ Mouun’s Moon, Alley Hunter | CRIT build. Mouun’s Moon is a powerful gacha weapon that scales very well with refinements, and can overtake some 5-star options at R5. Alley Hunter lags a little behind it, but is still well worth using if you have it; wait 10s at the start of a Domain to stack its passive. Note that neither is worth using in EM or Lunar-Charged builds, as The Stringless will perform better. |
 4★ Favonius Warbow | All builds. Sacrifices Venti’s personal damage for team Energy, though it requires building CRIT Rate to consistently trigger its passive. Performs better when Venti’s own ER needs are high. Even in an EM build, a CRIT Rate Circlet can be considered with this weapon if you can’t get enough from substats. |
  4★ Cloudforged, Windblume Ode | EM and Lunar-Charged builds. Event weapons whose EM secondary stats make them solid choices for an EM or Lunar-Charged build, if you don’t have a free copy of The Stringless. For Windblume Ode, make sure to use Skill before Burst to snapshot the passive. These weapons are not recommended for CRIT builds. |
  4★ Song of Stillness, Chain Breaker | CRIT build. These craftable weapons are both decent options on Venti for players who lack The Stringless. Song of Stillness usually performs better, but requires Venti to receive regular healing to proc its passive. Chain Breaker can be considered for Lunar-Charged teams if players lack both The Stringless and the more EM-heavy options above. Neither is recommended for an EM build. |
 3★ Raven Bow | EM build. A surprisingly viable baseline option for EM builds, if none of the above are available. |
Teambuilding
Rotation Notation
- N = Normal Attack
- C = Charged Attack
- A = Aimed Shot
- P = Plunging Attack
- E = Elemental Skill
- tE = Tap Skill
- hE = Hold Skill
- Q = Elemental Burst
- D = dash (cancel)
- J = jump (cancel)
- W = walk (cancel)
- > = switch character
- ( ) = these actions are optional; please refer to the notes below
- [ ] = repeat these actions the specified number of times

Venti is easy to slot into a variety of teams as an Anemo support. Though he lacks the innate buffing capabilities of units like Kazuha and Sucrose, there are a few traits that make him stand out:
- He is notable in teams with other Hexerei characters (e.g. Fischl, Durin), as he activates their powerful Hexerei passives. This alone can justify Venti’s inclusion over other options.
- Since his release, Venti’s crowd control capabilities remain unmatched. He can group enemies very close together for a long period of time, and this is of particular benefit to certain teammates, including those with quadratic or pseudo–quadratic scaling (see below). However, Venti struggles in any content where enemies cannot be grouped.
- The Flat Energy he grants is tremendously helpful for teammates with high ER needs, as long as he can reliably absorb the correct Element. This allows other units to build more offensive stats and equip DPS weapons rather than ER weapons.
Quadratic Scaling
The damage of attacks with quadratic scaling increases exponentially (by an exponent of 2) according to the number of enemies hit. For example, hitting 3 enemies with linear scaling will result in 3 damage instances; hitting 3 enemies with quadratic scaling will result in 9 damage instances. Notable units with quadratic or pseudo-quadratic scaling include Ayato (Burst), Ganyu (Burst), Albedo (Burst), and Childe (Riptide mechanic).
Notable Teammates
Hexerei Characters
Varka | Venti is Varka’s preferred Anemo teammate due to the 50% DMG Bonus he provides alongside VV RES Shred for Varka’s PHEC damage. Venti can also do a significant amount of damage in Varka teams, since Varka’s favored supports like Bennett and Durin benefit Venti as well. |
Durin | Durin and Venti have great synergy. They form a support-oriented Hexerei core, especially for Pyro DPS units, providing a whopping 75% Pyro RES Shred between them. Venti can also act as Hexerei support for Durin’s DPS in Vaporize and Melt compositions by shredding Pyro RES and applying additional Hydro/Cryo via his Burst, though care must be taken to ensure the RES Shred can be achieved without his Burst absorbing Pyro and stealing Durin’s Vapes/Melts. |
 Fischl | Fischl’s exceptional Electro application gives Venti a reliable source of aura to Swirl in Quicken and Electro-Charged teams, turning her frequent single-target hits into a source of AoE Electro application. Venti also enables Fischl’s Hexerei abilities, which provide buffs to herself and the active character when the team triggers Overload, Electro-Charged, or Lunar-Charged. |
 Mona | Venti activates Mona’s Hexerei passive, allowing her to function as driver to extend her Omen buff to a full 13s with her Normal and Charged attacks. His Burst also helps to alleviate her often high ER requirements, provided it absorbs Hydro. |
 Albedo | With his Hexerei passive activated, Albedo contributes significant off-field damage and a DMG% buff of up to 42% for Hexerei teammates (12% for non-Hexerei units). His Burst features quadratic scaling, which benefits from Venti’s strong grouping. |
 Klee | Venti fills a Hexerei slot for Klee while providing VV RES Shred. Her extremely high stagger values allow enemies that would not normally be lifted by Venti’s Stormeye to be sucked in, and Venti regroups enemies scattered by Klee’s Charged Attack. |
 Razor | Venti can fill the team’s Hexerei slot while providing VV RES Shred, strong grouping, and Energy for Razor. Razor’s Normal Attacks sometimes struggle to hit smaller enemies lifted into Venti’s Burst, however, so consider the content you’re facing before using them together. |
Pyro
 Bennett | Snapshotting Bennett’s Flat ATK buff onto his Burst greatly increases Venti’s raw Anemo damage, and Bennett also applies a high amount of Pyro aura, including self-aura, that facilitates absorbing Pyro into Venti’s Burst if desired. Bennett, in turn, appreciates the Flat Energy refund, especially as solo Pyro, and Venti’s strong grouping keeps enemies reachable from within his Burst radius. |
 Lyney | Venti’s short Burst cooldown means he can Burst every rotation in Lyney teams, giving Lyney all the benefits of his strong crowd control and grouping while providing some AoE damage from Pyro Swirls. Lyney can also hit multiple enemies with his Skill, Burst, and Grin-Malkin Hat explosions. |
 Dehya | Venti is a great support for Dehya in her on-field DPS teams. He keeps enemies in one place during her Burst, and she can generally still hit any that are lifted. His Flat Energy refund offsets her high ER requirements, giving her more room to build offensive stats. |


Hydro
 Ayato Ayato | Ayato’s Burst has pseudo-quadratic scaling, and Venti’s grouping helps Ayato hit multiple enemies with his Shunsuiken slashes. The Energy regen from Venti’s Burst also alleviates his ER needs. |
 Childe | Childe has true quadratic scaling on his Riptide mechanic, and he can apply Riptide in a multitude of ways. However, his melee attacks struggle to hit enemies lifted by Venti’s Burst, so it is best to pair them together with heavier enemies that can be grouped but not lifted, or arrange the rotation such that Venti’s Burst finishes as Childe begins his melee uptime. |
 Furina | The attacks from Furina’s Salon Members are small spherical AoEs; with Venti’s tight grouping, they can hit multiple enemies, increasing her damage in AoE scenarios. She also appreciates the Energy regen from his Burst when it absorbs Hydro, and her large DMG% buff increases his Talent damage. |
Electro
 Ineffa | Ineffa enables the Lunar-Charged reaction while dealing very strong damage from off-field. Lunar-Charged takes into account the stats of all those who contribute to the reaction (as opposed to Electro-Charged, in which only the direct reaction trigger is accounted for), and Venti contributes significantly via his Burst Absorption and Swirls. For best results, Venti should use a CRIT Circlet and build some CRIT substats in teams with Ineffa to benefit from Lunar-Charged’s partially CRIT-based scaling. |
Yae Miko | Yae Miko’s Burst hits 4 times in quick succession with high multipliers, which Venti facilitates via his Flat Energy refund and powerful grouping, allowing for more Bursts and more enemies hit by each Burst. The crowd control also helps prevent her from getting staggered while resetting her turrets, and all of her attacks hit enemies lifted by his Burst with ease. |
Sethos | Venti’s tight grouping is particularly notable for Sethos, whose Charged Shots and Burst-converted Normal Attacks can hit multiple enemies along their flight path. He also greatly appreciates Venti’s Energy regen in both playstyles, and his flexible field time pairs well with Venti’s short Skill and Burst cooldowns. |
Ororon | Ororon and Venti both do well in Electro-Charged and Lunar-Charged team setups. Venti keeps enemies close together to make the most out of Ororon’s Hypersense AoE, and Ororon appreciates the Energy regen when his Burst absorbs Electro, as his ER needs can be high. |
 Lisa | Lisa is known for having severe Energy issues and being easily staggered, two problems Venti is well-suited to alleviate with his Energy refund and strong crowd control. All of her attacks can easily hit enemies lifted in Venti’s Burst, and his tight grouping helps her quickly generate Conductive stacks. At C4, she gains some pseudo-quadratic scaling for her Burst discharges, lending further value to Venti’s strong grouping. |


Cryo
 Ganyu | Venti is Ganyu’s preferred Anemo support in Freeze for a few reasons. His crowd control helps prevent her from being staggered while lining up Charged Shots, and his tight grouping facilitates her Burst’s pseudo-quadratic scaling and her Charged Shots’ Bloom AoE. His Energy refund also helps Ganyu Burst as often as possible with lower ER needs. |
 Ayaka | Ayaka does not have the same pseudo-quadratic scaling as Ganyu, but her Burst greatly appreciates the grouping Venti provides. Venti’s Flat Energy refund alleviates her high ER needs. |
 Shenhe | Shenhe is a potent support option for Cryo DPS units and synergizes well with Venti. He can proc Shenhe’s Quill with his Burst’s Absorption, and his grouping helps enemies stay in range of her Burst field for better uptime on its buffs. She also greatly appreciates the Flat Energy from Venti’s Burst. |


Other
Faruzan | Pre-C6 Faruzan is best used in Triple Anemo teams to help offset her monstrous ER requirements, where Venti can slot in to provide particles, grouping, and a 12% Anemo DMG buff from 4pc Scroll. Faruzan brings great buffs for Anemo damage dealers, and though she can’t benefit from his Burst’s Energy refund, she appreciates the additional Anemo Particles from Venti’s Skill. Venti should use a CRIT build when Faruzan is present. |
Wanderer | Wanderer and Venti, though not an obvious pairing, can be a very effective one. Venti’s tight grouping enables Wanderer’s Normal Attacks to hit multiple enemies, a significant DPS gain in AoE scenarios. In teams with Faruzan, the additional Anemo Particles from Venti’s Skill help offset Faruzan’s large ER requirements, and Wanderer appreciates them as well at C2, when he prefers to Burst every rotation. Venti should hold 4pc Scroll with Wanderer to further buff the team’s Anemo damage. If another Hexerei character (e.g. Durin) is present, he can also provide a 50% DMG buff to Wanderer via his Hexerei passive — but as none of the current Hexerei roster are able to provide shields or healing, this would mean running sustainless or sacrificing Faruzan. The latter results in lower damage output, but is an option for players who don’t want to be tied to using Faruzan. |
 Kazuha | Venti and Kazuha can be used together as a flexible Anemo core capable of dealing tremendous damage with reactions. With Venti on 4pc VV, Kazuha can run 4pc Thundering Fury in an Electro-Charged or Aggravate composition and spam his Skill. |
Example Teams
This is not a comprehensive list of teams. The inclusion or exclusion of any given team does not necessarily reflect its power level. Support Venti is very flexible and can be used in a variety of compositions; the below reflects only a sampling.

This Hexerei team provides a plethora of buffs for Varka, while Venti and Durin contribute significant damage from off-field. Venti should equip 4pc VV to provide Pyro RES Shred for Durin’s damage and Varka’s PHEC attacks.
Sample Rotation
Durin 2[E]Q > Bennett EQ > Venti EQ N2 > Varka E combo > Venti E N1

A potent Double Hydro Lunar-Charged team with Ineffa doing impressive personal damage. For best results, use Venti’s Lunar-Charged build, i.e. EM / EM / CRIT and some CRIT substats.
Sample Rotation
Kokomi E > Ineffa E (Q) > Furina ED Q > Venti EQ > Kokomi Q 7[N3D] > Venti E N1

An Ayaka Freeze team with good Freeze uptime and survivability from Kokomi’s jellyfish. Venti’s Energy refund helps with Shenhe and Ayaka’s ER requirements. A CRIT build is better for Venti’s damage here, though an EM Sands can be optimal if there are 2+ targets.
Sample Rotation
Shenhe Q E > Venti EQ > Kokomi E > Ayaka D N1 EQ N1 > Shenhe E > Venti E N1 > Ayaka D 2[N2C] N2 D E N3

A typical Freeze Ganyu team with Layla for shielding. Venti can hold Favonius to help with Mona’s high ER requirements, since his Burst tends to absorb Cryo. At 2+ targets, Venti favors an EM build, but a CRIT build performs well in single-target.
Sample Rotation
Ganyu EQ > Venti EQ (N2)¹ > Layla Q (N1)² E > Mona (N1)¹ E Q > Ganyu 2C (1 if slow) > Venti E N1 > Ganyu C
¹Optional Burst extension
²Optional for a more reliable Favonius proc

An Anemo Overvape team in which Venti can absorb Pyro from Bennett’s Burst field’s self-aura, leading to a number of different reactions. He and Fischl also enable each other’s respective Hexerei abilities, with Fischl providing both ATK% and EM buffs. Venti should use an EM build in this team.
Sample Rotation
Bennett EQ > Ayato Q > Fischl E > Venti EQ (N2)¹ > Ayato E N15 > Bennett E > Fischl Q > Venti E N1 > Ayato E N15
¹Optional Burst extension

A classic Aggravate team with Yae Miko. Yaoyao or Kirara can be substituted for Baizhu. This team has many possible rotations and is pretty flexible as long as you maintain a consistent Quicken aura on enemies with Fischl’s Oz, Yae Miko’s Sesshou Sakura, and sufficient Dendro application, plus Bursting as often as possible with Venti and swapping in to use his Skill at least once every 10s for VV RES Shred uptime.
Sample Rotation
(Miko 3[E] > Venti Q (N2)¹ >)² Fischl E N1 > Baizhu EQ N1 > Venti E N1 > Miko Q 3[N1E]³ N2CJ N2D > Fischl N1 Q > Baizhu E N2 > Venti E N1 > Miko 3[N1E]³ 2[N2CJ] > Venti EQ (N2)¹
¹Optional Burst extension
²First rotation only
³With C6 Fischl; if Fischl is not C6, do 3[E]

A highly effective Sethos team. Party members use Normal Attacks to fill downtime and trigger Fischl’s C6. Venti should use an EM build in this team to maximize his Aggravated Swirl damage.
Sample Rotation (Charged Shot)
Fischl E N2 > Baizhu EQ N1 > Venti EQ (N2)¹ > Sethos C E 3C > Fischl N2 Q > Baizhu E N2 > Venti E N2 > Sethos C E 3C > Venti E N2
¹Optional Burst extension
Sample Rotation (Burst)
Fischl E N1 > Baizhu EQ > Venti EQ (N2)¹ > Sethos (C)² EQ 6[N2D] N2 > Fischl N1 Q > Baizhu E N2D N2 > Venti E N2 > Sethos (C)² EQ 6[N2D] N2
¹Optional Burst extension
²With C6

Venti lends grouping, buffing, and AoE damage to Lyney’s potent single-target damage potential. He and Durin activate each other’s Hexerei passives, and together they provide a total of 75% Pyro RES Shred and 35% Anemo RES Shred. EM and CRIT builds can both perform well for Venti in this team.
Sample Rotation
Durin 2[E] Q > Bennett EQ > Venti EQ (N2)¹ > Lyney combo
¹Optional Burst extension

Wanderer works surprisingly well with Venti, and can use his tight grouping to hit multiple enemies with his Normal Attacks and his crowd control to avoid getting staggered. Venti particularly benefits players who lack Faruzan’s C6, as Triple Anemo compositions help considerably with her monstrous ER requirements.
Venti favors a CRIT build here, though he generally does not snapshot Bennett’s buff to preserve that uptime for Wanderer. Since the team lacks a source of interruption resistance, some players may prefer slotting in Thoma instead for comfort.
Sample Rotation (C6 Faruzan + Bennett)
Faruzan (N1/E)¹ Q > Venti EQ > Bennett EQ > Wanderer combo
¹Optional for a more reliable Favonius proc; E is slower but hits multiple targets
Sample Rotation (C6 Faruzan + Thoma)
Faruzan (N1/E)¹ Q > Thoma EQ > Venti EQ > Wanderer combo
¹Optional for a more reliable Favonius proc; E is slower but hits multiple targets
Sample Rotation (pre-C6 Faruzan + Bennett)
Faruzan E C Q¹ > Venti EQ > Bennett EQ > Wanderer combo > Bennett E
¹If Faruzan is not C2+, move her immediately before Wanderer instead
Sample Rotation (pre-C6 Faruzan + Thoma)
Faruzan E C Q¹ > Thoma EQ > Venti EQ > Wanderer combo (> Venti E)²
¹If Faruzan is not C2+, move her immediately before Wanderer instead
²Venti can optionally funnel particles to Faruzan to help with her ER requirements
Limited Roster Alternatives
These teams are meant for newer players whose limited roster prevents them from using the teams above; as such, the teams below result in lower damage output.

An accessible Aggravate team featuring on-field Lisa. The rotation is flexible provided you maintain uptime on the Quicken aura with Fischl’s Oz and Kirara’s Skill/Burst.
Sample Rotation
(Lisa tE >)¹ Venti E N1 > Fischl E/Q > Kirara shE > Lisa (tE/N1) Q (tE/N1) C > Venti EQ (N2)² > Fischl Q/E > Kirara shE Q > Lisa tE hE 2[N2C]
¹First rotation only
²Optional Burst extension

An accessible Aggravate team featuring on-field Lisa. The rotation is flexible provided you maintain uptime on the Quicken aura with Fischl’s Oz and Kirara’s Skill/Burst.
Barbara plays on-field here to provide Hydro application and drive Beidou’s Burst. This team has no set rotation, and can simply swap as needed to keep uptime on each teammate’s abilities while having Barbara spam Normal Attacks to trigger Beidou’s Stormbreaker. Venti should swap in regularly to refresh 4pc VV, and can use two Normal Attacks after Bursting to extend his Burst’s duration. Barbara should hold TTDS for Fischl or Beidou to snapshot.
On-Field DPS
Venti’s Hexerei passive allows him to act as an on-field Anemo DPS with high damage potential, and his reworked Constellations and new signature weapon further strengthen this playstyle.
Artifacts
Artifact Stats
Sands | Goblet | Circlet |
| ATK% | Anemo DMG% | CRIT |
Stat Priority: ER (until requirement) > CRIT > ATK%
Venti’s on-field DPS build is pretty straightforward. Choose your Circlet based on whatever gets you closer to the optimal 1:2 CRIT ratio.
Artifact Sets
Hover over artifact images for more information.
 4pc A Day Carved From Rising Winds | Venti’s uncontested BiS for on-field DPS, providing ATK% and CRIT Rate buffs with full uptime. |
 4pc Echoes of an Offering | This set falls only a little behind 4pc Rising Winds in theory, but can be inconsistent at higher ping and is less efficient to farm. |
 2pc Mixed Sets (ATK%, Anemo DMG%) | Viable sets while farming for a 4pc Rising Winds set with good substats. These combinations tend to perform very similarly to each other, so use whichever pieces have the best substats. |
4pc Viridescent Venerer (VV) | In most cases, maximizing Venti’s damage with 4pc Rising Winds is the best strategy. However, there are cases when off-field PHEC teammates like Durin contribute significant damage, especially in AoE with frequent Swirls, where the difference between 4pc VV and 4pc Rising Winds for overall team damage is minimal and VV can even pull ahead. Please see the teambuilding section below for team-specific recommendations. |
 4pc Desert Pavilion Chronicle (DPC) | NOT recommended for Venti. Falls behind 4pc VV for personal damage, with none of the team benefits. |
Weapons
Hover over weapon images for more information.
5★ The Daybreak Chronicles | Venti’s best option for on-field DPS by a hefty margin, providing an easily maintained 60% Bonus to all of Venti’s Talent damage, high Base ATK, and a CRIT DMG secondary stat. No other weapon comes close. |
5★ Thundering Pulse | The second best option, lagging significantly behind Daybreak but ahead of other 5-star weapons. Lower performance if Venti’s Energy refills to full before the end of his field time; avoid building too much ER for this reason, especially with C6 Faruzan. |
5★ Astral Vulture’s Crimson Plumage, Aqua Simulacra, The First Great Magic, Polar Star | The tertiary tier of preferred 5-star weapons. These all perform similarly, but have different strengths and passive requirements. Astral Vulture’s Crimson Plumage is theoretically highest performing, but falls off in triple Anemo; Aqua Simulacra requires staying relatively close to enemies; The First Great Magic is a solid choice generally but shines best in triple Anemo scenarios; and Polar Star is theoretically lowest performing but very consistent as its passive is easily maintained at 3 stacks for most of the rotation. |
5★ Skyward Harp, Hunter’s Path | Lower performance than other 5-stars, but good CRIT stat sticks if you lack the options above. Venti has low Base ATK, so 5-star weapons are generally preferable to 4-stars, even when their passives are less relevant. |
 4★ Rust | Venti’s best 4-star option, offering a whopping 80% Normal Attack DMG buff at R5. Though a gacha weapon, it drops from both the standard banner and all limited banners, making it generally easy to acquire. Note that this weapon is still significantly outperformed by 5-star bows due to their higher Base ATK. |
4★ Song of Stillness | This craftable Bow is Venti’s best free option at high refinements, provided he receives consistent healing to maintain the passive, which can be difficult in some teams (and impossible in teams without a healer). |
 4★ The Viridescent Hunt | A good option for those who already have it, slightly outperforming R5 Slingshot. Refinements are not necessary. |
4★ Mouun’s Moon | Not worth using at R1, but can outperform R5 Slingshot at R3+, especially when characters with high-cost Bursts are on the team (e.g. Faruzan). |
 3★ Slingshot | The ever-reliable Slingshot is Venti’s baseline weapon, frequently dropping from all banners, including standard. A free copy is also accessible via dialogue with the NPC Vasco in Port Ormos. |
 4★ Prototype Crescent | Not worth using at low refinements, but if Venti can hit a weak spot, R5 Crescent performs on par with R5 Song of Stillness. Not recommended for general use, however, due to its inconsistent trigger condition. |
Teambuilding
Rotation Notation
- N = Normal Attack
- C = Charged Attack
- A = Aimed Shot
- P = Plunging Attack
- E = Elemental Skill
- tE = Tap Skill
- hE = Hold Skill
- Q = Elemental Burst
- D = dash (cancel)
- J = jump (cancel)
- W = walk (cancel)
- > = switch character
- ( ) = these actions are optional; please refer to the notes below
- [ ] = repeat these actions the specified number of times

A second Hexerei character is required to enable Venti’s on-field playstyles. Durin is the best candidate for this slot, but Fischl and Albedo also perform well.
Venti receives a 50% DMG buff from his Hexerei passive upon triggering Swirl, which requires some PHEC application from teammates to activate. This application need not be particularly consistent; as long as it’s enough for his Burst to absorb at the start of his field time, he can maintain full uptime.
As the primary damage dealer, teammates who provide buffs to his damage are preferred. Faruzan and Bennett are the ideal options, but there are viable alternatives. Triple Hexerei teams (i.e. 3 Hexerei units in total) are particularly competitive.
Notable Teammates
Hexerei Characters
Durin | Durin is the staple of Venti’s most competitive teams, contributing great off-field damage and 35% Anemo RES Shred. He also helps to enable Pyro Resonance when paired with other Pyro supports like Bennett, and can hold 4pc Noblesse Oblige if there are no better holders present. Dual DPS strategies, in which Durin and Venti contribute roughly equal damage, perform very well when the team supplies enough Hydro/Cryo aura for Durin to trigger consistent Vapes/Melts. |
Fischl | Fischl is another good choice for the Hexerei slot, providing off-field damage and Electro application. She gives a 22.5% ATK buff (45% at C6) to herself and the active character via her Hexerei passive whenever Overload is triggered, which incentivizes running her alongside Pyro supports like Bennett or Durin. Without Pyro to trigger Overload, she becomes a much weaker option. Fischl performs especially well in teams with Bennett, as she can snapshot his buff. |
 Albedo | Albedo is a strong choice in this slot. He provides great off-field damage and a DMG buff of up to 42% for Venti, scaling with Albedo’s DEF. The main thing he can’t provide is a source of PHEC aura for Venti to Swirl, so take this into consideration in filling the flex slots. In addition to his benefits for Venti’s damage, Venti’s Burst grouping benefits Albedo, as his Skill hits in an AoE and his Burst has pseudo-quadratic scaling. |
Klee (C2) | At C2, Klee becomes a viable option for this slot due to the rare DEF Shred she provides, but her lack of off-field damage contribution makes other choices stronger. |
 Mona | Mona is overall NOT recommended for Venti. She can provide a DMG% buff via her Burst’s Omen and is able to hold supportive equipment like TTDS, but these things come at a cost: the Omen buff is short-lived unless she stays on-field for several seconds to extend it via her Normal and Charged Attacks, eating into Venti’s uptime, and her ER requirements for Bursting every rotation can be astronomically high without an Energy weapon like Favonius. Though the latter can be alleviated somewhat by Venti’s Energy refund, getting his Burst to absorb Hydro can be inconsistent in practice when there are Pyro supports like Bennett on the team. |
Buffers
 Bennett | Consolidates good healing, Pyro Application for Venti’s Burst absorption, and a massive Flat ATK buff into one slot. If he’s available, it’s hard to find a reason not to use him. Compared to other on-field Anemo DPS such as Wanderer and Xiao, Venti has exceptionally low Base ATK (barely more than 4-stars like Lynette and Heizou). Bennett’s buff is therefore especially valuable for him. It is easier for a team without Faruzan to be competitive than a team without Bennett. |
 Faruzan | The premier Anemo buffer, consolidating Anemo RES Shred, DMG% Bonus, and (at C6) CRIT DMG Bonus into one package. Unfortunately, these are locked behind her high-cost Burst. Before C6, she suffers from low particle generation and astronomically high ER requirements (especially pre-C4), which can make her more challenging to use than some players would prefer. Luckily, Venti is also less dependent on her than most on-field Anemo DPS, making the choice not to use her less punishing. C6 Faruzan can produce Skill particles from her Burst hits, neatly solving most of her Energy issues and making her an incredibly powerful choice. |
 Furina | Provides good off-field damage and a large DMG% buff, but stacking the latter requires a strong healer to build her Fanfare. She is most viable in teams alongside Bennett but without Faruzan, and her Hydro application enables Venti and Durin to share damage as a dual DPS core. |
 Yelan | Yelan provides good off-field damage along with a ramping DMG% buff. Venti is a great driver for her Burst’s coordinated attacks, but she tends to have high ER requirements in his teams, and Venti’s Burst absorption isn’t always consistent enough to offset them. Her best use cases are teams with Durin, where she enables him to trigger Vaporize and raises his damage contribution to be on par with Venti’s. |
Sustain
 Bennett | Bennett is the obvious best choice here due to his massive Flat ATK buff and strong healing. See his description in the “Buffers” section above for more details. |
 Zhongli | Zhongli’s shield provides Universal RES Shred, benefitting both Venti and off-field damage dealers like Durin. When paired with Albedo, he provides full uptime on Geo Resonance. However, if Zhongli’s pillar breaks or its pulses miss, it can lead to much higher team ER requirements. This can be mitigated to some extent by having Zhongli build some CRIT Rate so he can hold Favonius Lance, but teams who already have Energy issues may want to look elsewhere. |
Thoma | Thoma provides a stacking shield and Pyro for Venti to Swirl while helping to enable Pyro Resonance. His C6 also gives a modest DMG% buff for Normal Attacks. Having Venti’s Burst absorb Pyro can be helpful to manage Thoma’s ER requirements, especially pre-C4. |
Lan Yan | As an Anemo catalyst, Lan Yan can hold 4pc Scroll to provide Venti with a 12% DMG buff, and TTDS to bolster his ATK. Her shield is very strong (especially at C2). |
 Kokomi, Barbara, Charlotte | These healers apply enough of their respective Elements for Venti to Swirl and can hold TTDS to buff his ATK. Kokomi can also provide good uptime on 4pc Tenacity of the Millelith. They have no innate buffing capability, however. |
  Jean, Sayu, Jahoda | Anemo healers who can hold 4pc Scroll and provide additional particles to help with Faruzan’s ER requirements, but not much else (unless Jean is C4, in which case she becomes a much better option). |
 Shinobu | Notable for her good uptime on 4pc Tenacity of the Millelith. |


Example Teams
This is not a comprehensive list of teams. The inclusion or exclusion of any given team does not necessarily reflect its power level.

When Faruzan is C6, this is easily the best team for Venti’s raw personal damage output. The combined buffs and debuffs from Durin, Bennett, and Faruzan complement each other beautifully. Without Faruzan’s C6, however, its performance noticeably drops.
Sample Rotation (C6 Faruzan)
Faruzan (N1/E)¹ Q > Durin 2[E] Q > Bennett EQ > Venti EQ N5D N5E N5D N2
¹Optional for a more reliable Favonius proc; E is slower but hits multiple targets
Sample Rotation (Pre-C6 Faruzan)
Faruzan E C Q¹ > Durin 2[E] Q > Bennett EQ > Venti EQ N5D N5E N5
¹If Faruzan is not C2+, move her after Durin

Triple Hexerei compositions are a highly competitive option for Venti, and can outperform Faruzan teams due to the potent off-field damage contributions of Durin, Albedo, and/or Fischl. The Durin/Albedo duo is the most powerful, but Durin/Fischl and Albedo/Fischl variants are also effective.
Sample Rotation (Durin/Albedo)
Durin 2[E] Q > Albedo E N1 > Bennett EQ > Venti EQ N5D N5E N5D N2 > Bennett E
Sample Rotation (Durin/Fischl)
Durin 2[E] Q > Bennett EQ > Fischl E/Q > Venti EQ N5D N5E N5D N2 > Bennett E
Sample Rotation (Albedo/Fischl)
Albedo E (Q/N2)¹ > Bennett EQ > Fischl E/Q > Venti EQ N5D N5E N5 > Bennett E N2
¹Burst if available, otherwise N2 to fill downtime

A high-performing Venti and Durin dual DPS team, where they share roughly equal proportions of the team’s damage. The Furina version tends to perform better overall, but the Yelan version is still competitive. Venti should equip 4pc VV in this team; though the Pyro RES Shred can occasionally fall off, it has enough uptime to constitute a large gain to team DPS relative to 4pc Rising Winds.
Furina can equip 4pc Tenacity of the Millelith for more buffs, but if she is well invested, 4pc Golden Troupe may perform better.
If using Yelan, both she and Bennett should equip Favonius weapons to avoid team ER requirements becoming prohibitively high.
Sample Rotation (Furina)
Furina ED > Durin (2[E] / E N1)¹ Q > Bennett EQ > Furina Q > Venti EQ N5D N5E N5D N2
¹For single target, use E N1; with multiple targets, use 2[E]
Sample Rotation (Yelan)
Durin (2[E] / E N1)¹ Q > Yelan EQ N1 > Bennett N1² EQ > Venti EQ N5D N5E N5
¹For single target, use E N1; with multiple targets, use 2[E]
²Helps trigger Favonius more consistently, can be skipped

Going with a shielder instead of Bennett can provide additional comfort and prevent DPS losses due to being staggered. These teams rise in relative performance when Venti wields a 5-star bow, as this makes him less dependent on Bennett’s ATK buff.
Zhongli is the most synergistic choice, providing full uptime on Geo Resonance thanks to his strong shield, and his Universal RES Shred benefits all three damage contributors. Zhongli should build some CRIT Rate so he can hold Favonius to help lower team ER requirements.
Though Thoma and Lan Yan’s buffs aren’t as inclusive, they remain good alternatives: Thoma offers Pyro Resonance and a Normal Attack DMG Bonus via his C6, while Lan Yan can hold TTDS and 4pc Scroll for Venti.
Sample Rotation (Zhongli)
Zhongli hED N2¹ > Albedo E (Q/N2)² > Durin 2[E] Q > Venti EQ N5D N5E N5
¹For more reliable Favonius procs and to fill downtime
²Burst if available, otherwise N2 to fill downtime
Sample Rotation (Thoma)
Durin 2[E] Q > Albedo E N1 > Thoma EQ > Venti EQ N5D N5E N5D N2
Sample Rotation (Lan Yan)
Durin 2[E] Q > Albedo E N1 > Lan Yan 2[E] (Q)¹ > Venti EQ N5D N5E N5D N2
¹Burst if available

Albedo and Fischl provide sizable DMG% and ATK% buffs, respectively, and perform quite similarly to each other if Fischl is C6. If not, Albedo will outperform her, since her ATK% buff and damage contribution are smaller.
It is recommended to use a DEF% weapon or Goblet on Albedo to get to ~3000 DEF (or as close as is reasonable), as this maximizes his DMG% buff without sacrificing much of his personal damage. Fischl can use her normal DPS build.
Sample Rotation (C6 Faruzan + Albedo)
Faruzan (N1/E)¹ Q > Albedo E (Q/N2)² > Bennett EQ > Venti EQ > Bennett E > Venti N5D N5E N5
¹Optional for a more reliable Favonius proc; E is slower but hits multiple targets
²Burst if available, otherwise N2 to fill downtime
Sample Rotation (C6 Faruzan + Fischl)
Faruzan (N1/E)¹ Q > Bennett Q E > Fischl E/Q > Venti EQ N5D N5E N5 > Bennett E N2
¹Optional for a more reliable Favonius proc; E is slower but hits multiple targets
Sample Rotation (pre-C6 Faruzan + Albedo)
Faruzan E C Q¹ > Albedo E N1 > Bennett EQ > Venti EQ > Bennett E > Venti N5D N5E N5
¹If Faruzan is not C2+, move her after Albedo instead
Sample Rotation (pre-C6 Faruzan + Fischl)
Faruzan E C Q > Bennett EQ > Fischl E/Q > Venti EQ N5D N5E N5 > Bennett E N2

A Faruzan team that swaps Bennett out for a shielder. Works best with a 5-star bow on Venti to offset the loss of Bennett’s ATK buff. Zhongli should not be used unless Faruzan is C6, as his low particle generation causes her ER requirements to be unreasonably high.
Sample Rotation (C6 Faruzan + Zhongli)
Faruzan (N1/E)¹ Q > Durin 2[E] Q > Zhongli hE > Venti EQ N5D N5E N5D N2
¹Optional for a more reliable Favonius proc; E is slower but hits multiple targets
Sample Rotation (C6 Faruzan + Thoma)
Faruzan (N1/E)¹ Q > Durin 2[E] Q > Thoma EQ > Venti EQ N5D N5E N5D N2
¹Optional for a more reliable Favonius proc; E is slower but hits multiple targets
Sample Rotation (C6 Faruzan + Lan Yan)
Faruzan (N1/E)¹ Q > Durin 2[E] Q > Lan Yan 2[E] (Q)² > Venti EQ N5D N5E N5
¹Optional for a more reliable Favonius proc; E is slower but hits multiple targets
²Burst if available
Sample Rotation (Pre-C6 Faruzan + Thoma)
Faruzan E C Q¹ > Durin 2[E] Q > Thoma EQ > Venti EQ N5D N5E N5
¹If Faruzan is not C2+, move her after Durin instead
Sample Rotation (Pre-C6 Faruzan + Lan Yan)
Faruzan E C Q¹ > Durin 2[E] Q > Lan Yan 2[E] (Q)² > Venti EQ N5D N5E N5
¹If Faruzan is not C2+, move her after Durin instead
²Burst if available
On-Field Driver
Keeping Venti on-field doubles his already high Swirl count thanks to his Anemo-converted Normal Attacks, some of which are multi-hit and all of which can hit multiple enemies if they are closely grouped. Venti is thus able to dish out significant reaction damage in this playstyle while also providing VV RES Shred, grouping, and Energy for teammates.
Artifacts
Artifact Stats
Sands | Goblet | Circlet |
| EM | EM | EM / CRIT |
Stat Priority (General): ER (until requirement) > EM > CRIT/ATK
Stat Priority (Lunar-Charged): ER (until requirement) > CRIT ≥ EM
A CRIT Circlet is worthwhile in Lunar-Charged teams, but a full EM build is also competitive, so choose whichever Circlet gives better substats.
Artifact Sets
Hover over artifact images for more information.
4pc Viridescent Venerer (VV) | Uncontested BiS. The whopping 60% Swirl DMG Bonus maximizes Venti’s reaction damage, while the 40% RES Shred for the Swirled Element buffs his teammates. |
Weapons
Hover over weapon images for more information.
5★ Elegy for the End | Indispensable for its teamwide buff, though it tends to lag behind other options for Venti’s personal damage, performing better with higher ER needs. If using Venti in teams with rotations shorter than 20s, this weapon’s passive will not trigger every rotation. |
5★ The Daybreak Chronicles | Best for Venti’s personal damage, though it lacks the team buffs of Elegy. |
 5★ CRIT Bows | Astral Vulture’s Crimson Plumage, Thundering Pulse, Polar Star, Aqua Simulacra, The First Great Magic, Skyward Harp, Hunter’s Path These 5-star bows are good options in Lunar-Charged teams due to the CRIT stats they provide. Astral Vulture and Thundering Pulse are particularly synergistic with Venti’s on-field kit, pulling ahead of the Stringless even without Lunar Reactions. |
4★ The Stringless | Unconditional EM stat stick that also gives a massive Skill and Burst DMG Bonus. At R5, this weapon will outperform most 5-stars, except in Lunar-Charged teams where CRIT stats become more important. |
4★ Favonius Warbow | Venti rarely requires this bow to meet his own ER needs, but it can be BiS for team damage when team Energy needs are high (e.g. with Durin). |
4★ Windblume Ode | This event weapon is a good option for players who lack an R5 copy of the Stringless. Make sure to use Skill before Burst to snapshot the passive. |
4★ Chain Breaker | This is Venti’s best free weapon if the additional Energy from Favonius is not needed. If you have it, though, Windblume Ode is better. |
4★ Song of Stillness, Cloudforged | These lag a bit behind other choices, but can be used if you lack the billets for Chain Breaker. |
3★ Slingshot | Baseline option for Lunar-Charged builds due to its CRIT Rate secondary stat. |
3★ Raven Bow | Baseline option for teams without Lunar Reactions. |
Teambuilding
Rotation Notation
- N = Normal Attack
- C = Charged Attack
- A = Aimed Shot
- P = Plunging Attack
- E = Elemental Skill
- tE = Tap Skill
- hE = Hold Skill
- Q = Elemental Burst
- D = dash (cancel)
- J = jump (cancel)
- W = walk (cancel)
- > = switch character
- ( ) = these actions are optional; please refer to the notes below
- [ ] = repeat these actions the specified number of times

Venti’s Hexerei passive makes him an excellent reaction driver, but he comes with some teambuilding restrictions:
- He requires another Hexerei character in order to be played on-field, most optimally Durin, Fischl, or Albedo.
- Venti’s Anemo Normal Attacks are directly tied to his Burst’s uptime. Unlike Anemo Catalysts like Sucrose or Heizou, he cannot simply swap in to take the field on demand. Though he can fit into more quickswap-oriented team setups when played as an off-field support, his driver playstyle is better suited to teammates who can afford to grant him a chunk of uninterrupted field time. Teammates with long-lasting off-field Elemental Application are ideal.
- Because the Quicken archetype strongly favors a quickswap style of play, this makes Venti a lackluster Aggravate driver, and he is better played as an off-field support in those teams. His driver playstyle is more suited to reaction teams that use Hydro and Electro as their basic building blocks (e.g. Electro-Charged, Lunar-Charged, Overvape, and Quickbloom/Hyperbloom).
Notable Teammates
Hexerei Characters
 Fischl | Fischl’s Hexerei passive provides an EM buff in Electro-Charged and Lunar-Charged teams in addition to an ATK% buff in Overvape teams. Venti’s frequent Normal Attacks help drive her C6, and her particle generation reduces team ER needs. |
Durin | Venti is a good driver for Durin’s Overvape compositions. Teams with Ineffa or Columbina (or both) to enable the Lunar-Charged reaction are particularly potent. |
 Albedo | Albedo provides a DMG% buff to teammates, as well as a sizable EM buff through his Burst (though he does not use it every rotation in most cases). He can deal impressive damage of his own without interfering with reactions, making him a strong choice for the Hexerei slot. |
Hydro
Hydro application is a necessity for all of Venti’s driver teams. Venti is a good driver for characters whose abilities trigger off of Normal Attacks, such as Xingqiu and Yelan, and with no Pyro aura present his Burst will preferentially absorb Hydro to reduce their ER requirements
Columbina | Columbina is a top choice for driver Venti, enabling all Lunar Reactions as well as providing relevant buffs, and she appreciates Venti’s Energy regen as her ER needs can be high. She prefers another Nod Krai teammate to activate Ascendant Gleam if possible. |
Aino | Though her damage is poor, Aino gives a Moonsign Level increase, good AoE Hydro application, and EM buffs from 4pc SMS and her C2. This makes her a solid and accessible choice, especially for Lunar Reaction teams. Her C6 also gives a nice Lunar Reaction DMG% buff if there is another Nod Krai teammate present to enable said reactions. |
 Kokomi | Her Skill’s jellyfish provides healing from off-field along with AoE Hydro application as long as enemies stay in its vicinity. Venti’s Burst helps keep enemies in range, and provides Energy for Kokomi to Burst and refresh it as needed. |
Furina | Furina dishes out respectable damage herself while also contributing a large DMG% buff to the team. Venti’s tight grouping helps increase her damage profile, as her Salon Members can hit multiple targets if they’re close enough together, and she appreciates his Energy regen. However, her buff is less effective for Lunar-Charged teams, where a significant portion of the damage is Lunar Reaction damage, which does not benefit from Common DMG Bonus. |
 Yelan | Provides consistent single-target Hydro application, plus a ramping DMG% buff for other off-field DPS. Venti’s Energy regen helps alleviate her high ER requirements so she can focus more on damage. |
 Xingqiu | Though he lacks Yelan’s damage buff, Xingqiu brings more utility with supplemental Hydro application from his Rain Sword orbitals, damage mitigation, minor healing, and interruption resistance. He appreciates Venti’s Energy regen, particularly pre-C6. |


Electro
Electro Swirls are the bulk of Venti’s damage in most of his on-field driver teams. It’s best to build under the assumption that his Electro teammates will not be receiving Energy from Venti’s A4, as Venti’s Burst will prefer picking up the Hydro aura in most cases.
 Ineffa | Ineffa enables Lunar-Charged, provides immense damage from off-field, and gives a strong enough shield to function as the party’s only sustain. Venti should use a CRIT Circlet with Ineffa to maximize his Lunar-Charged contribution. |
Ororon | Ororon is tailor-made for Electro-Charged and Lunar-Charged teams, and can deal respectable damage in AoE scenarios. He also provides Energy through his A4. |
 Shinobu | Consolidates healing and Electro application, and can maintain good uptime on buffing sets like 4pc Tenacity of the Millileth to benefit off-field DPS. |


Dendro
Dendro teammates are essential for Quickbloom and Hyperbloom team compositions.
Nahida | Nahida is an excellent source of damage and Dendro application, and her Burst’s EM share increases the damage of Venti’s Hyperblooms and Aggravated Swirls. She requires very strong Electro application, as otherwise her Skill can eat up all the Electro aura, leaving none for Venti to Swirl. Fischl is highly recommended. |
 Lauma | Lauma is an excellent candidate for Quickbloom teams, buffing Hyperbloom damage as well as allowing Hyperblooms to CRIT if she is the only Moonsign character. Her Dendro application is very consistent without overwhelming the other elements, allowing Venti to proc high-damage Hyperblooms via his Electro Swirls. |


Example Teams
This is not a comprehensive list of teams. The inclusion or exclusion of any given team does not necessarily reflect its power level.

Fischl provides sufficient Electro application for Venti to Swirl and trigger Hyperbloom, while Kokomi provides enough AoE Hydro application for plentiful Dendro Cores and keeps the team healthy. Other Hydro teammates can be considered if Lauma is C1, or if Nahida holds Prototype Amber, since Kokomi’s sustain is less needed in these cases.
The rotation is somewhat flexible; Kokomi can stay on-field for a bit longer if more healing is needed, and teammates can weave in Normal Attacks to fill downtime and trigger Fischl’s C6.
Sample Rotation (Nahida)
Kokomi E > Nahida E (Q)¹ > Fischl E/Q > Kokomi Q N3 > Venti EQ N5D N5E N5D N2
Sample Rotation (Lauma)
Kokomi E > Lauma hE Q > Fischl E/Q > Kokomi Q N3 > Venti EQ N5D N5E N5D N2
¹Burst if available

Columbina and Ineffa are an off-field Lunar-Charged powerhouse, contributing most of the damage in this team. The Durin variant is particularly potent, followed by Albedo, then Fischl, although all variants are strong. With Durin, Venti should hold Favonius Warbow to help with team Energy.
Sample Rotation (Durin)
Durin 2[E] Q > Venti E N1 > Ineffa E (Q)¹ > Columbina EQ > Venti Q N5E N5D N5
¹Burst if available
Sample Rotation (Albedo)
Columbina EQ > Ineffa E (Q)¹ > Albedo E (Q/N1)² > Venti EQ N5D N5E N5D N2
¹Burst if available
²Burst if available, otherwise N1
Sample Rotation (Fischl)
Columbina E > Fischl Q > Ineffa E > Venti N1 E N1 > Columbina Q > Venti Q N5D N5E N5 > Fischl N1 E > Ineffa Q > Venti N1 E N1

Aino is a decent alternative if Columbina is unavailable. These teams function similarly to the ones above, but with lower damage overall.
Sample Rotation (Durin)
Durin 2[E] Q > Venti E N1 > Ineffa E (Q) > Aino EQ > Venti Q N5E N5D N5
Sample Rotation (Albedo)
Aino EQ > Ineffa E (Q)¹ > Albedo E (Q/N1)² > Venti EQ N5D N5E N5D N2
¹Burst if available
²Burst if available, otherwise N1
Sample Rotation (Fischl)
Fischl Q > Ineffa E > Aino EQ > Venti EQ N5D N5E N5D N2 > Aino E > Fischl N1 E > Ineffa Q > Venti N1 E N1

This team centers around Albedo’s damage, with Venti activating his Hexerei passive and Columbina enabling Lunar-Crystallize. Venti provides additional Hydro application and Energy for Columbina via his Burst’s absorption. Illuga is the best choice for the final slot, but Gorou is a decent alternative.
In the absence of Columbina’s C1 or Gorou’s C4, Columbina should hold Prototype Amber for survivability. Illuga should hold 4pc SMS if he is at least C2; otherwise, Columbina should hold it. Gorou can hold 4pc Scroll to further buff Albedo’s damage, or whatever set gives him enough ER to Burst every rotation.
Venti does not deal much reaction damage in this team, so it’s best to use his standard on-field DPS build instead. 4pc VV is still optimal, however, for the buff to Columbina’s damage.
Sample Rotation (Illuga)
Columbina E N1 > Albedo E N1 > Illuga EQ > Columbina Q > Albedo E (Q/N1)¹ > Venti EQ N5D N5E N5D N2
¹Burst if available, otherwise N1
Sample Rotation (Gorou)
Columbina E N1 > Gorou (N2)² E Q > Albedo E (Q/N1)¹ > Columbina Q > Venti EQ N5D N5E N5D N2
¹Burst if available, otherwise N1
²Helps proc Favonius more consistently

This Electro-Charged team with Albedo performs well in AoE. The rotation is flexible enough for Kokomi to stay on-field for longer if more healing is needed.
Sample Rotation (Fischl)
Kokomi E > Fischl E/Q > Albedo E (Q/N1)¹ > Kokomi Q N3 > Venti EQ N5D N5E N5D N2
¹Burst if available, otherwise N1
Sample Rotation (Ororon)
Kokomi E > Albedo E (Q/N1)¹ > Ororon EQ > Kokomi Q N3 > Venti EQ N5D N5E N5D N2
¹Burst if available, otherwise N1

An Electro-Charged team with Furina. Furina and Kokomi both greatly appreciate Venti’s Energy regen, and Furina can forgo Energy weapons to equip offensive options like her signature instead. This team performs well in both single-target and AoE.
Sample Rotation
Kokomi E > Fischl E N1 > Venti E N1 > Furina ED Q > Kokomi Q N3D N3 > Fischl Q > Venti EQ N5D N5E N5D N2

Columbina, Albedo, and Venti all deal significant damage in this AoE-focused team, while Shinobu provides Electro Application for Lunar-Charged and keeps the team healthy.
Sample Rotation
Columbina E Q > Shinobu E N1 (Q)¹ > Albedo E (Q/N1)² > Venti EQ N5D N5E N5D N2
¹Burst if available
²Burst if available, otherwise N1

Durin and Venti share the majority of the damage in this Durin Overvape team. Venti should hold Favonius Warbow to help lower Durin’s ER requirements.
Sample Rotation
Kokomi E > Fischl E/Q > Durin (2[E] / E N1)¹ Q > Kokomi Q N3 > Venti EQ N5D N5E N5D N2
¹For single target, use E N1; with multiple targets, use 2[E]
Limited Roster Alternatives
These teams are meant for newer players whose limited roster prevents them from using the teams above; as such, the teams below result in lower damage output.

This is a classic Electro-Charged team composition. In AoE scenarios, Venti deals the majority of the team’s damage via Swirls and Electro-Charged reactions. Beidou and Xingqiu’s combined defensive utility allows the team to function without a dedicated sustain unit, and Xingqiu can equip 4pc Noblesse Oblige for higher team damage.
Sample Rotation
Fischl E N1 > Beidou E N2 > Xingqiu ED Q N1 > Venti E N1 > Beidou Q N1 E > Fischl N1 Q > Venti N1 Q E 2[N5D] N5E N2
Credits
Writer(s): madeofseaglass (Marvel)
Editor(s): idkanonymized, luwunae
TC Contributors: acerbus114, cosmic_wanderer_, mystathi
Team images made with the KQM portrait generator.