Updated for Version 5.4

Emilie is a 5-star Dendro Polearm character in Genshin Impact who provides off-field damage and excels in teams that utilize Burning. Unlike many other Dendro units, she focuses on her raw off-field damage output rather than triggering reactions. Learn about Emilie’s best builds, best weapons, best artifacts, and best teams in this quick guide.
Note that the information given may change if new discoveries are made. More extensive testing is in progress.
Join our Discord to check on and participate in the theorycrafting process.
Table of Contents
New Content
 Mountain-Bracing Bolt | A usable 4-star option if Emilie can utilize its ER secondary stat. Its passive gives an Elemental Skill DMG Bonus which only buffs part of Emilie’s damage. |
 Pyro Traveler | Pyro Traveler is a Pyro Support unit who offers off-field Pyro application and the full 4pc Scroll buff. |
 Mavuika | Mavuika is a Pyro DPS unit who prefers to Melt or Vaporize her attacks but can still be used with Emilie. She can also act as an off-field Pyro applier and buffer. |
 Tamayuratei no Ohanashi | The lastest 4-star event polearm. While Emilie can utilize its ER secondary stat, its passive will have limited uptime in most of her teams, making it very situational. |
Infographic
Credits to: cuppacote, haafr, pjeljr, and KQM Staff
Character Overview
Pros
- High off-field damage with great range and permanent uptime
- Little reliance on her Burst
- Relatively flexible team building
- Viable on-field playstyles
Cons
- Low Dendro application
- Primarily single-target damage
- High reliance on constant Burning uptime to deal significant damage
- Few effective 4-star options, none of which are craftable
Playstyles
Off-Field DPS
Emilie’s Skill, A1 Passive, and Burst can all deal damage from off-field, so she is primarily played as an off-field DPS. Since her Skill and Ascension Passives have mechanics that rely on the Burning reaction, she wants Pyro characters in her teams. She can still act as a Dendro applier for Quicken or Bloom-related teams, but her lower personal damage without Burning and low Dendro application means she is not particularly impressive in this role.
On-Field DPS
Emilie does not deal significant damage with her Normal Attacks pre-C6. However, some teams give her more field time to take advantage of Bennett’s Flat ATK buff.
Talents
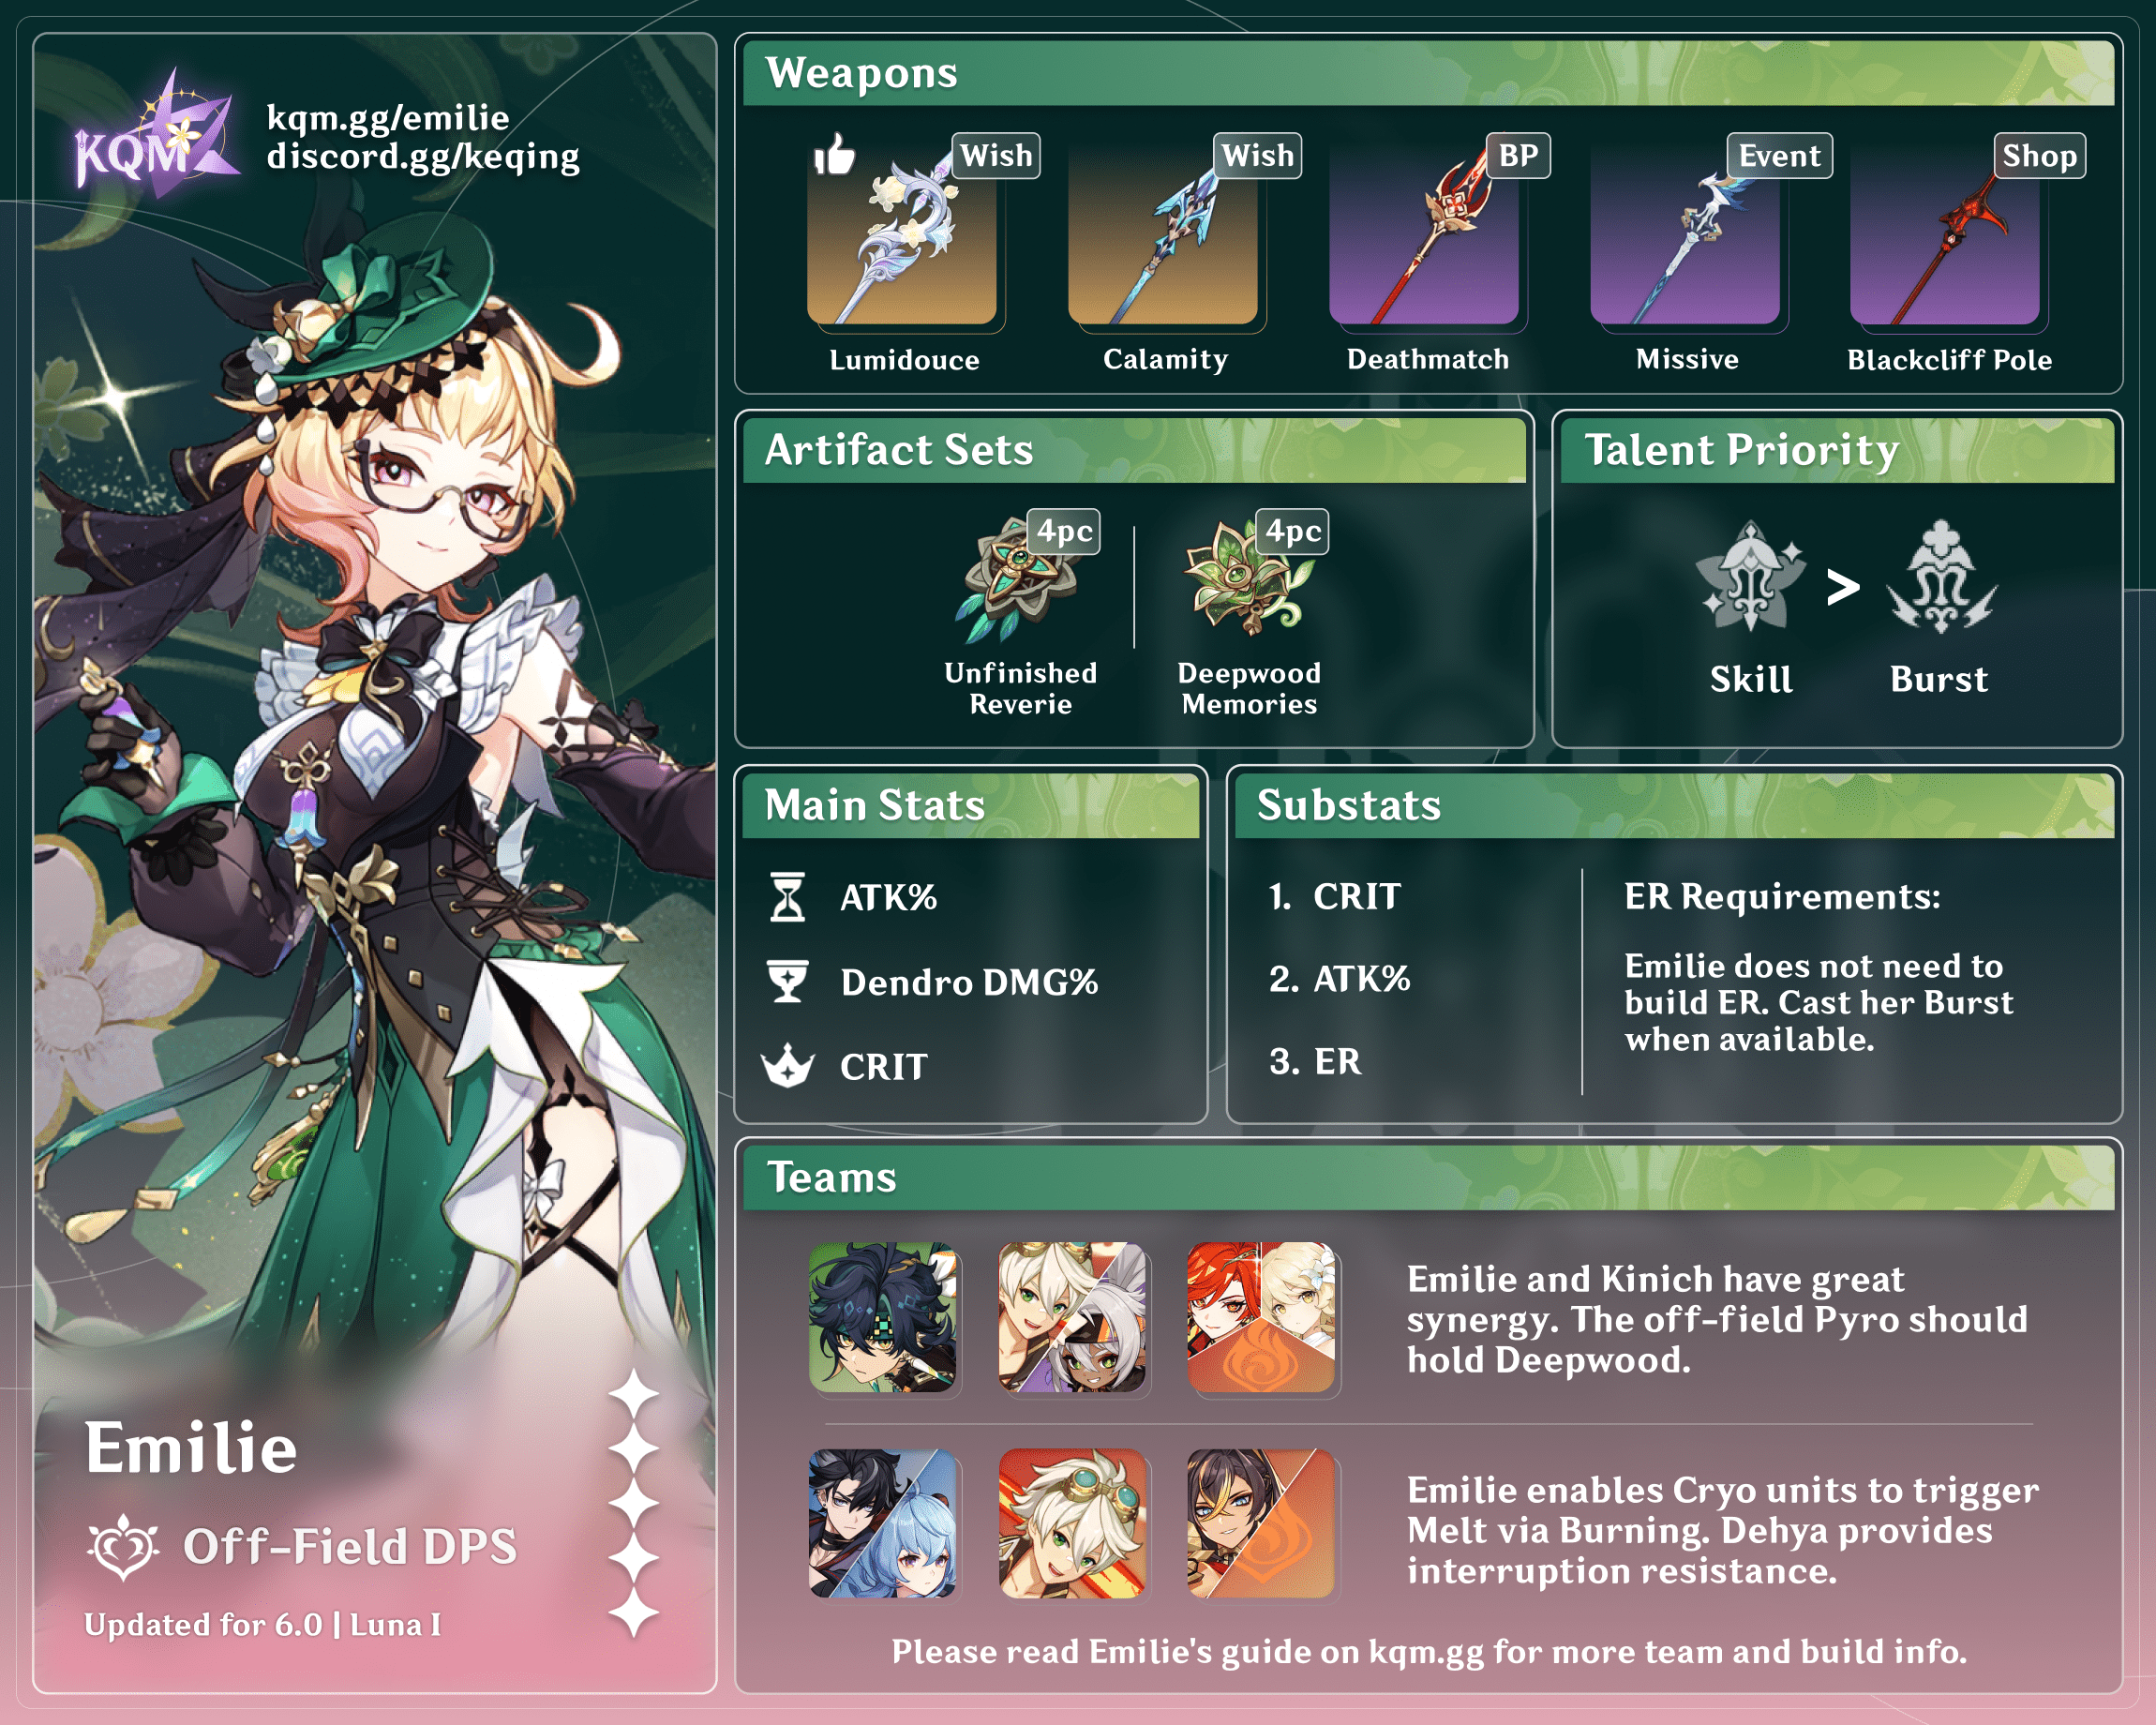
Talent Priority
Skill > Burst
Talent Overview
 Normal Attack | Shadow-Hunting Spear (Custom)
Talent Description
Normal Attack
Performs up to 4 consecutive spear strikes.
Charged Attack
Consumes a certain amount of Stamina to perform an upward slash.
Plunging Attack
Plunges from mid-air to strike the ground below, damaging opponents along the path and dealing AoE DMG upon impact.
Emilie’s Normal Attacks have no special mechanics pre-C6 and are seldom used in most playstyles. Even in teams where she can remain on-field, they usually do not deal much damage and can be left unleveled.
 Elemental Skill | Fragrance Extraction
Talent Description
Creates a Lumidouce Case that deals AoE Dendro DMG.
Lumidouce Case
- Fires Puffs of Puredew at nearby opponents at intervals, dealing Dendro DMG.
- When nearby opponents are affected by Burning, they will give off Scents at intervals, and 1 Scent can be created this way every 2s. The Lumidouce Case collects nearby Scents. The Lumidouce Case will level up after gathering 2 of them, after which it will fire 1 extra Puff of Puredew when firing, while the DMG dealt by and DMG AoE of the above attack will also be increased.
- 1 Lumidouce Case created by Emilie herself can exist at any one time. The Case starts at Level 1 and can go up to Level 2. If the Case does not collect any Scents for 8s while it is on the field, it will go back to Level 1.
Arkhe: Pneuma
At intervals, after Emilie creates a Lumidouce Case this way, a Spiritbreath Thorn will descend in front of her and pierce her opponent, dealing Pneuma-aligned Dendro DMG.
Emilie’s Skill deploys a turret that attacks enemies within a large AoE. While the turret is active, enemies affected by Burning periodically drop “Scents” that can be picked up by the turret. After picking up 2 Scents, her turret levels up and launches attacks that deal substantially more damage and have a larger AoE. If no Scents are picked up after 8s (i.e., if no Burning enemies are in range), the turret returns to its basic form. Note that only one turret can exist at any time.
Emilie thus wants enemies to be affected by Burning so that she can maintain her much-stronger Level 2 turret. Since the turret has a long 22s duration compared to its 14s cooldown, it is easy to achieve permanent uptime on it. However, note that casting Emilie’s Skill resets her turret to Level 1, so avoid casting it too early.
Emilie’s Skill does not snapshot buffs, and it applies Dendro every other hit. Casting this Skill also launches a Pneuma-aligned Dendro attack.
 Elemental Burst | Aromatic Explication
Talent Description
Guiding the fragrances collected within the Case, Emilie converts them into pure Dendro energy, creating a Level 3 Lumidouce Case and stowing existing Cases away.
While it exists, the Level 3 Lumidouce Case will not gather nearby Scents, but it will continuously cause Scented Dew to descend, attacking opponents within range and dealing Dendro DMG. During this time, 1 drop of Scented Dew will descend every 0.3 seconds, and 1 opponent can become the target every 0.7 seconds.
When the duration ends, a Level 1 Lumidouce Case will be recreated. If a Lumidouce Case was stowed away when using Aromatic Explication, then the Case that was stowed away will be deployed instead, and its duration will be reset.
While Aromatic Explication is active, the Elemental Skill “Fragrance Extraction” will not create a Lumidouce Case.
Emilie’s Burst temporarily replaces any existing turret with an improved Level 3 turret. The Level 3 turret has a short duration, during which it fires a wave of attacks that targets enemies in a manner similar to Ganyu or Ayato’s Bursts, within a very large range. While the Level 3 turret is active, it creates but does not pick up Scents, and Emilie’s Skill cannot create more turrets. After this period, the replaced turret is redeployed with the same level, but with its duration reset. If no turret was replaced, a Level 1 turret is created.
Emilie’s Burst is her most effective source of AoE damage. Since it refreshes the duration of her turret, she can use it instead of her Skill while still achieving permanent uptime.
 Ascension 1 Passive | Lingering Fragrance
Talent Description
Each time it collects 2 Scents, the Level 2 Lumidouce Case will consume Scents and release Cleardew Cologne that deals AoE Dendro DMG equal to 600% of Emilie’s ATK to opponents. This DMG is not considered Elemental Skill DMG.
With this passive, Emilie’s turret continues to pick up Scents after leveling up. After picking up 2 Scents, the Level 2 turret consumes them to fire a powerful AoE attack, which comprises a significant portion of Emilie’s damage. This attack is not considered Skill DMG, so it does not benefit from buffs such as Golden Troupe’s set effects.
 Ascension 4 Passive | Rectification
Talent Description
Emilie deals increased DMG to Burning opponents based on her ATK, with every 1,000 ATK increasing DMG dealt by 15%. The maximum DMG bonus that can be gained this way is 36%.
The damage dealt by Emilie’s Skill, Burst, and A1 Passive receives a DMG Bonus against Burning enemies that scales with her ATK. This buff caps out at 36% DMG Bonus when Emilie has 2400 ATK. However, you should not sacrifice other stats to reach the 2400 ATK threshold.
 Utility Passive | Headspace Capture
Talent Description
When the Lumidouce Case created by Emilie is on the field, all party members gain 85% Pyro RES against Burning DMG.
This passive greatly reduces the damage allies receive from Burning, mostly negating one of the reaction’s major drawbacks. It is effectively a permanent buff since Emilie’s Skill has full uptime.
Constellations
 Constellation 1 | Light Fragrance Leaching
Increases the DMG dealt by Fragrance Extraction and her Passive Talent’s Cleardew Cologne “Lingering Fragrance” by 20%. The latter requires unlocking said Passive Talent first.
Additionally, when nearby party members trigger the Burning reaction on opponents or deal Dendro DMG to Burning opponents, they will generate an additional Scent. This effect can be triggered once every 2.9s.
A simple but highly effective Constellation. It provides a good DMG Bonus to Emilie’s Skill and A1 Passive. It also speeds up the generation of Scents, increasing A1 procs.
 Constellation 2 | Lakelight Top Note
When Fragrance Extraction, Aromatic Explication, or Cleardew Cologne produced by the Passive Talent “Lingering Fragrance” (the last of which requires Passive Talent activation) hits opponents, those opponents’ Dendro RES is decreased by 30% for 10s.
Emilie’s attacks now shred Dendro RES by 30% (identical effect to that of 4pc Deepwood Memories). This Constellation allows more freedom in her team’s choice of artifact sets, or it can be used alongside a Deepwood set holder, especially to counteract enemies with very high Dendro RES.
Note that, against most enemies, this Constellation’s effect diminishes when paired with other sources of Dendro RES Shred such as the 4pc Deepwood set or Zhongli’s shield; this is because additional RES Shred past 0% (no RES) is halved. Additionally, Emilie tends to be the only Dendro damage dealer in many of her current teams.
 Constellation 3 | Exquisite Essence
Increases the Level of Fragrance Extraction by 3.
Maximum upgrade level is 15.
An additional 3 Talent levels to Emilie’s Skill. This Constellation isn’t too impactful, since it does not affect her A1 Passive.
 Constellation 4 | Lumidouce Heart Note
Aromatic Explication‘s duration is increased by 2s. The interval between opponents being selected as the target for Scented Dew is decreased by 0.3s.
Emilie’s C4 extends the duration of her Burst, nearly doubling the number of attacks it launches. It also enables her Burst to target the same enemy more frequently.
 Constellation 5 | Puredew Aroma
Increases the Level of Aromatic Explication by 3.
Maximum upgrade level is 15.
Emilie appreciates +3 Burst levels, especially after her C4 improvements.
 Constellation 6 | Marcotte Sillage
When using Fragrance Extraction or Aromatic Explication, Emilie will gain Abiding Fragrance for 5s.
While this is active, after Emilie uses Normal or Charged Attacks, she will generate 1 Scent, and her Normal and Charged Attack DMG will be converted into Dendro DMG that cannot be overridden, and the DMG dealt will be increased by 300% of Emilie’s ATK.
The Abiding Fragrance effect will be removed after 4 Scents are created this way or after its duration expires. Abiding Fragrance can be triggered once every 12s.
Emilie’s Skill and Burst casts now grant her a Dendro conversion that lasts for 4 attacks or 5s. These Dendro-converted Normal and Charged Attacks deal a substantial amount of damage and also generate additional Scents per hit, making them great for front-loading damage.
The Dendro Conversion cannot be overridden by teammate’s Elemental Infusions, allowing Emilie to make use of C6 Bennett.
Artifacts
ER Requirements
Calcs for ER requirements can be found here (last updated for Version 4.8).
Solo Dendro
| No Energy Weapon | Lumidouce Elegy | |
| Burst Every Rotation | 180–255% | 135–195% |
| Burst Every Other Rotation | 100–120% | 100% |
Use the Energy Recharge Calculator to determine exact requirements for your team and rotation. ER requirements for Double Dendro teams are difficult to represent with a range, as the compositions vary largely in regards to particle funneling and rotation time.
As Emilie’s particle generation is turret-based, her ER requirements decrease as the team’s rotation time increases. This also means that she may not be able to use her Burst as often if your rotation is cut short, and other units may miss their Bursts if they rely on Emilie’s particle generation.
Though Emilie’s Burst has a low cost of 50 Energy, she tends to be the team’s only Dendro unit and remain off-field, which results in significant ER requirements to Burst every rotation in most teams. In most cases, it is better damage-wise to forgo building much ER% and use her Burst every other rotation, allowing her to build more CRIT and ATK.
Artifact Stats
 Sands |  Goblet |  Circlet |
| ATK% | Dendro DMG Bonus | CRIT Rate or CRIT DMG |
Stat Priority: CRIT > ATK > ER
Emilie should not build EM, since she does not actually deal much Burning damage, and because Burning isn’t a very strong or consistent reaction to trigger. ER can be useful for enabling her Burst every rotation in some teams, though this is generally not much better than forgoing ER and using her Burst when it happens to be available.
Artifact Sets
 4pc Unfinished Reverie | Emilie’s best set. 4pc Reverie grants her a permanent DMG Bonus in her preferred teams, and it can outperform 4pc Deepwood Memories even if it means losing the latter’s RES Shred. |
 4pc Deepwood Memories | A decent alternative if you don’t have an Unfinished Reverie set available. Ideally, one of Emilie’s teammates holds this set to shred enemy Dendro RES for her. This set gains additional value in teams with another Dendro DPS unit. |
 2pc Mixed Sets, 4pc Golden Troupe | 2pc Bonuses: Dendro DMG%, ATK%, Skill DMG% A mix of 2-piece sets can be useful when building towards a full 4-piece set, or if the artifacts’ substats are exceptional. Note that 4pc Golden Troupe isn’t a noticeable upgrade over mixed sets, since much of Emilie’s damage output isn’t considered Elemental Skill DMG. |
Weapons
 5★ Lumidouce Elegy | Emilie’s best weapon by a noticeable margin. Its Energy restoration enables consistent Bursts with minimal ER investment. |
 5★ Calamity Queller | A strong option due to the huge amount of ATK it provides. To utilize this weapon’s passive, make sure to use Emilie’s Skill after casting her Burst. |
 5★ Staff of Scarlet Sands, Staff of Homa | Great 5-star options due to their high base stats and slightly useful passives. |
 4★ Deathmatch | Emilie’s best 4-star option. At higher refinements, it is capable of outperforming other 5-star Polearms. |
 Other 5-star Polearms | Primordial Jade Winged-Spear, Crimson Moon’s Semblance, Vortex Vanquisher, Skyward Spine These weapons perform well due to their high base stats in spite of their lackluster passives. Jade Spear becomes more effective when playing Emilie on-field. Skyward Spine is effective if it allows for consistent Burst usage. |
 4★ Missive Windspear | Missive Windspear is Emilie’s best free weapon, but it was only available in the Version 3.1 Event. |
 4★ Blackcliff Pole | A decent 4-star option by virtue of its CRIT DMG secondary stat. It can be purchased in Paimon’s Bargains using Starglitter, but its passive is unreliable even in multi-target. |
 4★ Lithic Spear, Wavebreaker’s Fin, Prospector’s Drill | These ATK% stat sticks are serviceable options if you don’t have any alternatives, but their passives are generally underutilized by Emilie. |
4★ Tamayuratei no Ohanashi | A viable event 4-star weapon for Emilie’s on-field teams, Its 10s duration 40% ATK buff makes it useful when she’s on-field and can freely recast her Skill, but otherwise, it’s lackluster. |
4★ Mountain-Bracing Bolt | A usable 4-star option if Emilie can utilize its ER stats. While an Elemental Skill DMG% buff is good for Emilie, her damage also comes from her A1 Passive and her Elemental Burst which this weapon does not buff. As a Limited Banner 4-star weapon, getting refinements for this weapon can be challenging. |
 4★ Favonius Lance | Favonius is not very good for Emilie’s damage, and even with this weapon Emilie still needs more ER% to use her Burst every rotation. However, it does lower her teammates’ ER requirements. |
 4★ Kitain Cross Spear | Emilie’s best permanently available free option, not because it is very good, but because all other options are worse. Only use this as a last resort. |
Teams
Rotation Notation
- N = Normal Attack
- C = Charged Attack
- A = Aimed Shot
- P = Plunging Attack
- E = Elemental Skill
- tE = Tap Skill
- hE = Hold Skill
- Q = Elemental Burst
- D = dash (cancel)
- J = jump (cancel)
- W = walk (cancel)
- > = switch character
- ( ) = these actions are optional; please refer to the notes below
- [ ] = repeat these actions the specified number of times
Teambuilding
- On-field and off-field Pyro appliers are valuable teammates for Emilie, because having consistent Burning on enemies amplifies her damage.
- Conversely, Emilie’s Burning benefits her teammates by allowing them to utilize the 4pc Unfinished Reverie set.
- Since Emilie’s Skill does not snapshot, teamwide ATK% buffs such as 4pc Noblesse Oblige and Pyro Resonance are well-appreciated.
- In teams with Bennett and no dedicated on-fielder, Emilie can swap in or even remain on-field to benefit from his Burst’s Flat ATK buff.
- Ideally, one of Emilie’s teammates should equip 4pc Deepwood Memories to shred Dendro RES and further boost her damage, but this is not mandatory for Emilie to deal good damage.
- Characters with lower personal damage output are good choices for holding 4pc Deepwood.
- 4pc Tenacity of the Millelith or 4pc Noblesse Oblige are good substitutes if the team has more ATK-scaling damage dealers.
- Although Emilie’s Utility Passive greatly reduces the damage received upon contact with Burning enemies, it may still slowly wear down your unit’s HP over extended combat. This issue can be alleviated by using healers, shielders, or units with self-sustain.
- The damage dealt by the Burning reaction is not a focus of Emilie’s kit. Generally, you should not build teams that rely on Burning’s DoT as a primary damage source, especially in single-target content.
“Burning”

This broad category of teams triggers Burning to boost Emilie’s damage, but the teams otherwise do not rely on the reaction to deal damage or set up Vaporize / Melt. These compositions often revolve around dealing Pyro damage and making use of buffs and off-field damage to compensate for the lack of Vaporizes. At least one Pyro unit is required to trigger Burning; the remaining slots are filled out by Pyro, Anemo, or Geo units, since these Elements do not significantly interfere with Burning aura.
Notable Teammates
 Kinich | A great on-field DPS unit to pair with Emilie. They both benefit from Burning to maximize their personal damage, and Kinich appreciates Emilie’s high off-field damage. |
 Bennett | Bennett is a ubiquitous support for any ATK-scaling DPS unit, thanks to his incredible combination of buffs, particle generation, and healing. |
 Zhongli | Zhongli provides a reliable shield, and his Universal RES Shred is one of the few sources that benefits Emilie’s damage. |
Pyro Units
Practically any Pyro DPS unit can include Emilie in the flex slot of their Mono Pyro teams. Units with faster Pyro application may have an advantage in maintaining Burning aura if the team includes units of other Elements.


Anemo Units 
Anemo units greatly increase the Pyro DPS character’s damage through 4pc Viridescent Venerer and their personal buffs. However, they provide little for Emilie’s personal damage.


Example Teams
This is not a comprehensive list of teams. The inclusion or exclusion of any given team does not necessarily reflect its power level.

Emilie is a great teammate for Kinich: her high off-field damage supplements his on-field damage, and they both want Burning. Off-field Pyro units would prioritize holding 4pc Deepwood over Emilie. Natlan Pyro units can hold 4pc Scroll instead, however, the artifact’s effect is not easily refreshed on the same enemy. Dehya provides extra comfort with her interruption resistance, while Mavuika offers better AoE Pyro application, damage and more buffing.
Sample Rotation (Mavuika)
Emilie E1/Q> Mavuika tE > Bennett EQ > Mavuika Q > Kinich combo
1Use Emilie’s Skill in the first rotation.
Sample Rotation (Pyro Traveler)
(Emilie E)1 > Pyro Traveler hE Q > Bennett EQ > (Emilie Q/E)2 > Kinich combo > (Bennett E)3
1First rotation only.
2Second rotation onwards.
3Do a Bennett Skill if you need the Energy.
Sample Rotation (Dehya)
(Emilie E)1 > Dehya 2[E] > Bennett EQ > (Emilie Q/E)2 > Kinich combo > (Bennett E)3
1First rotation only.
2Second rotation onwards.
3Do a Bennett Skill if you need the Energy.

A team that excels in single-target. Zhongli’s shield prevents Lyney from being interrupted while also shredding Pyro and Dendro RES.
Sample Rotation
Lyney C > Zhongli hED > Emilie Q/E > Bennett EQ > Lyney 3[C] Q1/2[C] E
1Cancel Lyney’s Burst early using a Skill input.

This is a riskier team due to Burning’s self-damage and Arlecchino’s inability to receive healing, but it has very high damage potential. Kazuha and Xilonen buff Arlecchino, but not Emilie.
Sample Rotation (Kazuha)
Arlecchino E > Bennett EQ > Emilie Q1/E > Kazuha tEP(Q)1 > Arlecchino C 5[N3D] N3
1Alternate between using Kazuha’s and Emilie’s Burst.
Sample Rotation (Xilonen)
Arlecchino E > Xilonen E N2 > Bennett EQ > Emilie Q/E > Arlecchino C 5[N3D] N3

Emilie remains on-field to benefit from Bennett’s Burst and Geo Resonance, while Chiori provides additional off-field damage.
Sample Rotation
(Emilie E)1 > Zhongli hED > Chiori 2[E] > Bennett EQ > Emilie Q/E N3D N2 > Bennett E N3 > Emilie 2[N3D] N2
Chiori’s (double-tapped) Skill automatically swaps to the next character, so be sure to have the correct party order.
1First rotation only.

Kirara provides a sturdy shield for Yoimiya, and she funnels Dendro Particles to Emilie so that Emilie can use her Burst every rotation.
Sample Rotation
Kirara Q shE > Emilie E¹/Q > Bennett EQ > Yoimiya E 3[N5D] (Q)2
1Use Emilie’s Skill in the first rotation.
2Use Yoimiya’s Burst when it is available.
Burnmelt and Burnvape

Burning aura not only increases Emilie’s damage, but it can also enable Reverse Melt or Forward Vaporize for Cryo or Hydro DPS units, respectively. However, Emilie’s Dendro application is not fast enough to maintain Burning aura by herself, so she should be paired with another off-field Pyro applier for consistency.
Note that Emilie and the Pyro character can often be a significant portion of team damage, even without access to reactions like Reverse Vaporize for the Pyro character.
Notable Teammates


Cryo DPS Units
These Cryo DPS units appreciate Melt to increase their personal damage. Notably, Ganyu can Melt all of her Charged Attack hits, whereas Chongyun and Rosaria can Melt every hit of their Bursts.


Hydro DPS Units
These Hydro characters are able to Vaporize their damage due to their slower Hydro application.


 Furina | Furina deals damage from off-field and provides a powerful teamwide DMG Bonus that benefits Emilie and an on-field DPS. She does require a healer to work effectively, with Bennett being the best choice in these teams. |


Example Teams
This is not a comprehensive list of teams. The inclusion or exclusion of any given team does not necessarily reflect its power level.

Mualani’s infrequent Hydro application allows the team to easily maintain Burning. Emilie contributes a good amount of damage, reducing the reliance on Mualani’s Surging Bites to finish off enemies.
Sample Rotation (Mavuika)
Emilie E1/Q > Zhongli hED N1 > Mavuika tE Q > Mualani (Q) E combo N1
1Use Emilie’s Skill in the first rotation
Sample Rotation (Xiangling)
Emilie E N1 > Zhongli hED N1 > Xiangling ED Q > Mualani (Q) E combo N1 > Emilie Q > Zhongli hED N1 > Xiangling N2 ED > Mualani E combo

Klee, Furina, and Emilie all contribute to team damage, and Furina’s Burst buffs the entire team. Klee’s fast Pyro application easily maintains a Burning aura, allowing Furina to Vaporize some of her Skill hits. Bennett heals Klee, Emilie, and himself, generating plenty of Fanfare for Furina.
Sample Rotation
Furina ED Q > Bennett Q E > Emilie Q/E > Bennett E > Klee combo

A unique “hypercarry-quickswap” Emilie team. This team works similarly to the previous composition, but it substitutes Klee with Xiangling. Since Xiangling applies Pyro from off-field, Emilie can spend more time on-field to benefit from Bennett’s Flat ATK buff, greatly increasing her Skill and A1 Passive’s damage. Emilie also receives more Energy while on-field, reducing her ER requirements substantially.
Due to the above factors, Emilie can often deal the majority of team damage; this makes it viable to run 4pc Tenacity of the Millelith and/or 4pc Deepwood Memories on Furina and/or Xiangling.
Sample Rotation
(Bennett E > Emilie E)1 > Furina ED Q > Bennett Q E > Xiangling Q ED > Emilie N2C N1C > Furina N22 > Emilie N1C Q 2[N1C] > Bennett N1 E > Xiangling N2
1First rotation only.
2Furina swaps in to receive healing from Bennett and potentially proc Favonius Sword’s passive.

Emilie and Xiangling allow Neuvillette to consistently Vaporize. Zhongli’s Universal RES Shred improves both Emilie’s and Neuvillette’s damage, while Citlali only benefits Neuvillette. Citlali holds 4pc Scroll, while Zhongli can hold 4pc Archaic Petra to buff Neuvillette in the first half of the rotation. Emilie should not use her Burst, as the extended duration of her turret will make triggering a Hydro reaction using Zhongli or Citlali harder on subsequent rotations, therefore not stacking Neuvillette’s A1 Passive.
Sample Rotation (Zhongli)
Neuvillette E (N2D N2)1 > Zhongli hED > Emilie E > Xiangling Q ED > Neuvillette C Q E C > Zhongli hED > Xiangling E > Neuvillette 2[C]
1Normal Attack with Neuvillette on the second rotation onwards to clear any lingering Dendro aura and apply Hydro.
Sample Rotation (Citlali)
Neuvillette E (N2D N2)1 > Citlali EQ > Emilie E > Xiangling ED Q > Neuvillette C Q E C > Xiangling E > Neuvillette 2[C]
1Normal Attack with Neuvillette on the second rotation onwards to clear any lingering Dendro aura and apply Hydro.

Emilie, paired with Xiangling, Thoma, or Mavuika provide off-field Pyro application for Wriothesley to Melt. Thoma provides extra defensive utility, while Xiangling and Mavuika deal solid personal damage. Mavuika holds 4pc Scroll to further buff the team, and Wriothesley should clear the Burning aura through his combo and reapply Cryo to the enemy before restarting the rotation.
Sample Rotation (Thoma)
Thoma EQ > Emilie E/Q > Bennett EQ > Wriothesley combo > Bennett E
Sample Rotation (Xiangling)
Emilie E/Q > Bennett Q E > Xiangling Q ED > Wriothesley combo > Bennett E > Xiangling N2
Sample Rotation (Mavuika)
(Wriothesley N1)1 > Emilie E/Q > Mavuika tE > Bennett EQ > Mavuika Q > Wriothesley 5[N3C] Q/N3C2
1First rotation only.
2Use Burst if available, else do a 6th N3C.

The Pyro application from Burning and Dehya’s Skill lets Ganyu Melt all of her Charged Attacks. Dehya provides interruption resistance for Ganyu and can hold an R5 Sacrificial Greatsword to shorten the rotation.
Sample Rotation
Emilie Q/E > Bennett EQ > Dehya E > Ganyu 6[C]1 E > Bennett E N2
1This assumes that Dehya successfully procs Sacrificial Greatsword’s passive. Otherwise, use an additional Charged Attack to fill time.

This team focuses on Rosaria’s damage. Rosaria snapshots Kazuha’s DMG% buff and triggers Melt through Emilie’s Burning and Kazuha’s Pyro-infused Burst.
Sample Rotation
Rosaria E > Emilie Q/E > Kazuha N1 tEP > Bennett EQ > Rosaria EQ > Kazuha Q tEP > Rosaria N2 E > Bennett E > Rosaria N3D N3 > Kazuha tEP
Quickburn

It is possible for both Quicken and Burning auras to coexist on the same enemy. This allows Electro and Dendro units to trigger Aggravate and Spread respectively, while also increasing Emilie’s damage output. Furthermore, Electro units deal additional damage from the occasional Overloaded proc.
Notable Teammates

Electro Units
Electro units deal damage supplemented by Aggravate and Overloaded. However, fast Electro application may reduce Burning uptime if the Pyro application isn’t equally fast to counteract it.


Example Teams
This is not a comprehensive list of teams. The inclusion or exclusion of any given team does not necessarily reflect its power level.

Emilie’s long Skill duration allows her to apply Dendro to new enemy waves during Cyno’s field time; this mitigates one of Nahida’s main drawbacks in Cyno teams. Nahida deals additional off-field damage, holds 4pc Deepwood Memories, buffs Cyno’s EM, enables Dendro Resonance, and lowers Emilie’s ER requirements. Cyno holds 4pc Thundering Fury, reducing his ER requirements through additional Skill casts.
Sample Rotation
(Cyno E)1 > Nahida E Q N1 > Emilie Q/E > Thoma E N1 Q N1 > Cyno combo
1First rotation only.

Clorinde acts as an on-field DPS while her teammates deal additional damage from off-field. Clorinde’s self-healing can compensate for the lack of a dedicated healer. Xiangling uses her Burst every other rotation to shorten rotation length and significantly reduce her ER requirements. Mavuika provides buffs to every teammate via 4pc Scroll and similarly to Xiangling, casts her Burst every other rotation for tighter rotations.
Sample Rotation (Xiangling)
Emilie Q/E > Xiangling (Q)¹ ED N3 > Fischl E N1 / N2 Q > Clorinde E (E)2 6[N3E] Q
1Xiangling uses her Burst every other rotation.
2Use an additional Skill when Clorinde has over 100 BoL
Sample Rotation (Mavuika)
Emilie Q/E > Mavuika tE (Q)¹ > Fischl E N1 / N2 Q > Clorinde E (E)2 6[N3E] Q
1Mavuika uses her Burst every other rotation.
2Use an additional Skill when Clorinde has over 100 BoL

Raiden’s Energy restoration allows Emilie to consistently cast her Burst every rotation. Emilie’s Burst can be cast inside Bennett’s Burst if she’s well invested. This leads to higher Quicken uptime which can make up for Raiden losing out on Bennett buff uptime.
Sample Rotations
(Raiden E)1 > Bennett Q E > Xiangling Q ED > Emilie Q > Raiden Q combo > Bennett N1 E > Xiangling N2
(Raiden E)1 > Emilie Q > Bennett Q E > Xiangling Q ED > Raiden Q combo > Bennett N1 E > Xiangling N2
1First rotation only.

An Alhaitham Quicken team with Bennett giving Fischl and Alhaitham his Flat ATK buff. Bennett’s Burst, Skill, and C6 Pyro Infusion allow for some Burning uptime, but Burning is inconsistent, especially against multiple targets. Nevertheless, the Burning allows for Emilie’s Skill to reach Level 2.
Sample Rotation
Emilie Q/E > Bennett EQ > Fischl N2 E > Alhaitham (N1)1 hEP 2[N3D] N2D > Bennett E > Fischl N2 Q2 > Alhaitham Q N3D N3CD 3[N3D] N2
1With C6 Bennett, using a Pyro-infused Normal Attack extends Burning uptime.
2Fischl’s Burst may be performed during Alhaitham’s Burst animation to save time, but this risks losing his Mirror stacks if not done correctly.
Other Dendro Teams

Emilie’s permanent Skill uptime allows her to function as a general off-field Dendro applier for various Dendro teams such as Quicken or Hyperbloom. However, her slow single-target Dendro application often necessitates another Dendro applier in Bloom-based teams. Due to the lack of Burning, her personal damage is severely reduced even in Quicken teams: Emilie loses her Level 2 turret, A1 Passive procs, and A4 Passive’s DMG Bonus. While these teams are viable, they do not showcase Emilie’s strengths over other Dendro units.

Emilie provides additional off-field Dendro application that can proc Nahida’s Skill, which allows for more Blooms in Nilou teams. Nahida serves as the primary Dendro applier by utilizing her Skill’s high and consistent application in conjunction with her Normal Attacks. Kokomi serves as both the team’s primary damage dealer and sustain unit.
More in-depth information on Nilou Bloom teams can be found in the Nilou Extended Guide.

This “AFK” team isn’t the most offense-oriented, since picking Emilie results in lower damage than using other Dendro units such as Nahida or Alhaitham. However, it can function in combat even with only Skill inputs, which is great in case you don’t want to put in much effort or enjoy seeing automated attacks.
Yae’s Normal Attacks can trigger Aggravate and proc Fischl’s A4 Passive, which in turn triggers even more Aggravates. Emilie can hold 4pc Tenacity of the Millelith to buff Fischl and Yae, since they deal significantly more team damage. Zhongli ideally holds 4pc Archaic Petra to provide a teamwide Electro DMG Bonus.
Sample Rotation
Yae 3[N1 E] > Zhongli N1 hED > Emilie Q/E > Fischl N1 Q > Yae N2C N1C Q N1 3[E] N2 > Zhongli N1 hED > Fischl N2 E > Yae N1C 2[N2C] N1
Credits
nikatosaurus, baloopy, haafr, caxia, polomo, doomuh, spphrs, caramielle, acerbus, pjeljr, Lesterberne, plumetra
Team images made with the KQM portrait generator.